Software Application Lab
62
Software Application Lab 2018 CIT, Gubbi, Dept. Of Civil Engg. Page 1 PROJECT PLANNING & SCHEDULING USING PRIMAVERA
Transcript of Software Application Lab

Software Application Lab 2018
CIT, Gubbi, Dept. Of Civil Engg. Page 1
PROJECT PLANNING & SCHEDULING
USING
PRIMAVERA
Software Application Lab 2018
CIT, Gubbi, Dept. Of Civil Engg. Page 2
Primavera provides an integrated project portfolio management (PPM) solution consisting of
role-specific tools to satisfy each team member’s needs, responsibilities, and skills. This
solution uses standard Windows interfaces, client/server architecture, Web-enabled
technology, and stand-alone (SQL Server Express) or network-based (Oracle and Microsoft
SQL Server) databases. Primavera offers the following software components:
Project Management
The Project Management module enables users to track and analyze performance. It is a
multiuser, multiproject system with scheduling and resource control capabilities supporting
multi-tiered project hierarchies, resource scheduling with a focus on roles and skills,
recording of actual data, customizable views, and user-definable data.
The module is ideal for organizations that need to simultaneously manage multiple projects
and support multiuser access across a department or the entire organization. It supports an
enterprise project structure (EPS) with an unlimited number of projects, activities, baselines,
resources, work breakdown structures (WBS), organizational breakdown structures (OBS),
user-defined codes, and critical-path-method (CPM) scheduling and resource leveling. Large-
scale implementations for organization-wide project portfolio management use it with Oracle
or SQL Server as the project database. For smaller implementations, you can use SQL Server
Express.
The module also provides centralized resource management. This includes resource timesheet
approval and the ability to communicate with project resources who use the Timesheets
module. In addition, the module provides integrated risk management, issue tracking, and
management by threshold. The tracking feature enables users to perform dynamic cross-
project rollups of cost, schedule, and earned value. Project work products and documents can
be assigned to activities and managed centrally. The Report Wizard creates customized
reports that extract specific data from its database.
Methodology Management
The Methodology Management module is a system for authoring and storing methodologies,
or project plan templates, in a central location. Project managers can select, combine, and
tailor methodologies to create custom project plans. These customized methodologies can be
imported into the Project Management module using the Project Architect wizard and used as
templates for new projects. In this way, your organization can continually improve and refine
methodology activities, estimates, and other information with each new project.
Timesheets
Primavera also provides a Web-based interproject communication and timekeeping system.
As a team-level tool for project participants, Timesheets helps team members focus on the
work at hand with a simple cross-project to-do list of their upcoming assignments. It also
provides views of project changes and timecards for manager approval. Because team
members use this module to enter up-to-the-minute information about their assignments and

Software Application Lab 2018
CIT, Gubbi, Dept. Of Civil Engg. Page 3
record time against their workloads, project leaders can make crucial project decisions with
the confidence that they have the most current information possible.
P6 Web Access
P6 Web Access provides browser-based access to project, portfolio, and resource data across
the organization. Every web user can create customized dashboards that provide an
individualized and focused view of the specific projects and categories of project data that are
most relevant to their role in managing project portfolios, projects, and resources. Project
Workspaces and Workgroups extend the model of customizable, focused data views by
enabling designated project team members to create a uniform team view of data that relates
to one specific project or to a subset of activities within a project. P6 Web Access provides
access to a wide range of data views and features that enable Web users to manage their
projects from initial concept review and approval through to completion.
P6 Web Services
P6 Web Services uses open standards, including XML, SOAP, and WSDL, to seamlessly
integrate Primavera’s project management functionality into other applications. Using P6
Web Services, organizations can share Primavera project management data between
applications independent of operating system or programming language. For detailed
information, see the Primavera P6 Web Services Administrator’s Guide.
Primavera Integration API
The Primavera Integration API (Application Programming Interface) is a Java-based API and
server that enables developers to create client code that can directly and seamlessly access
Primavera’s project management database. For detailed information, see the Primavera P6
Integration API Administrator’s Guide.
Software Development Kit
The Primavera Software Development Kit (SDK) enables users to integrate the data in the
Project Management module database with external databases and applications. It provides
access to the schema and to stored procedures that encapsulate business logic. The SDK
supports the Open Database Connectivity (ODBC) standard and ODBC-compliant interfaces,
such as OLE-DB and JDBC, for connecting to the project management database. The SDK
must be installed on any computer that needs to integrate with the database. For detailed
information, see the Primavera SDK Help.
Claim Digger
Claim Digger provides the capability to compare two projects, or a project and an associated
baseline, to determine what data has been added, deleted, or modified from the schedules.
Based on the data fields you select for comparison, this feature creates a project plan
comparison report in one of three file formats. Claim Digger is automatically installed with
the Project Management module. You can access it from the Tools menu.
Software Application Lab 2018
CIT, Gubbi, Dept. Of Civil Engg. Page 4
Project Link
Project Link is a plug-in that enables Microsoft Project (MSP) users to work in the MSP
environment while being connected to Primavera's enterprise features. The functionality
enables users of MSP2002 and 2003 to open and save projects from or to the Project
Management module database from within the MSP application. Moreover, MSP users have
the ability to invoke Primavera's resource management within the MSP environment. Project
Link benefits organizations that have a substantial amount of project data stored in MSP but
require some users to have the additional functionality and optimized data organization
available within Primavera applications.
This manual guides you through the process of planning and controlling projects using the
Project Management module. Read the first chapter to become familiar with the process of
PPM, then follow the steps in each successive chapter to build projects and project
components, set up codes and documents, manage the resources required to complete the
project plan, update projects as work gets underway, and report results throughout the project
life cycle. This manual is organized as follows:
Part 1: Overview and Configuration
Provides an overview of project portfolio management, simple steps for getting started
quickly, and information about the standard layouts you can use to view project data. This
part also provides a quick tour, including instructions for configuring user workstation
preferences.
Part 2: Structuring Projects
Includes the basics about the enterprise project structure (EPS) and describes how to set up
this structure, add new projects to build the hierarchy, use and navigate the EPS, open
existing projects, and define project properties. In addition, Part 2 describes how to
■Use an organizational breakdown structure (OBS) in conjunction with the EPS to ensure
that each project is effectively managed and that corresponding security measures are in place
■Establish the personnel and equipment required to perform the work, define unlimited
hierarchical resource codes for grouping and rollups, and create a standard set of roles based
on skill requirements that you can assign to resources in all projects
■Establish and use a work breakdown structure (WBS) as the basis for the budget and
spending information, specifications, and milestones within the EPS
■Establish project budgets and the funding sources behind them, monthly spending plans that
show how budgets are distributed throughout project life cycles, and layouts that track and
analyze variance as projects progress
■Set up project codes to categorize projects for organizing, grouping, selecting, and
summarizing
Software Application Lab 2018
CIT, Gubbi, Dept. Of Civil Engg. Page 5
■Define custom fields that enable you to track and report project data in fields customized for
your business needs
■Create calendars that define national and organizational holidays, project-specific work/non
workdays, and resource vacation days
Part 3: Implementing the Schedule
Describes how to define a set of codes you can use to categorize project activities for
organizing, grouping, selecting, and summarizing. Part 3 also explains how to
■Establish the activities that compose projects and apply durations, dates, resource
information, activity types, activity relationships, and other activity details
■Set up the expenses, or nonresource costs, associated with a project, and create global cost
accounts to track activity costs and earned value according to your organization’s specific
cost account codes
■Assign estimation weights to WBS elements and activities to perform top-down estimation

Software Application Lab 2018
CIT, Gubbi, Dept. Of Civil Engg. Page 6
Understanding Project Management
Primavera software products are designed to support the project management needs of
organizations that manage large numbers of projects at one time.
These integrated applications use project portfolio management (PPM) to support the
management needs of project teams in different locations and at varying levels of the
organization.
This chapter provides an overview of PPM, the roles used in PPM, and the basic concepts for
planning, managing, and controlling your projects.
Why Use Project Portfolio Management?
Large businesses typically have hundreds—even thousands—of projects underway at one
time to create the new products and services that build their future. These projects cross
normal business hierarchies and chains of command, making project portfolio management
(PPM) an organization-wide challenge. The pressure to complete projects on time and within
budget, and maintain a competitive edge, is driving corporations to develop and implement
PPM processes. They are moving away from a traditional functional structure to a multiple-
project organization that must achieve clear, but urgent goals, using limited, shared resources,
and they need the fastest business payback from those projects to realize potential revenue
and increase shareholder equity.
PPM provides comprehensive information on all projects in an organization, from executive-
level summaries to detailed plans by project. Individuals across all levels of the company can
analyze, record, and communicate reliable information and make timely, informed decisions
that support their corporate mission. By putting the right tool in the right hands, PPM enables
an organization to
■Make strategic business decisions
■Control the minute detail that is necessary to finish projects
■Understand current resource demands, set priorities, and evaluate long-term staffing
requirements
■Use skilled resources effectively and productively
■Reorganize projects to fit shifting priorities without sacrificing quality
Your Role in the Organization
By definition, PPM must meet the needs of several types of users. The following section
describes the roles as they typically apply to the Primavera applications. Roles may vary or
overlap depending on the organization.
Software Application Lab 2018
CIT, Gubbi, Dept. Of Civil Engg. Page 7
Network administrators
Network administrators configure an organization’s network environment (local- and wide-
area networks) for optimal performance with Primavera applications. They install and
maintain the server and client components of the applications. In addition, they manage user
access to data and develop and maintain a comprehensive security policy to ensure that PPM
data are protected from unauthorized access, theft, or damage.
Network administrators ensure that the hardware and software supporting Primavera
applications function reliably by
■Setting up and maintaining the network to ensure reliable connections and the fastest
possible data transfer
■Creating and maintaining accurate lists of network resources and users so that each has a
unique network identity
Database administrators
Database administrators (DBAs) are responsible for setting up, managing, and assigning
access rights for the Primavera database. They set and oversee rules governing use of
corporate databases, maintain data integrity, and set interoperability standards.
Database administrators ensure reliable access to the Primavera database by
■Installing, configuring, and upgrading database server software and related products as
required
■Creating and implementing the database
■Implementing and maintaining database security, including creating and maintaining users,
roles, and privileges for the database
■Monitoring database performance and tuning as needed
■Planning for growth and changes and establishing and maintaining backup and recovery
policies and procedures
Operations executives
Operations executives are responsible for strategic planning and ongoing performance
analysis. They use the Project Management module and the Portfolios section of P6 Web
Access to analyze schedule, resource, and cost data across projects.
Senior executives may be responsible for
■Prioritizing projects
■The profit/loss for a specific business entity

Software Application Lab 2018
CIT, Gubbi, Dept. Of Civil Engg. Page 8
■Funding and go/no-go decisions about projects
■Strategic planning over the future of the business or division
Project controls coordinators
Project controls coordinators are responsible for ensuring that Primavera applications are
implemented properly and operate smoothly. They play a key role during implementation by
■Working with operations executives and program/project managers to set up methodologies
in the Methodology Management module
■Working with operations executives and program/project managers to structure project,
organizational breakdown structure (OBS), and resource hierarchies, set up basic calendars,
and define organization-wide custom fields and codes in the Project Management module
■Working with the project administrator to create user accounts and user groups for the
Project Management module
■Assigning security rights to users in the Project Management module
Program managers
Program managers oversee several high-level project managers; they are responsible for
multiple projects and use the Project Management and Methodology Management modules,
along with P6 Web Access to:
■Perform cross-project analysis
■Manage projects to on-time and on-budget completion
■Prioritize resources across projects
■Plan projects before they are funded
Project managers
Project managers manage multiple small, repetitive projects or a single, complex project.
They are responsible for on-time/on-budget completion of the projects and use the Project
Management module and P6 Web Access to
■Allocate specific named resources to a project in conjunction with the functional manager
of those resources
■Communicate project information both up and down the chain of command
■Manage resources related to the project
Resource/cost managers

Software Application Lab 2018
CIT, Gubbi, Dept. Of Civil Engg. Page 9
Resource managers allocate resources across projects and distribute their workloads. They are
responsible for resource planning, including recruiting, hiring, and training resources, and
they may be responsible for loading resource information in the Project Management module,
the Methodology Management module, and the Resource section of P6 Web Access. Cost
managers perform detailed financial analysis of projects, handle project billing, and integrate
financial information within the company.
Team leaders
Team leaders manage the work for a portion of a larger project. They are managers who
produce work and manage a team, and they often use the Project Management and
Timesheets modules, and P6 Web Access, to prioritize short-term tasks or objectives,
typically when the duration is less than the planning period of the project.
Team members
Team members are trained in a specific skill required on a project. They work with their
manager to develop activities and durations for incorporation into the schedule. Once
activities are added to the schedule, team members update them using the Timesheets module
to indicate the work they performed during designated accounting periods. Team members
may also use personalized dashboards in P6 Web Access to quickly access their projects,
activities, documents, and more.
Project Management Process Overview
When contractors develop plans for a building, one of the first steps is laying a foundation.
This is also a true for building projects using the Project Management module. The
hierarchical structuring of data serves as the foundation before the addition of actual project
data. The following is a suggested sequence for setting up these structures:
■Set up the organizational breakdown structure (OBS), which is the hierarchical arrangement
of your company’s management structure, either as roles or individuals.
■Set up the enterprise project structure (EPS), which is the hierarchical structure that
identifies the company-wide projects and enables organization and management of those
projects in your organization.
■Set up a resource hierarchy that reflects your organization’s resource structure and supports
the assignment of resources to activities.
■For each project, set up the work breakdown structure (WBS), which is a hierarchical
arrangement of the products and services produced during and by a project.
Project controls coordinators, working with operations executives and program/project
managers, structure the OBS and EPS hierarchies. Setting up the OBS first enables
association of the responsible managers with their areas of the EPS—either nodes or
projects—when the EPS is structured. User access and privileges to nodes and projects within
Software Application Lab 2018
CIT, Gubbi, Dept. Of Civil Engg. Page 10
the EPS hierarchy are also implemented via a responsible OBS, so the security profiles that
monitor data access by project participants can be established early on in the process.
Once the OBS is established, the EPS can be set up. An EPS can consist of multiple root
nodes, which enable particular types of projects to be grouped together, such as project
templates or high-risk projects. Within each root node, you can further break down an EPS
into multiple EPS nodes, such as Capital Improvement projects and Manufacturing projects,
to categorize the types of templates projects.
The WBS acts as a continuation of the EPS for the individual projects in the organization. A
WBS provides organization and control of project and activity information through a
hierarchy of WBS elements. When you create projects, the Project Management module
automatically creates a WBS element at the same hierarchy level and with the same name as
the project. You can set anticipated project dates, budgets, and spending plans for a WBS at a
high level to indicate when the work should occur and how much its planned budget and
monthly spending will be before any projects are added to the EPS. In addition, you can use
the pre-established budget amounts and funding information you set for WBS elements for
their project and activity counterparts.
The following example represents how the OBS, EPS, and WBS structures interrelate within
one branch of the EPS.
Software Application Lab 2018
CIT, Gubbi, Dept. Of Civil Engg. Page 11
The responsible manager used for the root node in the EPS branch is used as the default for the EPS nodes and
projects for that branch; you can change the assignment(s).
Planning, Controlling, and Managing Projects
Before implementing Primavera to schedule projects, team members and other project
participants should understand the processes involved in project management and the
associated recommendations that help smooth the Primavera implementation that supports
your corporate mission.
Example: If you were driving to a place you had never seen, would you get in the car without
directions or a map? Probably not. More than likely you’d take the time to plan your trip,
consider alternate routes, and estimate your time of arrival. Planning the drive before you
even left would help your trip be more successful. And, along the way, should you encounter
road blocks or traffic delays, you would have already identified alternate ways to reach your
destination.
Project management follows the same methodology and purpose—to achieve each project’s
goals, you need to plan them in advance. Good project management is no longer an option in
today’s corporate world. It is a critical tool to help your company stay on target and
accomplish its goals.
Simply stated, project management is the process of achieving set goals within the constraints
of time, budget, and staffing restrictions. It allows you to get the most out of your available
resources. Resources include
■People
■Materials
■Money
■Equipment
■Information
■Facilities
■Roles
Project portfolio management factors in all of these variables across multiple projects,
enabling project managers and company executives to see an accurate picture of how each
project’s resource use affects other projects.
The process of project management is guided by three key principles:
■Planning
■Controlling

Software Application Lab 2018
CIT, Gubbi, Dept. Of Civil Engg. Page 12
■Managing
Planning a project
The first step in project management is to define your project.
1. What is the scope of the work? What activities will make up the project and what is
their relationship to each other? You’ll also want to identify the major milestones that
will help you monitor the project’s progress.
2. What is the project duration? What are the dates when the project will begin and end?
3. What resources are available to the project? Beyond labor, think about all the types of
resources you will require.
4. Who will perform what tasks? Determining your labor resources and their available
work hours is a key part of building a successful project. You’ll need to plan for
downtime and holidays and determine the regular workweek for various staffing
types.
5. How much will the project cost? What are the costs per resource? Are there any
hidden project costs?
6. What is the estimated budget? Establishing a project budget estimate in advance helps
you monitor possible cost overruns.
The answers to these questions form the framework of your project.
Controlling a project
Once you have built your project and estimated your budgeting needs, you save this original
plan as a baseline, or target schedule, to help you control the project. A baseline provides a
solid point of reference as your schedule changes over time. It allows you to compare the
original schedule to the current one and identify significant changes and develop contingency
plans.
You control a project to keep it heading in the right direction. You’ll want to track work
progress and costs, compare them to your baseline, and then recommend what actions should
be taken.
Effective project control reaps many benefits. It allows you to keep a close eye on possible
problems before they become critical. It lets the project team and senior management view
cost and scheduling timeframes based on the reality of the schedule.
Managing a project
The process of guiding a project from start to finish is the responsibility of a project manager.
A good project manager wears many hats, acting at various times as a motivator,
communicator, coordinator, and advisor. As you control the project’s progress, it is your job
to keep your team aware of changes to the schedule and possible consequences. In many

Software Application Lab 2018
CIT, Gubbi, Dept. Of Civil Engg. Page 13
ways, you are the project’s ambassador, ensuring that your project organization is carrying
out its responsibilities for the best possible outcome.
To be an effective project manager also requires consistency when you update your projects.
Select a day each week, or biweekly, when you will regularly update projects. This regular
update will include progress on values such as
■Dates on which activities started or finished
■Dates when resources are consumed
■Changes to resource rates
Determine a standard policy for the update and scheduling procedure, and for reporting
progress.
The Project Management module provides many tools to assist you in reporting progress to
both team members and senior management. Use the Project Web Site option to create a
central location where team members can view project progress. Consider the many system
reports as a means for communicating change. In addition, senior management can use the
Portfolios section of P6 Web Access to summarize project data and easily capture a snapshot
of how a project or group of projects is progressing.
Software Application Lab 2018
CIT, Gubbi, Dept. Of Civil Engg. Page 14
Getting Started
The installation process guides you through setting up the module on your computer.
Start the Project Management module
Click Start, then choose Programs, Primavera, Project Management.
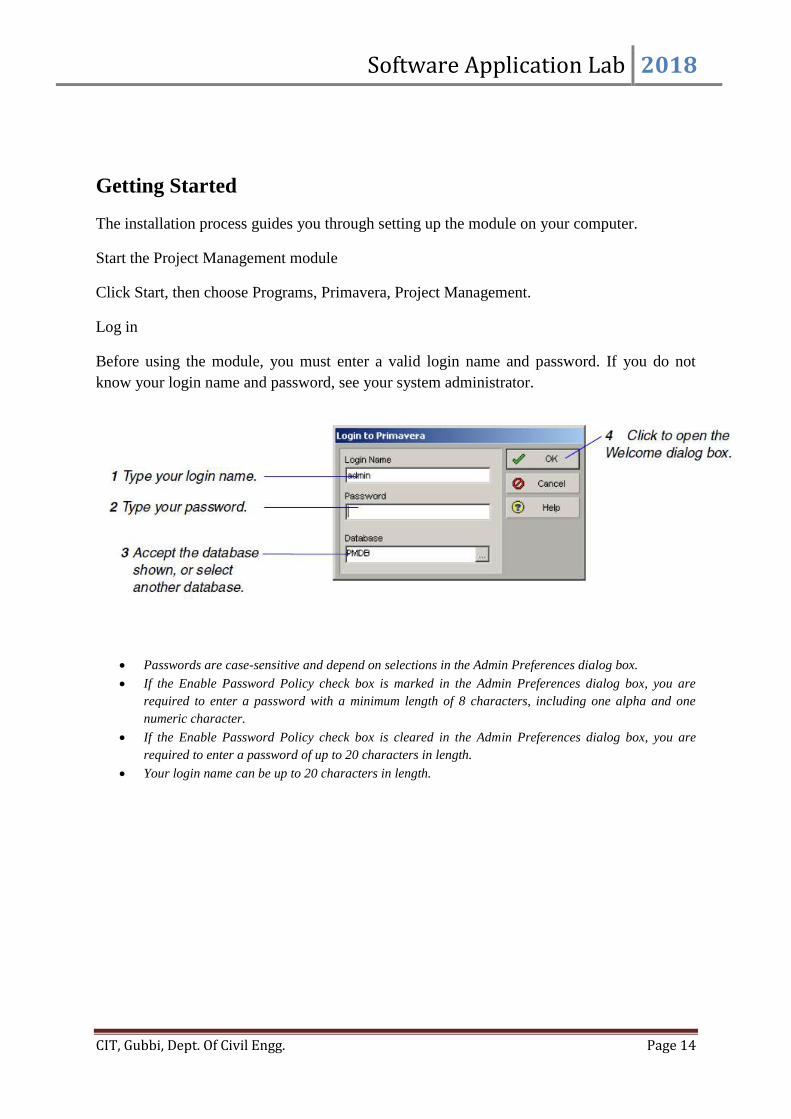
Log in
Before using the module, you must enter a valid login name and password. If you do not
know your login name and password, see your system administrator.
Passwords are case-sensitive and depend on selections in the Admin Preferences dialog box.
If the Enable Password Policy check box is marked in the Admin Preferences dialog box, you are
required to enter a password with a minimum length of 8 characters, including one alpha and one
numeric character.
If the Enable Password Policy check box is cleared in the Admin Preferences dialog box, you are
required to enter a password of up to 20 characters in length.
Your login name can be up to 20 characters in length.
Software Application Lab 2018
CIT, Gubbi, Dept. Of Civil Engg. Page 15
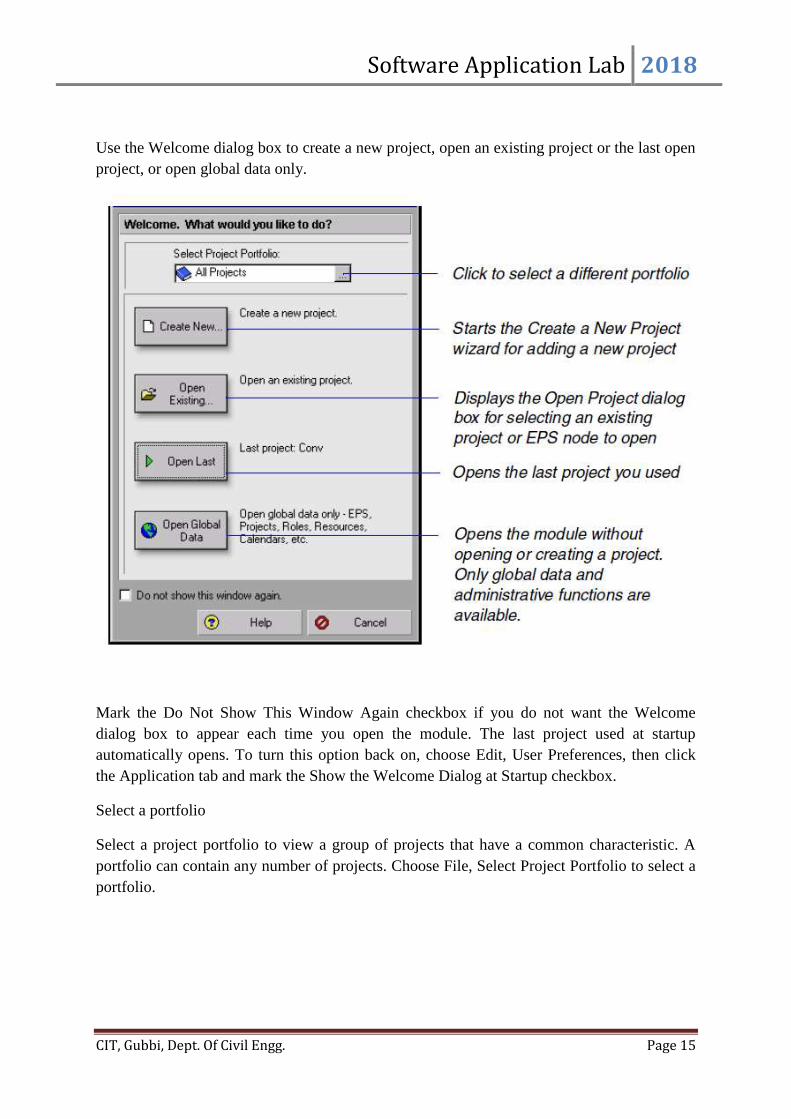
Use the Welcome dialog box to create a new project, open an existing project or the last open
project, or open global data only.
Mark the Do Not Show This Window Again checkbox if you do not want the Welcome
dialog box to appear each time you open the module. The last project used at startup
automatically opens. To turn this option back on, choose Edit, User Preferences, then click
the Application tab and mark the Show the Welcome Dialog at Startup checkbox.
Select a portfolio
Select a project portfolio to view a group of projects that have a common characteristic. A
portfolio can contain any number of projects. Choose File, Select Project Portfolio to select a
portfolio.

Software Application Lab 2018
CIT, Gubbi, Dept. Of Civil Engg. Page 16
Selecting a Language
Use the Set Language dialog box to select the language in which to display the information in
menus, dialog boxes, and messages.
This option does not affect the data you enter; this information appears exactly as typed.
Select a language. To display the Set Language dialog box, choose Tools, Set Language.
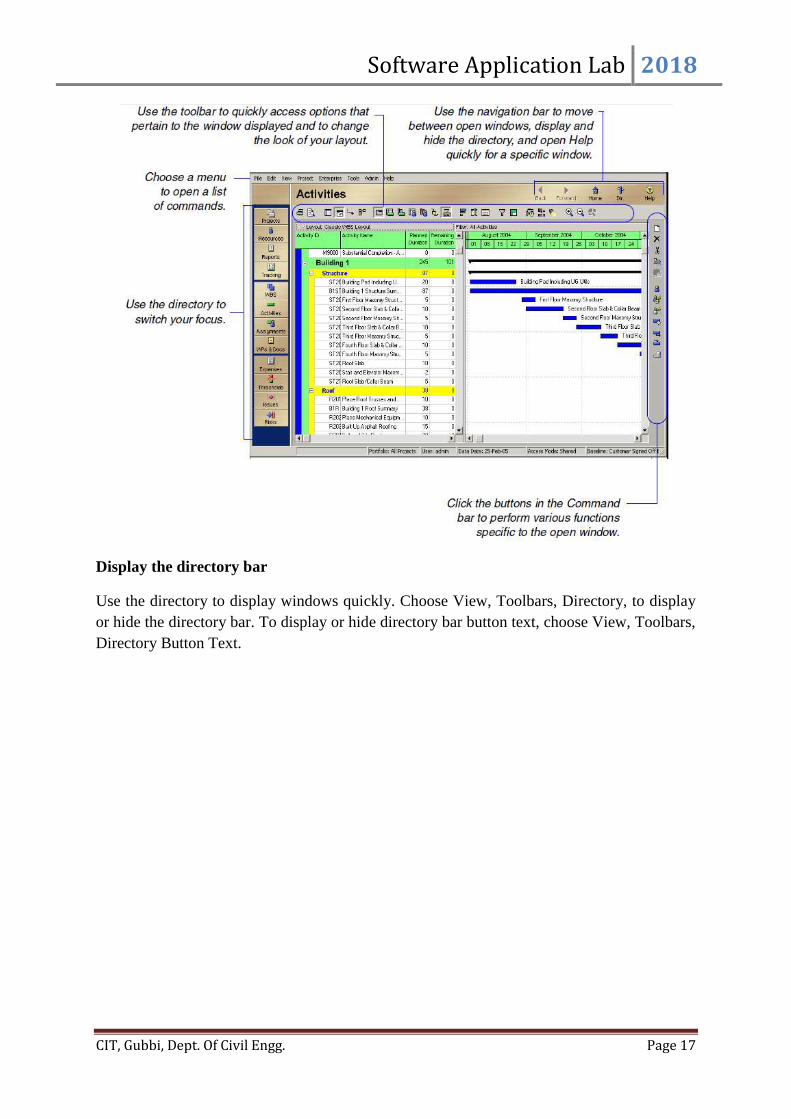
The Workspace
When you first open a project, the Home workspace displays the main functions available in
the module. For example, click Activities to focus on activity data and customize layouts.
The workspace for each main window consists of a menu bar, navigation bar, directory bar,
toolbar, and command bar.
Software Application Lab 2018
CIT, Gubbi, Dept. Of Civil Engg. Page 17
Display the directory bar
Use the directory to display windows quickly. Choose View, Toolbars, Directory, to display
or hide the directory bar. To display or hide directory bar button text, choose View, Toolbars,
Directory Button Text.

Software Application Lab 2018
CIT, Gubbi, Dept. Of Civil Engg. Page 18
Display the navigation bar
Use the navigation bar to move between open windows. You can also use the navigation bar
to display and hide the directory and open Help for the current window or dialog box. The
navigation bar is displayed or hidden when you choose View, Toolbars, Navigation Bar. To
display or hide navigation bar button text, choose View, Toolbars, Navigation Bar Button
Text.
Use shortcut menus
Instead of using standard menus and buttons, you can also use the right mouse button to
access frequently used commands. To use shortcut menus, right-click an element or the white
space in any window, then choose the appropriate command.
Select multiple items
To select a group of items that are next to each other in the display, hold down the Shift key,
click the first item in the group, then click the last item in the group. To select multiple items

Software Application Lab 2018
CIT, Gubbi, Dept. Of Civil Engg. Page 19
that are not next to each other in the display, hold down the Ctrl key, then click each item you
want to select.
What Is a Layout?
A layout is a customizable view of project information. To customize a layout to meet
specific needs, you can choose from a wide range of project information, columns, colors,
fonts, and activity groupings, and you can display these data in the top and/or bottom layouts.
For example, show a Gantt Chart in the top layout and an Activity Table in the bottom layout.
Each time you change the way data are presented in the top and bottom layouts, you create a
unique layout. The module automatically prompts you to save a layout when you close it,
allowing you to define a unique name for it so you can use the layout again with the current
project or a different project.
You can also customize the Activity Table and Gantt Chart in the Projects window.
Activity Table displays activity information in spreadsheet format. Use this type of layout to
quickly update a project. Use the Fill Down function to quickly copy and paste contents of
rows in the Activity Table. You can use filters and group data to see only those activities that
occur in your current status cycle. You can customize Activity Table columns. You can also
sort, filter, and group activities in the Activity Table, as well as change the font of the activity
information and the color of the table background. The Activity Table is displayed in the top
and bottom layouts.
Gantt chart provides a graphical display of activity progress over the course of the project.
You can customize Gantt Chart bars, colors, labels, and symbols. You can also sort, filter,
and group activities in the Gantt Chart. The Gantt Chart is displayed in the top and bottom
layouts.

Software Application Lab 2018
CIT, Gubbi, Dept. Of Civil Engg. Page 20
Activity Usage Spreadsheet displays units, costs, or earned value data by activity over time.
Use this type of layout to review per period and rolled up activity resource/cost data. The
Activity Usage Spreadsheet is displayed in the top and bottom layouts.
Activity Network provides a graphical display of activities, including logical relationships.
You can specify which information you want to display, and you can change the Activity
Network colors and fonts. You can also group and filter activities in the Activity Network.
The Activity Network is displayed in the top layout only.
Activity Details display detailed information for an activity you select in either the Activity
Table or Activity Network. You can also use Activity Details to enter and edit an activity’s
information, such as dates, resource assignments, and predecessor and successor
relationships. Activity Details is displayed in the bottom layout only.
Resource Usage Spreadsheet displays resource data in spreadsheet format. This approach is
helpful when you are updating and maintaining both your organization's resource hierarchy
and individual resource information. This spreadsheet is displayed in the bottom layout only.
Activity Usage Profile displays a time distribution of activity units and costs in a Bar Chart
format. You can customize all aspects of the Activity Usage Profile display. You can also
filter activity information in the Activity Usage Profile. This profile is displayed in the
bottom layout only.
Resource Usage Profile displays a time distribution of resource units and costs in relation to
activities in a Bar Chart format. You can customize all aspects of the Resource Usage Profile
display. You can also filter activity and resource information. This profile is displayed in the
bottom layout only. You can also display a stacked histogram for the profile in the Activity
window, and in the Resource Analysis type layout in the Tracking window.
Trace Logic provides a graphical display of dependency relationships for an activity you
select in either the Activity Table or Activity Network. Trace Logic is displayed in the
bottom layout only.
Software Application Lab 2018
CIT, Gubbi, Dept. Of Civil Engg. Page 21
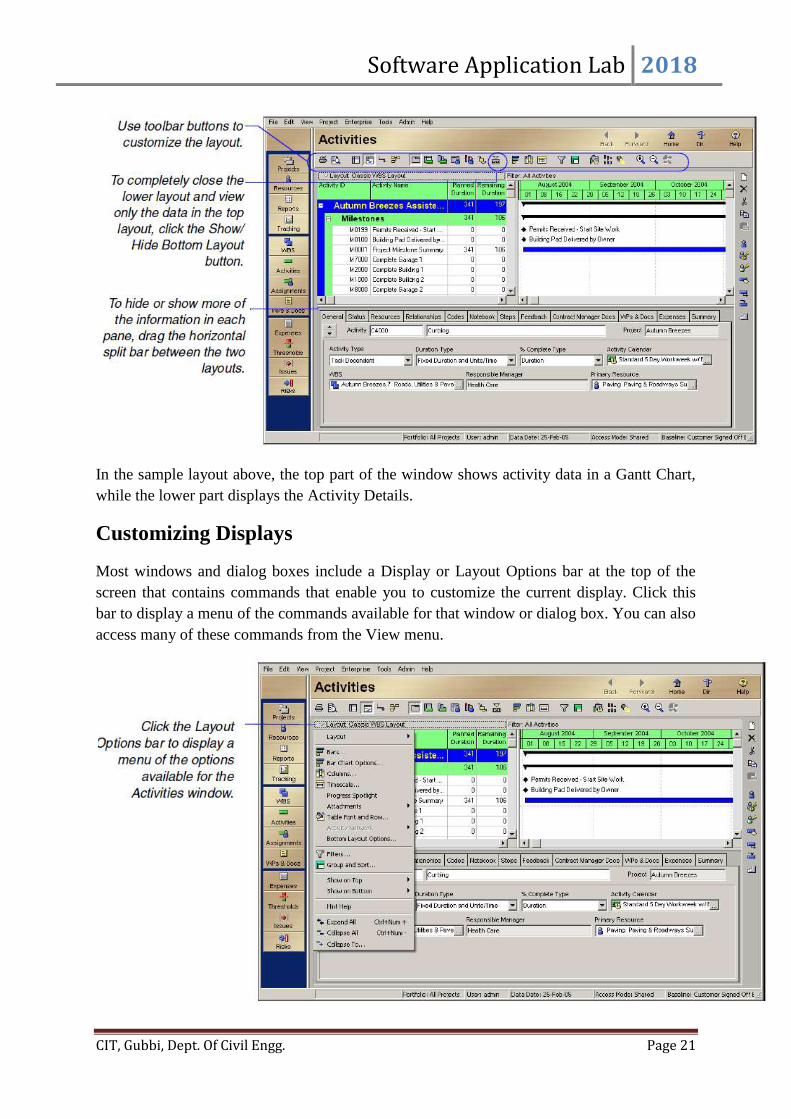
In the sample layout above, the top part of the window shows activity data in a Gantt Chart,
while the lower part displays the Activity Details.
Customizing Displays
Most windows and dialog boxes include a Display or Layout Options bar at the top of the
screen that contains commands that enable you to customize the current display. Click this
bar to display a menu of the commands available for that window or dialog box. You can also
access many of these commands from the View menu.
Software Application Lab 2018
CIT, Gubbi, Dept. Of Civil Engg. Page 22
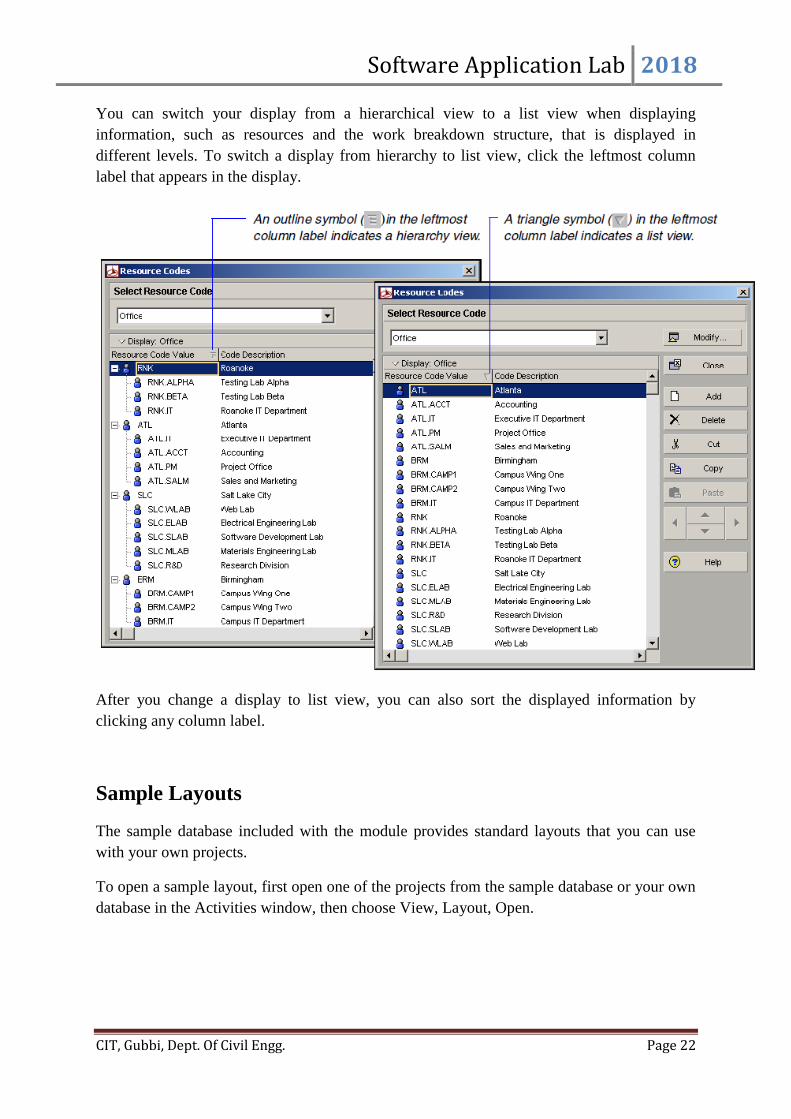
You can switch your display from a hierarchical view to a list view when displaying
information, such as resources and the work breakdown structure, that is displayed in
different levels. To switch a display from hierarchy to list view, click the leftmost column
label that appears in the display.
After you change a display to list view, you can also sort the displayed information by
clicking any column label.
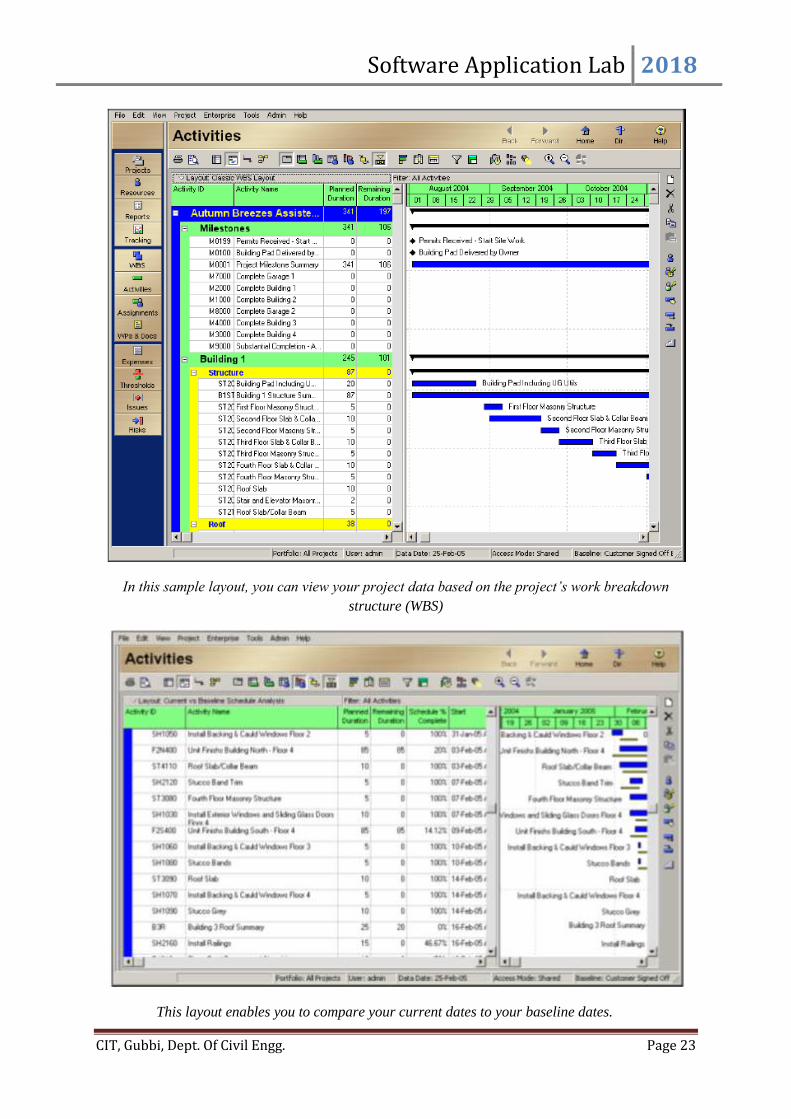
Sample Layouts
The sample database included with the module provides standard layouts that you can use
with your own projects.
To open a sample layout, first open one of the projects from the sample database or your own
database in the Activities window, then choose View, Layout, Open.
Software Application Lab 2018
CIT, Gubbi, Dept. Of Civil Engg. Page 23
In this sample layout, you can view your project data based on the project’s work breakdown
structure (WBS)
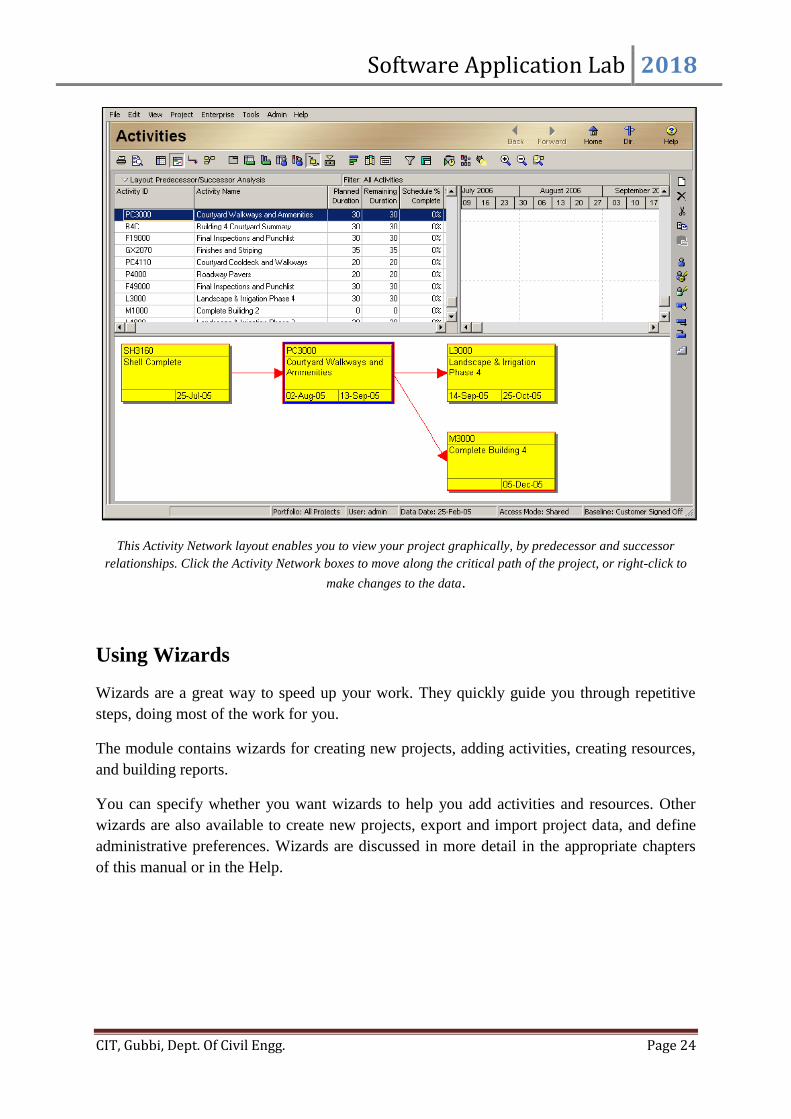
This layout enables you to compare your current dates to your baseline dates.
Software Application Lab 2018
CIT, Gubbi, Dept. Of Civil Engg. Page 24
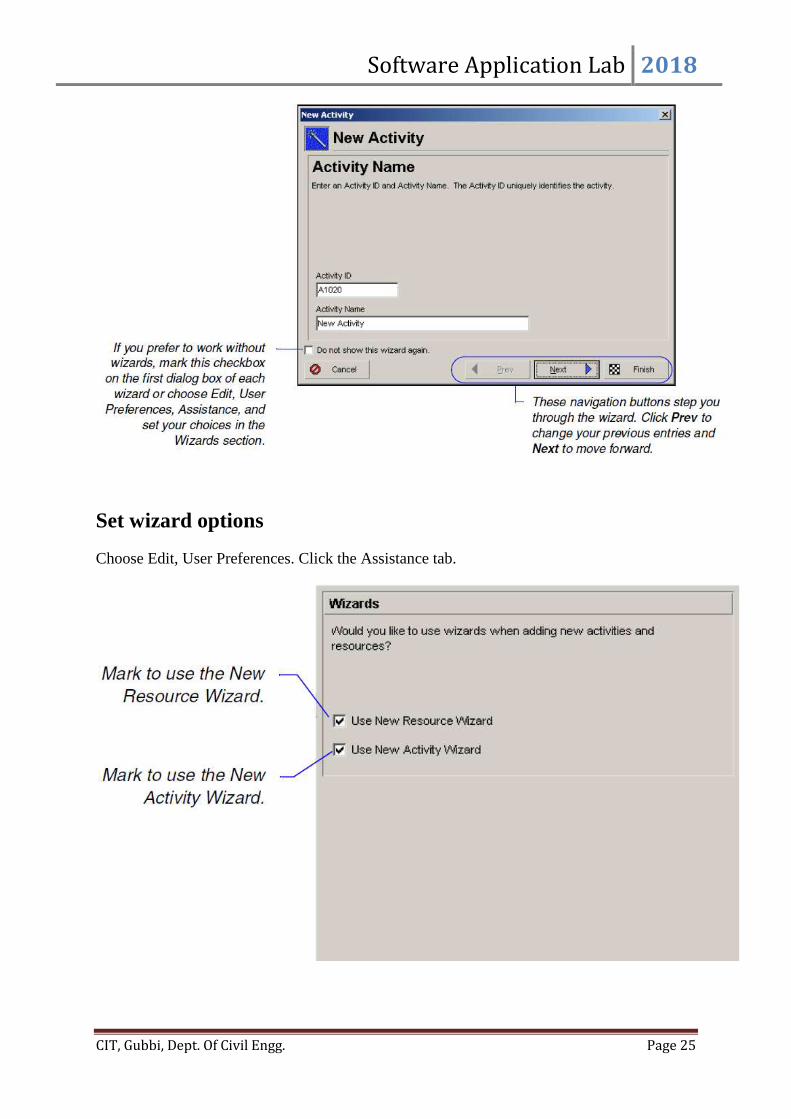
This Activity Network layout enables you to view your project graphically, by predecessor and successor
relationships. Click the Activity Network boxes to move along the critical path of the project, or right-click to
make changes to the data.
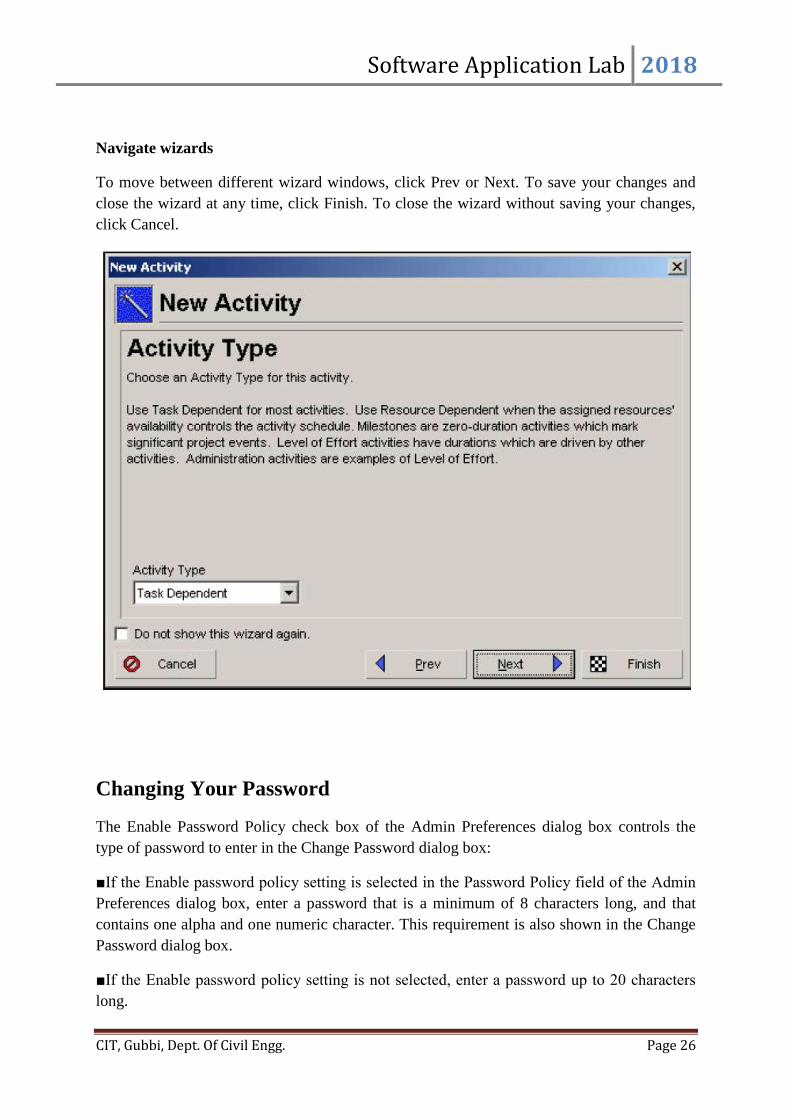
Using Wizards
Wizards are a great way to speed up your work. They quickly guide you through repetitive
steps, doing most of the work for you.
The module contains wizards for creating new projects, adding activities, creating resources,
and building reports.
You can specify whether you want wizards to help you add activities and resources. Other
wizards are also available to create new projects, export and import project data, and define
administrative preferences. Wizards are discussed in more detail in the appropriate chapters
of this manual or in the Help.
Software Application Lab 2018
CIT, Gubbi, Dept. Of Civil Engg. Page 25
Set wizard options
Choose Edit, User Preferences. Click the Assistance tab.
Software Application Lab 2018
CIT, Gubbi, Dept. Of Civil Engg. Page 26
Navigate wizards
To move between different wizard windows, click Prev or Next. To save your changes and
close the wizard at any time, click Finish. To close the wizard without saving your changes,
click Cancel.
Changing Your Password
The Enable Password Policy check box of the Admin Preferences dialog box controls the
type of password to enter in the Change Password dialog box:
■If the Enable password policy setting is selected in the Password Policy field of the Admin
Preferences dialog box, enter a password that is a minimum of 8 characters long, and that
contains one alpha and one numeric character. This requirement is also shown in the Change
Password dialog box.
■If the Enable password policy setting is not selected, enter a password up to 20 characters
long.

Software Application Lab 2018
CIT, Gubbi, Dept. Of Civil Engg. Page 27
Choose Edit, User Preferences, then click the Password tab to open the Change Password
dialog box, in which you can enter a new password.

Software Application Lab 2018
CIT, Gubbi, Dept. Of Civil Engg. Page 28
Setting Up the Enterprise Project Structure
This chapter describes how to define the enterprise project structure (EPS) that will be used
to organize and manage the projects in your organization. In addition, it explains how to
develop, create, and add projects to the EPS, and define project attributes.
Enterprise Project Structure Overview
Typically, users in a large organization will have access to a large database that contains all
the projects and related information for their company. The information this database
contains must be structured in a way that allows individuals to access the project data they
need, quickly and accurately. In addition, users must be able to review project data at the
level appropriate for their role in the organization and the specific questions they need to
answer.
Your database of projects is arranged in a hierarchy called the enterprise project structure
(EPS). The EPS can be subdivided into as many levels or nodes as needed to parallel work in
the organization. Nodes at the highest, or root, level might represent divisions within your
company, project phases, site locations, or other major groupings that meet the needs of your
organization, while projects always represent the lowest level of the hierarchy. Every project
in the organization must be included in an EPS node.

Software Application Lab 2018
CIT, Gubbi, Dept. Of Civil Engg. Page 29
The number of EPS levels and their structure depend on the scope of your projects and how
you want to summarize data. For example, you may want to define increasingly lower levels
of EPS nodes, similar to an outline, to represent broad areas of work that expand into more
detailed projects. In the following example, the Caprini Corporation EPS node includes a
lower-level node called Apex Project. The Apex Project node is further divided into the Apex
Construction node. This node contains the projects that constitute their part of the Apex
Project. For example, the Apex Construction node contains the Automated System, Office
Building Addition, and Conveyor System projects. You can specify as many projects as
necessary to complete the required work and fulfill the scope set forth by operations
executives and program managers in your organization.
Multiple levels enable you to manage projects separately while retaining the ability to roll up
and summarize data to higher levels. For example, you can summarize information up to each
node in the EPS. Conversely, top-down budgeting can be performed from higher-level EPS
nodes down through their lower-level projects for cost control.
Ideally, one person or group controls the EPS across the organization. The project controls
coordinator creates the hierarchical structure that identifies the company-wide projects. The
coordinator works with the project manager in each area of the organization to define basic
project information for each group and to develop standards before any projects are added.
The following diagram is a simplified representation of responsibilities and projects within a

Software Application Lab 2018
CIT, Gubbi, Dept. Of Civil Engg. Page 30
hierarchy.
Move around in the EPS : When you first start the module, click Open Existing on the
Welcome dialog box, or choose File, Open, from within the module. EPS nodes that contain
other nodes and projects are identified by a pyramid symbol. A + symbol indicates that more
nodes or projects are rolled up beneath the selected node. Click + or double-click the node to
display additional levels in the hierarchy.
Software Application Lab 2018
CIT, Gubbi, Dept. Of Civil Engg. Page 31
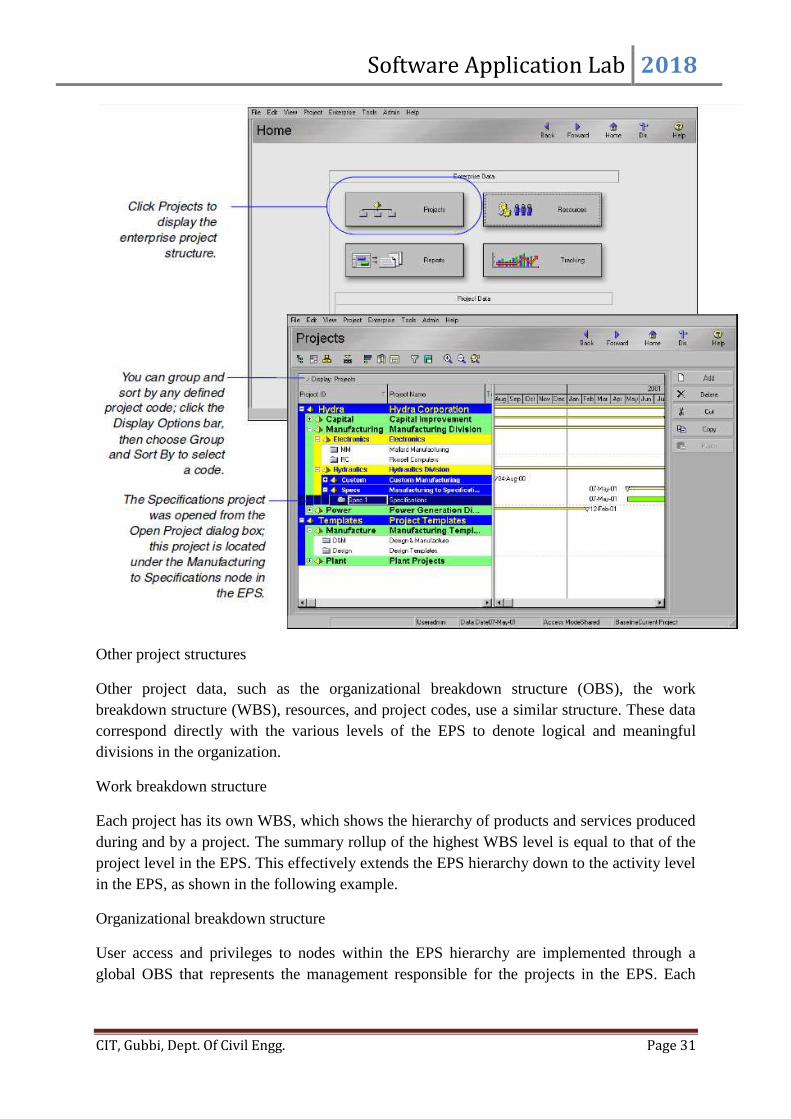
Other project structures
Other project data, such as the organizational breakdown structure (OBS), the work
breakdown structure (WBS), resources, and project codes, use a similar structure. These data
correspond directly with the various levels of the EPS to denote logical and meaningful
divisions in the organization.
Work breakdown structure
Each project has its own WBS, which shows the hierarchy of products and services produced
during and by a project. The summary rollup of the highest WBS level is equal to that of the
project level in the EPS. This effectively extends the EPS hierarchy down to the activity level
in the EPS, as shown in the following example.
Organizational breakdown structure
User access and privileges to nodes within the EPS hierarchy are implemented through a
global OBS that represents the management responsible for the projects in the EPS. Each

Software Application Lab 2018
CIT, Gubbi, Dept. Of Civil Engg. Page 32
manager in the OBS is associated with his or her area of the EPS, either by node or by
project, and the WBS of the particular level of the hierarchy.
Resources
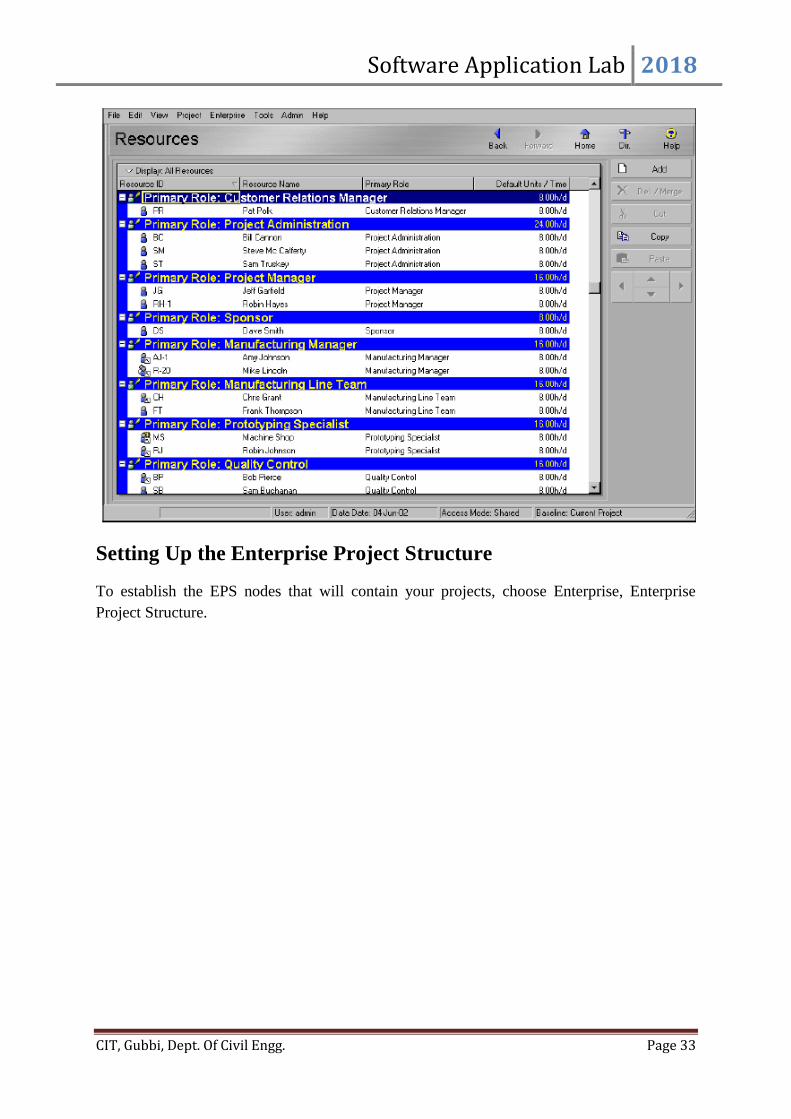
Resources are the personnel and equipment that perform the work across all projects. You
can set up a resource hierarchy that reflects your organization’s resource structure and
supports the assignment of resources to activities.
Software Application Lab 2018
CIT, Gubbi, Dept. Of Civil Engg. Page 33
Setting Up the Enterprise Project Structure
To establish the EPS nodes that will contain your projects, choose Enterprise, Enterprise
Project Structure.
Software Application Lab 2018
CIT, Gubbi, Dept. Of Civil Engg. Page 34
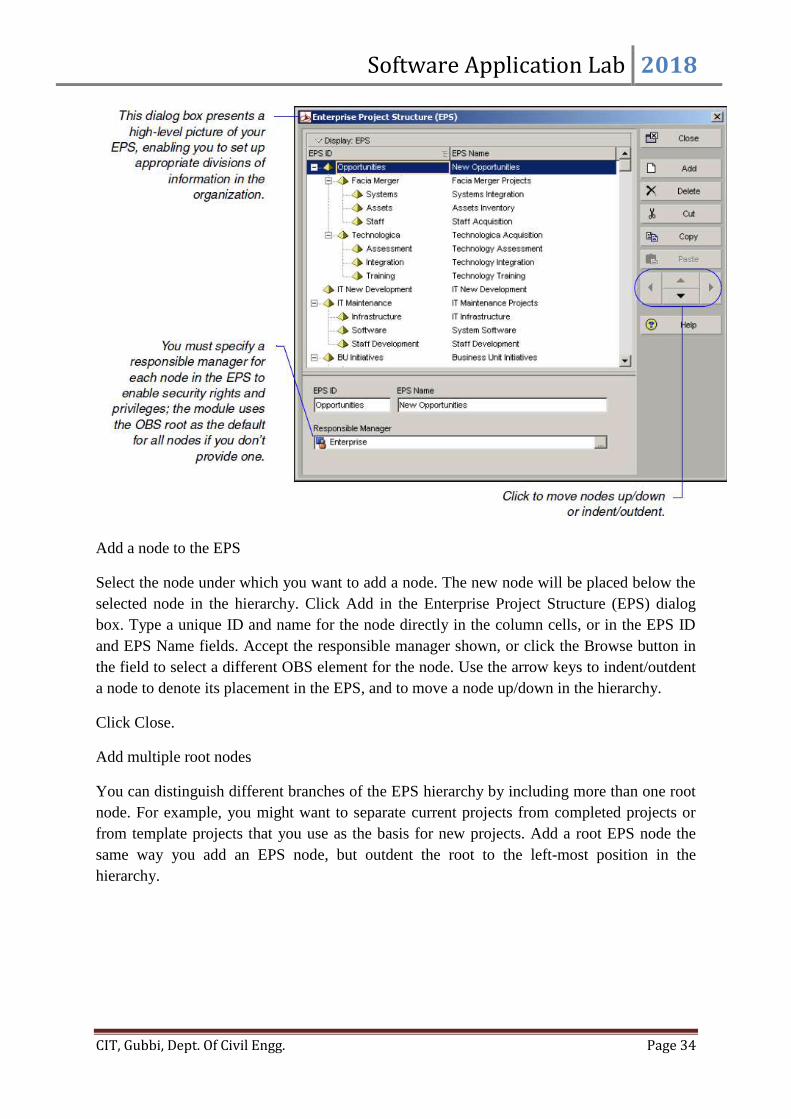
Add a node to the EPS
Select the node under which you want to add a node. The new node will be placed below the
selected node in the hierarchy. Click Add in the Enterprise Project Structure (EPS) dialog
box. Type a unique ID and name for the node directly in the column cells, or in the EPS ID
and EPS Name fields. Accept the responsible manager shown, or click the Browse button in
the field to select a different OBS element for the node. Use the arrow keys to indent/outdent
a node to denote its placement in the EPS, and to move a node up/down in the hierarchy.
Click Close.
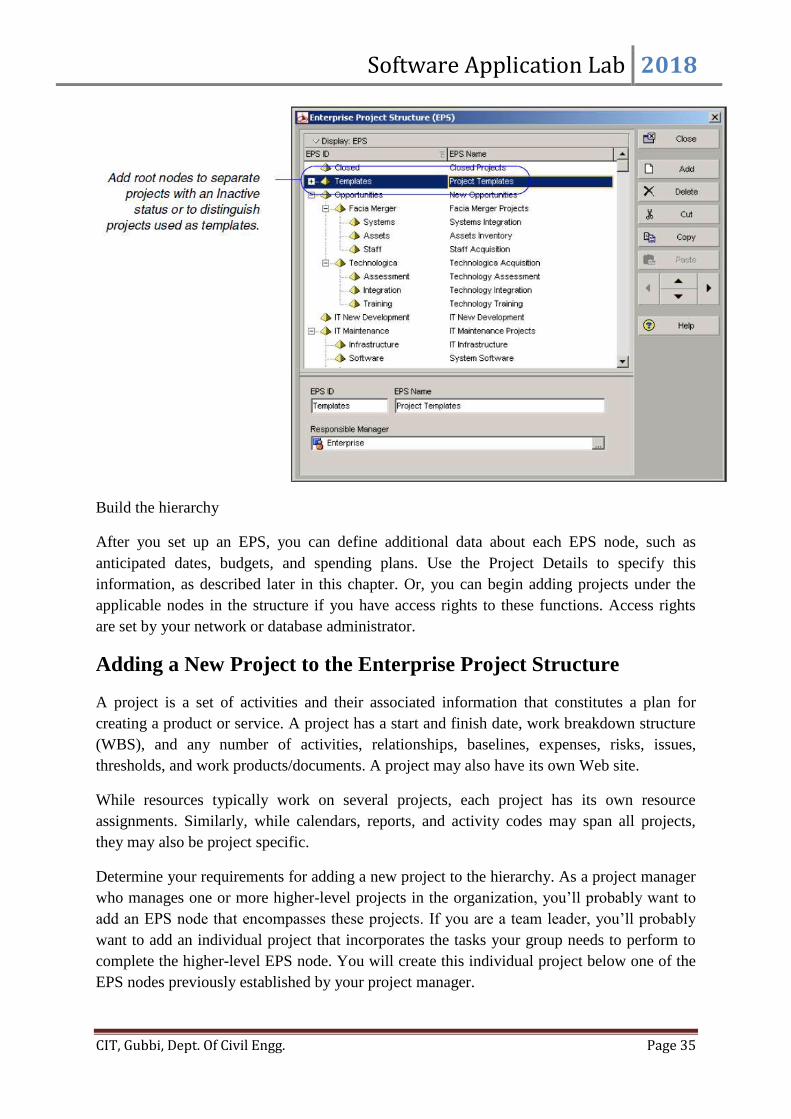
Add multiple root nodes
You can distinguish different branches of the EPS hierarchy by including more than one root
node. For example, you might want to separate current projects from completed projects or
from template projects that you use as the basis for new projects. Add a root EPS node the
same way you add an EPS node, but outdent the root to the left-most position in the
hierarchy.
Software Application Lab 2018
CIT, Gubbi, Dept. Of Civil Engg. Page 35
Build the hierarchy
After you set up an EPS, you can define additional data about each EPS node, such as
anticipated dates, budgets, and spending plans. Use the Project Details to specify this
information, as described later in this chapter. Or, you can begin adding projects under the
applicable nodes in the structure if you have access rights to these functions. Access rights
are set by your network or database administrator.
Adding a New Project to the Enterprise Project Structure
A project is a set of activities and their associated information that constitutes a plan for
creating a product or service. A project has a start and finish date, work breakdown structure
(WBS), and any number of activities, relationships, baselines, expenses, risks, issues,
thresholds, and work products/documents. A project may also have its own Web site.
While resources typically work on several projects, each project has its own resource
assignments. Similarly, while calendars, reports, and activity codes may span all projects,
they may also be project specific.
Determine your requirements for adding a new project to the hierarchy. As a project manager
who manages one or more higher-level projects in the organization, you’ll probably want to
add an EPS node that encompasses these projects. If you are a team leader, you’ll probably
want to add an individual project that incorporates the tasks your group needs to perform to
complete the higher-level EPS node. You will create this individual project below one of the
EPS nodes previously established by your project manager.

Software Application Lab 2018
CIT, Gubbi, Dept. Of Civil Engg. Page 36
Use the Projects window to add a project to the EPS hierarchy. Define general information
such as the project’s ID and name, planned start and must finish by dates, and the responsible
manager.
Add a project to the EPS
Choose Enterprise, Projects, or click Projects on the Home workspace to open the Projects
window. Select the EPS node to which you want to add a project. (If you have not yet created
any EPS nodes, select the root EPS node created for you when you installed the module.)
Click Add. The Create a New Project Wizard guides you through the steps required to add a
project, including selecting the node in which to place the project in the EPS, naming the
project, and identifying the responsible manager for the project.

Software Application Lab 2018
CIT, Gubbi, Dept. Of Civil Engg. Page 37
General information
The General tab enables you to view and edit general information about the selected node or
project. This information includes the ID, name, responsible manager, leveling priority, and
risk level. You can also view or edit the project’s Web site address, if applicable.
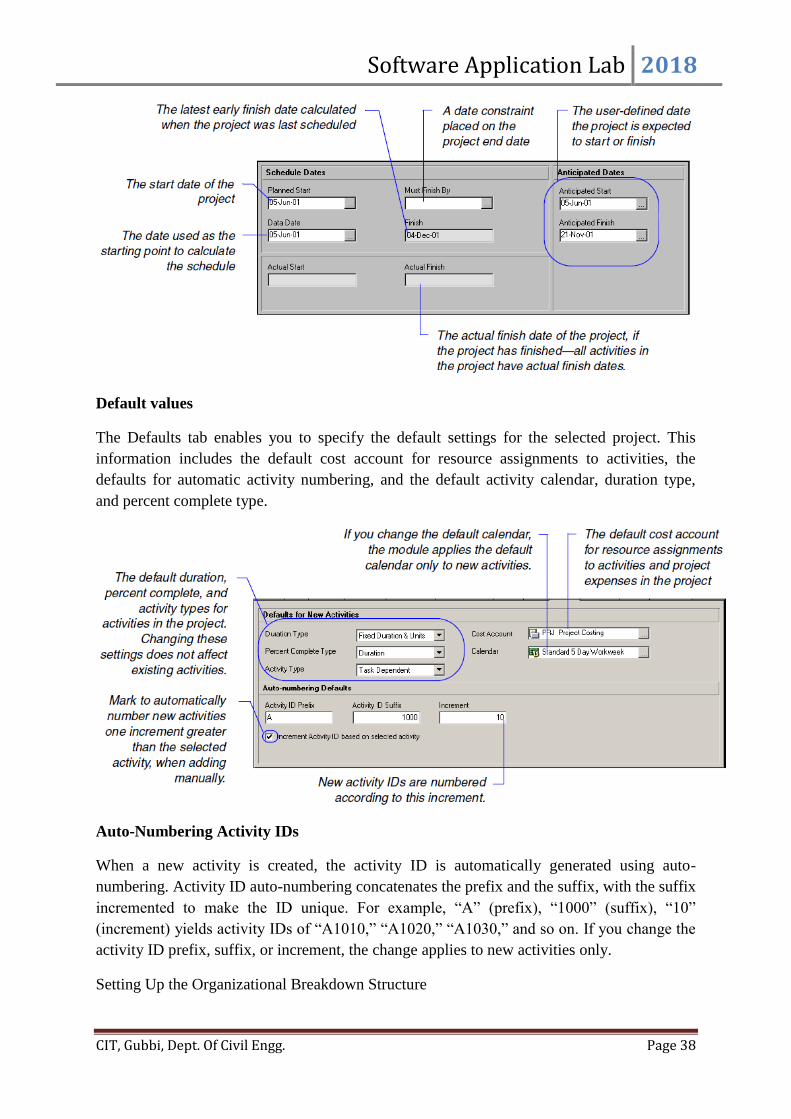
Dates
The Dates tab enables you to edit schedule information for the selected project. This
information includes the current data date, planned start date, and the scheduled finish date. If
you have an EPS node selected, you can also enter the dates you anticipate the node will start
and finish.
Software Application Lab 2018
CIT, Gubbi, Dept. Of Civil Engg. Page 38
Default values
The Defaults tab enables you to specify the default settings for the selected project. This
information includes the default cost account for resource assignments to activities, the
defaults for automatic activity numbering, and the default activity calendar, duration type,
and percent complete type.
Auto-Numbering Activity IDs
When a new activity is created, the activity ID is automatically generated using auto-
numbering. Activity ID auto-numbering concatenates the prefix and the suffix, with the suffix
incremented to make the ID unique. For example, “A” (prefix), “1000” (suffix), “10”
(increment) yields activity IDs of “A1010,” “A1020,” “A1030,” and so on. If you change the
activity ID prefix, suffix, or increment, the change applies to new activities only.
Setting Up the Organizational Breakdown Structure

Software Application Lab 2018
CIT, Gubbi, Dept. Of Civil Engg. Page 39
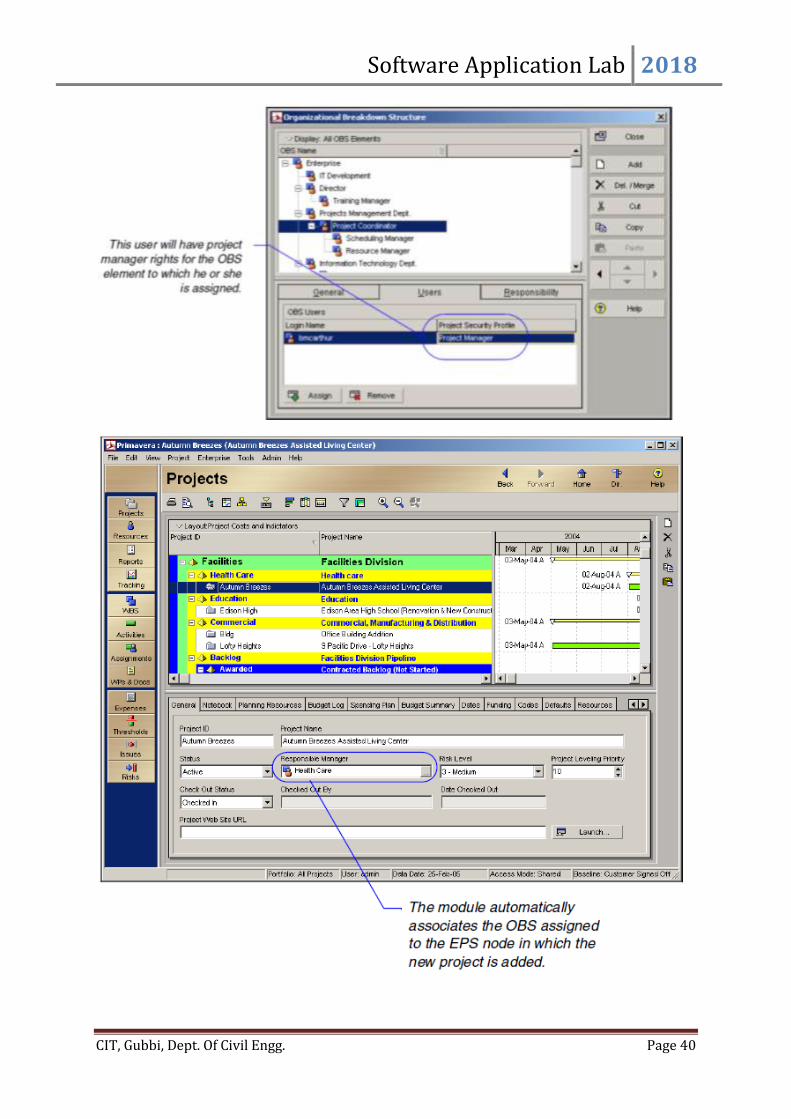
An organizational breakdown structure (OBS) is a hierarchical arrangement of a project’s
management structure. User access and privileges to nodes and projects within the enterprise
project structure (EPS) are implemented via responsible managers, defined in an
organization-wide OBS hierarchy.
An OBS is not the same as a resource pool. While resources are assigned to activities, OBS
elements are associated with EPS nodes and projects. The OBS element corresponding to an
EPS node is the project manager responsible for all work included in that branch of the
hierarchy. In this way, an OBS supports larger projects that involve several project managers
with different areas of responsibility.
The organizational breakdown structure (OBS) is a global hierarchy that represents the
managers responsible for the projects in your organization. The OBS usually reflects the
management structure of your organization, from top-level personnel down through the
various levels constituting your business. You can associate the responsible managers with
their areas of the EPS — either nodes or individual projects. When you associate a
responsible manager with an EPS node, any projects you add to that branch of the EPS are
assigned that manager element by default. The OBS hierarchy is also used to grant users
specific access privileges to projects and the WBS levels within projects.
You may want to create your OBS to match each EPS node and project set up in the EPS.
You can initially match OBS names to the EPS node and project names. For example, for the
Corporate (Corporate IT) node, name the OBS element, Corporate IT Manager. Assign users,
by their login names, to the OBS elements to grant access to the corresponding EPS nodes or
projects. The type of access granted to a user is determined by the project security profile
assigned to the user. Security profiles are set up on the Security Profiles dialog box (choose
Admin, Security Profiles) and then assigned to users on the Users dialog box (choose Admin,
Users).
Software Application Lab 2018
CIT, Gubbi, Dept. Of Civil Engg. Page 40
Software Application Lab 2018
CIT, Gubbi, Dept. Of Civil Engg. Page 41
The OBS can mirror the EPS at the node and project level, or include additional OBS levels
to accommodate your management organization. For example, you may want to specify team
leaders as the responsible managers for the WBS levels of a project, and the project manager
above the team leaders in the OBS as the responsible manager of the project. In this way, you
can delineate appropriate access and security measures at various levels of the EPS while
maintaining an OBS that accurately reflects your organization chart.
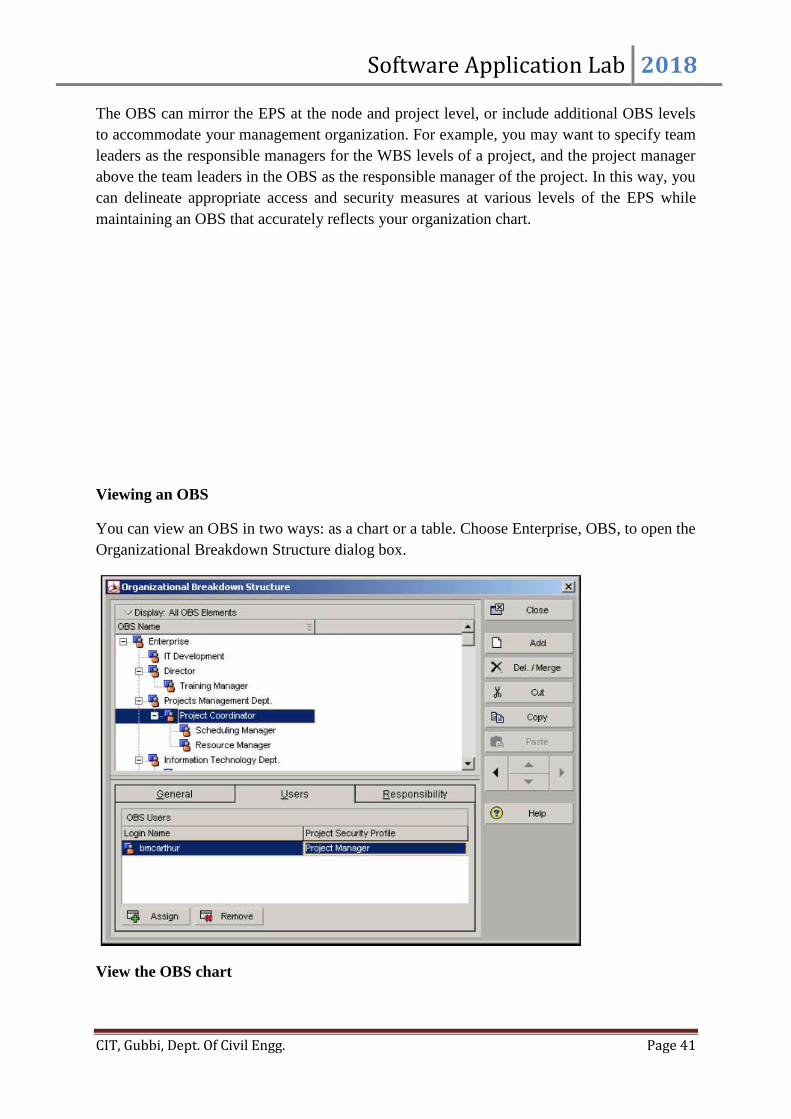
Viewing an OBS
You can view an OBS in two ways: as a chart or a table. Choose Enterprise, OBS, to open the
Organizational Breakdown Structure dialog box.
View the OBS chart

Software Application Lab 2018
CIT, Gubbi, Dept. Of Civil Engg. Page 42
Click the Display Options bar, then choose Chart View. To change the information included
in the chart and the way it is displayed, click the Display Options bar and choose Chart Box
Template, Customize.
View the OBS table
Click the Display Options bar, then choose Table View.
Setting Up an OBS

Software Application Lab 2018
CIT, Gubbi, Dept. Of Civil Engg. Page 43
Use the Organizational Breakdown Structure dialog box to create, view, and edit the global
OBS. You can also use this dialog box to view a list of users who can access an OBS
element’s global and project information, and to see how people are assigned across the
projects.
Create an OBS
A root OBS node is automatically assigned to the root EPS node so that a default OBS
element can be assigned to each project you add to the EPS root. When you use the
Enterprise Project Structure dialog box to set up the EPS nodes that make up the foundation
of the EPS, you can use the existing root EPS as the default for each node, or you can set up
the OBS before you build the EPS. You can then assign actual responsible managers when
you create EPS nodes. Once your basic OBS is in place, you can include additional OBS
elements to provide access to specific EPS nodes, projects, and WBS elements, to users not
included with the original OBS node.
Choose Enterprise, OBS. Select the OBS element immediately above and of the same
hierarchy level as the element you want to add, then click Add.
Click in the OBS Description area on the General tab to type a description of the OBS
element. You can use HTML editing features, which include formatting text, inserting
pictures, copying and pasting information from other document files (while retaining
formatting), and adding hyperlinks.
View users associated with OBS elements
Click the Users tab in the Organizational Breakdown Structure dialog box to view the users
and corresponding security profiles associated with an OBS element. You can also assign

Software Application Lab 2018
CIT, Gubbi, Dept. Of Civil Engg. Page 44
users from this tab, if you have appropriate access rights.
View a responsibility list
Click the Responsibility tab to quickly see where responsible managers (OBS elements) are
assigned across the organization. Select the OBS name for whom you want to see
assignments.
Editing OBS Elements
Software Application Lab 2018
CIT, Gubbi, Dept. Of Civil Engg. Page 45
You can edit an OBS in several ways. You can change an existing OBS element’s position
and information, you can add an OBS element (described earlier), and you can delete an OBS
element.
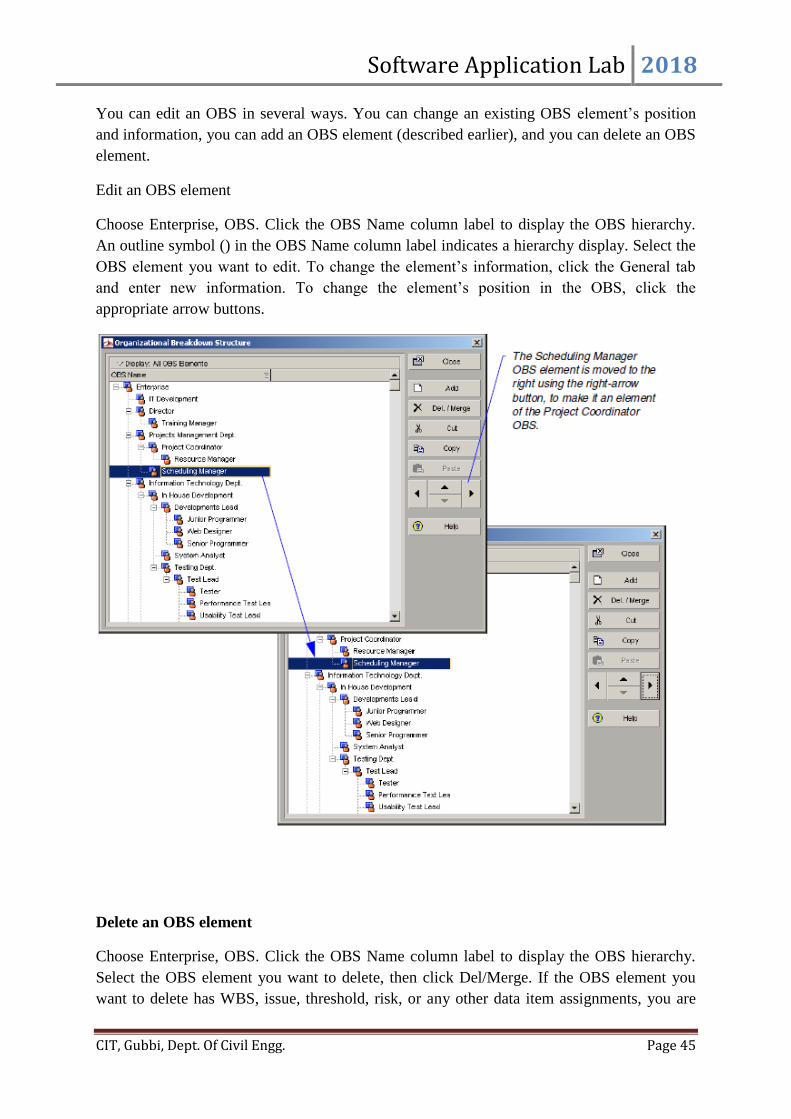
Edit an OBS element
Choose Enterprise, OBS. Click the OBS Name column label to display the OBS hierarchy.
An outline symbol () in the OBS Name column label indicates a hierarchy display. Select the
OBS element you want to edit. To change the element’s information, click the General tab
and enter new information. To change the element’s position in the OBS, click the
appropriate arrow buttons.
Delete an OBS element
Choose Enterprise, OBS. Click the OBS Name column label to display the OBS hierarchy.
Select the OBS element you want to delete, then click Del/Merge. If the OBS element you
want to delete has WBS, issue, threshold, risk, or any other data item assignments, you are

Software Application Lab 2018
CIT, Gubbi, Dept. Of Civil Engg. Page 46
prompted to merge the element with its higher-level OBS element. Click Yes, then click Yes
again.
Defining Resources and Roles
Resources include the personnel and equipment that perform work on activities across all
projects. Labor and nonlabor resources, such as engineers and equipment, are always time-
based and are usually assigned to other activities and/or projects; material resources, such as
supplies and other consumable items, are recorded in terms of cost per unit, rather than hours.
You can create a resource hierarchy that reflects your organization’s resource structure and
supports the assignment of resources to activities. You can establish unlimited hierarchical
resource codes for grouping and rollups.
In addition, you can set up roles with specific skill sets and use them as resource assignments
until specific resources can be assigned. This enables you to schedule and plan costs by role
at the project planning stage. You can also assign resource calendars and define contact
information, and define the price over time for resources and roles. This chapter describes
resources, roles, and resource codes.
Resources Overview
You can develop a resource plan that integrates resources, costs, and the schedule so you can
effectively control your projects. Begin by defining a list of all the resources necessary to
complete the projects included in your enterprise project structure (EPS). For each resource,
set availability limits, unit prices, and a calendar to define its standard worktime and
nonworktime. Define shifts and apply one or more of the shifts to the resources to whom they
apply. Group the resources by broad categories so you can easily find a specific resource
when assigning resources to a project.
To enable grouping and rollups of your resources across the organization set up resource
codes and assign code values. Use this information to produce resource reports and profiles.
Analyze the resource allocation, and adjust your project plan to avoid overallocation and
peaks and valleys of resource use.
Software Application Lab 2018
CIT, Gubbi, Dept. Of Civil Engg. Page 47
Resources are different than expenses. While some resources are time-based and generally
extend across multiple activities and projects, expenses are one-time expenditures for
nonreusable items required by activities.
Roles
If you are in the planning stage of your project or want to see how certain resource
assignments will affect the schedule, you can assign roles as temporary placeholders for
resource assignments. Roles are project personnel job titles or skills. They represent a type of
resource with a certain level of proficiency—rather than a specific individual. Roles can also
be assigned to specific resources to further identify that resource’s skills.
Primary resources
An activity’s primary resource is typically the resource who is responsible for coordinating
an activity’s work. The primary resource updates the activity’s start date, finish date, and
expected end date. In addition, if an activity has any material resources, the primary resource
may be responsible for reporting the material resource’s hours/units.
Primary resources are also responsible for editing the physical percent complete when
weighted steps are linked to activity percent complete for the corresponding activities in a
selected project.
Viewing and Adding Resources
Use the Resources window to view and add the resources required to complete all projects
across the organization. Structure the hierarchy of resources according to the work
performed. For example, you may have various teams comprised of individuals in several
resource groups in the organization. You can set up the hierarchy so that the people managing
these groups are at a higher level than the resources in the groups.
You can set up multiple root, or top-level, elements in a resource breakdown structure (RBS).
A root RBS element serves as the lead person (such as a manager), instead of a division or a
department. For this reason, you cannot roll up lower-level resources to the root resource.

Software Application Lab 2018
CIT, Gubbi, Dept. Of Civil Engg. Page 48
Team leaders, project managers, and resource managers in charge of teams or groups in the
organization should jointly establish the resource hierarchy. The program manager and/or
project controls coordinator may need to participate in this process to make sure resources are
distributed consistently based on availability.
View resources
Choose Enterprise, Resources, or click Resources on the Home workspace. Click the Display
Options bar, then choose one of the following:
To view detailed information about a specific resource, choose Details, then select the
resource whose information you want to view.
■To view resources as a chart, choose Chart View.
■To select the columns to include in the display, choose Columns, Customize, or one of the
predefined column displays.
■To select the resources to display, choose Filter By, then choose All Active Resources, All
Resources, or Current Project’s Resources.
■To organize the resource hierarchy, choose Group and Sort By, and choose one of the
predefined groupings or customize your own.
Software Application Lab 2018
CIT, Gubbi, Dept. Of Civil Engg. Page 49
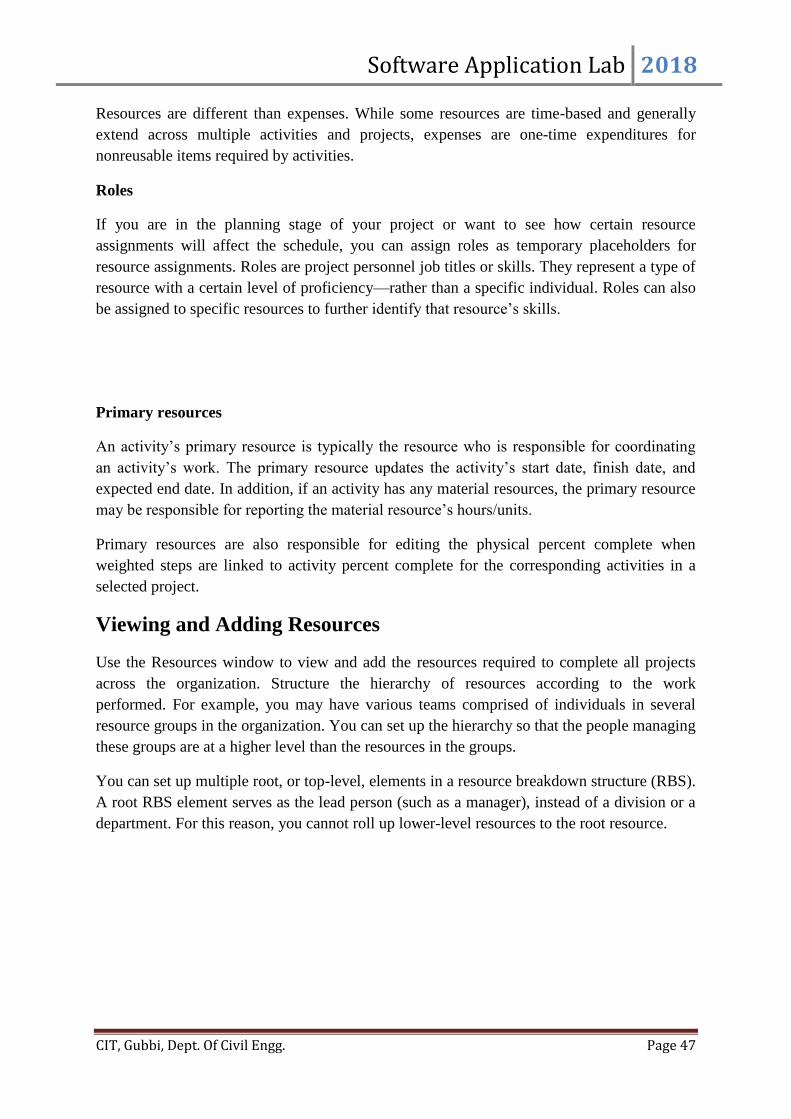
Add a resource: Choose Enterprise, Resources. Click the Display Options bar, then choose
Group and Sort By, Default, to display the resource hierarchy. Select the resource
immediately above and at the same level as the resource you want to add, then click Add.
Depending on your user preferences, the New Resource wizard may be started. The wizard
prompts you to add the information included on each tab in Resource Details. If you do not
use the wizard, this information can also be entered directly on each tab. To display Resource
Details, click the Display Options bar, then choose Details.
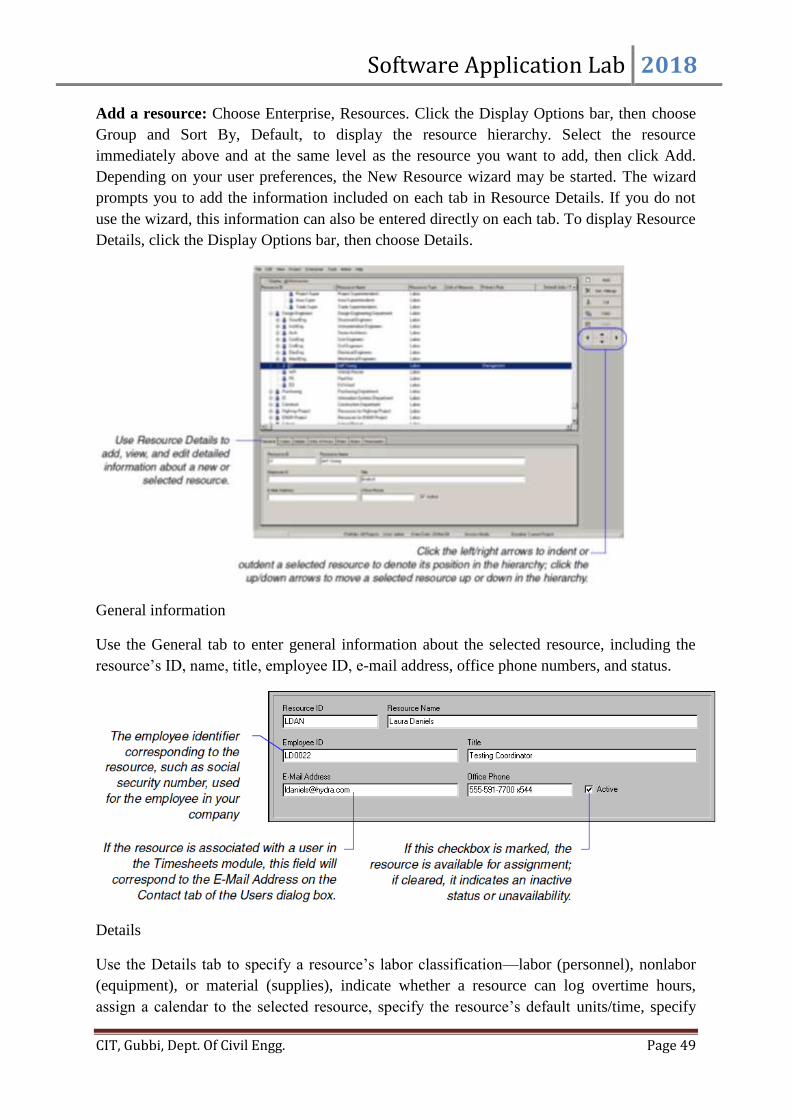
General information
Use the General tab to enter general information about the selected resource, including the
resource’s ID, name, title, employee ID, e-mail address, office phone numbers, and status.
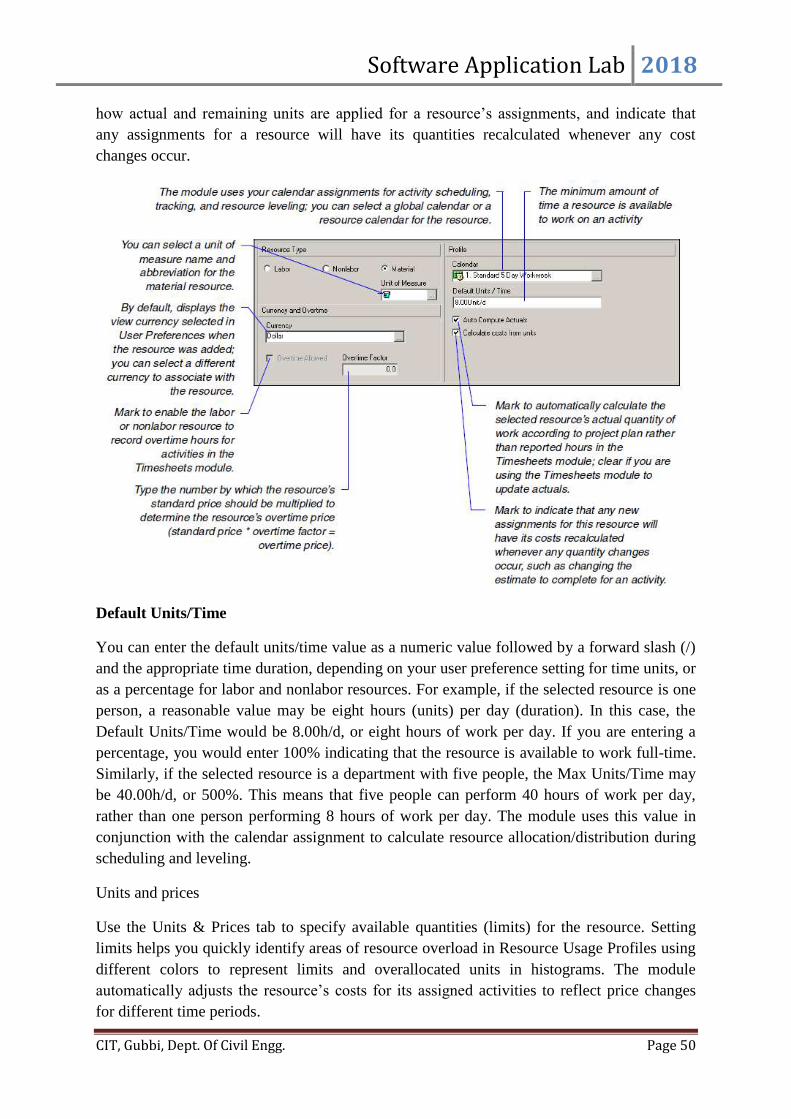
Details
Use the Details tab to specify a resource’s labor classification—labor (personnel), nonlabor
(equipment), or material (supplies), indicate whether a resource can log overtime hours,
assign a calendar to the selected resource, specify the resource’s default units/time, specify
Software Application Lab 2018
CIT, Gubbi, Dept. Of Civil Engg. Page 50
how actual and remaining units are applied for a resource’s assignments, and indicate that
any assignments for a resource will have its quantities recalculated whenever any cost
changes occur.
Default Units/Time
You can enter the default units/time value as a numeric value followed by a forward slash (/)
and the appropriate time duration, depending on your user preference setting for time units, or
as a percentage for labor and nonlabor resources. For example, if the selected resource is one
person, a reasonable value may be eight hours (units) per day (duration). In this case, the
Default Units/Time would be 8.00h/d, or eight hours of work per day. If you are entering a
percentage, you would enter 100% indicating that the resource is available to work full-time.
Similarly, if the selected resource is a department with five people, the Max Units/Time may
be 40.00h/d, or 500%. This means that five people can perform 40 hours of work per day,
rather than one person performing 8 hours of work per day. The module uses this value in
conjunction with the calendar assignment to calculate resource allocation/distribution during
scheduling and leveling.
Units and prices
Use the Units & Prices tab to specify available quantities (limits) for the resource. Setting
limits helps you quickly identify areas of resource overload in Resource Usage Profiles using
different colors to represent limits and overallocated units in histograms. The module
automatically adjusts the resource’s costs for its assigned activities to reflect price changes
for different time periods.
Software Application Lab 2018
CIT, Gubbi, Dept. Of Civil Engg. Page 51
Setting Up Roles
Roles are project personnel job titles or skills, for example, project planner, quality assurance
tester, and engineer. You can create a standard set of roles that you can assign to labor and
nonlabor resources and activities in all projects in the organization. You can establish an
unlimited number of roles and organize them in a hierarchy for easier management and
assignment. The set of roles you assign to an activity defines the activity’s skill requirements.
You can also define multiple price per unit rates and unit/time limits for each role to
accurately plan future costs and allocation.
Assign roles to activities as you would resources during project schedule and cost planning.
When your plans are finalized, you can replace roles with resources, based on each activity’s
role and skill requirements.
View roles
Choose Enterprise, Roles, then click the Display Options bar.
■To view only those roles that have assignments in the open project, choose Filter By,
Current Project’s Roles.
■To view all roles, choose Filter By, All Roles.

Software Application Lab 2018
CIT, Gubbi, Dept. Of Civil Engg. Page 52
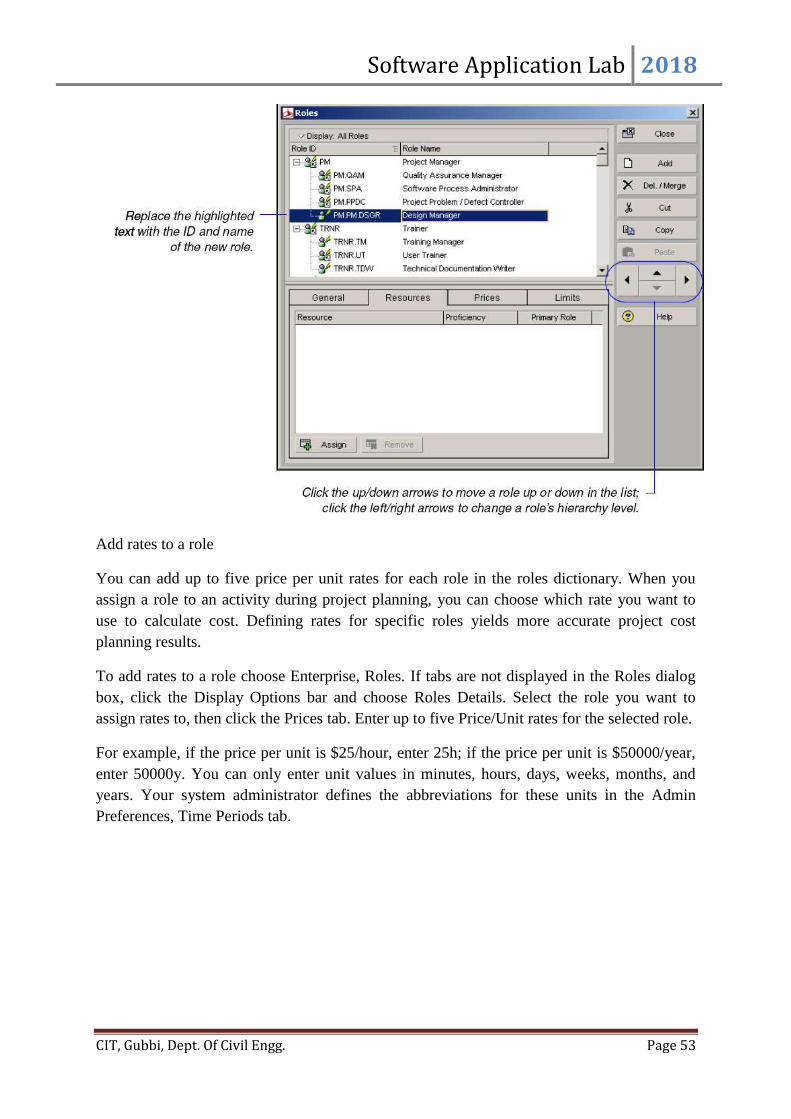
Add a role
Choose Enterprise, Roles. Select the role immediately above and at the same level as the role
you want to add, then click Add. Type the role’s ID and name. To create a hierarchy of roles,
click the right arrow key to indent the selected role one level. For example, you may want to
list specific roles included under Project Manager, such as Design Manager.
Software Application Lab 2018
CIT, Gubbi, Dept. Of Civil Engg. Page 53
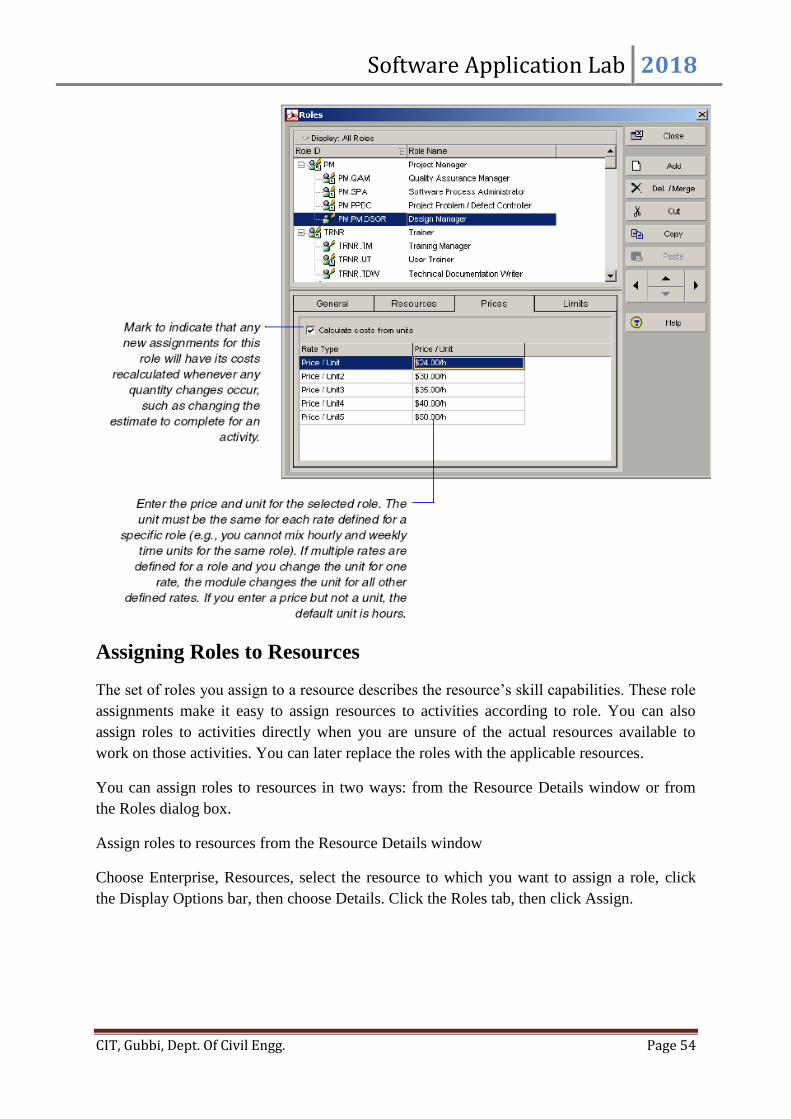
Add rates to a role
You can add up to five price per unit rates for each role in the roles dictionary. When you
assign a role to an activity during project planning, you can choose which rate you want to
use to calculate cost. Defining rates for specific roles yields more accurate project cost
planning results.
To add rates to a role choose Enterprise, Roles. If tabs are not displayed in the Roles dialog
box, click the Display Options bar and choose Roles Details. Select the role you want to
assign rates to, then click the Prices tab. Enter up to five Price/Unit rates for the selected role.
For example, if the price per unit is $25/hour, enter 25h; if the price per unit is $50000/year,
enter 50000y. You can only enter unit values in minutes, hours, days, weeks, months, and
years. Your system administrator defines the abbreviations for these units in the Admin
Preferences, Time Periods tab.
Software Application Lab 2018
CIT, Gubbi, Dept. Of Civil Engg. Page 54
Assigning Roles to Resources
The set of roles you assign to a resource describes the resource’s skill capabilities. These role
assignments make it easy to assign resources to activities according to role. You can also
assign roles to activities directly when you are unsure of the actual resources available to
work on those activities. You can later replace the roles with the applicable resources.
You can assign roles to resources in two ways: from the Resource Details window or from
the Roles dialog box.
Assign roles to resources from the Resource Details window
Choose Enterprise, Resources, select the resource to which you want to assign a role, click
the Display Options bar, then choose Details. Click the Roles tab, then click Assign.

Software Application Lab 2018
CIT, Gubbi, Dept. Of Civil Engg. Page 55
Assign roles to resources from the Roles dialog box
Choose Enterprise, Roles. Click the Display Options bar, then choose Roles Details. Select
the role you want to assign. Click the Resources tab, then click Assign.
Software Application Lab 2018
CIT, Gubbi, Dept. Of Civil Engg. Page 56
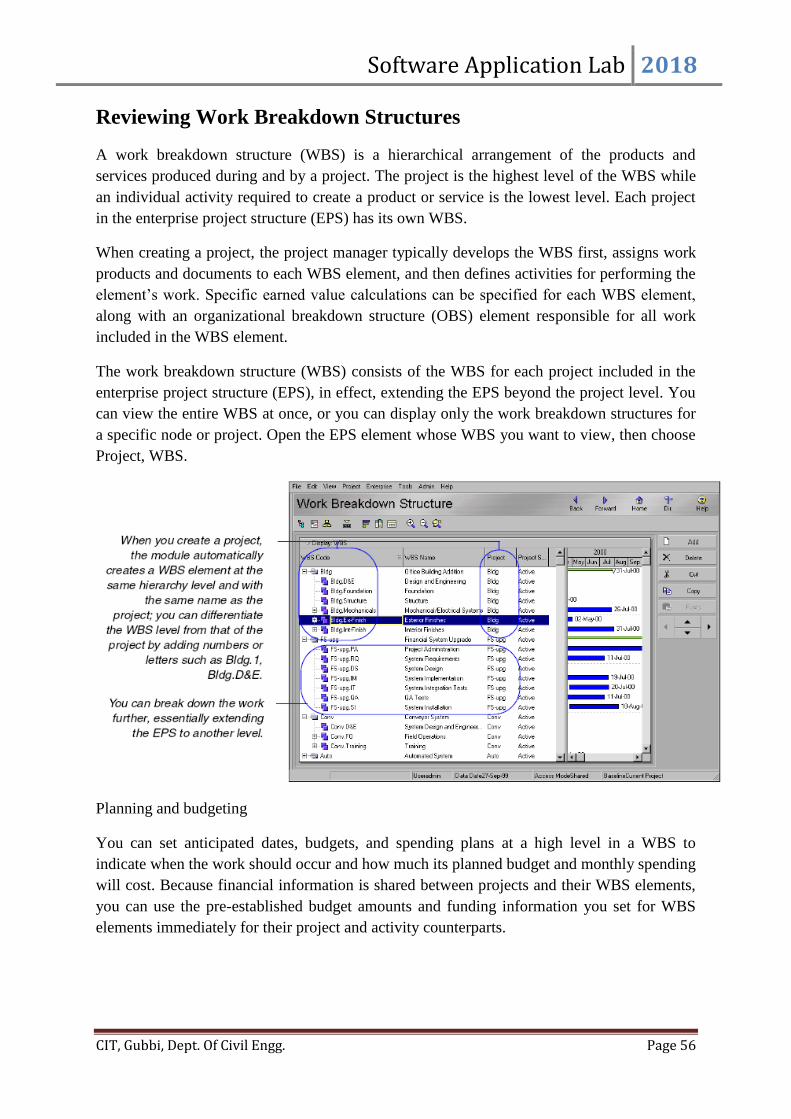
Reviewing Work Breakdown Structures
A work breakdown structure (WBS) is a hierarchical arrangement of the products and
services produced during and by a project. The project is the highest level of the WBS while
an individual activity required to create a product or service is the lowest level. Each project
in the enterprise project structure (EPS) has its own WBS.
When creating a project, the project manager typically develops the WBS first, assigns work
products and documents to each WBS element, and then defines activities for performing the
element’s work. Specific earned value calculations can be specified for each WBS element,
along with an organizational breakdown structure (OBS) element responsible for all work
included in the WBS element.
The work breakdown structure (WBS) consists of the WBS for each project included in the
enterprise project structure (EPS), in effect, extending the EPS beyond the project level. You
can view the entire WBS at once, or you can display only the work breakdown structures for
a specific node or project. Open the EPS element whose WBS you want to view, then choose
Project, WBS.
Planning and budgeting
You can set anticipated dates, budgets, and spending plans at a high level in a WBS to
indicate when the work should occur and how much its planned budget and monthly spending
will cost. Because financial information is shared between projects and their WBS elements,
you can use the pre-established budget amounts and funding information you set for WBS
elements immediately for their project and activity counterparts.

Software Application Lab 2018
CIT, Gubbi, Dept. Of Civil Engg. Page 57
Viewing a WBS
You can view a WBS as a chart or a table. Open the Work Breakdown Structure window by
choosing Project, WBS; you can also click WBS from the Directory bar or from the Home
workspace.
View the Work Breakdown Structure chart
Click the Display Options bar, then choose Show on Top, Chart View. To change the
displayed information, click the Display Options bar and choose Chart Box Template, then an
information type.
View the Work Breakdown Structure table
Click the Display Options bar, then choose Show on Top, WBS Table. To list and sort WBS
elements, click the WBS Code column label. To change the information the table displays,
click the Display Options bar, then choose any of the following:
■To view detailed information about a specific WBS element, choose Show on Bottom,
WBS Details, then select the WBS element whose information you want to view. To hide
WBS Details, choose Show on Bottom, No Bottom Layout.
■To change the columns in the WBS display, choose Columns, then one of the predefined
displays, or customize the columns.
Creating Calendars
You can create and assign calendars to each resource and each activity. These calendars
define the number of available workhours in each calendar day. You can also specify national
holidays, your organization’s holidays, project-specific work/nonworkdays, and resource
vacation days. The module uses your calendar assignments for scheduling and tracking

Software Application Lab 2018
CIT, Gubbi, Dept. Of Civil Engg. Page 58
activities, and leveling resources. An activity’s type determines whether the activity uses the
calendar of an assigned resource or its activity calendar.
You can link resource and project calendars to global calendars. Changes to a global calendar
apply to all resource and project calendars linked to the global calendar.
Adding Calendars
You can establish an unlimited number of calendars to accommodate different work patterns.
For example, if some activities require a five-day workweek, while others are performed part-
time (such as Monday, Wednesday, and Friday), you can create different calendars and assign
the activities and resources in your projects to them.
There are three calendar pools: global, resource, and project. The global calendar pool
contains calendars that apply to all projects in the database. The project calendar pool is a
separate pool of calendars for each project in the organization. The resource calendar pool is
a separate pool of calendars for each resource. You can assign resource or global calendars to
resources, and global or project calendars to activities.
Create a global calendar
Choose Enterprise, Calendars. Choose Global, then click Add. Select the calendar you want
to copy for the new global calendar, then click the Select button. Type the new calendar’s
name. To make the new calendar the default global calendar for activities and resources,
mark the Default checkbox. To edit the new calendar, click Modify. To view the calendar’s
assignments before changing it, click Used By.
Create a resource or project calendar
Choose Enterprise, Calendars. If you are creating a project calendar, you must first open a
project. Choose Resource or Project, then click Add. Select the calendar you want to copy for
the new resource or project calendar, then click the Select button. Type the new calendar’s

Software Application Lab 2018
CIT, Gubbi, Dept. Of Civil Engg. Page 59
name. To edit the new calendar, click Modify. To view the calendar’s assignments before
changing it, click Used By.
Modifying Calendars
Use more than one calendar when your projects contain activities that can occur on different
schedules. For example, you can create one calendar that specifies a normal Monday-
through-Friday workweek and another calendar that specifies continuous worktime (24
hours/day). If you define multiple project calendars, you must assign each activity to the
specific calendar that indicates the worktime available for performing that activity. The
module schedules each activity only during the worktimes of the calendar to which it is
assigned.
You can also create multiple calendars to control the times when work is performed by
resources throughout your organization. You can then associate different holidays/exceptions
from the global calendar for each work cycle to indicate individual resource availability.
Define the workhours for each day in the regular workweek. Use the Calendar dialog box to
view and edit a global, project, or resource calendar.
Modify calendars
Choose Enterprise, Calendars; choose the calendar type (Global, Resource, or Project), select
the calendar you want to modify, then click Modify.
Choose the month you want to modify by clicking the appropriate arrow button next to the
month-year title. Modify the year by clicking the month/year title, and clicking the
Software Application Lab 2018
CIT, Gubbi, Dept. Of Civil Engg. Page 60
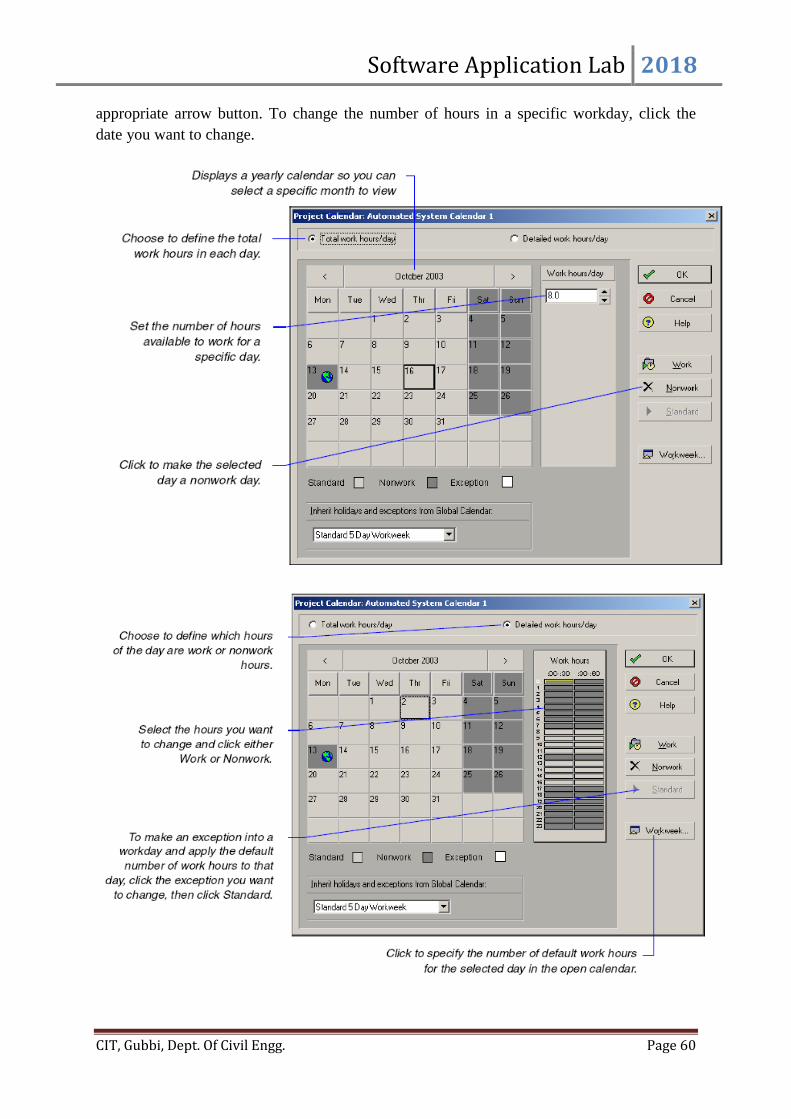
appropriate arrow button. To change the number of hours in a specific workday, click the
date you want to change.

Software Application Lab 2018
CIT, Gubbi, Dept. Of Civil Engg. Page 61
Each calendar’s work/nonworktime is based on its regular workweek. The changes you make
to the regular workweek are reflected in the global, resource, or project calendar dialog box.
The calendar dialog box shows normal/standard, nonworktime, and exceptions in the colors
indicated in the legend.
Apply exceptions directly in the calendar dialog box. To apply the same change to all
instances of a specific weekday in the displayed month, click the weekday's column label.
Specify default work hours
Use the Calendar Weekly Hours dialog box to specify the number of default work hours for
each week day in the open calendar.
Delete a calendar
Choose Enterprise, Calendars. Choose Global, Resource, or Project, depending on the type of
calendar you want to delete. Select the calendar you want to delete, then click Delete. If
activities or resources are assigned to the calendar, the Calendars in Use dialog box is
displayed.

Software Application Lab 2018
CIT, Gubbi, Dept. Of Civil Engg. Page 62
To delete the calendar and link its assignments to a different calendar, choose Select
Replacement Calendar, click OK, then select a replacement calendar when prompted. To
delete the calendar and link its assignments to the default global calendar, choose Link to
Default Global Calendar, then click OK.