Social Booth Settings - Display...(x86)\Photo Booth Solutions\Social Booth\Assets\Backgrounds The...
7
Social Booth Settings - Display Modified on: Sun, 12 Jul, 2015 at 8:05 AM (http://imgur.com/wGKgAm2) 1. Screen Backgrounds & Audio There are 2 ways to define your screen backgrounds and audio files. - Basic - Basic Mode will use the default background screens and audio files - Advanced Configuration- Advanced Mode gives you more control over which screens and audio files you want to use. 1. In advanced Configuration you can define the location of each individual screen background as well as select which screens have audio prompts 2. You can enable separate screen backgrounds and audio prompts for each of the Capture and Review Screens. For example, instead of each shot saying "Get Ready" and "Nice Shot", you can have different messages for each photo. With this enabled, you must label the extra screens as follows: Shot 1 is the original name: BG-Capture.png Shot 2 BG-Capture-1.png Shot 3 BG-Capture-2.png etc... The audio files work the same way:
Transcript of Social Booth Settings - Display...(x86)\Photo Booth Solutions\Social Booth\Assets\Backgrounds The...

Social Booth Settings - Display Modified on: Sun, 12 Jul, 2015 at 8:05 AM
(http://imgur.com/wGKgAm2) 1. Screen Backgrounds & AudioThere are 2 ways to define your screen backgrounds and audio files.
- Basic - Basic Mode will use the default background screens and audio files- Advanced Configuration- Advanced Mode gives you more control over which screens and audio files you want to use.
1. In advanced Configuration you can define the location of each individual screen background as well as select which screenshave audio prompts2. You can enable separate screen backgrounds and audio prompts for each of the Capture and Review Screens. Forexample, instead of each shot saying "Get Ready" and "Nice Shot", you can have different messages for each photo. Withthis enabled, you must label the extra screens as follows:Shot 1 is the original name: BG-Capture.png Shot 2 BG-Capture-1.pngShot 3 BG-Capture-2.pngetc...
The audio files work the same way:

Shot 1 is the original name: Audio-Capture.png Shot 2 Audio-Capture-1.pngShot 3 Audio-Capture-2.pngetc...
The default screen backgrounds are located in the Assets folder of the Social Booth install folder, usually: C:\Program Files(x86)\Photo Booth Solutions\Social Booth\Assets\BackgroundsThe default audio prompts are located in the Assets folder of the Social Booth install folder, usually: C:\Program Files (x86)\PhotoBooth Solutions\Social Booth\Assets\Audio
It's not recommended to overwrite the default files. If you would like to customize the screens or the audio prompts, copy them toa new folder and enter the locations in #2 & #3, or define the location of specific files using advanced mode.
By using different folders for your backgrounds and saving the settings as different events, you can easily customize the look ofthe booth for each event.
2. Backgrounds FolderSelect a location where your custom background files are located. Social Booth expects the files to be named the same wayas they are in the C:\Program Files (x86)\Photo Booth Solutions\Social Booth\Assets\Backgrounds folderYou only need the files for your particular resolution and screen orientation. Note the files that Social Booth chooses for youby default in the Advanced Mode. For example, 1920x1080 monitors will use BG-Capture.png, where 1024x768 monitors willuse BG-Capture_small.png. Portrait monitors will use BG-Capture-Portrait.png
3. Audio FolderSelect a location where your custom audio files are located. Social Booth expects the files to be named the same way as theyare in the C:\Program Files (x86)\Photo Booth Solutions\Social Booth\Assets\Audio folder
4. Buttons Folder
Select the location where your buttons are located. Social Booth expects the files to be named the same way as they are inthe C:\Program Files (x86)\Photo Booth Solutions\Social Booth\Assets\Buttons folder. Social Booth will look for flash files firstand then PNG files.
5. Photo Start
This is what the user touches on the "Touch To Start" screen to start a Photo Session.
- Button - This is the default button that Social Booth displays. You can swap this out with your own button in theC:\Users\Mike\Projects\PhotoboothSoft\SocialBooth\Director\Assets\Buttons folder. The file name and size should renamethe same.- Hotspot - If you don't want to use the default button or would like to make a more complex start screen layout, you canembed the button in your Start screen background and define a hotspot that will trigger the photo session. You can make thewhole screen hot by making the size 1920x1080 at location 0,0
Note: Coordinates for the hotspots are based on the size of the background, not the size of the monitor resolution. Thebackgrounds are always 1920x1080.
6. Video Start
This is what the user touches on the "Touch To Start" screen to start a Video Session.
- Button - This is the default button that Social Booth displays. You can swap this out with your own button in theC:\Users\Mike\Projects\PhotoboothSoft\SocialBooth\Director\Assets\Buttons folder. The file name and size should rename thesame.- Hotspot - If you don't want to use the default button or would like to make a more complex start screen layout, you can embedthe button in your Start screen background and define a hotspot that will trigger the video session. You can make the wholescreen hot by making the size 1920x1080 at location 0,0
Note: Coordinates for the hotspots are based on the size of the background, not the size of the monitor resolution. Thebackgrounds are always 1920x1080. 7. Live View
This setting allows you to customize the size and location of the live view
- Default - Social Booth will use a default size and location based on your monitor resolution.- Custom - Define your own custom size and location for the live view.

Note: Custom sizes should be a 3:2 ratio to prevent stretching of the live view.Note: To create a portrait size live view when the camera is on its side, use a 2:3 ratio for the size and position the live view.
8. EnableEnables the live view to start the photo sequence.
9. Auto Start Live ViewThis will show the live view in the "Touch to Start" screen. - Touch for Photo/Video - Enabling this will make the live view the button to start a photo or video session. You could also usecustom hotspots as described above.
10. Touch For: Photo or VideoChoose what you would like touching the live view to start. You can choose either photo or video.
11. BorderThis will show a white Polaroid style border around the live view with your define width.
12. Display Message atDisplay a message for the number of seconds you choose prior to the photo. If you have a 5 second count down and insert 2seconds here it will appear with 2 seconds prior to the photo being taken.
Share Screen Setup13. Back Button
Choose the default position or custom position and size for the back button.
14. Done Button
Choose the default position or a custom position for the done button.
15. Preview
Choose the default position or a custom position for the live preview of the photo/GIF/video.
16. Enable Layout SelectionEnabling this will insert another screen called "Layout" into the the user flow. This will allow you to do things like let the userchoose between templates or language selection.
1. The Layout Selection screen works off of hotspots and presets or settings. The default example uses the included BG-Layout screen

(https://s3.amazonaws.com/cdn.freshdesk.com/data/helpdesk/attachments/production/3010935628/original/blob1436727904344.png?1436727914)
As you can see we will be allowing the user to select between a single shot postcard or 4 shot photo strip template. Thecoordinates of the hotspots for each of the templates are set, and the corresponding template presets are selected.Of course you can make your own Layout.png screen and can define up to 6 hotspots.
The hotspots don't have to load template presets. They can also load entire event settings, so you could set up an event withdifferent background files to enable things like a multi-lingual photo booth.
17. Display Photo Thumbnails Display a thumbnail of each photo taken in the session. Layout Selection Configuration

(http://imgur.com/keCIXWS)1. Layout 1-6
Choose the saved layout and selection location for each layout you want included on your selection screen. 2. Show Before/After/Instead of Start Screen
Choose when the layout selection screen should appear.
3. Loading Text
Add text while the event settings are loading.
Photo Thumbnail Configuration
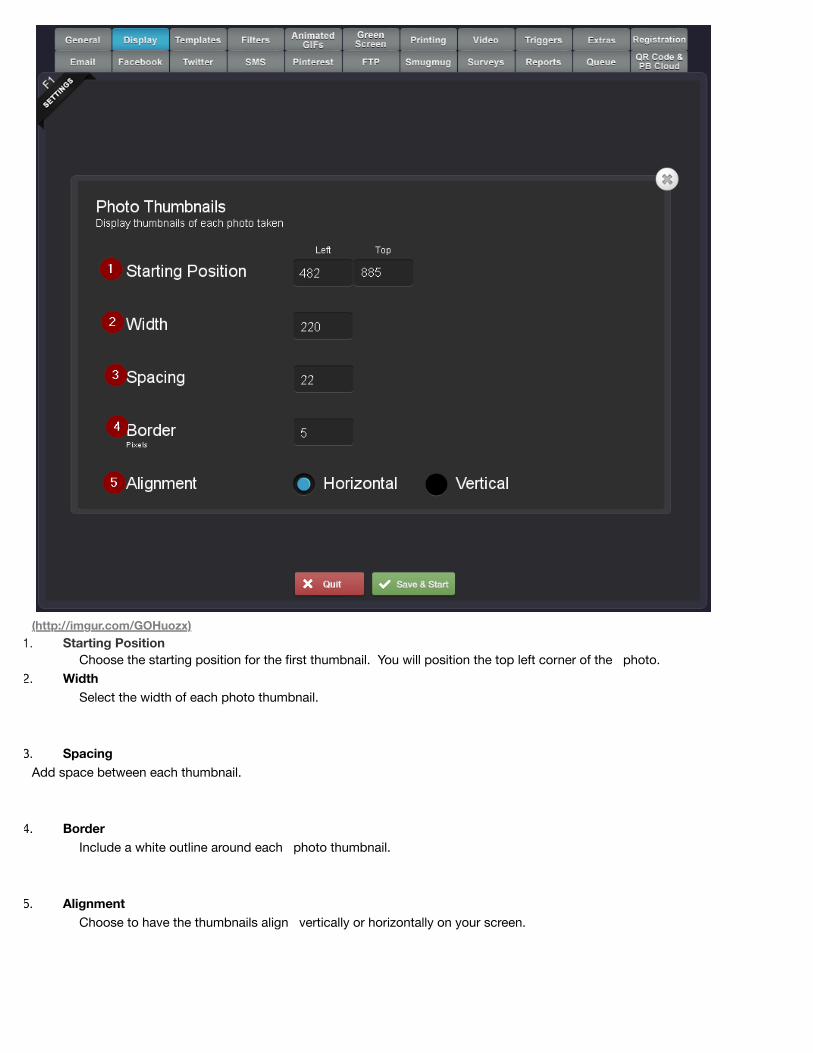
(http://imgur.com/GOHuozx)1. Starting Position
Choose the starting position for the first thumbnail. You will position the top left corner of the photo. 2. Width
Select the width of each photo thumbnail.
3. Spacing
Add space between each thumbnail.
4. Border Include a white outline around each photo thumbnail.
5. Alignment
Choose to have the thumbnails align vertically or horizontally on your screen.