
Smoothwall Certificate Guidance - Schools' Choicethe direct link below. SMOOTHWALL CERTIFICATE Note:...
20
1 Smoothwall Certificate Guidance A Smoothwall certificate must be installed on all devices requiring Internet access. If a Smoothwall certificate is not installed, users will receive an error/warning message similar to the one shown below. The Smoothwall certificate and installation instructions can be accessed from the Smoothwall website. To gain access to the Smoothwall certificate download page, you must a) configure the proxy and port settings on each device, or install and configure the optional IDEX client on each Windows computer, and b) add 10.*;*.gfl.suffolk.org.uk to your Internet settings as a proxy exception. A guide to configuring proxy and port settings and installing and configuring the IDEX client can be accessed from the link below. https://portal.schoolschoice.org/knowledge-base/article-details/KA-02332/en-us To add a proxy exception using Internet Explorer, perform the following steps. 1) Open Internet Explorer and choose Tools (the cog) then Internet options, as shown below.
Transcript of Smoothwall Certificate Guidance - Schools' Choicethe direct link below. SMOOTHWALL CERTIFICATE Note:...

1
Smoothwall Certificate Guidance
A Smoothwall certificate must be installed on all devices requiring Internet access. If a Smoothwall
certificate is not installed, users will receive an error/warning message similar to the one shown
below.
The Smoothwall certificate and installation instructions can be accessed from the Smoothwall
website. To gain access to the Smoothwall certificate download page, you must
a) configure the proxy and port settings on each device, or install and configure the optional
IDEX client on each Windows computer, and
b) add 10.*;*.gfl.suffolk.org.uk to your Internet settings as a proxy exception.
A guide to configuring proxy and port settings and installing and configuring the IDEX client can be
accessed from the link below.
https://portal.schoolschoice.org/knowledge-base/article-details/KA-02332/en-us
To add a proxy exception using Internet Explorer, perform the following steps.
1) Open Internet Explorer and choose Tools (the cog) then Internet options, as shown below.

2
2) Choose the Connections tab at the top, and then click on LAN settings as shown below on the left.
3) Next choose Advanced, as shown above on the right.
4) Add 10.*;*.gfl.suffolk.org.uk as shown above, then click OK.

3
Installing the certificate manually on Windows computers
The following guidance is provided as a supplement to the guidance on the Smoothwall certificate
download page and has been tested on Windows computers using Internet Explorer 11.
Instructions for installing the Smoothwall certificate for other browsers and devices can be found on
the Smoothwall certificate download page, by expanding the appropriate section, as shown below.
If you are having difficulty downloading the certificate on certain devices due to the proxy exception,
you can also download it from the Schools’ Choice website without using the proxy exception from
the direct link below.
SMOOTHWALL CERTIFICATE
Note: the following steps must be performed by a user with Administrative rights, specifically the
user must have permissions to add a certificate to the Trusted Root Certification Authorities store.
1) Browse to the Smoothwall certificate download page as shown above
http://smoothwall.gfl.suffolk.org.uk/getmitm, click DOWNLOAD certificate as shown above,
and save it to a suitable location, as shown below.

4
2) Navigate to the location where you saved the Smoothwall certificate and double-click to
open it. You may be presented with a security warning, as shown above on the right. If so,
click Open.
3) The certificate properties box will be displayed as shown above. Click on Install Certificate
to start the Certificate Import Wizard.

5
4) Click Next.
5) Choose Place all certificates in the following store as shown above, then click Browse.
6
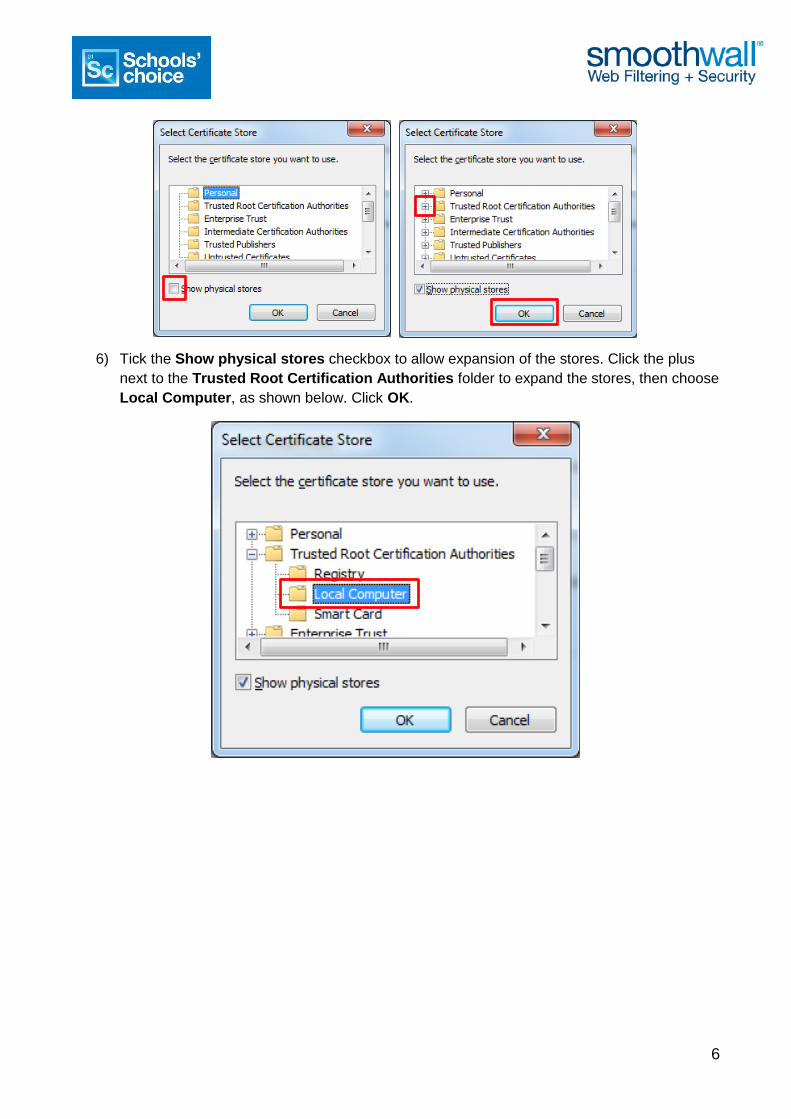
6) Tick the Show physical stores checkbox to allow expansion of the stores. Click the plus
next to the Trusted Root Certification Authorities folder to expand the stores, then choose
Local Computer, as shown below. Click OK.

7
7) Ensure the Certificate store detailed in the Certificate Import Wizard is set to Trusted Root
Certification Authorities\Local Computer as shown above, then click Next. If not, click on
Browse and review the selection, by repeating step 6. If you do not install the certificate in
this certificate store, the Smoothwall Certificate will NOT function correctly.
8) Click Finish.

8
9) You may be prompted by a security warning similar to the one displayed above. Click Yes to
confirm you wish to install the certificate.
10) Click OK to close the Certificate Import Wizard.

9
11) Click OK to close the certificate.
The certificate will now be installed successfully. Please restart your browser.
NOTE: If the Certificate icon has a red cross next to it, the installation has failed even though it is
reported as being successful. The certificate will have been imported but will not be trusted. Please
see the link to the Microsoft article below for further information and potential solutions.
https://technet.microsoft.com/en-us/library/cc754841.aspx#BKMK_addlocal
10
Deploying the Smoothwall certificate to Windows computers via group policy
If your school has a Microsoft Windows Server managing your computer accounts, and if an
appropriate organisational structure in your Active Directory has been configured, you may be able
to deploy the Smoothwall certificate to all Windows computers in your domain using group policy.
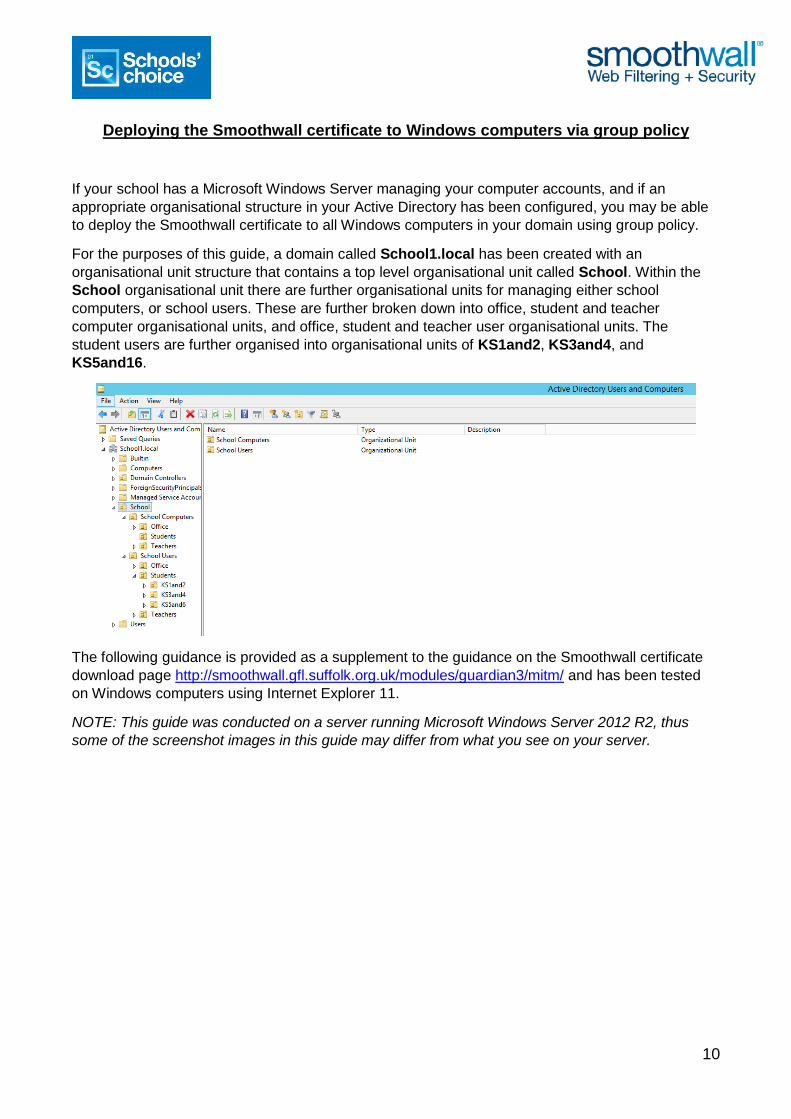
For the purposes of this guide, a domain called School1.local has been created with an
organisational unit structure that contains a top level organisational unit called School. Within the
School organisational unit there are further organisational units for managing either school
computers, or school users. These are further broken down into office, student and teacher
computer organisational units, and office, student and teacher user organisational units. The
student users are further organised into organisational units of KS1and2, KS3and4, and
KS5and16.
The following guidance is provided as a supplement to the guidance on the Smoothwall certificate
download page http://smoothwall.gfl.suffolk.org.uk/modules/guardian3/mitm/ and has been tested
on Windows computers using Internet Explorer 11.
NOTE: This guide was conducted on a server running Microsoft Windows Server 2012 R2, thus
some of the screenshot images in this guide may differ from what you see on your server.

11
1) Browse to the Smoothwall certificate download page as shown above
http://smoothwall.gfl.suffolk.org.uk/getmitm, click DOWNLOAD certificate, and save it to a
suitable location, as shown below.

12
2) Open the Group Management Console on your server. You can search for this if required,
as shown below.
3) The Group Management Console will be displayed, as shown below.

13
4) If required, click the arrow next to the Forest in the left-hand pane, so that it expands as
shown below. Our primary organisational unit is called School, so we’ve selected and
expanded that, so you can see the organisational units beneath.

14
5) As the certificate will be required on all computers, it should be applied to computer
organisational units, rather than user organisational units. In this example, we’ll create a
GPO (Group Policy Object) which will be used to apply the certificate to the School
Computers organisational unit. Right-click the School Computers organisational unit and
choose Create a GPO in this domain, and Link it here…
6) A New GPO box will appear. Type a name for the GPO, for example Smoothwall
Certificate as shown above, then click OK. The new policy will appear under the School
Computers organisational unit as shown below.

15
7) Right-click on the policy and choose Edit, as shown above. This will open the Group Policy
Management Editor, as shown below.

16
8) Under Computer Configuration, expand Windows Settings, Security Settings, Public
Key Policies and choose Trusted Root Certification Authorities, as shown above.
9) Right-click on Trusted Root Certification Authorities and choose Import… as shown
below.

17
10) The Certificate Import Wizard will open as shown above on the left. Click Next to continue,
then click Browse as shown above on the right. Navigate to the location where you saved
the certificate. Select the certificate, as shown below, then click Open.
18
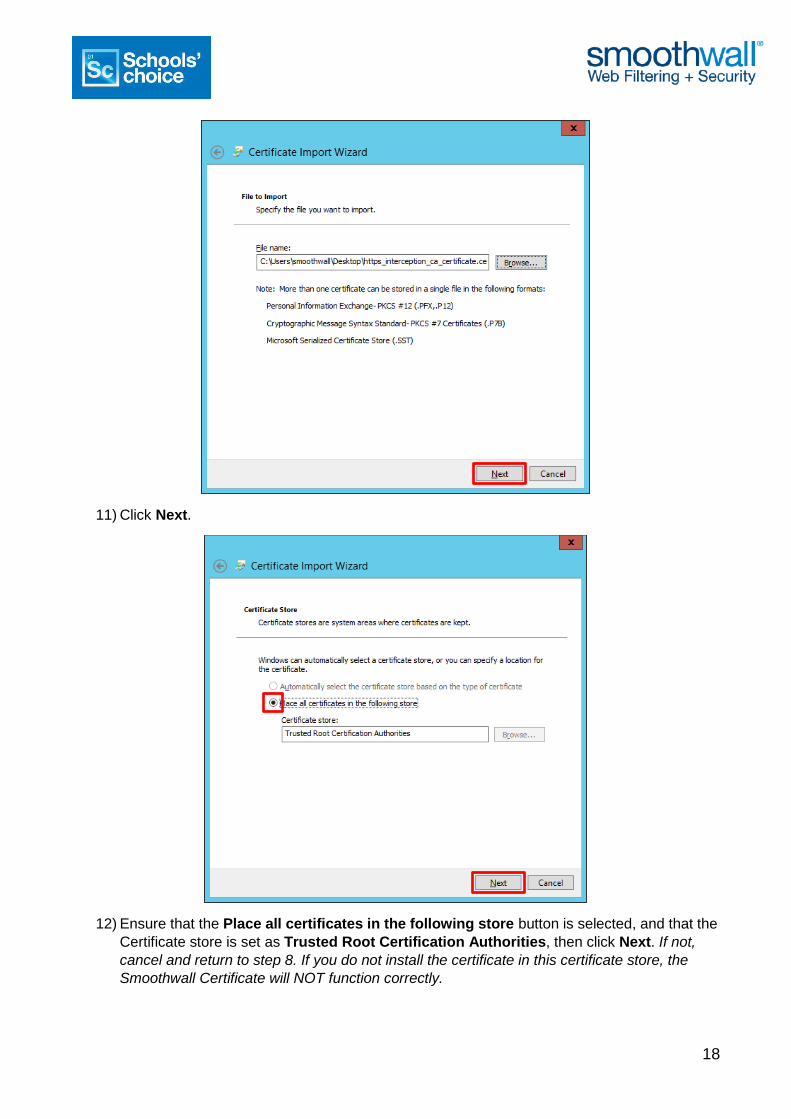
11) Click Next.
12) Ensure that the Place all certificates in the following store button is selected, and that the
Certificate store is set as Trusted Root Certification Authorities, then click Next. If not,
cancel and return to step 8. If you do not install the certificate in this certificate store, the
Smoothwall Certificate will NOT function correctly.

19
13) Click Finish.
14) Click OK to close the Certificate Import Wizard.

20
15) Back at the Group Policy Management Editor screen, you will see that the new policy has
been created and is displayed in the right-hand pane, as shown above. Close the Group
Policy Management Editor.
The certificate will be deployed to all computers in the target organisational units, and any sub-
folder organisational units you have below the target organisational unit. Computers will need to be
rebooted at least twice. Alternatively, you can apply the settings to an individual computer in the
target organisational unit by typing gpupdate /force from a command prompt on that computer,
then rebooting the computer when prompted.


![[MS-CSRA]: Certificate Services Remote Administration Protocol...certificate certificate. certificate. certificate . certificate. ...](https://static.fdocuments.in/doc/165x107/60ba4800192a5238ff710b32/ms-csra-certificate-services-remote-administration-protocol-certificate-certificate.jpg)