
Smooth Operator Blender - Smooth Operator® Blender SMO-56 Español al revés...
24
INSTRUCTION AND RECIPE BOOKLET For your safety and continued enjoyment of this product, always read the instruction book carefully before using. Cuisinart ® Smooth Operator ® Blender SMO-56 Español al revés IB-7737
Transcript of Smooth Operator Blender - Smooth Operator® Blender SMO-56 Español al revés...

INSTRUCTION AND RECIPE BOOKLET
For your safety and continued enjoyment of this product, always read the instruction book carefully before using.
Cuisinart® Smooth Operator® Blender SMO-56
Español al revés
IB-7737

�
IMPORTANT SAFEGUARDSWhen using an electrical appliance, basic safety precautions should always be followed, including the following:
1. READ ALL INSTRUCTIONS BEFORE USING.
2. To protect against the risk of electrical shock, do not put motor base of blender in water or other liquid.
3. Close supervision is necessary when any appliance is used by or near children.
4. Unplug from outlet when not in use, before putting on or taking off parts, and before cleaning or removing contents from blender jar. Never put hands into the blender jar, or insert fingers into dispenser tap hole, or handle the blades with appliance plugged in.
5. Avoid contact with moving parts.
6. Do not operate any appliance with a damaged cord or plug or after the appliance malfunctions, or is dropped or damaged in any manner. Return appliance to nearest Cuisinart service facility for examination, repair, and/or mechanical or electrical adjustment.
7. The use of attachments, including canning or ordinary jars, not recommended or sold by Cuisinart may cause fire, electrical shock, or risk of injury to persons.
8. Do not use outdoors.
9. Do not let cord hang over edge of counter or table or touch hot surfaces.
10. Keep hands and utensils out of jar while blending, to reduce the risk of severe injury to persons or damage to blender itself. A rubber or plastic spatula may be used but must be used only when the blender is turned OFF.
11. When blender is in ON mode, and LED lights are flashing or glowing, do not touch cutting assembly, interfere with blade movement, or remove blender jar cover. Accidentally touching a speed button may activate the blender.
12. BLADES ARE SHARP. HANDLE CAREFULLY.
13. To reduce the risk of injury, never place cutting assembly on base unless the blender jar is properly attached.
14. Always operate blender with the cover in place.
15. Never leave your blender unattended while running.
16. When blending HOT liquids, remove measured pour lid (center piece of cover) to allow steam to escape.
17. Twist on locking ring firmly. Injury can result if moving blades accidentally become exposed.
18. Do not use an extension cord with this unit. Doing so may result in fire, electrical shock, or personal injury.
Regarding your cord set: A longer cord has been provided so that you will have flexibility in positioning your Cuisinart® Smooth Operator® Blender near an electrical outlet. Exercise care when using the longer cord, to avoid entangling or tripping over the cord. The longer cord should be arranged so that it will not drape over the counter or tabletop, where it can be pulled on by children or tripped over. Excess cord should be stored in the cord storage area at the back of the blender base to avoid injury caused by the longer cord.
19. Wash the blender jar, locking ring with cutting assembly, dispenser tap, dispenser plug and cover before first use.
20. WARNING: TO REDUCE THE RISK OF ELECTRICAL SHOCK OR FIRE, DO NOT REMOVE THE BASE PANEL. NO USER SERVICEABLE PARTS ARE INSIDE. REPAIR SHOULD BE DONE ONLY BY AUTHORIZED PERSONNEL.
21. Always operate the blender with the dispenser tap or dispenser plug in place.
22. Never place blade assembly on base unless assembled to jar.
SAVE THESE INSTRUCTIONSFOR HOUSEHOLD USE ONLYNOTICEThis appliance has a polarized plug (one prong is wider than the other).
To reduce the risk of electric shock, this plug will fit into a polarized outlet only one way. If the plug does not fit fully into the outlet, reverse the plug.
If it still does not fit, contact a qualified electrician. Do not modify the plug in any way.
Note: Blades are sharp... handle carefully.
1.
2.
3.
6.
8a.
8b.9.10.
�
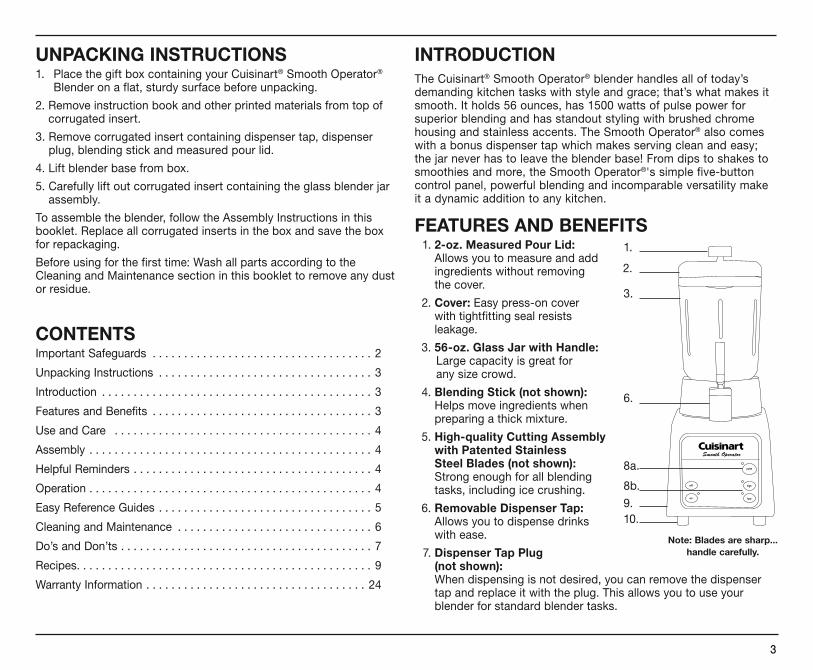
UNPACKING INSTRUCTIONS1. Place the gift box containing your Cuisinart® Smooth Operator®
Blender on a flat, sturdy surface before unpacking.
2. Remove instruction book and other printed materials from top of corrugated insert.
3. Remove corrugated insert containing dispenser tap, dispenser plug, blending stick and measured pour lid.
4. Lift blender base from box.
5. Carefully lift out corrugated insert containing the glass blender jar assembly.
To assemble the blender, follow the Assembly Instructions in this booklet. Replace all corrugated inserts in the box and save the box for repackaging.
Before using for the first time: Wash all parts according to the Cleaning and Maintenance section in this booklet to remove any dust or residue.
CONTENTSImportant Safeguards . . . . . . . . . . . . . . . . . . . . . . . . . . . . . . . . . . . 2
Unpacking Instructions . . . . . . . . . . . . . . . . . . . . . . . . . . . . . . . . . . 3
Introduction . . . . . . . . . . . . . . . . . . . . . . . . . . . . . . . . . . . . . . . . . . . 3
Features and Benefits . . . . . . . . . . . . . . . . . . . . . . . . . . . . . . . . . . . 3
Use and Care . . . . . . . . . . . . . . . . . . . . . . . . . . . . . . . . . . . . . . . . . 4
Assembly . . . . . . . . . . . . . . . . . . . . . . . . . . . . . . . . . . . . . . . . . . . . . 4
Helpful Reminders . . . . . . . . . . . . . . . . . . . . . . . . . . . . . . . . . . . . . . 4
Operation . . . . . . . . . . . . . . . . . . . . . . . . . . . . . . . . . . . . . . . . . . . . . 4
Easy Reference Guides . . . . . . . . . . . . . . . . . . . . . . . . . . . . . . . . . . 5
Cleaning and Maintenance . . . . . . . . . . . . . . . . . . . . . . . . . . . . . . . 6
Do’s and Don’ts . . . . . . . . . . . . . . . . . . . . . . . . . . . . . . . . . . . . . . . . 7
Recipes. . . . . . . . . . . . . . . . . . . . . . . . . . . . . . . . . . . . . . . . . . . . . . . 9
Warranty Information . . . . . . . . . . . . . . . . . . . . . . . . . . . . . . . . . . . 24
INTRODUCTIONThe Cuisinart® Smooth Operator® blender handles all of today’s demanding kitchen tasks with style and grace; that’s what makes it smooth. It holds 56 ounces, has 1500 watts of pulse power for superior blending and has standout styling with brushed chrome housing and stainless accents. The Smooth Operator® also comes with a bonus dispenser tap which makes serving clean and easy; the jar never has to leave the blender base! From dips to shakes to smoothies and more, the Smooth Operator®'s simple five-button control panel, powerful blending and incomparable versatility make it a dynamic addition to any kitchen.
FEATURES AND BENEFITS 1. 2-oz. Measured Pour Lid:
Allows you to measure and add ingredients without removing the cover.
2. Cover: Easy press-on cover with tightfitting seal resists leakage.
3. 56-oz. Glass Jar with Handle: Large capacity is great for any size crowd.
4. Blending Stick (not shown): Helps move ingredients when preparing a thick mixture.
5. High-quality Cutting Assembly with Patented Stainless Steel Blades (not shown): Strong enough for all blending tasks, including ice crushing.
6. Removable Dispenser Tap: Allows you to dispense drinks with ease.
7. Dispenser Tap Plug (not shown): When dispensing is not desired, you can remove the dispenser tap and replace it with the plug. This allows you to use your blender for standard blender tasks.

(c)
(b)
(a)
�
8. Push-button Controls:
a. On/Off Buttons.
b. High and Low Buttons: Choose High or Low speed to blend the ingredients to the desired consistency. Red LED lights will indicate which speed you are using.
c. Pulse Button: Allows you to pulse at High to Low speeds, so you can blend ingredients only as much as needed.
9. Heavy-duty Motor Base: It is so sturdy and stable, it will not “walk” on your counter.
10. Slip-proof Feet: Prevent movement during use and damaging marks on counter tops or tables.
11. Cord Storage: (not shown) Keeps countertops safe and neat, conveniently storing excess cord.
USE AND CAREASSEMBLY
To use your Cuisinart® Smooth Operator® Blender, begin by assembling the blender jar.
1. Turn the blender jar (a) upside down, and place it flat on a sturdy surface.
2. Position the rubber gasket (b) on the round opening on the bottom of the blender jar.
3. Turn the locking ring with cutting assembly (c) upside down, and place the blade end in the blender jar opening. Engage threads by twisting the locking ring clockwise until tightened. Make sure locking ring is tightly fastened to blender jar. Once assembled, turn the blender jar right-side up.
Note: Blades are sharp... handle carefully.
4. Push the cover onto the top of the blender jar. Twist the measured pour lid into the cover, or place the blending stick into the cover.
5. Place the blender jar on the motor base so that the handle is positioned to the back of the blender.
6. Screw the dispenser tap or dispenser plug onto the front of the locking ring.
7. Plug in power cord. Your blender is now ready to be used.
Helpful reminders
• Once the cover is in position, additional ingredients can be added during blending by simply lifting the measured pour lid, adding ingredients, and replacing the measured pour lid.
• Cover should always be in place while the unit is on.
• Warning: Do not place blender jar onto base while motor is running.
• Do not twist locking ring from blender jar when removing blender jar from base. Simply lift blender jar from motor base.
• Boiling liquid or solid frozen foods (with the exception of ice cubes or 1⁄2 inch [1.3 cm] pieces of frozen fruit) should never be placed in the blender jar.
• Do not place ice, frozen foods or very cold liquids into a blender jar which has come directly from a hot dishwasher.
• Do not place very hot liquids or foods into a blender jar which has come directly from the freezer. Boiling liquids should cool for 5 minutes before being placed in blender jar.
• Follow Cleaning and Maintenance instructions in this booklet prior to your first use.
OPERATION 1. Place the motor base of your Cuisinart® Smooth Operator®
Blender on a flat, sturdy surface. It is important that the surface be clean and dry. Assemble the blender by following the assembly instructions. Once the jar is assembled and is in position on the motor base, plug the Cuisinart® Smooth Operator® Blender into an electrical outlet.
2. Add all necessary ingredients to the blender jar, and replace the cover. You may use the blending stick or measured pour lid when blending. The blending stick helps to keep frozen ingredients moving without having to remove the lid. You may add more ingredients by lifting the measured pour lid or blending stick and dropping ingredients through the fill area. Replace the measured
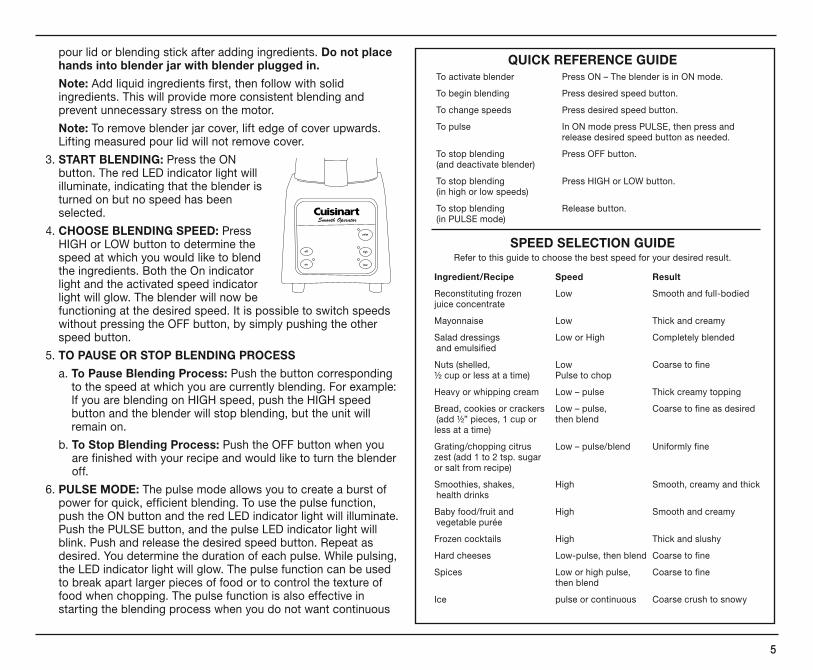
QUICK REFERENCE GUIDE To activate blender Press ON – The blender is in ON mode.
To begin blending Press desired speed button.
To change speeds Press desired speed button.
To pulse In ON mode press PULSE, then press and release desired speed button as needed.
To stop blending Press OFF button. (and deactivate blender)
To stop blending Press HIGH or LOW button. (in high or low speeds)
To stop blending Release button. (in PULSE mode)
SPEED SELECTION GUIDERefer to this guide to choose the best speed for your desired result.
Ingredient/Recipe Speed Result
Reconstituting frozen Low Smooth and full-bodied juice concentrate
Mayonnaise Low Thick and creamy
Salad dressings Low or High Completely blended and emulsified
Nuts (shelled, Low Coarse to fine ½ cup or less at a time) Pulse to chop
Heavy or whipping cream Low – pulse Thick creamy topping
Bread, cookies or crackers Low – pulse, Coarse to fine as desired (add ½” pieces, 1 cup or then blend less at a time)
Grating/chopping citrus Low – pulse/blend Uniformly fine zest (add 1 to 2 tsp. sugar or salt from recipe)
Smoothies, shakes, High Smooth, creamy and thick health drinks
Baby food/fruit and High Smooth and creamy vegetable purée
Frozen cocktails High Thick and slushy
Hard cheeses Low-pulse, then blend Coarse to fine
Spices Low or high pulse, Coarse to fine then blend
Ice pulse or continuous Coarse crush to snowy
�
pour lid or blending stick after adding ingredients. Do not place hands into blender jar with blender plugged in.
Note: Add liquid ingredients first, then follow with solid ingredients. This will provide more consistent blending and prevent unnecessary stress on the motor.
Note: To remove blender jar cover, lift edge of cover upwards. Lifting measured pour lid will not remove cover.
3. START BLENDING: Press the ON button. The red LED indicator light will illuminate, indicating that the blender is turned on but no speed has been selected.
4. CHOOSE BLENDING SPEED: Press HIGH or LOW button to determine the speed at which you would like to blend the ingredients. Both the On indicator light and the activated speed indicator light will glow. The blender will now be functioning at the desired speed. It is possible to switch speeds without pressing the OFF button, by simply pushing the other speed button.
5. TO PAUSE OR STOP BLENDING PROCESS
a. To Pause Blending Process: Push the button corresponding to the speed at which you are currently blending. For example: If you are blending on HIGH speed, push the HIGH speed button and the blender will stop blending, but the unit will remain on.
b. To Stop Blending Process: Push the OFF button when you are finished with your recipe and would like to turn the blender off.
6. PULSE MODE: The pulse mode allows you to create a burst of power for quick, efficient blending. To use the pulse function, push the ON button and the red LED indicator light will illuminate. Push the PULSE button, and the pulse LED indicator light will blink. Push and release the desired speed button. Repeat as desired. You determine the duration of each pulse. While pulsing, the LED indicator light will glow. The pulse function can be used to break apart larger pieces of food or to control the texture of food when chopping. The pulse function is also effective in starting the blending process when you do not want continuous

Dispenser Lever
Cap
Stopper Pin Hook
Dispenser Body
Stopper
�
power, or when processing items that do not require an extended amount of blending.
7. TO DISLODGE FOOD: Use a rubber or plastic spatula to help remove food lodged around the cutting assembly. Do not use spatula until you have turned the blender off. Replace the cover and measured pour lid and continue blending, if necessary. Make sure spatula is not inside the blender jar before blending.
8. USING DISPENSER TAP: Place cup or pitcher under the dispenser spout. Turn blender on and then press LOW – pull down the dispenser tap and stir contents with blending stick as ingredients are dispensing. If there is difficulty with dispensing, try dispensing on HIGH.
Note: It is highly recommended NOT to dispense hot ingredients through the dispenser tap.
9. WHEN FINISHED BLENDING: Press the Off button and unplug the blender from the electrical outlet. Never remove the blender jar from the motor base until the blender is off. Do not twist locking ring from blender jar when removing jar from motor base. Simply lift blender jar from motor base. Do not place hands into blender jar with blender plugged in.
CLEANING AND MAINTENANCEAlways unplug your Cuisinart® Smooth Operator® Blender from the electrical outlet before cleaning. The blender is made of corrosion-resistant parts which are easy to clean. Before first use and after every use, clean each part thoroughly. Periodically check all parts before reassembly. If any part is damaged or blender jar is chipped or cracked, DO NOT USE BLENDER.
Remove the blender jar from the motor base by lifting straight up and away. Twist off the locking ring with cutting assembly by turning counterclockwise.
Remove the rubber gasket. Wash in warm soapy water, rinse, and dry thoroughly.
Place the locking ring in the upper rack of the dishwasher or wash in warm water. Disassemble dispenser tap from locking ring (see diagram and instructions at right).
CAUTION: Handle the locking ring with cutting assembly carefully. It is SHARP and may cause injury. Do not attempt to remove blades from locking ring.
Remove the blender jar cover and the measured pour lid or blending stick. Wash in warm, soapy water; rinse and dry thoroughly, or place in upper rack of dishwasher. The blender jar must be washed in warm, soapy water and rinsed and dried thoroughly. The blender jar can also be placed upside down in the dishwasher, and the dispenser tap and the plug can be washed in the top rack of the dishwasher.
Finally, wipe the motor base clean with a damp cloth to remove any residue, and dry thoroughly. Never submerge the motor base in water or other liquid, or place in a dishwasher.
Tip: You may wish to clean your blender cutting assembly as follows: Squirt a small amount of dishwashing liquid into assembled blender jar and fill halfway with warm water. Run on LOW for 15 seconds. Repeat, using clean tap water. Empty blender jar and carefully disassemble parts. Wash locking ring with cutting assembly and gasket in warm, soapy water. Rinse and dry all parts thoroughly.
CLEANING DISPENSER TAPTo disassemble dispenser tap for cleaning:
1. Remove the dispenser tap from the locking ring by unscrewing the entire dispenser tap counterclockwise.
2. Remove the cap from the dispenser body by unscrewing it counterclockwise.
3. Squeeze cap and stopper together and slide the lever off the stopper pin.
4. Remove the cap from stopper and stopper pin. The stopper, pin and spring are tightly fitted. Do not separate.
5. Clean all parts in warm soapy water, dry thoroughly and reassemble in the order shown.
To assemble the dispenser tap after cleaning:
1. Make sure all parts are dry.
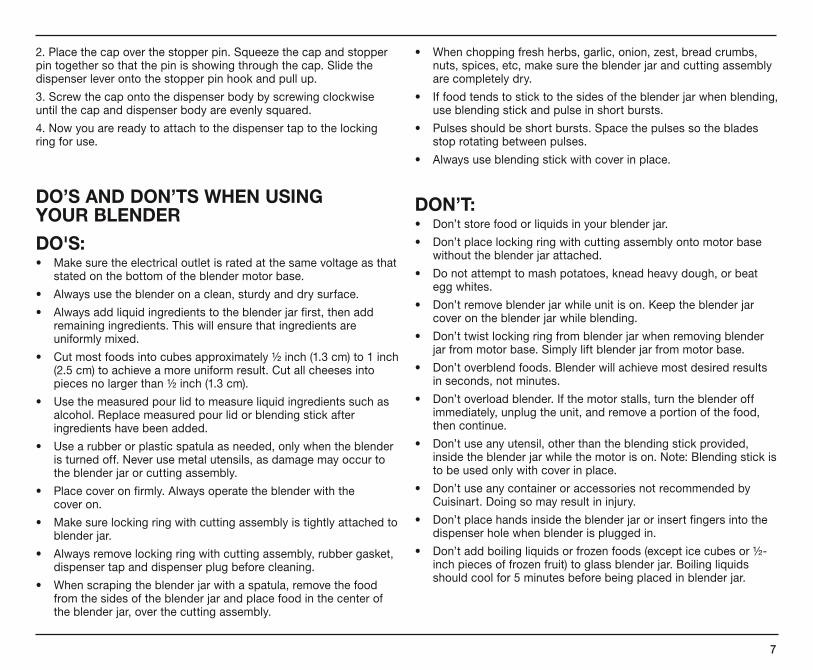
�
2. Place the cap over the stopper pin. Squeeze the cap and stopper pin together so that the pin is showing through the cap. Slide the dispenser lever onto the stopper pin hook and pull up.
3. Screw the cap onto the dispenser body by screwing clockwise until the cap and dispenser body are evenly squared.
4. Now you are ready to attach to the dispenser tap to the locking ring for use.
DO’S AND DON’TS WHEN USING YOUR BLENDER
DO'S:• Make sure the electrical outlet is rated at the same voltage as that
stated on the bottom of the blender motor base.
• Always use the blender on a clean, sturdy and dry surface.
• Always add liquid ingredients to the blender jar first, then add remaining ingredients. This will ensure that ingredients are uniformly mixed.
• Cut most foods into cubes approximately ½ inch (1.3 cm) to 1 inch (2.5 cm) to achieve a more uniform result. Cut all cheeses into pieces no larger than ½ inch (1.3 cm).
• Use the measured pour lid to measure liquid ingredients such as alcohol. Replace measured pour lid or blending stick after ingredients have been added.
• Use a rubber or plastic spatula as needed, only when the blender is turned off. Never use metal utensils, as damage may occur to the blender jar or cutting assembly.
• Place cover on firmly. Always operate the blender with the cover on.
• Make sure locking ring with cutting assembly is tightly attached to blender jar.
• Always remove locking ring with cutting assembly, rubber gasket, dispenser tap and dispenser plug before cleaning.
• When scraping the blender jar with a spatula, remove the food from the sides of the blender jar and place food in the center of the blender jar, over the cutting assembly.
• When chopping fresh herbs, garlic, onion, zest, bread crumbs, nuts, spices, etc, make sure the blender jar and cutting assembly are completely dry.
• If food tends to stick to the sides of the blender jar when blending, use blending stick and pulse in short bursts.
• Pulses should be short bursts. Space the pulses so the blades stop rotating between pulses.
• Always use blending stick with cover in place.
DON’T: • Don’t store food or liquids in your blender jar.
• Don’t place locking ring with cutting assembly onto motor base without the blender jar attached.
• Do not attempt to mash potatoes, knead heavy dough, or beat egg whites.
• Don’t remove blender jar while unit is on. Keep the blender jar cover on the blender jar while blending.
• Don’t twist locking ring from blender jar when removing blender jar from motor base. Simply lift blender jar from motor base.
• Don’t overblend foods. Blender will achieve most desired results in seconds, not minutes.
• Don’t overload blender. If the motor stalls, turn the blender off immediately, unplug the unit, and remove a portion of the food, then continue.
• Don’t use any utensil, other than the blending stick provided, inside the blender jar while the motor is on. Note: Blending stick is to be used only with cover in place.
• Don’t use any container or accessories not recommended by Cuisinart. Doing so may result in injury.
• Don’t place hands inside the blender jar or insert fingers into the dispenser hole when blender is plugged in.
• Don’t add boiling liquids or frozen foods (except ice cubes or ½-inch pieces of frozen fruit) to glass blender jar. Boiling liquids should cool for 5 minutes before being placed in blender jar.

�
RECIPE TIPSThe simple recipes that follow include some Cuisinart favorites as well as some creative combinations that are sure to please your friends and family. Thanks to the superior ice crushing power of the Smooth Operator® Blender, you’ll also be able to make delicious frozen drinks.
Chopping Nuts: Place ½ cup shelled nuts in the blender jar and cover blender. Set on low and pulse until desired chop is achieved. Pulse fewer times for coarsely chopped nuts. For best results process small amounts, ½ cup or less.
Bread, Cookie or Cracker Crumbs: Break or cut bread, cookies or crackers into pieces 1⁄2-inch or less in size. For best bread results, use day-old bread (drier bread works best). Place bread, cookie or cracker pieces in blender jar. Set on low or high and pulse to chop, then blend continuously until desired texture of crumbs is achieved. For best results, process 1 cup or less at a time.
Crushing Ice: Add up to 10 standard ice cubes to the blender jar. Cover. Press the Pulse button, then press the high button, using short bursts,10 times, or until cubes are the consistency of snow. Turn blender off. Pulse fewer times if coarsely chopped ice is desired.
Grating Fresh Citrus Zest: For best results, blender jar and cutting assembly must be clean and dry. Remove zest from fruit in strips, using a vegetable peeler; use a sharp knife to remove the bitter white pith from the underside of the zest. Cut strips in
half. Process no more than 8 strips at a time (zest of 1 medium lemon). Add strips and 1 teaspoon sugar or coarse salt (from recipe) to the blender jar. Cover blender jar. Set on low; blend for 15 to 20 seconds. Turn blender off.
Baby Food: Combine ½ cup cooked vegetables, fruit or meat with 3 to 4 tablespoons liquid (water, milk, fruit juice, broth, or cooking liquid) in the blender jar. Set on Low or High. Blend for 15 to 20 seconds until a smooth purée is reached.Add more liquid as necessary and process further until desired texture is reached. For “junior” type foods, set on high and use the pulse function. Always consult with your pediatrician/family physician concerning the best foods for your baby and when to introduce new foods to his/her diet.
Grinding Hard Cheese: Cut cheese into ½-inch pieces; remove all outer hard rind. Place cheese in blender jar. Set on low. Pulse to chop cheese, 10 to 12 times, then blend until desired grind is reached. For best results, grind no more than 3 ounces of cheese at a time.
Grinding Spices: For best results, blender jar and cutting assembly must be clean and dry. Add ¼ to ½ cup of spices/seeds/peppercorns to blender jar. Set on low or high; pulse to break up, then blend for 20 to 40 seconds. Turn blender off.
Whipping Cream: If possible, chill blender jar and cutting assembly in refrigerator for 15 minutes. Add 1 cup heavy or whipping cream to blender jar. Cover jar. Set on low and pulse (1-second pulses) 20 to 30 times until cream is thickened. (Do not overblend – bits of butter will begin to form.) If
desired, add 1 tablespoon sugar and 1 to 2 teaspoons of vanilla or other flavoring. Consistency with be that of a thickened but not fluffy whipped cream and is most appropriate for topping desserts or coffee drinks.
Puréeing Hot Mixtures: When using the blender to purée hot mixtures such as creamed soups and baby foods, strain the solids from the liquid, reserving the cooking liquid. Allow hot foods to cool slightly before blending to prevent steam buildup, which may cause the lid to lift up from the blender jar. Place the cooked solids in the blender jar along with ½ to 1 cup of the reserved cooking liquid. Pulse to chop, then blend until desired consistency/purée is reached.
NOTE: It is highly recommended NOT to dispense hot ingredients through the dispenser tap.
Keep ice cubes made of juices, yogurt, milk or fruit purées on hand, and use instead of plain ice when making smoothies and frosty beverages, to prevent diluting the drink.
For quick cleaning, add 1 cup of warm water and a drop of liquid dishwashing soap to the blender jar. Cover and blend on low or high for 30 seconds or more as needed. Discard the soapy water and rinse blender thoroughly before the next use. Keep your blender out on the counter within easy reach and you will be surprised how often you will use it.

�
RECIPES
SMOOTHIES, SHAKES, FRAPPéS, FROZEN BEVERAGES
Fresh Fruit SmoothieLayers of fresh fruit blend in just seconds
to make this all-fruit smoothie.
Makes six 8-ounce servings
½ cup orange juice1 cup cantaloupe, cut into 1-inch pieces1 cup raspberries (fresh or frozen)¾ cup pineapple chunks, cut into 1-inch pieces (fresh or canned, drained)1 cup navel orange segments, cut into 1-inch pieces1 cup strawberries, hulled and halved¾ cup mango chunks, cut into 1-inch
pieces1 medium banana, cut into ½-inch slices1 cup ice cubes (about 6 standard)
Attach the dispenser tap to the blender collar. Layer the ingredients in the blender jar in the order listed. Place cover with blending stick on the blender jar. Press On. Turn blender on high and process for 25 to 30 seconds until smooth. Press Off once it is smooth, if not dispensing immediately.
To dispense smoothie: With blender on high, place a cup or pitcher under the
dispenser tap. Pull down the dispenser tap and stir contents with the blending stick as smoothie is dispensing.
Note: The riper the fruit, the sweeter the smoothie.
Nutritional information per serving: Calories 101 (4% from fat) • carb. 25g • pro. 2g • fat 0g • sat. fat 0g • chol. 0mg • sod. 10mg
• calc. 35mg • fiber 4g
Taste of the Tropics Smoothie
Makes 5 cups
2 cups pineapple (fresh or frozen), cut into 1-inch pieces1 mango, cut into cubes
(about 1 to 1½ cups)1 cup frozen papaya1 frozen banana, cut into 1-inch pieces2 cups orange/peach/mango juice blend5 ounces dark rum (optional)
Attach the dispenser tap to the blender collar.
Place ingredients in blender jar in order listed. Place cover with blending stick on the blender jar. Press On. Turn blender on high and process for 25 to 30 seconds until smooth. Press Off once it is smooth, if not dispensing immediately.
To dispense smoothie: With blender on high, place a cup or pitcher under the dispenser tap. Pull down the dispenser tap and stir contents with the blending stick as smoothie is dispensing.
Nutritional information per ½-cup serving: Calories 70 (4% from fat) • carb. 17g • pro. 1g • fat 0g • sat. fat 0g • chol. 0mg • sod. 2mg
• calc. 14mg • fiber 1g
Mocha Banana SmoothieMakes 4 cups
2 frozen bananas, cut into 1-inch pieces6 ounces lowfat coffee yogurt3 tablespoons chocolate syrup½ teaspoon espresso powder1 cup vanilla soymilk6-8 ice cubes
Attach the dispenser tap to the blender collar.
Place ingredients in blender jar in order listed. Place cover with blending stick on the blender jar. Press On. Turn blender on high and process for 25 to 30 seconds until smooth. Press Off once it is smooth, if not dispensing immediately.
To dispense smoothie: With blender on high, place a cup or pitcher under the dispenser tap. Pull down the dispenser tap and stir contents with the blending stick as smoothie is dispensing.
Nutritional information per 1⁄2-cup serving: Calories 70 (12% from fat) • carb. 14g • pro. 2g • fat 1g • sat. fat 0g • chol. 1mg • sod. 25mg
• calc. 41mg • fiber 1g
10
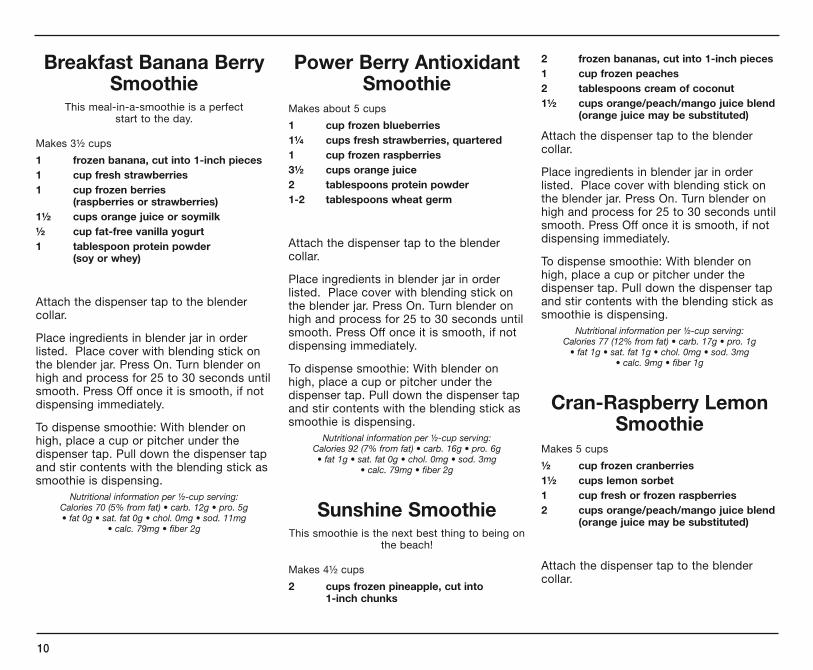
Breakfast Banana Berry Smoothie
This meal-in-a-smoothie is a perfect start to the day.
Makes 3½ cups
1 frozen banana, cut into 1-inch pieces1 cup fresh strawberries1 cup frozen berries (raspberries or strawberries)1½ cups orange juice or soymilk½ cup fat-free vanilla yogurt 1 tablespoon protein powder (soy or whey)
Attach the dispenser tap to the blender collar.
Place ingredients in blender jar in order listed. Place cover with blending stick on the blender jar. Press On. Turn blender on high and process for 25 to 30 seconds until smooth. Press Off once it is smooth, if not dispensing immediately.
To dispense smoothie: With blender on high, place a cup or pitcher under the dispenser tap. Pull down the dispenser tap and stir contents with the blending stick as smoothie is dispensing.
Nutritional information per ½-cup serving: Calories 70 (5% from fat) • carb. 12g • pro. 5g • fat 0g • sat. fat 0g • chol. 0mg • sod. 11mg
• calc. 79mg • fiber 2g
Power Berry Antioxidant Smoothie
Makes about 5 cups
1 cup frozen blueberries1¼ cups fresh strawberries, quartered1 cup frozen raspberries3½ cups orange juice2 tablespoons protein powder1-2 tablespoons wheat germ
Attach the dispenser tap to the blender collar.
Place ingredients in blender jar in order listed. Place cover with blending stick on the blender jar. Press On. Turn blender on high and process for 25 to 30 seconds until smooth. Press Off once it is smooth, if not dispensing immediately.
To dispense smoothie: With blender on high, place a cup or pitcher under the dispenser tap. Pull down the dispenser tap and stir contents with the blending stick as smoothie is dispensing.
Nutritional information per ½-cup serving: Calories 92 (7% from fat) • carb. 16g • pro. 6g • fat 1g • sat. fat 0g • chol. 0mg • sod. 3mg
• calc. 79mg • fiber 2g
Sunshine SmoothieThis smoothie is the next best thing to being on
the beach!
Makes 4½ cups
2 cups frozen pineapple, cut into 1-inch chunks
2 frozen bananas, cut into 1-inch pieces1 cup frozen peaches2 tablespoons cream of coconut1½ cups orange/peach/mango juice blend
(orange juice may be substituted)
Attach the dispenser tap to the blender collar.
Place ingredients in blender jar in order listed. Place cover with blending stick on the blender jar. Press On. Turn blender on high and process for 25 to 30 seconds until smooth. Press Off once it is smooth, if not dispensing immediately.
To dispense smoothie: With blender on high, place a cup or pitcher under the dispenser tap. Pull down the dispenser tap and stir contents with the blending stick as smoothie is dispensing.
Nutritional information per ½-cup serving: Calories 77 (12% from fat) • carb. 17g • pro. 1g
• fat 1g • sat. fat 1g • chol. 0mg • sod. 3mg • calc. 9mg • fiber 1g
Cran-Raspberry Lemon Smoothie
Makes 5 cups
½ cup frozen cranberries1½ cups lemon sorbet1 cup fresh or frozen raspberries2 cups orange/peach/mango juice blend (orange juice may be substituted)
Attach the dispenser tap to the blender collar.

11
Place ingredients in blender jar in order listed. Place cover with blending stick on the blender jar. Press On. Turn blender on high and process for 25 to 30 seconds until smooth. Press Off once it is smooth, if not dispensing immediately.
To dispense smoothie: With blender on high, place a cup or pitcher under the dispenser tap. Pull down the dispenser tap and stir contents with the blending stick as smoothie is dispensing.
Note: This smoothie is on the tart side. If you prefer a sweeter smoothie, just add a tablespoon or two of sugar.
Nutritional information per ½-cup serving: Calories 85 (1% from fat) • carb. 21g • pro. 1g • fat 0g • sat. fat 0g • chol. 0mg • sod. 3mg
• calc. 12mg • fiber 1g
Watermelon Strawberry Cooler
This cooler makes a sweet, refreshing treat.
Makes 4 cups
1½ cups strawberry sorbet, softened2 tablespoons fresh lime juice4 cups fresh watermelon, cut into cubes
Attach the dispenser tap to the blender collar.
Place ingredients in blender jar in order listed. Place cover with blending stick on the blender jar. Press On. Turn blender on high and process for 25 to 30 seconds until smooth. Press Off once it is smooth, if not dispensing immediately.
To dispense cooler: With blender on low, place a cup or pitcher under the dispenser tap. Pull down the dispenser tap and stir contents with the blending stick as cooler is dispensing.
Nutritional information per ½-cup serving: Calories 68 (5% from fat) • carb. 17g • pro. 1g • fat 0g • sat. fat 0g • chol. 0mg • sod. 6mg
• calc. 10mg • fiber 1g
Cucumber Melon Agua Fresca
The ultimate refreshing drink on a hot summer day.
Makes 4½ cups
2½ cups cucumber, peeled, seeded and chopped1½ cups honeydew melon, cut into cubes2 tablespoons lime juice2 tablespoons fresh mint, roughly chopped1 ½-inch piece fresh ginger, peeled and chopped½ cup apple juice½ cup water8 ice cubes
Attach the dispenser tap to the blender collar.
Place ingredients in blender jar in order listed. Place cover with blending stick on the blender jar. Press On. Turn blender on high and process for 25 to 30 seconds until smooth. Press Off once it is smooth, if not dispensing immediately.
To dispense: With blender on high, place a cup or pitcher under the dispenser tap. Pull
down the dispenser tap and stir contents with the blending stick as drink is dispensing.
Nutritional information per ½-cup serving: Calories 25 (4% from fat) • carb. 6g • pro.1g • fat 0g • sat. fat 0g • chol. 0mg • sod. 7mg
• calc. 14mg • fiber 1g
Frozen Rum PunchMakes 5 cups
1 cup frozen pineapple, pre-cut chunks1 cup canned pineapple in juice1 cup mango sorbet¾ cup rum1½ tablespoons grenadine¼ cup lime juice (approximately 4 limes)8 ice cubes
Attach the dispenser tap to the blender collar.
Place ingredients in blender jar in order listed. Place cover with blending stick on the blender jar. Press On. Turn blender on high and process for 25 to 30 seconds until smooth. Press Off once it is smooth, if not dispensing immediately.
To dispense punch: With blender on high, place a cup or pitcher under the dispenser tap. Pull down the dispenser tap and stir contents with the blending stick as punch is dispensing.
Nutritional information per ½-cup serving: Calories 91 (1% from fat) • carb. 14g • pro. 0g • fat 0g • sat. fat 0g • chol. 0mg • sod. 4mg
• calc. 7mg • fiber 1g
1�
Campari Grapefruit Slushy
Once you acquire a taste for this slightly bitter beverage, it will become a favorite flavor.
Makes about 6 cups
6 pink grapefruits, cut into sections, reserved with juices½ cup Campari®
¼ cup Grand Marnier®
6 ice cubes
Attach the dispenser tap to the blender collar.
Place ingredients in blender jar in order listed. Place cover with blending stick on the blender jar. Press On. Turn blender on high and process for 25 to 30 seconds until smooth. Press Off once it is smooth, if not dispensing immediately.
To dispense slushy: With blender on high, place a cup or pitcher under the dispenser tap. Pull down the dispenser tap and stir contents with the blending stick as slushy is dispensing.
Nutritional information per ½-cup serving: Calories 73 (1% from fat) • carb. 11g • pro. 0g • fat 0g • sat. fat 0g • chol. 0mg • sod. 1mg
• calc. 9mg • fiber 1g
Peach Raspberry Grand Margarita
Makes 3½ cups
2 cups frozen peaches¾ cup frozen raspberries1 cup raspberry or peach sorbet¼ cup Grand Marnier®
½ cup tequila2 tablespoons fresh lime juice½ cup orange juice
Attach the dispenser tap to the blender collar.
Place ingredients in blender jar in order listed. Place cover with blending stick on the blender jar. Press On. Turn blender on high and process for 25 to 30 seconds until smooth. Press Off once it is smooth, if not dispensing immediately.
To dispense: With blender on high, place a cup or pitcher under the dispenser tap. Pull down the dispenser tap and stir contents with the blending stick as drink is dispensing.
Nutritional information per ½-cup serving: Calories 144 (0% from fat) • carb. 21g • pro. 1g
• fat 0g • sat. fat 0g • chol. 0mg • sod. 2mg • calc. 8mg • fiber 2g
Mocha MudslideMakes 5 cups
2 cups coffee ice cream2 cups chocolate ice cream1 cup reduced fat milk¼ cup Kahlúa®
¼ cup vodka2 tablespoons Irish cream liqueur (optional)
Attach the dispenser tap to the blender collar.
Place ingredients in blender jar in order listed. Place cover with blending stick on
the blender jar. Press On. Turn blender on high and process for 25 to 30 seconds until smooth. Press Off once it is smooth if not dispensing immediately.
To dispense: With blender on high, place a cup or pitcher under the dispenser tap. Pull down the dispenser tap and stir contents with the blending stick as drink is dispensing.
Nutritional information per ½-cup serving: Calories 211 (45% from fat) • carb. 17g • pro. 4g • fat 11g • sat. fat 7g • chol. 59mg • sod. 61mg
• calc. 119mg • fiber 0g
Super Veggie JuiceGet your veggies for the day on the run in this
quick, fresh vegetable juice.
Makes about 4 cups
1½ cups V-8® juice½ cup cherry tomatoes, halved½ red bell pepper, roughly chopped (about ½ cup)1 celery stalk, cut into small dice1 cup cucumber, peeled, seeded, and roughly chopped3 tablespoons fresh parsley2 teaspoons lime juice (about ½ lime)3 dashes Tabasco®
4-5 ice cubes
Attach the dispenser tap to the blender collar.
Place ingredients in blender jar in order listed. Place cover with blending stick on the blender jar. Press On. Turn blender on high and process for 25 to 30 seconds until
1�
smooth. Press Off once it is smooth, if not dispensing immediately.
To dispense juice: With blender on high, place a cup or pitcher under the dispenser tap. Pull down the dispenser tap and stir contents with the blending stick as juice is dispensing.
Nutritional information per ½-cup serving: Calories 18 (7% from fat) • carb. 4g • pro. 1g
• fat 0g • sat. fat 0g • chol. 0mg • sod. 176mg • calc. 18mg • fiber 1g
Chocolate Cookies and Cream Shake
Makes 4 cups
3 cups chocolate ice cream1½ cups lowfat milk10 chocolate sandwich cookies
Attach the dispenser tap to the blender collar.
Place ingredients in blender jar in order listed. Place cover with blending stick on the blender jar. Press On. Turn blender on high and process for 25 to 30 seconds until smooth. Press Off once it is smooth if not dispensing immediately.
To dispense shake: With blender on high, place a cup or pitcher under the dispenser tap. Pull down the dispenser tap and stir contents with the blending stick as shake is dispensing.
Nutritional information per ½-cup serving: Calories 189 (41% from fat) • carb. 25g • pro. 4g • fat 9g • sat. fat 4g • chol. 20mg • sod. 136mg
• calc. 113mg • fiber 0mg
Peppermint Stick Milkshake
Makes 5 cups
3½ cups vanilla ice cream2 cups lowfat milk½-¾ cup peppermint candies, crushed 1-2 drops peppermint extract (optional)
Attach the dispenser tap to the blender collar.
Place ingredients in blender jar in order listed. Place cover with blending stick on the blender jar. Press On. Turn blender on high and process for 25 to 30 seconds until smooth. Press Off once it is smooth, if not dispensing immediately.
To dispense shake: With blender on high, place a cup or pitcher under the dispenser tap. Pull down the dispenser tap and stir contents with the blending stick as shake is dispensing.
Nutritional information per ½-cup serving: Calories 184 (29% from fat) • carb. 30g • pro. 3g • fat 6g • sat. fat 4g • chol. 24mg • sod. 70mg
• calc. 124mg • fiber 0g
DIPS, SAUCES, AND DRESSINGS
Chunky HummusFor this hummus variation the chickpeas
do not get puréed all the way.
Makes about 1 cup
1 small scallion, roughly chopped1 tablespoon chopped fresh parsley¾ teaspoon kosher salt2 tablespoons tahini2 tablespoons fresh lemon juice1 15-ounce can chickpeas4 tablespoons extra virgin olive oil
Attach dispenser tap to the blender collar.
Place the scallion, parsley, and salt in the blender. Place cover with blending stick on the blender jar. Press On and pulse on high 10 to 15 times. Scrape the sides of the blender jar and add the tahini, lemon juice, and chickpeas in the order listed and pulse on high about 10 times. Scrape sides of blender jar and blend on high for about 25 to 30 seconds. Add the olive oil in a steady stream through the opening in the blender jar lid while blending on high for 20 seconds. Once hummus has reached desired consistency, press Off.
Transfer the hummus to a bowl and let stand for 30 minutes before serving, to allow flavors to develop. Hummus will keep covered in the refrigerator for up to a week.
1�
Nutritional information per ¼-cup serving: Calories 122 (66% from fat) • carb. 8g • pro. 3g • fat 10g • sat. fat 1g • chol. 0mg • sod. 248mg
• calc. 32mg • fiber 2g
Black Bean DipMakes about 1¾ cup
½ teaspoon olive oil1 small garlic clove, smashed½ sweet red bell pepper, chopped into ½-inch dice (about 2 to 3 ounces)1 16-ounce can black beans½ teaspoon chipotle peppers¼ cup fromage blanc½ teaspoon salt
Attach dispenser tap to the blender collar.
In a small sauté pan, heat the olive oil over medium heat. Add the garlic clove and chopped red pepper and sauté for about 5 minutes, until the peppers are slightly browned. Add contents of pan to the blender jar along with the black beans, chipotle pepper, fromage blanc, and salt. Place cover with blending stick on the blender jar. Press On, pulse on high 10 times. Blend on high for 15 to 20 seconds. Once ingredients are puréed, press Off.
Transfer to a small serving bowl. Dip may be used immediately as a spread for tortillas and quesadillas or covered with plastic and refrigerated for an hour to set up to a more dip-like consistency.
Nutritional information per 1⁄4-cup serving: Calories 51 (8% from fat) • carb. 10g • pro. 5g • fat 1g • sat. fat 0g • chol. 0mg • sod. 384mg
• calc. 17mg • fiber 3g
Ancho Chile SauceA perfect all-purpose sauce for Mexican dishes.
Makes about 2 cups
6 dried ancho chiles1 tablespoon olive oil1 large shallot (about 3 ounces), roughly chopped1 garlic clove, chopped1 jalapeño, seeds removed, roughly chopped¾ teaspoon salt¼ cup white wine1 cup chicken stock2 tablespoons honey1 tablespoon lime juice
Reconstitute chiles: place them in a bowl, and pour boiling water over them so that they are completely covered. Invert a plate to cover bowl, keeping the chiles submerged. Allow the chiles to sit until they soften, about 30 minutes to an hour. Once soft, remove all seeds and stems, and reserve.
In a 3½-quart sauté pan, heat the olive oil over medium heat. Add shallot, garlic, jalapeño, and a small pinch of salt. Stir and sauté until softened and slightly browned, about 5 minutes. Stir in reserved chiles and heat through for about a minute. Stir in white wine. Scrape any bits that are clinging to the bottom of the pan. Allow wine to reduce to almost nothing. Add the chicken stock, bring to a boil and then reduce to a simmer for about 10 to 15 minutes.
Place contents of pan into the blender jar and add remaining salt, honey, and lime juice.
Place cover with blending stick on the blender jar. Secure the cover tightly with a dishtowel and your hand. Press On and blend on high for 30 to 40 seconds. Press Off once it is smooth. Serve chile sauce immediately or keep in refrigerator for up to a week.
Nutritional information per ¼-cup serving: Calories 49 (30% from fat) • carb. 7g • pro. 1g • fat 2g • sat. fat 0g • chol. 0mg • sod. 275mg
• calc. 10mg • fiber 0g
Romesco SauceThis sauce of Spanish origin is delicious served with grilled chicken, vegetables,
or even grilled seafood.
Makes about 2 cups
3 tablespoons plus 1 teaspoon extra virgin olive oil4 medium tomatoes (about 5 ounces each), sliced in half1 large sweet red bell pepper (about 7 to 8 ounces), sliced in half1 shallot (about 2 ounces) unpeeled3 garlic cloves, unpeeled1 cup white bread cubed (about 1" cubes, crust removed)1⁄3 cup roasted almonds, roughly chopped½ teaspoon paprika2 tablespoons sherry vinegar2 tablespoons sherry¼ cup chicken or vegetable stock½ teaspoon kosher salt freshly ground black pepper

1�
Preheat oven to 425°F.
Lightly coat a baking sheet with 1 tablespoon of olive oil and place the tomatoes, pepper, shallot, and garlic cloves on it. Roast for about 35 to 40 minutes until all vegetables are blistered and soft. Place the pepper in a small mixing bowl and seal tightly with plastic wrap (leave for about 30 minutes). Remove and discard skins and seeds from tomatoes and skins from both shallot and garlic. Reserve.
When the vegetables are almost cool, heat 1 teaspoon of olive oil in a 3½-quart sauté pan over medium heat. Toast the bread cubes gently until slightly golden, about 3 minutes. Stir in roasted tomatoes, shallot, and garlic and heat gently.
Remove skins and seeds from pepper and roughly chop. Stir pepper in with the almonds and paprika and heat for about 1 minute. Add the sherry vinegar and the sherry, scraping up any bits that are stuck to the bottom of the pan. Reduce liquid by half. Add the stock and bring to a boil. Reduce to simmer for about 4 to 5 minutes.
Place contents of pan into the blender jar plus the remaining 2 tablespoons of olive oil, salt, and pepper. Place cover with blending stick on the blender jar. Secure the cover tightly with a dishtowel and your hand. Press On. Blend on high for 20 seconds.
Press Off once it is smooth, and adjust seasonings accordingly.
Serve immediately or place in container to store in refrigerator for up to one week.
Nutritional information per ¼-cup serving: Calories 173 (47% from fat) • carb. 19g • pro. 4g
• fat 9g • sat. fat 1g • chol 0mg • sod. 108mg • calc. 27mg • fiber 2g
Rustic Tomato SauceMakes about 8 cups
1 tablespoon extra virgin olive oil1 onion (8 ounces), peeled and cut into ½-inch pieces2 carrots (4 ounces each), peeled and cut into ½-inch pieces2 ribs celery, trimmed and cut into ½-inch pieces4 cloves garlic, peeled1 teaspoon dried oregano1 teaspoon dried basil4 roasted red bell peppers, cut into 1-inch pieces½ cup dry white wine (such as vermouth)2 tablespoons tomato paste3 15-ounce cans recipe-ready diced tomatoes with juice½ teaspoon kosher salt¼ teaspoon freshly ground black pepper
In a 3½-quart saucepan, heat the olive oil over medium heat. Add the onion, carrots, celery, garlic, oregano and basil. Cover loosely and cook until the vegetables are softened, 6 to 8 minutes. Stir in the roasted red peppers, wine, tomato paste, and tomatoes. Bring to a boil, then reduce heat and simmer for 35 to 40 minutes, loosely covered. Uncover and simmer for 15 to 20 minutes longer to thicken. Turn off heat and let sit 5 minutes.
Strain the solids from the liquids, and return the liquid to the saucepan. Place the solids in the blender jar with ½ cup of the cooking liquid. Cover the blender jar. Press On and Pulse. Pulse 10 times to chop. Use a plastic spatula to scrape the sides of the blender jar. Blend on high for 30 to 40 seconds, until smooth, and press Off. Return the puréed tomato mixture to the liquid in the saucepan and reheat gently over medium low heat. Add salt and pepper.
Serve immediately or keep in refrigerator for up to 5 days.
Nutritional information per ½-cup serving: Calories 48 (17% from fat) • carb. 8g • pro. 1g • fat 1g • sat. fat 0g • chol. 0mg • sod. 194mg
• calc. 26mg • fiber 2g
Springtime Chèvre Dressing
This elegant dressing is wonderful on grilled vegetables and grilled chicken and is fantastic
on warm potato salad or baked potatoes.
Makes 2½ cups
¼ cup nonfat yogurt½ cup buttermilk16½ ounces chèvre2 scallions, roughly chopped2 tablespoons fresh parsley2 teaspoons lemon juice½ teaspoon kosher salt freshly ground black pepper
Attach the dispenser tap to the blender collar.

1�
Place ingredients in blender jar in order listed. Place cover with blending stick on the blender jar. Press On. Turn blender on high and process for 30 to 40 seconds until smooth. Press Off once it is smooth, if not dispensing immediately.
To dispense dressing: With blender on low, place a serving bowl or pitcher under the dispenser tap. Pull down the dispenser tap and stir contents with the blending stick as dressing is dispensing.
Nutritional information per 1⁄4-cup serving: Calories 179 (68% from fat) • carb. 2g • pro. 12g • fat 14g • sat. fat 9g • chol. 36mg • sod. 277mg
• calc. 235mg • fiber 0g
Creamy Dill DressingMakes about 3 cups
1 cup buttermilk¾ cup sour cream½ cup light mayonnaise2⁄3 cup fresh dill, packed1 tablespoon + 1 teaspoon fresh lemon juice1 tablespoon chopped shallot¾ teaspoon kosher salt freshly ground pepper
Attach the dispenser tap to the blender collar.
Place ingredients in blender jar in order listed. Place cover with blending stick on the blender jar. Press On. Turn blender on high and process for 20 to 30 seconds until smooth. Press Off once it is smooth, if not dispensing immediately.
To dispense dressing: With blender on low, place a serving bowl or pitcher under the dispenser tap. Pull down the dispenser tap and stir contents with the blending stick as dressing is dispensing.
Serve dressing immediately or keep in refrigerator for up to 5 days.
Nutritional information per 1-ounce serving: Calories 36 (79% from fat) • carb. 1g • pro. 1g • fat 3g • sat. fat 1g • chol. 5mg • sod. 93mg
• calc. 21mg • fiber 1g
Basic VinaigretteThis basic vinaigrette is perfect for a
crisp green salad. You may add herbs or use flavored vinegars.
Makes about 11⁄2 cups, and can be doubled or tripled
1 garlic clove, peeled2 tablespoons Dijon-style mustard½ cup wine vinegar1 teaspoon kosher salt½ teaspoon freshly ground pepper2⁄3 cup extra virgin olive oil2⁄3 cup vegetable oil
Attach the dispenser tap to the blender collar.
Place the garlic in the blender jar and cover jar. Place cover with blending stick on the blender jar. Press On and pulse. Pulse 5 times on high to chop the garlic. Add the mustard, vinegar, salt and pepper. Turn the blender on high and blend for 10 to 15 seconds. With the blender running, add the oils in a slow, steady stream, taking about 20 seconds, then blend for 20 seconds longer until completely emulsified.
Press Off once it is emulsified, if not dispensing immediately.
To dispense dressing: With blender on low, place a serving bowl or pitcher under the dispenser tap. Pull down the dispenser tap and stir contents with the blending stick as dressing is dispensing.
You may change the basic vinaigrette by using different flavors of the vinegar, mustard or oil. Try using fresh lemon juice and a little honey for a honey-mustard vinaigrette. Add fresh herbs, sun-dried tomatoes, or pesto for other flavor changes.
Nutritional information per tablespoon: Calories 109 (97% from fat) • carb. 1g • pro. 0g • fat 12g • sat. fat 2g • chol. 0mg • sod. 86mg
• calc. 1mg • fiber 0g
SOUPSAvocado and Cucumber
SoupThe perfect soup for a hot summer day.
If you have extra-large avocados reduce the number of avocados to 2. This soup can also
double as a delicious sauce.
Makes 5¾ cups
3 avocados1½ cups cucumber, peeled, seeded, and diced6 tablespoons fresh lemon juice (about 2 lemons)½ cup lowfat plain yogurt6 ice cubes1 cup water
1�
3 tablespoons fresh cilantro (or your favorite fresh herb) dash hot sauce1½ teaspoons kosher salt
Attach the dispenser tap to the blender collar.
Place ingredients in blender jar in order listed. Place cover with blending stick on the blender jar. Press On. Turn blender on high and process for 20 to 30 seconds until smooth. Press Off once it is smooth, if not dispensing immediately.
To dispense soup: With blender on low, place a serving bowl or pitcher underneath the dispenser tap. Pull down the dispenser tap and stir contents with the blending stick as soup is dispensing.
Serve soup immediately or keep in refrigerator for up to 5 days.
Nutritional information per ¼-cup serving: Calories 45 (73% from fat) • carb. 3g • pro. 1g • fat 4g • sat. fat 1g • chol. 0mg • sod. 94mg
• calc. 14mg • fiber 0g
Creamy Spinach and Watercress Soup
Makes 6 cups
½ tablespoons unsalted butter2 cups leeks, white and pale green parts only, washed and chopped (about 7 to 8 ounces of leeks)1½ tablespoons unbleached flour¼ cup white wine1 medium-small potato (about 6 ounces), cut into 1-inch dice
5¼ cups chicken or vegetable stock1 10-ounce package frozen spinach, defrosted and drained1 bunch watercress, washed and roughly chopped¼ teaspoon nutmeg¾ teaspoon kosher salt¼ cup heavy cream freshly ground black pepper
Place the butter in a 31⁄2-quart sauté pan over medium low heat. Stir in chopped leeks and sweat with lid on for about 10 to 15 minutes. Once leeks are very soft, add flour and stir over heat for about 3 minutes. Add white wine and reduce until just a touch remains. Stir in potatoes and add chicken/vegetable stock. Bring to a boil and then reduce to a simmer until the potatoes are soft, approximately 20 minutes. Once potatoes are soft, stir in spinach and cook for about 3 minutes. Stir in watercress, nutmeg, and salt. When watercress is soft, stir in heavy cream. Bring to a low simmer for 3 to 4 minutes.
Place contents of pan in blender jar. Place cover with blending stick on the blender jar. With your hand and a dishtowel FIRMLY securing the blender lid, press On. Blend on low and then high for 30 seconds.
Press Off once it is smooth. Serve soup immediately or keep in refrigerator for up to 5 days. If reheating, check seasoning as flavors may need to be brightened up with a little lemon, salt, and pepper.
Nutritional information per ½-cup serving: Calories 74 (41% from fat) • carb. 7g • pro. 3g
• fat 3g • sat. fat 2g • chol. 11mg • sod. 330mg • calc. 49mg • fiber 1g
Sweet Potato SoupThis simple yet satisfying soup makes a perfect meal on a cold wintry night.
Makes about 5 cups
½ tablespoon olive oil1 teaspoon unsalted butter1 shallot, sliced (about 1 ounce)1 3-inch piece of leek, white part only, cleaned and sliced¼ cup white wine2½ pounds yam or sweet potato, about 6 cups, ½-inch dice3 cups chicken stock½ teaspoon kosher salt¼ teaspoon ground nutmeg
Place the olive oil and butter in a 3-quart sauté pan over medium-low heat. Add the sliced shallot and leek. Stir to soften, then cover pan and allow the shallot and leek to sweat and become very soft, about 10 to 15 minutes. Uncover and stir, allowing any liquid to evaporate. Add the white wine and stir until completely evaporated, about 3 minutes. Add sweet potatoes and stir. Add chicken stock (add more stock if the potatoes are not completely submerged), salt, and nutmeg and simmer until potatoes are very soft, about 25 minutes.
Place contents of pan in blender jar. Place cover with blending stick on the blender jar. With your hand and a dishtowel FIRMLY securing the blender lid, press On. Blend on low for 10 seconds. Switch to high and blend for an additional 20 to 30 seconds, until soup is completely puréed.

1�
Press Off once it is smooth. Taste and adjust seasoning accordingly. Serve immediately.
Nutritional information per 1⁄2-cup serving: Calories 131 (9% from fat) • carb. 27g • pro. 2g • fat 1g • sat. fat 0g • chol. 1mg • sod. 228mg
• calc. 41mg • fiber 4g
Roasted Parsnip and Apple Soup
Makes 6 cups
2½ tablespoons olive oil2 pounds parsnips, cut into 1-inch rounds¼ teaspoon salt1 tablespoon unsalted butter1 shallot (about 11⁄2 ounces), minced1 medium apple, cut into 1-inch dice (about 6 ounces)¼ cup white wine3 cups chicken or vegetable stock1 cup 1-percent milk
Preheat oven to 400°F.
In a mixing bowl, toss together 1½ tablespoons olive oil, parsnips, and salt. Place on baking tray and roast for 30 to 35 minutes. The parsnips should be slightly browned and soft – be careful not to get them too dark.
While parsnips are roasting, heat the remaining tablespoon of oil and the butter together in a 3½-quart sauté pan over medium-low heat. Add the shallot and sweat for about 3 minutes. Add the apple and cover. Apple should soften in about 8 to 10 minutes. Once apple is soft, stir in the
parsnips. Add the wine and reduce until just a touch remains. Add chicken/vegetable stock and bring to a boil. Reduce to simmer for about 5 to 8 minutes to ensure all vegetables are tender.
Place contents of pan into blender jar. Add milk. Place cover with blending stick on the blender jar. With your hand and a dishtowel FIRMLY securing the blender lid, press On. Blend on low and then high for 30 seconds. Press Off once it is smooth.
Serve soup immediately or keep in refrigerator for up to 5 days.
Nutritional information per 1⁄2-cup serving: Calories 117 (33% from fat) • carb. 18g • pro. 3g • fat 4g • sat. fat 1g • chol. 4mg • sod. 174mg
• calc. 59mg • fiber 4g
Two-Berry Summer SoupMakes about 5 cups
1 cup fresh strawberries1 cup frozen strawberries1 cup frozen raspberries2½ cups lowfat vanilla yogurt8 ounces crème fraîche½ cup water2 tablespoons superfine sugar
Attach the dispenser tap to the blender collar.
Place ingredients in blender jar in order listed. Place cover with blending stick on the blender jar. Press On. Turn blender on high and process for 20 to 30 seconds until smooth. Press Off once it is smooth if not dispensing immediately.
To dispense soup: With blender on low, place a serving bowl or pitcher under the dispenser tap. Pull down the dispenser tap and stir contents with the blending stick as soup is dispensing.
Serve soup immediately or keep in refrigerator for up to 4 days.
Nutritional information per 1⁄2-cup serving: Calories 164 (53% from fat) • carb. 16g • pro. 3g • fat 10g • sat. fat 6g • chol. 35mg • sod. 48mg
• calc. 107mg • fiber 2g
DESSERTSChocolate Cherry
Bread Pudding For a warm dessert, mix and assemble this
bread pudding ahead of time and bake while dinner is being served. Top with sweetened
whipped cream.
Makes 8 to 12 servings
3 tablespoons unsalted butter6 cups firm bread cubes*¾ cup semisweet chocolate chips¾ cup dried tart cherries6 large eggs1 12-ounce can lowfat evaporated milk½ cup sugar½ tablespoon pure vanilla extract¾ cup heavy cream sweetened whipped cream for topping
1�
Butter a 2–quart shallow baking dish (9 x 9-inches square or equivalent) with 1 tablespoon unsalted butter and place inside a larger shallow baking pan. Melt the remaining 2 tablespoons of butter and toss in a large mixing bowl with bread cubes, chocolate chips, and dried cherries.
Place the eggs, evaporated milk, sugar, vanilla, and heavy cream in the blender jar. Place cover with blending stick on the blender jar. Press On. Turn blender on high and process for 10 seconds until smooth. Press Off. Place mixing bowl with bread cubes under the dispenser tap. With blender on low, pull down the dispenser tap and stir contents with the blending stick to dispense all of the egg mixture over the bread.
Pour mixture into prepared pan. Let the mixture stand for 45 minutes, or cover and refrigerate up to 12 hours (if refrigerated, let come to room temperature for 30 minutes before proceeding).
Ten minutes before baking, preheat oven to 325°F. Place the baking pans in the oven and carefully pour hot water into the larger, outer pan until the water comes up the sides of the inner dish by 1 inch. Bake for 60 to 70 minutes; bread pudding will be puffed and custard will be set. Remove from oven and allow the bread pudding to rest for 20 to 30 minutes on a rack before serving. Serve with sweetened whipped cream.
*Bread pudding is best made from day-old or slightly stale bread. Challah bread is an excellent choice.
Nutritional information based on 12 servings: Calories 343 (30% from fat) • carb. 25g • pro. 14g • fat 16g • sat. fat 8g • chol. 139mg • sod. 74mg
• calc. 117mg • fiber 4g
Dairy-Free Chocolate Mousse
This rich chocolate mousse is so good no one would know that it is actually has
health benefits!
Makes six ½-cup servings
12 ounces semisweet chocolate1 cup chocolate or vanilla soy milk½ tablespoon pure vanilla extract1 14-ounce package silken tofu, cut into cubes
Melt chocolate in a double boiler.
Attach the dispenser tap to the blender collar.
Place soy milk, vanilla, melted chocolate, and tofu in blender jar in order listed. Place cover with blending stick on the blender jar. Press On. Turn blender on high and process, stirring contents with blender stick for 25 to 30 seconds until smooth. Press Off once it is smooth if not dispensing immediately.To dispense mousse: With blender on low, place a custard cup under the dispenser tap. Pull down the dispenser tap and stir contents with the blending stick and dispense one custard cup full of mousse at a time.
Cover cups with plastic and refrigerate until set, about 8 to 12 hours.
Nutritional information per ½-cup serving: Calories 361 (50% from fat) • carb. 38g • pro. 6g
• fat 20g • sat. fat 9g • chol. 0mg • sod. 9mg • calc. 71mg • fiber 9g
Mango CoulisThis sauce makes a delicious dessert topping,
especially on ice cream and sorbet.
Makes 3½ cups
¾ cup water¾ cup granulated sugar4 cups cubed mango (approximately 3 medium mangoes)
Place the water and sugar in a saucepan and bring to a boil. Remove from heat when sugar is dissolved (about 2 to 3 minutes after the mixture comes to a boil).
Allow to cool.
Attach the dispenser tap to the blender collar.
Once simple syrup is cool, place it in the blender jar with the cubed mango. Place cover with blending stick on the blender jar. Press On. Turn blender on high and process for 15 to 20 seconds until smooth. Press Off once it is smooth, if not dispensing immediately.
To dispense coulis: With blender on low, place pitcher under the dispenser tap. Pull down the dispenser tap and stir contents with the blending stick as coulis is dispensing.
Nutritional information per ¼-cup serving: Calories 72 (1% from fat) • carb. 19g • pro. 0g • fat 0g • sat. fat 0g • chol. 0mg • sod. 1mg
• calc. 5mg • fiber 1g
�0
Crêpes Makes about 16 crêpes
1½ cups whole milk 1 cup plus 2 tablespoons all-purpose flour 3 large eggs 2 teaspoons sugar ¼ teaspoon salt 1 tablespoon unsalted butter, melted additional melted butter
Combine milk, flour, eggs, sugar and salt in blender. Blend until smooth, occasionally scraping down sides of blender, about 2 minutes. Add 1 tablespoon melted butter and blend 30 seconds. Cover and refrigerate crêpe batter in blender container at least 1 hour and up to 4 hours.
Reblend batter for 15 seconds. Heat nonstick skillet with 8-inch-diameter bottom over medium-high heat. Brush with melted butter. Pour 1⁄4 cup of batter into skillet, tilting skillet quickly to coat bottom evenly. Cook until top of crêpe appears dry and bottom is golden, loosening edges of crêpe with spatula, about 45 seconds. Turn crêpe over; cook until brown spots appear on bottom, about 30 seconds. Transfer to plate. Top with plastic wrap. Repeat with remaining batter, brushing skillet with more butter as needed. As crêpes are cooked, layer as directed, between sheets of plastic wrap. (Can be made 1 day ahead. Cover with plastic wrap plastic; chill.)
For serving immediately, cover the crêpes with aluminum foil and keep them warm in a preheated 200˚F oven. For serving later, wrap them in plastic wrap in quantities intended for each use and slip them into
a self-sealing plastic bag. Refrigerate the crêpes for up to 3 days, or freeze them for up to 2 months.
Nutritional information per crêpe: Calories 61 (33% from fat) • carb. 7g • pro. 3g • fat 2g • sat. fat 1g • chol. 40mg • sod. 53mg
• calc. 30mg • fiber 0g
Brown Sugar & Cinnamon Caramelized
Apples
Makes about 16 servings
¼ cup (½ stick) unsalted butter ½ cup (packed) light brown sugar 4 large apples (about 1½ pounds), peeled, halved, cored, each half cut lengthwise into 6 slices 1 tablespoon fresh lemon juice 1 teaspoon ground cinnamon
Melt butter in large nonstick skillet over medium-high heat. Add brown sugar; stir 1 minute. Add apple slices and lemon juice; cook until apples begin to release juice and syrup forms in skillet. Sprinkle with cinnamon and cook, turning apple slices frequently, about 3 to 4 minutes. Apples should be tender but still maintain their shape.
(Can be made 2 hours ahead. Let stand at room temperature. Rewarm before using.)
Use to fill crêpes. Top with vanilla or caramel ice cream, or slightly sweetened whipped cream.
Nutritional information per serving: Calories 67 (34% from fat) • carb. 12g • pro. 0g
• fat 3g • sat. fat 2g • chol. 7mg • sod. 2mg • calc. 9mg • fiber 1g

NOTES

NOTES

NOTES

��
LIMITED THREE-YEAR WARRANTYThis warranty supersedes all previous warranties on Cuisinart® Smooth Operator® Blenders. This warranty is available to consumers only. You are a consumer if you own a Cuisinart® Smooth Operator® Blender that was purchased at retail for personal, family, or household use. Except as otherwise required under applicable state law, this warranty is not available to retailers or other commercial purchasers or owners. We warrant that your Cuisinart® Smooth Operator® Blender will be free of defects in material or workmanship under normal home use for three years from the date of original purchase. We suggest that you complete and return the enclosed product registration card promptly to facilitate verification of the date of original purchase. However, return of the product registration card does not eliminate the need for the consumer to maintain the original proof of purchase in order to obtain the warranty benefits. In the event that you do not have proof of purchase date, the purchase date for purposes of this warranty will be the date of manufacture.
If your blender should prove to be defective within the warranty period, we will repair it (or, if we think it necessary, replace it) without charge to you. To obtain warranty service, please call our Consumer Service Center toll-free at 1-800-726-0190 or write to:
Cuisinart 150 Milford Road East Windsor, NJ 08520
To facilitate the speed and accuracy of your return, please enclose $10.00 for shipping and handling of the product. Please also be sure to include a return address, daytime phone number, description of the product defect, product serial number (stamped on bottom of product base), and any other information pertinent to the product’s return. Please pay by check or money order. (California residents need only supply proof of purchase and should call 1-800-726-0190 for shipping instructions).
NOTE: For added protection and secure handling of any Cuisinart® product that is being returned, we recommend you use a traceable, insured delivery service. Cuisinart cannot be held responsible for in-transit damage or for packages that are not delivered to us. Lost and/or damaged products are not covered under warranty.
Your Cuisinart® Smooth Operator® Blender has been manufactured to strict specifications and has been designed for use with the Cuisinart® Smooth Operator® Blender accessories and replacement parts. These warranties expressly exclude any defects or damages caused by accessories, replacement parts, or repair service other than those that have been authorized by Cuisinart. These warranties do not cover any damage caused by accident, misuse, shipment, or other than ordinary household use. These warranties exclude all incidental or consequential damages. Some states do not allow the exclusion of or limitation of incidental or consequential damages, so the foregoing limitation may not apply to you.
California Residents Only
California law provides that for In-Warranty Service, California residents have the option of returning a nonconforming product (A) to the store where it was purchased or (B) to another retail store which sells Cuisinart® products of the same type. The retail store shall then, according to its preferences, either repair the product, refer the consumer to an independent repair facility, replace the product, or refund the purchase price less the amount directly attributable to the consumer’s prior usage of the product. If either of the above two options does not result in the appropriate relief to the consumer, the consumer may then take the product to an independent repair facility if service or repair can be economically accomplished.* Cuisinart and not the consumer will be responsible for the reasonable cost of such service, repair, replacement, or refund for nonconforming products under warranty.
California residents may also, at their preference, return nonconforming products directly to Cuisinart for repair or, if necessary, replacement by calling our Consumer Service Center toll-free at 1-800-726-0190. Cuisinart will be responsible for the cost of the repair, replacement, and shipping and handling for such nonconforming products under warranty.
Before Returning Your Cuisinart Product
If you are experiencing problems with your Cuisinart® product, we suggest that you call our Consumer Service Center at 1-800-726-0190 before returning the product for servicing. Often, our Consumer Service Representatives can help solve the problem without having the product serviced. If servicing is needed, a Representative can confirm whether the product is under warranty and direct you to the nearest service location.
*Important: If the nonconforming product is to be serviced by someone other than Cuisinart’s Authorized Service Center, please remind the servicer to call our Consumer Service Center at 1-800-726-0190 to ensure that the problem is properly diagnosed, the product is serviced with the correct parts, and to ensure that the product is still under warranty.
©2007 CuisinartCuisinart® is a registered
trademark of Cuisinart
150 Milford RoadEast Windsor, NJ 08520
Printed in China
07CU26431