Smog DADdy™ - OTC Tools · Smog DADdy has 6 indicator LEDs that illuminate when communicating...
59
Smog DADdy™ User Guide Version 8.2
Transcript of Smog DADdy™ - OTC Tools · Smog DADdy has 6 indicator LEDs that illuminate when communicating...

Smog DADdy™ User Guide
Version 8.2
Smog DADdy™ User Guide
© 2014 Applus Technologies, Inc. All rights reserved. Applus+, A+, the A+ and Applus+
logos, and Smog DADdy are trademarks or registered trademarks of Applus Technologies, Inc.
or one of its affiliates. All other trademarks or registered trademarks are the property of their
respective owners.
Applus Technologies, Inc.
444 N. Michigan Avenue
Suite 1110
Chicago, IL 60611

Table of Contents
Introduction ................................................................................................................ 1
About this Guide ............................................................................................................. 1
Document Conventions ................................................................................................... 1
System Requirements ..................................................................................................... 1
Safety Information ...................................................................................................... 2
Safety Instructions .......................................................................................................... 2
Smog DADdy Overview ............................................................................................... 4
Key Features .................................................................................................................. 6
Indicator LEDs ................................................................................................................ 6
Fault .......................................................................................................................... 6
Power......................................................................................................................... 6
PC Comm ................................................................................................................... 6
Information ................................................................................................................ 7
Vehicle Voltage ........................................................................................................... 7
OBD Comm ................................................................................................................. 7
Cable Ports ..................................................................................................................... 7
Cable Connections .......................................................................................................... 8
Wired Smog DADdy ..................................................................................................... 8
Wireless Smog DADdy ................................................................................................. 9
Smog DADdy Manager Software ...............................................................................11
Installation ....................................................................................................................11
Checking for Updates .....................................................................................................12
Updating Smog DADdy Firmware ....................................................................................12
Updating Smog DADdy Manager Software........................................................................15
Performing a Self-Test ....................................................................................................18
BAR-OIS Software Installation .................................................................................21
COM Port and BAR-OIS Configuration ......................................................................23
Windows XP and Windows 7 ...........................................................................................23
Wired Smog DADdy ....................................................................................................23
Wireless Smog DADdy ................................................................................................24
Windows 8/8.1 ..............................................................................................................28
Wired Smog DADdy ....................................................................................................28
Wireless Smog DADdy ................................................................................................29
Configuring BAR-OIS ......................................................................................................33
Updating BAR-OIS Configuration .....................................................................................35

Using the BAR-OIS ....................................................................................................37
Performing a Vehicle / Smog Inspection ...........................................................................37
Performing a Self-Test ....................................................................................................38
Auxiliary Power and Alternate Ground Operation .....................................................44
Auxiliary Power ..........................................................................................................44
Alternate Ground ........................................................................................................44
Appendix ...................................................................................................................45
Maintenance ..................................................................................................................45
Troubleshooting .............................................................................................................45
Wireless Tips .................................................................................................................48
Troubleshooting Flowchart ..............................................................................................49
Contacting Customer Service ..........................................................................................51
Specifications ................................................................................................................51
Smog DADdy System Connection Diagrams ......................................................................52
Wired SmogDADdy .....................................................................................................53
Wireless SmogDADdy .................................................................................................54
Applus Technologies, Inc. Smog DADdy User Manual VER 8.2 Page 1 of 55
Introduction
Smog DADdy is a new generation On-Board Diagnostic (OBDII) Data Acquisition Device (DAD)
used for vehicle emissions testing. It complies with the State of California Bureau of Automotive
Repair (BAR) smog checking requirements and seamlessly integrates with its OBD Inspection
System software (OIS).
About this Guide
This User Guide introduces you to Smog DADdy features and explains how to use it for vehicle
emissions testing. It also provides instructions for installing BAR-OIS software on a computer.
Document Conventions
This User Guide uses the following conventions to help you distinguish the actions required by
you when using SmogDADdy and installing BAR-OIS software.
Convention Description
Bold Initiates a software command when clicking on the bold type face word. Example: Click on Self-Test to run a Self-Test.
‘ ’ Signifies the title of a newly displayed software window. Example: The ‘California BAR-OIS Setup’ window will appear.
“ ” Emphasizes a word or words you should see. Example: When the Self-Test is over, the status line will read “Completed”.
Italics Indicates a set of choices from which you must choose one. Example: Select Applus for the DAD vendor.
Courier New Font Identifies text you must type. Example: Type your Com Port number
into the field.
System Requirements
If you have not purchased the Applus Smog DADdy turnkey system, you will need a computer
with the following specifications to accommodate the BAR-OIS system requirements.
Windows 7 32-bit, Service Pack 1 (SP1 or later) Windows 8, 8.1, 8.64-bit
Internet Explorer 9 (or later) Web Browser
Internet connectivity (DSL, cable, satellite or dial-up)
A 2.0 USB port
Bluetooth (For wireless DAD version)
Applus Technologies, Inc. Smog DADdy User Manual VER 8.2 Page 2 of 55
Safety Information
Safety Instructions
This User Guide is intended to provide technical guidance on the installation, operation, and
maintenance of Smog DADdy (“device”). Do not attempt to install or operate this product
without having completely read and understood the information presented. If you have
questions, please contact Bosch Customer Service.
MISUSE OF PRODUCT MAY CAUSE PERSONAL INJURY, DAMAGE TO EQUIPMENT, OR VOIDING
OF THE MANUFACTURERS WARRANTY.
NOTE: Read and keep these safety instructions. Heed all warnings and follow all instructions.
For your own safety and the safety of others, and to prevent damage to the device and vehicles
upon which it is used, it is important that this User Guide is read and completely understood by
all persons operating, or coming into contact with the device.
Intended Use
The device is intended for use by properly trained and skilled professional automotive
technicians that are certified by the California Bureau of Automotive Repair (BAR) to conduct
vehicle emissions tests (smog checks). The safety information presented in this Users Guide
reminds the operator to exercise safe care when conducting a smog check.
It is assumed that the operator has a thorough understanding of vehicle systems before using
the device. Understanding of safety information and operating procedures is necessary for
competent, safe and accurate use of the device.
Intended Personnel
There are no variations in procedures, techniques, tools, or in the skill of the individual doing
the work in accordance with BAR and Applus Technologies guidelines. It is the automotive
technician’s responsibility to be knowledgeable about the testing system. It is essential to use
proper service methods and test procedures. It is important to perform tests in an appropriate
and acceptable manner that does not endanger your safety, the safety of others in the work
area, the equipment being used, and the vehicle being tested. Before using the device, always
refer to and follow the safety messages and applicable test procedures provided by the
manufacturer of the vehicle being tested. Read, understand, and follow all safety rules in this
guide when operating the device.

Applus Technologies, Inc. Smog DADdy User Manual VER 8.2 Page 3 of 55
Follow These Safety Rules
1 Keep all cables out of the reach of motorists and passengers. Failure to do this may result in injury.
2 Do not disassemble or modify the device, as this may result in fire, electric shock, or device failure.
3 Do not use the device in abnormal conditions, i.e. presence of smoke, excessive heat, odd smell, peculiar noise, etc. This may result in fire, burns, shock or device failure. If such conditions exist, turn the power off immediately, remove all cables from all device ports, and contact Bosch Customer Service.
4 In the event that any foreign material enters the device, turn off the power immediately and remove all cables from all device ports. Failure to do so may result in fire, electric shock, or device failure. Contact Bosch Customer Service.
5 Do not spill liquids (coffee, water, oil, etc.) on the device. Do not use the device in areas where liquids may splash on the device. This may result in igniting a fire, burns, shock or device failure.
6 To prevent danger of suffocation, keep plastic packaging out of the reach of motorist and passengers.
7 In the event of lightning strikes, do not touch the device to avoid potential electrical shock.
8 Do not expose Smog DADdy to an environmental temperature above 135°F (+55°C). This may result in a fire or device failure.
9 Damage to the device caused by dropping, throwing, being stepped on, etc., may prevent functionality of the device and may result in injury. In the event that the device is damaged, turn the power off immediately, remove all cables from all device ports, and contact Bosch Customer Service.
10 Do not place heavy objects on the device.
11 Do not use the device in any manner contrary to the instructions in this guide, or to perform any functions not explicitly provided in this guide. This may result in injury or device failure.
12 Do not use solvents (i.e. paint thinner, benzene, alcohol, etc.) when cleaning the device. This may damage the surface. Clean the device using a clean, dry cloth.

Applus Technologies, Inc. Smog DADdy User Manual VER 8.2 Page 4 of 55
Smog DADdy Overview
Your Smog DADdy includes the following hardware components. Wired devices will include a
16 ft. OBDII DLC cable and wireless devices will include a 4 ft. OBDII DLC cable.
1. 2. 3.
Wired or Wireless
Smog DADdy Device
16 ft. DLC Cable
(wired Smog DaDdy units)
4 ft. DLC Cable
(wireless Smog DaDdy units)
4. 5. 6.
3.3 ft. USB Cable
1 ft. Self-Test Cable Alternate Ground Cable
7.
Vehicle Charging Adapter (wireless Smog DADdy units)
Applus Technologies, Inc. Smog DADdy User Manual VER 8.2 Page 5 of 55
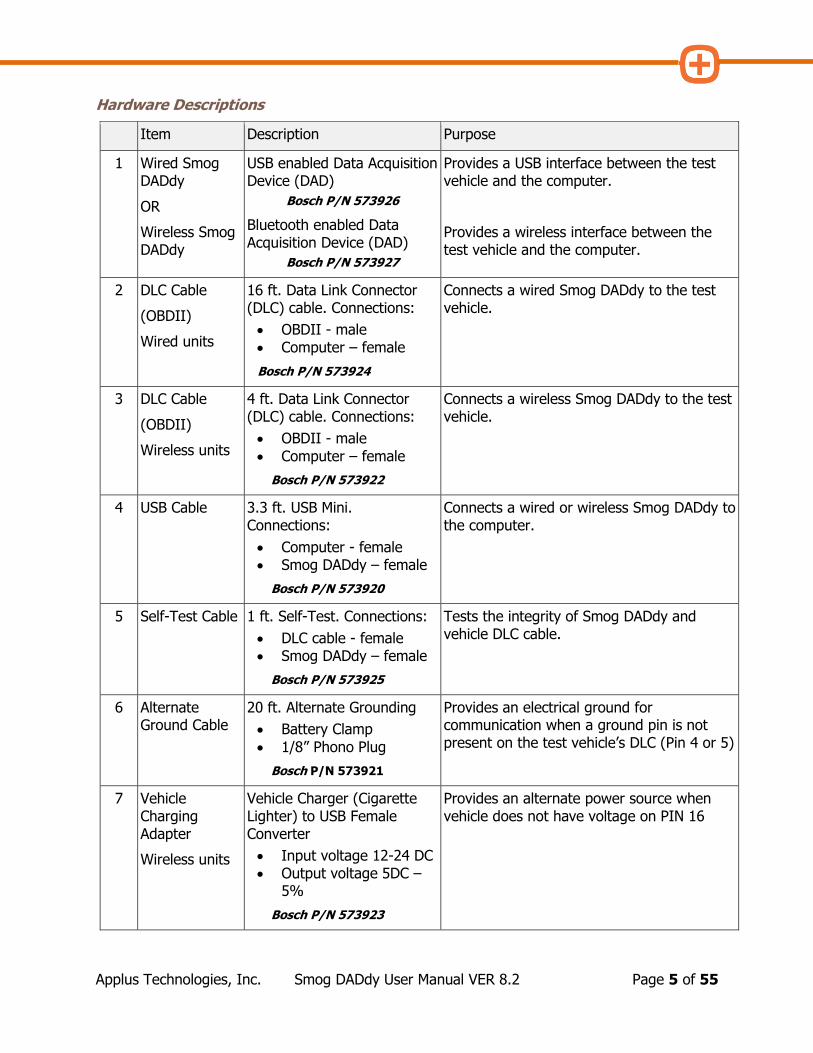
Hardware Descriptions
Item Description Purpose
1 Wired Smog DADdy
OR
Wireless Smog DADdy
USB enabled Data Acquisition Device (DAD)
Bosch P/N 573926
Bluetooth enabled Data Acquisition Device (DAD)
Bosch P/N 573927
Provides a USB interface between the test vehicle and the computer.
Provides a wireless interface between the test vehicle and the computer.
2 DLC Cable
(OBDII)
Wired units
16 ft. Data Link Connector (DLC) cable. Connections:
OBDII - male Computer – female
Bosch P/N 573924
Connects a wired Smog DADdy to the test vehicle.
3 DLC Cable
(OBDII)
Wireless units
4 ft. Data Link Connector (DLC) cable. Connections:
OBDII - male
Computer – female
Bosch P/N 573922
Connects a wireless Smog DADdy to the test vehicle.
4 USB Cable 3.3 ft. USB Mini. Connections:
Computer - female Smog DADdy – female
Bosch P/N 573920
Connects a wired or wireless Smog DADdy to the computer.
5 Self-Test Cable 1 ft. Self-Test. Connections:
DLC cable - female Smog DADdy – female
Bosch P/N 573925
Tests the integrity of Smog DADdy and vehicle DLC cable.
6 Alternate Ground Cable
20 ft. Alternate Grounding
Battery Clamp
1/8” Phono Plug
Bosch P/N 573921
Provides an electrical ground for communication when a ground pin is not present on the test vehicle’s DLC (Pin 4 or 5)
7 Vehicle Charging Adapter
Wireless units
Vehicle Charger (Cigarette Lighter) to USB Female Converter
Input voltage 12-24 DC Output voltage 5DC –
5%
Bosch P/N 573923
Provides an alternate power source when vehicle does not have voltage on PIN 16
Applus Technologies, Inc. Smog DADdy User Manual VER 8.2 Page 6 of 55
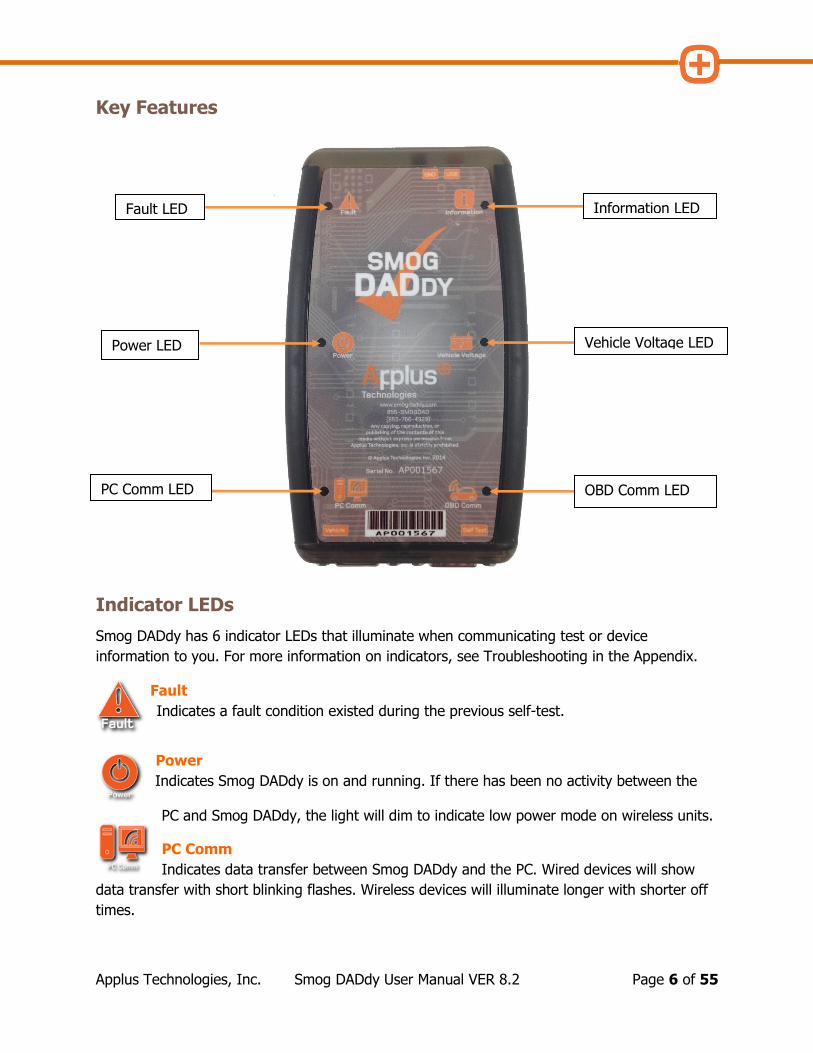
Key Features
Indicator LEDs
Smog DADdy has 6 indicator LEDs that illuminate when communicating test or device
information to you. For more information on indicators, see Troubleshooting in the Appendix.
Fault
Indicates a fault condition existed during the previous self-test.
Power
Indicates Smog DADdy is on and running. If there has been no activity between the
PC and Smog DADdy, the light will dim to indicate low power mode on wireless units.
PC Comm
Indicates data transfer between Smog DADdy and the PC. Wired devices will show
data transfer with short blinking flashes. Wireless devices will illuminate longer with shorter off
times.
Information LED
Vehicle Voltage LED
OBD Comm LED PC Comm LED
Power LED
Fault LED

Applus Technologies, Inc. Smog DADdy User Manual VER 8.2 Page 7 of 55
Information
Light flashes once every 2 seconds to indicate Smog DADdy is running in normal
mode. Light flashes 5 times per second when the DAD firmware is being updated or is
ready to be updated.
Vehicle Voltage
Illuminates when battery voltage is present on the vehicles OBDII port (pin 16).
OBD Comm
Once a vehicle inspection has been initiated, this light indicates a communications
link between the vehicle and Smog DADdy has been established.
Cable Ports
Port Connector Function
USB Mini USB 2.0
Connects Smog DADdy to the computer using a USB cable. Provides power and a communication link between the device and the computer.
Wireless Version – USB port used to charge the battery in the device and allows it to operate as a wired device.
Alternate Ground
1/8” Phono Jack Connects Smog DADdy to the Alternate Ground cable.
Top Connections
Alternating GroundPortUSB
Alternate
Ground

Applus Technologies, Inc. Smog DADdy User Manual VER 8.2 Page 8 of 55
Self-TestPort
Bottom Connections
Port Connector Function
DLC Female Connects Smog DADdy to the vehicle’s DLC (OBDII) using either a 4 ft. (wireless version) or 16 ft. (wired version) DLC cable.
Self-Test Male Connects the 1 ft. Self-Test cable to the SmogDADdy device.
Cable Connections
Wired Smog DADdy
The wired model is equipped with a 16 ft. vehicle DLC cable and a 3.3 ft. (1 meter) computer
USB cable to operate.
Smog DADdy Device Location Cables Used
Next to the computer 16 ft. vehicle DLC cable 3.3 ft. computer USB cable
USB
Alternate Ground
DLC
Self-Test

Applus Technologies, Inc. Smog DADdy User Manual VER 8.2 Page 9 of 55
Wired Connection Example
Wireless Smog DADdy
The wireless model adds the ability to communicate with the computer wirelessly via Bluetooth
technology. It is equipped with one 4 ft. vehicle DLC cable to conduct a smog check. A 3.3 ft. (1
meter) computer USB cable is provided and is used to charge the device, or perform a self-
check.
The wireless model contains an internal rechargeable lithium ion polymer (LiPo) battery that is
recharged while the device is connected to a USB port, or vehicle. The internal battery provides
power to the device when no battery voltage is present on the vehicle DLC (OBDII) connector
(pin 16). The device shuts down to conserve the battery’s power when it is not connected to
the USB port or to a test vehicle for more than 6 minutes. Please refer to the Auxiliary Power
and Wireless Tips sections that follow for additional information.
Smog DADdy Location Cables Used
Next to the vehicle
Next to the computer
4 ft. vehicle DLC cable
3.3 ft. computer USB cable (used to charge the device and perform self-test)
NOTE: The Self-Test functionality is only available when the wireless device is connected to the
USB port. Performing a cable Self-Test while connected via Bluetooth is currently not supported.
Test Vehicle Computer
1 ft. OBDII
Self-Test Cable
3.3 ft. USB
Cable
16 ft. DLC
Cable

Applus Technologies, Inc. Smog DADdy User Manual VER 8.2 Page 10 of 55
Wireless Connection Example
Test Vehicle Computer
1 ft. OBDII
Self-Test Cable 4 ft. DLC
Cable
Bluetooth
Link

Applus Technologies, Inc. Smog DADdy User Manual VER 8.2 Page 11 of 55
Smog DADdy Manager Software
Smog DADdy Manager Software is required for conducting smog checks. You must keep your
device current with the latest Smog DADdy Manager software and firmware, or risk being
locked out from testing.
You will need to install Smog DADdy Manager software on the computer that will be used for
smog checks. Contact Bosch Service for assistance in obtaining and installing this software.
NOTE: The initial software installation will require a Windows User Account with Administrative
privileges.
Installation
1. Download the Smog DADdy Manager installation from
http://www.otctools.com/california-dad
2. Read and agree to the licensing terms by clicking on the box to the left of ‘I accept the
terms in the License Agreement’.
3. Click Install to begin the installation update.

Applus Technologies, Inc. Smog DADdy User Manual VER 8.2 Page 12 of 55
4. A status bar will show the progress of the installation.
5. Once the installation has completed, select Finish.
6. Smog DADdy Manager will automatically start and will be in the system tray.
Checking for Updates
The Smog DADdy Manager software will periodically poll for firmware updates to your DAD, and
will automatically download and install them.
When new versions of the Smog DADdy Manger software are released, you will be notified that
update(s) are available. Alternately, you can check for both firmware and software updates
manually.
Updating Smog DADdy Firmware
Manually Checking for Updates
1. Connect the DAD to the computer or laptop being used to access the BAR OBD
Inspection System (OIS) using the provided USB cable.
2. Open Smog DADdy Manager by clicking on the orange small OTC icon in the Windows
System Tray (most commonly found at the lower right-hand corner of the screen).

Applus Technologies, Inc. Smog DADdy User Manual VER 8.2 Page 13 of 55
3. If the application is not running, select Program Files from the Start Menu, navigate
to the Applus Technologies folder and select Smog DADdy Manager.
4. The ‘Smog DADdy Manager’ window will appear. Click on Check For Updates to
manually check for updates. Clicking on the X at the upper right-hand corner of the
application will minimize to the System Tray and the software will remain running.
5. If alerted of an update via Windows Update Balloon as shown below, click the Balloon
and proceed to step 7.
Applus Technologies, Inc. Smog DADdy User Manual VER 8.2 Page 14 of 55
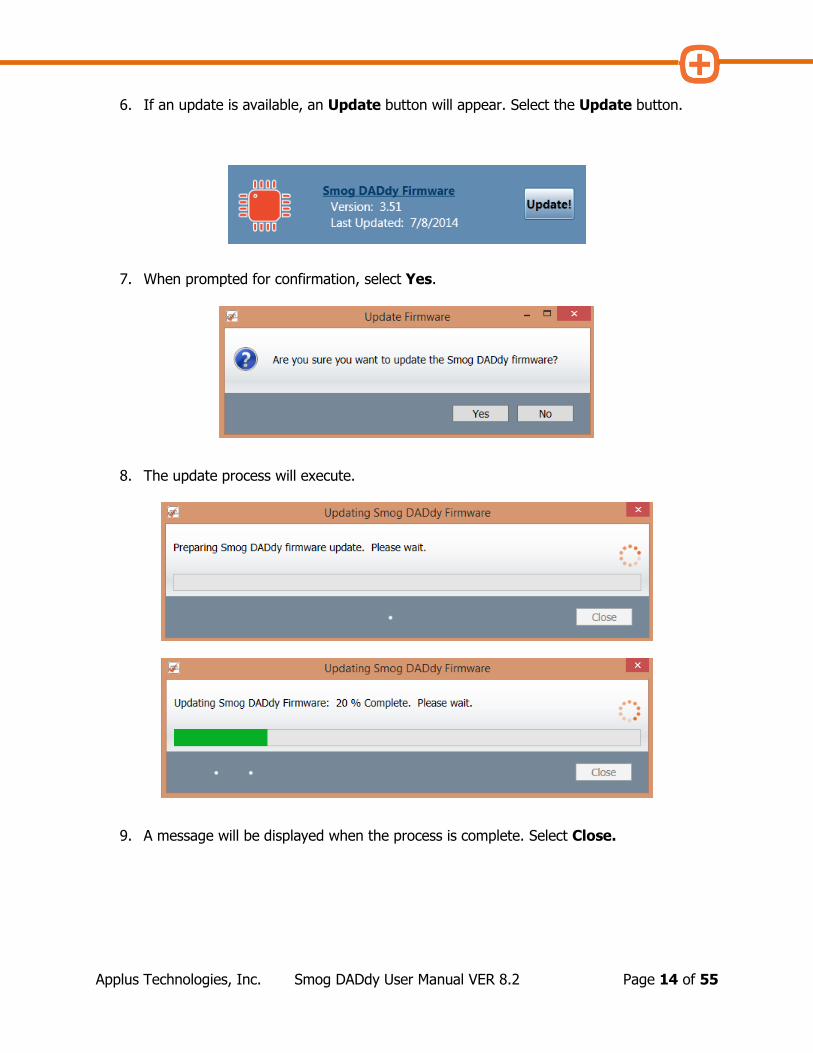
6. If an update is available, an Update button will appear. Select the Update button.
7. When prompted for confirmation, select Yes.
8. The update process will execute.
9. A message will be displayed when the process is complete. Select Close.

Applus Technologies, Inc. Smog DADdy User Manual VER 8.2 Page 15 of 55
10. The new version number should be displayed (3.51 version number shown for reference
purposes only).
NOTE: To manually query the Smog DADdy for its current firmware information, simply click
the Smog DADdy Firmware text.
Updating Smog DADdy Manager Software
1. If the Smog DADdy Manager software is already running, click the icon in the Windows
System Tray to bring the application to the desktop. If the application is not running,
click the Start Menu, select Program Files, navigate to the Bosch Automotive
Service Solutions folder and select Smog DADdy Manager.

Applus Technologies, Inc. Smog DADdy User Manual VER 8.2 Page 16 of 55
2. If alerted of an update via Windows Update Balloon as shown below, click the Balloon
and proceed to step 5.
3. To check for updates manually, click Check for Updates.
4. When a software update is available, an ‘Update!’ button will appear to the right of the
Smog DADdy Manager Version. Click on Update! to initiate the update process.
5. When prompted for confirmation, select Yes.
6. Read and agree to the licensing terms by clicking on the box to the left of ‘I accept the
terms in the License Agreement’.
7. Click Install to begin the installation update.

Applus Technologies, Inc. Smog DADdy User Manual VER 8.2 Page 17 of 55
8. A status bar will show the progress of the installation.
9. Once the installation has completed, select Finish.
10. Smog DADdy Manager will automatically restart.
11. View the Status tab and verify the Smog DADdy Manager software version is listed
(14.3.3.1 in this example, yours may be newer):

Applus Technologies, Inc. Smog DADdy User Manual VER 8.2 Page 18 of 55
Performing a Self-Test
The self-test verifies that Smog DADdy and the vehicle DLC cable are functioning properly.
1. If the Smog DADdy Manager software is already running, click the icon in the Windows
System Tray to bring the application to the desktop. If the application is not running,
select Program Files from the Start Menu, navigate to the Bosch folder and select
Smog DADdy Manager.
2. Connect Smog DADdy to your computer using the USB cable provided.

Applus Technologies, Inc. Smog DADdy User Manual VER 8.2 Page 19 of 55
3. Connect the smaller end of the self-test cable to the Smog DADdy self-test port.
4. Connect the larger end of the vehicle DLC cable to the 1 ft. self-test cable.
Vehicle DLC Cable
Self-Test Cable USB to PC

Applus Technologies, Inc. Smog DADdy User Manual VER 8.2 Page 20 of 55
5. Select the Tools menu option followed by Perform Self-Test to start the test.
6. When the self-test has finished successfully, click Close.
7. If the self-test failed, perform the following steps to try and fix or identify the problem:
a. Check all cables to confirm they are securely attached to the proper Smog
DADdy ports and to each other. If you are using a wireless device, make sure
the device is charged and USB cable is plugged in to the computer.
b. Unplug all cables from the device and the computer and plug them back in
again.
c. Try using alternate cables.
d. If the error message still displays, contact Applus customer service for technical
support.

Applus Technologies, Inc. Smog DADdy User Manual VER 8.2 Page 21 of 55
BAR-OIS Software Installation
The BAR-OIS Software will need to be installed on your PC. Please follow the steps below.
NOTE: The initial software installation, as well as subsequent updates, may require a Windows
User Account with Administrative privileges.
1. Step 1. Once BAR has activated your station, you will be contacted by Bosch, and
provided a webpage from which you can download the BAR-OIS software to your work
station.
The main screen of the BAR-OIS website should look like this:

Applus Technologies, Inc. Smog DADdy User Manual VER 8.2 Page 22 of 55
2. Follow the steps in this video which will explain the installation and registration process
for BAR-OIS software:
https://www.youtube.com/watch?v=fmlPX5eV04U&feature=youtu.be
NOTE: If you previously registered with BAR-OIS, you will not need to re-register your
workstation.
3. Once installation of the BAR-OIS software is complete, your workstation will be ready to
test vehicles.
For additional BAR-OIS training material visit:
http://www.bar.ca.gov/80_BARResources/05_Legislative/RegulatoryActions/NewEquipandInspPr
ocedures.htm
BAR-OIS Software Password Policy
1. The technician passwords expire after 90 days.
2. The technicians should update their passwords when instructed by the OIS.
3. Password length is to be a minimum of 8 characters, maximum of 30 characters.
4. Password must contain a minimum of 2 numeric characters, 1 alphabetic character, 1
non-alphanumeric character, and not have special or high ASCII characters.
5. Password expiration is set to 90 days, with 16 grace logins.
6. User is prevented from using the last five passwords.
7. Allow upper and lower case characters, but do not require a minimum.
8. Requires password to be a minimum of 4 characters different than the previous
password or any of the passwords stored in the history list.
Applus Technologies, Inc. Smog DADdy User Manual VER 8.2 Page 23 of 55
COM Port and BAR-OIS Configuration
During the BAR OIS software installation process, you will be required to enter your Smog
DADdy communication (COM) port number. This section reviews how to find and submit the
proper information. The steps are different for the wired and wireless versions of Smog DADdy
and vary by Windows Operating System (OS). Instructions for each type of device are listed
separately.
Windows XP and Windows 7
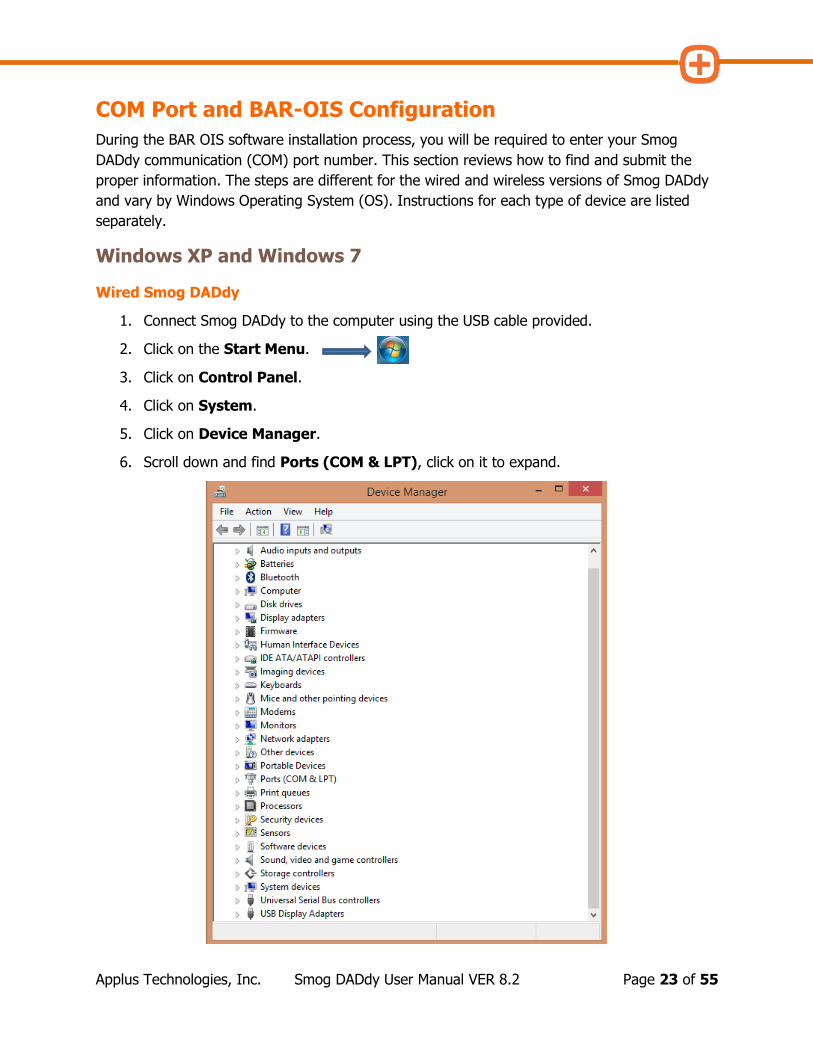
Wired Smog DADdy
1. Connect Smog DADdy to the computer using the USB cable provided.
2. Click on the Start Menu.
3. Click on Control Panel.
4. Click on System.
5. Click on Device Manager.
6. Scroll down and find Ports (COM & LPT), click on it to expand.

Applus Technologies, Inc. Smog DADdy User Manual VER 8.2 Page 24 of 55
7. Make note of the COM port number in parenthesis after A+ Virtual Com Port. In the
example below, it is “COM6” (capital letters, no spaces).
NOTE: Your port number will be used in the next step; you may want to write it down.
Please go to the Configuring BAR-OIS section, to complete the configuration process.
Wireless Smog DADdy
If you are a supplying your own laptop or PC it must have Bluetooth adapter installed and
enabled.
1. Connect Smog DADdy to the computer using the USB cable provided.
2. Click on the Start Menu.
3. Click on Control Panel.
4. Click on Devices and Printers.
5. Click Add a device from the window toolbar at the upper-left hand side of the screen.

Applus Technologies, Inc. Smog DADdy User Manual VER 8.2 Page 25 of 55
6. On the Add a device window scroll to locate the device, click on it to highlight it, and
click Next.
NOTE: The device name will match the Serial Number printed on the Smog DADdy label
followed by a dash and 4 alphanumeric characters, AP000014-E869 in the example above.

Applus Technologies, Inc. Smog DADdy User Manual VER 8.2 Page 26 of 55
7. A prompt asking “Does the code match the code on the device:” will appear. Click on
Yes and then click Next. If there is no code provided for the device enter 1234 as the
code and then click Next.
8. Click Close to complete the Bluetooth pairing process.

Applus Technologies, Inc. Smog DADdy User Manual VER 8.2 Page 27 of 55
9. Windows will install the appropriate drivers. You will see this message when the process
is complete.
10. Go back to Devices and Printers and locate the device that was just installed. See the
first 4 steps at the beginning of this section to locate Devices and Printers.
11. Right click on the device name (Smog DADdy serial number) and click Properties.
12. Click on the Services tab to view your port number. In the example below, the port
number is “COM4”.
NOTE: Your port number will be used in the next section; you may want to write it down.
13. Click OK to exit the Properties window.
Please go to the Configuring BAR-OIS section, to complete the configuration process.

Applus Technologies, Inc. Smog DADdy User Manual VER 8.2 Page 28 of 55
Windows 8/8.1
This section reviews the steps to configure a wired or wireless Smog DADdy Communication
(COM) Port from the native Windows 8/8.1 Start screen, shown below, rather than the
traditional Desktop Start screen.
Wired Smog DADdy
1. Connect Smog DADdy to the computer using the USB cable provided.
2. From the Windows 8 Start screen, type device manager and select Device Manager
from the search results.
Applus Technologies, Inc. Smog DADdy User Manual VER 8.2 Page 29 of 55
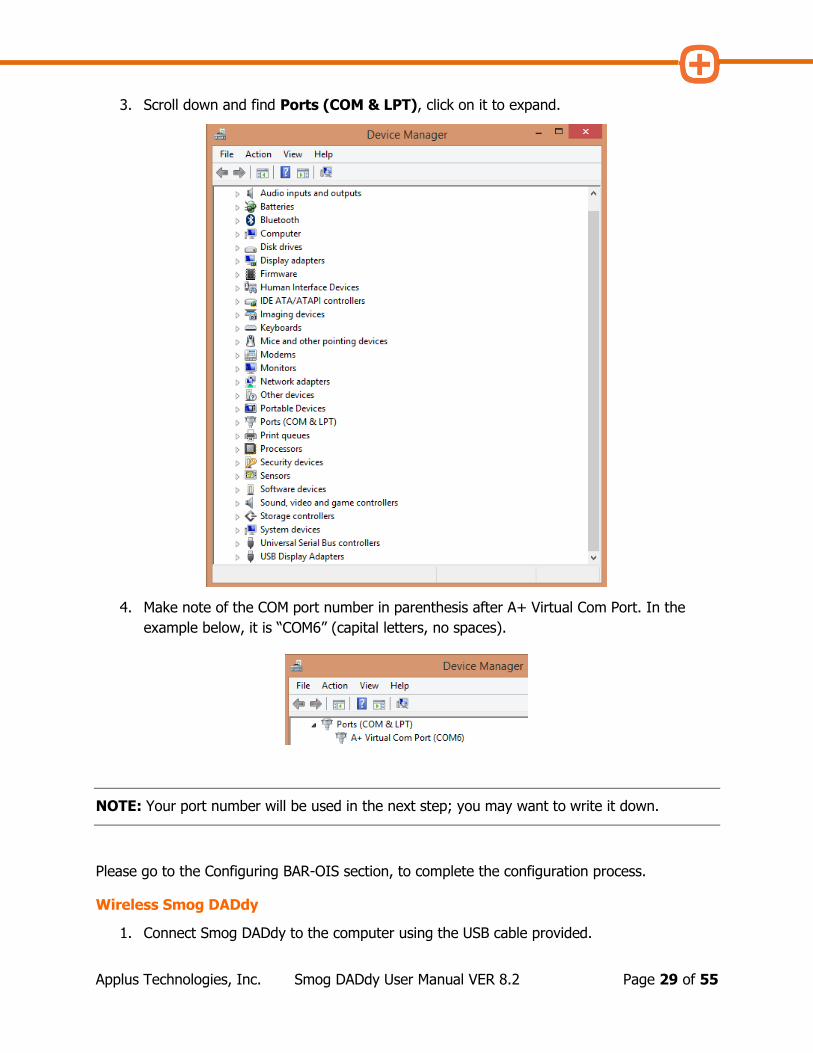
3. Scroll down and find Ports (COM & LPT), click on it to expand.
4. Make note of the COM port number in parenthesis after A+ Virtual Com Port. In the
example below, it is “COM6” (capital letters, no spaces).
NOTE: Your port number will be used in the next step; you may want to write it down.
Please go to the Configuring BAR-OIS section, to complete the configuration process.
Wireless Smog DADdy
1. Connect Smog DADdy to the computer using the USB cable provided.

Applus Technologies, Inc. Smog DADdy User Manual VER 8.2 Page 30 of 55
2. From the Windows 8 Start screen, type pc settings and select PC Settings from the
search results.
3. From PC Settings, select PC and devices.

Applus Technologies, Inc. Smog DADdy User Manual VER 8.2 Page 31 of 55
4. From PC and devices, select Bluetooth.
5. Confirm that Bluetooth is turned On as shown in the screenshot below. If Bluetooth is
not turned On, click on the box pointed to by the orange arrow below.
6. Locate your Smog DADdy device, click on it to highlight it, and then click Pair.
NOTE: The device name will match the Serial Number printed on the Smog DADdy label
followed by a dash and 4 alphanumeric characters, AP001042-8D5E in the example above.
7. If prompted to Compare the passcodes as shown in the screenshot below, click Yes.

Applus Technologies, Inc. Smog DADdy User Manual VER 8.2 Page 32 of 55
If prompted to Enter the passcode for your device as shown below, enter 1234 as the
passcode and then click Next.
8. The Smog DADdy is now connected to your computer.
9. From PC Settings, type change bluetooth settings and select Change
Bluetooth Settings from the search results.

Applus Technologies, Inc. Smog DADdy User Manual VER 8.2 Page 33 of 55
10. In Bluetooth Settings, click on the COM Ports tab and locate the Outgoing Port value
for your Smog DADdy. In the example below, the port number is “COM4”.
NOTE: Your port number will be used in the next section; you may want to write it down.
11. Click OK to exit the Bluetooth Settings window.
Configuring BAR-OIS
If this is the first time you are using the BAR-OIS software please review the BAR-OIS Station
Registration and Download Video located here:
https://www.youtube.com/watch?v=fmlPX5eV04U&feature=youtu.be and then complete your
configuration process with the following steps.
1. Launch the BAR OIS software by clicking on the Start Menu, Program Files, and
California BAR-OIS.
2. The ‘DAD Configuration’ screen will appear. Select Applus as your DAD vendor. Type the
COM port number you obtained from step 7 (wired) from the previous section or step
12 (wireless) into the DAD port field. If you are using a wireless device, you MUST
include an asterisk symbol (*) before entering the COM port number. For example, type
*COM4 versus COM4.

Applus Technologies, Inc. Smog DADdy User Manual VER 8.2 Page 34 of 55
Upon initial installation and prior to configuration, the ‘DAD Configuration’ screen will
appear as shown below.
A sample screenshot for a wired DAD configured to ‘COM3’ is shown below.
A sample screenshot for a wireless DAD configured to ‘*COM4’ is shown below.
NOTE: Throughout the remaining pages of this chapter, you will see illustrations that reference
both types of COM port numbers used. Remember, if you are using a wired device you do not
need to precede the COM port number with an asterisk symbol. If you are using a wireless
device, you will ALWAYS need an asterisk symbol before the COM port number.
3. Click Continue

Applus Technologies, Inc. Smog DADdy User Manual VER 8.2 Page 35 of 55
4. Click on the BAR-OIS File menu and select Self Diagnostics.
5. Confirm BAR-OIS can successfully communicate with Smog DADdy by clicking on
Get/Retry.
6. Verify the serial number displayed matches the serial number shown on the Smog
DADdy decal.
7. Select Return to BAR-OIS.
Updating BAR-OIS Configuration
If you ever need to change the port configuration, follow these steps.
1. Click on the BAR-OIS File menu and select Self Diagnostics.
Serial number

Applus Technologies, Inc. Smog DADdy User Manual VER 8.2 Page 36 of 55
2. Locate DAD Check in the ‘Self Diagnostics’ screen and click Configure.
3. Type the new DAD port number and click Continue. A sample screenshot for a wired
DAD configured to ‘COM3’ is shown below.
4. Confirm BAR-OIS can successfully communicate with Smog DADdy by clicking on
Get/Retry.

Applus Technologies, Inc. Smog DADdy User Manual VER 8.2 Page 37 of 55
5. Verify the serial number displayed matches the serial number shown on the Smog
DADdy decal.
6. Select Return to BAR-OIS.
Using the BAR-OIS
Performing a Vehicle / Smog Inspection
This option performs an official OIS smog check on a vehicle.
1. If you haven’t done so already, launch the BAR-OIS application.
2. From the home screen, click on 1 Perform Inspection
NOTE: When using a wireless unit, always connect the DLC cable to the test vehicle prior to
selecting Perform Inspection and confirm that the DAD power light is on. Please see Wireless
Tips in the Appendix for additional information.
3. Follow the prompts.
Serial number
Applus Technologies, Inc. Smog DADdy User Manual VER 8.2 Page 38 of 55
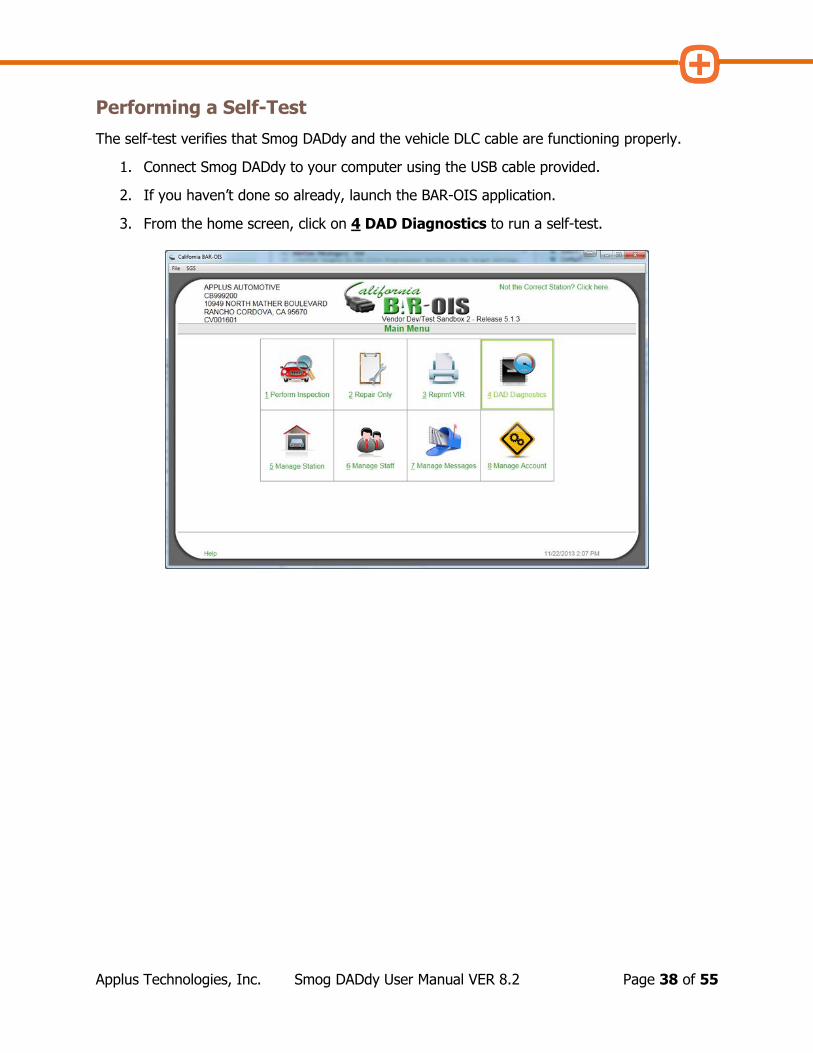
Performing a Self-Test
The self-test verifies that Smog DADdy and the vehicle DLC cable are functioning properly.
1. Connect Smog DADdy to your computer using the USB cable provided.
2. If you haven’t done so already, launch the BAR-OIS application.
3. From the home screen, click on 4 DAD Diagnostics to run a self-test.

Applus Technologies, Inc. Smog DADdy User Manual VER 8.2 Page 39 of 55
4. You will be required to log in. Scan your badge and type your password. Click Submit.
If you are unable to scan your badge, click on Unable to Scan.
5. Read the Terms & Conditions and click Continue to agree.
6. Connect the smaller end of the self-test cable to the Smog DADdy self-test port.

Applus Technologies, Inc. Smog DADdy User Manual VER 8.2 Page 40 of 55
7. Connect the larger end of the vehicle DLC cable to the 1 ft. self-test cable.
Vehicle DLC Cable
Self-Test Cable USB to PC

Applus Technologies, Inc. Smog DADdy User Manual VER 8.2 Page 41 of 55
8. After the cables are attached to the device, click Continue to perform the self-test.
9. You will be notified that the self-test has begun with the following screen.

Applus Technologies, Inc. Smog DADdy User Manual VER 8.2 Page 42 of 55
10. When the self-test has finished successfully, click Done.
11. If the self-test failed, you will see the following screen.
Perform the following steps to try and fix or identify the problem:
e. Check all cables to confirm they are securely attached to the proper Smog
DADdy ports and to each other. If you are using a wireless device, make sure
the device is charged and USB cable is plugged in to the computer.

Applus Technologies, Inc. Smog DADdy User Manual VER 8.2 Page 43 of 55
f. Unplug all cables from the device and the computer and plug them back in
again.
g. Try using alternate cables.
h. If the error message still displays, contact Applus customer service for technical
support.
If a test fails during an actual inspection, the OIS should automatically prompt the inspector to
run a self-test.

Applus Technologies, Inc. Smog DADdy User Manual VER 8.2 Page 44 of 55
Auxiliary Power and Alternate Ground Operation
The Smog DADdy unit will attempt to communicate with vehicles that are missing ground
and/or battery connections as described below.
Auxiliary Power
If no battery voltage is present on pin 16 of the vehicle’s DLC:
Wired Smog DADdy - When connecting to vehicles with insufficient battery voltage present
on pin 16 of the DLC connector, the ‘Vehicle Voltage’ indicator will not illuminate. The unit will
still attempt to communicate even if this indicator is not lit, no additional user intervention is
required.
Wireless Smog DADdy - The Smog DADdy unit shuts down after 6 minutes of inactivity to
conserve the internal battery and wakes up if sufficient battery voltage on pin 16 is detected or
a USB connection is established. If the vehicle has insufficient battery voltage present on pin 16
of the DLC, reconnect using a USB tethered connection or by using the USB vehicle charging
adapter.
NOTE: A wireless connection can be re-attempted after waking up the device using either of
the methods described above.
Alternate Ground
If no signal or chassis ground is present on the vehicle’s DLC:
Wired and Wireless Smog DADdy - If the unit is unable to establish
vehicle communications, the vehicle’s DLC may have no signal or chassis
ground present. Connect the alternate ground cable to the DAD and
attach the grounding clamp to a known good ground point on the vehicle.

Applus Technologies, Inc. Smog DADdy User Manual VER 8.2 Page 45 of 55
Appendix
Maintenance
Smog DADdy is a durable device that requires little maintenance. Following a few simple
procedures will help ensure its longevity.
Storage
Store your Smog DADdy in a dry and dirt free location.
Wireless Device Storage
When not in use, connect Smog DADdy to the computer using the USB cable provided. This will
keep the internal battery healthy and fully charged between uses.
Cables
Inspect the ends of the DLC and Self-Test cables regularly to ensure they are in good working
order.
Troubleshooting
If you are having difficulty with your Smog DADdy, read this section before calling for technical
support.
Power
Difficulty Suggestions
No Power -
Wired Version
Check to see if the USB cable is properly attached to the computer and Smog DADdy. USB hubs may not function properly, connect the DAD directly to the PC using the supplied USB cable.
Confirm that the USB cable is not damaged.
No Power -
Wireless Version
Make sure Smog DADdy has been charged for a minimum of 3 hours before using the first time.
Connect Smog DADdy to the computer using the USB cable to confirm the power light illuminates.
The Smog DADdy unit shuts down after 6 minutes of inactivity to conserve the internal battery and wakes up if sufficient battery voltage on pin 16 is detected or a USB connection is established. If the vehicle has insufficient battery voltage present on pin 16 of the DLC, reconnect using a USB tethered connection or by using the vehicle charging adapter.
NOTE: A wireless connection can be re-attempted after waking up the device using either of the methods described above.

Applus Technologies, Inc. Smog DADdy User Manual VER 8.2 Page 46 of 55
Self-Test
Difficulty Suggestions
Self-Test Failed Confirm the male end of the vehicle cable is securely connected to the female end of the self-test cable.
Confirm the self-test cable is securely attached to the Self-Test connector on the Smog DADdy.
Check the male connector of the DLC cable for bent pins.
Check that nothing is obstructing the cable and device connections.
Confirm the device has power and USB cable connected.
If you own more than one Smog DADdy, try using those cables to determine if either the DLC or Self-Test cables need replacement.
Vehicle Communication
Difficulty Suggestions
OBD Comm didn’t illuminate
Check all cables to confirm they are properly and securely connected.
Confirm BAR-OIS software is open and operational.
Use Alternate Grounding cable - ground pin may not be present on the test vehicles DLC. See
Auxiliary Power and Alternate Ground Operation section.
General See Troubleshooting Flowchart below.
See Internet below.
Indicator Lights
Difficulty Suggestions
OBD Comm didn’t illuminate
Check all cables to confirm they are properly and securely connected.
Confirm BAR-OIS software is open and operational.

Applus Technologies, Inc. Smog DADdy User Manual VER 8.2 Page 47 of 55
Vehicle Voltage didn’t illuminate
See
Auxiliary Power and Alternate Ground Operation section.
Power light didn’t illuminate
See Power troubleshooting.
Information light illuminated
Light flashes once every 2 seconds to indicate Smog DADdy is running in normal mode. Light flashes 5 times per second when the DAD firmware is being updated or is ready to be updated.
Fault light illuminated
This only indicates failed Self-Test.
Smog DADdy Manager Software
Difficulty Suggestions
Software didn’t install properly
Check computer administrative, security and privacy settings.
Check internet security and privacy settings.
Disallow pop-up blockers.
Confirm your computer is free of viruses, malware, and Trojans.
Click on Control Panel and uninstall program if it is there. Install the software again.
Software isn’t functioning properly
Confirm your computer is free of viruses, malware, and Trojans.
Internet
Difficulty Suggestions
Can’t connect to the internet
Using the BAR-OIS, select Self-Diagnostics from the File menu and verify the Google Internet Check passed (green check mark). If the internet Check failed, connect to an alternate web site using your browser to confirm.
Contact your Internet Service Provider (ISP).

Applus Technologies, Inc. Smog DADdy User Manual VER 8.2 Page 48 of 55
BAR-OIS Software
Difficulty Suggestions
Software didn’t install properly
Contact BAR Help Desk.
Software isn’t functioning properly
Contact BAR Help Desk.
Can’t communicate with BAR’s web application (NWA)
Using the BAR-OIS, select a Self-Diagnostics from the File menu and verify the BAR-OIS Server check passed (green check mark).
Verify you have the proper version of OIS software.
Contact BAR Help Desk.
Can’t log into BAR OIS
Contact BAR Help Desk.
BAR HELP DESK NUMBER: 866-860-8509
Wireless Tips
The OIS checks the DAD connected to the PC when you start the software and when you first
start a test. Therefore, the DAD needs to be powered when you first start the software and
when you begin an inspection. If the DAD is not connected to power, either from the vehicle or
from the USB connector, and there is no communications with it from the OIS for 6 minutes,
the DAD will power off to conserve its battery.
If you normally leave the DAD unplugged, that is fine. If so, you should plug the DAD into the
vehicle before you begin the inspection. Most vehicles will provide power through the DLC
connector, but some do not. Please observe whether the power and vehicle power light
illuminate when you plug the DAD into the vehicle. If so, you can begin the inspection.
If the power lights do not illuminate when you plug the DAD into the vehicle, you will need to
provide power to the DAD via the USB cable. Please see the section

Applus Technologies, Inc. Smog DADdy User Manual VER 8.2 Page 49 of 55
Auxiliary Power and Alternate Ground Operation.
If it ever happens that you cannot obtain communications after ensuring your DAD has power,
please unplug the DAD from both the vehicle and the USB until all the lights go out. Then, wait
10 seconds and plug it back in. You should be able to resume testing.

Applus Technologies, Inc. Smog DADdy User Manual VER 8.2 Page 50 of 55
Troubleshooting Flowchart

Applus Technologies, Inc. Smog DADdy User Manual VER 8.2 Page 51 of 55

Applus Technologies, Inc. Smog DADdy User Manual VER 8.2 Page 52 of 55
Contacting Customer Service
Contact Bosch Customer Service for technical assistance, placing orders and to ask questions.
Technical Support
Telephone: 800-833-8377
Specifications
Item Specification
Computer Interface (wired) USB 2.0
Computer Interface (wireless) Bluetooth Class 2
Bluetooth Version V2.1 + EDR
Frequency 2.402 ~ 2.480 MHz
FCC ID T9J-RN42
RF Transmit Power 0 ~ 4 dBm
Sensitivity at 0.1% BER -86 dBm
Operating Temperature 20°F ~ 130°F
Storage Temperature 0°F ~ 135°F
Max. cordless distance 30 feet (10 meters)
Dimensions 6.05”L x 3.5”W x 1.015”H
Power Source (wired model) USB
Power Source (wireless model) LiPo Battery (charged via USB)
Battery 3.7V Li-polymer rechargeable battery
Battery Capacity 280 mAh
Normal recharge time Less than 1 hour
Battery Information - Wireless
The rechargeable battery inside the device is not fully charged when it is new. Charge
Smog DADdy for 3 hours before using.
The rechargeable battery has a long service life if treated properly. A new battery, or
one that has not been used for a long period of time, could have reduced capacity the
first few times it is used.
Operate Smog DADdy in room temperature for maximum battery capacity.
Do not expose Smog DADdy to an environment temperature above 135°F (+55°C).
If Smog DADdy is operated in cold temperatures, the battery capacity is reduced.

Applus Technologies, Inc. Smog DADdy User Manual VER 8.2 Page 53 of 55
It is recommended to charge the battery in temperatures between 55°F (+10°C) and
113°F (+45°C).
Regulatory Information
Any modifications or changes (e.g., antennas) made to this device may void the user’s authority
to operate this device.
Declaration of Conformity
This device complies with Part 15 of the FCC Rules. Operation is subject to the following
conditions.
1. This device must accept any interference received, including interference that may
cause undesired operation.
2. This device may not cause harmful interference.
Federal Communications Commission (FCC) Statement
You are cautioned that changes or modifications not expressly approved by the part responsible
for compliance could void the user’s authority to operate the equipment.
FCC RF Radiation Exposure Statement
This device complies with FCC RF radiation exposure limits set forth for the general population.
This transmitter must not be co-located or operating in conjunction with any other antenna or
transmitter.
Smog DADdy System Connection Diagrams
The following diagrams illustrate the different configurations possible when using either the
wired or wireless Smog DADdy. They include the proper part numbers of the different
components used with each configuration option available.
Applus Technologies, Inc. Smog DADdy User Manual VER 8.2 Page 54 of 55
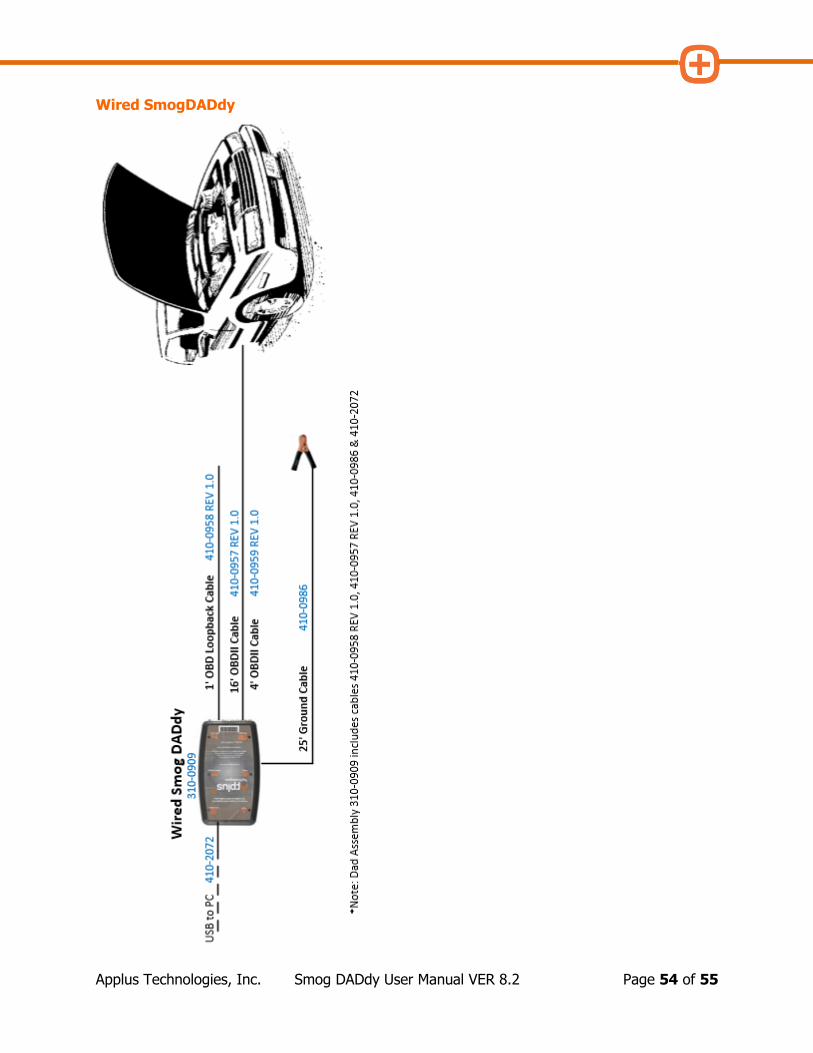
Wired SmogDADdy

Applus Technologies, Inc. Smog DADdy User Manual VER 8.2 Page 55 of 55
Wireless SmogDADdy