smarter ip eftpos - Tyro Payments ip eftpos Tyro EFTPOS Set Up Guide ... will assist you to connect...
10
faster smarter ip eftpos Tyro EFTPOS Set Up Guide April 2014 Faster Smarter IP EFTPOS Tyro’s EFTPOS terminals are easy to set up and use with step-by-step prompts guiding you through the process. This guide takes you through the installation and usage of your terminals while informing you of security standards and measures. Tyro Payments partners with most Point Of Sale (POS) and Practice Management (PMS) vendors to offer Integrated Payment Solutions for retail, hospitality, fashion, medical and other businesses. Go to www.tyro.com to check if your POS /PMS partner is Tyro certified. If not ask them how to integrate with Tyro. For the most updated version of this guide go to www.tyro.com. Thank you for choosing Tyro as your Merchant Service Provider.
Transcript of smarter ip eftpos - Tyro Payments ip eftpos Tyro EFTPOS Set Up Guide ... will assist you to connect...
fastersmarterip eftpos
Tyro EFTPOS Set Up GuideApril 2014
© Tyro Payments 125 York Street Sydney 2000 www.tyro.com
EFTPOSSetupGuide_Cover0414.indd 3 1/04/2014 11:57 am
Faster Smarter IP EFTPOS Tyro’s EFTPOS terminals are easy to set up and use with step-by-step prompts guiding you through the process.
This guide takes you through the installation and usage of your terminals while informing you of security standards and measures.
Tyro Payments partners with most Point Of Sale (POS) and Practice Management (PMS) vendors to offer Integrated Payment Solutions for retail, hospitality, fashion, medical and other businesses.
Go to www.tyro.com to check if your POS /PMS partner is Tyro certified. If not ask them how to integrate with Tyro.
For the most updated version of this guide go to www.tyro.com.
Thank you for choosing Tyro as your Merchant Service Provider.
Unpack and Install
Check your Tyro EFTPOS terminal package to ensure all components, as listed on the following pages are included. If any parts are missing, contact Tyro Customer Support.
Set Up
The first time you switch on your terminal, a Setup Wizard will assist you to connect to your network and to set up your terminal password.
The desktop terminals connect via Ethernet, however they also support GPRS connections with additional hardware supplied by Tyro on request. The portable terminals support both GPRS and WiFi connections.
Check on www.tyro.com to make sure that your network settings comply with Tyro’s requirements.
The Setup Wizard deals with two issues: The type of network connection you are using and the IP address configuration method used in the network.
GPRS Connection If using GPRS the terminals will have been pre-configured and will automatically connect to Tyro.
Ethernet Connection � Select Ethernet (if necessary)
and press DHCP for automatic or STATIC for manual IP address configuration. If unsure select DHCP.
� If you choose STATIC, the subsequent screens allow you to enter the necessary IP address information.
� Ask your network administrator for the IP address details.
WiFi Connection � Select WiFi (if necessary),
the terminal will then scan for available WiFi networks.
� Select your network from the list and then enter the required passphrase.
� Ask your network administrator for the WiFi configuration details.
� The terminal will only connect to a WPA2 secured network.
Activate
For security reasons Tyro terminals are shipped in deactivated mode. Once connected and powered up, call Tyro to activate. Quote your company’s trading name and the terminal’s serial no located on its base. Once activated, the terminal’s display will show your company’s name, current date/time and the “Swipe/Insert Card” message. 1
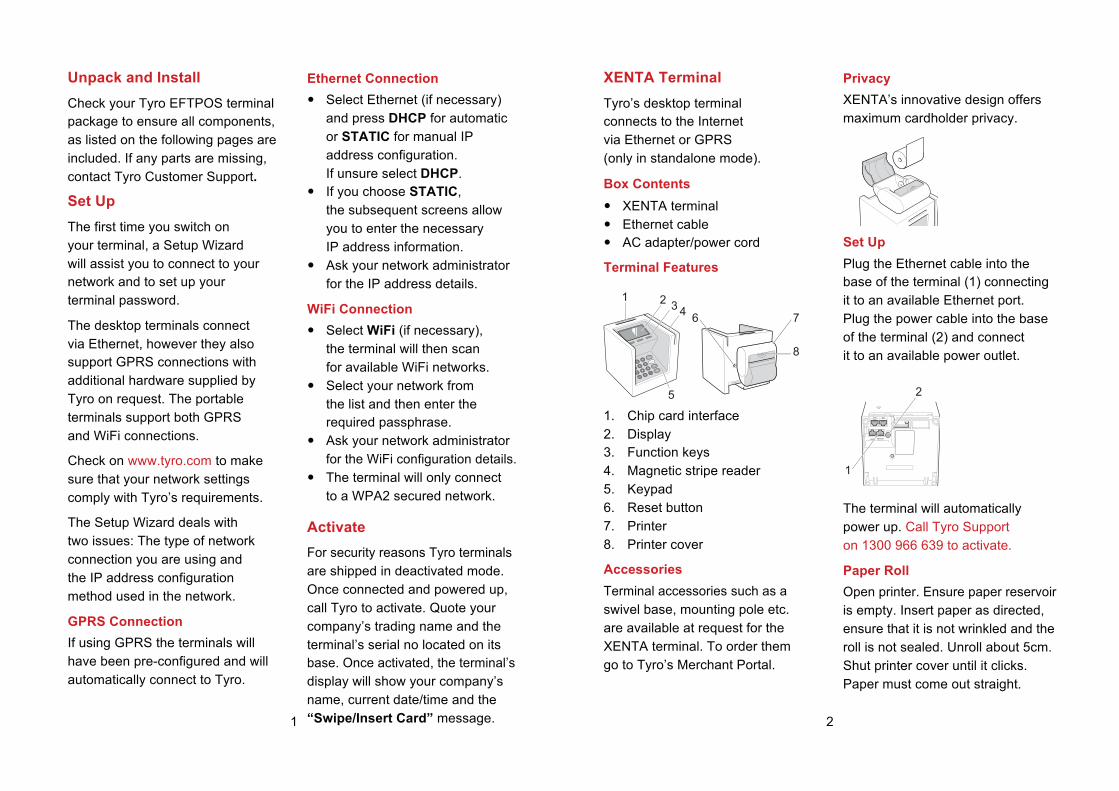
XENTA Terminal
Tyro’s desktop terminal connects to the Internet via Ethernet or GPRS (only in standalone mode).
Box Contents
� XENTA terminal � Ethernet cable � AC adapter/power cord
Terminal Features
1. Chip card interface 2. Display 3. Function keys 4. Magnetic stripe reader 5. Keypad 6. Reset button 7. Printer 8. Printer cover
Accessories
Terminal accessories such as a swivel base, mounting pole etc. are available at request for the XENTA terminal. To order them go to Tyro’s Merchant Portal.
Privacy
XENTA’s innovative design offers maximum cardholder privacy.
Set Up
Plug the Ethernet cable into the base of the terminal (1) connecting it to an available Ethernet port. Plug the power cable into the base of the terminal (2) and connect it to an available power outlet.
The terminal will automatically power up. Call Tyro Support on 1300 966 639 to activate.
Paper Roll
Open printer. Ensure paper reservoir is empty. Insert paper as directed, ensure that it is not wrinkled and the roll is not sealed. Unroll about 5cm. Shut printer cover until it clicks. Paper must come out straight.
2

XENTISSIMO Terminal Tyro’s portable lightweight terminal connects to the Internet via WiFi or GPRS (only in standalone mode).
Box Contents � XENTISSIMO terminal � Rechargeable battery � AC adapter/power cord
Terminal Features
1. Chip card interface 2. Display 3. Privacy shield 4. Function keys 5. Magnetic stripe reader 6. Keypad 7. Printer
Accessories Terminal accessories such as a cradle, carry bag, or lighter charger are available at request for the XENTISSIMO terminal. To order them go to Tyro’s Merchant Portal.
Privacy XENTISSIMO’s privacy shield offers maximum cardholder privacy and should not be removed.
Set Up Insert the battery as shown
Plug the power cable into the side of the terminal to charge the battery. Once it displays “Swipe/Insert Card”, the indicator will show the battery’s charge status. Call Tyro Support on 1300 966 639 to activate the terminal.
Paper Roll Open printer. Insert paper, ensure that it is not wrinkled and the roll is not sealed. Unroll about 5cm. Shut printer cover until it clicks. Paper must come out straight.
Standby Mode The XENTISSIMO can be configured to go into standby mode after 2 minutes of inactivity.
To enable/disable the standby mode: MENU >Settings >Standby Mode. When in standby, the display is blank. To re-activate the terminal press the ON button. Option not available for WiFi enabled terminals integrated with a POS system. 3
Accepted Cards
Tyro acquires payments for all EFTPOS, MasterCard and VISA cards.
To accept American Express, JCB, Diners and Discover cards a supplementary agreement is required with American Express and Diners.
EMV® Chip Cards
EMV® enabled Chip Cards offer enhanced security for the merchant. They must be inserted into the reading slot as shown below.
Insert the chip end of the card into the terminal facing up.The EMV® Chip Card determines the way transactions are processed:
� No PIN or Signature � PIN/Signature � Signature only � PIN only � Both a PIN and a Signature.
If the customer chooses to sign just enter OK on the PIN screen.
Always follow the terminal prompts to process the transaction correctly.
The terminal will beep and display “Remove Card” indicating when the card can be removed.
The card must remain in the reading slot during the whole transaction Magnetic Stripe Cards
Magnetic stripe cards must be swiped as shown:
Fraudulent Cards
Check for signs of suspicious activity:
� The terminal shows “Insert Card” although the card does not have a chip.
� The cardholder tries to distract or rush you during the sale.
� The cardholder makes an initial small purchase, leaves and returns to make more purchases.
� Bulk buying of valuable goods regardless of size or colour.
Call Tyro Support during or after the transaction on 1300 966 639 and ask for a “Code 10 Authorisation”.
Tyro Support will guide you through a set of questions and if required will contact the card issuer.
4

Administrator Password
The Administrator Password will be required to change the Tipping and Refund Passwords and to enable or disable functionalities on the terminal.
Tyro will have emailed the default Administrator Password to the account administrator’s email address indicated in the application form.
Refund Password
In order to restrict the ability to process Refunds, the administrator can allocate a separate password to this function.
In case no Refund Password has been allocated the Administrator Password can be used as the default Refund Password.
Tipping Password
In order to restrict the ability to complete Tipping, the administrator can allocate a separate password to this function.
In case no Tipping Password has been allocated then the Administrator Password can be used as the default Tipping Password.
Recover Passwords
The passwords are stored on the terminal and cannot be retrieved by Tyro Customer Support.
In case you lost or forgot any of the passwords go to: MENU >Settings >Recover Password.
All passwords will be consequently emailed to the address shown on the terminal screen.
Change Passwords
Go to MENU >Settings >Change Password to change the passwords.
Password Security
The Administration Password and the Refund Password are the only protection against misuse of the “Refund/Void” transaction feature.
We strongly recommend changing the passwords:
� On a regular basis � After receiving new terminals � When members of staff with
knowledge of any password cease employment.
Tyro strongly advises you to use secure passwords and not to keep written records of any passwords.
5
Integrated EFTPOS/Easyclaim
With Integrated EFTPOS you can seamlessly integrate credit, debit, gift or any other card processing into your business.
With Integrated Medicare Easyclaim the PMS talks to the Tyro terminal preventing double entry errors, abolishing end of day batching while increasing transaction speed.
Tyro partners with the majority of POS/PMS vendors. Check on www.tyro.com for the current list of all Tyro’s POS/PMS partners.
Tyro terminals will first have to be enabled for integrated transactions. To do so go to: MENU >Settings >Integrated EFTPOS >Enable >OK.
Integrated EFTPOS/Easyclaim is not available on GPRS terminals.
Pairing with POS/PMS To process Integrated EFTPOS/ Easyclaim Tyro terminals must be paired with your POS/PMS system.
To do so refer to your POS/PMS’s User Guide Manual.
If the terminal does not react to a POS/PMS initiated transaction, follow the instructions that appear on your POS/PMS display.
Menu Navigation
Press MENU to enter the menu. Use buttons �� to scroll through the settings. Press OK to choose. Return to the main display by pressing the red STOP button.
Transaction Times The average transaction time is less than 3 seconds via Ethernet/WiFi and less than 7 seconds via GPRS.
Purchase Transactions To process a Purchase Transaction, the customer must simply insert or swipe their card and select an account type.
If you have Integrated EFTPOS but want to process a transaction directly on the terminal go to: MENU >Transaction >Purchase. Swipe/Insert the card and follow the prompts.
Cash Out Transactions Cash Outs can be offered when processing a Purchase Transaction (only cheque/savings mode). This feature is only available to EFTPOS Debit cardholders.
Cash Out must first be enabled via the settings menu: MENU >Settings >Prompt Cash Out >Enable >OK.
6

Card-Non Present/MOTO Transactions
The terminals can be configured to accept Card-Non Present, Mail Order Manual and Telephone (MOTO) Transactions. The MOTO function must be enabled via the settings menu: MENU >Settings >Enable MOTO >OK. Follow the prompts and enter your Administrator Password.
Note that MOTO transactions have a higher risk of chargeback and are conducted at the merchant’s own risk. Please use with care.
Integrated MOTO In integrated environments, when the terminal faces the customer, you ‘”The Merchant” should be the only one using the MOTO button.
After initiating the transaction on the POS press the “Menu” button and select the MOTO option. The POS will ask you to confirm the use of MOTO.
Cardholder’s Data Security � If you can’t enter the client’s data
while on the phone, process the transaction as a Mail Order.
� Never request cardholder’s data to be sent in any electronic form.
� For fax orders use a secured /monitored fax machine.
Cardholder’s Data Storage � Never store the CVV2 security
panel. � Never store cardholder’s data
on a computer or POS system. � Securely store mail/fax orders
for 6 months after the transaction. � Securely dispose of all stored
data after 6 months.
Secure MOTO Transactions � When the card is present
always process the payment using the chip, magnetic stripe or tap.
� If none of the above work, do not accept the card.
� Never use MOTO to bypass electronic processing.
� If you were to accept an order using MOTO, you must ensure that -on collection of the goods- the card is used to process the payment of the remaining balance.
� When goods are picked up following MOTO orders, you must process the card electronically.
Above rules are set by the Payments Card Industry (PCI) Council. By failing to apply them you increase the risk of identity theft and may incur heavy fines.
7
Manual Transactions
If you cannot electronically process a payment (no connection to Tyro /no power supply) you will have to complete the transaction manually. To do so, use Tyro’s Manual Transaction Receipts to be found on Tyro’s Merchant Portal.
After completion you must call Tyro Support on 1300 966 639 to get a Voice Authorisation.
We recommend pre-printing a stock of Manual Transaction Receipts.
With Voice Authorisation
You can only process credit card transactions by getting a Voice Authorisation, in which case you must provide Tyro with the:
� Merchant ID and Terminal ID (MENU >Settings >Terminal Info) or Account name and the terminal’s 7-digit serial number
� Customer’s credit card number and its 4-digit expiry date
� Card’s 3 or 4-digit security code � Amount of the transaction
Tyro will give you a transaction reference number to be noted on the Manual Transaction Receipt.
Note that debit card transactions cannot be manually processed.
Without Voice Authorisation
Tyro strongly recommends that you do not process payments without Voice Authorisation. If you choose to do so, it is at your own risk.
In that case you must use Tyro’s Manual Transaction Receipts to document the transaction and to record the customer’s signature at the moment of purchase.
Once the Tyro terminal is online again, all transactions processed without Voice Authorisation must be completed as MOTO transactions.
The Manual Transaction Receipts must be retained on your premises in accordance with the PCI rules.
Void Transactions
Most credit transactions can be voided (cancelled) up to 48 hours after the transaction occurred.
Voiding a transaction requires the Refund or Administrator Password. Go to: Menu >Void Transaction> Last transaction/By Transaction Reference.
To void a transaction using “By Transaction Reference” enter the original transaction reference.
EFTPOS transactions can’t be voided.
8

Refund Transactions The Refund function is by default disabled for security reasons. It must first be enabled via the settings menu: MENU >Settings >Enable Refunds >Enter Refund Password >Enable >OK. The Administrator or Refund Passwords are required for you to process Refunds.
If the wrong password is used the terminal will lock out for increasing periods of time every time the wrong password is entered. After 15 wrong attempts the terminal will block. Tyro Support must then be contacted.
Reprint Receipt If you want to reprint a receipt for the last transaction go to: MENU >Reprint Receipts.
Transaction Receipts Transactions receipts must be securely stored in your premises up to six months from the date of transaction for the case of a dispute.
Terminal Reporting For transaction summaries and detailed reports go to: MENU > Print Reports >Summary/Detailed. Choose reporting date/type of card.
Settlement Time
By default each terminal is configured to settle at midnight, terminal local time.
Settlement time can be changed; � On the terminal � Via Tyro customer support
When using Tyro manual settlement is not required.
For next day funds transfer, the latest settlement time is 5 am AEST. If the terminal settles after 5 am AEST, Tyro’s instructions for the funds transfer will occur on the following banking day.
To check the settlement time or to change settlement time go to MENU >Configuration>Automatic Settlement on the terminal.
Tyro Customer Support can configure the default settlement time to be fixed to 5am AEST. If this is selected the settlement time cannot be changed on the terminal and the terminal cannot be manually settled.
If for any reason, you wish to personally change the settlement time, go to: Menu> Configuration> Automatic Settlement.
9
Manual Settlements
In rare circumstances you may want to force a Manual Settlement at a non-routine time. This can be done through the Manual Settlement feature that is activated via your POS.
In the majority of the cases, Tyro’s Auto Settlement at your selected time is the most convenient way to settle. Manual settlement should only be used in exceptional circumstances.
Accommodation
The Accommodation Services is a feature specifically designed for businesses offering accommodation.
Using the Pre-Authorisation function you can confirm/guarantee a booking. This function is by default disabled and you must call Tyro to enable it. It will automatically be added to all terminals linked to a Merchant’s ID.
To enable/disable Pre-Authorisation per terminal go to: MENU >Settings >Pre-Auth >Enable/Disable.
The pre-authorised amount cannot exceed the accommodation fee plus the expected expenses.
Pre-Authorisations and Completions can be differentiated and reported on Tyro’s transaction reporting website
Dynamic Currency Conversion (DCC)
Businesses can register for Dynamic Currency Conversion (DCC) offering their international customers the choice of paying in AUD or in their home currency.
Tyro offers DCC functionality for most international credit cards. If the terminal is DCC enabled, it will recognise an international card and will present the cardholder with a currency choice. Explain the DCC options to your customers.
If a customer pays in his home currency, the transaction amount will appear both in AUD and in the foreign currency including the applied exchange rate.
You can also offer MOTO DCC to your mail/telephone customers, provided you have requested the activation of this feature. You must be in compliance with the MOTO DCC Guidelines when doing so.
VISA and MasterCard may audit merchants offering DCC. If you fail to comply with the DCC or MOTO DCC Guidelines they have the right to stop you from offering DCC. Go to www.tyro.com to download the comprehensive DCC and MOTO DCC Guidelines.
10
Integrated Pay@Table With Integrated Pay@Table, Tyro’s mobile terminal synchronises with the POS to enable you to take card payments at your customer’s table.
Entering a table number into the terminal automatically displays the bill amount to the cardholder, who will then be guided through a Full Payment or Split-Bill process. Different tipping options will also be offered to the cardholder.
Tipping
The Tipping function allows a tip to be added to the transaction amount in two different ways; which ever suits your business best.
The customer can either enter the tip amount directly into the terminal (before the receipt is printed out) or can manually add the tip to the receipt afterwards.
Both credit and debit cardholders can enter the tip directly into the terminal whereas only credit cardholders can add a tip directly on the receipt. To allow for this, enter a tip of $0 into the terminal directly after having entered the bill amount.
The terminal will process a Pre-Authorisation and will produce a receipt with space allocated for tips. The tip amount can be added to the
pre-authorised transaction at a later stage but before Auto Settlement.
The Tipping function is compatible with DCC allowing the cardholder to enter the tip in their home currency.
To activate Tipping go to: MENU >Settings >Tipping >Enable >OK.
Go to www.tyro.com to download the comprehensive Paying and Tipping Guidelines.
Rental The Rental Services feature is meant to accommodate businesses that offer equipment or vehicles for rent.
Electronic Imprint Instead of keeping credit card details on file as collateral, an electronic imprint is made and securely stored by Tyro.
As part of this process the customer acknowledges the bond amount related to the rental agreement.
Return of Goods Once the rented goods returned, the electronic imprint must be cancelled through the terminal. If the goods are not returned or are damaged, the bond amount (agreed to by the customer) can be fully or partially captured by entering the imprint reference no. and amount into the terminal.
11
Gift Card Program
Tyro’s Gift Card Program includes a complete set of online reporting and administrative tools allowing easy management and evaluation of card-based programs.
Your Tyro account manager can inform you on the advantages of the Gift Card Program.
After enrolling to Tyro’s Gift Card Program, call Customer Support to enable this feature.
You can enter the Gift Card menu by swiping a Gift Card. You can then access the following options:
� Issue – Issues a new Gift Card � Purchase – Processes a Gift
Card transaction � Add Value – Adds value
to an issued Gift Card. This option only appears if previously enabled on the terminal.
� Balance Inquiry � Void � Reports � Enable Add Value
Above features apply only to the Tyro Gift Card Program. For all other Gift Cards refer to their program’s guidelines.
.
Transaction Data
Occasionally a cardholder might question a transaction on their bank statement; their bank can request from Tyro the relevant data. You must be able to present all receipts.
Go to www.tyro.com to download the comprehensive Integrated Pay@Table, Rental and Accommodation Guidelines.
Merchant Portal
A complete summary of all types of transactions and an updated and detailed breakdown of the cards used can be found on Tyro’s Merchant Portal on www.tyro.com >Log In
To access this portal, you will need your username (email address on your application) and password (sent to this address).
More information on the use of the Merchant Portal can be found on www.tyro.com.
System Updates
Tyro remotely conducts system updates that guarantee user friendly and secure terminal usage and constantly improved functionality.
12

PCI-DSS Security Recommendations
As well as protecting cardholder information, the PCI-DSS Security Recommendations aim to protect customer information and systems sharing the same connection to the Internet.
Most credit card schemes require the merchants to be PCI-DSS compliant.
Change Default Settings
We recommend that you change the default password and security settings on you router and ADSL modem to protect your network.
Should members of the staff with knowledge of any security passwords cease employment, all passwords and security codes should be changed.
Use WPA2 on WiFi networks
Only use WPA2 to secure your WiFi networks. Avoid unsecured or WEP encrypted wireless networks.
Use Firewalls
In accordance with security best practices and the advice of www.staysmartonline.gov.au, Tyros recommends you protect your network with an effective firewall.
Use Virus Scanners
The POS system and any mobile devices, e.g. laptops or mobile phones connecting to the same network as the EFTPOS terminals, should have anti-virus and anti-malware software installed and frequently updated using the automatic software update feature.
13
Payment Card Industry (PCI) Rules
The PCI Security Standards Council promotes the highest cardholder data protection. Three PCI standards regulate the payment process:
� PIN Transaction Security Standard (PTS): Standard for physical and logical security of the cardholder’s PIN.
� Payment Application Data Security Standard (PA-DSS): Data standard aiming to prevent payment applications from exposing cardholder data.
� The PCI Data Security Standard (PCI-DSS): Standard setting the minimal requirements for proactively safeguarding customer’s privacy and payment card data.
Tyro’s Security Standards
Tyro uses only PTS certified terminals and its applications are PA-DSS certified.
When exclusively using Tyro’s Payment Solutions, you only need to follow Tyro’s guidelines around MOTO transaction security to meet PCI-DSS compliance requirements.
When using other vendors’ POS solutions you must refer to their PCI-DSS compliance requirements.
Cyber Security
We suggest you regularly check www.staysmartonline.gov.au >Small and Medium Businesses, a free resource with plenty of information on cyber security for small and medium businesses.
Tyro’s recommendations are not meant to replace the current PCI Guidelines, which can be found on www.pcisecuritystandards.org.
14
Terminal Damage Policy
If a merchant damages a terminal, Tyro will debit the cost of repairing it or replacing it from the merchant’s account.
Tyro’s flat rate repair fees are:
$160 for XENTA $260 for XENTISSIMO
The removal of the PIN privacy shield, the damage or permanent marking of terminal casing, the damage from liquids or other misuse/neglect will attract repair or replacement fees (e.g. $90 for a PIN privacy shield replacement).
If a Tyro terminal is lost or damaged beyond reasonable repair - as duly determined by Tyro - its residual value will be charged to the merchant. Above rates exclude GST and are subject to change.
SIM Card Removal
Removal of the GPRS SIM card will automatically disable the SIM card functionality and will require the terminal to be returned for reconfiguration to Tyro.
Terminal Return Policy
Terminals must be returned to Tyro within 5 business days of receipt of the courier satchel sent to you upon your return request.
We will supply you with a prepaid courier satchel and instructions as to how to return the terminal.
Securely package the terminal and place in courier satchel. Call the courier company on indicated phone number to book a pick up, quote the pre-paid consignment note number and Tyro’s address: 125 York Street, Sydney, NSW 2000.
Paper Rolls
To order Tyro’s terminal paper rolls, call Tyro Customer Support. When ordering, please specify the type of terminal you are using.
Standard delivery time is 5 to 7 business days. Fees may apply.
Tyro Customer Support
Call Tyro Customer Support on 1300 966 639 for terminal activation, authorisations, or other queries going beyond the content of this Set Up Guide.
15
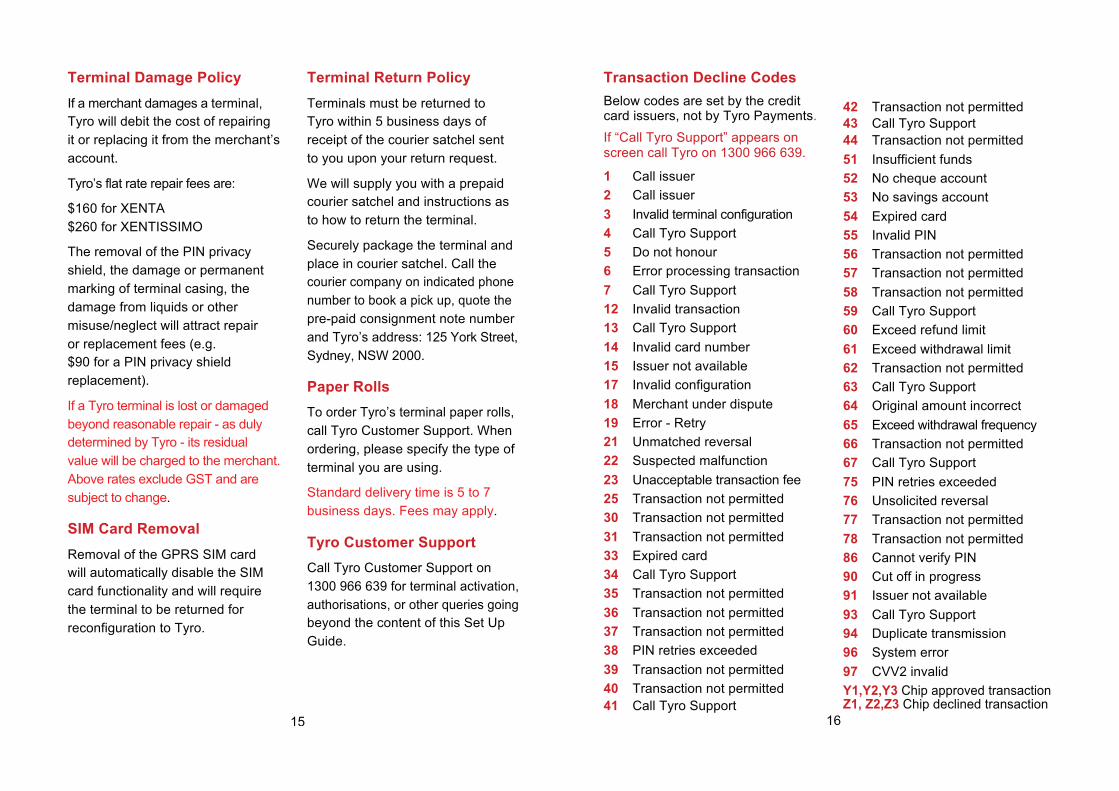
Transaction Decline Codes Below codes are set by the credit card issuers, not by Tyro Payments. If “Call Tyro Support” appears on screen call Tyro on 1300 966 639.
1 Call issuer 2 Call issuer 3 Invalid terminal configuration 4 Call Tyro Support 5 Do not honour 6 Error processing transaction 7 Call Tyro Support 12 Invalid transaction 13 Call Tyro Support 14 Invalid card number 15 Issuer not available 17 Invalid configuration 18 Merchant under dispute 19 Error - Retry 21 Unmatched reversal 22 Suspected malfunction 23 Unacceptable transaction fee 25 Transaction not permitted 30 Transaction not permitted 31 Transaction not permitted 33 Expired card 34 Call Tyro Support 35 Transaction not permitted 36 Transaction not permitted 37 Transaction not permitted 38 PIN retries exceeded 39 Transaction not permitted 40 Transaction not permitted 41 Call Tyro Support
42 Transaction not permitted 43 Call Tyro Support 44 Transaction not permitted 51 Insufficient funds 52 No cheque account 53 No savings account 54 Expired card 55 Invalid PIN 56 Transaction not permitted 57 Transaction not permitted 58 Transaction not permitted 59 Call Tyro Support 60 Exceed refund limit 61 Exceed withdrawal limit 62 Transaction not permitted 63 Call Tyro Support 64 Original amount incorrect 65 Exceed withdrawal frequency 66 Transaction not permitted 67 Call Tyro Support 75 PIN retries exceeded 76 Unsolicited reversal 77 Transaction not permitted 78 Transaction not permitted 86 Cannot verify PIN 90 Cut off in progress 91 Issuer not available 93 Call Tyro Support 94 Duplicate transmission 96 System error 97 CVV2 invalid Y1,Y2,Y3 Chip approved transaction Z1, Z2,Z3 Chip declined transaction
16
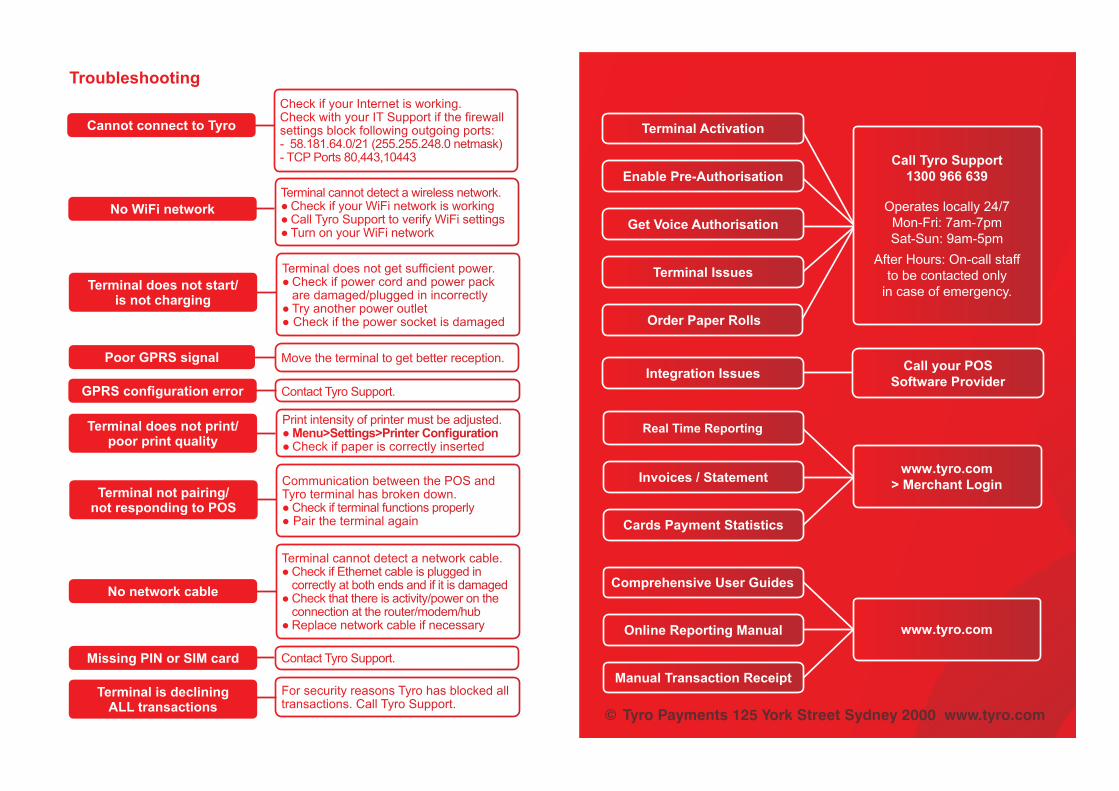
Troubleshooting
Terminal cannot detect a network cable.Ɣ�&KHFN�LI�(WKHUQHW�FDEOH�LV�SOXJJHG�LQ�FRUUHFWO\�DW�ERWK�HQGV�DQG�LI�LW�LV�GDPDJHG
Ɣ�&KHFN�WKDW�WKHUH�LV�DFWLYLW\�SRZHU�RQ�WKH�FRQQHFWLRQ�DW�WKH�URXWHU�PRGHP�KXE
Ɣ�5HSODFH�QHWZRUN�FDEOH�LI�QHFHVVDU\
No network cable
7HUPLQDO�FDQQRW�GHWHFW�D�ZLUHOHVV�QHWZRUN�Ɣ�&KHFN�LI�\RXU�:L)L�QHWZRUN�LV�ZRUNLQJƔ�&DOO�7\UR�6XSSRUW�WR�YHULI\�:L)L�VHWWLQJVƔ�7XUQ�RQ�\RXU�:L)L�QHWZRUN
No WiFi network
&RQWDFW�7\UR�6XSSRUW�Missing PIN or SIM card
&RQWDFW�7\UR�6XSSRUW�*356�FRQ¿JXUDWLRQ�HUURU
&KHFN�LI�\RXU�,QWHUQHW�LV�ZRUNLQJ��&KHFN�ZLWK�\RXU�,7�6XSSRUW�LI�WKH�¿UHZDOO�VHWWLQJV�EORFN�IROORZLQJ�RXWJRLQJ�SRUWV����������������������������������QHWPDVN� ��7&3�3RUWV�������������
Cannot connect to Tyro
&RPPXQLFDWLRQ�EHWZHHQ�WKH�326�DQG�7\UR�WHUPLQDO�KDV�EURNHQ�GRZQ�Ɣ�&KHFN�LI�WHUPLQDO�IXQFWLRQV�SURSHUO\Ɣ�3DLU�WKH�WHUPLQDO�DJDLQ
Terminal not pairing/ not responding to POS
7HUPLQDO�GRHV�QRW�JHW�VXI¿FLHQW�SRZHU�Ɣ�&KHFN�LI�SRZHU�FRUG�DQG�SRZHU�SDFN� DUH�GDPDJHG�SOXJJHG�LQ�LQFRUUHFWO\
Ɣ�7U\�DQRWKHU�SRZHU�RXWOHWƔ�&KHFN�LI�WKH�SRZHU�VRFNHW�LV�GDPDJHG
Terminal does not start/ is not charging
0RYH�WKH�WHUPLQDO�WR�JHW�EHWWHU�UHFHSWLRQ�Poor GPRS signal
Terminal is declining ALL transactions
)RU�VHFXULW\�UHDVRQV�7\UR�KDV�EORFNHG�DOO�WUDQVDFWLRQV��&DOO�7\UR�6XSSRUW�
Terminal does not print/poor print quality
3ULQW�LQWHQVLW\�RI�SULQWHU�PXVW�EH�DGMXVWHG�Ɣ�0HQX!6HWWLQJV!3ULQWHU�&RQ¿JXUDWLRQƔ�&KHFN�LI�SDSHU�LV�FRUUHFWO\�LQVHUWHG
EFTPOSSetupGuide_Troubleshooting060213.indd 1 1/04/2014 11:40 am
Call Tyro Support 1300 966 639
Operates locally 24/7 Mon-Fri: 7am-7pmSat-Sun: 9am-5pm
After Hours: On-call staffto be contacted only
in case of emergency.
Call your POS Software Provider
www.tyro.com
Integration Issues
Online Reporting Manual
Comprehensive User Guides
Terminal Activation
Enable Pre-Authorisation
Get Voice Authorisation
Terminal Issues
Order Paper Rolls
Manual Transaction Receipt
© Tyro Payments 125 York Street Sydney 2000 www.tyro.com
www.tyro.com > Merchant Login Invoices / Statement
Real Time Reporting
Cards Payment Statistics
EFTPOSSetupGuide_Cover0414.indd 2 1/04/2014 11:57 am