Smart Software Manager satellite Installation · PDF fileSmart Software Manager satellite...
20
Smart Software Manager satellite Installation Guide First Published: December 01, 2014 Americas Headquarters Cisco Systems, Inc. 170 West Tasman Drive San Jose, CA 95134-1706 USA http://www.cisco.com Tel: 408 526-4000 800 553-NETS (6387) Fax: 408 527-0883
Transcript of Smart Software Manager satellite Installation · PDF fileSmart Software Manager satellite...

Smart Software Manager satellite Installation Guide First Published: December 01, 2014
Americas Headquarters Cisco Systems, Inc.
170 West Tasman Drive
San Jose, CA 95134-1706
USA http://www.cisco.com
Tel: 408 526-4000 800 553-NETS (6387)
Fax: 408 527-0883

THE SPECIFICATIONS AND INFORMATION REGARDING THE PRODUCTS IN THIS MANUAL ARE SUBJECT TO CHANGE WITHOUT NOTICE. ALL STATEMENTS,
INFORMATION, AND RECOMMENDATIONS IN THIS MANUAL ARE BELIEVED TO BE ACCURATE BUT ARE PRESENTED WITHOUT WARRANTY OF ANY KIND,
EXPRESS OR IMPLIED. USERS MUST TAKE FULL RESPONSIBILITY FOR THEIR APPLICATION OF ANY PRODUCTS.
THE SOFTWARE LICENSE AND LIMITED WARRANTY FOR THE ACCOMPANYING PRODUCT ARE SET FORTH IN THE INFORMATION PACKET THAT SHIPPED WITH
THE PRODUCT AND ARE INCORPORATED HEREIN BY THIS REFERENCE. IF YOU ARE UNABLE TO LOCATE THE SOFTWARE LICENSE OR LIMITED WARRANTY,
CONTACT YOUR CISCO REPRESENTATIVE FOR A COPY.
The Cisco implementation of TCP header compression is an adaptation of a program developed by the University of California, Berkeley (UCB) as part of UCB's public domain version
of the UNIX operating system. All rights reserved. Copyright © 1981, Regents of the University of California.
NOTWITHSTANDING ANY OTHER WARRANTY HEREIN, ALL DOCUMENT FILES AND SOFTWARE OF THESE SUPPLIERS ARE PROVIDED “AS IS" WITH ALL FAULTS.
CISCO AND THE ABOVE-NAMED SUPPLIERS DISCLAIM ALL WARRANTIES, EXPRESSED OR IMPLIED, INCLUDING, WITHOUT LIMITATION, THOSE OF
MERCHANTABILITY, FITNESS FOR A PARTICULAR PURPOSE AND NONINFRINGEMENT OR ARISING FROM A COURSE OF DEALING, USAGE, OR TRADE PRACTICE.
IN NO EVENT SHALL CISCO OR ITS SUPPLIERS BE LIABLE FOR ANY INDIRECT, SPECIAL, CONSEQUENTIAL, OR INCIDENTAL DAMAGES, INCLUDING, WITHOUT
LIMITATION, LOST PROFITS OR LOSS OR DAMAGE TO DATA ARISING OUT OF THE USE OR INABILITY TO USE THIS MANUAL, EVEN IF CISCO OR ITS SUPPLIERS
HAVE BEEN ADVISED OF THE POSSIBILITY OF SUCH DAMAGES.
Any Internet Protocol (IP) addresses and phone numbers used in this document are not intended to be actual addresses and phone numbers. Any examples, command display output, network
topology diagrams, and other figures included in the document are shown for illustrative purposes only. Any use of actual IP addresses or phone numbers in illustrative content is unintentional
and coincidental.
Cisco and the Cisco logo are trademarks or registered trademarks of Cisco and/or its affiliates in the U.S. and other countries. To view a list of Cisco trademarks, go to this URL: http://
www.cisco.com/go/trademarks. Third-party trademarks mentioned are the property of their respective owners. The use of the word partner does not imply a partnership relationship between
Cisco and any other company. (1110R)
The Java logo is a trademark or registered trademark of Sun Microsystems, Inc. in the U.S. or other countries.
© 2014 Cisco Systems, Inc. All rights reserved.

Smart Software Manager satellite Installation Guide
i
C O N T E N T S
P r e f a c e Preface iii
Audience iii
Document Conventions iii
Obtaining Documentation and Submitting a Service Request iv
C H A P T E R 1 Overview 1
About Smart Software Manager satellite Installation 1
Device Terminology 2
System Requirements 3
C H A P T E R 2 Installing Smart Software Manager satellite 5
Prerequisites of OVA File Deployment 5
Deploying the OVA File 5
Configuring the IP Address 6
Verifying Time Sync with the NTP 7
Launching the Cisco Smart Software Manager satellite 7
Setting Up Smart Software Manager satellite 8
Sample of Configuring the Call-home Profile to Use Smart Software Manager satellite on the
Cloud Service Router 10

Smart Software Manager satellite Installation Guide
Smart Software Manager satellite Installation Guide
ii

Smart Satellite Installation Guide
iii
Preface
This preface contains the following sections:
• Audience, page iii
• Document Conventions, page iii
• Obtaining Documentation and Submitting a Service Request, page iv
Audience
This guide is intended for site administrators who will manage Cisco Smart-enabled software installation and licensing.
Document Conventions Command descriptions use the following conventions:
Convention Description
bold Bold text indicates the commands and keywords that you enter literally
as shown.
Italic Italic text indicates arguments for which the user supplies the values.
[x] Square brackets enclose an optional element (keyword or argument).
[x | y] Square brackets enclosing keywords or arguments separated by a vertical
bar indicate an optional choice.

Preface
Document Conventions
Smart Software Manager satellite Installation Guide
iv
{x | y} Braces enclosing keywords or arguments separated by a vertical bar
indicate a required choice.
[x {y | z}] Nested set of square brackets or braces indicate optional or required
choices within optional or required elements. Braces and a vertical bar
within square brackets indicate a required choice within an optional
element.
variable Indicates a variable for which you supply values, in context where italics
cannot be used.
string A nonquoted set of characters. Do not use quotation marks around the
string or the string will include the quotation marks.
Examples use the following conventions:
Convention Description
screen font Terminal sessions and information the switch displays are in screen font.
boldface screen font Information you must enter is in boldface screen font.
italic screen font Arguments for which you supply values are in italic screen font.
< > Nonprinting characters, such as passwords, are in angle brackets.
[ ] Default responses to system prompts are in square brackets.
!, # An exclamation point (!) or a pound sign (#) at the beginning of a line
of code indicates a comment line.
This document uses the following conventions:
Note Means reader take note. Notes contain helpful suggestions or references to material not covered in the manual.
Caution Means reader be careful. In this situation, you might do something that could result in equipment damage or
loss of data.
Obtaining Documentation and Submitting a Service Request For information on obtaining documentation, using the Cisco Bug Search Tool (BST), submitting a service
request, and gathering additional information, see What's New in Cisco Product Documentation, at: http://
www.cisco.com/c/en/us/td/docs/general/whatsnew/whatsnew.html.
Subscribe to What's New in Cisco Product Documentation, which lists all new and revised Cisco technical
documentation, as an RSS feed and deliver content directly to your desktop using a reader application. The
RSS feeds are a free service.

Smart Satellite Installation Guide
1
Overview
This chapter contains the following sections:
• About Smart Software Manager satellite Installation, page 1
• Device Terminology, page 2
• System Requirements, page 3
About Smart Software Manager satellite Installation This section describes the process involved in launching the Cisco Smart Software Manager satellite.
Note Ensure that you are assigned to a smart account before you proceed with the tasks mentioned in this guide.
The Smart Software Manager satellite requires the configurations mentioned in this section to ensure secure
data transfer to Cisco.com. Your installation package of the OVA build for Smart Software Manager consists
of the following:
• JEOS
• Smart Call Home Transport Gateway(TGW) – refer to References for TGW links
• Smart Software Manager satellite
Note JEOS pronounced as juice stands for Just Enough Operating System. It contains various system and
middleware components. It provides basic services for ServicePack components to operate and play an
enabling role. Some of the examples include: Hardened CentOS, ActiveMQ, MYSQL, Connectivity TGW,
LCM AdminShell and Agent.
This figure shows the satellite installation workflow process:
Overview
About Smart Software Manager satellite Installation
Smart Software Manager satellite Installation Guide
2
OVA – Open Virtualization Appliance
JEOS – Just Enough Operating System
You must configure the following before you proceed to install:
• Deploying the OVA file on the VSphere Client
• Configuring the IP address at the Console
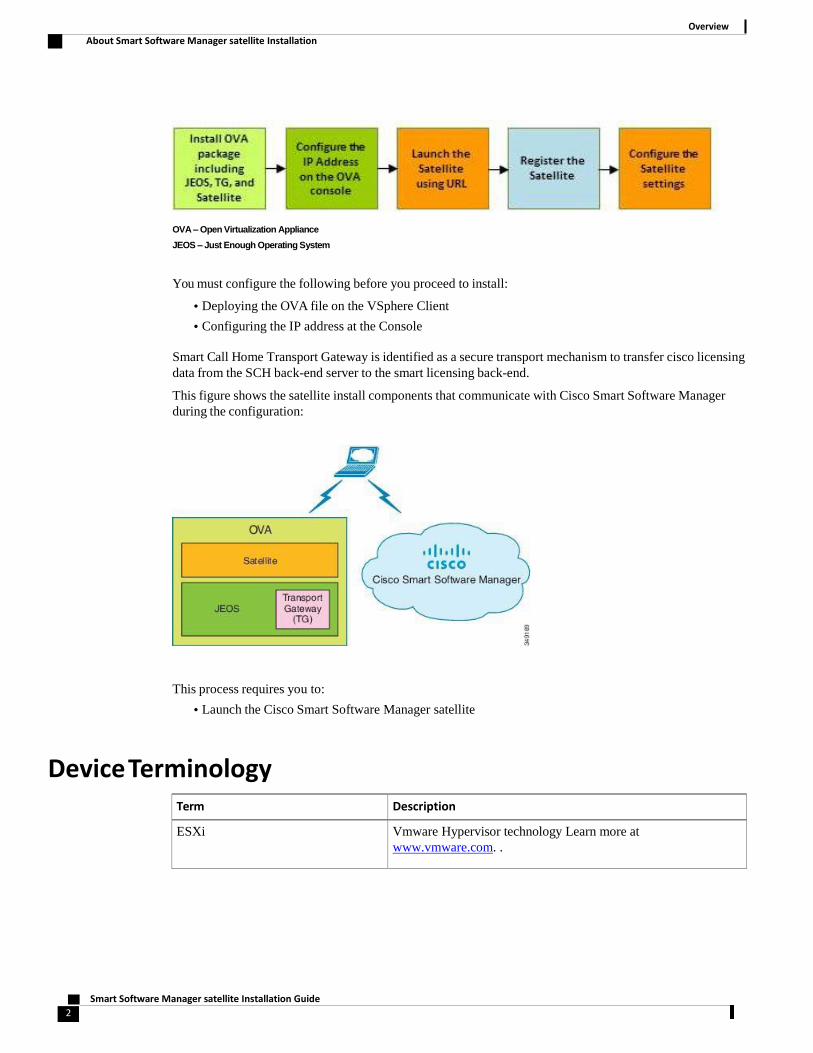
Smart Call Home Transport Gateway is identified as a secure transport mechanism to transfer cisco licensing
data from the SCH back-end server to the smart licensing back-end.
This figure shows the satellite install components that communicate with Cisco Smart Software Manager
during the configuration:
This process requires you to:
• Launch the Cisco Smart Software Manager satellite
Device Terminology
Term Description
ESXi Vmware Hypervisor technology Learn more at
www.vmware.com. .

Smart Satellite Installation Guide
3
Term Description
Open Virtual Appliance or Application
(OVA) file
Package that contains the following files used to describe a virtual
machine and saved in a single archive using .TAR packaging:
• Descriptor file (.OVF)
• Manifest (.MF) and certificate files (optional)
Open Virtual Machine Format (OVF) Platform-independent method of packaging and distributing Virtual
Machines (VMs).
Virtual Machine (VM) Virtualized x86 PC environment in which a guest operating system
and associated application software can run. Multiple VMs can
operate on the same host system concurrently.
vSphere Client User interface that enables users to connect remotely to vCenter
Server or ESXi host from any Windows PC. You can use the
primary interface for vSphere Client to create, manage, and
monitor VMs, their resources, and the hosts. It also provides
console access to VMs.
System Requirements
Note Ensure that you are assigned to a smart account before you proceed with the tasks mentioned in this guide.
The following install component is required for the satellite installation:
• Satellite OVA file
Ensure that the OVA image supplied for the installation of Cisco Smart Software Manager satellite has the
following configuration:
• 50GB-200GB hard disk
• 8GB Memory
• 4 Virtual CPUs

Overview
About Smart Software Manager satellite Installation
Smart Software Manager satellite Installation Guide
4

Smart Satellite Installation Guide
5
Installing Smart Software Manager satellite
This chapter contains the following sections:
• Prerequisites of the OVA File Deployment for the Smart Satellite, page 5
• Deploying the OVA file for the Smart Software Manager satellite, page 5
• Configuring the IP Address, page 6
• Verifying Time Sync with the NTP , page 7
• Launching the Cisco Smart Software Manager satellite, page 7
• Setting Up Smart Software Manager satellite, page 8
• Sample of Configuring the Call-home Profile to Use Smart Software Manager satellite on the Cloud
Service Router, page 10
Prerequisites of OVA File Deployment You must install and configure the following components before you install the OVA file:
ESXi v5.x host with sufficient OVA resources.
vSphere Client v5.x

Installing Smart Software Manager satellite
Deploying the OVA File
Smart Software Manager satellite Installation Guide
6
Deploying the OVA File
Step 1 Connect to the UCS EXSi server by logging into vSphere Client.
Step 2 Choose File > Deploy OVF Template.
Step 3 In the Deploy OVF Template—Source window, do the following:
a) Browse to the OVA file in the Deploy from a file or URL field.
b) Click Next. The Deploy OVF Template—OVF Template Details window opens.
Step 4 In the Deploy OVF Template—OVF Template Details window, review the product information, including the size
of the file and the VM disk, and then click Next.
Step 5 In the Deploy OVF Template—Name and Location window, do the following:
a) In the Name field, enter a name for the OVA file installation that is unique within the inventory folder and has up
to 80 characters.
b) In the Inventory Location pane, choose the location that you would like to use for hosting the OVA file.
c) Click Next.
Step 6 In the Deploy OVF Template—Disk Format window, do the following:
a) In the Datastore field, enter the datastore in which you want to store the OVA file.
b) In the Available space (GB) field, enter the value for disk space availability.
c) In the option for Provision, click the radio button for the Thick Provision disk format.
d) Click Next.
Step 7 In the Deploy OVF Template—Network Mapping dialog box, click Next.
Note You do not need to configure this dialog box.
Step 8 In the Ready to Complete window, do the following:
a) Review the deployment settings information.
b) Check the Power on after deployment check box.
c) Click Finish to install the image.
Step 9 Power on the VM. You will be prompted to log in and configure initial settings at the console on your vSphere Client.
See Configuring the IP Address.
Note This process takes time, so please be patient.

Installing Smart Software Manager satellite
Configuring the IP Address
Smart Satellite Installation Guide
7
Configuring the IP Address You can use the following procedure to configure the virtual machine IP address, its gateway and the
subnetmask:
Step 1 Login to console using the default user ID admin and a password Admin!23.
Note After you log in for the first time, you will be asked to change to a new password. Create a new password
and make a note of it for future reference.
Step 2 Configure the IP Address. At the command prompt enter the command conf ip <intf> <ipaddr> <netmask>
<gateway> in which
• intf—Interface name
• ipaddr—Static IP Address of virtual machine
• netmask—Subnet mask in dot notation
• gateway—Default gateway IP Address
Example:
conf ip eth0 172.168.16.130 255.255.255.128 172.168.16.129 in which
• eth0—Ethernet 0 interface
• 172.168.16.130 —Static IP Address of virtual machine
• 255.255.255.128 —Subnet mask
• 172.168.16.129 —Default gateway IP Address
Step 3 Configure the DNS.
Note Contact your network administrator to obtain the required DNS information.
You will need to enter at least one DNS IP address, and optionally additional IP addresses (shown in brackets in the
following command line).
At the command prompt enter the command:
conf dns -a <DNS ip-address1> [DNS ip-address2] [DNS ip-address3] [DNS ip-address4]
Example:
conf dns -a 192.168.1.1 192.168.2.1 conf dns -a 8.8.8.8 8.8.4.4
Note These two examples are of Google’s public DNS addresses. Please use the DNS addresses recommended by
your network administrator.
Step 4 Reload the VM machine to use the config IP Address. At the command prompt enter the command reload
The system prompts for reboot confirmation and provides options: Y or N. Type Y at the command prompt to confirm
reboot and proceed.
Example: admin# reload Do you want to reload the appliance [y/n]? : y

Installing Smart Software Manager satellite
Verifying Time Sync with the NTP
Smart Software Manager satellite Installation Guide
8
Step 5 At the command prompt enter the command show ip to verify the IP Address and DNS configured. The default gateway, IP
Address, DNS details are displayed.
Example: admin# show ip
Interface eth0 is up
DHCP is disabled
Device : eth0
IP : 172.168.16.130
MAC : 00:0C:29:F2:96:E9
Subnet Mask: 255.255.255.128
DNS Servers:
Nameserver1 : 8.8.8.8
Nameserver2 : 8.8.4.4
Gateway :
Interface: eth0
Gateway: 172.168.16.129
Proxy is not configured
admin#
Verifying Time Sync with the NTP You can use the following procedure to verify time sync with the NTP
Login to console using the default user ID admin and the password you created in Step 1 under
Configuring the IP Address. Use the following commands to verify the time sync
with NTP:
admin# timesync
===============================================================================
Synchronize Appliance Time
===============================================================================
Ntp Server Address [pool.ntp.org] : 171.68.38.65
Would you like to synchronize time with '171.68.38.65' (y|n)? y Successfully updated NTP sync interval
admin#
Note If the time sync fails, it gives the message: Problem while updating to NTP sync interval. Contact your
network administrator to obtain the required DNS information.
What to Do Next
Launch the Cisco Smart Software Manager satellite.

Installing Smart Software Manager satellite
Launching the Cisco Smart Software Manager satellite
Smart Satellite Installation Guide
9
Launching the Cisco Smart Software Manager satellite Before You Begin
Ensure the following actions:
• Deployed the OVA file on the VSphere Client
• Configured the IP address at the Console
Step 1 Provide the http://<ip-address>:8080 URL on a web browser to launch the Smart Satellite. The Cisco
Smart Software Manager satellite login screen is displayed.
Example: http://172.168.16.130:8080
Use the IP-address that you use in Step 2 of Configuring the IP Address.
Before You Begin
Ensure that you have installed and launched the Satellite before you begin the setup process.
Note Alternatively, you may also launch the Smart Satellite by using https://<ip-address>:8443.
Example:
https://172.168.16.130:8443
Installing Smart Software Manager satellite
Setting Up the Smart Software Manager satellite
Smart Software Manager satellite Installation Guide
10
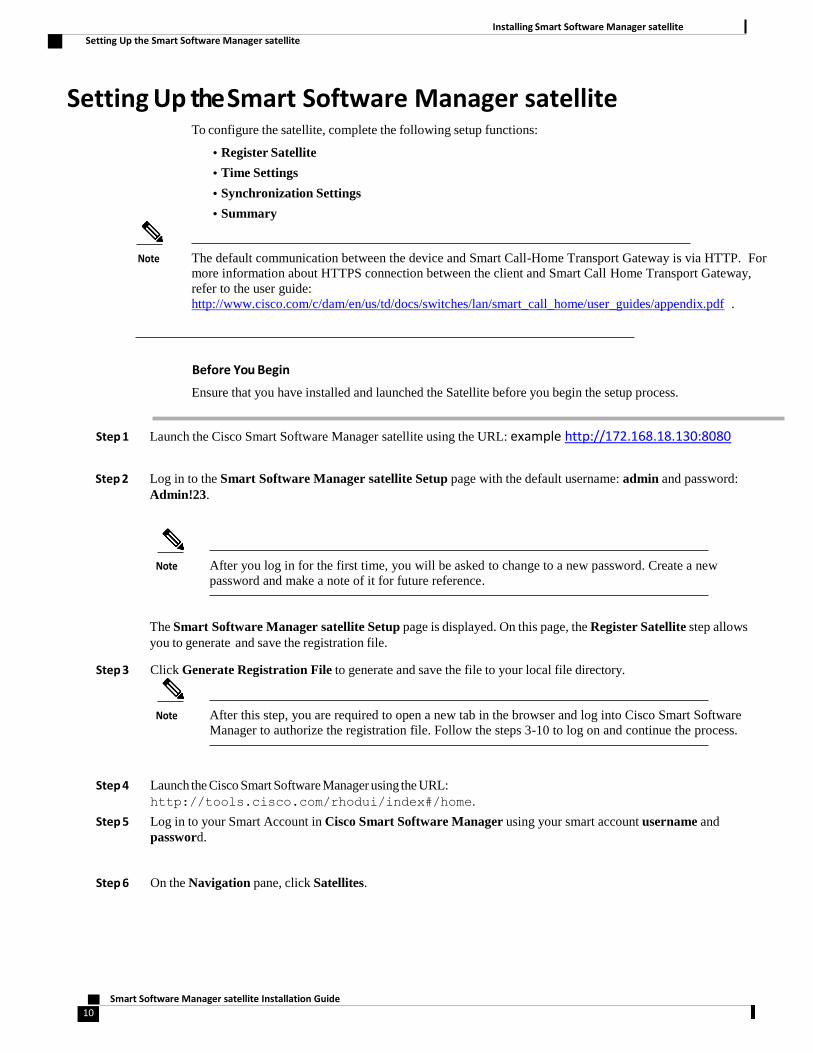
Setting Up the Smart Software Manager satellite To configure the satellite, complete the following setup functions:
• Register Satellite
• Time Settings
• Synchronization Settings
• Summary
Note The default communication between the device and Smart Call-Home Transport Gateway is via HTTP. For
more information about HTTPS connection between the client and Smart Call Home Transport Gateway,
refer to the user guide:
http://www.cisco.com/c/dam/en/us/td/docs/switches/lan/smart_call_home/user_guides/appendix.pdf .
Before You Begin
Ensure that you have installed and launched the Satellite before you begin the setup process.
Step 1 Launch the Cisco Smart Software Manager satellite using the URL: example http://172.168.18.130:8080
Step 2 Log in to the Smart Software Manager satellite Setup page with the default username: admin and password:
Admin!23.
Note After you log in for the first time, you will be asked to change to a new password. Create a new
password and make a note of it for future reference.
The Smart Software Manager satellite Setup page is displayed. On this page, the Register Satellite step allows
you to generate and save the registration file.
Step 3 Click Generate Registration File to generate and save the file to your local file directory.
Note After this step, you are required to open a new tab in the browser and log into Cisco Smart Software
Manager to authorize the registration file. Follow the steps 3-10 to log on and continue the process.
Step 4 Launch the Cisco Smart Software Manager using the URL:
http://tools.cisco.com/rhodui/index#/home.
Step 5 Log in to your Smart Account in Cisco Smart Software Manager using your smart account username and
password.
Step 6 On the Navigation pane, click Satellites.

Installing Smart Software Manager satellite
Setting Up the Smart Software Manager satellite
Smart Satellite Installation Guide
11
Step 7 In the Satellites page, click New Satellite button.
Step 8 In the New Satellite dialog box, enter the name of the satellite that requires registration.
Step 9 Click Browse, which is located next to the Registration File field, to select the registration file that was
generated in the Software Satellite Setup tool.
Step 10 In the Virtual Accounts field specify the virtual account in which you want to add the new satellite.
Step 11 In the text box next to Contact Email Address field, enter your email address. You will be notified to this
email once the satellite file has been authorized.
Step 12 Click Send Authorization Request to proceed. A message is displayed stating that an authorization file is
generated within 48 hours of the request and that you will receive an email notification to download the same.
Note If the authorization file is not generated within 48 hours of your request or you do not receive an email
notification, you can contact the Cisco support.
Step 13 Log into Cisco Smart Software Manager after you receive the email notification. Navigate to the Satellite page.
Step 14 In the Satellite page, locate the new satellite that you created in the satellite table. You will see an alert message in
the Alerts column displaying: Authorization File Ready and a link in the Actions column displaying: Download
Authorization File against the new satellite that you created in the satellite table.
Step 15 Click the Download Authorization File link and download the authorization file to your local file directory
on your hard drive.
Note After this step, you should use the Cisco Smart Software Manager satellite to upload the
authorized file. Perform the following steps to continue the setup process.
Step 16 In the Software Satellite, at the Register Satellite step, click Browse and navigate to the location where the
authorized satellite file was downloaded.
Step 17 Click Upload to upload the authorized satellite file.
Step 18 Click Next to proceed.
Step 19 On the Time Settings tab, ensure that the time on the satellite is accurate to synchronize with the Cisco licensing
cloud.
If the time varies, make sure that the JEOS platform on which the satellite is running is in sync with the NTP server.
Step 20 Click Next to proceed to the Synchronization Settings page.
A periodical synchronization must happen between the satellite and the Cisco licensing servers to update the
licenses and reauthorize any product instances.
Step 21 Choose one of the following methods to set up the synchronization.
This section allows you to set up the connection between the Cisco Smart Software Manager satellite and the
Cisco.com cloud portal to synchronize at different time intervals using the following mode options:
• Network Synchronization—Data is synchronized and updated at scheduled time periods in this mode. You
can choose this mode if you are able to connect to Cisco.com periodically. This type of synchronization is
suitable for network enabled environments.
Note Port 443 must be enabled for communications between the Smart Satellite and the Smart Manager.

Installing Smart Software Manage Satellite
Setting Up Smart Software Manage Satellite
Smart Software Manager satellite Installation Guide
12
• Manual Synchronization—Data is transferred through a file download and upload process in a manual
synchronization mode. You can choose this mode if you do not have network connectivity or cannot
establish a connection to communicate with Cisco Smart Software Manager.
Note You can modify this setting and schedule synchronization timing later in the Synchronization page
of the Cisco Smart Software Manager satellite portal. For more details, see Scheduling
Synchronization for Satellites.
Step 22 Click Next to view the Summary page.
Step 23 Review the summary details and click Configure Satellite to complete the satellite configuration and navigate to
the Cisco Smart Software Manager satellite screen or click Back to edit the previous page settings.
This completes the satellite configuration process. You can now navigate to the Cisco Smart Software Manager and
view the details of the satellite. Refer to the other sections of the user guide to view or perform various tasks of smart
licensing.
Step 24 (Optional step): You can use snapshot functionality to create a backup instance of Satellite.
Sample of Configuring the Call-home Profile to Use Smart Software Manager satellite on the Cloud Service Router
Procedure
Command or Action Purpose
Step 1 enable Enables privileged EXEC mode.
• Enter your password if prompted.
Step 2 configure terminal Enters global configuration mode.
Step 3 call-home Enters call-home configuration mode.
Step 4 contact-email-addr
email-address
Specify a valid email ID.
Step 5 profile name Specify the profile name.
Note: CiscoTAC-1 is the default profile.
Step 6 destination transport-
http
Sets the transport option to HTTP.
Step 7 destination address http
http from TG
Accesses the SCH Transport Gateway URL.
Note: The destination url is http://<ip-
address>:80/Transportgateway/services/DeviceRequestH
andler This is the same IP address you get from Step 2
of Configuring the IP Address.

Installing Smart Software Manager satellite
Setting Up the Smart Software Manager satellite
Smart Satellite Installation Guide
13
Step 8 active Activates the profile specified in step 5.
Step 9 exit Saves and exits the current configuration mode and returns
to privileged EXEC mode.
Step 10 end Returns to privileged EXEC mode.
Step 11 wr Saves the configuration.
Note This configuration is only a sample for CSR. Please see platform specific configurations for the call-
home profile config.
If you are using the cloud server router, you will need to change the destination URL in the smart call home
profile.
Example: Router# configure terminal
Router(config)# call-home
Router(cfg-call-home)# contact-email-addr [email protected]
Router(cfg-call-home)# profile CiscoTAC-1
Router(cfg-call-home-profile)# active
Router(cfg-call-home-profile)# destination transport-method http
Router(cfg-call-home-profile)# no destination transport-method email
Router(cfg-call-home-profile)# destination address http
http://172.168.16.130:8080/Transportgateway/services/DeviceRequestHandler

Installing Smart Software Manage Satellite
References
Smart Satellite Installation Guide
14
References Note For more information about TG, here is the TG user guide:
http://www.cisco.com/c/dam/en/us/td/docs/switches/lan/smart_call_home/user_guides/SCH_Ch4.pdf .
Note For more information about HTTPS connection between the client and Smart CallHome Transport Gateway, refer to the
user guide: http://www.cisco.com/c/dam/en/us/td/docs/switches/lan/smart_call_home/user_guides/appendix.pdf .