Smart Pianist Manual - Yamaha Corporation · Smart Pianist Manual 1 Smart Pianist Manual The Smart...
9
Smart Pianist Manual 1 Smart Pianist Manual The Smart Pianist is a special app for smart devices, providing various music-related functions when connected with compatible musical instruments. NOTICE When you activate Smart Pianist while the instrument is connected to the smart device, the settings of the instrument are automatically replaced by the settings on Smart Pianist. NOTE • The example screen captures in the instructions are in English, and appear differently depending on the smart device. • Availability of some of the displayed screens and certain functions depends on the particular connected instrument. • For information on compatible instruments and smart devices, refer to the website. https://www.yamaha.com/kbdapps/ EN
Transcript of Smart Pianist Manual - Yamaha Corporation · Smart Pianist Manual 1 Smart Pianist Manual The Smart...
Smart Pianist Manual 1
Smart Pianist Manual
The Smart Pianist is a special app for smart devices,
providing various music-related functions when
connected with compatible musical instruments.
NOTICEWhen you activate Smart Pianist while the instrument is
connected to the smart device, the settings of the instrument
are automatically replaced by the settings on Smart Pianist.
NOTE• The example screen captures in the instructions are in English,
and appear differently depending on the smart device.
• Availability of some of the displayed screens and certain
functions depends on the particular connected instrument.
• For information on compatible instruments and smart devices,
refer to the website.
https://www.yamaha.com/kbdapps/
EN
Smart Pianist Manual 2
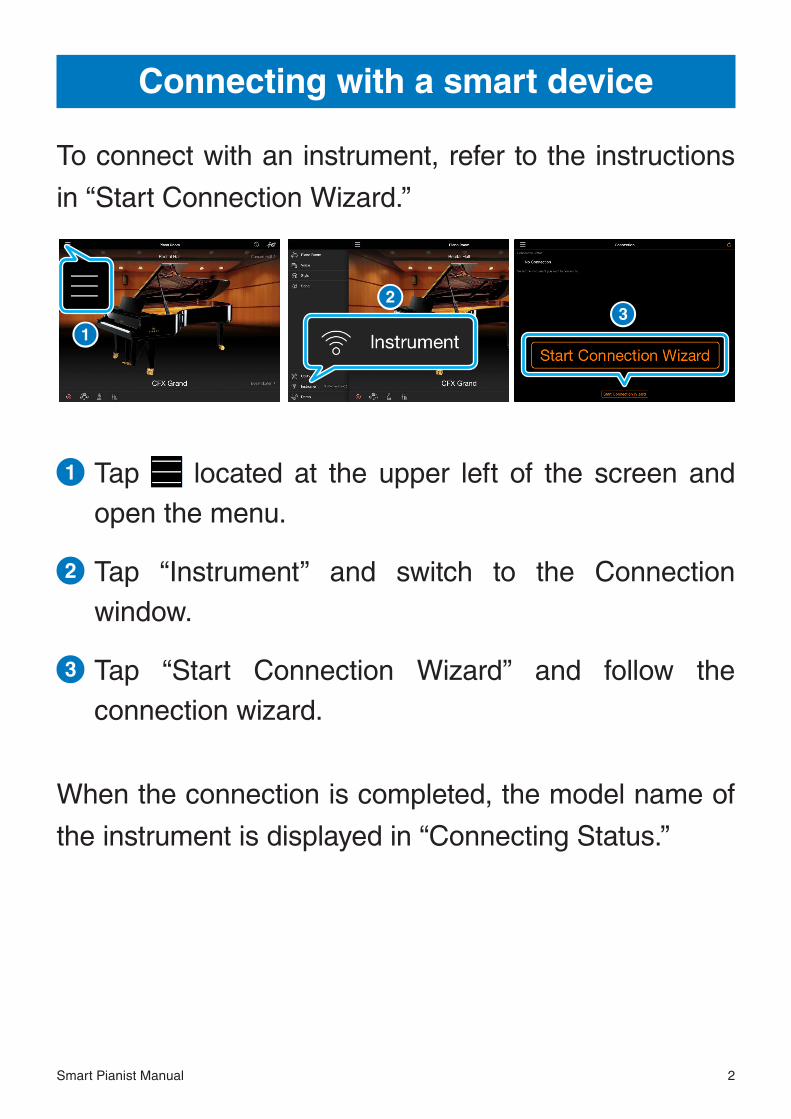
Connecting with a smart device
To connect with an instrument, refer to the instructions
in “Start Connection Wizard.”
1
23
1 Tap located at the upper left of the screen and open the menu.
2 Tap “Instrument” and switch to the Connection window.
3 Tap “Start Connection Wizard” and follow the connection wizard.
When the connection is completed, the model name of
the instrument is displayed in “Connecting Status.”
Smart Pianist Manual 3
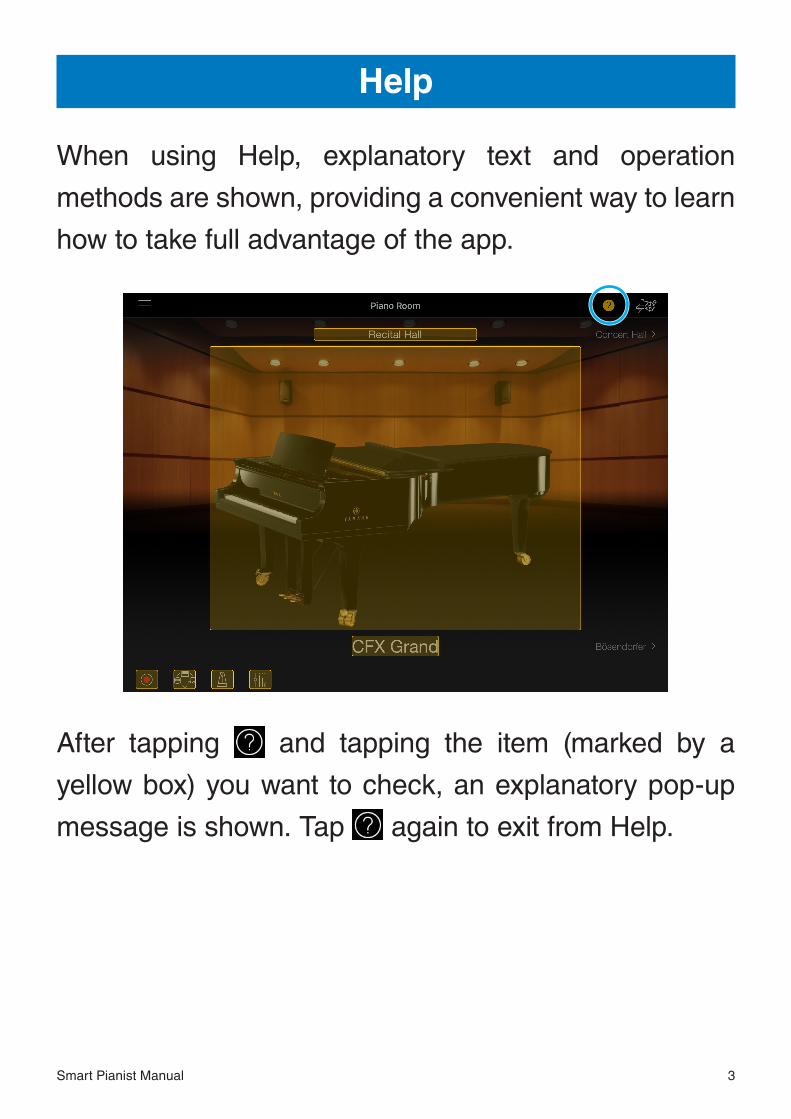
Help
When using Help, explanatory text and operation
methods are shown, providing a convenient way to learn
how to take full advantage of the app.
After tapping and tapping the item (marked by a
yellow box) you want to check, an explanatory pop-up
message is shown. Tap again to exit from Help.
Smart Pianist Manual 4
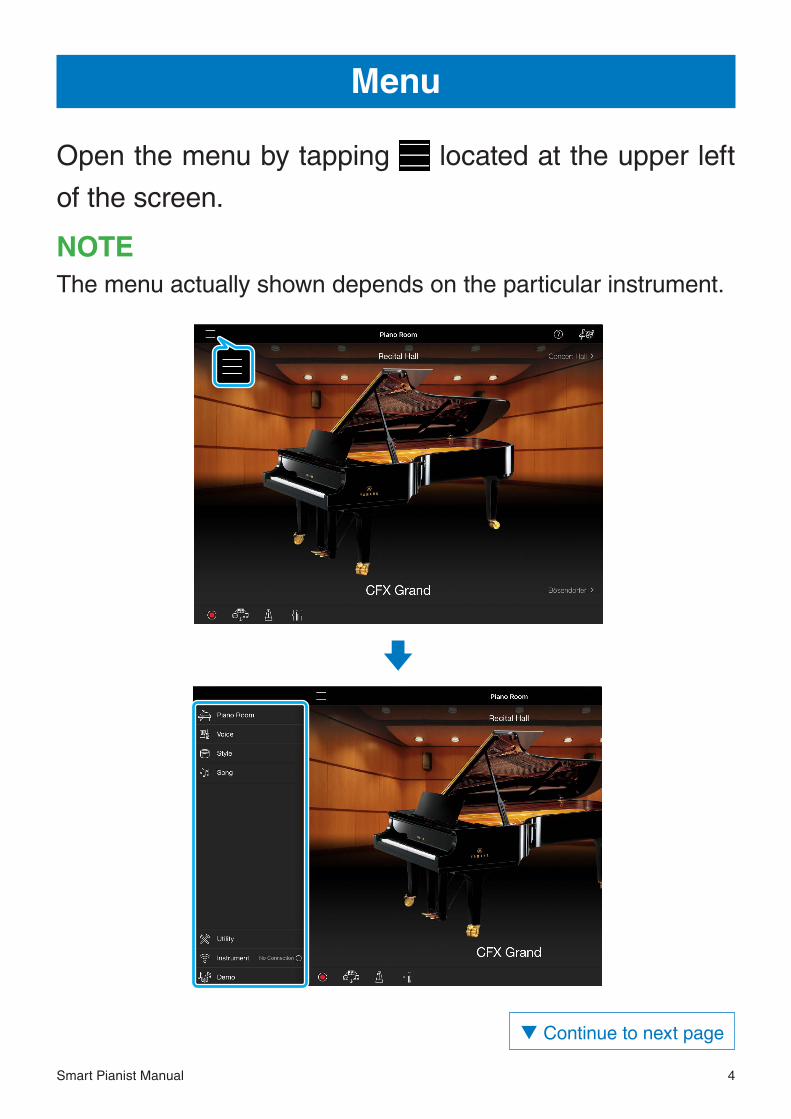
Menu
Open the menu by tapping located at the upper left
of the screen.
NOTEThe menu actually shown depends on the particular instrument.
q Continue to next page
Smart Pianist Manual 5
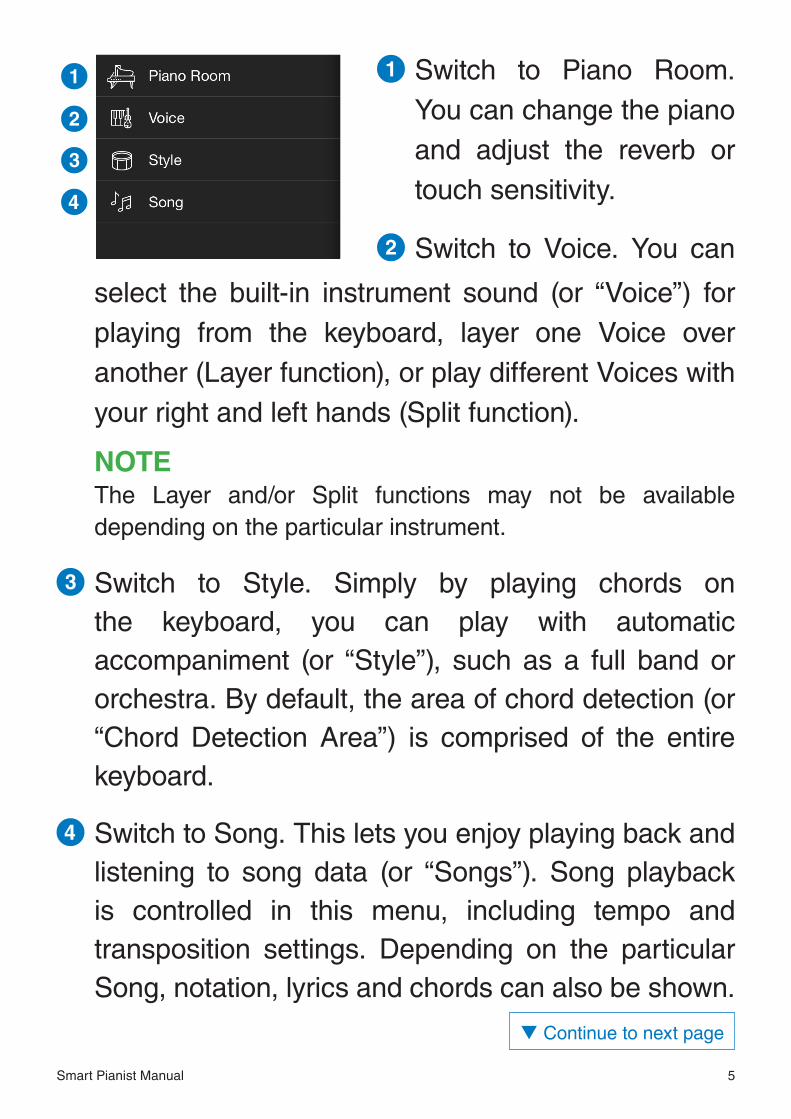
1 Switch to Piano Room. You can change the piano and adjust the reverb or touch sensitivity.
2 Switch to Voice. You can
1
2
3
4
5
6
7
select the built-in instrument sound (or “Voice”) for playing from the keyboard, layer one Voice over another (Layer function), or play different Voices with your right and left hands (Split function).
NOTEThe Layer and/or Split functions may not be available depending on the particular instrument.
3 Switch to Style. Simply by playing chords on the keyboard, you can play with automatic accompaniment (or “Style”), such as a full band or orchestra. By default, the area of chord detection (or “Chord Detection Area”) is comprised of the entire keyboard.
4 Switch to Song. This lets you enjoy playing back and listening to song data (or “Songs”). Song playback is controlled in this menu, including tempo and transposition settings. Depending on the particular Song, notation, lyrics and chords can also be shown.
q Continue to next page
Smart Pianist Manual 6
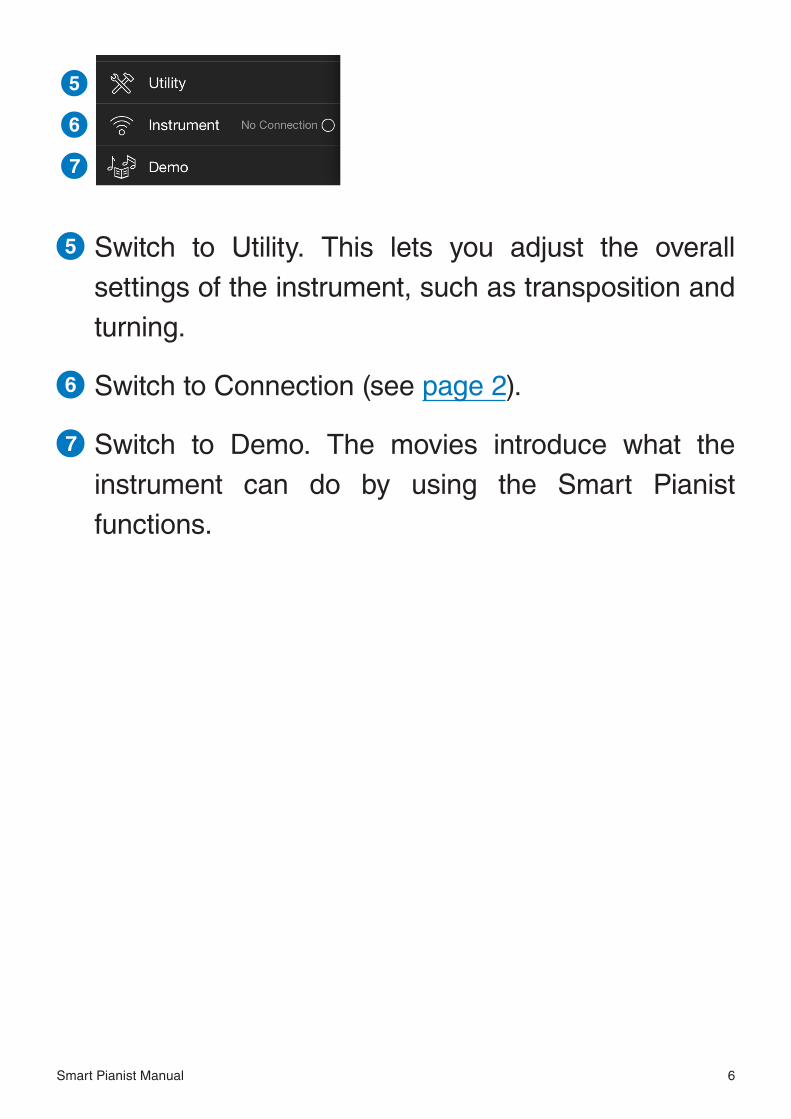
5 Switch to Utility. This lets you adjust the overall settings of the instrument, such as transposition and turning.
6 Switch to Connection (see page 2).
7 Switch to Demo. The movies introduce what the instrument can do by using the Smart Pianist functions.
1
2
3
4
5
6
7
Smart Pianist Manual 7
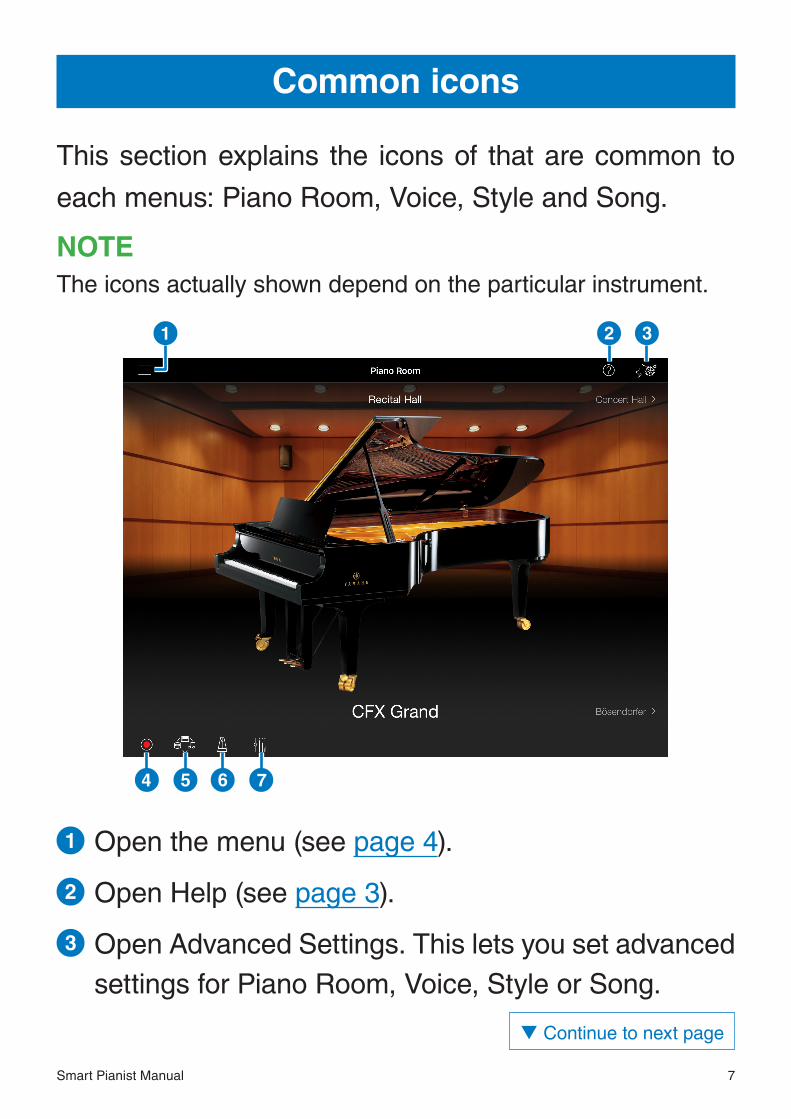
Common icons
This section explains the icons of that are common to
each menus: Piano Room, Voice, Style and Song.
NOTEThe icons actually shown depend on the particular instrument.
1 2
4 5 6 7
3
1 Open the menu (see page 4).
2 Open Help (see page 3).
3 Open Advanced Settings. This lets you set advanced settings for Piano Room, Voice, Style or Song.
q Continue to next page

Smart Pianist Manual 8
4 Open the Recording window.
5 Open the Registration Memory window. This lets you save virtually all instrument settings, as well as restore your saved settings.
6 Open the Metronome window.
7 Open the Balance window. You can adjust the volume balance between the notes you play on the keyboard, and the Style and Song.
1 2
4 5 6 7
3
Smart Pianist Manual 9
Information
• Copying of the commercially available musical data including but not limited to MIDI data and/or audio data is strictly prohibited except for your personal use.
• This product incorporates and bundles contents in which Yamaha owns copyrights or with respect to which Yamaha has license to use others’ copyrights. Due to copyright laws and other relevant laws, you are NOT allowed to distribute media in which these contents are saved or recorded and remain virtually the same or very similar to those in the product.
• You may not copy or modify this software or any part or all of the manual without permission.
• Yamaha does not assume any responsibility for the results and effects of operation of this software and this manual.
• The illustrations and captures of application as shown in this manual are for instructional purposes only, and may appear somewhat different from those on your instrument.
• The company names and product names in this manual are the trademarks or registered trademarks of their respective companies.
Manual Development Group© 2017 Yamaha CorporationPublished 04/2018 MW-B0