Smart CID User Guide - Hewlett Packard Enterprise a system for SAP HANA .....24 Configuring Dual...
85
Smart CID User Guide HPE ConvergedSystem 500 HPE ConvergedSystem 900 Version 4.2 Abstract This document is intended for Pre-Sales, Account Managers, Integration Center personnel, and Solution Architects who are involved in creating Customer Intent Documents (CIDs) for HPE ConvergedSystems. Published: December 2017 Edition: 1
Transcript of Smart CID User Guide - Hewlett Packard Enterprise a system for SAP HANA .....24 Configuring Dual...
Smart CID User GuideHPE ConvergedSystem 500HPE ConvergedSystem 900
Version 4.2
AbstractThis document is intended for Pre-Sales, Account Managers, Integration Center personnel, and Solution Architects who are involved in creating Customer Intent Documents (CIDs) for HPE ConvergedSystems.
Published: December 2017
Edition: 1
Copyright Notices© Copyright 2017, Hewlett-Packard Development Company, L.P.
Confidential computer software. Valid license from HPE required for possession, use or copying. Consistent with FAR 12.211 and 12.212, Commercial Computer Software, Computer Software Documentation, and Technical Data for Commercial Items are licensed to the U.S. Government under vendor's standard commercial license.
The information contained herein is subject to change without notice. The only warranties for HPE products and services are set forth in the express warranty statements accompanying such products and services. Nothing herein should be construed as constituting an additional warranty. HPE shall not be liable for technical or editorial errors or omissions contained herein.
Trademark NoticesRed Hat® is a registered trademarks of Red Hat, Inc.
SUSE® is a registered trademark of SUSE Linux AG.
SAP HANA® is a registered trademark of SAP AG.
VMware® is a registered trademark of VMware, Inc. in the United States and/or other jurisdictions.
vSphere® is a registered trademark of VMware, Inc. in the United States and/or other jurisdictions.
Microsoft® is a registered trademark of Microsoft Corporation in the United States and other countries.
Hyper-V® is a registered trademark of Microsoft Corporation in the United States and other countries.
vCenter™ is a trademark of VMware, Inc. in the United States and/or other jurisdictions.
Intel® is a trademark of Intel Corporation in the U.S. and other countries.
Chrome™ is a registered trademark of Google Inc.
Microsoft® Internet Explorer® are registered trademarks of the Microsoft Corporation.
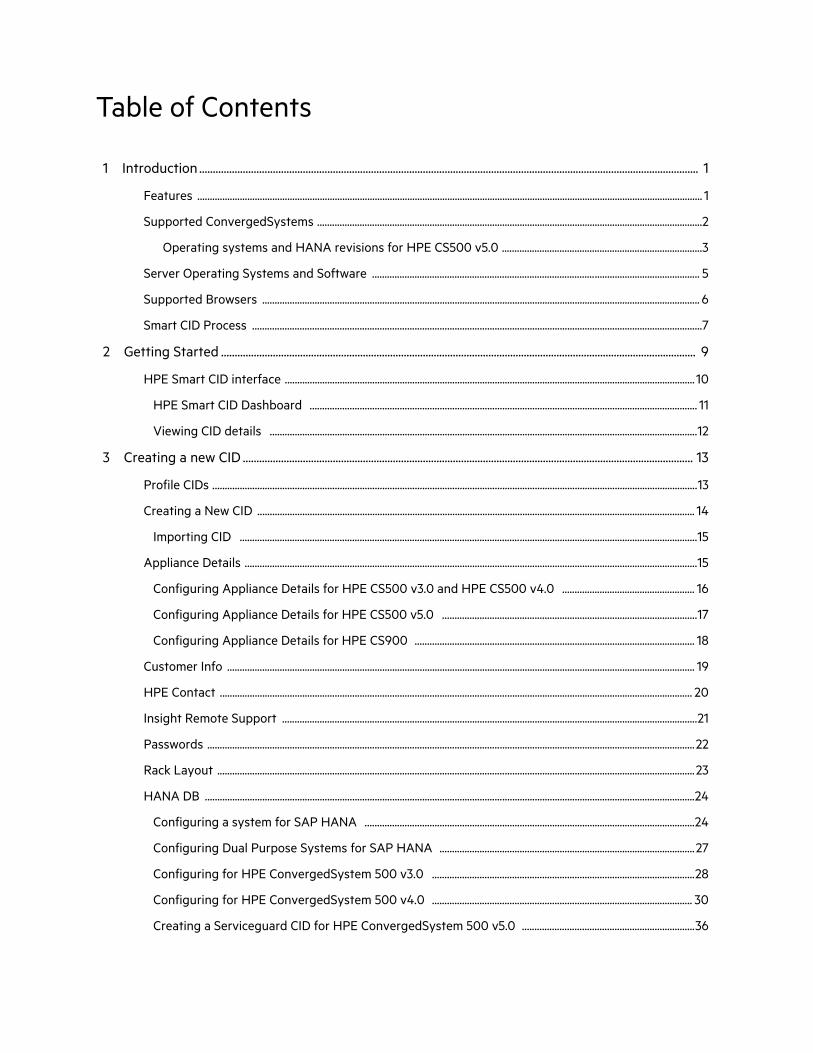
Table of Contents
1 Introduction ....................................................................................................................................................................................... 1
Features .......................................................................................................................................................................................................... 1
Supported ConvergedSystems ..........................................................................................................................................................2
Operating systems and HANA revisions for HPE CS500 v5.0 ................................................................................3
Server Operating Systems and Software ................................................................................................................................... 5
Supported Browsers ............................................................................................................................................................................... 6
Smart CID Process ....................................................................................................................................................................................7
2 Getting Started .............................................................................................................................................................................. 9
HPE Smart CID interface .................................................................................................................................................................... 10
HPE Smart CID Dashboard ........................................................................................................................................................... 11
Viewing CID details ...........................................................................................................................................................................12
3 Creating a new CID ..................................................................................................................................................................... 13
Profile CIDs ..................................................................................................................................................................................................13
Creating a New CID ............................................................................................................................................................................... 14
Importing CID .......................................................................................................................................................................................15
Appliance Details .....................................................................................................................................................................................15
Configuring Appliance Details for HPE CS500 v3.0 and HPE CS500 v4.0 ..................................................... 16
Configuring Appliance Details for HPE CS500 v5.0 ......................................................................................................17
Configuring Appliance Details for HPE CS900 ................................................................................................................ 18
Customer Info ........................................................................................................................................................................................... 19
HPE Contact ............................................................................................................................................................................................. 20
Insight Remote Support ......................................................................................................................................................................21
Passwords ...................................................................................................................................................................................................22
Rack Layout ...............................................................................................................................................................................................23
HANA DB ....................................................................................................................................................................................................24
Configuring a system for SAP HANA ....................................................................................................................................24
Configuring Dual Purpose Systems for SAP HANA ......................................................................................................27
Configuring for HPE ConvergedSystem 500 v3.0 .........................................................................................................28
Configuring for HPE ConvergedSystem 500 v4.0 ........................................................................................................ 30
Creating a Serviceguard CID for HPE ConvergedSystem 500 v5.0 .....................................................................36
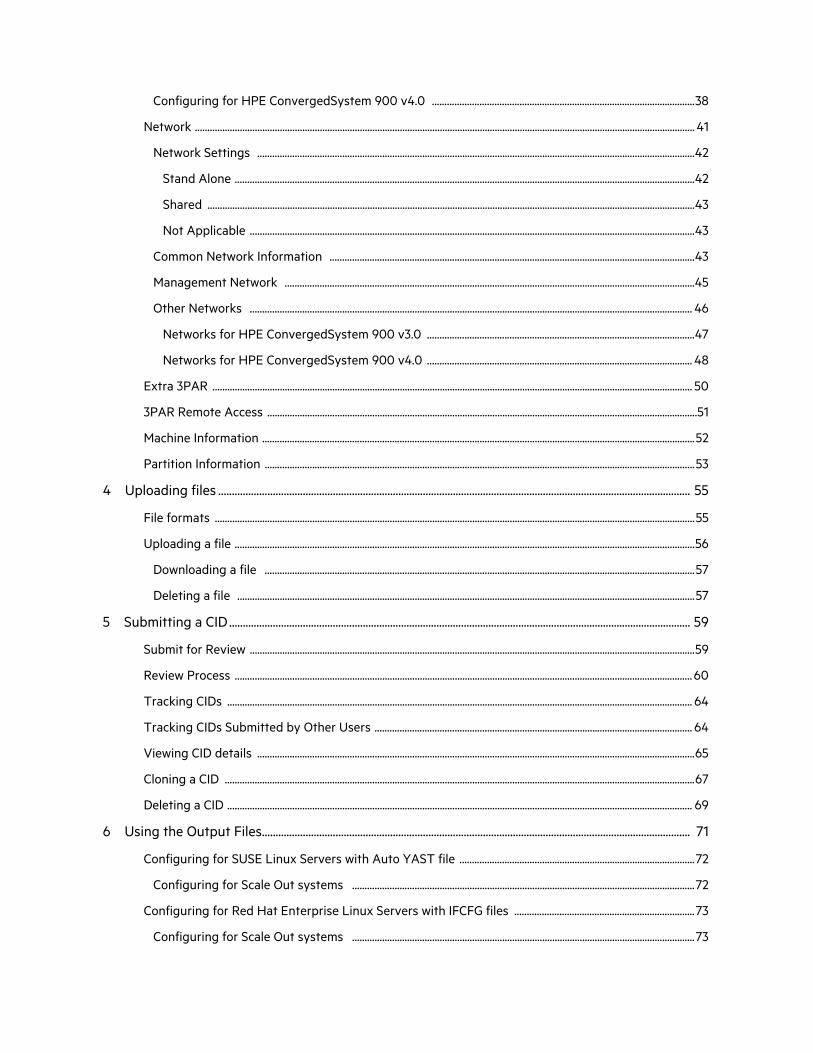
Configuring for HPE ConvergedSystem 900 v4.0 .........................................................................................................38
Network ........................................................................................................................................................................................................ 41
Network Settings ...............................................................................................................................................................................42
Stand Alone ........................................................................................................................................................................................42
Shared ...................................................................................................................................................................................................43
Not Applicable ..................................................................................................................................................................................43
Common Network Information ..................................................................................................................................................43
Management Network ....................................................................................................................................................................45
Other Networks ................................................................................................................................................................................. 46
Networks for HPE ConvergedSystem 900 v3.0 ...........................................................................................................47
Networks for HPE ConvergedSystem 900 v4.0 .......................................................................................................... 48
Extra 3PAR ................................................................................................................................................................................................ 50
3PAR Remote Access ............................................................................................................................................................................51
Machine Information .............................................................................................................................................................................52
Partition Information ............................................................................................................................................................................53
4 Uploading files ............................................................................................................................................................................. 55
File formats ................................................................................................................................................................................................55
Uploading a file ........................................................................................................................................................................................56
Downloading a file ............................................................................................................................................................................57
Deleting a file .......................................................................................................................................................................................57
5 Submitting a CID ......................................................................................................................................................................... 59
Submit for Review ..................................................................................................................................................................................59
Review Process ....................................................................................................................................................................................... 60
Tracking CIDs .......................................................................................................................................................................................... 64
Tracking CIDs Submitted by Other Users ............................................................................................................................... 64
Viewing CID details ...............................................................................................................................................................................65
Cloning a CID ............................................................................................................................................................................................67
Deleting a CID .......................................................................................................................................................................................... 69
6 Using the Output Files............................................................................................................................................................. 71
Configuring for SUSE Linux Servers with Auto YAST file ..............................................................................................72
Configuring for Scale Out systems .........................................................................................................................................72
Configuring for Red Hat Enterprise Linux Servers with IFCFG files ........................................................................73
Configuring for Scale Out systems .........................................................................................................................................73

7 Saving a CID to PDF.................................................................................................................................................................. 75
Google Chrome ........................................................................................................................................................................................75
Internet Explorer 11 ...............................................................................................................................................................................78
Exporting CIDs ................................................................................................................................................................................... 80
8 Offline CID ...................................................................................................................................................................................... 81
Prerequisites ............................................................................................................................................................................................. 81
Supported Operating Systems .................................................................................................................................................. 81
Disk Space ............................................................................................................................................................................................. 81
Supported Web Browsers ............................................................................................................................................................. 81
Installing Offline CID ............................................................................................................................................................................. 81
Offline CID process ................................................................................................................................................................................ 81
Working with Offline CID ...................................................................................................................................................................82
Exporting Offline CIDs ....................................................................................................................................................................83
Importing CIDs ................................................................................................................................................................................... 84
9 Smart CID Documentation .................................................................................................................................................... 85
Related Documentation ......................................................................................................................................................................85
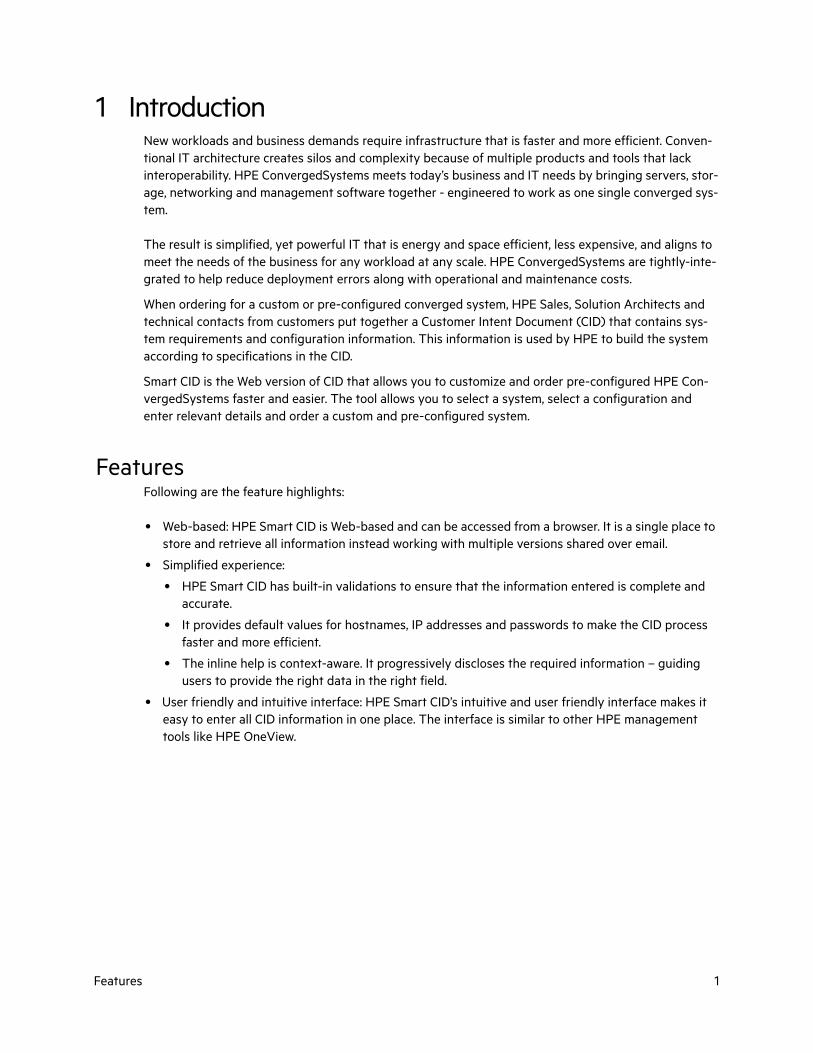
1 IntroductionNew workloads and business demands require infrastructure that is faster and more efficient. Conven-tional IT architecture creates silos and complexity because of multiple products and tools that lack interoperability. HPE ConvergedSystems meets today’s business and IT needs by bringing servers, stor-age, networking and management software together - engineered to work as one single converged sys-tem.
The result is simplified, yet powerful IT that is energy and space efficient, less expensive, and aligns to meet the needs of the business for any workload at any scale. HPE ConvergedSystems are tightly-inte-grated to help reduce deployment errors along with operational and maintenance costs.
When ordering for a custom or pre-configured converged system, HPE Sales, Solution Architects and technical contacts from customers put together a Customer Intent Document (CID) that contains sys-tem requirements and configuration information. This information is used by HPE to build the system according to specifications in the CID.
Smart CID is the Web version of CID that allows you to customize and order pre-configured HPE Con-vergedSystems faster and easier. The tool allows you to select a system, select a configuration and enter relevant details and order a custom and pre-configured system.
FeaturesFollowing are the feature highlights:
• Web-based: HPE Smart CID is Web-based and can be accessed from a browser. It is a single place to store and retrieve all information instead working with multiple versions shared over email.
• Simplified experience:
• HPE Smart CID has built-in validations to ensure that the information entered is complete and accurate.
• It provides default values for hostnames, IP addresses and passwords to make the CID process faster and more efficient.
• The inline help is context-aware. It progressively discloses the required information – guiding users to provide the right data in the right field.
• User friendly and intuitive interface: HPE Smart CID’s intuitive and user friendly interface makes it easy to enter all CID information in one place. The interface is similar to other HPE management tools like HPE OneView.
Features 1
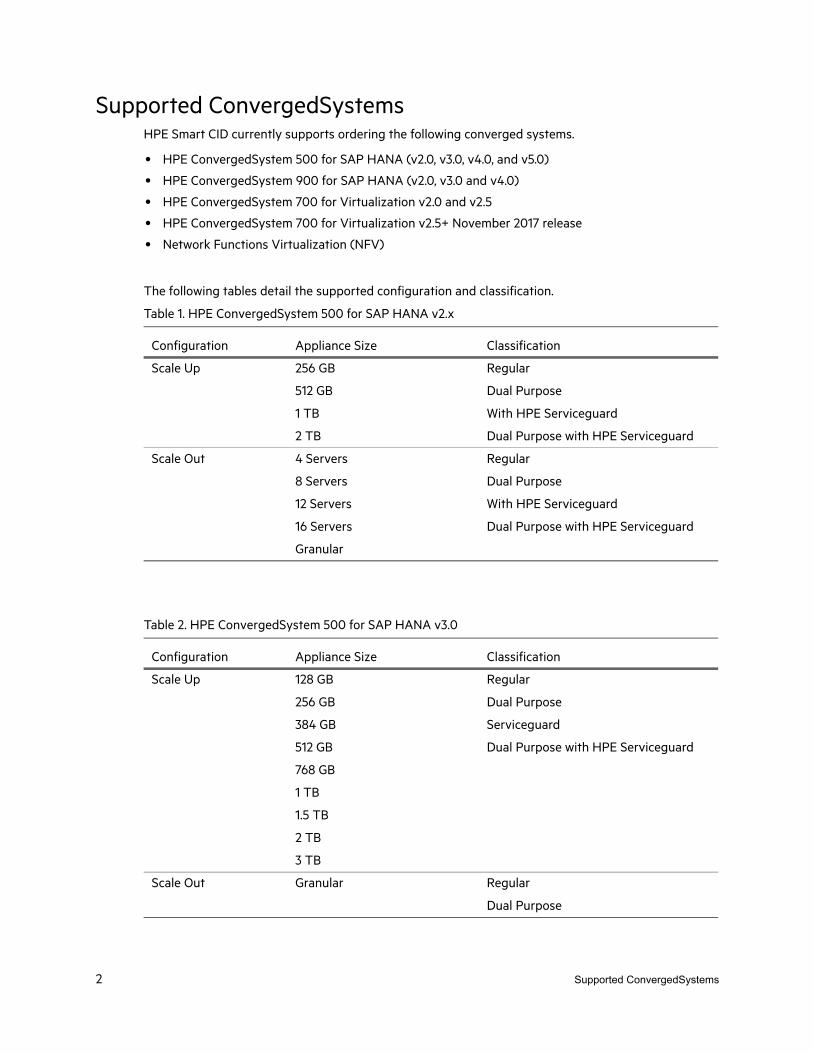
Supported ConvergedSystemsHPE Smart CID currently supports ordering the following converged systems.
• HPE ConvergedSystem 500 for SAP HANA (v2.0, v3.0, v4.0, and v5.0)
• HPE ConvergedSystem 900 for SAP HANA (v2.0, v3.0 and v4.0)
• HPE ConvergedSystem 700 for Virtualization v2.0 and v2.5
• HPE ConvergedSystem 700 for Virtualization v2.5+ November 2017 release
• Network Functions Virtualization (NFV)
The following tables detail the supported configuration and classification.
Table 1. HPE ConvergedSystem 500 for SAP HANA v2.x
Configuration Appliance Size Classification
Scale Up 256 GB
512 GB
1 TB
2 TB
Regular
Dual Purpose
With HPE Serviceguard
Dual Purpose with HPE Serviceguard
Scale Out 4 Servers
8 Servers
12 Servers
16 Servers
Granular
Regular
Dual Purpose
With HPE Serviceguard
Dual Purpose with HPE Serviceguard
Table 2. HPE ConvergedSystem 500 for SAP HANA v3.0
Configuration Appliance Size Classification
Scale Up 128 GB
256 GB
384 GB
512 GB
768 GB
1 TB
1.5 TB
2 TB
3 TB
Regular
Dual Purpose
Serviceguard
Dual Purpose with HPE Serviceguard
Scale Out Granular Regular
Dual Purpose
2 Supported ConvergedSystems
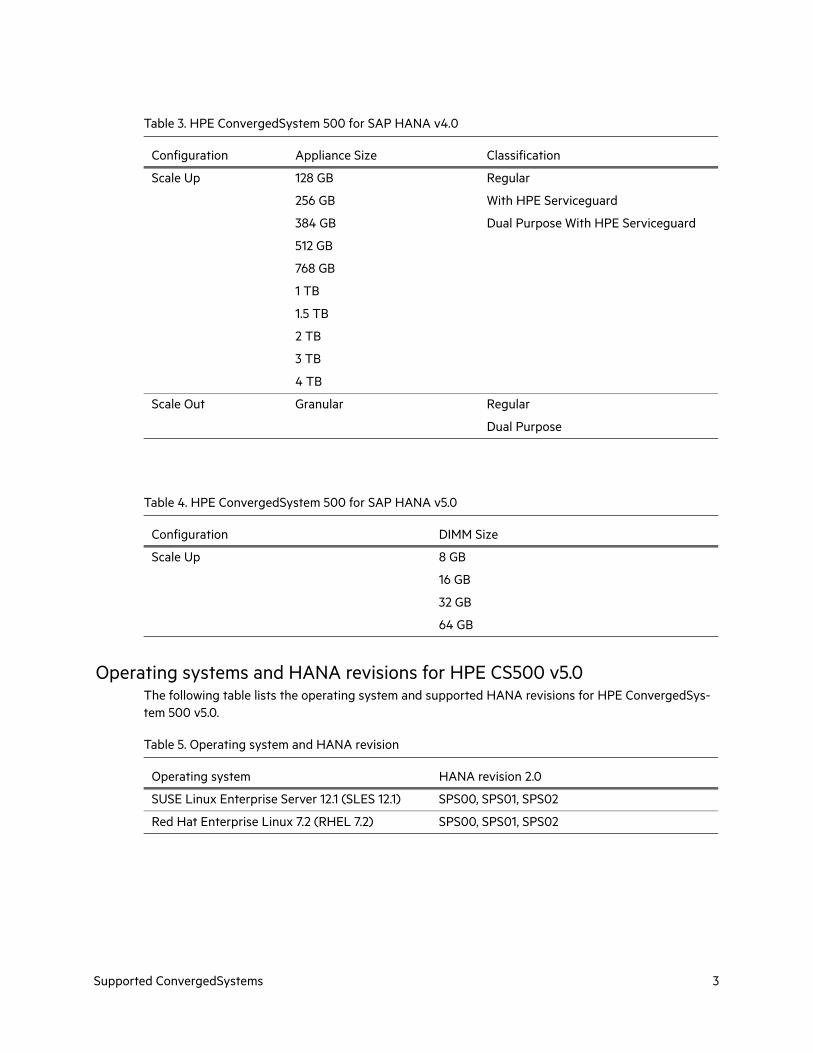
Operating systems and HANA revisions for HPE CS500 v5.0The following table lists the operating system and supported HANA revisions for HPE ConvergedSys-tem 500 v5.0.
Table 3. HPE ConvergedSystem 500 for SAP HANA v4.0
Configuration Appliance Size Classification
Scale Up 128 GB
256 GB
384 GB
512 GB
768 GB
1 TB
1.5 TB
2 TB
3 TB
4 TB
Regular
With HPE Serviceguard
Dual Purpose With HPE Serviceguard
Scale Out Granular Regular
Dual Purpose
Table 4. HPE ConvergedSystem 500 for SAP HANA v5.0
Configuration DIMM Size
Scale Up 8 GB
16 GB
32 GB
64 GB
Table 5. Operating system and HANA revision
Operating system HANA revision 2.0
SUSE Linux Enterprise Server 12.1 (SLES 12.1) SPS00, SPS01, SPS02
Red Hat Enterprise Linux 7.2 (RHEL 7.2) SPS00, SPS01, SPS02
Supported ConvergedSystems 3
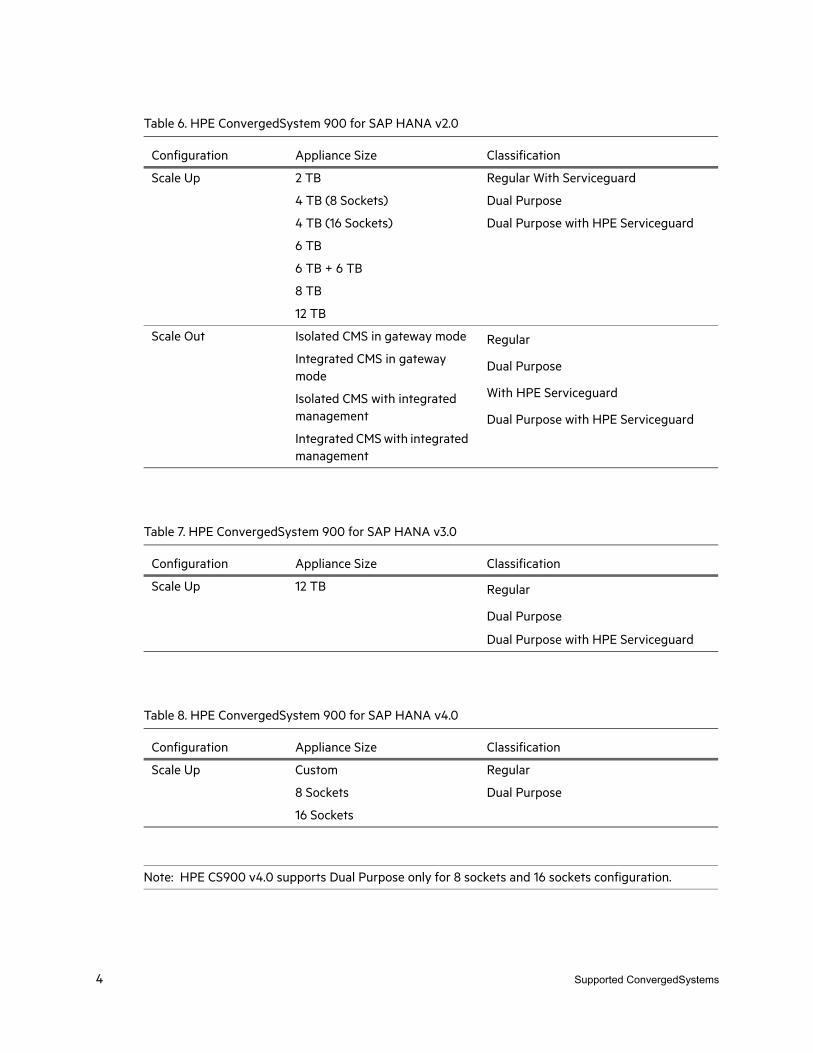
Note: HPE CS900 v4.0 supports Dual Purpose only for 8 sockets and 16 sockets configuration.
Table 6. HPE ConvergedSystem 900 for SAP HANA v2.0
Configuration Appliance Size Classification
Scale Up 2 TB
4 TB (8 Sockets)
4 TB (16 Sockets)
6 TB
6 TB + 6 TB
8 TB
12 TB
Regular With Serviceguard
Dual Purpose
Dual Purpose with HPE Serviceguard
Scale Out Isolated CMS in gateway mode
Integrated CMS in gateway mode
Isolated CMS with integrated management
Integrated CMS with integrated management
Regular
Dual Purpose
With HPE Serviceguard
Dual Purpose with HPE Serviceguard
Table 7. HPE ConvergedSystem 900 for SAP HANA v3.0
Configuration Appliance Size Classification
Scale Up 12 TB Regular
Dual Purpose
Dual Purpose with HPE Serviceguard
Table 8. HPE ConvergedSystem 900 for SAP HANA v4.0
Configuration Appliance Size Classification
Scale Up Custom Regular
8 Sockets Dual Purpose
16 Sockets
4 Supported ConvergedSystems
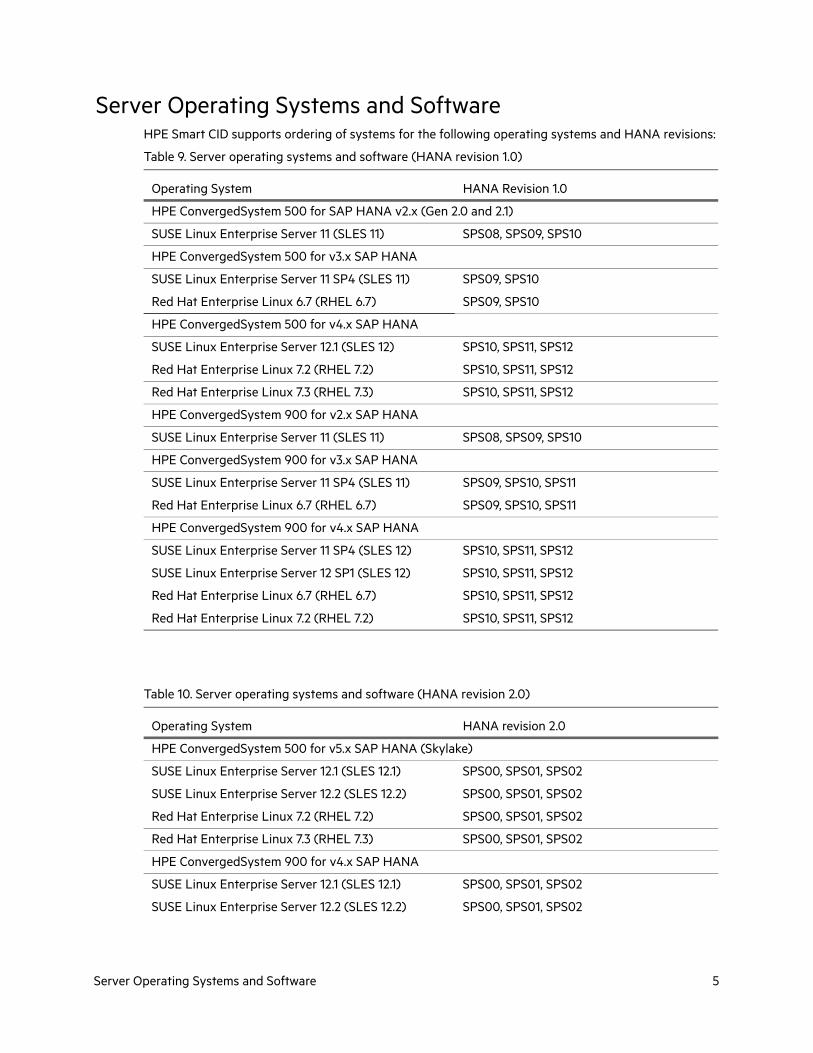
Server Operating Systems and SoftwareHPE Smart CID supports ordering of systems for the following operating systems and HANA revisions:
Table 9. Server operating systems and software (HANA revision 1.0)
Operating System HANA Revision 1.0
HPE ConvergedSystem 500 for SAP HANA v2.x (Gen 2.0 and 2.1)
SUSE Linux Enterprise Server 11 (SLES 11) SPS08, SPS09, SPS10
HPE ConvergedSystem 500 for v3.x SAP HANA
SUSE Linux Enterprise Server 11 SP4 (SLES 11) SPS09, SPS10
Red Hat Enterprise Linux 6.7 (RHEL 6.7) SPS09, SPS10
HPE ConvergedSystem 500 for v4.x SAP HANA
SUSE Linux Enterprise Server 12.1 (SLES 12) SPS10, SPS11, SPS12
Red Hat Enterprise Linux 7.2 (RHEL 7.2) SPS10, SPS11, SPS12
Red Hat Enterprise Linux 7.3 (RHEL 7.3) SPS10, SPS11, SPS12
HPE ConvergedSystem 900 for v2.x SAP HANA
SUSE Linux Enterprise Server 11 (SLES 11) SPS08, SPS09, SPS10
HPE ConvergedSystem 900 for v3.x SAP HANA
SUSE Linux Enterprise Server 11 SP4 (SLES 11) SPS09, SPS10, SPS11
Red Hat Enterprise Linux 6.7 (RHEL 6.7) SPS09, SPS10, SPS11
HPE ConvergedSystem 900 for v4.x SAP HANA
SUSE Linux Enterprise Server 11 SP4 (SLES 12) SPS10, SPS11, SPS12
SUSE Linux Enterprise Server 12 SP1 (SLES 12) SPS10, SPS11, SPS12
Red Hat Enterprise Linux 6.7 (RHEL 6.7) SPS10, SPS11, SPS12
Red Hat Enterprise Linux 7.2 (RHEL 7.2) SPS10, SPS11, SPS12
Table 10. Server operating systems and software (HANA revision 2.0)
Operating System HANA revision 2.0
HPE ConvergedSystem 500 for v5.x SAP HANA (Skylake)
SUSE Linux Enterprise Server 12.1 (SLES 12.1) SPS00, SPS01, SPS02
SUSE Linux Enterprise Server 12.2 (SLES 12.2) SPS00, SPS01, SPS02
Red Hat Enterprise Linux 7.2 (RHEL 7.2) SPS00, SPS01, SPS02
Red Hat Enterprise Linux 7.3 (RHEL 7.3) SPS00, SPS01, SPS02
HPE ConvergedSystem 900 for v4.x SAP HANA
SUSE Linux Enterprise Server 12.1 (SLES 12.1) SPS00, SPS01, SPS02
SUSE Linux Enterprise Server 12.2 (SLES 12.2) SPS00, SPS01, SPS02
Server Operating Systems and Software 5
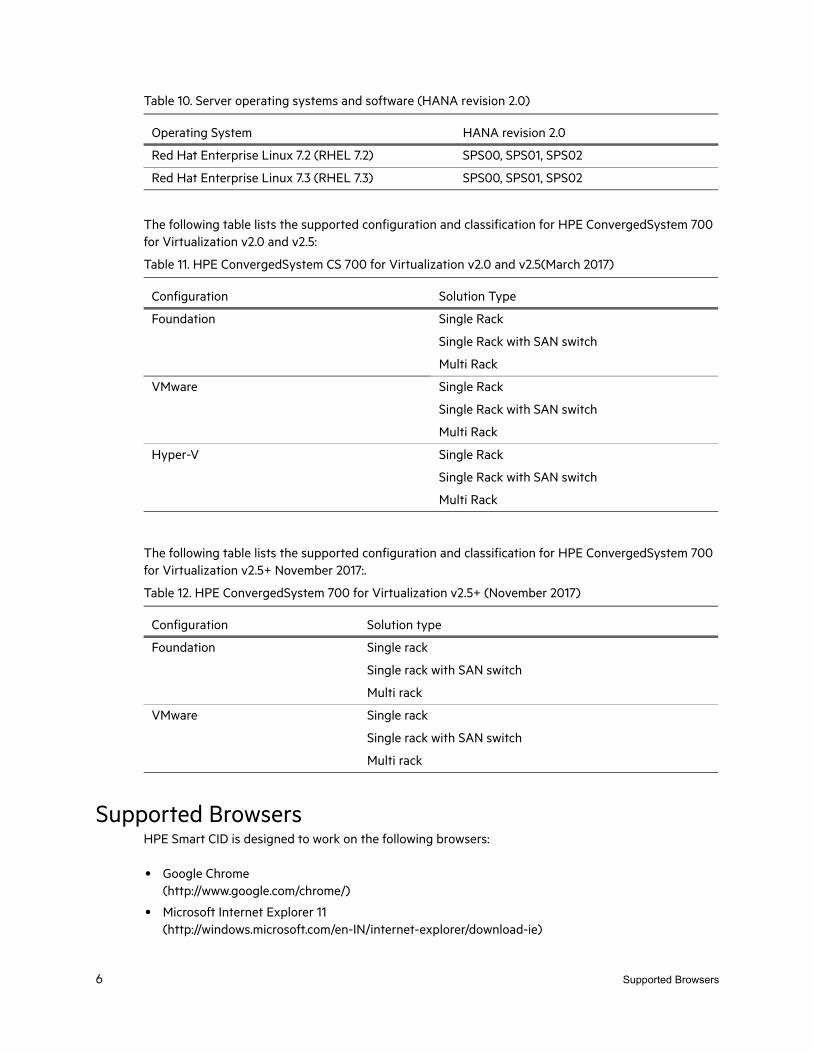
The following table lists the supported configuration and classification for HPE ConvergedSystem 700 for Virtualization v2.0 and v2.5:
The following table lists the supported configuration and classification for HPE ConvergedSystem 700 for Virtualization v2.5+ November 2017:.
Supported BrowsersHPE Smart CID is designed to work on the following browsers:
• Google Chrome (http://www.google.com/chrome/)
• Microsoft Internet Explorer 11 (http://windows.microsoft.com/en-IN/internet-explorer/download-ie)
Red Hat Enterprise Linux 7.2 (RHEL 7.2) SPS00, SPS01, SPS02
Red Hat Enterprise Linux 7.3 (RHEL 7.3) SPS00, SPS01, SPS02
Table 11. HPE ConvergedSystem CS 700 for Virtualization v2.0 and v2.5(March 2017)
Configuration Solution Type
Foundation Single Rack
Single Rack with SAN switch
Multi Rack
VMware Single Rack
Single Rack with SAN switch
Multi Rack
Hyper-V Single Rack
Single Rack with SAN switch
Multi Rack
Table 12. HPE ConvergedSystem 700 for Virtualization v2.5+ (November 2017)
Configuration Solution type
Foundation Single rack
Single rack with SAN switch
Multi rack
VMware Single rack
Single rack with SAN switch
Multi rack
Table 10. Server operating systems and software (HANA revision 2.0)
Operating System HANA revision 2.0
6 Supported Browsers

Smart CID ProcessThe following section gives an overview of the Smart CID process.
1. Presales teams work with customers and their IT contacts to get requirements and details of the converged system.
2. These details are used to create a new CID in Smart CID. When a new CID is created, a CID number is generated by Smart CID.
3. After all the details are entered, and the CID is submitted, Smart CID generates the required config-uration files and a detailed summary of the CID. The following illustrates the process flow after the CID is submitted.
Figure 1. Smart CID Process
4. After the CID is submitted on Smart CID, the Presales team provides the CID number to the GSD PM team. This is then added to the SISP tool by the GSD IND team.
5. For new orders that are added to the daily report, GSD IND team checks if a Smart CID number is available. If the number is available, the CID number is loaded to SISP.
6. The GSD IND team then adds any additional customization information to SISP and releases it to manufacturing to generate a build document for the order.
7. This is then used by the integration centers to build the converged system.
Smart CID Process 7
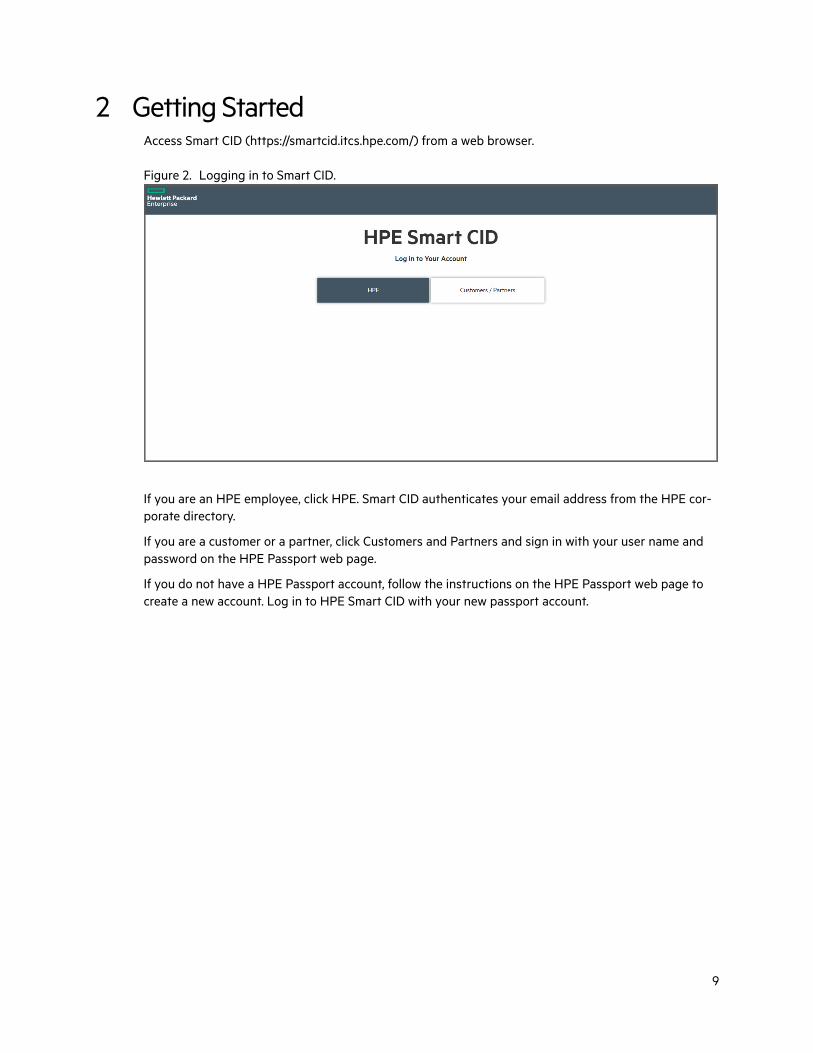
2 Getting StartedAccess Smart CID (https://smartcid.itcs.hpe.com/) from a web browser.
Figure 2. Logging in to Smart CID.
If you are an HPE employee, click HPE. Smart CID authenticates your email address from the HPE cor-porate directory.
If you are a customer or a partner, click Customers and Partners and sign in with your user name and password on the HPE Passport web page.
If you do not have a HPE Passport account, follow the instructions on the HPE Passport web page to create a new account. Log in to HPE Smart CID with your new passport account.
9
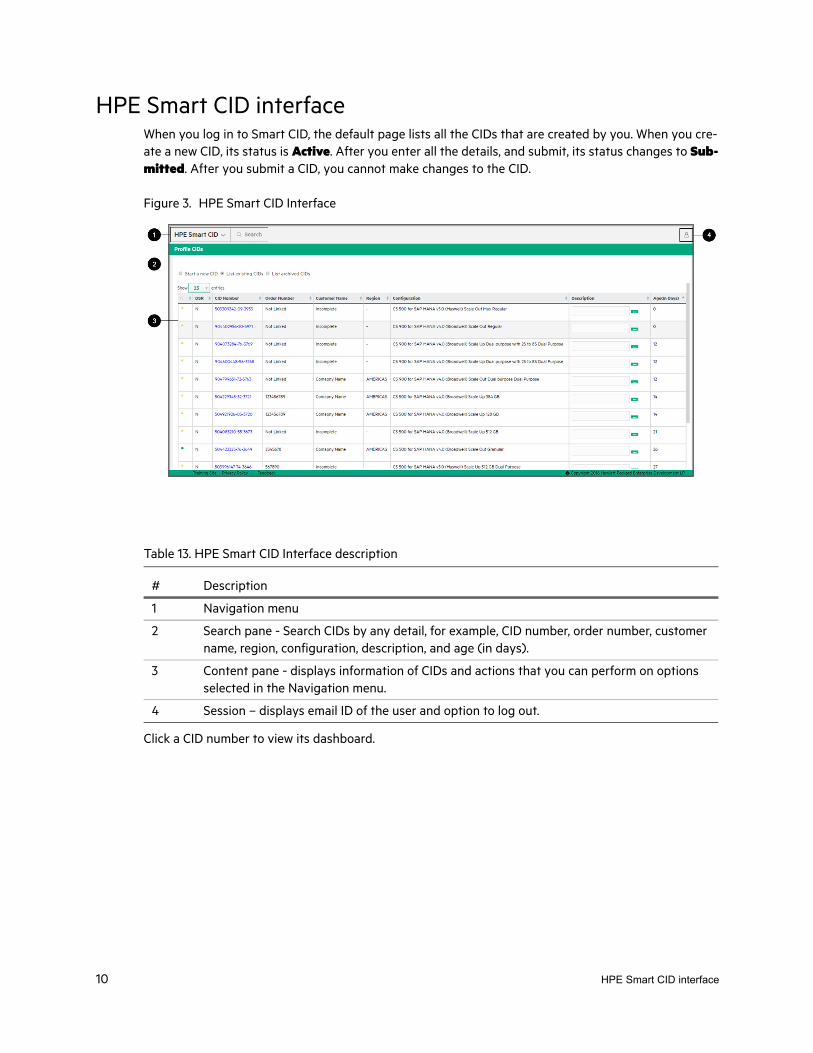
HPE Smart CID interfaceWhen you log in to Smart CID, the default page lists all the CIDs that are created by you. When you cre-ate a new CID, its status is Active. After you enter all the details, and submit, its status changes to Sub-mitted. After you submit a CID, you cannot make changes to the CID.
Figure 3. HPE Smart CID Interface
Click a CID number to view its dashboard.
Table 13. HPE Smart CID Interface description
# Description
1 Navigation menu
2 Search pane - Search CIDs by any detail, for example, CID number, order number, customer name, region, configuration, description, and age (in days).
3 Content pane - displays information of CIDs and actions that you can perform on options selected in the Navigation menu.
4 Session – displays email ID of the user and option to log out.
2
3
10 HPE Smart CID interface
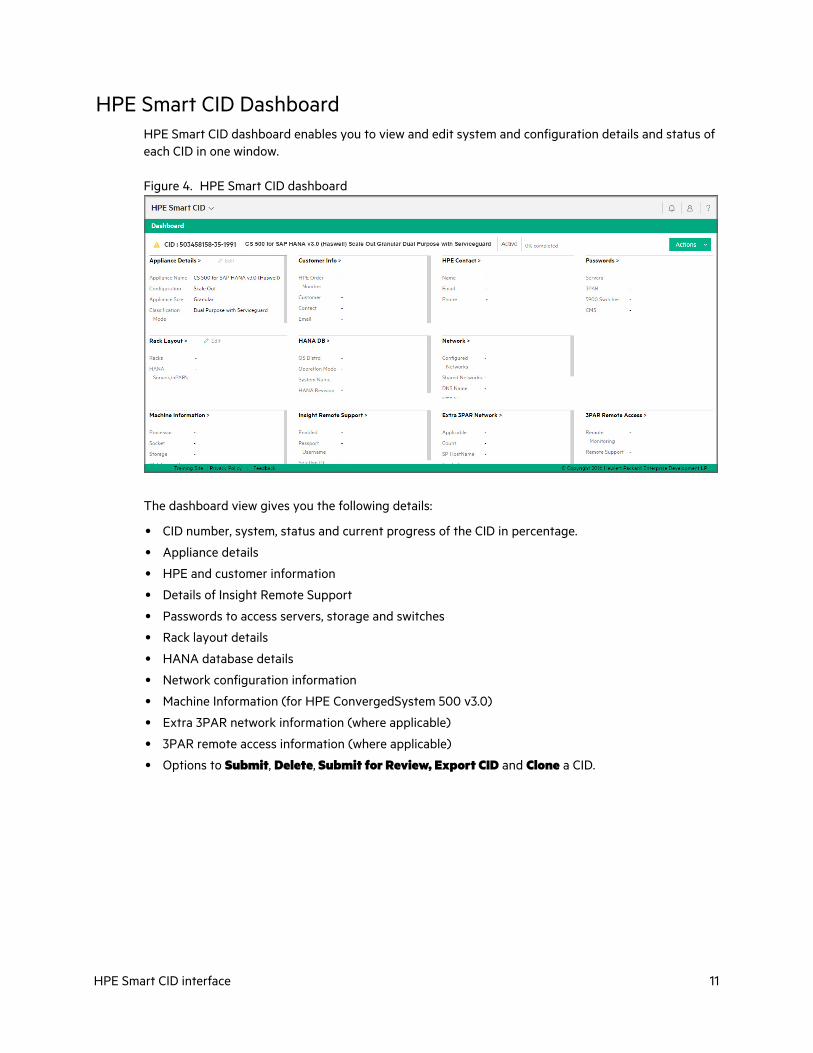
HPE Smart CID DashboardHPE Smart CID dashboard enables you to view and edit system and configuration details and status of each CID in one window.
Figure 4. HPE Smart CID dashboard
The dashboard view gives you the following details:
• CID number, system, status and current progress of the CID in percentage.
• Appliance details
• HPE and customer information
• Details of Insight Remote Support
• Passwords to access servers, storage and switches
• Rack layout details
• HANA database details
• Network configuration information
• Machine Information (for HPE ConvergedSystem 500 v3.0)
• Extra 3PAR network information (where applicable)
• 3PAR remote access information (where applicable)
• Options to Submit, Delete, Submit for Review, Export CID and Clone a CID.
HPE Smart CID interface 11
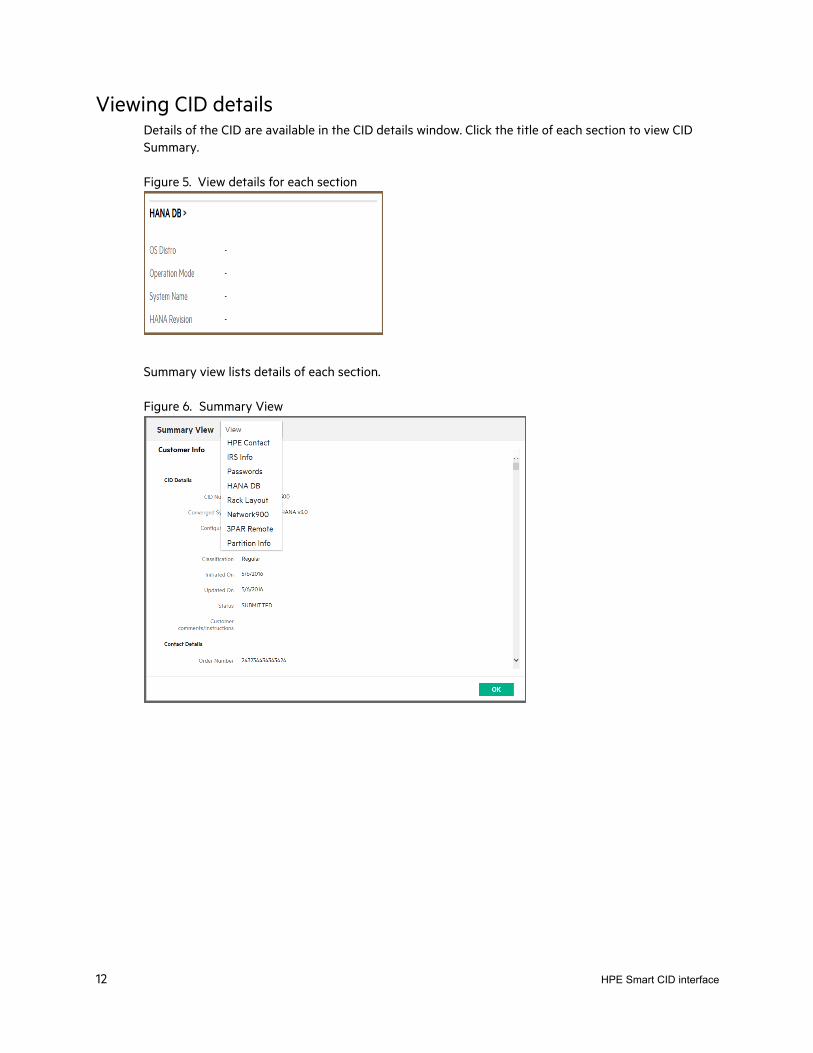
Viewing CID detailsDetails of the CID are available in the CID details window. Click the title of each section to view CID Summary.
Figure 5. View details for each section
Summary view lists details of each section.
Figure 6. Summary View
12 HPE Smart CID interface
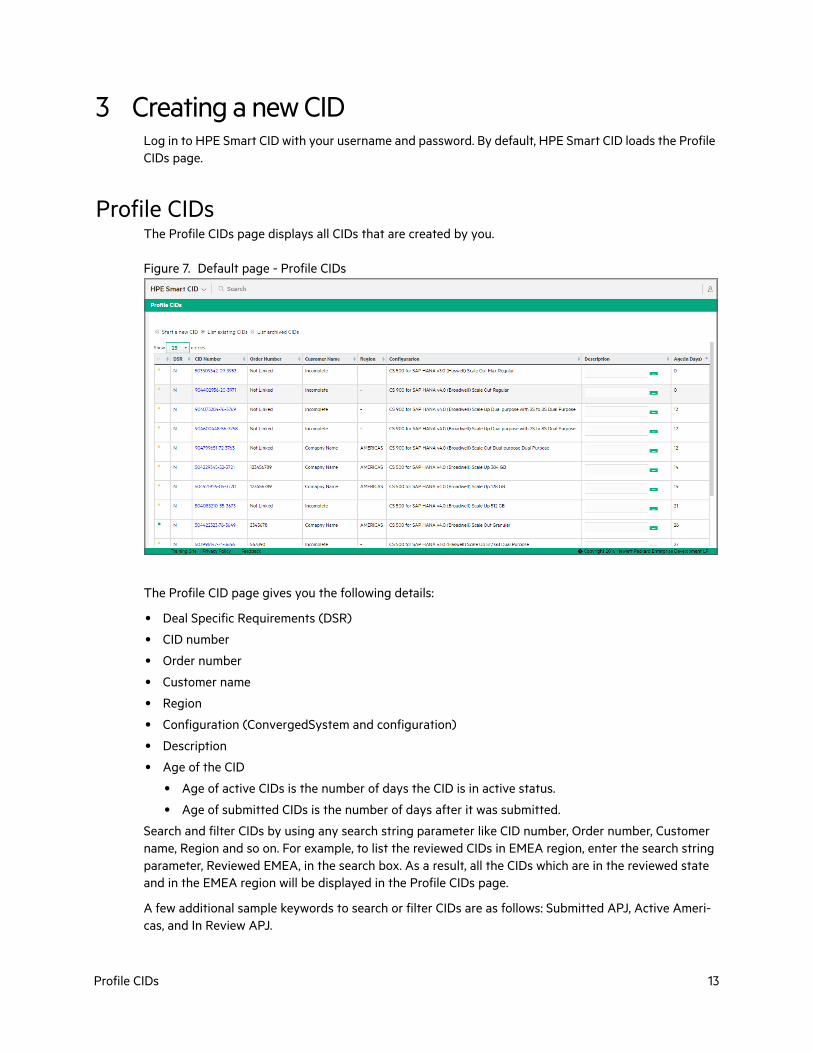
3 Creating a new CIDLog in to HPE Smart CID with your username and password. By default, HPE Smart CID loads the Profile CIDs page.
Profile CIDsThe Profile CIDs page displays all CIDs that are created by you.
Figure 7. Default page - Profile CIDs
The Profile CID page gives you the following details:
• Deal Specific Requirements (DSR)
• CID number
• Order number
• Customer name
• Region
• Configuration (ConvergedSystem and configuration)
• Description
• Age of the CID
• Age of active CIDs is the number of days the CID is in active status.
• Age of submitted CIDs is the number of days after it was submitted.
Search and filter CIDs by using any search string parameter like CID number, Order number, Customer name, Region and so on. For example, to list the reviewed CIDs in EMEA region, enter the search string parameter, Reviewed EMEA, in the search box. As a result, all the CIDs which are in the reviewed state and in the EMEA region will be displayed in the Profile CIDs page.
A few additional sample keywords to search or filter CIDs are as follows: Submitted APJ, Active Ameri-cas, and In Review APJ.
Profile CIDs 13
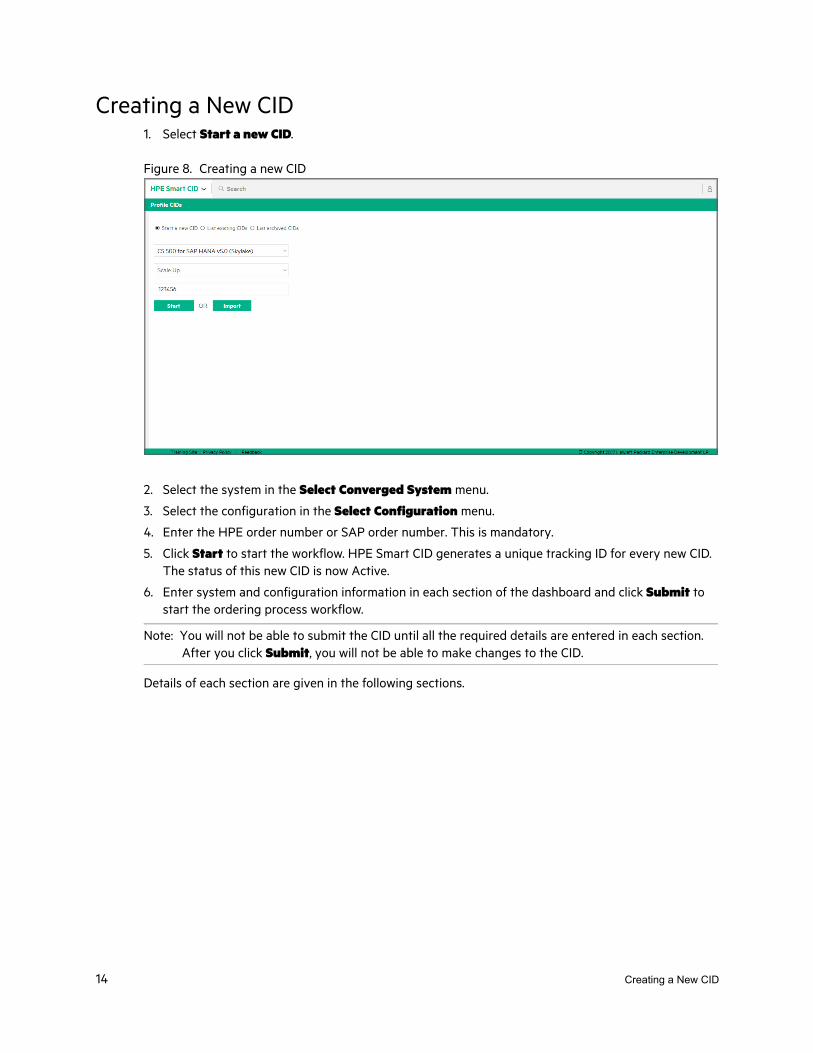
Creating a New CID1. Select Start a new CID.
Figure 8. Creating a new CID
2. Select the system in the Select Converged System menu.
3. Select the configuration in the Select Configuration menu.
4. Enter the HPE order number or SAP order number. This is mandatory.
5. Click Start to start the workflow. HPE Smart CID generates a unique tracking ID for every new CID. The status of this new CID is now Active.
6. Enter system and configuration information in each section of the dashboard and click Submit to start the ordering process workflow.
Note: You will not be able to submit the CID until all the required details are entered in each section. After you click Submit, you will not be able to make changes to the CID.
Details of each section are given in the following sections.
14 Creating a New CID
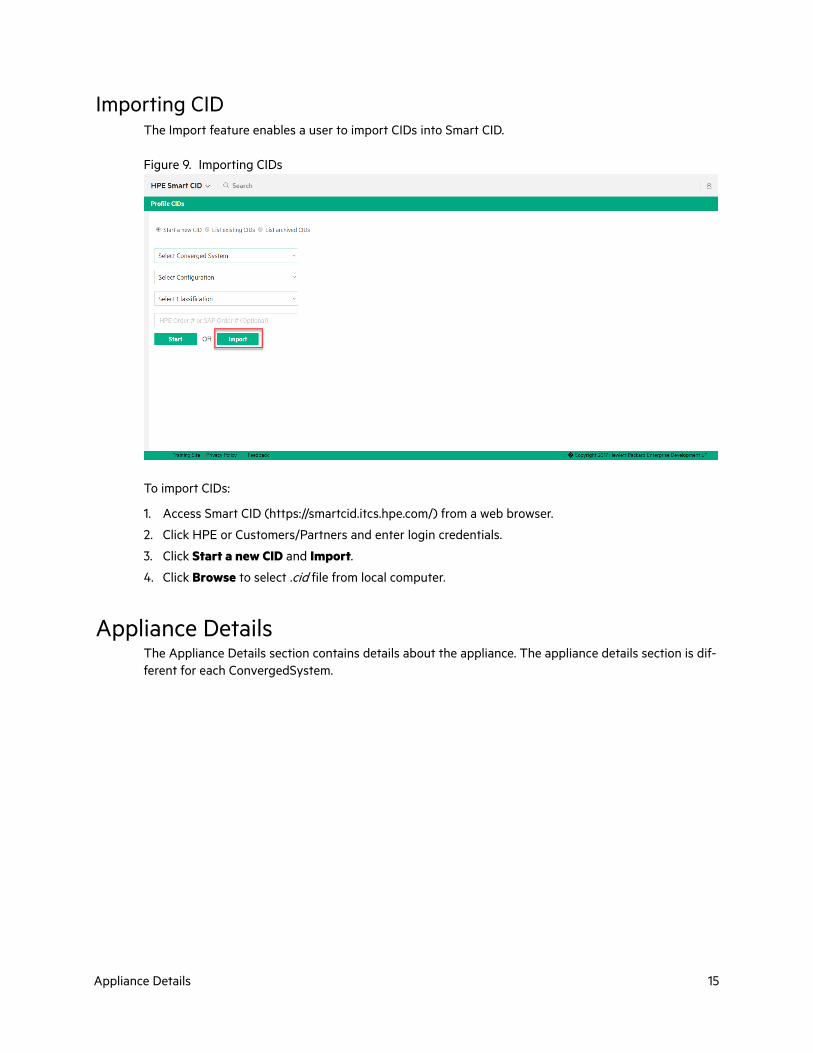
Importing CIDThe Import feature enables a user to import CIDs into Smart CID.
Figure 9. Importing CIDs
To import CIDs:
1. Access Smart CID (https://smartcid.itcs.hpe.com/) from a web browser.
2. Click HPE or Customers/Partners and enter login credentials.
3. Click Start a new CID and Import.
4. Click Browse to select .cid file from local computer.
Appliance DetailsThe Appliance Details section contains details about the appliance. The appliance details section is dif-ferent for each ConvergedSystem.
Appliance Details 15
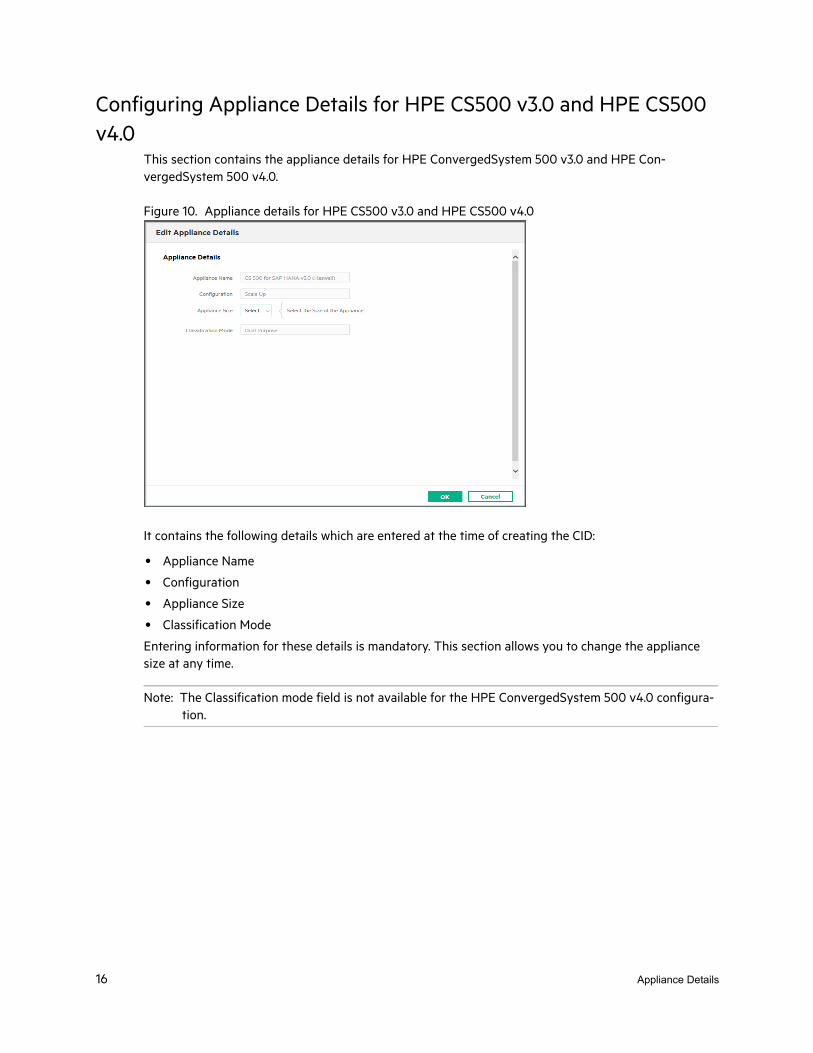
Configuring Appliance Details for HPE CS500 v3.0 and HPE CS500 v4.0
This section contains the appliance details for HPE ConvergedSystem 500 v3.0 and HPE Con-vergedSystem 500 v4.0.
Figure 10. Appliance details for HPE CS500 v3.0 and HPE CS500 v4.0
It contains the following details which are entered at the time of creating the CID:
• Appliance Name
• Configuration
• Appliance Size
• Classification Mode
Entering information for these details is mandatory. This section allows you to change the appliance size at any time.
Note: The Classification mode field is not available for the HPE ConvergedSystem 500 v4.0 configura-tion.
16 Appliance Details
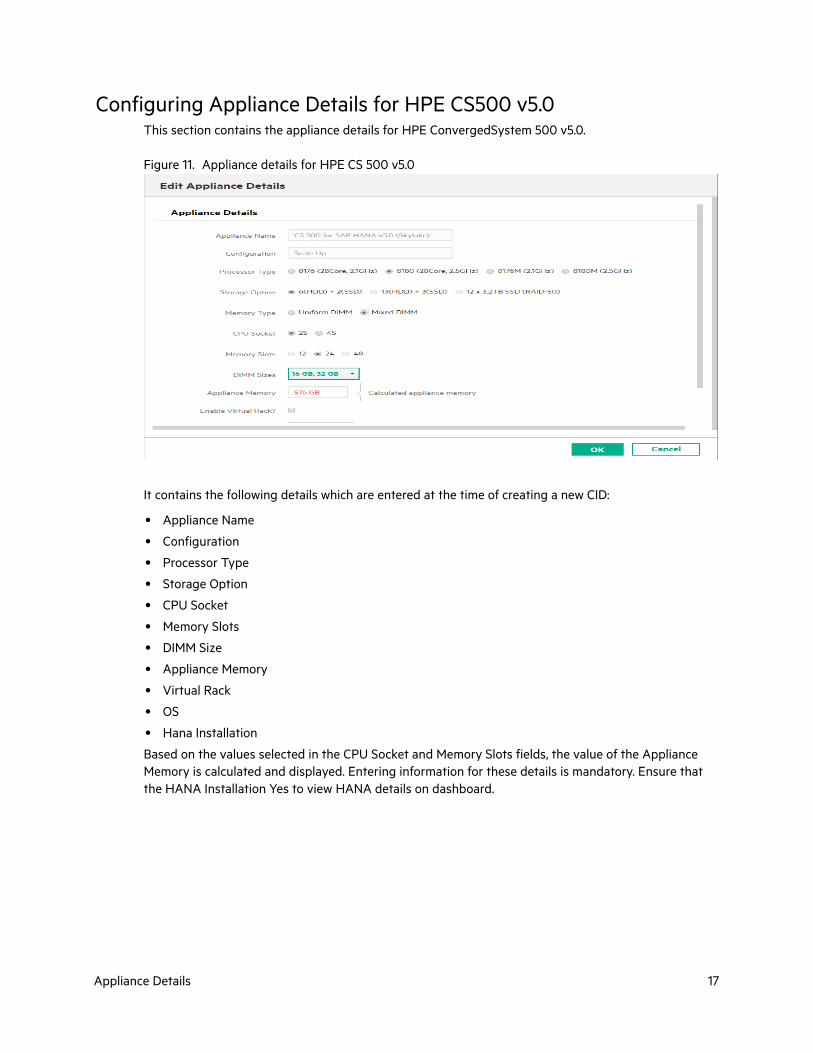
Configuring Appliance Details for HPE CS500 v5.0This section contains the appliance details for HPE ConvergedSystem 500 v5.0.
Figure 11. Appliance details for HPE CS 500 v5.0
It contains the following details which are entered at the time of creating a new CID:
• Appliance Name
• Configuration
• Processor Type
• Storage Option
• CPU Socket
• Memory Slots
• DIMM Size
• Appliance Memory
• Virtual Rack
• OS
• Hana Installation
Based on the values selected in the CPU Socket and Memory Slots fields, the value of the Appliance Memory is calculated and displayed. Entering information for these details is mandatory. Ensure that the HANA Installation Yes to view HANA details on dashboard.
Appliance Details 17
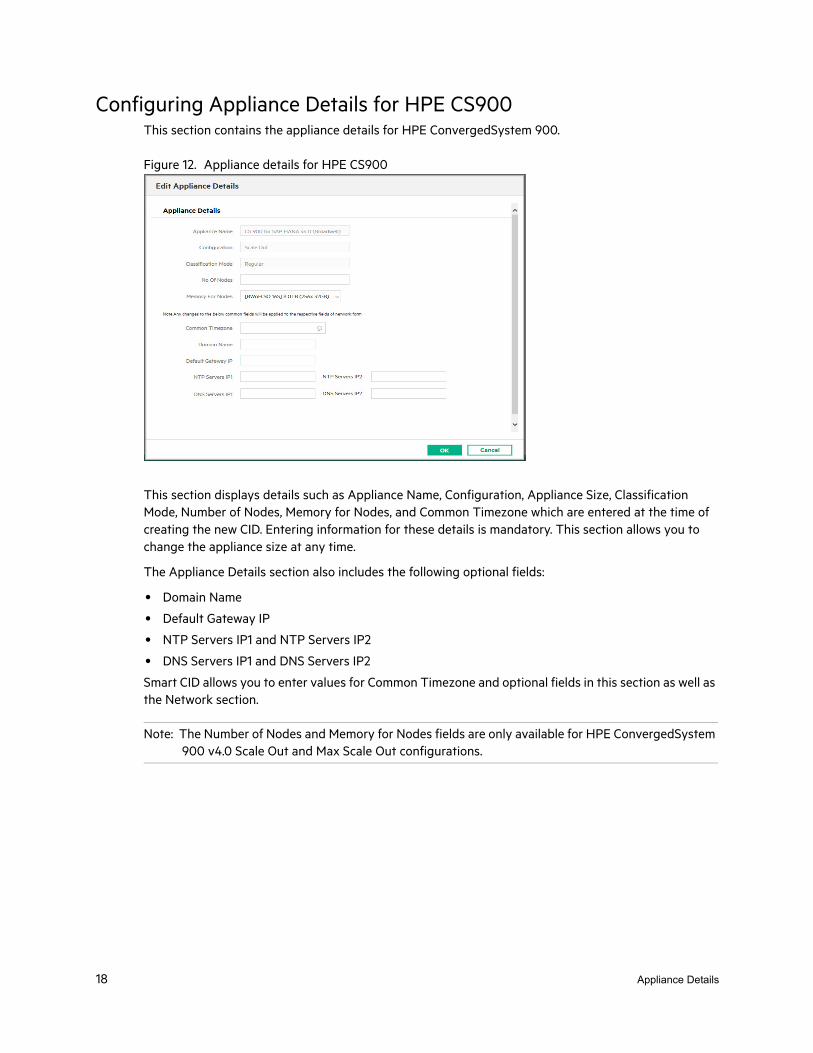
Configuring Appliance Details for HPE CS900This section contains the appliance details for HPE ConvergedSystem 900.
Figure 12. Appliance details for HPE CS900
This section displays details such as Appliance Name, Configuration, Appliance Size, Classification Mode, Number of Nodes, Memory for Nodes, and Common Timezone which are entered at the time of creating the new CID. Entering information for these details is mandatory. This section allows you to change the appliance size at any time.
The Appliance Details section also includes the following optional fields:
• Domain Name
• Default Gateway IP
• NTP Servers IP1 and NTP Servers IP2
• DNS Servers IP1 and DNS Servers IP2
Smart CID allows you to enter values for Common Timezone and optional fields in this section as well as the Network section.
Note: The Number of Nodes and Memory for Nodes fields are only available for HPE ConvergedSystem 900 v4.0 Scale Out and Max Scale Out configurations.
18 Appliance Details
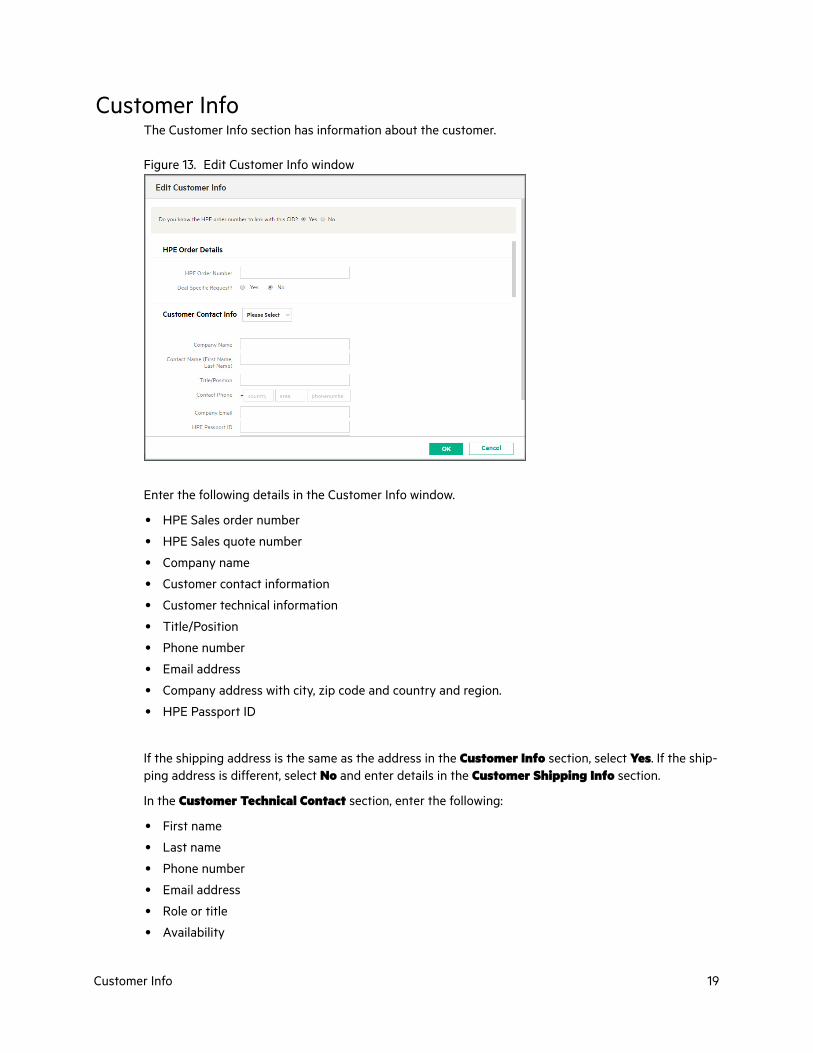
Customer InfoThe Customer Info section has information about the customer.
Figure 13. Edit Customer Info window
Enter the following details in the Customer Info window.
• HPE Sales order number
• HPE Sales quote number
• Company name
• Customer contact information
• Customer technical information
• Title/Position
• Phone number
• Email address
• Company address with city, zip code and country and region.
• HPE Passport ID
If the shipping address is the same as the address in the Customer Info section, select Yes. If the ship-ping address is different, select No and enter details in the Customer Shipping Info section.
In the Customer Technical Contact section, enter the following:
• First name
• Last name
• Phone number
• Email address
• Role or title
• Availability
Customer Info 19
• Click OK to save changes and close the window.
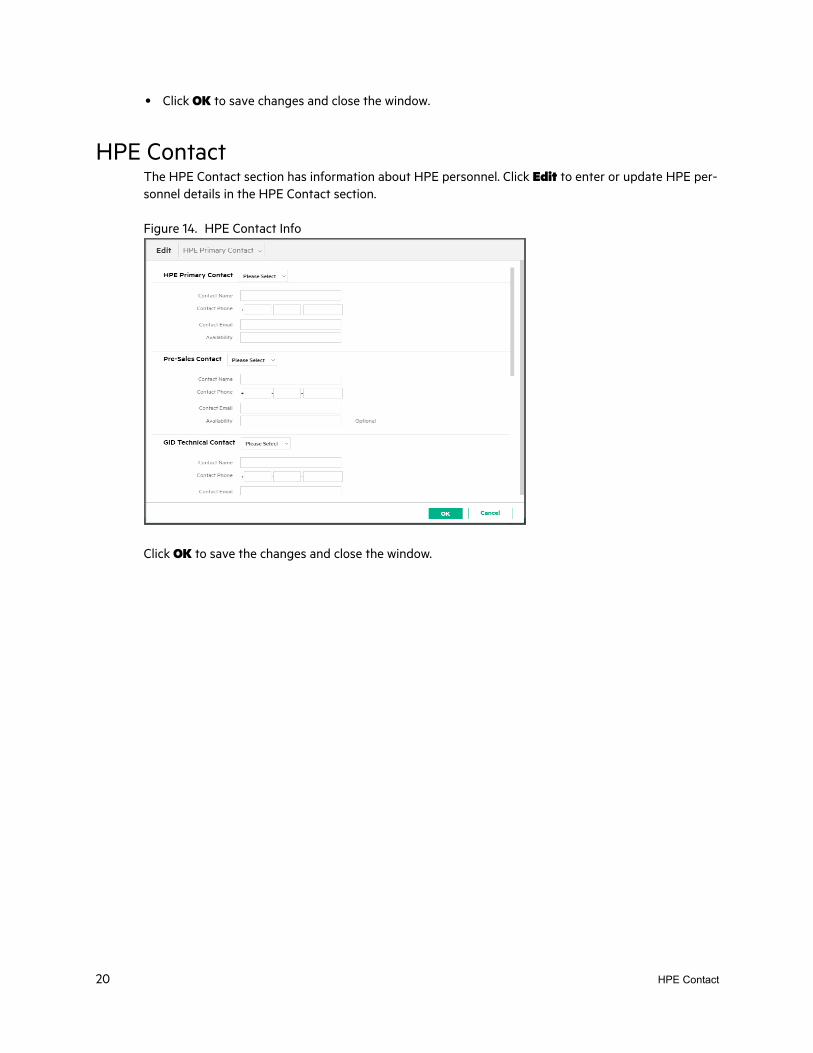
HPE ContactThe HPE Contact section has information about HPE personnel. Click Edit to enter or update HPE per-sonnel details in the HPE Contact section.
Figure 14. HPE Contact Info
Click OK to save the changes and close the window.
20 HPE Contact
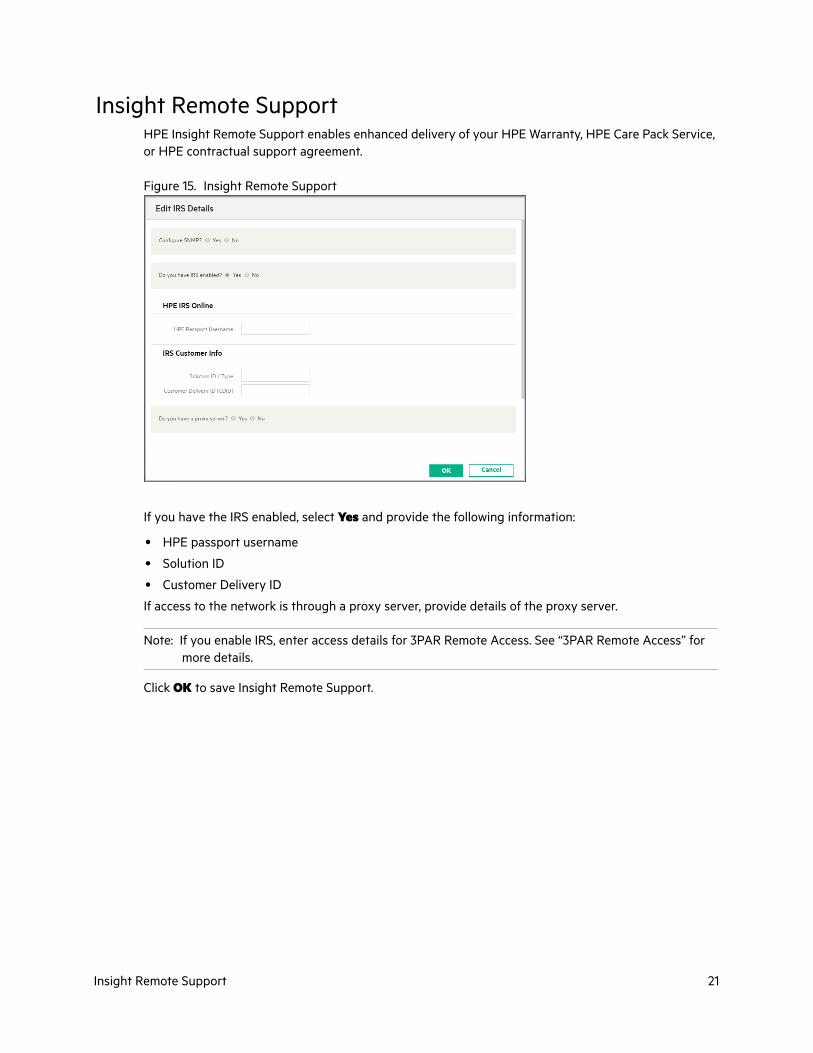
Insight Remote Support HPE Insight Remote Support enables enhanced delivery of your HPE Warranty, HPE Care Pack Service, or HPE contractual support agreement.
Figure 15. Insight Remote Support
If you have the IRS enabled, select Yes and provide the following information:
• HPE passport username
• Solution ID
• Customer Delivery ID
If access to the network is through a proxy server, provide details of the proxy server.
Note: If you enable IRS, enter access details for 3PAR Remote Access. See “3PAR Remote Access” for more details.
Click OK to save Insight Remote Support.
Insight Remote Support 21
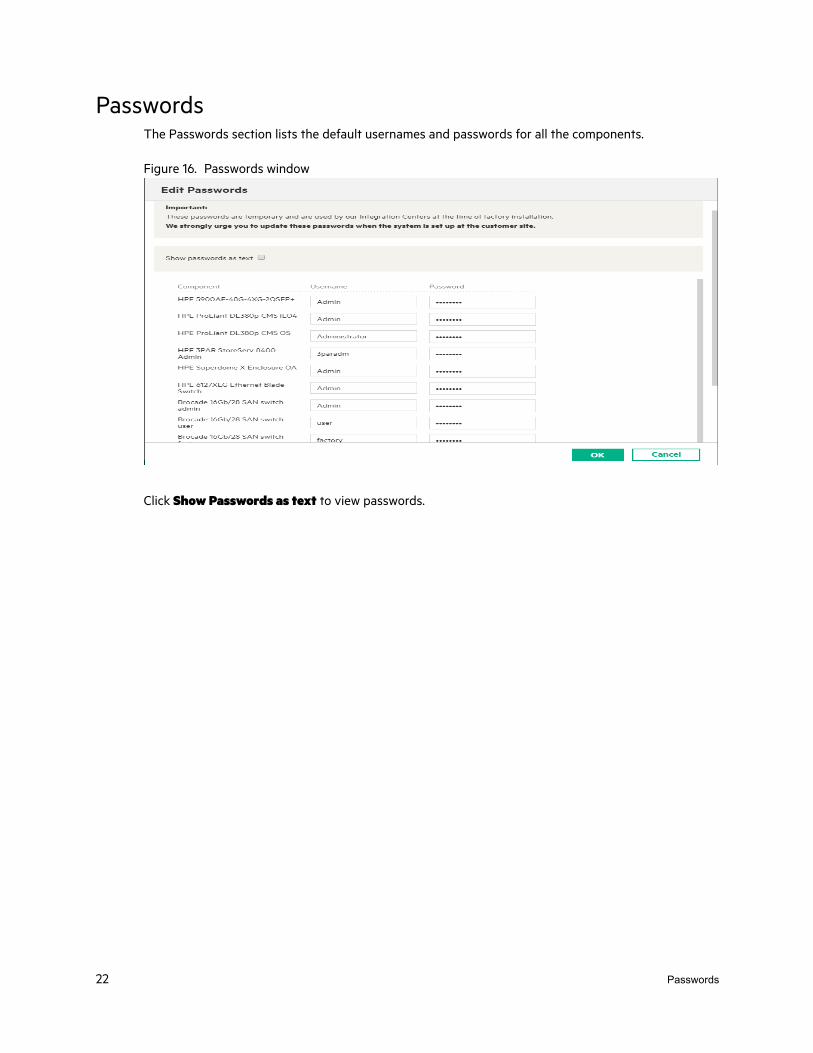
PasswordsThe Passwords section lists the default usernames and passwords for all the components.
Figure 16. Passwords window
Click Show Passwords as text to view passwords.
22 Passwords
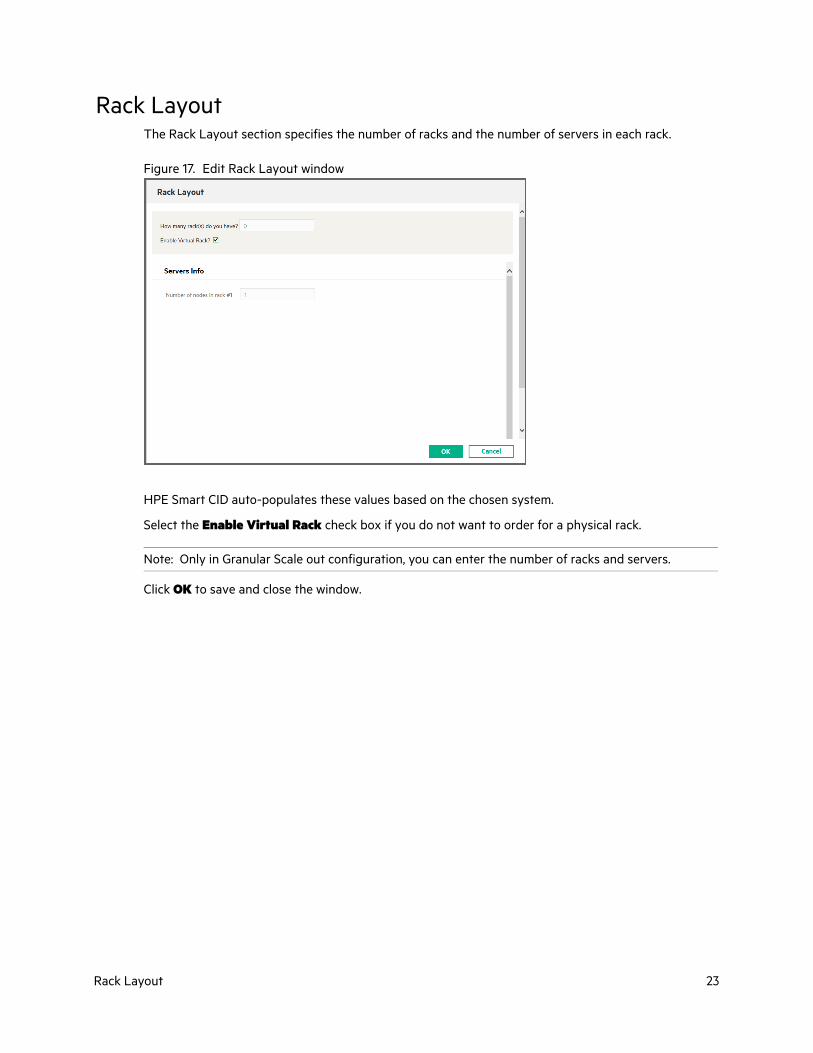
Rack LayoutThe Rack Layout section specifies the number of racks and the number of servers in each rack.
Figure 17. Edit Rack Layout window
HPE Smart CID auto-populates these values based on the chosen system.
Select the Enable Virtual Rack check box if you do not want to order for a physical rack.
Note: Only in Granular Scale out configuration, you can enter the number of racks and servers.
Click OK to save and close the window.
Rack Layout 23
HANA DB3 different configurations are supported for the SAP HANA database configuration.
• Production System
• Non-Production System (Testing, Development and Other environments)
• Dual Purpose System
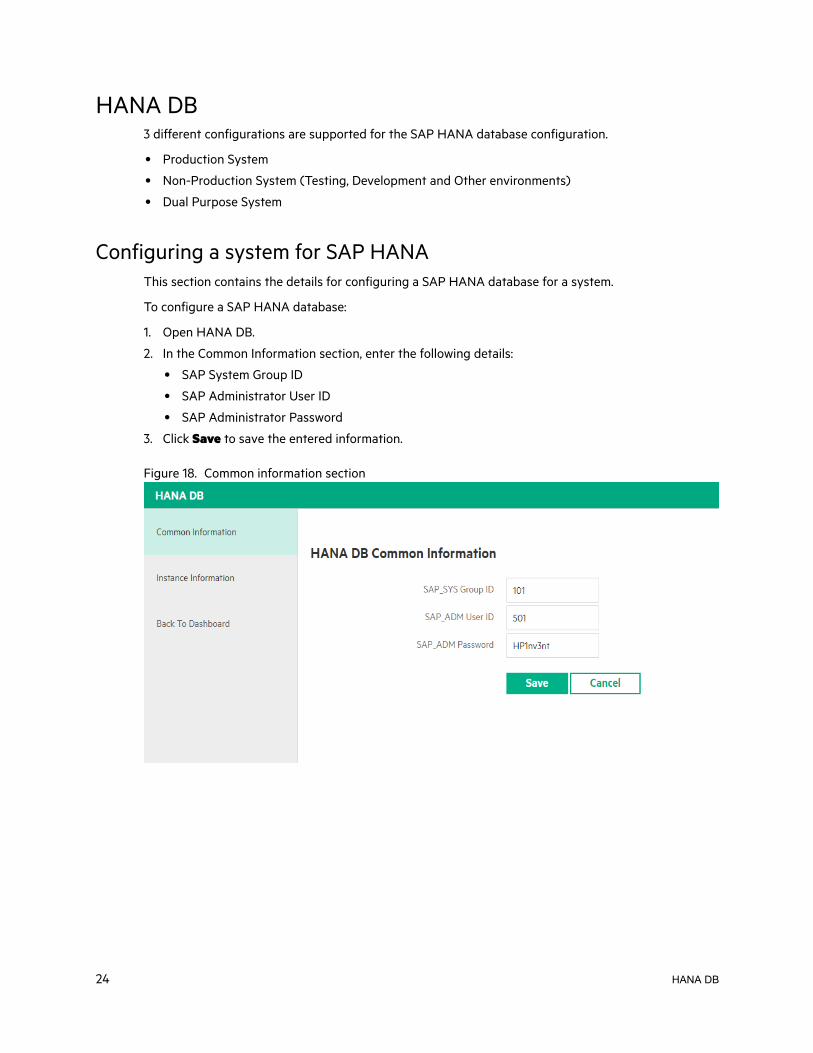
Configuring a system for SAP HANAThis section contains the details for configuring a SAP HANA database for a system.
To configure a SAP HANA database:
1. Open HANA DB.
2. In the Common Information section, enter the following details:
• SAP System Group ID
• SAP Administrator User ID
• SAP Administrator Password
3. Click Save to save the entered information.
Figure 18. Common information section
24 HANA DB
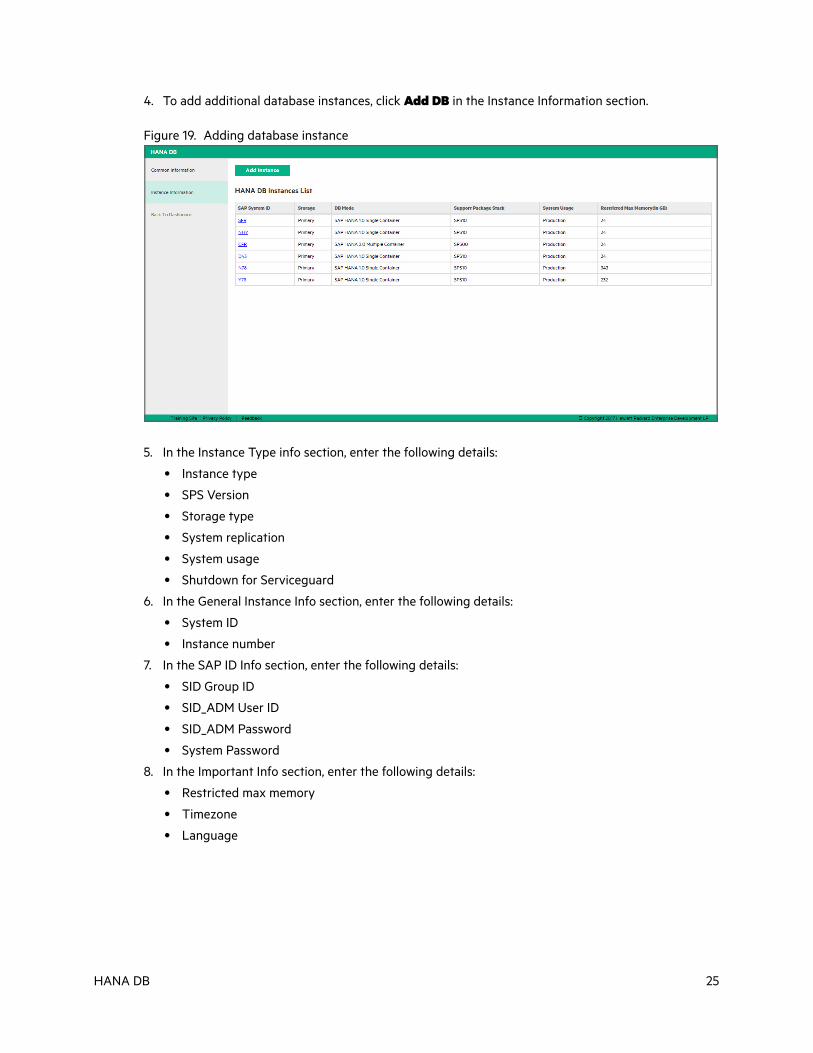
4. To add additional database instances, click Add DB in the Instance Information section.
Figure 19. Adding database instance
5. In the Instance Type info section, enter the following details:
• Instance type
• SPS Version
• Storage type
• System replication
• System usage
• Shutdown for Serviceguard
6. In the General Instance Info section, enter the following details:
• System ID
• Instance number
7. In the SAP ID Info section, enter the following details:
• SID Group ID
• SID_ADM User ID
• SID_ADM Password
• System Password
8. In the Important Info section, enter the following details:
• Restricted max memory
• Timezone
• Language
HANA DB 25
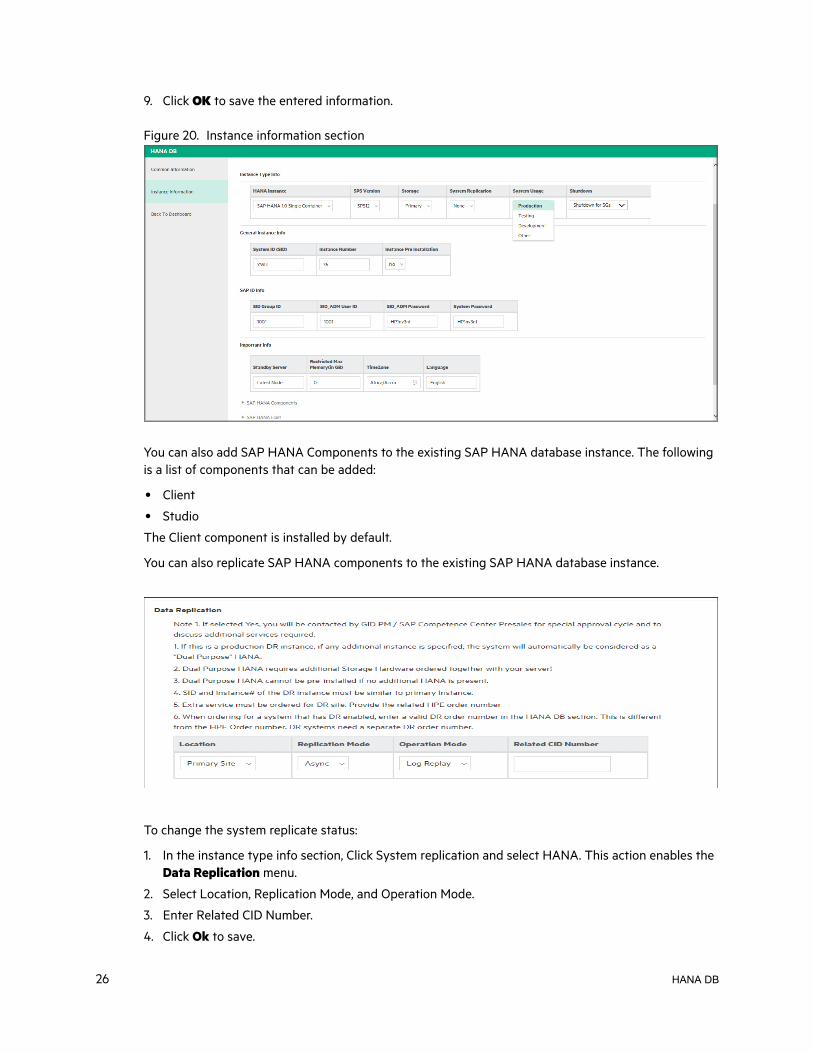
9. Click OK to save the entered information.
Figure 20. Instance information section
You can also add SAP HANA Components to the existing SAP HANA database instance. The following is a list of components that can be added:
• Client
• Studio
The Client component is installed by default.
You can also replicate SAP HANA components to the existing SAP HANA database instance.
To change the system replicate status:
1. In the instance type info section, Click System replication and select HANA. This action enables the Data Replication menu.
2. Select Location, Replication Mode, and Operation Mode.
3. Enter Related CID Number.
4. Click Ok to save.
26 HANA DB
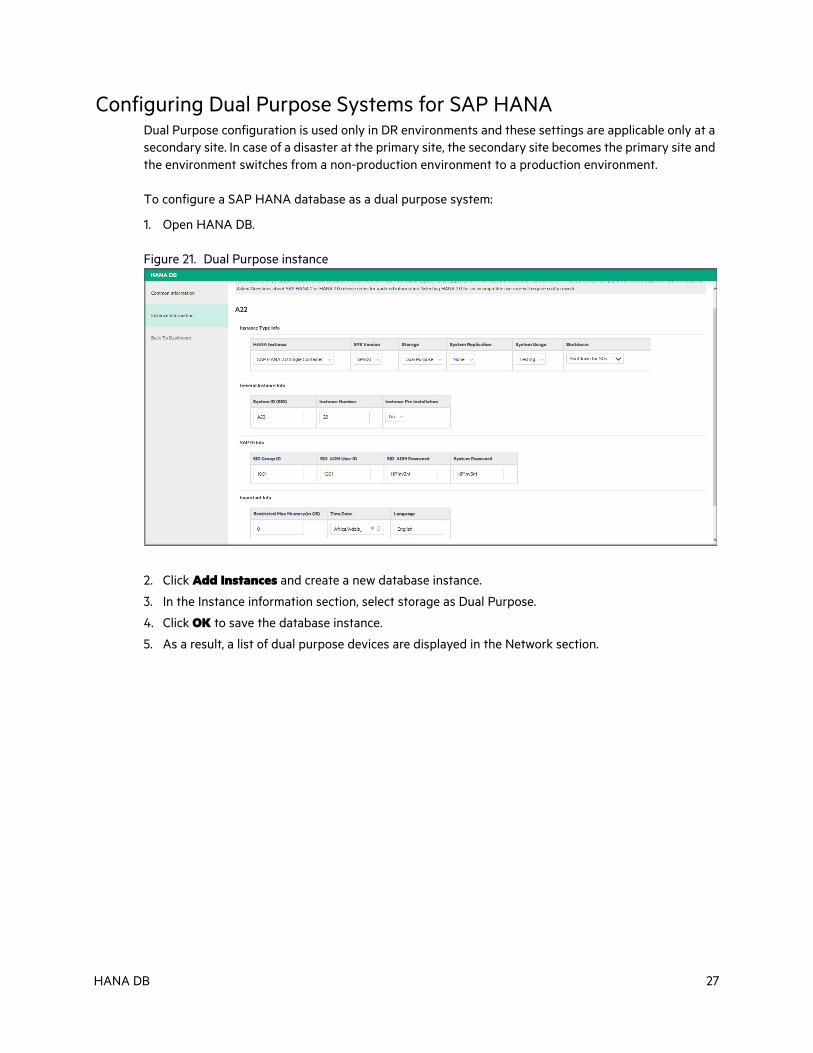
Configuring Dual Purpose Systems for SAP HANADual Purpose configuration is used only in DR environments and these settings are applicable only at a secondary site. In case of a disaster at the primary site, the secondary site becomes the primary site and the environment switches from a non-production environment to a production environment.
To configure a SAP HANA database as a dual purpose system:
1. Open HANA DB.
Figure 21. Dual Purpose instance
2. Click Add Instances and create a new database instance.
3. In the Instance information section, select storage as Dual Purpose.
4. Click OK to save the database instance.
5. As a result, a list of dual purpose devices are displayed in the Network section.
HANA DB 27
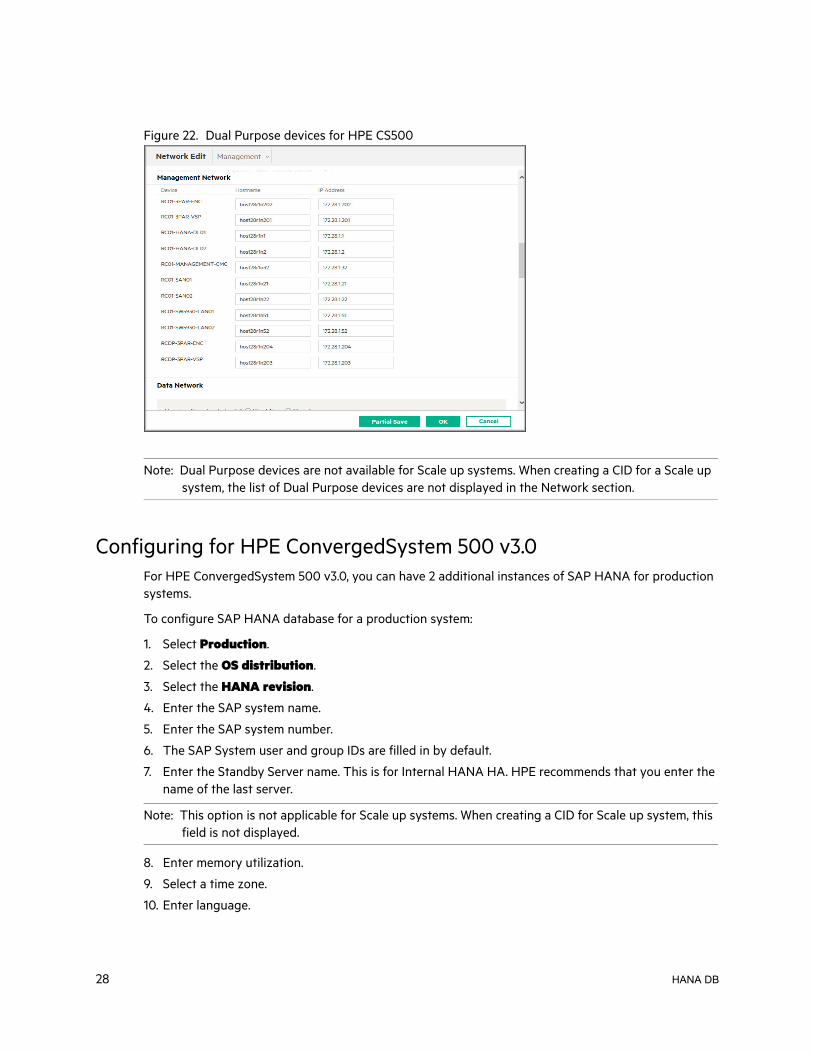
Figure 22. Dual Purpose devices for HPE CS500
Note: Dual Purpose devices are not available for Scale up systems. When creating a CID for a Scale up system, the list of Dual Purpose devices are not displayed in the Network section.
Configuring for HPE ConvergedSystem 500 v3.0For HPE ConvergedSystem 500 v3.0, you can have 2 additional instances of SAP HANA for production systems.
To configure SAP HANA database for a production system:
1. Select Production.
2. Select the OS distribution.
3. Select the HANA revision.
4. Enter the SAP system name.
5. Enter the SAP system number.
6. The SAP System user and group IDs are filled in by default.
7. Enter the Standby Server name. This is for Internal HANA HA. HPE recommends that you enter the name of the last server.
Note: This option is not applicable for Scale up systems. When creating a CID for Scale up system, this field is not displayed.
8. Enter memory utilization.
9. Select a time zone.
10. Enter language.
28 HANA DB

11. For HPE ConvergedSystem 500 v3.0, you can have 2 additional instances of SAP HANA. Select the operation mode and enter details for the additional instances.
Figure 23. Additional instances of HANA DB for HPE ConvergedSystem 500 v3.0
12. Enter instance memory.
IMPORTANT: Memory utilization for each instance must be at least 64 GB (SAP recommendation). The sum of all instances of memory utilization must be less than 90% of the total system memory.
13. Click OK to save and close the window.
HANA DB 29
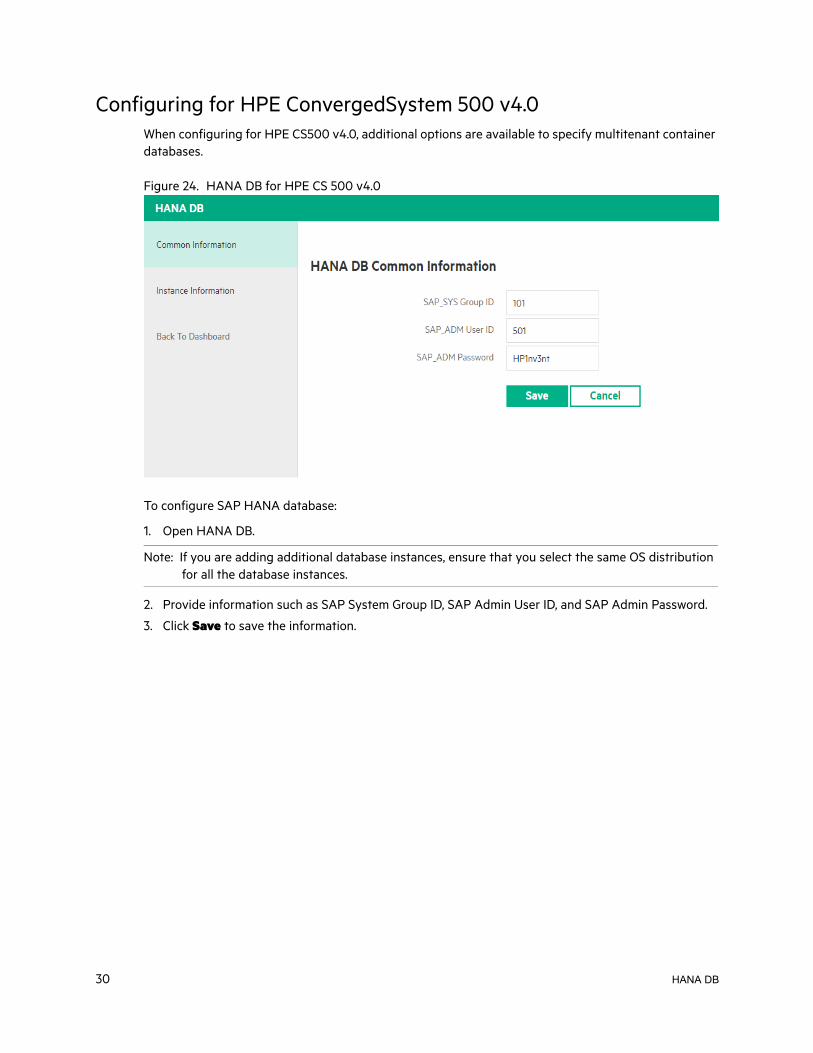
Configuring for HPE ConvergedSystem 500 v4.0When configuring for HPE CS500 v4.0, additional options are available to specify multitenant container databases.
Figure 24. HANA DB for HPE CS 500 v4.0
To configure SAP HANA database:
1. Open HANA DB.
Note: If you are adding additional database instances, ensure that you select the same OS distribution for all the database instances.
2. Provide information such as SAP System Group ID, SAP Admin User ID, and SAP Admin Password.
3. Click Save to save the information.
30 HANA DB
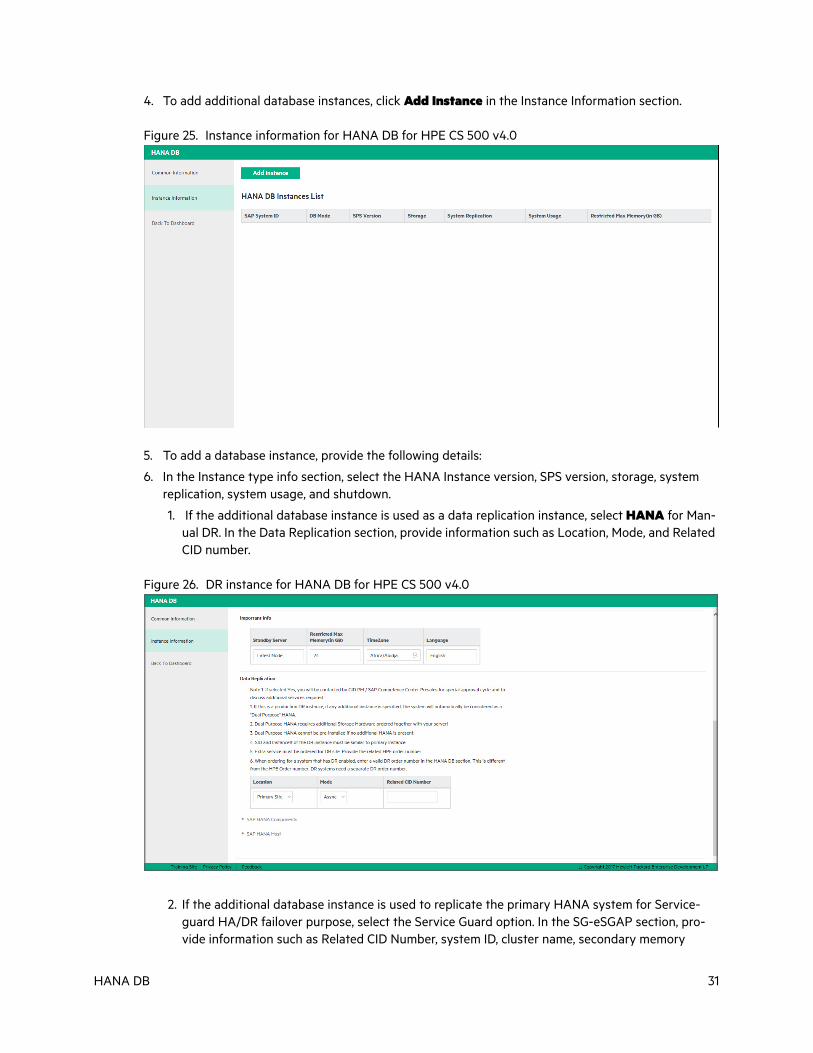
4. To add additional database instances, click Add Instance in the Instance Information section.
Figure 25. Instance information for HANA DB for HPE CS 500 v4.0
5. To add a database instance, provide the following details:
6. In the Instance type info section, select the HANA Instance version, SPS version, storage, system replication, system usage, and shutdown.
1. If the additional database instance is used as a data replication instance, select HANA for Man-ual DR. In the Data Replication section, provide information such as Location, Mode, and Related CID number.
Figure 26. DR instance for HANA DB for HPE CS 500 v4.0
2. If the additional database instance is used to replicate the primary HANA system for Service-guard HA/DR failover purpose, select the Service Guard option. In the SG-eSGAP section, pro-vide information such as Related CID Number, system ID, cluster name, secondary memory
HANA DB 31
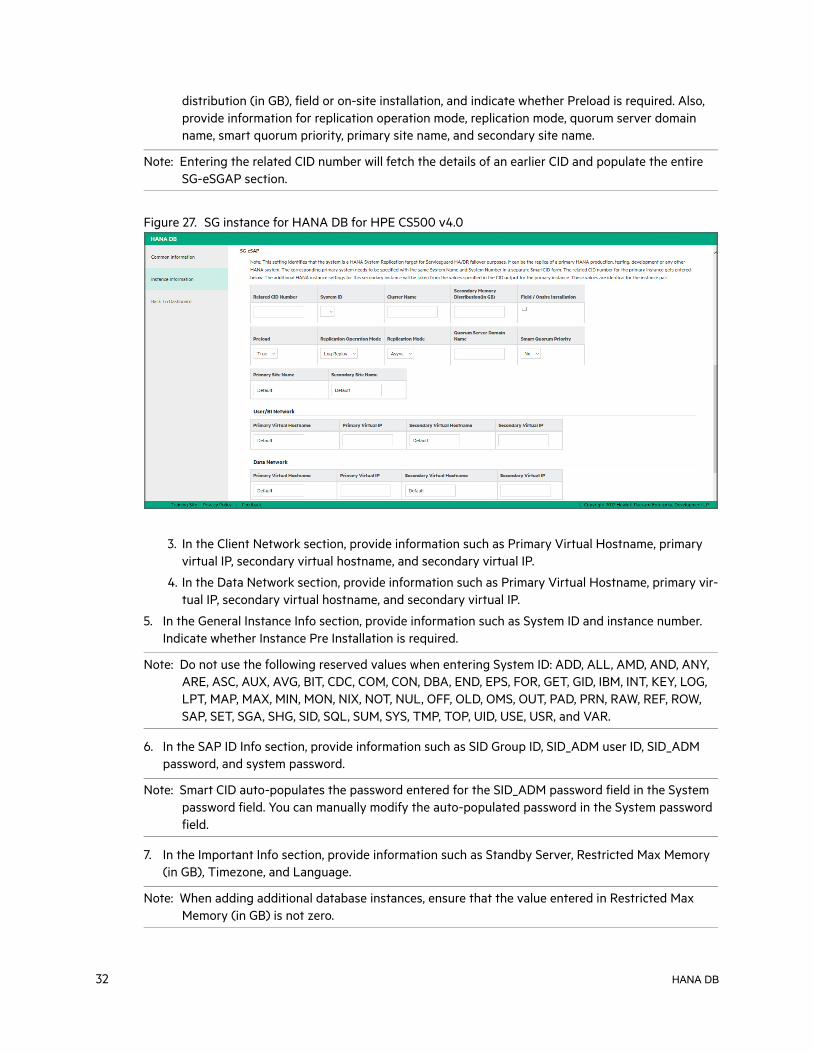
distribution (in GB), field or on-site installation, and indicate whether Preload is required. Also, provide information for replication operation mode, replication mode, quorum server domain name, smart quorum priority, primary site name, and secondary site name.
Note: Entering the related CID number will fetch the details of an earlier CID and populate the entire SG-eSGAP section.
Figure 27. SG instance for HANA DB for HPE CS500 v4.0
3. In the Client Network section, provide information such as Primary Virtual Hostname, primary virtual IP, secondary virtual hostname, and secondary virtual IP.
4. In the Data Network section, provide information such as Primary Virtual Hostname, primary vir-tual IP, secondary virtual hostname, and secondary virtual IP.
5. In the General Instance Info section, provide information such as System ID and instance number. Indicate whether Instance Pre Installation is required.
Note: Do not use the following reserved values when entering System ID: ADD, ALL, AMD, AND, ANY, ARE, ASC, AUX, AVG, BIT, CDC, COM, CON, DBA, END, EPS, FOR, GET, GID, IBM, INT, KEY, LOG, LPT, MAP, MAX, MIN, MON, NIX, NOT, NUL, OFF, OLD, OMS, OUT, PAD, PRN, RAW, REF, ROW, SAP, SET, SGA, SHG, SID, SQL, SUM, SYS, TMP, TOP, UID, USE, USR, and VAR.
6. In the SAP ID Info section, provide information such as SID Group ID, SID_ADM user ID, SID_ADM password, and system password.
Note: Smart CID auto-populates the password entered for the SID_ADM password field in the System password field. You can manually modify the auto-populated password in the System password field.
7. In the Important Info section, provide information such as Standby Server, Restricted Max Memory (in GB), Timezone, and Language.
Note: When adding additional database instances, ensure that the value entered in Restricted Max Memory (in GB) is not zero.
32 HANA DB
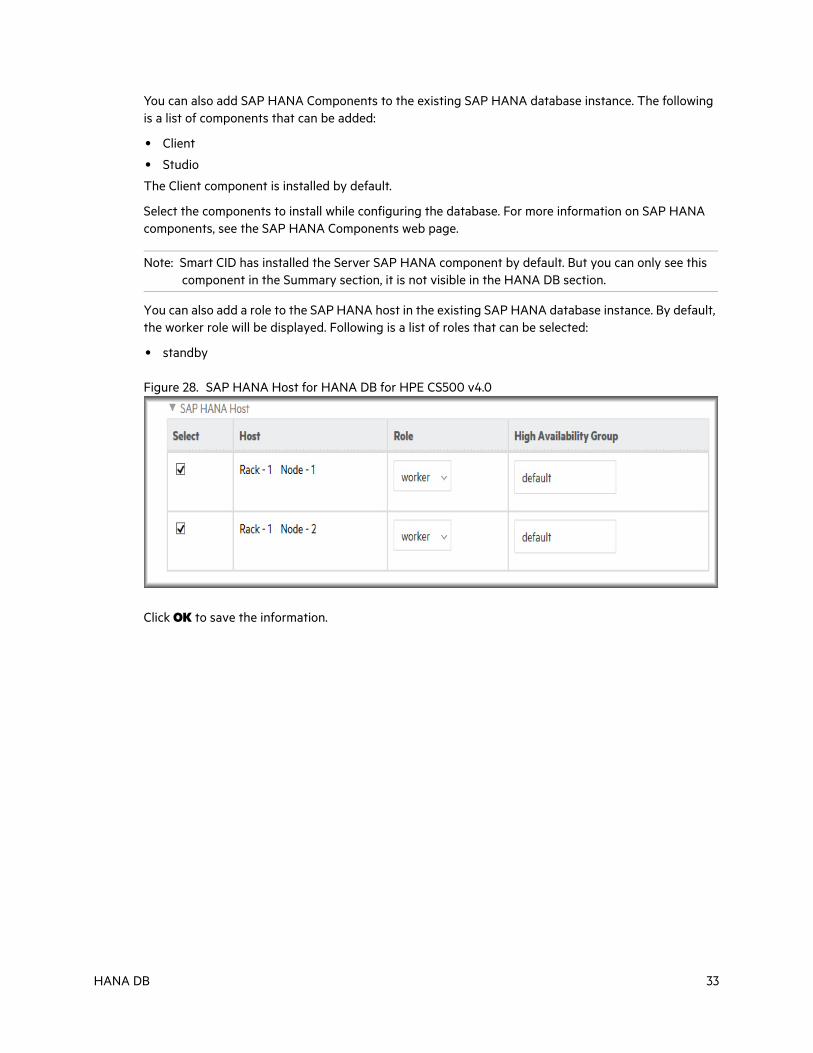
You can also add SAP HANA Components to the existing SAP HANA database instance. The following is a list of components that can be added:
• Client
• Studio
The Client component is installed by default.
Select the components to install while configuring the database. For more information on SAP HANA components, see the SAP HANA Components web page.
Note: Smart CID has installed the Server SAP HANA component by default. But you can only see this component in the Summary section, it is not visible in the HANA DB section.
You can also add a role to the SAP HANA host in the existing SAP HANA database instance. By default, the worker role will be displayed. Following is a list of roles that can be selected:
• standby
Figure 28. SAP HANA Host for HANA DB for HPE CS500 v4.0
Click OK to save the information.
HANA DB 33
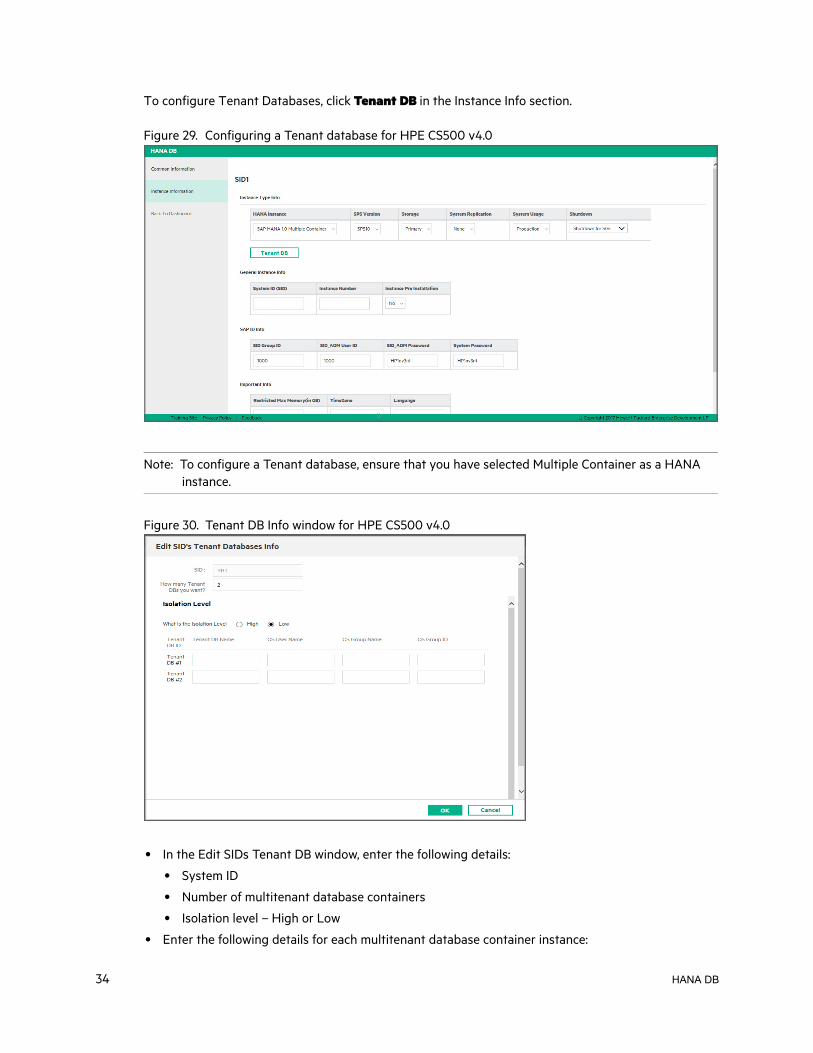
To configure Tenant Databases, click Tenant DB in the Instance Info section.
Figure 29. Configuring a Tenant database for HPE CS500 v4.0
Note: To configure a Tenant database, ensure that you have selected Multiple Container as a HANA instance.
Figure 30. Tenant DB Info window for HPE CS500 v4.0
• In the Edit SIDs Tenant DB window, enter the following details:
• System ID
• Number of multitenant database containers
• Isolation level – High or Low
• Enter the following details for each multitenant database container instance:
34 HANA DB

• Tenant DB Name
• OS User Name
• OS Group Name
• OS Group Number
Note: If the Isolation level is selected as low, the OS User Name, OS Group Name, and OS Group Number fields for each multitenant database container instance become disabled.
HANA DB 35
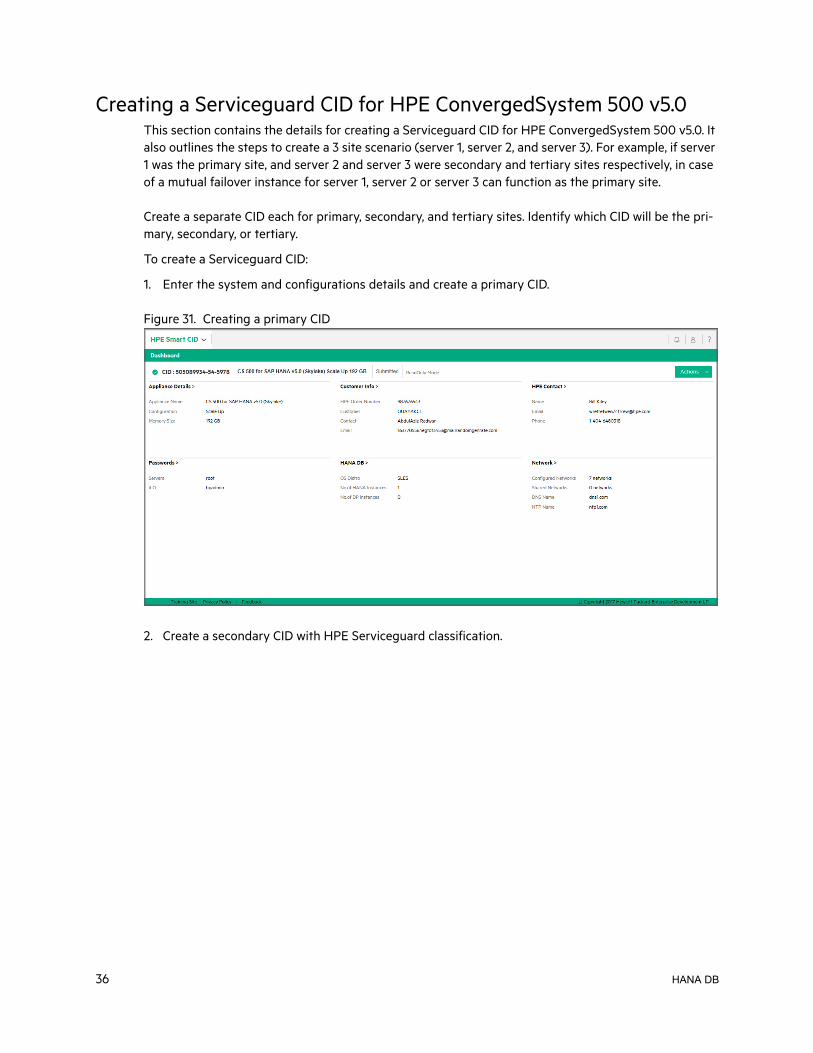
Creating a Serviceguard CID for HPE ConvergedSystem 500 v5.0This section contains the details for creating a Serviceguard CID for HPE ConvergedSystem 500 v5.0. It also outlines the steps to create a 3 site scenario (server 1, server 2, and server 3). For example, if server 1 was the primary site, and server 2 and server 3 were secondary and tertiary sites respectively, in case of a mutual failover instance for server 1, server 2 or server 3 can function as the primary site.
Create a separate CID each for primary, secondary, and tertiary sites. Identify which CID will be the pri-mary, secondary, or tertiary.
To create a Serviceguard CID:
1. Enter the system and configurations details and create a primary CID.
Figure 31. Creating a primary CID
2. Create a secondary CID with HPE Serviceguard classification.
36 HANA DB

1. Enter the appliance details, customer contact info, passwords, and HPE personnel contact info.In HANA DB, select the Serviceguard option in the System Replication drop-down.
Figure 32. Creating a secondary CID with HPE Serviceguard
2. In the SG-eSAP section, enter the primary CID number in the Primary CID number field.
Note: Ensure that you have noted the primary CID number when entering secondary CID details.
Figure 33. Adding primary CID
3. Select the database instance in the System ID drop-down. As a result, the primary CID details will be populated in the following sections: Instance Type Info, General Instance Info, SAP ID Info, and Important Info.
4. Enter network related information in the Network section and submit the secondary CID.
HANA DB 37
Similarly, create a Tertiary CID by entering system and configuration details. Then select HANA in the System Replication drop-down in the HANA DB section. Enter network related information in the Net-work section and submit the Tertiary CID.
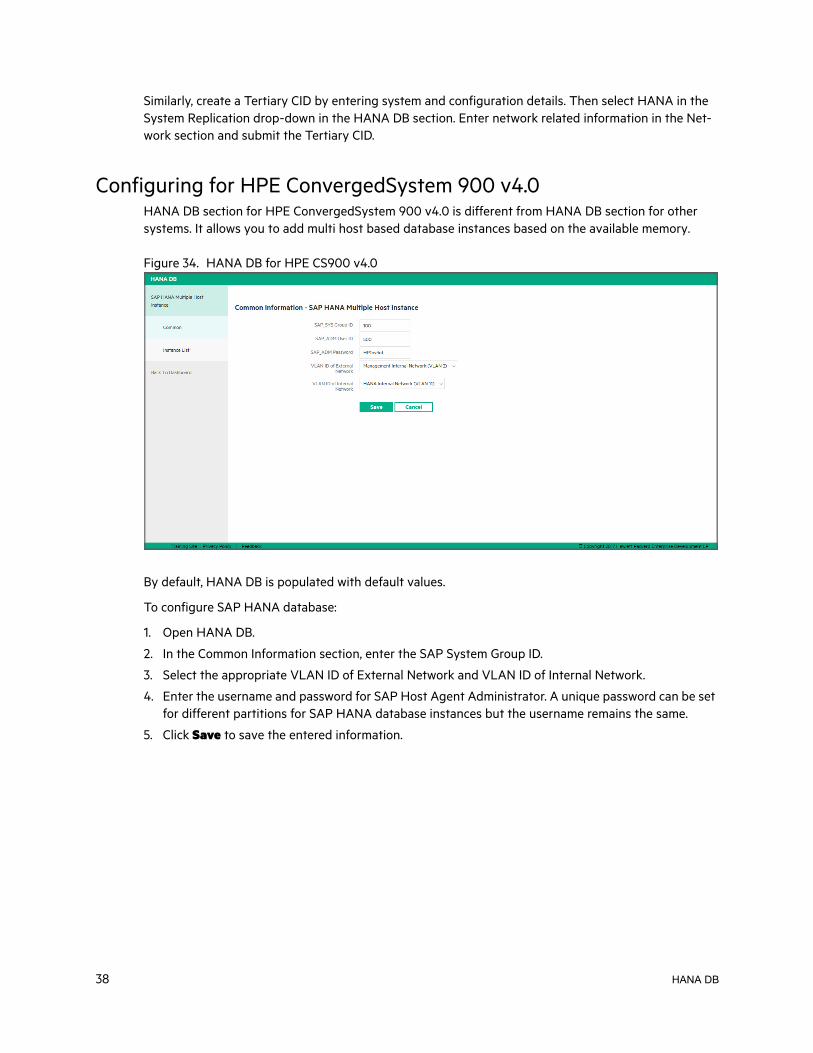
Configuring for HPE ConvergedSystem 900 v4.0HANA DB section for HPE ConvergedSystem 900 v4.0 is different from HANA DB section for other systems. It allows you to add multi host based database instances based on the available memory.
Figure 34. HANA DB for HPE CS900 v4.0
By default, HANA DB is populated with default values.
To configure SAP HANA database:
1. Open HANA DB.
2. In the Common Information section, enter the SAP System Group ID.
3. Select the appropriate VLAN ID of External Network and VLAN ID of Internal Network.
4. Enter the username and password for SAP Host Agent Administrator. A unique password can be set for different partitions for SAP HANA database instances but the username remains the same.
5. Click Save to save the entered information.
38 HANA DB
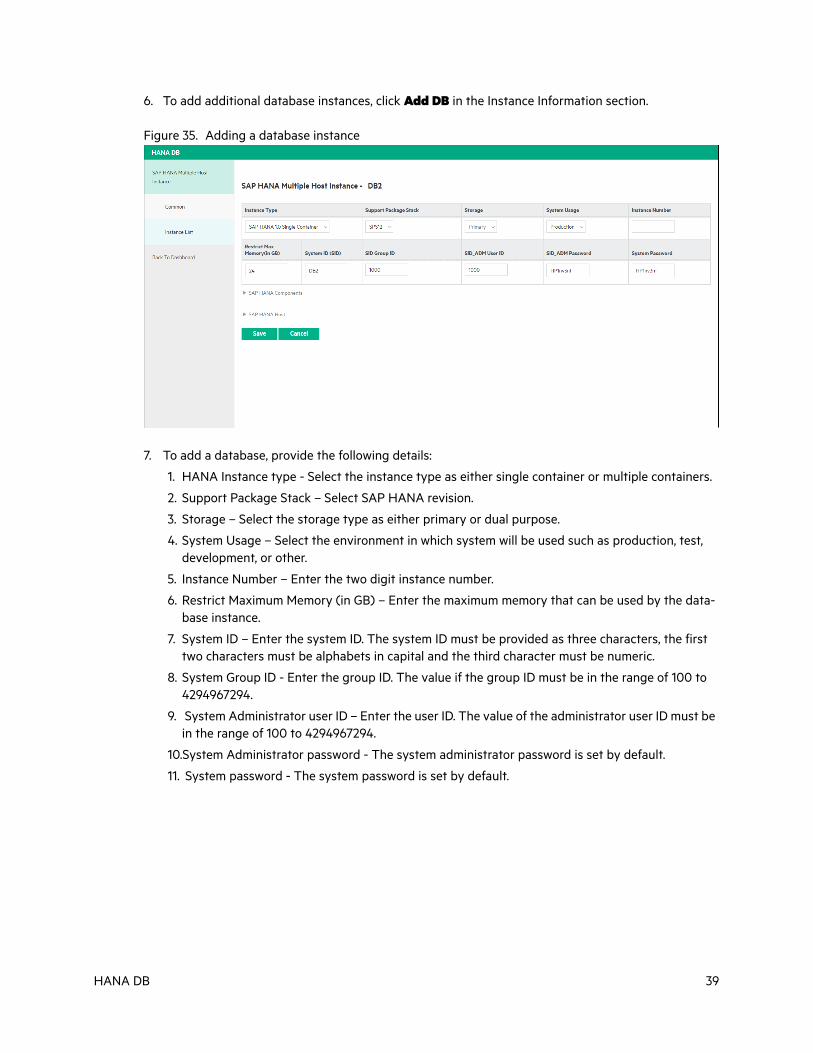
6. To add additional database instances, click Add DB in the Instance Information section.
Figure 35. Adding a database instance
7. To add a database, provide the following details:
1. HANA Instance type - Select the instance type as either single container or multiple containers.
2. Support Package Stack – Select SAP HANA revision.
3. Storage – Select the storage type as either primary or dual purpose.
4. System Usage – Select the environment in which system will be used such as production, test, development, or other.
5. Instance Number – Enter the two digit instance number.
6. Restrict Maximum Memory (in GB) – Enter the maximum memory that can be used by the data-base instance.
7. System ID – Enter the system ID. The system ID must be provided as three characters, the first two characters must be alphabets in capital and the third character must be numeric.
8. System Group ID - Enter the group ID. The value if the group ID must be in the range of 100 to 4294967294.
9. System Administrator user ID – Enter the user ID. The value of the administrator user ID must be in the range of 100 to 4294967294.
10.System Administrator password - The system administrator password is set by default.
11. System password - The system password is set by default.
HANA DB 39
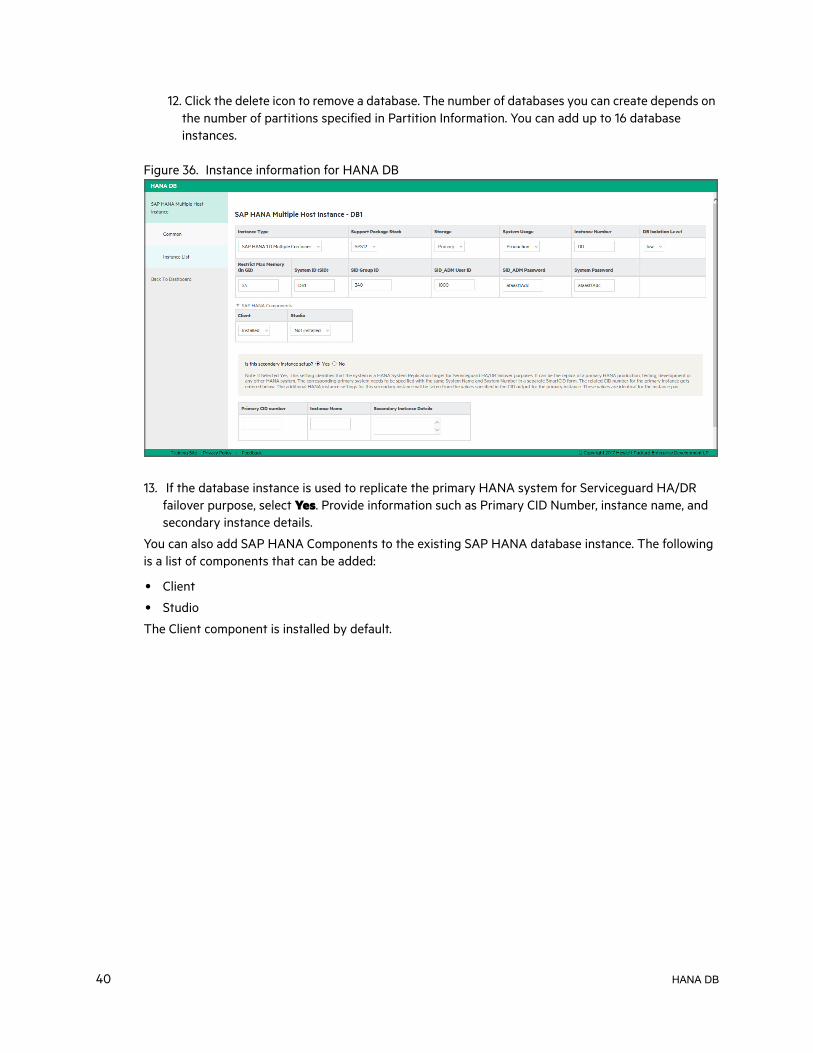
12. Click the delete icon to remove a database. The number of databases you can create depends on the number of partitions specified in Partition Information. You can add up to 16 database instances.
Figure 36. Instance information for HANA DB
13. If the database instance is used to replicate the primary HANA system for Serviceguard HA/DR failover purpose, select Yes. Provide information such as Primary CID Number, instance name, and secondary instance details.
You can also add SAP HANA Components to the existing SAP HANA database instance. The following is a list of components that can be added:
• Client
• Studio
The Client component is installed by default.
40 HANA DB
Select the components to install while configuring the database. For more information on SAP HANA components, see the SAP HANA Components web page.
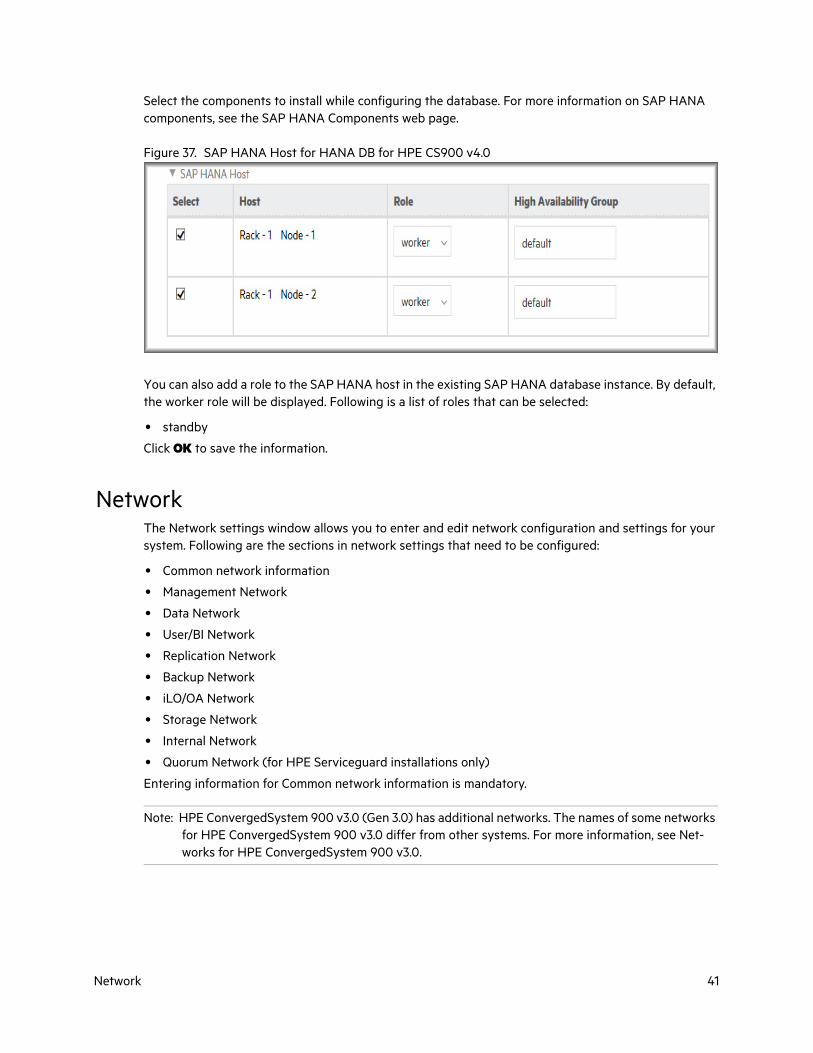
Figure 37. SAP HANA Host for HANA DB for HPE CS900 v4.0
You can also add a role to the SAP HANA host in the existing SAP HANA database instance. By default, the worker role will be displayed. Following is a list of roles that can be selected:
• standby
Click OK to save the information.
NetworkThe Network settings window allows you to enter and edit network configuration and settings for your system. Following are the sections in network settings that need to be configured:
• Common network information
• Management Network
• Data Network
• User/BI Network
• Replication Network
• Backup Network
• iLO/OA Network
• Storage Network
• Internal Network
• Quorum Network (for HPE Serviceguard installations only)
Entering information for Common network information is mandatory.
Note: HPE ConvergedSystem 900 v3.0 (Gen 3.0) has additional networks. The names of some networks for HPE ConvergedSystem 900 v3.0 differ from other systems. For more information, see Net-works for HPE ConvergedSystem 900 v3.0.
Network 41
Network SettingsSettings for other networks can be one of the following:
• Stand Alone
• Shared
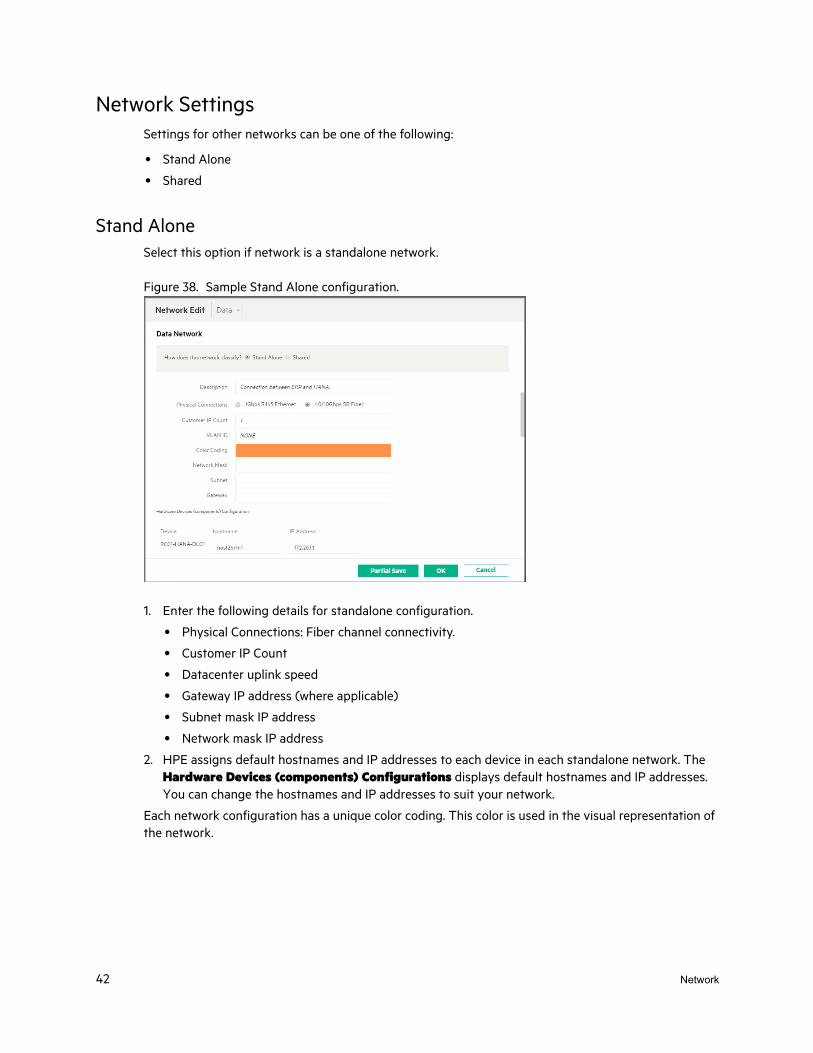
Stand AloneSelect this option if network is a standalone network.
Figure 38. Sample Stand Alone configuration.
1. Enter the following details for standalone configuration.
• Physical Connections: Fiber channel connectivity.
• Customer IP Count
• Datacenter uplink speed
• Gateway IP address (where applicable)
• Subnet mask IP address
• Network mask IP address
2. HPE assigns default hostnames and IP addresses to each device in each standalone network. The Hardware Devices (components) Configurations displays default hostnames and IP addresses. You can change the hostnames and IP addresses to suit your network.
Each network configuration has a unique color coding. This color is used in the visual representation of the network.
42 Network
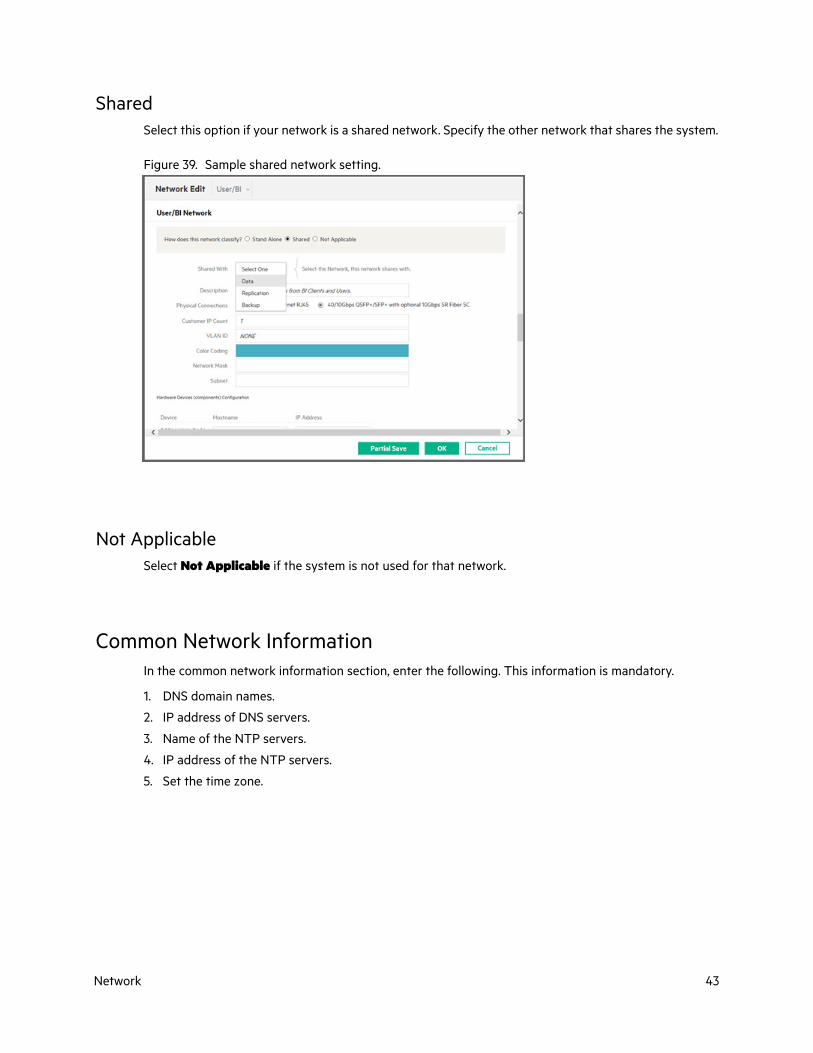
SharedSelect this option if your network is a shared network. Specify the other network that shares the system.
Figure 39. Sample shared network setting.
Not ApplicableSelect Not Applicable if the system is not used for that network.
Common Network InformationIn the common network information section, enter the following. This information is mandatory.
1. DNS domain names.
2. IP address of DNS servers.
3. Name of the NTP servers.
4. IP address of the NTP servers.
5. Set the time zone.
Network 43
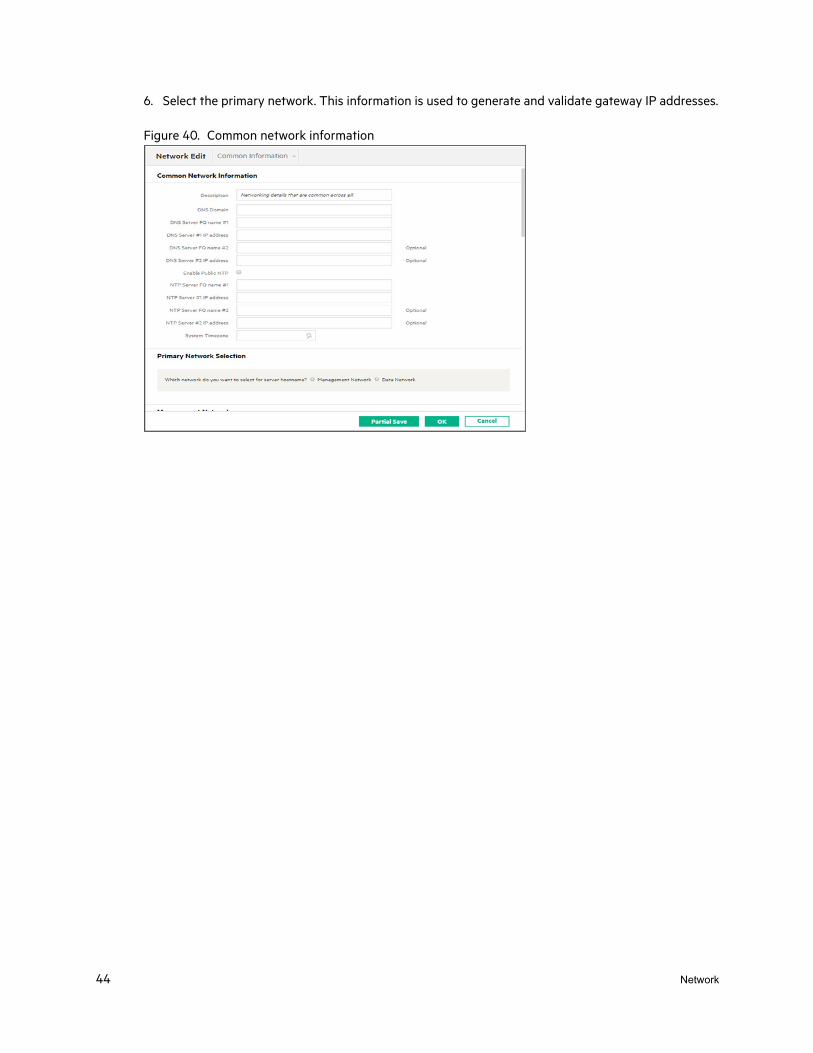
6. Select the primary network. This information is used to generate and validate gateway IP addresses.
Figure 40. Common network information
44 Network
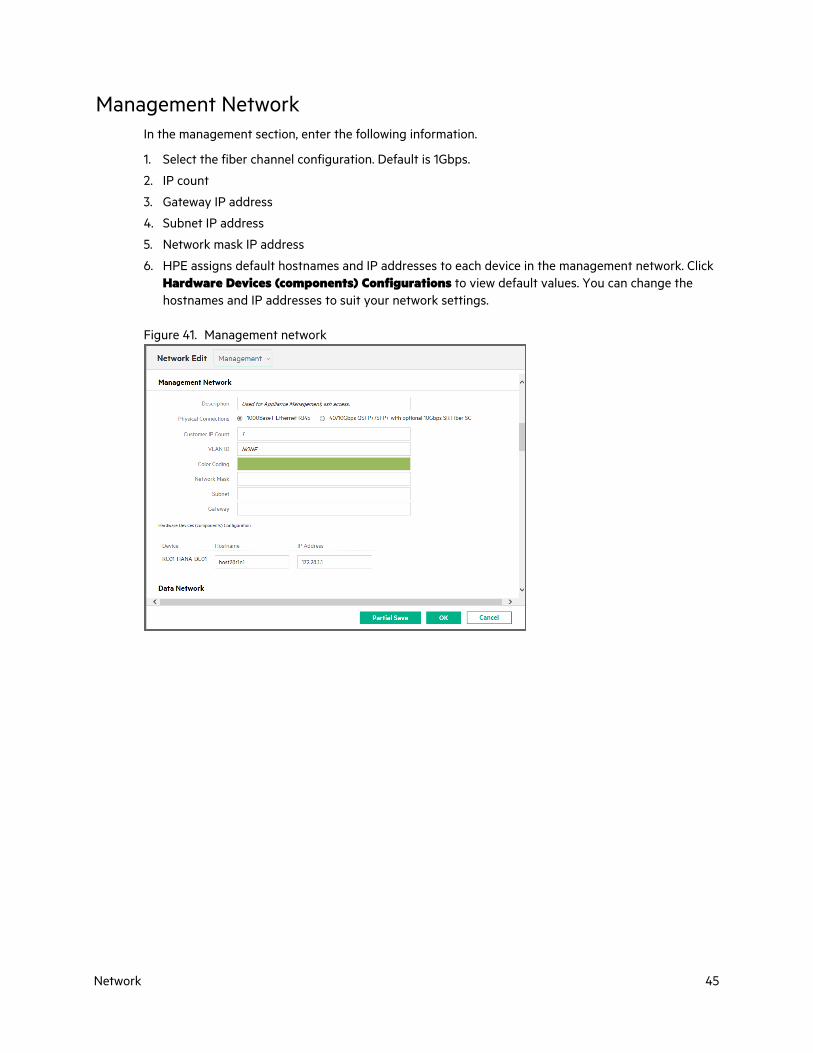
Management NetworkIn the management section, enter the following information.
1. Select the fiber channel configuration. Default is 1Gbps.
2. IP count
3. Gateway IP address
4. Subnet IP address
5. Network mask IP address
6. HPE assigns default hostnames and IP addresses to each device in the management network. Click Hardware Devices (components) Configurations to view default values. You can change the hostnames and IP addresses to suit your network settings.
Figure 41. Management network
Network 45
Other NetworksHPE Smart CID allows you to configure the system for each of these networks.
• Data Network
• User/BI Network
• Replication Network
• Backup Network
• iLO/OA Network
• Storage Network
• Internal Network
• Quorum Network (for HPE Serviceguard installations only)
Note: HPE ConvergedSystem 900 v3.0 (Gen 3.0) has additional networks. The names of some networks for HPE ConvergedSystem 900 v3.0 differ from other systems. For more information, see “Net-works for HPE ConvergedSystem 900 v3.0”.
If your system is used as a data network, select Stand Alone and enter the following details:
• Fiber channel configuration
• IP count
• Gateway IP address
• Subnet IP address
• Network mask IP address
If the network is shared, select Shared and select the shared network from the drop down menu.
If your system is not used for any of the above networks, select Not Applicable.
46 Network
Networks for HPE ConvergedSystem 900 v3.0HPE ConvergedSystem 900 v3.0 has the following networks:
• Management External Network
• Management Internal Network
• Management Storage Network
• Management iLO Network
• HANA Client Access Network
• HANA Data Provisioning Network
• HANA Replication Network
• HANA Backup Network
• HANA Shared NFS Network
• HANA Internal Network
• HANA Administration Network
• Serviceguard Quorum Network
Note: Each of these networks can be configured as Stand Alone networks or Shared networks.
Network 47
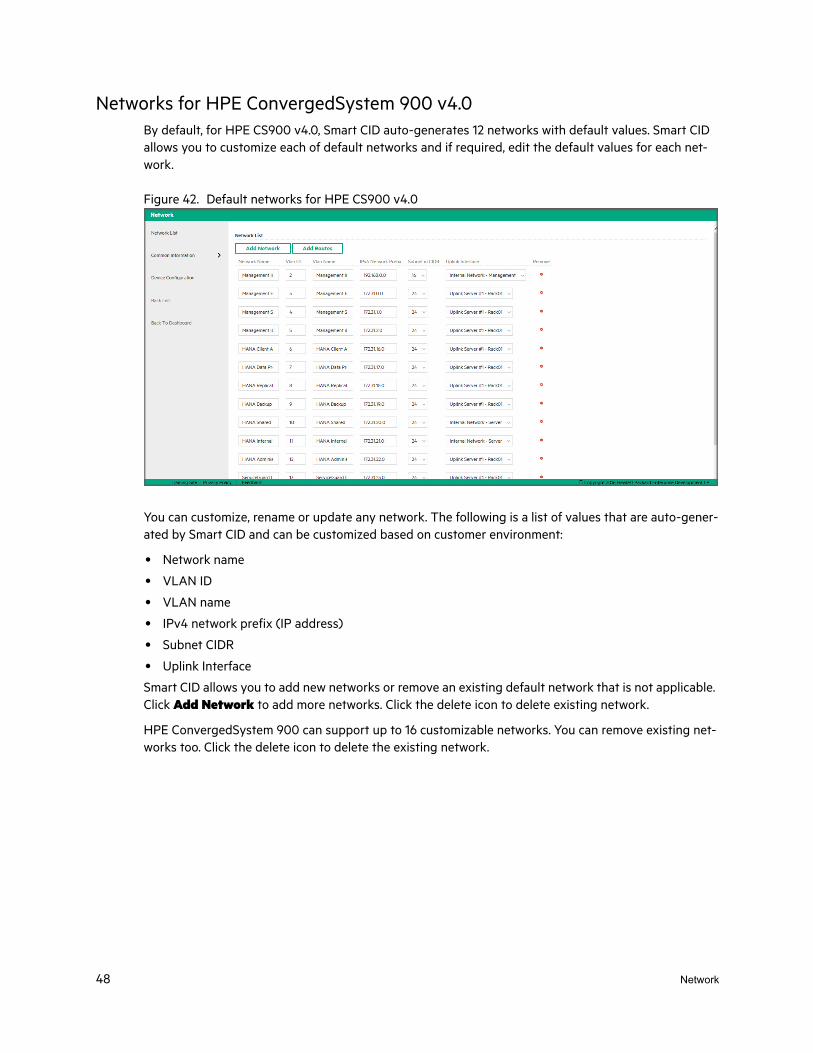
Networks for HPE ConvergedSystem 900 v4.0By default, for HPE CS900 v4.0, Smart CID auto-generates 12 networks with default values. Smart CID allows you to customize each of default networks and if required, edit the default values for each net-work.
Figure 42. Default networks for HPE CS900 v4.0
You can customize, rename or update any network. The following is a list of values that are auto-gener-ated by Smart CID and can be customized based on customer environment:
• Network name
• VLAN ID
• VLAN name
• IPv4 network prefix (IP address)
• Subnet CIDR
• Uplink Interface
Smart CID allows you to add new networks or remove an existing default network that is not applicable. Click Add Network to add more networks. Click the delete icon to delete existing network.
HPE ConvergedSystem 900 can support up to 16 customizable networks. You can remove existing net-works too. Click the delete icon to delete the existing network.
48 Network
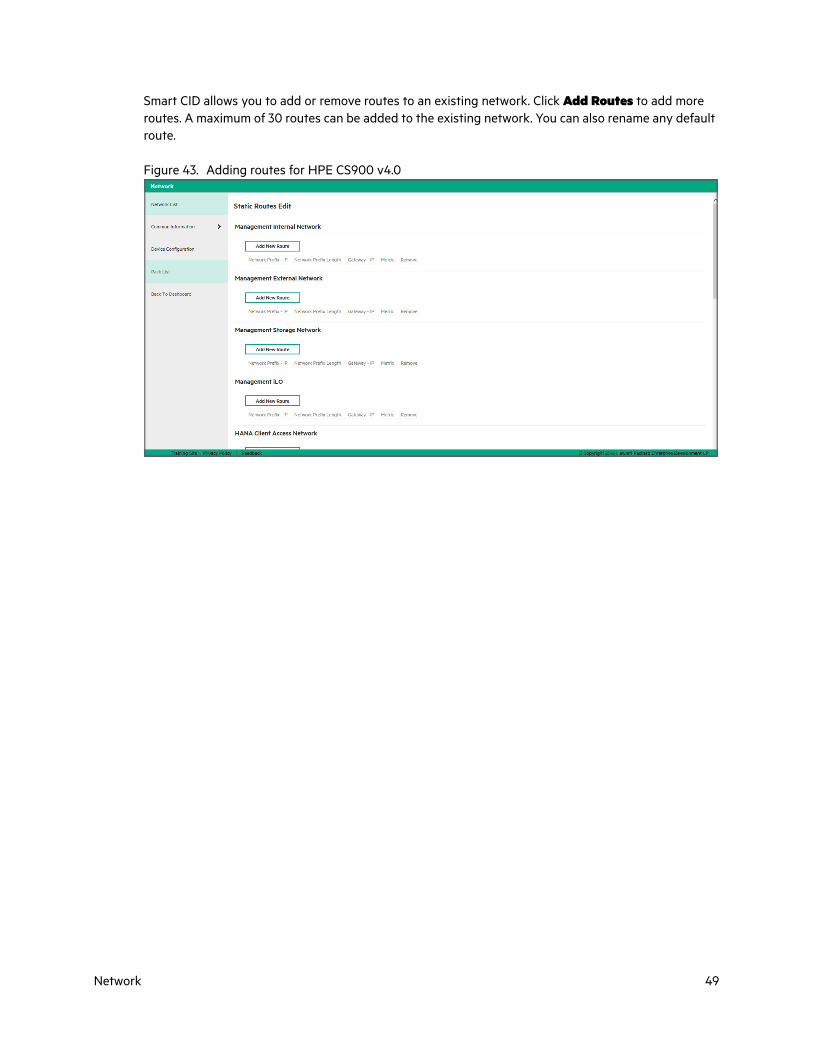
Smart CID allows you to add or remove routes to an existing network. Click Add Routes to add more routes. A maximum of 30 routes can be added to the existing network. You can also rename any default route.
Figure 43. Adding routes for HPE CS900 v4.0
Network 49
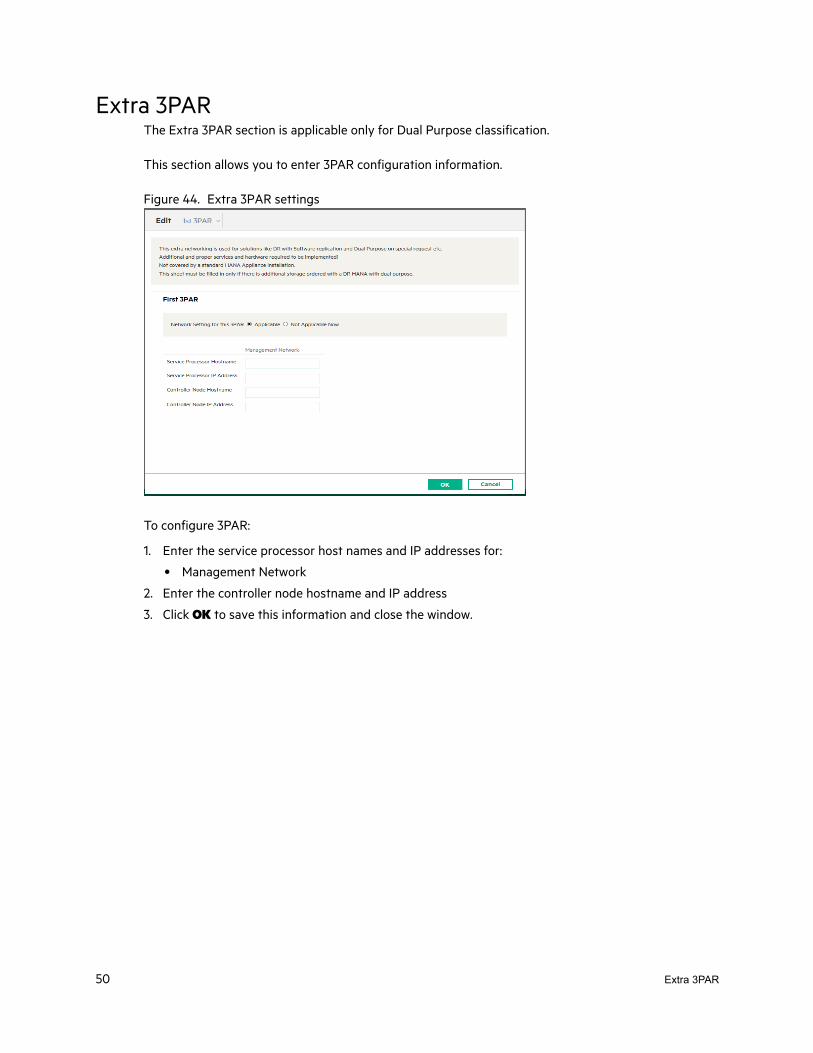
Extra 3PARThe Extra 3PAR section is applicable only for Dual Purpose classification.
This section allows you to enter 3PAR configuration information.
Figure 44. Extra 3PAR settings
To configure 3PAR:
1. Enter the service processor host names and IP addresses for:
• Management Network
2. Enter the controller node hostname and IP address
3. Click OK to save this information and close the window.
50 Extra 3PAR
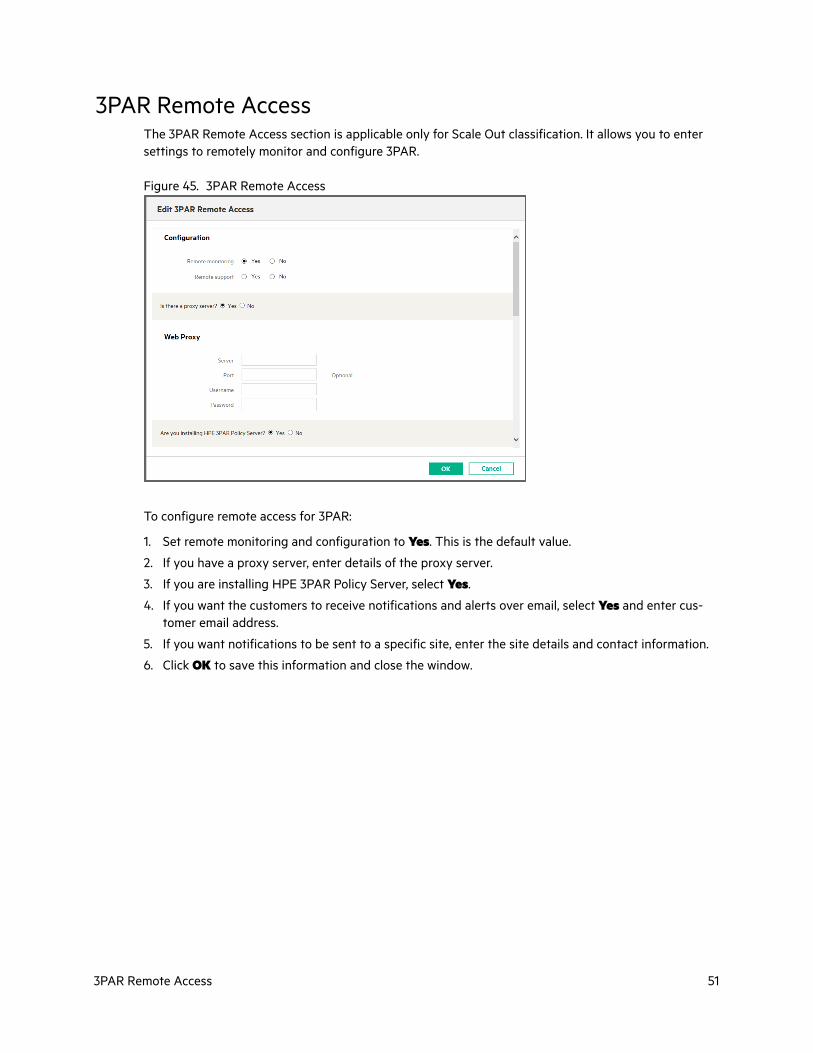
3PAR Remote AccessThe 3PAR Remote Access section is applicable only for Scale Out classification. It allows you to enter settings to remotely monitor and configure 3PAR.
Figure 45. 3PAR Remote Access
To configure remote access for 3PAR:
1. Set remote monitoring and configuration to Yes. This is the default value.
2. If you have a proxy server, enter details of the proxy server.
3. If you are installing HPE 3PAR Policy Server, select Yes.
4. If you want the customers to receive notifications and alerts over email, select Yes and enter cus-tomer email address.
5. If you want notifications to be sent to a specific site, enter the site details and contact information.
6. Click OK to save this information and close the window.
3PAR Remote Access 51
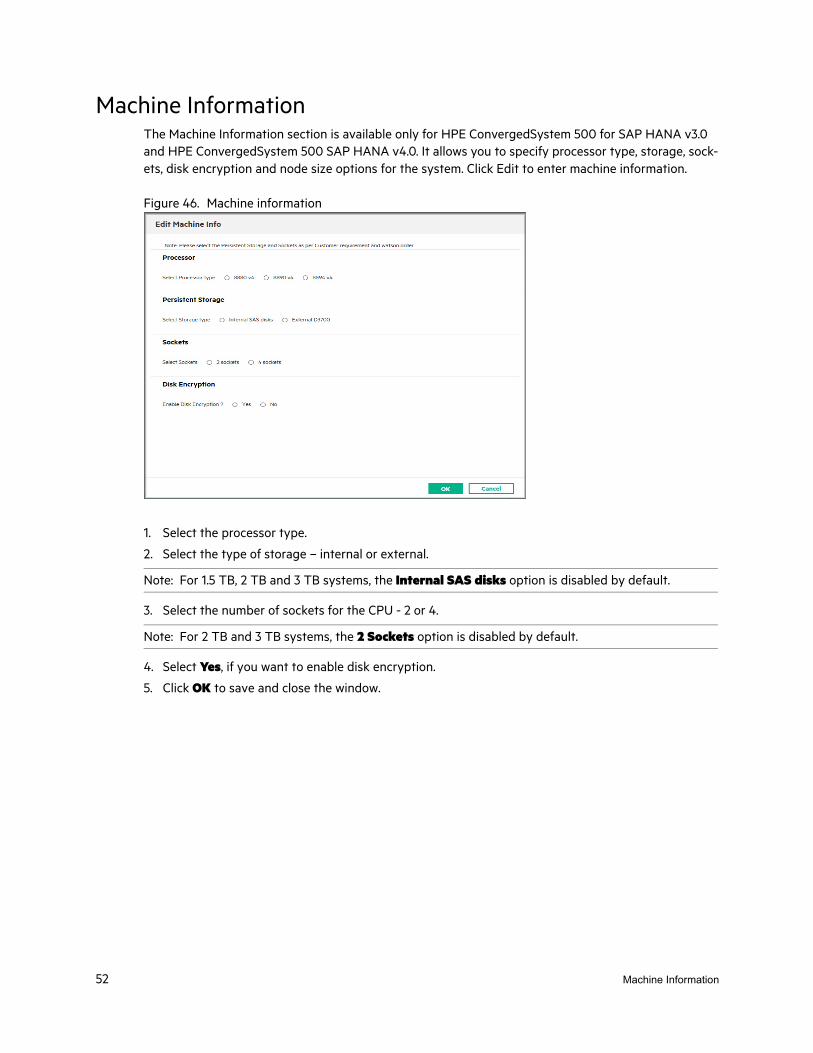
Machine InformationThe Machine Information section is available only for HPE ConvergedSystem 500 for SAP HANA v3.0 and HPE ConvergedSystem 500 SAP HANA v4.0. It allows you to specify processor type, storage, sock-ets, disk encryption and node size options for the system. Click Edit to enter machine information.
Figure 46. Machine information
1. Select the processor type.
2. Select the type of storage – internal or external.
Note: For 1.5 TB, 2 TB and 3 TB systems, the Internal SAS disks option is disabled by default.
3. Select the number of sockets for the CPU - 2 or 4.
Note: For 2 TB and 3 TB systems, the 2 Sockets option is disabled by default.
4. Select Yes, if you want to enable disk encryption.
5. Click OK to save and close the window.
52 Machine Information
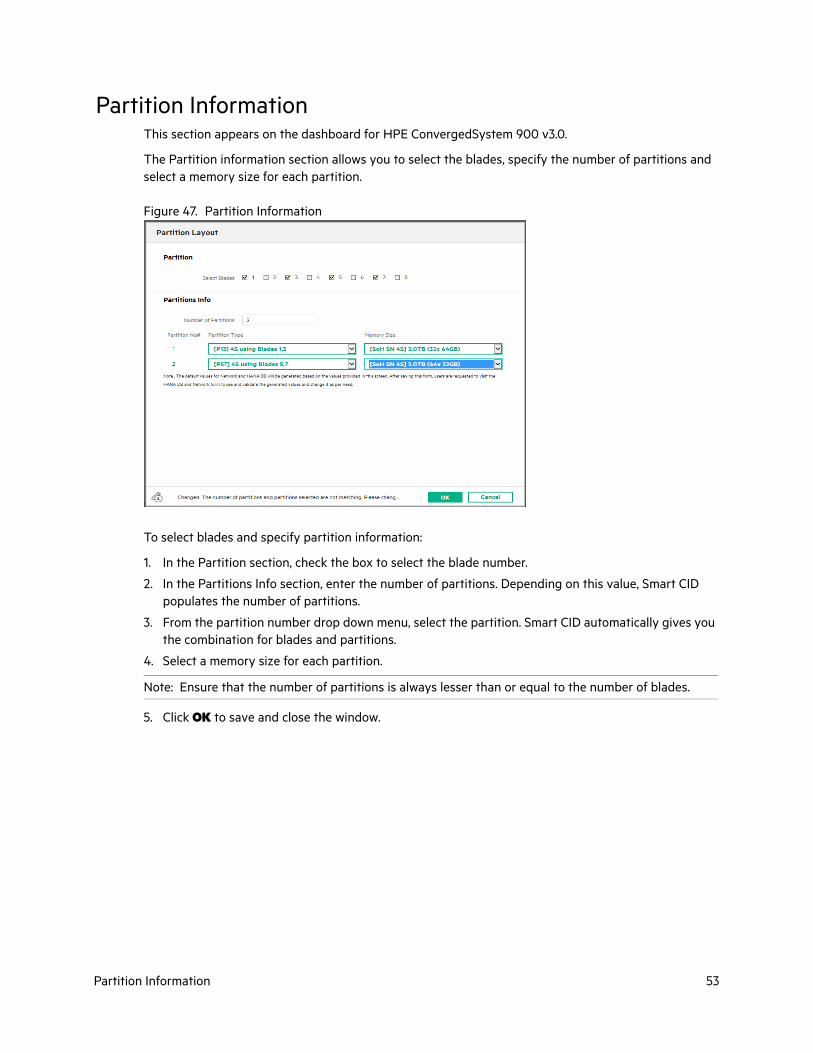
Partition InformationThis section appears on the dashboard for HPE ConvergedSystem 900 v3.0.
The Partition information section allows you to select the blades, specify the number of partitions and select a memory size for each partition.
Figure 47. Partition Information
To select blades and specify partition information:
1. In the Partition section, check the box to select the blade number.
2. In the Partitions Info section, enter the number of partitions. Depending on this value, Smart CID populates the number of partitions.
3. From the partition number drop down menu, select the partition. Smart CID automatically gives you the combination for blades and partitions.
4. Select a memory size for each partition.
Note: Ensure that the number of partitions is always lesser than or equal to the number of blades.
5. Click OK to save and close the window.
Partition Information 53
4 Uploading filesSmart CID allows you to upload or attach files to a CID. This feature is useful when you need to add sup-porting documents to a CID. Use this feature for customization and Deal Specific Requirements (DSRs).
You can upload up to 10 files with every CID. Each CID can store files up to 10 MB.
File formatsSmart CID allows the following file formats:
• Image files with JPEG and JPG extensions (file_name.jpeg and file_name.jpg)
• Text files (file_name.txt)
• Portable document format (PDF)
• Microsoft Word files with DOC and DOCX extensions (file_name.doc and file_name.docx)
• Microsoft Excel files with XLS and XLSX extensions (file_name.xls and file_name.xlsx)
• Microsoft Visio files with VSD extension (file_name.vsd)
File formats 55
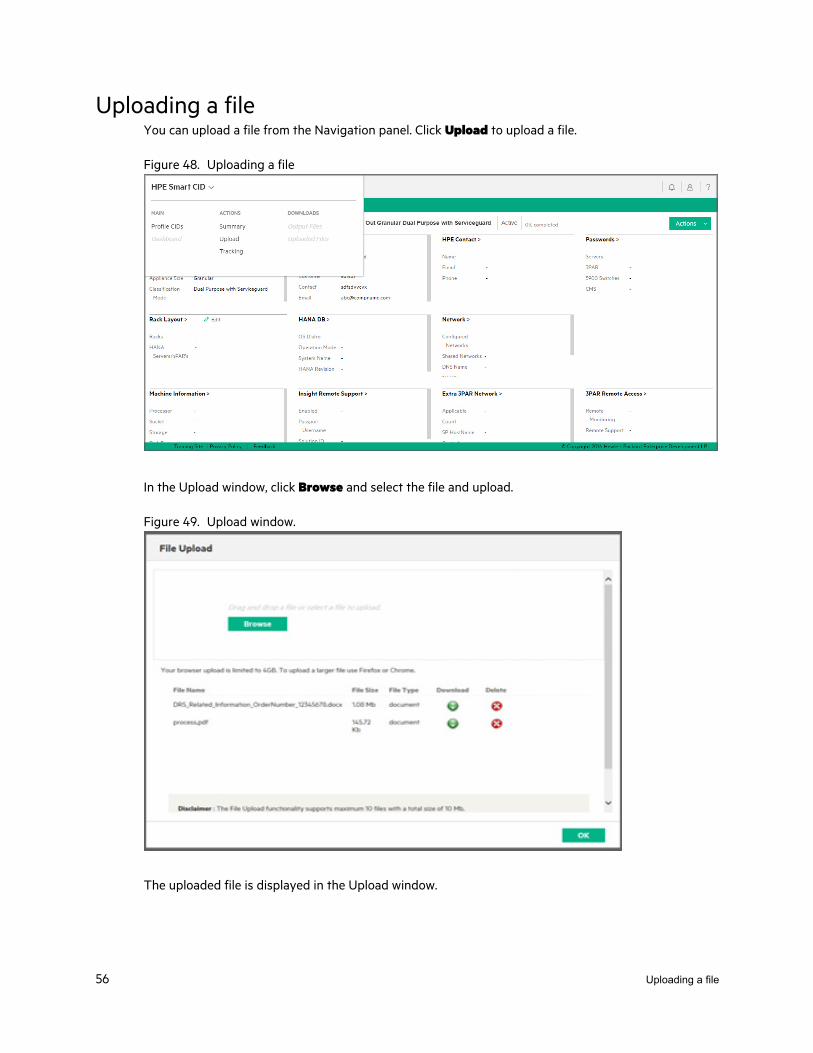
Uploading a fileYou can upload a file from the Navigation panel. Click Upload to upload a file.
Figure 48. Uploading a file
In the Upload window, click Browse and select the file and upload.
Figure 49. Upload window.
The uploaded file is displayed in the Upload window.
56 Uploading a file
Downloading a fileTo download a file, click the Download icon.
Deleting a fileTo delete a file, click the Delete icon.
Uploading a file 57
5 Submitting a CIDAfter all the system and configuration details are entered, the CID is ready for submit. You can also sub-mit a CID for review if your region has Submit for Review enabled. The Submit for Review link is enabled in the Actions menu.
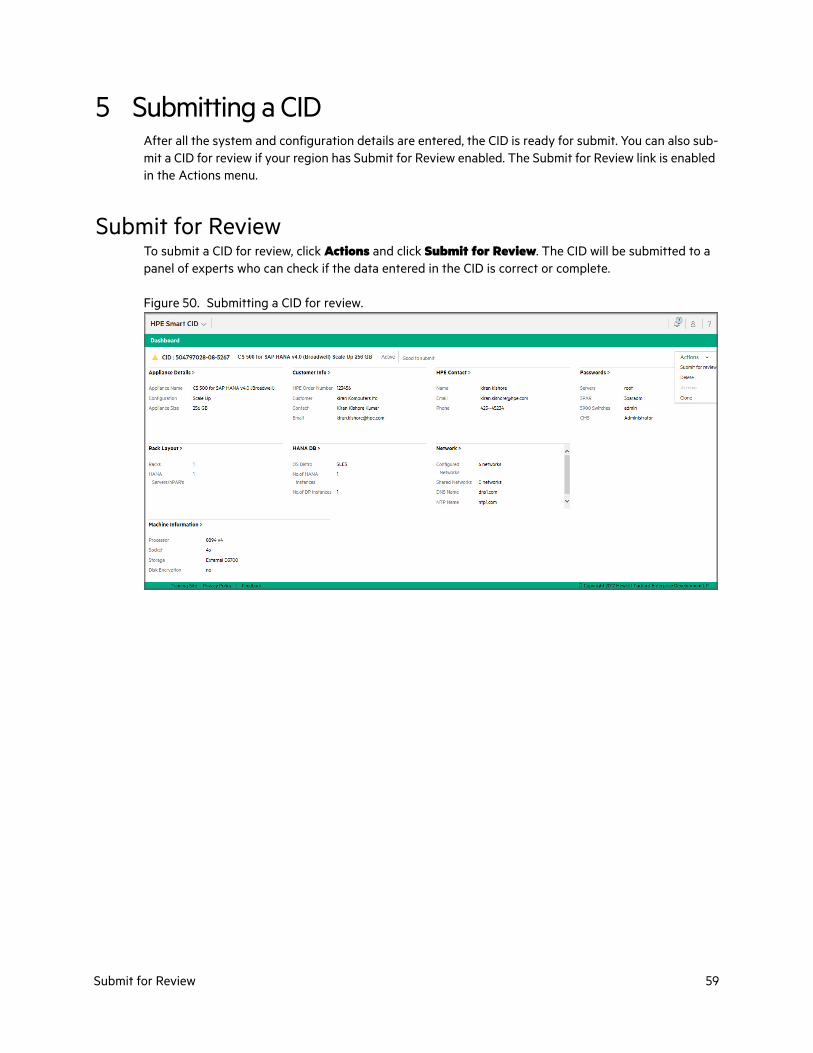
Submit for ReviewTo submit a CID for review, click Actions and click Submit for Review. The CID will be submitted to a panel of experts who can check if the data entered in the CID is correct or complete.
Figure 50. Submitting a CID for review.
Submit for Review 59

Review ProcessWhen a CID is submitted for review, an email is sent to the reviewer with the CID details. Once the CID is in review, it is locked for review. The following figure gives a summary for the Submit for Review pro-cess workflow.
Figure 51. Review process workflow.
When a CID is in review and if changes are to be made in the CID, the reviewer adds comments in the Reviewer Comments section and sends the CID back to the creator of the CID. The creator makes the changes suggested by the reviewer and submits the CID.
Once the CID is submitted for review, the reviewer logs in to the CID and reviews the CID information.
Figure 52. CID in review.
60 Review Process
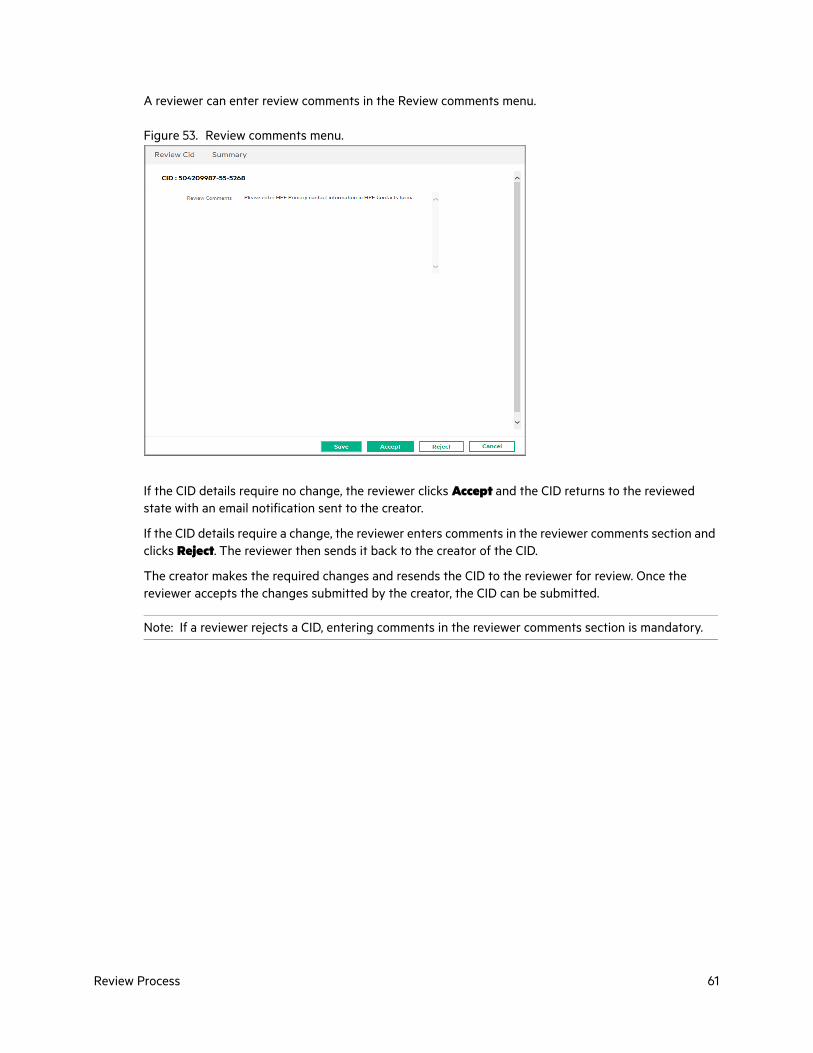
A reviewer can enter review comments in the Review comments menu.
Figure 53. Review comments menu.
If the CID details require no change, the reviewer clicks Accept and the CID returns to the reviewed state with an email notification sent to the creator.
If the CID details require a change, the reviewer enters comments in the reviewer comments section and clicks Reject. The reviewer then sends it back to the creator of the CID.
The creator makes the required changes and resends the CID to the reviewer for review. Once the reviewer accepts the changes submitted by the creator, the CID can be submitted.
Note: If a reviewer rejects a CID, entering comments in the reviewer comments section is mandatory.
Review Process 61
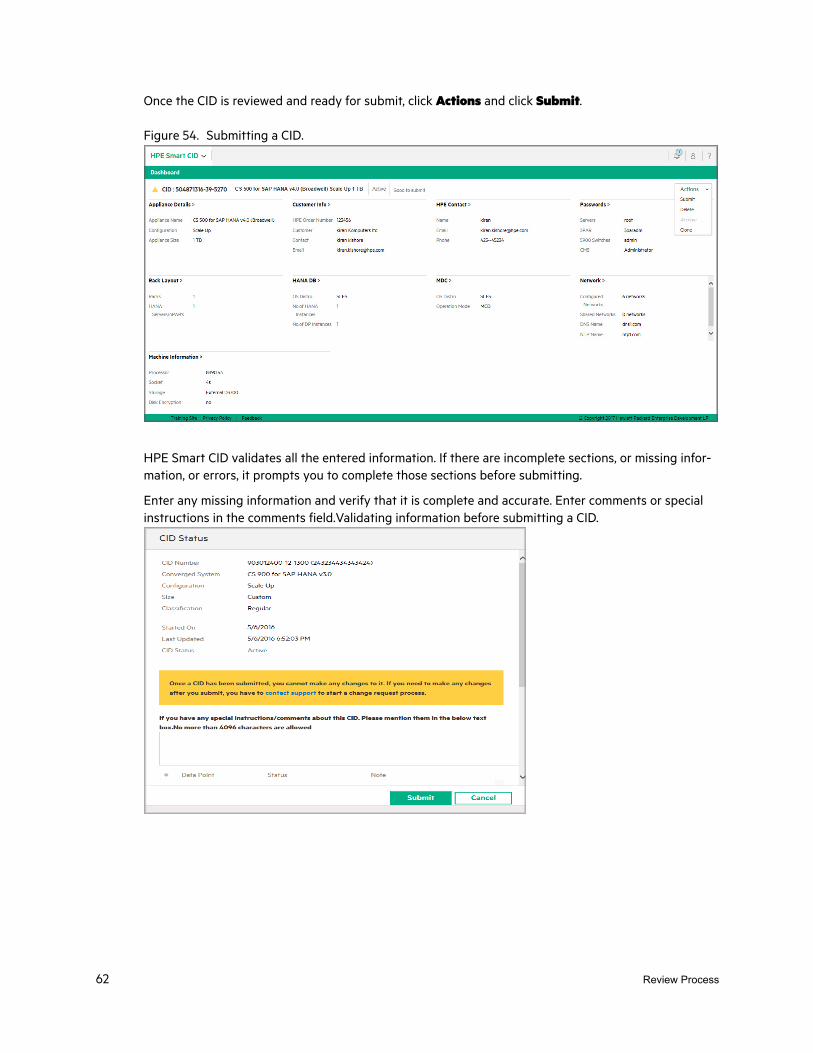
Once the CID is reviewed and ready for submit, click Actions and click Submit.
Figure 54. Submitting a CID.
HPE Smart CID validates all the entered information. If there are incomplete sections, or missing infor-mation, or errors, it prompts you to complete those sections before submitting.
Enter any missing information and verify that it is complete and accurate. Enter comments or special instructions in the comments field.Validating information before submitting a CID.
62 Review Process

After you submit a CID, you can no longer edit it and the information is available in a read-only mode. Its status changes to Submitted.
Figure 55. Submitted CID.
Note: After you submit a CID, if you need to edit or update CID information, send an email to [email protected] to change the status from Submitted to Active. You can then update the CID and submit it.
Review Process 63

Tracking CIDsOnce you submit the CID, you can track its status. Click Tracking in the navigation menu to view the status of the submitted CID.
Figure 56. Tracking CIDs
At every stage listed in the tracking section, HPE Smart CID sends notifications over email to all the email IDs listed in the Customer Info and HPE Contact Info sections.
Tracking CIDs Submitted by Other UsersBy default, you can only view or edit CIDs submitted by you from the Dashboard.
You can also view CIDs if your login email ID is any of the following fields:
• HPE Primary Contact
• Pre-Sales Contact
Log in with your email ID and password and search for the CID to view or update its details.
64 Tracking CIDs
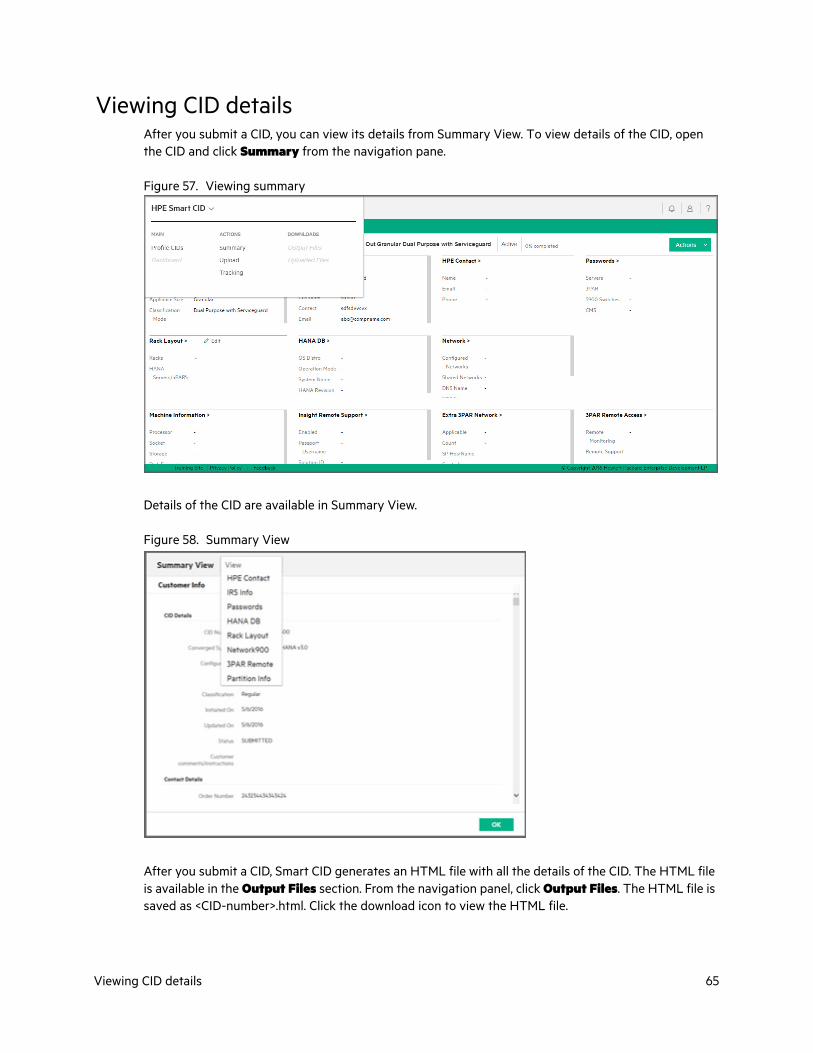
Viewing CID detailsAfter you submit a CID, you can view its details from Summary View. To view details of the CID, open the CID and click Summary from the navigation pane.
Figure 57. Viewing summary
Details of the CID are available in Summary View.
Figure 58. Summary View
After you submit a CID, Smart CID generates an HTML file with all the details of the CID. The HTML file is available in the Output Files section. From the navigation panel, click Output Files. The HTML file is saved as <CID-number>.html. Click the download icon to view the HTML file.
Viewing CID details 65
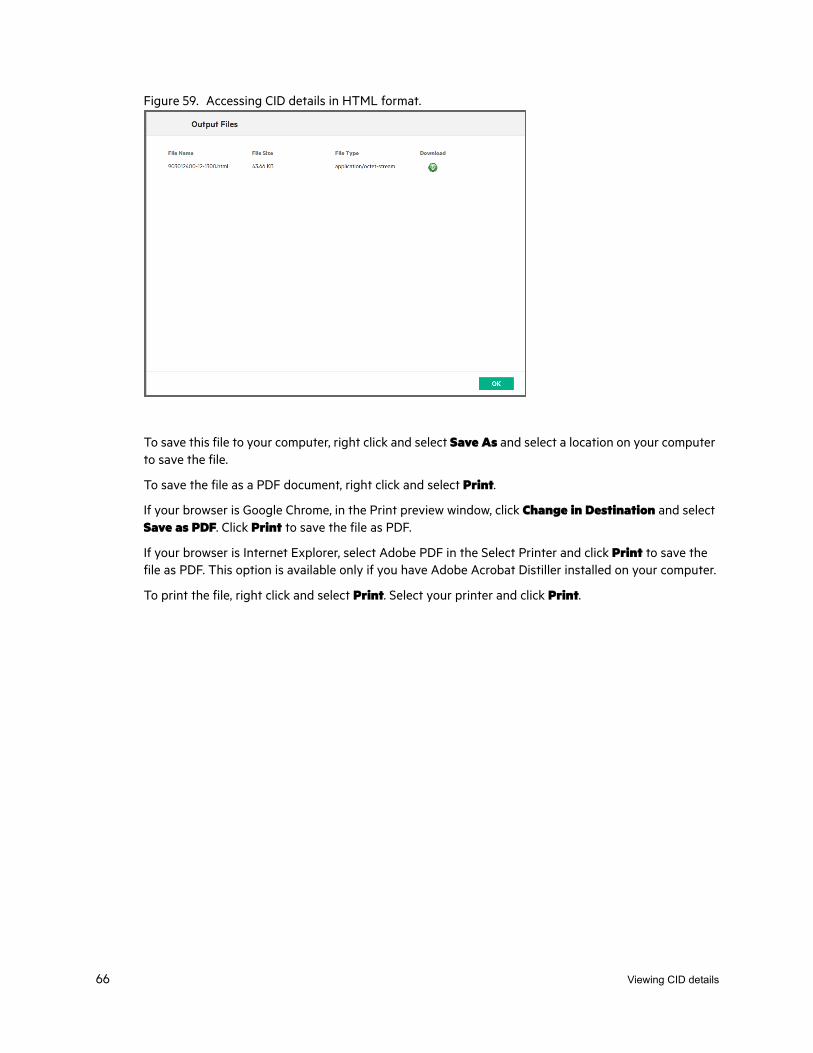
Figure 59. Accessing CID details in HTML format.
To save this file to your computer, right click and select Save As and select a location on your computer to save the file.
To save the file as a PDF document, right click and select Print.
If your browser is Google Chrome, in the Print preview window, click Change in Destination and select Save as PDF. Click Print to save the file as PDF.
If your browser is Internet Explorer, select Adobe PDF in the Select Printer and click Print to save the file as PDF. This option is available only if you have Adobe Acrobat Distiller installed on your computer.
To print the file, right click and select Print. Select your printer and click Print.
66 Viewing CID details
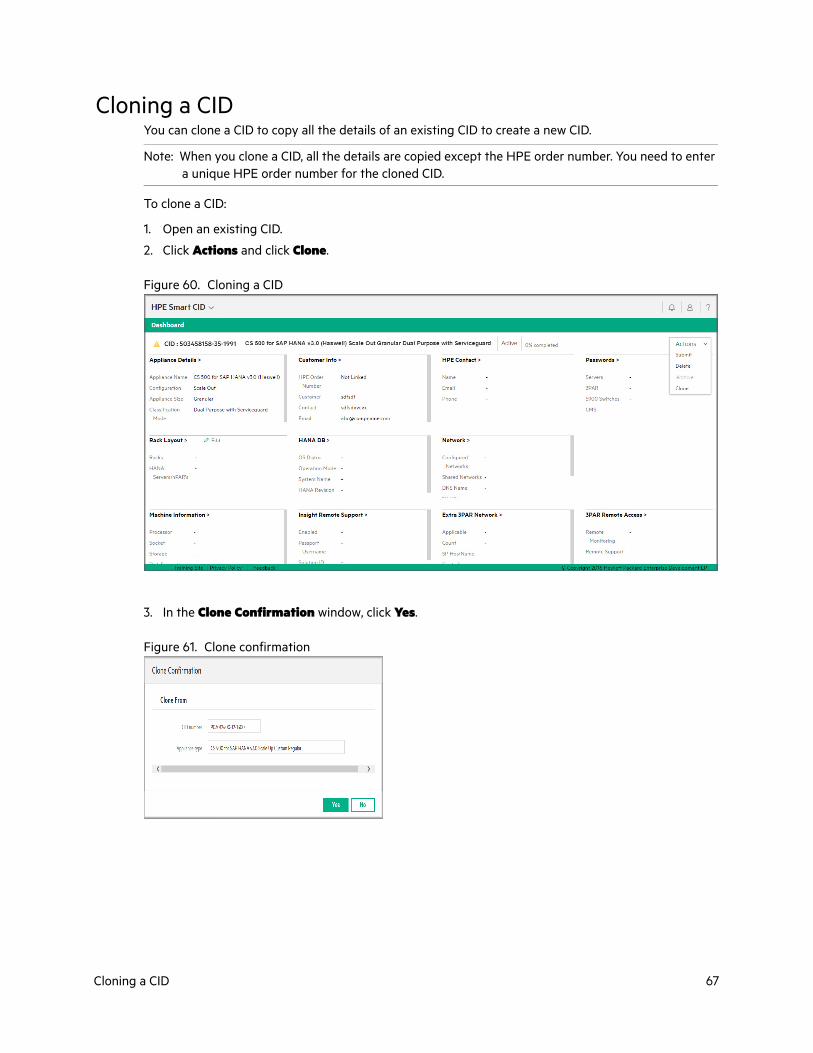
Cloning a CIDYou can clone a CID to copy all the details of an existing CID to create a new CID.
Note: When you clone a CID, all the details are copied except the HPE order number. You need to enter a unique HPE order number for the cloned CID.
To clone a CID:
1. Open an existing CID.
2. Click Actions and click Clone.
Figure 60. Cloning a CID
3. In the Clone Confirmation window, click Yes.
Figure 61. Clone confirmation
Cloning a CID 67
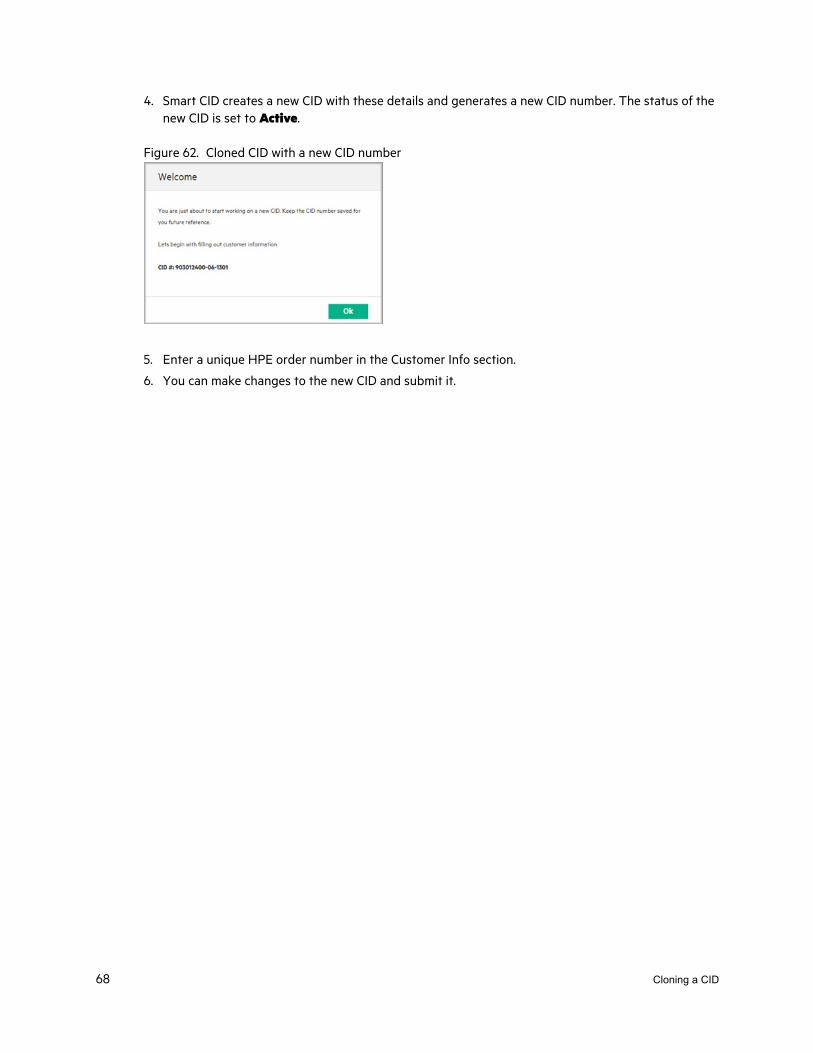
4. Smart CID creates a new CID with these details and generates a new CID number. The status of the new CID is set to Active.
Figure 62. Cloned CID with a new CID number
5. Enter a unique HPE order number in the Customer Info section.
6. You can make changes to the new CID and submit it.
68 Cloning a CID
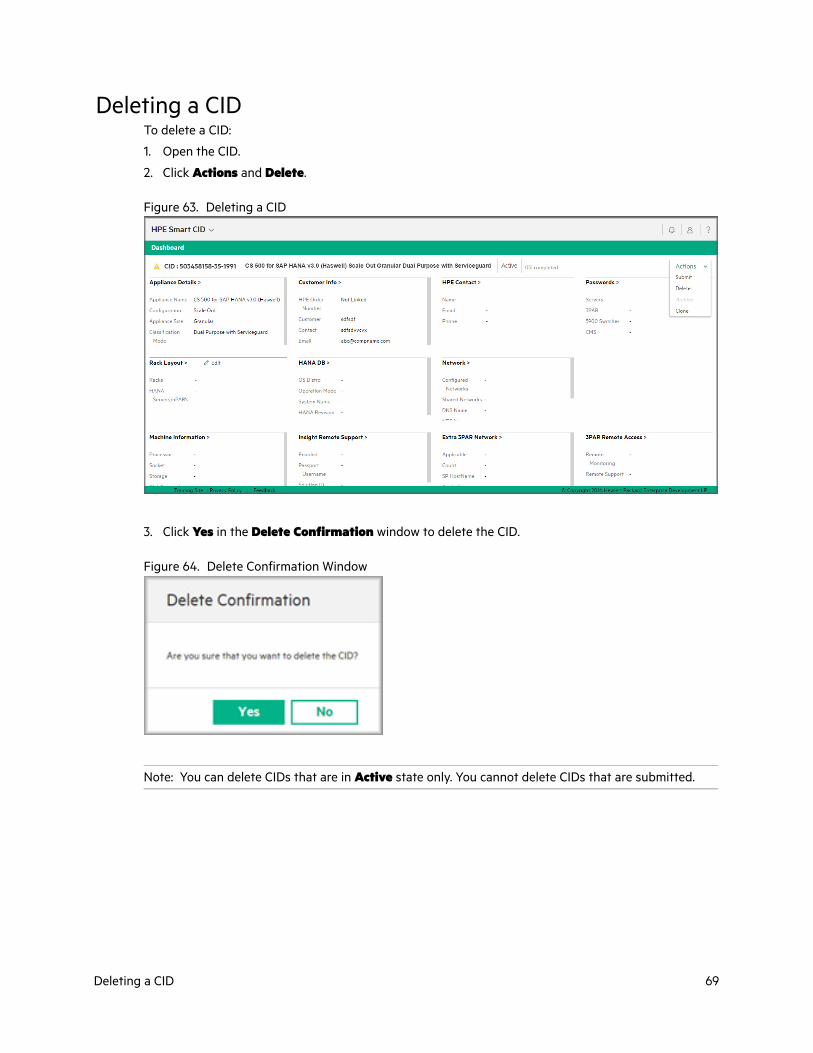
Deleting a CIDTo delete a CID:
1. Open the CID.
2. Click Actions and Delete.
Figure 63. Deleting a CID
3. Click Yes in the Delete Confirmation window to delete the CID.
Figure 64. Delete Confirmation Window
Note: You can delete CIDs that are in Active state only. You cannot delete CIDs that are submitted.
Deleting a CID 69
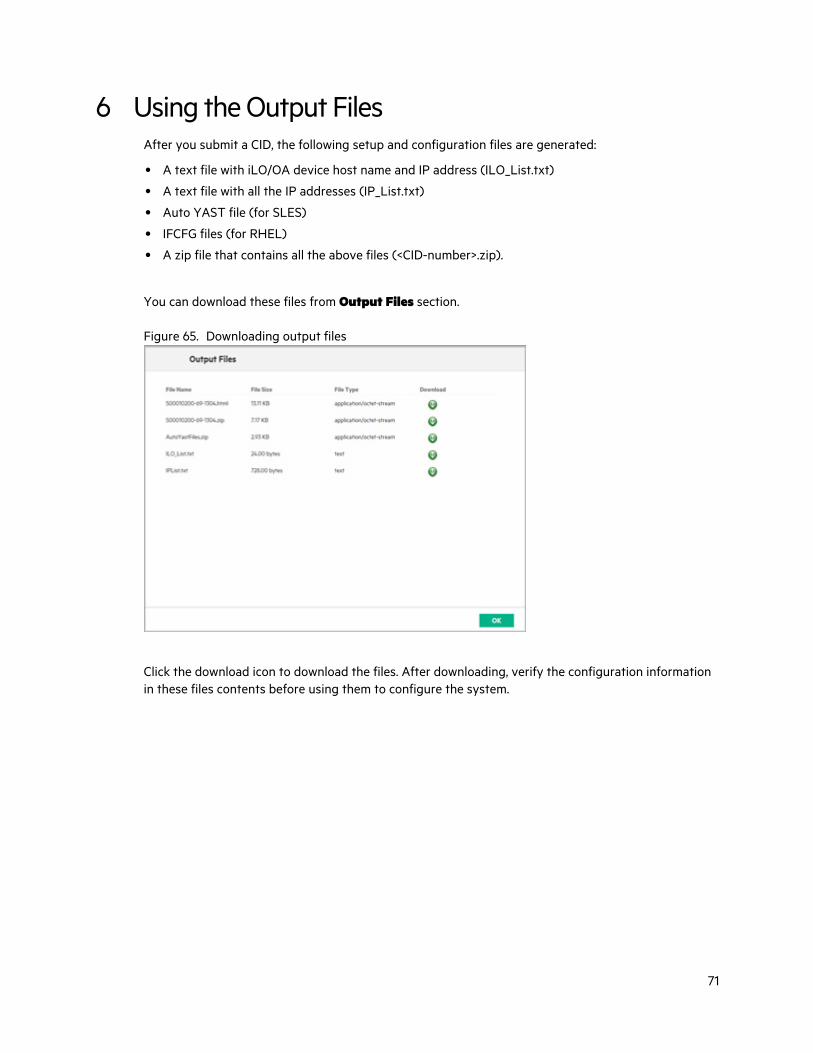
6 Using the Output FilesAfter you submit a CID, the following setup and configuration files are generated:
• A text file with iLO/OA device host name and IP address (ILO_List.txt)
• A text file with all the IP addresses (IP_List.txt)
• Auto YAST file (for SLES)
• IFCFG files (for RHEL)
• A zip file that contains all the above files (<CID-number>.zip).
You can download these files from Output Files section.
Figure 65. Downloading output files
Click the download icon to download the files. After downloading, verify the configuration information in these files contents before using them to configure the system.
71
Configuring for SUSE Linux Servers with Auto YAST file
For SUSE Linux Enterprise Server (SLES) configuration, HPE Smart CID generates the Auto YAST con-figuration file based on the information in the CID.
To configure for SUSE Linux servers:
1. Download the AutoYASTFiles.zip from the Output Files section.
2. Extract the zip file and copy the setuplan-XX.xml to the root directory of the server that needs to be configured.
3. From the command line interface, run the following command to begin configuration:# yast_ayast_setup setup filename=/root/setupplan_XX.xml
4. After configuration is complete, verify the physical connections for the Data Network. Run the fol-lowing command to view the network interfaces:
# ifconfig –a
Verify that the Data Network has either bond2 (for 10 Gbps or 40 Gbps interface) or bond8 (for 1Gbps).
5. Run the following command to verify the hostname:
# hostname
6. Open the following file locations and verify if these files are generated and match the values in the CID.
• NTP configuration file in /etc/ntp.conf.
• DNS configuration file in /etc/resolv.conf.
• Default gateway configuration file in /etc/sysconfig/network/routes/.
• Host IP address mapping with their names in /etc/hosts.
Configuring for Scale Out systemsFor Scale Out systems, Smart CID generates separate setuplan_XX.xml files for each server. Copy each file to each server and run the following command to configure the servers.
# yast_ayast_setup setup filename=/root/setupplan_XX.xml
.
72 Configuring for SUSE Linux Servers with Auto YAST file
Configuring for Red Hat Enterprise Linux Servers with IFCFG files
For Red Hat Enterprise Linux Server configuration, HPE Smart CID generates IFCFG configuration files based on the information in the CID.
1. Download the <CID-number>.zip from the Output Files section.
2. Extract the contents of the zip file to your local computer.
3. Copy Server1.zip to the system that needs to be configured.
4. Extract the file and run the following command from the command line interface:
# bash DeploySmartCID.sh
Configuring for Scale Out systemsFor Scale Out systems, when the number of servers are 4 or more, Smart CID generates ServerX.zip file for each server.
Copy and unzip the files to each server and run the bash command to configure each server.
# bash DeploySmartCID.sh
Configuring for Red Hat Enterprise Linux Servers with 73
7 Saving a CID to PDFAfter you submit the CID, you can save the CID information to a PDF document. You can use the Web browser’s built-in utility to do this.
Google ChromeHPE recommends using Google Chrome to save CID information in the PDF format. Unlike other brows-ers, Google Chrome saves all the information in a single PDF file.
To save CID information to PDF from Google Chrome:
1. Click the CID number and open the CID.
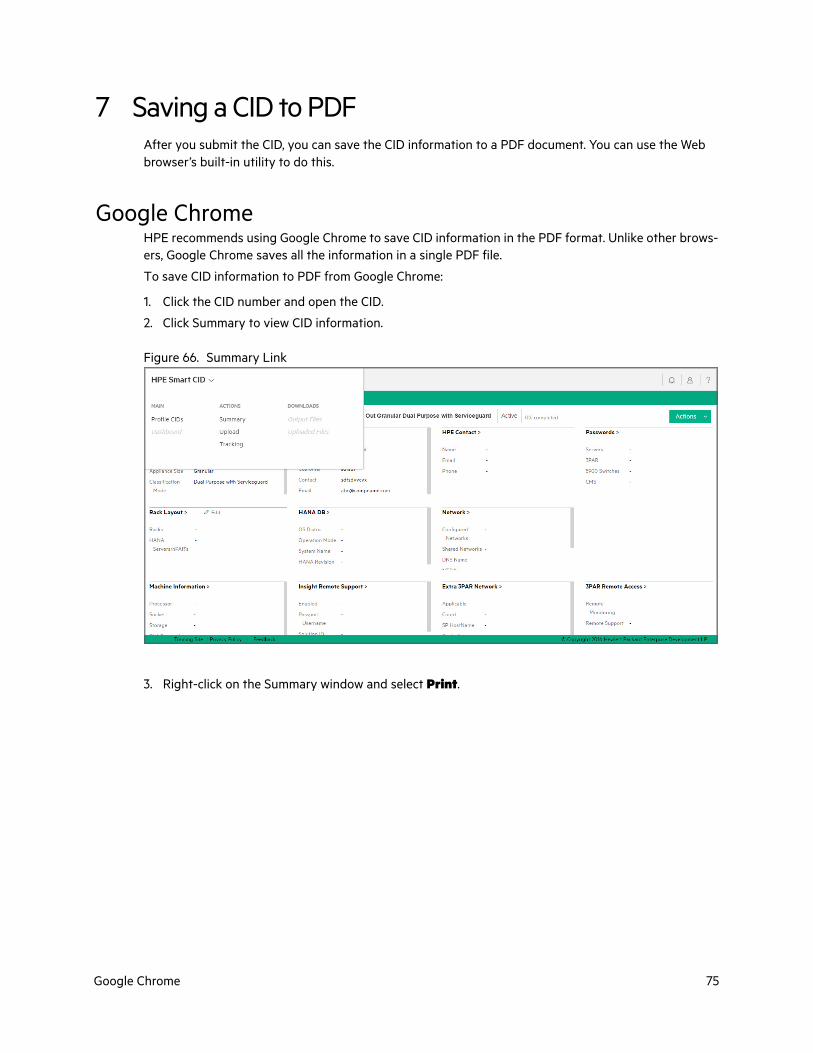
2. Click Summary to view CID information.
Figure 66. Summary Link
3. Right-click on the Summary window and select Print.
Google Chrome 75
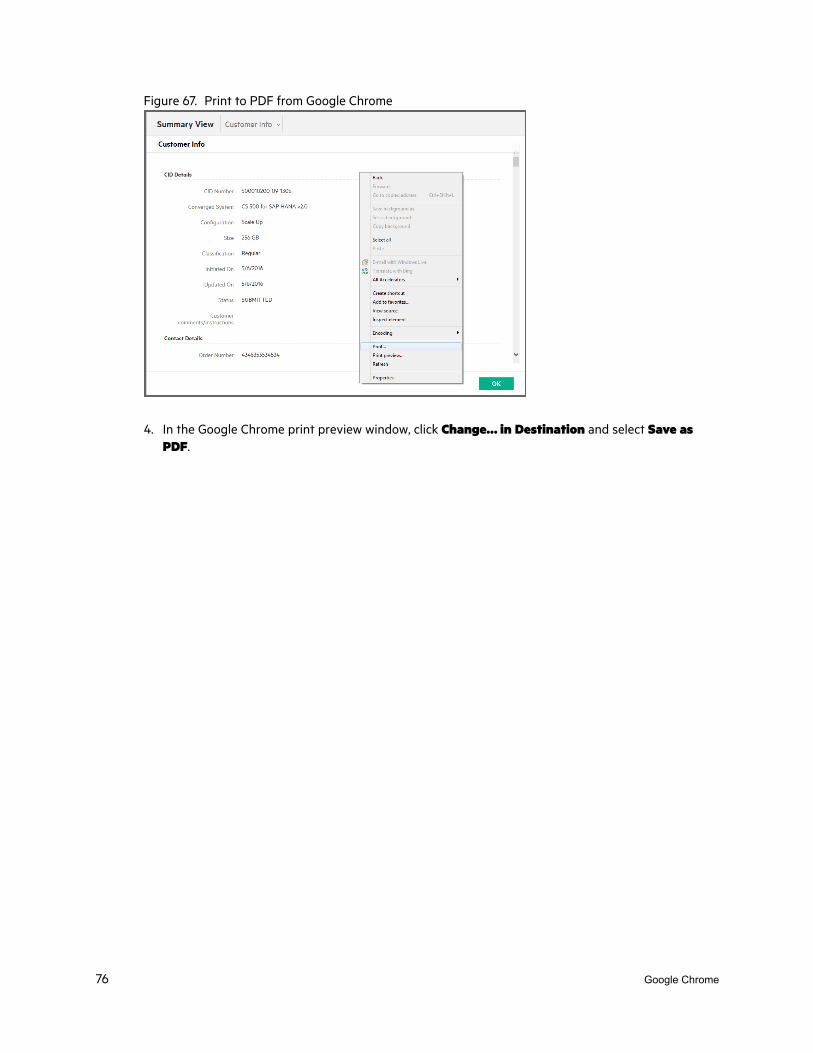
Figure 67. Print to PDF from Google Chrome
4. In the Google Chrome print preview window, click Change… in Destination and select Save as PDF.
76 Google Chrome
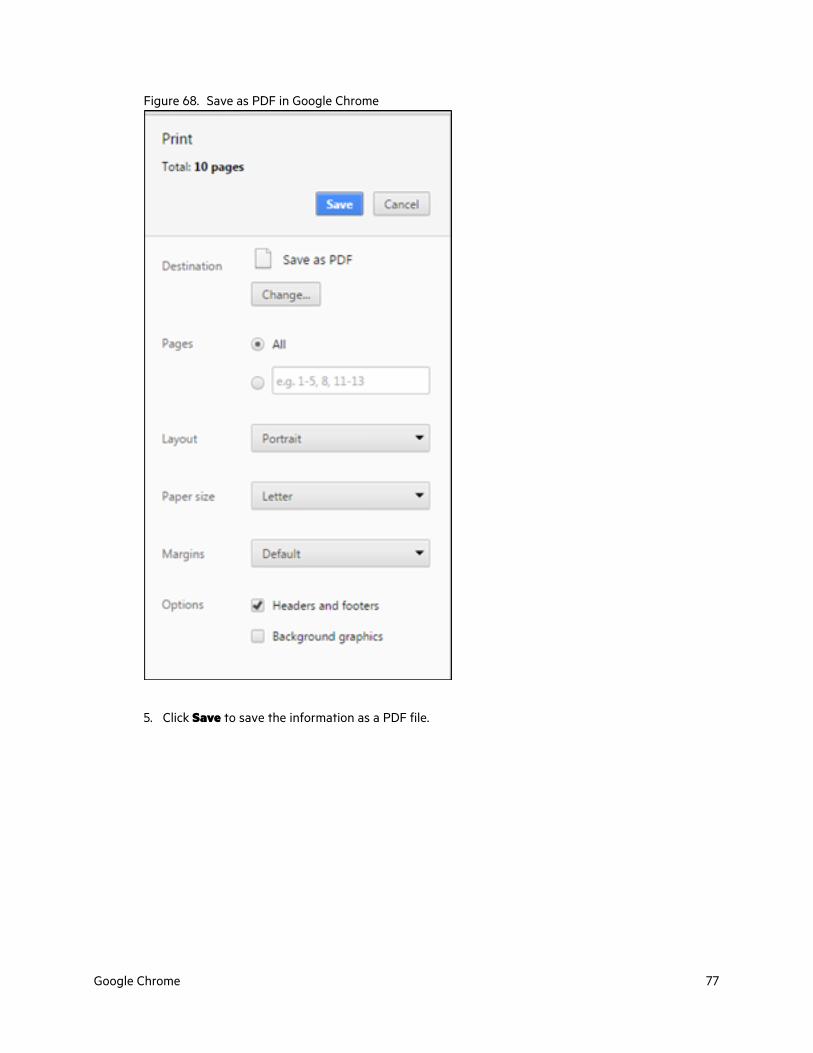
Figure 68. Save as PDF in Google Chrome
5. Click Save to save the information as a PDF file.
Google Chrome 77
Internet Explorer 11HPE does not recommend using Internet Explorer 11 to save CID information as PDF. Internet Explorer does not save all the information in a single file. You must save each section as a separate PDF file and then import each file into a new file.
Note: This option is available only if you have Adobe Acrobat Distiller installed on your computer.
To save CID information to PDF from Internet Explorer:
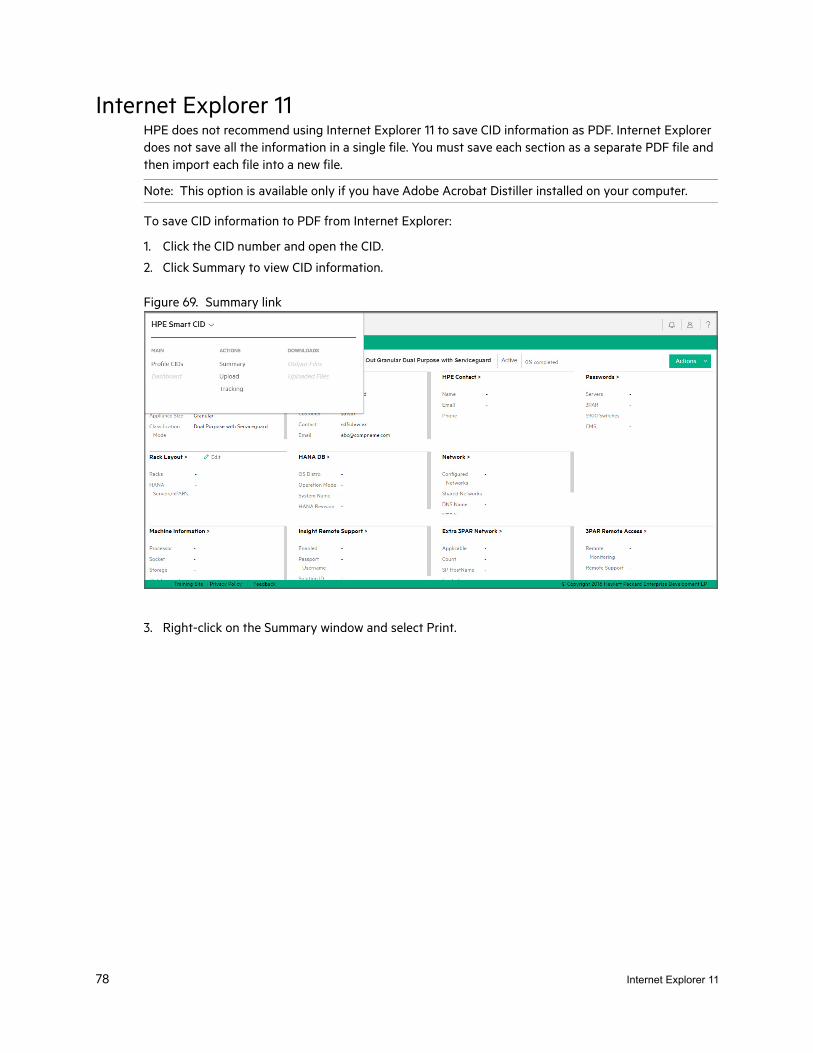
1. Click the CID number and open the CID.
2. Click Summary to view CID information.
Figure 69. Summary link
3. Right-click on the Summary window and select Print.
78 Internet Explorer 11
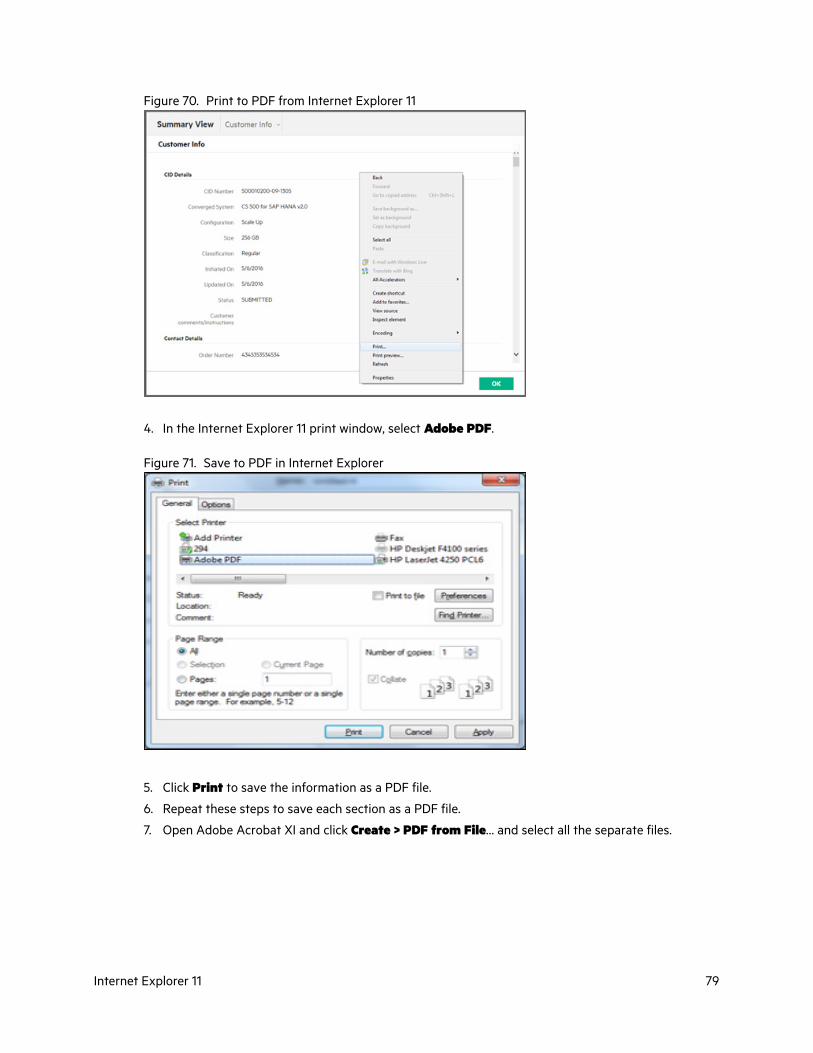
Figure 70. Print to PDF from Internet Explorer 11
4. In the Internet Explorer 11 print window, select Adobe PDF.
Figure 71. Save to PDF in Internet Explorer
5. Click Print to save the information as a PDF file.
6. Repeat these steps to save each section as a PDF file.
7. Open Adobe Acrobat XI and click Create > PDF from File… and select all the separate files.
Internet Explorer 11 79
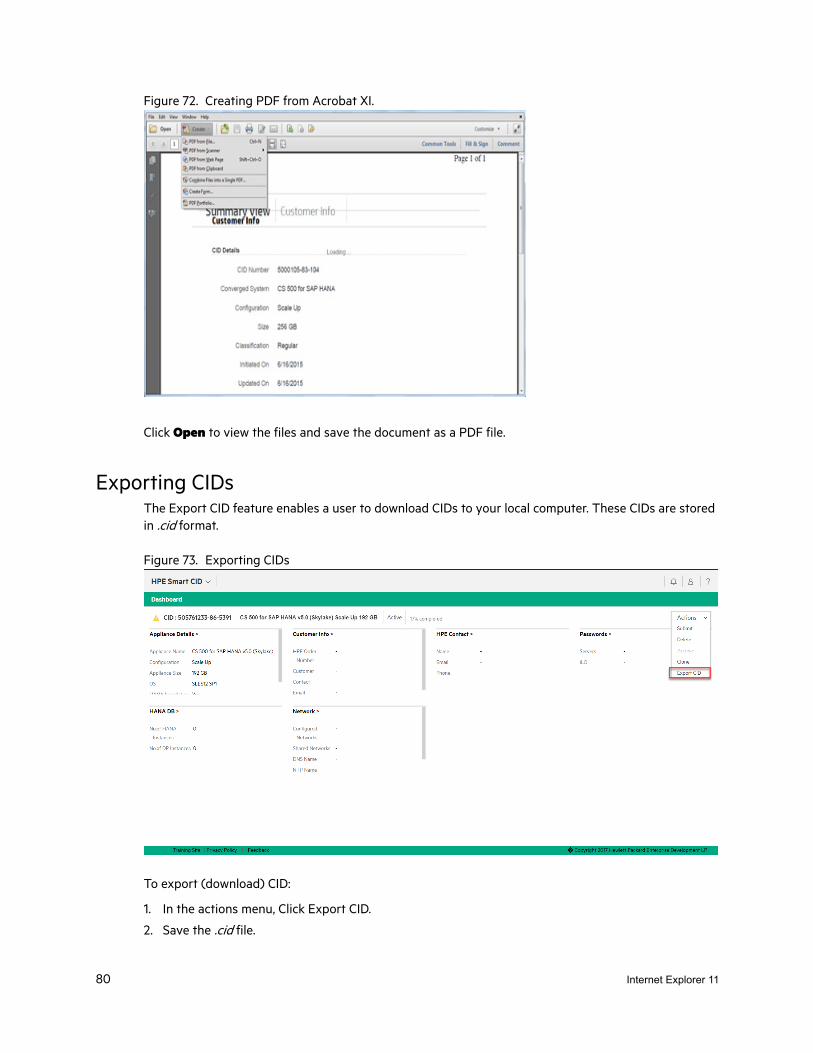
Figure 72. Creating PDF from Acrobat XI.
Click Open to view the files and save the document as a PDF file.
Exporting CIDsThe Export CID feature enables a user to download CIDs to your local computer. These CIDs are stored in .cid format.
Figure 73. Exporting CIDs
To export (download) CID:
1. In the actions menu, Click Export CID.
2. Save the .cid file.
80 Internet Explorer 11
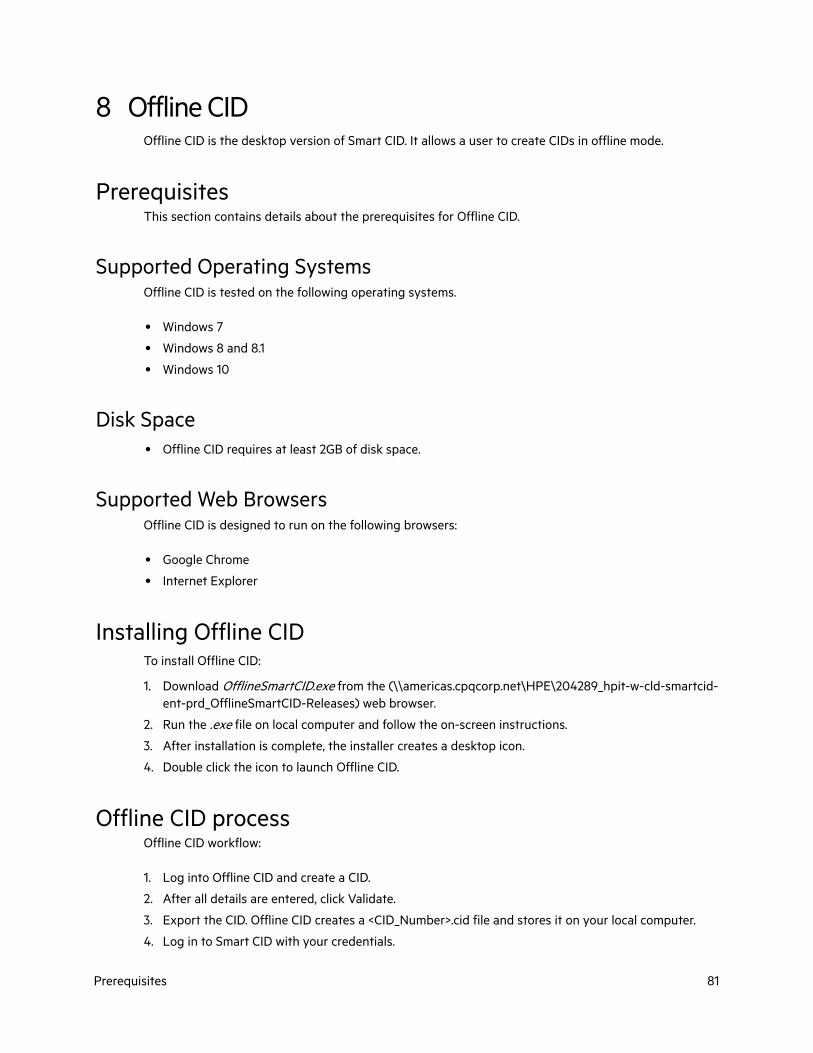
8 Offline CIDOffline CID is the desktop version of Smart CID. It allows a user to create CIDs in offline mode.
Prerequisites This section contains details about the prerequisites for Offline CID.
Supported Operating SystemsOffline CID is tested on the following operating systems.
• Windows 7
• Windows 8 and 8.1
• Windows 10
Disk Space• Offline CID requires at least 2GB of disk space.
Supported Web BrowsersOffline CID is designed to run on the following browsers:
• Google Chrome
• Internet Explorer
Installing Offline CIDTo install Offline CID:
1. Download OfflineSmartCID.exe from the (\\americas.cpqcorp.net\HPE\204289_hpit-w-cld-smartcid-ent-prd_OfflineSmartCID-Releases) web browser.
2. Run the .exe file on local computer and follow the on-screen instructions.
3. After installation is complete, the installer creates a desktop icon.
4. Double click the icon to launch Offline CID.
Offline CID processOffline CID workflow:
1. Log into Offline CID and create a CID.
2. After all details are entered, click Validate.
3. Export the CID. Offline CID creates a <CID_Number>.cid file and stores it on your local computer.
4. Log in to Smart CID with your credentials.
Prerequisites 81
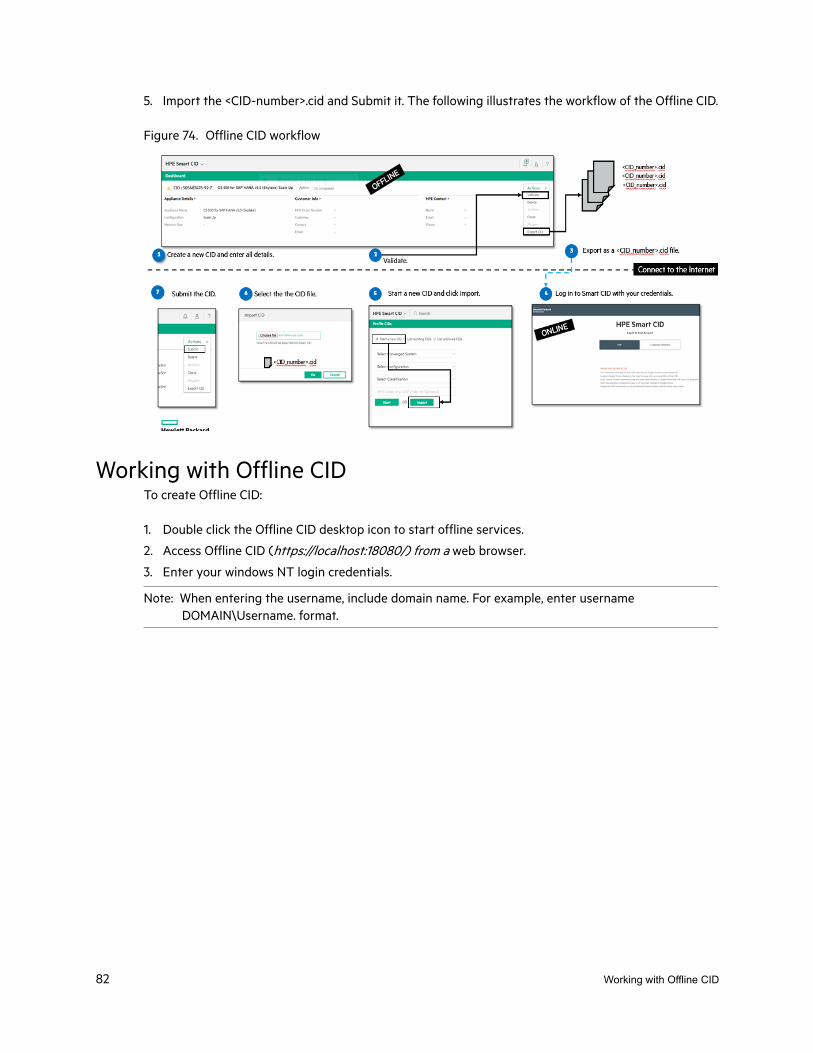
5. Import the <CID-number>.cid and Submit it. The following illustrates the workflow of the Offline CID.
Figure 74. Offline CID workflow
Working with Offline CIDTo create Offline CID:
1. Double click the Offline CID desktop icon to start offline services.
2. Access Offline CID (https://localhost:18080/) from a web browser.
3. Enter your windows NT login credentials.
Note: When entering the username, include domain name. For example, enter username DOMAIN\Username. format.
82 Working with Offline CID
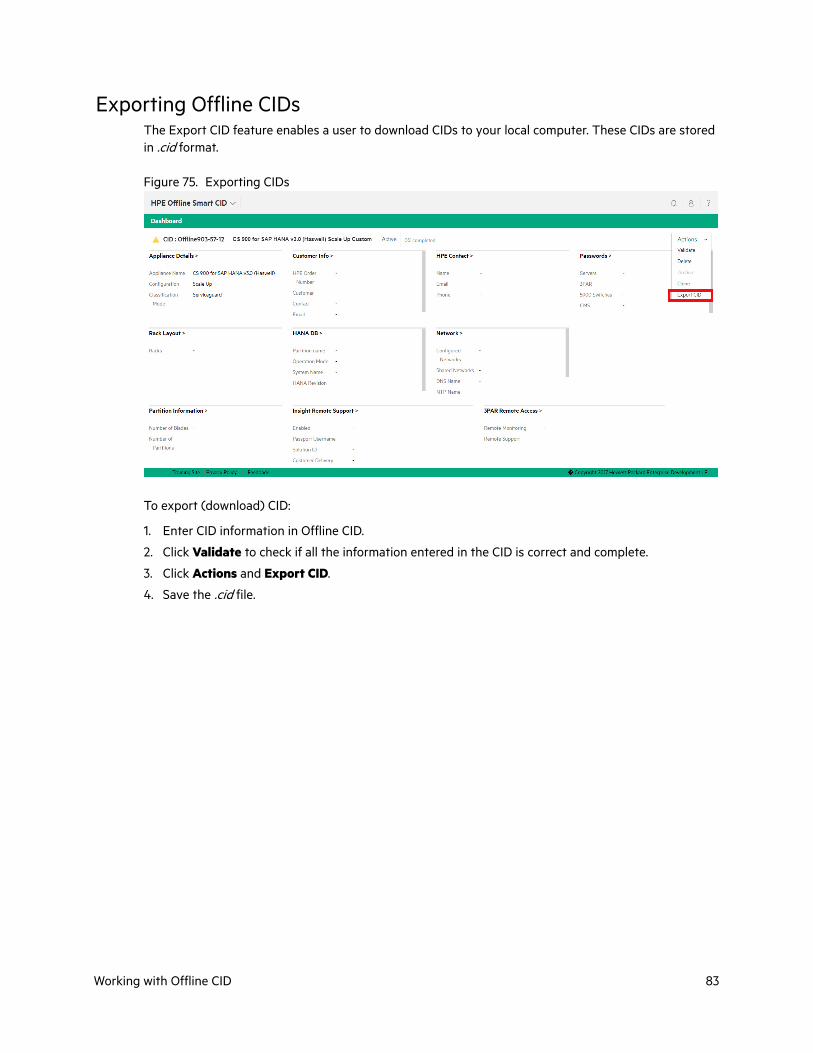
Exporting Offline CIDsThe Export CID feature enables a user to download CIDs to your local computer. These CIDs are stored in .cid format.
Figure 75. Exporting CIDs
To export (download) CID:
1. Enter CID information in Offline CID.
2. Click Validate to check if all the information entered in the CID is correct and complete.
3. Click Actions and Export CID.
4. Save the .cid file.
Working with Offline CID 83
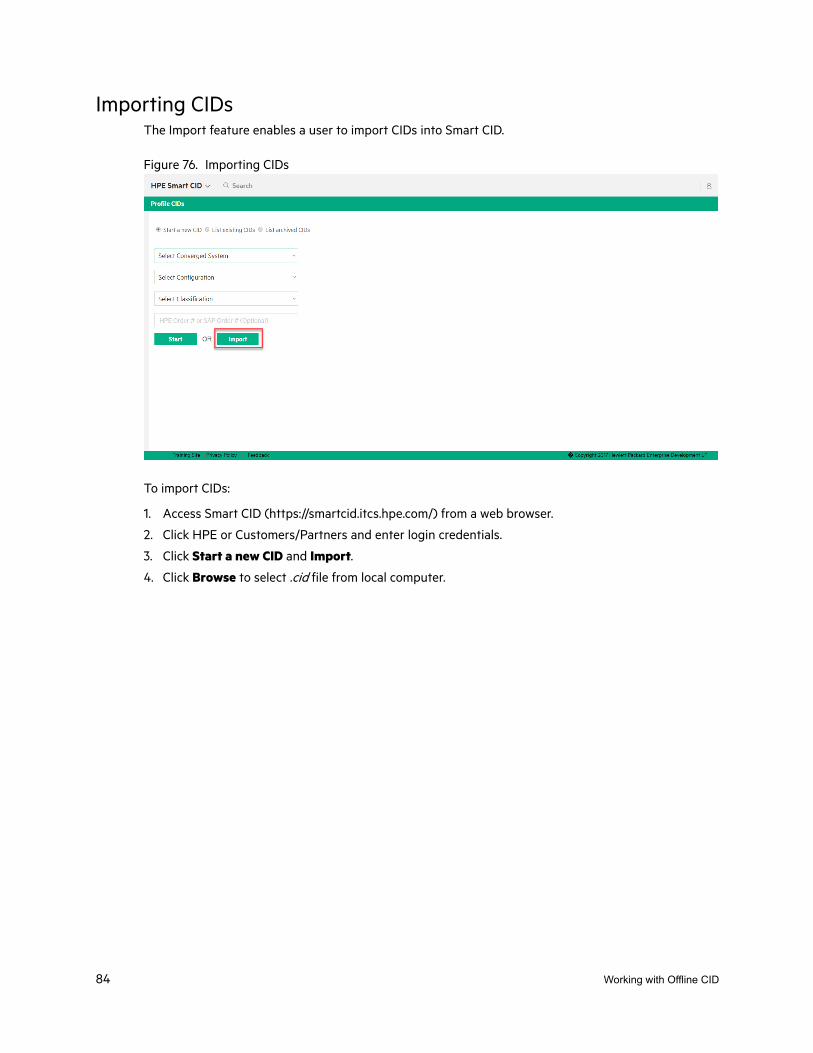
Importing CIDsThe Import feature enables a user to import CIDs into Smart CID.
Figure 76. Importing CIDs
To import CIDs:
1. Access Smart CID (https://smartcid.itcs.hpe.com/) from a web browser.
2. Click HPE or Customers/Partners and enter login credentials.
3. Click Start a new CID and Import.
4. Click Browse to select .cid file from local computer.
84 Working with Offline CID
9 Smart CID DocumentationHPE is committed to providing documentation that meets your needs. To help us improve the docu-mentation, send any errors, suggestions, or comments to CSS Documentation Feedback ([email protected]). Include the document title and version number when submitting your feedback.
Related DocumentationThe documentation set for this release is available on HPE Smart CID website. In addition to this docu-ment, you can find related documents and training material on the website.
https://smartcid.itcs.hpe.com/Training/#docs
Related Documentation 85