
Small and Medium Businesses 2 - download.webroot.com · ... //. The trial page also has the...
18
-
Upload
nguyenmien -
Category
Documents
-
view
214 -
download
1
Transcript of Small and Medium Businesses 2 - download.webroot.com · ... //. The trial page also has the...

Page 1 | © 2018 Webroot Inc. All rights reserved. | Proprietary and Confidential Information March 27, 2018
Getting Started – Small and Medium Businesses ............................................................................................................................. 2
Is This For Me? ........................................................................................................................................................................... 2
How Webroot Endpoint Agents Are Managed With GSM ................................................................................................................. 2
System Requirements ...................................................................................................................................................................... 3
Overview ......................................................................................................................................................................................... 3
Step 1: Register for Trial or Purchase the Product ............................................................................................................................. 3
Step 2: Create an Account ............................................................................................................................................................... 3
Step 3: Install.................................................................................................................................................................................. 7
Create Your Site .......................................................................................................................................................................... 8
Deploy Agents to Your Endpoints ................................................................................................................................................ 13
Windows PC Agent Installation ............................................................................................................................................. 13
Mac Agent Installation .......................................................................................................................................................... 15
What’s Next? ................................................................................................................................................................................. 17
Page 2 | © 2018 Webroot Inc. All rights reserved. | Proprietary and Confidential Information March 27, 2018
This document is for small and medium businesses, usually with 5 to 249 computers. This section is intended for people familiar with computers but who are not necessarily system administrators.
We will take you through setting up and using Webroot SecureAnywhere Business – Endpoint Protection using our Global Site Manager (GSM) console for a single site like a home office or small office.
What is an Endpoint?
For this product, an endpoint is a Microsoft Windows or an Apple Mac computer, laptop, server, or virtual machine. Webroot SecureAnywhere Business – Endpoint Protection will protect your endpoints from malware, viruses, and other threats. If you want to protect Google Android or Apple iOS devices, consider Webroot SecureAnywhere Business – Mobile Protection.
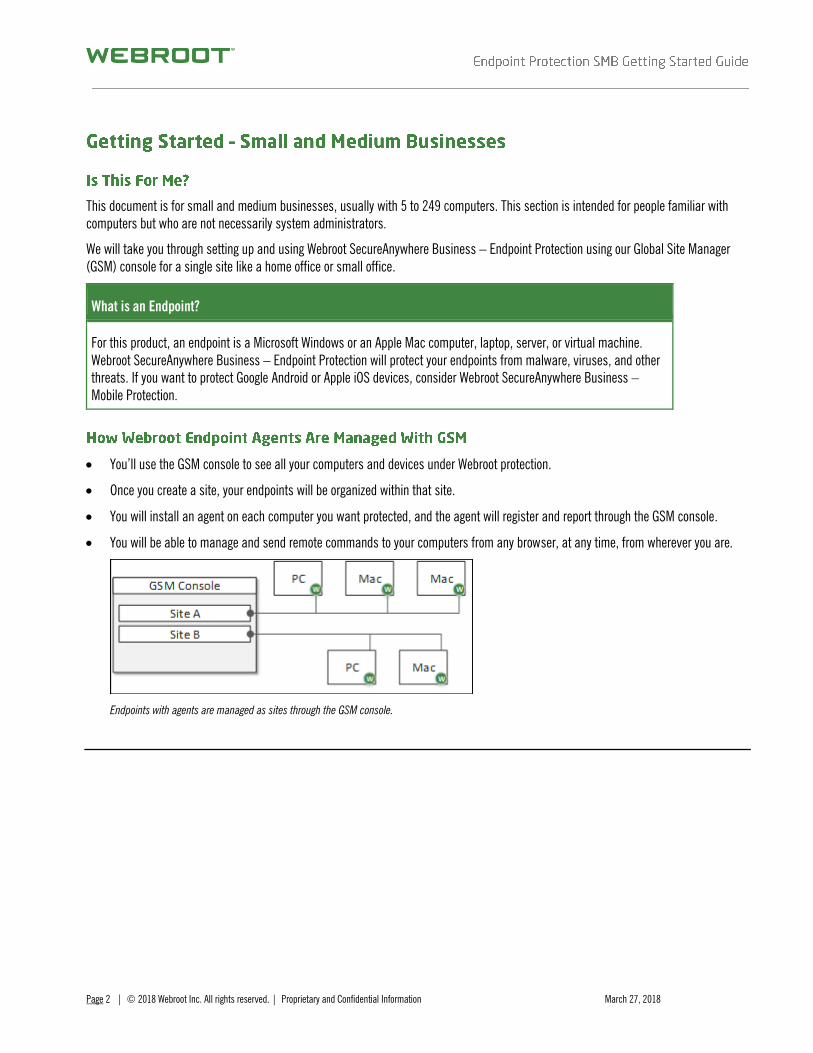
You’ll use the GSM console to see all your computers and devices under Webroot protection.
Once you create a site, your endpoints will be organized within that site.
You will install an agent on each computer you want protected, and the agent will register and report through the GSM console.
You will be able to manage and send remote commands to your computers from any browser, at any time, from wherever you are.
Endpoints with agents are managed as sites through the GSM console.
Page 3 | © 2018 Webroot Inc. All rights reserved. | Proprietary and Confidential Information March 27, 2018
Before you begin installing Webroot Endpoint Protection on your endpoints, ensure that your computers meet the minimum requirement.
For more information, see the System Requirements section of the Business Endpoint Protection webpage.
There are three steps to setting up and using Endpoint Protection:
Step 1: Register for a Trial or Purchase the Product
Step 2: Create an Account
Step 3: Install
You should have already registered for a trial, or have purchased the product. If you have not, please visit the product page for starting a trial or reviewing purchasing options: https://www.webroot.com/us/en/business/smb/endpoint-protection.
The trial page also has the telephone number for our sales experts if you need assistance:
https://www.webroot.com/us/en/business/trials/endpoint-protection
Note: These links are to the United States site. Country and language options can be changed at the top of the website.
As mentioned, you should have already registered for a trial, or have purchased the product.
In this section, we’ll walk through activating and creating your account for the Webroot Global Site Manager (GSM) console.
What is the GSM console?
The Webroot Global Site Manager (GSM) console is the online portal that you will use to manage the security for your Windows or Mac computers (endpoints). This can also be used to manage other Webroot applications.

Page 4 | © 2018 Webroot Inc. All rights reserved. | Proprietary and Confidential Information March 27, 2018
To create an account:
1. Open, read, and follow the information in the Webroot Global Site Manager (Trial) Account - Instructions email from Webroot to set up your Global Site Manager. This email usually arrives 5-10 minutes after your Welcome email.
2. Click the registration link in the email.
The Confirm Registration pane displays.

Page 5 | © 2018 Webroot Inc. All rights reserved. | Proprietary and Confidential Information March 27, 2018
3. Copy the temporary password from the Webroot Global Site Manager (Trial) Account - Instructions email, and paste in the Temporary Password field on the Confirm Registration pane.
4. In the Create New Password field, enter a new password.
Note: Passwords must be at least nine characters and must contain at least six alphabetic characters and three numeric characters. Your password can be longer than nine characters and can include special characters excluding the less than and greater than symbols (< and >).
5. In the Repeat New Password field, enter your new password again.
6. In the Personal Security Code field, enter a security code that you will use to log in. Typically the security code is six digits long and you will be asked to enter two of those digits.
7. From the Security Question drop-down menu, select one of the following types of security questions:
Best childhood friend Grandfather’s occupation Favorite historical figure Mother’s Birthplace Name of first pet Favorite teacher
8. In the Security Answer field, enter the answer to that security question. This question and answer pairing will help you access your account.
9. In the Office Phone field, enter the phone number for your office.
10. Select the Agree & Register Now checkbox.
Note: By clicking Agree & Register Now, you agree to the terms and conditions of the applicable agreement, if you have licensed one service, or applicable agreements, if you have licensed more than one service, located here governing your use of the applicable service or services.

Page 6 | © 2018 Webroot Inc. All rights reserved. | Proprietary and Confidential Information March 27, 2018
11. Click the Confirm button.

Page 7 | © 2018 Webroot Inc. All rights reserved. | Proprietary and Confidential Information March 27, 2018
12. You’ve now created and activated your account, and you’ll be taken to your GSM console with the Sites tab active
After you have activated and are in the GSM online portal, you will do both of the following:
Create your first site.
Deploy agents to your endpoints.
That’s it! Let’s get started.
Note: Deploy the agents only after you have completed setting up the GSM console and created a site.
What is a site?
Most businesses will only need to have one site so they can manage all their computers under a single simple view. However, the GSM allows you to create multiple sites if needed.
This guide takes you through setting up your first site. You organize your computers into sites, and you get to determine what a site is.
If you are a larger business, you can organize your different offices, departments, or even geographic regions into sites. Or, if you are a Managed Service Provider (MSP), you can have a site for each of your clients. The section of this guide for Enterprises and Managed Service Providers (MSPs) goes into detail on multi-site deployments.
Page 8 | © 2018 Webroot Inc. All rights reserved. | Proprietary and Confidential Information March 27, 2018
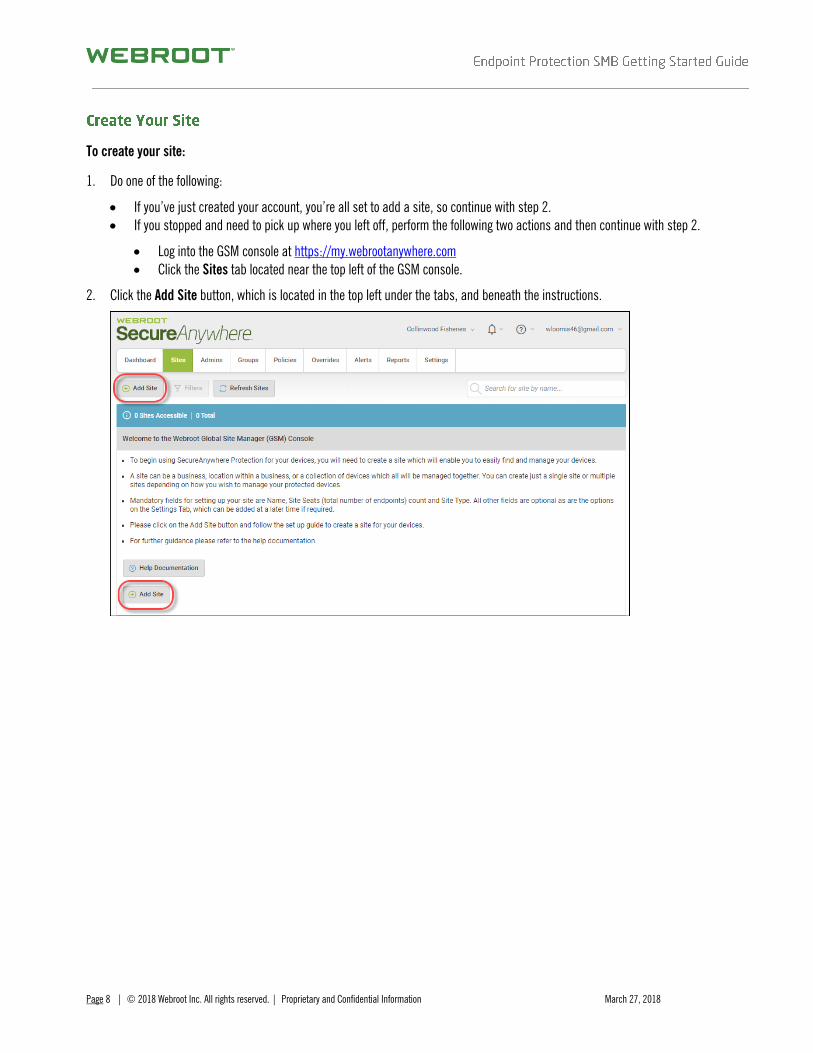
To create your site:
1. Do one of the following:
If you’ve just created your account, you’re all set to add a site, so continue with step 2. If you stopped and need to pick up where you left off, perform the following two actions and then continue with step 2.
Log into the GSM console at https://my.webrootanywhere.com Click the Sites tab located near the top left of the GSM console.
2. Click the Add Site button, which is located in the top left under the tabs, and beneath the instructions.

Page 9 | © 2018 Webroot Inc. All rights reserved. | Proprietary and Confidential Information March 27, 2018
The Add Site pane displays.
3. In the Site/Company Name field, enter the name of your company.
4. For the Site type, select one of the following:
If you’re using Endpoint Protection for your own company, select Internal Site. If you’re administering security for a paying client, select External Company and fill in the information for your customer.

Page 10 | © 2018 Webroot Inc. All rights reserved. | Proprietary and Confidential Information March 27, 2018
5. Continue to follow the prompts to set up your site’s details.
6. When you’re done, click the Next button.
You are now in the Permissions section. For your first site, you will have full Permissions.
7. Click the Next button.

Page 11 | © 2018 Webroot Inc. All rights reserved. | Proprietary and Confidential Information March 27, 2018
You are now in the Endpoint Protection section.
8. In the Site Seats field, enter how many seats each site will potentially use.
9. From the Default Endpoint Policy drop-down menu, select a default policy that will be applied to this site. If you’re not sure, select Recommended Defaults.
10. For the Include Global Policies? Checkbox, select the checkbox if you want to use global policies created at the GSM level.
Note: Once selected, including Global Policies cannot be reversed. The Global Policies and Global Overrides are advanced features you can enable. For more information see the Adding Sites topic in the Global Site Manager Admin Guide.
11. For the Include Global Overrides? Checkbox, select the checkbox if you want to use global overrides created at the GSM level.
Note: Once selected, including Global Overrides cannot be reversed. The Global Policies and Global Overrides are advanced features you can enable. For more information see the Adding Sites topic in the Global Site Manager Admin Guide.
12. In the Report Distribution List field, enter the email addresses of the individuals to whom reports will be sent.
Use commas to separate email addresses. For more information on report distribution, see Global Site Manager Reports Overview.
13. From the Data Filter drop-down menu, select the number of days after which inactive endpoints will be hidden. If you’re not sure, leave the default setting, which is Inherit the GSM data filter setting.

Page 12 | © 2018 Webroot Inc. All rights reserved. | Proprietary and Confidential Information March 27, 2018
14. When you’re done, click the Finish button.
That’s it! You’ve created your first site!
Page 13 | © 2018 Webroot Inc. All rights reserved. | Proprietary and Confidential Information March 27, 2018
If you need to install agents on both PCs and Macs, please read both the Windows PC Agent and the Apple Mac Agent instructions before installation.
Note: Deploy your agents only after you have completed setting up the GSM console and have created a site.
Windows PC Agent Installation
We’ll walk you through one way to install the Windows PC agent.
To install a PC agent:
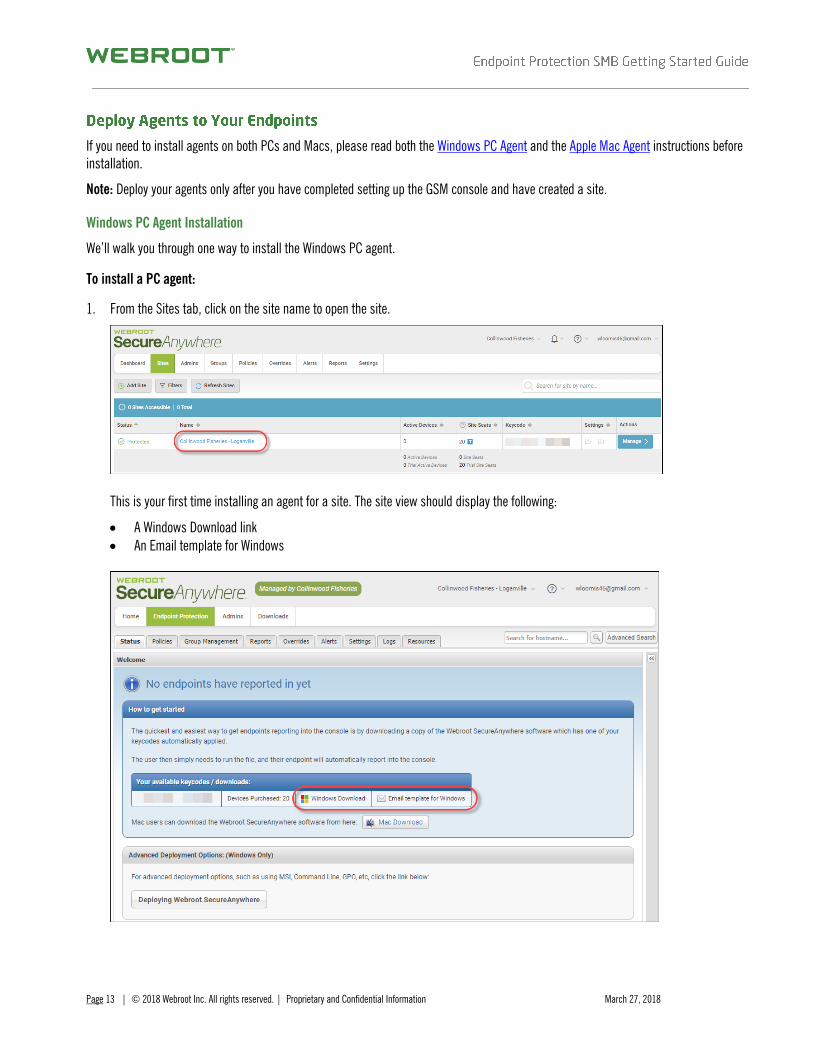
1. From the Sites tab, click on the site name to open the site.
This is your first time installing an agent for a site. The site view should display the following:
A Windows Download link An Email template for Windows

Page 14 | © 2018 Webroot Inc. All rights reserved. | Proprietary and Confidential Information March 27, 2018
2. Do one of the following:
If you are using a PC that you want to protect, click the Windows Download link. Save and run the .exe file to install the agent. If you need to install the Windows agent on other computers without logging into the console, use the Email template for
Windows to email the information to yourself or your workers to download, save, and run the .exe file to install the agent.
3. When the agent has installed, it will report to the site for centralized management.
Note: After your first agent installation, you can always find the deployment options under the Resources tab.

Page 15 | © 2018 Webroot Inc. All rights reserved. | Proprietary and Confidential Information March 27, 2018
Mac Agent Installation
We’ll walk you through the easiest way to install the Mac agent.
Note: For an easier installation across multiple Mac machines, copy these instructions and paste them, along with your keycode, into an email, which you then send to yourself and your employees.
To install a Mac agent:
1. Find your site (child) keycode.
Each site under the GSM console has its own child keycode. You will need to know this keycode to complete the agent installation on your Apple Macs.
2. Under the Sites tab, click on the site name to open the site.
The child keycode for the site is the first field in the Keycodes / Downloads table.
What is the difference between a parent and child keycode?
You used a keycode while setting up your GSM console. This is the parent keycode that represents your entire subscription for this Webroot product.
When you create a site within the GSM console, a child keycode is generated. You use this and any other site keycode to tell your agents where to check in.
IMPORTANT – DO NOT use the parent keycode to install your agents. Only use a site / child keycode

Page 16 | © 2018 Webroot Inc. All rights reserved. | Proprietary and Confidential Information March 27, 2018
3. Click the Mac Download button to download the SecureAnywhere installer file (.dmg) to the Mac.
The installer file is also available from the Resources tab or by clicking this link and saving the file: http://anywhere.webrootcloudav.com/zerol/wsamac.dmg
4. Locate and double-click the wsamac.dmg to open the installer.
5. Double-click the Applications folder to open it.
6. In the Applications folder, double-click the Webroot SecureAnywhere icon to begin activation.
7. In the first activation window, from the Language Selection drop-down menu, select a language and click the Next button.
Note: Make sure to select the correct language. You cannot change the language after you install the product.
8. In the next panel, copy and paste or enter your site (child) keycode and click the Activate button.
9. Follow any remaining on-screen prompts to complete the installation.
Note: After your first agent installation, you can always find the deployment options under the Resources tab in your GSM console view.
Page 17 | © 2018 Webroot Inc. All rights reserved. | Proprietary and Confidential Information March 27, 2018
You’ve finished setting up your Endpoint Protection product.
The agents should complete their first scans for threats in seconds or minutes and report back to your site.
Webroot uses cloud-based threat detection, so you will won’t have to download and install any definition files. Any new threats that are identified are updated in the cloud for immediate protection across all Webroot customers.
You can run Endpoint Protection alongside any other security products without conflicts.
Webroot’s user guides for business products are online at: https://docs.webroot.com/us/en/business.
The documents for using a site when you click into a site are listed under Endpoint Protection. The Global Site Manager documentation is listed under Global Site Manager.
The GSM console and each site also has a help and support area with helpful links, and more information can be found on our website at: https://www.webroot.com.
We recommend that you review the following topics:
Editing Site Details Editing Site Settings Adding Admins Working With Admins
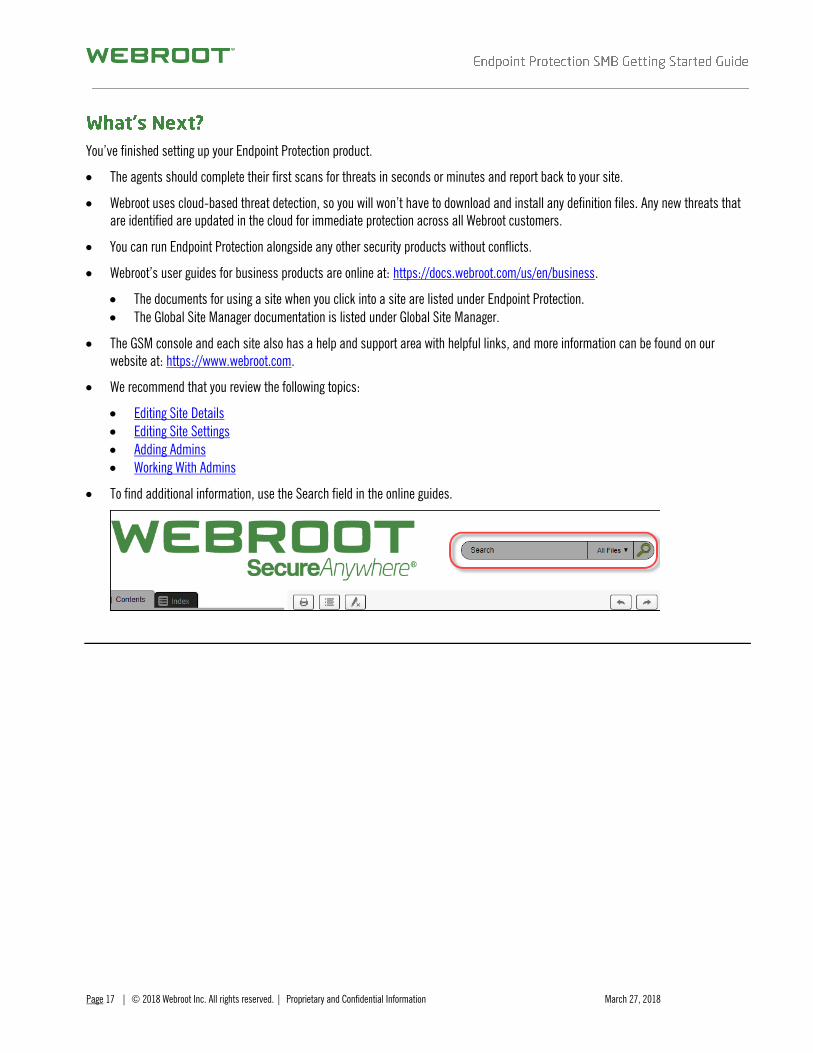
To find additional information, use the Search field in the online guides.