Sky at Night January 2015
128
Sky at Night THE BIGGEST NAME IN ASTRONOMY ROSETTA: BEHIND THE SCENES AT MISSION CONTROL 6 top amateur astronomers reveal their must-see targets for the year OBSERVING IN 2015 AGE OF TOTALITY Why now is a great time to become an eclipse chaser FREE HOME OBSERVATORY CONSTRUCTION GUIDE MILKY WAY’S EARLY ANCESTOR Getting to know our distant galactic relatives 3D PRINTING REACHES SPACE Additive manufacturing on board the ISS JANUARY 2015 #116 www.skyatnightmagazine.com IMAGE PROCESSING Astronomy Photographer of the Year 2014 reveals his top tips MOON DANCE Jupiter moon and shadow transits: the 10 most unmissable events ALSO THIS ISSUE 1ST FOR GEAR Planets & deep sky, can iNova’s new colour CCD camera capture it all?
-
Upload
phoebe-hepzibah -
Category
Documents
-
view
107 -
download
2
description
sky at night magazine
Transcript of Sky at Night January 2015

Sky at NightTHE BIGGEST NAME IN ASTRONOMY
ROSETTA: BEHIND THE SCENES AT MISSION CONTROL
6 top amateur astronomers reveal their must-see targets for the year
OBSERVING IN
2015AGE OF TOTALITYWhy now is a great time to become an eclipse chaser
FREE
HOME O
BSER
VATORY
CONSTR
UCTIO
N G
UID
E
MILKY WAY’S EARLY ANCESTOR
Getting to know our distant galactic relatives
3D PRINTING REACHES SPACE Additive manufacturing on board the ISS
JANUARY 2015 #116www.skyatnightmagazine.com
IMAGE PROCESSINGAstronomy Photographer of the
Year 2014 reveals his top tips
MOON DANCEJupiter moon and shadow transits:
the 10 most unmissable events
ALSO THIS ISSUE
1ST FOR GEARPlanets & deep sky, can iNova’s new
colour CCD camera capture it all?


LETTER FROM THE EDITOR JANUARY 03
skyatnightmagazine.com 2015
Welcome�
�
HOW TO CONTACT USSubscriptions, binders, CD cases and back issues
0844 844 0254
Mon to Fri 8am to 8pm; Sat 9am to 1pm for ordersEditorial enquiries
0117 314 7411 9.30am to 5.30pm, Mon to Fri Advertising enquiries
0117 314 8365
Subscription email enquiries
[email protected] enquiries
[email protected] enquiries
http://apps.immediate.co.uk/support [email protected]
Editorial enquiries
BBC Sky at Night Magazine, Immediate Media Co Bristol Ltd, Tower House, Fairfax Street, Bristol, BS1 3BN
JAMES WOODENDAPY 2014 WINNER
Champion
astro
imager
James
reveals
his aurora processing
secrets in our brand
new column. Page 85
WILL GATERASTRONOMY AUTHOR
Will brings
inspiration
for the new
year: watch
lists from
top amateurs, plus a
selection of our picks
for 2015. Page 32
ELIZABETH PEARSONSTAFF WRITER
If eclipses
occur in
regular
seasons,
why are
total eclipses so rare?
Elizabeth reveals all in our
totality special. Page 40
PS Next issue goes on sale 22 January.
This month’s contributors include...
Chris Bramley Editor
The new year brings a new dawn: the age of totality is upon usMAGGIE ADERIN-POCOCKSKY AT NIGHT PRESENTER
Relive the
drama of
Philae’s
descent to
comet 67P
with Maggie’s report
from ESA. Page 21
Sky at Night LOTS OF WAYS TO ENJOY THE NIGHT SKY...
PODCAST
The BBC Sky at Night
Magazine team discuss
the latest astro news in
our monthly podcast
Follow @skyatnightmag
to keep up with the
latest space stories and
tell us what you think
ONLINE
Visit our website for
reviews, competitions,
astrophotos, observing
guides and our forum
TELEVISION Find out what The Sky at Night team will be
exploring in this month’s
episode on page 19
iPAD
Get each month’s
issue on your iPad,
now with bonus video
and extra images
All the details of our
latest issue, plus news
from the magazine and
updates to our website
observations to paper for the past five years. Filling her shoes is a tall order, so who better than 2014’s Astronomy Photographer of the Year, James Woodend? He is the first contributor to our new monthly image processing column on page 85, giving us insight into how to create award-winning aurora imagery.
Enjoy the issue!
Have you got a wishlist of targets most in need of observation in 2015? Mine includes an exploration of the Moon and planets, particularly the area bordered by the Mare Imbrium, Serenatatis
and Vaporum, and the opposition of Saturn in May. Turn to page 32 to discover what six of the most dedicated amateur astronomers from the UK and the US will be training their scopes on in the next 12 months: there could well be something to add to your list.
Doubtless many of will be looking forward to 20 March. This is the date of the Faroe Islands total solar eclipse, and we in the UK will be witnessing an impressive partial solar eclipse that calls for preparations to be made, in spite of the ever-present chance of cloud. This eclipse is the start of something of a purple patch in terms of total solar eclipses: our planet will be bestowed with totality for the next three years. On page 40, Elizabeth Pearson examines the causes of this boon, and on page 44 we catch up with a dedicated eclipse chaser, for whom this period is sure to be rather busy!
This issue sees something of a change to our Skills section: we say goodbye to Carol Lakomiak’s monthly sketching column. I’m sure you will join me in thanking her for sharing the satisfaction of committing your

04 CONTENTS JANUARY
skyatnightmagazine.com 2015
FIRST LIGHT90
2015: MY OBSERVING YEAR
ECLIPSE: AGE OF TOTALITY40JUPITER’S DYNAMIC MOONS67
32 REGULARS
In the magazine NEW TO ASTRONOMY?See The Guide on page 80 and our online glossary
at www.skyatnightmagazine.com/dictionary
CO
VER
: PA
UL
WH
ITFI
ELD
, IST
OC
K, T
HIS
PA
GE:
A
NN
A M
ORR
IS, D
AN
IEL
LYN
CH
, NA
SA/J
PL-
CA
LTEC
H X
5, W
WW
.TH
ESEC
RETS
TUD
IO.N
ET
32 2015: MY OBSERVING YEARWhat will you be observing in 2015?
We ask top amateurs for their picks.
38 STARGAZING LIVE PREVIEWThe series returns – this time in March.
63 3D IN ZERO GA new age of space engineering dawns.
67 JUPITER’S DYNAMIC MOONSYour guide to the giant planet’s satellites.
73 VISUAL OBSERVING GUIDEView, and draw, the Solar System’s finest sights.
06 EYE ON THE SKY
11 BULLETIN
19 WHAT’S ON
21 A PASSION FOR SPACE Sky at Night presenter Maggie Aderin-Pocock reports from mission control at the Rosetta comet landing.
23 JON CULSHAWJon’s off-world travelogue continues.
24 INTERACTIVE
26 SUBSCRIBE Get your issues at a discount
28 HOTSHOTS
80 SKILLS80 The Guide Philae’s historic landing.
82 How to Build a Dobsonian mount, part 2.
85 Image Processing NEW
87 Scope Doctor Your gear problems solved.
89 REVIEWSFirst Light90 William Optics Star 71
five-element apo refractor.
94 iOptron CEM 60 equatorial mount.
98 iNova NNB-Cx colour CCD camera.
102 Books
104 Gear
106 WHAT I REALLY WANT TO KNOW IS…What lit up the early Universe?
FEATURES47 THE SKY IN JANUARY
Your 15-page guide to the night sky featuring the top sights, an all-sky chart, a deep-sky tour and more…
ECLIPSE: AGE OF TOTALITY
40 ECLIPSE: DANCE OF THE PLANETSHow eclipses can be predicted decades ahead.
45 ECLIPSE: ON THE TRAILOne man’s quest to see every eclipse he can.
C
FREE
16-PAGE
GUIDE
BUILD YOUR OWN OBSERVATORYHouse your scope in style with our DIY guide –full plans provided.
C = on the cover
C
C
C
C
C
C
C

skyatnightmagazine.com 2015
EDITORIALEditor Chris Bramley Art Editor Steve MarshProduction Editor Kev Lochun Online Editor Kieron AllenStaff Writer Elizabeth PearsonReviews Editor Paul Money
CONTRIBUTORS Paul Abel, Maggie Aderin-Pocock, Sean Blair, Stuart Clark, Jon Culshaw, Adam Crute, Lewis Dartnell, Glenn Dawes, Ian Evenden, Mark Garlick, Will Gater, Nicky Jenner, Pete Lawrence, Chris Lintott, Hazel Muir, Chris North, Mark Parrish, Colm Quinn, Steve Richards, Steve Sayers, Keaton Stone, Paul Sutherland, Stephen Tonkin, James Woodend
ADVERTISING SALESAdvertising Managers Steve Grigg (0117 314 8365), Tony Robinson (0117 314 8811)Inserts Laurence Robertson (00 353 87 690 2208)
The publisher, editor and authors accept no responsibility in respect of any products, goods or services that may be advertised or referred to in this issue for any errors, omissions, mis-statements or mistakes in any such advertisements or references.
BBC Sky at Night Magazine is published by Immediate Media Company Bristol Limited under licence from BBC Worldwide, who help fund new BBC programmes.
PRODUCTIONProduction Director Sarah Powell Production Manager Derrick AndrewsAd Services Manager Paul ThorntonAd Co-ordinator Emily ThorneAd Designers Cee Pike, Andrew HobsonReprographics Tony Hunt, Chris Sutch
LICENSINGDirector of Licensing and Syndication Tim HudsonInternational Partners’ Manager Anna Brown
MARKETINGHead of Circulation Rob Brock Head of Marketing Jacky Perales-MorrisMarketing Executive Ethan ParryHead of Press and PR Carolyn Wray (0117 314 8812)
PUBLISHINGPublisher Jemima RansomeManaging Director Andy Marshall
MANAGEMENT Chairman Stephen Alexander Deputy Chairman Peter PhippenCEO Tom Bureau
BBC WORLDWIDE, UK PUBLISHINGDirector of UK Publishing Nicholas Brett
Head of UK Publishing Chris KerwinUK Publishing Coordinator Eva Abramik [email protected] www.bbcworldwide.com/uk--anz/ukpublishing.aspx
EDITORIAL ADVISORY BOARD Deborah Cohen, Andrew Cohen, Michael Ewing, Julian Hector, John Lynch, Jonathan Renouf
SUBSCRIPTION RATESAnnual subscription rates (inc P&P): UK cheque/credit card £59.88; Europe & Eire Airmail £69; rest of world airmail £79. To order, call 0844 844 0260
© Immediate Media Company Bristol Limited 2014ISSN 1745-9869All rights reserved. No part of BBC Sky at Night Magazine may be reproduced in any form or by means either wholly or in part, without prior written permission of the publisher. Not to be re-sold, lent or hired out or otherwise disposed of by way of trade at more than the recommended retail price (subject to VAT in the Republic of Ireland) or in mutilated condition.Immediate Media Company Bristol Limited is working to ensure that all of its paper is sourced from well-managed forests. This magazine is printed on Forest Stewardship Council (FSC) certified paper. This magazine can be recycled, for use in newspapers and packaging. Please remove any gifts, samples or wrapping and dispose of it at your local collection point.
Download the complete multimedia experience with our special edition apps
TAP HERE TO FIND OUT MORE
TAP HERE TO FIND OUT MORE
TAP HERE TO FIND OUT MORE
THE APOLLO STORYThe Apollo Story is your complete guide to the greatest journey in human history, featuring the facts, figures and stories from every Apollo mission.
In this app:
X GO BEHIND THE SCENES WITH AUDIO AND VIDEO SECTIONS
X RARE PHOTOS AND EXHAUSTIVE PICTURE GALLERIES
Download your copy today for just £4.99/$6.99!
MAN IN SPACEMan in Space celebrates 50 years of mankind’s adventure in space, brought to life by historic video footage and amazing images.
In this app:
X 3D VIEWS OF LEGENDARY SPACECRAFT
X 360-DEGREE PANORAMIC VIEWS OF THE MOON
X A FOREWORD BY SIR PATRICK MOORE
Download your copy today for just £3.99/$5.99!
MAN ON THE MOONMan on the Moon celebrates the complete story of Apollo 11: the crew, the spacecraft, the mission, the legend of the historic first steps on the Moon.
In this app:
X AMAZING VIDEO FOOTAGE AND PHOTO GALLERIES
X INTERACTIVE DIAGRAMSX PANORAMIC VIEWS OF
THE MOON
Download your copy today for just £3.99/$5.99!
Sky at NightMAGAZINE

S Farewell Philae
ROSETTA SPACECRAFT, 12 NOVEMBER 2014
This image, taken by the Rosetta spacecraft’s OSIRIS narrow-angle camera, captures the isolation of the Philae lander shortly after separation, as it made the slow 10km descent to the icy space rock below. The moment of separation marked the end of a joint journey that had lasted for more than 10 years and covered more than 6 billion km. ES
A/R
OSE
TTA
/MPS
FO
R O
SIRI
S TE
AM
MPS
/UPD
/LA
M/I
AA
/SSO
/IN
TA/U
PM/D
ASP
/ID
A, ES
A/R
OSE
TTA
/PH
ILA
E/C
IVA
X 2
On 12 November 2014, the pioneering scientists behind ESA’s Rosetta mission captured the world’s attention by landing the Philae probe on the surface of comet 67P/Churyumov–Gerasimenko. Not only was this the first time any man-made object had been
landed on a comet, this incredible feat was controlled from a staggering distance of 500,000 million km away at ESA’s Space Operations Centre in Darmstadt, Germany. We dedicate this Eye on the Sky to this defining moment in the history of spaceflight.
Follow the journey of the Philae lander as it left the
safety of Rosetta and dived down towards its comet
history
descent
into
A
skyatnightmagazine.com 2015
06

T Picturing
a new world
PHILAE LANDER 13 NOVEMBER 2014
Zooming in on this section of Philae’s initial panoramic image, the structure of the comet’s surface is clear to see. This area was the only part of Philae’s landing site where the light was good enough for such a detailed capture.
Touchdown! X
PHILAE LANDER 13 NOVEMBER 2014
This is the first panoramic image taken from the surface of a comet. Look carefully at Philae’s shot of 67P/Churyumov-Gerasimenko and you’ll spot the probe’s three feet, circled. Philae’s touchdown was confirmed at 16:03 UT on 12 November.
skyatnightmagazine.com 2015
EYE ON
THE SKY
ROSETTA
SPEC
IAL

skyatnightmagazine.com 2015
08
W Monolithic
meeting
ROSETTA SPACECRAFT 11 NOVEMBER 2014
This image taken from 10km above the ‘neck’ of comet 67P/Churyumov-Gerasimenko reveals thin layers of rock (bottom right) that appear to have been compressed, adding weight to the theory that the comet could have been formed by a collision between two smaller bodies.
S Caught in a crag
ROSETTA SPACECRAFT, 11 NOVEMBER 2014
This side-on view of the smaller lobe of comet 67P/Churyumov-Gerasimenko gives the space rock a dramatic, alien appearance. Mission controllers had a challenging task in choosing a suitable landing site for Philae amongst this rocky terrain.
T Brace for impact
PHILAE LANDER, 13 NOVEMBER 2014
At just 40m above the comet, Philae’s ROLIS imager captured this view of its debris strewn surface. To give an idea of scale, the large boulder in the top right corner of the image is 5m across.
ESA
/RO
SETT
A/N
AV
CA
M –
CC
BY-
SA IG
O 3
.0 X
2, ES
A/R
OSE
TTA
/PH
ILA
E/RO
LIS/
DLR
X 2
, ES
A/
ROSE
TTA
/MPS
FO
R O
SIRI
S TE
AM
MPS
/UPD
/LA
M/I
AA
/SSO
/IN
TA/U
PM/D
ASP
/ID
A

skyatnightmagazine.com 2015
T Going,
going, gone!
ROSETTA SPACECRAFT 17 NOVEMBER 2014
Rosetta’s OSIRIS camera was able to capture the dramatic, 30-minute period as the Philae lander approached, and then bounced out from, its intended landing site. The probe can be seen, top right, drifting over a shadowy outcrop towards its final resting place.
Homing in X
PHILAE LANDER 12 NOVEMBER 2014
Philae used its downward pointing ROLIS instrument to capture this image at a distance of 3km from the comet. As well as being used to record the lander’s descent, the camera was also used to study the texture of the space rock’s surface.
EYE ON
THE SKY
ROSETTA
SPEC
IAL
15:14 UT
15:19 UT
15:23 UT
Taken at 15:43 UT Taken at 15:18 UT
15:43 UTTouchdown point before


skyatnightmagazine.com 2015
COMMENT
by Chris Lintott
I’m writing this from hallowed ground – just behind mission control at ESA’s Darmstadt control centre. A few minutes ago, the team monitoring transmissions from Rosetta saw the signal it was receiving from Philae drop away. There are few of us here, and no cameras, but the atmosphere in this part of the room is sombre. Philae is not just a robot which functioned to the best of its ability, it is also the embodiment of our desire to explore the Solar System and a repository of hard work by a huge international team.
But the scientists aren’t shedding tears. Up the road at lander control in Cologne, champagne corks are popping. Yes, they would have liked Philae to live, but the fact it returned data from what looks like all but one instrument has saved jobs and made careers. More importantly, it guarantees we will know more about the history of the Universe than we did before. We shouldn’t mourn Philae – we should celebrate it.
CHRIS LINTOTT co-presents The Sky at Night
The latest astronomy and space
news written by Hazel Muir
Our experts examine the hottest new astronomy research papers
CUTTING
EDGE
PLUS
BULLETIN JANUARY 11
Bulletin
ESA
/RO
SETT
A/N
AV
CA
M –
CC
BY-
SA
IG
O 3
.0, ES
A/A
TG M
EDIA
LAB
14 CHRIS LINTOTT 16 LEWIS DARTNELL
THE FIRST EVER spacecraft to land on a comet is being hailed as a great success, despite several setbacks. The lander Philae separated from the Rosetta probe, which orbits Comet 67P/Churyumov-Gerasimenko, and touched down on 12 November.
The lander failed to deploy the harpoons that should have anchored the probe to the comet. Instead, it bounced off the surface twice before coming to rest in the shadow of a cliff.
This means that its solar panels are not receiving as much sunlight as was hoped. Once the battery’s inital charge depleted – after 57 hours – mission controllers lost contact with the probe. That was expected, but the hope was that the solar panels would recharge the battery and that Philae would ‘wake up’ and resume data collection. That seems unlikely for the time being.
Nonetheless, Philae returned useful data. “It has been a huge success, the team is delighted,” says lander manager Stephan Ulamec from the German Aerospace Agency. “Despite the unplanned series of touchdowns, all our instruments could be operated and now it’s time to see what we’ve got.”
It’s possible that Philae will eventually re-establish communication. “We still hope that at a later stage of the mission, perhaps when we are nearer to the Sun, we might have enough solar illumination to wake up the lander,” says Ulamec.
The Rosetta orbiter will accompany the comet as it becomes more active en route to its closest encounter with the Sun in August. The mission should help us understand whether comets delivered water to the young Earth.> See Comment, right
The probe Philae has made history as the first to land on a comet
Triumph
Rosetta’s
lander
for

skyatnightmagazine.com 2015
12
THE EXPANDING FIREBALL of a dramatic
nova has been tracked and analysed in
unprecedented detail. Astronomers say the
observations should clarify exactly how and
why these explosions occur on the surfaces
of white dwarf stars.
In August 2013, Japanese amateur
astronomer Koichi Itagaki discovered a ‘new’
star, subsequently named Nova Delphinus 2013.
A nova occurs when hydrogen accumulates on
the surface of a white dwarf, the hot shrunken
remains of a Sun-like star that has run out of
fuel. The hydrogen is siphoned off a companion
star due to the white dwarf’s gravitational pull.
“The white dwarf continually sucks hydrogen
from its partner, forming an ocean on its
surface. After drawing about as much mass as
the entire planet Saturn, the pressure reaches a
critical point, then boom!” says Peter Tuthill
from the University of Sydney, Australia. “The
stellar surface turns into one titanic hydrogen
bomb hurling a fireball out into space.”
With team leader Gail Schaefer from Georgia
State University, Tuthill and colleagues analysed
follow-up observations of Nova Delphinus 2013
HOW VESTA GOT IN THE GROOVEDeep grooves around the
equator of Vesta formed
due to a glancing impact
at the asteroid’s south pole,
according to a new study.
In 2011, NASA’s Dawn
spacecraft showed that
the grooves are probably
due to a massive impact.
Now simulations by Peter
Schultz from Brown
University in Rhode Island
suggest it was struck at an
angle of less than 40°,
making interior rocks crack
and forming deep canyons.
“Vesta got hammered
– the whole interior was
reverberating,” says
Schultz. “What we see
on the surface is the
manifestation of what
happened in the interior.”
made by a telescope array in California. They
measured the size and shape of the nova on
27 nights over the course of two months.
The results suggest the nova occurred 14,800
lightyears away, and the expanding material had
a surprisingly complex and slightly elliptical
shape. The earliest observations showed the
fireball was roughly the size of the Earth’s orbit.
It then expanded at a velocity of more than
600km/s until it was nearly the size of Neptune’s
orbit just 43 days after the initial detonation.
“Although novae often play second fiddle to
their more famous cousins the supernovae, they
are a remarkable celestial phenomenon,” says
Tuthill. “The ferocity of the expansion is
breathtaking, engulfing a region the size of the
Earth’s orbit within a day, and passing Jupiter’s
orbit in less than two weeks.”
The observations also revealed that the
fireball’s outer layers became more diffuse and
transparent as it expanded. After about four
weeks, the cooler outer layers brightened,
possibly due to the formation of dust grains
that emit light at infrared wavelengths.
www.chara.gsu.edu
NA
SA/J
PL-C
ALT
ECH
/UC
LA/M
PS/D
LR/I
DA
, DA
VID
.A.H
ARD
Y/W
WW
.AST
ROA
RT.O
RG/S
TFC
, NA
SA/J
PL/S
PAC
E SC
IEN
CE
INST
ITU
TE, A
ND
REA
GH
EZ, G
UN
THER
WIT
ZEL/
UC
LA G
ALA
CTI
C C
ENTE
R G
ROU
P/W
. M. K
ECK
OBS
ERVA
TORY
, NA
SA, E
SO/I
DA
/DA
NIS
H 1
.5 M
/ R.
GEN
DLE
R, J
-E. O
VALD
SEN
/C. T
HÖ
NE
AN
D C
. FER
ON
NEWS IN
BRIEF
GAIA SET FOR PLANET BONANZAESA’s Gaia spacecraft,
launched in 2013, could
detect as many as 70,000
new planets.
Gaia’s primary goal is
to map roughly a billion
objects, mostly stars. But
a team led by Michael
Perryman from Princeton
University calculates that
it could also reveal many
new exoplanets if the
mission lasts 10 years.
“It’s anyone’s guess
how the field will develop
as a result,” he says.
A white dwarf star pulls hydrogen from its larger companion to create the nova explosion
revealedA dwarf’s
Astronomers have witnessed the true ferocity of a nova explosion
tantrum

BULLETIN JANUARY 13
skyatnightmagazine.com 2015
G2, circled, is a merged pair of stars
Mimas’s Herschel crater spreads across a third of the moon’s diameter
BLACK HOLE DODGER IDENTIFIED
A STRANGE OBJECT orbiting perilously close to the giant black hole at the centre of the Milky Way has turned out to be the product of merged stars.
For years, astronomers have been puzzled by the object, called G2. Initially they thought it
Mimas hides inner secrets
SATURN’S ICY MOON Mimas might harbour either a frozen core shaped like a rugby ball, or a liquid water subsurface ocean. The two suggestions follow an analysis of observations by NASA’s Cassini spacecraft, which has measured how much Mimas wobbles as it orbits Saturn.
This gave some clues to the moon’s interior structure. “Something is not right, so to speak, inside Mimas,” says analysis leader Radwan Tajeddine from Cornell University in Ithaca,
New York. “The amount of wobble we measured is double what was predicted.”
An oblong core that solidified soon after the moon’s formation could explain this. Alternatively, Mimas might have an underground ocean, making it a member of the exclusive club of ‘ocean worlds’ that includes several moons of Jupiter and two other moons of Saturn, Enceladus and Titan.www.nasa.gov/cassini
GALAXIES SHAPED UP SOONER A discovery that galaxies developed features such as discs or spiral arms up to two billion years earlier than expected has been made with the help of volunteers sorting Hubble images as part of the Galaxy Zoo project.
Key structures formed when the Universe was just three billion years old. “Some galaxies settle very early on in the Universe,” says scientist Brooke Simmons from the University of Oxford.
COMET PUMMELS MARS WITH METEORSA comet passed within 139,500km of Mars, less than half the Earth-Moon distance, on 19 October, and was monitored by NASA’s MAVEN probe.
Comet dust triggered a huge meteor shower in Mars’s atmosphere and added ions including sodium, magnesium and iron. “A Martian would have seen many thousands of shooting stars per hour, so it must have been a spectacular event,” says MAVEN scientist Nick Schneider from the University of Colorado.
NEWS IN
BRIEF Tiny wobbles of this Saturnian moon suggest it has a strange interior
was a hydrogen gas cloud destined to be ripped apart by the immense gravity of the supermassive black hole.
G2 made a close approach to the black hole in the summer of 2014 and was monitored using the Keck Observatory in Hawaii. If it was a gas cloud it should have been torn apart, creating energetic flares, according to Andrea Ghez from the University of California at Los Angeles.
“G2 survived and continued happily on its orbit – a simple gas cloud would not have done that,” she says. “It was basically unaffected by the black hole, and there were no fireworks.”
Instead, after studying G2, Ghez’s team concludes that it is probably a pair of binary stars that merged to form an enormous star cloaked in gas and dust.www.keckobservatory.org

NA
SA/E
SA/A
. ZIT
RIN
(C
ALI
FORN
IA IN
STIT
UTE
OF
TEC
HN
OLO
GY/
PASA
DEN
A A
ND
J. L
OTZ
/M.
MO
UN
TAIN
/A. K
OEK
EMO
ER A
ND
TH
E H
FF T
EAM
(SP
AC
E TE
LESC
OPE
SC
IEN
CE
INST
ITU
TE B
ALT
IMO
RE M
D.)
skyatnightmagazine.com 2015
14
Abell 2744 as seen in Hubble’s Frontier Fields survey; the newly found galaxy’s three lenses are shown inset
AB
C
A
B
C
T
his month’s paper proudly announces the
discovery of a faint blob at an enormous
distance from Earth, so distant that its
light has taken more than 13 billion years
to reach us. It is the fossil remnant of the early
Universe, one of only a handful which have been
detected from such early times, and a clue to the
very earliest stages of the processes that produced
the Universe we see today.
Discovered in images taken by the Hubble Space
Telescope’s Frontier Fields survey, some of the
deepest ever taken, it remains nothing more than a
smudge. It is so faint that effective follow-up is all
but impossible, and the smudge is the best view
we’ll get for decades to come. So why should we
care? For one thing, we see the object not once, but
three times. It happens to lie behind a distant galaxy
cluster, and so its light has been bent on its passage
towards Earth. The cluster magnifies the distant
image, but it’s an imperfect telescope, and there are
several paths light can take to reach us. That’s the
key to the problem; the position of these multiple
images depends on the distribution of mass within
the cluster (which we understand) and the distance
to the lensed galaxy (which we want to calculate).
Astronomers already suspected this was a distant
galaxy based on the colour of its light. Start with
the assumption that there’s nothing special about
the galaxy, and you can predict its likely colour at
different distances. This so-called ‘photometric
redshift’ is an estimate, but a good one, and this
system suggested a redshift above 9, equivalent to a
light travel time of 13.2 billion years. The Universe,
remember, is 13.8 billion years old.
When dealing with rare objects, there’s always
the nagging feeling that estimates might be wrong
– that the galaxy might be odd – and so independent
confirmation is critical. That’s what the multiple
lensed images provide, with a best-fit model
suggesting a redshift of 9.8 and a light travel time
of 13.23 billion years.
The importance of this discovery is thus not that
the galaxy exists, but that we can be reasonably sure
how distant it is. Two things immediately follow as
a consequence. Firstly, the galaxy is star-forming at
a rate of a solar mass’s worth of stars every three
years, doubling its stellar mass every 500 million
years. This is rapid for a galaxy that only weighs in
at 40 million solar masses and so we’re seeing the
first, rapid burst of star formation.
Secondly, the system is smaller than expected, no
more than a few thousand lightyears across. We had
expected galaxies in the early Universe to be small,
but not that small – it’s even smaller than the tiny
satellite galaxies around the Milky Way. It could be
a one-off, but it does make me shake my head in
wonder that we can see this thing at all.
CHRIS LINTOTT is an astrophysicist and co-presenter of The Sky at Night on BBC TV. He is also the director of the Zooniverse project.
CHRIS LINTOTT was reading… A geometrically supported z ~ 10 candidate multiply imaged by the Hubble Frontier Fields Cluster A2744 by Adi Zitrin et alRead it online at http://iopscience.iop.org/2041-8205/793/1/L12/
Our experts examine the hottest new research
In a galaxy far, far away...
Gravitational lensing has helped us uncover a galactic fossil 13.2 billion lightyears away
CUTTING
EDGE
“What’s important
is not that the galaxy
exists, but we can
be reasonably sure
how distant it is”

skyatnightmagazine.com 2015
January 1990On 21 January 1990, the intriguing title for The Sky at Night was ‘Tales of the Unexpected’. The programme discussed short-lived astronomical events such as bright new comets, supernovae and aurorae.
Ancient Chinese texts reveal that people have noticed new comets blazing through the skies for millennia. In 1705, English scientist Edmond Halley first predicted when a comet (later named after him) would return, after recognising it
Milky Way starves local dwarfs
STORMS RAGE ON URANUS
Our Galaxy raids star-building gas from its neighbours
THE NORMALLY TRANQUIL face of Uranus has become increasingly stormy. Late last year, enormous cloud systems on the planet became so bright that even amateur astronomers could see clear details formed in the planet’s hazy blue-green atmosphere.
“The weather on Uranus is incredibly active,” says Imke de Pater from the University of California at Berkeley, whose team detected several large storms in the ice giant’s northern hemisphere. The bright clouds probably form when gases such as methane rise in the atmosphere and condense into highly reflective clouds of methane ice, but what triggered the storms is unclear.www.keckobservatory.org
THE GRAVITY OF our Galaxy strips gas out of nearby dwarf galaxies, a new study suggests. Effectively, the Milky Way robs them of the raw materials for star formation.
Using the Green Bank Telescope in West Virginia – the world’s largest fully steerable radio telescope – a team led by Kristine Spekkens from the Royal Military College of Canada showed that dwarf galaxies up to about 1,000 lightyears from the edge of the Milky Way have very little hydrogen gas. Beyond that, dwarf galaxies are teeming with star-forming material.
“What we found is that there is a clear break, a point near our home Galaxy where dwarf galaxies are completely devoid of any traces of neutral atomic hydrogen,” says Spekkens.www.gb.nrao.edu
Looking back
BULLETIN JANUARY 15
T. A
RA
I/U
NIV
ERSIT
Y O
F TO
KYO
, N
ASA
/ESA
AN
D G
. BA
CO
N (
STS
CI),
NR
AO
/AU
I/
NSF,
IM
KE
DE
PATE
R (
UC
BER
KEL
EY)
& W
. M
. K
ECK
OBSER
VA
TORY
IM
AG
ES,
ISTO
CK
The bright spots in the atmosphere of Uranus may be the result of methane ice reflecting sunlight
must make periodic trips to the inner Solar System.
There are several naked-eye supernovae in the historical record, including one seen by Chinese astronomers in 1054. Other fleeting events include gamma-ray bursts, bright flashes of radiation that last from a few milliseconds to several minutes. They were discovered by US military satellites in the 1960s and are now linked to energetic explosions in distant galaxies.
ORPHAN STARS’ COSMIC GLOWThe dark space between galaxies is surprisingly bright in the infrared according to results from a new NASA experiment. The glow is thought to come from stars that have been flung out of their galactic homes.
“We think stars are being scattered out into space during galaxy collisions,” says Michael Zemcov from the California Institute of Technology, whose team analysed observations by cameras on rocket flights in 2010 and 2012 as part of a project called the Cosmic Infrared Background Experiment.
Zemcov suggests galaxies don’t have clear boundaries, but instead stretch out to great distances, forming a vast, interconnected sea of stars.
NEWS IN
BRIEF
NEW TARGETS FOR NEW HORIZONS Astronomers have used the Hubble Space Telescope to identify three icy Kuiper Belt objects NASA’s New Horizons spacecraft could visit after it flies past Pluto in July. Although far smaller than Pluto, they are around 10 times larger than a typical comet.
Our greedy Milky Way slurps raw materials for new stars from its neighbouring dwarf galaxies
Þ The supernova recorded by the Chinese in 1054 can still be seen today as the Crab Nebula, M1

NA
SA
/ZU
BER
/M.T
. ET
AL/
NA
TURE
201
2
skyatnightmagazine.com 2015
16 BULLETIN JANUARY
W
hen you’re thinking about long-term exploration of the lunar surface, either by robotic landers or human astronauts, one of the most important
considerations is power. It’s almost certain that future lunar settlements will rely on solar energy for power, so a key consideration when choosing a site is going to be how much sunlight is available to your solar panels. This month’s paper explores one way we might be able find a suitable spot.
Equatorial regions of the Moon are routinely plunged into darkness for weeks at a time and this would be disastrous for maintaining a power supply based on solar energy. However, because the Moon is only inclined at 1.5º it sits almost perfectly upright, meaning that some highland regions around the poles receive almost continuous sunlight. On the flip side, the bottoms of some polar craters experience permanent shadow. But these cold traps may harbour significant amounts of water-ice, a vital in-situ resource for a manned Moon base to exploit for drinking water and (via electrolysis) oxygen to breathe.
Computer models are vital to predicting which polar regions receive the most reliable sunlight
levels, and will therefore make the best lunar landing sites. Such an illumination map can be calculated from an accurate Digital Terrain Model (DTM) – essentially an Ordnance Survey map of elevations across the landscape.
In this study, Philipp Gläser of the Technical University Berlin and colleagues built their DTM of a 20km-wide square of interest just off the Moon’s south pole by using the ultra high-res, laser-based altitude data now being generated by the Lunar Reconnaissance Orbiter. They used their terrain model to calculate the changing sunlight levels falling on the contoured landscape during the Moon’s orbit and also how this monthly average of illumination varies with the wobbling of the Moon’s axis over its 19-year precession cycle.
Gläser focused on three particular highland regions near the south pole as potential landing sites. Two of these are on the high rim of crater Shackleton, and the third is positioned on a ‘connecting ridge’ running between Shackleton
and crater de Gerlache. The maps showed that while there are no spots receiving constant sunlight (the Sun was at least partially obscured behind high ground on the horizon for some of the time), the three target regions all had parts that received more than 70 per cent illumination. And if you were to raise the solar panels to just 2m above the ground, this increases to up to 92 per cent illumination.
Gläser found that the best site overall is the connecting ridge as it receives the greatest illumination levels over the widest area, and the longest you would need to endure darkness is only four or five days at a time. And importantly for permanent habitation over the decades this still holds true over the 19-year precessional cycle.
So, if you happen to be planning your own excursion to the south lunar pole, you’ll want to touch down right at 89.4399°S, 222.8524°E!
LEWIS DARTNELL is an
astrobiologist at University
of Leicester and the author
of The Knowledge: How to Rebuild our World from Scratch (www.the-
knowledge.org)
LEWIS DARTNELL was reading… Illumination conditions at the lunar south pole using high resolution Digital Terrain Models from LOLA by Philipp Gläser et al
Read it online at www.sciencedirect.com/science/article/pii/S0019103514004278
Our experts examine the hottest new research
� Sunlight is critical for power generation, while dark crater floors could also hold a vital resource in the form of water-ice
A place in the Sun
New terrain models could help find the perfect
spot to set up a base on the Moon
CUTTING
EDGE
“It’s almost certain
that future lunar
settlements will
rely on solar
energy for power”


Dark matter is thought to exist throughout the
Universe; inset, Dr Roberto Trotta
WHAT’S ON JANUARY 19
skyatnightmagazine.com 2015
Our pick of the best events from around the UK
What’s on
Is the All-There-Is
all there is?
Winchester Science Centre, Winchester, 14 January 4.30pm and 6.30pm
Imperial College London’s Dr Roberto Trotta addresses one of the most enigmatic and mysterious areas of astrophysics at the Winchester Science Centre this month, that of dark matter.
The ‘All-There-Is’ is in fact the Universe: a term Trotta coined in his recent book The
Edge of the Sky, in which he explains core conceits in cosmology using only the 1,000 most common words in the English language. In what promises to be a fascinating
lecture, he will review the evidence for the existence of dark matter, which is thought to make up 95 per cent of the Universe, as well as his own theories on the nature of dark matter and dark energy.
Following the lecture, there will be a short planetarium show highlighting the evening’s best observing sights. Tickets cost £8 for the early lecture and £10 for the later showing. www.winchestersciencecentre.org
THE BILLION PIXEL CAMERAThe Milky Way is a magnificent
sight in the night sky, but we know
surprisingly little about it. The Gaia
space telescope will change that.
This month the team visit the
factory that made the astonishing
sensor at the heart of the mission,
which will allow us to see our Galaxy
as we’ve never seen it before.
*Check www.bbc.co.uk/skyatnight
for subsequent repeat times
Four, 11 January, 10pm (first repeat Four, 15 January, 7.30pm)*
BEHIND THE SCENES THE SKY AT NIGHT IN JANUARY
ILLU
STRI
S C
OLL
ABO
RA
TIO
N, C
ASS
INI I
MA
GIN
G T
EAM
/CA
SSIN
I PRO
JEC
T/N
ASA
, ES
A–D
. D
UC
ROS
201
3
MORE LISTINGS ONLINE
Visit our website at www.skyatnightmagazine.com/whats-on for the full list of this month’s events from around the country.
To ensure that your talks, observing evenings and star parties are included, please submit your event by filling in the submission form at the bottom of the page.
What makes the Milky Way special?Wakefield and District Astronomical Society, Horbury Academy, Horbury, 15 January, 7.30pm
Join Wakefield and District Astronomical Society this month and hear Dr Chris Lintott discuss why our Galaxy, the Milky Way, differs from the many millions
that surround it. Tickets cost £3 to non-members. www.wakefieldastronomysociety.co.uk/index.html
The camera aboard the Gaia space scope is the most advanced ever sent into space
International Year of Light 2015 Stirling Astronomical Society, Smith Museum and Art Gallery, Stirling, 9 January, 7.30pm
Stirling Astronomical Society marks the UN’s International Year of Light – a celebration of the science and technological uses of light – with a talk from Prof Martin Hendry from the
University of Glasgow. He will be discussing how Danish astronomer Ole Rømer measured the speed of light using eclipses of Jupiter’s moon Io in 1676.www.stirlingastronomicalsociety.org.uk
PICK OF THE MONTH
The Theory of EverythingAt cinemas nationwide from 1 January 2015
Eddie Redmayne stars in The Theory of Everything, the stunning new biopic from director James Marsh charting the life of Prof Stephen
Hawking. Delve into Hawking’s world, from his time as an undergraduate at the University of Oxford to the development of his most famous scientific principles.

A PASSION FOR SPACE JANUARY 21
skyatnightmagazine.com 2015
I
hate to admit it, but my last Passion for Space was a real
understatement. I cannot remember the last time that I laughed, cried or generally shouted so much in public or among strangers, such was the brilliant success of the Rosetta mission and its Philae lander.
Overnight on 11 November, the Sky
at Night team was in mission control at ESA’s European Space Operations Centre in Germany, waiting to see if Philae was to be released at all. Confirmation came at 8.30am on the 12th: it was go for Philae. This marked the start of a seven-hour wait as the probe wafted towards the surface of the comet under the weakest of gravitational pulls imaginable.
A nearly unbearable seven hours and seven minutes later, the signal came through confirming touchdown had been achieved. A wild roar ripped through the press room, followed by a collective sigh of relief. This was slightly mitigated by the rather worried face of one of the engineers from lander control. He reported that although touchdown was confirmed, the telemetry coming in from Philae’s instruments did not make sense.
By analysing the telemetry over the next 24 hours, mission controllers worked out ES
A/A
TG M
EDIA
LAB;
CO
MET
IMA
GE:
ESA
/RO
SETT
A/N
AV
CA
M
A PASSION FOR
The Sky at Night presenter reflects on a victory for European unity: a historic landing on a distant comet
that Philae had reached the surface but had then performed a ‘super bounce’, which lasted for two hours and saw it rise 1km from the comet’s surface. It had then landed intact but in a bad location, where only a small portion of it solar panels were illuminated by sunlight. In this position Philae was totally dependent on its 10-year-old onboard battery, which could only power it for around 60 hours.
Race against the clock
At this stage we transferred to lander control to speak with the instrument teams, who were all vying for the limited battery power available on Philae. For many of the scientists there this was their life’s work at stake, and yet they all worked in a spirit of focused cooperation – each taking it in
turns to get data so every instrument could be used.
There were also times that were reminiscent of NASA’s Apollo 11 mission, as teams tried to use onboard instrumentation to reorientate the lander to give it more sunlight. Unfortunately, these operations failed and Philae’s battery eventually ran out of power, but not before a wealth of data had been acquired for each of the Philae instruments.
The few days I spent out at ESA were quite transformative for me: one of the things I took away from the whole experience was a feeling of reassurance. That 11 November was also a special Armistice Day, when we remembered the death and destruction caused by the First World War 100 years before. Yet there was a definite show of European unity on the 12th, as scientists from across the EU worked together to get the maximum amount of science data from a space probe some half a billion km away. It showed me how much can change over a period of 100 years and also made me feel that if we can achieve this, then what else might we be able to do?
Maggie Aderin-Pocock is a space scientist
and co-presenter of The Sky at Night
with Maggie Aderin-Pocock
S
Philae’s seven-hour descent
was agonising for everyone
following the mission


MA
IN IL
LUST
RATI
ON
BY
MA
RK G
ARL
ICK,
PH
OTO
: EM
MA
SA
MM
S
One of the most spectacular coincidences on Earth is the very fact that total solar eclipses take place: that the Sun is both 400 times larger than the Moon and 400 times further away from us. This wonderful fluke means that the Sun and Moon appear the same size, allowing our Moon to perfectly block the solar disc and give us the glory of totality.
I heartily agree with Sir Patrick Moore’s assertion that total solar eclipses are the most incredible sight in all nature and I’m giddy to discover how they might appear in other parts of the Universe around other stars. So I’m steering the cruiser globe to Fomalhaut, a young blue star 25 lightyears from the Sun and the brightest star in the constellation of Piscis Austrinus, the Southern Fish.
Fomalhaut is believed to be around 200 million years old and is approximately twice the mass of our Sun. This youthful star is very much faster, fiercer and more active than our middle-aged home star: the stellar equivalent of a 19-year-old knocking back high-caffeine energy drinks at Reading Festival in contrast to a more matured soul, who much prefers a quiet brew with a macaroon watching Dickinson’s Real Deal.
Orbiting this star is the gas giant Fomalhaut b, a world estimated to be two or three Jupiter masses. I’m going to settle in the region of this planet – one of the first extrasolar worlds to be imaged
directly – to assess where best to observe a total Fomalhaut eclipse from.
This planet is around 115 AU from Fomalhaut, rather far back to observe the kind of eclipses familiar on Earth, so I cruise closer into the habitable zone until I’m just 2.5 AU from the star. Here, I have the supreme fortune to locate a rocky world sized somewhere between Mars and Earth.
By steering the Cruiser Globe to a point where this rocky world appears in its ‘new’ phase, and then reversing to where it appears identically sized to Fomalhaut itself, I have an amazing chance to witness a beyond breathtaking alien eclipse. I shall name this rocky world ‘Totalis’ in honour of the exo-eclipse it’s allowing us to see.
What a majestic, eerie sight, a total stellar eclipse. Surrounding the solid black disc of the ‘new’ Totalis, the Fomalhaut corona pierces outwards with elongated, spindly rays, like the outstretched arms of someone doing a funny dance.
This corona is a distinct silvery blue and visibly fast moving, as if it’s being blown in a cosmic breeze. The shape is evocative of medieval sketches of the Sun. Prominences shimmer in pure, piercing white, very differently to the Sun’s prominences of burgundy flecks during totality seen from Earth. At the end of the eclipse, the valleyed terrain of Totalis gives three separate diamond ring effects at the one, three and four o’clock positions.
To witness another variety of total eclipse is a breathtaking exoplanetary vision. I could get the taste for this: eclipsed red giant viewed through dazzling auroral activity on an icy exoworld, anyone?
Jon Culshaw is a comedian, impressionist
and guest on The Sky at Night
EX PLANETJON CULSHAW’S
EXOPLANET EXCURSIONS JANUARY 23
Jon’s eclipse chasing desire leads him to Piscis Austrinus for an interstellar perspective
EXCURSIONS

24
Interactive
skyatnightmagazine.com 2015
Email us at [email protected]
MESSAGE OF THE MONTH There’s no place like dome
I am in the final stages of completing my project to
build a 2.4m dome out of wood. I have almost
finished the building of the dome and constructed
the base, but have still to build the deck and make
the two halves fit together.
The dome will be supported and rotate on the base
using 12 ball transfer unit bearings (similar to the
balls you find on the base of old computer mice).
I am having a load ring manufactured locally for the
bearings to run on rather than directly on the
plywood itself. In most places the plywood is doubled
up not only to aid in the construction of the larger
ribs and base ring but also to add strength to
the overall structure. In order to make the
whole design waterproof I have fibreglassed it
and applied a final smoothing resin coat
EMAILS • LETTERS • TWEETS • FACEBOOKThe ‘Message of the Month’ writer will receive four top titles courtesy of astronomy publisher Philip’s. Heather Couper and Nigel Henbest’s Stargazing 2015 is a month-by-month guide to the year and you’ll be able to find all the best sights with Patrick Moore’s The Night Sky. Stargazing
with Binoculars by Robin Scagell and David Frydman contains equipment and observing guides, and you’ll be viewing planets, galaxies and more with Storm Dunlop’s Practical Astronomy.
This month’s top prize: four Philip’s books
Oort or noort?With regard to the question raised by
David Tart in December 2014’s Interactive
(page 25), who asked “What hard evidence
is there for the existence of the Oort
impregnated with a colour chosen by my wife to
fit in with the surrounding shrubs.
I have included a variety of photos showing
the whole process all the way from site selection
– including the moving of a broadband cable that
I discovered while digging the pier hole!
By the way, I love the magazine and now that
I have a permanent setup I hope to be able to improve
my astrophotography skills. The pier will hold
my Orion Atlas EQ6 mount along with an Orion
10-inch astrograph.
Stephen Charnock, via email
Good luck with the rest of this exciting project,
Stephen. For more on home observatories, see
our 16-page pullout this issue. – Ed
cloud?”: if the Oort cloud does exist around
our Solar System, then one would think that
such a cloud would also exist around other
planetary systems in our Universe. If you
go back to Chris Lintott’s Cutting Edge in
NA
SA/E
SA/A
. G
OO
BAR
(STO
CK
HO
LM U
NIV
ERSI
TY)
AN
D T
HE
HU
BBLE
HER
ITA
GE
TEA
M (
STSC
I/A
UR
A)
� Circumstellar material
can be seen around the
star that exploded as
supernova 2014J
� An impressive back-garden observatory is possible with engineering skills and careful avoidance of buried utilities

LETTERS JANUARY 25
skyatnightmagazine.com 2015
Have your say at twitter.com/skyatnightmag and facebook.com/skyatnightmagazine
@skyatnightmag asked: What does the Philae landing mean to you?
Patricia Antunes: It means nothing is really impossible as long as we believe in it! Don’t give up Philae.
@phrixus: The Philae landing proves that we, as humans, can do anything. Imagine what we’d achieve if we funded science as we fund war.
Mick Cassidy: Anything is possible, nothing is impossible. We can achieve anything as proved over years and years of evolution.
@DaveCJLP: That we can plan long term to achieve something incredibly difficult. So let’s send another probe to Titan. With a boat!
@JP_Astronomy: Philae amazed me. I wasn’t around to see the Moon landings, but Philae was another giant leap for mankind.
@Johnimus_Prime: And boy, did it leap!
Lín Rhys: It means we can go farther and do more than we ever could before… and we should! Exploration is in our nature, and should be in our future!
@nillchill: It was inspiring scientific history. It shows us just what we can do when we all work on discovering and not on conflicts.
SOCIAL MEDIA
the style of the Calendar Girls, with all the proceeds going to the Cornwall Hospice Fund. She has not only managed to get sponsorship for the printing of the calendar so all of the £10 price goes directly to the charity, but also got the excellent background photography donated by local astrophotographers Paul Hughes and Karl Stephens. Carolyn Kennett, via email
Brave ladies indeed, I hope the calendar does its job and raises lots of money for this worthy cause Carolyn. – Ed
Flocking successI refer to your August 2014 article ‘How to Flock a Newtonian’ (page 81). I have a 12-inch UK Orion Optics SPX Dobsonian and took the plunge in deciding to flock it in September. I followed all your instructions, but had to wait until October to check my results due to
poor conditions. Our club, the Northern Ireland Amateur Astronomy Society, was at a dark sky site on 28 October and that was my first opportunity to see the results. What a difference the flocking made. The Andromeda Galaxy is usually a bright blob, but the effect of the flocking was dramatic and I got the best view I have ever had of it. All the members present agreed. The background was so much darker and the star fields were so rich, all in all a great success. You, Steve Richards, are a great scope doctor!Derrick McCourt, Northern Ireland
It’s amazing how simple improvements to your astronomical equipment can have a dramatic effect on the observing experience. It sounds like you’ve done an excellent job of flocking your Dobsonian telescope and I hope it continues to deliver great views of the night sky. – Steve Richards
.........................................................................................OOPS!• In November’s issue of BBC Sky at Night Magazine we incorrectly stated that Mount Teide in Tenerife is 3,260m high. The summit is actually at 3,718m.
WHAT YOU’VE BEEN SAYING ON TWITTER AND FACEBOOK
December (page 14) concerning supernova 2014J, Chris refers to circumstellar material around the star, which in this case had exploded into a supernova. The light from the exploded star was so intense that the reflected light from the star’s surrounding material had shown up on the photo as a ring of light around the supernova. Could this be evidence that an Oort cloud had existed around that star? Brian Drew, Doncaster
Researchers are looking at other planetary systems within our own Galaxy for evidence of exo-Oort clouds. As for supernova 2014J in M82, they are still investigating that. Due to the great distance involved, however, it is unlikely that they’ll be sure whether or not any material around the star is an Oort Cloud. – Elizabeth Pearson, staff writer
Alice in AstrolandThis is my four-year-old daughter Alice – the next generation of astronomer. The telescopes in the image are a 6-inch iStar Optical f/8 refractor and a Celestron C9.25 Schmidt-Cassegrain on an Astromount. The picture was taken in my home-built observatory near Oxford.Matt Armitage, Oxford
What a heart-warming picture Matt, Alice seems dwarfed by the scope but what a great place to develop a passion for the stars! – Ed
The great bareI wanted to write to you about fellow astronomer Amanda King who has, along with 12 other brave ladies from Cornwall, created a cosmic calendar in
Þ Daughter Alice carries out a last-minute daylight check for unwanted flexure in Matt’s observatory setup

SAVE WHEN YOU SUBSCRIBETO THE DIGITAL EDITION
Sky at NightMAGAZINE
Available from

The perfect addition to your stargazing, BBC Sky at Night Magazine is your practical guide to astronomy, helping you to
discover the night skies, understand the Universe around us and
learn exciting techniques for using your telescope.
Enjoy our Premium App experience now available from
MAGAZINESky at Night

28
skyatnightmagazine.com 2015
This month’s pick of your very best astrophotos
Hotshots
S M13
PETER MARTIN, IRELAND, 30 APRIL 2014
BBC Sky at Night Magazine says: “From the intricate resolution of individual stars in the cluster to the presence of background galaxies and the expert balance of colour, there is a great deal to admire in Peter’s stunning composition.” About Peter: “I started with astronomy after seeing Stargazing LIVE in January 2012. I did visual observing until July of that year,
Peter says: “I took two sets of exposures for this shot: one set of fairly short ones for the core and another much longer set to capture the faint outer stars. I then blended them so that the core wouldn’t burn out when I brightened the outer stars.”
Equipment: Starlight Xpress H694 CCD camera, Orion Optics AG10 telescope, Avalon linear mount.
when I took my first picture of the Dumbell Nebula with a DSLR. I can still remember the feeling of seeing it pop up on the DSLR screen in full colour after months of seeing it in black and white through the eyepiece. I was hooked.
It’s been a steep learning curve but I would encourage anyone to take it up.”
PHOTOOF THEMONTH

HOTSHOTS JANUARY 29
skyatnightmagazine.com 2015
T The Moon
JOHN O’MAHONY, SYDNEY, AUSTRALIA, 12 OCTOBER 2014
John says: “This image was created from a stack of seven photos taken during exceptional seeing conditions from my backyard in Sydney.”
Equipment: Canon EOS 7D DSLR camera, Meade 8-inch Schmidt-Cassegrain.
S Sunspot NOAA 12192
PETE WILLIAMSON SHROPSHIRE, 25 OCTOBER 2014
Pete says: “This is a large sunspot taken in white light.”
Equipment: ZWO 120mm CCD camera, Bresser 6-inch refractor.
S The Cave NebulaKFIR SIMON ISRAEL 14 OCTOBER 2014
Kfir says: “I like the great contrast between the blue and reddish orange in this image – representing Ha and SII light. This reflects the different materials composing this nebula.”
Equipment: SBIG ST8300M CCD camera, 10-inch ASA telescope, ASA DDM 60 Pro mount.
W Comet C/2013 A1 and MarsANDREA PISTOCCHINI GERMIGNAGA, ITALY 22 OCTOBER 2014
Andrea says: “On the last day possible (for my location) I managed to image the conjunction of Mars and comet C/2013 A1 Siding Spring. It was the fifth time that I had tried to capture them. The first two were spoiled by clouds, the third moisture, the fourth bad seeing.”
Equipment: Canon EOS 450D DSLR camera, Tecnosky 80/480 telescope, NEQ6 Pro mount.

skyatnightmagazine.com 2015
30
NGC 6914 X
BOB FRANKE ARIZONA, US 17 AUGUST 2014
Bob says: “This remarkably beautiful nebula complex is located at the heart of the constellation of Cygnus. Just left of centre is NGC 6914, a complex of the three blue reflection nebulae. The two on the right are cataloged as vdB 132; to the left and slightly lower is vdB 131.”
Equipment: SBIG STF-8300M CCD camera, Takahashi FSQ-106ED telescope, Losmandy G11 mount.
W M31
JESPER SUNDH LYON, FRANCE, 4 NOVEMBER 2014
Jesper says: “This is an 11-panel mosaic with a total of 200 hours and 35 minutes integration time.”
Equipment: Atik 460EX CCD camera, Sky-Watcher ED80 telescope, Astro-Physics 1600GTO mount.
S NGC 7023
SHAUN REYNOLDS NORFOLK, SEPTEMBER AND OCTOBER 2014
Shaun says: “I wanted to go deep and capture all the dust stretching out from the hot stars at the centre of this reflection nebula, which required 15 hours of exposure time. I particularly like this nebula as it presented a challenge in capturing both the dust and detail at the centre.”
Equipment: SXV 694 mono cooled CCD camera, Takahashi E-180 telescope, Paramount GT-1100S German equatorial mount.

HOTSHOTS JANUARY 31
skyatnightmagazine.com 2015
ENTER TO WIN A PRIZE!
We’ve teamed up with the Widescreen Centre to offer the winner of next month’s best Hotshots image a fantastic prize. The winner will receive an Orion StarShoot Solar System Colour Imager IV camera, designed for capturing sharp shots of the Moon and planets.
www.widescreen-centre.co.uk • 020 7935 2580
Email your pictures to us at [email protected] or enter online. £99WORTH
S Star trails
BOB FORD, WILTSHIRE, SEPTEMBER 2014
Bob says: “These star trails were taken at Old Sarum, the English Heritage site in Wiltshire. The Moon was waning gibbous, creating a blue sky under long exposure, and the trees very kindly pointed out Polaris for me!”
Equipment: Canon EOS 110D DSLR camera.
NGC 1398 X
DAN CROWSON NEW MEXICO, US, 22 OCTOBER 2014
Dan says: ”This is the first of several images I captured from five ‘black zone’ sites on my way to an astrophotography seminar in Arizona. My goal was to image objects that were too low to capture from the St Louis area in Missouri.”
Equipment: SBIG ST-8300M CCD camera, Astro-Tech AT90EDT telescope.
T NGC 7822
CHRIS GRIMMER, NORWICH, 31 OCTOBER 2014
Chris says: ”This image data was captured over three nights across one week, possibly my quickest image ever, due to unusually clear skies.”
Equipment: SXVR H694M CCD camera, William Optics GT81 triplet refractor, iOptron CEM60 standard mount.

2015MY OBSERVING YEARTop amateur astronomers from the US and UK talk to Will Gater about their observing wishlists in the year ahead, plus our top picks for 2015
Next year many will be excitedly
awaiting the arrival of darkness during
the total eclipse in March, and later in
the year the Moon gets in on the action
with a total lunar eclipse in September. These are
the stand-out astronomical events that will get
everyone looking skyward. But we astronomers
need more than that: we have an urge to observe
that we would satisfy 365 days (or more accurately
nights) per year if we could. We spoke to six of
the most dedicated, passionate amateur
astronomers out there and asked them what their
intentions were in the 12 months ahead. Read
on to discover how they plan on fulfilling their
astronomical aspirations in 2015 and for our
own recommendations of great observing sights
in the seasons ahead.
ABOUT THE WRITER
Will Gater is an astronomer, science writer and author of several popular astronomy books, including The Practical Astronomer. He tweets as @willgater.
PAU
L W
HIT
FIEL
D, A
LEX
AN
DRA
HA
RT, ©
NA
TIO
NA
L G
EOG
RAPH
IC IM
AG
E C
OLL
ECTI
ON
/ALA
MY
>

OBSERVING IN 2015 JANUARY 33
skyatnightmagazine.com 2015
Alexandra’s spectacular solar image ‘Ripples in a pond’ won the Our
Solar System category of Astronomy Photographer of the Year 2014
ALEXANDRA HART Solar imager and Astronomy Photographer of the Year 2014 ‘Our Solar System’ winner
I am obsessed with imaging the Sun,
although at night I do enjoy staring at
the stars and any planets and taking
wide-angle landscape photos of them
– but I am far from being any good at it!
My first love is the Sun: what I enjoy
most is that it is so dynamic. It is never
the same in appearance from one
moment to the next and there is always
something to study, even on a quiet day.
What I would like to see most this
year – and these have been on my bucket
list since I started solar observing – are
a white-light flare and an X-class flare in
hydrogen-alpha. I’d also love to get the
chance of make animations of post-flare
loops or a large prominence lift-off event.
I think the highlight in everyone’s
diary will be 20 March, though, when we
get to witness a partial solar eclipse. Where
I live, the Sun will be up to 90 per cent per
cent covered by the Moon and should be
an amazing sight for anyone with solar
eclipse glasses. I’m just worried it will be
cloudy as there won’t be another where so
much of the Sun is covered for a long time.
JON SHANKLIN Director of the British Astronomical Association’s comet section
I have a wide range of interests – solar
observations, variable stars, comets and
meteors. All of my observations are visual,
mostly using binoculars for the variables
and comets, a small telescope for the Sun
and just my eyes for meteors. Over the
past year I’ve observed half-a-dozen or
so comets. The one that generated the
most excitement was of course C/2012 S1
ISON, and though it didn’t get as bright
as many had hoped for I did get a nice
glimpse of it and its short tail just prior
to perihelion.
One of my tasks as director of the
British Astronomical Association and
Society for Popular Astronomy comet
sections is looking forward and predicting
what comets will come within easy
range. It’s a bit of a lottery. Unusually,
there are three in the frame for easy
binocular viewing in 2015. There is a
chance that C/2013 US10 Catalina might
be a naked-eye object in late November.
C/2014 Q1 PANSTARRS may be good in
the southern hemisphere and C/2014 Q2
Lovejoy could be a nice binocular object
at the start of the year.
Three comets could become good binocular targets in 2015

skyatnightmagazine.com 2015
14 JANUARY 2015 The bright winter constellations of Orion, Gemini and Auriga are high in the south at 10pm.
16 JANUARY 2015 Saturn sits a little over 2.5º from the crescent Moon in the predawn sky.
22 JANUARY 2015 Venus and Mars are joined by a thin crescent Moon low in the west after sunset.
6 FEBRUARY 2015 The giant planet Jupiter is at opposition tonight in the constellation of Cancer, the Crab.
14 FEBRUARY 2015 The Orion Nebula is due south at 8pm; it’s a superb object for a small telescope.
21 FEBRUARY 2015 The planets Mars and Venus are just over 28 arcminutes from one another tonight.
22 FEBRUARY 2015 The constellations Leo and Virgo are high in the south at 2am, providing a good opportunity for galaxy hunting.
2 DECEMBER 2015 The Andromeda Galaxy, M31, is high in the south at a sociable 8pm.
8 DECEMBER 2015 The crescent Moon lines up with Venus, Mars and Jupiter in the southeast before dawn.
14 DECEMBER 2015 The Geminid meteor shower reaches its peak this evening. Look for meteors streaking from the head of the ‘Twins’.
SEASONAL SIGHTS
WINTER
ANNA MORRIS Deep-sky astrophotographer
The objects that hold the greatest
interest for me right now are
nebulous regions, especially
emission and dark nebulae. I’m
also trying to find regions that
aren’t imaged that often in order
to pull out as much detail as
I can from them. Capturing
dozens of hours of data to
process is incredibly fun and
fascinating to me.
It takes patience to image
nebulae in narrowband well:
they need to have enough data
gathered on them to really show
them off. So I’ll spend multiple nights on a single target at a time with a single
filter. You get to find out a lot about astrophotography by pushing out of your
comfort zone when selecting targets.
In 2015 I’m planning on working on imaging more galaxies. I tend to
focus on nebulae as they’ve always interested me more, but the more time
I spend reading about galaxy formation and interactions within them, the
more it makes me want to concentrate on imaging them than I have in the
past. Having said that, I have also found time to collect enough data on some
obscure parts of nebulosity that you don’t typically see in images in order
to really bring them out. WIL
L G
ATE
R, T
HIN
KSTO
CK
X 5,
AN
NA
MO
RRIS
X 2
, BIL
L LE
ATH
ERBA
RRO
W X
234
� Anna’s shot of the Pac-Man Nebula reveals a staggering amount of detail
� Aim for less familiar targets – this is NGC 6559 – to take you out of your comfort zone
Magnificent Saturn will be close to the crescent Moon on 16 January
The Andromeda Galaxy will be well placed in December

OBSERVING IN 2015 JANUARY 35
SEASONAL SIGHTS
SPRING
19 MARCH 2015 At 9pm tonight the beautiful open cluster M44 – also known as the Beehive Cluster – is due south.
skyatnightmagazine.com 2015
20 MARCH 2015 This morning a spectacular total solar eclipse will be visible from Svalbard and the Faroe Islands; it’s a good partial eclipse from the UK too.
22 MARCH 2015 The crescent Moon sits around 3.5º from Venus low in the west after sunset.
8 APRIL 2015 Why not use tonight to observe the beautiful double star Algieba in Leo, which is due south at 10.18pm.
11 APRIL 2015 Venus is roughly 2.5º away from the sparkling Pleiades cluster in Taurus this evening.
12 APRIL 2015 The Leo Triplet galaxies
(M65, M66 and NGC 3628) are due south
just after 11pm.
22 APRIL 2015 Star cluster Melotte 111 is high in the south at 11.30pm.
5 MAY 2015 Now is a good time
to spot Mercury, low in the west after sunset.
12 MAY 2015 With the Moon mostly out of
the way, tonight is a good time to go galaxy hunting in Virgo. 23 MAY 2015 Today Saturn is at opposition, meaning now is a great time to observe the Ringed Planet.
BILL LEATHERBARROW Director of the British Astronomical Association’s lunar section
I’ve always been a keen observer of the
Moon and planets, but especially the Moon.
When I first started out in the 1960s I was
a visual observer relying on pen and paper
to depict the lunar and planetary surfaces,
but now I have taken up high-resolution
imaging with high-speed planetary
cameras. Don’t be put off observing the
Moon by its familiarity in our skies, or by
the complaints of deep-sky observers that
its light drowns out faint objects! It is a
fantastic telescopic object that rewards
patient observation.
� Bill’s beautiful shots of Crater Tycho (left) and Crater Clavius (right) show that the Moon can offer up as much intricacy as a nebula or galaxy
This year should be good for eclipses
visible from the UK too. The solar eclipse
of 20 March will be total from the Faroe
Islands and Svalbard, but it will also be an
impressively large partial eclipse from the
British mainland. The total lunar eclipse
on 28 September will be visible in its
entirety from Britain.
But the most exciting event of the
year, in my mind, will be the arrival
of the New Horizons spacecraft at Pluto
in July. I cannot wait to see the images
returned from its flyby.
The Beehive Cluster is one of the stand-out objects in Cancer
March’s total solar eclipse is visible from
the Faroe Islands

36
SEASONAL SIGHTS
SUMMERJUNE–EARLY AUGUST Keep a look out for the beautiful glowing wisps of noctilucent clouds after sunset and before sunrise.
11 JUNE 2015 Showpiece globular cluster M13 in Hercules can be found due south at 12.30am this morning.
skyatnightmagazine.com 2015
30 JUNE 2015 Tonight Jupiter and Venus are just over 21 arcminutes from one another, low in the west after sunset.
9 JULY 2015 The Lagoon and Trifid Nebulae, M8 and M20, are due south just before midnight on the 10th.
MID JULY With new Moon on the 16th, now’s the time to observe and image the stunning summer star fields of the Milky Way.
18 JULY 2015 The Swan Nebula, M17, is a lovely telescopic object in the south at around 11.30pm.
8 AUGUST 2015 At 10.48pm you’ll find the sparkling stars of the Wild Duck Cluster, M11, due south.
13 AUGUST 2015 Wrap up warm and dig out that
deckchair: today is the peak of the famous Perseid
meteor shower.
14 AUGUST 2015 The Ring Nebula, M57, is high in the south at around 10.20pm; so is the quadruple star system of Epsilon Lyrae.
17 AUGUST 2015 The Coathanger
asterism in Sagitta is a wonderful binocular
target. It’s due south at around 10.45pm tonight.
SALLY RUSSELL Visual observer and astronomical sketcher
My main interests in astronomy are observing
and sketching the Moon, Sun and Mars. The
Moon and Sun in particular provide ever-
changing vistas – the fleeting nature of these
views is the challenge that makes my fingers
just itch to pick up a pencil and commit the
views to paper!
You don’t need to be artistic – absolutely
anyone can have a go at sketching what they
observe. The equipment for getting started
with sketching is cheap and simple – a couple
of graphite pencils (the ones I use the most are
2B and 4B), a plastic eraser, and a small pad of
medium weight cartridge paper. A red headtorch
is useful too, for hands-free lighting to sketch by.
Jupiter will be very well placed for observing
over the winter and into the early part of 2015.
During this apparition there will be numerous
satellite eclipse and occultation events, so I hope
I’ll get the chance to observe and record some
of those. I invested in a fine double star atlas
last year and would like to make good use of
it in 2015. I’ve always been interested in them
but simply haven’t known where to look!
SALL
Y R
USS
ELL
X 3
, W
ILL
GA
TER
X 2
, D
AM
IAN
PEA
CH
X 2
, TH
INK
STO
CK
X 4
Noctilucent clouds are often descibed as ‘eerie blue tendrils’
The Swan Nebula sits among the rich star fields of Sagittarius
� Sally’s gorgeous sketch of the Sun in hydrogen-alpha, drawn on 2 May 2011
� Sally’s rendering of Crater Gassendi from 20 June 2011 captures the starkness of the Moon
� Sally’s sketch of Mars from 13 April 2014 shows many major dark albedo features

EARLY SEPTEMBER The rich Milky Way star fields that wind through the constellation of Cygnus are almost directly overhead at around 10pm.
14 SEPTEMBER 2015 Albireo in Cygnus, arguably the finest double star in the autumn skies, is high in the south around 9pm.
19 SEPTEMBER 2015 Globular cluster M71, in the constellation of Sagitta, is due south at around 9.05pm.
28 SEPTEMBER 2015 The UK will be treated to a total lunar eclipse in the early hours of this morning.
29 SEPTEMBER 2015 Tonight the asteroid Vesta will be at opposition in Cetus, though the bright gibbous Moon will be nearby.
12 OCTOBER 2015 Turn your telescope towards the outer Solar System – the ice giant Uranus is at opposition today.
18 OCTOBER 2015 The Andromeda and Triangulum Galaxies, M31 and M33, are high in the south at around 12.30am.
7 NOVEMBER 2015 Jupiter, Mars, Venus and the crescent Moon come together for a beautiful gathering in the predawn sky.
17-18 NOVEMBER 2015 Tonight’s a good time to look out for shooting stars as it’s the peak of the Leonid meteor shower.
19 NOVEMBER 2015 The Pleiades star cluster, M45 in Taurus, is due south at midnight.
SEASONAL SIGHTS
AUTUMN
OBSERVING IN 2015 JANUARY 37
skyatnightmagazine.com 2015
DAMIAN PEACH Planetary imager and overall Astronomy
Photographer of the Year 2011
My prime interests are the planets and
comets. I’m a big fan of these dynamic
objects – things that can change in
appearance on rapid time scales: like the
ever-changing atmosphere of Jupiter,
or the appearance of an icy comet as it
moves across the sky.
The planets in particular are great
objects to try your hand at photographing.
It needn’t cost that much: a webcam-type
camera hooked up to a laptop will take good
images and is an affordable way to start.
Objects like Jupiter are easy to locate too,
and even small telescopes will show detail on its disc.
Last year was a busy one for me in terms of imaging. Jupiter and Mars were
prominent targets during the first half of 2014 and I put in a brief spell on
Saturn in late spring. There have also been several interesting comets I’ve been
following. In 2015, Jupiter is well placed during the early half of the year so
I’ll be imaging that when I can. Also, a few comets look like they will become
nice sights in our skies, such as C/2013 US10 Catalina. I’m still debating on what
to do for the solar eclipse in March, the weather prospects along the path of
totality make it a tricky decision.
Damian’s latest shot of Jupiter, taken on 28 October 2014
Damian’s stunning shot of C/2012 S1 ISON, taken on 15 November 2013
S
Early September offers a glimpse into the heart of our Galaxy
November’s lunar eclipse will be total
across the UK
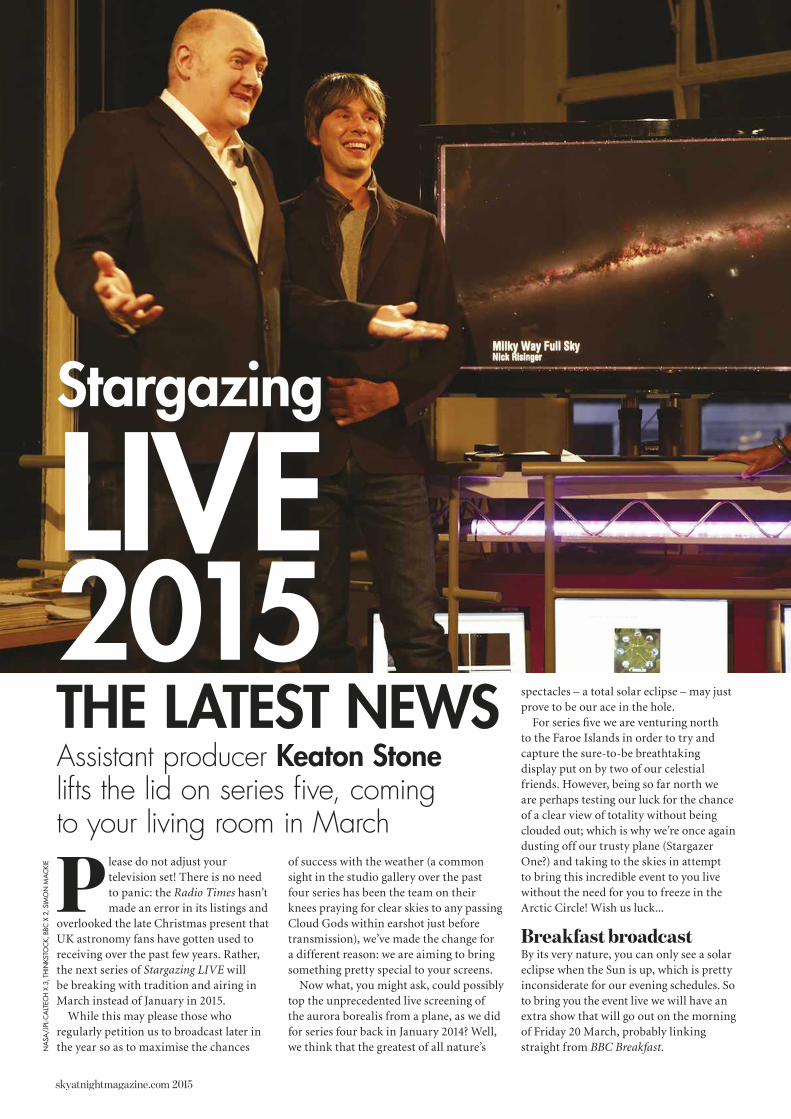
Stargazing
LIVE 2015
skyatnightmagazine.com 2015
P
lease do not adjust your television set! There is no need to panic: the Radio Times hasn’t made an error in its listings and
overlooked the late Christmas present that UK astronomy fans have gotten used to receiving over the past few years. Rather, the next series of Stargazing LIVE will be breaking with tradition and airing in March instead of January in 2015.
While this may please those who regularly petition us to broadcast later in the year so as to maximise the chances N
ASA
/JPL
-CA
LTEC
H X
3, TH
INK
STO
CK
, BB
C X
2, SI
MO
N M
AC
KIE
Assistant producer Keaton Stone
lifts the lid on series five, coming
to your living room in March
of success with the weather (a common sight in the studio gallery over the past four series has been the team on their knees praying for clear skies to any passing Cloud Gods within earshot just before transmission), we’ve made the change for a different reason: we are aiming to bring something pretty special to your screens.
Now what, you might ask, could possibly top the unprecedented live screening of the aurora borealis from a plane, as we did for series four back in January 2014? Well, we think that the greatest of all nature’s
spectacles – a total solar eclipse – may just prove to be our ace in the hole.
For series five we are venturing north to the Faroe Islands in order to try and capture the sure-to-be breathtaking display put on by two of our celestial friends. However, being so far north we are perhaps testing our luck for the chance of a clear view of totality without being clouded out; which is why we’re once again dusting off our trusty plane (Stargazer One?) and taking to the skies in attempt to bring this incredible event to you live without the need for you to freeze in the Arctic Circle! Wish us luck...
Breakfast broadcast
By its very nature, you can only see a solar eclipse when the Sun is up, which is pretty inconsiderate for our evening schedules. So to bring you the event live we will have an extra show that will go out on the morning of Friday 20 March, probably linking straight from BBC Breakfast.
THE LATEST NEWS

STARGAZING LIVE PREVIEW JANUARY 39
skyatnightmagazine.com 2015
ABOUT THE WRITERKeaton Stone is a space
enthusiast, and assistant
producer for Stargazing LIVE and other BBC
science shows. Follow him
on Twitter: @Keaton_S
As the eclipse is our main focus this
time around we’ll be highlighting the
orbital mechanics and ‘celestial ballet’
of the cosmos, which through various
coincidences of alignment allows for such
sensational displays to occur. But we’ll
also be dedicating an episode to some of
the actual astronomical bodies that are
equally integral.
We’ll be taking an in-depth look at our
star to find out why it is so special for us
here on Earth; and we’ll also be taking a
trip across the Galaxy to investigate other
stars and hear how the latest space missions
are helping us to learn more about these
distant cosmic furnaces. It’s early days and
things are always liable to change, but
tentatively we’re going to look into the lives
of stars, from their dusty beginnings through
protostar-hood and into middle age like
our Sun is now, then on to some of the
spectacular ways that stars eventually die.
We also plan on examining supernovae
a bit closer as well as running a citizen
science campaign alongside the
series, which people watching
at home can get involved
in. This time around
we want the public’s
help in hopefully
identifying a record
amount of these
stellar fireworks.
Moon rakers
The other major
ingredient you need
in a solar eclipse is the
Moon, of course.
We have visited our
closest neighbour a
number of times over
Stargazing LIVE’s lifetime, so we’re
keen to explore some of the other strange
and fantastic bodies that orbit other
planets. We’re interested in Jupiter’s
Galilean satellites as well as Saturn’s
moon Titan – the only other moon
we’ve ever landed on, sometimes described
as ‘Earth in the freezer’ due to it having
an atmosphere and weather cycle. Europa
and Enceladus are also fascinating, both
being particularly strong candidates
for being the home of potential life
elsewhere in the Universe.
As ever then we aim to treat viewers to
a star guest and without giving anything
away we have someone VERY special
lined up to join us in March at
Jodrell Bank... apologies,
but that’s all I’m
allowed to say!
What I can say is
that series five is
shaping up to be
one of the most
memorable yet
– which will of course
only present us with a
headache later on when
we wonder how we can
possibly top it. But let’s not
worry about that for
now. Instead, in March
let us once again come
together to turn on, tune in and look up!
� The team hope the March eclipse will top the live aurora from last year’s show
Liz Bonnin will be in the field once more – possibly
aboard ‘Stargazer One’
< This year the show will look at
other moons in our Solar System;
from top: Titan, Europa, Enceladus
The team will be broadcasting a special breakfast episode
Star guests will join Dara Ó Briain and Brian
Cox for the new series of Stargazing LIVE
S
Stargazing LIVE will be broadcast on BBC Two on 18, 19 and 20 March 2015. For updates and
show times follow @BBCStargazing.

ECLIPSE: AGE OF TOTALITY
OF THE PLANETS
ECLIPSE
With three total solar eclipses in the next three years, Elizabeth Pearson investigates how the movements of the Earth, Sun and Moon affect what we see from our planet
DANCE

skyatnightmagazine.com 2015
T
his March, a creeping darkness will
sweep across part of the northern
hemisphere. But there’s no need to worry.
As the sky falls dark you can rest assured
that it had been predicted decades ago, as has every
other passing of our planet into the shadow of our
Moon for the next millennium.
In March this year the path of a total solar eclipse
will pass well north of the UK. The shadow of the
Moon will eventually fall on the Faroe Islands,
before its path continues north. Finally, it will fall
on frozen Svalbard, only recently emerged from
the unending night of Arctic winter.
“A total solar eclipse of the Sun is just the most
spectacular astronomical phenomenon that you
can see with your naked eye,” says Fred Espenak,
scientist emeritus at NASA’s Goddard Space Flight
Center. “The experience of having that shadow go
over me – of witnessing the environment go into
this eerie twilight and the stark beauty of the
corona – was just overwhelming.”
For some of those heading to the Faroes, it will be
a chance to experience totality for the first time. But
for dedicated eclipse chasers, this will be the start of
a rare run of the solar phenomenon. The next three
years we will be an age of totality, with every year
seeing a total eclipse somewhere on the Earth.
A tale of two seasons
With so many people from all over the globe racing
to catch the phenomena, you would be forgiven for
thinking that an eclipse is a rare sight. In a way, it is,
but that’s not the whole story. While a total eclipse
being visible from a particular place on the Earth
is rare, there are actually two ‘eclipse seasons’ each
year, consisting of at least one solar and one lunar
eclipse. However, this doesn’t mean that there are
only two total solar eclipses every year. There can THIN
KSTO
CK,
© C
ULT
URA
RM
/ALA
MY
ABOUT THE WRITERElizabeth Pearson is BBC Sky at Night Magazine’s staff writer, specialising in space science. She gained her PhD in extragalactic astronomy at Cardiff University.
ECLIPSE SPECIAL JANUARY 41
The beautiful Faroe Islands will see a total solar eclipse in March
>

skyatnightmagazine.com 2015
be as many as seven eclipses, and due to the orbital fine-tuning of the Solar System, they may not all be ‘total’.
When most people think of an eclipse, they think of totality, the apex of a total solar eclipse, where the Sun, Moon and Earth are in perfect alignment and the Moon completely covers the Sun. Even here, the Sun’s light doesn’t completely disappear. With the central brightness gone, it’s possible to see the beautiful arcing curves of the Sun’s corona.
A second kind of eclipse can happen when the Sun, Moon and Earth are in perfect alignment: an annular eclipse. Normally the Moon and Sun appear to be the same size on the sky, which is why the shadow of one can completely cover the other. However the Moon’s orbit around the Earth is not a perfect circle, which causes the Moon’s apparent size to change over the course of each month by 14 per cent. When the Moon appears smallest it no longer fills the Sun’s disc. When eclipses happen during this time, they are annular instead of total. A thin ring of fire remains visible around the edge of the Moon’s shadow, and this can be just as beautiful as totality.
Away from totality
Both annular and total eclipses are classed as ‘central eclipses’. But there is also a blend of the two, called a hybrid. These are the rarest of all eclipses, making up only a five per cent of these events. They only occur when the movement of the three bodies in their orbits causes the Moon to transition from covering the Sun entirely to being too small just as the lunar shadow crosses Earth. Watching this eclipse, you would see it change from a total to an annular, or vice versa.
Even if there is a central eclipse, totality can only be seen along a narrow corridor known as the path of totality. As you travel farther from this central path a smaller proportion of the Sun is covered by
the Moon, gifting viewers in these areas a partial eclipse.
During the Faroe Island’s total eclipse the Sun won’t be totally obscured for those of us in the UK, but there will be at least an 80 per cent partial
eclipse everywhere in the British Isles.In every solar eclipse some
swathe of Earth’s surface will see the Sun partially blocked,
however there some eclipses during which the darker umbral shadow
misses the Earth completely, meaning there is no totality anywhere on the planet. On 23 October 2014 there was a partial eclipse that could be seen from North America, but in order to see totality you would have had to have been several hundred kilometres above the North Pole.
While partial and annular eclipses may lack the mysterious allure of totality, they are still beautiful to behold, though a bit more caution is needed to view them safely. If only one per cent of the light from the Sun reached your eyes your vision would be damaged, so these events need to be viewed either indirectly (eg, projected onto cardboard) or through
Eclipses appear in
various guises: top left,
annular; top right, total;
and above, partial
THIN
KSTO
CK
X 3
, A
LAM
Y, ILL
USTR
ATI
ON
S B
Y S
TEV
E M
ARSH
>
ECLIPSE: AGE OF TOTALITY

5° tilt
P
l
a
n
e
o
f
M
o
o
n
’
s
o
r
b
i
t
E
c
l
i
p
t
i
c
(
p
l
a
n
e
o
f
E
a
r
t
h
’
s
o
r
b
i
t
)
Node
Node
Eclipse limits
Earth
Moon
Sun
skyatnightmagazine.com 2015
special filters. What you don’t get with these eclipses
is the dramatic dimming of the sky to a false
twilight. This occurs only when a large portion of
the Sun is covered and the event is viewed from, or
very close to, the path of totality.
Crossing points
But why do eclipses only happen twice a year during
the 34-day window of an eclipse season? The
Moon’s orbit around the Earth is inclined at 5.3
º
to
the ecliptic, the plane in which the Earth orbits the
Sun. That means that even if the Earth, Moon and
Sun are aligned in a straight line as seen from above
(known as a ‘syzygy’, shown on the right), the Moon
may be too high above or too low below the orbital
plane to block out the Sun’s light. If this wasn’t the
case then there would be a total solar eclipse visible
23.5
º
either side of the equator every new Moon. As
it is, for an eclipse to occur the Moon has to be at
the point in its orbit called a lunar node – where it
cuts across the ecliptic – at the time of the new Moon.
This happens at intervals of slightly less than six
months. At this time the lunar nodes line up with
the Sun, and this lasts for 34 days before slipping
out of alignment again. During this window
there will always be two eclipses – a solar eclipse
at new Moon, then a lunar eclipse at full Moon.
Sometimes, if the timings are right, a third eclipse
can sneak in as well. This means that there will
always be four eclipses a year, but there can be as
many as seven – though the last time this happened
was in 1982, and it won’t happen again until 2038.
As the motions of the planets are so reliable,
scientists and astronomers have been predicting the
dates of eclipses for centuries, or at least attempting
to. The Antikythera mechanism, a 2,100-year-old
ancient Greek ‘computer’ recovered from a wreck in
1900, is believed to be an early device for predicting
the motions of the planets and, it appears, eclipses.
“They couldn’t calculate which city would see an
eclipse, but they could certainly predict when an eclipse
might be likely to happen on a given day,” says Espenak.
A veteran of over 25 eclipses himself, Espenak has
been key in testing the Antikythera mechanism’s
THE SAROS CYCLEIt takes 27.2 days for the Moon to complete one orbit around Earth, a period known as the draconic month. In this time it crosses the plane of the ecliptic twice due to its inclined path. However, as Earth is also moving around the Sun, it takes a little bit longer for the Moon to reach the same phase. This is why there are 29.5 days between full Moons, a period known as a synodic month. This means that for the Sun, Moon and Earth to return to a similar geometry it takes 18 years, 10 days and about eight hours. This period is known as a saros cycle, or saros, and is useful for predicting when eclipses will
happen. Solar eclipses recur one saros apart, but at different places on the Earth.
“The cycles can mismatch by a handful of hours,” says Espenak. “If you go over hundreds of years the alignment slowly drifts away.”
As the alignment drifts, it causes the position of the eclipse to move across the globe until the shadow no longer falls on Earth’s surface, signifying the end of that particular saros. However another cycle will start up to take its place, leading to dozens of them overlapping.
“A saros only goes on for around 12-13 centuries,” says Espenak. “They start out
as partial eclipses at one of the poles, and then you get a series of total eclipses before eventually you find the eclipses drift to the opposite pole and become partial again. Then the magnitude of the eclipse becomes progressively smaller until no eclipse takes place at that node.”
There are currently 41 active cycles. The last new saros began in May 2013, but the ‘eclipse’ that heralded it wasn’t even viewable to the naked eye, covering only two per cent of the lunar disc. It can take the cycles a long time to mature, and the new saros won’t provide a total eclipse for over 500 years.
ECLIPSE SPECIAL JANUARY 43
< Even if the Sun, Moon and Earth appear in line
from above (a syzygy), they may not line up in the
orbital plane – so the Moon’s shadow will miss the
Earth and there is no eclipse
The Moon’s orbit is slightly tilted
with respect to Earth’s, which
means eclipses occur in seasons
>

ECLIPSE: AGE OF TOTALITY
skyatnightmagazine.com 2015
precision, as well as creating a modern catalogue using a battery of computer programs that not only predicts future eclipses, but also backtracks them to over 2,000 BC. “I wanted to look to the past because it is of interest to historians and archaeologists,” he says. “Over the years I’ve written many eclipse prediction programs, each one does a different aspect of eclipse predicting.”
The programs have created 11,898 eclipse predictions spanning a period from 2,000 BC to 3,000 AD. However, the further predictions get from the
current day, the less accurate they become. “Going back it gets tricky because Earth’s rotational period slows down,” says Espenak. “This is due to the exchange of momentum between Earth and Moon through frictional drag. It happens at an unpredictable rate so it’s difficult to predict the exact rotation of the Earth as you go into the past or into the future.”
With at least two eclipses each year, why do people travel thousands of kilometres across the globe, chartering boats and private planes, to catch these fleeting phenomena?
Though the path of an eclipse can be thousands of kilometres long, they are also very narrow. While a partial eclipse might be seen in a corridor spanning several countries, the path of totality is often less than 100km wide. Most places on the Earth will be able to see a partial eclipse every decade or so, but the time between central eclipses can be much longer, potentially centuries.
The last total solar eclipse that was visible from the mainland UK happened in 1999. Sixteen years ago the path of totality was limited to Devon and Cornwall, and cloud meant that many missed this once in a lifetime show. Those waiting for another chance to see a total eclipse from the UK won’t have to travel far, as the next path of totality to cross over Great Britain will once again cross Devon and Cornwall. We have a bit of a wait on our hands though, as it won’t happen until 2090.
There’s a better chance of seeing totality by travelling overseas, and 20 March 2015 is just the first opportunity to come over the next few years in the age of totality. On 9 March 2016 Indonesia will be plunged into darkness by the Moon, while on 21 August 2017 a shadowy path 2,500km long will cut across mainland US.
THREE TIMES TOTALITY: 2015-2017
20 March 2015 max duration 2m 46.9s
This year’s eclipse will only be visible on land from the Faroe Islands and Svalbard. However, at this time of year the chance of cloud covering the view of totality is fairly high, though cloud will darken false twilight.
9 March 2016 max duration 4m 09.4s
Most of this eclipse passes across the Pacific Ocean, though a portion of the path travels over Indonesia giving eclipse chasers an exotic destination to catch the sight from. Again, there is a risk of clouds at this time of year.
21 August 2017 max duration 2m 40.2s
The North American eclipse in 2017 may be the best opportunity to see a total solar eclipse in the next few years. It passes across the whole of continental US from South Carolina to Oregon.
� The 2,100-year-old
Antikythera mechanism
may have been used to
calculate eclipse dates
THIN
KST
OC
K,
© Z
UM
A P
RESS
, IN
C./
ALA
MY
ILLU
STR
ATI
ON
S BY
PA
UL
WO
OTT
ON
S
>

skyatnightmagazine.com 2015
ECLIPSE SPECIAL JANUARY 45
There is an ancient Chinese myth that a solar eclipse was a dragon trying to eat the Sun, so the people fired arrows at it to
drive it away. And they had a 100 per cent success rate, as each time the cowardly dragon retreated and the warriors patted each other on the back for a job well done.
Thirty-year-old maths teacher Daniel Lynch almost has a perfect score with eclipses too. He’s part of the small but enthusiastic group of people who call themselves eclipse chasers; people who, year after year, take planes, freight tankers or anything else which will get them on the right spot of land, sea or air to view these fleeting phenomena.
His most recent viewing was on 3 November 2013 off the coast of Bermuda. The path of the eclipse wasn’t going to be making landfall on the island, so he and 11 other eclipse chasers chartered a plane to fly them out into the Atlantic where it could be seen.
Lynch sits in his classroom in Gonzaga College in Dublin, explaining why this eclipse was such a unique experience. “Normally the path of totality is maybe 200km across: you just stick
yourself anywhere in the 200km and you get to see it. But in this case it was about 1km across.
“This particular eclipse was difficult and unique. There was only a very small shadow and there was no way to fly along the eclipse path and be able to see it outside the window.” Faced with this
problem Lynch and his fellow eclipse chasers came up with another way to see it.
“The only way was to fly at right angles, trying to hit it perpendicularly. This was a huge task on this particular eclipse. The shadow normally moves at around 2,000km/h, but this time around it was going to be moving at 8,000km/h. It is as if you were trying to shoot a bullet against another bullet, side on.”
A faltering startLynch’s interest in eclipses was piqued when he saw a lunar eclipse as a young child. Over the years his interest would grow and when, as a 15-year-old, the 1999 total solar eclipse was going to cross Europe, he was determined to see it. Deciding against Ireland because the eclipse wasn’t going to be total, and England because of the chance of clouds, he went to Germany. Where it lashed rain.
“I was not as disappointed as I thought I would be. It was still impressive in that it went dark and the temperature dropped, but I couldn’t help thinking that the same effect could be had by stepping into my wardrobe.”
Seeing pictures of the event on television made him even more determined to see
ON THE TRAILECLIPSEWhat is it that drives people to travel the world to catch three minutes of darkness? Colm
Quinn talks with eclipse chaser Daniel Lynch to find out
� Schoolteacher Daniel Lynch has not
missed a total solar eclipse since 1999
DA
NIE
L LY
NC
H X
2
The 2008 total
eclipse as seen
from Yiwu in China
>

skyatnightmagazine.com 2015
one in the flesh. So Lynch researched when the next one was happening and two years later, in Zimbabwe, he finally got to see his first total solar eclipse.
“It was just an incredible view. It’s so difficult to explain to someone what it’s like seeing a total solar eclipse. Words don’t do it justice. It looked like there was an incredible vortex up in the sky. There was this black hole where the Sun should have been.”
After that he was hooked and has scrimped and saved his money to be able to see as many as possible. He’s not the only one with this particular hobby, however. Eclipse chasers are spread out all over the world, but when an eclipse comes around most can be found along that narrow path wherever the shadow slices through.
Lynch has a good record with eclipse viewing – the only one he has missed in the past 15 years was his first one back
in 1999. But he has come close to missing a couple because of cloud. One in the Gobi Desert in China in 2008 sticks out in his mind: “The government set up a viewing position and you weren’t allowed move from it. Ten minutes before the eclipse, this one big horrible cloud just moved in.” Then he saw something remarkable. “With 60 seconds to go we got what looked like a pretty miraculous dissipation of the cloud.”
The past lives on
He only found out in Bermuda what really happened in China. In a modern-day scientific interpretation of the ancient practice of firing arrows into the sky during eclipses, the authorities shot two chemical rockets into the cloud, dissipating it allowing the eclipse chasers a clear view.
If you’re inspired to view
a total eclipse, the path of the
next relatively close one passes off the coast
between Britain and Iceland in March 2015. It can be seen from
land in the Faroe Islands or Svalbard, or from a cruise ship or plane.
Lynch believes that the August 2017 eclipse in the US might be easier to see. It passes across the entire country and takes place during the summer. He will be there of course – Lynch is adamant that each eclipse is different. Saving for years to see something that lasts only a few seconds is, in his view, definitely worth it.
ABOUT THE WRITERColm Quinn is a feature writer from the Republic of Ireland covering science, music, culture and arts. He tweets from @cqbkcp.
� Lynch (second from left) and the group from Gonzaga College who travelled to Australia for the 13 November 2012 total eclipse
� A composite sequence showing the Moon gradually masking the Sun during the total eclipse seen in Libya on 29 March 2006
< A beautiful diamond ring seen from the ship Costa Classica,
sailing close to Iwo Jima on 22 July 2009
Totality approaches at the solar eclipse in Australia on 13 November 2012
DA
NIE
L LY
NC
H X
4
S
>
ECLIPSE: AGE OF TOTALITY

PETE LA
WREN
CE
THE SKY GUIDE JANUARY 47
skyatnightmagazine.com 2015
Written by
Pete Lawrence
Pete Lawrence is an
expert astronomer
and astrophotographer
with a particular
interest in digital
imaging. As well as
writing The Sky Guide, he appears on
The Sky at Night each
month on BBC Four.
PLUSS
t
e
p
h
e
n
T
o
n
k
i
n
’
s
BINOCULAR TOURT
u
r
n
t
o
p
a
g
e
5
8
f
o
r
s
i
x
o
f
t
h
i
s
m
o
n
t
h
’
s
b
e
s
t
b
i
n
o
c
u
l
a
r
s
i
g
h
t
s
The orbits of Jupiter’s four Galilean satellites are tilted in a way that allows us to see them interact with one another. On the morning of the 24th there’s a particularly rare sight: three moon shadows and two moons can be seen crossing the planet’s disc at the same time.
JanuaryThe Sky
Guide

48
Highlights
skyatnightmagazine.com 2015
PETE
LA
WRE
NC
E X
7
This icon indicates a good photo opportunity
Your guide to the night sky this month
WEDNESDAY X
Look to the southwest
just after sunset: mag. –3.8 Venus shines away in the evening twilight. A slim, 1%-lit waxing crescent Moon lies 7.75º to the right of Venus, while mag. +0.6 Mercury is just 2º below and left of the Moon’s centre. See page 51.
21
SATURDAY�
The annual Quadrantids meteor shower peaks around 18:00 UT.
Unfortunately, the Moon is near full and will rather spoil the show.
3
SATURDAY
Definitely one not
to miss, the shadows of three Galilean moons can be seen crossing Jupiter’s disc between 06:28 UT and 06:53 UT. See page 50.
24
SUNDAY X�
It might not feel much like it, but today the Earth is at its closest to
the Sun for the year. This point in its orbit, known as perihelion, occurs at 06:36 UT; at this time our separation from the Sun will be 147,096,204km. The Sun’s apparent diameter is at its largest for the year at this time.
4
TUESDAY X
Look for the last quarter Moon just before
dawn; the bright star 3.5º to the southeast is mag. +1.0 Spica (Alpha (_) Virginis).
Variable star Algol (Beta (`) Persei) reaches minimum brightness at 19:36 UT.
13FRIDAY
The 22%-lit waning
crescent Moon lies 3º west of mag. +0.9 Saturn this morning. Catch the pair at 05:00 UT, low in the southeast.
16SATURDAY
Lunar libration is favourable
for a view of Mare Orientale. The Moon is low in the southeast before dawn.
17
WEDNESDAY
Saturn is 58-arcminutes north of mag.
+2.6 Acrab (Beta (`) Scorpii).
Variable star Algol (Beta (`) Persei) reaches minimum brightness at 03:36 UT
28
THURSDAY�
The 91%-lit waning gibbous Moon lies 5.5º south of mag.
–2.3 Jupiter in the early hours.
Variable star Algol (Beta ( )̀ Persei) reaches minimum brightness at 01:54 UT.
8
TUESDAY Orion is well placed around 21:30 UT. With the Moon out of the way, this is a great time
to investigate this beautiful constellation. The Orion Nebula, M42, is an obvious target, but M43, M78 and NGC 1977 are well worth hunting down too.
20
January July

THE SKY GUIDE JANUARY 49
skyatnightmagazine.com 2015
HOW TO TELL WHAT EQUIPMENT YOU’LL NEED
Getting started in astronomyIf you’re new to astronomy, you’ll find two
essential reads on our website. Visit http://
bit.ly/10_Lessons for our 10-step guide to
getting started and http://bit.ly/First_Tel
for advice on choosing your first scope.
NAKED EYEAllow 20 minutes for your eyes to become dark-adapted
BINOCULARS10x50 recommended
SMALL/MEDIUM SCOPEReflector/SCT under 6 inches, refractor under 4 inches
LARGE SCOPEReflector/SCT over 6 inches, refractor over 4 inches
PHOTO OPPORTUNITYUse a CCD, planetary camera or standard DSLR
Need to know
The terms and symbols used in The Sky Guide
UNIVERSAL TIME (UT) AND BRITISH SUMMER TIME (BST)Universal Time (UT) is the standard time used by astronomers around
the world. British Summer Time (BST) is one hour ahead of UT.
RA (RIGHT ASCENSION) AND DEC. (DECLINATION) These coordinates are the night sky’s equivalent of longitude and
latitude, describing where an object lies on the celestial ‘globe’.
Pete Lawrence “Jupiter’s triple shadow
transit on the 24th is something rather
special. I tried in vain to catch the last one
in daylight under cloudy skies; this one
occurs in darkness so fingers crossed it stays clear!”
Chris Bramley “I got a new mount last
month and I’m keen to test it out with my
setup on the Mare Crisium region of the
Moon – particularly that sea’s western
shore, with its fascinating capes and ridges.”
Paul Money “I’ll be looking out for Venus
and Mercury in the evening twilight for the
first few weeks of January. I especially want
to catch them at their closest on the 10th.”
What the team will be
observing in January
SUNDAY
Eighth-
magnitude
comet C/2014 Q2
Lovejoy lies approximately 2.5º
southwest of mag. +3.9 Nu (i)
Tauri at 00:00 UT. See page 51.
11
SATURDAY
Fading
comet
C/2014 Q2
Lovejoy will be approximately 5º to
the east of the Triangulum Galaxy,
M33, at 00:00 UT. The comet is
expected to be around mag. +9.0
at this time. See page 51.
31
SATURDAY
Mercury is
0.6º west of
Venus at 17:00
UT. Both planets (mag. –0.7 and
–3.8 respectively) are visible low
in the southwest at this time.
Variable star Algol (Beta (`)
Persei) reaches minimum
brightness at 22:42 UT.
10
THURSDAY
The
Moon,
now 6%-lit, sits
9º above mag. –3.8 Venus and
6.5º below and right of mag. +1.2
Mars this evening. See page 51.
22
THURSDAY
Locate
the
75%-lit waxing
gibbous Moon as darkness falls
and see if you can spot the
mag. +0.8 orange supergiant
star just below and left of it.
This is Aldebaran, the alpha
star of Taurus.
29
MONDAY X�
Eclipsing binary star
Algol (Beta ( )̀ Persei)
is well placed and
drops to its minimum brightness
at 05:06 UT. Algol has a precise
cycle of variability lasting two
days 20 hours and 49 minutes.
During this time the star dips from
mag. +2.1 to. +3.4, with minimum
brightness lasting for 9.6 hours.
5
SUNDAY
Eighth-
magnitude
comet C/2014
Q2 Lovejoy lies just over 1º
northeast of the mag. +4.3
Delta (b) Arietis at 00:00 UT.
See page 51.
18MONDAY
Neptune,
Mars and
mag. +4.8 star
Sigma (m) Aquarii form a line in
the evening sky; mag. +8.0
Neptune is to the north and mag.
+1.2 Mars is in the centre. The trio
are an easy target for a small scope.
19
`
PERSEUS
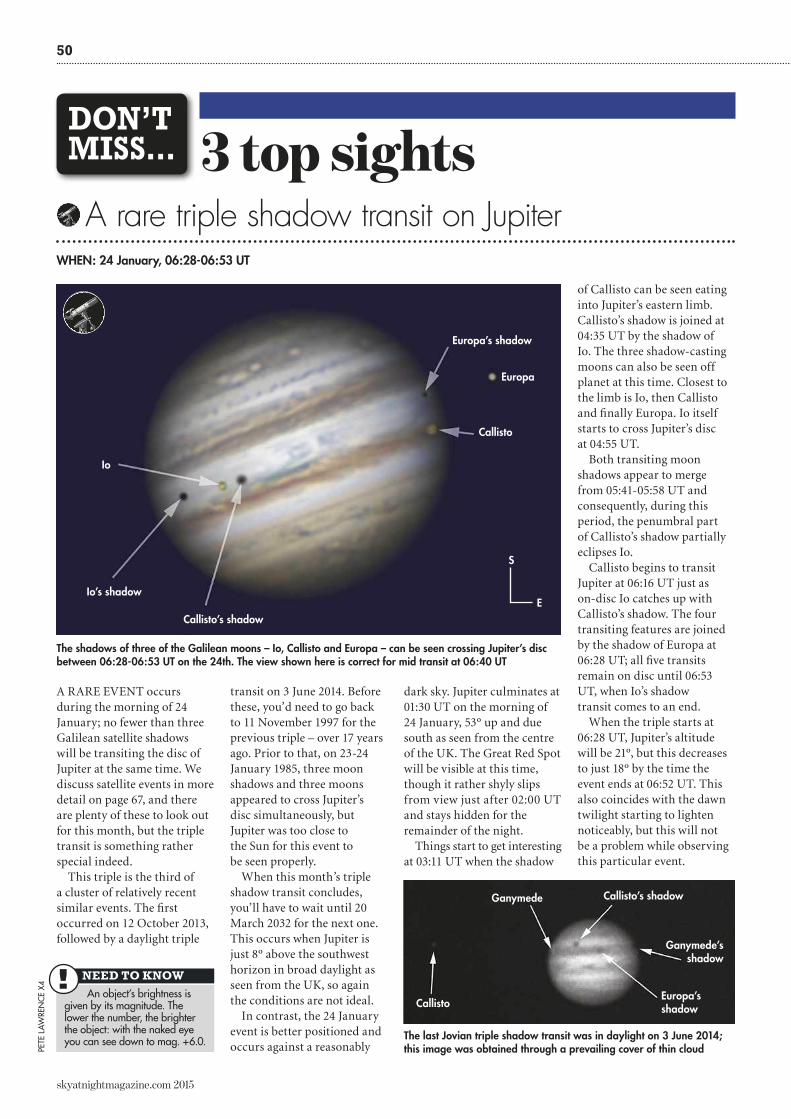
50
skyatnightmagazine.com 2015
3 top sights
A rare triple shadow transit on Jupiter
A RARE EVENT occurs
during the morning of 24
January; no fewer than three
Galilean satellite shadows
will be transiting the disc of
Jupiter at the same time. We
discuss satellite events in more
detail on page 67, and there
are plenty of these to look out
for this month, but the triple
transit is something rather
special indeed.
This triple is the third of
a cluster of relatively recent
similar events. The first
occurred on 12 October 2013,
followed by a daylight triple
transit on 3 June 2014. Before
these, you’d need to go back
to 11 November 1997 for the
previous triple – over 17 years
ago. Prior to that, on 23-24
January 1985, three moon
shadows and three moons
appeared to cross Jupiter’s
disc simultaneously, but
Jupiter was too close to
the Sun for this event to
be seen properly.
When this month’s triple
shadow transit concludes,
you’ll have to wait until 20
March 2032 for the next one.
This occurs when Jupiter is
just 8º above the southwest
horizon in broad daylight as
seen from the UK, so again
the conditions are not ideal.
In contrast, the 24 January
event is better positioned and
occurs against a reasonably
of Callisto can be seen eating
into Jupiter’s eastern limb.
Callisto’s shadow is joined at
04:35 UT by the shadow of
Io. The three shadow-casting
moons can also be seen off
planet at this time. Closest to
the limb is Io, then Callisto
and finally Europa. Io itself
starts to cross Jupiter’s disc
at 04:55 UT.
Both transiting moon
shadows appear to merge
from 05:41-05:58 UT and
consequently, during this
period, the penumbral part
of Callisto’s shadow partially
eclipses Io.
Callisto begins to transit
Jupiter at 06:16 UT just as
on-disc Io catches up with
Callisto’s shadow. The four
transiting features are joined
by the shadow of Europa at
06:28 UT; all five transits
remain on disc until 06:53
UT, when Io’s shadow
transit comes to an end.
When the triple starts at
06:28 UT, Jupiter’s altitude
will be 21º, but this decreases
to just 18º by the time the
event ends at 06:52 UT. This
also coincides with the dawn
twilight starting to lighten
noticeably, but this will not
be a problem while observing
this particular event.
PETE LA
WREN
CE X
4
WHEN: 24 January, 06:28-06:53 UT
NEED TO KNOW!An object’s brightness is
given by its magnitude. The
lower the number, the brighter
the object: with the naked eye
you can see down to mag. +6.0.
DON’T
MISS…
dark sky. Jupiter culminates at
01:30 UT on the morning of
24 January, 53º up and due
south as seen from the centre
of the UK. The Great Red Spot
will be visible at this time,
though it rather shyly slips
from view just after 02:00 UT
and stays hidden for the
remainder of the night.
Things start to get interesting
at 03:11 UT when the shadow
The shadows of three of the Galilean moons – Io, Callisto and Europa – can be seen crossing Jupiter’s disc between 06:28-06:53 UT on the 24th. The view shown here is correct for mid transit at 06:40 UT
The last Jovian triple shadow transit was in daylight on 3 June 2014; this image was obtained through a prevailing cover of thin cloud
Europa’s shadow
Europa
Callisto
Callisto’s shadow
Io’s shadow
Io
S
E
Callisto’s shadow
Ganymede’s shadow
Europa’s shadow
Ganymede
Callisto

skyatnightmagazine.com 2015
THE SKY GUIDE JANUARY 51
THERE’S A DECENT chance of spotting binocular comet C/2014 Q2 Lovejoy this month as it passes up from below Orion, through Taurus and into Andromeda. On the 1st the comet is expected to shine at mag. +8.3, but its low altitude will make it harder to spot than this brightness may suggest.
The comet increases in brightness to mag. +8.1 around the first week of January, then gradually dims to mag. +9.0 at the end of the month. Despite dimming, its increasing altitude will help its visibility.
On 1 January, as Big Ben chimes in the New Year, the comet is in Lepus, the Hare, close to the mid-point between mag. +3.6 Mu (+) and mag. +3.2 Epsilon (¡) Leporis.
THERE’S A LOT going on low in the southwest just after sunset. Brilliant Venus, shining at mag. –3.8, is joined by Mercury for most of January, the pair having a very close encounter on the 10th. Mag. +1.1 Mars is there too, to the east of Venus. Despite being dimmer, Mars sits against a darker sky background and so should still be easy to spot.
Venus appears close to the Sun at the start of the month, but its intense brilliance will keep it visible. Mag. –0.7 Mercury heads up from below Venus for the first half of January. Both planets are less than 1º apart between 7 and 13 January, and just 39 arcminutes apart on the 10th.
By the 21st, Mercury will be separated from Venus by just over 6º and will have dimmed to mag. +0.6. A beautiful 1%-lit waxing crescent Moon lies just to the right of it on this date. The following evening, the Moon, now 6% lit, can be seen a little above the midway point between Mars and Venus. As Venus moves eastward against the stars, Mars appears to keep pace with it. However, Venus is gaining ground; the pair will be very close at the end of February.
On the morning of 2 January, it passes approximately 2º south of the red variable star R Leporis, also known as Hind’s Crimson Star.
The comet moves from Lepus into Eridanus, and is located roughly midway between mag. +4.0 Omicron (k) and mag. +2.1 Nu (i) Eridani at 21:00 UT on the 6th. It enters Taurus on 9 January, after which the bright Moon – which will have been hampering views at the start of the month – will move out of the way, leaving the sky nice and dark for comet hunting.
Lovejoy passes a couple of degrees southwest of mag. +3.9 Nu (i) Tauri on the evening of 10 January and less than 1º northeast of mag. +4.1 star 5 Tauri on the evening of the 14th.
On 17 January, it will be approximately 9º southwest of the Pleiades open cluster, and close to mag. +4.3 Delta (b) Arietis. It briefly passes through eastern Triangulum towards the end of the month. By the 31st, it just manages to
ORION
GEMINI
AURIGA
TAURUS
ERIDANUSLEPUS
ARIES
PERSEUS
TRIANGULUM
ANDROMEDA
CETUS
PISCES
MONOCEROS
BetelgeuseAldebaran
Rigel
Capella
CastorPollux
Pleiades
Hyades
C/20 14 Q2 Lovejoy
1 Jan
6 Jan
11 Jan
16 Jan
21 Jan
26 Jan
31 Jan
M33
M42
+
¡
R
i
k1
k2
i
5
b
Evening conjunctions
NEED TO KNOW!The size of objects in the
sky and the distances between
them are measured in degrees.
The width of your little finger at
arm’s length spans about 1º.
WHEN: Throughout the month as specified
Comet C/2014
Q2 Lovejoy
WHEN: All month, best seen between 9-23 January
Venus, Mars and Mercury converge on the Moon on the 21st and 22nd
Mars
Moon
22 Jan
Moon
21 Jan
Venus
Mercury
17:00 UT
SW
creep into the constellation of Andromeda.
The best time to look for comet C/2014 Q2 Lovejoy will be in the earlier part of the evening, when the Moon’s out of the way between 9 and 23 January.
Þ C/2014 Q2 Lovejoy travels from Lepus through to Andromeda this month

SW
Venus
1 Jan
3 Jan
5 Jan
7 Jan
9 Jan
11 Jan
13 Jan
15 Jan
17 Jan
19 Jan
21 Jan
23 Jan
21 Jan
3 Jan
5 Jan
7 Jan
9 Jan
11 Jan
13 Jan
15 Jan
17 Jan
19 Jan
21 Jan
23 Jan
10 Jan (Smallest separation of 39 arcminutes)
Mercury
Moon
1 Jan
52
skyatnightmagazine.com 2015
THE NEW YEAR brings with it a good view of planet Mercury. At the start of the month this tiny world sets about an hour after the Sun and is visible in the southwest, not too far from brilliant Venus. In fact it’ll remain close to its dazzling Solar System neighbour for the first half of January, making Venus a useful pointer when trying to locate Mercury.
Mercury remains at around mag. –0.7 up until it has a close encounter with Venus on the 10th. On this evening, Mercury and Venus will be
The phase and relative sizes of the planets this month. Each planet is shown with south at the top, to show its orientation through a telescope
THE PLANETS IN JANUARY
MARS 15 January
JUPITER 15 January
SATURN 15 January
URANUS 15 January
ARCSECONDS0” 10” 20” 30” 40” 50” 60”
PETE L
AW
REN
CE X
3
The planets
separated by just 39 arcminutes, or about 1.3 times the apparent size of the full Moon. Both planets are less than 1º apart from 7-13 January.
For the first half of the month, Mercury looks small through a telescope – it is less than 7 arcseconds across – and shows a phase greater than 50% lit. Greatest eastern (evening) elongation occurs on 14 January, when Mercury will be 18.9º from the Sun, setting one hour and 45 minutes after sunset.
After greatest elongation the planet starts to fade, becoming harder to spot in the evening twilight. On 20 January,
Mercury will shine at mag. +0.4 but if you can get a telescope on it, will be showing an 8-arcsecond disc with a 30%-lit crescent.
A delicate, 1%-lit waxing crescent Moon lies a little over 2º to the north of the planet on 21 January. As it continues to fade the evening twilight will eventually engulf it. The last view of Mercury is likely to be had around 26 January when the planet will be at mag. +2.8, presenting a 9-arcsecond, 5%-lit crescent when viewed through a telescope. Inferior conjunction then occurs a few days later on 30 January.
MERCURY
BEST TIME IN JANUARY: 10 January, 17:00 UT
ALTITUDE: 5º (low)
LOCATION: Capricornus
DIRECTION: Southwest
RECOMMENDED EQUIPMENT: 3-inch telescope
FEATURES OF INTEREST: Phase, subtle markings
VENUS 15 January
MERCURY 15 January
MERCURY 1 January
NEPTUNE 15 January
PICK OF THE MONTH
MERCURY 31 January
A thin crescent Moon will sit north of Mercury on the 21st
Venus is close to Mercury for much of January; the pair
are closest on the 10th

JUPITER
BEST TIME IN JANUARY: 31 January, 01:00 UT
ALTITUDE: 53º
LOCATION: Leo
DIRECTION: South
Jupiter is the best planet on
view at present and doesn’t
disappoint even through a
small telescope. At the start
of January it appears at mag.
–2.4, rising in the east-northeast
around 19:30 UT. It remains
favourably placed all month.
Use a high magnification to
view its atmospheric features.
Its belts and zones typically
contain lots of subtle detail,
and these move fairly quickly
from east to west due to the
planet’s less than 10-hour
rotation. A 92%-lit waning
gibbous Moon sits 6.3º southwest
of Jupiter on the 7th, the
bright planet easily standing
out even in the Moon’s bright
glare. The highlight Jovian
event will be the triple moon
shadow transit on the 24th.
VENUS
BEST TIME IN JANUARY: 31 January, 17:15 UT
ALTITUDE: 13º
LOCATION: Aquarius
DIRECTION: Southwest
Venus is a magnificent evening
object and can be seen low in
the southwest as the sky is
darkening just after sunset.
At mag. –3.8, the planet is
something of a beacon and
will be joined by Mercury for
much of the month. Closest
apparent approach of both
planets occurs on the 10th,
when they’ll be separated by
just 39 arcminutes. A thin
waxing crescent Moon joins
the scene on the evenings of
the 21st and 22nd. Through a
scope the planet’s disc is a
quite small 10 arcseconds
across. Its phase is nearly full,
because it’s on the far side of
its orbit relative to Earth. As
the month progresses, Venus
slowly becomes better placed.
MARS
BEST TIME IN JANUARY: 1 January, 17:30 UT
ALTITUDE: 14º
LOCATION: Capricornus
DIRECTION: Southwest
Mars is an evening object low
in the west-southwest after
sunset. This mag. +1.1 orange
dot isn’t well placed at present,
but on the 19th it will be 16
arcminutes from mag. +8.0
Neptune. The two planets form
a line with mag. +4.6 Sigma
(m) Aquarii on this date.
SATURN
BEST TIME IN JANUARY: 31 January, 06:00 UT
ALTITUDE: 15º
LOCATION: Scorpius
DIRECTION: South-southeast
Mag. +0.6 Saturn is a morning
object, but fails to culminate
as dawn breaks by month end.
On the 16th, a waning crescent
Moon sits 2.6º northwest of the
planet. The rings are now nicely
tilted as seen from Earth, the
angle reaching 24.9º by the
close of January.
URANUS
BEST TIME IN JANUARY: 1 January, 18:15 UT
ALTITUDE: 41º
LOCATION: Pisces
DIRECTION: South
Uranus culminates as darkness
falls at the start of the month,
but its position worsens through
January. The mag. +5.9 planet
is 3º south of mag. +4.4
Delta (b) Piscium.
NEPTUNE
BEST TIME IN JANUARY: 1 January, 18:00 UT
ALTITUDE: 21º
LOCATION: Aquarius
DIRECTION: Southwest
Mag. +8.0 Neptune is past its
best for the current viewing
period and losing altitude as
the sky darkens by the end
of the month. Mars lies
17 arcminutes south of the
planet on the 19th.
JanuaryUsing a small scope you’ll be able to spot Jupiter’s biggest moons.
Their positions change dramatically during the month, as shown on
the diagram. The line by each date on the left represents midnight.
DATE
WEST EAST
2
1 3 5
4 6 8
7 9
11
10 12 14
13 15 17
16 18 20
19 21 23
22 24 25
26 28
27 29 30 31
arcminutes
0
1 2 3
4
5
6 7 81234
5
678
Io Europa Ganymede CallistoJupiter
J U P I T E R ’S M O O NS
1
See what the planets look like through your telescope with the
field of view calculator on our website at:
http://www.skyatnightmagazine.com/astronomy-tools

skyatnightmagazine.com 2015
The Northern Hemisphere
MONDAY TUESDAY WEDNESDAY THURSDAY FRIDAY SATURDAY SUNDAY
Sickle
BOÖTES
M51
M101
M63
M65
M66
URSA
MA
JOR
LEO
LEO MINOR
HYDRA
SEXTANS
CA
NES
VENATIC
I
CO
MA
BERENIC
ES
VIRGO
cor
Cor Caroli
Regulus
Denebola
Alphard
JupiterAlpha Leonids
Peak 24-31 Jan
Delta CancPeak 17 Jan
Jan BoötidsPeak 16-18 Jan
10th
7th
_
_
_
b`
`
_
`
`a
_
a
`
a
`
a
a
NORTHEAST
EA
ST
SOUTHEAST
HOW TO USE THIS CHART1. HOLD THE CHART so the direction you’re facing
is at the bottom.2. THE LOWER HALF of the chart shows the sky
ahead of you.3. THE CENTRE OF THE CHART is the point
directly over your head.
THE SUN IN JANUARY*
*Times correct for the centre of the UK
DATE SUNRISE SUNSET
1 Jan 2015 08:26 UT 16:01 UT
11 Jan 2015 08:22 UT 16:15 UT
21 Jan 2015 08:12 UT 16:31 UT
31 Jan 2015 07:57 UT 16:50 UT
MOONRISE TIMES
1 Jan 2015, 13:40 UT 17 Jan 2015, 04:53 UT
5 Jan 2015, 17:01 UT 21 Jan 2015, 08:15 UT
9 Jan 2015, 21:13 UT 25 Jan 2015, 10:13 UT
13 Jan 2015, 00:26 UT 29 Jan 2015, 12:22 UT
THE MOON IN JANUARY*
1 JANUARY AT 00:00 UT
15 JANUARY AT 23:00 UT
31 JANUARY AT 22:00 UTOn other dates, stars will be in slightly different places due to Earth’s orbital motion. Stars that cross the sky will set in the west four minutes earlier each night.
WHEN TO USE THIS CHART
1 2 3 4
5 6 7 8 9 10 11
12 13 14 15 16 17 18
19 20 21 22 23 24 25
26 27 28 29 30 31
FULL MOON
NEW MOON
54
PERSEUS
Arcturus
Circlet
N
E
S
W
5º
STAR NAME
CONSTELLATIONNAME
GALAXY
OPEN CLUSTER
GLOBULAR CLUSTER
PLANETARY NEBULA
DIFFUSE NEBULOSITY
DOUBLE STAR
VARIABLE STAR
THE MOON, SHOWING PHASE
COMET TRACK
ASTEROID TRACK
STAR-HOPPING PATH
METEOR RADIANT
ASTERISM
PLANET
QUASAR
STAR BRIGHTNESS:
MAG. 0 & BRIGHTER
MAG. +1
MAG. +2
MAG. +3
MAG. +4 & FAINTER
MILKY WAY
COMPASS AND FIELD OF VIEW
KEY TO
STAR CHARTS

C
e
l
e
s
t
i
a
l
E
q
u
a
t
o
r
E
c
l
i
p
t
i
c
Plough
House
W
Gre
at S
quar
eof
Peg
asus
V
Mirror of Venus
Win
ter Tr
iang
le
Kids
HERCULES
U
RR
S
S
R
X
R
T
S
V
M39
M10
3
M52
M31
DoubleCluster
M34
M74
M81
M82
M101
M110
M32
Pleiad
es
M45
Hyades
M38M36M37
M35
M42
M44
M50
M79
M78
M1
M41
M47M46
M67
M40
M33
NGC 2403
RSA
DRACO
URSA
MINOR
CEP
HEU
S
LACERTA
ANDROMEDA
CASS
IOPE
IA
PERS
EUS
CAMELOPARDALIS
AURIGALYNX
PISC
ES
TRIANGULUM
ARIES
TAURUS
GEMINI
ORION
CA
NC
ER
CANIS MINOR
CANIS MAJOR
LEPUS
ERID
ANUS
R
MONOCEROS
PUPPISPYXISCYGNUS
CETUS
Deneb
Thuban
Kochab
Polaris Sche
dar
Mirphak
Algol
Capella
Dubhe
Merak
Mizar
Alcor
Sche
at
Alph
erat
z
Alderamin
Betel
geus
e
Men
kar
Ham
al
Mira
Aldebaran
Rigel
Castor
Pollux Elna
thBe
llatri
x
Procyon
Sirius
Zaur
ak
upiter
Delta Cancridseak 17 Jan
Rho
Gem
inid
s
Peak
8/9
Jan
Quadrantids
Peak 3 Jan
January Draconids
Peak 13-16 Jan
Zeta Aurigids
Peak 3
1 Dec
1
s
t
4
t
h
7
t
h
2
5
t
h
2
8
t
h
3
1
s
t
_
`
b
_
`a
b
_
a
`a
_
b
_
`b
`
_
b
a
`
b
_
a`
_
_
`
a
b
`
_
_
`
b
`
_
_
b
a
`b
_
`
a
b
`
a
_a
b
b
_
`a
_
`
a
_
_
`
a
a
`
_ab
a
`
_
b_
_
_
_
`
a
b k
D
e
e
p
-
s
k
y
t
o
u
r
,
p
5
7
NORTH
SOUTH
SOUTH
WES
T
WES
T
N
ORTHW
EST
`
PEG
ASU
S
THE SKY GUIDE JANUARY 55
skyatnightmagazine.com 2015

THE TRAPEZIUM CLUSTER The energy that creates the beauty of M42 comes from the Trapezium Cluster (designated
Theta1 (e1) Orionis) that sits at its core. So called because of the pattern made by its four brightest stars, the cluster has formed out of the nebula material itself. Two of the four stars, (A and B) are eclipsing binaries (A is mag. +6.7-7.5, period 65.43 days; B is mag. +8.0-8.5. period 6.47 days). The brightest member is mag. +5.1 C, estimated to be 40 times as massive as the Sun and 210,000 times as luminous. Other fainter cluster stars can also be seen with larger scopes and these have been marked in our inset chart. G, I, H1 and H2 are proplyds – stars surrounded by a disc of material left over after their formation. Planets may form within these discs. � SEEN IT
M43Dark material blocks M42’s light just to the east of the Trapezium Cluster, forming a shape known
as the ‘Fish’s Mouth’. To the north of this feature is variable star NU Orionis. This star sits at the centre of M43, a comma-shaped nebula separated from M42 by a dark lane of material. Also known as De Mairan’s Nebula, M43 is notably fainter than M42 and looks relatively smooth in a 8-inch or smaller instrument. Larger scopes will start to reveal an uneven texture. The tail of the comma lies north of NU Orionis and on the eastern edge it looks like a right-angled piece has been removed from the otherwise round nebula. � SEEN IT
THE RUNNING MAN NEBULAJust 0.5º north of the Trapezium Cluster is another open cluster, designated NGC 1977 and known
as the Running Man Nebula. The cluster consists of a dozen or so stars, but the nebula the name suggests isn’t immediately obvious. Three prominent cluster stars form a bent line with two brighter ones (42 & 45 Orionis) at the ends and a dim one (V359 Orionis) in the middle. The nebula is brightest in the region around these stars. A 3-inch scope shows little more than a haze, but the nebula takes on a more arc-like appearance through larger instruments, while long exposures show plenty of faint nebulosity. Dark lanes cross the nebula, creating the outline of a running man. � SEEN IT
NGC 1981 The northern end of Orion’s Sword is marked by open cluster NGC 1981. A small scope reveals
about 16-18 stars here, scattered loosely to the north of NGC 1977, while a 6-inch scope will show about 50. The cluster contains two lovely double stars known as Struve 750 and Struve 743. Struve 750 splits into two stars of mag. +6.4 and +8.4 separated by 4.2 arcseconds, described as lucid white and pale blue. Struve 743 is a harder target due to a smaller separation. Here you’re looking for a mag. +7.7 and +8.2 pair separated by just 1.8 arcseconds. � SEEN IT
56
skyatnightmagazine.com 2015
NGC 1980 The southern end of Orion’s Sword is marked by mag. +2.8 quadruple star Iota (f)
Orionis – also known as Na’ir al Saif or ‘the Bright One on the Sword’. It is located in NGC 1980, a young open cluster embedded in faint nebulosity. A small telescope shows the cluster’s 20 or so stars arranged as a loose, northeast-pointing triangle. NGC 1980 is estimated to be between 1,300 and 1,370 lightyears away and is the older sibling of the Trapezium Cluster, which lies at the heart of the Orion Nebula. Though it formed out of the same material, NGC 1980 is now regarded as a separate entity that lies in front of the main nebula. � SEEN IT
THE ORION NEBULAThe Orion Nebula, M42, lies 0.5º north of Iota Orionis and is quite frankly hard to miss. A small
scope reveals a kidney-shaped region of glowing gas, with fainter swept-back extensions. The bright core is known as ‘the Thrust’ and has a mottled appearance. The northwest extension is known as ‘the Sail’ and the sharp-edged southern one confusingly as ‘the Sword’. The nebula is bright enough to exhibit colour, especially with larger apertures. M42 is believed to be a blister of hot, ionised gas on the surface of the dark and much larger Orion Molecular Cloud. It is estimated to be 24 lightyears across and contains the equivalent mass of 2,000 Suns. � SEEN IT C
HA
RT: P
ETE
LAW
REN
CE;
PH
OTO
: TH
INKS
TOC
K
��Tick the box when you’ve seen each one �
The Orion and Running Man Nebulae: one is a tricky spot,
the other is unmissable
2
3
4
5
6
1
It’s familiar and famous, but there are still surprising depths to the Orion Nebula region
Deep-sky tour

ORION
-6∞
-5º
-4º
-4º
-5º
-6º
05h 35m
05h 35m
05h 30m
NGC 1981
NGC 1977
NGC 1975
M43
M42
NGC 1980
Trapezium Cluster
Fish’s Mouth
Thrust
Sail
Sword
f
e�
e�
4245
V359
NU
Struve 750Struve 743
Na’ir al Saif
C
F
G
BE
A
D
I
H1H2
20 arcseconds
A: +6.7 - +7.5B: +8.0 - +8.5C: +5.1D: +6.7E: +10.3
F: +10.2G: +14.5 (proplyd)H1: +14.5 (proplyd)H2: +15.5 (proplyd)I: +15.0 (proplyd)
Trapezium Cluster Detail
S
E
Magnitudes
1
5
6
2
4
3

CH
ART
S A
ND
PIC
TURE
S: P
ETE
LAW
REN
CE
1 M35 If you put mag. +2.9 Tejat Posterior (Mu (+) Geminorum) and mag. +4.2
star 1 Geminorum in your field of view you should see a large misty patch in the top half of the field. This is the aptly named Queen of Clusters, M35. It shines at mag. +5.1 and is about the same apparent size as the Moon. You should be able to resolve a dozen or so stars in 10�50 binoculars. Using averted vision if necessary, see if you can glimpse the smaller (5-arcminute diameter) NGC 2158, a mag. +8.6 cluster 0.5º to the southwest. � SEEN IT
2 NGC 2169 Halfway between Tejat Posterior and mag. +0.5 Betelgeuse (Alpha (_) Orionis)
are a pair of brilliant white mag. +4.4 stars, Nu (i) and Xi (j) Orionis. In the same field of view, on the Betelgeuse side of the pair, is a 7-arcminute diameter rectangular cluster of stars that has an empty centre. This is NGC 2169. If you mount your binoculars and ensure that they
are perfectly focused, you should be able to resolve it enough to see that the stars of this rectangle form the number 37, which gives it the nickname the ‘37 Cluster’. � SEEN IT
3 THE CHRISTMAS TREE CLUSTER In the north of faint Monoceros lies NGC 2264, the Christmas Tree Cluster; it’s just
2° north of the centre of a line joining Betelgeuse and mag. +2.9 Beta (`) Canis Minoris. The cluster surrounds slightly variable star S Monocerotis (mag. +4.6-4.7), which forms the trunk of the inverted Christmas tree, the characteristic narrow wedge of which is easy to discern in binoculars. Note how few faint stars there are in this region of the Milky Way – this is thought to be due to a large amount of interstellar dust in the region. � SEEN IT
4 THE MEISSA CLUSTER Orion’s head looks distinctly fuzzy to the naked eye and, if you look at it through
binoculars, you can immediately see why: it is
We kick off the new year with a regal cluster, and the fish of Orion
��Tick the box when you’ve seen each one �
Binocular tour
a small cluster of stars, designated Collinder 69 and dominated by the brilliant white mag. +3.5 Meissa (Lambda (h) Orionis). It’s alternative name is Heka, which means ‘the white spot’. The other two bright stars in the field of view are the sapphire blue mag. +4.4 Phi1 ( 1) and deep yellow mag. +4.1 Phi2 ( 2) Orionis, which is probably not part of the cluster. You should be able to resolve about another 10 stars in this sparse object. � SEEN IT
5 COLLINDER 70 The odds are that you have already seen Collinder 70 without knowing it: it is the
cluster that includes the belt stars of Orion. On a clear night, you should be able to see at least 70 stars, some forming beautiful curving chains, in this magnificent oval cluster. They are mostly of a blue-white colour, with a few yellow stars here and there. It is an association of stars that has formed about eight million years ago from a giant molecular cloud that includes the Orion Nebula and which contains hundreds of protostars. � SEEN IT
6 THE ORION NEBULA Although the Orion Nebula is visible to the naked eye as the blurry central ‘star’
of Orion’s sword, this nearest stellar nursery to Earth – superb in binoculars of any size – is very sensitive to sky transparency. For this reason, the best time to observe it is usually when the rain from a cold front has cleaned the sky of dust, when you should easily make out the ‘Fish’s Mouth’ and the ‘Wings’. � SEEN IT
GEMINI
CANISMINOR
MONOCEROS
ORION
TAURUS
ERIDANUS
CANCER
Aldebaran
Betelgeuse
Rigel
Procyon
Pollux
Castor
Tejat Posterior Propus
Meissa
`
_ a
b
_
`
a
b
`
_
`
_
a
b
b
`
a
`
`
+ d�
j i
S
h
q�
q�
¡
c
M35NGC 2158
NGC 2175
Collinder 65
NGC 2169Collinder 69
Hyades
Collinder 70
M42
NGC 1981
NGC 1980NGC 2232
NGC 2264
5°N
S
E W
With Stephen Tonkin
skyatnightmagazine.com 2015
10 x50
10 x50
15 x70
10 x50
10 x50
10 x50
1
4
5
6
2
3

skyatnightmagazine.com 2015
THE SKY GUIDE JANUARY 59
the south of it, heading in towards the Mare Vaporum. Here you’ll find a roughened terrain. Concentrate and see if you can make out the curious form of Rima Yangel. This appears as a 2km-wide flat track that resembles an east-west road running through the region.
Moonwatch
THE MARE VAPORUM is a relatively small elliptical sea measuring 330x200km and is located slightly north of the centre of the Moon’s disc as seen from Earth, nestled in the region between the Mare Imbrium, Mare Serenitatis and Mare Tranquillitatis. This makes locating Mare Vaporum relatively easy.
Telescopically, the dark lava covering Vaporum’s floor is fairly nondescript to the west as it flows into the foothills of the giant Appenine mountain range. When the Sun is low in the lunar sky, shadows creep along Vaporum’s floor and reveal a number of wrinkle ridges, more obvious to the south and west. A small raised patch is present in the middle of the northern region of the sea and there are various lunar domes clustered here.
To the east of this complex is a subtle north-south ridge that passes just west of the small crater Manilus D (5km). A 7x11km volcanic lunar dome sits slightly north and west of Manilus D, again best seen under oblique illumination.
Manilus (40km) is the more substantial crater located close to Vaporum’s eastern shore. It’s a prominent crater with a sharp rim rising to a height of 2,400m; it also contains a central mountain complex.
A gap in the southern boundary of Vaporum naturally leads the eye towards the fantastic Rima Hyginus. This appears as a crack that seems to change direction when it passes the 10km crater Hyginus. It’s reminiscent of a bird gliding towards you, with the crater representing the bird’s body and the cracks its wings. Craterlets appear along the crack sections, indicating
that volcanism may have played a part in the feature’s formation. The region of mare immediately north or Hyginus is much rougher than the rest of Vaporum. The most prominent feature visible to the west of Hyginus is the slightly triangular crater Ukert (23km).
If you fancy a challenge, there are a couple of unusual features on the northern shores of the mare that are worth looking out for with high magnification. The first lies close to the small crater Yangel (9km). Once you’ve located the crater look just to
The Mare Vaporum is easy to find, surrounded by three other lunar seas: Imbrium, Serenitatis and Tranquillitatis
Approximately 45km to the west of Yangel lies another curiosity. Here there’s a dark volcanic dome that sits on the southern edge of a small, 5km circular crater rim. The part of the rim to the west is higher and better defined than that to the east. Together these are referred to as the ‘hook and dome’.
STATISTICSTYPE: Lunar sea
SIZE: 330km long
and 200km wide
AGE: 3.9-4.2 billion years
LOCATION: Latitude 4.1°E,
longitude 13.2°N
BEST TIME TO OBSERVE: First quarter or six days
after full Moon (mornings
of 11-12 January and
evenings of 27-28 January)
MINIMUM EQUIPMENT: Binoculars
The Mare Vaporum
“A gap in the southern boundary leads the eye to the fantastic Rima Hyginus”
N
E
MANILUS
YANGEL
UKERT
HOOK AND DOME
HYGINUS
MANILUS D
RIMA HYGINUS
MARE VAPORUM
LUNAR APPENINES
MARE SERENITATIS

60
Orion is high in the sky as seen from the
UK so I’m going back to an old friend,
the Orion Nebula, or M42. This big and
bright object is something that most
imagers will dabble with at one time or
another, but it’s always worth returning
to every so often to practice learned skills
or experiment with new techniques.
The nebula is large, measuring 85x60
arcminutes, but also contains a number
of interesting regions that can be treated
as targets in their own right. Just as M42
can be enjoyed using a variety of optical
instruments, from binoculars through
to large telescopes, so a variety of cameras
can be employed to squeeze detail out of it.
M42’s size, brightness and complexity
makes it a great wide-field target, and one
especially suited to a DSLR coupled to a
short focal length telescope. Indeed, even
a basic camera lens will record it as a brightly
coloured patch in the middle of Orion’s
Sword. On the subject of colour, a standard
Astrophotography
Imaging the core of the Orion Nebula
ALL PIC
TU
RES: PETE LA
WREN
CE
the nebula; its four main stars make a
great focus target. Use longer exposures
for the outer regions and shorter ones for
the bright core; these can be combined
using layer-masking techniques.
A monochrome CCD camera and filters
opens up different options for capturing
the region. A hydrogen-alpha pass filter,
for example, will only capture hydrogen-
alpha light, resulting in a clean and crisp
representation of glowing hydrogen gas in
the nebula. This can then be used to enhance
other filtered results – for example, adding
it as a luminance layer to an RGB image
to bring out the detail. This is a great way
to pick out the delicate tendrils of gas as
they waft away from the bright centre.
M42’s kidney-shaped core can be a
problem because it’s so much brighter
than the outlying regions. The core also
contains the famous Trapezium Cluster,
which if you’re not careful can become
lost in an overexposed splodge of white.
The bright core is known as the Thrust
and is interesting to image in its own right.
A longer focal length scope such as a
Schmidt-Cassegrain can get you right
into the detail, and getting the exposure
just right can reveal its amazing texture.
Being relatively bright, this is a part of the
nebula which can also be imaged with
high frame rate planetary cameras that
offer longer exposure modes.
DSLR does struggle because of its limited
hydrogen-alpha wavelength response.
M42 is rich in this wavelength, which
gives parts of the nebula a distinctive red
colour. The infrared-blocking filters fitted
to most commercial DSLRs tend to cut
out a portion of this light, resulting in a
nebula that looks more magenta than red.
Camera choices
The technique of imaging M42 with a
DSLR and scope is straightforward. For
the best results, use a polar aligned and
driven mount. An inexpensive adaptor
can be used to connect the camera directly
to a scope, so that the scope becomes the
camera’s lens. Focus as accurately as you
can on a bright star, then line up on M42.
If your camera has a live view, refocus
on the Trapezium Cluster at the heart of
�Send your image to: [email protected]
skyatnightmagazine.com 2015
RECOMMENDED EQUIPMENTDSLR with remote shutter release on a long focal length scope, or a long-exposure
planetary camera on a medium focal length scope; polar aligned and driven mount
KEY TECHNIQUEGETTING DETAIL FROM THE COREThis month we’re looking at using a
program normally used for planetary
image processing to reveal the inner core
of M42. We’ll look at how using RegiStax
to process a set of deep-sky images can
produce a result ready for final tweaking
in a graphics editor. Being so bright, the
core lends itself well to this sort of
processing. While a typical image of the
nebula may concentrate on capturing the
whole thing, a close-up of the core allows
us to see its amazing mottled texture,
which is often overexposed and lost.
There’s rich texture to be seen in M42’s core – the trick is not overexposing it in the first place

skyatnightmagazine.com 2015
THE SKY GUIDE JANUARY 61
STEP-BY-STEP GUIDE
STEP 6 Click on ‘Align’. In the resulting registration graph, drag the slider so that only high quality (say 90 per cent or better) frames are used – the quality is indicated by the red graph line. Click ‘Limit’, then ‘Stack’. When done, click the Wavelet tab, ‘Do All’ and ‘Save’. Load the end result in a graphics editor and apply a gentle unsharp mask and curve adjustment.
STEP 3 For a DSLR set the ISO to 800 or 1600 and take a 30-second exposure. Examine the result: if the Trapezium looks burnt out and individual stars are lost, reduce the ISO; if too dark, increase exposure. For a planetary camera, set the gain to around 50 per cent and repeat the DSLR process above, reducing the gain if the end result is too bright.
STEP 5 In RegiStax, click ‘Select’ and choose the dark frames. Click ‘No Align’ and then in the Wavelet tab ‘Reset Wavelets’. Uncheck ‘Use Linked Wavelets’ and click ‘Do All’. Save the result. Click on ‘Flat/Dark/Reference’, then ‘Load Darkframe’, selecting the file just saved. Click ‘Select’ and choose the M42 shots. Click on stars across the image to set the align points.
STEP 4 Once you’re happy with the result, repeat the exposures at least 25 times. Cover the telescope and create a repeat set of dark frames. If you took the images in raw format, it will be necessary to convert them to a lossless format such as png before the next step. There are several freeware programs that can do this, such as the Faststone Viewer.
STEP 2 Line the scope up with M42’s core. The Trapezium stars are relatively bright and distinctive. Focus as accurately as possible on them: as focus is reached the stars should separate into individual dots, making it easier to identify the precise point of focus. If using a planetary camera, keep the exposure to two seconds or less while focusing.
STEP 1 A DSLR attached to a long focal length scope (say, 10 inches and f/10) is ideal for capturing the core of M42. Alternatively a long exposure planetary camera attached to a smaller, mid-range focal length scope (4 inches and f/9) will work well too. The mount needs to be accurately polar aligned and driven or autoguided.


Sean Blair looks at how
3D printing could change the face of space exploration forever
� Off-the-shelf 3D printers didn’t work in microgravity, so a new one for space had to be designedTHIN
KSTO
CK
X 2,
MA
DE
IN S
PAC
E/IN
C
>
IN ZERO G
>
B
y the time you read this, it
has already happened. With
a click of a mouse in a Silicon
Valley office, a data file was
uploaded to the International Space
Station (ISS), allowing the very first
off-world manufacturing to take place.
The 3D printer that reached the ISS in
September has completed its historic
first item, made from the same plastic
as Lego bricks. Down on the ground,
3D printing – properly known as additive
manufacturing – has been termed ‘the
third industrial revolution’. Now this
technology has made it into orbit, could
space exploration be revolutionised too?
Today, space is at the end of a long
and costly supply chain: everything in
orbit gets manufactured on the ground,
goes through extensive testing, then gets
propelled out of Earth’s gravity well at
upwards of 8km/s. It’s a supply chain
that will stretch further still as future
missions venture beyond Earth orbit. But
NASA, together with start-up company
Made in Space, aims to change that by
making parts right where they are needed
– in space, that is – thanks to 3D printing.
Launching a revolution
On the ground, 3D printing has ushered
in a quiet revolution. From collectibles
to solar cells, dental implants to rocket
combustion chambers, almost anything
that can be designed can be 3D printed.
Software-based designs are built up, layer
by layer, from an ever-widening choice
of materials – hence the alternative term
additive manufacturing.
Made In Space began by testing off-the-
shelf 3D printers in weightless conditions
aboard parabolic flights. But there was
a problem, says Mike Snyder, the firm’s
lead engineer: “They didn’t work! In the
absence of gravity parts would go out of
alignment and the print quality would
degrade. We realised we would have to
design our own.”
Their work was supported through a
NASA contract. “NASA experts helped us

64
skyatnightmagazine.com 2015
MA
DE
IN S
PAC
E/IN
C, N
ASA
, ES
A/F
OST
ER +
PA
RTN
ERS
X 2
, M
ON
OLI
TE,
ALT
RA
N IT
ALI
A,
NA
SA/S
EAN
SMIT
H,
SYST
EMS
AN
D M
ATE
RIA
LS R
ESEA
RCH
CO
PRO
RA
TIO
N/Y
OU
TUBE
X 3
, TH
INK
TSO
CK
X 2
3D PRINTING ON OTHER WORLDS
through the safety aspects of designing
for the ISS – the printer has to be contained
so that it doesn’t affect the crew, for
example by releasing fumes or particulates.”
The resulting box-shaped machine
reached space on 23 September 2014. It
prints from a spool of plastic filament that
is melted into place in layers as thin as
0.25mm and a minimum vertical
thickness of 1mm. Parts up to 5cm wide,
10cm long and 5cm tall can be produced.
“The printer operates from inside the
ISS’s Microgravity Science Glovebox,
ensuring safe containment,” says Snyder.
“Results from early testing will guide
development of our follow-on printer, the
Additive Manufacturing Facility, which
will be more capable and employ a greater
range of plastics. It will also have its own
containment, so can be housed within its
own rack instead of the glovebox.”
Candidate designs for 3D-printed space
tools are being crowdsourced through a
US-only online competition. “Right now
everything has to be shaped around the
need to stand up to Earth gravity, then
the 2G to 7G launch loads,” says Snyder.
“Printing in weightlessness means items
will end up looking quite different.”
This second printer is due to reach
orbit next year, with its customers
expected to include microgravity
experimenters as well as NASA itself.
“When you set up an experiment on
Earth, you can repeat it, improving things
that don’t work,” adds Snyder. “On the
ISS it might take years to get redesigned
parts up. But with 3D printing adaptations
can be made rapidly.
“Tools and replacement parts can also
be produced,” he adds. “Right now the ISS
carries a collection of spares that might
never be used. Sometimes tools have to be
jury-rigged – for instance, spacewalkers
had to modify a toothbrush to help
unfasten one stuck bolt.” Snyder estimates
30 per cent of all parts on the ISS could be
replaced by 3D-printed constructs.
Next year will also see Europe’s first 3D
printer on the ISS: Italy’s POP3D will
produce a single plastic part that remains
inside its printer, which will then be flown
down to compare with a ground-produced
equivalent. Made In Space’s next step will
be a recycler able to process waste plastic
aboard the ISS into printable material.
From plastic to metal
But plastic parts are limited in function.
That’s why a NASA team has developed
the Electron Beam Freeform Fabrication
(EBF3) for wire-based metal 3D printing.
“We have to attain temperatures
around an order of magnitude higher
than the few hundreds of degrees needed
to melt plastic,” says Karen Taminger
of NASA’s Langley Research Center.
“But the resulting metal parts can
handle higher loads and a much greater
temperature range, along with electrical
Spacefaring 3D printers rely on raw materials from Earth, but research is being done into how astronauts could make use of materials found on alien worlds, allowing expeditions to ‘live off the land’. In 2013, ESA collaborated with an industrial team including renowned architects Foster + Partners to research printing a Moon base using ground-up lunar rock. “One of our key findings was that the printing method we chose – applying a binding liquid – still worked in a vacuum, within which liquids boil away,” says ESA engineer Laurent Pambaguian. “But millimetre-scale droplets we used are preserved by capillary forces in the soil.” As a proof-of-concept, a 1.5-tonne building block was produced using simulated regolith. “As a next step, we’re looking into fusing regolith using focused sunlight.” ‘Glassifying’ Moon rock in this fashion might also help cut down on troublesome lunar dust.
� ESA’s 3D-printed lunar base concept
would be made entirely from lunar dust
� 3D printers have no trouble creating
complex shapes like those in this sculpture
>
� The ISS’s first 3D-printed part was a piece
of the printer’s casing; highlighting that the
technology will allow astronauts to produce
‘spares’ as needed; left, the printer itself

3D PRINTING JANUARY 65
skyatnightmagazine.com 2015
Chemical and thermal irregularities in asteroid fields could be evidence of alien industry, say SETI scientists
ABOUT THE WRITERSean Blair is a science
and technology journalist.
A former Guinness World
Records researcher, he
now edits ESA’s space
engineering website.
and thermal conductivity and
corrosion resistance.”
The EBF3 has been extensively tested
on parabolic flights and now the team
is aiming for an ISS berth, either inside
or outside the station. “The electron
beam process operates in a vacuum
– and there’s a lot of vacuum in space,”
says Taminger. “Outside would give us
more room, although the printer would
have to be partially shrouded to prevent
contamination of any exterior surfaces,
such as solar panels.”
Either way, the aim is to prove that
items to be used in space can be built
there and to extend this capability
further afield. “The ISS has a finite
lifetime and we want to take advantage
of it while it’s there,” Taminger adds.
“It’s not really built for repair and
replacement – if a single board or
component breaks down the entire unit
is swapped over. But the further we go, to
the Moon, Mars or beyond, that becomes
impractical. We want astronauts on
manned missions to be able to dismantle
systems, do repairs and make things.”
Just how far might such an approach
go? One 2012 study by NASA engineers
proposes that self-replicating machines
– in other words, 3D printers that can
print 3D printers – could establish an
exponentially-growing industrial base.
Initially key electronic parts would be
sourced from Earth, but with each new
generation their reproductive autonomy
would grow. Place 41 tonnes of 3D printers
and worker robots on the Moon and within
20 years the result would be 40,000 tonnes
including 100,000 robots, efforts having
expanded out to the mineral-rich asteroid
belt. Then, says the report: “Within
another few decades, with no further
investment, it can have millions of times
the industrial capacity of the United States.”
SETI astronomers have previously
suggested hunting out evidence of
vast-scale industry by alien civilisations.
It’s an awe-inspiring prospect, if also
slightly alarming. For our descendants’
sake, no matter how autonomous such
self-replicating 3D printers become, they
should surely always be manufactured
with an off switch.
“Tea, Earl Grey. Hot.” Captain Picard and the rest of the USS Enterprise crew could rely on their trusty food replicators to keep them in home comforts, no matter how far they ventured into the final frontier. What might real-life astronauts have to look forward to?
3D-printed food is already a reality, mainly yielding high-end desserts for now. Last year a NASA-funded pizza printer was unveiled at the SXSW Eco festival in Texas. Modified from the open source RepRap 3D printer, the prototype printed layers of dough followed by tomato sauce, then a ‘protein layer’ – which turned out to mean
cream cheese. The long-term aim is to avoid monotonous diets during long-duration space expeditions by combining freeze-dried ingredients in novel ways.
‘Bioprinters’ – 3D printers capable of generating living tissue – might end up being more indispensable. 3Dynamic Systems, a company spun off from Swansea University, is working on printing artificial bone and other biologically compatible materials. On average, astronauts lose one per cent of their bone mass per month in weightlessness. Bioprinters would offer a means of bone regeneration in advance of reentering a planetary gravity field.
A REAL REPLICATOR?
Þ A pizza printer sounds like the stuff dreams are made of; the pizza itself, rather less so
Þ ESA’s plastic printer POP3D will be sent to the ISS for product testing next year
Þ The EBF3 system can deliver temperatures capable of melting metal wire for 3D printing
S

…then SAVE 21% …then SAVE 20% …then SAVE 29% …then SAVE 25% …then SAVE 28% …then SAVE 35% …then SAVE 30%
…then SAVE 30% …then SAVE 25% …then SAVE 35% …then SAVE 29% …then SAVE 33% …then SAVE 30% …then SAVE 23%
…then SAVE 22%…then SAVE 25% …then SAVE 25% …then SAVE 30% …then SAVE 33% …then SAVE 33% …then SAVE 30%
5 issues for£5 *
With over 30 magazines to choose from, why not take out a subscription to one of your JEZSYVMXI�XMXPIW�SV�XV]�E�RI[�SRI�ERH�VIGIMZI�]SYV�½�VWX�5 issues for just £5*
2 EASY WAYS TO ORDER
Visit www.buysubscriptions.com/januarysale and enter promotional code JSSP15
Call 0844 844 0390†
please quote code (Lines open Mon to Fri 8am – 8pm and Sat 9am – 1pm)
JSSP15
* This offer closes on 1 February 2015 and is valid for UK delivery addresses and by direct debit only. The discounts shown are savings calculated as a percentage of the full shop price, excluding Radio Times which is calculated as a percentage of the Basic Annual Rate. For
overseas rates visit www.buysubscriptions.com or call 01795 414 746. Should the magazine ordered change in frequency; we will honour the number of issues and not the term of the subscription. Your are free to cancel your subscription at any time – if you cancel within
2 weeks of receiving your penultimate issue you will pay no more than the trial rate, this is with the exception of Radio Times and Match of the Day, which you will need to cancel 3 weeks before the trial is due to end.
†
Calls to the number above made from a BT landline will
cost no more than 5p per minute. Calls from mobiles and other providers may vary. Radio Times and Match of the Day subscriptions are for 26 weekly issues (6 months). The Basic Annual UK Subscription Rate of Radio Times is £102. This price is for 51 issues, which includes
the Christmas double issue and a contribution towards fi rst class postage.
Great reasons to subscribe�� 8V]�]SYV�½�VWX�5 issues for just £5*
• Continue to make great savings after your trial period• Enjoy easy and convenient delivery direct to your door• Never miss an issue of your favourite magazine
NEW
!
NEW
!
Beat those January blues with a magazine subscription

dynamic
moons
J
UPITER’S
Pete Lawrence explains why now is a perfect time
to witness the balletic dance of the Galilean satellites
NA
SA
/JPL
-CA
LTEC
H X
5
Rare line of sight events will
be taking place in the Jupiter
system over the next few months

68
skyatnightmagazine.com 2015
J
upiter is a spectacular planet to view
through a telescope of any size. This year it
reaches opposition on 6 February and it’s
around this date that it appears at its best.
The planet is a telescopic favourite because it is both
bright and has a disc that shows plenty of fine detail.
In addition, its four largest moons – Io, Europa,
Ganymede and Callisto, in order of distance – are
mesmerising to watch as they endlessly orbit around
Jupiter’s globe. These are collectively known as the
Galilean moons, in honour of their discovery by
Galileo Galilei over 400 years ago.
Each Galilean moon is a sizeable object in its own
right, and from Earth they can appear to interact
with Jupiter in a number of ways. All four have orbits
that are more or less in line with Jupiter’s equatorial
plane. Europa has the largest orbital inclination
of 0.47
º
, while Io has the smallest at just 0.05
º
. The
three innermost moons also have a 1:2:4 ratio orbital
resonance: Europa’s orbital period is twice that of Io’s
42.5 hours, and Ganymede’s twice that of Europa’s.
Jupiter’s equatorial plane and consequently all
the orbital planes of the Galilean satellites appear
edge-on from Earth roughly every six years, when
Jupiter experiences an equinox. At such times, the
equatorial plane of Jupiter lines up with the Sun
and, because of our great distance from the planet,
our view is pretty edge-on too. Jupiter was actually ALL
PIC
TU
RES B
Y P
ETE L
AW
REN
CE
Þ Jupiter’s allure is
not solely in its moons;
its disc is covered
in exciting features
“Each moon is sizeable in its
own right and can interact with
Jupiter in a number of ways”
edge-on to Earth at the start of November 2014 and
will be edge-on again for us during mid-April.
Jupiter’s axial tilt is quite small at just 3.1
º
; for
comparison, Earth’s is 23.5
º
. Apart from reducing
the intensity of Jupiter’s seasonal variations, the
slightness of this lean also means that even when
we see the planet at maximum tilt, the orbits of the
Galilean moons appear as very thin ellipses. Note
that when Jupiter is at maximum tilt relative to the
Sun, the planet is at solstice.
Earthward encounters
With such a small tilt angle, the three inner moons
appear to pass in front of, or transit, Jupiter’s disc
when they’re on the Earthward side of their orbit.
Callisto, the outermost moon, can appear to pass above
or below the planet when Jupiter is close to solstice,
but will transit around 20 months either side of equinox.
A transiting moon passes across Jupiter east-west
and can be tricky to see visually against the disc.

JUPITER’S MOONS JANUARY 69
skyatnightmagazine.com 2015
Each Galilean moon casts a shadow in space. When a moon passes between Jupiter and the Sun, the shadow can fall on the planet’s disc below, producing a dark spot known as a shadow transit. The one exception again is Callisto: close to Jovian solstice its shadow misses the planet altogether.
Opposition timing affects how a moon and its shadow transit. Before opposition, a shadow will precede its moon across Jupiter’s disc. The gap between moon and shadow decreases as opposition approaches; after opposition, the moons precede their shadows. At opposition moons and shadows pass across the disc together, typically offset slightly north or south of one another.
The great shadow
These events happen when the moons are closest to us, but a different set of interactions can be seen when they are on the far side of their orbits. Here, the massive shadow cast by Jupiter comes into play and any moon wandering into this will undergo an eclipse and disappear from view. A moon travelling behind Jupiter’s disc will also undergo an occultation.
The sequence of events changes depending on where Jupiter is in relation to the Sun and the distance between a moon and Jupiter. Before
MOON-PLANET INTERACTIONS
The interplay between the Galilean moons and their planet take several forms
OCCULTATIONSWhen a moon passes behind Jupiter’s disc it undergoes an event known as an occultation. Disappearance always takes place at the west limb, reappearance at the east. Jupiter’s own shadow may hide occultation disappearances before opposition and reappearances after opposition.
SHADOW TRANSITSWhen a moon passes between the Sun and Jupiter, its shadow appears as a dark spot on the planet below. Single shadow transits are common, double ones less so. The triple shadow transit on 24 January (see page 50) is really rather rare.
MOON TRANSITSWhen Io, Europa, Ganymede and Callisto
pass in front of Jupiter’s disc, the event is known as a transit. A transit starts at Jupiter’s east limb, with the moon
moving east-west. It can be tricky to spot a transiting moon visually.
ECLIPSESJupiter casts a big shadow in space.
When a Galilean moon enters this shadow it disappears from view in an event known
as an eclipse. Before opposition the shadow points west of Jupiter; after opposition
it extends off to the east.
Moon pairings as viewed through a small scope
Moon pairings as viewed through
a large scope
>

70 JUPITER’S MOONS JANUARY
skyatnightmagazine.com 2015
opposition, Jupiter’s shadow points west of the
planet. Consequently, as a moon approaches from
the west, it will first be eclipsed by Jupiter’s shadow
before passing behind the planet and reappearing
from occultation at the east limb, fully illuminated.
After opposition the situation is reversed: a
moon is first occulted by the planet’s west limb,
then reappears from occultation eclipsed by
Jupiter’s shadow on the east, suddenly popping
into view some way off the edge of the planet as
its eclipse ends. This situation is more complex
for Ganymede and Callisto: in the run up to
opposition these more distant moons may
disappear into eclipse but reappear again before
undergoing a full occultation behind Jupiter.
After opposition they can be first occulted by
Jupiter, to temporarily reappear fully illuminated
before undergoing a full eclipse.
For a period of approximately nine months
centred on Jupiter’s equinox, the tilt of the planet
is such that the moons may appear to interact with
one another in what are known as mutual events.
Here one moon may occult another either partially,
totally or annularly, when it’ll appear to pass fully
inside the disc of the more distant moon. The
moon shadows may also interact, producing partial
or total eclipses. An annular eclipse occurs if one
moon’s shadow passes inside the disc of another
moon but doesn’t hide it completely.
Jupiter’s next equinox occurs on 5 February 2015,
virtually coincident with opposition. Consequently,
now is an ideal time to look out for these fascinating
interactions. And just to add extra excitement, on
24 January there will be a triple shadow transit
visible between 06:28 and 06:53 UT. Turn to page 50
for the full run down of this rare spectacle.
10 GALILEAN EVENTS TO WATCH IN 2015 2/3 JANUARY
22:39-03:09 UT Double transit and shadow
transit of Io and Europa
19 JANUARY 02:30-02:36 UT
Ganymede totally
occults Europa
24 JANUARY 06:28-06:53 UT
Triple shadow transit and
double moon transit
3 FEBRUARY 19:25-21:47 UTIo in transit next
to its shadow
23/24 FEBRUARY
Ganymede transit
19:36-23:03 UT, shadow
transit 21:07-00:45 UT
27 FEBRUARY 02:17-02:23 UT
Io annularly occults
Ganymede
11 MARCH20:30-20:36 UT
Europa’s shadow partially
eclipses Io
20/21 MARCH
Jupiter occults Ganymede
19:22-23:02 UT, then
eclipses it 23:07-02:47 UT
8 APRIL 22:54-23:00 UT Europa annularly
occults Callisto
18 APRIL 01:28-01:37 UT
Callisto annularly
occults Ganymede
ABOUT THE WRITERExpert imager Pete Lawrence is a regular on the The Sky at Night and Stargazing LIVE. The author of several books, he also compiles our monthly Sky Guide.
S
>
MOON-MOON INTERACTIONS
Mutual events between the moons of Jupiter fall under one of three types
PARTIAL OCCULTATIONSA partial occultation occurs when one moon appears to clip the disc of another. These are by far the most common mutual events. Watch one of these interactions through a small telescope and the pair may look like a single moon for a short period.
TOTAL OCCULTATIONSIf a closer moon lines up with a more distant one and covers it completely, it is a total occultation. If the occulting moon is small enough to fit inside the disc of the more distant moon, this is known as an annular occultation.
ECLIPSESIf a moon’s shadow cone passes across the disc of another, it produces an eclipse. An eclipse can be partial, total or annular. If the eclipsed moon passes through the weaker outer part of a shadow cone, this is a penumbral eclipse.
PETE
LA
WRE
NC
E X
3, N
ASA
/JPL
-CA
LTEC
H X
5
Partial Total Annular
Annular(transit)Total


>
There was a time before webcams
and CCDs when photographic
film had a resolution lower
than that of the human eye.
During this era, the only reliable tools
an astronomer could rely upon was his
own vision and a pencil, but even with
these limited resources some startling
discoveries were made. The astronomers
of this era seem to be like great explorers
venturing out into a vast and complex
cosmos, their drawings and observations
rather like postcards from alien frontiers.
Today, the sensitivity and size of
imaging equipment has improved
immeasurably. Yet even in the 21st
Century, there are still areas of amateur
astronomy where visual observers can
make valuable contributions. Visual
observers need many specialist techniques
to obtain reliable results that can go into
the scientific record and this three-part
guide will introduce these observing skills
with the aim of making you a better
astronomer. We start this month with
the most rewarding planets for study:
Venus, Mars, Jupiter and Saturn.
ISTO
CK
The first of Paul Abel’s three-part guide to visual observing looks at how to get the best views of the planets
>
PART 1: THE PLANETS
COMING SOONPART 2: VARIABLE STARS
PART 3: SUPERNOVA PATROLS
VISUALOBSERVING GUIDE
VISUALOBSERVING GUIDE
>

74
skyatnightmagazine.com 2015
VENUS CAN BE a challenging object for
visual observers, yet in the 1960s it was
such astronomers who helped to establish
that the planet’s clouds have a three-day
rotation period. With Venus, a visual
observer’s main objectives are to obtain
disc drawings that correctly show the phase
and to record elusive cloud markings.
A cursory telescopic view of Venus will
reveal a bright white disc with a phase. The
bright cusp caps covering the poles may be
glimpsed, but that will probably be the only
detail. Don’t be put off, though: with time
and patience subtle cloud markings come
into view. The first thing to do is to find
the correct magnification: one that gives a
reasonable disc size and is suitable for the
seeing conditions. I find 130-160x to be about
right. Venus is also best observed in bright
skies, as this reduces the glare from the disc.
As with all planets, don’t expect to see
all the fine details at once – you will need
to engage with your visual system (one of
the most remarkable adaptive optics kits
on Earth). Ask yourself what you can see
on the disc and slowly your eyes will respond.
Spend about 15 minutes looking at the
planet’s disc before you start drawing.
To sketch Venus you’ll need a circle 50mm
in diameter. Draw in the phase and then,
with a 2B pencil, gently shade in the subtle
cloud markings. Eyepiece filters are a great
help as they allow you to see into different
depths of the atmosphere. Red and blue
filters help to enhance cloud markings,
while a yellow filter will bring out the
polar collars.
The Schröter effectLook at Venus when it’s predicted to be
at half phase and you’ll notice that the
phase is actually slightly less than half.
This is the Schröter effect, where Venus’s
observed phase is always less than the
theoretical one, and it is particularly
prominent in a blue filter.
The phenomenon was first recorded by
Johann Schröter in the 1790s and is due to
light being scattered in the thick Venusian
atmosphere. You can record it for yourself:
on your drawing, simply measure the
distance (in mm) with a ruler from the
limb to the terminator and divide this
distance by 50 to get the observed phase of
Venus. Do this for all of your drawings and
you can plot the decreasing phase against
time on a graph and show how the effect
changes over the course of an elongation.
VENUS
KEEPING A LOG BOOKKeeping a log book is an essential skill for any visual observer. It will keep your observations in a logical structure and you’ll be able to look back and see how your drawing skills have developed. Your log book should be a sturdy bound notebook, and every observation should include the following information:
THE DATE OF OBSERVATION
THE TIME, always in UT
THE TELESCOPE AND MAGNIFICATION, along with the details of any filters used
THE SEEING CONDITIONS, recorded using the Antoniadi scale, which runs in Roman numerals from I to V; I is perfect seeing and V is a very poor unfocused image.
> A page from the author’s Saturn log book shows observation details, a drawing and some filter remarks
� Determining the phase of Venus from your drawing is easy. Simply measure the widest horizontal distance from the limb to the terminator. Here it’s 32mm, and so for a 50mm sketching circle the phase is 32/50, which is 64 per cent
� The Schröter effect is easily seen through a blue filter (middle) in these three views drawn on the same night
32mm
Phase = = 0.64 32mm50mm
PAU
L A
BEL
X 5
, N
ASA
/JPL
-CA
LETC
H X
3

VISUAL OBSERVING JANUARY 75
skyatnightmagazine.com 2015
THE RESTLESS CLOUDS of Jupiter have generated plenty of work for visual observers for hundreds of years. Through a telescope, this gas giant is differentiated into darker belts and brighter zones. Powerful jet streams carry large storms along, presenting us with an ever-changing cloudscape.
Jupiter has a large disc and magnifications of 160x or more are sufficient to reveal a lot of fine detail. A red filter helps to enhance bluer features like festoons along the equator. Conversely a blue filter helps to enhance redder objects like the belts and the Great Red Spot. A yellow filter gives good all-round contrast.
It takes practice to record Jupiter correctly, but doing so will really hone your observational skills. A Jupiter drawing requires the correct blank: this planet is appreciably flattened due to its rapid rotation, so the standard blank is 64mm wide but only 60mm high.
Like Mars, Jupiter rotates quickly; in this case you have 10 minutes to make your sketch. First draw the main belts and large storms, recording the ones near the preceding edge first as these will vanish soonest. Spend the remaining time adding in the finer details.
Jupiter’s most famous and persistent storm is the Great Red Spot, a vast hurricane situated in Jupiter’s South Tropical Zone. Visible to a 5-inch scope, the Great Red Spot drifts in longitude at
varying speeds; this drift rate can be measured.
When the storm is visible, watch as it moves towards the central meridian. When you think its centre is on the meridian, record the time. Use
freeware software WinJUPOS (www.
jupos.org/gh/download.htm) to
convert the time into longitude and repeat this whenever you observe the Great Red Spot. You can plot the resulting longitudes
against time and look at how quickly the spot is moving in Jupiter’s atmosphere.
THE OCHRE DISC of Mars is full of subtle, slowly changing features. Mars is a world of vast volcanoes, continent-sized canyons and majestic deserts. It’s not uncommon for fogs to collect in the basins such as Hellas and Argyre, and the volcanoes attract brilliant clouds at their summits. Martian meteorology changes over the course of a few hours, and it can all be recorded and studied visually.
The well-defined Martian seasons produce different phenomena. During
the previous apparition in 2013-14, it was
springtime in the northern hemisphere, and the brilliant north polar cap shrank dramatically as it sublimated away. Recording the
retreat and advance of the polar caps is
important as it reveals information about the
Martian climate. The dust-storm season
occurs during spring and summer in the southern
hemisphere. Telescopically, these storms resemble small orange clouds, and they can engulf the entire planet. It may take many months for the dust to clear and
afterwards there may be changes to the dark albedo features. You can track the progress of large dust storms, recording their size and changes to local surroundings. A green filter helps enhance them.
Mars tolerates high magnification well because red light is less affected by Earth’s turbulent atmosphere. At powers of 300x, dark albedo features like the Syrtis Major will show a multitude of subtle structure.
Drawing Mars requires some patience. You can’t spend any longer than 15 minutes doing so as Mars’s rotation will have moved the features away from where you’ve placed them in the drawing. Sketch the phase first if it is present, then the polar caps. Spend seven minutes putting down the obvious features and use the remaining time to put in any bright clouds you can see. A blue Wratten No 80A filter helps to enhance white clouds. Aim to make two to three drawings over a night to show how the clouds change.
� Use high magnifications to
reveal dark albedo features
like the Syrtis Major
� The Great Red Spot moves
in longitude but is held at
a fixed latitude of 22ºS
Syrtis
Major
GRS
North
Polar cap
MARS
JUPITER
Bright
clouds
>

76 VISUAL OBSERVING JANUARY
skyatnightmagazine.com 2015
IT IS OFTEN said that majestic Saturn is
a ‘quieter’ Jupiter. The belts and zones of
Saturn’s atmosphere are less well defined,
but the storms that this planet can produce
are even more ferocious.
Watching and charting storm activity is
one of the main tasks for visual observers
of Saturn. Storms are seasonal, occurring
every 30 years, and usually take the form
of a large white oval on Saturn’s equator.
The next outbreak is due near 2020.
Recently Saturn has produced other
storms: quite unexpectedly in late 2010
a large storm erupted in the planet’s
northern hemisphere, lasting into 2011.
This powerful storm churned up the
SATURN
North Tropical Zone, reminding us of the
need for a constant vigil if we’re to catch
the next outbreak.
To really view Saturn, you’ll need
to use a power of 160x times or more;
250x is a good all-round magnification.
Drawing Saturn requires five accurately
placed ellipses – so don’t try to do it free-
hand, use a carefully produced blank.
Saturn is also a quick spinner, so
spend about eight minutes drawing in
the main features on the disc and the
rings, and use the final four minutes
to finish the fine details such as the
fainter belts and shadows. Filters work
well for Saturn: yellow enhances the
contrast between belts and zones,
TOOLS OF THE TRADE
EYEPIECESA selection of medium- and high-power eyepieces, giving a range of magnifications
ABOUT THE WRITERDr Paul Abel is an astronomer based at the University of Leicester. You can listen to him on our Virtual Planetarium each month.
while light blue helps to emphasise
redder features. Also watch out for
a bi-coloured aspect of Saturn’s rings:
occasionally Saturn’s outermost ring,
the A-Ring, appears brighter in a blue
filter than in a red one. Although rare,
this phenomenon has been reported
by visual observers and is worth keeping
an eye out for.
Þ One of the author’s Saturn sketches; the white storms that occur in the equatorial region are best seen with a blue Wratten No 80A filter
to suit your seeing conditions. A useful range is 160-190x for low power, 200-250x for medium power and 300x-plus for high power.
FILTERS These help to enhance different features on planetary discs. Red, blue and yellow filters are invaluable.
PENCILS Some planetary features are more subtle than others, so you’ll need range of pencils from HB to 6B, to capture as many as possible.
RED LIGHTWhite light destroys night vision, so always use a red light to draw.
WINJUPOSThis essential free software (www.jupos.org/gh/download.htm) displays the features present on Jupiter or Saturn’s disc at any date and time, and gives you the planetary longitudes for both gas giants so you can record the location of details. It is especially helpful as these planets have three systems of longitude due to their different bands of rotation.
PAU
L A
BEL,
NA
SA/J
PL-C
ALE
TCH
, PA
UL
WH
ITFI
ELD
S

ADVERTISEMENT FEATURE
THE
NORTHERN LIGHTS
With holiday companies releasing details of their latest
aurora tours, now’s the time to start thinking about booking
your trip to see the Northern Lights. There’s nothing quite
like standing under a starry night sky and watching as this truly
magical celestial show dances overhead. There are many ways you
can travel in style too. You can sail in luxury with cruise companies
voyaging up and down the coast of Arctic Norway, head to the
glacial glory of Iceland, or even be a tad more adventurous and join
the huskies sledging across the frozen expanses of Lapland. Wherever
you decide to go remember one thing... never take your eyes off the
skies, you never know when that spectacular display might appear.
SOLAR ECLIPSE 2 0 1 5Option One
Option Two
Day Trip by Airfrom Stansted airport to the Faroe Islands
Observational Flight - Departs from Glasgow airport
t�&BSMZ�NPSOJOH�EFQBSUVSF�t�5SBOTGFST�UP�&DMJQTF�WJFXJOH�TJUF�t�1PTU�&DMJQTF�5PVS�PG�UIF�BSFBt�&DMJQTF�"TUSPOPNFS�t�4BGFUZ�WJFXJOH�HMBTTFT�t�#SFBLGBTU���EJOOFS�PO�CPBSEt�1BDLFE�MVODI�PO�'BSPF�*TMBOET��t�'3&&�PO�CPBSE�CBS���/PU�$IBNQBHOF�t�"MM�BJSQPSU�UBYFT�BOE�TFDVSJUZ�DIBSHF
�����FDMJQTF�SVJOFE�CZ�DMPVET �'PS�UIF�.BSDI������FDMJQTF �HFU�BCPWF�UIF�DMPVET�GPS�B�PODF�JO�B�MJGFUJNF�FY�UFOEFE�BJSCPSOF�WJFX�JO�QFSGFDU�WJFXJOH�DPOEJUJPOT �BOE�DMPTF�FOPVHI�UP�UIF�6,�UP�HFU�UIFSF�BOE�CBDL�JO�B�EBZ��8F�BSF�PòFSJOH�8)0-&�3084�0/-: �PO�UIF�TVO�TJEF�PG�UIF�BJSDSBGU �GPS�NBYJNVN�WJFXBCJMJUZ��5IF�OFYU�UPUBM�FDMJQTF�TP�DMPTF�UP�UIF�6,�NBJOMBOE�JT�OPU�VOUJM����� �TP�JG�UIJT�JT�PO�ZPVS�CVDLFU�MJTU �OPX�T�ZPVS�DIBODF�
Friday 20 March 2015
Friday 20 March 2015
ONLY
����.��pp
t�4 hour�SPVOE�USJQ�øJHIU�GSPN�(MBTHPX�BJSQPSU��t�"JSQPSU�UBYFT�
t�4BGFUZ�WJFXJOH�HMBTTFT�t�-JHIU�SFGSFTINFOUT�BOE�HMBTT�PG�DIBNQBHOF
t����NJOVUF�QSF�øJHIU�UBML�CZ�PVS�0NFHB�BTUSPOPNFS�
Look what’s included......
*NQPSUBOU�OPUFT��8IJMTU�FWFSZ�FòPSU�XJMM�CF�NBEF�UP�PQFSBUF�UP�TDIFEVMF�BOE�UP�CF�JO�B�QPTJUJPO�UP�WJFX�UIF�&DMJQTF �0NFHB�)PMJEBZT�$"//05�CF�IFME�SFTQPOTJCMF�GPS�BOZ�EFMBZT�PS�XFBUIFS�DPOEJUJPOT�UIBU�NJHIU�BòFDU�BDUVBMMZ�TFFJOH�UIF�&DMJQTF��5IF�SPVUF�PG�UIF�QPTU�&DMJQTF�UPVS�XJMM�BMTP�CF�7&3:�EFQFOEFOU�PO�MPDBM�XFBUIFS�BOE�USBóD�DPOEJUJPOT��*U�JT�UIF�QBTTFOHFST��SFTQPOTJCJMJUZ�UP�FOTVSF�UIBU�UIF�TVQQMJFE�TBGFUZ�&DMJQTF�WJFXJOH�HMBTTFT�BSF�-*()5�5*()5�CFGPSF�BOE�EVSJOH�VTF�BOE�0NFHB�)PMJEBZT�DBOOPU�CF�IFME�SFTQPOTJCMF�GPS�BOZ�FZF�EBNBHF��4JNJMBSMZ �0NFHB�DBOOPU�CF�IFME�SFTQPOTJCMF�JG�VOGPSFTFFO�DJSDVNTUBODFT�QSFWFOU�PVS�"TUSPOPNFS�GSPN�KPJOJOH�UIF�UPVS��'"$*-*5*&4��%VF�UP�UIF�QPUFOUJBM�SFNPUFOFTT�PG�UIF�WJFXJOH�TJUF�o�GBDJMJUJFT�BSF�MJLFMZ�UP�CF�BU�CFTU�CBTJD�JG�BWBJMBCMF��*U�JT�BOUJDJQBUFE�UIBU�B�DPNGPSU�TUPQ�XJMM�CF�NBEF�FO�SPVUF�UP�UIF�TJUF�
For more information or to book, please call:
01524 37500 quote SAN1
or visit: www.omega-holidays.com
OPENING TIMES:
MON-FRI 8.30-19.30SAT 8.45-15.30
SUN 10.00 - 15.00
OPTIONALovernight accommodation*
��XJUI�DPOUJOFOUBM�CSFBLGBTU�BU�UIF�����)PMJEBZ�*OO �(MBTHPX�"JSQPSU� * Thursday
19 March 2015 only.
DUE TO CANCELLATIONS
Last few cabins 15 nights cruisewith Fred Olsen from Southampton.Guest astronomer Pete LawrenceImpressionist Jon CulshawDeparts 9 March 2015
from£1699pp
Morning excursion
by AIRPrice for entire row
of 3 seats
�����.��pp
(max 3 passengers per 6 seats)
from
���.95pp
NORTHERN LIGHTS
�ight from regional airportsin January & February 2015,
with Pete Lawrence
£199.95PP

ADVERTISEMENT FEATURE
THE
NORTHERN LIGHTS
BALTIC TRAVEL COMPANYWe know the territory – you’ll experience the difference. We pride ourselves on our intimate and expert knowledge of Scandinavia, the Baltic States, Russia and more. By combining our first-hand knowledge of your destination and our extensive experience within the global travel industry, we’re able to tailor-make the perfect holiday for you – whatever your interests, budget and location. To discover the Northern Lights visit our website or call the phone number below.
Tel: +44 (0) 208 233 2875 www.baltictravelcompany.com
Aurorahunters – In Pursuit of the Northern LightsAs featured on the BBC’s “Litle Stargazing” TV documentary
Our proven track record of Aurora hunting (99% over 5 years), in-depth knowledge of the area and our combined years of photographic experience provide the essential ingredients for a unique and memorable adventure. We do all we can to ensure you experience the ‘thrill of the chase’. Photographic guidance from professional Northern Lights chasers and photographers. Each member of our team has at least 3 years experience under the Auroras. All tours are conducted under the direct guidance of veteran Aurora hunter and internationally acclaimed Aurora photographer, Andy Keen. Small group sizes – maximum 7 people per tour vehicle. Your safety and comfort are of paramount importance to us. We operate in pristine, Arctic landscapes, far away from light and noise pollution. Extensive search radius and, unlike many of our competitors, we are not limited by time restraints.
Andy Keen Photographer & veteran Aurora hunter
www.aurorabasecamp.comwww.facebook.com/[email protected]+44 (0)7961 096 459 (Monday–Friday, 13:00 h–17:00 h)
DISCOVER THE NORTHERN LIGHTSWhether you’d like to voyage along Norway’s spectacular coastline, experience Iceland’s natural wonders, visit Sweden’s breathtaking Icehotel or stay in an idyllic log cabin in Finland, we offer all this and more. We specialise in finding unique locations that give truly exceptional chances of viewing the aurora as well as offering a wide variety of thrilling daytime activities guaranteed to make a winter break to remember. And with the continuing ‘solar max’, meaning more intense northern lights activity, this really is the time to visit.
Tel: 01737 218 806 www.discover-the-world.co.uk
ICELAND | GREENLAND | SCANDINAVIA | FINLAND | ARCTIC CRUISES
Speak to a Regent Specialist on 020 7666 1290
www.regentholidays.co.uk
Experience the
Northern Lights this winter
NorwayUloya Island
Aurora Short Break
from £685pp
IcelandNorthern Lights
Photography Group Tour
from £1595pp
IcelandNorthern Lights
Explorer Group Tour
from £1395pp


skyatnightmagazine.com 2015
Philae’s historic landing
Stuart Clark was in Darmstadt at the moment the plucky lander touched down
Brush up on your
astronomy prowess with
our team of experts
It was the early hours of the
morning on the day of Philae’s
landing attempt when suddenly it
looked as if the whole thing might
be called off. Two critical go/no-go
decisions had to be taken. The first, for the
Rosetta orbiter, was given on time but the
second, for the Philae lander, was delayed.
Something was wrong. The landing
was in jeopardy.
Anxious officials at ESA’s European
Space Operations Centre (ESOC) were in
close communication with the Philae Lander
Control Centre in Cologne. They in turn
were making phone calls to the industrial
partners who had built the lander.
Eventually, an hour later than
expected, the lander was pronounced
ready. But what had caused the delay? At
6am, I made my way to ESOC to begin
the day’s reporting and soon discovered
that the cold gas thruster designed to
hold Philae to the icy comet while the
harpoons anchored it to the surface
was not working. Overnight, signals
from the lander had shown that there
was no pressure in the gas supply lines
to the thruster. Philae faced the real
danger of bouncing off the comet
back into space.
“We came close to cancelling the
attempt,” Paulo Ferri, ESA’s head of
mission operations, admitted to a small
group of journalists who had also
struggled in early to get the news. Yet
after intense discussion, everyone
decided that there was no reason to
believe that a delay was likely to restore
the thruster. There was nothing to be
done but go for it.
And so began around 10 hours of
nervous waiting. The tension was made
bearable because there were images and
events scheduled throughout the day.
The Guide
SKILLS80828587
THE GUIDEHOW TONEW IMAGE PROCESSINGSCOPE DOCTOR
Each one of these was like a mile marker,
assuring us that everything was going
to plan 510 million km away.
The distance was so great, out beyond
the orbit of Mars, that the transmissions
took more than 28 minutes to reach Earth
– but one by one the mission milestones
were passed. First, Rosetta took a sharp
turn in towards the comet. With the
landing site directly in view it released
Philae and boosted itself away.
The descentThe first images came mid-afternoon.
The room gasped as we saw the picture
of Rosetta, its giant panels outstretched
like a bird of prey as Philae dropped
away underneath. Then there was the
picture of Philae itself, landing
legs and radar antennas deployed,
captured in exquisite detail by
the OSIRIS camera on Rosetta.ESA
/J.
MA
I X 2
, ES
A/R
OSE
TTA
/MPS
FO
R O
SIRI
S TE
AM
MPS
/UPD
/LA
M/I
AA
/
SSO
/IN
TA/U
PM/D
ASP
/ID
A X
2, ES
A/R
OSE
TTA
/PH
ILA
E/C
IVA
Þ Rosetta flight director Andrea Accomazzo (centre) looks on anxiously shortly after receipt of Philae’s signal from the surface of the comet
With Stuart Clark

THE GUIDE JANUARY 81
skyatnightmagazine.com 2015
There was something moving
about that image. The
fragile-looking lander
was on its way. No one
could help it now.
And all knew that
this might be the
last we ever saw of
it. Although
everything was
proceeding as
planned, without the
thruster system the
mission was in clear
jeopardy. People wanted
to talk about it, people
wanted to not talk about
it. The thought of the landing failing after
10 years in space and so much success so
far was almost too difficult to contemplate.
Some words of cautious encouragement
came in the afternoon from Fred Jansen,
ESA Rosetta mission manager.
“In principle, the ice screws should be
sufficient to hold us to the surface,” he
said. These were attached to each of the
landing legs and would literally screw
themselves into the surface of the comet
due to the force of the landing. This would
take place at about 1.5m/s, the equivalent
impact of walking headlong into a brick
wall. It seemed reassuring but then Jansen
added, “If we land on a surface we expect.”
And the anxiety returned.
Nothing about this comet had been
expected. 67P/Churyumov-Gerasimenko
was about 4km from end to end but it was
not a round ‘potato’ shape: it looked more
like two smaller potatoes shoved together.
Once the effect of our own Galaxy has been completely removed, the fluctuations across the sky become clear. One of the biggest mysteries of the CMB is the ‘cold spot’, circled in the image above, a region seemingly devoid of radiation and currently without explanation.
That made the landing risky
because there were not large
areas of smooth terrain.
Instead the comet was
a place of cliffs,
depressions and
boulder-strewn
surfaces. An unlucky
landing was every
bit as possible as a
lucky one.
We had been
warned that there was a
40-minute window in
which the landing might
take place. We settled to
watch the live feed of the
main control room. All eyes were on
Andrea Accomazzo, the Rosetta flight
director. Within a minute or two of the
window opening, Accomazzo strained
towards the computer screen and then
leapt to his feet with his arms in the air.
Around me the place erupted. The
celebrations began, Philae had touched
down – or so it seemed. Then there were
anxious faces and confusion and a
promised press briefing that was delayed
twice. Four hours later we learnt that not
only had the thruster failed, so had the
harpoons. The ice screws hadn’t gripped
and Philae had bounced from its original
position and had taken more than two
more hours to finally come to rest.
It was unknown where Philae was
exactly, but it was on the comet, it was
communicating with Rosetta. The landing
had been achieved. History had been
made. Now the science could begin.
Stuart Clark is a science journalist and
author of Is There Life on Mars?
Members of the ESA team celebrate after making history with the landing
Philae (circled) is just a tiny dot in this shot taken
almost six hours after seperation from Rosetta
Also described as having the shape of a rubber duck, comet 67P presented challenging terrain for a landing
Þ Rosetta’s solar panel can be seen in this parting shot taken by Philae
S

In our December issue, we showed
you how to cut out all the wooden
parts to make a Dobsonian mount.
This month, we’ll walk you through
assembly and finishing the mount ready for
use. We’ll be referring to our online
resources throughout (highlighted in bold),
so we recommend that you print these out
before you begin. Download them from
http://bit.ly/DobMountPt2.
Start by marking the centre of the rocker
box base, then draw a line from one side to
the other through this central point.
Do the same for your base board.
Take the base board and – using the line
you just drew as the ‘horizontal’ to rest
against – use a protractor and ruler to
mark off the various points indicated on
Diagram 1. Drill the holes at the sizes
specified on Diagram 1, and then a 12mm
hole in the centre of the rocker box base,
plus a 10mm hole in the centre of a vinyl
LP you can bear to live without!
We’ll assume that you have gathered
all of the fixings, bearings and other parts
listed in our Components list. Lightly
How to
Assemble the mount so it’s capable of supporting a telescope
ALL
PIC
TURE
S: S
TEV
E RI
CH
ARD
S
coat the outside of one of the T nuts with
epoxy resin and pull it into the top of the
base board using a 10mm bolt and washers
until it is firmly seated. Drill out the thread
of the second T nut using a 10mm drill bit,
and install it in the top of the rocker box
base in the same manner – use a 10mm
bolt, washers and nut.
Take one of the rocker box side panels
and mark the centre point on its bottom
inside edge; repeat for the other side panel.
Place the two side panels on top of the
rocker box base so that the points you just
marked match up with the line you drew
across the base. Now position the front of
the rocker box so that it touches the two
sides. Mark its outside edge on the top
of the rocker base. Now mark the height
of the front piece on the edges of the two
side panels; trim these ‘horns’ so the side
panels sit flush against the front panel.
Next, refer to Diagram 2 and drill out
the nine 4.5mm holes in the rocker base
as shown; countersink the holes on the
reverse. Fix the rocker base, front and side
panels together using PVA glue and 15 No 8
skyatnightmagazine.com 2015
Build a Dobsonian mount
With Steve Richards
1.5-inch screws (nine in the base, three in each
side; these also need 4.5mm drilled holes).
Once the glue is dry, draw a pencil line
perpendicular to the existing line (which
you drew in Part 1) through the centre of
each altitude wheel. Centre the dovetail bar
of your telescope on this line both vertically
and horizontally, then mark and drill the
two holes for attaching the tube rings.
Sand all the components and round
the corners of the two bases. Apply two
TOOLS AND
MATERIALS
FIXINGS AND ANCILLARY
COMPONENTS
A complete list of all the fixings required to complete the assembly can be found in the components list included with our online resources.
TOOLS A standard crosshead screwdriver is needed for much of the assembly; Allen keys and spanners are required for some of the retaining bolts.
PAINT OR VARNISH
To give the mount protection from night-time moisture to prolong its life. Make sure the product you use is intended for outdoor use.
TAPE MEASURE, PROTRACTOR
AND PENCIL
For accurately marking out the positions of the various components.
ADHESIVES
Both PVA wood glue and epoxy resin are needed.
� Nearly there: rocker box is assembled, all that’s left is to add the base and bearing wheels
SKILLS
PART 2

HOW TO JANUARY 83
STEP 1Mark the centre of the rocker box base
and drill a 12mm hole. Mark and drill the
holes in the baseboard in accordance
with Diagram 1. Drill the threads out of
one T nut to form a smooth bearing and
insert both T nuts.
STEP 2Place the rocker box sides and front on the
rocker box base and mark their positions
carefully. Drill and countersink 4.5mm holes
through the rocker box base for attaching the
sides and front. Glue and screw the rocker
box together using 1.5-inch wood screws.
STEP 3When the glue has dried, sand all the
surfaces including the altitude wheels and
the retainer discs. Round off all four corners
of the rocker box base and base board with
a small radius. Apply two coats of external
quality undercoat followed by two topcoats.
STEP 4Cut down the height of the adjustable feet
and install them on the underside of the base
board. Attach the three azimuth bearing pads
to the baseboard at 120° positions. Attach
the altitude bearing pads to the top of the
sides, followed by the side retainers and felt.
STEP 5Place the vinyl LP centrally on top of the
azimuth bearing pads then place the rocker
box centrally over the base board. Insert a
10mm bolt through rocker box’s smooth T
nut, vinyl LP and into the T nut on the base
board; tighten it with a nyloc nut underneath.
STEP 6Attach edging strips to the altitude bearing
wheels and then attach the tube rings to the
telescope. Attach the altitude bearing wheels
to the tube rings with oversize washers,
sandwiching the dovetail bars. Finally, lower
your scope gently onto the rocker box’s ‘cups’.
skyatnightmagazine.com 2015
coats of external quality undercoat and
topcoat paint to all surfaces, rubbing down
between coats. Then reduce the height of
the screw base and centre tube sections
of the adjustable feet to 25mm and attach
them to the underside of the baseboard
with epoxy resin and No 6 �-inch screws.
Bear with itTo make the azimuth bearings, cut the PTFE
sheet into three 25mm square pads (unless
you are using ‘Slide Glides’); secure these in
the 1.5mm pilot holes in the rocker box base
(see Diagram 1) using No 6 �-inch screws.
For the altitude bearings, cut four
rectangular pieces of PTFE 25mm long
by the width of the rocker box sides, then
drill and countersink them. Attach them
to the top of the rocker box sides spaced as
close as possible to 70° apart.
Assemble the rocker box on top of the
baseboard, sandwiching the LP – which will
act as a ridged bearing surface – as shown
in Diagram 3. Make sure you leave a 0.5mm
gap under the bolt head before tightening
the locknut underneath the baseboard.
Cut the edging strip to the correct width
with scissors and attach it with impact
adhesive to the perimeter of the altitude
wheels, securing the ends with No 6 �-inch
screws and cup washers. Bolt the two circular
retainers (the wooden discs you kept over
from Part 1) to the centre top of the rocker
box sides and apply felt to the inside surface.
To finish, attach the altitude wheels to
the tube rings, sandwiching the dovetail
bars, using oversize washers on the outside.
Gently lower the altitude wheels into the
bearing ‘cups’ to complete the assembly.
As a final option, you can use the swing of
the telescope to determine the position for
the attachment of a bracing bar. S
STEP-BY-STEP GUIDE
Steve Richards is a keen astro imager
and an astronomy equipment expert
� Using both PVA wood glue and screws to secure the rocker base gives a sturdy end result
DOWNLOAD THE PROJECT FILES
Visit this link for a complete components list and
drilling diagrams: http://bit.ly/DobMountPt2

YEARBOOK 2015YOUR GUIDE TO THE NIGHT SKY
SPECIA
L
EDITIO
N
Explore the night sky over the next 12 months with BBC Sky at Night Magazine’s Yearbook
2015 – Your Guide to the Night Sky. This indispensable astronomy bible contains a full year of stargazing tips, projects and how-to guides, plus ideas on where to find dark skies, amazing images and dates for all the astronomical events you can’t afford to miss.Each month of the year has its own detailed star chart to point you toward the best views.
Plus – subscribers to BBC Sky at Night
Magazine receive FREE UK P&P*!
Chris Bramley Editor, BBC Sky at Night Magazine
PRE-ORDER YOUR COPY TODAY www.buysubscriptions.com/sky2015
Alternatively call 0844 844 0254† and quote ‘SKYHA15’†Calls to this number from a BT landline will cost no more than 5p per minute. Calls from mobiles and other providers may vary. Lines are open 8am-8pm weekdays & 9am-1pm Saturday.
*UK subscribers to BBC Sky at Night Magazine receive FREE P&P on this special edition. Prices including postage are: £9.49 for UK residents, £10.99 for Europe and £11.49 for Rest of World. All orders subject to availability. Please allow 28 days for delivery.
Photography projects to help you make a record of sky phenomena, with guides to location, camera settings and editing
All the key dates for your diary. Keep track of eclipses, oppositions, occultations, meteor showers and more
Expert tips on finding and observing deep-sky objects with the naked eye, binoculars and telescopes
ONLY£7.99FREE P&P*
FROM THE MAKERS OF

Image processing
ALL
PIC
TU
RES: JA
MES W
OO
DEN
D
skyatnightmagazine.com 2015
Balanced auroral landscapes
With James Woodend
One of the challenges of processing aurora images is matching what the human eye sees with what is recorded by a DSLR camera.
A dark-adapted human eye will usually pick up some foreground detail while the aurora appears as a faint and slow moving green-greyish ‘wisp’. In a strong auroral event, muted activity can quickly change into a very bright and fast-moving display, which can easily overexpose the shot. In this case it’s best not to lower the ISO; instead increase the shutter speed.
With the shot captured, I run through the following processing steps in Photoshop, but they will also apply to other layer-based editing software, such as GIMP. The aim is
to draw out the best from the foreground while retaining the essential components of the aurora against a dark sky.
[1] With the RAW image open in your editing software (there’s a plugin for Photoshop called Camera Raw), first look at the image’s colour temperature. Aurorae can totally confuse a DSLR’s colour balance, so adjust the colour temperature until the scene better resembles what it looked like on the night. Note the temperature slider compensates for the colour temperature of light: telling it that the light is more blue makes the resulting image more yellow. As with all processing, use small adjustments.
[2] Address the general darkness by raising overall Exposure by about +1, depending
SKILLS
on the correction needed, then adjust Whites by about +10. I add a touch (about +5) of Clarity and Vibrance too.
[3] In Camera Raw’s Sharpening and Noise Reduction panel, set Sharpening and Luminance to around 50; adjust this higher or lower as needed.
[4] Open the image in Photoshop proper to deal with any underexposed foreground subjects in the image. Mask any foreground with the Magic Wand or Lasso, adding feathering to the edge.
[5] Using Levels or Curves, select the greyscale eyedropper. Dab this on the area of the masked image where the tonal value is approximately 50 per cent. If this produces a bizarre result try another part of the masked image (you can always cancel and start again). Keep going until the resulting image has a natural tonal colour. Adjust the values of the right-hand (white) and middle (grey) sliders until the foreground is revealed to an extent that would be natural to the human eye at night.
[6] Now invert the mask and use Levels or Curves to lighten or darken the sky until it has a natural appearance, remembering that black skies look unnatural. Gently brighten the aurora to suit.
[7] Adjust Hue/Saturation. Select Greens from the drop-down menu and use the colour picker to sample any aurora present. Adjust the sliders until it has a natural colour.
[8] Finish up with some noise reduction: I use Dfine 2, part of the Google Nik Collection of Photoshop plugins.
James won the APY 2014 competition
with an aurora image. See more at www.
500px.com/imagesinspiredbynature
Þ James’s final processed image shows delicate harmony between landscape and aurora
Þ Step 4: Correct underexposure on any foreground objects separately from the sky
Þ Step 6: Darken the sky using Levels or Curves, but remember too dark looks unnatural
Þ Step 7: Use the Hue/Saturation sliders to give your aurora a realistic colour
NEW IMAGE PROCESSING JANUARY 85


SKILLS
skyatnightmagazine.com 2015
Our resident equipment specialist cures your optical ailments and technical maladies
PETE
LA
WRE
NC
E X
2, S
TEV
E RI
CH
ARD
S, C
OPY
RIG
HT
© C
AN
ON
(U
K) L
TD 2
014
Email your queries to [email protected]
As you own a DSLR, you will quickly discover the two disadvantages of this type of camera for deep-sky work – the attenuation of light in the all-important red portion of the spectrum and thermal noise generated as the sensor warms up during long exposures. A cooled CCD camera will alleviate both of these issues.
Both monochrome and colour CCDs use the same kind of sensor, which detects the intensity of all light that falls upon it. To create an image, the colour CCD uses a matrix of red, green and blue filters overlaid on the sensor’s surface so that one colour covers each photosite, or pixel. When the data is processed into an image the colour information is extracted from the matrix, but the interpolation needed between pixels in each colour channel compromises the resolution a little.
When using a mono camera, however, external filters have to be used and the images processed afterwards to create the full-colour result. This method benefits from the increased resolution of using the full CCD at every colour band, but triples the imaging time as you have to take exposures with separate red, green and blue filters.
Mono CCDs can also take full advantage of narrowband filters, whereas colour CCDs always have their colour filters in place, dramatically reducing the signal in three of every four photosites.
The biggest advantage of a colour CCD camera is that unlike a mono CCD and filters, every subframe produces a colour image. Under the unpredictable skies of the UK, this greatly increases the chances of capturing a colour image from each session.
Can I achieve focus using a Canon EOS 550D DSLR on a 9.25-inch Celestron Schmidt-Cassegrain with a focal reducer and off-axis guider? ADAM DELMAGE
Installing a camera on a telescope sounds great but as soon as you introduce a focal reducer and an off-axis guider you run into spacing issues. Focal reducers and field correctors have very specific spacing requirements and getting a good match is often fraught with difficulty.
The Celestron off-axis guider cannot be used with an Edge HD Schmidt-Cassegrain, focal reducer and a DSLR camera as the spacing is super-critical and there simply isn’t enough backspace allowance for these accessories. However, Celestron’s standard 9.25-inch Schmidt-Cassegrain and focal reducer are a little more forgiving.
Although the optimum spacing of the sensor from the face of the focal reducer is 105mm, you can extend this and achieve focus. The components should be installed in the following order: f/6.3 reducer; Schmidt-Cassegrain adaptor; off-axis guider body; male M42 camera adaptor; EOS T-Ring; DSLR.
Steve Richards is a keen astro imager
and an astronomy equipment expert
With Steve Richards
Scope
DOCTORSTEVE’S TOP TIPHow do I work out how much data to capture
when deep-sky imaging?
Stacking multiple images of deep-sky objects
increases the ‘signal to noise ratio’, which means
that you end up with more of the signal you want
and less of the noise that you don’t want. Setting
a limit of around 30 subframes is a good rule of
thumb as increasing past this number gives
diminishing returns. However, there is no substitute
for incorporating long exposures even when
stacking, but there are limits here too: imposed by
your mount’s tracking abilities and by having to
ensure that you take short enough exposures for
them not to be overwhelmed by light pollution.
SCOPE DOCTOR JANUARY 87
I’m a DSLR user but I’m thinking of trying
a CCD camera for the first time. What are
the pros and cons of colour vs mono? JIM LECKIE
Spacing makes combining a DSLR with a focal reducer tricky
A mono CCD requires external filters (top) but allows you to use narrowband filters for nebulae,
unlike a colour CCD (bottom)


REVIEWS JANUARY 89
Bringing you the best in equipment and accessories
each month, as reviewed by our team of astro experts
William Optics Star 71: a compact scope expressly intended for imaging
90
Reviews
HOW WE RATE
Each category is given a mark out of five stars according to how well it performs. The ratings are:
+++++�Outstanding +++++�Very good +++++�Good+++++�Average +++++�Poor/Avoid
skyatnightmagazine.com 2015
Gear
104Including these ultra-
portable binoculars94iOptron
CEM 60 equatorial mount
98iNova NNB-Cx
colour CCD camera
Books
102We rate four of the latest
astronomy titles
Find out more about how we review equipment at www.skyatnightmagazine.com/scoring-categories
90William Optics Star 71 five-
element apo refractor
SEE INTERACTIVE 360° MODELS OF ALL OUR FIRST LIGHT REVIEWS AT
WWW.SKYATNIGHTMAGAZINE.COM
First light
This month’s reviews
WW
W.T
HES
ECRE
TSTU
DIO
.NET
X 4

90
FIRST light
•
Price £799
(introductory offer)
•
Aperture 71mm
(3 inches)
•
Focal length 350mm
(f/4.9)
•
Optical design
Five-element patented
lens arrangement
•
Tube length 324mm
dew shield retracted,
356mm extended
•
Focuser 2.5-inch
dual-speed rack
and pinion
•
Weight 2.05kg;
2.4kg with tube rings
and Vixen bar
•
Extras Dew shield,
tube rings, Vixen
dovetail bar, Canon
DSLR adaptor
•
Supplier The
Widescreen Centre
•
www.widescreen-
centre.co.uk
•
Tel 020 7935 2580
VITAL STATS
Ever since the days of Galileo, the refractor has been the most familiar form of telescope to anyone thinking
of exploring the night sky. Early refractor designs suffered from a variety of optical problems, especially when used for astrophotography – and so today manufacturers strive to perfect the ideal imaging refractor. It is this ambition that has led to William Optics’s Star 71 five-element apo instrument.
The package comprises an optical tube, tube rings with a Vixen dovetail bar, 2.5-inch dual-speed rack and pinion focuser with built-in thermometer, front and rear metal covers and an M48-Canon EOS adaptor ring. If you have a non-Canon DSLR, you’ll need to buy a suitable adaptor.
Cheap refractors suffer from chromatic aberration, a defect where not all colours are brought to the same focus, as well as field curvature. Combined, these lead to distorted star shapes at the edge of the image field of view. Visually a doublet design can improve chromatic aberration, but triplet lenses are often used in scopes intended for imaging as they provide a higher degree of colour
WW
W.T
HES
ECRE
TSTU
DIO
.NET
X 4
, PA
UL
MO
NEY
X 2
SLIGHT AND LIGHT
The combination of compactness and lightness,
even with the tube rings and Vixen dovetail bar
attached, make this a viable travel telescope as well
as one that can capture great wide-field vistas. The
telescope tube weighs just 2.05kg; even with the ring
and dovetail bar attached it’s only 2.4kg, and at
324mm long it can fit in airline hand luggage. Its
size and weight makes it suitable for any of the travel
mounts reviewed in these pages, enabling you to take
it abroad to capture large deep-sky objects that are not
visible from your regular observing sites. Add to that
the excellent colour, field correction and fast focal
length, and you’ll find that lots of short image
exposures of a minute or so will give great results.
skyatnightmagazine.com 2015
correction. Overall triplets work well, but still leave fast apo refractors with some field distortion around the edges.
Flat out successOne way to fix this problem is to buy an external flat-field corrector. William Optics has gone even better
here, opting for a five-element arrangement: a triplet as the front objective and two correcting lenses, one of which is flat field.
As the Star 71 is expressly intended for imaging, the back of the focusing unit ends in a male M48 thread – which means you can’t add a regular star diagonal for visual observing. William Optics has stated that it will be stocking a custom 1.25-inch 90° dielectric mirror diagonal to allow visual use, but this was not available in the UK at the time of review. However we did discover we had a suitable adaptor that allowed us to attach an eyepiece for straight-through viewing with our own 26mm and 17mm eyepieces.
The Vixen mounting bar has a tripod thread, allowing us to attach the scope to a standard tripod. We enjoyed crisp wide field views with our 26mm
SKY SAYS…
Stars were sharp
to the edges as
we’d expect from
a scope designed
specifically for
a flat field
apo refractorWilliam Optics Star 71
five-element
A compact imaging scope that offers great sharpness and colour
WORDS: PAUL MONEY
>
See an interactive 360° model of this scope at www.skyatnightmagazine.com/willops715

skyatnightmagazine.com 2015
FIRST LIGHT JANUARY 91
DEW SHIELD
The retractable dew shield was
smooth to use, being easy to retract
for storage and capable of being
locked in place with a thumbscrew.
Though the shield seemed a little
short, it gave good protection from
dewing up under normal conditions.
FOCUSER
The dual-speed rack and pinion
focuser built into the rear of the
telescope was a delight to use. The
screw at the base enables you to lock
the focus position and didn’t move
even with our DSLR attached, though
there was a tiny image shift when
initially locking it.
TUBE RINGS AND VIXEN BAR
The scope is supplied with a sturdy and nicely crafted pair of tube rings,
which are lightweight and easy to use. There are threaded holes on
the top of each one so that you can add other accessories, such as a
guidescope. The rings attach via a Vixen-style mounting bar.
Þ Our four-minute hydrogen-alpha exposures revealed the Veil Nebula Complex in its entirety save for a faint region in the western section
Þ Our final stacked images of the Pleiades in Taurus showed a healthy amount of nebulosity as well as the cluster stars themselves

WW
W.T
HES
EC
RETS
TUD
IO.N
ET,
PA
UL
MO
NEY X
292 FIRST LIGHT JANUARY
FIRST light
skyatnightmagazine.com 2015
VERDICT
BUILD & DESIGN +++++
EASE OF USE +++++
FEATURES +++++
IMAGING QUALITY +++++
OPTICS +++++
OVERALL +++++
eyepiece and slightly more magnified views with
the 17mm. Stars were sharp to the edges as we’d
expect from something designed specifically for
a flat field; there’s every indication that with the
custom diagonal the Star 71 can be turned into
a visual instrument if you so wish.
But this is primarily an imaging instrument so
we attached our Canon EOS 50D DSLR to the scope
and set them on an NEQ6 Go-To mount, giving
us the ability to capture exposures of up to four
minutes without guiding. The camera’s APS-C
sensor, coupled with the Star 71, equates to an
image scale of 3.65° by 2.4°, a nice wide field of view.
Full format camera sensors will give an even wider
view of 5.9° by 3.9°, which is large enough to
photograph sprawling targets such as the Veil
Nebula and Andromeda Galaxy comfortably.
We imaged the Pleiades star cluster, taking a
series of exposures of 30 seconds each to ensure
no trailing. Stars at the corners were still crisp
and well rounded with no sign of distortion. The
final stacked image, made from two sets of data
on different days, showed an enjoyable amount
of nebulosity too. We also experimented with
taking hydrogen-alpha images of the Veil Nebula
Complex, partly because of moonlight and partly
due to the scale of the object. We achieved
12 exposures of four minutes each at ISO 3200,
showing the whole complex bar a fainter section
of the western section.
Overall, William Optics has produced a good
looking, compact imaging telescope that gives
sharp stars out to the field edges and good colour
correction. We can recommend it to anyone
interested in wide-field imaging.
SKY SAYS… Now add these:
1. Soft case
2. 50mm guidescope and rings
3. William Optics 1.25-inch 90° dielectric mirror diagonal
S
OPTICS
The patented five-element design incorporates a multicoated triplet objective lens at the front and two further lenses
farther down the tube to provide additional colour and field correction. The lenses made of FPL-53 low-dispersion glass
for colour-free apochromatic performance.
INTERNAL BAFFLES
There are internal baffles at both ends and these are coated with matt paint to cut down on stray light bouncing around inside the tube. They do a good job in preventing internal reflections, which would otherwise spoil the contrast of faint deep-sky objects.
< Our composite of the Beehive Cluster, made from 20 exposures lasting 60 seconds
< The Star 71 has a field of view of 3.65º by 2.4º – so targets such as the Moon appear quite small
>


94
FIRST light
• Price £2,299
• Payload capacity 27.2kg
• Hand controller Go2Nova 8407 with 32-channel GPS
• Database 358,000 objects
• Flash upgradeable Yes
• Autoguider port Standard ST-4
• Extras Flight case, polarscope, 12V cigar lighter cable, AC power supply, serial cable, 9.5kg counterweight
• Weight 12.3kg (excluding counterweight)
• Supplier Altair Astro
• www.altairastro.com
• Tel 01263 731505
VITAL STATS Astronomers want all sorts
of things from a telescope
mount, but nothing is
more challenging than the
quest for good stability allied with
lightness. The CEM 60 tackles these
conflicting needs head on with its
unusual Z-shaped design.
The mount is supplied in a
substantial, internally sculpted
aluminium flight case. This case is such
an excellent fit that it ensures the safe delivery
and later transport of the mount. Paradoxically
for a mount so clearly capable of portability,
the tripod is an optional extra – although in
fairness many of these mounts will be bought
for installation on piers in home observatories.
The tripod depicted here was loaned to us for
the purposes of this review.
The offset Z shape of the CEM 60 looks very
different to other equatorial mounts and at first
glance it is not immediately obvious how it works.
Closer inspection reveals that this novel design
results in the RA axis being substantially supported
in main bearings at two locations. Placing the
mount load between two bearings in this manner
should produce a better mechanical solution than
the usual mounting method that has the bearing
to one side of the payload.
WW
W.T
HES
ECRE
TSTU
DIO
.NET
X 5
, ST
EVE
RIC
HA
RDS
WORDS: STEVE RICHARDS
DEFINED BY DESIGN
The CEM 60 is the second of iOptron’s unusual Z shaped designs, the first being the company’s smaller ZEQ25 GT mount. This design is currently unique to iOptron.
An important design element of this mount is that it keeps the centre of gravity directly over the centre of the tripod and as low as possible, giving natural balance and increased stability. With the RA axis supported at both ends, this allows a rugged mounting to be produced without the bulk and additional materials of a more conventional
design. This makes the CEM 60 easy to transport but also capable of a high payload capacity of 27.2kg. These virtues make the mount a good choice for portable astrophotography where a good payload capacity and sturdiness are very appealing.
As the counterbalance shaft is offset and bolted onto the RA housing rather than inserted through it, the polarscope sighting tube is never obstructed thus allowing unrestricted access to the polarscope.
A surprising Z--shaped mount that offers novel solutions to common problems
equatorial mountiOptron CEM 60
skyatnightmagazine.com 2015
SKY SAYS…We were very impressed with how quiet the mount was when slewing. Your neighbours won’t hear this one
The counterweight bar is offset
from the centre line, completing the
Z shape. Achieving an accurate balance
in both the RA and dec. axes is easy,
because once the clutch mechanism
is disengaged both axes rotate fluidly.
Unusually, the mount head sits in
a pair of crescent-shaped cups on
the top of the base section and is
retained in position by a pair of
small locking capstans. This simple
arrangement allows the whole mount to rotate
easily for altitude adjustment.
The supplied Go2Nova 8407 hand controller
has a full feature set and a database of over 358,000
objects. It has an internal 32-channel GPS receiver
that supplies date, time and location information
automatically and it took less than 45 seconds to
initialise at the start of each of our observing sessions.
Priming the mountA good polar alignment is a prerequisite for accurate
slewing and the Go2Nova has two methods to help
you achieve this. The first produces a graphical
display showing the position of Polaris in relation
to the north celestial pole. Simply rotate the RA axis
until the bubble level on the polarscope is centred,
then adjust the altitude and azimuth of the mount
to place the view of Polaris in a matching position
>
See an interactive 360° model of this mount at www.skyatnightmagazine.com/iopmountcem60

skyatnightmagazine.com 2015
FIRST LIGHT JANUARY 95
SPRING-LOADED
SADDLE CLAMP
The saddle clamp is compatible with both the standard Vixen and the larger Losmandy styles of dovetail bar. A generous 114mm clamping section ensures a firm but non-marring attachment for your telescope. Twin spring-loaded hand bolts allow easy tightening even when wearing gloves.
ALTITUDE
ADJUSTMENT
Altitude adjustment, which must be carried
out to ensure an accurate polar
alignment, uses a geared quadrant driven by a worm
screw. We found this very easy to adjust and much
simpler than the usual opposing bolt method
adopted in many other mounts. Two
locking capstans clamp the mount firmly in position.
HAND CONTROLLER
The Go2Nova 8407 hand controller has a generous eight-line display and integrated temperature control. With a huge database of in excess of 358,000 objects – including Solar System, NGC, Messier, Caldwell, Herschel 400, UGC, IC, GCVS, Abell, binary stars and the SAO catalogue – there’s no shortage of objects to locate and observe.

WW
W.T
HESEC
RETSTU
DIO
.NET X
3
96 FIRST LIGHT JANUARY
FIRST light
skyatnightmagazine.com 2015
VERDICT
ASSEMBLY +++++
BUILD & DESIGN +++++
EASE OF USE +++++
GO-TO ACCURACY +++++
STABILITY +++++
OVERALL +++++
to the display. For southern hemisphere use, Sigma
Octantis takes the place of Polaris. The second
method, called ‘BrightStar’, doesn’t require a view
of Polaris – it is an iterative process requiring one
star at high altitude and another near the horizon.
The azimuth adjustment, using two posts and bolts
on either side of the mount, was simply a joy to use.
Following polar alignment there is a choice of
one-star or multi-star alignment. Using the latter
option with three stars we found Go-To accuracy
to be excellent, with our chosen objects across
the sky appearing within our 17mm eyepiece.
Accuracy can be further improved by
choosing up to nine stars for the alignment.
We were also very impressed with how
quiet the mount was when slewing at full
speed. Your neighbours won’t hear this one.
And when it came to imaging, we captured
five- and 10-minute guided exposures using
our 98mm refractor with an off-axis guider
and were delighted with the very round stars
that we recorded. The mount was certainly
easy to guide using the industry standard
ST-4 port for control.
The CEM 60 mount should be on any
intermediate user’s shortlist and we would
particularly recommend it for astrophotography,
a situation where payload capacity and stability
are so important.
SKY SAYS…
Now add these:
1. Altair Starbase
field tripod (for
travel)
2. Altair
Adjustable 8-inch
observatory pier
(for home use)
3. Additional
counterweights
CONNECTIONS
To assist with cable management, the CEM 60
has a range of extended ports mounted on
the rear of the dec. axis head. There are four
USB 2.0 sockets, two 12V power sockets
and an ST-4 autoguiding port.
Connections to a computer and
12V supply are on the panel
surrounding the polarscope.
GEAR SYSTEM
To minimise any backlash in the
worm gear drive system, the
CEM 60 uses a magnetically
loaded gear system to maintain
a constant mesh. An unusual
clutch mechanism comprised of
a small adjustment knob allows
for free rotation of each axis for
balancing purposes, but a solid
engagement when locked.
S
>

The best telescope advice in the industry - call us on (020) 7935 2580
NEW Daystar Quark ‘H-Alpha Eyepiece’
In stock from £799.00
As reviewed by Pete LawrenceEverything you hear about
The Quark Ha ‘eyepiece’ from Daystar is true. Available now at Widescreen.
Introducing the NEW 5-element William Optics Star 71 Imaging OTA
STAR-71mm f/4.9 Imaging OTA with FPL 53 glass.5 elements, 3 groups, 45mm imaging circle.2.5” focuser - M48 thread & Canon EOS adapter.Includes mounting rings and Vixen style dovetail.Weighs 2.4 kg with tube rings & dovetail.Optional dedicated 1.25” dielectric diagonal. An optional soft carry case is available separately. See the Star-71 at Widescreen’s events including Astrofest 2015 (Feb 6-7) and the monthly BSIA meetings. William Optics Star-71 from £799.00
‘The best scope we’ve ever made’ - William
Widescreen Knows
William Optics
Available Now
at Widescreen
See in Store Now!
6” £1199 £1095
8” £1799 £1495
9.25” £2099 £1745
Hot Product for Winter!Damian Peach DVD
It’s Here!
Available Now £22.99Learn from the Master!
-only from Widescreen-
Arguably the world’s premier marque and most desirable telescope. Questar have been in continuous production since 1950 and is now available from The Widescreen Centre. Standard model 3.5” shown from £3,999.00
The Widescreen Centre47 Dorset StreetLondon W1U 7NDTele Vue always in stock
Whether it’s an Ethos or a Delos, a scope for travelling or a Powermate IRU�WKLVH�XS�FORVH�SODQHWDU\�VKRWV��\RXOO�¿QG�LW�LQ�VWRFN�DW�:LGHVFUHHQ
Delos Ethos 13£295 £256 £525 £479
www.widescreen-centre.co.uk�������������������[email protected]���'RUVHW�6WUHHW���/RQGRQ���:�8��1'���Baker Street
NEW 150P Star
Discovery
- In Store Now! ��%LJJHU��FKHDSHU�WKDQ�
competing 130s��8SUDWHG�6\QVFDQ�
AZ GT mount��'XDO�(QFRGHU�
Technology��,W¶V�IXQ� £369.00
Call Widescreenon (020)
7935 2580
Pelican nebula courtesy Gordon Haynes www.imagingtheheavens.co.uk
StarBlast 62 £339StarBlast 4.5” £199
9x50 RA CI £8950mm guide £297
Celestron
NexStar
Evolution
���'RUVHW�6WUHHW���/RQGRQ���:�8��1' � %DNHU�6WUHHW
The Widescreen Centre Flawless
Sky Navigation
Happy New Year from The UK’s Tele Vue showroom!
SkyFi USB
£149.95

Thermoelectric cooling (TEC) unit
98
FIRST light
•
Price £455
•
Sensor Aptina
MT9M034, 8.5mm
(1/3-inch), 1280x960
3.25µm pixels
•
Ports USB 2.0, ST-4
(autoguiding), TTL
(peripheral control)
•
Operating systems Windows XP (SP3),
Vista, 7, 8 and 8.1 (32
& 64-bit)
•
Fitting C-mount,
1.25-inch adaptor
supplied
•
Size 90x76x48mm
•
Weight 260g
•
Supplier SCS Astro
•
www.scsastro.co.uk
•
Tel 01823 665510
VITAL STATS
T
he iNova NBB-Cx colour
camera blurs the line
between planetary and
deep-sky imaging, which
for a long time have been regarded as
two distinct disciplines. There are a
number of cameras already on the
market that can be used to image both,
but the NBB-Cx goes the extra mile by
including active cooling to reduce noise
and produce optimised results.
The phrase ‘Solar System imaging’ describes the
processes required to capture images of the Sun,
Moon and brighter planets. These targets are
relatively bright, but suffer because the fine detail
they present is at the mercy of the Earth’s turbulent
atmosphere and easily lost. Planetary cameras such
as the NBB-Cx address this issue by taking lots of
short exposure still images in a short burst. By
picking out the best frames, then aligning and
stacking them, its possible to remove noise. The
smoother end result is then suitable for further
processing to bring the best out of the image.
The NBB-Cx is great at this. Its capture software,
PLxCapture, offers a dedicated planetary imaging
module capable of capturing 8- or 12-bit images
WW
W.T
HESEC
RETS
TUD
IO.N
ET
X 5
WORDS: PETE LAWRENCE
A COLD-HEARTED BEAST
The NBB-Cx camera has a number of optimisations to help improve image
quality. For a start, the thermoelectric cooling (TEC) unit uses a Peltier circuit
and a cooling fan to achieve a temperature at least 25°C below ambient
levels. Cooling fins on the camera body speed up heat removal and these
get appreciably warm to the touch quite quickly.
The sensor cooling makes a noticeable difference to the thermal noise
present in images, something that increases as you up the exposure time.
In addition, during long-exposure sessions, non-essential components inside
the camera are powered down, further reducing sources of heat and delivering
images that are less noisy as a result.
Another unwanted noise source, known as readout noise, occurs every time
an image is read off the sensor and pixel charge converted to a digital value.
The NBB-Cx camera helps reduce the effects of readout noise by providing
different sensor readout speeds for its imaging modes. Finally, the visual
enhancement deep-sky imaging module produces the cleanest long-exposure
images by incorporating real-time stacking to average out random noise.
A rare breed that bridges the divide between planetary and deep-sky imagingcolour CCD camera
iNova NNB-Cx
skyatnightmagazine.com 2015
with exposures between one and 1,000
milliseconds. The camera’s Aptina
MT9M034 sensor has a 1280x960 pixel
array, which is ideal for capturing
large areas of the Moon or Sun. At full
array size, the camera is capable of
delivering 8-bit frames at 30 frames
per second (fps).
A planet’s disc will typically occupy
a small part of the imaging field,
and so the camera allows you to select a region
of interest (ROI), using a smaller portion of the
sensor. A smaller pixel array means less data
and consequently a higher frame rate – and
capturing more frames per second gets your more
from periods of steadier seeing. The smallest ROI
of 320x240 pixels can be delivered at 200fps.
Colouring the night
Our lunar imaging session produced excellent
results despite the Moon’s low altitude at the
time, with post processing revealing some fine
detail. An early morning session on Jupiter showed
off the colour capabilities of the camera, the
red-brown Southern and Northern Equatorial
Belts contrasting beautifully with the exquisite
grey-blue of a large equatorial festoon.
SKY SAYS…
It’s a decent
planetary imager
and certainly
capable of
taking great
deep-sky images
>
See an interactive 360° model of this camera at www.skyatnightmagazine.com/inovacx

skyatnightmagazine.com 2015
FIRST LIGHT JANUARY 99
IMAGE SENSOR
Light is recorded by an Aptina MT9M034 CMOS colour sensor with a full array of 1280x960, 3.75µm pixels. The chip’s quantum efficiency is good across visible wavelengths (red 57 per cent, green 62 per cent, blue 51 per cent); quantum efficiency being a measure of how much incoming light is actually recorded. It can also be 2x2 binned for greater sensitivity. An infrared-blocking filter is pre-fitted.
AUTOGUIDING PORT
As well as its imaging capabilities, the iNova NBB-Cx can be used for autoguiding. An RJ12 ST-4 cable (not supplied) is required to connect the camera to a compatible mount. An ASCOM driver allows the camera to work with a number of commercial packages as well as popular freeware programs.
COMMUNICATIONS PORT
The communications port at the base of the camera can be used to control other equipment via the ASCOM platform. Control can then be applied via the PLxCapture software for equipment such as electric focusers, motorised filter wheels and GPS units.

WW
W.T
HES
EC
RETS
TUD
IO.N
ET,
PETE
LA
WREN
CE X
5100 FIRST LIGHT JANUARY
FIRST light
skyatnightmagazine.com 2015
VERDICT
BUILD & DESIGN +++++
CONNECTIVITY +++++
EASE OF USE +++++
FEATURES +++++
IMAGING QUALITY +++++
OVERALL +++++
When you’re done imaging Solar System objects, the NBB-Cx can turn its hand to deep-sky targets. Here, the requirements of the camera change somewhat: the very short exposures needed for planetary work are replaced with long exposures necessary to record faint detail in nebulae and galaxies.
Our first test sequence was on the Orion Nebula, M42. We captured some great detail using a 4-inch f/9 telescope and modest exposures of 30 seconds and 120 seconds. The results showed plenty of red too, which is an important component colour of emission nebulae. Star colours were
generally excellent as well; we managed to image bright Aldebaran in Taurus with its
distinct orange hue intact.The camera’s operating software is supplied on a
USB memory stick and includes all you need to get the device working. Installation is straightforward but it pays to read and follow the initial instructions carefully. Camera control is via PLxCapture, which offers separate interfaces for planetary imaging, deep-sky imaging and visual enhancement. The design of each interface is reassuringly similar. Each presents two windows, one for control and one showing a preview of what the camera is seeing.
There are various noise reduction optimisations available with this camera, and they all work at their best when using PLxCapture’s visual enhancement module. This is designed to create the cleanest images by stacking them in real time. The visual enhancement module also includes its own autoguiding functions.
This camera performed well for us and was fun to use. It’s a decent planetary imager and certainly capable of taking some great deep-sky images, especially when coupled with a short focal length wide-field scope. If you’re just starting out, its main attraction is that it covers two bases in one device. The use of similar looking controls for both disciplines is a big plus point too. Finally, the addition of autoguiding functions means that should you upgrade in the future, the NBB-Cx still has a valuable place in your equipment toolbox.
SKY SAYS… Now add these:
1. iNova Carbon fibre 70 ED refractor doublet
2. Sky-Watcher Star Adventurer mount
3. iNova lithium-ion battery pack 12V – 9.8Ah
S
C-MOUNT/1.25-INCH FITTING
The camera is pre-threaded with a C-mount thread, a standard often used for video cameras. A C-mount to 1.25-inch eyepiece adaptor is supplied as standard.
PLXCAPTURE SOFTWARE
The camera is controlled via PLxCapture. On start up this presents four clickable areas, giving access to the Solar System, deep-sky and visual enhancement interfaces; a fourth pane exits the program. Each interface is similar in appearance offering settings appropriate to what you’re imaging. The visual enhancement module stacks deep-sky images in real time.
>
� We created this lunar mosaic with shots taken through a 4-inch refractor while the Moon was at low altitude
� Combined 30- and 120-second exposures of M42’s core – see page 60 for more tips on imaging this nebula
� Through a C14, we captured great contrast on Jupiter, where dark belts nestled alongside a grey-blue festoon

Japan
To buy Vixen or Opticron star gazing equipment, please contact your nearest stockist:
Oregon Observation Binoculars Available as 11x70 or 15x70 for just £99
Oregon Observation binoculars are excellent value for money for the first time or occasional user looking for a pair of large objective lens binoculars for long range terrestrial observation and star gazing.
Space Eye 70MA Great Xmas Gift!
The Vixen Space Eye 70M is the perfect starter scope package for beginner astronomers.
Supplied with two Plössl eyepieces (10mm and 20mm) and 90˚ star diagonal, the scope will deliver excellent views of the planets and moon. A 5x20mm finderscope makes targeting quick and simple.
“My overall impression is this telescope provides
good value and should keep the beginner happy.
It’s well made, easy and quick to set up”.
David Powell, OBE - Secretary, Cardiff Astronomical Society
BristolBristol Cameras, 0117 9140089
DevonFirst Light Optics, Exeter, 01392 826133
HertfordshireTring Astronomy Centre, 01442 822997
LondonThe Widescreen Centre, W1, 020 7935 2580
West SussexAstronomia, Rusper, 01306 640714
West YorkshireGreen Witch, Leeds, 01924 477719
www.vixenoptics.co.uk
For more information about Vixen and Opticron astronomy products please call 01582 726522 or email us at [email protected] quoting reference SN01.
D istributed in the UK by Opticron, Unit 21, Titan Court, Laporte Way, Luton, LU4 8EF

102
skyatnightmagazine.com 2015
Books
RATINGS
HHHHH Outstanding HHHHH Good HHHHH AverageHHHHH PoorHHHHH Avoid
TWO MINUTES
WITH AUKE
SLOTEGRAAF
What inspired you to write the book?My good friend Dieter
Willasch has been imaging the southern sky for many years. His archive of beautiful photographs was the impetus to put together this volume. Our intention was that the book should showcase images of the ‘best’ southern hemisphere objects while also giving some context to each one by describing its visual appearance, history and basic astrophysical characteristics.
What makes the southern sky so beautiful?There are two features I think: the first is the magnificent view of the centre of our Milky Way. To see the Scorpion and the Archer overhead with the Milky Way stretching down to the horizon creates an indelible impression. The other is the duo we call the Cape Clouds, better known as the Large and Small Magellanic Clouds. Naked-eye targets from a dark site, they present telescopic observers with a wonderful challenge because of the sheer number of objects they contain and diverse visual appearance.
How did you choose your favourites?Once we had selected the core list, we sorted through Dieter’s archive for other eye-catching images. We also compiled a list of objects that would be of interest to deep-sky observers. Dieter spent several sessions imaging some objects specifically for the book. We eventually ended up with enough material for a very big book indeed, but the painful process of ruthlessly pruning objects was inevitable.
AUKE SLOTEGRAAF is director of the Deep Sky Observing Section of the Astronomical Society of South Africa
You can order these books from our shop by calling 01803 865913
Reader price £22.99, subscriber price £21.99P&P £1.99 Code: S0115/4 (until 23/02/15)
Dieter Willasch and Auke SlotegraafFirefly£24.99 z HB
At first glance, you could easily mistake this book showcasing the wonders of the southern hemisphere skies for yet another coffee table tome full of pretty pictures. But although there are numerous superb images within its pages, the accompanying text makes it a fascinating read as well.
Translation from the original German version is very good and the object descriptions are written in an engaging style that leads you to examine each image more closely and specific features mentioned in the text. The objects are arranged in right ascension order – an excellent format for helping to approximately determine the best time for observation. Information about the 71 objects includes common names (including some uncommon ‘nicknames’), catalogue designations, coordinates, object type, size and the orientation of the image. Of particular interest to astrophotographers is an appendix at the end of the book that details the equipment used and exposure times for each image – this is a real astronomer’s book.
The page format places a beautiful quality image on the left-hand page with the text on the right but, where appropriate, a smaller wide-field image is included to show an object in its ‘natural surroundings’. This approach works very well, especially for objects embedded within other objects
or where a main feature of a more extensive nebula has been highlighted. The images are beautiful and have been taken using a range of filters to bring out fine detail. Many are composited from both wideband (LRGB) and narrowband (Ha and OIII) data, a technique that is becoming very popular.
To add further to the descriptive text, there are well written articles towards
the back of the book describing the formation of stars, open clusters,
globular clusters, bright and dark nebulae, planetary
nebulae and supernova remnants, finishing with galaxies and galaxy clusters. These make an excellent introduction to an astronomy beginner
and are, of course, relevant to both
northern and southern hemisphere objects.Observers in the northern
hemisphere cannot see many of the southern hemisphere
objects depicted here. If you have a natural fascination about observing them, this excellent photographic digest will fuel that curiosity.
HHHHH
STEVE RICHARDS is BBC Sky at Night Magazine’s Scope Doctor
New astronomy and space titles reviewed
Southern hemisphere nebula NGC 5189 in the constellation of Musca
NA
SA/E
SA A
ND
TH
E H
UBB
LE H
ERIT
AG
E TE
AM
(STS
CI/
AU
RA)
Pearls of the
Southern Skies
BOOK OF THE MONTH

BOOKS JANUARY 103
skyatnightmagazine.com 2015
Duncan Lunan Springer £35.99 z PB
What if we knew Earth
would be hit by an
asteroid in a decade’s
time? Would we cross
our fingers and hope not to die, or tackle
the threat head on? If we decided on
action, what could we do?
These questions underpin Duncan
Lunan’s book on an impact preparation
project at ASTRA, an organisation that
began life as the Scottish arm of the
British Interplanetary Society.
Incoming Asteroid! establishes that there
is a real threat and explains how we could
best detect and prepare for an impact.
There are three main methods we could
use to avoid a disastrous dinosaur-like
fate: deflecting the asteroid using remote
probes, launching a manned mission to
nudge the asteroid onto a different orbit
or blowing it up with nuclear weaponry.
Lunan touches on how humanity
would deal with an impact – preventing
mass chaos, surviving and returning to
normality. If unprepared, up to 25 per cent
of the human population would die from
a collision with a 1km-wide asteroid, says
Lunan. With planning, this could drop
below five per cent.
The topic is interesting, but Lunan does
not do it justice for a general audience and
Incoming Asteroid! is not always enjoyable
to read. At times it seems like an advert for
ASTRA’s programme and is occasionally
quite one-sided, strongly pushing certain
perspectives and dismissing criticisms
readily. The excessive references are also
a distraction – by page 20 the count had
already hit 47 – and the story derails
frequently as the author becomes bogged
down in small details. For those interested
in the ASTRA project rather than the general
topic, it is a comprehensive overview.
HHHHH
NICKY JENNER is a science journalist and Hubble public information officer
Reader price £33.99, subscriber price £29.99 P&P £1.99 Code: S0115/2 (until 23/02/15)
Storm Dunlop and Wil Tirion Collins£6.99 z PB
It is a sheer delight to find
a book that completely
and seemingly effortlessly
achieves its aims. The
2015 Guide to the Night
Sky combines clear and
economical writing
with charts drawn by an accomplished
uranographer to guide readers, month by
month, through the significant celestial
events of the year.
After a concise explanation of key
concepts, the major northern constellations
are introduced as reference markers from
which the rest of the sky can be explored.
The book is mainly concerned with
phenomena that can be observed with
the naked eye. For each month, there
are charts of the northern and southern
skies, Moon phases, the ecliptic and
notable events such as appulses (close
approaches) of bright planets, stars and
the Moon. The ecliptic charts show the
motion of the Sun and bright planets.
There is also a calendar that lists
Moon phases, appulses, meteor shower
maximums, planetary oppositions,
conjunctions and elongations (all of which
are explained in the introduction) and
other astronomically important events.
There are descriptions of what may
be seen from Britain in the northern
and southern skies, meteor showers and
phenomena concerning the Moon and
planets. Alongside these are notes of some
significant events – ranging from the
unobservable, such as the Dawn mission to
Ceres, to the unmissable, such as March’s
solar eclipse and September’s lunar eclipse.
If you are stuck for a gift idea for any
observational astronomer, but especially
a newcomer to the hobby, give them this
book. They will not be disappointed.
HHHHH
STEPHEN TONKIN writes our Binocular Tour each month
Reader price £5.99, subscriber price £5.50 P&P £1.99 Code: S0115/1 (until 23/02/15)
Chris Hadfield Macmillan £19.99 z HB
Chris Hadfield is the nearest thing to a celebrity among the modern breed of astronaut. Canada’s famous spaceman,
instantly recognisable thanks to his equally famous moustache, made great use of social media to promote his last mission to the International Space Station from December 2012 to May 2013.
He delighted fans, of course, with a new rendition from orbit of David Bowie’s pop classic Space Oddity, the words adapted to reflect his own mission. But when he wasn’t strumming his guitar, or keeping busy with essential tasks on the orbiting outpost, Hadfield liked to photograph the Earth.
He took an astonishing 45,000 photos over 2,597 orbits from his vantage point, some by chance and others meticulously planned to record a particular site. Hadfield posted several on Twitter but now gives us many previously unseen images in this picture-packed book, along with an entertaining commentary.
The book is subtitled Around the World in 92 Minutes, the time it takes to make one orbit. In fact, they were assembled over five months, providing a fascinating and colourful view of our own planet as only a few are ever privileged usually to see it. They include patterns, made by weather, nature and mankind. Some are particularly dramatic, such as asteroid impact scars and volcanoes. Others resemble abstract paintings or, as with Lincolnshire’s fields, patchwork quilts.
This beautifully produced package is not a textbook. Rather, it will give a fresh appreciation of the amazing Earth on which we live.+++++
PAUL SUTHERLAND is a space writer and journalist
Reader price £18.50, subscriber price £17.50 P&P £1.99 Code: S0115/3 (until 23/02/15)
You Are Here
2015 Guide to the Night Sky
Incoming Asteroid!

2
4
skyatnightmagazine.com 2015
Elizabeth Pearson rounds up the latest astronomical accessories
Gear104 GEAR JANUARY
6
3
1
5
1 Altair Lightwave 3mm Long Eye Relief Planetary Eyepiece
Price £45 • Supplier Altair Astro01263 731505 • www.altairastro.com
Delivering high magnification with a short focal length scope, this 55º field of view eyepiece is ideal for planetary or lunar observing. Other focal lengths are available.
2 Vixen SX 2.1x42 Binoculars Price £229 • Supplier Tring Astro 01442 822997 • www.tringastro.co.uk
Based on Galilean optics, these ultra-portable binoculars offer 2.1x magnification and wide views. A soft carry case is included.
3 Sky-Watcher Enhanced Dual-Axis Drive for EQ5 Mount
Price £110 • Supplier f1Telescopes 01795 432702 • www.f1telescopes.co.uk
With Sky-Watcher’s enhanced hand controller allowing you to interface with an autoguider, this motor drive helps to ensure that your camera/scope setup tracks with the night sky.
4 Space Origami SetPrice £4.99 • Supplier Paramount Zone020 3384 8304 • www.paramountzone.com
Create your own astronauts, Moon landers and stellar objects with this unique origami set. The pack contains everything you need to recreate the wonders of the Universe using nothing more than coloured paper.
5
Polarscope IlluminatorPrice £46.20 • Supplier 365Astronomy 020 3384 5187 • www.365Astronomy.com
This illuminator delivers a dim red light to make the marks on the reticle of your polarscope visible. It has been CNC machined to fit mounts that have a polarscope inside the RA axis; go online for a full compatibility list.
6
Philip’s Star MapPrice £5.99 • Supplier Scopes‘n’Skies 03333 440817 • www.scopesnskies.com
This handy wall chart not only helps you find your way around the night sky, but is an attractive addition to any astronomer’s home.

www.telescopes-direct.com
Question? Email [email protected]
From £219.00
The best yet from Lunt?Preorder yours
now!
A new benchmark in portable imaging...
Telescopes DirectFor all your Astronomy needs
Happy New Year from Telescopes Direct! We stock a very large range of telescopes, mounts, accessories, imaging equipment, solar products & more. Whatever your level, we have the best equipment and prices!
Now only £295.00!
The Original
-AndThe Best!
NEW NexStar Evolutionis Available Now!.... ....6”....8”....9.25”
New Lunt 50mm Solar Scope!
NEW SKY-WATCHER STAR ADVENTURERASTRO-IMAGING MOUNT
New to Telescopes Direct...
(DFK�¿OWHU�JXDUDQWHHG����\HDUV�
The future is here...“A 5-Star
‘scope”

What lit up the Universe?
R
ight after the Big Bang, there was a lot of light because the Universe was very dense and very hot, but as it expanded and got older,
it cooled down until it became opaque. Astronomers call this period the Dark Ages.
Around a billion years after the Big Bang, the Universe began to light up again with the generation of intense ultraviolet light as neutral hydrogen was turned into ionised hydrogen. It was a bit like burning away a fog. On a foggy day, it takes a while before you really see the sunlight because all the energy from the Sun first goes into getting rid of the fog. Then eventually it clears and you see the Sun properly.
The Universe went through some stage like that and there has long been a question over how exactly it happened. What burned away that fog? You need an awful lot of light, or to put it another way an awful lot of energy, to make the whole Universe transparent in this way.
The source of the light
Our bid to solve this puzzle is focused on looking back a little more recently, to around 10 billion years ago when the Universe was being bathed in light. We know that was happening because we can actually see distant galaxies as they were at that time. However, it’s still not clear what is producing most of the light, or energy. Was it a small number of very bright objects or a large number of individually quite dim objects? It is rather like flying over a country at night. When you look down from your aircraft, you can see either a few really big patches of light coming from big cities or maybe smaller sources of light much more spread out in lesser towns and villages. Either could be producing the same amount of power in total.
Our computer modelling has shown that it should be possible to answer this question by
ABOUT ANDREW
PONTZEN
Dr Andrew Pontzen is a
researcher at University
College, London, where
between writing songs
he seeks to master the
Universe and shed light
on its early history.
studying data that will be forthcoming from a new sky survey, using a spectroscopic effect called the
Lyman-alpha forest. Take something very distant and bright, say a quasar. As its
light travels towards our telescope, it encounters lots of gas, and so
there is always the possibility that any particular photon,
or particle of light, will be absorbed by some of this gas along the route. Combine that effect with the fact that light is redshifting as it comes towards us, due to the expansion of the Universe. It means that when we analyse the
light from our distant quasar we get a sort of
thumbprint, a very good measure of what is going on
in the gas between us and the quasar – that thumbprint is called
the Lyman-alpha forest. The phenomenon has been used
before, mainly to put constraints on things such as dark energy because it is tracing the way
that structure is behaving in the Universe. But the gas that causes it is also responding to the light being generated in the Universe. So if you compare the thumbprints of millions of quasars, you can get at how patchy the light is in the Universe, which in turn tells us what is actually generating it.
We plan to use a survey coming online in 2018 known as DESI, short for Dark Energy Spectroscopic Instrument, which will be running on a ground-based telescope at Kitt Peak, Arizona. DESI will take spectra of the light from millions of objects, including about a million quasars.
We are pretty hopeful of finding a result, but it will really be a win-win study. Either the patchiness will be there, showing that illumination of the Universe is quite uneven and so from rare bright objects like quasars, or we won’t see it, which effectively reveals that the Universe is actually very uniformly illuminated. In that case, the illumination has to be coming from small numerous objects, tiny little galaxies that we would never see individually on their own.
106 EXPERT INTERVIEW JANUARYES
O/M
. KO
RN
MES
SER
skyatnightmagazine.com 2015
WHAT I REALLY WANT TO KNOW IS…
Andrew Pontzen aims to lift the fog on what produced the ultraviolet light that ended the darkest days of the cosmosINTERVIEWED BY PAUL SUTHERLAND
We can see galaxies in
the early Universe, but
we’re not sure what ended
the cosmic Dark Ages
S


skyatnightmagazine.com 2014
STARS AND CONSTELLATIONS
Look below Orion in the northern
evening sky and spend some time
with Taurus. The bull’s most distinctive
feature is the V-shaped Hyades star cluster,
which represents its face, complete with a
red eye in the form of mag. +1.0 Aldebaran
(Alpha (_) Tauri). Extending the V takes
you to the end of its horns, marked by mag.
+3.0 Zeta (c) Tauri and mag. +1.7 Elnath
(Beta ( )̀ Tauri). From the southern
hemisphere the constellation is mostly upside
down, making its head tricky to visualise.
10th
M83
Ghost of Jupiter
Regulus
CENTAURUS
HYD
LEO
CORVUS
CRA
TER
VIRG
O
LUPU
Sickle
_
`
ab
`
a
`a
b
_
_`
ba
`
a
_
`
NORTHEAST
EA
ST
SOUTHEAST
WHEN TO USE THIS CHARTThe chart accurately matches the sky on the dates and times shown. The sky is different at other times as stars crossing it set four minutes earlier each night. We’ve drawn the chart for latitude –35° south.
With Glenn Dawes
JANUARY HIGHLIGHTS
There are some great conjunctions in
the evening skies. January opens with
Mercury 2.5° to the lower right of Venus in
the twilight. Mercury slowly moves towards
Venus with closest approach on 11th, when
they will be separated by 0.6°. On the 22nd,
the crescent Moon forms a triangle with these
two inner worlds, being 7° to the right of
Venus. The following night the Moon is 5.7°
to the right of Mars. On the 8th, the waxing
gibbous Moon forms a triangle with Jupiter
and mag. +1.4 Regulus (Alpha (_) Leonis).
Brilliant Venus can’t be overlooked
near the western horizon despite
spending January embedded in the evening
twilight. Mercury is close to Venus for the
first two weeks, but then drops into the Sun’s
glow. Mars and Neptune are heading slowly
towards Venus, and by month end they all
set around the end of twilight. Uranus
follows Neptune and sets about 90 minutes
later. Jupiter is visible most of the night,
transiting at 2:00 EST mid month. Saturn
is best left until the pre-dawn to observe.
THE PLANETS
Taurus is home to two
of the closest and
brightest open star clusters,
the Hyades (see above) and
the Pleiades, or M45 (RA
3h 47.0m, dec. +24° 07’). To
the naked eye, the Pleiades
shows six stars ranging from
mag. +2.8 to +4.3, fitting within a 1°
circle. Through binoculars M45 is
breathtaking, easily revealing a couple of
dozen stars out to 1° from the centre, the
brightest members an obvious blue.
Another gem is the
Crab Nebula or M1
(RA 5h 34.5m, dec. +22°
01’; pictured), the brightest
supernova remnant in the
sky and the most accessible
to amateur astronomers. This
slightly oval (4x5 arcminutes)
hazy patch is easy to find, only 1°
northwest of mag. +3.0 Zeta (c) Tauri.
The larger your telescope, the more
filaments and mottling you should be
able to glimpse using averted vision.
DEEP-SKY OBJECTS
THIN
KSTO
CK
GALAXY
OPEN CLUSTER
GLOBULAR
CLUSTER
PLANETARY
NEBULA
DIFFUSE
NEBULOSITY
DOUBLE STAR
VARIABLE STAR
COMET TRACK
ASTEROID
TRACK
METEOR
RADIANT
QUASAR
STAR
BRIGHTNESS:
MAG. 0
& BRIGHTER
MAG. +1
MAG. +2
MAG. +3
MAG. +4
& FAINTERPLANET
CHART KEY
The Southern Hemisphere in January
1 JAN AT 00:00 UT
15 JAN AT 23:00 UT
31 JAN AT 22:00 UT

SOUTHERN HEMISPHERE
skyatnightmagazine.com 2014
1
s
t
4
t
h
7
t
h
2
8
t
h
3
1
st
Pleiades
Hyades
M44
M35
M37
M36
Christmas Tr
ee Cluster
M50M48
M47
M41
Omicron Velorum Cluster
Jewe
l Box
47 Tucanae
NG
C 1
851
NG
C 1261
SMC
LMC
NG
C 30
0
NGC 253
Eta Carina Nebula
Tarantula Nebula
Coal Sack
M42
M78
M43
Rose
tte
Neb
ula
Ghost of Jupiter
C
e
l
e
s
t
i
a
l
E
q
u
a
t
o
r
E
c
l
i
p
t
i
c
Jupiter
Rige
l Ken
t
Ach
erna
r
Den
eb K
aito
s
Canopus
Men
kar
Aldebaran
Betelgeuse
Rigel
Siriu
s
Acrux
Algol
Cape
lla
Procyon
Ham
al
Alre
scha
Pollu
x
Castor
Alphard Mira
Had
ar
Adh
ara
Wesen
PISCES
PERSEUS
ARIES
TAURUS
AURIGA
GEMINI
CETU
S
CANIS MINO
R
ORION
MONOCEROS
LEPUS
ERIDANUS
CANISMAJOR
OCTANS
PHO
ENIX
GRU
S
INDUS
TUCANA
SCU
LPTO
R
HYDRUS
RETICULUM
DORADOPICTOR
COLU
MBA
PUPPIS
CARINA
VELA
VOLANS
APUS
PAVO
TRIANGULUM
AUSTRALE
CIRCINUS
MUSCACRUX
CHAMAELEO
N
ARA
PYXIS
MENSA
HORO
LOG
IUMCA
ELU
M
CANCER
HYDRA
South Celestial Pole
AN
TLIA
LYNXLUPUS
FORNAX
Win
ter T
riang
le Mirror of Venus
V
Kids
False Cross
_
`
ab
b
_`
_
`
a
b
_
`
_
_
`
a
b
_
`
a
b
_
`a
b
_
b
_
`
a
b
_
`a
a
`b
_
_
ab
` _
`a
b`
_
a
b
_
`
ab
b
`
`
ab
_
_ `a
ab`
_`
_
a
`
_
b
_
`
ab
_a
`
b b
`
_a
_
`
ab
_`
_b
`
_
b
a
`
_
`
ab
_
_
`
a
b
`
a
_
b
`
_
_
a
`
b`
b
b
_
`
a
b`
_`
_
b
b`
`_
a
b_
R
R
W
e
a
HR 1771
c
M1
NORTH
SOUTH
SOUTH
WES
T
WES
T
N
ORTHW
EST

LOW PRICES we’ll match any genuine web price!
Visionary Classic 10x50Good optics and excellent value for money.
Kepler GL 10x50A strong and sturdy binocular - excellent value for money and a great tool for viewing the night sky at a great price.
£29.99
£34.99
Visionary HDVery high quality optics at a great price. Traditional styled binoculars featuring BAK4 prisms, fully coated lenses, Long eye relief, rubber armour body.
HD 8x42 ......£69.99HD 8x56 ......£99.99HD 7x50 ......£79.99HD 10x50 ....£79.99HD 12x60 ....£89.99HD 15x70 ....£99.99HD 20x80 .£149.99HD 20x80T .£249.99
102 ED Telescope
SYX½X
Eyepieces & AccessoriesEYEPIECES/ACCESSORIES
Plossl 5mm (1.25”) ..................£14.99 Plossl 10mm (1.25”) ...............£14.99 Plossl 15mm (1.25”) ...............£14.99 Plossl 20mm (1.25”) ...............£14.99 Plossl 25mm (1.25”) ...............£17.99 Plossl 30mm (1.25”) ...............£17.99 Plossl 40mm (1.25”) ..............£19.99 Super Wide angle 10mm (1.25”) £39.99 Super Wide angle 20mm (1.25”) £44.99 FF 8mm (1.25”) ........................£49.99 FF 12mm (1.25”) .....................£49.99 FF 19mm (1.25”) .....................£49.99 FF 27mm (1.25”) .....................£49.99 SWA 26mm (2”) ......................£79.99 SWA 32mm (2”) ......................£79.99 SWA 38mm (2”) ......................£79.99
Olivon QB 10x50Excellent quality traditional styled binoculars. Rubber armoured, water resistant and BAK 4 optics.
Ostara Elinor 10x50BAK 4 prisms, Fully multi coated , waterproof ERH�RMXVSKIR�½PPIH�
£84.99
£179.99
Ostara Prophecy 10x50 The ultimate in high quality viewing. Highest quality, full multicoated optics, prism and phase coatings for superb brightness, clarity and contrast. ;EXIVTVSSJ�ERH�RMXVSKIR�½PPIH��*YPP]�GLIGOIH�ERH�XIWXIH�MR�XLI�9/�
£299.99
Stockists of
Visionary Saxon
Visionary HD 15x70 only £ 99.99
VisionaryFIRST VIEW3” starter telescope GSQTPIXI�[MXL�½RHIVWGSTI��table base and eyepieces.
£49.99
Clearview Binoculars: Four Square Chapel, Mapplewell. S75 6GG. Tel 01226 383736.
www.clearviewbinoculars.co.uk Callers very welcome, please check website for opening times.
The Far-Sighted binocular company is a group of independent specialist optical goods suppliers. For more information please visit www.far-sighted.co.uk.
Offers are subject to availability and at participating outlets only. Prices DQG�VSHFL¿FDWLRQV�DUH�VXEMHFW�WR�change without notice.
Binocular Outlet: 01162 430 967, Check our website and visit us on shows and events throughout the UK:
www.binocularoutlet.co.uk
The Army Surplus Store: 01297 23867, High Street, Totnes, Devon, TQ9 5NN
www.thearmysurplusstore.co.uk����SURPLUS STORE
2VWDUD�2�����ÀOWHU��µ .......................£59.99Ostara 2x achro barlow ....................£34.99Ostara 3x achro barlo .......................£39.99Ostara 45 degree 1.25” .....................£29.99Ostara 90 degree 1.25” .....................£29.99Ostara 45degree 2” ............................£99.99Ostara 90degree 2” ............................£99.99
2VWDUD��SF�ÀOWHU�VHW ..............£49.99ZLWK�IUHH�ÀOWHU�ZDOOHW
2VWDUD�FU\VWDO�PRRQ�ÀOWHU�����µ . £9.992VWDUD�&U\VWDO�PRRQ�ÀOWHU��µ £19.992VWUD�2�����ÀOWHU�����µ .......£49.99
£799.00Includes 2” SWA eyepeice, 2” 90M and 8.5x50 MPPYQMREXIH�½RHIV
We stock T2 mounts
1ER]�QSVI�½PXIVW�ERH�accessories in stock, great prices!
VisionarySTARLA
80
£169.99VisionaryTELESTO
£129.99
���´�PLUURU�UHÀHFWLQJ�WHOHVFRSH�ZLWK�full astronomical equatorial mount takes just a short time to set up and use. Great for the beginner wishing to learn all the basics of astronomy.
VisionaryMIRA CETI
80mm objective refracting telescope. Sets up in minutes and really easy to use. This is a great starter telescope yet has all the features to grow with your hobby.
£229.99
�´�PLUURU�UHÀHFWLQJ�WHOHVFRSH� with full astronomical equatorial mount for those taking things a little more seriously. Supplied complete with full size tripod and (4��PRXQW��VLGH�¿QGHU�VFRSH� and two eyepieces.
Prime camera adaptor 1.25” for SLR photography
£12.99 £49.99
,9+)�6%2+) of eyepieces and accessories
Extending3pc cameraadapter1.25”

OBSERVATORYBUILD YOUR OWN
BY MARK PARRISH
Steps, plans, diagrams and galleries: all
you need to build your own home dome

Galloway
For more information visit our website or call us on 01671 402420 www.forestry.gov.uk/darkskygalloway
Galloway Forest Park
home to the UK’s 1st Dark Sky Park
Black Hole discovered in Galloway
If you want to see stars - then Galloway Forest Dark Sky Park is the place to come. Astrophotography shows up our immediate celestial neighbours like no other place in the UK
- in proximity to cities & towns. An easy 2hrs from Glasgow and Carlisle, 4.5hrs from the midlandsand you reach the astronomers dream location.
With a Bortle classification of 2 and light readings of between 21.9 – 23 it is little wonder that we seeGalloway Forest not as a green wilderness but as black wonder!
With astronomy friendly accommodation and Galloway Forest Astronomical Society assistance whynot come and find your ideal spot in the 300 square miles of Gold Tier darkness.
Big skies beautiful settings, quiet roads and fantastic wildlife even day time can be an enjoyable experience. Bring the family along to enjoy miles of walking trails, the world’s best
mountain biking on the world famous 7stanes and visit the UK’s only red deer range.
“It was the most amazing sight I have ever seen” This is extraordinary and should not be missed” “all this and it’s free” “I thought it was a cloud and it was
the Milky Way” “I feel as if I could reach up and touch the stars” “ I have never been in such a dark place,
quite an experience”
Visit our website to get all the latest information and links. Come and visit
us now and see why we are The UK’s 1st Dark Sky Park
Photographs © NASA & ESA (unless otherwise stated)
Be among the 20% of the UK’s population to experience true darkness and the elite 2% that see the Milky Way. Crystal clear skies,
protected Dark Skies and the Milky Way stretching from horizon to horizon.
Background© James Hilder
© Forestry CommissionPicture Library

OBSERVATORYBUILD YOUR OWN
As I write this
introduction,
I am looking at
my observatory out
of the living room window and
I have to say it is hard to imagine
a time when it wasn’t there. It
really has taken the struggle out
of my observing and made it
simple, to such an extent that
I sometimes wonder if I’m
becoming a bit complacent!
When I feel the urge – and the sky
obliges – I simply switch on the power,
take the key from its hook, open up the
dome and I can be observing within just
a few minutes, sheltered from the breeze
and nearby streetlights. All my kit is close
to hand and, if the clouds roll in, I can be
packed up and back in the warm in a
matter of moments.
That was the plan from the outset, and
the observatory has certainly lived up to
expectations. I am pleased to have heard
from several readers who have built their
CONTENTS
4PART 1
How to pick your site and establish the foundations of your observatory
6PART 2
How to turn your stack of timber into the beginnings of a building
8PART 3
Creating the dome roof that will protect you and your gear from the elements
10PART 4
The finishing touches and ideas for extras to make your creation even better
12GALLERY AND
COSTINGS
Extra pics, plus an up to date parts and prices list
14CAD PLANS
The schematic diagrams you need to help you construct the observatory
own based on these plans, after the
four-part series was first published in
2009. I hope that this supplement will
inspire many more – either following
them closely or developing and adjusting
the techniques to suit their own
aspirations and situations.
A tour of ‘The Dome’ is always popular
with visitors, and even though it has
weathered a little and the accumulation
of ‘useful clutter’ inside has increased, it
continues to function very well indeed.
I do need to be a bit more assertive with
my hedge trimming and tree pruning
this autumn, though – my window of
sky has been gradually shrinking!
Mark Parrish, craftsman and amateur telescope maker

ALL
PIC
TURE
S: M
ARK
PA
RRIS
H
PART 1 LAYING THE FOUNDATIONSPick the right site and establish the foundations of your home-built observatory
Y
ou can’t beat a night under the
stars with your telescope, but
this usually involves lugging
heavy equipment outside and
assembling it, by which time you may find
that the clouds are rolling in. With a
garden observatory at home, you simply
open the roof and in a few minutes you’re
stargazing. When it’s time to stop, just
close up and head indoors.
There are many
styles of home
observatory.
Commercially made
glass-reinforced
plastic domes are an instant – although
expensive – solution, but home-built
options also include apex-roofed sheds
with roll-off or lift-off roofs. If space is
tight you can make a small enclosure that
rolls back on wheels. Every style has
its merits and drawbacks, but the great
thing about designing and building your
own observatory is that you choose the
best size, layout and appearance for
your particular situation.
In this four-part guide we will follow the
construction of a domed-roof observatory.
This is ideal for a site with strong winds,
local light pollution and limited space,
because the dome shields the telescope
and any observers within it.
In this first part, we’re going to consider
how to pick a location and how to cast the
concrete foundations. On the following
pages we’ll cover creating a framework for
the walls and floor; constructing the dome
itself; and finally fitting out the interior.
The construction methods and principles
we describe can be used with other
designs, and the materials and techniques
will be familiar to anyone with DIY
experience. So read on and begin dreaming
of your own miniature Kitt Peak.
Location, location
Before starting, you need to carefully
consider the siting of your observatory.
Spend several nights with your telescope
on a portable mount, trying different
locations. There are a number of factors
to consider, all influencing where you
get the best views. Remember that for
planetary and lunar observations a clear
view of the southern sky is essential.
Could small trees eventually grow and
block your view? Do house lights cause
a nuisance? Is the site secure? Make a
note of the optimum position and
decide how high the mount should be.
Once these practicalities are resolved,
check that you have
permission to build.
With the aid of
sketches or photos of
similar projects, talk
to your family – especially if a favourite
flowerbed will require ‘modification’! It’s
also a good idea to check with your local
planning authorities. Temporary
structures less than 3m tall are usually
allowed, providing that they are not too
close to buildings or beyond the boundaries
set by building lines. An informal chat
with the planning department may be
all that is required. Inform your
neighbours as well – a good relationship
will help things run smoothly. If they
feel involved, they will more readily
“It’s a good idea to check with your
local planning authorities”
Carefully marking out
the observatory now will prevent problems later on
4 BUILD YOUR OWN OBSERVATORY BBC SKY AT NIGHT MAGAZINE JANUARY 2015

STEP 1Carefully mark out the ground using wooden pegs, straight poles and string. Peg tops, which are used as a reference for the top of the concrete, should all be hammered down to the same level and checked with a spirit level rested on a long bar.
STEP 2Dig the pad holes (400x400x400mm) and central pier hole (900x900x900mm). If you dig the holes carefully you may not need any shuttering, but offcuts of timber or plywood nailed together can be used to keep the edges neat.
STEP 3Here we’ve used chipboard to make shuttering, which gives the concrete neat edges and sides. Make a frame to hold the eight 1m-long threaded rods in place while the concrete in the central pier base sets. Use a spirit level for accuracy.
STEP 4A cement mixer (and plenty of help) makes mixing the concrete easier. Protect grass and plants from cement dust. Add enough water to make a ‘dropping’ consistency similar to thick porridge. Wash all your tools before the concrete on them sets.
STEP 5Pour in the mix and pat it down to remove air pockets. Top up to the correct level then use a trowel to smooth the surface. Make a square frame to form a lip on top of the pier base. This will help you align shuttering for the top part.
STEP 6Once the concrete begins to set, fit your frame around the upper section of the pier and pour in the remaining concrete. The shuttering can be carefully removed after a couple of days, but don’t chip any edges, which take much longer to go hard.
STEP-BY-STEP GUIDE
understand future requests to trim bushes
and turn off security lights.
Our design has eight concrete pads
below the wall posts and a large block
(almost 1m3) for the central pier. Bolting
the mount to this solid mass of concrete
keeps it aligned and stops vibrations at the
eyepiece when walking around on the floor
above. Because the floor is raised,
additional shuttering (wooden support)
was used to provide a short column on
which to fix the steel pier. Eight M12
threaded rods 1m long were cast into this
column to provide reinforcement, and
50mm lengths were left sticking up to
which the pier base was bolted.
Sawing and nailing together the
shuttering, and mixing concrete, is
hard but rewarding work. Neatness isn’t
vital, but ensure that each surface is level
and smooth to avoid problems later on.
We used 1.5m3 of ballast and 12x 25kg
bags of cement altogether, mixed in a
ratio of about 6:1. While you are waiting
for the concrete to harden, you can begin
preparing the timber sections.
Once your foundations are laid, follow
the steps on the next spread to find out
how to construct the wooden framework
for the walls and floor.
` MARKING OUT TOOLS
A tape measure is essential, as is a spirit level and string.
` MIXER AND BARROW
Hire a cement mixer and use a wheelbarrow to transport wet concrete.
` PEGS
Make pegs from 1x2-inch timber.
` SHUTTERING BOARD AND TOOLS
A handsaw, hammer, nails and a selection of plywood or chipboard pieces.
` SPADE AND SHOVEL
A spade and a shovel for shifting ballast and concrete.
TOOLS AND
MATERIALS
TURN THE PAGE FOR PART 2 X

PART 2 CONSTRUCTING THE WALLSHow to turn your stack of timber into the beginnings of a building
Once all the concrete work is
complete, you can start work
on the observatory’s walls and
floor. This doesn’t involve any
complicated joints, just careful cutting
and fixing with screws and nails. You
may need help to erect the posts, but
once they are upright, construction is
fairly straightforward.
The eight posts have wooden strips on
either side, to which the wall cladding will
be fixed. They also have hardwood blocks
attached that hold the joist support beams,
plus pads on the bottom. We used
hardwood offcuts for these pads, but you
could improvise with thick plastic or
ceramic tiles – anything that separates
the wood from the damp ground.
You should first loosely erect the
structure and then make adjustments
so that the posts are evenly spaced and
upright. An offcut of wood, bolted to
the central column, provides a useful
reference point to take measurements
from. Tap a nail into it and you can
use a length of string to ensure all
the posts are the same distance from
the centre of your observatory.
If some of your concrete pads aren’t
quite level, you can add a little packing
under the relevant posts. When you’re
happy with the alignment, screw all the
parts tightly together. A powered
screwdriver is a great help here.
Floor-less vibrations When you come to the joists, the first to
place are the long ones either side of the
central column. Leave a gap of about
10mm between the concrete and the wood
so that vibrations from walking on the
floor aren’t transmitted to the telescope.
We used 75mm woodscrews, screwed in
at an angle of about 45º from either side,
to fix the joists onto the supporting beams.
Next, fix a joist at right angles to form the
step. The remaining joists are placed at an
equal spacing (about 400mm apart) until
you reach the edges. Some angled cuts are
needed at the edges or else the wall
cladding may not fit properly.
In between the main joists, nail short
sections of the same timber to brace
the structure. Our joists were 50mm
wide and 150mm deep, but if you want
to calculate your own depth, use this
formula as a guide: depth in mm =
[(span in mm ÷ 600) x 25] + 50. We
decided not to fix the floorboards to
the joists until the dome was in place,
as rainwater could damage them.
Next, cast a simple concrete floor
under your step. Alternatives could be
a gravel patch or a simple paving stone.
This will help to prevent wear and will
stop muddy footprints getting into the
dome during wet weather.
For our cladding we used sawn and
treated ‘feathered edge’ fencing boards.
These are screwed into place with an
overlap of about 30mm, starting close
to ground level with the thin sides at the
top. A smoother, but more expensive,
The main structure is ready to receive the dome; the steel pier
inside is firmly bolted to the concrete foundations and a neat plywood ring tops off the walls
6 BUILD YOUR OWN OBSERVATORY BBC SKY AT NIGHT MAGAZINE JANUARY 2015
ALL
PIC
TURE
S: M
ARK
PA
RRIS
H
Þ A jig was built for the router to cut the eight curved sections for the plywood ring on top of the observatory walls

STEP 1Cut sections of timber for the eight posts,
joist supports and top bracing. A circular
saw will make short work of the angled
cuts, but these can be done with a handsaw.
All our timber is pre-treated, but freshly
exposed cuts require preservative.
STEP 2Screw together the sections for each post.
Use galvanised coach bolts to hold the
hardwood blocks that will support the floor
and hardwood pads below the posts as
they are more water resistant. Coat all
the wood with preservative.
STEP 3Assemble the posts and joist supports. Use
one woodscrew for each joint at first, to
allow small adjustments to be made. All
posts must be upright and evenly spaced.
You can still see the wood shuttering on the
central column in this photo.
STEP 4Cut the floor joists and fix them into place.
Make sure there is a gap between the
column and the joists to prevent vibrations.
Short sections of joist between the main
lengths stiffen up the structure. Note the gap
on the top left for the step.
STEP 5Nail the wall cladding boards between the
posts. Start at ground level and work up,
trimming the top board if necessary. Note
the optional cast concrete floor inside the
entrance to the observatory. The short post
under the step provides support.
STEP 6The steel pier is bolted to the column using
the protruding threaded rods. A temporary
wooden block clamped to the top of the pier
(see image on page 6) can be used (with
a string line) to help set out the posts and
trim the ring sections on top of the walls.
STEP-BY-STEP GUIDE
option is interlocking tongue-and-groove
board, and a cheaper option is plywood;
the choice here is a personal one because
the outward appearance will be quite
different for each. A dark brown
preservative paint was then applied to
the outside. If you line the inside of the
observatory with plywood or coated
hardboard panels, it provides a smooth
surface for putting up your sky charts
and astrophotos.
Finally, cut the eight sections of the
plywood ring that fits round the top of
the wall posts. This ring provides a fixing
surface for the dome wheels and also
makes a great shelf for eyepieces and cups
of tea. We made a jig (a frame to hold a
piece of wood in position) that enabled us
to cut the plywood sheet to the required
radius using a router, but it could also
be cut with a jigsaw.
At this stage you should also bolt the
steel pier to the central concrete column.
The top of the pier was used to hold our
router on its jig to trim the ring to a
perfect circle once the pieces were
screwed to the post tops. With the ring
in place on, don’t forget to cover up your
construction with plastic sheeting to
protect it from rain while you prepare
for the next phase.
` POWER TOOLS
A circular saw, router or jigsaw
for cutting the wood. You can hire
these tools.
` TIMBER
Eight 153x100x100mm treated fence
posts, 150x50mm timber for the
floor joists, 100x50mm timber for
the joist beams, and a sheet of
18mm plywood.
` WOOD PRESERVATIVE
Water-based fencing paint is
available in many colours.
` WOODWORKING TOOLS
A handsaw, plane, hammer and
screwdriver, plus nails and screws.
TOOLS AND
MATERIALS
TURN THE PAGE FOR PART 3 X

Þ The lifting-on party: a great opportunity to show your creation to friends and neighbours (and get them to do the hard work!)
PART 3 BUILDING THE DOMENow it’s time to assemble the rolling roof that will protect your telescope
T
he third part of our
observatory project – building
the hemispherical dome – is
not as tricky as it sounds. The
curved ribs are cut using a simple jig that
you can make yourself, and because the
dome is coated with a strong, glass-
reinforced plastic (GRP) layer, you can
get away with a few gaps.
It’s important to build the dome on
a level surface, so that it rolls around
smoothly on its runner when fitted.
Building ours, we supported it on a ring
of level wooden pegs hammered into the
lawn. A central peg with a string line is
useful for checking that the shape is
circular as work progresses.
Spend some valuable time making a
jig to hold your router or jigsaw. We
made a frame on which to rest the
sheets of plywood and added a long
swinging arm. Our router was clamped
at various positions along the arm to
cut different sections.
The main ring is made from two layers
of 12mm plywood, and each layer is made
from eight segments. Glue and screw the
layers together with the joints staggered to
form a rigid, 24mm thick ring. A thin
plywood skirt was glued and nailed to
the outside edge. Because the ring was
supported on raised pegs, the skirt
didn’t have to take any weight during the
dome’s construction.
Next, two continuous rib sections were
cut to form the shutter opening. These
were reinforced with a second layer of
plywood. Around the opening, this second
layer protrudes to form a lip that keeps the
rain out. Two similar ribs were then added
at 90° to the shutter ribs. We used
pre-drilled steel brackets and screws to fix
them at the top and bottom. Temporary
wooden spacers inserted between the
shutter ribs kept the opening parallel.
The four remaining ribs were cut from
one layer of plywood and fixed at 45° to
the shutter ribs using butt hinges. Because
of the geometry, the hinges don’t move,
and using them means you don’t need to
make a tricky joint!
Putting it all together
Adding the hardboard skin is easier
with an extra pair of hands. We held a
whole sheet in place over the relevant
ribs and traced the shape from inside
with a pencil. Then we cut out each
panel using a jigsaw and held it up to the
ribs to check the shape, before gluing and
nailing them in place.
A similar technique is used to make
the two sections that form the shutter.
Tubes of gap-filling adhesive (available
from builders’ merchants) are excellent
for this. Once all the panels were fixed,
a generous squirt of glue was used to
seal and reinforce all the joints and
any rough edges were sanded down.
Rough-sanding the whole surface helps
the GRP resin to make a good bond.
Adding the GRP layer is fun, but messy
and sticky. Do read the manufacturer’s
safety guidance, work in a ventilated
Two continuous rib sections form the shutter opening
8 BUILD YOUR OWN OBSERVATORY BBC SKY AT NIGHT MAGAZINE JANUARY 2015
ALL
PIC
TURE
S: M
ARK
PA
RRIS
H

STEP 1Build a double-thickness plywood ring, supported on wooden pegs. The joints are staggered to improve the strength. Bend thin plywood around the edge to form the skirt. Run a length of string from a central peg to check the shape is circular.
STEP 2The two main ribs are screwed to the main ring using metal brackets. A raised lip around the shutter opening is formed by an inner layer of plywood. The rear spacers will stay in place, but temporary spacers will help to keep the opening parallel.
STEP 3Three further ribs are fixed on each side of the main ribs. We used normal hinges to join them at the top and bottom. Cut the ribs a little long, then trim them to suit the position. A stepladder comes in handy for reaching the top.
STEP 4Cut out the hardboard panels and fix them to the ribs with nails and gap-filling adhesive. The panels will form curved ‘facets’ rather than a perfect hemisphere. Sand down any ridges then use more adhesive to reinforce joints and fill gaps.
STEP 5Roughen the surface of the hardboard, then coat with resin, chopped strand matting and more resin. Don’t mix too much resin at a time or it will set in the bucket. Work it in well using rollers, and complete the job with a coloured gel coat layer.
STEP 6Eight heavy-duty 100mm fixed casters with rubber tyres above the posts take the weight, while eight smaller horizontal wheels, held by steel brackets, guide the dome round by touching the skirt. Once these are in place, the dome can be lifted on.
STEP-BY-STEP GUIDE
space – preferably outside – and certainly
avoid contact with the skin. The process
involves applying resin to the whole
surface, sticking strips of GRP matting
over each joint to make them smoother
and stronger, then sticking a layer of
GRP matting over the whole surface
of each panel, working it into the resin
with a roller.
Lastly, we applied a layer of grey-
coloured gel coat, which seals the surface
and provides the required colour. When
this is set, there may be some trimming
and sanding to do, but the dome will
require no further finishing and becomes
rigid, waterproof and strong.
Our dome runs on eight pairs of
rubber-tyred wheels, eight supporting
the dome and eight facing outwards to
guide it round. Once all the wheels are
fixed to the wall ring above each post,
enlist the help of as many friends as you
can muster to lift the dome onto the
structure. We found it easiest to lift and
manoeuvre the dome when it was
supported on two aluminium ladders.
One team lifts it from outside, while those
inside the observatory take the weight
while the ladders are slid away, before
lowering it onto the wheels.
` GLASS-REINFORCED PLASTIC (GRP)
We used chopped strand matting to cover the dome and reinforced the joints with chopped strand tape. Resin bonds the matting together.
` GRP TOOLS/ EQUIPMENT
Mixing buckets, old rollers and brushes, acetone, safety gloves, overalls.
` POWER TOOLS A router or jigsaw to cut the curved plywood parts of the ring.
` TIMBER
12mm plywood for the ribs and main ring. Thin (2mm approx) plywood for the skirt and shutter skin. Hardboard for the main dome panels.
TOOLS AND
MATERIALS
TURN THE PAGE FOR PART 4 X
Raised lip
Rear spacers

PART 4 FINISHING TOUCHESYou’re almost ready to start exploring the night sky from your new observatory
N
ow that your project looks like a completed observatory, you’ll be anxious to get inside and start observing. However, there
are still a few final details to get sorted. Here, we’ll cover the finishing touches that will help you to set up your observatory for maximum satisfaction.
First comes the shutter, which is made in two sections. The main section rolls back beyond the opening, allowing a clear view overhead. In order to see down to the horizon, the lower section can be lifted out. The shutter’s main section is fitted with small, fixed caster wheels that run directly on the dome’s surface. Additional wheels, mounted sideways
between the inside edge and the lip around the opening, guide the shutter while closing. You could open and close it with a long pole, but for a touch of sophistication we installed a pair of pulleys and a strong cord to operate the shutter. A cleat is used to tie off the cord and hold the shutter closed.
Batten down the hatches
Although the dome and shutter are heavy, it is important to provide methods to keep them in place during strong winds. We used sliding bolts to secure the shutter and four long, bent strip hinges that flap down over the wall ring to stop the dome lifting.
A step is desirable if your floor is high. We opted to build a step to bridge the distance between the ground and the floor, and also fitted a useful doormat (as you can see in the open doorway of the observatory on the left). Fortunately, we have never fallen down the step. But if you sense this might be hazardous in the dark, you could make a removable floor panel to cover the gap. The door is built from a 75x50mm timber frame with cladding to match the walls. Strong hinges and a good-quality lock are recommended for security and durability.
A plush interior
Power and lighting requirements are a personal choice; many observers use portable batteries for powering mounts and red torches for lighting. However, we opted for mains power and chose to install two dimmable red lights, two white lights for maintenance work and a pair of mains sockets so we could use a computer. The power comes from the house via an armoured cable running in a deep trench and is protected by a residual current device (RCD) circuit breaker. All the electrical work should be carried out by a registered electrician. You might also consider installing network cabling so you can use the internet in your observatory.
Once the services were installed, we painted the inside of our dome with a
10 BUILD YOUR OWN OBSERVATORY BBC SKY AT NIGHT MAGAZINE JANUARY 2015
ALL
PIC
TURE
S: M
ARK
PA
RRIS
H
Þ Inside is a perfectly aligned telescope ready for use at any time; a dream come true
The completed observatory ready for use; the fully opened shutter provides clear views of the sky

STEP 1The shutter panels overlap the opening like a lid. They could be lifted on and off, but small casters fitted to the edges run smoothly over the curved surface of the dome so the main section can simply roll back. We painted the inside matt black.
STEP 2Fit a pair of pulleys near to the top of the shutter opening. A strong nylon cord (4-6mm thick) is used to open and close the shutter. A cleat fixed to the lower edge enables you to tie the cord off, securing the panel when closed. We also fitted sliding bolts.
STEP 3As well as a good quality door lock and bolts, we used long bent hinges to make the observatory secure. These flap down from the dome and prevent it lifting or being lifted. To rotate the dome, simply flip them back up.
STEP 4Lights, power sockets and communications cables will enhance your experience. We selected tough bulkhead lights to resist knocks. Some have dimmable red bulbs to preserve night vision. A qualified electrician should carry out this work.
STEP 5Once all the painting and wiring has been done you can fit the wooden floor. Nailing the boards in place is fun and a sign that you are nearing the end of the job. If you want, you can line the walls with thin wooden panels.
STEP 6Small items of furniture and equipment (depending on requirements) can now be installed. Make sure you leave enough room to operate your telescope. It is wise not to permanently fix anything, as you will inevitably need to move it around.
STEP-BY-STEP GUIDE
wood preservative, followed by a matt
black emulsion. The interior woodwork
was given a gloss varnish. Then we laid
a tongue-and-groove wooden floor,
which is nailed to the joists. If you expect
to lift your floor to make future changes,
straight-sided boards fixed with screws
may be preferable. We lined our walls
with thin (3mm) panels of MDF. You
don’t need to insulate the walls, but
lining does make it easier to pin up
charts and photos. A pale wall colour
helps you find your way around when
the lights are dimmed.
Finally we added some useful
furniture. Space dictates what is possible,
but a small desk is good for your laptop,
eyepieces and charts, and a stool is
welcome for resting your legs. If you have
a tall mount you may also wish to make
some moveable steps to reach the eyepiece.
Most of the furniture spends its time
on the northern side of our dome, but
we recommend not fixing anything
permanently as you will inevitably want
to move it at some point.
Hopefully you’ll soon be observing from
your very own dome. You may opt for a
different design, but many of the issues
will be similar. If you have made the effort,
your enjoyment of the night sky will be
even more satisfying.
` DECORATING EQUIPMENT
Rollers and brushes, black emulsion paint and varnish; gloves and overalls.
` ELECTRICS
A pair of mains outlets, dimmable red lights, white lights, buried armoured cable and a protective RCD device, telephone and network cable.
` TIMBER 18mm floorboards (either tongue- and-grooved or plain) thin plywood or MDF (3-6mm).
` TOOLS
Hand tools for cutting and fixing the floorboards.
TOOLS AND
MATERIALS
TURN THE PAGE FOR MORE PICTURES X

� The observatory’s roof shutter is made of two parts: the upper one rolls back, while the lower one lifts out
� The pier is bolted into a block of concrete separated from the floor, meaning you can walk around it without creating vibrations
12 BUILD YOUR OWN OBSERVATORY BBC SKY AT NIGHT MAGAZINE JANUARY 2015
> Once the observatory is fully constructed and installed, you’ll be able to begin your stargazing sessions within a matter of minutes
ALL
PIC
TU
RES: M
ARK
PA
RRIS
H

TURN THE PAGE FOR CAD PLANS X
ITEM DETAILS AMOUNT UNIT COST/UNIT
COST
CEMENT 25KG BAGS 12 BAGS £5.90 £70.80
BALLAST 1M� BULK BAGS 1.5 BAGS £40 £60
WALL POSTS 100x100 TREATED SOFTWOOD 12 METRES £5 £60
CLADDING BATTENS 50x50 TREATED SOFTWOOD 24 METRES £1.50 £36
JOIST SUPPORT BEAMS 100x50 TREATED SOFTWOOD 10 METRES £2.30 £23
TOP OF WALL STRIPS 100x25 TREATED SOFTWOOD 10 METRES £1.30 £13
HARDWOOD FOR BLOCKS 100x30 HARDWOOD 1.8 METRES £2 £3.60
FLOOR JOISTS 150x50 TREATED SOFTWOOD 30 METRES £2 £60
FLOOR BOARDS 140x18 TONGUE & GROOVE 50 METRES £1.20 £60
WALL CLADDING 150x15 FEATHERED-EDGE TREATED 110 METRES £0.65 £71.50
WALL RING 2,440x1,220 18MM PLYWOOD 1.5 SHEETS £33 £49.50
DOME RING 2,440x1,220 12MM PLYWOOD 3 SHEETS £25 £75
DOME SKIRT 2,440x1,220 3MM PLYWOOD 1 SHEET £12 £12
DOME RIBS 2,440x1,220 12MM PLYWOOD 4 SHEETS £25 £100
DOME CLADDING 2,440x1,220 3.6MM HARDBOARD 7 SHEETS £6.60 £46.20
SHUTTER CLADDING 2,440x1,220 3.6MM PLYWOOD 1 SHEET £12 £12
RESIN 3 LAYERS, EACH AROUND 7.2KG 1 20KG DRUM £51 £51
CHOPPED STRAND MAT 16M� (10M ROLLS) OF 450GM 2 ROLLS £16 £32
GEL COAT 1 LAYER OF 3.5KG 1 5KG DRUM £28 £28
CATALYST 500G ADDED TO RESIN & GEL COAT 1 1KG BOTTLE £9.50 £9.50
CASTERS 100MM FIXED CASTERS 8 CASTERS £5 £40
SKIRT CASTERS 50MM FIXED CASTERS 8 CASTERS £4 £32
SHUTTER CASTERS 30MM FIXED CASTERS 8 CASTERS £4 £32
TOTAL: £977.10
ADD COST OF SUNDRIES SUCH AS SCREWS, NAILS, PAINT, WOODSTAIN AND ELECTRICS DEPENDING ON REQUIREMENTS
COST ESTIMATES FOR
OBSERVATORY CONSTRUCTION

CAD PLANSPART 1
PART 2
14 BUILD YOUR OWN OBSERVATORY BBC SKY AT NIGHT MAGAZINE JANUARY 2015

PART 3
PART 4
visit www.skyatnightmagazine.com/CAD-plans to download printable versions of these plans

UK
ADVERTISEMENT FEATURE
It is quite easy to become daunted by the vast array
of equipment that is available to today’s amateur
astronomers. Different makes, different models, different
sizes and optical arrangements – if you’re new to the
hobby, how do you make sense of all these details and �nd the
telescope that will show you the Universe?
The answer lies in buying from a specialist retailer –
somewhere that really knows what they’re talking about. Like
the retailers in this guide, they’ll have the practical knowledge
that will guide you towards the scope that won’t end up
gathering dust in a cupboard.
Today there are over 1,000 models of telescope to choose
from – refractors and re�ectors, Dobsonians and Newtonians,
Schmidt- and Maksutov-Cassegrains. And just as important as
the telescope is the mount it sits on; but do you go for equatorial
or altazimuth, manual or Go-To? And what about accessories
like eyepieces and �nderscopes?
That’s certainly a lot to consider before making a decision,
but a specialist retailer will help you make that decision, taking
important considerations like portability, construction and price
into account.
So if you need friendly, face-to-face advice and excellent
aftersales service, free from biased opinions, specialist
telescope retailers are the place to go for a helping hand
through the technical literature and tables of �gures. They’ll
help you �nd a scope that combines quality and convenience at
a price that’s right.
Find the right one for you: buy your
telescope from a specialist retailer
Retailer Guide

ADVERTISEMENT FEATURE
TELESCOPE HOUSE
01342 837610www.telescopehouse.com
Founded in 1785, Telescope House has been responsible for supplying many well-known Astronomers with telescopes and equipment. The late Sir Patrick Moore bought the majority of his telescopes from the company, including his very first instrument. With a friendly showroom in Surrey, a number one ranked retail website and a service centre with fully qualified staff, the company offers equipment from manufacturers such as Meade, Revelation, Coronado, Bresser, Skywatcher, Orion USA, TeleVue, Vixen and Explore Scientific. Whether it’s advice on your first telescope, to setting up advanced Astrophotography systems, the staff at Telescope House have a wealth of experience and instant access to the right stock to back it up.
TRING ASTRONOMY CENTRE
01442 822997 www.tringastro.co.uk
At Tring Astronomy Centre we know that choosing the right equipment can be a minefield, but we strongly believe that seeing telescopes in the flesh and talking to an expert in a relaxed environment can really help. That’s why we have a coffee machine, a fully stocked bicuit barrel, and 45+ telescopes on display. As well as representing leading brands such as Celestron, Sky-Watcher, Baader Planetarium, Altair Astro, Vixen, Opticron, AstroTrac, iOptron, Lunt, Starlight Instruments, ZW Optical and many more we also offer a hire service so you can even try before you buy! So what are you waiting for? Visit or contact Tring Astronomy Centre and lets talk Astronomy!
SHERWOODSEstablished for over 60 years, we at Sherwoods are one of the Midlands leading suppliers of astronomical telescopes, binoculars and accessories. Through our website and showroom we are able to supply optics from some of the world’s leading optical manufacturers including Celestron, Skywatcher and Meade at some of the lowest prices in the UK. We offer a full mail-order service including next day delivery on many items held in stock.
01527 857500www.binocularhouse.com
GREEN WITCHGreen Witch is one of the UK’s leading suppliers of telescopes, binoculars and accessories for astronomy. Founded by former members of the Royal Greenwich Observatory in 1998, Green Witch is dedicated to helping you choose and use the equipment that is right for you.
We also carry an extensive range of telescopes and binoculars for nature and leisure, which you are welcome to try before you buy. Whether you visit our showrooms or buy online you can be sure of excellent service.
01924 477719 - Birstall, West Yorks 01767 677025 - Gransden,
Beds & Cambswww.green-witch.com
THE WIDESCREEN CENTRE
02079 352580 www.widescreen-centre.co.uk
The Widescreen Centre is London’s Astronomy Showroom, located in Sherlock Holmes territory off Baker Street in the heart of Marylebone - a family owned and run business since starting out in1971. Our experienced and highly knowledgeable staff will offer you quality, choice, expertise and service - see Celestron, Sky-Watcher, Meade, Orion, Tele Vue, APM, Takahashi and much, much more besides says Simon Bennett, Widescreen’s MD and lifelong amateur astronomer, “If the correct equipment is purchased it will give a lifetime’s enjoyment. This is our mission. We will never sell you anything you don’t need” Watch out for Widescreen at Star Parties and exhibitions throughout the UK.
ASTRONOMIAAtronomia is the award-winning home of the biggest range of telescopes and binoculars on display in the South of England. With over 50 telescopes and even more binoculars, Astronomia brings you the widest choice from respected brands such as Celestron, Sky-Watcher, Meade, Vixen and more. Visit our store in the High Street, Dorking or check out the website. Take advantage of our full-price trade-ins on all telescopes – if you upgrade within 12 months, you don’t lose a penny!
01306 640714www.astronomia.co.uk

Swiss movement, English heart
Swiss made / Quartz chronograph movement / 1/10th second split timing function / Hand finished 316L stainless steel case / Anti-reflective sapphire crystal / SuperLuminova™ hands and indices / Matt finish optic white one-piece dial / Italian leather strap with easy opening butterfly clasp / Diameter: 39mm /
Calibre: Ronda 5040.D