Skid-Frame Foundation T - Squarespace · PDF filetimbers tend to bow, crack, and warp over...
21
3 Skid-Frame Foundation The local building department allowed us to build this 280-sq.-ft. barn on an on-grade foundation, meaning that we didn’t have to dig down to the frost line. Permanent, frost-proof foundations are typically required only for structures over 400 sq. ft., but that requirement varies from town to town, so be sure to check the building code in your area before proceeding. Here, we built a skid foundation made up of long wood beams (skids) laid across rows of solid-concrete blocks. Skids are traditionally made of solid-wood timbers, such as 46s, 66s, or even 88s, but solid timbers tend to bow, crack, and warp over time. Plus, it’s hard to find really long timbers that are perfectly straight. We eliminated those problems by fabricating each of the three 20-ft.-long skids out of pressure-treated 26s. SET THE SKIDS Start by laying out three parallel rows of 2-in.-thick solid-concrete blocks. Place five equally spaced blocks in each row, and use a long 26 board to align the blocks in straight rows (1) . Make each five- block row 19 ft. 6 in. long. Space the first and third rows precisely 12 ft. 11 1 ⁄ 2 in. apart, as measured from the center of one row to the center of the other. Center the middle row of blocks in between the other two rows. To see if a row of blocks is level, set the long board on edge on the blocks. Place a 4-ft. level on top of the long board and check for level. If necessary, shim up the lowest block by adding another solid- concrete block, short lengths of pressure-treated lumber, or strips of asphalt roofing. Our building site was relatively level, so we didn’t have to do much shimming. However, if your barn site slopes down dramatically, build up the low end with 4-in.-thick or even 8-in.-thick solid-concrete blocks. Once the foundation blocks are in position, make the three skids from 20-ft.-long pressure-treated 26s. Form each skid by fastening to- gether three 26s with 3-in.-long decking screws (2) . Drive in a row of the screws from each side of the skid in a zigzag pattern; space the screws about 12 in. apart. 1 2 Set the solid-concrete blocks into place, then check them for level. Use a long, straight 26 to align each row of five concrete blocks. Make each 20-ft.-long skid by screw- ing together three pressure-treated 26s. Drive the 3-in. screws in from both sides of the skid. 2 POST-AND-BEAM BARN T his spacious 14-ft. by 20-ft. post-and-beam barn melds tradi- tional barn architecture with modern building methods. And the result is a large timber-frame building that goes up sur- prisingly fast. The barn features a white-pine frame of rough- sawn 66 posts, 610 beams, and 48 rafters. The walls are braced with diagonal 45s, and the window openings are framed with 44s. However, unlike a traditional post-and-beam structure, there’s not a single mortise-and-tenon joint or scarf joint in the whole barn. Instead, we assem- bled the frame with metal fasteners called T-Rex connectors. The T-shaped fasteners were screwed in place and then slid into slots cut into the ends of the posts and beams. Aluminum pins were driven through holes bored in the timbers and fasteners to securely hold together the barn frame. Now this modern construction method might not impress timber-frame purists, but it does provide a quick and easy way for do-it-yourselfers to build a beautiful post-and-beam barn. Other notable features include vertical-board pine siding, two round win- dows, an interior storage loft with ladder, architectural-style asphalt roof shingles, and two styles of doors: an outswinging hinged pair on the front gable end and a traditional rolling barn door on the sidewall. And while it’s attractive on the outside, what makes this barn truly special is what’s visible on the inside: an exposed frame of large white-pine timbers that would warm the heart of any barn builder.
Transcript of Skid-Frame Foundation T - Squarespace · PDF filetimbers tend to bow, crack, and warp over...

3
Skid-Frame FoundationThe local building department allowed us to build this 280-sq.-ft. barn on an on-grade foundation, meaning that we didn’t have to dig down to the frost line. Permanent, frost-proof foundations are typically required only for structures over 400 sq. ft., but that requirement varies from town to town, so be sure to check the building code in your area before proceeding.
Here, we built a skid foundation made up of long wood beams (skids) laid across rows of solid-concrete blocks. Skids are traditionally made of solid-wood timbers, such as 46s, 66s, or even 88s, but solid timbers tend to bow, crack, and warp over time. Plus, it’s hard to find really long timbers that are perfectly straight. We eliminated those problems by fabricating each of the three 20-ft.-long skids out of pressure-treated 26s.
SET THE SKIDSStart by laying out three parallel rows of 2-in.-thick solid-concrete blocks. Place five equally spaced blocks in each row, and use a long 26 board to align the blocks in straight rows (1). Make each five-block row 19 ft. 6 in. long. Space the first and third rows precisely 12 ft. 111⁄2 in. apart, as measured from the center of one row to the center of the other. Center the middle row of blocks in between the other two rows.
To see if a row of blocks is level, set the long board on edge on the blocks. Place a 4-ft. level on top of the long board and check for level. If necessary, shim up the lowest block by adding another solid-concrete block, short lengths of pressure-treated lumber, or strips of asphalt roofing. Our building site was relatively level, so we didn’t have to do much shimming. However, if your barn site slopes down dramatically, build up the low end with 4-in.-thick or even 8-in.-thick solid-concrete blocks.
Once the foundation blocks are in position, make the three skids from 20-ft.-long pressure-treated 26s. Form each skid by fastening to-gether three 26s with 3-in.-long decking screws (2). Drive in a row of the screws from each side of the skid in a zigzag pattern; space the screws about 12 in. apart.
1
2
Set the solid-concrete blocks into place, then check them for level. Use a long, straight 26 to align each row of five concrete blocks.
Make each 20-ft.-long skid by screw-ing together three pressure-treated 26s. Drive the 3-in. screws in from both sides of the skid.
2 PoST-anD-BEam Barn
This spacious 14-ft. by 20-ft. post-and-beam barn melds tradi-
tional barn architecture with modern building methods. And
the result is a large timber-frame building that goes up sur-
prisingly fast. The barn features a white-pine frame of rough-
sawn 66 posts, 610 beams, and 48 rafters. The walls are braced with
diagonal 45s, and the window openings are framed with 44s.
However, unlike a traditional post-and-beam structure, there’s not a single
mortise-and-tenon joint or scarf joint in the whole barn. Instead, we assem-
bled the frame with metal fasteners called T-Rex connectors. The T-shaped
fasteners were screwed in place and then slid into slots cut into the ends of
the posts and beams. Aluminum pins were driven through holes bored in
the timbers and fasteners to securely hold together the barn frame. Now
this modern construction method might not impress timber-frame purists,
but it does provide a quick and easy way for do-it-yourselfers to build a
beautiful post-and-beam barn.
Other notable features include vertical-board pine siding, two round win-
dows, an interior storage loft with ladder, architectural-style asphalt roof
shingles, and two styles of doors: an outswinging hinged pair on the front
gable end and a traditional rolling barn door on the sidewall.
And while it’s attractive on the outside, what makes this barn truly special is
what’s visible on the inside: an exposed frame of large white-pine timbers
that would warm the heart of any barn builder.

4 5 Skid-Frame Foundation
If your local lumberyard doesn’t carry 20-ft.-long 26s, you’ll have to order them, which may take up to a week. Another option is to splice together 8-ft.- and 12-ft.-long 26s to form each skid. Just be sure to stagger the splices for optimum strength.
After nailing together the skids, set them into place on top of the foun-dation blocks (3). Be sure to position the skids on edge, not down flat. Check that the skids rest on the center of the blocks, and that the ends of the skids extend 3 in. past the concrete blocks. Next, lay the long 26 and 4-ft. level perpendicularly across all three skids and check for level. Shim where necessary to ensure the three skids are level with one another.
Measure the distance between the skids, making sure they’re parallel. Then, measure the two diagonal distances from opposite corners. If the two dimensions are identical, then the outer skids are square to each other. If not, adjust the first or third skid until the diagonal mea-surements are the same.
BUILD THE FLoor FramEWith the skid foundation completed, you can build the floor frame, which consists of floor joists and perimeter rim joists, all cut from pressure-treated 26s. Start by cutting 18 floor joists to 13 ft. 9 in. long, and two perimeter rim joists to 20 ft. long. Also cut nine 24-in.-long pieces from a pressure-treated 46. These blocks will provide solid fastening for the metal T-Rex connectors.
3Set the 20-ft.-long skids into place atop the rows of foundation blocks. Check each skid for level, adjusting the shims, if necessary.
2
TooL TIP
If the ground at the building site is soft, rent or buy a hand tamper and pound the area flat beneath each concrete foundation block. Com-pacting the soil will help keep the blocks from sinking down into the dirt. If necessary, put down a layer of gravel to support the blocks, sta-bilize the soil, and combat erosion.
HELPFUL HInT
When adding shims to founda-tion blocks, never use untreated wood or plywood; the shims will eventually rot, causing the floor frame to drop. Cut shims from weather-resistant materials, such as pressure-treated wood, com-posite lumber, cedar or redwood, or asphalt roof shingles.
PoST-anD-BEam Barn
TImBEr FramE
66 corner post
610 plate beam
45 diagonal brace26 rim joist
46 girt
46 bottom plate
210 ridge beam
46 fly rafter
610 crossbeam
45 diagonal brace
48 roof rafter46 fly rafter
66 loft joist
26 rim joist
26 floor joist
1⁄2-in.-dia. 6-in.-long aluminum pins
3⁄4-in. plywood floor
T-Rex connector
5-in.- deep slot
46 support block
66 corner post
Corner post detail
66 corner post

6 7
Set two joists at each end of the skids, and two more in the middle (1). Position the three pairs of joists as shown in the Floor Frame drawing on the facing page.
Measure 9 ft. 83⁄4 in. from the end of each skid and draw a square line. Place the outer edge of a 26 joist on the line and extend its end 21⁄2 in. past the skid. Secure the joist by driving a 3-in. decking screw down at an angle through the side of the joist and into each skid (2). Set a 24-in.-long 46 block against the inside of the joist. Hold it flush with the end of the joist and drive 3-in. screws through the joist and into the 46 (3). Repeat to fasten two more 46 blocks to the same joist: Position one block flush with the opposite end of the joist, and center the other block over the middle skid.
Note that the 46s positioned at the ends of the joists provide solid blocking for screwing down the metal connectors. The blocks straddling the center skid are there just to prevent the joist pairs from bowing out.
Now set another joist against the opposite side of the 46 blocks, effectively sandwiching the 24-in.-long blocks between two joists. Fasten the joist to the blocks with 3-in. screws (4). Then screw down through the sides of the joist and into the tops of the skids. Repeat to install the remaining two pairs of joists and 46 blocks.
1Set two 26 joists at the far end of the skids, then place another pair in the middle. Cut two more joists for the near end of the skids.
Fasten the 26 joist to each of the three skids with a 3-in.-long decking screw down at an angle and into the top of the skid below.
Hold a 24-in.-long support block of pressure-treated 46 against the inside of the joist. Drive 3-in. screws through the joist and into the block.
3
2
Place another 26 floor joist against the opposite side of the 46 block and secure it with 3-in.-long gal-vanized decking screws.
4
Skid-Frame Foundation
FLoor FramE
8-in.-wide 16-in.-long solid-concrete block
19 ft. 6 in.
20 ft.
13 ft. 71⁄2 in.
Skid made by nailing together three pressure-treated 26s
Space the blocks equally
3 in.
3 in.
24-in.-long pressure-treated 46 blocking
Pressure-treated 26 rim joist
20 ft.
14 ft.
Pressure-treated 26 floor joists spaced 16 in. on center
Pressure-treated 26 rim joist
Foundation Layout
9 ft. 83⁄4 in.
Floor Frame
PoST-anD-BEam Barn

PrEP THE PoSTSSix 66 posts support the roof—one on each corner and at the middle of the two long walls. Begin by crosscutting the six posts to 84 in. long. Then use the chainsaw fixture to cut a 1⁄4-in.-wide by 5-in.-deep slot into both ends of each post (1). To ensure the slots are cut into the ex-act center of the posts, we made a plywood jig, but a simple screwed-in-place 13 fence would work just as well. Fasten the fence to the post, so that the chainsaw aligns with the center of the post. Then guide the saw shoe along the fence to cut the slot.
9
7Nail the 26 perimeter rim joist to the ends of the floor joists. Be sure to keep the rim joist flush with the top edges of the floor joists.
Cover the floor frame with 3⁄4-in. tongue-and-groove plywood. Fasten the plywood down to the joists with 21⁄2-in. decking screws.
1 SaFETY FIrST
Always wear safety goggles and a dust mask when sawing wood, especially pressure-treated wood. The chemicals used in treated wood can be particularly irritating to your eyes and lungs. And after handling treated lumber, always wash your hands before eating.
Use a chainsaw attachment on a circular saw to cut 5-in.-deep slots into the 66 posts. The plywood jig ensures straight, accurate cuts.
8
After installing the three pairs of double joists, lay out the remaining 26 floor joists, spacing them 16 in. on center (5). Before screwing each joist to the skids below, be sure its end extends 21⁄2 in. past the skids (6). Now nail 26 rim joists to the ends of the floor joists (7). Drive three 31⁄2-in. (16d) galvanized nails into the end of each joist.
Next, cover the floor frame with 3⁄4-in. tongue-and-groove plywood. Cut the plywood so that the end of each sheet falls on the center of a joist. And stagger the seams between plywood sheets by 48 in. Fasten the plywood to the joists with 21⁄2-in.-long decking screws spaced 10 in. to 12 in. apart (8).
Post-and-Beam Frame To accurately cut the rough-sawn white-pine timbers for the post-and-beam frame you’ll need to use large-capacity saws, which are available at most tool rental dealers. We used three different saws, depending on the size of the timbers. The roof rafters, ridge beam, diagonal braces, and other smaller timbers were cut with a 12-in. sliding compound-miter saw or 10-in. beam saw, which is essentially an oversized circular saw with a large-diameter blade. The larger posts and beams were cut to length with a chainsaw fixture attached to a circular saw. This fixture was also used to cut slots into the ends of the posts and beams for the metal connectors.
PoST-anD-BEam Barn8
65Adjust the floor joists to extend 21⁄2 in. past the skids. Fasten each 26 joist by driving 3-in. screws down at an angle into the skid.
Slide the remaining 26 floor joists into place across the skids and between the double-pair joists. Space the joists 16 in. on center.
TooL TIP
A cordless drill/driver is indispens-able for drilling holes and driving screws, but for pure screw-driving power use a cordless impact driver. An impact driver has four advan-tages over a drill/driver: It runs at faster speeds; produces much more torque or power; has less bit slippage (known as cam-out); and is shorter and more compact.
HELPFUL HInT
To keep a board from splitting when driving screws close to the end of a board, drill a 5⁄32-in.- or 3⁄16-in.-dia. screw-shank clearance hole through the board before driving in the screw.

PoST-anD-BEam Barn10
5
11 Post-and-Beam Frame
Next, secure a hole-boring jig to the post with two 15⁄8-in. screws. This simple jig provides a quick, accurate way to drill holes for the aluminum pins that secure the posts to the connectors. You can buy the jig or make one out of scrap wood and two 1⁄2-in.-dia. steel bushings.
With the jig in place, use an electric drill fitted with an extra-long 1⁄2-in.-dia. drill bit to bore two holes clean through both the post and con-nector (5). Repeat to bore holes through the remaining 11 connectors.
ErECT THE PoSTSOnce the metal connectors have been slotted into the posts you can install the posts, starting in one corner of the floor deck. Unscrew and remove the metal connector from the end of the post. Set the connec-tor down onto the barn floor with its edges perfectly flush with the cor-ner of the plywood deck. Fasten down the connector with six 4-in.-long structural screws (1). Stand the post beside the metal connector and rotate it until the wit-ness mark on the post aligns with the mating mark on the connector. Lift the post and set it down over the protruding flange of the metal connector (2). Use a hammer to drive a 1⁄2-in.-dia. by 6-in.-long alumi-num pin through each hole (3).
321Fasten the connectors to the floor deck with four 4-in. screws. Notice that the metal flange is parallel with the long side of the barn floor.
After checking the witness marks to ensure the post is aligned properly, lift the post and set it down over the flange of the connector.
Hammer 1⁄2-in.-dia. aluminum pins through the holes to lock the 66 post to the connector. Tap the pins flush with the surface of the post.
SaFETY FIrST
When drilling the 1⁄2-in.-dia. holes through the 66 posts and metal connectors, back out the bit sev-eral times to clear wood chips and prevent the bit from jamming and twisting your wrist. This technique also produces less strain on the drill motor.
HELPFUL HInT
Here’s a quick, easy way to align the metal connectors perfectly flush with the edges of the ply-wood floor deck: Hold a layout square against the floor frame and allow it to protrude a couple of inches above the plywood deck. Then simply slide the connector up against the square and it’ll be flush with the plywood. Don’t have a layout square? Use a 10-in.- to 12-in.-long wood block instead.
Slide the wide flange of the T-Rex connector into the slot. Temporarily screw the metal connector to the end of the post.
Use a router to chamfer the edges of each slot. Trimming the edges to 45° will allow the metal connectors to fit tightly into the slots.
After slotting both ends of all six posts, chamfer the slots with a router and 45° chamfering bit (2). The chamfer allows the metal connectors to sit flat and flush against the post ends. Insert a metal T-Rex connec-tor into each slot (3). Temporarily fasten the connectors to the posts with two 15⁄8-in. screws. Now draw a dark pencil line across the edge of the metal connectors and onto the posts (4). Later, you’ll need these “witness” marks to ensure the connectors and posts are installed back to their original positions.
2 3
4To identify the precise position of the metal connector on the 66 post, draw a line across the edge of the connector and onto the post.
5
Mount a hole-drilling jig to the post with two screws and then drill two 1⁄2-in.-dia. holes completely through the 66 post and metal connector. Hold the drill as perfectly vertical as possible.
HELPFUL HInT
Use the plywood floor deck of the barn as a flat, stable work surface for cutting and slotting the posts. Place the timbers on sawhorses to create a comfortable working height and provide cutting clear-ance for the chainsaw attachment.

12
1
3
2
protruding flanges of the connectors into the slots in the tops of the posts. Secure the beam by driving two pins through the holes at each post (3). Repeat to install the second plate beam along the opposite side of the barn.
Prepare to install the 610 crossbeams by first screwing a temporary 26 cleat to two posts that are directly opposite one another. The cleats serve two purposes: They automatically establish the height of the crossbeam T-Rex connectors, and they hold up the crossbeams until you can drive in the aluminum pins.
Hold the 26 cleats level and even with the bottoms of the plate beams, not the tops of the posts. Secure each cleat with two 4-in. screws driven into the posts. Now set a T-Rex connector on top of the cleat and fasten it to the plate beam with six 4-in. screws (4). Repeat to install the connector on the opposite beam.
Fasten three metal connectors—one for each post—to the edge of the long 610 plate beam. Secure each connector with six 4-in. screws.
Lift the plate beam above the three posts. Lower the beam, guiding the metal connectors into the slots cut in the tops of the posts.
3 4Lock the 610 plate beam to the 66 posts by driv-ing two 1⁄2-in.-dia. aluminum pins through the holes at the top of each 66 post.
Screw a 24-in.-long temporary 26 cleat to the posts and then set a metal T-Rex connector on top of the cleat. Fasten the connector to the 610 plate beam with six 4-in.-long structural screws.
HELPFUL HInT
The easiest way to install the over-head beams is to first set each end of the beam on top of a stepladder. Then stand on the ladder with your shoulder pressed against the under-side of the beam. Now simply take one or two steps up to set the beam into position. Depending on the size of the beam, you’ll need between two and four people, each with their own ladder.
Install the remaining five posts in a similar manner, securing each with two pins. Then screw temporary 24 diagonal braces to the posts to hold them perfectly plumb (4).
InSTaLL THE BEamSThe six vertical 66 posts support an overhead framework of eight horizontal timbers: two 20-ft. 4-in.-long 610 plate beams that span the length of the barn; three 13-ft. 1⁄2-in.-long 610 crossbeams that run perpendicular to the plate beams; and three 6-ft. 41⁄2-in.-long 66 joists that fit between two crossbeams to frame the loft.
Cut the eight beams and joists to length, then use the chainsaw attachment to cut slots into both ends of the three crossbeams and three joists; the plate beams don’t require slots.
Chamfer the slots, then temporarily screw metal connectors into each slot and drill the 1⁄2-in.-dia. holes through the beams and connectors for the aluminum pins. Note that the 610 connectors require three holes each; the 66 connectors need only two holes.
Set all eight beams on edge onto the plywood floor deck. Slide one of the long plate beams up against the three posts along one side of the barn. Check that the beam extends past each corner post by 2 in. Use a framing square to mark the position of each post onto the beam.
Remove the metal T-Rex connectors from the tops of the three posts. Set the connectors onto the beam, using the post layout lines for po-sitioning. Fasten the three connectors to the plate beam with 4-in. screws (1).Next, raise the plate beam and set it on top of the three posts (2). You’ll need at least four people to lift the heavy beam into place. Fit the
4Temporarily hold the posts plumb with diagonal 24 braces. Fasten the braces to the floor frame and posts with 3-in. screws.
Build-a-Barn KitAll the metal connectors, building plans, and hole-boring jigs needed to erect a post-and-beam frame can be purchased through Connecticut Post and Beam (www.ctpostandbeam.com; 203-534-8771).
T-Rex connectors are available for various sizes of posts and beams, including both full-dimension rough-sawn lumber and standard nominal-dimension lumber.
Rough-sawn timbers, sometimes called “green” lumber, are cut to full dimension; a rough-sawn 66 post measures 6 in. by 6 in. Nomi-nal-dimension lumber is milled and surfaced to slightly smaller sizes; a nominal 66 is only 51⁄2 in. sq.; a nominal 44 is 31⁄2 in. sq. Be sure to order the T-Rex connectors to match the size of your timbers.
Connecticut Post and Beam also offers more than a dozen different building plans for barns ranging in size from 12 ft. by 16 ft. to 26 ft. by 42 ft.

14 15 Post-and-Beam Frame
Next, fasten a 24 cleat to each crossbeam, directly opposite from one another. Hold each cleat tight against the underside of the metal connector and secure it with two 3-in. screws. Lower the 66 joist down between the crossbeams and guide the metal flanges into the slots (8). Rest the joist on the cleats and drive two aluminum pins through each end of the joist. Repeat the previous steps to install the final two joists.
BraCE THE FramECut 46 bottom plates to fit snugly between the six vertical 66 posts (1). Secure each plate to the plywood floor deck with 8-in. struc-tural screws. Be sure to drive the screws into a floor joist or rim joist.
Next, cut diagonal braces out of 45 pine timbers. Make each brace 30 in. long and miter-cut both ends to 45°. Near each end of every brace drill two 1⁄2-in.-deep by 1-in.-dia. counterbore holes. Set a brace into place between the bottom plate and post and secure with four 8-in.-long structural screws (2). After installing the lower braces, fas-ten the upper braces, screwing each one to the post and overhead beam (3).Once all the braces are securely fastened, conceal the screw heads by gluing a 1⁄4-in.-thick by 1-in.-dia. wood plug into each counter- bore hole.
1Install 46 bottom plates between the vertical 66 posts. Drive 8-in. screws through the plates and ply-wood deck and into the joists.
Fasten diagonal braces at each post to add strength and rigidity to the timber frame. Secure each 45 brace with four 8-in. screws.
2
Add 45° diagonal braces to the upper wall sections, too. Align each brace flush with the outside edge of the post and plate beam.
3
Raise the 610 crossbeam above the plate beams with its slots aligned vertically. Drop the beam down, fitting the metal connectors into the slots (5). Let the crossbeam rest on the 26 cleats. Use a hammer to drive three aluminum pins through each end of the beam, locking it between the plate beams (6). Repeat the previous four steps to install the two remaining crossbeams.
Now prepare to install three 66 joists between the two crossbeams at the back half of the barn. These 66 joists will support the floor of the overhead storage loft. Begin by screwing three metal connectors to each crossbeam. Hold the connectors flush with the tops of the crossbeams and space them 41 in. on center. Secure each connector with six 4-in. screws (7).
TooL TIP
If you have trouble driving in the alu-minum pins, it’s because the holes in the beam and metal connector are misaligned. When that occurs, take a drill and 1⁄2-in. bit and bore into the offending holes with very light pressure to chamfer the edges of the holes in the connector. Then, when you tap in the pin, those slight chamfers will help steer the pins through the holes.
5Set the 610 crossbeam between the plate beams. Fit the metal connectors into the slots, then rest the crossbeam on the 26 cleats.
7
Screw metal connectors to the crossbeams for each of the three 66 joists that will support the floor of the overhead loft. Fasten a temporary 24 cleat to the crossbeam, directly below each metal connector.
8Lower the 66 joist between the crossbeams. Slip the connectors into the slots in the joist ends. Rest the joist onto the cleats and then pin each end.
Secure each end of the 610 cross-beam with three aluminum pins, driving the 6-in.-long pins flush with the surface of the crossbeam.
6

3 4
17
Cut a 46 rough sill to fit between the vertical trim-mer studs. Then push the sill down onto two 20-in.-tall spacer blocks.
Drive a 6-in. screw through the outside of the sill and into the trimmer. Move the spacer block and drive two screws up from below.
Cut 46 horizontal girts to span between all the posts and trimmer studs. Set the girts level with the tops of the lower diagonal braces, about 251⁄2 in. above the floor deck. Fasten each girt with 6-in. screws. Now, frame the barn-sash windows by cutting two vertical 46 trim-mer studs to fit between the girt and plate beam. Slip the trimmers into place, spacing them 481⁄4 in. apart (2). Check each trimmer for plumb, then secure them with 6-in. screws.
Saw two 46s to fit between the two vertical trimmer studs. One will serve as the rough sill, the other as the header. Cut two 20-in.-long spacer blocks from scrap wood. Stand one spacer on top of the hor-izontal girt and against the inside of each trimmer stud. Set the 46 sill into place between the trimmers and push it down on top of the spacer blocks (3). Screw the sill to the trimmers from the outside and from below (4).Next, cut two 25-in.-long spacer blocks. Stand the spacers on top of the sill and against the inside of the trimmers. Set the 46 header be-tween the trimmers and on top of the spacers (5). Screw the header to the trimmer studs. Remove the spacers and repeat to frame the rough openings for the remaining sidewall windows. Saw a 46 header to fit between the
vertical trimmer studs. Push the header down onto two 25-in.-long spacer blocks, then secure with 6-in. screws.
5
Post-and-Beam Frame PoST-anD-BEam Barn16
FramE THE WInDoWSOnce all the main posts and beams are erected, you can install the rough framing for the windows. There are two 24-in. by 48-in. barn-sash windows in the rear sidewall, one 24-in. by 48-in. barn-sash window in the front sidewall, and a 12-in. by 84-in. fixed (non-opening) transom window in the rear gable end wall. (The two round windows don’t get framed until you frame the roof.)
However, before framing the window openings, you must install some additional wall framing. Cut two horizontal 46 nailers to 13 ft. long and screw one to the underside of each crossbeam at the front and rear of the barn (1). Position the nailers even with the 66 corner posts and 2 in. back from the outer face of the 610 crossbeam. These timbers provide nailing for the siding, and the one in the front also acts as a stop for the top of the hinged doors.
Next, create a rough opening at the front of the barn for the hinged doors: Cut two vertical 46 trimmer studs to span from the plywood floor to the underside of the 46 nailer above. Screw the trimmers in place, making sure they’re plumb and spaced 84 in. apart.
Install another 46 trimmer stud for the sliding door on the right-hand sidewall. Cut the 46 to fit between the plywood floor and the underside of the 610 plate beam above. Screw the trimmer in place 48 in. to the right of the 66 center post.
HELPFUL HInT
When fastening the timbers that frame the rough openings for the doors and windows, drive in the screws from the outside of the barn. That way, the screw heads will be covered by the siding and not be visible from inside the barn.
1 2Use 8-in. screws to fasten a 46 nailer to the under-side of each 610 crossbeam. Hold the nailer flush with the outer surface of the beam.
Frame the sides of the window open-ings with 46 trimmer studs. Check each 46 for plumb with a level be-fore screwing it in place.

PoST-anD-BEam Barn18 19
Roof Framing Similar to the barn frame, the roof is built with rough-sawn white-pine timbers, including 48 roof rafters, spaced 44 in. apart; 46 fly rafters, which create an overhang at each end of the gable roof; and a 210 ridge beam that runs between the rafters at the roof peak.
This roof is stick-built, meaning it’s built one board at a time, but there are only 17 pieces to the whole roof frame—12 rafters, four 46 fly rafters, and one ridge beam—so it goes up pretty quickly.
SET THE raFTErSCut each rafter from a 12-ft.-long 48. Use a 10-in. or larger beam saw or a 12-in. sliding-compound miter saw to cut the rafters. Miter the top end of each rafter to 40° to form the appropriate 10/12 roof slope (1). Trim the lower end of each rafter to create a 51⁄2-in.-tall plumb tail cut, as shown in the drawing on the facing page. Then, cut the bird’s-mouth notches to create a 10-in. overhang at each sidewall.
Measure 44 in. from the inside surface of the cross beams at the front and rear of the barn and mark layout lines on top of both plate beams. These lines represent the edges of the second and fifth pairs of rafters. As one person supports the upper end of the rafter, set its lower end on the line. Then, fasten the lower end of the rafter to the plate beam with two 10-in. screws (2). Screw on the mating rafter in a similar manner. Move down to the fifth rafter position and repeat the above steps to install the other pair of rafters.
Next, cut the 210 ridge beam to 20 ft. 4 in. long. Push the ridge beam up between the pairs of rafters from below (3). Check to be sure the ridge extends beyond each rafter pair an equal amount.
1 2Use a large portable beam saw or 12-in. sliding- compound miter saw to miter-cut the ends of the 48 rough-sawn roof rafters.
Hold a roof rafter in place and secure its lower end to the top of the 610 plate beam with two 10-in.-long structural screws.
After installing two pairs of rafters, slide the 210 ridge beam between the rafters. Be sure the ridge is flush with the tops of the rafters and secure each rafter to the ridge with two 6-in. screws.
3
Roof Framing
raFTEr LaYoUT
Miter-cut rafter to 40° to form 10/12 roof slope.
Rough-sawn pine 48
4 ft.
8 ft.
12 ft
.
16 ft
.
40°
20 ft
.
51⁄2 in.plumb tail cut
9 ft. 0 1 ⁄16 in
.
10 ft. 1
1 ⁄16 in.
210 ridge beam
48 roof rafter
46 fly rafter
6-in. plumb heel cut roof rafter
610 plate beam
6 in.
55⁄16-in. level seat cut
610 plate beam
4 in.6 in. 3 ft. 8 in. 3 ft. 8 in. 3 ft. 8 in. 3 ft. 8 in.4 in. 4 in. 4 in. 4 in. 4 in. 6 in.
48 roof rafter
3 ft. 8 in.
Roof Framing 21
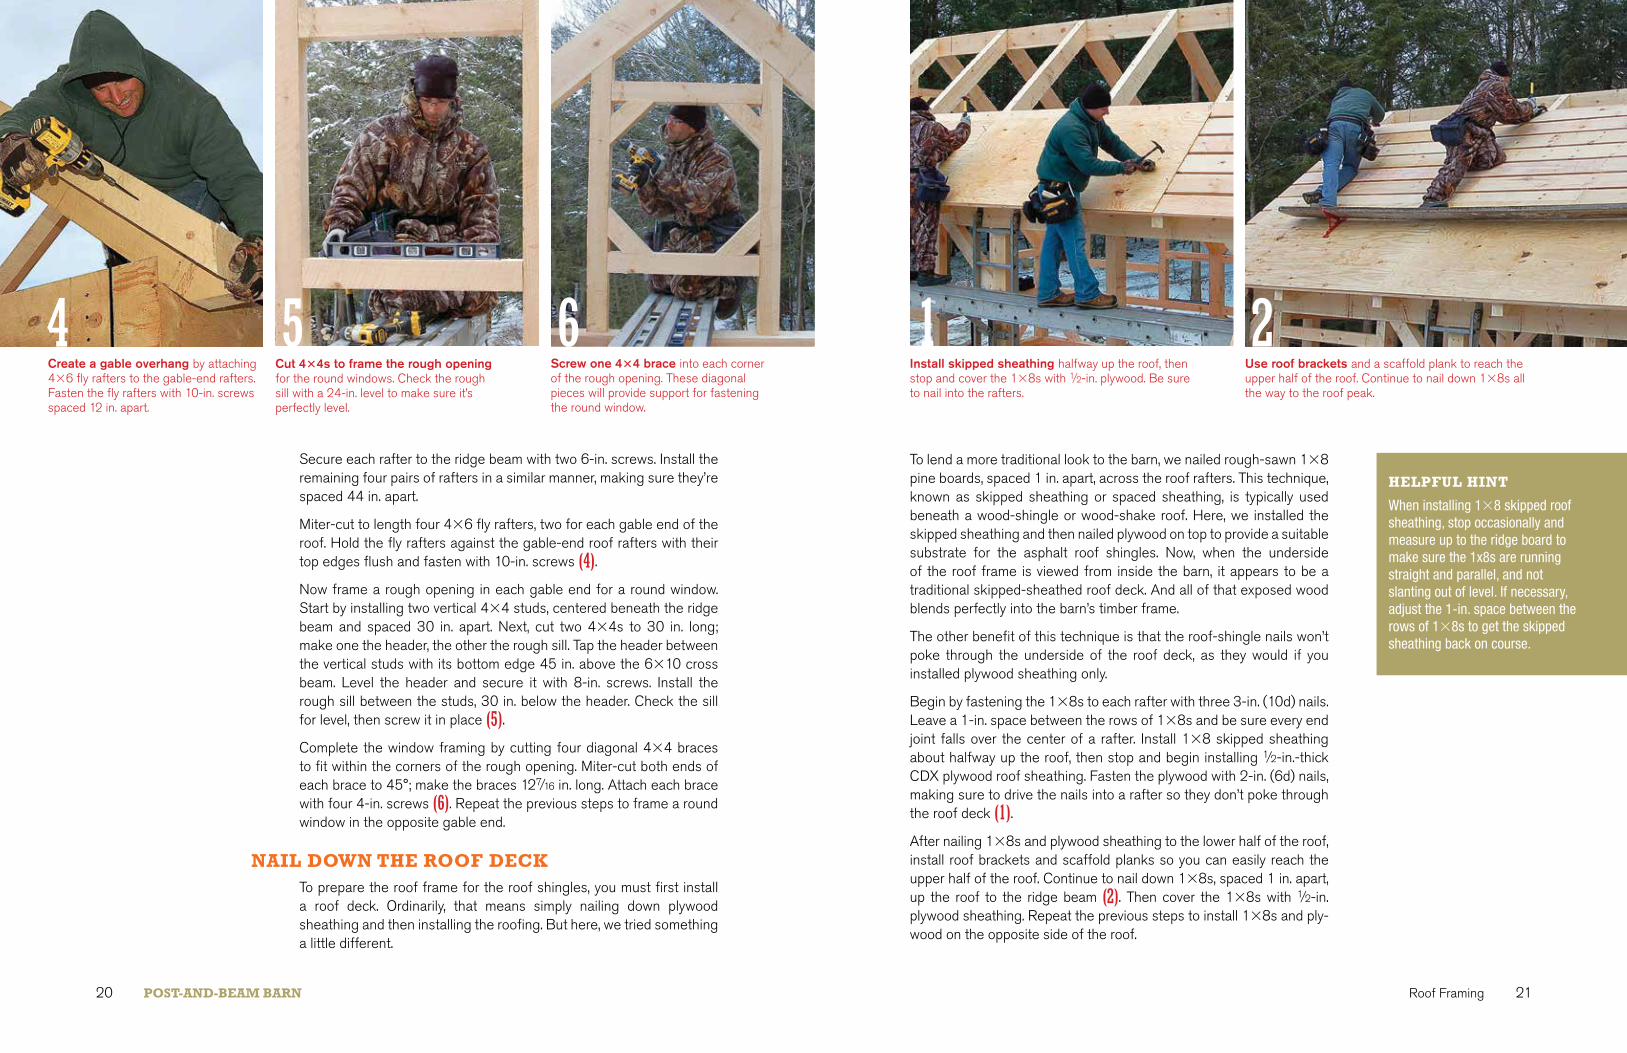
To lend a more traditional look to the barn, we nailed rough-sawn 18 pine boards, spaced 1 in. apart, across the roof rafters. This technique, known as skipped sheathing or spaced sheathing, is typically used beneath a wood-shingle or wood-shake roof. Here, we installed the skipped sheathing and then nailed plywood on top to provide a suitable substrate for the asphalt roof shingles. Now, when the underside of the roof frame is viewed from inside the barn, it appears to be a traditional skipped-sheathed roof deck. And all of that exposed wood blends perfectly into the barn’s timber frame.
The other benefit of this technique is that the roof-shingle nails won’t poke through the underside of the roof deck, as they would if you installed plywood sheathing only.
Begin by fastening the 18s to each rafter with three 3-in. (10d) nails. Leave a 1-in. space between the rows of 18s and be sure every end joint falls over the center of a rafter. Install 18 skipped sheathing about halfway up the roof, then stop and begin installing 1⁄2-in.-thick CDX plywood roof sheathing. Fasten the plywood with 2-in. (6d) nails, making sure to drive the nails into a rafter so they don’t poke through the roof deck (1). After nailing 18s and plywood sheathing to the lower half of the roof, install roof brackets and scaffold planks so you can easily reach the upper half of the roof. Continue to nail down 18s, spaced 1 in. apart, up the roof to the ridge beam (2). Then cover the 18s with 1⁄2-in. plywood sheathing. Repeat the previous steps to install 18s and ply-wood on the opposite side of the roof.
21Install skipped sheathing halfway up the roof, then stop and cover the 18s with 1⁄2-in. plywood. Be sure to nail into the rafters.
Use roof brackets and a scaffold plank to reach the upper half of the roof. Continue to nail down 18s all the way to the roof peak.
HELPFUL HInT
When installing 18 skipped roof sheathing, stop occasionally and measure up to the ridge board to make sure the 1x8s are running straight and parallel, and not slanting out of level. If necessary, adjust the 1-in. space between the rows of 18s to get the skipped sheathing back on course.
Secure each rafter to the ridge beam with two 6-in. screws. Install the remaining four pairs of rafters in a similar manner, making sure they’re spaced 44 in. apart.
Miter-cut to length four 46 fly rafters, two for each gable end of the roof. Hold the fly rafters against the gable-end roof rafters with their top edges flush and fasten with 10-in. screws (4). Now frame a rough opening in each gable end for a round window. Start by installing two vertical 44 studs, centered beneath the ridge beam and spaced 30 in. apart. Next, cut two 44s to 30 in. long; make one the header, the other the rough sill. Tap the header between the vertical studs with its bottom edge 45 in. above the 610 cross beam. Level the header and secure it with 8-in. screws. Install the rough sill between the studs, 30 in. below the header. Check the sill for level, then screw it in place (5).Complete the window framing by cutting four diagonal 44 braces to fit within the corners of the rough opening. Miter-cut both ends of each brace to 45°; make the braces 127⁄16 in. long. Attach each brace with four 4-in. screws (6). Repeat the previous steps to frame a round window in the opposite gable end.
naIL DoWn THE rooF DECKTo prepare the roof frame for the roof shingles, you must first install a roof deck. Ordinarily, that means simply nailing down plywood sheathing and then installing the roofing. But here, we tried something a little different.
4 5Create a gable overhang by attaching 46 fly rafters to the gable-end rafters. Fasten the fly rafters with 10-in. screws spaced 12 in. apart.
Cut 44s to frame the rough opening for the round windows. Check the rough sill with a 24-in. level to make sure it’s perfectly level.
20
Screw one 44 brace into each corner of the rough opening. These diagonal pieces will provide support for fastening the round window.
6
PoST-anD-BEam Barn

23 Roofing 22
Set the aluminum drip-cap flashing onto the roof edge, positioned so that its wide flange lays flat on the plywood deck. Secure to the roof with 11⁄2-in.-long nails.
Aluminum drip cap is typically sold in 10-ft. lengths, and is easily cut with aviation snips. Here, we installed bright (unpainted) aluminum drip cap, but it also comes in limited paint colors, including white and brown.
Start by setting a length of drip cap onto the roof with its narrow flange hanging down over the roof edge. Align one end of the flashing flush with the plywood sheathing, then fasten it to the roof deck with 11⁄2-in. (4d) nails. (1). Install the remaining pieces of drip cap across the edge of the roof in a similar manner, overlapping the ends by 3 in. or 4 in. When necessary, cut the drip cap to length with aviation snips.
naIL on THE rooF SHInGLESThe first step to asphalt roofing is nailing down a row of starter shin-gles along the lower edge and ends of the roof. However, to ensure the shingles are installed perfectly straight, you must first snap two layout chalklines.
Snap the first chalkline across the plywood roof deck, 6 in. up from the lower edge of the drip cap flashing. Then, snap a line up each end of the roof—from the eave to the ridge—6 in. in from the rake boards.
Attach a row of starter shingles along the edge of the roof with 11⁄2-in. roofing nails (2). Align the shingles flush with the chalkline and butt them end-to-end (don’t overlap them). Starter shingles are 61⁄2 in. wide, so they’ll overhang the roof edge by 1⁄2 in. Note that we used a pneu-matic coil roofing nailer, but you can hand-nail the shingles, as well. Just be sure to use 11⁄2-in.-long galvanized roofing nails. Cut the last starter shingle to fit using a utility knife or manual shingle shear.
Nail starter shingles up each end of the roof (3). Again, place the shin-gles on the chalkline and butt them end-to-end. With starter shingles in place, you can begin nailing architectural shingles along the roof
TooL TIP
A pneumatic framing nailer pro-vides a much faster, easier way to fasten the roof deck, but if you’d prefer to hand-nail the 1x8s and plywood—as we did—use a fram-ing hammer, which has a long handle for increased power. Fram-ing hammers are commonly avail-able in weights ranging from about 22 oz. to 30 oz.
Nail a row of starter shingles along the edge of the roof. Align the top edge of the shingles with the chalkline snapped across the roof.
2
Install starter shingles up each end of the roof, making sure they follow the chalkline. Secure each shingle with 11⁄2-in. roofing nails.
3
1
PoST-anD-BEam Barn
Once the roof deck is completed, install the exterior roof trim, starting with the 16 fascia board, which runs across the rafter tails. Fasten the fascia to each rafter tail with two 3-in. (10d) galvanized nails.
Next, nail a 16 rake board to each fly rafter at the gable ends of the roof. Allow the rake to run long, then use a circular saw to trim it flush with the fascia (3). Now, to create a little extra shadow line along the gable ends, nail 12 trim to the rake boards. Hold the 12 flush with the upper edge of the 16 rake and attach it with 21⁄2-in. (8d) galvanized nails (4).
Roofing To complement the barn’s wood timber frame and pine siding, we installed architectural-style asphalt roof shingles that are somewhat reminiscent of weathered wood. Since the building isn’t heated, it wasn’t necessary to first install builder’s paper or any other type of underlayment. The 131⁄4-in.-wide by 393⁄8-in.-long asphalt shingles are simply nailed down to the plywood deck with galvanized roofing nails.
InSTaLL THE DrIP CaPBefore installing the roof shingles you must first protect the lower edge of the roof deck with a piece of aluminum flashing, called drip cap or drip edge. As its name implies, the flashing helps divert rainwater off the roof, but it also conceals the exposed edge of the plywood sheathing and provides rigid support for the lowest course of roof shingles.
43Cut the 16 rake board longer than needed, then nail it to the fly rafter. Use a circular saw to trim the rake flush with the fascia board.
Nail 12 trim to the 16 rake. This narrow piece of trim isn’t required, but it does create an extra shadow line along the gable ends.
SaFETY FIrST
• Metal roof brackets provide a safe, convenient way to work on slanted roofs, but only if you follow two important safety rules: Always nail the brackets solidly into roof rafters, not just into the plywood sheathing; and use an approved staging or scaffold plank with the brackets. Standard construction- grade lumber can bend excessively and crack if walked upon.
• The edges of aluminum drip cap are extremely thin and sharp. Handle the flashing carefully and wear work gloves when cutting it to length.
HELPFUL HInT
If you’re interested in an asphalt- shingle roof but architectural shingles aren’t in your budget, buy three-tab shingles. They may not be as visually attractive, but three-tab shingles are easier to install, weigh nearly half as much, and cost 20% to 40% less than archi-tectural shingles.

2524 Roofing
Once you’ve shingled the lower half of the roof, install roof brackets and a staging plank to shingle the upper half of the roof (5). Trim the uppermost course of shingles even with the ridge beam. Then, repeat this process to install shingles to the opposite side of the roof.
The last roofing step is to cover the peak with ridge shingles, which are simply rectangular pieces of asphalt shingle that match the archi-tectural roof shingles. Start installing the ridge shingles at the roof end that’s opposite the direction of the prevailing wind. For example, if the roof peak is aligned in an east-west direction, and the wind typically blows in from the west, then start installing the ridge shingles on the eastern end of the roof. That way, the wind will blow over the tops of the overlapping ridge shingles, forcing them down, not under them, lifting them up.
Gently bend each ridge shingle to conform to the roof peak. Be sure the shingles extend down each roof slope an equal amount, then se-cure each one with two nails, one per side, driven through the back half of the shingle (6). Overlap the shingles by 6 in. Secure the last ridge shingle with four nails, then seal each nail head with roofing cement.
Shingle Cutting Made EasyThree-tab shingles cut easily with a sharp utility knife, but architectural shingles are a different story. Each architectural shingle is composed of two layers of thick asphalt roofing, making it very difficult to cut quickly and cleanly, especially when the shingles are cold.
On this job, we used a manual shingle shear, which operates like a giant paper cutter. Simply raise the handle, lay the shingle onto the cutting table, and bring down the handle to cut the shingle. (Be sure to keep your hand well away from the blade.) It takes quite a bit of pressure to slice through the shingle, but the shear does produce a nice, clean cut, and it’ll stay sharp throughout the entire job. Shingle shears are costly to buy, but are available at most tool rental dealers.
TooL TIP
When nailing on roof shingles, it’s very important that the nail heads are driven flush. If the nails are driven too deeply or at an angle, they’ll rip the shingles, increasing the chances of the shingles blow-ing off in a strong wind. And if the nails are left sticking up, they’ll interfere with the installation of the shingles in the next course.
Trim 17 in. off first shingle in fourth course.
Trim 11 in. off first shingle in third course.
Chalkline
6 in.
1⁄2-in. overhang
11⁄2-in. roofing nails
Starter shingle
Starter shingle
Aluminum drip cap
1⁄2-in. plywood roof sheathing
Trim 6 in. off first shingle in second course.
Align bottom edge of shingle with top edge of notched cutout.
Start first course with a full shingle.
Chalkline1⁄2-in. overhang
12 in. 12 in.
2 in.
6 in.
rooF-SHInGLE DETaIL
2 in.
4 5To work safely on the upper half of the roof, install metal roofing brackets and a long staging plank. Nail each bracket into a rafter.
Using the stair-step method to install roof shingles allows you to com-plete one section of roofing before moving down to the next.
edge. Set the first shingle into place, flush with the starter shingles at the roof’s edge and end. Fasten the shingle with four nails spaced about 2 in. from each end, and 12 in. from each end. Nail down four or five shingles, butting them end-to-end, then stop and start the second course.
Cut 6 in. off the first shingle in the second course to create the proper end-joint offset from the shingles in the first course. Set the shingle into place, aligning its bottom edge with the top edge of the notched cutout in the shingle below; refer to the Roof-Shingle Detail drawing on the facing page. Nail the shingle in place, then continue the second course by nailing down three or four full-width shingles.
Cut 11 in. from the first shingle in the third course, then continue the course by nailing down a few full shingles. Trim 17 in. from the first shingle in the fourth course, nail it down, and install a couple full shin-gles. When you get to the fifth course, start the sequence all over again with a full-width shingle (4). This roofing technique is known as the stair-step method and it allows you to work in one area for longer periods of time, rather than walking back and forth across the entire roof one course at a time.
Now return to the first course and install four or five more shingles along the roof edge. Then continue shingling the second, third, fourth, and fifth courses, stopping each one just short of the course below. Repeat this process, one section at a time, until you reach the opposite end of the roof. Cut the last shingle in each course to fit, making sure it extends 1⁄2 in. past the rake board and flush with the starter shingle below.
HELPFUL HInTS
• Be sure to drive the roofing nails through the plywood and into the 18 skipped sheathing below. Nails driven into the 1-in. space between the 18s will poke through and be visible from inside the barn.
• Starter shingles might not seem all that necessary, but here are three reasons why they’re import-ant: (1) Tests have proven that starter shingles help keep roof shingles from being blown off; (2) they reduce leaks along the susceptible edges and ends of the roof; and (3) most manufacturers will increase the wind-resistance warranty coverage on the roof, if starter shingles are used.
6Cover the peak of the roof with overlapping ridge shingles. Be sure to place the nails where they’ll be covered by the subsequent shingle.
PoST-anD-BEam Barn

2726 Vertical-Board Siding
Check it for plumb with a 4-ft. level, then face-nail the siding to the timber frame with 21⁄2-in. spiral-shank galvanized nails. Position the nails about 1 in. in from each edge of the 1x8 siding.
Next, make a spline by ripping a 1⁄2-in.-wide strip from a sheet of 1⁄4-in.-thick plywood. Apply waterproof glue to the spline and press it into the grooved edge on the siding piece just nailed in place. Now miter-cut a second siding piece to 40° and install it against the first siding piece, slipping its groove over the spline (1). Don’t apply glue to the spline this time. Slide the second siding piece tight against the first piece, then nail it to the timber frame.
The reason for splining the first two siding pieces together groove-to-groove is that now the tongue edges are facing out in both directions, which is the preferred installation method. Continue to miter-cut and install siding to the right and then left of center, fitting the groove of one siding piece over the tongue of the previously installed piece. Again, secure the siding to the timber frame with 21⁄2-in. galvanized nails.
Once the gable end is covered in siding, prepare to trim the siding to length. Stand at one end of the gable, near the eave, and mark a cutline onto the siding 1 in. below the bottom edge of the 610 crossbeam. Move to the other end of the gable and measure and mark an identical cutline. Then, take a portable circular saw and measure from the sawblade to the nearest edge of the saw shoe, a distance of about 11⁄2 in.
Measure up from each cutline the distance from the sawblade to the shoe and draw a second set of marks, which represents the offset distance of the circular saw. Stretch a chalkline from one offset mark to the next and snap a chalkline across the siding (2).
Upgrade to a Better NailYou can buy nails specifically designed for installing wood siding, but don’t use them on this post-and-beam barn. Siding nails have thin, ringed shanks and are great for nailing up cedar bevel siding or wood shingles. But pine siding, like the type installed here, isn’t very dimensionally stable. It tends to bow and warp—and pull nails free.
So, upgrade to a more tenacious nail with a slightly larger head, such as the 21⁄2-in.-long, double-hot-dipped galvanized PTL nail from Maze Nails. It’s designed for nailing pressure-treated decking and trim, but is also an excellent choice for installing 18 vertical-board pine siding.
3Adjust the sawblade to cut 11⁄8 in. deep, then guide a circular saw along the 24 fence to trim the siding to length. Unscrew the 24.
PoST-anD-BEam Barn
Vertical-Board SidingThe barn’s exterior walls are covered with rough-sawn, tongue-and-groove pine siding to match its pine timber frame. The 1x8 siding is installed vertically, in keeping with traditional barn architecture. The tongue-and-groove joints along the edges of the siding lock the boards together to seal out wind and rain.
Pine siding was also chosen because it’s readily available, affordable, and attractive. However, pine isn’t very weather resistant and must be protected—and then maintained—with an exterior-grade finish, such as water-repellent wood stain or paint.
Other vertical-board siding options include red cedar or redwood, two softwood species that are naturally resistant to rot and wood-boring bugs. Unfortunately, cedar and redwood sidings are typically much more expensive than pine siding.
naIL SIDInG To THE GaBLE EnDSInstall siding on the two gable ends first, then move on to the four sidewalls. Here’s why: If you side the gable ends first, you won’t have to worry about tools or ladders banging against and damaging the siding below.
Start siding in the very middle of a gable end, and then work your way out in both directions toward the eaves. Cut each piece of siding several inches longer than necessary, and then later, trim them all to length at the same time.
Miter-cut the upper end of a piece of siding to 40° and slide it up against the fly rafter with its tongue edge facing out toward the eave.
HELPFUL HInT
Ridge shingles get stiff and brittle when cold. (Who doesn’t?) So when working in cold weather, store the ridge shingles in a heated room until they’re soft and pli-able. Then, when you’re ready to install them, put the shingles into a bucket, bending them to fit the inside curve of the bucket. Now when you press the shingles down over the roof peak, they’ll be less likely to crack or crease.
1Start installing siding in the middle of the gable end. Spline together the two center boards, so the tongue edges are facing out.
2Snap a chalkline across the jagged ends of the siding. Then screw a long, straight 24 fence to the siding, flush on the chalkline.

29
If a siding piece is bowed and you can’t tighten the joint, pry it closed using a wood chisel hammered into the timber frame.
Install 18 pine siding across the gable-end wall. Slip each piece under the siding above and secure with 21⁄2-in.-long galvanized nails.
1 2
naIL SIDInG To THE WaLLSBegin siding the barn walls at the front gable end of the barn, using the same rough-sawn 1x8 pine siding installed earlier on the upper gable ends. Starting at the corner post, cut the first piece of siding to fit from the underside of the 6x10 crossbeam down 1 in. past the floor frame. This slight extension not only hides the pressure-treated rim joists but also creates a drip edge for shedding rain.
Next, use a tablesaw to rip the grooved edge off the first siding piece. Squaring up the edge is necessary because this barn doesn’t have corner boards to hide the corner joints. Set the siding against the left-hand corner post with its tongue edge facing to the right and its square edge extending 1 in. past the post. This 1-in. lip will be concealed by the sidewall siding.
Use a 6-ft. level to plumb up the siding piece, then fasten it to the post with 21⁄2-in. galvanized nails. Cut several more pieces of siding to length and nail them in place, fitting the groove of one piece over the tongue of the preceding piece (1).If a tongue-and-groove joint won’t close tightly, try this trick: Start a nail in the siding piece, then hammer a wood chisel into the timber frame right beside the tongue edge of the siding. Pull on the chisel handle to pry the joint closed, then drive in the nail (2).Continue in this manner across the gable end. Cut the siding around the doorway to fit flush with the rough opening. Use the tablesaw to rip the last siding piece to width, making sure it extends 1 in. past the corner post.
Next, measure and cut the first piece of siding for the sidewall. Rip off the groove edge and set the siding piece against the corner post
Vertical-Board Siding
1
PoST-anD-BEam Barn28
Tilt the round window into the opening, then level it. Secure the window by driving four 21⁄2-in. screws through its perimeter flange.
5After marking the round window opening onto the gable end, use a jigsaw to cut the 30-in.-dia. circle through the 18 pine siding.
2
Screw a long, straight 24 to the siding with its bottom edge flush with the chalkline. Adjust the sawblade to cut 11⁄8 in. deep, then guide the saw shoe against the 24 fence to trim the overhanging siding pieces to length (3) (see p. 27). Unscrew the 24 from the wall. Repeat the previous three steps to install siding onto the gable at the opposite end of the barn.
InSTaLL THE roUnD WInDoWSTo contrast the barn’s straight lines and square architecture, we installed a round window into each gable-end wall. The 36-in.-dia. windows are made of cellular PVC (polyvinyl chloride), a resilient plastic that won’t rot, crack, or ever need painting.
From inside the barn, locate the center of the framed rough opening for the window. Mark the center on the backside of the siding, then drive a screw through the center point to the outside. Go outside and attach a string to the tip of the protruding screw, and tie a pencil to the other end exactly 15 in. from the center point. Now swing the pencil around to strike a 30-in.-dia. circle onto the siding.
Drill a 1⁄2-in.-dia. hole through the siding, just inside the edge of the marked circle. Insert a jigsaw blade into the hole and saw along the pencil line to cut a 30-in.-dia. circle into the siding (1).Set the round window into the opening and press it flat against the sid-ing (2). If the window doesn’t quite fit, don’t force it. Use the jigsaw to re-move a little more wood from the round opening, and then reinstall the window. Fasten the window by driving 21⁄2-in.-long weather-resistant trim-head screws through the window’s flange and siding and into the timber frame. Repeat this process to install the round window in the opposite gable end.
TooL TIP
When installing the round win-dows, use a 9-in.-long torpedo lev-el to ensure that the windows are properly positioned and not tilted out of alignment. However, since there’s no place on the window on which to set the level, you must first make a setting block. Cut a 3⁄4-in.-thick by 4-in.-long scrap-wood block and set it onto one of the horizontal muntins in the cen-ter of the window grille. Now, hold the torpedo level on top of the wood block and rotate the window either clockwise or counterclockwise until the muntin is perfectly level.

Doors and Windows 31
Doors and WindowsWith the siding completed, you can install the barn doors and windows, which include two hinged doors on the front gable-end wall, a sliding door on the right-hand sidewall, and four windows: one barn sash beside the sliding door, two barn sash in the left-hand sidewall, and a long, narrow transom window in the rear gable-end wall. Start by building the doors from 11⁄2-in.-thick pine planks.
PrEP THE Door PLanKSThe hinged doors on the gable end and the sliding door on the sidewall are called plank doors. Each is built from 11⁄2-in.-thick by 63⁄4-in.-wide tongue-and-groove pine planks. But the planks aren’t simply glued together; they’re reinforced with 3⁄4-in.-dia. threaded steel rods, as shown in the drawing on p. 32.
Start by cutting 12 pine planks to 843⁄4 in. long; that’s six planks for each hinged door. Cut seven planks to 81 in. long for making the sliding barn door. Use the tablesaw to rip the grooved edge off three planks: the first plank in the left-hand hinged door, the last (sixth) plank in the right-hand hinged door, and the first plank in the sliding door.
Next, rip the tongue off the last (sixth) plank in the left-hand hinged door, the first plank in the right-hand hinged door, and the last plank in the sliding door. This ripping is necessary to create square-edged doors.
6Nail siding right over the transom-window opening in the rear wall. Come back later and rout out the sid-ing from within the opening.
HELPFUL HInT
It’s important to build the barn doors using pine planks that are perfectly straight and dead flat. However, determining such attri-butes by eye isn’t so easy. That’s why it’s a good idea to buy a few extra planks just in case you come across one during assembly that’s bowed, warped, or twisted.
PoST-anD-BEam Barn30
with its tongue edge facing out. Tuck the square edge behind the 1-in. siding lip protruding from the gable-end wall. Fasten the siding with 21⁄2-in. galvanized nails. Nail up several more siding pieces across the wall. When you reach a window opening, cut the siding flush with the vertical sides of the opening and with the rough sill at the bottom of the window opening.
Cut short pieces of siding to fit above the window opening. Use a tablesaw to notch the siding, as necessary, to fit snugly around the rafter tails (3). As you work your way across the window opening, stop occasionally and use a 6-ft. level to make sure the siding pieces above the window are perfectly aligned with the pieces below (4).Install a piece of siding to cover the end of the window opening. Fit it tightly against the adjacent siding pieces. Then go inside the barn and trace the window opening onto the back of the siding piece. Remove the siding, cut along the lines with a jigsaw, and set it back into place (5).Continue to install siding across the sidewall and around the corner to the rear gable end. When you get to the rough opening for the long, narrow transom window, simply nail the siding right over it (6). Don’t bother cutting the siding to fit around the opening. You can rout it out later when you install the transom (see p. 35). Then nail siding to the final sidewall, cutting it to fit flush around the two rough openings for the 24-in. by 48-in. windows.
HELPFUL HInT
When cutting siding to fit above the window openings, cut the pieces a few inches longer than necessary. Then, notch the siding to fit around the rafter tails. Now you can re-cut the notch for a tighter fit, if neces-sary, without having to cut a new board. Once the notch fits tightly, mark and cut the siding piece to the finished length.
3 4 5Use a tablesaw to notch pieces of siding to fit around the rafter tails. It’s often necessary to re-cut the pine siding to obtain a snug fit.
Stop every now and then and use a long level to check the alignment of the siding pieces above and below the window opening.
At the end of the window opening it’s necessary to notch the siding to fit around the top, side, and bottom of the rough opening.

33
BUILD THE DoorS Once all the holes are bored, lay out the planks for each door. Cut 6-ft.-long threaded rods to length with a hacksaw, making each about 1⁄2 in. shorter than necessary, so it doesn’t bottom out in the holes.
Smear subfloor construction adhesive onto the end of a threaded rod. Spread the adhesive about 5 in. up from the rod end. Twist the glue-coated rod end into a hole in the first plank. Repeat to install the other two rods. Slide the second door plank onto the three rods—no adhesive necessary—and push its grooved edge over the tongue on the first plank. Slide on the next three planks, one at a time, tapping closed each tongue-and-groove joint.
Apply construction adhesive to the ends of the threaded rods, then press on the final plank. Use six long bar clamps or pipe clamps—three under the door, three over the door—to hold the planks together. Leave the clamps in place overnight until the adhesive dries. Repeat this procedure to assemble the two remaining doors.
HanG THE HInGED DoorSEach hinged door swings on three 16-in.-long strap hinges. To make installation easier, attach the hinges before hanging the door. Fasten one hinge 8 in. down from the top of the door, one 8 in. up from the door bottom, and position the final hinge in the middle of the 843⁄4-in.- tall door.
Now, cut a 91-in.-long 24 mounting post and butt it against the door edge, directly underneath the hinges. Hold the upper end of the 24 post flush with the door top, then screw the hinges to the 24. Drill six 1⁄2-in.-deep by 1-in.-dia. counterbore holes into the 24. Position the holes a few inches above and below each hinge. Repeat these steps to mount the hinges to the remaining swinging door.
Stand the left-hand door in the doorway opening (1). Tilt in the door top until it hits the overhead 46 nailer. Check the door edge for plumb using a 6-ft. level. Secure the door to the barn by driving six 6-in.-long screws through the 24 mounting post and into the timber frame (2).Conceal the screw heads by gluing a 1-in.-dia. wood plug into each counterbore hole (3). Use a handsaw to trim the bottom end of the 24 post flush with the siding. Install the right-hand door in a similar manner.
1Set the door into the opening in the gable end. Note that the hinges and 24 mounting post are already attached to the door.
Use a cordless impact driver to drive 6-in. screws through the coun-terbore holes in the 24 mounting post and into the timber frame.
3Apply waterproof glue to 1-in.-dia. hardwood plugs. Then press the plugs into the counterbore holes to conceal the screw heads.
2
Doors and WindowsPoST-anD-BEam Barn32
Now, use a tablesaw or router to cut a 3⁄4-in.-wide by 3⁄4-in.-deep rabbet into the face of the last plank of the left-hand hinged door, and into the rear of the first plank in the right-hand hinged door. Then, when the doors are closed, the rabbets will overlap, sealing out wind and rain.
After cutting and milling all the door planks, prepare to drill 3⁄4-in.-dia. holes to accept the threaded rods. Each door is reinforced with three rods, so each plank receives three holes. However, the holes in the first and last planks in each door—a total of six planks—aren’t bored clean through. Those six planks receive stopped holes bored to just 5 in. deep, so the threaded rods aren’t visible at the door edges.
Use a drill press or horizontal boring machine to drill three 3⁄4-in.-dia. holes into the planks. Position the holes 6 in. down from the top end of each plank, 6 in. up from the bottom end of each plank, and halfway in between at the center of the planks.
PLanK Door
TooL TIP
If you don’t own a hole-boring machine with the capacity to drill clean through the door planks, contact a professional woodwork-ing shop or cabinet manufacturer. They’ll likely have the proper equipment and may bore the holes for a nominal fee.
Rip off groove edge.
Rip off tongue edge.
Construction adhesive on each end of all three 3⁄4-in.-dia. threaded rods
Left-hand door Right-hand door
8 in.
6 in.
6 in.
3⁄4-in. rabbet
24 mounting post, 91 in. long
Trim end of post after installation.
11⁄2 in.
3⁄4-in.-dia. through hole
Tongue-and-groove pine plank, 843⁄4 in. long
Bottom hinge
Middle hinge
Top hinge
8 in.
343⁄8 in.423⁄8 in.
5 in.
63⁄16 in.
63⁄4 in. (typ.) 3⁄4-in. x 3⁄4-in. rabbets
5 in.
PoST-anD-BEam Barn34 Doors and Windows 35
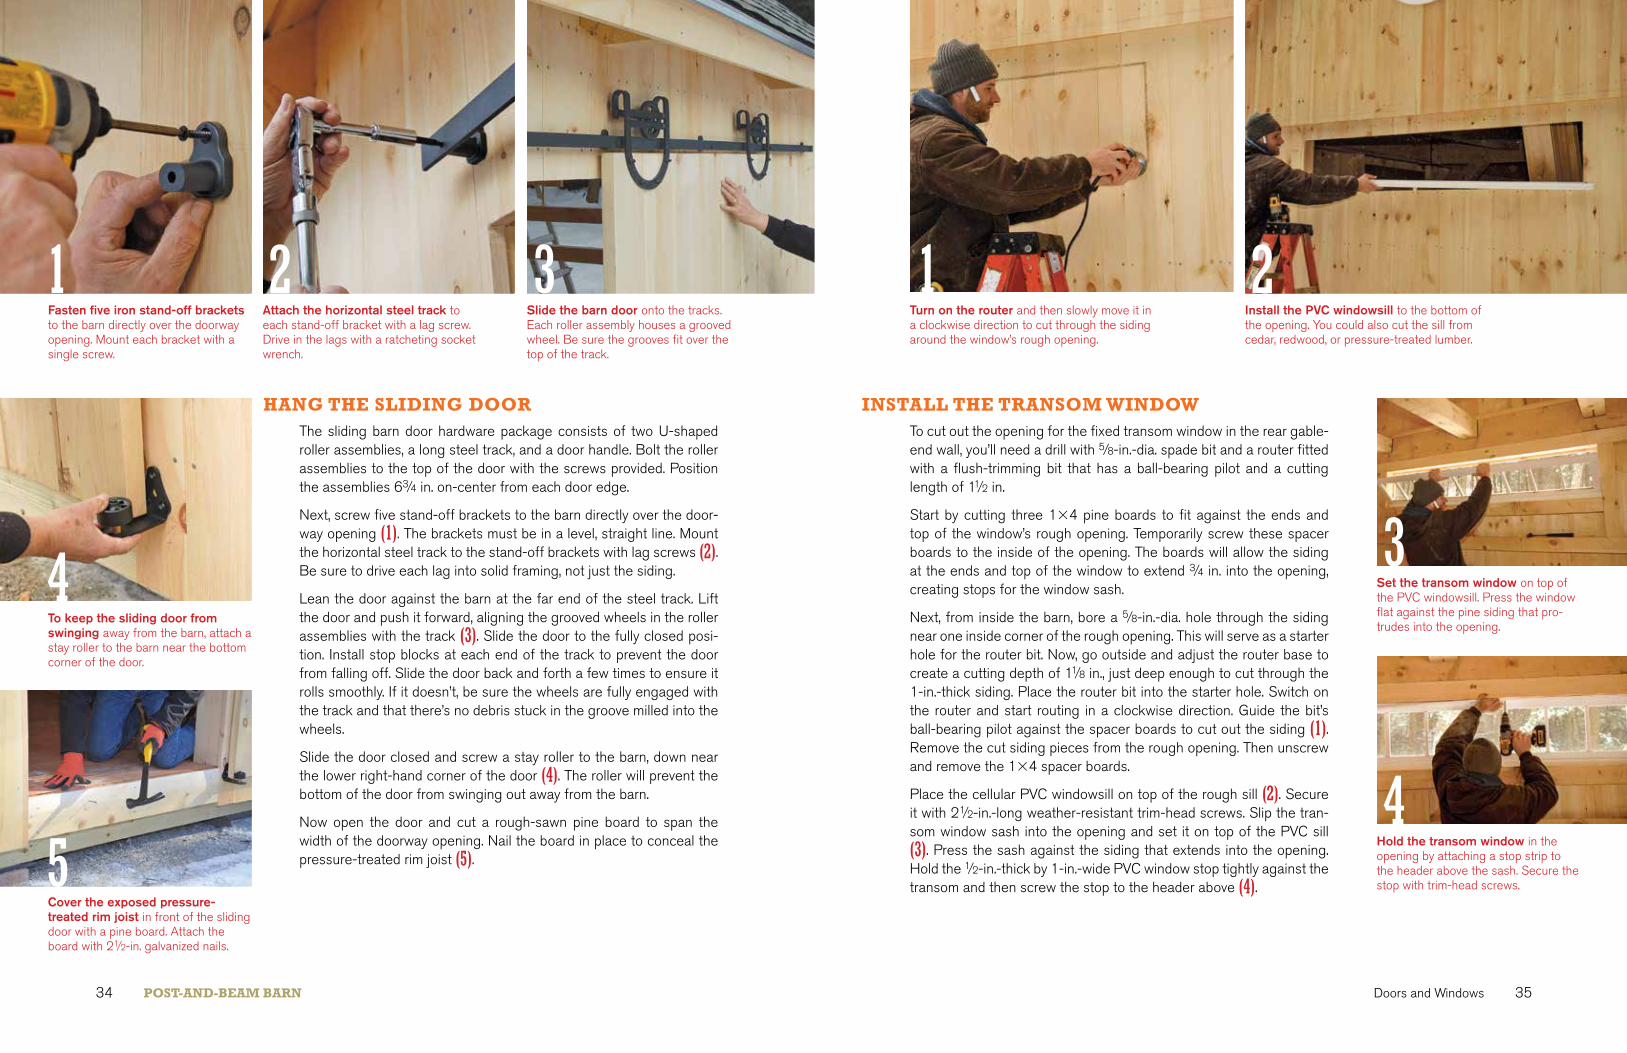
InSTaLL THE TranSom WInDoWTo cut out the opening for the fixed transom window in the rear gable-end wall, you’ll need a drill with 5⁄8-in.-dia. spade bit and a router fitted with a flush-trimming bit that has a ball-bearing pilot and a cutting length of 11⁄2 in.
Start by cutting three 14 pine boards to fit against the ends and top of the window’s rough opening. Temporarily screw these spacer boards to the inside of the opening. The boards will allow the siding at the ends and top of the window to extend 3⁄4 in. into the opening, creating stops for the window sash.
Next, from inside the barn, bore a 5⁄8-in.-dia. hole through the siding near one inside corner of the rough opening. This will serve as a starter hole for the router bit. Now, go outside and adjust the router base to create a cutting depth of 11⁄8 in., just deep enough to cut through the 1-in.-thick siding. Place the router bit into the starter hole. Switch on the router and start routing in a clockwise direction. Guide the bit’s ball-bearing pilot against the spacer boards to cut out the siding (1). Remove the cut siding pieces from the rough opening. Then unscrew and remove the 14 spacer boards.
Place the cellular PVC windowsill on top of the rough sill (2). Secure it with 21⁄2-in.-long weather-resistant trim-head screws. Slip the tran-som window sash into the opening and set it on top of the PVC sill (3). Press the sash against the siding that extends into the opening. Hold the 1⁄2-in.-thick by 1-in.-wide PVC window stop tightly against the transom and then screw the stop to the header above (4).
Set the transom window on top of the PVC windowsill. Press the window flat against the pine siding that pro-trudes into the opening.
3
Hold the transom window in the opening by attaching a stop strip to the header above the sash. Secure the stop with trim-head screws.
4
1 2Turn on the router and then slowly move it in a clockwise direction to cut through the siding around the window’s rough opening.
Install the PVC windowsill to the bottom of the opening. You could also cut the sill from cedar, redwood, or pressure-treated lumber.
HanG THE SLIDInG DoorThe sliding barn door hardware package consists of two U-shaped roller assemblies, a long steel track, and a door handle. Bolt the roller assemblies to the top of the door with the screws provided. Position the assemblies 63⁄4 in. on-center from each door edge.
Next, screw five stand-off brackets to the barn directly over the door-way opening (1). The brackets must be in a level, straight line. Mount the horizontal steel track to the stand-off brackets with lag screws (2). Be sure to drive each lag into solid framing, not just the siding.
Lean the door against the barn at the far end of the steel track. Lift the door and push it forward, aligning the grooved wheels in the roller assemblies with the track (3). Slide the door to the fully closed posi-tion. Install stop blocks at each end of the track to prevent the door from falling off. Slide the door back and forth a few times to ensure it rolls smoothly. If it doesn’t, be sure the wheels are fully engaged with the track and that there’s no debris stuck in the groove milled into the wheels.
Slide the door closed and screw a stay roller to the barn, down near the lower right-hand corner of the door (4). The roller will prevent the bottom of the door from swinging out away from the barn.
Now open the door and cut a rough-sawn pine board to span the width of the doorway opening. Nail the board in place to conceal the pressure-treated rim joist (5).
1Fasten five iron stand-off brackets to the barn directly over the doorway opening. Mount each bracket with a single screw.
2Attach the horizontal steel track to each stand-off bracket with a lag screw. Drive in the lags with a ratcheting socket wrench.
3Slide the barn door onto the tracks. Each roller assembly houses a grooved wheel. Be sure the grooves fit over the top of the track.
To keep the sliding door from swinging away from the barn, attach a stay roller to the barn near the bottom corner of the door.
4
Cover the exposed pressure- treated rim joist in front of the sliding door with a pine board. Attach the board with 21⁄2-in. galvanized nails.
5

PoST-anD-BEam Barn36
3 4Install the apron under the windowsill, attaching it with 21⁄2-in. screws. Conceal all screw heads with white caulk or plastic plugs.
Attach a small barrel bolt to the top interior surface of the sash. Slip the sash into place behind the stops (5). Hold the sash closed and then use a hammer to lightly tap the barrel bolt to leave an impression on the header.
Remove the window and bore a 11⁄2-in.-deep hole in the header slightly larger in diameter than the barrel bolt. Replace the sash and lock the barrel bolt. Now, set the interior stop on top of the sill and against the sash. Screw the stop to the sill to hold the bottom of the sash in place.
Mount a stop to each side of the windows. When the sash is open, it’ll rest against the wood dowel protruding from the 22 cleats.
5Slip the barn sash into place behind the wooden win-dow stops. Install a barrel bolt at the top of the sash to hold the window closed. Protection Plan
If, for some reason, you can’t stain or paint the barn for several weeks, it’s important to apply a coat of clear wood preservative. The preservative will help the siding repel water, dust, and dirt, and keep it from staining and rotting. Use a paint pad or paint roller to liberally apply the preservative to the siding, as shown above. Pay particular attention to the end grain of boards, which are very porous. For extra protection, apply a second coat of preservative after the first coat has dried.
InSTaLL THE Barn SaSHThe barn-sash windows and trim purchased for this outbuilding are made of cellular PVC. Wood windows and trim would’ve cost much less, but PVC is highly weather resistant and doesn’t require painting or staining. The trim package includes a sill, exterior side casings, head casing, apron, and interior stop.
Begin by setting the sill into the window opening. Fasten the PVC sill to the rough sill with 21⁄2-in.-long trim-head screws (1). Next, screw the exterior side casings to the left and right sides of the window opening. Be sure that each casing extends 3⁄4 in. into the opening (the window sash will close against the 3⁄4-in. lip). Set the head casing across the top of the window, resting it on the side casings to create a 3⁄4-in. overhang (2). Screw the head casing in place, then slip the apron under the sill and attach it with screws (3).The barn-sash windows tilt in for ventilation. To hold them open at the proper angle, make two stops for each of the three windows. Start by cutting a 22 cleat to 12 in. long. Measure down 2 in. from the top end and bore a 3⁄4-in.-dia. by 3⁄4-in.-deep hole. Glue a 3⁄4-in.-dia. by 13⁄4-in.-long wood dowel into the hole. Repeat for the remaining five sash stops.
From inside the barn, attach one stop to each side of every window opening (4). Be sure the wood dowel is facing in toward the window. Now, when you open the window, it’ll come to rest against the wood dowels protruding from each cleat.
1 2After attaching both side casings, install the head casing across the window top where it, too, will pro-trude 3⁄4 in. into the opening.
Fasten the sill into the window opening with 21⁄2-in. trim-head screws. The horn on each end of the sill extends 3 in. past the opening.

39PoST-anD-BEam Barn38
DESIGn DETaILS
1The rear gable-end wall has a round window and a transom window. Note the interesting shadows created by the fly rafter, rake board, and rake trim.
39
Create the look of a traditional rubble-rock foundation by dry-stacking thin stones around the barn. Set the stones even with the siding.
Use a paintbrush to apply semi- transparent stain to the siding. Scrub the stain into the wood to ensure good adhesion and even color.
3
Finish Up the Barn The last phase to completing the barn begins with installing the floor to the interior storage loft. Cut 11⁄2-in.-thick by 63⁄4-in.-wide tongue-and-groove pine planks to span the 66 joists in the overhead loft. This is the same type of lumber used to build the plank doors. Use a rubber mallet to tap the floor planks tightly together (1). Then fasten the planks to the joists with 31⁄2-in. nails or screws.
Next, use thin stones to build a wall around the perimeter of the barn. Tuck the stones under the barn, stacking them flush with the siding (2). The stones are dry-stacked, meaning there’s no mortar holding them together. Adding stone is an optional step, but it does serve two useful purposes: It conceals the floor framing and makes the barn look as if it’s sitting on a traditional stacked-stone foundation.
The final step is to finish the barn with an exterior-grade stain or paint. Here, we applied a light-gray semi-transparent stain to the siding, which protects the pine boards but still lets the wood grain show through (3). The rake boards and fascia were finished with white solid-body stain, a color chosen to complement the siding and match the windows.
2Build the loft floor from 11⁄2-in.-thick tongue-and-groove pine planks. Use a rubber mallet to pound the planks tightly together.
1
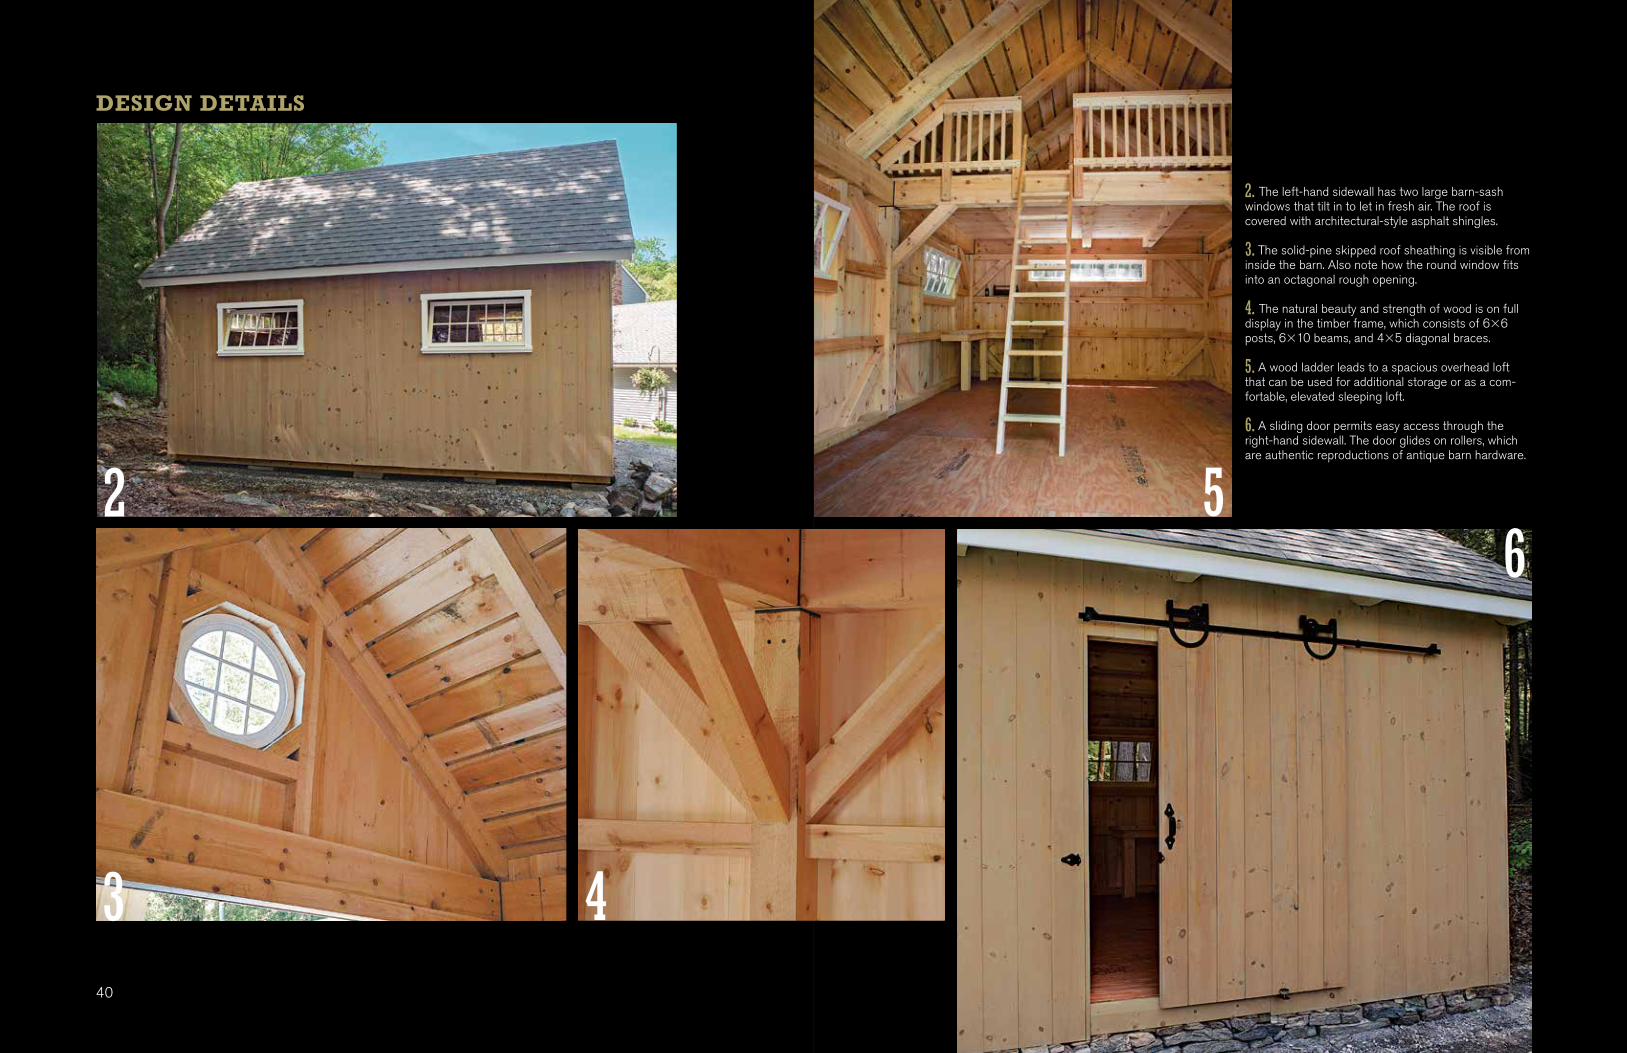
2. The left-hand sidewall has two large barn-sash windows that tilt in to let in fresh air. The roof is covered with architectural-style asphalt shingles.
3. The solid-pine skipped roof sheathing is visible from inside the barn. Also note how the round window fits into an octagonal rough opening.
4. The natural beauty and strength of wood is on full display in the timber frame, which consists of 66 posts, 610 beams, and 45 diagonal braces.
5. A wood ladder leads to a spacious overhead loft that can be used for additional storage or as a com-fortable, elevated sleeping loft.
6. A sliding door permits easy access through the right-hand sidewall. The door glides on rollers, which are authentic reproductions of antique barn hardware.
56
40
DESIGn DETaILS
3 4
2
40