SK AOD-H SHIFT KIT - res.cloudinary.com
10
© TransGo 2016 18 May 2016 Corrects/Prevents/Reduces 1-2 Bump or Slide, 2-3 Bump or Slide-Bump, Rough Down-Shift, 4-3 Cut-Loose or Bind-Up, 4-3-4 Shuttle- Hot, 4th Shudder-Light Throttle, O.D. Band Failure, Excessive Shifting, Late or no 4th, Falls out of 4th, Converter Dampener Breakage, 3rd Shaft Breakage. SK AOD-H SHIFT KIT ® ® Page 1 WARNING: This isn't a "do-it-yourself" kit. It is for the experienced, professional trans mechanic and is used for improving performance, durability and reducing complaints. It doesn't make HARD shifts, nor let you transplant transmission, engine, carbs, or linkage. No Changes. Disassemble to clean if needed. For removing the plugs that the factory puts threads in, a 4mm bolt is furnished. Over-adjusting the TV either way to correct a bad shift is a losing game. Adjust the TV until the start of the shift is where is should be. Then if the shift is too long or short, fix that shift. This will make the vehicle, you and the customer all winners. Boost Sleeve Seat PR No Changes 2-3 Shift TMV Manual TV Plunger TV Valve Balance Valve WHITE 1st Design: 3 lands are same size. 2nd Design: 3 lands are smaller. C. SHORT BLUE 3-4 Backout PR Outer A. GREEN PR Inner B. BLACK D. 2-3 Back-out: Select spring & install with new plug & retainer. Plug & Retainer Please! Only open each bag of parts as the instructions require them for that page! Do not mix them! Quick Tip: Use Short Screwdriver to hold TV plunger “In” to clean the 2-3 shift valve if needed. 2-1 Schedule Low Servo GREEN No Changes Smaller First time using this product? Read “A Little Straight Talk” from Gil on page 6 first.
Transcript of SK AOD-H SHIFT KIT - res.cloudinary.com

© TransGo 2016 18 May 2016
Corrects/Prevents/Reduces 1-2 Bump or Slide, 2-3 Bump or Slide-Bump, RoughDown-Shift, 4-3 Cut-Loose or Bind-Up, 4-3-4 Shuttle-Hot, 4th Shudder-Light Throttle, O.D. Band Failure,Excessive Shifting, Late or no 4th, Falls out of 4th,Converter Dampener Breakage, 3rd Shaft Breakage.
SK AOD-H SHIFT KIT ® ®
Page 1
WARNING: This isn't a "do-it-yourself" kit. It is for the experienced, professional trans mechanic and is used for improving performance, durability and reducing complaints. It doesn't make HARD shifts, nor let you transplant transmission, engine, carbs, or linkage.
No Changes. Disassemble to clean if
needed.
For removing the plugs that the factory puts threads in, a 4mm bolt is furnished.
Over-adjusting the TV either way to correct a bad shift is a losing game.Adjust the TV until the start of the shift is where is should be. Then if the shift is too long or short, fix that shift. This will make the vehicle, you and the customer all winners.
Boost Sleeve
Seat
PR No Changes 2-3 ShiftTMV
Manual
TV Plunger TV Valve Balance Valve
WHITE
1st Design: 3 lands are same size.
2nd Design: 3 lands are smaller.
C. SHORT BLUE
3-4 Backout
PR Outer
A.GREEN
PR Inner
B.BLACK
D. 2-3 Back-out: Select spring & install with new plug & retainer.
Plug & Retainer
Please! Only open each bag of parts as the
instructions require them for that page!
Do not mix them!
Quick Tip: Use Short Screwdriver to hold TV plunger “In” to clean the 2-3 shift
valve if needed.
2-1
Sche
dule
Low
Ser
vo
GREEN
No Changes
Smaller
First time using this product? Read “A Little Straight Talk”
from Gil on page 6 first.

No
Cha
nges
– C
lean
if N
eces
sary
1-2Shift
T.V.Limit
2-3Capacity
Late
83&
up
3-4
Shift
Val
ve3-
4 G
over
nor
Bush
ing
& Va
lve
ORANGE
LARGE RED
BLUE
C.
3-4
T.M
.V.
A. 2-3 Capacity:Controls 2-3 Shift Feel. Ford built this trans with 5 medium capacity direct (3rd) frictions. Repair quality and durability is greatly improved with 6 or 7 high capacity friction. Open sub-pack containing a Clip, 3 small springs (Red, Yellow & Green) & 1 small flat washer.
1-2 Capacity
1-2 Accum
F. Smart Act™ACCM System is in
Separate Pack
OD Servo Reg
D.
3-4Shuttle
E.
If washer WILL fit over end of valve: With 5 frictions:Install GREEN6-7-8 Frictions:Install YELLOW
OR If washer WON’T fit over end of valve: 5 frictions: Install RED 6-7-8 Frictions:Install GREEN
Read this CAREFULLY! Washer is a
sizing tool.
B.
Orifice Ctrl.
Install New Clip Up through the Bottom of VB
Any Vehicle 1985 & Up
Skip step C. Re-Use Original
Springs
Install New Clip
End of Valve
79 to
ear
ly 8
3 3-
4 Sh
ift V
alve
LONG GREEN
SMALL RED
BLACK
Install New Clip
WHITE
This is the thickest & tallest clip
© TransGo 2016 18 May 2016 Page 2 Mr. Shift
®
© TransGo 2016 18 May 2016 Page 3
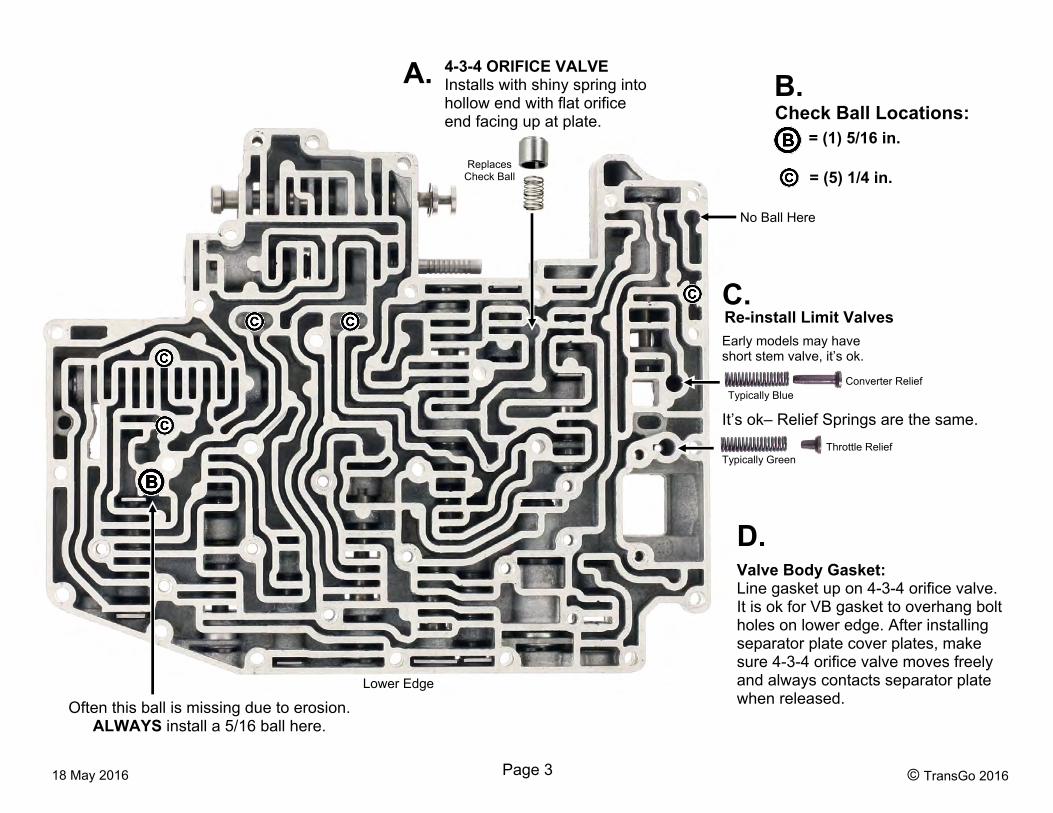
4-3-4 ORIFICE VALVE Installs with shiny spring into hollow end with flat orifice end facing up at plate.
Valve Body Gasket: Line gasket up on 4-3-4 orifice valve. It is ok for VB gasket to overhang bolt holes on lower edge. After installing separator plate cover plates, make sure 4-3-4 orifice valve moves freely and always contacts separator plate when released.
D.
A. B. Check Ball Locations:
= (1) 5/16 in.
= (5) 1/4 in.
No Ball Here
Early models may have short stem valve, it’s ok.
Converter Relief
Throttle Relief
Lower Edge
C. Re-install Limit Valves
Typically Blue
Typically Green
It’s ok– Relief Springs are the same.
Often this ball is missing due to erosion. ALWAYS install a 5/16 ball here.
Replaces Check Ball

© TransGo 2016 Page 4
F
X.
If plate has a round hole at X: Drill it .086 to .093.
C. B. E. K.
If plate has this hole: Center punch up close to peen it shut.
Drill this hole .093 to .099
Holes C, B, E & K: Drill with .055 drill furnished If hole is bigger than .055 make it smaller first as shown below & re-drill .055.
Hole C: Install [.038 to .040]cotter pin furnished up through hole “C.” Spread legs slightly and cut them off short so they will fit thru the hole in the gasket. Rotate cotter pin so legs lay horizontally when plate is held as shown on this page.
Cotter Pin Legs
18 May 2016 Sprag Race
Separator Plate Steel Ball
If hole is bigger than size needed, make it smaller by placing the separator plate on a hardened surface like a Sprag Race. Place a ball on the hole to be made smaller & hit the ball smartly with a light hammer. Re-drill to size.
Universal Adjustment Tool. (metric version shown)
Separator Plate
Cover Notch
Z
Z
Z = Alignment Holes for Plate to Valve Body
alignment.
© TransGo 2016
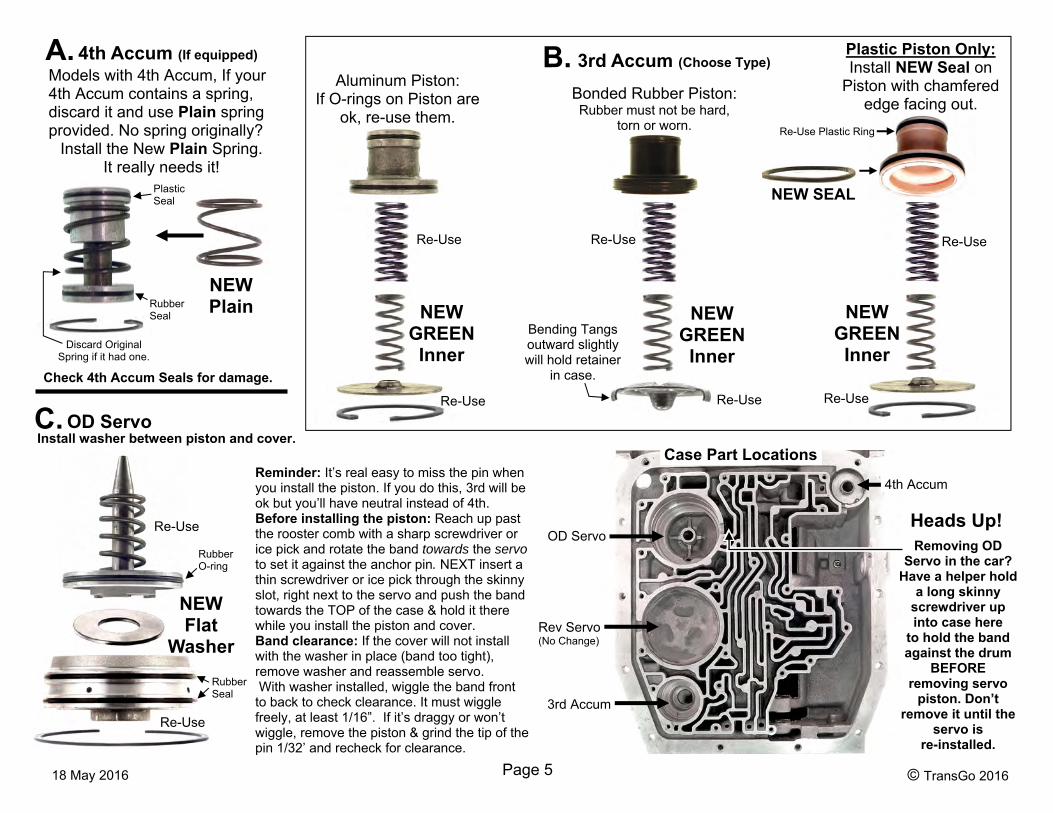
Plastic Piston Only: Install NEW Seal on
Piston with chamfered edge facing out.
Re-Use
Re-Use
Re-Use
Bonded Rubber Piston: Rubber must not be hard,
torn or worn.
Aluminum Piston: If O-rings on Piston are
ok, re-use them.
NEW GREEN Inner
Re-Use Re-Use
Re-Use
Re-Use Plastic Ring
Bending Tangs outward slightly will hold retainer
in case.
NEW SEAL
NEW GREEN Inner
NEW GREEN Inner
4th Accum
OD Servo
Rev Servo (No Change)
3rd Accum
Case Part Locations
Heads Up! Removing OD
Servo in the car? Have a helper hold
a long skinny screwdriver up into case here
to hold the band against the drum
BEFORE removing servo
piston. Don’t remove it until the
servo is re-installed.
B. A. 4th Accum (If equipped)Models with 4th Accum, If your4th Accum contains a spring,discard it and use Plain springprovided. No spring originally?
Install the New Plain Spring. It really needs it!
NEW Plain
Discard Original Spring if it had one.
Rubber Seal
Plastic Seal
Check 4th Accum Seals for damage.
3rd Accum (Choose Type)
C. OD ServoInstall washer between piston and cover.
Reminder: It’s real easy to miss the pin when you install the piston. If you do this, 3rd will be ok but you’ll have neutral instead of 4th. Before installing the piston: Reach up past the rooster comb with a sharp screwdriver or ice pick and rotate the band towards the servo to set it against the anchor pin. NEXT insert a thin screwdriver or ice pick through the skinny slot, right next to the servo and push the band towards the TOP of the case & hold it there while you install the piston and cover. Band clearance: If the cover will not install with the washer in place (band too tight), remove washer and reassemble servo. With washer installed, wiggle the band front to back to check clearance. It must wiggle freely, at least 1/16”. If it’s draggy or won’t wiggle, remove the piston & grind the tip of the pin 1/32’ and recheck for clearance.
Page 5 18 May 2016
NEW Flat
Washer
Re-Use
Re-Use
Rubber Seal
Rubber O-ring

T.V. Adjustment (Rod Type)1. Remove the air cleaner and put it on the BENCH. You're 1/2done. Have someone floor the gas pedal (from inside the car)while you bend the THROTTLE cable bracket, until the butterflyARM bottoms SOLIDLY on it's stop.2. Turn the adjustment screw "IN" until 13 threads are stickingout the front of the adjuster arm. Approx 7/16".3. Start the engine with the AIR off, and leave It OFF.4. While the engine Is idling, loosen the adjustment bolt on thearm on the side of the trans with a 13mm socket, one full turn.Push the arm UP (towards the top of the car) gently and tightenthe bolt.5. Now go back to the top adjustment and back It off 13 turns.6. Place the selector In the "3" position and cruise at 45 MPH.Floor the throttle, you will notice you do not have a 3-2 kick-down.Turn adjustment screw In EXACTLY one turn at time,until you have kick-down at 45 MPH. THEN, turn the screw In 3more turns and you will be In the middle of the TV adjustment.7. Now road test for shift feel and timing. You can adjust It twoturns from here either "IN" or "OUT", to Improve shift quality.8. Don't forget the air cleaner when you’re done!
T.V. Adjustment (Cable Type)1. Install a 100psi pressure gauge on the T.V. port located onthe passenger side of the transmission towards the middle andjust above the pan gasket. There are two taps side by side. Usethe one that is recessed inward towards the gear train more.2. Bring the gauge up to the engine bay & tie it up safely so youcan drive the car with the gauge left on to make adjustments.3. You need the spacer tool or make your own. Take a 5/16 boltand grind two flats 180 degrees apart from each other on thethreaded end until the total thickness between the flats is .250”.Using a exhaust cutoff wheel or hack saw, make a slot for thecable that will pass through the center of both flats.
4. Locate the crimped end of the bare cable that is sticking out ofthe plastic. Its in front of where it hooks to the throttle arm. Gentlypull on the crimp exposing the bare cable and insert the slottedspacer onto the cable. Effectively it’s holding the cable out .250”.5. Release the cable lock and adjust the cable until the pressuregauge reads approx 28psi to start. Remove spacer & road test.Range with our kit installed is 24 to 40psi. Don’t go below 24psi!Also, you must have a 3-2 KD at 45mph in the D3 position! Toadjust shift points- Lower the TV pressure = Earlier shifts.
Crimped End
Spacer Tool - Flat
Plastic Cable End
HOW ABOUT A LITTLE STRAIGHT TALK? SHOP OWNER/MANAGER/MECHANIC: If your goal is a couple upshifts, a passing gear and "OUT THE DOOR", you are reading the WRONG paper. If you are wanting your customer and your mechanic to say "This is the best working transmission I have ever driven", you are reading the RIGHT paper. It's going to take your mechanic at least an extra 45 minutes to read this information and install the parts in this kit and another 20 minutes to adjust the T.V. and road test. The first few times is going to take some concentration for LEARNING. After 4 or 5, it's duck soup.
In my opinion this is one D_ good trans. The most efficient I've ever seen. Both you and it deserve the superior calibration and quality clutches that will knock the complaints and failures in the head. It took over three years of hard research, including many nights and weekends, to find the real causes of 3rd failure, bang and slide 1-2, 4-3-4-3-4 when hot and band failure.Am I complaining? Not really, when you
make the 123rd road test and it's still notfixed you have learned a patience and humil-ity that overcomes the anger you experiencedon the 2nd and 3rd road test.Everything we have learned, that could beturned into parts, is IN this kit.This is one tough valve body to work on. Itrequires concentration, patience and evenhumility. So take it easy on yourself. DON'Texpect to do the first or 2nd one in 15 min-utes. It will take you longer than that justto read the instructions. Let me encourageyou by saying this, "Whether this is a brandnew car, a fresh overhaul or a 60,000 mileslider, when this kit is installed you will roadtest the best one you ever drove. So don'tworry if it takes awhile. You will be doingmore for the trans, customer satisfaction anddurability, then everything else you could doall put together. There is IMPORTANT repairinformation on Page 7 that you’ll find helpful.
DON'T throw this kit at your mechanic at 4:30 to try to salvage a loser. It doesn't install with a SHOTGUN. It installs with PATIENCE and CARE. DON'T expect your mechanic to know or do what you don't. Haven't you noticed it doesn't work that way? If you are his leader, give him the time and support to learn. LEARNING is the first attribute of leadership. SHARING (teaching) is the second. There is more useful HERE, NOW and TODAY repair information in this kit, than all the manuals available put together. Go for it, you'll feel good about it. Let your customer read it too, so he can appreciate your efforts. MECHANIC: We know the feeling when the trans comes in with a 1-2 or 2-3 slide or bump, and when you get everything apart it looks OK. It's SCARY. We also know what it's like to get it back in the car and have a big slide or bump because of defective calibration or clutch plates. Most of these complaints are “System Mal-functions” and calibration weaknesses that this kit corrects. If the system malfunctions are not removed the trans isn't fixed. Sorry to say it so bluntly, but every customer deserves to have his trans fixed. I am against the attitude of getting the car moving again and guaranteeing the complaints all the way to the wrecking yard. This trans is a marvel in basic design and efficiency. You will be road testing the finest working trans in the World today. Don't expect a hard HOT ROD type shift. A hard shift with this trans is a malfunction. The 1-2 or 2-3 bump or slide bump you've often felt with this trans means the clutches are slipping all the way thru the accum stroke and then engaging suddenly when the accum piston bottoms.
© Gil Younger 1989 18 May 2016 Page 6
Mr. Shift
®
“Thanks for listening!”
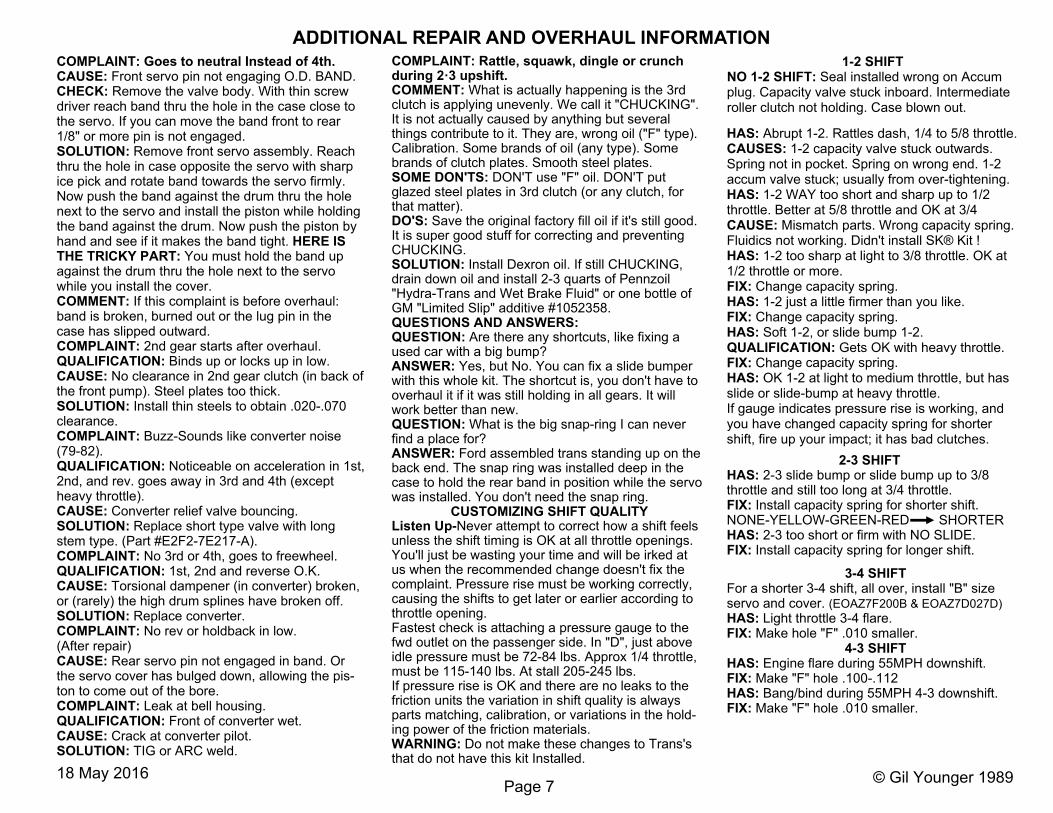
COMPLAINT: Rattle, squawk, dingle or crunch during 2·3 upshift. COMMENT: What is actually happening is the 3rd clutch is applying unevenly. We call it "CHUCKING". It is not actually caused by anything but several things contribute to it. They are, wrong oil ("F" type). Calibration. Some brands of oil (any type). Some brands of clutch plates. Smooth steel plates. SOME DON'TS: DON'T use "F" oil. DON'T put glazed steel plates in 3rd clutch (or any clutch, for that matter). DO'S: Save the original factory fill oil if it's still good. It is super good stuff for correcting and preventing CHUCKING. SOLUTION: Install Dexron oil. If still CHUCKING, drain down oil and install 2-3 quarts of Pennzoil "Hydra-Trans and Wet Brake Fluid" or one bottle of GM "Limited Slip" additive #1052358. QUESTIONS AND ANSWERS: QUESTION: Are there any shortcuts, like fixing a used car with a big bump? ANSWER: Yes, but No. You can fix a slide bumper with this whole kit. The shortcut is, you don't have to overhaul it if it was still holding in all gears. It will work better than new. QUESTION: What is the big snap-ring I can never find a place for? ANSWER: Ford assembled trans standing up on the back end. The snap ring was installed deep in the case to hold the rear band in position while the servo was installed. You don't need the snap ring.
CUSTOMIZING SHIFT QUALITY Listen Up-Never attempt to correct how a shift feels unless the shift timing is OK at all throttle openings. You'll just be wasting your time and will be irked at us when the recommended change doesn't fix the complaint. Pressure rise must be working correctly, causing the shifts to get later or earlier according to throttle opening. Fastest check is attaching a pressure gauge to the fwd outlet on the passenger side. In "D", just above idle pressure must be 72-84 lbs. Approx 1/4 throttle, must be 115-140 lbs. At stall 205-245 lbs. If pressure rise is OK and there are no leaks to the friction units the variation in shift quality is always parts matching, calibration, or variations in the hold-ing power of the friction materials. WARNING: Do not make these changes to Trans's that do not have this kit Installed.
© Gil Younger 1989 18 May 2016 Page 7
COMPLAINT: Goes to neutral Instead of 4th. CAUSE: Front servo pin not engaging O.D. BAND. CHECK: Remove the valve body. With thin screw driver reach band thru the hole in the case close to the servo. If you can move the band front to rear 1/8" or more pin is not engaged. SOLUTION: Remove front servo assembly. Reach thru the hole in case opposite the servo with sharp ice pick and rotate band towards the servo firmly. Now push the band against the drum thru the hole next to the servo and install the piston while holding the band against the drum. Now push the piston by hand and see if it makes the band tight. HERE IS THE TRICKY PART: You must hold the band up against the drum thru the hole next to the servo while you install the cover. COMMENT: If this complaint is before overhaul: band is broken, burned out or the lug pin in the case has slipped outward. COMPLAINT: 2nd gear starts after overhaul. QUALIFICATION: Binds up or locks up in low. CAUSE: No clearance in 2nd gear clutch (in back of the front pump). Steel plates too thick. SOLUTION: Install thin steels to obtain .020-.070 clearance. COMPLAINT: Buzz-Sounds like converter noise (79-82). QUALIFICATION: Noticeable on acceleration in 1st, 2nd, and rev. goes away in 3rd and 4th (except heavy throttle). CAUSE: Converter relief valve bouncing. SOLUTION: Replace short type valve with long stem type. (Part #E2F2-7E217-A). COMPLAINT: No 3rd or 4th, goes to freewheel. QUALIFICATION: 1st, 2nd and reverse O.K. CAUSE: Torsional dampener (in converter) broken, or (rarely) the high drum splines have broken off. SOLUTION: Replace converter. COMPLAINT: No rev or holdback in low. (After repair) CAUSE: Rear servo pin not engaged in band. Or the servo cover has bulged down, allowing the pis-ton to come out of the bore. COMPLAINT: Leak at bell housing. QUALIFICATION: Front of converter wet. CAUSE: Crack at converter pilot. SOLUTION: TIG or ARC weld.
1-2 SHIFTNO 1-2 SHIFT: Seal installed wrong on Accum plug. Capacity valve stuck inboard. Intermediate roller clutch not holding. Case blown out.
HAS: Abrupt 1-2. Rattles dash, 1/4 to 5/8 throttle. CAUSES: 1-2 capacity valve stuck outwards. Spring not in pocket. Spring on wrong end. 1-2 accum valve stuck; usually from over-tightening. HAS: 1-2 WAY too short and sharp up to 1/2 throttle. Better at 5/8 throttle and OK at 3/4 CAUSE: Mismatch parts. Wrong capacity spring. Fluidics not working. Didn't install SK® Kit ! HAS: 1-2 too sharp at light to 3/8 throttle. OK at 1/2 throttle or more. FIX: Change capacity spring. HAS: 1-2 just a little firmer than you like. FIX: Change capacity spring. HAS: Soft 1-2, or slide bump 1-2. QUALIFICATION: Gets OK with heavy throttle. FIX: Change capacity spring. HAS: OK 1-2 at light to medium throttle, but has slide or slide-bump at heavy throttle. If gauge indicates pressure rise is working, and you have changed capacity spring for shorter shift, fire up your impact; it has bad clutches.
2-3 SHIFTHAS: 2-3 slide bump or slide bump up to 3/8 throttle and still too long at 3/4 throttle. FIX: Install capacity spring for shorter shift. NONE-YELLOW-GREEN-RED SHORTER HAS: 2-3 too short or firm with NO SLIDE. FIX: Install capacity spring for longer shift.
3-4 SHIFTFor a shorter 3-4 shift, all over, install "B" size servo and cover. (EOAZ7F200B & EOAZ7D027D) HAS: Light throttle 3-4 flare. FIX: Make hole "F" .010 smaller.
4-3 SHIFTHAS: Engine flare during 55MPH downshift. FIX: Make "F" hole .100-.112 HAS: Bang/bind during 55MPH 4-3 downshift. FIX: Make "F" hole .010 smaller.
ADDITIONAL REPAIR AND OVERHAUL INFORMATION

If the small end of accm valve does not have a hole for a spring, install the flat end of the plug into valve body.
If the small end of the accm valve has a hole in it, for a spring, install the recessed end of the plug into the VB so that the three accm springs will slide into the recess.
To assure a high quality gear change for the life of the vehicle, the effective range of 1-2 accm/capacity system is 5 times as broad as original design.
SMART ACT™1-2 SYSTEM—The four stage system that “THINKS”
QUICK/CHANGE/CUSTOMIZING Ever finish a road test and wish there was a quick way to make the 1-2 shift a little shorter or longer? If you take a couple minutes to drill a hole and install a cotter pin, then you can customize shift feel, without having to remove the valve body. SEE OTHER SIDE OF THIS PAGE
DISCARD this spring if the VB has it.
A
YELLOW
RED
BLACK
MIDDLE groove
CLIP
ONLY Install SEAL in OUTBOARD groove RECESSED
END
PLUG
FLAT END
Light brown Green w/alum flake Grey w/white flake White to Yellowish
No Grooves No Grooves Grooved No Grooves
Alto Products Borg Warner (Not good for HD or HO) Raybestos
White Green Blue Blue
Identify NEW PLATES Capacity Spring
Several capacity springs are furnished to match the clutch plates and for customizing shift feel. B
Identify ORIGINAL/OLD PLATES Capacity Spring [Wash one plate in solvent to aid color identification.] Light brown Green w/alum flake White, Tan or Brn White to Yellowish
No Grooves No Grooves No Grooves No Grooves
Alto or Borg Warner Borg Warner Mfr unknown Raybestos
White Green White Blue
SPRING Smaller end Snug on plug
New Plug CLIP
THREADED END
®Mr. Shift
®
CAPACITY SPRING
Green White
or Blue
CAPACITY Valve
OR
© TransCo 1990
A C C U M U L A T O R
Clutch ID unknown or not listed? Use Green Spring.

SYSTEM CORRECTION TECHNOLOGY AND ETHICS. Today’s Transmissions: About 15% come in with broken parts. Another 15% arrive because they ran out of fluid. The other 70% arrive because of SYSTEM MALFUNCTIONS. The ones that came in with broken parts or ran out of fluid also have system malfunctions. Wasted time and profit-during the repair and back from the customer: Except for converter complaints, 98% of the time spent trying to get them good enough to deliver, and over 95% of the complaint/failures back from the customer is caused by system malfunctions. Selling a repair without correcting the system malfunctions is the same as putting air in flat tire and leaving the nail in it. It is simply NOT FIXED. ARE YOU STILL TRYING TO KID THE GUY YOU SHAVE? If you are performing a “REBUILD, RECONDITION OR OVERHAUL”, the customer understands those words to include removing the malfunctions that cause short life, complaints and failure. In short, those words let the customer believe it includes fixing the trans. If you’re not removing the system malfunctions, your are deceiving yourself and the customer. You’re not fixing the trans. System Correction is not something you learn in five minutes. It’s not just some parts that you throw in. It includes making some correct decisions from a lot of repair data while you are doing the job. It will take you a while to learn the whole thing, on each late model trans. But, once you learn and apply it, you will know they are FIXED. The guys who learn and apply this technology are going to take over the trans business in the next few years. The guys that don’t learn it are going to be out of ethics, out of tech, working too long for too little, and be in serious consumer trouble too.
With new HIGH QUALITY 2nd clutches 1-2 shift SHOULD get about 30% shorter after break-in. ALWAYS start with Calibration recommended.
Here’s how to make the 1-2 adjustable so that you can make it longer or shorter without removing the VB.A. Install new steel 1-2 capacity plug and thenew clip.B. While holding the plug outboard with asuitable tool, drill a hole up tight against theplug and down through the bottom of the VB.USE a .076-.078 drill bit.C. Remove clip. Screw a VB bolt into plugand remove plug. Clean up drill chips andscrape the burrs off hole.D. Install new spring & new Capacity Valve.E. Install the plain spring on the plug andinstall the plug deep enough to insert thecotter pin furnished into the drilled holestarting from the pan side. (VB Bottom)Spread the cotter pin legs slightly.DO NOT INSTALL ANY CLIP!
QUICK/CHANGE AND CUSTOMIZING 1-2 SHIFT
LONGER —— SHORTER Capacity GREEN———WHITE———BLUE
To make a Shorter or Longer 1-2 Shift: Drop pan, remove cotter pin, screw VB
bolt into plug, remove plug, change spring.
1-2 CapacityValve

Performance Products for the AOD Transmission!
TRANSGO PART #: AOD Shaft Kit
TRANSGO PART #: AOD-HP Reprogramming Kit Fits Ford and Lincoln Mercury AOD 1980-1993 Includes (4) governor valves for max throttle shift tuning; new boost valve with springs for tuning high performance engine applications and our patented High Temperature rings for forward clutch. Includes pan gasket and both valve body separator plate gaskets as well as other parts and procedures for shift feel calibration.Short, Firm Shifts with Performance, Durability and “CLASS”. Tunable wide open throttle shifts from 5500 - 6800 RPM. This Kit does not provide a wide-open throttle up-shift to 4th. Trans will have full automatic operation in OD or D position.
FITS: Ford/Lincoln Mercury AOD 80-93 FEATURES: Run a C6 Converter in an AOD! New Hardened Input Shaft works with Cast iron or stamped steel drum. Open Converter performance, No more lugging in 3rd and 4th or coast down chug. Great for street rods and transplants. Works with custom high stall or stock C6 converter.
© TransGo 2016