Sitecore XC Installation Guide for On-Premises Solutions
31
Sitecore XC Installation Guide for On-Premises Solutions Sitecore Experience Commerce 10.1 February 25, 2021
Transcript of Sitecore XC Installation Guide for On-Premises Solutions
Sitecore XC Installation Guide forOn-Premises SolutionsSitecore Experience Commerce 10.1
February 25, 2021

Table of Contents1. Getting started ........................................................................................................................... 3
1.1. Sitecore Experience Commerce solution .............................................................................. 41.2. System requirements .......................................................................................................... 5
1.2.1. Hardware requirements ............................................................................................... 51.2.2. Hosting environment requirements .............................................................................. 5
1.3. Packages for on-premises installation ................................................................................. 72. Preparing for a Sitecore XC installation ....................................................................................... 9
2.1. Verify your Sitecore XP setup ............................................................................................. 102.1.1. Search provider setup ................................................................................................ 102.1.2. SQL server setup ........................................................................................................ 10
2.2. Download the Sitecore XC release package and prerequisites ............................................ 112.3. Create a secret client certificate ......................................................................................... 12
3. Installing Sitecore XC ................................................................................................................ 133.1. Customize the deployment script ...................................................................................... 143.2. IIS setup ............................................................................................................................ 153.3. Run the deployment script ................................................................................................ 16
4. Post-installation steps .............................................................................................................. 174.1. Update the Storefront theme (optional) ............................................................................. 184.2. Configure user accounts .................................................................................................... 194.3. Configure connectivity with a remote Redis server (optional) ............................................. 20
4.3.1. Change caching options in the Commerce engine configuration ................................. 204.3.2. Add a remote Redis server to Commerce Engine Connect configuration ..................... 204.3.3. Restart the Commerce Engine in IIS ............................................................................ 21
5. Uninstall Sitecore XC ................................................................................................................ 226. Troubleshooting ....................................................................................................................... 23
6.1. Installation script fails to create a tenant and storefront site ............................................. 246.2. Default storefront site fails to load or loads without catalog navigation bar ....................... 25
6.2.1. Verify the template overrides values ........................................................................... 266.2.2. Default storefront site fails to load or loads without catalog navigation bar ................ 266.2.3. Verify the site grouping configuration ......................................................................... 276.2.4. Refresh the Commerce cache and data templates ...................................................... 276.2.5. Rebuild the Solr XP index ............................................................................................ 276.2.6. Re-publish the site ...................................................................................................... 27
6.3. Install-SitecoreConfiguration: The service cannot accept control messages at this time ..... 286.4. Remove a module or task from the deployment script ...................................................... 29
6.4.1. Remove a reference to a module ................................................................................ 296.4.2. Remove a completed task from a module ................................................................... 306.4.3. Skip specific tasks ....................................................................................................... 30
6.5. Orders information in Experience Analytics reports and XP is not up-to-date .................... 306.6. HTTP Error 500.30 - ANCM In-Process Start Failure ............................................................ 31
Sitecore XC Installation Guide for On-Premises Solutions
© Copyright 2021, Sitecore® - all rights reserved. 2

1. Getting started
This guide describes how to install a Sitecore Experience Commerce™ (XC) solution on premise, in asingle-server configuration, in a local environment or on a hosted virtual machine.
NOTEThis document assumes that you have already installed the Sitecore ExperiencePlatform software, using the XP Single Instance (XP0) configuration, as described in theSitecore XP Quick Installation Guide for a Developer Workstation.
This chapter contains the following sections:
• Sitecore Experience Commerce solution
• System requirements
• Packages for on-premises installation
Sitecore XC Installation Guide for On-Premises Solutions
© Copyright 2021, Sitecore® - all rights reserved. 3

1.1. Sitecore Experience Commerce solutionSitecore Experience Commerce (XC) is an e-commerce solution, built on the Sitecore ExperiencePlatform (Sitecore XP).
The Sitecore XC solution provides a core framework for rapidly delivering commerce functionalitythrough the following components:
• Commerce EngineAn extensible commerce core framework, hosting commerce services such as Cart, Order,Pricing, Promotions, Catalogs, and Inventory. The Commerce Engine includes a pluggableframework for extending the engine to modify or add to existing functionality.
• Commerce Business ToolsA set of rich business tools for merchandisers and customer service representatives. Thebusiness tools are built on the Angular framework, and can also be extended using the samepluggable framework.
• Sitecore Experience Accelerator (SXA) StorefrontA sample storefront website that is integrated with the Commerce Engine. You can use the SXAStorefront as a starting point to building a customized storefront.
For more information about Sitecore XP, refer to the Sitecore Documentation site.
For assistance, or to report any discrepancies between this document and the product, please contactSitecore Support.
The on-premises installation of the platform occurs in the context of the Sitecore InstallationFramework (SIF). The framework deploys Web Deploy Packages (WDP) by passing parameters toconfiguration files through a Microsoft® PowerShell module.
Sitecore XC Installation Guide for On-Premises Solutions
© Copyright 2021, Sitecore® - all rights reserved. 4

1.2. System requirementsThis section describes the system requirements for a Sitecore XC 10.1 hosting environment.
The Sitecore Experience Commerce compatibility matrix is available in this Sitecore Knowledge Basearticle
• Hardware requirements
• Hosting environment requirements
NOTEYou need a Braintree sandbox account to enable web payment functionality throughthe Commerce Engine. Follow the instructions on the Braintree website to set up anaccount, and note the MerchantID, Public Key and Private Key information. You need tospecify the values for those parameters in the Sitecore XC deployment script.
1.2.1. Hardware requirementsThe minimum hardware configuration requirements for running a single Sitecore XC installation are:
• 4 core processor
• 16 GB of RAM
NOTEThese are recommended hardware requirements for running the software on a singlecomputer. For more information about running Sitecore XC on different kinds ofhardware, consult your Sitecore partner or technical sales representative.
1.2.2. Hosting environment requirementsThe following table lists the software requirements for Sitecore XC 10.1 hosting environment.
IMPORTANTAddress all system requirements before you proceed with the Sitecore XC deploymentor upgrade.
Operatingsystem
• Windows Server 2016
• Windows Server 2019
• Windows 10 Professional (64-bit)
.NETFramework
The latest available version of the ASP.NET Core Runtime 3.1. Hosting Bundle
Sitecore XC Installation Guide for On-Premises Solutions
© Copyright 2021, Sitecore® - all rights reserved. 5

Database • Microsoft SQL Server 2019
• Microsoft SQL Server 2017
• Microsoft Azure SQL
• Redis data store
• Redis (Linux): 4.0.9 (or later)
• Redis (Azure): 4.0.14 (or later)
• Redis (Windows): 3.0.504 (or later)
NOTESitecore recommends using Redis for Linux for productioninstallations. The version for Windows should only be used fordevelopment or non-production single machine deployments.
Web server • IIS 10.0
• Microsoft Web Deploy 3.6
• URL Rewriter
Development • Visual Studio 2019
• The latest available version of .NET Core SDK 3.1
• MSBuild Microsoft Visual Studio Web targets (available from Nuget)
NOTEWhen you unpack the Web targets NuGet package, copy the\tools \VSToolsPath\Web\Microsoft.Web.XmlTransform.dll file into a folder andtake note the path.
• OData Connected Service (available from Visual Studio Marketplace)
• Node.js (for BizTools customization)
Deployment PowerShell 5.1 or later
Searchindexing
Solr 8.4.0
SolrCloud
Sitecoresoftware
• Sitecore Experience Platform 10.1 (available on dev.sitecore.net)
• Sitecore Experience Accelerator (SXA) 10.1 (available on dev.sitecore.net)
• Sitecore PowerShell Extensions 6.2 for Sitecore 10.1 (available with SXA downloadson dev.sitecore.net)
• Sitecore Identity 5.0.0
NOTESitecore PowerShell Extensions and Sitecore SXA are installed whenyou run the Sitecore Experience Commerce deployment script, as partof the XC installation process.
The Sitecore XC installation process requires the .ZIP packages for bothSitecore SXA and Sitecore Powershell Extensions. WDP packages arenot supported.
Sitecore XC Installation Guide for On-Premises Solutions
© Copyright 2021, Sitecore® - all rights reserved. 6
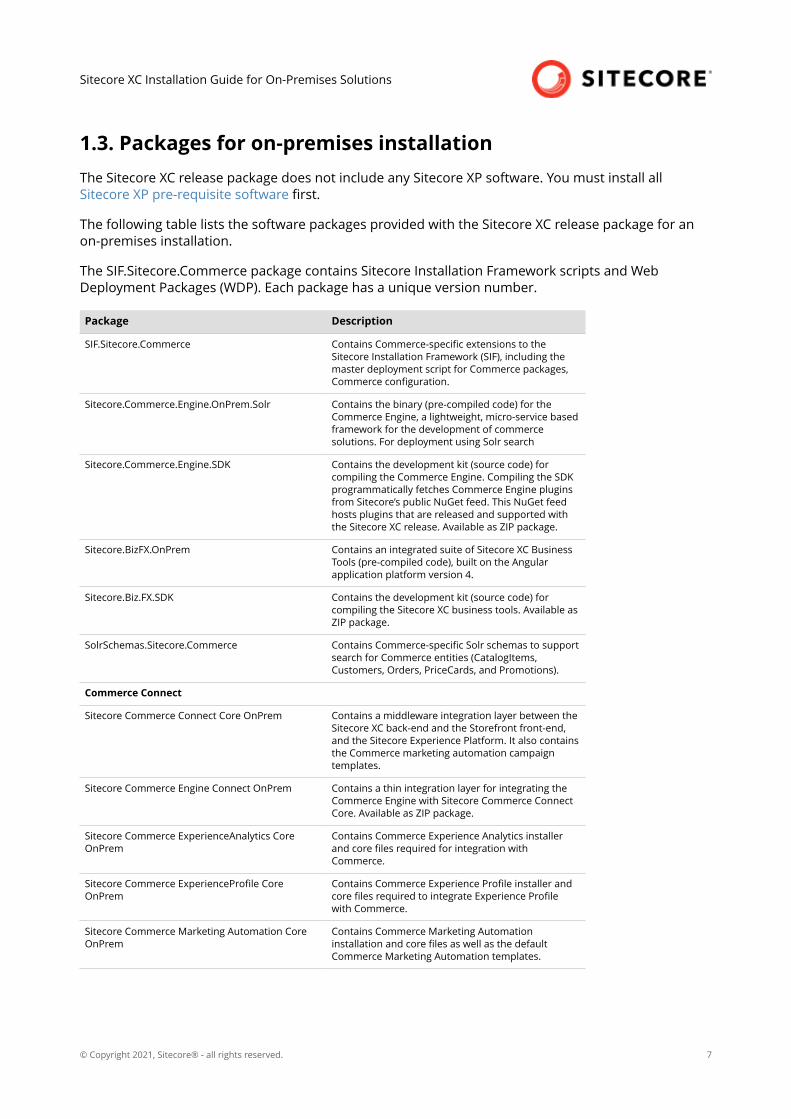
1.3. Packages for on-premises installationThe Sitecore XC release package does not include any Sitecore XP software. You must install allSitecore XP pre-requisite software first.
The following table lists the software packages provided with the Sitecore XC release package for anon-premises installation.
The SIF.Sitecore.Commerce package contains Sitecore Installation Framework scripts and WebDeployment Packages (WDP). Each package has a unique version number.
Package Description
SIF.Sitecore.Commerce Contains Commerce-specific extensions to theSitecore Installation Framework (SIF), including themaster deployment script for Commerce packages,Commerce configuration.
Sitecore.Commerce.Engine.OnPrem.Solr Contains the binary (pre-compiled code) for theCommerce Engine, a lightweight, micro-service basedframework for the development of commercesolutions. For deployment using Solr search
Sitecore.Commerce.Engine.SDK Contains the development kit (source code) forcompiling the Commerce Engine. Compiling the SDKprogrammatically fetches Commerce Engine pluginsfrom Sitecore’s public NuGet feed. This NuGet feedhosts plugins that are released and supported withthe Sitecore XC release. Available as ZIP package.
Sitecore.BizFX.OnPrem Contains an integrated suite of Sitecore XC BusinessTools (pre-compiled code), built on the Angularapplication platform version 4.
Sitecore.Biz.FX.SDK Contains the development kit (source code) forcompiling the Sitecore XC business tools. Available asZIP package.
SolrSchemas.Sitecore.Commerce Contains Commerce-specific Solr schemas to supportsearch for Commerce entities (CatalogItems,Customers, Orders, PriceCards, and Promotions).
Commerce Connect
Sitecore Commerce Connect Core OnPrem Contains a middleware integration layer between theSitecore XC back-end and the Storefront front-end,and the Sitecore Experience Platform. It also containsthe Commerce marketing automation campaigntemplates.
Sitecore Commerce Engine Connect OnPrem Contains a thin integration layer for integrating theCommerce Engine with Sitecore Commerce ConnectCore. Available as ZIP package.
Sitecore Commerce ExperienceAnalytics CoreOnPrem
Contains Commerce Experience Analytics installerand core files required for integration withCommerce.
Sitecore Commerce ExperienceProfile CoreOnPrem
Contains Commerce Experience Profile installer andcore files required to integrate Experience Profilewith Commerce.
Sitecore Commerce Marketing Automation CoreOnPrem
Contains Commerce Marketing Automationinstallation and core files as well as the defaultCommerce Marketing Automation templates.
Sitecore XC Installation Guide for On-Premises Solutions
© Copyright 2021, Sitecore® - all rights reserved. 7

Package Description
Sitecore Commerce Marketing Automation forAutomationEngine
Contains Commerce Marketing automation filesrequired to setup the Marketing Automation Engineservice. Available as ZIP package.
SXA Storefront
Sitecore Commerce Experience Accelerator Contains Commerce-specific extensions to theSitecore Experience Accelerator (SXA) templated UXlayouts (for example, UI renderings used to display acatalog on the Storefront) as well as the Commerceemail campaign templates.
Sitecore Commerce Experience AcceleratorStorefront
Contains the sample and starter storefront as anintegrated part of the Sitecore XC solution, built usingSXA UX layouts.
Sitecore Commerce Experience AcceleratorStorefront Themes
Contains the themes used for the SXA Storefront site.
Sitecore Commerce Experience Accelerator HabitatCatalog
Contains the Habitat sample catalog for theStorefront site.
Sitecore.Commerce.Habitat.Images.OnPrem Contains images for the Habitat sample catalog.
Adventure Works Images.OnPrem Contains images for the Adventure Works samplecatalog.
NOTEIn addition to the above, the Sitecore XC release package for 10.1 also includes otherpackages that are not used the deployment of the sample Commerce solution on-prem.
Sitecore XC Installation Guide for On-Premises Solutions
© Copyright 2021, Sitecore® - all rights reserved. 8

2. Preparing for a Sitecore XC installation
This chapter outlines the tasks you must complete before installing the Sitecore XC solution on asingle machine in a non-production environment.
This chapter contains the following sections:
• Verify your Sitecore XP setup
• Download the Sitecore XC release package
• Create a secret client certificate
Sitecore XC Installation Guide for On-Premises Solutions
© Copyright 2021, Sitecore® - all rights reserved. 9

2.1. Verify your Sitecore XP setupThe instructions in this document assume that you have already installed the Sitecore XP software onyour system, as described in the Sitecore Experience Platform Installation Guide.
These instructions also assume that you have .Net Core SDK 3.1.302 (or latest) installed in yourdevelopment environment and have the following installed in your deployment environment:
• Windows Server hosting .Net Core 3.1.6
• Solr 8.4.0 deployment (with HTTPs enabled)
• Sitecore Experience Platform 10.1 (XP Single deployment)
• Sitecore Identity (5.0.0)
2.1.1. Search provider setupSolr is the recommended search provider for Sitecore XC on-premises installation
The Sitecore XC deployment script assumes that your deployment uses Solr.
Sorl is installaed with Sitecore XP. You must make sure that Solr is running properly before you installthe Sitecore XC solution. Rebuild the search indexes and the link databases in the Sitecore client(Control Panel > Indexing Manager). See the Sitecore Experience Platform Installation Guide fordetailed instructions .
In addition, make a note of the values you used for Solr ($SolrUrl, $SolrRoot, $SolrService)during the Sitecore XP installation. You must specify these values in the Sitecore XC deployment script.
2.1.2. SQL server setupThe Sitecore Installation Framework (SIF) installs the required databases during Sitecore XPdeployment, but you must set up the correct user roles for authentication. Ensure that you add arecognized user (for example, collectionuser) to the xDB shared databases (as described in theSitecore Experience Platform Installation Guide).
Sitecore XP uses SQL authentication during installation (for example, $SqlAdminUser = "sa").Sitecore XC uses Windows Authentication during installation, which means that the user identityrunning the Sitecore XC deployment script is typically the current Windows logon user. This useraccount must have proper database permissions (for example, sysadmin at the SQL instance level)during the installation.
In addition, make a note of the value you used for the SQL installation ($SqlServer) during theSitecore XP installation. You must specify this value in the Sitecore XC deployment script.
Sitecore XC Installation Guide for On-Premises Solutions
© Copyright 2021, Sitecore® - all rights reserved. 10

2.2. Download the Sitecore XC release package andprerequisitesYou can download the Sitecore XC release package from the Sitecore Experience Commerce Downloadpage.
To download the Sitecore XC 10.1 release package and prerequisites:
1. Download and install Redis.
NOTE• Sitecore recommends using Redis for Linux for production installations.
Redis for Windows should only be used for development or non-production, single machine deployments.
• The deployment script assumes a developer scenario where Redis and XCare installed on the same host. If your development environment is usinga remote Redis installation, you need to perform additional post-installation steps to establish connectivity with the remote Redis server.
2. Open a browser and go to the Sitecore Experience Commerce Download and access the pagefor Sitecore Experience Commerce 10.1. release downloads page.
3. In the section Download Options for On Premise Deployments, download the SitecoreExperience Commerce Packages for On Premise WDP (Packages for On-Premises2021.02-x.x.xxx).
4. Extract the contents of the .zip file to the location from which you are deploying Sitecore XC(for example, c:\deploy).The extraction process results in multiple .zip files.
5. Extract the content of the SIF.Sitecore.Commerce.zip file.
6. Download the following software to a folder in your local deployment folder:
• Sitecore PowerShell Extensions 6.0 for Sitecore 10.1 (available from the SitecoreExperience Accelerator (SXA) Download page)
• Sitecore Experience Accelerator 10.1 (available from the Sitecore Experience AcceleratorDownload page)
NOTEThe Sitecore XC 10.1 installation process uses .ZIP packages for SXA 10.1and for Sitecore PowerShell Extensions.
SXA WDP packages are not supported.
• MSBuild Microsoft Visual Studio Web targets (available from Nuget)
NOTEWhen you unpack the Web targets NuGet package, copy the \tools\VSToolsPath\Web\Microsoft.Web.XmlTransform.dll file into afolder and note the path.
Sitecore XC Installation Guide for On-Premises Solutions
© Copyright 2021, Sitecore® - all rights reserved. 11

2.3. Create a secret client certificateThe Commerce Engine Connect clients authenticate with the Sitecore Identity server using a clientsecret. You must create an authentication secret as a prerequisite to running the Sitecore XCdeployment script. The client authentication secret is a required parameter value that you mustprovide when you customize the deployment script.
There are many ways to create client authentication secrets, but following is an example usingPowerShell:
$bytes = New-Object Byte[] 32$rand = [System.Security.Cryptography.RandomNumberGenerator]::Create()$rand.GetBytes($bytes)$rand.Dispose()$newClientSecret = [System.Convert]::ToBase64String($bytes)
NOTETake note of the generated secret value so that you have it at hand when youcustomize the the deployment script.
Sitecore XC Installation Guide for On-Premises Solutions
© Copyright 2021, Sitecore® - all rights reserved. 12

3. Installing Sitecore XC
The Sitecore XC release package includes PowerShell scripts for installing Sitecore XC. The Deploy-Sitecore-Commerce.ps1 script (located in the SIF Sitecore Commerce folder) installs all of theSitecore XC modules and the SXA Storefront site.
This chapter contains the following sections:
• Customize the deployment script
• IIS setup
• Run the deployment script
Sitecore XC Installation Guide for On-Premises Solutions
© Copyright 2021, Sitecore® - all rights reserved. 13

3.1. Customize the deployment scriptThe Sitecore XC deployment script executes a single command to deploy Sitecore XC, and includes anumber of parameters that you must change. Sitecore recommends that you modify the existingdeployment script and save it with a new name (to preserve a record of the factory default script).
After you specify required parameter values and paths to reflect your own deployment environment,you can run the script to install the solution.
NOTEBy default, Sitecore XC parameters values are aligned with the Sitecore ExperiencePlatform (XP0) default parameters values. If your Sitecore XP deployment uses customvalue, make sure to customize the Sitecore XC deployment script accordingly.
For your convenience, the script file provides a brief description of each parameter.
NOTEThe deployment script requires that you provide a client secret to authenticate withCommerce Engine Connect. Deployment fails if you omit to provide a value forparameter $CommerceEngineConnectClientSecret = "". Make sure to generate aclient secret prior to customizing the script.
To customize the deployment script:
1. Navigate to the SIF Sitecore Commerce folder that you unzipped earlier (for example,c:\deploy\SIF.Sitecore.Commerce.x.x.xxx\).
2. In a text editor, open the Deploy-Sitecore-Commerce.ps1 script file.
3. Save a copy of the file with a new name (for example, MyDeploy-Sitecore-Commerce.ps1).
4. Specify values for parameters, according to your own environment. In particular, make surethat the path values correspond to the locations where you unzipped or copied files neededfor the installation. The script provides a description of each parameter.
NOTEUse a double-backslash character in parameter values that specify namedserver instance ("<servername>\\<instanceName>"). For example,CommerceServicesDbServer = "SQLServerName\\SQLInstanceName.
5. By default, the script deploys the SXA Storefront. If you want to install the Sitecore XC solutionin a Commerce-Engine only deployment (that is, without installing the SXA Storefront), set thevalue of the parameter $skipInstallDefaultStorefront to true. The script predefinesthe list of tasks to skip.
NOTEWhen you skip the installation of the SXA Storefront, the script still deploys allSF-related packages. To avoid deploying unnecessary storefront packages, setthe $SkipDeployStorefrontPackages parameter to true.
6. After you have made your changes to the deployment script, save the file.
Sitecore XC Installation Guide for On-Premises Solutions
© Copyright 2021, Sitecore® - all rights reserved. 14

3.2. IIS setupIf the Sitecore XP IIS site name is different from its application pool name (by default, they are thesame), you must change the values in the Sitecore XC deployment scripts for the StopAppPool andStartAppPool parameters in the SXAStorefront.Preconfigure.json file to reflect the correctapplication pool name.
Sitecore XC Installation Guide for On-Premises Solutions
© Copyright 2021, Sitecore® - all rights reserved. 15

3.3. Run the deployment scriptTo run your customized Sitecore XC deployment script:
1. In IIS Manager, restart the Sitecore Identity service.
IMPORTANTAfter you have restarted the service, do not browse to the Sitecore Identityservice. Run the deployment script (by performing the following steps) beforeaccessing the Sitecore Identity service.
2. Launch PowerShell as an administrator, and navigate to: C:\deploy\<path-to-SIF-folder>.
3. Run the customized deployment script by executing the following command (using the filename you used for your deployment script), for example: .\MyDeploy-Sitecore-Commerce.ps1
NOTEThe installation script performs tasks that update the Sitecore databases. If youattempt to re-run the Sitecore XC deployment script after a Sitecore databasewas altered by a previous installation attempt, the script fails with an errormessage. To avoid this error, you can modify the script to skip or remove thetasks previously completed, and run the script again. Otherwise, you mustuninstall and re-install Sitecore Experience Platform and Sitecore Commerce XC.
Sitecore XC Installation Guide for On-Premises Solutions
© Copyright 2021, Sitecore® - all rights reserved. 16

4. Post-installation steps
After you have successfully installed the Sitecore XC software, you must complete the following tasksto complete your deployment:
• Update the Storefront theme (optional)
• Configure user accounts
• Configure connectivity with a remote Redis server (optional)
Sitecore XC Installation Guide for On-Premises Solutions
© Copyright 2021, Sitecore® - all rights reserved. 17

4.1. Update the Storefront theme (optional)By default, the Sitecore XC deployment script installs the SXA Storefront site with the storefront-branded theme.
Optionally, you can assign a different theme (for example, a custom theme), as described in the Createa new tenant and site topic on the Sitecore Documentation site.
You must re-publish the Storefront site for your changes to take effect.
Sitecore XC Installation Guide for On-Premises Solutions
© Copyright 2021, Sitecore® - all rights reserved. 18

4.2. Configure user accountsAfter you have deployed your Sitecore XC solution, you must create user accounts and assign theappropriate roles.
NOTEEvery Sitecore XC user who requires access to the Business Tools must have theCommerce Business User role assigned, at a minimum.
You and assign roles using the User Manager tool on the Sitecore Launchpad.
Refer to the User roles and permissions topic for information on the pre-defined roles and associatedpermissions for the Sitecore XC Business Tools.
Sitecore XC Installation Guide for On-Premises Solutions
© Copyright 2021, Sitecore® - all rights reserved. 19

4.3. Configure connectivity with a remote Redis server(optional)The default deployment script assumes that Redis and Sitecore Experience Commerce (XC) aredeployed on the same host. If your Sitecore XC developer environment uses a remote instance ofRedis, you must perform additional steps to establish connectivity with Redis.
NOTEYou must perform the following procedures on each instance of the Commerce Enginein your deployment.
1. Change caching options in the Commerce engine configuration
2. Add a remote Redis server to Commerce Engine Connect configuration
3. Restart the Commerce Engine in IIS
4.3.1. Change caching options in the Commerce engine configurationThe Commerce Engine config.json file defines default caching options that you must change whenusing a remote Redis instance.
To configure the Commerce Engine to use a remote Redis instance:
• Open the c:\inetpub\wwwroot\<COMMERCE_ENGINE_INSTANCE_NAME>\wwwroot\config.json file, locate the "Caching" section and, in the Redis Options subsection, changethe default "Configuration": "localhost" to specify the machine name hosting your Redisserver. For example:
"Caching": { "Memory": { "Enabled": false, "CacheStoreName": "Commerce-Memory-Store" }, "Redis": { "Enabled": true, "CacheStoreName": "Commerce-Redis-Store", "IntervalBetweenConnectionAttemptsInSeconds": 60 "RedisConnectionPoolSize": 1, "RedisCompressionEnabled": true, "Options": { "Configuration": "<MACHINENAME>:<PORT>", "InstanceName": "Redis" } } },
NOTEYou do not need to specify the Redis port number when using the default port forRedis (6380). If your Redis deployment does not use the default, you must specifythe port number in the configuration (for example "Configuration":"localhost:6398").
4.3.2. Add a remote Redis server to Commerce Engine Connect configurationTo establish connectivity with a remote Redis server:
Sitecore XC Installation Guide for On-Premises Solutions
© Copyright 2021, Sitecore® - all rights reserved. 20

1. In the c:\inetpub\wwwroot\<site>\App_Config\Include\Y.Commerce.Engine folder,open the Sitecore.Commerce.Engine.Connect.config file.
2. In the cache settings section of the files, change the configuration to specify the machinename and port where the Redis server is running, and the named instance.For example:
NOTEConfiguration options used in this procedure are provided as example only. Useconfiguration options required in your deployment.
<redis type="Sitecore.Commerce.Engine.Connect.RedisCacheSettings, Sitecore.Commerce.Engine.Connect.Caching"> <enabled>true</enabled> <cacheStoreName>Commerce-Connector-Redis</cacheStoreName> <options type="Microsoft.Extensions.Caching.Redis.RedisCacheOptions, Microsoft.Extensions.Caching.Redis"> <configuration>MACHINENAME:PORT, defaultDatabase=1,allowAdmin=true,syncTimeout=3600000</configuration> <instanceName>MACHINENAME</instanceName> </options></redis>
NOTEYou do not need to specify the Redis port number when using the default portfor Redis (6380). If your Redis deployment does not use the default, you mustspecify the port number in the configuration (for example localhost:6398).
4.3.3. Restart the Commerce Engine in IISAfter you have completed the configuration changes, restart the Commerce Engine and Sitecoreinstances in IIS for the new configuration to take effect.
Sitecore XC Installation Guide for On-Premises Solutions
© Copyright 2021, Sitecore® - all rights reserved. 21

5. Uninstall Sitecore XC
You can uninstall Sitecore XC when you want to start with a fresh deployment. You use the SitecoreInstallation Framework (SIF) to uninstall the Sitecore XC on-premises topology.
WARNINGWhen you uninstall Sitecore XC, your Sitecore Experience Platform (XP) deploymentbecomes nonfunctional. You must also uninstall Sitecore XP.
To uninstall Sitecore Experience Commerce:
1. Change the Install-SitecoreConfiguration cmdlet to Uninstall-SitecoreConfiguration. For example,Change:
Install-SitecoreConfiguration @deployCommerceParams -Verbose *>&1 | Tee-Object "$XCSIFInstallRoot\XC-Install.log
To:
Uninstall-SitecoreConfiguration @deployCommerceParams -Verbose *>&1 | Tee-Object "$XCSIFInstallRoot\XC-Uninstall.log
NOTEIf the SQL database server in your Commerce deployment uses a namedinstance, you must remove the extra backslash character ("\") from the sqlnamed instance in the script. For example, if you deployed using ss-mysqlinstance-01-cn\\sql2017, you must update the SQL database servername in the script to ss-mysqlinstance-01-cn\sql2017 before running theuninstall command.
2. Execute the script to remove the topology.
3. Uninstall Sitecore XP. For instructions on how to uninstall your Sitecore XP single topologydeployment, refer to the Sitecore XP Quick Installation Guide for a Single Developer Workstation,available on the Sitecore Download site.
Sitecore XC Installation Guide for On-Premises Solutions
© Copyright 2021, Sitecore® - all rights reserved. 22

6. Troubleshooting
This section contains a list of issues that can arise during the initial deployment of Sitecore ExperienceCommerce, and proposes possible solutions.
• Installation script fails to create a tenant and storefront site
• Default storefront site fails to load or loads without catalog navigation bar
• Install-SitecoreConfiguration: The service cannot accept control messages at this time
• Remove a module or task from the deployment script
• Orders information in Experience Analytics reports and XP is not up-to-date
• HTTP Error 500.30 - ANCM In-Process Start Failure
Sitecore XC Installation Guide for On-Premises Solutions
© Copyright 2021, Sitecore® - all rights reserved. 23

6.1. Installation script fails to create a tenant and storefrontsiteIf the installation process fails to create a tenant and default storefront site, you can manually create atenant and storefront site by following steps described in this topic.
Sitecore XC Installation Guide for On-Premises Solutions
© Copyright 2021, Sitecore® - all rights reserved. 24
6.2. Default storefront site fails to load or loads without catalognavigation barIf, after completing the deployment procedure, the default storefront site fails to load or loads withoutdisplaying the catalog navigation bar, you can perform the following procedures as possible solutions:
• Verify the template overrides values
• Verify catalog configuration
• Verify the site grouping configuration
• Refresh the Commerce cache and data templates
• Republish the site
• Rebuild the Solr XP index
For additional troubleshooting solutions, see Troubleshooting SXA Storefront.
Sitecore XC Installation Guide for On-Premises Solutions
© Copyright 2021, Sitecore® - all rights reserved. 25

6.2.1. Verify the template overrides valuesIf the template overrides values of the Habitat Master catalog do not match the default storefrontvalues, the storefront site fails to load properly.
To verify the template overrides for the default storefront catalog:
1. In the Content Editor, navigate to /sitecore/Content/Sitecore/Storefront/Home/Catalogs/Habitat_Master.
2. Go to the Template Overrides section, and verify that the value template override. The valuesfor the Habitat_Master should be as follows:
6.2.2. Default storefront site fails to load or loads without catalognavigation barIf the default Habitat catalog configuration contains errors, the storefront site or catalog informationmay fail to load properly. The root cause of this error might be the catalog configuration.
To verify the catalog configuration:
1. In the Content Editor, navigate to /sitecore/Content/Sitecore/Storefront/Settings/Commerce/Catalog Configuration.
2. Go to the Commerce section, and verify that values for the Catalog and Start NavigationCategory fields are set as follows:
Sitecore XC Installation Guide for On-Premises Solutions
© Copyright 2021, Sitecore® - all rights reserved. 26

6.2.3. Verify the site grouping configurationIf the host name value specified in the storefront site grouping configuration does not match thedefault storefront hostname, the default storefront site cannot load.
To verify the site grouping configuration:
1. In the Content Editor, navigate to /sitecore/Content/Sitecore/Storefront/Settings/Site Grouping/Storefront.
2. Go to the Basic section, and verify that the field Host Name (use* as wild card and | to listmore values) is set to sxa.storefront.com.
6.2.4. Refresh the Commerce cache and data templatesA staled Commerce cache or obsolete data templates may prevent the default storefront from loadingor displaying properly.
To refresh the Commerce cache:
1. In the Content Editor, click the Commerce tab.
2. On the ribbon, click Refresh Commerce Cache.
To refresh data templates:
1. In the Content Editor, click the Commerce tab.
2. On the ribbon, click Delete Data Templates.
3. On the ribbon, click Update Data Templates.
6.2.5. Rebuild the Solr XP indexAfter you publish the storefront, you must rebuild the Solr XP index .
6.2.6. Re-publish the siteIf you made any changes to the storefront configuration or settings, you must republish the defaultstorefront site.
Sitecore XC Installation Guide for On-Premises Solutions
© Copyright 2021, Sitecore® - all rights reserved. 27

6.3. Install-SitecoreConfiguration: The service cannot acceptcontrol messages at this timeThe Sitecore XC deployment script might fail, with an error message similar to the following:
Install-SitecoreConfiguration: The service cannot accept control messages at this time. (Exception from HRESULT: 0x80070425) At C:\Program Files\WindowsPowerShell\Modules\SitecoreInstallFramework\2.1.1\Public\Install-SitecoreConfiguration.ps1:641 char:25 + & $entry.Task.Command @paramSet | Out-Default + ~~~~~~~~~~~~~~~~~~~~~~~~~~~~~~~ + CategoryInfo : NotSpecified: (:) [
To resolve this issue:
1. In IIS manager, re-start the app pool and the application.
2. Run the deployment script again.
Sitecore XC Installation Guide for On-Premises Solutions
© Copyright 2021, Sitecore® - all rights reserved. 28

6.4. Remove a module or task from the deployment scriptAs a general rule, when a task in the Deploy-Sitecore-Commerce.ps1 script fails during execution,you can remove preceding tasks that completed successfully from the script file before you attempt torun the deployment script again.
Before running the deployment script again, you can either remove the reference to a specific module(for example, if all tasks defined in that module's JSON file successfully executed), or you can removespecific completed tasks in a module's JSON file.
6.4.1. Remove a reference to a moduleTo remove a reference to a module from the Master_SingleServer.json file:
1. In the folder where you deployed the SIF.Sitecore.Commerce package, open theConfiguration/Commerce/Master_SingleServer.json file and, in the file, locate the"Includes" section. The following shows an example of the "Includes" section and someof the modules it contains:
}, "Includes": { "IdentityServer": { "Source": ".\\Configuration\\Commerce\\IdentityServer\\IdentityServer.Config.json" }, "Solr": { "Source": ".\\Configuration\\Commerce\\Solr\\Solr.Install.json" }, "CommerceEngine": { "Source": ".\\Configuration\\Commerce\\CommerceEngine\\CommerceEngine.json" }, "BizFx": { "Source": ".\\Configuration\\Commerce\\SitecoreBizFx\\SitecoreBizFx.Install.json" }, "StoreFront-PreconfigureInstance": { "Source": ".\\Configuration\\Commerce\\SXAStorefront\\SXAStorefront.Preconfigure.json" }, "Module-DirDst-EnsurePath": { "Source": ".\\Configuration\\Commerce\\Common\\Common.EnsurePath.json" }, "Module-PowershellExtensions": { "Source": ".\\Configuration\\SitecoreUtilities\\InstallModule.json" }, "Module-SXAFramework": { "Source": ".\\Configuration\\SitecoreUtilities\\InstallModule.json" }, "Publish-Extensions": { "Source": ".\\Configuration\\Commerce\\Common\\Common.PublishToWeb.json" }, "Module-HabitatImages": { "Source": ".\\Configuration\\Commerce\\Common\\Common.InstallWdpModule.json" ...}
2. Delete the reference to the module you want to remove from the deployment process, andsave the changes.For example, to exclude the module that deploys theSitecore.Commerce.Habitat.Images.OnPrem.scwdp.zip package, delete the followingblock from the Master_SingleServer.json file: "Module-HabitatImages":{ "Source": ".\\Configuration\\Commerce\\Common\\Common.InstallWdpModule.json".
Sitecore XC Installation Guide for On-Premises Solutions
© Copyright 2021, Sitecore® - all rights reserved. 29

3. Run the Deploy-Sitecore-Commerce.ps1 script again. The script deploys the remainingmodules.
6.4.2. Remove a completed task from a moduleTo remove a task from module's JSON file:
1. In the folder where you deployed the SIF.Sitecore.Commerce package, open theConfiguration\Commerce/<MODULE><FILENAME.json>, and locate the "Tasks" section.The following shows an example of the "tasks" section in the Configuration/Commerce/CommerceEngine/CommerceEngine.Initialize.json file.
}, "Tasks": { "DisableCsrfValidation": "RestartWebAppPoolOps": "GetIdServerToken": "BootStrapCommerceServices": { "EnsureSyncDefaultContentPaths": { "Type": "EnsureSyncDefaultContentPaths", "Params": { "UrlEnsureSyncDefaultContentPaths": "[variable('UrlEnsureSyncDefaultContentPaths')]", "UrlCheckCommandStatus": "[variable('UrlCheckCommandStatus')]", "Environments": "[parameter('Environments')]" } },}
2. Remove completed tasks, and save your changes.
3. Run the Deploy-Sitecore-Commerce.ps1 script again. The script performs the remainingdeployment tasks.
6.4.3. Skip specific tasksSitecore Install Framework (SIF) allows you skip specific tasks by passing the -Skip parameter to theInstall-SitecoreConfiguration function.
For example, you can use Install-SitecoreConfiguration @params -Skip Module-PowershellExtensions_CheckPaths,Module-PowershellExtensions_InstallModule to skipthe following tasks during deployment: Module-PowershellExtensions_CheckPaths andModule-PowershellExtensions_InstallModule.
6.5. Orders information in Experience Analytics reports and XPis not up-to-date
To make sure that the most up-to-date orders information is visible in Sitecore Experience Analyticsreports and in Sitecore Experience Platform, you must deploy all marketing definitions andtaxonomies.
Sitecore XC Installation Guide for On-Premises Solutions
© Copyright 2021, Sitecore® - all rights reserved. 30

6.6. HTTP Error 500.30 - ANCM In-Process Start FailureIf your Commerce Engine fails to start and reports error “HTTP Error 500.30 - ANCM In-Process StartFailure”, make sure that, in the Deploy-Sitecore-Commerce.ps1 file, you use a double-backslash (\\) character in parameter values that specify a server name and a named instance ("<serverName>\\<instanceName>).
For example, CommerceServicesDbServer = "SQLServerName\\SQLInstanceName"
Sitecore XC Installation Guide for On-Premises Solutions
© Copyright 2021, Sitecore® - all rights reserved. 31