Site Structure, Navigation & User Registration...General Navigation Elements Note: The images shown...
19
USER GUIDE Chapter 3 Site Structure, Navigation and User Registration Schoolwires Academic Portal Version 4.3.1
Transcript of Site Structure, Navigation & User Registration...General Navigation Elements Note: The images shown...

USER GUIDE
Chapter 3
Site Structure, Navigation and User Registration
Schoolwires Academic Portal
Version 4.3.1

Schoolwires Academic Portal 4.3.1 Site Structure, Navigation and User Registration
TABLE OF CONTENTS
Introduction......................................................................................................................... 1 Audience and Objectives ................................................................................................ 1 Navigating in the Academic Portal ................................................................................. 1
General Navigation Elements ..................................................................................... 1 Before Sign In ......................................................................................................... 2 After Sign In ........................................................................................................... 2
Channel Navigation Elements..................................................................................... 3 Homepages.................................................................................................................. 5 Navigating to a Section............................................................................................... 5
Editing Privileges on Your Website ................................................................................... 7 Site Director .................................................................................................................... 7 Subsite Director .............................................................................................................. 8 Section Editor.................................................................................................................. 8 Homepage Editor ............................................................................................................ 8
Using Roles on Your Website............................................................................................. 9 Registering on Your Website............................................................................................ 10 Signing In to Your Website .............................................................................................. 12
Signing in to the Academic Portal ................................................................................ 12 Using a Secure Sign in.................................................................................................. 13 Signing in with Lightweight Directory Access Protocol (LDAP) ................................ 13 Automatic Sign in to Synergy and Assist ..................................................................... 14
Working with Your User Profile....................................................................................... 15 Modifying Your User Profile........................................................................................ 16 Deleting Your User Profile ........................................................................................... 17
AP Ch3 V2_012508 Page i

Schoolwires Academic Portal 4.3.1 Site Structure, Navigation and User Registration
Introduction
efore you begin organizing and populating your website, it is important for you to understand the structure of the Schoolwires Academic Portal.
Your organization may have a main site and subsites or just a single main site. Both the main site and any subsites associated with it will include editable sections within that site.
B Audience and Objectives
Schoolwires recommends that all people who will be assigned editing privileges on your website read this chapter.
In this chapter, you will learn about:
• Navigating in the Academic Portal
• Editing privileges in the Academic Portal
• Using roles
• Registering on your website
• Signing in to your website
• Working with your user profile
Navigating in the Academic Portal
Using the Academic Portal, your organization may customize not only the look of its website but also the way visitors navigate through it. However, your website will still use the basic Schoolwires navigation elements. These elements, along with the name of the main site or subsite you are viewing, will appear on each page of your website and provide you with consistent navigation throughout the main site and any subsites. TIP: Contact your Site Director or Subsite Director if you need more specific information on navigating your organization’s website.
General Navigation Elements
Note: The images shown reflect the standard Schoolwires template.
General navigation elements appear on the MyStart bar as shown in Figure 1. What you see before you sign in to the website and what you see after you sign in will be slightly different.
AP Ch3 V2_012508 Page 1

Schoolwires Academic Portal 4.3.1 Site Structure, Navigation and User Registration
MyStart bar
Figure 1: MyStart bar before sign in
Before Sign In As you can see from Figure 1, before you sign in, the following navigation elements may be available to you:
• District: Allows you to navigate to your organization’s main site from any subsite.
• Select a School: Allows you to navigate to each of your organization’s subsites from either the main site or another subsite. When you click on this element, a drop-down list like the one shown in Figure 2 will display. From this drop-down list, you can select the subsite you wish to view. The organization in Figure 2 is a school district. Its main site is the website for the entire school district. Each school in the district has a subsite linked to this main site.
subsites from either the main site or another subsite. When you click on this element, a drop-down list like the one shown in Figure 2 will display. From this drop-down list, you can select the subsite you wish to view. The organization in Figure 2 is a school district. Its main site is the website for the entire school district. Each school in the district has a subsite linked to this main site.
Each school name links to that subsite
• Sign In: Allows you to sign in if you are a registered user of the site. Signing in is covered later in this chapter.
• Sign In: Allows you to sign in if you are a registered user of the site. Signing in is covered later in this chapter.
Figure 2: Select a School drop-down list
• Register (optional): Allows users to register themselves on the website if your organization chooses to enable self-registration.
• Register (optional): Allows users to register themselves on the website if your organization chooses to enable self-registration.
After Sign In After Sign In As you can see in Figure 3, the Sign In and Register buttons will no longer appear once you sign in to the website. As you can see in Figure 3, the Sign In and Register buttons will no longer appear once you sign in to the website.
After you sign in, the following navigation elements may be available to you: After you sign in, the following navigation elements may be available to you:
Figure 3: MyStart bar after sign in
• District • District
AP Ch3 V2_012508 Page 2

Schoolwires Academic Portal 4.3.1 Site Structure, Navigation and User Registration
• Select a School
• Sign Out: Allows you to sign out of the site when you are finished working. TIP: To ensure security, Schoolwires recommends that you always sign out when you are finished working.
• Access My Info: Allows you to access your user profile (account) and change it if you desire. Accessing and making changes to your user profile is covered later in this chapter.
• Site Manager: Displays if you have editing privileges at the level you are viewing. In other words:
ο If you are the Site Director, once you sign in, you will see the Site Manager button on the MyStart bar on every page of the main site and all subsites. Clicking on it will give you access to the Site Workspace for the main site as well as to all Subsite Workspaces, and Channel and Section Workspaces for the main site and all subsites.
ο If you are a Subsite Director, the Site Manager button will appear on the MyStart bar once you sign in and navigate to your subsite. It will appear on every page of that subsite. Clicking on it will allow access to the Subsite Workspace for that subsite as well as Channel and Section Workspaces for that subsite.
ο If you are a Section Editor, the Site Manager button will appear on the MyStart bar once you sign in and navigate to your section. Clicking on it will only give you access to the Section Workspace for the section for which you have editorial privileges.
ο If you are a Homepage Editor, the Site Manager button will appear on the MyStart bar once you sign in and navigate to the site or subsite to which you are assigned. However, clicking on it will only give you access to the Homepage Workspace for your homepage.
Channel Navigation Elements
Each main site or subsite contains channels or groups of information. These channels are visible on every page of your site or subsite and provide end users with consistent navigation. The channels on each subsite may be different from those of the main site or any other subsite.
The default in a Schoolwires standard template is for the Home button to appear on the far left and the Calendar button to appear on the far right of the Channel bar as shown in Figure 4.
AP Ch3 V2_012508 Page 3

Schoolwires Academic Portal 4.3.1 Site Structure, Navigation and User Registration
Figure 5 illustrates the channel navigation elements. The three primary elements are:
1. Channels: If you think of your site or subsite as a file cabinet, the channels are the drawers. You might label each drawer of a file cabinet according to the contents you keep in it. This label is the general category for the contents. On your site or subsite, each channel is labeled to reflect its contents.
2. Sections: Within each drawer (channel), you have hanging folders. You use these to break down the general category into subcategories called sections.
3. Pages: Finally, within each hanging folder (section) in the drawers (channel) of your file cabinet (site or subsite), you have pages. All the information is actually stored on the pages.
Figure 4: Standard template Channel bar
Channel bar
Figure 5: File cabinet illustration
AP Ch3 V2_012508 Page 4

Schoolwires Academic Portal 4.3.1 Site Structure, Navigation and User Registration
Homepages
Your main site, each subsite and each section has its own homepage. This is the first page you will see on that site, subsite or section.
Note: The name for the homepage for a section may initially default to “Overview.” In other instances, it will have a different name.
Navigating to a Section
Whether you are on your organization’s main site or one of its subsites, you will navigate to each section on the end-user website in the same way.
1. Hover over a channel name. Generally, you will see a drop-down list of the sections in that channel like the one shown in Figure 6. There are two reasons you may not see a drop-down list for a particular channel. They are:
• There is only one section under the channel and your organization has elected not to show a drop-down list when there is only one section. In this instance, you will click on the channel name to navigate to the section.
• There are 15 or more sections for the channel. In this case, a directory page like the one shown in Figure 7 for that channel will display.
Note: A channel will not appear on the Channel bar until it contains at least one section.
Figure 6: Channel drop-down list showing sections
AP Ch3 V2_012508 Page 5

Schoolwires Academic Portal 4.3.1 Site Structure, Navigation and User Registration
2. On either the drop-down list or the directory page, click on the name of the section you wish to view. An Overview Page (or homepage) of the selected section like the one shown in Figure 8 will display. The navigational elements of the Schoolwires standard template, including the channel, section, and page names, help to identify where you are on your website.
Sections
Figure 7: Channel directory page
Pages in this section
Channel name
Section name
Figure 8: Section Overview Page
AP Ch3 V2_012508 Page 6

Schoolwires Academic Portal 4.3.1 Site Structure, Navigation and User Registration
Editing Privileges on Your Website
The Schoolwires Academic Portal Site Manager allows your organization to share the responsibility for maintaining its website. Site Manager has four levels of editing privilege:
• Site Director
• Subsite Director
• Section Editor
• Homepage Editor
Before you can be assigned any editing privileges, you must be a registered user on the website. See “Registering on your Website” later in this chapter and “Site Manager—Site Workspace” for information on how users are registered. See “Site Manager—Site Workspace” and “Site Manager—Section Workspace” for how each level of editing privilege is assigned.
Important: You cannot assign Site Directors as Subsite Directors, Homepage Editors or Section Editors for the main site or any subsite. As Site Directors they can already have these editing privileges. You cannot assign Subsite Directors as Homepage Editors or Section Editors on their assigned subsites. They can, however be assigned these privileges at other subsites or on the main site.
When a user is assigned to a higher editing privilege, the Academic Portal software automatically removes that user from any list of editors at lower editing privileges.
Site Director Site Directors have editing privileges for the main site and the sections and pages within that site as well as for any subsites and sections and pages within each of those subsites. The Site Manager navigation button appears on the MyStart bar as soon as a Site Director signs in and will appear on every page. Clicking on it will allow access to the Site Workspace for the main site, to all Subsite Workspaces, and Channel and Section Workspaces for the main site and all subsites.
Note: A Site Director may enter Site Manager at a Subsite Workspace if on a subsite when signing in. TIP: Schoolwires recommends that you have at least two, but no more than five Site Directors.
AP Ch3 V2_012508 Page 7
Schoolwires Academic Portal 4.3.1 Site Structure, Navigation and User Registration
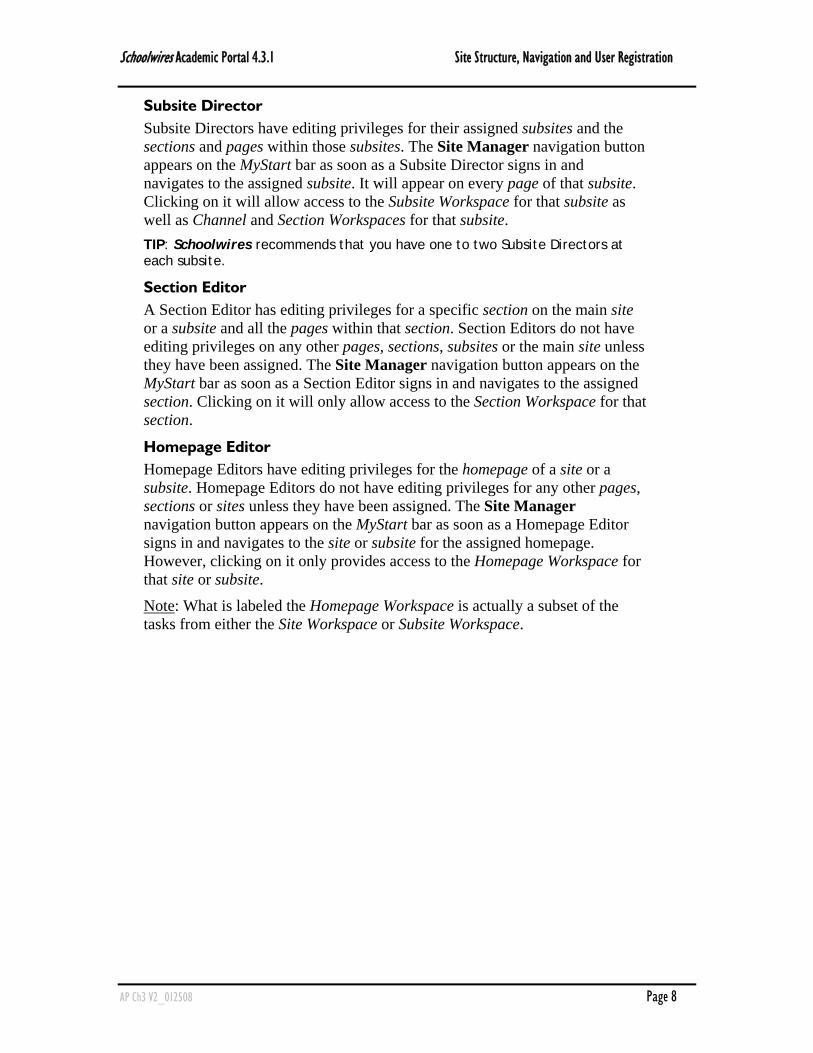
Subsite Director Subsite Directors have editing privileges for their assigned subsites and the sections and pages within those subsites. The Site Manager navigation button appears on the MyStart bar as soon as a Subsite Director signs in and navigates to the assigned subsite. It will appear on every page of that subsite. Clicking on it will allow access to the Subsite Workspace for that subsite as well as Channel and Section Workspaces for that subsite. TIP: Schoolwires recommends that you have one to two Subsite Directors at each subsite.
Section Editor A Section Editor has editing privileges for a specific section on the main site or a subsite and all the pages within that section. Section Editors do not have editing privileges on any other pages, sections, subsites or the main site unless they have been assigned. The Site Manager navigation button appears on the MyStart bar as soon as a Section Editor signs in and navigates to the assigned section. Clicking on it will only allow access to the Section Workspace for that section.
Homepage Editor Homepage Editors have editing privileges for the homepage of a site or a subsite. Homepage Editors do not have editing privileges for any other pages, sections or sites unless they have been assigned. The Site Manager navigation button appears on the MyStart bar as soon as a Homepage Editor signs in and navigates to the site or subsite for the assigned homepage. However, clicking on it only provides access to the Homepage Workspace for that site or subsite.
Note: What is labeled the Homepage Workspace is actually a subset of the tasks from either the Site Workspace or Subsite Workspace.
AP Ch3 V2_012508 Page 8

Schoolwires Academic Portal 4.3.1 Site Structure, Navigation and User Registration
Using Roles on Your Website
Roles are viewing permissions. They allow you to display content only to specific users—users who have been assigned a specific role or roles. As you create content, you will be given opportunities to limit content to a role or roles as you desire. In addition, if your organization has purchased the E-Alerts Premium Enhancement Module, you can use roles when sending Broadcast E-Alerts.
Examples of common roles include:
• Administrators
• Teachers
• Staff
• Technical Staff
• Parents
• Students
Once you are registered as a user, you may be assigned a role by a Site Director. Roles can be assigned to users in their individual user profiles or when importing those users into the database. Only a Site Director may change a user’s role.
Notes:
• If you register yourself, you cannot assign yourself a role. You are automatically assigned the default roles.
• A user may be assigned more than one role.
A Site Director may create up to 50 custom roles. See “Site Manager—Site Workspace” for information on how a Site Director manages custom roles and establishes or changes roles.
AP Ch3 V2_012508 Page 9

Schoolwires Academic Portal 4.3.1 Site Structure, Navigation and User Registration
Registering on Your Website
Users of your website can be registered in one the following ways:
• A Site Director can register them one at a time. See “Site Manager—Site Workspace” for more information on how Site Directors register users.
• A Site Director can import data files of users. See “Site Manager—Site Workspace” and “User Import Guide” for more information on how Site Directors import users.
• Users can register themselves if your organization has enabled self-registration. This is covered here.
To register yourself on your website:
1. Click on the Register button on the MyStart navigation bar. A birth date validation window like the one shown in Figure 9 will display.
Note: Validation of birth dates is required to ensure that the registration process is compliant with fede
Figure 9: Birth date validation window
ral law under the Children’s
3. . A Registration window like the one shown in Figure 10 will display.
Online Privacy Protection Act (COPPA).
2. Enter your birth date in the format mm/dd/yyyy.
Click on the Submit button
AP Ch3 V2_012508 Page 10

Schoolwires Academic Portal 4.3.1 Site Structure, Navigation and User Registration
4. Enter your information. The names of the required fields are in bold with the field locations outlined in red and marked with asterisks. The required fields are:
a. First Name
Figure 10: Registration window
d. Sign In Name
b. Last Name e. Password
c. Email Address f. Confirm Password TIP: Be sure to include a zip code. This will enable distance calculation when viewing calendar events or Maps & Directions pages. Your Sign-In Name must be between 1 and 30 characters. Your Password must be between 1 and 14 characters and is not case sensitive.
5. Click on the Submit button. A confirmation message like the one in Figure 11 will display. You may now sign in to your website.
Note: Only Site Directors can change user profiles and though they can change passwords if required, they cannot see users’ passwords.
Figure 11: Registration confirmation message
AP Ch3 V2_012508 Page 11

Schoolwires Academic Portal 4.3.1 Site Structure, Navigation and User Registration
Signing In to Your Website
Once you are a registered user, you can sign in to your organization’s website. To do this you will need:
• Your Sign-in Name
• Your Password
You may have received an email with this sign-in information. If you did not receive your sign-in information, contact your System Administrator.
To retrieve a forgotten Sign-in Name or Password click on the Forgot Sign-in Information Button in the Sign In window shown in Figure 13. Your sign-in information will be emailed to you.
You will be able to change your information once you sign in. See “Modifying Your Profile” later in this chapter.
Signing in to the Academic Portal
To sign in to your organization’s website:
1. Navigate to the website by entering the website address (URL) in your browser’s address bar.
2. Click on the Sign In button on the MyStart bar as shown in Figure 12. A Sign In window like the one shown in Figure 13 will display.
Figure 12: Sign in button on the MyStart bar
Figure 13: Sign in window
AP Ch3 V2_012508 Page 12

Schoolwires Academic Portal 4.3.1 Site Structure, Navigation and User Registration
3. Enter your Sign-In Name and Password.
4. Click on the Sign In button. The first time you sign in to the website after you have been registered, you will see the message shown in Figure 14. On subsequent visits, you will see your site’s homepage.
Figure 14: Message that appears the first time a user signs in
5. If this is the first time you are signing in, click on Continue on to the Main Area to get to your website.
Using a Secure Sign in
If your organization has requested a secure sign in, the sign-in window will be HTTPS. Strictly speaking, HTTPS is not a separate protocol, but rather refers to a normal HTTP interaction over an encrypted Secure Sockets Layer (SSL) or Transport Layer Security (TLS) transport mechanism.
In addition to the HTTPS, you will see a gold padlock. By double-clicking on that padlock, you will be able to view the website’s certificate. When this padlock displays and in what location varies with the operating system and browser you are using.
Signing in with Lightweight Directory Access Protocol (LDAP)
LDAP is an Internet protocol that allows programs to look up information on a server. Used with the Schoolwires Academic Portal, LDAP authenticates and synchronizes user information for the Academic Portal that is stored on a remote directory (i.e., LDAP) server.
The effects of LDAP on registered users whose information is stored on the remote directory are:
• LDAP users of the Academic Portal will still need to sign in. However, they will use the same sign-in name and password as they use for the network.
• When LDAP users of the Academic Portal access their profiles (Access My Info), they will not have access to the Sign-in Name, Password or Confirm Password fields.
• LDAP users will not receive any confirmation or be able to request sign-in information from the Academic Portal.
AP Ch3 V2_012508 Page 13

Schoolwires Academic Portal 4.3.1 Site Structure, Navigation and User Registration
Automatic Sign in to Synergy and Assist
If your organization has purchased Schoolwires Synergy, a digital file sharing application or Schoolwires Assist, a work order management application, as a registered user, you may sign in to either or both of these applications from the Academic Portal.
However, to enable this, a Site Director must complete the initial setup. In addition, you must sign in to the Academic Portal before you can access the links to Synergy or Assist.
Once initial setup is completed, you will see the Sign-in button for either Synergy or Assist or both when:
• You have been assigned the appropriate roles for the other application or applications.
• You sign in to the Academic Portal.
To sign in to Synergy or Assist from the Academic Portal:
1. Sign in to the Academic Portal. A Synergy button or an Assist button or both will display.
2. Click on the appropriate button.
a. If you are listed as a user in the other application and your user name and password match those in the Academic Portal, you will be signed into the application.
b. If you are not listed as a user of the other application or if your user name and password do not match those in the Academic Portal, you will see an error message. Contact your System Administrator.
AP Ch3 V2_012508 Page 14
Schoolwires Academic Portal 4.3.1 Site Structure, Navigation and User Registration
Working with Your User Profile
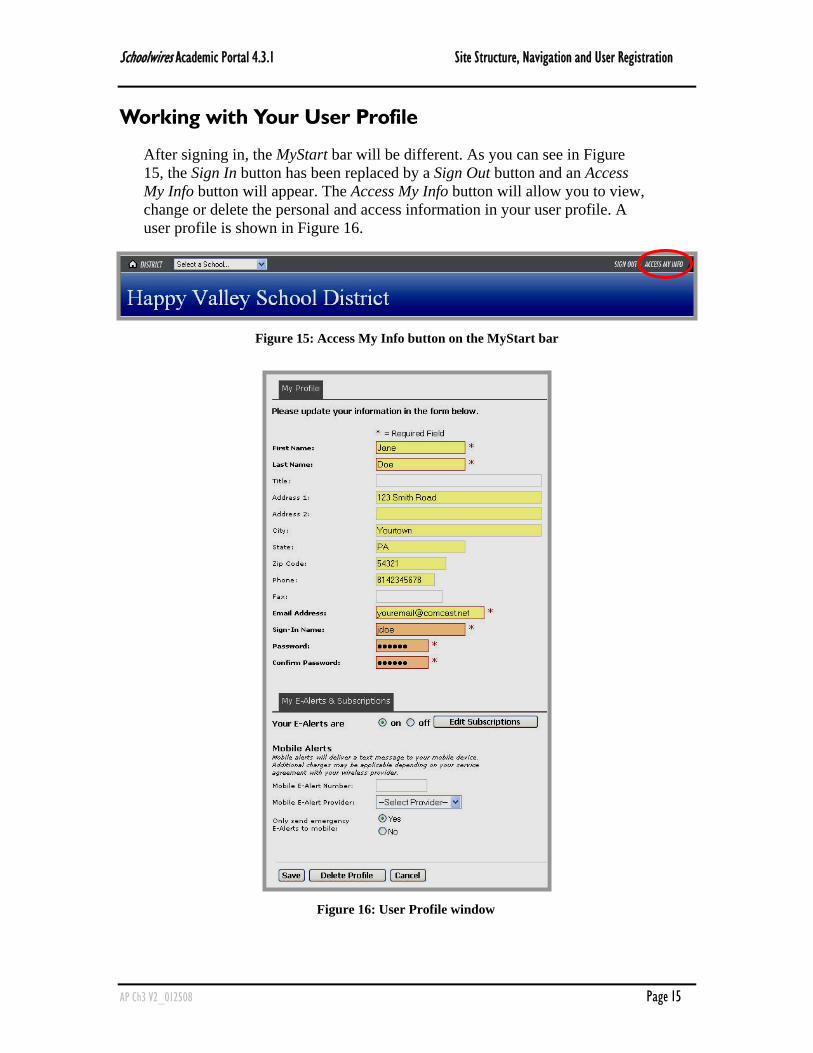
After signing in, the MyStart bar will be different. As you can see in Figure 15, the Sign In button has been replaced by a Sign Out button and an Access My Info button will appear. The Access My Info button will allow you to view, change or delete the personal and access information in your user profile. A user profile is shown in Figure 16.
Figure 15: Access My Info button on the MyStart bar
Figure 16: User Profile window
AP Ch3 V2_012508 Page 15

Schoolwires Academic Portal 4.3.1 Site Structure, Navigation and User Registration
Modifying Your User Profile
To modify your user profile:
1. Click on the Access My Info button on the MyStart bar. A User Profile window like the one shown in Figure 16 will display.
2. Enter or modify your information as needed. The names of the required fields are in bold with the field locations outlined in red and marked with red asterisks. The required fields are:
a. First Name d. Sign-In Name
b. Last Name e. Password
c. Email Address f. Confirm Password
TIPS:
• If you did not register yourself, Schoolwires recommends that you change your password. Your Sign-In Name must be between 1 and 30 characters. Your Password must be between 1 and 14 characters and is not case sensitive.
• Schoolwires also recommends that you enter your zip code. This will enable distance calculation when viewing calendar events or Maps & Directions pages.
3. You will notice a My E-Alerts & Subscriptions region in the bottom half of the User Profile window. Here you can:
a. Turn Content E-Alerts on or off and manage your content subscriptions. See: “Using E-Alerts” for more information on how to edit your Content E-Alert subscriptions.
Note: In order for you to receive a Content E-Alert, the editor of that content must send it.
b. Set up mobile device information for Broadcast E-Alerts if a Site Director has enabled this function for your website. To enter mobile device information:
i. Enter your ten digit cell phone number in the Mobile E-Alert number field. Enter the numbers with no dashes or spaces.
ii. Select your service provider from the Mobile E-Alert Provider drop-down list as shown in Figure 17.
Figure 17: Service Provider drop-down list
AP Ch3 V2_012508 Page 16

Schoolwires Academic Portal 4.3.1 Site Structure, Navigation and User Registration
iii. Indicate whether you want Broadcast E-Alerts sent to your cell phone all the time or just if they are emergency Broadcast E-Alerts by clicking in the appropriate radio button.
Note: In order for a Broadcast E-Alert to be sent to your cell phone rather than your email address, the sender must indicate that it is a Mobile E-Alert.
Warning: Additional charges may be applicable depending on your service agreement with your wireless provider.
4. Click on the Save button. The confirmation message shown in Figure 18 will display. You may return to your user profile to make additional changes, sign out, choose a site or subsite or navigate to a section on the current site or subsite.
Deleting Your User Profile
Figure 18: Profile change confirmation message
Warning: If you delete your user profile, you will not be able to sign in to the website.
To delete your user profile:
1. Click on the Access My Info button on the MyStart bar. A User Profile window like the one shown in Figure 16 will display.
2. Click on the Delete Profile button. A confirmation message like the one shown in Figure 19 will display before your user profile is deleted.
3. Click on the OK button. Your user profile will be deleted. You will no longer be able to sign in to the website using the deleted user profile’s sign-in name and password. However any content you entered will remain.
Figure 19: Delete User Profile confirmation message
AP Ch3 V2_012508 Page 17