
Sistem.admin
52
WORKCENTRE PRO 420 SYSTEM ADMINISTRATOR - NETWORK CONNECTIVITY GUIDE WorkCentre Pro 420 System Administrator Network Connectivity Guide Oct, 2002 602E96100
-
Upload
eduard4all -
Category
Documents
-
view
212 -
download
0
Transcript of Sistem.admin

WORKCENTRE PRO 420 SYSTEM ADMINISTRATOR - NETWORK CONNECTIVITY GUIDE
WorkCentre Pro 420
System AdministratorNetwork Connectivity Guide
Oct, 2002
602E96100

©2002 XEROX CORPORATION. All rights reserved.
Copyright protection claimed includes all forms and matters of copyrightable material and information now allowed bystatutory or judicial law or hereinafter granted, including without limitation, materials generated from the software programswhich are displayed on the screen such as styles, templates, icons, screen displays, looks, etc.
XEROX®, The Document Company®, the digitized X, WorkCentre™ Pro, and the identifying product names and numbersherein are registered trademarks of XEROX CORPORATION. Xerox Canada Ltd. is the licensee of all the trademarks. Allnon-Xerox brands and product names are trademarks or registered trademarks of their respective companies. Forexample: Xionics® Document Technologies, Incorporated; Microsoft® and Windows® are trademarks of MicrosoftCorporation.

WorkCentre Pro 420
System AdministratorNetwork Connectivity Guide
Prepared by:
Fuji Xerox of Shanghai Limited

WORKCENTRE PRO 420
ii WORKCENTRE PRO 420 NETWORK CONNECTIVITY GUIDE
ContentsIntroduction ..................................................................... v
About this Guide ................................................................................ vBefore You Begin............................................................................... v
Finding Information in the System Administrator NetworkConnectivity Guide....................................................................... vi
Chapter 1 – Network Utilities Overview......................... 1-1Introduction........................................................................................ 1-1
Network Utilities ........................................................................... 1-1Windows IP Peer-to-Peer Printing......................................... 1-1Windows IPX Peer-to-Peer Printing ...................................... 1-1Windows MAP Utility.............................................................. 1-1Windows NWSetup Utility...................................................... 1-2Run BootP Lite........................................................................ 1-2
System Administrator Network Connectivity Guide .................. 1-2Print Server Card (NIC) Owner’s Manual .................................... 1-3Print Server Quick Configuration Guide..................................... 1-3
Chapter 2 – Getting Started............................................ 2-1Connectivity Flowchart...................................................................... 2-1Programmable Features .................................................................... 2-2
Setting the IP Address ........................................................... 2-2Network Status Page ......................................................................... 2-3
Chapter 3 – Embedded Web Management Service....... 3-1Introduction........................................................................................ 3-1
Network Print Options Page........................................................ 3-3Status Page................................................................................... 3-4
Printer Information Page........................................................ 3-4Network Status Page.............................................................. 3-6
Properties Page............................................................................ 3-8Maintenance Page ........................................................................ 3-10
Reset Network Interface Page ............................................... 3-10Change Password Page......................................................... 3-11Change Language Page ......................................................... 3-12

WORKCENTRE PRO 420
WORKCENTRE PRO 420 NETWORK CONNECTIVITY GUIDE iii
Chapter 4 – Printer Setup ............................................... 4-1Introduction........................................................................................ 4-1Embedded Web Management Service.............................................. 4-2
Embedded Web Management Setup........................................... 4-2IP Address Setup Using the Control Panel........................... 4-3Using Windows MAP Utility to Access Web Management .. 4-5
TCP/IP Setup................................................................................. 4-6NetWare (IPX) Setup..................................................................... 4-8IPP Printer Setup.......................................................................... 4-10SNMP Setup.................................................................................. 4-11
Peer-to-Peer Printing ......................................................................... 4-12IP Peer-to-Peer (P2P) Printing Setup .................................... 4-12IPX Peer-to-Peer (P2P) Printing Setup .................................. 4-13Windows Printer Setup .......................................................... 4-14
Using the NWSetup Utility................................................................. 4-15
Chapter 5 – Glossary ...................................................... 5-1

WORKCENTRE PRO 420
iv WORKCENTRE PRO 420 NETWORK CONNECTIVITY GUIDE

WORKCENTRE PRO 420 NETWORK CONNECTIVITY GUIDE v
Introduction
About this Guide
The WorkCentre Pro 420 is designed for ease of use. To use yourmachine to its fullest potential, please take some time to read theUser Documentation.This System Administrator Network Connectivity Guide will helpyou understand how to better support WorkCentre Pro 420.
Before You Begin
This guide can be printed on WorkCentre Pro 420 using a directParallel Port connection.Read the information in this guide to better understand the networkand connectivity requirements for WorkCentre Pro 420.Each Network Interface Card is shipped with a Factory DefaultPassword of sysadm. Use this password to access the features ofthe Embedded Web Management Service for the first time.The Web Management Service pages are available in elevenlanguages. Refer to the Change Language Page section ofChapter 3 for more details.
NOTE: The installation procedures in this guide assume thatWorkCentre Pro 420 is being installed on an existing,operational network. These procedures are not intended forinstalling specific operating systems and protocols (e.g.,NetWare, Windows NT, TCP/IP, IPX/SPX, etc.).

WORKCENTRE PRO 420
vi WORKCENTRE PRO 420 NETWORK CONNECTIVITY GUIDE
Finding Information in the System Administrator Network ConnectivityGuide
The System Administrator Network Connectivity Guide contains the followingsections:
Table of ContentsUse the table of Contents to find topics easily.
Network Utilities Overview – Chapter 1Describes the contents of the Print Server CD supplied with the NetworkInterface Card (NIC).
Getting Started – Chapter 2Maps out the connectivity process, and provides preliminary stepsnecessary for connecting WorkCentre Pro 420 to a network.
Embedded Web Management Service – Chapter 3Introduces the various elements of the Web Management Serviceembedded in the NIC memory.
Printer Setup – Chapter 4Describes setting up WorkCentre Pro 420 for use as a network printer.
Glossary – Chapter 5

WORKCENTRE PRO 420 NETWORK CONNECTIVITY GUIDE 1-1
Chapter 1 – Network Utilities Overview
Introduction
The Print Server CD supplied with the Network Interface Cardcontains the following:
• Network Utilities
• System Administrator Network Connectivity Guide (PDF)
• Print Server Card Owner’s Manual (PDF)
• Print Server Card Quick Configuration Guide (PDF)To install/run network utilities or view System AdministratorNetwork Connectivity Guide, please select options from the PrintServer CD Main menu. As for Print Server Card Owner’s Manualand Print Server Card Quick Configuration Guide, you can findthem under the \manual directory of Print Server CD.The Embedded Web Management Service can be used toconfigure the WorkCentre Pro 420 for your network environment.These web pages can be customized to any one of elevenlanguages, including English.
Network Utilities
The following utilities are available on the CD:
Windows IP Peer-to-Peer Printing
This utility can be used to provide IP Peer-to-Peer printingcapability.Click on this selection to install the utility on your hard drive. SeeChapter 4 for directions on how to use this program.
Windows IPX Peer-to-Peer Printing
This utility can be used to provide IPX Peer-to-Peer printingcapability.Click on this selection to install the utility on your hard drive. SeeChapter 4 for directions on how to use this program.
Windows MAP Utility
This utility can be used as an alternative to accessing theEmbedded Web Management pages via TCP/IP or IPX/SPX.

WORKCENTRE PRO 420
1-2 WORKCENTRE PRO 420 NETWORK CONNECTIVITY GUIDE
Click on this selection to install the utility on your hard drive. SeeChapter 4 for directions on how to use this program.
Windows NWSetup Utility
This utility can be used to set up NetWare Queue based printing.Click on this selection to install the utility on your hard drive. SeeChapter 4 for directions on how to use this program.
Run BootP Lite
BootP is an alternative to a DHCP Server. BootP can be used toautomatically assign an IP Address to clients, such as WorkCentrePro 420.To install this program, use Windows Explorer or File Manager tocopy the file Bootpl32.exe from the Print Server CD to your harddrive.Run the program by using the RUN command, or by double-clicking the copied file in Windows Explorer.See the Print Server Card Owner’s Manual for setup andconfiguration information.
System Administrator Network Connectivity Guide
This document is in PDF format and can be viewed with AdobeAcrobat. Click on View Network Connectivity Guide selection toopen the document for reading or printing.

WORKCENTRE PRO 420
WORKCENTRE PRO 420 NETWORK CONNECTIVITY GUIDE 1-3
Print Server Card (NIC) Owner’s Manual
This document is in PDF format and can be viewed with AdobeAcrobat. This document is found under \manuals directory with thename of DPOManual.pdf. Open the document with Adobe Acrobatfor reading or printing.
Print Server Quick Configuration Guide
This document is in PDF format and can be viewed with AdobeAcrobat. This document is found under \manuals directory with thename of DPOQuick.pdf. Open the document with Adobe Acrobatfor reading or printing.

WORKCENTRE PRO 420
1-4 WORKCENTRE PRO 420 NETWORK CONNECTIVITY GUIDE

WORKCENTRE PRO 420 NETWORK CONNECTIVITY GUIDE 2-1
Chapter 2 – Getting Started
Connectivity Flowchart
NIC installedby Xerox
Technician
Connectto
Network
DHCP/BootPServer Present?
Enter IP Addressusing
Control Panel
NIC Card sendsDHCP Client
Request
Yes
WorkCentreWeb Home
Page isdisplayed
PowerOn the
machine
DHCPServer
assigns IPAddress
NIC prints aStatus Page withthe IP Address
Sys Adminpoints web
browser to IPAddress onStatus Page
NWTCP/IP IPP
Set up DesiredConnection
Protocol
No
Will you useEmbedded Web
Mgmt?
Run NWSetup
No
Will you use theMAP utility? YesNo
Run the MAPutility Yes
1
2
3
4 5 6
1) Chapter 4 4) Chapter 42) Chapter 3 5) Chapter 43) Chapter 4 6) Chapter 4 7) Chapter 4
SNMP
7

WORKCENTRE PRO 420
2-2 WORKCENTRE PRO 420 NETWORK CONNECTIVITY GUIDE
Programmable Features
Setting the IP Address
For IP and IPP printing, a DHCP or BootP server automaticallyassigns an IP Address to WorkCentre Pro 420. If these servers arenot present in your network, you can use Programmable Featuresmode to set the IP Address manually from WorkCentre Pro 420Control Panel.Refer to the IP Address Setup Using the Control Panel section inChapter 4.

WORKCENTRE PRO 420
WORKCENTRE PRO 420 NETWORK CONNECTIVITY GUIDE 2-3
Network Status Page
To generate a Network Interface Card (NIC) Network Status Page:
1. Press and hold Stop and 1.
2. Retrieve the NIC Status Page from the printer.
Sample Network Status Page
09.29e
13.187.76.1140.0.0.0
http://13.187.76.114:631/Print

WORKCENTRE PRO 420
2-4 WORKCENTRE PRO 420 NETWORK CONNECTIVITY GUIDE

WORKCENTRE PRO 420 NETWORK CONNECTIVITY GUIDE 3-1
Chapter 3 – Embedded Web Management Service
Introduction
Each Network Interface Card (NIC) has a series of web pagesembedded in its memory. These web pages provide information onprinter status and configurations.When you enter the NIC's IP Address in the Web Browser,WorkCentre Pro 420 Web Home Page is displayed. This web pageprovides links to the various Status and Configuration pages on theNIC.These web pages can be customized to one of eleven languagesfrom the Maintenance/Change Language Page.

WORKCENTRE PRO 420
3-2 WORKCENTRE PRO 420 NETWORK CONNECTIVITY GUIDE
The following Navigation Links can be found on the Home Page:Print Links to the Network Print Options page.
Status Links to the Status pages (Network Status andPrinter Information).
Properties Links to the Properties pages (TCP/IP, NetWare, IPPPrinter and SNMP).
Maintenance Links to the Maintenance pages (Reset NetworkInterface, Change Password and ChangeLanguage).
Assistance The Assistance page provides a set of links to theXerox Web Sites where additional customerinformation is available.
On each page, there are two more links you may find useful:
• Printer Index: This button links to the Index and Tableof Contents of the web pages.
• Help: This context-sensitive Help button links to theappropriate section of the Help page.

WORKCENTRE PRO 420
WORKCENTRE PRO 420 NETWORK CONNECTIVITY GUIDE 3-3
Network Print Options Page
NIC Settings:• Print Status Page on Startup: A checkbox that enables
printing of the NIC Status Page whenever WorkCentrePro 420 is powered on.
• User Password: This password is required to updateprinter parameters.
• Print Status Page: This button invokes printing of theNIC Status Page.
• Print Test Page: This button invokes printing of thePrint Controller's test page.

WORKCENTRE PRO 420
3-4 WORKCENTRE PRO 420 NETWORK CONNECTIVITY GUIDE
Status Page
The Status Page is divided into two sub-pages: PrinterInformation and Network Status. The Printer Information pageis the default view when the Status link is first selected.
Printer Information Page
The following Printer Information is displayed:
• Printer: Displays the printer's model name.
• Printer Status: Displays the current printer status(Online, Offline, Idle, etc.)
• Error Message: Displays any error message comingfrom the printer.
• NIC ROM Version: Displays the current version of theNIC software.

WORKCENTRE PRO 420
WORKCENTRE PRO 420 NETWORK CONNECTIVITY GUIDE 3-5
• NIC Serial Number: Displays the serial number of theNetwork Interface Card installed in your WorkCentre Pro420.
The following Paper Information is displayed:
• Tray 1: Displays the Paper Size and Orientation of Tray1.
• Tray 2: Displays the Paper Size and Orientation of Tray2. This option only appears when Tray 2 has beeninstalled.
The following Toner Information is displayed:
• Toner: Displays the status of the toner.The following Drum Cartridge Information is displayed:
• Drum Cartridge: Displays the status of the drumcartridge.

WORKCENTRE PRO 420
3-6 WORKCENTRE PRO 420 NETWORK CONNECTIVITY GUIDE
Network Status Page
The following Network Information is displayed:
• MAC Address: Displays the Ethernet physical address.
• Network Topology: Only Ethernet is supported.
• Network Speed: 10 or 100 Megabits/sec., dependingon the speed of the connected network.
• NetWare: This link selects and displays NetWarestatus.

WORKCENTRE PRO 420
WORKCENTRE PRO 420 NETWORK CONNECTIVITY GUIDE 3-7
• TCP/IP: This link selects and displays TCP/IP status.
If you are attached to a NetWare Server, the following NetWareStatus is displayed:
• Frame Type: Displays the current active Frame Type(Ethernet 802.2, Ethernet 802.3 or Ethernet II).
• File Server: Displays the active File Server to which theprinter is connected.
• File Server Status: Displays the File Server status(Connected or Not Connected).
• Print Queue Name: Displays the active Print Queue.
• Print Queue Status: Displays the active Print Queuestatus (Attached or Not Attached).
If you are attached to a TCP/IP Server, the following TCP/IP Statusis displayed:
• Frame Type: Displays the current active Frame Type(Ethernet 802.2, Ethernet 802.3 or Ethernet II).
• IP Address: Displays the IP Address for WorkCentrePro 420.
• Subnet Mask: Displays the Subnet Mask forWorkCentre Pro 420.
• Gateway Address: Displays the Gateway Address forWorkCentre Pro 420.
• IP Address Resolution Mode: Displays the currentselection of DHCP/BootP or Static.
• Primary WINS Server: Displays whether you arelogged in or not.
• Secondary WINS Server: Displays whether you arelogged in or not.
• LPD Banner: Displays the status of Enabled orDisabled.
• Raw TCP/IP Port Number: Displays the currentlyselected port number.

WORKCENTRE PRO 420
3-8 WORKCENTRE PRO 420 NETWORK CONNECTIVITY GUIDE
Properties Page
The Properties Page is divided into four sub-pages: The TCP/IPConfiguration page, the NetWare Configuration page, the IPPPrinter Configuration page and the SNMP Configuration page. TheTCP/IP Configuration page is the default view when the Propertieslink is first selected.
Refer to the TCP/IP Setup section of Chapter 4 for instructions onhow to setup the TCP/IP.
Refer to the NetWare (IPX) Setup section of Chapter 4 forinstructions on how to setup the NetWare.
Refer to the IPP Printer Setup section of Chapter 4 for instructionson how to setup the IPP Printer.

WORKCENTRE PRO 420
WORKCENTRE PRO 420 NETWORK CONNECTIVITY GUIDE 3-9
Refer to the SNMP Setup section of Chapter 4 for instructions onhow to setup the SNMP.

WORKCENTRE PRO 420
3-10 WORKCENTRE PRO 420 NETWORK CONNECTIVITY GUIDE
Maintenance Page
The Maintenance Page is divided into three sub-pages: TheReset Network Interface page, the Change Password page andthe Change Language page. The Reset Network Interface pageis the default view when the Maintenance link is first selected.
Reset Network Interface Page
The following options are available:
• User Password: This password is required to reset theprinter parameters.
• Reset: This button restarts (reboots) the NetworkInterface Card (NIC).
• Restore Factory Defaults: This button resets all NICparameters to the factory default settings.

WORKCENTRE PRO 420
WORKCENTRE PRO 420 NETWORK CONNECTIVITY GUIDE 3-11
Change Password Page
The following options are available:
• Old Password: The current password is entered in thisfield.
• New Password: The new password is entered in thisfield.
• Retype New Password: The new password is retypedin this field for verification.
• Apply: This button applies the password change.
Default Password:Each Network Interface Card is shipped with a Factory DefaultPassword of sysadm.

WORKCENTRE PRO 420
3-12 WORKCENTRE PRO 420 NETWORK CONNECTIVITY GUIDE
Change Language Page
The following options are available:
• HTML Language: This field provides a drop-down boxfrom which you can choose the language the WebManagement pages will be displayed in.
• User Password: This password is required to reset theprinter parameters.
• Apply: This button applies the new language.

WORKCENTRE PRO 420 NETWORK CONNECTIVITY GUIDE 4-1
Chapter 4 – Printer Setup
Introduction
WorkCentre Pro 420 Network Interface Card (NIC) can support IPand NetWare (IPX) protocols.When connected in the TCP/IP environment, the NIC provides:
• IPP printing functions
• IP Peer-to-Peer printing functions
• IP Client-Server printing functions (LPR)When connected in the IPX environment, the NIC provides:
• Queue based printing functions in the Novell NDS orBindery Modes
• IPX Peer-to-Peer printing functions
• IPX Client-Server printing functions

WORKCENTRE PRO 420
4-2 WORKCENTRE PRO 420 NETWORK CONNECTIVITY GUIDE
Embedded Web Management Service
This section covers how to set up your WorkCentre Pro 420, usingthe Embedded Web Management Service with the followingnetwork protocols:
• TCP/IP
• NetWare (IPX)
• IPP Printer
• SNMPNOTE: WorkCentre Pro 420 Web Home Page is embedded in the
Network Interface Card memory, accessed through yourlocal intranet.
Each Network Interface Card is shipped with a Factory DefaultPassword of sysadm. Use this password to access the features ofthe Embedded Web Management Service for the first time.
Embedded Web Management Setup
After the Network Interface Card (NIC) is installed by a XeroxService Technician, perform the following:1. Power on WorkCentre Pro 420. Wait for the NIC status page
to be printed:
• If a DHCP or BootP Server is present, an IP Address willbe assigned automatically to the NIC.Go to Step 2.
• If no DHCP or BootP Server is present, an IP addressmust be assigned manually.Go to the IP Address Setup Using the Control Panelsection.
• If you want to use Web Management in a NetWareenvironment, the MAP utility can be used to find andconnect the printer.Go to the Using Windows MAP Utility to Access WebManagement section.
2. At a client workstation, open the Web browser (MicrosoftInternet Explorer or Netscape; version 4.0 or higher). Enterthe IP address from the NIC Status Page into the URL box.WorkCentre Pro 420 Web Home Page will be displayed inthe browser window.
3. Select the Properties link.4. On the Properties page, click on the radio button for the
desired Protocol (TCP/IP, NetWare, IPP Printer, SNMP).Refer to the appropriate section for setup instructions.

WORKCENTRE PRO 420
WORKCENTRE PRO 420 NETWORK CONNECTIVITY GUIDE 4-3
IP Address Setup Using the Control Panel
NOTE: When entering or changing an IP address manually, all fourbytes must be entered sequentially.
The following is an example of IP address ("13.187.76.114") setupusing the control panel.
1. Press and hold down the Tray Select button until threedashes appear in the Message Display.This turns WorkCentre Pro 420 into the ProgrammableFeatures mode. The lights will flash in the MachineDiagram.
2. Enter Program Number.For the first Program Number, enter 22.
3. Press Start.The Program Number will flash in the Message Display.
4. Enter the set of three digits of the IP Address (first byte, i.e."13", of the IP Address).
5. Press Start.The numbers you entered will flash in the Message Display.
6. Press Stop.This will accept the setting while keeping WorkCentre Pro420 in Programmable Features mode.
7. Repeat steps 2 through 6 for Program Numbers 23 (secondbyte, i.e. "187", of the IP Address) and 24 (third byte, i.e."76", of the IP Address).
8. For the fourth and last byte of the IP Address (i.e. "114"),repeat steps 2 through 4, using Program Number 25.
9. Press Start.
Tray Select Start StopMessage Display Machine
Diagram

WORKCENTRE PRO 420
4-4 WORKCENTRE PRO 420 NETWORK CONNECTIVITY GUIDE
The Message Display will flash 0 instead of the numbersentered.
10. Press Tray Select to exit the Programmable Featuresmode.The NIC will print a new Network Status Page inapproximately 2-3 minutes, which will include the IPAddress you just entered.
11. At a client workstation, open the Web browser (MicrosoftInternet Explorer or Netscape; version 4.0 or higher). Enterthe IP address from the NIC Status Page into the URL box.WorkCentre Pro 420 Web Home Page will be displayed inthe browser window.
12. Select the Properties link.13. On the Properties page, click on the radio button for the
desired Protocol.Refer to the appropriate section for setup instructions.

WORKCENTRE PRO 420
WORKCENTRE PRO 420 NETWORK CONNECTIVITY GUIDE 4-5
Using Windows MAP Utility to Access Web Management
The Management Access Program (MAP) Utility allows access toWorkCentre Pro 420 web pages on a non-IP network.Prior to using this utility, you might need to run the MAP Setupprogram to configure the Protocol to be used.1. At a client workstation, run the MAP Utility to search for
WorkCentre Pro 420 Web Home Page over the IPXenvironment.
2. On the search result page, click the XRX_xxxxxxxx.WorkCentre Pro 420 Web Home Page will be displayed inthe browser window.
3. Select the Properties link.4. On the Properties page, click on the radio button for the
desired Protocol. Refer to the appropriate section for setupinstructions.
NOTE: When SNMP is disabled, this utility cannot be used.

WORKCENTRE PRO 420
4-6 WORKCENTRE PRO 420 NETWORK CONNECTIVITY GUIDE
TCP/IP Setup
1. On the Properties page, click on the TCP/IP radio button.

WORKCENTRE PRO 420
WORKCENTRE PRO 420 NETWORK CONNECTIVITY GUIDE 4-7
2. Set up the IP environment for WorkCentre Pro 420 asfollows:
• Select the Enable TCP/IP check box.
• Enter the IP Address (if necessary).
• Enter the Subnet Mask (if necessary).
• Enter the Gateway Address (if necessary).
• Select Enable Raw TCP check box if you want to use IPPeer-to-Peer (P2P) printing.
• Change the Raw TCP Port Number if you want to useanother IP P2P port number.
• Select IP Address Resolution Mode (DHCP/BootP orStatic).
• Enter the NetBIOS Name, Primary WINS Server,Secondary WINS Server of NetBIOS (WINS) Settings(if necessary).
3. Power off, wait 30 seconds, then power on WorkCentre Pro420.
4. Set up each Client PC for one of the following:
• Windows NT: Use the Add Printer Wizard. Select LocalPrinter, and add an LPR port. Install the appropriateWorkCentre Pro 420 printer driver.
• Windows 2000: Use the Add Printer Wizard. SelectLocal Printer, and add a TCP Printer Port. Install theappropriate WorkCentre Pro 420 printer driver.
• Windows 9x/ME: Use IP Peer-to-Peer printing. See theIP Peer-to-Peer Printing section in this chapter.
WORKCENTRE PRO 420
4-8 WORKCENTRE PRO 420 NETWORK CONNECTIVITY GUIDE
NetWare (IPX) Setup
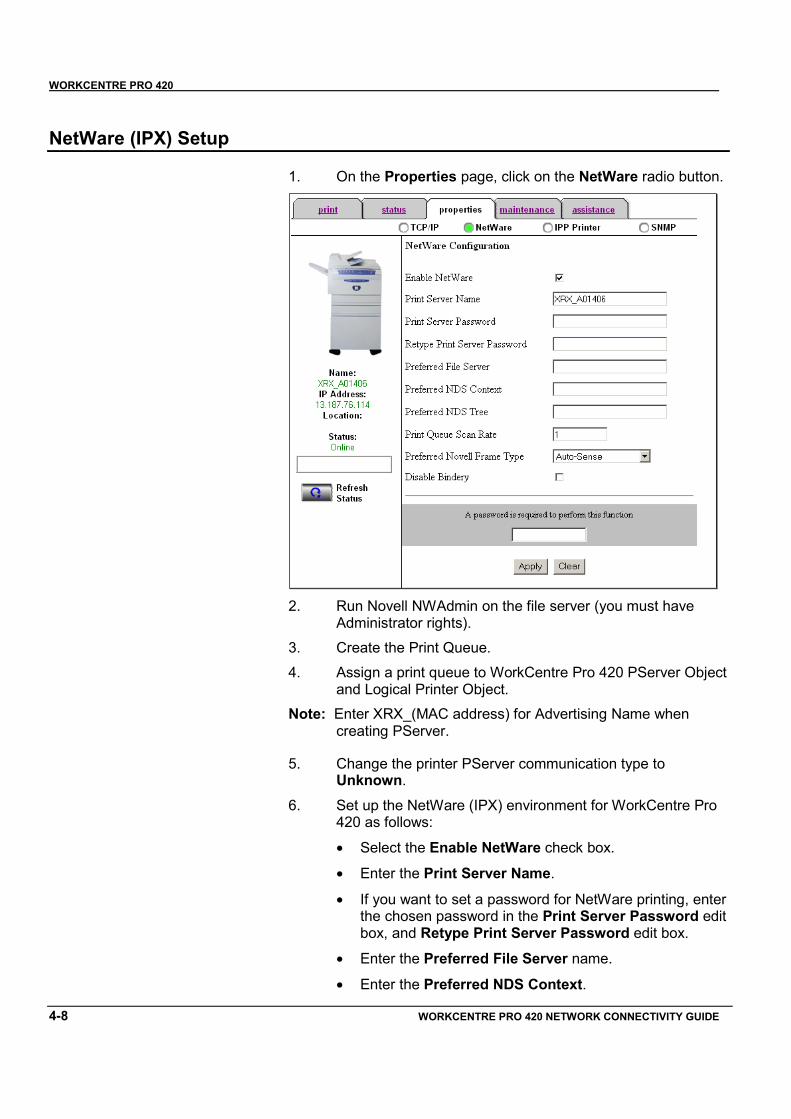
1. On the Properties page, click on the NetWare radio button.
2. Run Novell NWAdmin on the file server (you must haveAdministrator rights).
3. Create the Print Queue.4. Assign a print queue to WorkCentre Pro 420 PServer Object
and Logical Printer Object.Note: Enter XRX_(MAC address) for Advertising Name when
creating PServer.
5. Change the printer PServer communication type toUnknown.
6. Set up the NetWare (IPX) environment for WorkCentre Pro420 as follows:
• Select the Enable NetWare check box.
• Enter the Print Server Name.
• If you want to set a password for NetWare printing, enterthe chosen password in the Print Server Password editbox, and Retype Print Server Password edit box.
• Enter the Preferred File Server name.
• Enter the Preferred NDS Context.

WORKCENTRE PRO 420
WORKCENTRE PRO 420 NETWORK CONNECTIVITY GUIDE 4-9
• Enter the Preferred NDS Tree.
• Change the Print Queue Scan Rate (sec.) if necessary.
• Change the Preferred Novell Frame Type if necessary(it is suggested you accept the default setting of Auto-Sense).
• Select Disable Bindery if you do not want to supportNetWare 3.11.
7. Power off, wait 30 seconds, then power on WorkCentre Pro420.
8. Select Finish.
The printer will then show up in the Add Printer Wizard as anetwork port.

WORKCENTRE PRO 420
4-10 WORKCENTRE PRO 420 NETWORK CONNECTIVITY GUIDE
IPP Printer Setup
1. On the Properties page, click on the IPP Printer radiobutton.
2. Set up the IPP Printer environment for WorkCentre Pro 420as follows:
• Change the IPP Printer Name if necessary.
• Change the IPP Printer Location if necessary.
• Add or edit the optional Printer Information text, ifnecessary.
• Add or edit More Printer Information text, if necessary.
• Add or edit the Printer Driver Installer text, whichpoints the user to a location where the correct PrinterDriver can be found and downloaded.
• In the Printer Accepting Jobs field, select YES to allowprint jobs to be accepted and processed.
• Add or edit the optional Message From Operator ifnecessary.
3. Set up an IPP Client on each PC that will use IPP Printing.
WORKCENTRE PRO 420
WORKCENTRE PRO 420 NETWORK CONNECTIVITY GUIDE 4-11
SNMP Setup
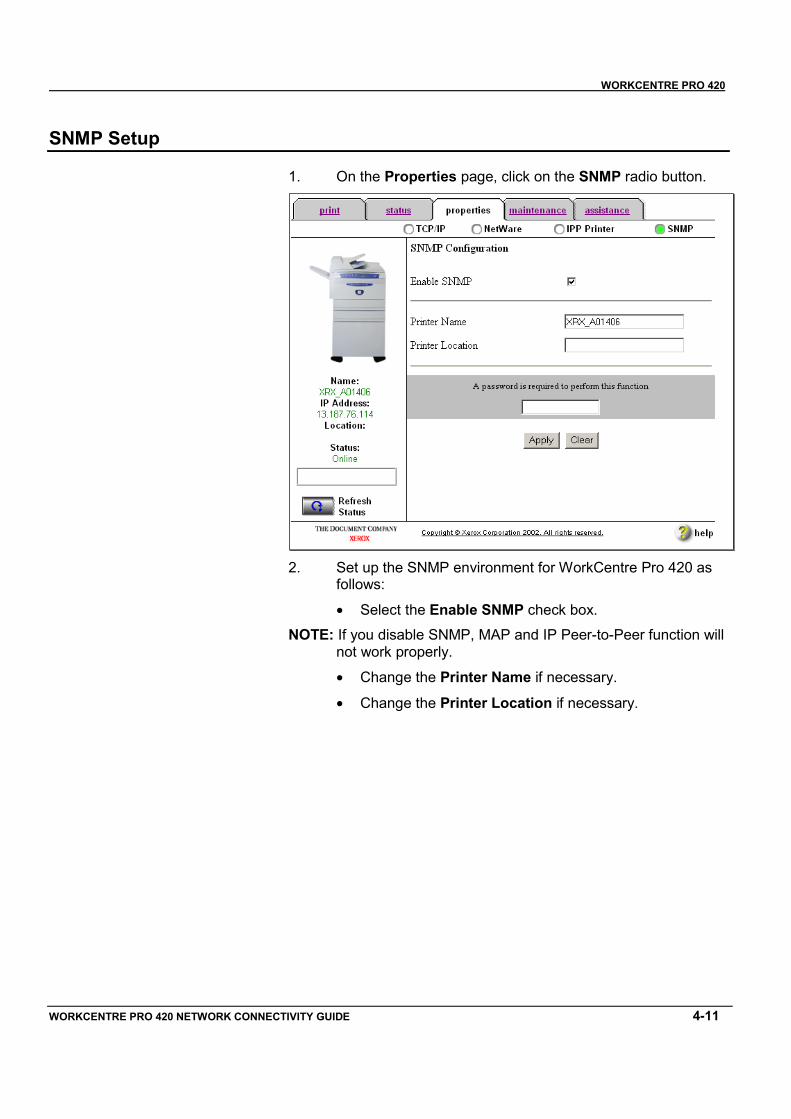
1. On the Properties page, click on the SNMP radio button.
2. Set up the SNMP environment for WorkCentre Pro 420 asfollows:
• Select the Enable SNMP check box.NOTE: If you disable SNMP, MAP and IP Peer-to-Peer function will
not work properly.
• Change the Printer Name if necessary.
• Change the Printer Location if necessary.
WORKCENTRE PRO 420
4-12 WORKCENTRE PRO 420 NETWORK CONNECTIVITY GUIDE
Peer-to-Peer Printing
This section covers how to configure each PC client for IP or IPXPeer-to-Peer printing.
IP Peer-to-Peer (P2P) Printing Setup
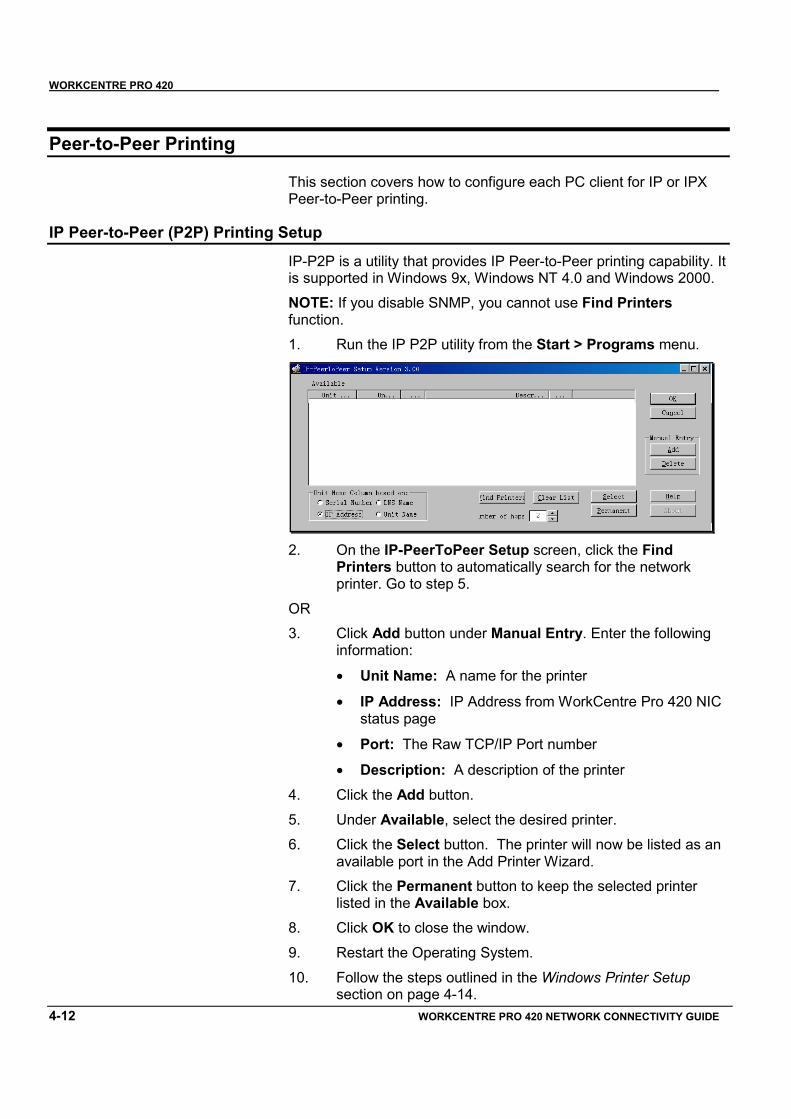
IP-P2P is a utility that provides IP Peer-to-Peer printing capability. Itis supported in Windows 9x, Windows NT 4.0 and Windows 2000.NOTE: If you disable SNMP, you cannot use Find Printersfunction.1. Run the IP P2P utility from the Start > Programs menu.
2. On the IP-PeerToPeer Setup screen, click the FindPrinters button to automatically search for the networkprinter. Go to step 5.
OR3. Click Add button under Manual Entry. Enter the following
information:
• Unit Name: A name for the printer
• IP Address: IP Address from WorkCentre Pro 420 NICstatus page
• Port: The Raw TCP/IP Port number
• Description: A description of the printer4. Click the Add button.5. Under Available, select the desired printer.6. Click the Select button. The printer will now be listed as an
available port in the Add Printer Wizard.7. Click the Permanent button to keep the selected printer
listed in the Available box.8. Click OK to close the window.9. Restart the Operating System.10. Follow the steps outlined in the Windows Printer Setup
section on page 4-14.

WORKCENTRE PRO 420
WORKCENTRE PRO 420 NETWORK CONNECTIVITY GUIDE 4-13
IPX Peer-to-Peer (P2P) Printing Setup
IPX-P2P is a utility, which provides IPX Peer-to-Peer printingcapability. It is supported in Windows 9x, Windows NT 4.0 andWindows 2000.1. Run the IPX P2P utility from the Start > Programs menu.
2. Click the Find Printers button to automatically search forthe network printer.
3. Under Available, select the desired printer.4. Click the Select button. The printer will now be listed as an
available port in the Add Printer Wizard5 Click the Permanent button to keep the selected printer
listed in the Available box.6. Click OK to close the window.
7. Restart the Operating System.8. Follow the steps outlined in the Windows Printer Setup
section on page 4-14.

WORKCENTRE PRO 420
4-14 WORKCENTRE PRO 420 NETWORK CONNECTIVITY GUIDE
Windows Printer Setup
1. On the Windows Taskbar, Select Start > Settings >Printers.
2. Select Add Printer to start the Add Printer Wizard.3. Select Local Printer when the Add Printer Wizard asks you
to choose between local and network printers.4. Select your printer’s make and model. (Install the
appropriate printer driver if necessary.)5. Your IP P2P or IPX P2P network printers will be listed as
local printer ports.6. Select the desired printer.7. Complete the rest procedures of the printer installation.

WORKCENTRE PRO 420
WORKCENTRE PRO 420 NETWORK CONNECTIVITY GUIDE 4-15
Using the NWSetup Utility
The NWSetup utility is used to set up NetWare Queue basedprinting. Before running NWSetup, be sure you are logged intoNetWare, and that you have the necessary rights and permissions.
1. Run NWSetup from the Start > Programs menu.2. In the NWSetup window, select the Unit (Printer) you wish to
set up and click the Select button.

WORKCENTRE PRO 420
4-16 WORKCENTRE PRO 420 NETWORK CONNECTIVITY GUIDE
3. At the Print Server Settings window, the followingparameters can be changed as necessary:
• Print Server Name
• Print Server Password (click the Change Passwordbutton)
• Print Queue Scan Rate (sec.)
• Ethernet Frame TypeClick the Next button.

WORKCENTRE PRO 420
WORKCENTRE PRO 420 NETWORK CONNECTIVITY GUIDE 4-17
4. Select the appropriate mode:
• If Enable NDS Mode is checked, fill in the PreferredNDS Context and Preferred NDS Tree fields.
• If Enable Bindery Mode is checked, select the PrimaryFile Server.
Click the Next button.

WORKCENTRE PRO 420
4-18 WORKCENTRE PRO 420 NETWORK CONNECTIVITY GUIDE
5. At the Port 1 window, click the Add Queue button to createa Queue and attach the PServer.
6. Click the Next button.7. Click the Finish button the following screen. The printer will
now be listed as an available port in the Add Printer Wizard.

WORKCENTRE PRO 420 NETWORK CONNECTIVITY GUIDE 5-1
Chapter 5 – Glossary
10BaseT A cable used for networking that transfers data at 10 Mega-bits persecond. It is also called "twisted-pair" because it is comprised oftwo insulated wires twisted together. 10BaseT cable can beshielded or unshielded. Shielded cable provides more protectionfrom noise than unshielded cable.
100BaseT A cable similar to 10BaseT that transfers data at 100 Mega-bits persecond. It is also called fast Ethernet.
ASCII An acronym for American Standard Code for InformationInterchange. A coding scheme that assigns numeric values toletters, numbers, punctuation and certain other characters.
Bindery A NetWare 2.x and 3.x database of resources and clients on anetwork.Bindery mode print servers use the information stored in theNetWare bindery to process a print job.Bindery views the network as a group of separate computers.
BOOTP An acronym for Boot Protocol. A protocol used for booting systemsremotely to the network.
DHCP An acronym for Dynamic Host Configuration Protocol. A protocolallows the principal parameters of network devices (including IPAddresses) to be configured by central DHCP servers.
Driver Software loaded on the client workstation that prepares data to besent to or received from the printer. Also called a "printer driver".The drivers we describe here are designed specifically for thisXerox device.

WORKCENTRE PRO 420
5-2 WORKCENTRE PRO 420 NETWORK CONNECTIVITY GUIDE
Ethernet Network transport technology commonly used to send data fromone node to another.
Ethernet Address The Ethernet Address is a unique address that identifies a deviceon a network. The Ethernet Address is built into the device when itis manufactured. The Ethernet Address consists of six bytes ofinformation and is expressed as hexadecimal numbers with thebytes separated by colons. (Example: 00:00:08:D4:05:14)
File Server A network environment in which the nodes communicate with a fileserver, and not directly with other nodes. NetWare 3.12 andBanyan VINES are file server networking products.
Frame A group of data sent through the network. Also called a "packet" ora "message". There are several different types of frames. The datais arranged differently in different types of frames. Nodes on anetwork must be set up for the same Frame Type in order tocommunicate.
Gateway Address The Gateway Address is the IP Address of the gateway, or router,that will be used to access devices on other subnets.
IP See TCP/IP.
IP Address See TCP/IP.
IPP An acronym for Internet Printing Protocol. The application ofInternet tools to allow end-users to print to a remote printer usingthe same methods as would be used for a local printer.This could include the use of HTTP servers and browsers.
IPX Internetwork Packet eXchange. IPX is part of NetWare. It routespackets to the correct node and to the correct process within thenode.
LAN An acronym for Local Area Network. This is a network that servesa relatively small area, such as one building, and does not requiretelecommunications services to reach all of the nodes.See also WAN.

WORKCENTRE PRO 420
WORKCENTRE PRO 420 NETWORK CONNECTIVITY GUIDE 5-3
LPR An acronym for Line Printer Remote. This refers to the processthat sends jobs to the printer or print queue.LPR is a platform independent printing protocol that runs overTCP/IP.
Message See Frame.
NDS An acronym for NetWare Directory Services. A globally distributednetwork database that replaces the bindery used in previousversions of NetWare.NDS is incorporated into NetWare versions 4.0 and above.NDS views the network as a unified information system rather thana group of separate computers.
NetBIOS An acronym for Network Basic Input/Output Operating System. Anetwork file sharing application defined for use with PC-DOSpersonal computers, usually implemented under TCP/IP at theapplication layer.
NetWare A network operating system from Novell. Clients log onto one ormore file servers which provide services such as mail, printing, andfiling.
NetWare Core Protocol A protocol used by a NetWare client to request services from aNetWare server.
NIC An acronym for Network Interface Card. A printed circuit boardused to connect a printer or computer to a network.
Node A device on a network that has an address and can send and/orreceive data to and from other devices on the network.
Packet See Frame.

WORKCENTRE PRO 420
5-4 WORKCENTRE PRO 420 NETWORK CONNECTIVITY GUIDE
PCL An acronym for Printer Control Language, which is used byHewlett-Packard. This is a set of commands that tell a printer andprinter driver how to print a document.
PCL5e A Hewlett-Packard Printer Control Language (PCL) that was thefirst version of PCL to support bi-directional communicationbetween printer and computer.
PDL An acronym for Page Description Language. This refers to aprogramming language, such as PostScript, that is used todescribe output to a printer or a display device, which then uses theinstructions from the PDL to construct text and graphics to createthe required page image.
Peer-to-Peer A network environment in which the nodes communicate directlywith other nodes. Windows for Workgroups and NetWare Lite areexamples of peer-to-peer networking products.
Print Queue Scan Rate Service Interval that tells how often the print server checks the printqueue for print jobs going to this printer. The default is every 5seconds. Values from 1 to 255 are allowed.
Protocol The rules that control the transmitting and receiving of data.
Queue A place where jobs are stored temporarily, while they are waiting tobe processed. A print queue will hold several print jobs. A printerthat is attached to the print queue will print the jobs one at a time.
Queue Based Printing Printing via a print queue. A Print Queue is a network directory thatstores print jobs. When the printer assigned to a print queue isready, the print server takes the print job out of the print queue andsends it to the printer. The print queue can hold as many print jobsas disk space allows.
RARP An acronym for Reverse Address Resolution Protocol. A protocoldesigned for the data link layer that allows hosts to associate anetwork hardware address with an IP address.

WORKCENTRE PRO 420
WORKCENTRE PRO 420 NETWORK CONNECTIVITY GUIDE 5-5
Raw TCP / Port 9100 printing Ports are specified as destinations for network transmissions at thetransport layer.Port 9100 is reserved for simple TCP printing, otherwise known asRaw TCP printing.
RJ45 A connector used to connect a 10BaseT cable to a device.
Router A device that directs network packets to the segment of thenetwork for which the packet is intended, and excludes packets thatare not intended for a segment. Routers reduce unnecessarynetwork traffic and control access to segments of the network.
SPX An acronym for Sequenced Packet eXchange. SPX is part ofNetWare. It ensures that packets are received in the correct orderand that there are no errors.
Subnet Mask There are approximately 4.3 billion different addresses in the IPAddress range of 000.000.000.000 to 255.255.255.255. Theseaddresses can be divided into smaller, and much moremanageable sub-networks, or subnets. The Subnet Mask identifieswhich part of the IP Address contains the Subnet Address andwhich part contains the host (or device) address.
TCP/IP An acronym for Transmission Control Protocol / Internet Protocol.TCP/IP is a set of communication protocols that is supported by avariety of computer platforms. TCP controls the data transfer andIP controls the routing of the data. The IP Address is a uniqueaddress that identifies a device in a network. The IP Address has tobe set by the System Administrator. The IP Address consists offour bytes of information and is expressed as decimal numbers withthe bytes separated by dots. (Example: 13.1.188.2)
Twisted-pair See 10BaseT.
WAN An acronym for Wide Area Network. This is a network that serves arelatively large area, such as buildings in different cities, andrequires telecommunications services to reach all the nodes.See also LAN.
WINS An acronym for Windows Internet Naming Service. Provides adynamically updated name resolution service which allows clientsto register their names and IP addresses.

WORKCENTRE PRO 420
5-6 WORKCENTRE PRO 420 NETWORK CONNECTIVITY GUIDE


