Simultaneous joinery - University of Michigan
10
Copyright © 2014 Jared Dwarshuis and Lawrence Morris Page 1 of 10 Simultaneous Joinery Larry and I developed a set of simultaneous wood working joints about 20 years ago but never got around to documenting our work until now. We were inspired by a puzzle piece that had an intersection of three pairs of symmetrical elements. The puzzle was fascinating to look at but unfortunately it had very little structural value. It occurred to us that if we could build more structure into the design that it could be a true wood working joint.
Transcript of Simultaneous joinery - University of Michigan

Copyright © 2014 Jared Dwarshuis and Lawrence Morris Page 1 of 10
Simultaneous Joinery
Larry and I developed a set of simultaneous wood working joints about 20 years ago but never got around to documenting our work until now. We were inspired by a puzzle piece that had an intersection of three pairs of symmetrical elements. The puzzle was fascinating to look at but unfortunately it had very little structural value. It occurred to us that if we could build more structure into the design that it could be a true wood working joint.

Copyright © 2014 Jared Dwarshuis and Lawrence Morris Page 2 of 10
The assembled puzzle piece on which we based our work.
This is what it looks like disassembled.

Copyright © 2014 Jared Dwarshuis and Lawrence Morris Page 3 of 10
We developed our simultaneous joints using a mixture of trigonometry and geometry. We prototyped the joints using clay models built over undercut sticks. Some of our first models had internal voids and unnecessary facets.
Making simultaneous joinery is a demanding task since exacting dimensions are critical. Poorly cut joints will either be loose or they will not close up properly. One could glue up simultaneous joints and get away with having looser tolerances but you would need an adhesive with a very long pot life and it would be a messy glue-up. Our pieces are all glue-less construction so they could be disassembled and repaired. We have a few examples of furniture made with glue-less simultaneous joints and they have held tight for about 20 years now.
This paper will outline the procedures we used to achieve the precision needed to produce simultaneous joinery. All of the cutting of parts is done one piece at a time and this is very time consuming. One could make jigs that were extremely precise and cut a large number of parts all at once but this is hard to justify unless you plan to mass produce a particular piece of furniture. The procedure we have outlined does work nicely for ‘one offs’ and is within the scope of a small woodshop.
First: find wood that is straight grained. We used Elm for our recent piece; Elm has nice working qualities and is reasonably tough. Figure on buying enough material to produce 10% more parts then you will actually need for the finished product so you will be able to reject a few pieces before assembly. While shopping for wood pick up a few boards of relatively inexpensive pine as these are used for test cuts and fit checking.
Second: make a few test cuts with your router cutter on a scrap piece of wood and use this block of wood as a go- no go gauge for dimensioning your sticks. Alternately you could use a micrometer or dial indicator but a test block is easier and fool proof. We re-dimension 3/4” stock down to 11/16” with a thickness sander. We used 320 grit abrasives for the final passes. We finish sanded the stock until the gauge slid smoothly across the boards with just enough clearance for a varnished finish. If we had used an oil finish instead of varnish the test block would have been tight, but not so tight that you get dented wood.
We use long boards for making our sticks and we leave the sticks long so that we can rub varnish on them easily with a rag; we wanted a near mirror finish on these sticks so our clearance take-up was a few thousandths of an inch. Figure on a few inches of snipe to toss out from both ends of your long sticks
Third: We used hard stops to cut the sticks to length using a chop saw. We recommend a hard stop that has space for sawdust to settle into rather than having saw dust bunching up against the hard stop ruining the critical lengths needed.
Fourth: We made a fancy table for doing the routing work. The table has pillow blocks with bearings and gives a nice feel for cutting parts. Ordinary jigs made with good materials can be substituted; the first router jig we made used (expensive) ball bearing drawer slides and it worked just fine. We always precut our facets to remove the bulk of material before doing a final pass. With the final pass go once across and do not back the router bit out through the slot you have just cut as this will tend to make the slot wider than desired. Vibration causes poor cuts and router bits can creep, usually cutting more material rather than less. Be on guard and check depth of cut with a go-no-go gauge frequently. We cut the V notches last with two passes; but I think that next time we make simultaneous joints we will pre notch the v cuts with a table saw and then clean them up with a light router cut. One very important remark that we cannot overemphasize when using a router; always ensure that the cutter is forcing the sticks to be cut against the hard stop by paying attention to cutter rotation,

Copyright © 2014 Jared Dwarshuis and Lawrence Morris Page 4 of 10
when the router bit approaches the stock it must push the stock against the stop and not away from it. If you don’t pay attention to this detail you will likely get horrible results. And a final safety reminder: Long hours of repetitive cutting; is a recipe for injury.
Fifth: Before assembly we sand the sticks lightly in preparation for our finish coats of varnish and to remove burrs. While sanding we tilt the sander slightly while approaching the v notches so it places a tiny bit of rounding on the edge; this tiny bit of edge rounding makes fitting the shoulders much easier and is not visible once assembled. Alternately this edge rounding could be done with a chisel or file. A file would be my preference.
Sixth: The fun part is assembly. We use a box full of rubber bands to get a light tension across the pairs of stick, keeping the rubber bands close to the joints and slowly fit the sticks to their shoulders starting with the center cube. Keep all sticks parallel while collapsing and collapse the structure uniformly. Be careful that the rubber bands don’t get caught under the joints. If the structure is not collapsing you may have a stick sideways, open the surrounding area gently and turn the stick.
Seventh: Enjoy your creation; there are only a handful of examples in the entire world. Also feel free to run with the idea. It should be possible to join non-square parts, or make joints that do not entirely close or even join hexagonal sticks. In mathematic jargon ‘there is a family of solutions’. It would also be fun to build outdoor trellises with large beams. (Please share your ideas) Assembling furniture made with simultaneous joinery is a hoot!
A tally: Each cube has 96 sticks. Each stick has 24 cuts so it takes 48 passes with a router for each stick. That’s 4608 router passes per cube. Each stick has 16 shoulders, so each cube has 1536 shoulders total. It took us about two hours to assemble the first cube.

Copyright © 2014 Jared Dwarshuis and Lawrence Morris Page 5 of 10
Remarks About the Variety of Joints That We Have Produced
This is joint we used for making our cube; it is one of our favorite joints. It is very sturdy.
This shows how a joint collapse along three axes for assembly.

Copyright © 2014 Jared Dwarshuis and Lawrence Morris Page 6 of 10
This joint is similar externally but the internal cuts are quite different.
This is a prototype joint we have not used for furniture. Ideally it would have a pyramid in the center but it was omitted for sake of simplicity.

Copyright © 2014 Jared Dwarshuis and Lawrence Morris Page 7 of 10
This is our second favorite joint, it is also very strong.
These are the internal cuts.

Copyright © 2014 Jared Dwarshuis and Lawrence Morris Page 8 of 10
This is similar to the previous joint.
These are the internal cuts. We are still looking into prototyping a version of this joint without the missing corner piece. (It is being elusive.)

Copyright © 2014 Jared Dwarshuis and Lawrence Morris Page 9 of 10
We used a joint similar to this one for making furniture. Interestingly the joint has true shoulders at a compounded 45 degree angle
These are the cuts needed for the previous joint. These were cut by hand and are rough but they could be machine cut with the right jigs.
Copyright © 2014 Jared Dwarshuis and Lawrence Morris Page 10 of 10
This would need lashing or hardware.
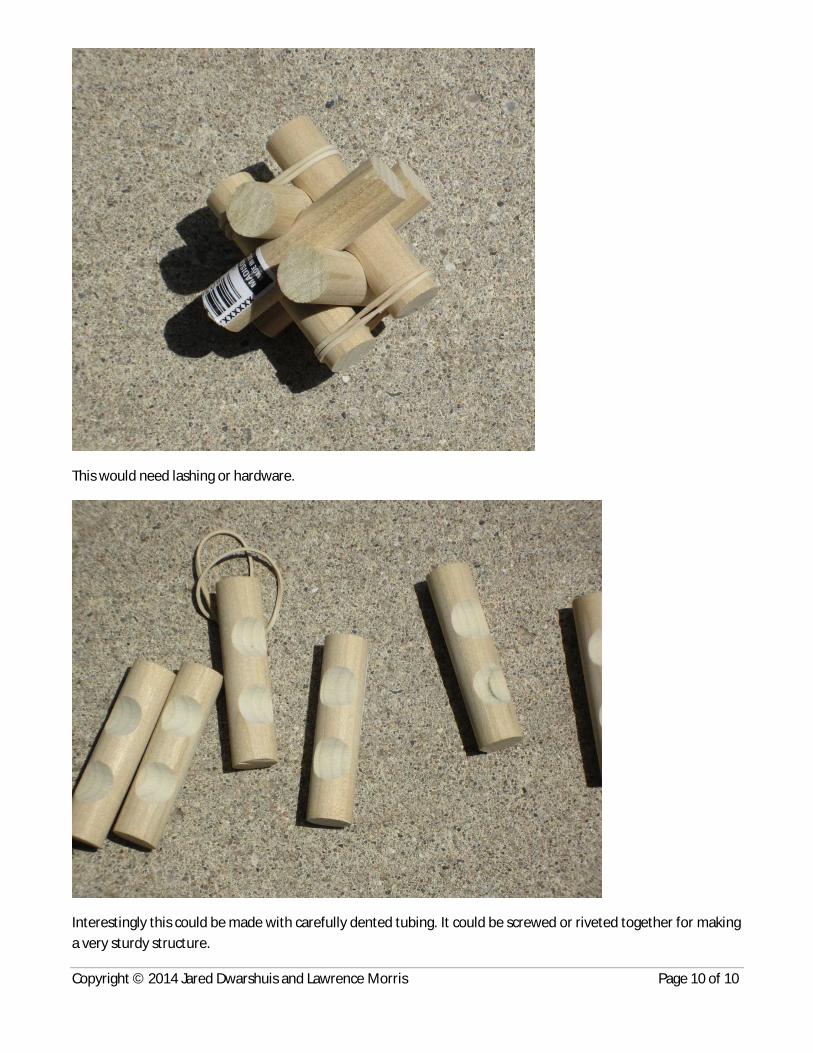
Interestingly this could be made with carefully dented tubing. It could be screwed or riveted together for making a very sturdy structure.