SIMS .net Assessment Key Stage Wizard 2017 Early Years ... · Page | 3 Introduction This chapter...
15
Page | 1 SIMS .net Assessment Key Stage Wizard 2017 Early Years Foundation Profile Version 1.2
Transcript of SIMS .net Assessment Key Stage Wizard 2017 Early Years ... · Page | 3 Introduction This chapter...

Page | 1
SIMS .net Assessment
Key Stage Wizard 2017
Early Years Foundation
Profile
Version 1.2

Page | 2
REVISION HISTORY
Version Change Description Date
1.0 Updated to 1.174
1.1 Quality checking 27/04/2017
1.2 Correction to CTF screenshots 14/06/2017

Page | 3
Introduction
This chapter covers the process from beginning to end for the Early Years Foundation Stage, including importing the wizard, entering results, printing the reports and exporting the results.
The Spring 2017 upgrade will load the 2017 Key Stage and EYFS Wizards into the AMPA folder.
The Wizards are automatically placed in a folder on each school’s computer as part of the upgrade process. They can be found in the following locations:-
Hosted Schools: F:\Public\AMPA\England Primary (and Middle Deemed Primary)\Assessment Manager
Non-Hosted Schools:
C:\Program Files\SIMS\SIMS.net\AMPA\ England Primary (and Middle Deemed
Primary)\Assessment Manager As these Teacher Assessments form part of the CTF that accompanies children if they transfer between schools, it is a statutory requirement that where you are using alternative software for recording assessments, the data is also imported into SIMS. Please refer to your software supplier for guidance and instructions on how to do this. The EYFS profile must be completed for each child who will be five years old on or before Sunday 31 August 2017 unless:
• an exemption from the profile has been granted for the setting by the Secretary of State;
• the child is continuing in EYFS provision beyond the year in which they turn five;
• the child has arrived from abroad less than two weeks before the profile submission deadline and so an accurate and valid assessment cannot be completed; or
• the child has spent the majority of the academic year away from the setting, for example, due to illness or medical treatment.
Step 1 – Check SIMS .net Version
In order to use the 2017 Wizards you must be using the Spring 2017 Main Release version of SIMS .net or later. To check: 1. Go to Help | About SIMS .net. 2. Check that the version of SIMS .net is 7.174 or higher.
Step 2 – Identify the Early Years Foundation Stage Pupils
If the Reception year in SIMS includes all the pupils being assessed continue to Step 3.
If pupils outside of the Reception year are being included in the EYFS assessment, or some of the Reception pupils are not being assessed – please refer to the notes for Creating a User Defined Group by clicking on the link below.
http://faq.scomis.org/kb15030/

Page | 4
Step 3 – Import the Wizard for EYFS Profile 2017
1. Select Routines | Data In | Assessment | Import. If you see a screen similar to the one below, click Yes.
2. Once the update has completed, Close the activity log.
3. Select the file to import by clicking the Browser button.
Hosted Schools: F:\Public\AMPA\ England Primary (and Middle Deemed Primary)\Assessment Manager
Non-Hosted Schools: C:\Program Files\SIMS\SIMS.net\AMPA \England Primary (and Middle Deemed
Primary)\Assessment Manager
4. Select the EYFS Profile Wizard 2017 and click on Open to display the screen shown in the following graphic.
5. The Overwrite with default values check box should be ticked then select Finish. Click the Yes button when asked ‘Do you want to proceed?’

Page | 5
6. An Activity Log shows what has been imported. It is worth scrolling to the bottom of the log to check the import has been successful.
Step 4 – Enter Results
1. Select Tools | Performance | Assessment | Wizard Manager.
If other wizards have been imported in the past they will also appear in the list.
2. Leave the filter on Incomplete and click the wizard which is going to be worked with – in this case EYFS Profile Wizard 2017.
3. Click the Next button.

Page | 6
4. From the Select Group screen, click the Browser button to display the Selector dialog.
5. Click the + icon next to Year Group and select Year R
6. OR the + button next to User Defined Groups to select the user defined group, if you created one earlier, then click the Apply button. This places this group on the Select Group screen.
7. Click the Next button.
8. The following screen appears listing the marksheets available.
Click the + icon next to Year Group and select Year R then click the Apply button.
Or the + button next to User Defined Groups to select the user defined group if you created one earlier, if applicable, then click the Apply button. This places this group on the Select Group screen.
Highlight EYFS Profile 2017. Click on the Pencil icon to open the marksheet.
Change the filter to ALL if you are unable to find the relevant marksheet

Page | 7
A marksheet with the Year R pupils is displayed (or the User Defined Group if you created one earlier) and columns relating to the 17 assessments that need to be entered.
1. Right click in a cell and enter a 3 (Exceeding), 2 (Expected), 1 (Emerging) or A (Unable to assess or exempt) for each pupil in the appropriate white cells.
2. For a quicker method of entering results - right mouse click on the first cell you wish to enter a result into and choose Select Grade for Cell to display the dialogue box. Double clicking on a result from the dialogue box will enter it into the cell and move down to the next pupil so you can repeat the process.
Alternatively, you can right click in the grey column heading and choose Select Grade for Column. This will allow you to flood fill a column with the most popular result. You can then click into individual cells and change to the appropriate grade before clicking Save.

Page | 8
3. Once all these columns are completed click the Save button.
4. Click on the Calculate button to populate the Data Check and formula columns. The Data Check column is used to check there is an entry for each area for each pupil and alert you to any missing results.

Page | 9
5. Enter any missing results by clicking in the empty cell.
NOTE: To amend a result that has already been saved, right click on the cell that
contains the result, select View/Edit Result History, click on the result under the Result
Column and type the amended result. Click on the Close button. Click Calculate and
click Save.
Click Close.
On the Wizards – EYFS Profile Wizard 2017 screen:
Information entered on the EYFS Profile Wizard 2017 marksheet will automatically populate the EYFS Good Development 2017 marksheet. Click on Calculate. This will indicate if Good Level of Development has been achieved.
Highlight EYFS Profile Good Development 2017. Click on the Pencil icon to open the marksheets.

Page | 10
Once all the results are entered on the marksheets, reports can be produced. The wizards will produce an individual report for each pupil.
Step 5 - Using the Wizards for Reporting to Parents
To access and use the reports:
1. Go to Tools | Performance | Assessment | Wizard Manager.
2. Select the EYFS Profile Wizard 2017. Click the Next button.
3. Leave the group selection as it is. Click the Next button.
4. At the marksheet, click Next.
5. Choose the report you want to produce eg EYFS Profile Pupil Report 2017.
6. To preview a report ensure one of the pupils is ticked then click the Preview Report icon
Preview
Export
Upload

Page | 11
Three reports are listed.
EYFS Profile Pupil Report 2017 produces an individual report for each pupil - use the Select All button to produce an individual report for each pupil. Click on the Print icon.
EYFS Pupil School Report 2017 Page 1 shows each Early Learning Goal and the percentage of pupils in the school at each level in 2017. Page 2 shows the above for Boys. Page 3 shows the above for Girls. Only one pupil needs to be ticked in order to produce the report. This can then be photocopied for Parents. Detail of the calculations used can be found in the footer.
Page | 12
Step 6 - Upload Reports
A copy of each child’s report can be saved in the Document Server. This can then be viewed at any time. 1. Once reports have been generated they can be uploaded, either individually or in bulk, by
clicking the Upload icon. 2. To view the copy open the Pupil Details screen for the child and select Linked Documents
in the Links panel on the right. The report will open as read only.
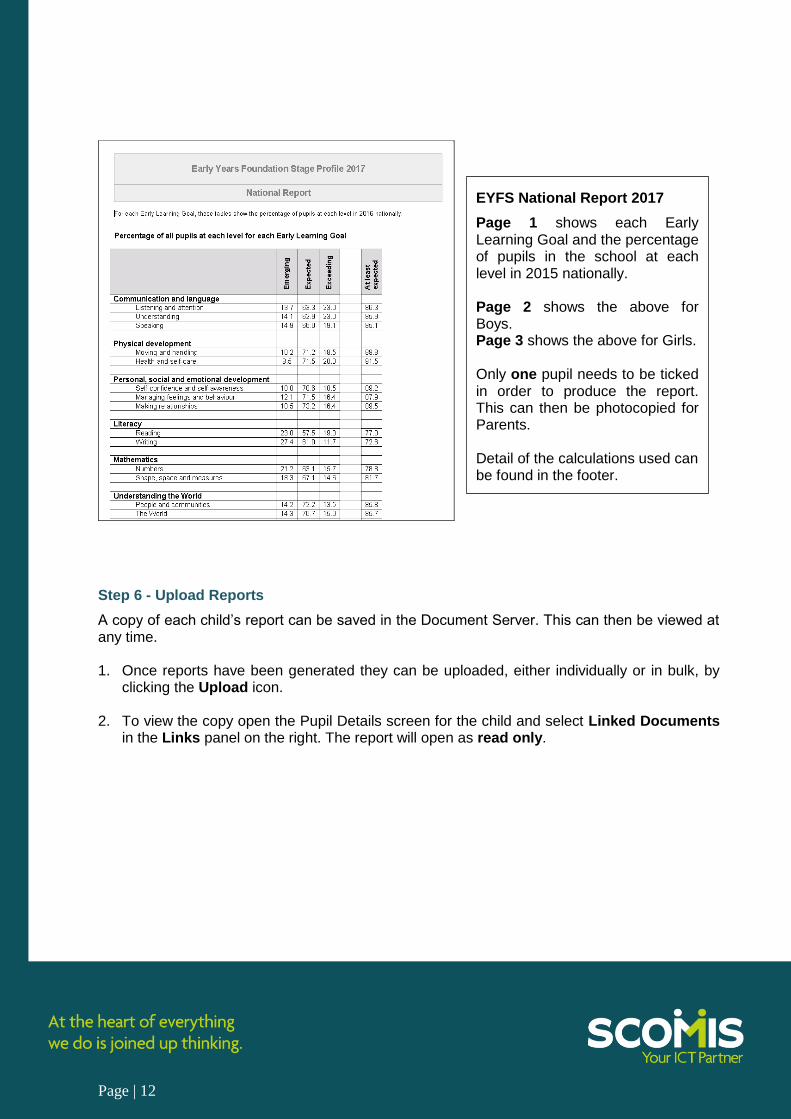
EYFS National Report 2017
Page 1 shows each Early Learning Goal and the percentage of pupils in the school at each level in 2015 nationally. Page 2 shows the above for Boys. Page 3 shows the above for Girls. Only one pupil needs to be ticked in order to produce the report. This can then be photocopied for Parents. Detail of the calculations used can be found in the footer.

Page | 13
Step 7 - Exporting EYFS Results in a CTF file to send to the Local Authority
Once the appropriate assessments have been entered for all pupils, the results need to be exported to the Local Authority (LA). This is not done in Assessment Manager, but in SIMS.net by creating a CTF to the LA. The LA may ask for results by way of a CTF. The procedure for transferring the results will vary from one Local Authority to another. Please check the advice given by your LA before proceeding. The following steps show the process for Year Reception. For creating a CTF for pupils from more than one year group please see http://faq.scomis.org/kb15034/.
For creating a CTF including leavers please see http://faq.scomis.org/kb15037/.
1. Go to Routines | Data Out | CTF | Export CTF
Select Early Years Foundation Stage data (FSP) from the Export Type options
General
Phonics Test Results
KS1
KS1 excluding Tests and Tasks
KS2
Early Years Foundation Stage data (FSP)

Page | 14
1. In the Student Options area, enter a tick against ‘Include students already exported’, and ensure that the View is set to “Current Students”, then click Refresh Students.
2. Click the down arrow on the ‘Year Group’ column heading and select Year Reception to
show just the Reception pupils. 3. Right mouse click in the first cell under Destination / Other and click on Select All. 4. All the cells appear highlighted.
5. Left click in the first highlighted cell under Destination/ Other and select your authority from the list.
6. Click on the Export CTF.
The following message may appear. You can choose to continue with the CTF Export or run the Address Tidy and Merge routine from SIMS .net Homepage via Tools | Housekeeping | Bulk Address Tools | Tidy and Merge Addresses.

Page | 15
Click on Yes.
A confirmation will appear with the name of the file.
Make a note of the filename here in case of a query with the Local Authority:
Step 8 - Sending the Results File to Your LA
The CTF containing the results should now be sent to your Local Authority. Upload the file to the LA in the normal way prescribed by them.
Submission Date – 23 June 2017.
823 – An example of your Local Authority Number 2999 – An example of your School Number FSP – Results you are exporting 878LLLL –Export destination - eg Local Authority