
Simplify low EMI design with power modules · the possibility of creating a good layout by reducing...
10
Simplify low EMI design with power modules Michael Daimer Analog Field Application Engineer Texas Instruments
Transcript of Simplify low EMI design with power modules · the possibility of creating a good layout by reducing...

Simplify low EMI design with power modules
Michael DaimerAnalog Field Application EngineerTexas Instruments

Simplify low EMI design with power modules 2 November 2017
Sources of EMI in switching power supplies
First of all, you can’t beat physics. According
to Maxwell’s equations, an alternating current
produces an electromagnetic field. This occurs in
every electrical conductor, which has by nature
some electrical capacitance and inductance that
forms an oscillating circuit. This oscillating circuit
radiates electromagnetic energy into space with a
specific frequency (f=1/(2*π*sqrt(LC))). The circuit
acts as a transmitter of electromagnetic energy, but
can also receive electromagnetic energy and act as
a receiver. Antennas are designed in such a way as
to maximize transmitted or received energy.
But not every application should act like an
antenna, and negative side effects can occur.
For example, switching-buck power supplies are
designed to convert a higher electrical voltage into
a lower voltage, but they also act as an (unwanted)
transmitter for electromagnetic waves and can
disturb other applications, such as interfering with
the AM band. This effect is called EMI.
To maintain functionality, it is important to minimize
sources of EMI. The Comité International Spécial
des Perturbations Radioélectriques (CISPR) defines
standards such as CISPR 25, which is a benchmark
for automotive electrical applications, and CISPR
22, for information technology equipment.
How can you lower the radiated EMI of a power
design? One method is to completely shield the
switching power supply with metal. But in most
applications, this is not an option due to cost and
space. A better approach is to reduce and optimize
the sources of EMI. Much literature already deals
with this topic in detail; I recommend two at the end
of this article.
Let’s review the main sources of EMI in switching
power supplies and why power modules can help
easily reduce EMI.
Minimizing current loops in the layout
As the name implies, switching power supplies are
switching. They are switching the input voltage on
and off with frequencies from hundreds of kilohertz
up to several megahertz. This causes fast current
transitions (dI/dt) and fast voltage transitions (dV/
dt). Alternating currents and voltages produce
alternating electromagnetic fields according to
Maxwell’s equations. The fields spread radially
from their origin and their magnitude lowers with
distance.
When designing a switching power supply, you may have heard of electromagnetic interference (EMI).
More and more applications must pass EMI standards in order for their manufacturers to receive approval for commercial resale. A switching power supply implies that there are electrical switchers inside the device, through which EMI radiates.
In this paper, I will explain the sources of EMI in a switching power supply and methods or technologies for mitigating EMI. I will also show you how power modules (controller, high side and low side FET and inductor in one package) help reduce EMI.

Simplify low EMI design with power modules 3 November 2017
Figure 1. EMI coming from the switch-mode power supply has effects on the load and the primary power supply.
Figure 2. A critical current loop forms between the input, switches and input capacitor.
Figure 3. Minimizing the loop area helps mitigate EMI
Magnetic and electric fields interfere with the
conducting parts of an application (for example,
copper traces on a printed circuit board [PCB] that
act like antennas) and cause additional noise on
the lines, which again cause EMI (see Figure 1).
The fact that several watts of power are translated
increases the range of radiated EMI. Radiated
electromagnetic energy is directly proportional
to the magnitude of current (I) and the loop area
(A) through which it flows. Minimizing the area of
alternating current and voltage loops helps reduce
EMI (see Figures 2 and 3).
A look at the pinout (see Figure 4) helps you see
the possibility of creating a good layout by reducing
the area of high dI/dt loops. The switch node, for
example, is a source of both: high current variation
(dI) and high voltage transition (dV). A good pinout
takes care of separating noise sensitive pins and
noisy pins. Switch node and boot pin should
be positioned as far as possible from the noise
sensitive feedback pin. Additionally input pins and
ground pins should be neighboring. This eases
routing on the PCB and the placement of the input
caps.
Figure 5 shows the modified evaluation module
(EVM) of the LMR23630 SIMPLE SWITCHER®
converter. The two input capacitors are about
2.5cm away from the input pin. This was done to
simulate a bad layout, since the current loop area
(red rectangular shape in Figure 5) is made bigger
than required and suggested by the datasheet.
The oval red shape in Figure 5 shows the switch
node between converter and inductor. The loop
area between both IC and inductor is as small as
possible.
Supply Load
Switch-ModePowerSupply
+–
Critical path
+–
Minimize loop area
Figure 4. The pinout can help minimize loop areas. Left: Optimized pinout; Right: Non-optimized layout which makes a good layout almost impossible.

Simplify low EMI design with power modules 4 November 2017
Figure 6. Influence of the input capacitance placement of the LMR23630 converter on radiated EMI.
Figure 7. Internal composition of different types of power modules. In both cases, the inductor sits on top of the IC die.
Figure 5. Example of a bad layout with a large loop area (red rectangular shape) between input pin and input capacitors. The second loop area (oval red shape) is formed between IC and inductor.
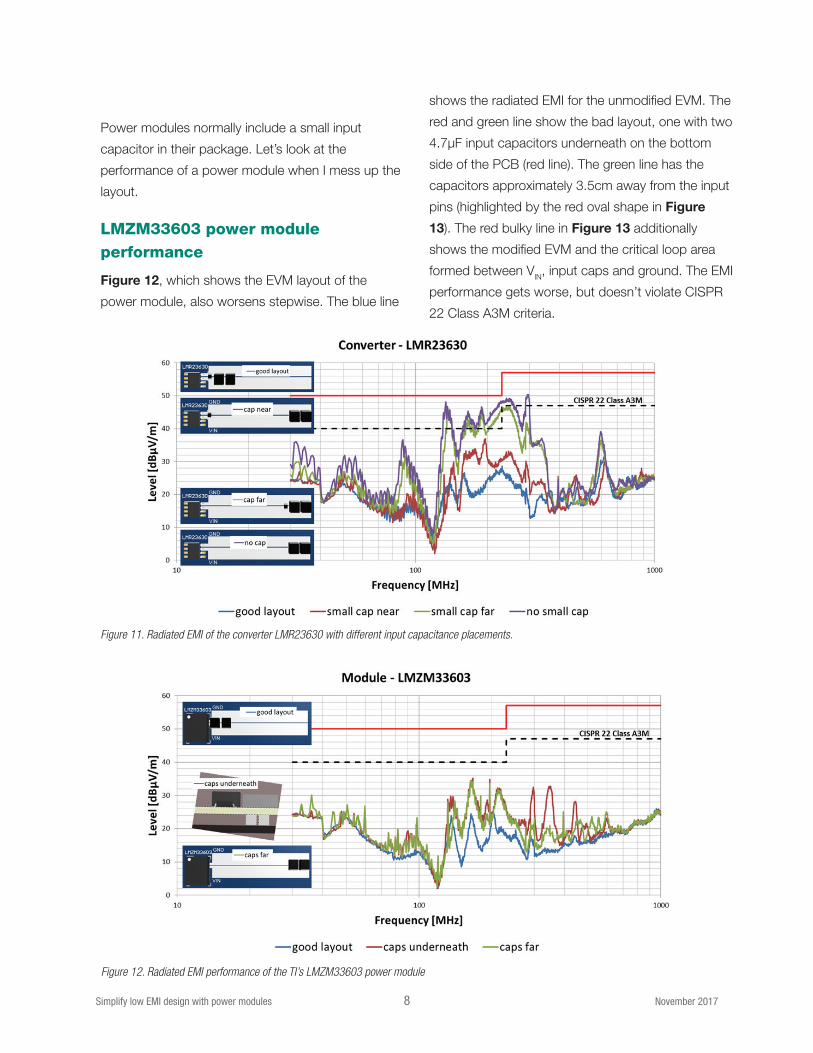
The graph in Figure 6 shows the radiated EMI of
the LMR23630 converter where only the loop area
formed between VIN, GND and the input capacitor
is different. A good layout places the capacitors as
close as possible to input and ground pins (the loop
area is as small as possible). A bad layout places
the input capacitors 2.5cm away from the input pin,
forming a large loop area.
The red line of the graph in Figure 6 shows the
radiated EMI for the bad layout. The blue line
shows the radiated EMI of a good layout using
the same EVM. The effect of modifying one loop
area is tremendous. The radiated EMI level of the
converter LMR23630 can be lowered by more than
20 dBμV/m.
Therefore the placement of the input capacitors
should be one of the first considerations, when
designing either with a buck converter or a buck
power module. Power modules also have the
advantage that the critical loop area between
inductor and IC is already optimized. The inductor
is connected internally inside the package with the
integrated circuit (see Figure 7). This placement
creates a very small loop area inside the package.
Therefore it is not necessary to route the noisy
switch node on the printed circuit board.

Simplify low EMI design with power modules 5 November 2017
Most inductors used in power modules are
additionally shielded to prevent electromagnetic
radiation coming from the coil. The high current and
voltage transitions occur very close to the inductor
and a part of the electromagnetic field from the
switch node is shielded, with the inductor sitting on
top of the lead frame (see Figure 7).
Fast voltage and current transients
Fast transients can cause ringing on the switch
node, which will cause EMI. In some cases, a
converter provides access to the boot pin. Placing
a resistor in series with the boot capacitor will
increase the rise time (dt), which can lower EMI at
the expense of efficiency.
Figure 8 shows an EMI radiation scan of the
LMR23630 EVM. The layout was modified to
place the input capacitors about 2.5cm away from
the pins in order to simulate a bad layout and to
show how placing a boot capacitor will influence
EMI performance. It might be easier to place an
additional boot capacitor in the design rather than
change the layout completely. I recommend always
planning for a boot capacitor in your design in case
you need it. If not, you can short the space on the
PCB with an 0Ω resistor.
Placing a boot resistor in series with the boot
capacitor results in a lower EMI spectrum. The
emission in some frequency regions drops as
much as 6dB. Figure 8 also shows the trade-off
Figure 8. The influence of adding a boot resistor to the switch node of the converter LMR23630. The radiated EMI is lower, but the efficiency decreases due to higher switching losses.
Simplify low EMI design with power modules 6 November 2017
in efficiency. Slowing down the rise time dt with a
30.1Ω resistor lowers the efficiency more than 1%.
A look at the power loss illustrates this even more.
The power loss increases for a full load (3A) from
1.9W up to 2.1W. This increase of more than 10%
can be problematic and lead to thermal issues.
It’s possible to lower the switch-node current ringing
dI in synchronous converters by placing a small
Schottky diode between switch-node pin and a
ground pin to lower reverse-recovery current, but at
the expense of a higher bill-of-materials (BOM) cost.
Or you could add a snubber network containing an
additional large package capacitance and resistance
between switch node and ground. The snubber
burns the energy of the switch-node ringing, but
requires knowledge of the ringing frequency and
proper calculations of the additional components.
It also lowers the efficiency of the switching power
supply.
Parasitic inductances and capacitances in current paths
For a synchronous buck converter, each IC
architecture will contribute different amounts of
noise appearing as radiated EMI. But it is difficult
to find this out from a datasheet. Most datasheets
do not provide an EMI plot, since PCB layout, BOM
components and other factors have an impact on
EMI behavior. Sometimes, if you’re lucky, the EVM
user’s guide provides a plot of the EMI behavior
of this specific design. But if your design does
not match the layout and BOM of the EVM, the
EMI characteristic of your application may differ
dramatically. Power modules simplify the layout
and make fast-and-easy designs possible, since
you only have to consider a few rules of thumb.
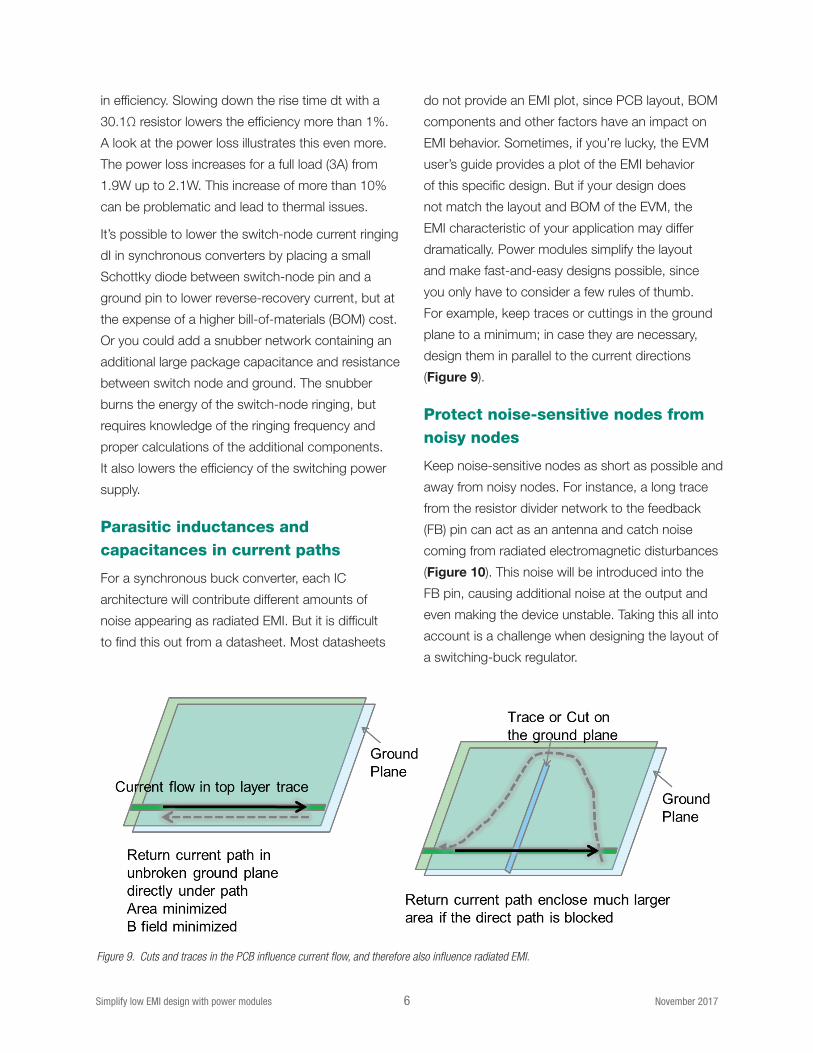
For example, keep traces or cuttings in the ground
plane to a minimum; in case they are necessary,
design them in parallel to the current directions
(Figure 9).
Protect noise-sensitive nodes from noisy nodes
Keep noise-sensitive nodes as short as possible and
away from noisy nodes. For instance, a long trace
from the resistor divider network to the feedback
(FB) pin can act as an antenna and catch noise
coming from radiated electromagnetic disturbances
(Figure 10). This noise will be introduced into the
FB pin, causing additional noise at the output and
even making the device unstable. Taking this all into
account is a challenge when designing the layout of
a switching-buck regulator.
Figure 9. Cuts and traces in the PCB influence current flow, and therefore also influence radiated EMI.

Simplify low EMI design with power modules 7 November 2017
Noise-sensitive nodes Noisy nodes
Feedback pin Switch node
Frequency setting Inductor
Compensation network High dI/dt caps
Sensing paths etc. FETs, diodes etc
Table 1. Examples of noise sensitive and noisy nodes in a buck converter.
Figure 10. Always place the resistor divider on the FB pin as close as
possible to the FB pin.
Modules have an advantage in that they keep both
noise-sensitive and noisy nodes to a minimum,
therefore minimizing the chance of choosing the
wrong layout. The only thing is to keep the traces of
the FB pin short.
Conclusion
There are many knobs to tune EMI in a switching
buck converter, but following best practices may
not be good enough. Finding the best configuration
consumes a lot of precious design time. Power
modules already include both FETs and the
inductor, making it simple and fast to create and
finish a power design with good EMI performance.
The most critical point when designing with a
buck module is the placement of a few external
components, which can help improve EMI
performance considerably.
EMI comparison of a converter and a power module
Previously, I described the sources of EMI in
switching power supplies and how to reduce
them. Now, I’ll demonstrate how modules help
mitigate radiated EMI by comparing measurements
between a converter and a power module that
use the same integrated circuit (IC). Both from
the SIMPLE SWITCHER product line at TI, the
converter is the LMR23630 and the power module
is the LMZM33603, which uses the LMR23630
IC. I partially modified the EVMs of both devices to
get the same BOM count so that the results only
depend on the selected part (converter or power
module) and the layout. Both EVMs have a good,
optimized layout. Later on, I made the layout worse
by placing capacitors farther away from the input
pins.
Performance of the LMR23630 converter
Figure 11 shows four different EMI spectra for
different design layouts. The design worsens
stepwise (similar to Figure 5, only done stepwise).
The first measurement (good layout/blue line) is with
the unmodified layout of the EVM (a good layout
with all input capacitors very close to the input pin).
For the second measurement (small cap near/red
line), the two 4.7μF capacitors are placed 2.5cm
away from the input pin. The small 0.22μF capacitor
stays very close to the input pin. In the third (small
cap far/green line) and fourth (no small cap/
purple line) measurements, respectively, the small
capacitor is 2.5cm away from the input pin and then
completely removed.
You can see in Figure 11 that the placement of
the input capacitors is very critical. Placing the
small input capacitor far away from the input pin or
removing it completely violates the CISPR 22 Class
A3M. Placing the small capacitor near the input pin
minimizes the loop area for high frequencies. The
small capacitor filters high frequencies, whereas
larger-capacitance capacitors filter lower-frequency
noise.
X ✔
Simplify low EMI design with power modules 8 November 2017
Power modules normally include a small input
capacitor in their package. Let’s look at the
performance of a power module when I mess up the
layout.
LMZM33603 power module performance
Figure 12, which shows the EVM layout of the
power module, also worsens stepwise. The blue line
shows the radiated EMI for the unmodified EVM. The
red and green line show the bad layout, one with two
4.7µF input capacitors underneath on the bottom
side of the PCB (red line). The green line has the
capacitors approximately 3.5cm away from the input
pins (highlighted by the red oval shape in Figure
13). The red bulky line in Figure 13 additionally
shows the modified EVM and the critical loop area
formed between VIN, input caps and ground. The EMI
performance gets worse, but doesn’t violate CISPR
22 Class A3M criteria.
Figure 11. Radiated EMI of the converter LMR23630 with different input capacitance placements.
Figure 12. Radiated EMI performance of the TI’s LMZM33603 power module
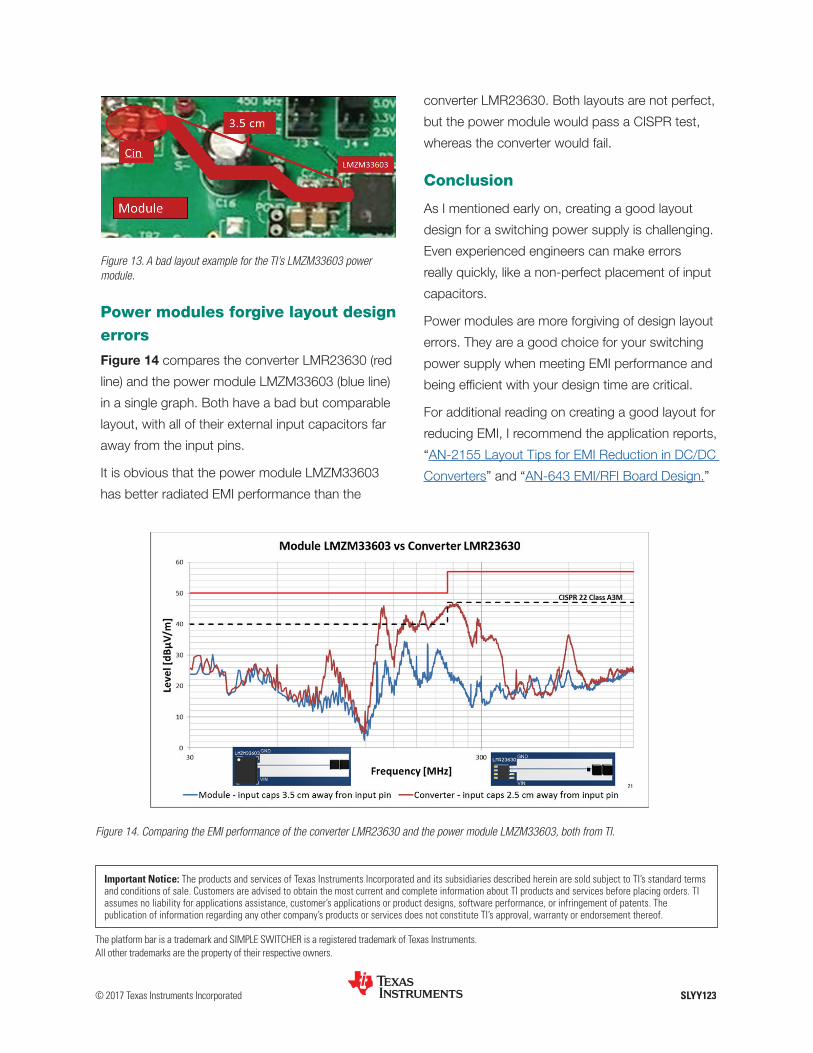
Figure 13. A bad layout example for the TI’s LMZM33603 power module.
Power modules forgive layout design errors
Figure 14 compares the converter LMR23630 (red
line) and the power module LMZM33603 (blue line)
in a single graph. Both have a bad but comparable
layout, with all of their external input capacitors far
away from the input pins.
It is obvious that the power module LMZM33603
has better radiated EMI performance than the
converter LMR23630. Both layouts are not perfect,
but the power module would pass a CISPR test,
whereas the converter would fail.
Conclusion
As I mentioned early on, creating a good layout
design for a switching power supply is challenging.
Even experienced engineers can make errors
really quickly, like a non-perfect placement of input
capacitors.
Power modules are more forgiving of design layout
errors. They are a good choice for your switching
power supply when meeting EMI performance and
being efficient with your design time are critical.
For additional reading on creating a good layout for
reducing EMI, I recommend the application reports,
“AN-2155 Layout Tips for EMI Reduction in DC/DC
Converters” and “AN-643 EMI/RFI Board Design.”
Figure 14. Comparing the EMI performance of the converter LMR23630 and the power module LMZM33603, both from TI.
SLYY123
Important Notice: The products and services of Texas Instruments Incorporated and its subsidiaries described herein are sold subject to TI’s standard terms and conditions of sale. Customers are advised to obtain the most current and complete information about TI products and services before placing orders. TI assumes no liability for applications assistance, customer’s applications or product designs, software performance, or infringement of patents. The publication of information regarding any other company’s products or services does not constitute TI’s approval, warranty or endorsement thereof.
The platform bar is a trademark and SIMPLE SWITCHER is a registered trademark of Texas Instruments. All other trademarks are the property of their respective owners.
© 2017 Texas Instruments Incorporated
IMPORTANT NOTICE FOR TI DESIGN INFORMATION AND RESOURCES
Texas Instruments Incorporated (‘TI”) technical, application or other design advice, services or information, including, but not limited to,reference designs and materials relating to evaluation modules, (collectively, “TI Resources”) are intended to assist designers who aredeveloping applications that incorporate TI products; by downloading, accessing or using any particular TI Resource in any way, you(individually or, if you are acting on behalf of a company, your company) agree to use it solely for this purpose and subject to the terms ofthis Notice.TI’s provision of TI Resources does not expand or otherwise alter TI’s applicable published warranties or warranty disclaimers for TIproducts, and no additional obligations or liabilities arise from TI providing such TI Resources. TI reserves the right to make corrections,enhancements, improvements and other changes to its TI Resources.You understand and agree that you remain responsible for using your independent analysis, evaluation and judgment in designing yourapplications and that you have full and exclusive responsibility to assure the safety of your applications and compliance of your applications(and of all TI products used in or for your applications) with all applicable regulations, laws and other applicable requirements. Yourepresent that, with respect to your applications, you have all the necessary expertise to create and implement safeguards that (1)anticipate dangerous consequences of failures, (2) monitor failures and their consequences, and (3) lessen the likelihood of failures thatmight cause harm and take appropriate actions. You agree that prior to using or distributing any applications that include TI products, youwill thoroughly test such applications and the functionality of such TI products as used in such applications. TI has not conducted anytesting other than that specifically described in the published documentation for a particular TI Resource.You are authorized to use, copy and modify any individual TI Resource only in connection with the development of applications that includethe TI product(s) identified in such TI Resource. NO OTHER LICENSE, EXPRESS OR IMPLIED, BY ESTOPPEL OR OTHERWISE TOANY OTHER TI INTELLECTUAL PROPERTY RIGHT, AND NO LICENSE TO ANY TECHNOLOGY OR INTELLECTUAL PROPERTYRIGHT OF TI OR ANY THIRD PARTY IS GRANTED HEREIN, including but not limited to any patent right, copyright, mask work right, orother intellectual property right relating to any combination, machine, or process in which TI products or services are used. Informationregarding or referencing third-party products or services does not constitute a license to use such products or services, or a warranty orendorsement thereof. Use of TI Resources may require a license from a third party under the patents or other intellectual property of thethird party, or a license from TI under the patents or other intellectual property of TI.TI RESOURCES ARE PROVIDED “AS IS” AND WITH ALL FAULTS. TI DISCLAIMS ALL OTHER WARRANTIES ORREPRESENTATIONS, EXPRESS OR IMPLIED, REGARDING TI RESOURCES OR USE THEREOF, INCLUDING BUT NOT LIMITED TOACCURACY OR COMPLETENESS, TITLE, ANY EPIDEMIC FAILURE WARRANTY AND ANY IMPLIED WARRANTIES OFMERCHANTABILITY, FITNESS FOR A PARTICULAR PURPOSE, AND NON-INFRINGEMENT OF ANY THIRD PARTY INTELLECTUALPROPERTY RIGHTS.TI SHALL NOT BE LIABLE FOR AND SHALL NOT DEFEND OR INDEMNIFY YOU AGAINST ANY CLAIM, INCLUDING BUT NOTLIMITED TO ANY INFRINGEMENT CLAIM THAT RELATES TO OR IS BASED ON ANY COMBINATION OF PRODUCTS EVEN IFDESCRIBED IN TI RESOURCES OR OTHERWISE. IN NO EVENT SHALL TI BE LIABLE FOR ANY ACTUAL, DIRECT, SPECIAL,COLLATERAL, INDIRECT, PUNITIVE, INCIDENTAL, CONSEQUENTIAL OR EXEMPLARY DAMAGES IN CONNECTION WITH ORARISING OUT OF TI RESOURCES OR USE THEREOF, AND REGARDLESS OF WHETHER TI HAS BEEN ADVISED OF THEPOSSIBILITY OF SUCH DAMAGES.You agree to fully indemnify TI and its representatives against any damages, costs, losses, and/or liabilities arising out of your non-compliance with the terms and provisions of this Notice.This Notice applies to TI Resources. Additional terms apply to the use and purchase of certain types of materials, TI products and services.These include; without limitation, TI’s standard terms for semiconductor products http://www.ti.com/sc/docs/stdterms.htm), evaluationmodules, and samples (http://www.ti.com/sc/docs/sampterms.htm).
Mailing Address: Texas Instruments, Post Office Box 655303, Dallas, Texas 75265Copyright © 2017, Texas Instruments Incorporated