
SimpleLeaf Magazine
32
SIMPLE grow garlic and beets this season! GROW GARLIC RECIPES Squash and Tomato Bake
-
Upload
sabine-tinglof -
Category
Documents
-
view
214 -
download
1
description
Gardening Magazine for Typography Fal12
Transcript of SimpleLeaf Magazine

SIMPLE
grow garlic and beets this season!GROW GARLIC
RECIPESSquash and Tomato Bake

AQUAPONICSA sustainable food production system
that combines aquaculture and hydroponics in a symbiotic environment

SIMPLE 3
con
ten
ts
EDIBLES
DECO
RRE
CIPE
S
GROW YOUR OWN GARLICFall is the time to plant, and no vegetable is so easy to grow and havest
YUMMY BEETSDon’t let the cold intimidate you; beets don’t mind the cold to grow
GARDENS FOR SMALL SPACESDon’t think you have space for your plants? Create the perfect garden for your small space in no time with these three creative tips.
AQUAPONICSThe possible future for sustainable farming both fish and plants.
PUMPKIN CUSTARDHoliday pie minus the crust
SQUASH & TOMATO BAKEDelicious and easy side dish to pair with roasted chicken or beef
INSP
IRATION
POINTERS
FALL CLEAN UPDuring your fall clean-up be sure to follow these handy tips for next year
PRESERVE YOUR HERBSThree different ways to preserve your herbs for the winter
PASSIFLORA INCARNATAThis Florida Native vine has the most beautiful flowers and many handy uses
EPISCIA CUPREATAThe impressive Flame Violet Gesneriad will bloom for you all year long
DISCLAIMER: SIMPLELEAF MAGAZINE AND ITS CONTENTS ARE FOR EDUCATIONAL PURPOSES ONLY;
ALL CREDIT GIVEN TO ORIGINAL AUTHORS; IF THERE IS AN ISSUE IT WILL BE EDITED ACCORDINGLY.

4 SIMPLE
Passionflower (Passiflora incarnata) is a fast-growing perennial vine occurring from Virginia to southern Illinois and southeast Kansas, south to Florida and Texas. The genus Passiflora of the passionflower family (Passifloraceae), explodes in diversity in the American tropics with over 400 species, representing 95 percent of all passionflowers. There is only a handful of temperate climate species, including Passiflora incarnata.
PASSIFLORAINCARNATA
WHAT’S IN A NAME?
The common and genus names share the same origin - honoring the Passion of Christ (the period between the Last Supper and the death of Christ). The name is derived from flos passionis, a translation of fior della passione, a popular Italian name which was applied to the plant to signify religious symbolism.
The floral structure was seen to sym-bolize the implements of the crucifix-ion. The three spreading styles atop the stigma were thought to represent the three nails by which Christ was attached to the cross. To some the five hammer-like anthers atop of the sta-mens exemplified the hammers used
to drive the nails. To others, they rep-resented Christ’s five wounds. Beneath these floral structures is a fringe of colored filaments, known as the coro-na. It was believed to depict a halo or perhaps the crown of thorns. Beneath it sits the corolla - with ten petals, each representing the ten apostles at the Crucifixion. Giacomo Bosio, an Italian ecclesiastic and historian, went so far as to interpret that the unopened, bell-shaped flowers held these sacred sym-bols from the view of heathens who had not yet been converted to Chris-tianity. If that’s not enough, the lobed leaves and long green vines were further thought to represent the hands
By Steven Foster

SIMPLE 5
and whips of Christ’s prosecutors. And so, both the common and Latin names - passionflower (Passiflora) - honors these visions.
Thomas Johnson, editor of the 1633 edition of Gerarde’s Herball described these notions for what they were: “The Spanish Friers for some imaginarie resemblances in the floure, first called it Flos Passionis, The Passion floure, and in a counterfeit figure, by adding what was wanting, they made it as it were an Epitome of our Saviors passion. Thus superstitious personssemper sibi somnia fingunt” The species name “incarnata” means “made of flesh or flesh-colored.”
PASSIONFLOWER AS FOOD
In his “Thousand Mile Walk to the Gulf” John Muir speaks of the apricot vine (passionflower) as having a superb flower “and the most delicious fruit I have ever eaten.” That delicious flavor apparently did not go unnoticed by Indian groups of the eastern United States.
In a 1989 study on Indian sites, K. J. Gremillion provides strong evidence for the prehistoric use of the fruits by Indian populations of North America, as well as evidence that by the time Europeans arrived, the plant was either consciously cultivated, or at least managed for fruit production around areas of Algonkian settlements in Virginia. The seeds are found at archaeological sites several thou-sand years old. She notes also that the human-plant relationship with passion-flower may have contributed to helping to spread the plant’s modern geograph-ical range.
If you grow passionflower, you must taste the fruits. The fruits of the maypop ripen from yellowish to light brown in color. The slimy aril covering the seeds is very sweet and fruity when ripe. The hard seeds can be separated from the pulp through a sieve or apple sauce strainer. Or if you are in the garden, you can pop
DECO
RPA
SSIF
LORA
INCA
RNAT
A

open the ripe fruit and suck the delicious pulp from the fruit. Make sure that the fruit is not over-ripe. Perfectly ripe fruits are delicious -- over-ripe fruits ferment into a foul paste.
TRADITIONAL USES
In America, passionflower is also known as maypop and apricot vine. Traditionally, the fresh or dried whole plant has been in herbal medicines to treat conditions of ner-vous anxiety. The earliest reference on American medici-nal plants, Schoepf’s Materia Medica Americana, a Latin work, published in Germany in 1787, mentioned use of the plant to treat epilepsy of the aged. Mostly absent from nineteenth century works on American medicinal plants, or mentioned only in passing, passionflower was intro-duced into medicine in 1839 or 1840 by Dr. L. Phares of Mississippi. The remedy remained buried in obscurity until Prof. I. J. M. Goss of Atlanta, Georgia, rein-troduced it into the practice of Eclectic physicians in the late nineteenth century.
Eclectic physicians used medicines largely made from American medicinal
plants.
Dr. E. D. Stapleton writ-ing in a 1904 issue of the Detroit Medical Journalsummed up his experience in using passionflower tincture to treat insomnia “I would say that its action is best obtained in cases of ner-vousness due to causes other than pain-that it
is slow in acting because it is not a narcotic, but a nervine and sedative. It relieves irritation of the nerve-centers and improves sympathetic innerva-tion, thus improving circulation and nutrition, and is as a rule sure in its results-no bad after-effects, no habits formed”.
Harvey Wickes Felter and John Uri Lloyd wrote in 1898, “Its force is exert-ed chiefly upon the nervous system, the remedy finding a wide applica-tion inspasmodic disorders and as a rest-producing agent. It proves special-ly useful in the insomnia of infants and old people. It gives sleep to those who are laboring under the effects of mental worry or from mental overwork.”
Pharmacists only recognized the value of the plant in the twentieth century. The dried flowering and fruiting tops of Passiflora incarnata were listed in National Formulary from 1916 to 1936. Formerly approved as a sedative and sleep aid over-the-counter drug, it is no longer recognized as effective by FDA after a 1978 review of night-time sleep aids. This is not because the FDA evaluated the herb and found it wanting in medicinal value, rather industry was responsible for sub-mitting data on safety and efficacy of nonprescription drugs during the review process. No American com-pany came forward in support of the
the fresh or dried whole plant has been in herbal medicines to treat conditions of nervous anxiety”
“

medicinal value of passionflower, hence it was dropped. Consequently, passionflower is yet another native American plant that is more widely researched and used in Europe than it is in the United States.
CURRENT USE
The fresh or dried whole plant as well as their preparations are accept-ed for medicinal use in Germany, France, and other European coun-tries for the treatment of nervous anxiety, in daily dosages equivalent to 0.5 to 2 g. of the herb, or 2.5 g in tea (about a teaspoon of the dried, ground herb). Preparations include tea, tinctures, fluid extracts, solid extracts, and even sedative chewing gums. Passionflower is also com-bined with valerian and hawthorn in products used in Europe to treat di-gestive spasms, gastritis, and colitis.
A number of chemical components have been identified from the leaves including flavonoids, small amounts of maltol, coumarin derivatives, a small amount of an essential oil and trace amounts of a potentially toxic alkaloid group called harma-la alkaloids. Plant material used in European phytomedicines is ana-lyzed to see that it contains at least 0.8% total flavonoids, and less than 0.01% harmala alkaloids. Standard-ized passionflower products contain flavonoids as the primary chemical marker. While flavonoids are gener-ally considered among the most ac-tive components of the plant, scien-tists cannot attribute passionflower’s sedative action to a single chemical compound or group of compounds. Once again, mother nature’s com-plexity defies unraveling.
In 1988, Italian researchers published on research of an extract of the flow-er for its potential neuropharmacologi-cal properties. Oral administration and
DECO
RPA
SSIF
LORA
INCA
RNAT
A

injections into the peritoneal cavity of rats decreased brain stimulus in a num-ber of pharmacological models. The later route of administration also significantly prolonged sleeping time and protected animals from the convulsive effect of chemical test models. Locomotor activity was also reduced by the extract. Active components were ascribed to both water soluble and alcohol soluble chemical fractions. However, the activity could not be attributed to either the alkaloids or fla-vonoids in the extracts. While a number of chemical components have been con-sidered among the plant’s active com-ponents, attribution to its neuropharma-cological properties has not been clearly determined. These authors suggest that future research should attempt to eval-uate possible relationships with central nervous system neurotransmitters.
Pharmacological studies by various European research groups have shown that passionflower preparations have anti-spasmodic, sedative, anxiolytic (allaying anxiety) and hypotensive activity. One Italian research group tested passionflow-er both alone and in various combinations with other herbs which were considered to have a sedative activity. A synergistic association of sedative activity at high dosage was observed. Other research-ers have found that one component of passionflower (passicol) has antimicrobial and antifungal activity.
In European phytomedicine, passionflow-er is used for states of nervous tension, especially in cases of sleep disturbance or exaggerated awareness of heart palpita-tions at doses ranging from 0.5 to 2 g of the herb and 2.5 g of the herb in infusion (tea), taken three to four times a day. No toxicity has been observed in labora-tory animals, and they also showed no adverse effects of passionflower extracts administered intravenously in mice. The German monograph on passionflower lists no known contraindications, side effects or drug interactions.
THE FUTURE
While various pharmacological studies have confirmed sedative, antispasmodic, and anxiolytic activity at various doses of several chemical fractions, definitive attribution to a single active component has not been achieved. Research to date on passionflower extracts points to a synergistic activity of several chemical com-ponents. Unfortunately, well-designed clinical research on passionflower extracts are notably absent from the literature, except for a handful of studies involving passionflower in combination with other phytomedicines. Here, clinical experi-ence provides some insights. In his textbook Herbal Medicine Rudolf Fritz Weiss (1988) notes that Passiflora is mildly sedative and hypnotic, but is best used as a supportive ingredient in herbal preparations containing other ingredients.
In Europe, passionflower products are widely prescribed as sleep aids. Most of the supply of dried leaves, either cultivated or wild-harvested in North America goes to the European market. The long-standing success reported in clinical cas-es, coupled with its safety and historical reputation, merit intensified research to discover passionflower’s exact mechanisms of action and optimum applications.
GROWING FROM SEED
Passiflora incarnata is easy to grow from seeds. Evergreen, fast growing climber. Pre-soak seed overnight in warm water. Best sowing time is winter or early spring. Germination can take several months. Prick out the seedlings into individual pots when they are large enough to handle. If you want to grow your plants outdoors, it is best to keep them in the house/greenhouse for their first winter and plant them out into their permanent positions in late spring, after the last expected frosts. Passiflora prefers a moist but well drained soil, and sunny location. Hardy to about -15 degrees C. To overwinter
outdoors, cut down to the ground and mulch the roots well in late autumn to protect them from the cold.
As with other passifloras, it is the larval food of a number of butterfly species, including the Zebra longwing and Gulf Fritillary.
Step 1: Select a location for your passi-flora with a full sun to partial daily shade exposure. Plant in soil that is nutrient rich and well drained. Protect from exposure to heavy winds, which can be drying and affect fruit production.
Step 2: Provide sturdy architectural support for your passiflora that will facilitate its fast climbing growth.

A fence in good condition with sturdy posts will work. Arbors, loggias and heavy duty trellising with also be both functional and attractive. A good spreading plant structure that allows sunlight to reach the plant will en-hance bloom and fruit production.
Step 3: Maintain an evenly moist but not wet soil two inches into to the soil. Allow the top inch or two of soil to dry before watering again. Mulch with an organic material such as shredded bark to cut down of pas-sive water loss, weeds and to extend intervals between watering.
Step 4: Feed passiflora only lightly with a twice yearly application of slow-release fertilizer at the roots. For organic fertilizing, till in a few pounds of compost or well aged ma-nure, or both, around the base of the plant a few times a year and water in well. Always apply fertilizer to wet soil and water in after feeding.
Step 5: Harvest the ripe rounded ovoid fruit, called maypops, in the fall. Pluck them loose or use seca-teurs to cut them free.The maypops can be cut in half and eaten as fresh fruit or the flesh scooped out and frozen as pulp or made into pre-serves. Prune the vine to control shape and size as needed.
DECO
RThe Flame Violet (Episcia Cupreata) are easy to care for plants and should be in every home. They will brighten the darkest, dreariest of days and will bloom nearly all year long. It does well during the cold
months of winter and when not in bloom, the foliage is impressive as well.
Episcias are tropical trailing plants so they like bright light. The Flame Violet can not handle full sun, but with a touch of sun the plant will give more frequent blooms.
Episcia prefer a light, airy growing medium. They have a very fine root system. You can try a mix of 2 parts AV soil, 2 parts sphagnum moss and 1 part perlite. Light, airy, and well draining. A temperature between 65F and 80F is ideal. The minimum temperature is 60F. In areas where temperatures are higher than 80F the humidity must be increased using pebble trays, terrariums or misting around the plant. When misting be careful not to get the leaves wet, just like the Afican Violet they do not appreciate wet leaves. As the Flame Violets likes humidity, they like to be consistently moist, without being soggy. f allowed to dry out they will reward you with dead or browning leaves. Brown, curled leaves are a good sign of underwatering. They do not like to be watered with cold water, it is best to use room temperature water if you can. When fertilizing use a wellbalanced fertilizer and water with plain water once a month, at least, to flush any residues from the soil.
Flame Violets provide us, conveniently, with Stolons, or runners if you prefer. Those little stems that shoot out with a new plant at the end of them can easily be cut off and rooted in soil. Cover lightly with a baggie for humidity and wait. You can also fill a little pot with soil, place it on a table or shelf within reaching distance of the main plant. Place the stolon, still attached, on the soil surface and hold it down with a hair pin or paper clip. Once roots have formed you can cut the stem that is still attaching it to the main plant. Some people have had success with rooting them in water as well. Occasionally a plant can become stubborn about blooming. Some people have had success "forcing" them by removing the stolons.
Episcia, being natural trailing plants, are great for a hanging basket. To make a thicker, lusher basket, pin down the stolons in the pot as they form. Once the basket is full, let the stolons hang. They look sharp growing on a shelf with their stolons dripping down. The stolons will eventually grow and send out their own stolons and, when blooming, this makes a wondrous display.
Lee Anne Stark
the perfect addition FLAME VIOLET FLOWER

10 SIMPLE
1. CHOOSING TYPES OF GARLIC
There is a wide variety of different types of garlic, but for general purpos-es the most important difference is the one between softneck and hardneck.
Softnecks are so called because the whole green plant dies down to plian-cy, leaving nothing but the bulb and flexible stems that are easy to braid.
Hardnecks have a stiff stem in the center that terminates in a beautiful flower – or cluster of little bulbs – then dries to a rigid stick that makes braid-ing impossible.
Softnecks, the standard garlics of commerce, are the easiest to grow in regions where the weather is mild. They keep longer than hardnecks, but they are less hardy and more prone to make small, very strong-flavored cloves. Hardnecks do best where there is a real winter and are more vulner-able to splitting – or simply refusing to produce – when grown in warm climates.
Gardeners in most of the U.S. can try some of both. Southerners should probably stick to softnecks and north-erners to the hard ones, but micro-climates matter. Specialty sellers
will suggest best bets based on your climate and tastes, and of course it's wise to get some seed stock from your local farmers' market: whatever it is, it's growing where you are.
2. PLANTING GARLIC
Growing garlic starts with knowing when to plant it. But planting itself is incredibly easy: In mid-fall (around October 10 here in the Hudson Valley), plant garlic bulbs in loose, very fertile soil that's as weed-free as possible. Insert cloves root side down about 8 inches apart in all directions (if space is limited, you can squeeze by with 6), burying the tips about two inches down. Green shoots will come up; mulch around them with straw. Hard freeze will come and kill the shoots. Draw the mulch over the whole bed.
In spring, pull the mulch back when the new shoots emerge. Give them a shot of mixed fish emulsion and liquid seaweed. Keep them weeded. Water only if the soil is dry two or more inch-es down, being sure to avoid pouring water into the crowns of the plants.
Garlic gets the blue ribbon for grow-ing your own. It's absurdly easy to plant and care for; it tastes great; it looks beautiful and it takes up so little ground that even those with very small gardens can raise enough to be self-sufficient in garlic for a good part of the year.
All you have to do is choose the right varieties; plant at the right time, in the right soil; then harvest when just right and store correctly.
GARLIC

EDIBLES
a good way to think about harvesting garlic. Those heads are more delicate than they seem and any cut or bruise will shorten storage life.
Try to choose an overcast day when the soil is dry. Loosen the soil with a dig-ging fork, inserting it well away from the heads, then lift them out of the row and place them in a flat carrier.
4. CURING GARLIC
Let the whole plants dry in a single layer somewhere out of the sun where it's warm but not hot. When the outer skin is papery, brush off as much dirt as possible and clip the roots. Rush this a bit if you're braid-ing garlic stems; if you wait until they're completely dry they tend to crack and break.
The finished garlic will still be on the dirty side compared to anything commercial. We leave it that way until we want to use it because further cleanup can shorten storage life. If you can't bear the way it looks, try removing the outer layer of wrapper. You can wash the bulbs if you must and should be ok as long as they dry quickly and thoroughly, but if you ask me you're asking for trouble by pushing it this way.
5. STORING GARLIC
How to store garlic? The at-home ideal for storing garlic is between 55 and 70 degrees, with moderate humidity and good air circulation, in the light but out of the sun. Those less fortunate in the storage department can punt as necessary with good results as long as they avoid the refrigerator (excess cold leads to sprouting) and plastic bags (no air = high humidity = rot).
By Leslie Land
TIPS FOR CUTTING GARLIC SCAPES:
• No harm in taking a few to eat, but don't wait until they're large.
• No harm in cutting some for the vase, either, but don't take them too soon. If you wait until the tops are well developed you'll get, depending on variety, either: a head of tiny garlic grains that can be used whole and unpeeled in place of minced garlic (for a week or two, after which the skins toughen), or a clump of small round bulbs, called topsets, that can be stored all winter long and then planted close together in early spring to produce the garlic equivalent of scallions.
3. HARVESTING GARLIC
When to harvest garlic depends on the type. Garlic varieties are divided into early, midseason and late, but what that means depends not only on your climate zone but also on your climate in the growing year. Heat speeds 'em up, cold slows 'em down, and although the harvest window is wide if you plan to eat the garlic fresh, it's narrow if you want to ensure maximum storage life.
The bulbs are ready when most of the lower leaves have browned. The upper ones will still be green. If you've ever grown onions, it's easy to assume garlic is the same and you should wait until all the leaves have fallen over. Bad idea. By the time all the leaves are dead the bulbs will have split; they won't have the leaf sheathes they need to form wrappers and it's likely fungus disease will have found a way in.
"Lift the bulbs" is usually used to describe moving things like daffodils, but it's also
garlic drying

BEETSBeets are a fast growing crop that can be grown just about anywhere. Although beets are known as a root crop, all parts of the beet plant are edible.

SIMPLE 13
EDIBLES
Tender beet greens can begin being harvested when thinning a row of beets. The most com-
monly known root beets are red, but golden and striped varieties have made growing beets more popular in recent years. They take sixty days to harvest, from seed, to seedlings, to transplants, to harvest.
Beets are not quite as cold tolerant as something like broccoli, but they can tolerate a light frost and they do like cool temperatures, so beets are gener-ally grown in the spring or fall.
Beets are biennial. They will not flower until their roots have matured and they’ve had at least 1 month of cold temperatures.
To start out, try a fall harvest, and then again a spring crop.
Beet seeds can be slow to germinate, because of their tough outer shell. soaking the seed clusters over night will help soften the shell and speed germination Another germination trick is to cover the seed in the garden with vermiculite, peat moss or some other non-crusting material. This will keep
the seed moist and warm, but not inhibit it from breaking through the surface. This trick is very useful in gardens with less than ideal soil.
Plant beets about a half inch deep and four inches apart. That’s nine per square foot for the square foot gardener. If you plant in rows, you will have to thin out your seedlings of baby beets. If you do so, wait until they have a satisfying leaf, and then don’t forget to eat the greens you just thinned.
Like most root crops, beets need a soil high in phosphorous to develop the underside of the plant. Stay away from nitrogen based fertilizers unless you are specifically growing beets for the tops. Keep your vegetable garden moist and well drained for optimal beet growth.
You can start harvesting greens when they are a couple of inches tall. The greens are most tender before they reach 6". Beet roots are ready to harvest when they are approx. 1 ½ - 2" in diameter. Larger roots are tougher and more fibrous.
Harvest by tugging or digging. When harvesting your beets, leave a bit of the stem, and a bit of the tap root intact. This helps the beets retain moisture and avoid bleeding during cooking.
Beets are ideal root cellar vegetables and can be stored for 3-4 months at near freezing temperatures with high humidity (98 - 100 percent). Beets can also be canned, pickled or frozen.They totally store well in the refrigerator.
They are high in sugar and roasting brings out the natural sweetness, and browning enhances the depth of the flavor.
Beets vary based on variety.
By Brian Gardner and Marie Iannotti
seed
ling
s
tran
spla
nt
pla
nt
mat
ure
bee
ts
bee
t
bee
t h
arve
st

14 SIMPLE
PROLONG BLOOM
Everyone is sorry to see flowers fade away in the fall. You can keep flowers in your garden a little longer by protecting plants at night. Cover the plants with cloth or plastic sheets, newspaper tents, boxes, or bushel baskets to protect them from light frost. If a sudden cold snap catches you unprepared, you may be able to protect lightly frosted plants by hosing them with water before sunrise.
FERTILIZE
Stop fertilizing your garden in midsummer or switch to a "winterizer" fertilizer. Nitrogen-heavy fertilizers stimulate new, soft growth that won't have a chance to mature before freezing weather. Winterizer fertilizer, which is high in potassium and low in nitrogen, encourages strong root growth and helps plants prepare for winter.
BURY THE DEAD
Nothing looks sadder than leggy tomato vines, yellow zucchini leaves, and dried-up perennials that long ago displayed
their last bloom. So pull and prune the dead or dying plants in your garden.
Bury spent plants in your compost pile; double-bag diseased and infested plants and place in the trash. (Empty mulch bags are great final resting places for these plants, so be sure to stockpile them in spring.)
If your tomato vines are still bearing fruit, keep staking and pruning them until the first hard frost, when they’ll likely die. And give the birds a break and leave some seed-bearing but spent blooms for them. They love sunflowers, cone flowers, berries, and black-eyed Susans.
PRUNE
Late winter is the best time for heavy pruning, but trees and shrubs benefit from having any diseased material pruned out in the fall. Insect infestations, like Webworms, can be pruned out at any time.
Once leaves have dropped, dead, damaged, and diseased material is easier to see. Prune six to twelve
inches beyond the diseased area. Dip the pruners in a ten percent bleach solution between cuts to prevent spreading disease any further. You can make the solution by adding one part bleach to nine parts water.
PULL WEEDS
This is the last time this season to pull weeds. Pluck them before they flower and send seeds throughout your garden that will rest in winter and sprout in spring.
If you have a mulcher, chop the weeds and throw them on your compost pile. If you want to be extra sure that weed seeds are dead, bag weeds in black plastic and place in a sunny place for a couple of months. The heat will kill the seeds. Then throw the cooked weeds on your compost pile.
BULBS
You will need to lift and store the bulbs or tubers of tender plants like gladioli, dahlias, and tuberous begonias if you live in an area with cold winters. If
Tidy your garden for fall and winter before the first frost to keep it comely even after the growing ends. Growing season is winding down, but your garden still needs your love. Spent vines, stubborn weeds, greens gone to seed are making your garden look sloppy and tired.
FALL CLEAN UP
SIMPLE 15
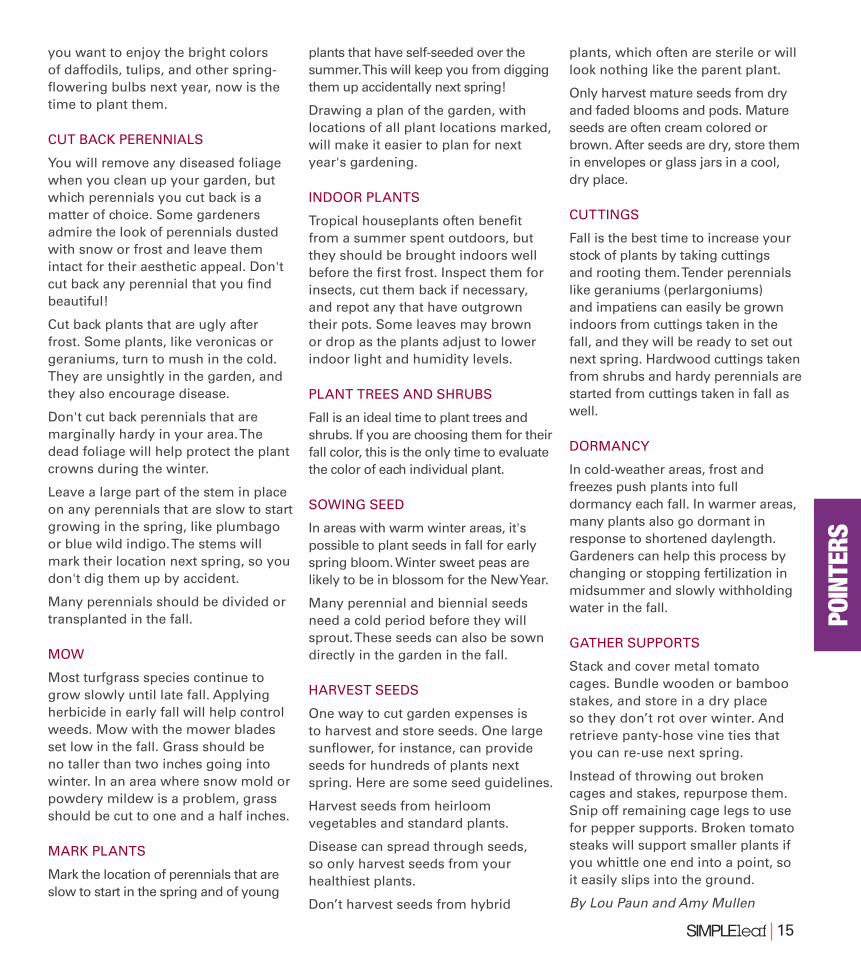
you want to enjoy the bright colors of daffodils, tulips, and other spring-flowering bulbs next year, now is the time to plant them.
CUT BACK PERENNIALS
You will remove any diseased foliage when you clean up your garden, but which perennials you cut back is a matter of choice. Some gardeners admire the look of perennials dusted with snow or frost and leave them intact for their aesthetic appeal. Don't cut back any perennial that you find beautiful!
Cut back plants that are ugly after frost. Some plants, like veronicas or geraniums, turn to mush in the cold. They are unsightly in the garden, and they also encourage disease.
Don't cut back perennials that are marginally hardy in your area. The dead foliage will help protect the plant crowns during the winter.
Leave a large part of the stem in place on any perennials that are slow to start growing in the spring, like plumbago or blue wild indigo. The stems will mark their location next spring, so you don't dig them up by accident.
Many perennials should be divided or transplanted in the fall.
MOW
Most turfgrass species continue to grow slowly until late fall. Applying herbicide in early fall will help control weeds. Mow with the mower blades set low in the fall. Grass should be no taller than two inches going into winter. In an area where snow mold or powdery mildew is a problem, grass should be cut to one and a half inches.
MARK PLANTS
Mark the location of perennials that are slow to start in the spring and of young
POINTERS
plants that have self-seeded over the summer. This will keep you from digging them up accidentally next spring!
Drawing a plan of the garden, with locations of all plant locations marked, will make it easier to plan for next year's gardening.
INDOOR PLANTS
Tropical houseplants often benefit from a summer spent outdoors, but they should be brought indoors well before the first frost. Inspect them for insects, cut them back if necessary, and repot any that have outgrown their pots. Some leaves may brown or drop as the plants adjust to lower indoor light and humidity levels.
PLANT TREES AND SHRUBS
Fall is an ideal time to plant trees and shrubs. If you are choosing them for their fall color, this is the only time to evaluate the color of each individual plant.
SOWING SEED
In areas with warm winter areas, it's possible to plant seeds in fall for early spring bloom. Winter sweet peas are likely to be in blossom for the New Year.
Many perennial and biennial seeds need a cold period before they will sprout. These seeds can also be sown directly in the garden in the fall.
HARVEST SEEDS
One way to cut garden expenses is to harvest and store seeds. One large sunflower, for instance, can provide seeds for hundreds of plants next spring. Here are some seed guidelines.
Harvest seeds from heirloom vegetables and standard plants.
Disease can spread through seeds, so only harvest seeds from your healthiest plants.
Don’t harvest seeds from hybrid
plants, which often are sterile or will look nothing like the parent plant.
Only harvest mature seeds from dry and faded blooms and pods. Mature seeds are often cream colored or brown. After seeds are dry, store them in envelopes or glass jars in a cool, dry place.
CUTTINGS
Fall is the best time to increase your stock of plants by taking cuttings and rooting them. Tender perennials like geraniums (perlargoniums) and impatiens can easily be grown indoors from cuttings taken in the fall, and they will be ready to set out next spring. Hardwood cuttings taken from shrubs and hardy perennials are started from cuttings taken in fall as well.
DORMANCY
In cold-weather areas, frost and freezes push plants into full dormancy each fall. In warmer areas, many plants also go dormant in response to shortened daylength. Gardeners can help this process by changing or stopping fertilization in midsummer and slowly withholding water in the fall.
GATHER SUPPORTS
Stack and cover metal tomato cages. Bundle wooden or bamboo stakes, and store in a dry place so they don’t rot over winter. And retrieve panty-hose vine ties that you can re-use next spring.
Instead of throwing out broken cages and stakes, repurpose them. Snip off remaining cage legs to use for pepper supports. Broken tomato steaks will support smaller plants if you whittle one end into a point, so it easily slips into the ground.
By Lou Paun and Amy Mullen

16 SIMPLE
STEP 1
Harvest herbs from the garden. Do not harvest herbs in moist conditions or while dew is still on them. Use strong scissors or a kitchen knife to snip the herbs. If the herb can survive winter (i.e. it is a perennial with over-wintering abilities), cut the stems at the base of the plant. Other herbs can be entirely pulled out and the roots and woody parts composted after cutting. Cut all herbs used for drying in a way that leaves them with long stems.
STEP 2
Wash dirty herbs carefully. If you have to wash your herbs because of dirt, the best thing to do is to gently spray them with a fine mist sprayer and then wipe them. (Otherwise there may be a risk of mildew problems during storage.) Pat them with a paper towel or shake dry. If you have used chemicals in your garden, even if not directly on the herbs, take greater care to clean the herbs before drying them.
STEP 3
Start the preservation process by doing any of the following:
HANGING:
Remove lower leaves from the stems and tie the bunch of herbs together close to the top of the stems. Ideally, a bunch should contain no more than 5 - 10 stems to facilitate ventilation. Find a dry, warm (not humid), dark and well ventilated place that is out of the way of pedestrian traffic or constant rummaging. The ideal temperature for drying is around 68ºF/20ºC. If you do not have a dark spot in the house, you can try tying paper lunch bags over each bunch and piercing airholes in the bag. This has the added bonus of also keeping the dust off.
Herb Preservation
Drying herbs is a simple way of keeping your garden bounty for longer. Drying your own herbs allows you to have total control over the origin of the herbs and the amount. Even though fresh herbs may be better, herbs usually do not supply you through winter unless dried. There are three principal ways to dry herbs: hanging, freezing or steeping in oil. Each has its benefits. Here's how to dry your own herbs in any way you choose.

SIMPLE 17
Leave the herbs to dry for 1 - 3 weeks. Check them every now and then to see how they are drying - thicker stemmed herbs will take longer. Check to see if their consistency has become crumbly by rubbing a leaf between two fingers. If they crumble, they are ready to be taken down.
Remove the leaves and bottle them in airtight glass herb jars (or other jars you have around). Pick out any fluff, woody pieces and other foreign material as you remove the leaves. You can keep the leaves whole, crush them in your fingers to make a really fine ground mix for cooking (but use this quickly to retain flavour) or leave them in leaf shape for tea, garnishes on soups, etc. (these should not be too crumbly). Seeds should be left whole and crushed only when needed for cooking. Label the jar and date it. Store the herbs for up to one year.
FREEZING:
Select appropriate herbs for freezing. Usually this method works best for soft-leaf herbs such as basil, tarragon, lovage and parsley. Some herbs can only be frozen as they don't dry, such as chives.
Wash and dry freshly picked herbs, as above. Strip the leaves off and place them into freezer bags or containers. Label and date them as they should keep for up to 3 months. If you want them to last longer, blanch them for a few sec-onds in hot water and then dip straight into ice-cold water and pop them into the freezer in bags/containers. Blanched herbs will freeze for up to 6 months.
Some cooks prefer to freeze herbs in ice-cube trays, so that they have handy little sizes for cooking use. If you choose to do it this way, freeze approximate-ly one-third chopped herbs to two-thirds water. Basil is great pureed with olive oil before freezing in ice cubes (don't add water). Remove herbs frozen as ice cubes and store in plastic freezer bags. Remove pieces as needed.
STEEPING IN OIL:
(WARNING: herbed oils can cause botulism poisoning which may be fatal).
Harvest and clean herbs as per instructions above. Choose an oil; olive oil is preferred but any other oils that you like are generally fine.
You have the choice of keeping the leaves attached to the stem or removing them and adding them separately. If you want to use the oil as herbal fla-voured oil, the stems are fine. Place in a bottle as a container; herbs remaining on their stem inside the oil bottle look very attractive as ornamental arrange-ments, as well as being useful culinary items. If you wish to remove the herbal leaves for cooking, a shorter, wider container is preferable to enable you to put in a spoon and scoop out the herbs and oil.
Keep in a cool or refrigerated place, especially during warmer months. Use within 6 months of preparation.
AIR DRY:
Lay a clean paper towel on a counter top. Lay another one on top of this. Snip washed leaves off stem and arrange in rows on 1/2 of the towel. Lay another paper towel folded in 1/2 over leaves. Add another layer of leaves and bring other 1/2 of first 2 towel layers to cover this. Leave it to dry about 2 days or 3 depending on leaf thickness. You know they're dry when you can crumble a leaf in your hand. Place in a zippered plastic bag or plastic container.
For more tips go to WikiHow.com/Preserve-Herbs
HANGING
FREEZING
STEEPING IN OIL
AIR DRYING
POINTERS

18 SIMPLE
INGREDIENTS
• 2 cups cooked, mashed winter squash (use a fine-grained and sweet variety such as ‘Hubbard,’ ‘Buttercup,’ above, or ‘Butternut;’ stringy, wet pumpkins such as jack-o-lanterns make terrible pie)
• 3 large eggs• 1/3 cup dark maple syrup or to taste
(if using sugar, start with ½ cup and taste to adjust)
• pinch of salt• ½ teaspoon ground cinnamon• ½ teaspoon ground ginger• pinch of nutmeg and cloves• 1 cup whole-milk yogurt (I used goat),
or up to 2 cups milk or half-and-half or a combination of milk and cream
DIRECTIONS
• Preheat oven to 375oF
• Mash the cooked, cooled squash in a large bowl. (Note: You can steam the pumpkin first, or roast it, the scoop meat from the skin.)
• Add the sweetener, spices and dairy, blend well by hand or with a mixer.
• Taste and adjust sweetness and spices.
• Beat eggs, and mix into the batter.
• Scoop mix into oven-proof custard cups, enough to nearly fill each cup.
• Set into a pan of water (seen above, ready to pop into the oven) and bake for 30-50 minutes (as above), until the custard is set and rises up (it will fall once cooled). A note on baking time: My latest batch, made from that ‘Buttercup’ up above with yogurt and maple syrup, took about 50 minutes; I have made lighter versions with milk and a different squash, like ‘Butternut,’ that cooked in 30.
Yield, 6 ramekins.By Margaret Roach,For more, visit her website at www.awaytogarden.com
PUMPKIN CUSTARD

SIMPLE 19
RECIPE
S
INGREDIENTS
• 2 pounds yellow summer squash, sliced (about 7 cups)
• 1 tablespoon all-purpose flour
• 2 teaspoons sugar
• 1 teaspoon paprika
• 1/2 teaspoon salt
• 1/2 teaspoon garlic powder
• 1/4 teaspoon dried basil, crushed
• 1/8 teaspoon pepper
• 2 14 1/2 - ounce cans stewed toma-toes, drained
• 1/2 cup shredded mozzarella cheese (2 oz.)
• 1/2 cup finely shredded or grated Parmesan cheese (2 oz.)
DIRECTIONS
• In a Dutch oven, bring 1 inch of lightly salted water to boiling; add sliced summer squash. Cover and cook for 4 minutes. Drain well.
• Meanwhile, in a large bowl, stir together flour, sugar, paprika, salt, garlic powder, basil, and pepper; stir in drained tomatoes. In a 2-quart square baking dish, layer half of the squash and half of the tomato mixture; repeat layers. Bake, uncovered, in a 350 degree F oven for 25 minutes. Sprinkle with cheeses; bake for 5 to 10 minutes more or until heated through and sauce is bubbly around the edges. Let stand for 5 minutes before serving. Serve with a slotted spoon. Makes 8 side-dish servings.
Yield, 8 side-dish servingswww.midwestliving.com
SQUASH& TOMATO
BAKE
20 SIMPLE

SIMPLE 21 INSP
IRATION
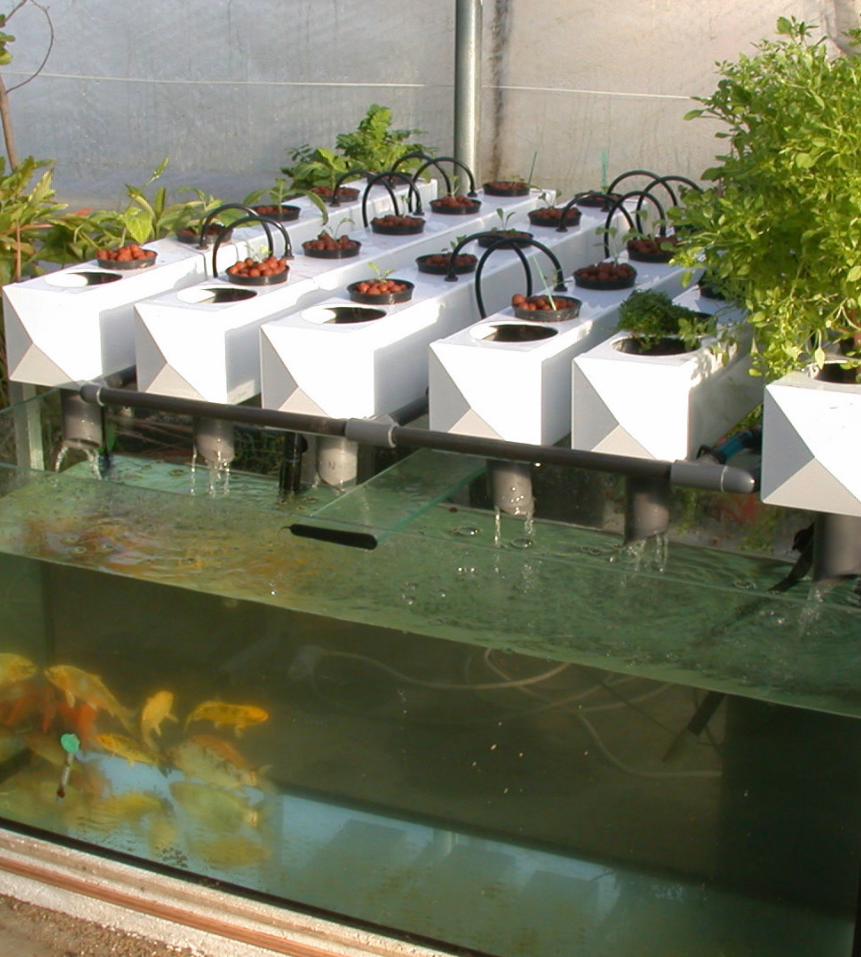
WHAT IS AQUAPONICS?
Aquaponics as a practical application started only a couple of decades ago. It is a hybrid technology that combines “aqua-culture” (fish farming), and “hydro-ponics” (growing plants with-out soil).This is an environmentally sound technology that wastes hardly any water, uses practically no plant foods, and needs no filtration system for the fish. It works as an eco-system between plants and fish, where fish waste provides a food source for the growing plants, and the plants provide a natural filter for the fish.
Although fish farming and soilless plant culture have been traced to ancient times, the combination of the two is quite new. Research in aqua-ponics started around the 1970s and continues today. Many universities and laboratories world-wide are inter-ested in this new technology, one that
allows you to grow plants and raise fish with a minimum of wastes – and costs – for your fun as well as for com-mercial applications.
Aquaponics is an amazing loop, and a perfect example of synergy inspired to man by nature. If you look around, plants grow in the oceans, and inside and around ponds and lakes. Why? Creation must have many reasons for this. But one of them is certainly the close relationship that exists between plants, fish and water.
Fish must live in a clean, well-oxygen-ated environment, and must be fed properly. They consume their food and reject their waste in the form of solids and liquids. The accumulation of waste in the tank will poison the fish. This is why aquariums are always sold with a special filter, which eliminates waste.
Plants consume most their food through their roots. In order to do so, the solids must be reduced to their chemical foundations. This is called “denification process”. Simply described, the solids must be ex-posed to water in order to feed cer-tain bacteria (the “nitro-bacteria”), which begin to break them down. All along the chain of bacteria, solids are transformed first into Nitrites, a terrible poison to plants, and then, into Nitrates, which plants eat and thrive on. During this conversion, many mineral salts are processed too, bringing to the plant most of the essential elements it needs. While the plants absorb their food, they re-move all wastes from the fish water, thus providing a clean and healthy environment, which the fish need to live and develop in.

On a commercial scale, aquaponics is still a marginal technique, although more and more companies are start-ing to use it nowadays, especially in Australia and California. In the Virgin Islands, a crew of researchers have de-veloped a commercially viable aqua-ponic system designed for use in the tropics where natural fish populations have been depleted and most agricul-tural products must be imported.
The University of Davis in California is readapting our concept of the “family farm” (aquaponics/UC Davis) with this technology, introducing it into homes and gardens for pleasure, fun and small to medium scale auto-production.
On a hobby level, aquaponics has the potential to catch on quickly. It is a very easy and rather inexpensive process that will please gardeners and fish lovers alike.
WHAT YOU NEED
1. a fish tank and a plant support
2. bacteria to decompose the fish wastes
3. a filter to host the bacteria and aerate the water
4. fish and fish food
5. plants
6. pH regulators (Up and Down) and Test Kit
7. an exhaustive supplement of micro and sub microelements, to prevent eventual deficiencies in the plant’s diet.
FISH AND PLANT EQUIPMENT
Any pet shop will help you buy the aquarium, the filter, and the nitro-bac-teria needed to convert the fish waste into plant food. It is good to know that the bacteria are not essential to buy, as they will naturally develop in the tank in about 3 weeks.
As for the grow system, it has to be hydroponics. You may choose any type you wish. You can use NFT or Aero-hydroponics, according to the way you like to grow: NFT for soft/cool growing, Aero-hydroponics for dynamic/lively results. It is important to secure an excellent oxygenation of the solution, for the fishes as well as for the plants. Of course ensure proper temperature, good ventila-tion, cleanliness, etc… all the parameters you have to guarantee in a traditional hydroponics grow-room.
Place your grow system on top of the aquarium, add a pump to create the circu-lation system, and you are set.
THE FISH
There are many fish to select from. It is best to choose fresh water species, as your plants won’t be happy in brackish, salty water. You can mix several spe-cies or you can have only one at a time, this is your choice. Here again your pet shop will advice you on the ones you can raise according to the size of your tank and the temperature of your water. In our greenhouse we raise Japanese Koïs (carps) because they are very hardy and can stand about any temperature and environmental variations. They are beautiful and very coloured. It is said that no 2 Koi fish look alike and in Japan some specimen are sold for several thousand euros a piece! Koi fish may grow a lot, but it seems that as long as they stay in a small tank, they won’t grow more than the environment allows.
THE PLANTS You can grow about any plant in aquaponics. If you start a commercial operation, it is best to choose plants which thrive on high Nitrogen levels like lettuces, aromatic and culinary herbs. Indeed it is the fish food that ultimately determines the fertilisers fed to the plants, and there are no customized fish feed blends with variable NPK ratios, available yet …
But as a hobby gardener, or to raise your “family garden”, you can choose all the plants you want: decorative, edible, medicinals, herbs, etc… What you must ensure is a steady balance between the amount of fish (including the relation to fish feed) in the tank, and the amount of plants in order to prevent toxicities and deficiencies. This is why the fish feed is an important parameter. It has to be of good quality, so that your fish eat as much of the food as possible, and leave less waste as a by-product in the reservoir.
The best food for fish is live fish. Almost all fish love fish, and there are live fish to fit any size of fish! Apart from being a very rich food, live fish will move fast and give your fishes some exercise to keep them healthy… (funny but true!). You can prepare your own fish feed too! Your pet shop will tell you which diet adapts best to your fishes, and you can prepare it at home. For those who want to guarantee a 100% organic crop, this may be their best option…
In any event, and whichever your fish diet is, it is not uncommon to experience some deficiencies in your plants, especially iron. This is why, once every 2 to 3 weeks, we add a few drops of Bio Essentials (an exhaustive mix of micro and sub micro elements containing a good blend of iron chelates), as a supplement. That’s all, you need nothing else for a healthy crop.

SIMPLE 23 INSP
IRATION
To start your aquarium you must do the following:
1. To make your fish happy, put some sand in the bottom of the aquarium
2. Fill your aquarium with tap water in the following manner: Place a plastic sheet on the sand, and place a bowl on the plastic, then fill the tank slowly, so that the water filling the reservoir doesn’t move the sand. Take plastic and bowl out gently once you finished filling.
3. Leave the filter run as is for 24 hours, to let the chlorine in your water evaporate! (if you don’t want to wait, you will find a special product to get rid of chlorine at your aquarium store, but this is not really needed.)
4. It is important, before introducing the fish, to adjust your water’s pH so that it suits the fish as well as the plants. The optimum level to main-tain is 7.0, which is a good compro-mise between the ideal pH for fish (7.5) and a good one for plants (6.5). To do so, use a good blend of pH Down or pH Up, and a pH Test Kit. GHE’s Dry pH Down (powder form) is an excellent quality, natural pH regulator for this purpose.
Note: Some may think that a pH level of 7.0 is too high for plants, but in reality most plants will accept high pHs with no problem. It is true that in hydroponics, most mineral salts are best available when the pH varies between 5.5 and 6.5, and the chelates are best protected inside this range. But at pH 7.0, most salts will remain fairly available. Of course it is not as perfect as in pure hydroponics
START YOUR AQUAPONICS OPERATION
conditions; this is why it is recommended to add a small amount of micro and sub microelements once in a while.
5. Add the nitro-bacteria: 2/3 in the filter, 1/3 spread on the sand.
6. Put the fish in. Choose young fish, they will adapt better.
7. Add the growing trays or chambers on top of the aquarium, and hook your system up.
8. Wait for two or three days for the fish wastes to build up, and for the ni-tro-bacteria to transform them into nitrogen, and then add your plants.
9. Regularly monitor your water’s pH and EC, to make sure your plants and fishes live in the environment best adapted to their needs.
You are all set. Sit back, enjoy your fish, and watch your plants grow happily in the most natural and economical grow system possible.
By Noucetta KehdiLearn more at www.gb.eurohydro.com and www.growfish.com
plant roots in hydroponics
AQUA
PON
ICS

COMPACT GARDENSfor those of us with not enough space

SIMPLE 25 INSP
IRATION
The wall-mounted herb garden is an easy way to make a vertical garden using materials around the house. The nice thing about it is that you can mount it anywhere, specially in your kitchen to have easily accessible herbs.
WHAT YOU NEED:
• Scrap of wood• Empty 2-litre plastic bottles• Batting• Fresh herbs• Potting soil• Some small screws• 2 picture hooks• 2 concrete nails • Hammer
HERE'S HOW:
1. Cut a piece of board to the size that you want your hanging herb garden.
2. It should be approximately 20cm wide and long enough to accommodate the amount of herbs you want to place in the herb garden.
3. Attach two picture hangers to the top of the board at the back, for mount-ing onto the wall.
4. Use a craft knife to cut the top section off the cold drink bottles.
5. If you look at the empty bottle you will see a moulding line at the top, and you can use this to cut a straight line.
6. Space evenly along the length of the board to allow for growing height, and fasten the tops onto the board with small screws.
7. Use a piece of bundled up batting to fill in the neck of the bottle. This pre-vents the soil from falling out! Only place a small amount of potting soil into the container for the time being, as the soil from the potted herb will take up quite a bit of space. Plant the herbs into the container and fill up with soil, leaving at least a 1cm gap between the level of soil and the top of the container.
8. Now you are ready to hang your herb garden in a sunny spot just outside the kitchen door. Measure where you want it to hang and hammer in two concrete nails.
By Janice AnderssenFor more, visit her site at www.home-dzine.co.za
OPTIONAL:
• PC printed stencil• Craft acrylic• Paintbrush
vertical herb garden

FINDING A PALLET
The first thing you need to do is–obvi-ously–find a pallet. I’ve had good luck finding them in dumpsters behind su-permarkets. No need to be squeamish. It doesn’t smell. At least, it doesn’t smell that bad. Don’t just take the first pallet you find. You’re looking for one with all the boards in good condition, no nails sticking out, no rotting, etc. If you intend to put edibles in your pal-let, be sure to find one that was heat treated as opposed to fumigated with pesticides.
GET YOUR PALLET INTO SHAPE
Once you’ve dragged your pallet home, give it a once over. Are any of the boards a little loose? Is the wood chipping in places? Nail down any loose boards, and use sand paper to smooth down any rough spots.
WHAT YOU NEED
• For this project, you’ll need the pallet you found (below)
• 2 large bags of potting soil• 16 six packs of annual flowers (one
six pack per opening on the face of the pallet, and two six packs per opening on the top of the complet-ed pallet garden)
• a small roll of landscape fabric• a staple gun• staples• sand paper
turn a pallet into a garden

SIMPLE 27 INSP
IRATION
LET THE STAPLING BEGIN!
Decide which side of the pallet will be the bottom when the pallet gar-den is completed and leaning against the wall. You are going to be cover-ing the bottom, back, and sides with landscape fabric, leaving the spaces between the slats and the top uncov-ered (you’ll be planting flowers in the uncovered spaces).
Lay the pallet face down. Roll the land-scape fabric over the back. Cut two identically sized pieces that are long enough to go from the top edge of the back of the pallet and wrap all the way around the bottom, plus a few extra inches.
Hold the two pieces of landscape fab-ric together as if they were one piece of fabric. Fold over the top edge by one inch and center it on the top board of the back of the pallet. Staple the
fabric into place near the top edge of the top board. Smooth the fabric out to the left and right and pull it taut. Staple the fabric down on the top, right edge of the top board. Repeat on the left side. Fill in between those three staples with one staple every two inches along the top edge of the top board.
When the top of the landscape fabric is securely attached to the top, back board, smooth the fabric down, and repeat the process along the bottom edge of the bottom board, except don’t fold the fabric under, leave a long flap on the bottom.
Pulling the fabric tautly along the bottom, fold the cut edge under, and staple the fabric down along the front edge of the bottom. Smooth the fabric out to the left and right and staple every two inches along the front edge of the bottom.
Now for the sides. Start near the bottom and fold the excess fabric inwards as if you were wrapping a present. Fold the cut edge of the fabric under and staple it down near the front, bottom edge of the side facade. Smooth the fabric out and place a staple every two inches along the front edge of the side of the pallet. The fabric should be taut but not in danger of tearing. Repeat on the other side of the pallet.
You should now have a pallet with landscape fabric wrapped around the sides, back, and bottom. Place more staples along the spine of the back side of the pallet, and anywhere else you think the fabric needs to be held down so that soil can’t creep into places you don’t want it to go.
COM
PACT
GAR
DEN
S

NOW FOR THE FUN PART–PLANTING!
Bring the pallet close to wherever it’s final spot will be and lay it down face up. You’re going to plant it while it’s laying flat on the ground.
First slide the plants into what will be the top (above). Plant everything very tightly, you should have to practically shoe horn the last plant into place. Now that you have capped the top, pour the entire first bag of potting soil on top of the pallet. Push the soil into the pallet between the slats and smooth it out so that the soil is level. Repeat with the second bag of potting soil.
Push potting soil into the bottom cavi-ty, so that there is a trench directly be-low one of the bottom openings. Plant six plants in the trench, so that they are very tightly fitted into the opening. Repeat with the other bottom opening. Now push the potting soil up against
those flowers you just planted, making a trench beneath one of the openings in the second row. Plant your flowers tightly in that opening. Repeat for all the remaining openings.
When you’re done planting, you should have plants that are complete-ly covering every opening (i.e. there shouldn’t be any place for soil to fall out). There should also be soil firmly pushed into every part of the pallet where there aren’t plants.
CARING FOR YOUR PALLET
Now, I’m going to tell you what you should do, and I what I always end up doing (which is what you should not do). You should leave the pallet flat on the ground for a couple of weeks (watering when needed), so that the roots can start to grow in and hold all the plants in place. I can never wait though, so I always tip the pallet up-
right a few days after planting. Some soil does fall out, but it seems to be okay. But I think it would be better if you left it to settle and only tipped it upright after a few weeks. Do as I say, not as I do.
Water your pallet regularly, they dry out quickly. Pay special attention to the bottom two openings, they seem to be the driest. Fertilize with water solu-ble fertilizer added to your watering can (follow package instructions for amount and frequency).
By Fern Richardson For more, feel free to visit www.lifeonthebalcony.com

SIMPLE 29 INSP
IRATION
COM
PACT
GAR
DEN
S
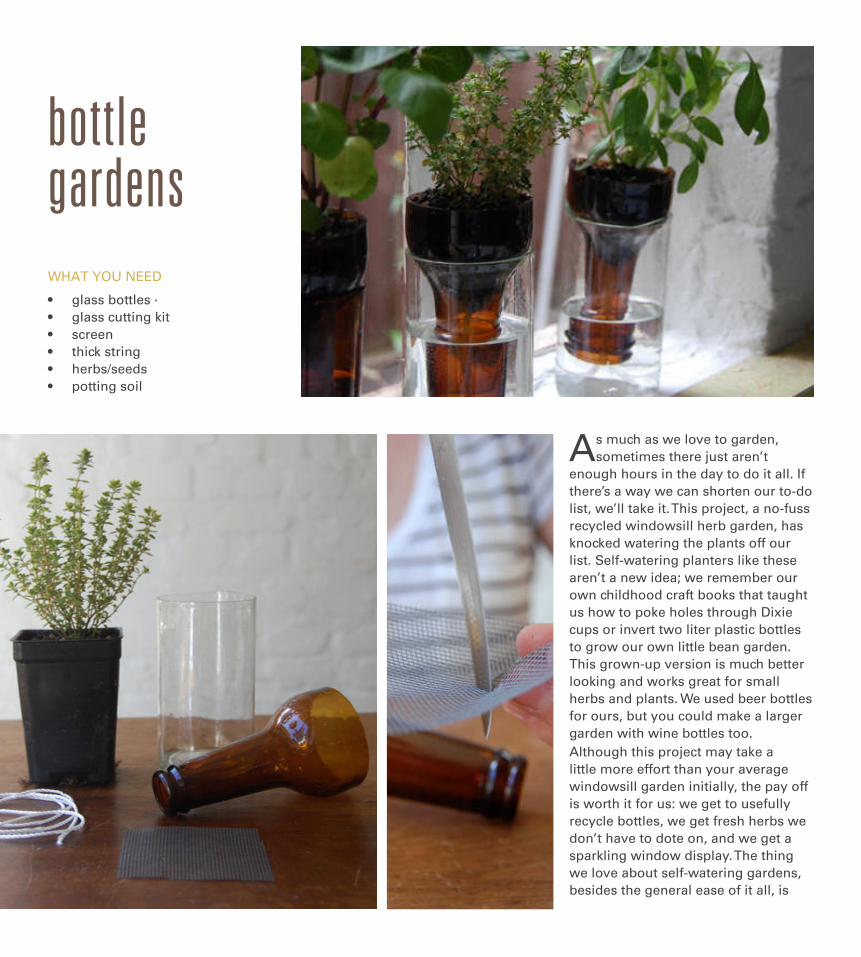
bottle gardens
As much as we love to garden, sometimes there just aren’t
enough hours in the day to do it all. If there’s a way we can shorten our to-do list, we’ll take it. This project, a no-fuss recycled windowsill herb garden, has knocked watering the plants off our list. Self-watering planters like these aren’t a new idea; we remember our own childhood craft books that taught us how to poke holes through Dixie cups or invert two liter plastic bottles to grow our own little bean garden. This grown-up version is much better looking and works great for small herbs and plants. We used beer bottles for ours, but you could make a larger garden with wine bottles too.Although this project may take a little more effort than your average windowsill garden initially, the pay off is worth it for us: we get to usefully recycle bottles, we get fresh herbs we don’t have to dote on, and we get a sparkling window display. The thing we love about self-watering gardens, besides the general ease of it all, is
WHAT YOU NEED
• glass bottles ·• glass cutting kit• screen• thick string• herbs/seeds• potting soil

SIMPLE 31 INSP
IRATION
that we don’t have to worry about over-watering our plants or under-watering them. For our planters, we snatched up some “practice cut” glass pieces that were left from another project. If you aren’t lucky enough to have extra bottle halves around…there are glass cutting kits available at craft stores, there are tons of tutorials online, or if you know people with mad tools and skills, they can help you cut down your bottles. Our favorite combination used a dark neck inside a clear base, but you can vary with whatever bottles you’d like.You’ll just want to make sure the neck piece is shorter than the bottom piece so it will rest inside without touching the bottom.
Once your bottles are cut (it could take some practice), sand down the edges enough so they’re not dangerous to the touch. Take a square of screen, about 2" by 2", and cut a small hole in the center to pass a thick string through. The string will act as a wick for the water and draw it up to the plant, keeping the soil just wet enough to keep the herbs growing. Pass the string through and tie a tall knot large enough to keep it from slipping through the screen. Run the string down the neck of the bottle top with the screen resting at the top. The bottom half of your bottle will be the water reservoir, while the top half is the planter.Transplant your herbs (or add dirt and plant seeds) to the bottle top. Make sure your length of string reaches the bottom of the glass below, and your garden is good to go. Just keep your water at a good level and the string does the rest of the work for you.
By Grace Bonney,Learn more atwww.designsponge.com
COM
PACT
GAR
DEN
S

DISCLAIMER: SIMPLELEAF MAGAZINE AND ITS CONTENTS ARE FOR EDUCATIONAL PURPOSES ONLY