simple paging QSG - Barix · Simple Paging Start-Up Guide About the Barix Simple Paging Solution...
12
Simple Paging Start-Up Guide About the Barix Simple Paging Solution The Barix Simple Paging solution is based on a number of Barix devices that come ready to use, enabling to you setup a paging system in minutes. Every endpoint or Paging Zone can be individually addressed, or combined to belong to one or more Paging Groups. Paging Heads, or Masters, are devices where a page can be made from. They can be Barix desktop units, or an iDevice, for paging when you are on the move! In case an iDevice is used the system also need a Paging Gateway device. About this document This document guides you in setting up the Barix Simple Paging solution for the first time. It also explains the basic functionality of the system, and provides a walk through example of setting a system up and configuring groups both on fixed and mobile paging devices. For a complete guide to all features please refer to the users manual. BARIX AG | October 11, 2013 | Simple Paging QSG | /12
-
Upload
nguyenphuc -
Category
Documents
-
view
228 -
download
1
Transcript of simple paging QSG - Barix · Simple Paging Start-Up Guide About the Barix Simple Paging Solution...

Simple Paging Start-Up Guide
About the Barix Simple Paging Solution
The Barix Simple Paging solution is based on a number of Barix devices that comeready to use, enabling to you setup a paging system in minutes.
Every endpoint or Paging Zone can be individually addressed, or combined tobelong to one or more Paging Groups.
Paging Heads, or Masters, are devices where a page can be made from. They canbe Barix desktop units, or an iDevice, for paging when you are on the move!
In case an iDevice is used the system also need a Paging Gateway device.
About this document
This document guides you in setting up the Barix Simple Paging solution for the firsttime. It also explains the basic functionality of the system, and provides a walkthrough example of setting a system up and configuring groups both on fixed andmobile paging devices.
For a complete guide to all features please refer to the users manual.
BARIX AG | October 11, 2013 | Simple Paging QSG | /12

1 Setting up the systemBarix devices ordered specifically for use with Simple Paging are delivered with theapplication firmware and are ready to use.
If you already have Barix devices and want to use them for Simple Paging, you can getthe firmware from the Barix website, and load it to the device, as with any other Barixapplication
1.1 Supported Hardware
Masters (Paging Head): • Annuncicom PS16, Annuncicom PS1, Annuncicom 60 and iPhone or iPad with
Barix Simple Paging App loaded.The Simple Paging App can be downloaded from the Apple store for free
Zones (End Points): • Exstreamer 1xx, Exstreamer 2xx or Exstreamer P5
Paging Gateway: • Exstreamer 100.
Gateway firmware can also be loaded on other Exstreamers, but can not beordered preconfigured on other devices
1.2 Connecting the devices
Use the step by step description in the Quick Installation Guide provided with yourdevices to install the hardware.
The PS16 can be powered by PoE on LAN port 1, or byan external PSU. If using a PoE switch, no separate PSUconnection is necessary.
MasterPS16
Connect the device to the network switch and power (ifnot using PoE)
=> the device will boot up, displaying its IP address,before indicating that it is ready to page.
The PS1 is powered by PoE no separate PSUconnection is necessary.
MasterPS1
Connect the device to the network switch
=> the device will boot up, announce its IP address,and is ready to page when button 'A' shows green
BARIX AG | Oct 11, 13 | Simple Paging Start-Up Guide| 2/12

The Exstreamer is powered by the provided PSU.
Paging GatewayExstreamer 100
Connect the device to the network switch, and power itusing the power supply that came with the unit. Thedevice will boot up, announcing its IP address on theRCA and headphone outputs.
The P5 is powered by PoE only.
Connect a suitable 8 ohm speaker to the Exstreamer P5“Speaker” connector
Paging ZoneExstreamer P5
Connect the LAN port of the Exstreamer P5 to a PoEnetwork switch: the device will boot up, announcing itsIP address.
The iDevice must have the free “Barix Simple Paging”app installed.
Paging HeadiDevice
On iTunes search for the “Barix Simple Paging” App andinstall it. On startup the App will automatically connectto the Gateway, and show the groups available forpaging.
Once all components are connected, the system is ready to use.
1.3 Make your first announcement from desk station
Out of the box, the Simple Paging Solution is configured such that all the devices, orZones, are in Group1. This means that after the initial installation an announcement willautomatically be heard everywhere when paging to Group1.
Note that Masters are also serving as Zones. This means that they will also play theannouncement.
This is an excellent way to verify everything is connected correctly. Let's try paging fromthe different Masters;
1.3.1 Paging from PS1The PS1 Master has two buttons on the front 'A' and 'B'. By default button 'A' ispreconfigured to Group1. Button 'B' is not configured.
Press and hold button 'A' while talking, you will make an announcement to all Zones.Releasing button 'A' will end the announcement.
BARIX AG | Oct 11, 13 | Simple Paging Start-Up Guide| 3/12
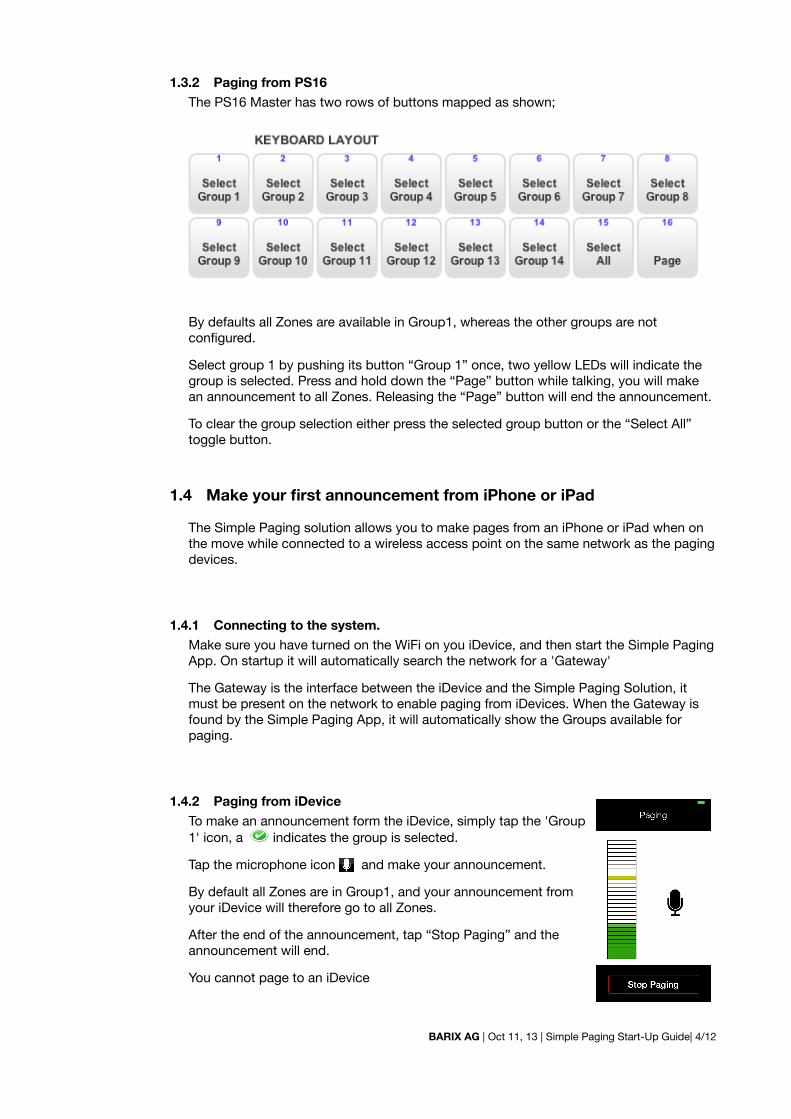
1.3.2 Paging from PS16The PS16 Master has two rows of buttons mapped as shown;
By defaults all Zones are available in Group1, whereas the other groups are notconfigured.
Select group 1 by pushing its button “Group 1” once, two yellow LEDs will indicate thegroup is selected. Press and hold down the “Page” button while talking, you will makean announcement to all Zones. Releasing the “Page” button will end the announcement.
To clear the group selection either press the selected group button or the “Select All”toggle button.
1.4 Make your first announcement from iPhone or iPad
The Simple Paging solution allows you to make pages from an iPhone or iPad when onthe move while connected to a wireless access point on the same network as the pagingdevices.
1.4.1 Connecting to the system.Make sure you have turned on the WiFi on you iDevice, and then start the Simple PagingApp. On startup it will automatically search the network for a 'Gateway'
The Gateway is the interface between the iDevice and the Simple Paging Solution, itmust be present on the network to enable paging from iDevices. When the Gateway isfound by the Simple Paging App, it will automatically show the Groups available forpaging.
1.4.2 Paging from iDeviceTo make an announcement form the iDevice, simply tap the 'Group1' icon, a indicates the group is selected.
Tap the microphone icon and make your announcement.
By default all Zones are in Group1, and your announcement fromyour iDevice will therefore go to all Zones.
After the end of the announcement, tap “Stop Paging” and theannouncement will end.
You cannot page to an iDevice
BARIX AG | Oct 11, 13 | Simple Paging Start-Up Guide| 4/12

2 Setting up Paging GroupsIf your paging needs are as simple as 'Page to All', no further configuration is required,but if more flexible Paging is needed you can setup individual groups to page to.
Groups can be setup on all paging Masters and on the Gateway for iDevices. Afterdefinition of a Group you can page to this specific Group or any combination of Groups(only on PS16 and iDevice). On the PS1 two individual Groups can be defined, on thePS16 and the Gateway 14 Groups can be defined on each.
To define the groups either the web UI or the Simple Paging configuration tool can beused.
The configuration tool is a java tool that allows you to manage your Simple Pagingsolution from one single interface.
• Download the Simple Paging Configuration Tool from the Barix website
• Unzip the package and double-click on the file “ConfigTool.jar”
The tool will start and automatically discover all online Barix Simple Paging Solutioncomponents on the network.
The web UI is accessed directly on the device by entering the device IP address into aweb browser (please refer to the installation guide for details)
For setting up the Groups in the next step, we will use the example pictured below.
In this example there are 3 Paging Zones available: a lone unit in Group 1 and twodevices in Group 2.
2.1 Zone Names and IDs
Every device has an address, an identifier called the “Zone ID”, which is used torecognise them, send audio to them and exchange status information. 'Out of the box'every device has a Zone ID of 1, and all Masters are setup to have a Paging Group thattalks to devices with the ID of 1.
BARIX AG | Oct 11, 13 | Simple Paging Start-Up Guide| 5/12

This means that when devices are connected up for the first time, a PagingAnnouncement, made to Group 1 will go to all Paging Zones and all other Masters.
A Zone Name can also be assigned to each Zone. This name is used in the tools andApps to refer to the Zone to make it easier to remember however Zone Names areoptional.
• Creating different Paging Groups is simply a case of telling each Paging Head “thisPaging Group consists of the following IDs” and then assigning those IDs to therelevant devices – see the worked example later in this document.
• Many devices can share the same Zone ID if required, the result is that thesedevices will always make announcements at the same time – useful if you have 3Paging Endpoints in a long corridor, for instance.
• If a device must be individually addressable, it needs a unique Zone ID assigning toit.
• All of the Barix Simple Paging devices share information, which allows them tounderstand what other components are present and display status informationabout the system as a whole.
The configuration tool also uses the same method to identify devices and make updatesto their configuration. If the tool is not used, changes can also be made directly on eachdevice's web UI.
In our working example above the following combination of IDs and names are used forthe devices;
Zone ID Zone Name Device10 Administration Annuncicom PS16128 Paging Gateway Exstreamer 10011 Assembly Hall Exstreamer P521 Juniors Exstreamer P522 Seniors Exstreamer P5
The Zone ID can be any integer from 1 to 127. The ID=128 is reserved for the Gatewayand should not be used by any other device.
The Zone Name is a 15 character string allowing use of characters, numbers and blanks.
2.1.1 Assign Zone Names and IDs with the web UIOpen the web UI and go to Configuration. On the top of the page the desired ID andName can be set. After modification of the ID and Name, click “Apply” on the left handside of the interface to update the configuration on the device.
BARIX AG | Oct 11, 13 | Simple Paging Start-Up Guide| 6/12

2.1.2 Assign Zone Names and IDs with the configuration toolOn startup the tool automatically finds and reports to the devices on the network beingpart of the Simple Paging Solution.
For our example above the initial screen looks as follows;
The fields in the columns Zone ID and Zone Name are editable. Click on the cell andenter the desired ID or Name. One or more devices can be edited. Modified fields not yetsaved are shown in blue.
After the desired modifications are done click 'Push Config'. The new settings will thenbe sent to the devices and they will automatically reboot to activate their new settings.
During the update you will see the devices going off-line and then being available againwith their new ID and Name.
2.2 Group definitions
After the Zones have gotten individual IDs, Groups can be defined using the individualZones according to the example above.
After setting the Zone ID and details, the next step is to define groups by adding one ormore IDs to it. Groups are defined on Masters and the Gateway in the same way. Groupsthat are defined on the Gateway will automatically appear on the iDevice when the Appis running.
Any Zone can be used in one or more Groups. There is no practical limit to themaximum number of devices in a Group.
2.2.1 Defining Zone Groups with the web UIOn the web UI again on the Configuration tab, but just below where the ID and Namewere set perviously, the Groups are defined.
BARIX AG | Oct 11, 13 | Simple Paging Start-Up Guide| 7/12
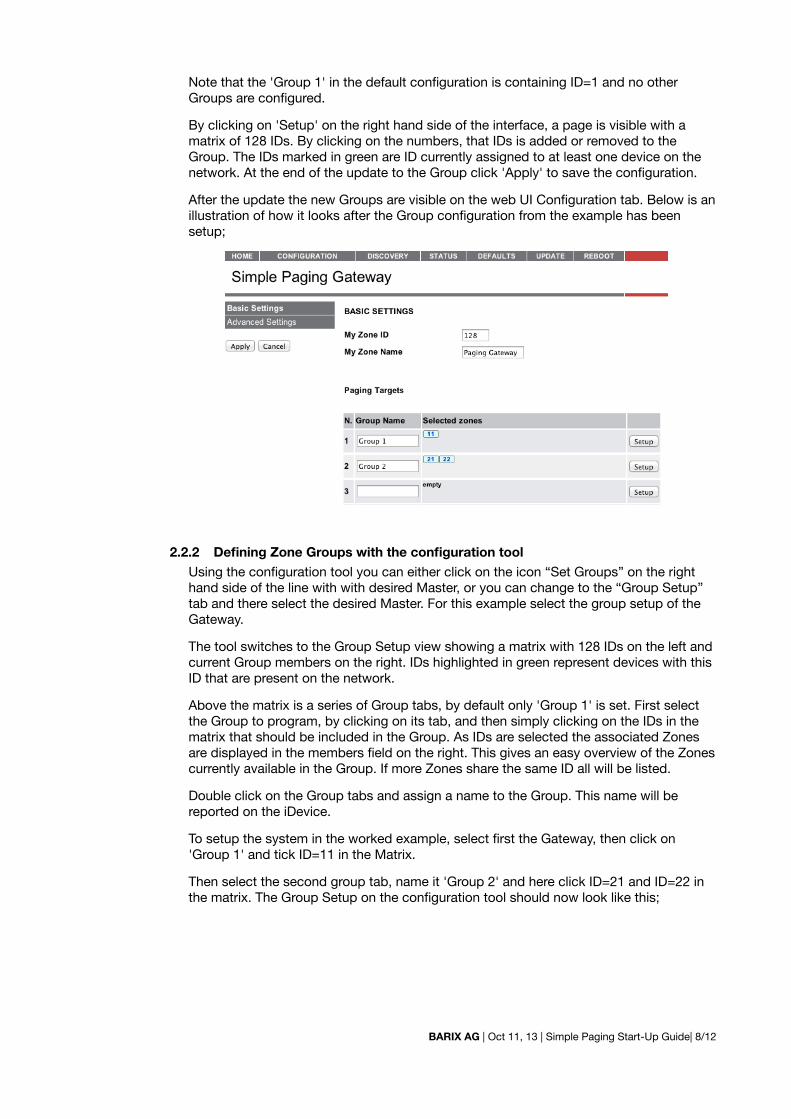
Note that the 'Group 1' in the default configuration is containing ID=1 and no otherGroups are configured.
By clicking on 'Setup' on the right hand side of the interface, a page is visible with amatrix of 128 IDs. By clicking on the numbers, that IDs is added or removed to theGroup. The IDs marked in green are ID currently assigned to at least one device on thenetwork. At the end of the update to the Group click 'Apply' to save the configuration.
After the update the new Groups are visible on the web UI Configuration tab. Below is anillustration of how it looks after the Group configuration from the example has beensetup;
2.2.2 Defining Zone Groups with the configuration toolUsing the configuration tool you can either click on the icon “Set Groups” on the righthand side of the line with with desired Master, or you can change to the “Group Setup”tab and there select the desired Master. For this example select the group setup of theGateway.
The tool switches to the Group Setup view showing a matrix with 128 IDs on the left andcurrent Group members on the right. IDs highlighted in green represent devices with thisID that are present on the network.
Above the matrix is a series of Group tabs, by default only 'Group 1' is set. First selectthe Group to program, by clicking on its tab, and then simply clicking on the IDs in thematrix that should be included in the Group. As IDs are selected the associated Zonesare displayed in the members field on the right. This gives an easy overview of the Zonescurrently available in the Group. If more Zones share the same ID all will be listed.
Double click on the Group tabs and assign a name to the Group. This name will bereported on the iDevice.
To setup the system in the worked example, select first the Gateway, then click on'Group 1' and tick ID=11 in the Matrix.
Then select the second group tab, name it 'Group 2' and here click ID=21 and ID=22 inthe matrix. The Group Setup on the configuration tool should now look like this;
BARIX AG | Oct 11, 13 | Simple Paging Start-Up Guide| 8/12

Click on “Save & Send”. The configuration file will be saved, sent to the device, and thedevice will reboot to activate the configuration.
To set the same configuration on the PS16, select it from the Master pulldown list on the'Group Setup' tab, and now simply click “Import file” and select the file just saved. Afterloading, again click “Save & Send”. The PS16 and the Gateway now have the sameGroups configured. Each Master can have completely independently groups if required.
2.3 Set password on Gateway
The App is freely available on iTunes. It is important to protect the paging system using apassword.
This can only be done from the Gateway web UI by going toCONFIGURATION>Advanced Settings>Security
After the password on the Gateway is set, a pop-up box will promptfor the password next time the App is started and connects to theGateway. The password is stored in the App and only needs to beentered once.
BARIX AG | Oct 11, 13 | Simple Paging Start-Up Guide| 9/12
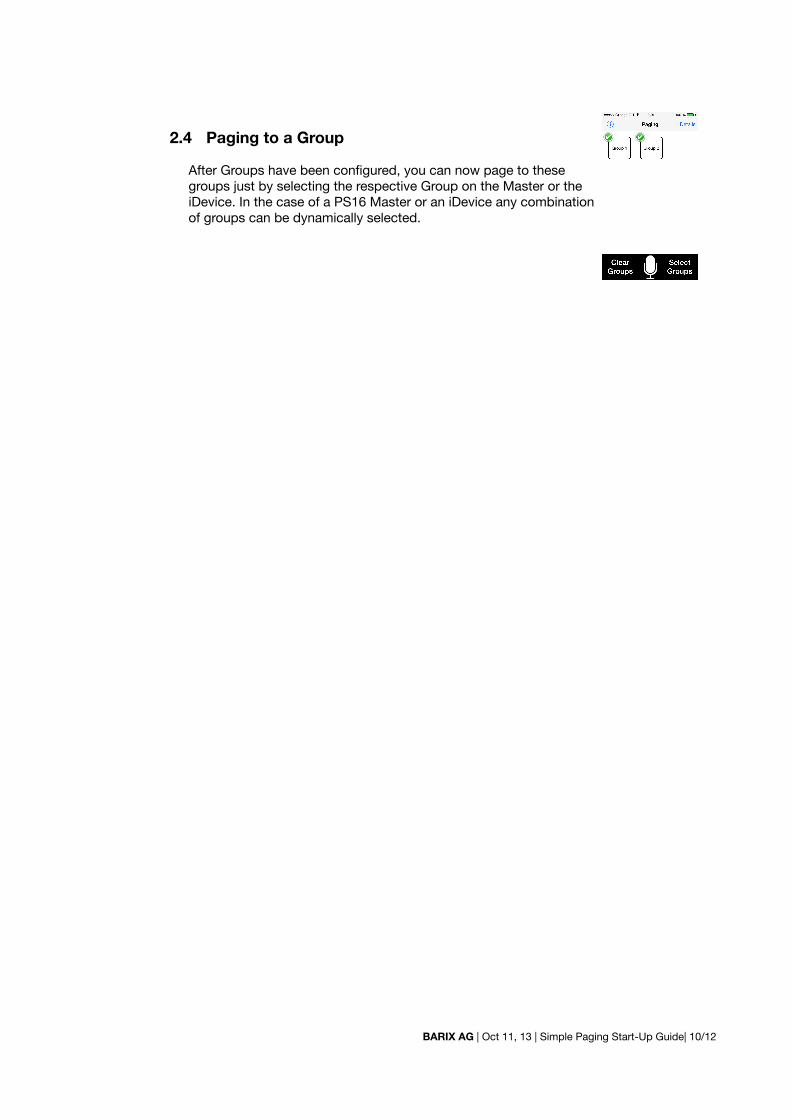
2.4 Paging to a Group
After Groups have been configured, you can now page to thesegroups just by selecting the respective Group on the Master or theiDevice. In the case of a PS16 Master or an iDevice any combinationof groups can be dynamically selected.
BARIX AG | Oct 11, 13 | Simple Paging Start-Up Guide| 10/12

3 Using Simple PagingThe Simple Paging solution supports simultaneous announcements from different Masters and atthe same time provides a number of features for reporting status and potential issues.
Below is an overview of the actions and notification features;
3.1 Making Announcements
Step Action PS16 PS1 iPhone1 Select Group(s) Press each of the target
Group buttons to selectPress and Hold “A” or“B” button
Tap targetGroups
2MakeAnnouncement
Press and hold “Page”button (PTT)
Keep button pressed (PTT) Tap
3End Announcement Release Button Release Button Tap “Stop
Paging”
3.2 System Feedback
Meaning PS16 PS1 iPhoneSystem Idle Simple Paging Ready Solid Green on 'A' No IconGroup(s) selected Solid yellow LED on Group
key(s)---
Sending Page Paging Flashing Red on 'A' PagingIncoming page Receiving From Flashing white on 'B' and
green on 'A'----------
Device(s) in GroupBusy
Flashing yellow LED on Groupkey(s)
Flashing Red on 'A'
Device(s) in GroupOffline
Flashing yellow LED on Groupkey(s)
Flashing Red on 'A'
3.3 iDevice status information
The iDevices offer a number of features reporting the status of the system.
If a device is busy or off-line within a group, it is possible to identify which device it is bytapping 'Details' in the top right corner of the App, and a list of groups will appear.
In the list of groups, those marked with red are either busy or off-line, those marked withgreen are ready to be paged to.
Tapping on a Group will produce a list of Zones in the Group. The Zones listed are alsomarked in green or red for easy identification of any issues.
Each Zone is clearly identified in the first line by its Zone Name, followed in line two by theIP address and unique MAC address. The Third line shows the type of device, it's Zone ID,and its status. It is here the source of the problem can be identified.
Below are examples of Zones in a group being busy;.
BARIX AG | Oct 11, 13 | Simple Paging Start-Up Guide| 11/12
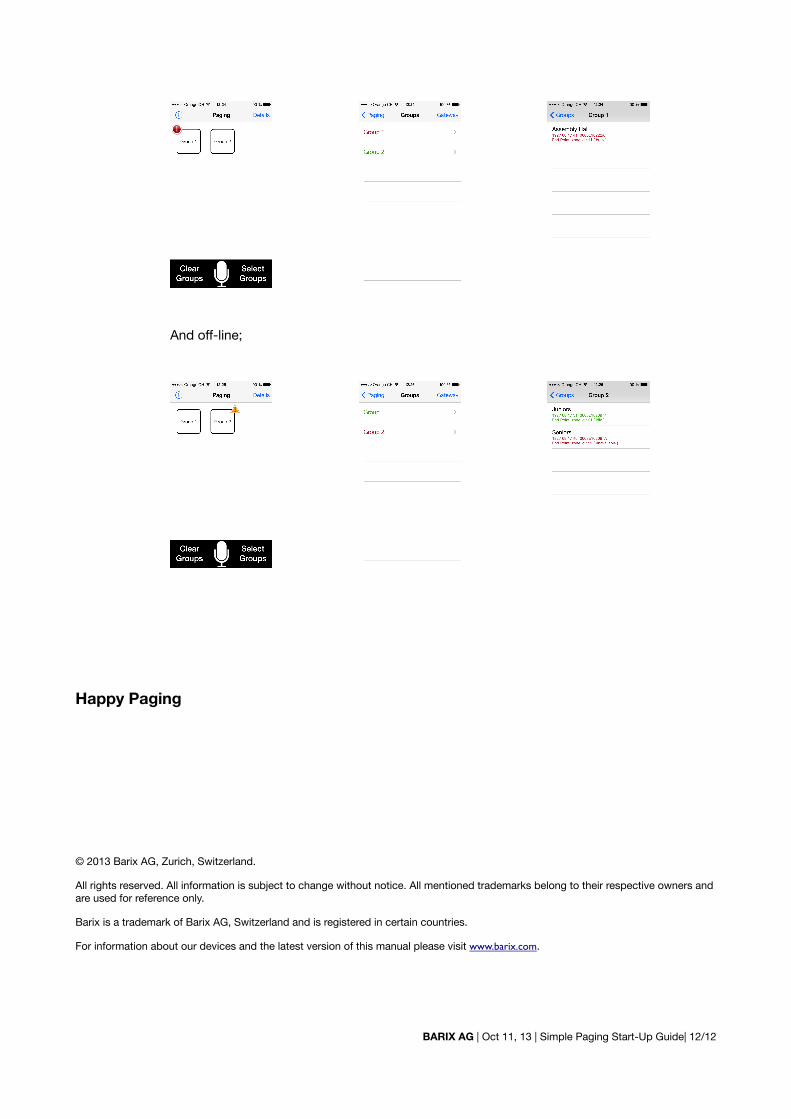
And off-line;
Happy Paging
© 2013 Barix AG, Zurich, Switzerland.
All rights reserved. All information is subject to change without notice. All mentioned trademarks belong to their respective owners andare used for reference only.
Barix is a trademark of Barix AG, Switzerland and is registered in certain countries.
For information about our devices and the latest version of this manual please visit www.barix.com.
BARIX AG | Oct 11, 13 | Simple Paging Start-Up Guide| 12/12