
SimEMR v2 Quick Start Guide - SimEMR® | KbPortsimemr.kbport.com/docs/2 - SimEMRv2...
21
SimEMR v2 Quick Start Guide Welcome Welcome to SimEMRv2. This guide will walk through a simple process to explain the methods of operation in SimEMR®. This document focuses not only on the processes that instructors should follow to complete their tasks, but some examples of tasks to complete. The capabilities of SimEMR® go beyond what is covered in this guide. We encourage you to experiment and ask questions! Our support staff is always available to cover topics not addressed in this guide. Overview of Simulation Systems The mission of SimEMR® is to provide the necessary tools to run an effective, patient-focused simulation that utilizes an EMR to provide contextual information to the learner. SimEMR® was designed as both a learning platform to introduce students to a user-friendly EMR, as well as a support tool for more advanced simulations using an EMR. The fundamental definitions used in this guide are expounded upon below. • Agency: An institution that learns together. Typically, an Agency represents your school, university, or learning environment. Data is never shared between Agencies. • Instructor: The default faculty role in SimEMR. Instructors can create and assign patient profiles, manage the Courses they have been assigned to, and review the work completed by Learners in those Courses. • Lab Coordinator: A faculty role in SimEMR® corresponding to an elevated Instructor. Lab Coordinators have the same expected operation as Instructors, with a few expansions. Firstly, Lab Coordinators are responsible for the creation of Courses and for assigning Instructors to those Courses. Secondly, Lab Coordinators have access to all data (Courses, Patient Profiles, Learner Work) in their parent Agency. Due to this configuration, anything in this Guide that references Instructors can also reference Lab Coordinators. • Learner: A role in SimEMR® corresponding to a person learning from the SimEMR® system. The learner's view of SimEMR® consists almost entirely of patient care and the data used to complete a care scenario effectively. Their view is of a simplified EMR, without the management and simulation tools that Instructors have access to. • Course: A Course is a group of Learners who will work toward the same learning goals, and the instructor/s that will oversee that learning process. • Course Group: A subdivision within a Course that logically breaks down the list of Learners further. Groups are optional, but may be used to break a course into small groups of students which complete their objectives independently from the course. • Patient Profile: A Patient Profile is the fundamental building block of a learning experience in SimEMR®. A Patient Profile represents the patient scenario that a Learner will have access to when it has been assigned. Patient Profiles are composed of any number of forms representing
Transcript of SimEMR v2 Quick Start Guide - SimEMR® | KbPortsimemr.kbport.com/docs/2 - SimEMRv2...

SimEMR v2 Quick Start Guide Welcome
Welcome to SimEMRv2. This guide will walk through a simple process to explain the methods of operation in SimEMR®. This document focuses not only on the processes that instructors should follow to complete their tasks, but some examples of tasks to complete. The capabilities of SimEMR® go beyond what is covered in this guide. We encourage you to experiment and ask questions! Our support staff is always available to cover topics not addressed in this guide.
Overview of Simulation Systems The mission of SimEMR® is to provide the necessary tools to run an effective, patient-focused
simulation that utilizes an EMR to provide contextual information to the learner. SimEMR® was designed as both a learning platform to introduce students to a user-friendly EMR, as well as a support tool for more advanced simulations using an EMR. The fundamental definitions used in this guide are expounded upon below.
• Agency: An institution that learns together. Typically, an Agency represents your school, university, or learning environment. Data is never shared between Agencies.
• Instructor: The default faculty role in SimEMR. Instructors can create and assign patient profiles, manage the Courses they have been assigned to, and review the work completed by Learners in those Courses.
• Lab Coordinator: A faculty role in SimEMR® corresponding to an elevated Instructor. Lab Coordinators have the same expected operation as Instructors, with a few expansions. Firstly, Lab Coordinators are responsible for the creation of Courses and for assigning Instructors to those Courses. Secondly, Lab Coordinators have access to all data (Courses, Patient Profiles, Learner Work) in their parent Agency. Due to this configuration, anything in this Guide that references Instructors can also reference Lab Coordinators.
• Learner: A role in SimEMR® corresponding to a person learning from the SimEMR® system. The learner's view of SimEMR® consists almost entirely of patient care and the data used to complete a care scenario effectively. Their view is of a simplified EMR, without the management and simulation tools that Instructors have access to.
• Course: A Course is a group of Learners who will work toward the same learning goals, and the instructor/s that will oversee that learning process.
• Course Group: A subdivision within a Course that logically breaks down the list of Learners further. Groups are optional, but may be used to break a course into small groups of students which complete their objectives independently from the course.
• Patient Profile: A Patient Profile is the fundamental building block of a learning experience in SimEMR®. A Patient Profile represents the patient scenario that a Learner will have access to when it has been assigned. Patient Profiles are composed of any number of forms representing

2 KbPort LLC | Phone: 412/487.4663 | E-mail: [email protected]
events as part of the patient's history or as part of an unfolding case. Patient Profiles can only be accessed by Lab Coordinators and Instructors. Patient Profiles act as a template for Patients.
• Patient: A Patient in SimEMR® represents a Patient in a care environment. Learners complete care scenarios with a Patient as a focus. When an Instructor assigns a Patient Profile to Learners, the result is that those Learners will have a Patient based on that Patient Profile in their care.
• SimTime™: SimTime™ is the innovative system that SimEMR® uses to define Patient Profiles for easy adoption and re-use. SimTime™ allows Patient Profiles to be defined in a time-context independent of the real-world date and time. SimTime™ defines time for Patient Forms as a delta expressed in minutes. We understand that this is a complex topic, so it will be covered in more depth and with more context later in this guide.
Diving Right In With the above definitions for context, this guide will walk through a simple learning scenario,
from inception to review. The capabilities of SimEMR® expand well beyond the simple scenario presented here, but this guide will define the basic workflow. The process in the following section uses a brand-new Agency called KbPort Simplicity University. This process sets KbPort Simplicity University up with a Course, creates a Patient Profile, assigns that Patient Profile to that Course, completes work as a Learner in that Course, and review the Learner's work after it is completed.
Course Creation The first part of setting up a learning experience is setting up the learning environment. Lab
Coordinators should create courses corresponding to their learning institution's courses, then assign the appropriate Instructors to manage that Course in the future. After logging in as a Lab Coordinator, navigate to Manage Courses on the left-hand side or via the dashboard link.
Click the Create New Course button.

3 KbPort LLC | Phone: 412/487.4663 | E-mail: [email protected]
Enter relevant information for the Course, then click Create.
The course is now created! Now, to add instructors and Learners to the course, click the Settings gear icon, then select Manage Instructors from the dropdown menu.
Select as many instructors from the Available Instructors list on the right as you need to assign to the course, and click the Add Instructors to Course button.

4 KbPort LLC | Phone: 412/487.4663 | E-mail: [email protected]
You can see that I have added an instructor named Alexander Henry to this course. The process of adding learners is largely the same. Click the Settings gear icon next to the course for which you wish to add Learners, then select Manage Learners from the dropdown menu.
Select your learners, and click the Add Learners button.

5 KbPort LLC | Phone: 412/487.4663 | E-mail: [email protected]
Just like that, the course management is completed and we are ready to move to the next step, creating a patient profile.
Patient Profile Creation Now that a Course has been created with an Instructor and two Learners, the next step is to provide some
work for them to do! In SimEMR, all the work for Learners is based on a Patient. This provides a realistic medical context for their activities. To provide a Patient for the Learners to work on, we must first set up a Patient Profile. SimEMR® comes with a stock set of Patient Profiles that you can copy and tweak to your liking, but also lets you develop your own cases from scratch! This process will be covered in this step.
Go to the Patient Profile menu item, and click Create Patient Profile in the top right corner.

6 KbPort LLC | Phone: 412/487.4663 | E-mail: [email protected]
The next screen is the basic personal and medical information for your new Patient Profile. I have entered some information for a new patient profile named Joseph Jones.
After entering all the information and clicking the Create button, Joseph Jones now appears in the list of profiles.
Now that Mr. Jones has been created, new forms can be added to this profile to create a simple medication administration scenario. The purpose of Joseph Jones will be to walk a Learner through an administration of a medication. All the data to justify the administration of medication can be entered quickly in the profile, and the Learner will see everything they need to verify and perform the administration.
Joseph Jones will come in to the ER complaining of muscle cramps and an arrhythmia. Blood work will be drawn, and a low potassium level will be detected. An order for a potassium tablet will be created. The learner's goal will be to administer the ordered potassium.
Click Edit from the gear menu in the Mr. Jones row.

7 KbPort LLC | Phone: 412/487.4663 | E-mail: [email protected]
The next page is the Patient Profile Builder. From this page, you can add new forms and edit existing forms for Patient Profiles.
The first form for this Patient will be an Admission. New forms can be added by clicking the Add New Form button near the top-right corner.
Selecting Admissions from the Admission section will bring up a new Admission form.
Worthy of note is the Admission Date box on this form that says SIMULATION START. This is part of the innovative SimTime™ system included in SimEMR®. SIMULATION START is the initial time for the scenario. Typically, this will be when the learner first logs in to view their Patient copied from this Patient Profile. SimTime™ defines dates and times in a delta format that allows for the dates in a simulation to always be relevant to the current calendar date. This system is complicated to explain, but simpler in

8 KbPort LLC | Phone: 412/487.4663 | E-mail: [email protected]
action. The SimTime™ for this Admission form with be set at -1H, meaning one hour before the SIMULATION START.
After filling in the rest of the information and clicking "Save" at the bottom, the Patient Profile Builder looks like this:
The blue dot on the timeline represents our newly added Admission. A key in the top left corner corresponds to the bubbles on the timeline. Clicking one of the bubbles will pull up the relevant form, to be viewed or edited. If several events occur at the same time, they will be represented by a black box with the number of forms grouped together. Clicking that box will present a list of forms to select. With this timeline, it becomes simple to visualize the progression of a Patient through a care scenario.
Now that the patient has been admitted, lab work would be drawn to confirm the suspicion of low potassium from the patient presentation in the ER. To add this lab work, click Add New Form again, this time selecting Labs.

9 KbPort LLC | Phone: 412/487.4663 | E-mail: [email protected]
The following form presents itself.
Much like the Admission form, the SimTime™ capability is front and center on this form. Mr. Jones will need a Chemistry panel to check his Potassium. The Date Drawn should be shortly after Admission for this scenario, so it will be set at –50m, meaning 50 minutes before SIMULATION START and 10 minutes after the Admission. In this simulation, our hospital tests lab values very quickly, so the Date Available will be 5 minutes after the Date Drawn, or –45m.
Clicking create will generate a Chemistry panel for Mr. Jones. We can then set our Potassium value.
After setting the Potassium value, the form must be saved to reflect our changes. Always be sure to save your work!

10 KbPort LLC | Phone: 412/487.4663 | E-mail: [email protected]
It's also worth noting that the timeline now shows a black box with a "2", representing the Admission and Labs forms.
The next step in the Scenario is to order Potassium for Mr. Jones. Clicking "Add New Form" again will allow entering a new Provider's Order.
The Provider's Orders form has 3 SimTime™ options. An Order Date (the date the order was created), a Start Date (when the order should start) and an option End Date (when the order should be discontinued).

11 KbPort LLC | Phone: 412/487.4663 | E-mail: [email protected]
In our scenario, it will take the provider 15 minutes from the time the lab work comes back until the order is created. The start date will be the same as the order date, because it should start "right now".
Because this order should include a medication, clicking the Add Medication will attach a medication to this order.
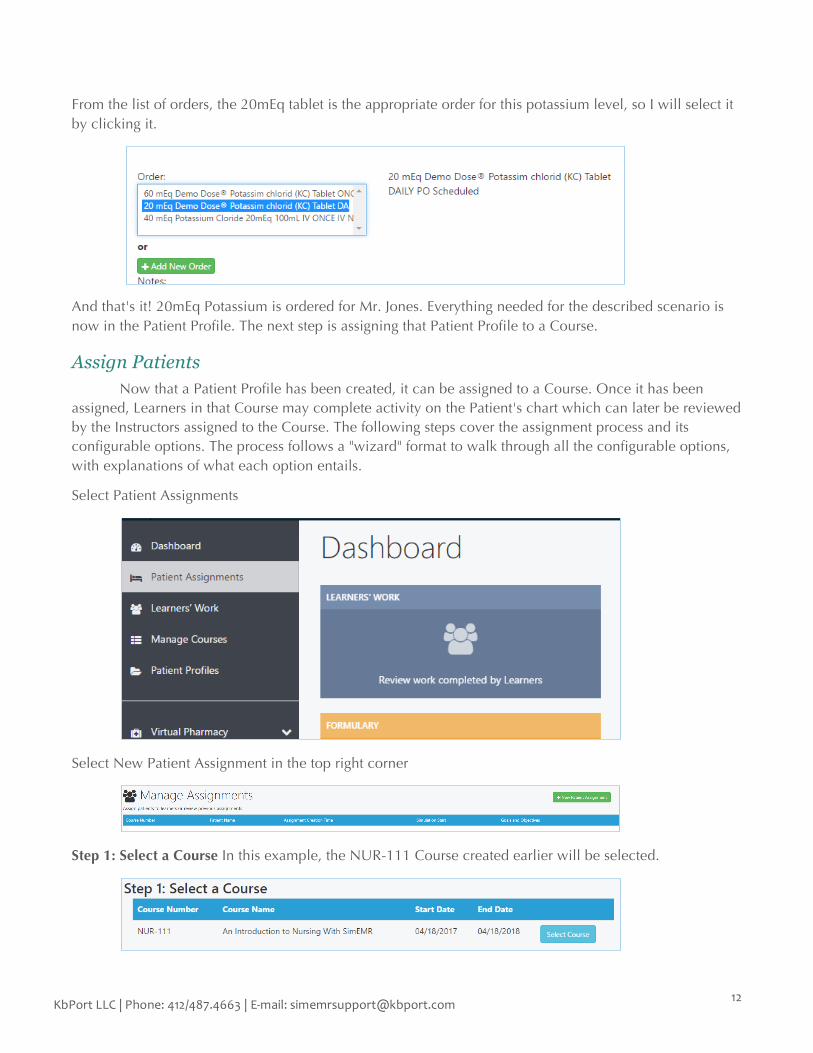
As many medications as desired can be added to an order. After Add Medication is clicked, select a saved medication order, or enter a new order by clicking the Add New Order button (See Formulary Management section for more information). Because I have already ordered this potassium tablet in the past, expanding the "Filters" area and selecting "Potassium Chloride" should only show the orders already entered for that drug.
12 KbPort LLC | Phone: 412/487.4663 | E-mail: [email protected]
From the list of orders, the 20mEq tablet is the appropriate order for this potassium level, so I will select it by clicking it.
And that's it! 20mEq Potassium is ordered for Mr. Jones. Everything needed for the described scenario is now in the Patient Profile. The next step is assigning that Patient Profile to a Course.
Assign Patients Now that a Patient Profile has been created, it can be assigned to a Course. Once it has been
assigned, Learners in that Course may complete activity on the Patient's chart which can later be reviewed by the Instructors assigned to the Course. The following steps cover the assignment process and its configurable options. The process follows a "wizard" format to walk through all the configurable options, with explanations of what each option entails.
Select Patient Assignments
Select New Patient Assignment in the top right corner
Step 1: Select a Course In this example, the NUR-111 Course created earlier will be selected.

13 KbPort LLC | Phone: 412/487.4663 | E-mail: [email protected]
Step 2: Select Patient Profiles For this example, Joseph Jones will be selected. A single or multiple Patient Profiles can be assigned at a time. Scroll to the bottom of the page and click "Continue to next step".
Step 3: Simulation Timing
The Start Time option defines when, in real time, the SIMULATION START should occur. By default, Learner Login Time is selected. This means that the SIMULATION START will occur when the Learner logs in and selects the Patient for the first time. As an example, assume the Learner logs in at 13:00 on 04/19/2017. For the Patient Profile defined above, the Admission Date is set at –1H. When the Learner looks at the Admission form associated with this Patient, the date that the Learner will see would be 12:00 on 04/19/2017. This applies to every form associated with the Patient Profile. All the dates and times of forms will be based on this SIMULATION START time.
The Instructor Selected Time option should be used for scenarios in which you know what time the Learners should begin their work. This option is useful if the Instructor wants the simulation to start at the beginning of a class period, for example.
14 KbPort LLC | Phone: 412/487.4663 | E-mail: [email protected]
Specify a Stop Time allows an Instructor to prevent a simulation from progressing past a certain point. For example, if a Patient Profile has events set in the future, but the Instructor doesn't want those events to be shown yet, setting a Stop Time will prevent the simulation from progressing to the point that those events are reached. For this example, we do not need a stop time, so it will be unchecked.
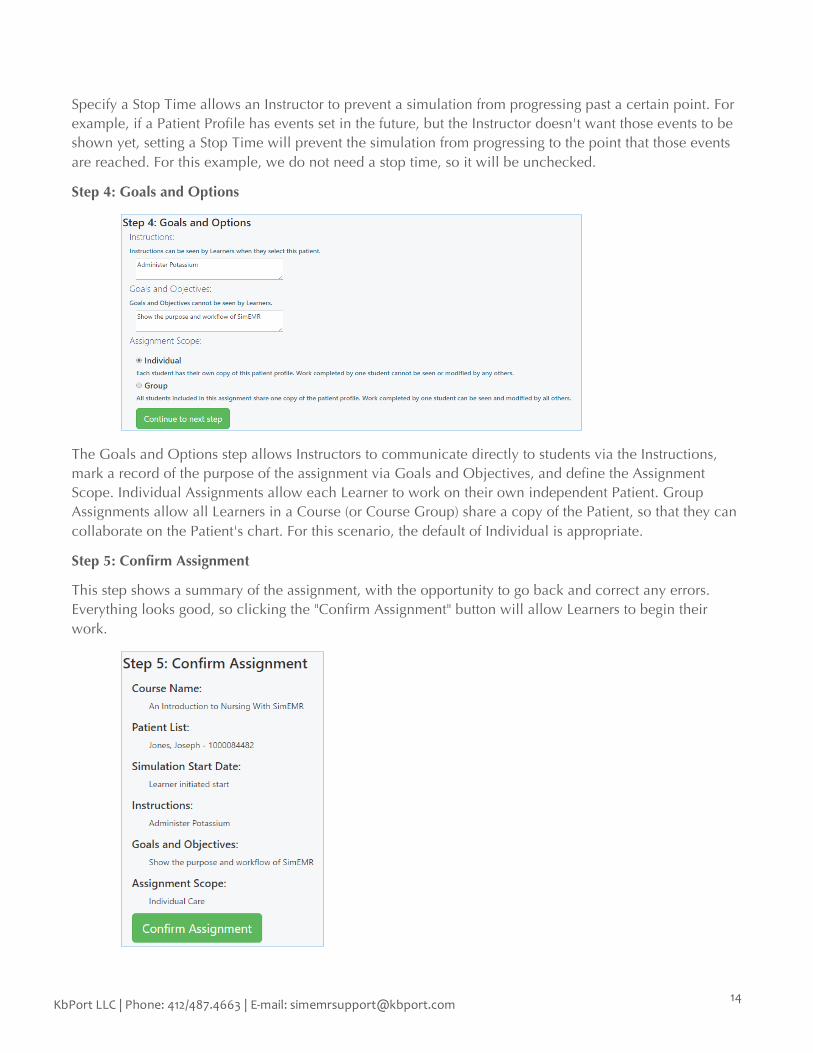
Step 4: Goals and Options
The Goals and Options step allows Instructors to communicate directly to students via the Instructions, mark a record of the purpose of the assignment via Goals and Objectives, and define the Assignment Scope. Individual Assignments allow each Learner to work on their own independent Patient. Group Assignments allow all Learners in a Course (or Course Group) share a copy of the Patient, so that they can collaborate on the Patient's chart. For this scenario, the default of Individual is appropriate.
Step 5: Confirm Assignment
This step shows a summary of the assignment, with the opportunity to go back and correct any errors. Everything looks good, so clicking the "Confirm Assignment" button will allow Learners to begin their work.

15 KbPort LLC | Phone: 412/487.4663 | E-mail: [email protected]
After confirming the assignment, it is added to the main Patient Assignments section for further management.
Nothing else must be done to get started with this patient, so the next portion of this guide will briefly consider how the Learner completes work, before covering the review process an Instructor would complete.
Learner Activity After logging in as one of the Learners named Rhonda Tyson in the NUR-111 course, the assigned Patient is the first thing that the Learner sees.
Clicking the Show Instructions button will display the instructions entered as part of the assignment.

16 KbPort LLC | Phone: 412/487.4663 | E-mail: [email protected]
After clicking the "Go to Patient" button, a Summary of Activity is pulled up for that patient. Included on that summary is all the activity entered on the Patient Profile. The times displayed on this summary (and on the forms, themselves) are calculated based on the SimTime™ entered when the Profile was created. The following screenshot shows the activity for the Patient after logging in at 13:14 on 04/20/2017.
The Admission form displays as 04/20/2017 12:14, exactly 1 hour before I logged in!
Now the versatility of SimTime™ should be apparent. As much detail as desired, potentially comprising years of medical history for a Patient Profile, can be constructed once and re-used. Year after year new Learners' current time will always being the deciding factor of what date and time displays for medical events!
Another important thing to note with this system is the ability to define SimTime™ events in the future. If an expansion of this simple scenario was desired that turned it into an unfolding case, that can easily be accomplished by setting SimTime™ events with a positive delta. This scenario only used negative deltas, which are used to construct a Patient Profile's history. By using positive deltas, it is possible to define a Patient's future!
If this scenario were expanded to include a future event (I.E. a Vital Sign recording 15 minutes after the SIMULATION START) that event would be hidden until that amount of time had elapsed. Those entered Vital Signs would not appear in the Patient's chart until 15 minutes after the student logged in and viewed the Patient. This enables the creation of deep and diverse unfolding case studies using SimEMR, with down-to-the-minute accuracy and no restriction on how far into the future it can go.
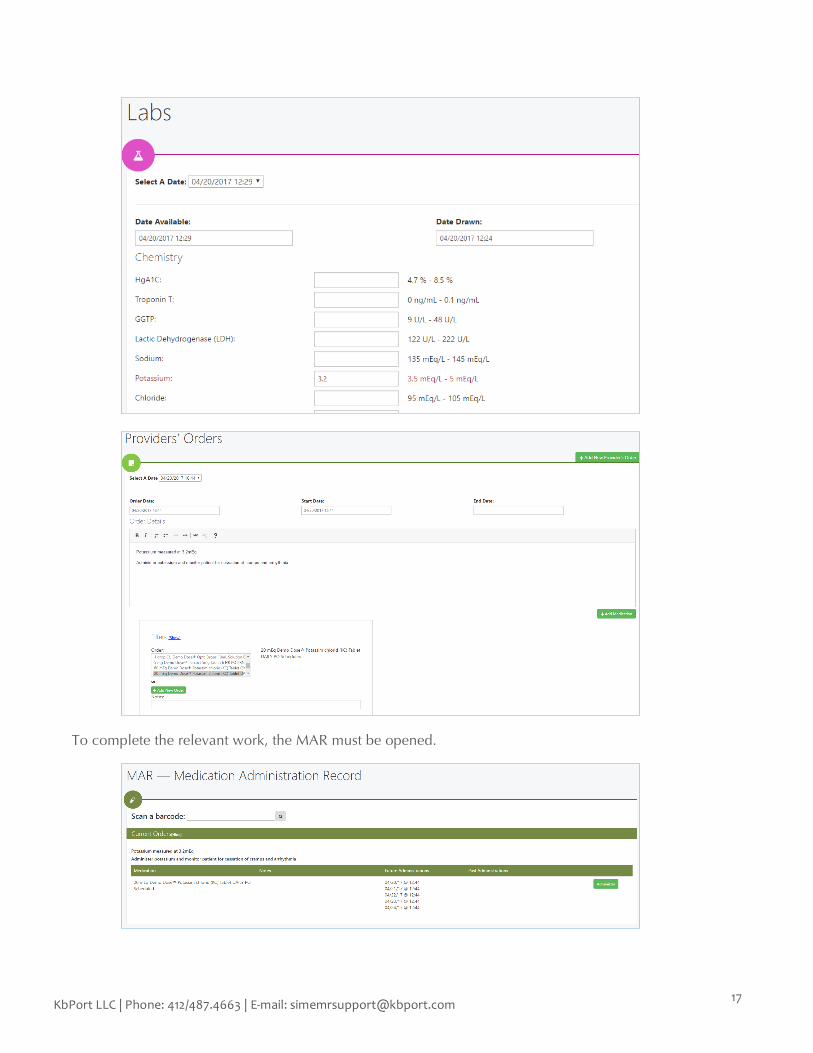
The Learner can review all the Patient information entered as part of the Patient Profile:
17 KbPort LLC | Phone: 412/487.4663 | E-mail: [email protected]
To complete the relevant work, the MAR must be opened.

18 KbPort LLC | Phone: 412/487.4663 | E-mail: [email protected]
Clicking Administer (or scanning the drug's barcode) will pull up the Administration Record for that order, shown completed below.
Clicking save will return to the MAR, with a new Administration visible.
Review Learners' Work Now that the Learner has completed the objective, an Instructor can log back in to review that work. After logging in, navigating to the Learner Work section will allow for the review of the above administration.

19 KbPort LLC | Phone: 412/487.4663 | E-mail: [email protected]
The following screen shows all the Courses that the Instructor has access to. For this example, the NUR-111 Course is the target.
The entry for NUR-111 has two buttons, "Review By Learner" and "Review By Patient". The information presented by both buttons will retrieve the work completed by Learners in that Course, but the context is slightly different.
"Review by Patient" allows rapid movement through the same Patient for all the Learners in a Course. This option is useful if all Learners should have completed their work by a specific due date, and the goal is to quickly review that work for an entire Course.
"Review by Learner" allows for the review of all work by a Learner for all their assigned Patients. This method is useful for trying to gain a comprehensive overview of a Learner's progression over the duration of a course.
For this demonstration, "Review By Learner" will be selected.
A list of all Patient Profiles assigned to the Course will be visible. The only available Patient Profile is Joseph Jones.
Clicking "Review This Patient" shows the Review Patient Info page.

20 KbPort LLC | Phone: 412/487.4663 | E-mail: [email protected]
The top of this page contains contextual information about the Patient Profile and assignment. A list of Learners appears on the left. The first one selected, Helen Tucker, has not yet accessed this Patient. No activity is present. The Learner used above was Rhonda Tyson, so clicking on that Learner will pull up the activity for that Learner.
There is now a Patient Document visible under the All Activity heading on the right. Any activity on this Patient, as well as any activity on KbPort's suite of simulation devices, will show on this log. Clicking the "View" link on the Patient Document will display exactly the work that the Learner completed.
All the Learner's relevant work can be reviewed by this mechanism. It looks like the Learner did everything correctly, so the Instructor should feed back to them directly from SimEMR!
By clicking the "Email" button next to the selected Learner's name, an email to that Learner will be opened in your default email client.
21 KbPort LLC | Phone: 412/487.4663 | E-mail: [email protected]
Closing Remarks This completes the full cycle of education described in this guide. From start to finish, this process was designed to be streamlined and lightweight, but with the flexibility to support in-depth scenarios with little more cognitive load than shallower scenarios. SimTime™ allows for the re-use of Patient Profiles semester after semester and for the expansion of SimEMR® into the realm of unfolding cases.
Our support staff and education consultants are more than happy to help fill in the details of specific features, support the development of complex Patient Profiles, and assist in any technical questions you may have.
For our returning customers from the old version of SimEMR, we hope that you enjoy the new streamlined experience and usability improvements. Only through your feedback and collaboration was the SimEMR® team able to make a better experience.
Thank you,
KbPort's SimEMR® Team


