Chinese Silver Staining Technique and Its Applications in Chronic Renal Failure Diagnosis
USER GUIDE
For Research Use Only. Not for human or animal therapeutic or diagnostic use.
SilverQuest™ Silver Staining Kit
For Mass Spectrometry-Compatible Silver Staining of Proteins in Polyacrylamide Gels
Catalog Number LC6070
Revision Date 16 July 2012
Publication Part Number IM-6070
MAN0000736

ii
iii
Contents Kit Contents and Storage ................................................................................ iv
Introduction ......................................................................... 1 Overview ............................................................................................................ 1
Methods ............................................................................... 5 Basic Staining Protocol ..................................................................................... 5
Fast Staining Protocol ..................................................................................... 11
Destaining Protocol ......................................................................................... 14
Prepare Samples for Mass Spectrometry Analysis .................................... 15
Troubleshooting .............................................................................................. 18
Appendix ............................................................................ 20 Accessory Products ......................................................................................... 20
Technical Support ........................................................................................... 21
Purchaser Notification .................................................................................... 22
References ......................................................................................................... 23
iv
Kit Contents and Storage
Shipping and Storage
The SilverQuest™ Silver Staining Kit is shipped at room temperature. Upon receipt, store the kit at room temperature, 15°C to 30°C. The kit is stable for 6 months when stored at room temperature.
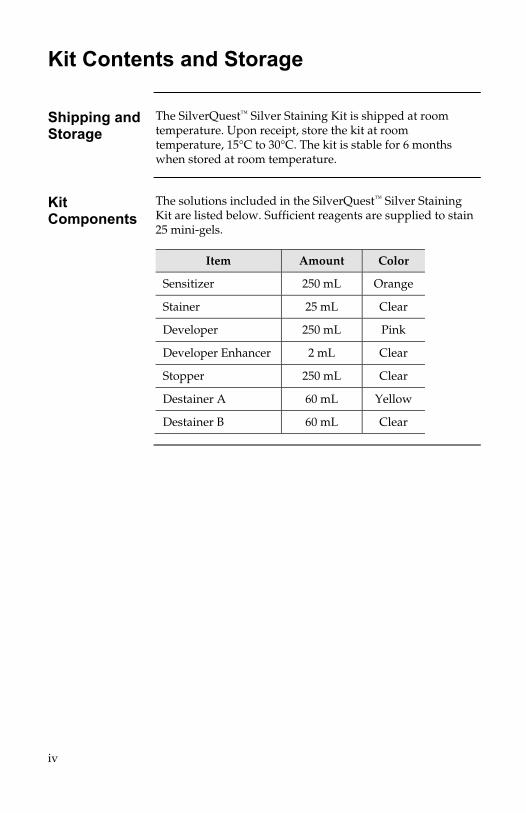
Kit Components
The solutions included in the SilverQuest™ Silver Staining Kit are listed below. Sufficient reagents are supplied to stain 25 mini-gels.
Item Amount Color
Sensitizer 250 mL Orange
Stainer 25 mL Clear
Developer 250 mL Pink
Developer Enhancer 2 mL Clear
Stopper 250 mL Clear
Destainer A 60 mL Yellow
Destainer B 60 mL Clear
1
Introduction Overview
Introduction The SilverQuest™ Silver Staining Kit provides a rapid and
easy method to silver stain proteins in polyacrylamide gels. Silver staining allows detection of most proteins since it is 30-fold more sensitive than staining with colloidal Coomassie G-250. This kit is specifically designed to provide sensitive silver staining compatible with mass spectrometry analysis.
Features Important features of the SilverQuest™ Silver Staining Kit
are:
• Protein sensitivity at sub-nanogram level
• Staining compatible with mass spectrometry analysis
• Protein bands can be visualized within an hour
• Color-coded solutions for easy staining
Description The SilverQuest™ Silver Staining Kit is based on the chemical
reduction of silver ions to metallic silver on a protein band. The protein bands are visualized as spots where reduction begins. For more details on the mechanism of silver staining, refer to Rabilloud et al, 1994.
The SilverQuest™ Silver Staining Kit includes a specially formulated sensitizer to provide improved sensitivity and light background when compared to other silver staining methods.
Continued on next page

2
Overview, Continued
Description, Continued
The following table describes the various steps involved in silver staining of proteins.
Step Reagent Description
Fix Fixative Removes interfering ions and detergent from the gel and helps to restrict the movement of proteins out of the gel matrix.
Sensitize Sensitizer Increases sensitivity and contrast of the stain.
Wash Ultrapure water Removes excess Sensitizer and rehydrates the gel for subsequent staining.
Stain Stainer Binds silver ions to the protein and forms a latent image.
Wash Ultrapure water Removes excess Stainer.
Develop Developer Reduces silver ions to metallic silver at the protein bands resulting in development of the protein bands.
Stop Stopper Complexes with any free silver to prevent further reduction.
Continued on next page
3
Overview, Continued
Compatibility with Mass Spectrometry Analysis
Silver staining of proteins followed by mass spectrometry analysis is a sensitive technique for protein identification in the field of proteomics. In this method, proteins are separated by 2-D gel electrophoresis and silver stained. Since extraction of proteins from the gel is difficult, in-gel digestion of proteins with proteases (mostly trypsin) is used to generate peptide fragments. These peptide fragments are analyzed using Matrix Assisted Laser Desorption Ionization Mass Spectrometry (MALDI/MS) to determine their exact mass. Resulting peptide masses are then subjected to various database searches to identify the protein by comparing the peptide masses.
The SilverQuest™ Silver Staining Kit is specifically modified to be compatible with mass spectrometry (MS) analysis as follows:
• Sensitizing solution does not contain glutaraldehyde or formaldehyde
For optimal mass spectrometry analysis, it is important to obtain complete trypsin digestion of the protein sample. Most silver staining kits contain Glutaraldehyde- or formaldehyde-based sensitizers. These aldehydes modify lysine residues and prevent complete trypsin digestion (Rabilloud, 1990). The aldehydes also reduce the efficiency of protein extraction from the gel by crosslinking two lysine residues (Rabilloud, 1990). The SilverQuest™ Silver Staining Kit does not include an aldehyde-based sensitizer improving trypsin digestion and extraction of peptides from the gel.
• Includes destaining solutions to remove silver from the gel
The SilverQuest™ Silver Staining Kit includes destaining solutions that effectively remove silver ions from protein bands in polyacrylamide gels (Gharahdaghi et al., 1999). This improves trypsin digestion and subsequent mass spectrometry coverage of the protein because silver ions are known to inhibit trypsin digestion of proteins (Chambers et al., 1974).
Continued on next page
4
Overview, Continued
Experimental Overview
The following table outlines the basic steps necessary to silver stain your protein sample in a polyacrylamide gel and prepare your sample for mass spectrometry analysis.
Step Action Page
1 Run your protein sample on a suitable polyacrylamide gel using a method of choice.
2 Silver stain the gel using the Basic or Fast Staining Protocol using solutions provided in the kit.
5–13
3 Excise the band of interest from the gel and destain the band using the destaining solutions provided in the kit.
14
4 Perform in-gel trypsin digestion and extract peptide fragments from the gel.
16
5 Analyze the peptide fragments by MALDI/MS. 17
Methods Basic Staining Protocol
Introduction Instructions are provided below to silver stain proteins on
polyacrylamide gels following electrophoresis. Using this protocol, staining can be completed in 90 minutes. An alternate, quick, and sensitive staining protocol is provided on page 11.
Materials Needed
• Ultrapure water (>18 megohm/cm resistance recommended, see the following Important Note)
• Staining tray (a polypropylene tray is recommended)
• Rotary shaker
• Teflon coated stir bars
• Disposable 10-mL pipettes
• Clean glass bottles for reagent preparation
• Graduated glass cylinders
• 30% ethanol (made with ultrapure water)
• 100% ethanol
• Fixative (40% ethanol, 10% acetic acid, made with ultrapure water)
��������
Always use ultrapure water of >18 megohm/cm resistance for preparing all solutions and rinsing gels and containers. Poor quality of water may increase the background or impair band development.
To achieve best results, be sure to keep the volume of all solutions and incubation time of all steps exactly as given in the protocol. Changes in the protocol can result in high background or poor band development.
Continued on next page
5
Basic Staining Protocol, Continued
����
�����
���
For optimal staining results, follow these guidelines:
• Be sure to wear rubber gloves that have been rinsed with deionized water while handling gels
• Use clean containers and designate these containers for silver staining purposes only
• Make sure that the size of the container permits free movement of the gel during shaking and complete immersion in solution while staining
• Avoid touching the gel with bare hands or metal objects and avoid applying pressure on gels while handling or changing solutions
• Use teflon coated stir bars and clean glass containers to prepare reagents
• Avoid cross contamination of kit reagents
• Use freshly made solutions
Samples Containing High Concentration of DTT
If your sample contains high concentrations of DTT (>50 mM), silver staining may result in streaking and yellow background. To avoid streaking, perform reduction and alkylation of the sample as described below:
1. Reduce your sample with freshly prepared DTT to a final concentration of 17 mM and heat the sample at 70°C for 10 minutes.
2. Alkylate the sample with freshly prepared iodoacetamide to a final concentration of 35 mM and heat the sample at 70°C for 10 minutes.
3. Add SDS sample buffer without DTT to the reduced and alkylated sample.
4. Proceed for electrophoresis and perform silver staining as described in this manual.
Continued on next page
6
7
Basic Staining Protocol, Continued
Before Starting
Use the reagents provided in the kit to prepare the following solutions for staining:
• Sensitizing solution
Ethanol 30 mL
Sensitizer 10 mL
Ultrapure water to 100 mL
• Staining solution
Stainer 1 mL
Ultrapure water to 100 mL
• Developing solution
Developer 10 mL
Developer enhancer 1 drop
Ultrapure water to 100 mL
Note: You may prepare all solutions immediately before starting the staining protocol or prepare them as you proceed to the next step.
Continued on next page
8
Basic Staining Protocol, Continued
Procedure Use the following procedure with an 8 × 8 cm NuPAGE® Novex Bis-Tris or Tris-Acetate, Tricine, TBE, or Tris-Glycine mini-gel, 1.0-mm thick. For staining 2 mini-gels, 1.0-mm thick or 1 large (18 × 18 cm) gel, double all solution volumes while maintaining the incubation time.
Note: If the dimensions of your gel are not the same as mentioned above, you may have to optimize the staining protocol by varying the incubation time or the solution volume.
All incubations should be performed on a rotary shaker rotating at a speed of 1 revolution/second at room temperature. Be sure to use 100 mL of each solution per gel.
1. After electrophoresis, remove the gel from the cassette and place the gel in a clean staining tray of the appropriate size. Rinse the gel briefly with ultrapure water.
2. Fix the gel in 100 mL of fixative for 20 minutes with gentle rotation. If you are using a Tricine gel, incubate the gel in fixative for 1 hour.
Note: The gel can be stored in the fixative overnight if there is not enough time to complete the staining protocol. Longer fixing times may improve the sensitivity and background staining in some cases.
3. Decant the fixative solution and wash the gel in 30% ethanol for 10 minutes.
4. Decant the ethanol and add 100 mL of Sensitizing solution to the washed gel in the staining container. Incubate the gel in the Sensitizing solution for 10 minutes.
5. Decant the Sensitizing solution and wash the gel in 100 mL of 30% ethanol for 10 minutes.
6. Wash the gel in 100 mL of ultrapure water for 10 minutes.
7. Incubate the gel in 100 mL of Staining solution for 15 minutes.
Continued on next page
9
Basic Staining Protocol, Continued
Procedure, Continued
8. After the staining is complete, decant the Staining solution and wash the gel with 100 mL of ultrapure water for 20–60 seconds.
Note: Washing the gel for more than a minute will remove silver ions from the gel resulting in decreased sensitivity.
9. Incubate the gel in 100 mL of Developing solution for 4–8 minutes until bands start to appear and the desired band intensity is reached.
10. After the appropriate staining intensity is achieved, immediately add 10 mL of Stopper directly to the gel still immersed in Developing solution. Gently agitate the gel for 10 minutes. The color changes from pink to colorless indicating that the development has stopped.
11. Decant the Stopper solution and wash the gel with 100 mL of ultrapure water for 10 minutes.
For destaining the gel for mass spectrometry analysis, see the Destaining Protocol on page 14.
If you are having problems with staining or obtaining a light background, see Troubleshooting on page 18.
Silver Staining After Coomassie Blue Staining
After destaining the Coomassie Blue stained gel:
1. Rinse the gel thoroughly in ultrapure water for 10 minutes with gentle agitation.
2. Proceed with silver staining at the fixing step using the Basic or Fast Staining Protocol.
Continued on next page
Basic Staining Protocol, Continued
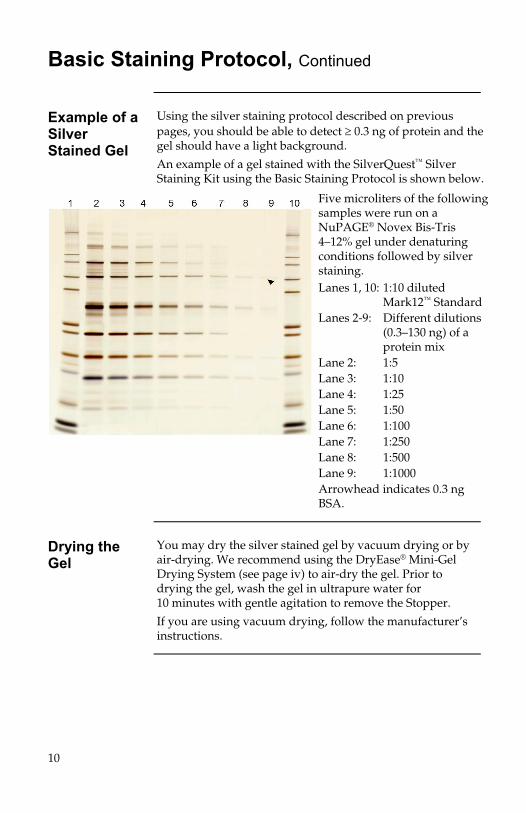
Example of a Silver Stained Gel
Using the silver staining protocol described on previous pages, you should be able to detect ≥ 0.3 ng of protein and the gel should have a light background.
An example of a gel stained with the SilverQuest™ Silver Staining Kit using the Basic Staining Protocol is shown below.
Five microliters of the following samples were run on a NuPAGE® Novex Bis-Tris 4–12% gel under denaturing conditions followed by silver staining. Lanes 1, 10: 1:10 diluted Mark12™ Standard Lanes 2-9: Different dilutions (0.3–130 ng) of a protein mix Lane 2: 1:5 Lane 3: 1:10 Lane 4: 1:25 Lane 5: 1:50 Lane 6: 1:100 Lane 7: 1:250 Lane 8: 1:500 Lane 9: 1:1000 Arrowhead indicates 0.3 ng BSA.
Drying the Gel
You may dry the silver stained gel by vacuum drying or by air-drying. We recommend using the DryEase® Mini-Gel Drying System (see page iv) to air-dry the gel. Prior to drying the gel, wash the gel in ultrapure water for 10 minutes with gentle agitation to remove the Stopper.
If you are using vacuum drying, follow the manufacturer’s instructions.
10
Fast Staining Protocol
Introduction The fast staining protocol is a modification of the Basic
Staining Protocol. This method uses a microwave oven to rapidly silver stain protein gels. This staining protocol can be completed in less than an hour.
Use caution while performing the Fast Staining Protocol using a microwave oven. Do not overheat the staining solutions. Some of the staining solutions contain alcohol and alcohol fumes are highly flammable. Do not heat the staining solutions in any microwave oven that is not well ventilated or which can generate sparks. Placing a lid loosely over the staining container may minimize fumes.
Materials Needed
• Ultrapure water
• Microwaveable staining tray
• Microwave oven (700–1200 W)
• Rotary shaker
• Teflon coated stir bars
• Disposable 10-mL pipettes
• Clean glass bottles for reagent preparation
• Graduated Glass Cylinders
• 30% ethanol (made with ultra pure water)
• 100% ethanol
• Fixative (40% ethanol, 10% acetic acid, made with ultra pure water)
Continued on next page
11
12
Fast Staining Protocol, Continued
Before Starting
Use the reagents provided in the kit to prepare the following solutions for staining:
• Sensitizing solution
Ethanol 30 mL
Sensitizer 10 mL
Ultrapure water to 100 mL
• Staining solution
Stainer 1 mL
Ultrapure water to 100 mL
• Developing solution
Developer 10 mL
Developer enhancer 1 drop
Ultrapure water to 100 mL
Note: You may prepare all solutions immediately before starting the staining protocol or prepare them as you proceed to the next step.
Procedure For use with an 8 × 8 cm NuPAGE® gel, 1.0-mm thick. Use
100 mL of each solution per gel.
Note: You may have to optimize the staining protocol if the dimensions of your gel are not the same as mentioned above.
1. After electrophoresis, place the gel in a clean microwaveable staining tray of the appropriate size. Rinse the gel briefly with ultrapure water.
2. Place the gel in 100 mL of fixative and microwave at high power (700 watts) for 30 seconds. Remove the gel from the microwave and gently agitate it for 5 minutes at room temperature. Decant the fixative.
3. Wash the gel with 100 mL of 30% ethanol in a microwave at high power for 30 seconds. Remove the gel from the microwave and gently agitate it for 5 minutes at room temperature on a rotary shaker. Decant the ethanol.
Continued on next page

13
Fast Staining Protocol, Continued
Procedure, Continued
4. Add 100 mL of Sensitizing solution to the washed gel. Microwave at high power for 30 seconds. Remove the gel from the microwave and place it on a rotary shaker for 2 minutes at room temperature. Decant the Sensitizing solution.
5. Wash the gel twice in 100 mL ultrapure water. Microwave at high power for 30 seconds. At each wash step, remove the gel from the microwave and gently agitate it for 2 minutes at room temperature.
6. Place the gel in 100 mL of Staining solution. Microwave at high power for 30 seconds. Remove the gel from the microwave and gently agitate it for 5 minutes at room temperature.
7. Decant the Staining solution and wash the gel with 100 mL of ultrapure water for 20–60 seconds. Do not wash the gel for more than a minute (see page 9).
8. Place the gel in 100 mL of Developing solution and incubate for 5 minutes at room temperature with gentle agitation on a rotary shaker. Do not microwave.
9. After the desired band intensity is achieved, immediately add 10 mL of Stopper directly to the gel still immersed in Developing solution and gently agitate the gel for 10 minutes. The color changes from pink to clear indicating the end of development.
10. Wash the gel with 100 mL of ultrapure water for 10 minutes.
11. If you need to destain the gel for mass spectrometry analysis, see Destaining Protocol on page 14.
14
Destaining Protocol
Introduction When preparing samples for mass spectrometry analysis, it is important to remove silver ions from protein bands before performing in-gel trypsin digestion (Gharahdaghi et al., 1999). A destaining protocol using the Destainer solutions provided in the kit to remove silver ions from the gel is provided below.
Materials Needed
• Clean scalpel
• 1.5-mL sterile microcentrifuge tubes
• Ultrapure water
Procedure Use the following procedure with NuPAGE®, Tris-Glycine,
or Tricine 8 × 8 mini-gels, 1.0-mm thick.
1. After silver staining the gel, wash the gel thoroughly with ultrapure water.
2. Carefully excise the band of interest using a clean scalpel and place the gel piece into a 1.5 mL sterile microcentrifuge tube.
3. Excise another piece of gel of the same size from a blank region of the gel and place the gel piece into another sterile microcentrifuge tube. This will be used as a control for trypsin digestion.
4. Add 50 μL of Destainer A and 50 μL of Destainer B to each microcentrifuge tube.
Note: If you need to destain a large number of gel bands, then prepare the required amount of the destaining solution by mixing Destainer A and B, and use immediately. Destainer solutions A and B cannot be stored for long periods once they are mixed.
5. Mix the contents of the tube thoroughly and incubate for 15 minutes at room temperature. The gel pieces will slowly settle to the bottom.
6. Remove the supernatant using a clean pipette tip.
7. Add 200 μL of ultrapure water to the tube and mix. Incubate for 10 minutes at room temperature.
8. Repeat Steps 6–7 at least two times. Proceed to Trypsin Digestion (see page 16).
15
Prepare Samples for Mass Spectrometry Analysis
Introduction After completing silver staining and destaining your gel, you
are ready to prepare your protein sample from the gel for mass spectrometry analysis. Guidelines are provided on the following pages for trypsin digestion and sample preparation for MALDI/MS.
Materials Needed
• Sequencing grade trypsin
• 50 mM ammonium bicarbonate
• 100% methanol
• 30% methanol
• 50% acetonitrile containing 0.1% trifluoroacetic acid
• 100 mM ammonium bicarbonate containing 30% acetonitrile
• SpeedVac® Concentrator
• Water bath set at 37°C
• 1.5-mL sterile microcentrifuge tubes
Continued on next page
16
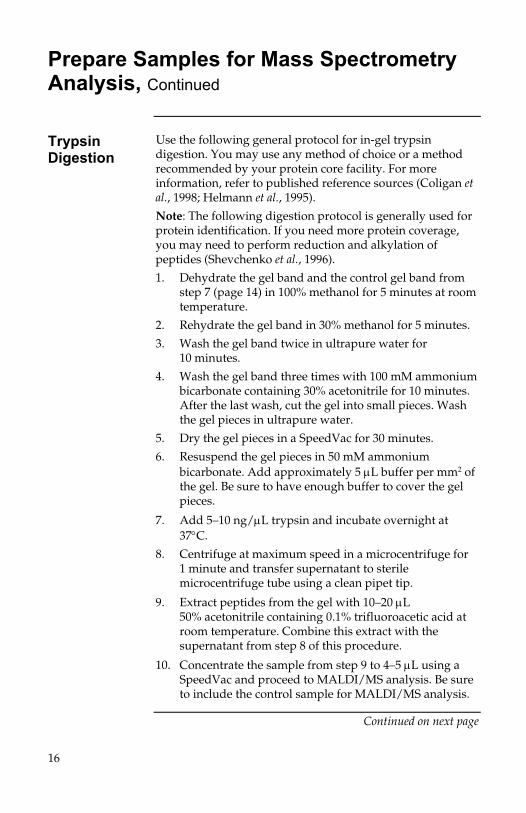
Prepare Samples for Mass Spectrometry Analysis, Continued
Trypsin Digestion
Use the following general protocol for in-gel trypsin digestion. You may use any method of choice or a method recommended by your protein core facility. For more information, refer to published reference sources (Coligan et al., 1998; Helmann et al., 1995).
Note: The following digestion protocol is generally used for protein identification. If you need more protein coverage, you may need to perform reduction and alkylation of peptides (Shevchenko et al., 1996).
1. Dehydrate the gel band and the control gel band from step 7 (page 14) in 100% methanol for 5 minutes at room temperature.
2. Rehydrate the gel band in 30% methanol for 5 minutes.
3. Wash the gel band twice in ultrapure water for 10 minutes.
4. Wash the gel band three times with 100 mM ammonium bicarbonate containing 30% acetonitrile for 10 minutes. After the last wash, cut the gel into small pieces. Wash the gel pieces in ultrapure water.
5. Dry the gel pieces in a SpeedVac for 30 minutes.
6. Resuspend the gel pieces in 50 mM ammonium bicarbonate. Add approximately 5 μL buffer per mm2 of the gel. Be sure to have enough buffer to cover the gel pieces.
7. Add 5–10 ng/μL trypsin and incubate overnight at 37°C.
8. Centrifuge at maximum speed in a microcentrifuge for 1 minute and transfer supernatant to sterile microcentrifuge tube using a clean pipet tip.
9. Extract peptides from the gel with 10–20 μL 50% acetonitrile containing 0.1% trifluoroacetic acid at room temperature. Combine this extract with the supernatant from step 8 of this procedure.
10. Concentrate the sample from step 9 to 4–5 μL using a SpeedVac and proceed to MALDI/MS analysis. Be sure to include the control sample for MALDI/MS analysis.
Continued on next page
17
Prepare Samples for Mass Spectrometry Analysis, Continued
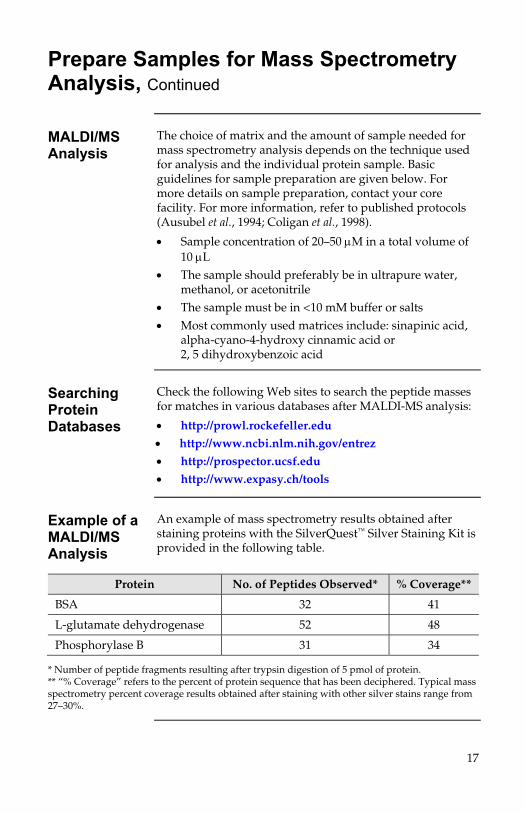
MALDI/MS Analysis
The choice of matrix and the amount of sample needed for mass spectrometry analysis depends on the technique used for analysis and the individual protein sample. Basic guidelines for sample preparation are given below. For more details on sample preparation, contact your core facility. For more information, refer to published protocols (Ausubel et al., 1994; Coligan et al., 1998).
• Sample concentration of 20–50 μM in a total volume of 10 μL
• The sample should preferably be in ultrapure water, methanol, or acetonitrile
• The sample must be in <10 mM buffer or salts • Most commonly used matrices include: sinapinic acid,
alpha-cyano-4-hydroxy cinnamic acid or 2, 5 dihydroxybenzoic acid
Searching Protein Databases
Check the following Web sites to search the peptide masses for matches in various databases after MALDI-MS analysis:
• http://prowl.rockefeller.edu
• http://www.ncbi.nlm.nih.gov/entrez
• http://prospector.ucsf.edu
• http://www.expasy.ch/tools
Example of a MALDI/MS Analysis
An example of mass spectrometry results obtained after staining proteins with the SilverQuest™ Silver Staining Kit is provided in the following table.
Protein No. of Peptides Observed* % Coverage**
BSA 32 41
L-glutamate dehydrogenase 52 48
Phosphorylase B 31 34
* Number of peptide fragments resulting after trypsin digestion of 5 pmol of protein. ** “% Coverage” refers to the percent of protein sequence that has been deciphered. Typical mass spectrometry percent coverage results obtained after staining with other silver stains range from 27–30%.
18
Troubleshooting
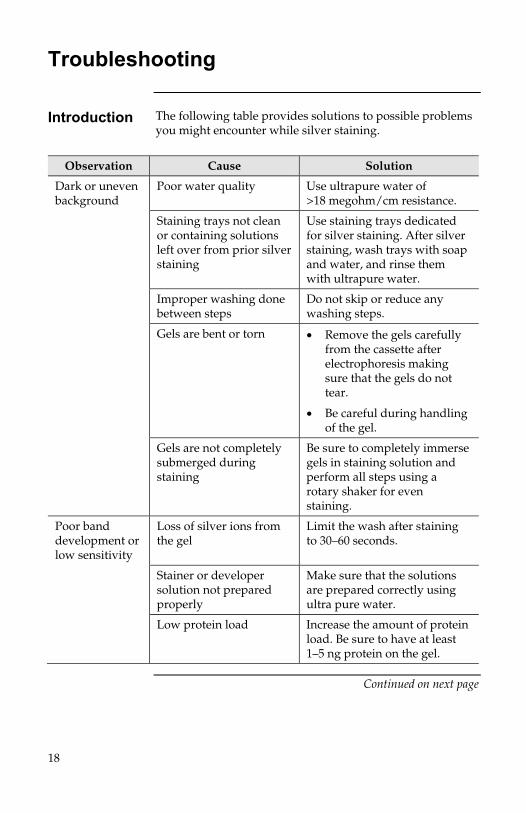
Introduction The following table provides solutions to possible problems
you might encounter while silver staining.
Observation Cause Solution
Dark or uneven background
Poor water quality Use ultrapure water of >18 megohm/cm resistance.
Staining trays not clean or containing solutions left over from prior silver staining
Use staining trays dedicated for silver staining. After silver staining, wash trays with soap and water, and rinse them with ultrapure water.
Improper washing done between steps
Do not skip or reduce any washing steps.
Gels are bent or torn • Remove the gels carefully from the cassette after electrophoresis making sure that the gels do not tear.
• Be careful during handling of the gel.
Gels are not completely submerged during staining
Be sure to completely immerse gels in staining solution and perform all steps using a rotary shaker for even staining.
Poor band development or low sensitivity
Loss of silver ions from the gel
Limit the wash after staining to 30–60 seconds.
Stainer or developer solution not prepared properly
Make sure that the solutions are prepared correctly using ultra pure water.
Low protein load Increase the amount of protein load. Be sure to have at least 1–5 ng protein on the gel.
Continued on next page
19
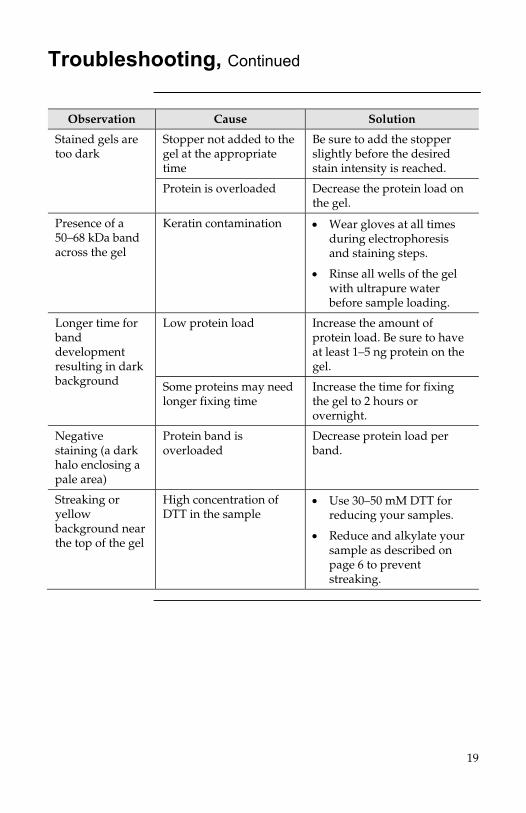
Troubleshooting, Continued
Observation Cause Solution
Stained gels are too dark
Stopper not added to the gel at the appropriate time
Be sure to add the stopper slightly before the desired stain intensity is reached.
Protein is overloaded Decrease the protein load on the gel.
Presence of a 50–68 kDa band across the gel
Keratin contamination • Wear gloves at all times during electrophoresis and staining steps.
• Rinse all wells of the gel with ultrapure water before sample loading.
Longer time for band development resulting in dark background
Low protein load Increase the amount of protein load. Be sure to have at least 1–5 ng protein on the gel.
Some proteins may need longer fixing time
Increase the time for fixing the gel to 2 hours or overnight.
Negative staining (a dark halo enclosing a pale area)
Protein band is overloaded
Decrease protein load per band.
Streaking or yellow background near the top of the gel
High concentration of DTT in the sample
• Use 30–50 mM DTT for reducing your samples.
• Reduce and alkylate your sample as described on page 6 to prevent streaking.
20
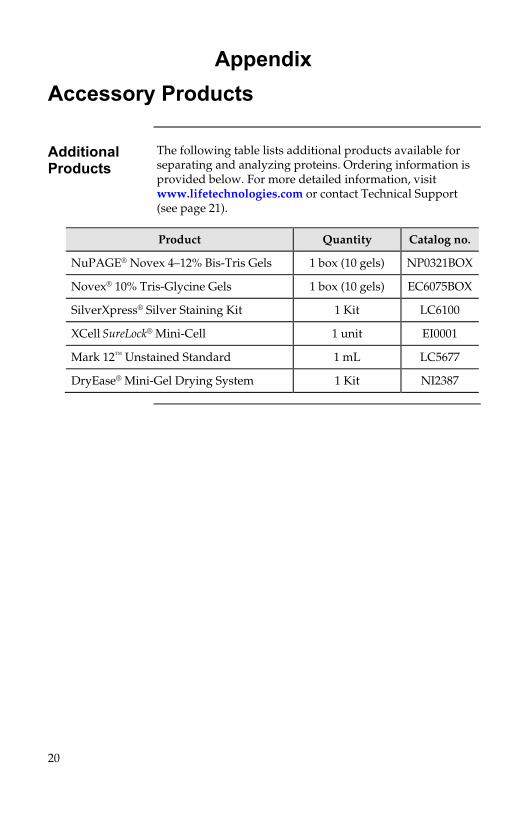
Appendix Accessory Products
Additional Products
The following table lists additional products available for separating and analyzing proteins. Ordering information is provided below. For more detailed information, visit www.lifetechnologies.com or contact Technical Support (see page 21).
Product Quantity Catalog no.
NuPAGE® Novex 4–12% Bis-Tris Gels 1 box (10 gels) NP0321BOX
Novex® 10% Tris-Glycine Gels 1 box (10 gels) EC6075BOX
SilverXpress® Silver Staining Kit 1 Kit LC6100
XCell SureLock® Mini-Cell 1 unit EI0001
Mark 12™ Unstained Standard 1 mL LC5677
DryEase® Mini-Gel Drying System 1 Kit NI2387

21
Technical Support
Obtaining support
For the latest services and support information for all locations, go to www.lifetechnologies.com/support. At the website, you can: • Access worldwide telephone and fax numbers to contact
Technical Support and Sales facilities • Search through frequently asked questions (FAQs) • Submit a question directly to Technical Support
([email protected]) • Search for user documents, Safety Data Sheets (SDSs),
vector maps and sequences, application notes, formulations, handbooks, certificates of analysis, citations, and other product support documents
• Obtain information about customer training • Download software updates and patches
Safety Data Sheets (SDS)
Safety Data Sheets (SDSs) are available at www.lifetechnologies.com/support.
Certificate of Analysis
The Certificate of Analysis provides detailed quality control and product qualification information for each product. Certificates of Analysis are available on our website. Go to www.lifetechnologies.com/support and search for the Certificate of Analysis by product lot number, which is printed on the box.
Limited Product Warranty
Life Technologies Corporation and/or its affiliate(s) warrant their products as set forth in the Life Technologies’ General Terms and Conditions of Sale found on Life Technologies’ website at www.lifetechnologies.com/termsandconditions. If you have any questions, please contact Life Technologies at www.lifetechnologies.com/support.
22
Purchaser Notification
Limited Use Label License: Research Use Only
The purchase of this product conveys to the purchaser the limited, non-transferable right to use the purchased amount of the product only to perform internal research for the sole benefit of the purchaser. No right to resell this product or any of its components is conveyed expressly, by implication, or by estoppel. This product is for internal research purposes only and is not for use in commercial services of any kind, including, without limitation, reporting the results of purchaser’s activities for a fee or other form of consideration. For information on obtaining additional rights, please contact [email protected] or Out Licensing, Life Technologies, 5791 Van Allen Way, Carlsbad, California 92008.
23
References
Ausubel, F. M., Brent, R., Kingston, R. E., Moore, D. D., Seidman, J. G., Smith, J.
A., and Struhl, K. (1994). Current Protocols in Molecular Biology (New York: Greene Publishing Associates and Wiley-Interscience).
Chambers, J. L., Christoph, G. G., Krieger, M., Kay, L., and Sroud, R. M. (1974). Silver Ion Inhibition of Serine Proteases. Biochemical and Biophysical Research Communications 59, 70-74.
Coligan, J. E., Dunn, B. M., Ploegh, H. L., Speicher, D. W., and Wingfield, P. T. (1998). Current Protocols in Protein Science, V. B. Chanda, ed. (New York: John Wiley and Sons, Inc.).
Gharahdaghi, F., Weinberg, C. R., Meagher, D. A., Imai, B. S., and Mische, S. M. (1999). Mass Spectrometric Identification of Proteins from Silver-Stained Polyacrylamide gel: A method for the Removal of Silver Ions to Enhance sensitivity. Electrophoresis 20, 601-605.
Helmann, U., Wernstedt, C., Gonez, J., and Heldin, C. (1995). Improvement of an In Gel Digestion Procedure for the Mircopreparation of Internal Protein Fragments for Amino Acid Sequencing. Anal. Biochem. 224, 451-455.
Laemmli, U. K. (1970). Cleavage of structural proteins during the assembly of the head of bacteriophage T4. Nature 227, 680-685.
Rabilloud, T. (1990). Mechanisms of Protein Silver Staining in Polyacrylamide gels: A 10-year Synthesis. Electrophoresis 11, 785-794.
Rabilloud, T., Vuillard, L., Gilly, C., and Lawrence, J. L. (1994). Silver -Staining of Proteins in Polyacrylamide Gels: A General Overview. Cellular and Molecular Biology 40, 57-75.
Shevchenko, A., Wilm, M., Vorm, O., and Mann, M. (1996). Mass Spectrometric Sequencing of Proteins from Silver-stained Polyacrylamide Gels. Anal. Chem 68, 850-858.
©2012 Life Technologies Corporation. All rights reserved. The trademarks mentioned herein are the property of Life Technologies Corporation or their respective owners.
SpeedVac is a registered trademark of Thermo Fisher Scientific.
LIFE TECHNOLOGIES CORPORATION AND/OR ITS AFFILIATE(S) DISCLAIM ALL WARRANTIES WITH RESPECT TO THIS DOCUMENT, EXPRESSED OR IMPLIED, INCLUDING BUT NOT LIMITED TO THOSE OF MERCHANTABILITY, FITNESS FOR A PARTICULAR PURPOSE, OR NON-INFRINGEMENT. TO THE EXTENT ALLOWED BY LAW, IN NO EVENT SHALL LIFE TECHNOLOGIES AND/OR ITS AFFILIATE(S) BE LIABLE, WHETHER IN CONTRACT, TORT, WARRANTY, OR UNDER ANY STATUTE OR ON ANY OTHER BASIS FOR SPECIAL, INCIDENTAL, INDIRECT, PUNITIVE, MULTIPLE OR CONSEQUENTIAL DAMAGES IN CONNECTION WITH OR ARISING FROM THIS DOCUMENT, INCLUDING BUT NOT LIMITED TO THE USE THEREOF.
24
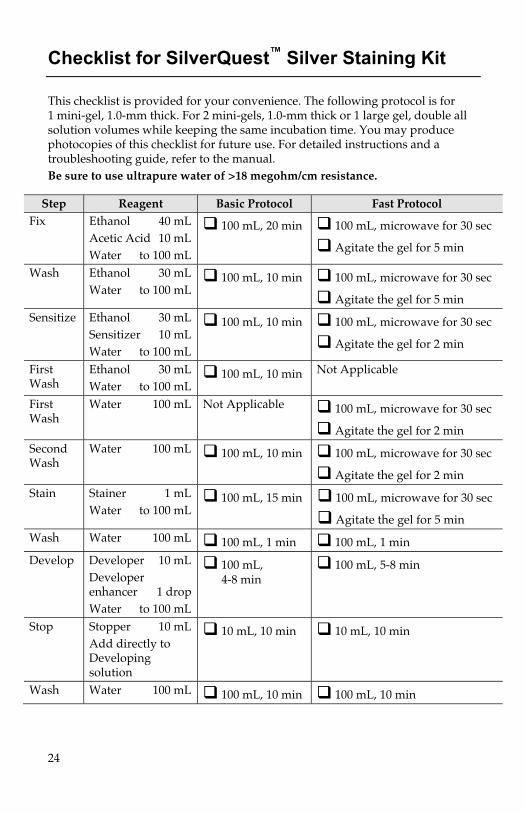
Checklist for SilverQuest™ Silver Staining Kit
This checklist is provided for your convenience. The following protocol is for 1 mini-gel, 1.0-mm thick. For 2 mini-gels, 1.0-mm thick or 1 large gel, double all solution volumes while keeping the same incubation time. You may produce photocopies of this checklist for future use. For detailed instructions and a troubleshooting guide, refer to the manual. Be sure to use ultrapure water of >18 megohm/cm resistance.
Step Reagent Basic Protocol Fast Protocol Fix Ethanol 40 mL
Acetic Acid 10 mL Water to 100 mL
100 mL, 20 min 100 mL, microwave for 30 sec
Agitate the gel for 5 min
Wash Ethanol 30 mL Water to 100 mL
100 mL, 10 min 100 mL, microwave for 30 sec
Agitate the gel for 5 min
Sensitize Ethanol 30 mL Sensitizer 10 mL Water to 100 mL
100 mL, 10 min 100 mL, microwave for 30 sec
Agitate the gel for 2 min
First Wash
Ethanol 30 mL Water to 100 mL
100 mL, 10 min Not Applicable
First Wash
Water 100 mL Not Applicable 100 mL, microwave for 30 sec
Agitate the gel for 2 min
Second Wash
Water 100 mL 100 mL, 10 min 100 mL, microwave for 30 sec
Agitate the gel for 2 min
Stain Stainer 1 mL Water to 100 mL
100 mL, 15 min 100 mL, microwave for 30 sec
Agitate the gel for 5 min
Wash Water 100 mL 100 mL, 1 min 100 mL, 1 min
Develop Developer 10 mL Developer enhancer 1 drop Water to 100 mL
100 mL, 4-8 min
100 mL, 5-8 min
Stop Stopper 10 mL Add directly to Developing solution
10 mL, 10 min 10 mL, 10 min
Wash Water 100 mL 100 mL, 10 min 100 mL, 10 min

25
Notes

26
Notes


Headquarters5791 Van Allen Way | Carlsbad, CA 92008 USAPhone +1 760 603 7200 | Toll Free in USA 800 955 6288For support visit www.lifetechnologies.com/support or email [email protected]
www.lifetechnologies.com