Silicone Sealants and Coatings for Building Construction … · 2016-11-07 · materials , methods,...
87
Silicone Sealants and Coatings for Building Construction and Restoration By: Dow Corning Corporation
Transcript of Silicone Sealants and Coatings for Building Construction … · 2016-11-07 · materials , methods,...

Silicone Sealants and Coatings for Building Construction and Restoration By: Dow Corning Corporation
Presenter
Presentation Notes
AV08519, AV07507, AV16742 Thank you for taking the time to attend today’s presentation about silicone sealants and coatings for building construction and restoration. We will be discussing sealant technology and proper applications and joint design for both new construction and restoration applications. This is an AIA accredited in which you will earn one learning unit and HSW credit.

Dow Corning is a Registered Provider with The American Institute of Architects Continuing Education Systems. Credit earned on completion of this program will be reported to CES Records for AIA members. Certificates of Completion for non-AIA members are available on request. This program is registered with the AIA/CES for continuing professional education. As such, it does not include content that may be deemed or construed to be an approval or endorsement by the AIA of any material of construction or any method or manner of handling, using, distributing, or dealing in any material or product. Questions related to specific materials, methods, and services will be addressed at the conclusion of this presentation.
Presenter
Presentation Notes
AV19083 Dow Corning is a Registered Provider with The American Institute of Architects Continuing Education Systems. Credit earned on completion of this program will be reported to CES Records for AIA members. Certificates of Completion for non-AIA members are available upon request. This program is registered with the AIA/CES for continuing professional education. As such, it does not include content that may be deemed or construed to be an approval or endorsement by the AIA of any material of construction or any method or manner of handling, using, distributing, or dealing in any material or product. Questions related to specific materials, methods, and services will be addressed at the conclusion of this presentation.
3
Copyright Materials
This presentation is protected by U.S. and international copyright laws. Reproduction, distribution, display and use of the presentation without written permission of the speaker is prohibited.
© Dow Corning Corporation 2011, 2016
Presenter
Presentation Notes
This presentation is protected by U.S. and international copyright laws. Reproduction, distribution, display and use of the presentation without written permission of the speaker is prohibited.

4
Upon completion of this course, participants will be able to: • Describe the differences between silicone and organic sealant
chemistries. • Identify key sealant properties. • Explain the functions of nonstructural glazing sealants and
select appropriate sealing systems for new construction and renovation applications.
• Explain the function of silicone structural glazing and identify appropriate applications.
(continued)
Learning Objectives
Presenter
Presentation Notes
AV16742 Today we will cover sealant chemistry, properties, and appropriate uses and designs for sealants in construction. By the end of the course, you should be able to do the following: Describe the differences between silicone and organic sealant chemistries. Identify key sealant properties. Explain the functions of nonstructural glazing sealants or weather sealants. Explain the function of silicone structural glazing.

5
Learning Objectives • Describe appropriate designs for structural vs. weathersealing
sealant joints. • Explain how and why sealants fail. • Select appropriate sealant systems for different building
construction and restoration applications and describe appropriate installation techniques.
• Identify the primary benefits of silicone sealants and coatings for building construction and restoration.
Presenter
Presentation Notes
AV16742 Describe appropriate designs for structural and weathersealing sealant joints. Explain how and why sealants fail. Select appropriate sealant systems for different building construction and restoration applications. And, identify the primary benefits of silicone sealants and coatings.

Course Outline • Sealant choices • Sealant chemistry • The role sealants play • Properties • Applications • Sealant failure • Proven silicone performance • References
Presenter
Presentation Notes
In this course, we will discuss the following topics. We'll start with sealant choices, then sealant chemistry and why it is important. We will examine the critical roles that sealants play as well as their properties, including definitions of the key terms used to describe sealant performance We will look at the many application types for sealants. We will also look at some common causes of sealant failure, and then look at some of the many examples of proven silicone performance. We'll provide some additional references of additional material. For AIA credit, a ten-question exam will follow the presentation.

You Have Many Choices When Specifying Sealants • Sealants available: One- and two-part polyurethane,
polysulfide, acrylic, hybrid and silicone
• What are the differences, and why does it matter?
• How important is the longevity of a sealant?
• Restoration can cost 2 to 3 times the cost of an original installation … can the building owner afford to do it a third time?
Presenter
Presentation Notes
You have many choices when specifying sealants. There are polyurethanes, polysulfides, acrylics, modified silicones and hybrid silicones on the market. So why are we so excited about silicones and what makes them different? We will talk a lot today about durability and longevity. When restoration can cost two- to three-times what an original product installation can cost, this matters. You want to choose a sealant chemistry with proven long-term performance.

Sealant Chemistries There are two broad categories of sealant chemistries available: • Organic, which consist of a carbon-based polymer
(-C-C-O-C-C-) – Single-component and multicomponent polyurethane – Polysulfide – Acrylic – Hybrid
• Inorganic, which consist of noncarbon-based polymer (-Si-O-Si-O-Si-) – Silicone
Presenter
Presentation Notes
AV19082 For a better understanding of the sealants and the selection process, let's begin with a brief explanation of sealant chemistry. There are two broad categories of sealant chemistries available: organic and inorganic. Organic sealants consist of a carbon-based polymer, so the backbone of the sealant is composed of carbon-carbon bonds. There are many types of organic sealants: polyurethanes, polysulfides, acrylics and even modified silicone sealants. Inorganic sealants are silicones only. They are comprised of a noncarbon-based polymer and have a backbone made up of silicon-oxygen bonds or Si-O bonds. So what's the difference? As the next slide will show, in real life, there's a big difference. But since we're still talking chemistry in this slide, the difference is bond angle. The silicon-oxygen bond is approximately 30% more flexible than the carbon-carbon bond. If you think of this like your backbone, the carbon-carbon spine cannot take much twisting an movement before the bond breaks. Conversely, the silicone-oxygen bond can absorb a lot of energy, and the silicon and oxygen move around and twist without the bonds breaking.

Why Is Sealant Chemistry Important? • Ultraviolet (UV) light will degrade the carbon-carbon or
carbon-oxygen bond of an organic sealant • There is not enough energy in UV light to degrade the Si-O
bond of a silicone sealant • Therefore, an organic (polyurethane)
sealant will degrade in sunlight, and a silicone sealant will be virtually unaffected
Presenter
Presentation Notes
AV17122, AV19082 This degree of movement and the sealant's ability to absorb energy comes into play when a sealant encounters its environment. Temperature swings, UV light, different loading scenarios, but the most intense environmental factor which puts energy in to a sealant is UV light. There is enough energy in UV light to break the carbon-carbon and carbon-oxygen bonds which make up the organic sealants. In essence, the bonds holding their spines together break, because the carbon and oxygen atoms soak up the energy and start to move, and the bonds holding them together cannot stretch and move, so they break. The silicone and oxygen atoms, when exposed to the same UV light, will also start to move, but the bond energy holding together is much higher, and UV light cannot break it. So, the atoms remain bonded and the sealant remains intact. Therefore, an organic sealant will degrade in sunlight, whereas a silicone will be virtually unaffected. The picture shows a silicone sealant next to a polyurethane sealant and the sample has been artificially weathered for 2,400 hours, which is equivalent to approximately 3 to 6 years in outdoor conditions, depending on the severity. In high UV exposure climates such as Las Vegas and Phoenix, this may represent an even shorter field exposure time. As you can see, the organic sealant – a polyurethane in this case – degrades while the silicone remains unaffected. This is because the silicone-oxygen backbone of the silicone sealant can absorb the energy from the UV light while its bonds remain intact. The organic bonds are not able to do this. The energy breaks the bonds, resulting in the degraded sealant. This is just chemistry and physics, and it is unavoidable. All the additives in the world cannot change the fact that carbon-carbon and carbon-oxygen bonds just cannot absorb nearly the energy that a silicone-oxygen bond can. When the polymer backbone is less able to absorb energy, it is not going to be as durable in exterior environments where it is being bombarded by energy from UV light and temperature swings.

Polyurethane Sealant Deterioration How a polyurethane sealant deteriorates from exposure to UV light: • Hardening, chalking, crazing,
cracking and reverting
10
Presenter
Presentation Notes
AV23610 This picture further illustrates what can happen to organic sealants when exposed to UV light over time. They can harden, chalk, crack, craze or even revert. In most cases, the sealant gets stiffer as it ages. Since joint movement continues, the sealant then commonly fails cohesively or tears within itself. The photo on the right illustrates cohesive failure. As the sealant hardens, it may also put more stress on the substrate, causing adhesive failure of the sealant, substrate delamination, or spalling. The surface of the organic sealant can also chalk, craze, or crack on the surface. These surface cracks can propagate through the sealant and cause it to fail. A form of polyurethane sealant failure discovered in the 1990s is called reversion. Reversion is when the sealant becomes so badly degraded it goes back to – or reverts – to its pastelike consistency.

What Causes Reversion? • 1991 study evaluated 5 multicomponent polyurethane sealants
and 2 silicone sealants
• 4 of 5 polyurethane sealants reverted after accelerated weathering; silicones did not
• 1 polyurethane sealant doubled in modulus
• Conclusion: Ultraviolet light triggers reversion
Presenter
Presentation Notes
For a little more on what reversion is, in a 1991 study presented at ASTM, five multi-component and two silicone sealants were exposed to various weathering conditions, including UV, heat and moisture, both separately and independently. In this study, 4 of the 5 polyurethane sealants reverted, and one became stiffer, in fact doubling in modulus. The silicones remained unaffected. The conclusion of the paper was that ultraviolet light triggers reversion.

What Is the Role of a Sealant? • Stop water and air intrusion • Accommodate differential
thermal movement and other structural movements
• Coefficient of thermal expansion (in/in/°F) – Aluminum = 12.9 x 10⁻⁶ – Glass = 5.1 x 10⁻⁶ – Concrete = 6.5 x 10⁻⁶ – Polycarbonate = 38 x 10-6
Presenter
Presentation Notes
AV21549 We are done with chemistry. I hope you can see how important it is to pick the sealant with the right backbone so that it will perform over time. Now that a durable sealant has been selected, what do we want the sealant to do? The primary purpose of a sealant is to stop water and air from infiltrating into a building. Many different types of materials are used on a building’s exterior. All of these materials have different coefficients of thermal expansion. This means that as temperature changes, the materials move at different rates. Aluminum, for example, moves at twice the rate of glass and concrete. When these materials abut each other at window perimeters and other locations, a sealant that can accommodate a range of expansion and contraction is required to keep the joints – and, subsequently, the building – air- and water-tight. Air infiltration is the buzz in construction today, and avoiding it will lead to more energy-efficient buildings. To achieve airtight buildings, components must be sealed together and remain sealed together over time. Perhaps a little more obvious and more damaging to other components in the building, is water intrusion. Again, if a sealant loses adhesion or doesn't gain it due to improper installation or the sealant cracks or reverts as we have seen in the prior photos, and water is dripping on the expensive carpet in the penthouse suite, well… the building owner is going to hear about that right away. Depending on the extent of the exposure, the repairs for water intrusion can go far beyond fixing the sealant. For energy costs, air infiltration is definitely key, but the consequences are not quite as obvious if we don't keep water out. When it comes to keeping the components inside the building from damage such as mold and mildew, its really important to keep water out.

Important Sealant Properties • Adhesion to a variety of materials
– Primers may be required • Modulus – high modulus (stiffest) to ultralow modulus
(for high-movement joints) • Movement capability (determined by ASTM C719) • Durability when exposed to UV light, moisture and
temperature extremes – What are the property changes?
Presenter
Presentation Notes
Now that you know what you want a sealant to do, how do you go about specifying the proper sealant to ensure that it will work? Key sealant properties include adhesion, modulus, movement capability and durability. First, and perhaps most important, is adhesion. Every sealant, depending on its formulation, has a different adhesion profile. Certain sealants adhere better to porous substrates, while other sealants adhere better to nonporous substrates. In many cases, the sealant manufacturer will require the use of a primer to enhance a sealant’s adhesion to a specific substrate. Sealant manufacturers offer adhesion testing as part of their services to help you evaluate which sealant and primer are appropriate for which substrate. Additionally, product literature can be helpful in determining which sealants stick to which substrates. Field testing is always an option as well. Modulus is important because it helps determine whether a sealant can accommodate the specified joint movement. A high-modulus sealant is a stiffer sealant. In other words, a high-modulus sealant can accommodate a high stress load with very little strain or movement. This type of sealant usually has lower movement capability. High-modulus sealants are often used where strength is important, such as in structural glazing where a sealant adheres glass to the outside of a building. A medium-modulus sealant can sometimes be used in both structural and weatherseal applications. A low- or ultra-low-modulus sealant has high movement capability, which allows the product to expand with minimal force. Movement is usually correlated to modulus, but not necessarily. Typically, high-modulus sealants have lower movement capability, and low-modulus sealants have higher movement capability. Low-modulus sealants may have movement capability of up to +100/-50% of the original joint width. Movement capability is determined through the ASTM C719 test method. The final important sealant property is durability. A sealant may have excellent physical properties initially, but what will happen to those properties after 5, 10 or 20 years on the building? What effect will moisture have on those properties? Also, what effect will temperature have on the sealants’ movement capability and modulus?

Silicone Sealant Properties • Excellent UV resistance and physical property retention • Properties vary with polymers, crosslinkers, fillers, adhesion
promoters, fluids, etc. • Properties that vary include:
– Adhesion – Stain potential – Movement capability – Modulus
Presenter
Presentation Notes
Silicones serve very well in all of these categories and stand out as being more durable than other sealant technologies. Silicone sealants have excellent UV resistance and physical property retention due to the stable silicone polymer backbone – that backbone we discussed which was unaffected by its environment? This makes silicones very durable. There have been numerous ASTM and other peer reviewed papers published on this topic. Sealant properties vary with composition of the components. Properties such as adhesion, stain potential, movement capability and modulus change with the formulation of the sealant.

Silicone Sealant Properties
Presenter
Presentation Notes
AV23711 Modulus is a critical component of a sealant’s performance. A low-modulus sealant such as this will stretch freely and not put as much stress on the substrate as a stiffer, high-modulus sealant.

Sealant Modulus vs. Temperature St
ress
, psi
Elongation, %
Presenter
Presentation Notes
This graph further illustrates how different sealant chemistries and different sealant moduli affect the sealant-substrate interface. Results are shown from testing performed on a multi-component polyurethane sealant and a silicone sealant both at room temperature and 0°F. On the left side of the graph is the amount of stress (in psi) being applied as the blocks are pulled apart. Along the bottom is the percent elongation. As you can see, the polyurethane sealant (the blue colored line) is relatively low modulus at room temperature. At 25% elongation, the stress is about 15 psi. The same sealant, when conditioned for 24 hours at 0°F and tested again (the purple line), experiences a three-fold increase in modulus to about 45 psi. This organic sealant gets very stiff when it gets cold, translating to a lot more stress put on the substrate at cold temperatures. When tested at the same temperatures, the silicone sealant, on the other hand, demonstrated minimal change in modulus, as shown by the green and red lines on the graph. This is an inherent characteristic of silicone sealants. Organic sealants, however, all demonstrate significant changes in modulus as temperature changes. Why is this important? Well, when is a joint at its widest? When is it coldest, because the substrates on either side are contracted. This is when modulus becomes important. A sealant that becomes stiff when it is cold will put excessive stress on the substrate when a joint opens up, which could lead to substrate failure with softer or weaker substrates such as EIFS.

Applications • Weatherseals • nonstructural glazing • Restoration • Precured silicone
sealants • Exterior insulation and
finish systems (EIFS)
• EIFS restoration • Silicone coatings • Sensitive substrates • Parking structures • Stadiums • Structural glazing • Protective glazing
Presenter
Presentation Notes
AV19084 Next, we will talk about some different applications for silicone sealants and silicone coatings in the construction industry, including weatherseals, structural glazing and other topics.

Weatherseals
• Use an hourglass-shaped butt joint for best performance
• 2-to-1 width-to-depth ratio minimum
• Maintain 1/4" contact to each joint surface
• Avoid 3-sided adhesion; use backer rod or bond breaker tape
• Other joint types: fillet joint, bridge joint, double weatherseal
Presenter
Presentation Notes
But first let's discuss weatherseals and an overview of weatherseal joint design. The most basic and most common weatherseal is a butt joint between two materials as shown in the diagram. It may be an expansion joint, a perimeter seal or just a butt joint within a system between panels or glass. The hourglass butt joint shape is effective because the sealant depth of half the joint width reduces stress on the sealant and substrate. The hourglass shape always allows for maximum contact with the sides of the joint. The other important item to consider when dimensioning a sealant joint is the substrate to sealant bond length, or sealant bite. In all cases, there should be at least 1/4" contact on each joint surface in a moving joint. Also, the sealant should be installed to allow adhesion to only the two sides of the joint and not the back of the joint. Backer rod or bond breaker tape can be used to prevent three-sided adhesion. Other common joints include: fillet joints, where two perpendicular joints abut each other; bridge joints, which are typically used for restoration over failed weatherseals; and double weatherseals, commonly used in modern commercial construction.

Joint Design Basics
• Minimum depth of 1/4" sealant/substrate bond to ensure adequate adhesion
• Minimum width of 1/4" opening to ensure sealant flow into joints • Ensure joint design allows moisture from environmental humidity
access to one-part silicone sealants for full cure
Presenter
Presentation Notes
AV18953 Sealants are designed to perform when installed in compliance with accepted weathersealing procedures. Industry guides documenting in detail the procedures for designing weatherseal joints are available. We will provide some examples in this presentation. A few underlying principles are critical to consider in virtually all joint designs using silicone sealants. This section is intended as a review of these underlying design principles. In all cases, a minimum depth of 1/4" sealant/substrate bond is necessary to ensure adequate adhesion. In most cases, a minimum width of 1/4" opening is necessary to ensure that sealant applied from a caulking gun will flow into the sealant joints. In some cases where the sealant is used simply as a nonmoving bedding compound and is applied to one substrate before both substrates are pressed together, thinner joint dimensions are acceptable. One-part silicone sealants require atmospheric moisture to fully cure. Therefore, the sealant joint must be designed to ensure that the sealant is not isolated from the air.

Design of Moving Joints
• A minimum 1/4" joint width is recommended • Eliminate three-sided adhesion using a bond breaker tape or
backer rod • A properly designed moving joint with a 2:1 width to depth ratio
will accommodate more movement than a thick joint • As the sealant joint width becomes larger than 1", the depth
should be held at approximately 3/8" to 1/2" at maximum • Joint widths up to 4" can be accommodated with silicone
sealants
Presenter
Presentation Notes
For moving joints, the following items should also be considered. A minimum 1/4" joint width is recommended. Wider joints accommodate more movement than narrow joints. Three-sided adhesion limits the amount of movement that a joint can accept without inducing a tear. Three-sided adhesion can be eliminated by the addition of a bond breaker tape or backer rod. With three-sided adhesion, no more than ±15% movement can be accommodated. A properly designed moving joint with a 2:1 width to depth ratio will accommodate more movement than a thick joint (i.e., a 1.5:1 or 1:1 ratio). Sealants are designed to deliver optimum performance when the joints are shaped like an hourglass and use the 2:1 ratio. As the sealant joint width becomes larger than 1", the depth should be held at approximately 3/8" to 1/2" at maximum. There is no need for greater sealant depth with a silicone sealant. This may mean that the width to depth ratio will be greater than 2:1 (i.e., 3:1). Joint widths up to 4" can be accommodated with silicone sealants. Wide joints may require additional care and attention to detail to provide an aesthetically pleasing finish. Wider joints may be better accommodated by use of precured silicone strips. Although wider joints can be installed, it is much more difficult to install them correctly without the sealant sagging or wrinkling. A guideline is that the sealant depth in the middle of the joint is approximately half the sealant width, up to 1" in width. For wider joints, the sealant depth should still be maintained at no more than one half of an inch. This is important so that the joint movement capability of the sealant is maintained. If you imagine holding a rubber band between your thumb and forefinger and stretching it, it is fairly easy to do. Now double the rubber band on itself, making it thicker, and it is harder to pull on. If you fold it over again, it will become thicker and so on, because it is in effect, deeper. The rubber band hasn't changed in composition, but its depth can affect its ability to move. Sealants are the same way; the thicker the joint, the less movement it will have, so it should not be deeper than 1/2". The minimum depth at the joint center then is 1/8" for a 1/4" wide joint, but remember … 1/8" depth is used at the center; 1/4" bite or contact on the substrate must still be maintained.

Typical Joint Designs – Conventional Moving Weatherseal
Good Joint Design – Key Points: 1. Dimension A must be at least 1/4" (6 mm). 2. Dimension B must be at least 1/8" (3 mm). 3. Dimension C must be at least 1/4" (6 mm). 4. Ratio of A:B should be 2:1 minimum. 5. Joint surface tooled. 6. Dimension B suggested maximum = 1/2" (12.7 mm). 7. Dimension A maximum = 4" (100 mm). Joints wider
than 2" (50 mm) may slump slightly; therefore, double application techniques of the sealant may be required.
Poor Joint Design – Concerns: 1. A deep sealant joint will not have the same
movement capability as a properly designed joint. 2. Slow cure due to excessive sealant depth.
Silicone sealant
Backer rod
Good Joint Design Poor Joint Design Silicone sealant
Backer rod
Presenter
Presentation Notes
On the next few slides, we'll look at some typical weatherseal joint designs and some of the key points differentiating good and bad designs. We'll begin with a conventional moving weatherseal joint, which is designed to accommodate typical expansion/contraction and substrate movement. Key points for a good joint design include: Dimensions that meet minimum joint requirements. In this case, a joint width of at least 1/4", joint depth of at least 1/8", with a ratio of the width to depth being at least 2:1. The joint surface should be tooled. The joint depth should not exceed a 1/2"maximum, and the joint width should not exceed a 4" maximum. Joints wider than 2“ may slump slightly; therefore, double application techniques of the sealant may be required. Comparatively, common mistakes in a moving weatherseal design are illustrated with the "Poor Joint Design" detail. A deep sealant joint will not have the same movement capability as a properly designed joint, and excessive sealant depth will cause slow sealant cure.

Typical Joint Designs – Moving Corner Joints
Good Joint Design – Key Points: 1. Dimensions A and B must be at least 1/4" (6
mm). 2. A bond breaker tape or backer rod must be
present if joint movement is anticipated. 3. Joint must be tooled flat or slightly concave. 4. Dimension C must be at least 1/4" (6 mm).
Poor Joint Design – Concerns: 1. Dimension A or B less than 1/4" (6 mm). 2. Joint not properly tooled. 3. No bond breaker material; therefore, the joint
will not accept movement.
Poor Joint Design Good Joint Design
Bond breaker/backer rod
Presenter
Presentation Notes
With a moving corner joint, use of a breaker tape or backer rod is critical to enable joint movement. The break material should be at least 1/4" in thickness as shown by dimensions A and B on the illustration. Similarly, the sealant should be at least 1/4“ deep (shown by dimension C) and should be tooled flat or slightly concave. Factors contributing to a poor joint design include insufficient depth of backer materials, improperly tooled sealant or complete lack of a backer material – which negates the movement capability of the joint.

Typical Joint Designs – Dual-Seal Moving Weatherseal
Good Joint Design – Key Points: 1. Both weatherseals comply with the requirements
for conventional moving weatherseals (addressed previously).
2. Open-cell backer rod is used to ensure full cure of the back weatherseal.
3. If closed-cell backer rod is used, the back weatherseal must be fully cured prior to the installation of the exterior seal.
4. Dimension A is at least 3/4" wide to assist application of the rear sealant joint.
Poor Joint Design – Concerns: 1. If both joints are sealed at or near the same
time, the closed-cell backer rod will prevent moisture from reaching the rear sealant joint, and the sealant will not cure.
2. Dimension A is less than 3/4", making application of rear joint difficult.
3. Exterior joint seal to aesthetic snap-on cap.
Good Joint Design Poor Joint Design
Open-cell backer rod
Closed-cell polyethylene backer rod
Silicone sealant
Silicone sealant
Presenter
Presentation Notes
In the dual-seal moving weatherseal, both weatherseals must comply with the requirements for conventional moving weatherseals as we previously discussed. An open-cell backer rod – which will enable moisture vapor to pass through – is used to ensure full cure of the back weatherseal. If closed-cell backer rod is used, the back weatherseal must be fully cured prior to the installation of the exterior seal. It is recommended that the joint width (dimension A) be at least 3/4" wide to assist application of the rear sealant joint. Some typical concerns that can lead to poor joint performance are indicted by the “Poor Joint Design” detail. If both joints are sealed at or near the same time and a closed-cell backer material is used, the closed-cell backer rod will prevent moisture from reaching the rear sealant joint, and the sealant will not cure. Use of a narrower joint width (dimension A less than 3/4") can make application of the rear joint difficult and contribute to installation problems. And an exterior joint seal to aesthetic snap-on cap.

Good Joint Design – Key Points: 1. Dimensions A and B are each 1/4" (6 mm) or larger.
Poor Joint Design – Concerns: 1. Attempting to apply sealant onto the edge of (or
behind) thin-gauge metal results in inadequate sealant/substrate contact and water leakage.
Typical Joint Designs – Window Perimeter Joints
Good Joint Design Poor Joint Design
Splice joint
Splice joint
Backer rod
Backer rod
Presenter
Presentation Notes
In window perimeter joints, it's critical to allow 1/4" of sealant bite on both the aluminum extrusion and the substrate. Attempting to apply sealant onto the edge of (or behind) thin-gauge metal results in inadequate sealant/substrate contact and water leakage.

• Glass-to-glass butt joints • Silicone cap beads • Internal seals
– End dams – Screw heads – Splice joints
Nonstructural Glazing
Presenter
Presentation Notes
(AV25102) Other weatherseal applications include nonstructural glazing applications, such as glass-to-glass butt joints, silicone cap beads from the glass to the window frame and internal seals in the window system. These seals are often overlooked but are very critical. They ensure that the window drainage system can effectively control water when it enters the window system. Silicone is the best product to provide long-term window drainage system performance.
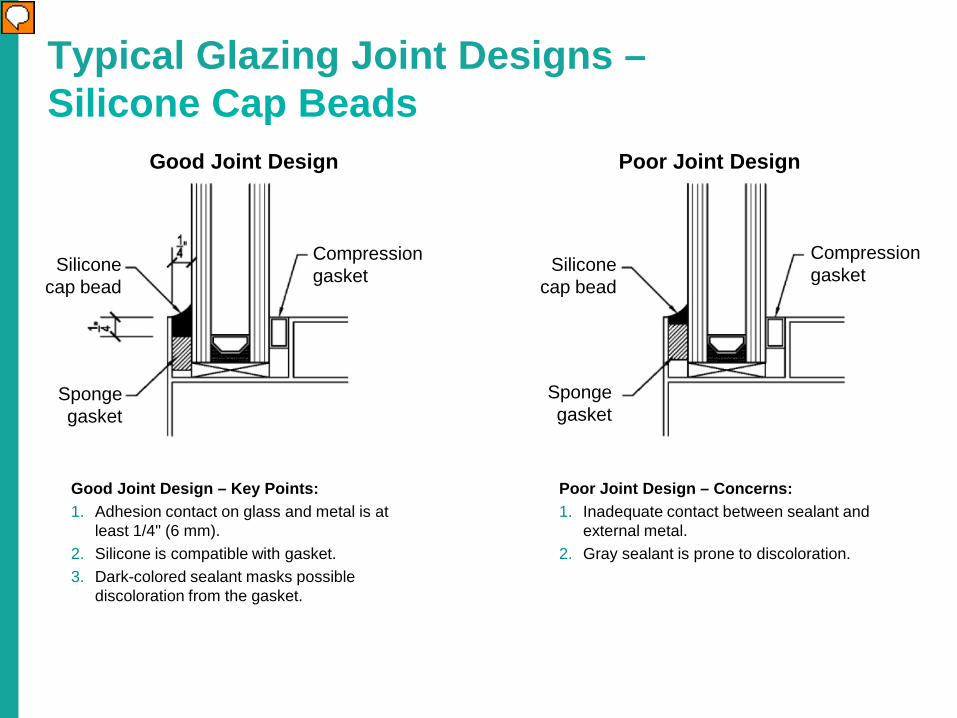
Typical Glazing Joint Designs – Silicone Cap Beads
Good Joint Design – Key Points: 1. Adhesion contact on glass and metal is at
least 1/4" (6 mm). 2. Silicone is compatible with gasket. 3. Dark-colored sealant masks possible
discoloration from the gasket.
Poor Joint Design – Concerns: 1. Inadequate contact between sealant and
external metal. 2. Gray sealant is prone to discoloration.
Good Joint Design Poor Joint Design
Silicone cap bead
Silicone cap bead
Compression gasket
Compression gasket
Sponge gasket
Sponge gasket
Presenter
Presentation Notes
On the next two slides, we'll discuss some suggestions for good glazing joint designs. Like most joint designs, a key point for cap bead glazing joints is to ensure adequate adhesion contact area. A minimum contact area of one quarter inch is recommended on the glass and metal areas. It is also critical that the chosen silicone is compatible with the gasket material. Additionally, use of a dark-colored sealant will mask possible discoloration from the gasket. Typical concerns encountered in poorly designed joints are inadequate contact between the sealant and the external metal. Use of lighter, gray sealant is prone to discoloration.

Typical Glazing Joint Designs – Splice Joints
Key Points: 1. Joint is very difficult to clean. 2. Bond breaker hard to position/size
correctly. 3. Movement during cure can cause
joint failure.
Good Joint Design Poor Joint Design
Bond breaker tape
Aluminum splice Bond breaker tape
Adhesive foam tape
Bond breaker tape
Best Joint Design
Bond breaker
Old sealant
Silicone seal Silicone weatherproofing sealant or silicone building sealant as the adhesive
Good Joint Design
Presenter
Presentation Notes
Regardless of their apparent simplicity, splice joint designs have a number of challenges. They can be very difficult to clean, the bond breaker can be hard to position/size correctly, and movement during cure can cause joint failure. Take particular care to address these concerns, and ensure adequate sealant contact area, ideally 3/8" or greater beyond the bond breaker material. In the "Best Joint Design" figure shown here, the splice joint is used as a remedial seal to replace existing failed sealant.

Sealant Installation • Clean – clean, dry, frost-free substrates • Prime as recommended by the sealant manufacturer • Install backer material sized 25% larger than the joint • Install sealant and tool • Perform field adhesion testing – document in quality
assurance log
Presenter
Presentation Notes
AV17125, AV17126, AV17127, AV17128, AV17129 Now we will talk about proper sealant installation. We spend hours on this topic when training sealant installers or contractors, but this will be a quick overview today. The biggest take-away here is that sealant installation is critical. You can specify the perfect sealant, but improperly installed, it can lose adhesion, and the water and air comes flowing into the building. When we are called to look at sealant issues, it is generally related to improper installation. Proper installation of sealant requires that certain steps be followed. These are the big six of sealant installation: Clean, prime, back the sealant, install the sealant, tool the sealant and check your work. First, the substrate must be clean, dry and frost-free. Depending on the substrate, this may require abrasion or solvent cleaning. Priming is then done for certain sealant/substrate combinations. There are many types of primers, including film-forming primers and chemical treatment primers which penetrate instead of forming a film. The correct primer must be used. Refer to the sealant manufacturer’s guidelines. After cleaning and priming, a backer material is installed. The backer rod allows the sealant to be installed and tooled properly and provides a proper joint shape. The backer rod should be sized at least 25% larger than the joint. The sealant is then installed and tooled. The sealant should completely fill the joint. Tooling ensures that the joint is filled to the proper joint shape and that the sealant wets out the sides of the joint. Finally, field adhesion testing is performed on the sealant one to two weeks after it has been installed to ensure full adhesion.

Sealant Installation: Adhesion Testing
Field adhesion testing verifies sealant adhesion at the job site
Presenter
Presentation Notes
AV17130 Field adhesion testing is simple to do and ensures things are being installed correctly and consistently. This picture shows a field adhesion test being performed on an ultra-low-modulus sealant installed in an EIFS-to-EIFS joint. In this case, a tab is pulled one inch from where it is cut. You can see the extreme elongation characteristics of this product. Each sealant has different pass/fail criteria. Some sealants require a certain percent elongation, while others require cohesive failure of the sealant. Each manufacturer should publish its pass/fail criteria. Field adhesion tests should be conducted at the start of the job and throughout the project to verify sealant adhesion and to track the workmanship of the contractor.

Restoration • Grind off old sealant • Install test joints before starting the
restoration project • Wet seals – to replace failed gaskets • Bridge joints – disengage existing
sealant joints that are hardened and/or difficult to remove
Presenter
Presentation Notes
AV24441 For restoration work, a step has to be added to the installation process. The old sealant must be removed, or it may be decided to cover over it. If removed, there could be a cutting or grinding step before cleaning depending on the condition. For example, to restore joints containing failed polyurethane sealant, we recommend complete removal of the failed sealant. We do not want to rely on adhesion on a failed, poorly performing product. This may mean grinding the joint surfaces down to the original substrate or cutting the sealant out and abrading the substrate with something like Scotch-Brite™ may be sufficient. Each job and condition is unique, so we recommend a mock-up for restoration projects, in which field adhesion tests be performed on a representative substrate to verify first that the substrate preparation method has worked, and secondly to determine if a sealant will adhere with or without primer. Another common restoration application is the use of wet seals from the window frame to glass. The use of fillet beads and bridge joints should be used at all window joinery to prevent water from entering the window system. Bridge joints can be produced with wet sealant or precured sealant.

Restoration – Bridge Joints – Wet Sealants
Good Joint Design – Key Points: 1. Dimension A must be at least 1/4" (6 mm). 2. Dimension B must be at least 1/8" (3 mm). 3. Bond breaker tape must be used to isolate
fresh sealant from failed organic weatherseal and to allow joint movement.
4. If existing sealant has not lost adhesion to the substrate, disengage it before applying silicone sealant.
Poor Joint Design – Concerns: 1. Dimension A less than 1/4" (6 mm) increases
difficulty in obtaining adhesion and increases the likelihood for voids.
2. Dimension B less than 1/8" (3 mm) increases the likelihood of pinholes or voids in tooling; poor cohesive integrity.
3. No bond breaker material; therefore, the joint will not accept movement.
Good Joint Design Poor Joint Design
Failed organic sealant
Silicone sealant
Bond breaker
Backer rod Backer rod
Failed organic sealant
No bond breaker
Silicone sealant
Presenter
Presentation Notes
Alternatively, instead of cutting out the old sealant, it may be chosen to bridge over it, either to lower the labor costs or to protect the substrate that may be damaged when removing sealant. Bridge joints may be formed with precured silicone strips that use wet sealants as the adherent, or they may be installed using wet sealant as the bridge material. It is very important that sufficient sealant contact area is used. At least 1/4" is recommended, as shown in Dimension A on the detail. The sealant thickness (shown as dimension B) must be at least 1/8" in depth. To isolate the fresh sealant from failed organic weatherseal and to allow joint movement, a bond breaker tape must be used. If the existing sealant has not failed completely or lost adhesion to the substrate, it should be disengaged from the substrate before applying the new silicone sealant. Concerns arising from poor joint designs are similar to those previously discussed. A lack of appropriate sealant contact area increases difficulty in obtaining adhesion and increases the likelihood for voids. Too thin of sealant application – say, less than 1/8“ thickness, increases the likelihood of pinholes or voids in tooling and may exhibit poor cohesive integrity. With a lack of bond breaker material, the joint will not be able to accommodate movement.

Bridge Joints
Presenter
Presentation Notes
AV17110 The picture shown here is a combination of techniques to create a water-tight window system. Wet seals at the window frame metal-to-glass joint in conjunction with bridge joints at the metal-to-metal miters provide leak protection for both spots. Precured sealant, as shown, can be used to make bridge joints.

Precured Silicone Sealants
Presenter
Presentation Notes
AV03749, AV03750, AV03873 Precured silicone sealants were introduced in the early 1990s as an innovative way to restore failed polyurethane sealant joints. These products are applied on the face of the joint adjacent to the existing sealant joint. Normally, the existing sealant does not need to be removed. First, the substrate is cleaned as the manufacturer recommends. A silicone sealant is applied in a uniform bead adjacent to the joint. Next, the strip of precured silicone sealant is pressed into the wet sealant. The contact areas should be at least 3/8" once the wet sealant is compressed. Once the sealant is cured, it chemically bonds to the substrate, as well as to the precured silicone sealant strip. Precured silicone sealants are available in a variety of standard and custom colors, in widths from 1 inch to 12 inches. They can be textured to blend with substrates such as stucco or EIFS, and notched to allow the strips to conform easily around corners.
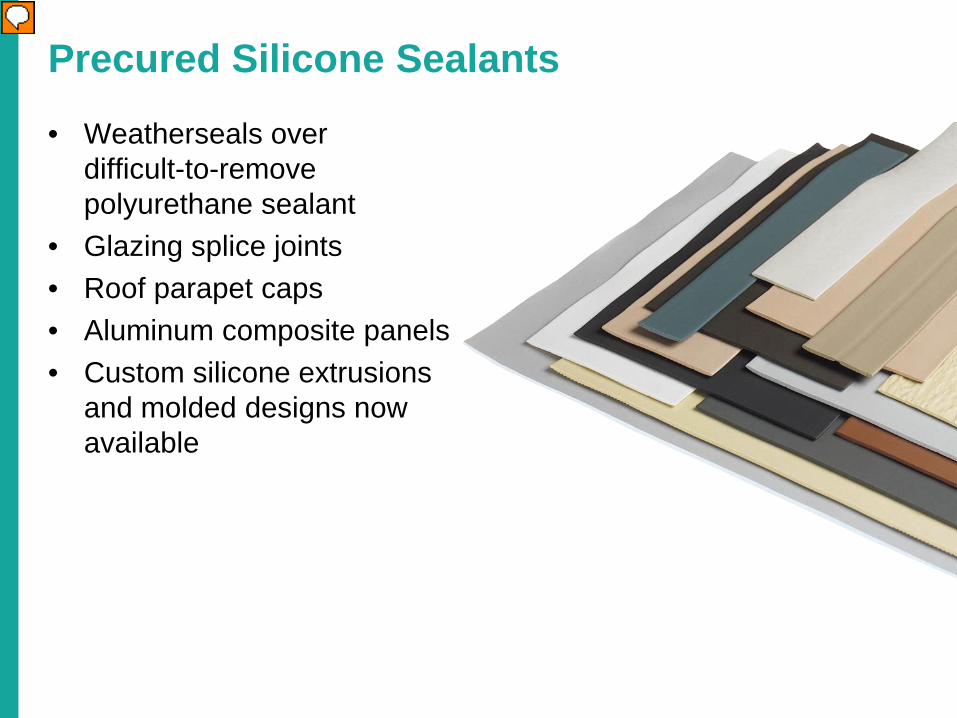
Precured Silicone Sealants • Weatherseals over
difficult-to-remove polyurethane sealant
• Glazing splice joints • Roof parapet caps • Aluminum composite panels • Custom silicone extrusions
and molded designs now available
Presenter
Presentation Notes
AV05682 Precured silicone sealants have many applications. These products have found acceptance in joints where the original failed polyurethane sealant has reverted or is very difficult or costly to remove. This product can be used in difficult-to-seal joints, such as splice joints in window systems or on roof parapet caps. Custom extrusions and molded precured silicone sealant designs also have been introduced.

Precured Silicone Sealants
Presenter
Presentation Notes
AV23690, AV23689, AV23691, AV23693 Custom extrusions and molded procured silicone designs have also been introduced. Shown are examples of some of the different shapes and designs that can be created. These materials can be formed into molded boots or extrusions, then adhered with silicone sealants. These products have found acceptance in new construction for curtainwall designs, as well as in restoration applications.

Exterior Insulation and Finish Systems (EIFS)
• EIFS is a softer substrate requiring sealants that produce less stress on the substrate
• Silicone sealants offer long-term durability, high movement capability and low modulus, particularly in cold temperatures
Presenter
Presentation Notes
AV24409 EIFS is a substrate that offers some unique challenges to the sealant manufacturer. EIFS is a soft substrate; as a result, selection of the right sealant is critical to the material’s performance. Silicone sealants have been broadly accepted for use with EIFS because silicone offers long-term durability, high movement capability and low modulus, particularly in cold temperatures. As you will see on the coming slides, sometimes EIFS is the perfect candidate for bridge joints using the cured silicone strips we have been discussing.

• EIFS coating delamination can be caused by the stiffness of the sealant
• A low-modulus silicone sealant applies less stress to the substrate
Exterior Insulation and Finish Systems (EIFS)
Presenter
Presentation Notes
AV23609 Proper sealant properties are important when sealing EIFS in new construction. This picture shows what a high-modulus sealant can do to EIFS. It can cause the EIFS coating to delaminate. A sealant that is low-modulus and stays low-modulus when it is cold is much less likely to cause this problem.

EIFS Joint Restoration • EIFS joint restoration methods
– Recessed joint repair – Sealant removal – Joint reconstruction – Bridge with preformed sealant
• Silicone elastomeric coating effectively waterproofs the entire EIFS wall
Presenter
Presentation Notes
When sealant in EIFS need to be repaired or restored, there are several methods which can be used. A bridge joint is most effective for restoring reverted polyurethane sealants. When coated with a silicone elastomeric coating, you have an aesthetically pleasing, watertight wall, and you haven't had to cut into the EIFS joint, possibly damaging it.
EIFS Joint Restoration • EIFS joint restoration is complex due to the difficulty in
removing failed polyurethane sealant without damaging the EIFS substrate
• The use of a precured silicone sealant bridge joint and silicone elastomeric coating offers a cost-effective, aesthetically pleasing, watertight solution
• Cost-effective with reverted polyurethane sealant by eliminating the need for removal
Presenter
Presentation Notes
EIFS coatings and mesh can be easily damaged if a grinder is used to remove the failed sealant. A solution that is gaining broad acceptance is the use of a precured silicone sealant bridge to span the failed joint. The entire EIFS wall, including the precured silicone sealant, can then be coated with a silicone elastomeric coating to provide a cost-effective, aesthetically pleasing watertight wall.

EIFS Joint Restoration
Presenter
Presentation Notes
AV03866 An example of this restoration method is shown here. Silicone, as the sealant, strip and coating, offers long-term water-tight performance. Let's talk more about the silicone elastomeric coating and what makes it a unique addition to this waterproofing solution.

Silicone Elastomeric Coating
• Water-based, one-part silicone emulsion
• 50% solids by weight • Easily applied by roller, brush or
spray • At least 10 mil dry film thickness • VOC compliant
Presenter
Presentation Notes
AV17113 A silicone elastomeric coating is a water-based emulsion of silicone polymer. This product is similar to other acrylic elastomeric emulsions, except the polymer is silicone instead of acrylic. Like other elastomeric coatings, silicone elastomeric coating is 50% solids by weight and can be easily applied by roller, brush or spray. The coating is applied to a dry film thickness of 10 mils. Being water-based, the coating is VOC compliant.

Silicone Elastomeric Coating • Long-term silicone flexibility • High permeability (average 43 metric perms at
10 mil dry film thickness) • Suitable for use on concrete, stucco, EIFS, brick
Presenter
Presentation Notes
AV04554 The coating offers long-term silicone flexibility. Silicone is also inherently very permeable, and aside from its durability, this permeability is what makes the coating very unique. By being highly permeable, the coating allows water in vapor form only to easily permeate the coating. But the coating, as it is a continuous solid layer when applied, repels water in its liquid form. Thereby, if the coating is applied to a wet wall, there will be vapor drive for water to want to leave that wall. It can pass easily through a permeable coating. However, more liquid water form the outside will not penetrate. So, by coating a building with a silicone elastomeric coating, you can actually dry it out. What does 43 perms really mean? To translate it into something useful, this means about 8 ounces of water in vapor form per square yard per day can escape through the coating. Conversely, other coating technologies with lower perm rates will not allow this much moisture to escape. This can create bubbles, blisters and eventually tears in a coatings which are not permeable enough to allow trapped moisture to escape. Silicone is also inherently fungus and mildew resistant. This is particularly useful in high-humidity environments. Silicone elastomeric coating can be used on porous substrates such as poured or precast concrete, stucco, EIFS, and brick. The coating is formulated with stable pigments to provide excellent color retention. Generally silicone elastomerics should be applied to cured concrete and cementitious products. Cure time varies but is generally referenced in the industry to be 28 to 30 days for concrete products and 7 to 10 days for thin set cementitious patch materials or stucco products.

Staining of Sensitive Substrates • Staining is caused by
unreacted fluids in the sealant formulation
• Any sealant can stain if poorly formulated or if used on a nonrecommended substrate
• Requires stain testing per ASTM C1248 and a nonstaining warranty from the sealant manufacturer
Polyurethane sealant staining
Presenter
Presentation Notes
AV19655 Let's switch gears now back to sealant types and some unique properties that should be considered for construction projects. The single greatest negative voiced against silicone sealants is that they can stain a building. Staining is caused by nonreacted plasticizers or fluids in the sealant that can leach out of the sealant after it cures. Every sealant formulation, whether silicone or organic, is different. Any poorly formulated sealant can stain. For example, this building in Pittsburgh was sealed with a commercially available multi-component polyurethane sealant. We recommend that you, as a specifier, require that the sealant manufacturer test its sealant on a sample of your project’s stone in accordance with ASTM C1248. You should ask for the results and a nonstaining warranty from the manufacturer. Please note that ASTM C510 is not nearly as stringent a test. If you want to ensure nonstaining performance, ASTM C1248 should be specified.

Clean Silicone Sealants • Novel silicone sealants are
available for sensitive substrates
• These sealants will not stain the most porous stone types, including Vermont and Italian white marbles
• Sealant is formulated to allow for reduced dirt pickup and to minimize streaking on metal panel systems
Presenter
Presentation Notes
AV24725 To address the staining concern, new silicone sealants that are specifically formulated for sensitive substrates have been introduced to the market. These sealants have no unreacted ingredients and have been found to be nonstaining on even the most porous marbles. Additionally, these sealants can be formulated with a special additive that imparts a smooth matte finish that helps minimize dirt pickup by the sealant. This surface then, with reduced dirt build up on it, reduces streaking on adjacent substrates, such as metal panel systems, and keeps the building looking cleaner for longer.

Parking Structure Sealants • Expansion joints
– Fast-cure sealant • Control joints
– Self-leveling sealant • Cove beads • Vertical joints
– Nonsag sealant
Presenter
Presentation Notes
AV17114 Other special sealant considerations are sealants for parking structures. Silicone sealants designed especially for parking structures are available for use in expansion joints, control joints, cove beads and vertical joints. These joints experience high UV exposure and high movement. Silicone sealants perform best under these conditions. Silicone sealants are available in two-part fast-cure formulations for dynamic joints on parking decks. For other joints, one-part self-leveling or nonsag sealants may be appropriate.

Good Joint Design: Nonsag
Control Joint Construction Joint
Tooled joint with 1/4" recess
Nonsag parking- structure sealant
Polyethylene backer rod
Tooled joint with 1/4" recess
Polyethylene backer rod
Nonsag parking- structure sealant
Presenter
Presentation Notes
Here are examples of good joint designs for nonsag parking structure sealant in both control and construction joints on precast decks. We recommend the use of a polyethylene bond-breaking backer rod in the bottom of V joints. In construction joints, a backer rod is required to properly position the sealant in the joint and to avoid three-sided adhesion. The sealant in both joints is tooled to a minimum of 1/4" below the surface of the pavement or concrete.

Good Joint Design: Self-Leveling
Control Joint
1/4" recess Sawed joint
Bond breaker tape
1/4" recess
Polyethylene backer rod
Construction Joint
Self-leveling parking- structure sealant
Self-leveling parking- structure sealant
Presenter
Presentation Notes
These are good joint designs for self-leveling parking structure sealants. Note the use of bond-breaker tape in the bottom of the saw joint to prevent three-sided adhesion (which could limit the movement capability) and the use of backer rod in the construction joint. Since this sealant is self-leveling, the bond breaker tape and backer rod are positioned to allow for the required 1/4" recess.

Parking Structure Sealants
Presenter
Presentation Notes
AV17115 Preparing parking structure joints for sealant installation can sometimes involve a fair amount of work. This installer is using a sandblaster to clean and prepare a concrete joint.

Parking Structure Sealants
Presenter
Presentation Notes
AV17119 The recess is important to prevent tires from damaging the sealant when the joint compresses.

Structural Glazing
• Silicone sealant adheres glass to the structure • Sealant allows wind load to be transferred to the structure • Sealant must be strong but flexible to accommodate thermal
expansion • Sealant must have a long life • Only silicones can be used for structural glazing
Presenter
Presentation Notes
AV16953 Next we will transition to discussing structural glazing. Now we are talking about the sealant functioning as a flexible anchor and actually adhering glass or panels to the building structure. The sealant allows for load transfer from the glass to the building structure. In structural glazing, silicone is used primarily for its strength as opposed to its weatherseal properties. In structural glazing, the sealant serves several purposes: • First, the sealant acts as an adhesive, adhering the glass or panel to the framing structure of the building. • The sealant must be strong enough to allow wind load stresses on the glass or panel to be transferred to the structure. • The sealant must be strong, but it must also be flexible to allow for differential thermal movement between the glass and metal. • The sealant must also have proven durability. As we discussed earlier, only silicone sealants remain unaffected by UV light and show superior durability. For these reasons, only silicone sealants can be used in structural glazing.

Structural Glazing
4-sided silicone structural glazing
2-sided silicone structural glazing
Presenter
Presentation Notes
AV08519, AV10058 The two major categories of structural glazing are two-sided and four-sided. In two-sided structural glazing, the structural silicone is typically used to attach the vertical edges of the glass. The two horizontal edges are conventionally glazed, with metal and gaskets being used to attach the glass from the outside. In four-sided structural glazing, all four edges of the glass are attached to the building with structural silicone. Both forms of structural glazing are broadly accepted, and structural glazing has been used successfully on hundreds of buildings worldwide for more than 40 years. The first two-sided structural glazing jobs were completed in the mid-1960s and the first four-sided silicone structural glazing jobs were completed in 1971.

2-Sided Structural Glazing
Presenter
Presentation Notes
In 2-sided structural glazing, the structural silicone is typically used to attach either the vertical or horizontal edges of the glass. The 2 remaining edges are conventionally glazed, with metal and gaskets being used to attach the glass from the outside. 2-sided structural glazing can be fabricated in the factory or on-site.

4-Sided Structural Glazing
Presenter
Presentation Notes
Glass is supported on all 4 sides with structural silicone. Structural silicone is used for bonding all 4 edges of the glass to the support frame, and the deadload can either be supported mechanically by a fin and setting block or by the structural silicone. It is generally recommended that 4-sided structural glazing be performed in-shop.

Application Methods • Factory (shop) glazing • Site (field) glazing
Presenter
Presentation Notes
AV06100 Application of silicone structural glazing materials is generally broken down into two methods. The first is factory (or shop) glazing. Curtainwalls assembled in a factory environment are assembled in individual units. This system is referred to as unitized curtainwall. Factory construction of the curtainwalls provides a controlled environment where proper surface preparation and sealant application procedures can be maintained and quality control programs can be implemented and documented. After the units are assembled and sealant has been allowed to fully cure and develop adhesion, units are shipped to the construction site, where they are erected onto the building structure. The other common method is site (or field) glazing. Site glazing is a method that applies structural sealant directly at the construction site. Panels are attached to the mullions and transoms, which are already attached to the structure. Site glazing is suitable for 2-sided structural systems, but it is generally recommended that 4-sided systems are factory-glazed.

Application Methods • Structural glass systems (bolted or point-fixed glazing) • Total vision systems (fin glazing) • Structural attachment of nonglass materials • Panel stiffeners • Protective glazing systems
Presenter
Presentation Notes
AV16742 There are also a number of other structural glazing application methods. In structural glass systems (also know as bolted or point-fixed glazing), the structural glass or bolted glass system generally has holes drilled at each corner of a glass element, and a bolt is used to provide mechanical support for the glass and fixes the glass façade to a metallic structure, which is secured to the main structural member of the building. A high-quality silicone sealant is then used to provide the weatherseal between the glazing elements. One of the latest developments in structural glass design is the elimination of the bolted system and the need to drill the glass by using structurally bonded patch plates as an alternative. Structural adhesive sealants enable the designer to do away with the cost of drilling holes in glass and the use of very expensive stainless-steel spider systems. This results in a system that has a reduced cost of manufacture, increased visibility and improved aesthetics. Structural glass systems are often referred to as structural glazing, which is often confused with structural silicone glazing, as both techniques use this generic term. Therefore, architects and specifiers should be sure which system is being offered. Total vision or fin glazing is a system that is used to maximize the area of glass at the front of the building, reducing the visible mechanical fixings and increasing the unobstructed vision area of the façade. Total vision glazing is a 2-sided structural glazing system in which the glass is normally mechanically fixed at head and sill and the vertical edges are structurally attached to glass fins or mullions. The glass is bonded to the glass fin using structural silicone sealants. The structure is then made watertight using silicone weathersealing sealants. This technique is widely used for lobbies, showrooms and racetracks, where the unobstructed visibility is an advantage. Materials other than glass have been successfully attached to buildings with silicone sealants for many years. The benefits of structural silicone have been used with materials such as thin stone panels, including granite or marble, ceramic tile, plastic, and aluminum composite materials. The durability of the nonglass material must be evaluated by the manufacturer to determine its suitability for this application. In panel-stiffening applications, aluminum composite materials are mechanically attached around the perimeter, and the sealant is used to attach an aluminum stiffener; glueline thickness dimensions of less than 1/4" may be permitted. In this application, there is a negligible amount of differential movement between the two aluminum components, and shear stress on the sealant is minimal. A best practice is to use a spacer material to establish a sealant joint, which can be controlled for width and thickness. Ensure use of suitable sealant for these applications by following the project specification. Structural glazing products have successfully been used in protective glazing systems designed to meet the demands of missile impact and bomb blast testing. In missile impact testing required to withstand flying debris from hurricanes and windstorms, the glazing must stay intact through either a small or large missile impact. The sealant then must “anchor” the laminated glass through repeated wind cycles that duplicate a hurricane. For bomb blast mitigation glazing, the sealant must also anchor the laminated glass through an air blast explosion. Potential users should either test their system and have it approved or work with a bomb blast consultant who can review the design and determine the sealant requirements.

Structural Glazing Design Guidelines • The structural bite must be a minimum of 1/4" • The glueline thickness must be a minimum of 1/4" • The structural bite must be equal to or greater than the
glueline thickness • For one-part sealant, the bite-to-glueline ratio must be
between 1:1 and 3:1 • The structural sealant joint must be able to be filled using
standard sealant application procedures
Presenter
Presentation Notes
The following are general guidelines recommended for all structural glazing applications. The structural bite must be a minimum of 1/4“. The glueline thickness must be a minimum of 1/4“. The structural bite must be equal to or greater than the glueline thickness. For one-part sealant, the bite-to-glueline ratio must be between 1:1 and 3:1. The structural sealant joint must be able to be filled using standard sealant application procedures.

Structural Glazing Design Guidelines • The joint design must allow the sealant exposure to air so it
can cure and obtain its ultimate physical properties • For two-part sealant, the bite-to-glueline ratio may be greater
than 3:1 with the understanding that the joint can be properly filled and the two-part materials are mixed at proper ratio during application
• The structural sealant joint must be fully cured and adhered prior to removing temporary fasteners in the field
• Before moving units in-shop, fabricators should verify that substantial cure has occurred and adhesion has been achieved
Presenter
Presentation Notes
The joint design must allow the sealant exposure to air so it can cure and obtain its ultimate physical properties. For two-part sealant, the bite-to-glueline ratio may be greater than 3:1 with the understanding that the joint can be properly filled and the two-part materials are mixed at proper ratio during application. The structural sealant joint must be fully cured and adhered prior to removing temporary fasteners in the field. Before moving units in shop, fabricators should verify that substantial cure has occurred and adhesion has been achieved.

Structural Glazing Design
Presenter
Presentation Notes
The basic guidelines for structural glazing have been established for many years. The silicone acts to attach the glass during wind load. Minimum structural bite requirements have been established based on the size of the glass and the design wind load on the building. More information on structural glazing design is available from the silicone sealant manufacturer, GANA and ASTM C1401, the Standard Guide to Structural Glazing. The basic equation for establishing the correct sealant bite is bite equals half times the glass short span times the design wind load over the sealant design strength. The sealant design strength for wind load applications is set at 20 psi by industry consensus. This does not mean that the sealants are only 20 psi in strength; this is just the design factor. Structural sealants must display at least 50 psi tensile strength when tested according to ASTM C1184, the standard specification for silicone structural glazing sealants. Many structural sealants on the market are well over 100 psi when tested to this criteria. The 20 psi design strength value is conservative and has for many years been proven in the industry to be a very safe way to design silicone structurally glazed systems. The other design considerations for structural joints are that the bite must be equal to or greater than the glueline thickness and the minimum glueline thickness and therefore the bite, is 1/4". Even if the equation says that you need only 1/8" bite, that would always be rounded up to 1/4". The minimum glueline thickness is set at 1/4" to allow both proper access to install the sealant as well as to accommodate thermal and seismic movements.

Structural Glazing Design – Deadload
Structural silicone sealant
Spacer
Bite = weight of glass in lb
sealant contact length in inches * sealant design strength (1 psi)
Presenter
Presentation Notes
In unsupported deadload designs, the weight of the panel places constant load upon the sealant. Structural sealants can support the weight of the panel or glass when used within manufacturer's published guidelines. For a structural sealant with an allowable deadload design strength of 1 psi (or 700 kg/m2), the weight of the panel divided by the total silicone contact area must not exceed 1 psi. Insulating glass unit manufacturers require deadload support for their insulating glass units. The deadload structural bite requirement is calculated by dividing the weight of glass by the sealant contact length times the sealant design strength.

Structural Glazing Design Splice Joint in Curtainwalls
Best Design Poor Design Better Design Live load and thermal movement from above
Live load and thermal movement from below
Live load and thermal movement from below
Live load and thermal movement from below
Live load and thermal movement from above
Live load and thermal movement from above
Splice joint
Splice joint
Splice joint
Splice joint
Splice joint
Presenter
Presentation Notes
Splice Joints in Curtainwalls Splice joints in aluminum curtainwall framing are the highest-movement, fastest-moving joints on a curtainwall system. Splice joints absorb the thermal expansion of 13' to 16' of aluminum framing exposed to the building’s exterior on a daily basis. Field-installed stick curtainwalls use splice joints to also absorb building deflection, live loads and wind sway. It is best to avoid splice joints within a structural joint. Placing 13' to 16' of aluminum frame thermal movement and live load deflection of the floor into the shearing of a 1/4" wide structural silicone joint will, first, exceed the design stress of the silicone, causing fatigue; second, place excessive loading onto glass, causing possible failure; or third, cause premature fogging of the insulating glass unit. If splice joints cannot be avoided within a structural silicone joint due to the requirements of field-applied structural silicone in a stick system, then the splice joint should be applied to within 1" of the head of a piece of glass. If silicone failure occurs due to excessive joint movement, a minimum of forces will be placed onto the glass due to the placement.

Protective Glazing
• Building codes require the use of windows that can withstand flying debris from hurricanes or other severe weather
• Window systems that use laminated glass and a silicone sealant to anchor the laminated glass in the window frame have successfully passed the demanding missile-impact test
Presenter
Presentation Notes
AV24408 Protective glazing is a specialized area of structural glazing in which the sealant acts not only as a flexible anchor to undergo wind load but helps retain glass in its frame during an impact event. As a result of events like Hurricane Andrew in 1992, protective glazing has grown in popularity. New codes require that glass openings remain intact during hurricane events. A silicone sealant is used to retain the laminated glass during missile impact and cyclic wind loads on the windows. Numerous window systems that use silicone sealants and laminated glass have successfully passed missile-impact tests.

Blast-Resistant Glazing
• Silicone sealant is used to anchor laminated glass or a protective film in a window frame during bomb-blast testing or computer-simulated evaluations
Image Courtesy of Grendon Design Agency
Presenter
Presentation Notes
AV05124 Blast-resistant glazing is an area that has seen significant growth since the Oklahoma City bombings and the events of 9/11. The use of silicone sealant to anchor a protective film or laminated glass can help prevent flying glass debris from entering a building and injuring people.

How Sealants Fail
Adhesively Cohesively Deterioration
Presenter
Presentation Notes
Now that we have learned how to specify and install sealants correctly, let's look at what can happen when things don't go according to plan.
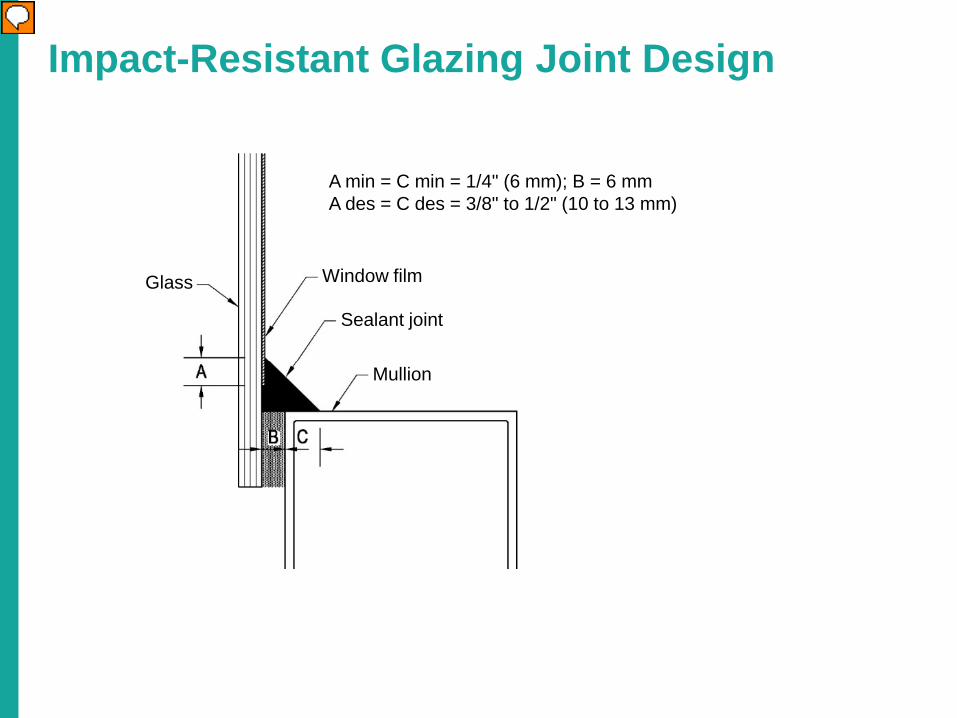
Impact-Resistant Glazing Joint Design
A min = C min = 1/4" (6 mm); B = 6 mm A des = C des = 3/8" to 1/2" (10 to 13 mm)
Glass Window film
Sealant joint
Mullion
Presenter
Presentation Notes
The demands of missile impact testing are great on any sealant, which is only one component of a glazing system that includes the framing system, glass and laminate. Joints must be specifically designed to accommodate the additional requirements and stresses of this application.

How Sealants Fail • Adhesively
– Poor surface prep – Lack of or wrong primer – Excessive bondline stress – Moisture during or after
application – Poor tooling – Poor joint profile – Weak substrate
Presenter
Presentation Notes
AV17120 Adhesive failure results from various factors. Adhesive failure can be due to poor surface preparation or lack of cleaning of the substrate. We all know that silicone sticks great to dirt and your clothes and tools and hands and everything involved in the job, but dirt doesn't stick so well to its substrates. So if a surface isn't properly cleaned, it can result in adhesive failure of the sealant. If a primer is required, but not used or used improperly, you could likewise have a substrate surface that is not suitable for sealant adhesion. If a joint is not wide enough to accommodate the movement in a joint, or if too stiff or too high a modulus of sealant is used, excessive bondline stress may be generated and can either pull a weak substrate apart or result in adhesive failure of a sealant. An excessively wet or moist substrate may also cause an adhesive failure. Generally substrates should be dry to the touch before installing sealants. Once installed, most sealants can withstand rain, even if they are not cured yet. But if they are not cured and a severe storm with wind-driven rain hits directly on the sealant joint, the sealant could sustain mechanical damage which could affect adhesion. Not completing tooling a joint can also cause adhesive failure. Although tooling is done partly to make the joint aesthetically pleasing, tooling also serves to push the sealant mechanically into the substrate to create the best bond possible. If the sealant has not been tooled, or was poorly tooled, adhesion problems may result. A poor joint profile in which the sealant is either too thin to survive being in an external moving joint or is too thick and restricts the joint's movement will also create adhesion problems. Lastly, a weak substrate that is crumbly or chalky may just never be easy to adhere to, regardless of cleaning and priming it. When a substrate is particularly crumbly or weak, such as grout, film-forming primers can act as bonding agents and help bond weak substrates together. This is worth considering for substrates that are known to be chalky or crumbly.

How Sealants Fail
• Cohesively – Movement exceeding capability – Poor joint profile – Excessive hardening – Chalking away – Poor tear resistance
Presenter
Presentation Notes
AV17107 Cohesive failure is failure within the body of the sealant. Here are some possible causes for cohesive failure. As with adhesive failure, a sealant that is too stiff, or a joint that moves more than the capability of the sealant, may also result in cohesive failure, depending on how the stress transfers in the sealant. Along those same lines, again, poor joint design and a sealant that is too thick or too thin can result in cohesive failure. Cohesive failure (or cracking within a sealant) may also be seen if a sealant hardens over time and doesn't maintain its modulus and movement capability. Other factors which may come from sealants that are not durable in exterior conditions may be chalking or poor tear resistance because of hardening and these can also contribute to cohesive failure. Generally, cohesive failure is centered around either too much joint movement for the sealant specified or for the joint size designed, or poor sealant properties to begin with. It is not as often attributed to poor sealant installation practices such as not cleaning the surface. Those errors tend to show up as adhesive failures.

How Sealants Fail • Deterioration
– Excessive hardening – Chalking away – Compression set – Poor recovery – Reversion
67
Presenter
Presentation Notes
AV03865 Deterioration is more commonly associated with organic sealants exposed to UV light. Deterioration may be apparent in the form of hardening, chalking, compression set, moisture or reversion.

Proven Performance
Presenter
Presentation Notes
AV11559, AV14664, AV17194 In contrast, silicones offer the longevity and reliability that are important to building owners, whether for new construction or renovation. Silicone sealants have been used on many prominent projects worldwide.
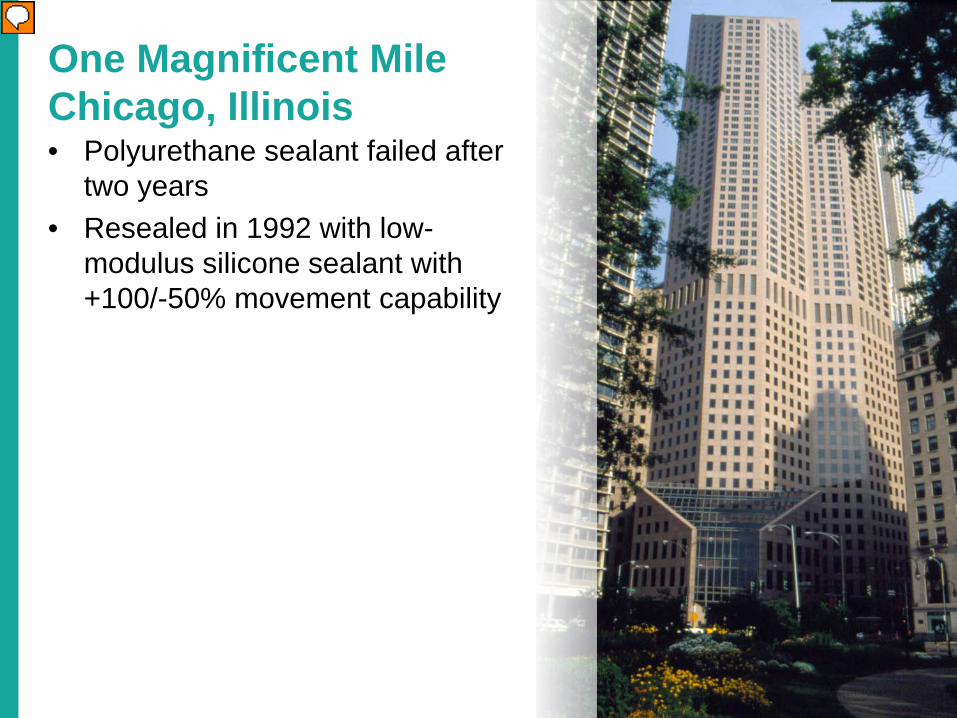
One Magnificent Mile Chicago, Illinois • Polyurethane sealant failed after
two years • Resealed in 1992 with low-
modulus silicone sealant with +100/-50% movement capability
Presenter
Presentation Notes
AV04011 The next several slides highlight projects which have been resealed with silicone sealants after organic sealant technologies underwent failures for some of the reasons we've just been discussing. One Magnificent Mile in Chicago experienced sealant failures after only two years after being sealed with a polyurethane. This building was resealed in 1992 with a low-modulus silicone sealant and the leaking problems have been remedied.

One Georgia Center • Resealed in 2001 using a
surface-modified silicone sealant in Georgia white marble joints
• Original silicone sealant was installed in 1967 – still rubbery
Presenter
Presentation Notes
AV18293 One Georgia Center was originally sealed in 1967 with a silicone sealant that was still stretchy and modulus stable when it was removed in 2001. However, this is a white marble building, and to help avoid some of the surface streaking and dirt rundown, it was chosen to reseal the building with a surface-modified silicone that does not pick up as much dirt as the original silicone did.

Marriott Marquis Atlanta, Georgia • Polyurethane sealant failed • Replaced in 1998-99 with a
medium-modulus silicone sealant and preformed sealant around all windows
Presenter
Presentation Notes
AV18292 Marriott Marquis in Atlanta, Georgia, experienced polyurethane sealant failure and was resealed in 1998 to 1999 using a medium-modulus silicone sealant as well as precured silicone pieces sealant at the windows.

Rosen Plaza Orlando, Florida • Polyurethane sealant failed; wall
was retrofitted with EIFS trim on stucco in 2000 – Precured silicone sealants – Medium-modulus silicone sealants – Silicone elastomeric coating
Presenter
Presentation Notes
AV18518 Rosen Plaza in Orlando, Florida, was another project in which polyurethane sealants had failed. It was retrofitted in 2000 using a medium-modulus silicone sealant, precured silicone strips, and silicone elastomeric coating on the EIFS wall surfaces.
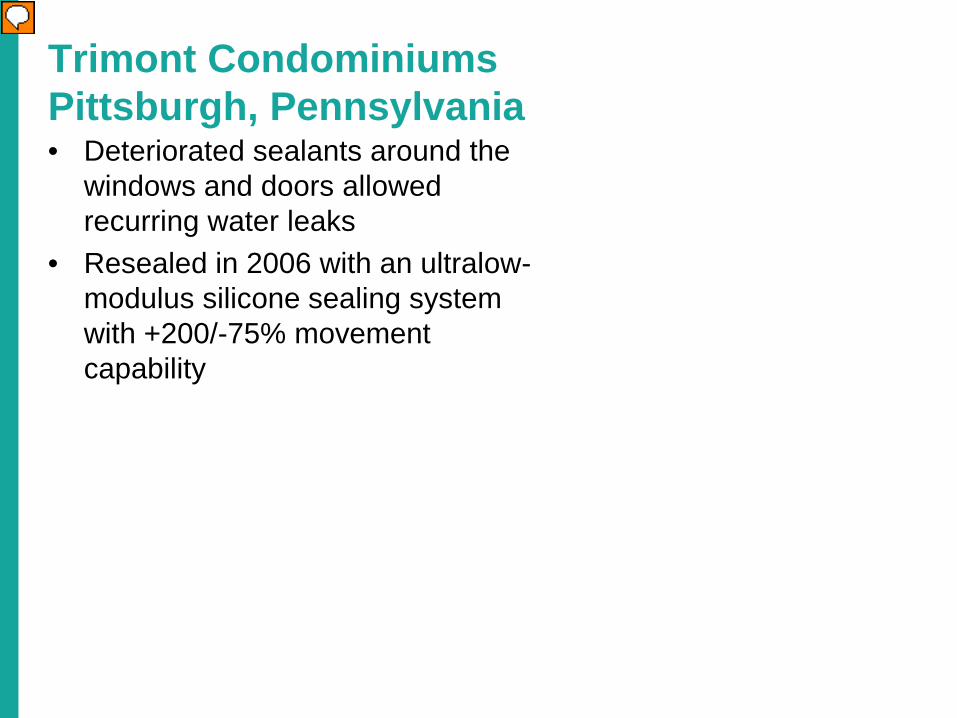
Trimont Condominiums Pittsburgh, Pennsylvania • Deteriorated sealants around the
windows and doors allowed recurring water leaks
• Resealed in 2006 with an ultralow-modulus silicone sealing system with +200/-75% movement capability
Presenter
Presentation Notes
AV15635 Trimont Condominiums in Pittsburgh, Pennsylvania, was resealed in 2006 after the building had suffered leaks from deteriorated sealant around the windows. A low-modulus silicone strip material with wet sealant as the adhesive was used to restore on this project.

In Summary, Silicone Sealants Offer … • Longevity • Versatility • Aesthetics • Value • Proven performance
Presenter
Presentation Notes
Silicone sealants, coatings and precured materials offer longevity, versatility, pleasing aesthetics, proven performance, and above all, value. They may or may not cost more, depending on market conditions, but when you consider the cost of recaulking buildings, silicones will offer more value, every time.
References
• ASTM C719 Movement Capability Test Method • ASTM C794 Adhesion in Peel Test Method • ASTM C920 Standard Sealant Specification • ASTM C1087 Compatibility Test Method • ASTM C1184 Structural Glazing Specification • ASTM C1193 Guide for Use of Sealants • ASTM C1248 Stain Test Method • ASTM C1401 Guide to Structural Glazing • ASTM C1472 Guide for Calculating Joint Movement • ASTM C1481 Guide to Use of Sealants with EIFS
Presenter
Presentation Notes
AV16953 If you would like to learn more about the sealant applications we have discussed so far, here are some of the relevant standards for sealants. For copies of these standards, go visit the ASTM website at astm.org.

Thank you
This concludes the American Institute of Architects Continuing Education System Program "Silicone Sealants and Coatings for Building Construction and Restoration" Please take the test to receive your AIA credits. For more information, contact: dowcorning.com
Presenter
Presentation Notes
AV22472 This concludes the American Institute of Architects Continuing Education System Program "Silicone Sealants and Coatings for Building Construction and Restoration". To receive AIA credit, please complete the following 10-question test.

For full credit after listening to this presentation, we will now have a 10-question exam. You are allowed to answer more than once if your first answer is incorrect. This quiz will be followed by information regarding Dow Corning® brand construction products.
Quiz
Presenter
Presentation Notes
For full credit after listening to this presentation, we will now have an exam. You are allowed to answer more than once if your first answer is incorrect.

Presenter
Presentation Notes
We are now at the point in the presentation where we can talk about Dow Corning specific products. In the following slides, we will overview our sealants and coatings product line.

Dow Corning® brand Weatherseal Sealants • Dow Corning® 790 Silicone Building Sealant (+100/-50%) –
ultralow-modulus expansion joint sealant; best for porous substrates • Dow Corning® 791 Silicone Weatherproofing Sealant (±50%) –
economical, medium-modulus general weatherseal sealant • Dow Corning® 795 Silicone Building Sealant (±50%) – versatile
industry standard for use as structural and weatherseal sealant • Dow Corning® Contractors Weatherproofing Sealant (±25%) –
superior silicone performance at a urethane-competitive price • Dow Corning® Contractors Concrete Sealant (±50%) – superior
primerless adhesion to most porous substrates at a urethane-competitive price
Presenter
Presentation Notes
Silicone sealants, coatings and precured materials offer longevity, versatility, pleasing aesthetics, proven performance and above all, value. They may or may not cost most more depending on market conditions, but when you consider the cost of recaulking buildings, silicones will offer more value, every time. Dow Corning® brand silicone sealants offer a life expectancy that’s roughly three times that of organic materials in the same applications. Silicone weathersealing materials from Dow Corning minimize nature’s toll on building envelopes, as they are usually unaffected by sunlight, ozone, rain, snow or temperature extremes. They remain flexible and maintain adhesion (even while being stretched or compressed), resist cracking and tearing, and are easy to apply over a wide temperature range. Five of our most popular weatherseal sealants that offer the proven performance of silicone include: Dow Corning® 790 Silicone Building Sealant Dow Corning® 791 Silicone Weatherproofing Sealant Dow Corning® 795 Silicone Building Sealant Dow Corning® Contractors Weatherproofing Sealant Dow Corning® Contractors Concrete Sealant Dow Corning® 795 Silicone Building Sealant also has a proven history spanning more than 40 years in structural glazing, serving as a versatile, one-part structural silicone that is widely specified and accepted among contractors and architects. Sealants are often referred to as class 25 or class 50. These class designations indicate the movement capability of the sealant. Dow Corning® 790 Silicone Building Sealant is an ultralow modulus sealant that is class 100/50, indicating a movement capability of plus 100 percent, minus 50 percent. You could not have a plus 100 minus 100 sealant because the sealant cannot be compressed to nothing. Because Dow Corning® 790 Silicone Building Sealant is ultralow modulus and has a high movement capability, it puts very little stress on the substrates around it. It is the perfect choice, then, for weak substrates such as EIFS or stucco. It is also unparalleled in its unprimed adhesion to porous substrates, especially concrete. Dow Corning® 791 Silicone Weatherproofing Sealant is a plus or minus 50% movement capability sealant, or medium modulus, that is an economical choice for weathersealing applications. It has excellent adhesion to metals, and Kynar™ and Duranar™ substrates in particular. As mentioned, Dow Corning® 795 Silicone Building Sealant is a versatile medium-modulus sealant that can be used for both structural and weathersealing applications. It is one of the most specified and chosen sealants and is suitable for the widest variety of applications. Dow Corning® Contractors Weatherproofing Sealant and Dow Corning® Contractors Concrete Sealant are value options offering silicone performance at urethane-competitive prices.

Dow Corning® 756 SMS Building Sealant • Clean sealant technology for
weathersealing sensitive substrates
• One-part formulation • Low staining potential • Reduced dirt pickup • Unprimed adhesion to both porous
and fluoropolymer-painted substrates
• ±50% extension/compression capability
Presenter
Presentation Notes
AV05292 Dow Corning® 756 SMS Building Sealant is a clean sealant developed for use with the most sensitive of stones, including Italian and white marble. Because of its completely fluid-free formulation, it also offers a cleaner surface than other silicone sealants, so not only will it not stain stone, it can be used in areas where you want to minimize dirt pick up or dirt run down. It has excellent adhesion to a wide variety of substrates.

Dow Corning® 123 Silicone Seal
• High movement (+200/-75%) for new and remedial construction
• Widths from 1" to 12" • Available in standard and custom
colors, EIFS textures, and notched • Dow Corning® 123 Silicone
Seal Custom Designs H.C. – engineered extrusions and molded silicone pieces for new and remedial construction
Presenter
Presentation Notes
AV05682 Dow Corning® 123 Silicone Seal is a preformed silicone seal with high movement capability. It is ideal for situations in which a sealant bridge is needed but would be difficult to install. Now those areas can be sealed using a precured silicone strip attached using regular liquid sealant. For example, at a parapet cap where the metal is too thin to gain the required ¼" bite, Dow Corning® 123 Silicone Seal can be used to bridge over that joint. It can be adhered using Dow Corning® 791 Silicone Weatherproofing Sealant, Dow Corning® 795 Silicone Building Sealant or Dow Corning® 756 SMS Building Sealant. Additionally, Dow Corning® 123 Silicone Seal can be used as a transition piece when openings need to be flashed using a flexible strip. In these applications, the Dow Corning® 123 Silicone Seal can also be adhered using Dow Corning® 758 Silicone Weather Barrier Sealant if an air barrier needs to be adhere to. Custom-shaped parts are also available.

Dow Corning® AllGuard Silicone Elastomeric Coating • Waterproof coating for above-grade exterior
masonry substrates • 2-coat water-based coating (10 mil DFT) • SWR Institute validated • 50% solids by volume • 10-year warranty available
Presenter
Presentation Notes
AV05634 Dow Corning® AllGuard Silicone Elastomeric Coating is a breathable, durable elastomeric waterproof coating for above-grade masonry substrates. It offers a high perm rating and all the benefits of silicone stability. It is also water-based and low in VOC content. Dow Corning® AllGuard Silicone Elastomeric Coating can bridge cracks up to 1/16” inch and easily applied by spray or roll. It is applied in two coats to provide a 10 mil dry film thickness. Dow Corning® AllGuard Silicone Elastomeric Coating has been validated by the SWRI and is backed by the assurance of an available 10-year warranty from Dow Corning. The coating is available in a wide variety of standard colors and custom colors are also available. AllGuard is ideal for restoration applications in which it is known the wall is leaking or has moisture problems. By putting a breathable coating on the surface, the moisture vapor trapped in the wall can escape, while Dow Corning® AllGuard Silicone Elastomeric Coating keeps any future liquid water from penetrating.

Dow Corning® Parking Structure Sealants
• Dow Corning® NS Parking Structure Sealant – nonsag sealant for horizontal and vertical control and expansion joints
• Dow Corning® SL Parking Structure Sealant – self-leveling sealant for horizontal control and expansion joints
• Dow Corning® FC Parking Structure Sealant – fast-curing, self-leveling two-component sealant for dynamic expansion joints
Presenter
Presentation Notes
AV12076 Dow Corning offers three parking structure sealant options: NS for nonsag applications, SL for self-leveling applications, and FC for fast-cure applications. Nonsag is ideal for horizontal and vertical applications, while self-leveling is for horizontal control and expansion joints. Fast cure, or FC, is ideal for situations in which a fast cure is required so that the parking deck or garage can be quickly used. FC is a two-part sealant option, while the SL and NS are one-part sealants.

Structural Glazing Sealants • Dow Corning® 795 Silicone Building
Sealant – one-component industry standard for on-site glazing
• Dow Corning® 995 Silicone Structural Sealant – one-component, high-strength sealant for on-site and protective glazing
• Dow Corning® 983 Structural Glazing Sealant – two-component, fast-cure, in-shop sealant for unitized curtainwall and protective glazing
• Dow Corning® 121 Structural Glazing Sealant – two-component, fast cure sealant for on-site and in-shop glazing
Presenter
Presentation Notes
AV05276 Dow Corning's structural glazing sealant line is comprised of two one-part sealants and two two-part sealants. Dow Corning 795 Silicone Building Sealant and Dow Corning 995 Silicone Structural Sealant are the one-part sealants for structural glazing and can be used for field or shop glazing applications. Dow Corning® 995 Sealant is a stronger version of Dow Corning® 795 Sealant and is ideal for impact or protective glazing applications. Dow Corning 983 SGS Structural Glazing Sealant and Dow Corning 121 Structural Glazing Sealant are quick-curing two-part sealants often used by glazing contractors for in-shop curtainwall or storefront fabrication. The faster-curing two-part sealants allow the units to be moved more quickly than waiting for a one-part sealant to cure. Dow Corning 983 Sealant also has proven performance in impact applications. And although Dow Corning® 983 Sealant can be field-applied in certain circumstances, it requires a two-part pump and many quality control processes, so it is typically used in a controlled environment. Supplied in a simple to use 1 to 1 mix ratio, Dow Corning 121 Structural Glazing Sealant can be used for both in-shop and on-site glazing.
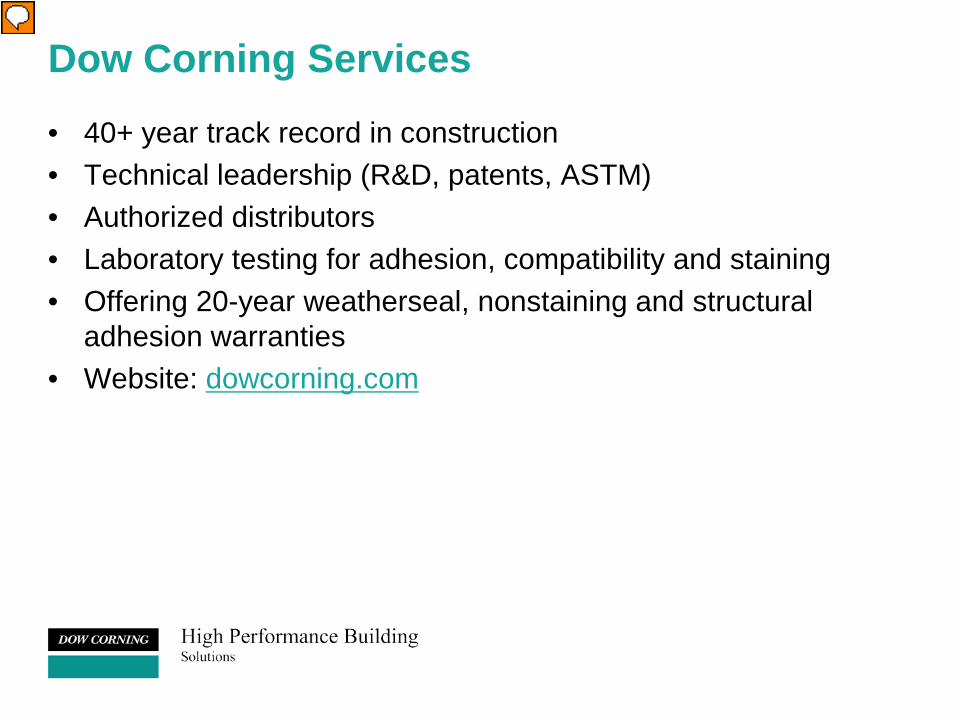
Dow Corning Services • 40+ year track record in construction • Technical leadership (R&D, patents, ASTM) • Authorized distributors • Laboratory testing for adhesion, compatibility and staining • Offering 20-year weatherseal, nonstaining and structural
adhesion warranties • Website: dowcorning.com
Presenter
Presentation Notes
Finally, Dow Corning is truly your partner for sealant specification and testing. We have a 40 plus year track record in construction, numerous patents, extensive R&D projects, and are involved in all of the industry influencing organizations regarding sealants. Dow Corning has authored and co-authored numerous ASTM publications, among others. We are fully staffed throughout the country with technical sales people, technical service engineers, and the best distribution network in the industry. We offer all of the laboratory testing discussed in this presentation at no charge for our customers working on construction projects. Dow Corning offers 20-year limited weatherseal and structural adhesion warranties, and the good news is that they are more than just a piece of paper to us. Dow Corning really stands behind our products. More information can be found at our website, www.dowcorning.com.

AIA MasterSpec • Individual copies of AIA MasterSpec 079200 and 099653 can be
ordered through arcomnet.com or by calling 1 800 424 5080 • We will review your specification for you and offer recommendations
at no charge; send specifications directly to our review department at [email protected]
• Specs are available on dowcorning.com
Presenter
Presentation Notes
Dow Corning Master Specifications can be obtained through Arcomnet.com. Specifications can be reviewed by sending an email to [email protected].

The information contained in this communication does not constitute an offer, does not give rise to binding obligations, and is subject to change without notice to you. The creation of binding obligations will occur only if an agreement is signed by authorized representatives of Dow Corning and your company. Any reference to competitor materials contained in this communication is not an endorsement of those materials by Dow Corning or an endorsement by the competitor of Dow Corning materials.
To the fullest extent permitted by applicable law, Dow Corning disclaims any and all liability with respect to your use or reliance upon the information. DOW CORNING DOES NOT MAKE ANY WARRANTY OR REPRESENTATION, EXPRESS OR IMPLIED, WITH RESPECT TO THE UTILITY OR COMPLETENESS OF THE INFORMATION AND DISCLAIMS THE IMPLIED WARRANTIES OF MERCHANTABILITY AND FITNESS FOR A PARTICULAR PURPOSE. DOW CORNING DISCLAIMS LIABILITY FOR ANY INCIDENTAL OR CONSEQUENTIAL DAMAGES.
Dow Corning is a registered trademark of Dow Corning Corporation. We help you invent the future is a trademark of Dow Corning Corporation. All other trademarks are the property of their respective owners. © 2016 Dow Corning Corporation. All rights reserved. Form No. 63-6263-01
Presenter
Presentation Notes
This concludes the Dow Corning presentation. Thank you for taking your time to learn about sealants today. In order to ensure that our training sessions are as meaningful as possible, we appreciate your feedback on the following slides. This optional course evaluation is not required for completion of this AIA course.