Siebel Phase 2a - ComfortSite...Phase 2a Training Guide Updated 08Oct2014 Page 7 5. Once you have...
28
Siebel Phase 2a IWD Training Guide
Transcript of Siebel Phase 2a - ComfortSite...Phase 2a Training Guide Updated 08Oct2014 Page 7 5. Once you have...

Siebel Phase 2a IWD Training Guide

Phase 2a Training Guide
Updated 08Oct2014 Page 2
Table of Contents
Import/Export Functionality ................................................................................................................................................. 3
Pricing Change Flag .......................................................................................................................................................... 17
Agreements – Pre & Post Approval ................................................................................................................................. 18

Phase 2a Training Guide
Updated 08Oct2014 Page 3
Import/Export Functionality
The Import/Export functionality can be used to add line items when creating a new quote or to modify line item
attributes like Qty, ordering of line items, Req. Buy & Req. Sell (US) and Req. Buy & Foreign Req. Sell (Canadian) on
existing quotes, as long as the quote is in the correct status.
In order to update an existing quote, the status must be in Pending Submission. Additionally:
1. The import feature cannot be used when the latest revision of the quote is in Accepted, Cancelled or Pending
Sales Review status.
2. Non‐active versions of the quote cannot be updated using the import feature.
Prior to Import/Export
Before starting the process of working with the import/export functionality in Siebel, make sure you have enabled
macros in Microsoft Excel. This is required for the import/export template to function properly in Excel.
Instructions for enabling macros can be found using the link below that correlates to the version of Microsoft Excel that
you are running on your computer.
Excel 2007
We recommend that you set your macro trust settings to “Disable all macros with notification” using the instructions
found in the link below. This will disable all macros and give you a security alert if macros are present. You can then
choose to run macros on a case by case basis.
http://office.microsoft.com/en‐us/excel‐help/enable‐or‐disable‐macros‐in‐office‐documents‐HA010031071.aspx#BM12
When you open the import template in Excel, you will see the message above. Click “Options” and then select “Enable
this content” (as shown below) to allow the macro to run.
Excel 2010, 2013

Phase 2a Training Guide
Updated 08Oct2014 Page 4
We recommend that you set your macro trust settings to “Disable all macros with notification” using the instructions
found in the link below. This will disable all macros and give you a security alert if macros are present. You can then
choose to run macros on a case by case basis.
http://office.microsoft.com/en‐us/excel‐help/enable‐or‐disable‐macros‐in‐office‐files‐
HA010354316.aspx#_Toc311698312
When you open the import template in Excel, you will see the message above. Click “Enable Content” to allow the
macro to run.
To Begin
1. The import/export functionality only imports line items so you will need to create the quote header before you
execute the import/export process.
It is also suggested that you add at least one line item manually to serve as a guide when working with the
exported template. To begin, you will perform the same steps as creating a new quote.
Log in and click on the Quotes Tab. In the Quotes home screen, click on My Quotes – IWD and begin the
process of creating a new quote

Phase 2a Training Guide
Updated 08Oct2014 Page 5
2. Click “New” to start a new quote.
3. Begin creating your quote by entering the header information either in the list view or form view as seen below.
4. The required fields when creating the header for a Residential quote are:
Dealer Info
o IWD Dealer Name
o IWD Dealer Location

Phase 2a Training Guide
Updated 08Oct2014 Page 6
Competitor Info
o Competition – click arrow for drop down menu and choose competitor
Project Info
o Project name
o Location
o Business Segment: Residential
o Project Type
Submission Details
o Margin to Apply
Click “Save” to create the quote.

Phase 2a Training Guide
Updated 08Oct2014 Page 7
5. Once you have clicked save, Siebel will assign a quote number to the header information that you created. To
view the quote details and manually add the first item on the quote, scroll up to the list view and click on the
Agreement Number of the quote you just created.
Quote Details

Phase 2a Training Guide
Updated 08Oct2014 Page 8
6. Click on “Add Items” to query for the model that you want to add or simply click “New” in the line items section
and fill in the required information.
Item #
Quantity
7. Once you have entered the item number and quantity, click “Get Price”. A pop up will display that says
“Retrieving Pricing Information” while the system pulls pricing from R12.
8. Once pricing has been loaded, enter your Requested Sell Price. This will automatically populate numbers in the
other required fields based on the amount you entered for your Margin to Apply.
Phase 2a Training Guide
Updated 08Oct2014 Page 9
9. After you have entered all prices, click “Save”. You have now completed the initial steps and are ready to begin
the import/export process.
10. There are two ways to download/export the excel template:
a. Click the drop down “Menu” button in the line details portion of the quote and select “Download Import
Template”

Phase 2a Training Guide
Updated 08Oct2014 Page 10
b. Click on the “Download Import Template” button
A pop‐up screen will appear that says “Exporting”
IMPORTANT: Always download a new template before starting the import process. Using an old template will
cause errors.
11. Next, a pop up screen will appear that asks what you would like to do with xls file: Open, Save, or Save As.
You can pick any of them as long as you save the file once you are finished working with it.
Selecting “Open” – will open the file so that you can begin working on it immediately, however the file will
not be automatically saved. You will have to do this from inside the Excel template by choosing the File
menu and selecting Save or Save As
The Default file name when saving the template is:
Quote #_Date_Time in Minutes and Seconds

Phase 2a Training Guide
Updated 08Oct2014 Page 11
12. Once the xls file is open, if macros are not enabled, a yellow “Security Warning” banner will appear letting you
know macros have been disabled. Click the “Enable Content” button. This will enable macros and allow the
template to function correctly.
IMPORTANT: It is extremely important to emphasize that you only input information needed to import line
items into the quote. Changing information such as moving column order, changing header names of columns or
modifying the core information that makes up the template will cause it not to function properly. In short, only
fill in the information that you need to execute the import/export functionality. DO NOT modify the existing
information in the template in any way.
13. Required Fields
For IWD Users – Quote Number, Quantity, Order (line#), Req Buy AND Req. Sell Price are mandatory in the Excel
template. They are easily identified by red text in their column header. *When working with Canadian Quotes,
Foreign Req Sell is also a mandatory field.*
Quote Number – you can only import line items for one quote per template. Column A (Quote Number)
should have the same quote number listed for each line where models are present
Order – numbers in this column designate the order in which the line item will appear on the quote.
*Numbers listed in this column are also used in Column E when identifying models that you want to package.
For more about Package Units please see the Packaging a model/models In Excel section of this user
manual*

Phase 2a Training Guide
Updated 08Oct2014 Page 12
14. Once all required fields are completed, validate the information.
Click the “Validate” button in the template
Successful validation (no errors) will produce green text reading “Validated” in the Status column T
IMPORTANT: The Req Dist.Margin% field determines Req Buy Price values. IF the Req. Dist.Margin% field
contains a value, it will auto populate or replace the Req Buy Price field with the calculated Req Dist.Margin %
when you click the “Validate” button. If the Req Dist.Margin% field is blank and the Req Buy Price field contains
a value, clicking “Validate” will calculate the Req Dist.Margin% and auto populate the field.
15. When the validation is NOT successful, i.e. there is an issue against a row/line item in Excel, then the system will
display the status (Column T) in Red text so that users can easily identify erroneous lines. The text in the status
field will start with the word “Error” followed by a message regarding the type of error that occurred. Double
check that all required information is present and has been input correctly.
Phase 2a Training Guide
Updated 08Oct2014 Page 13
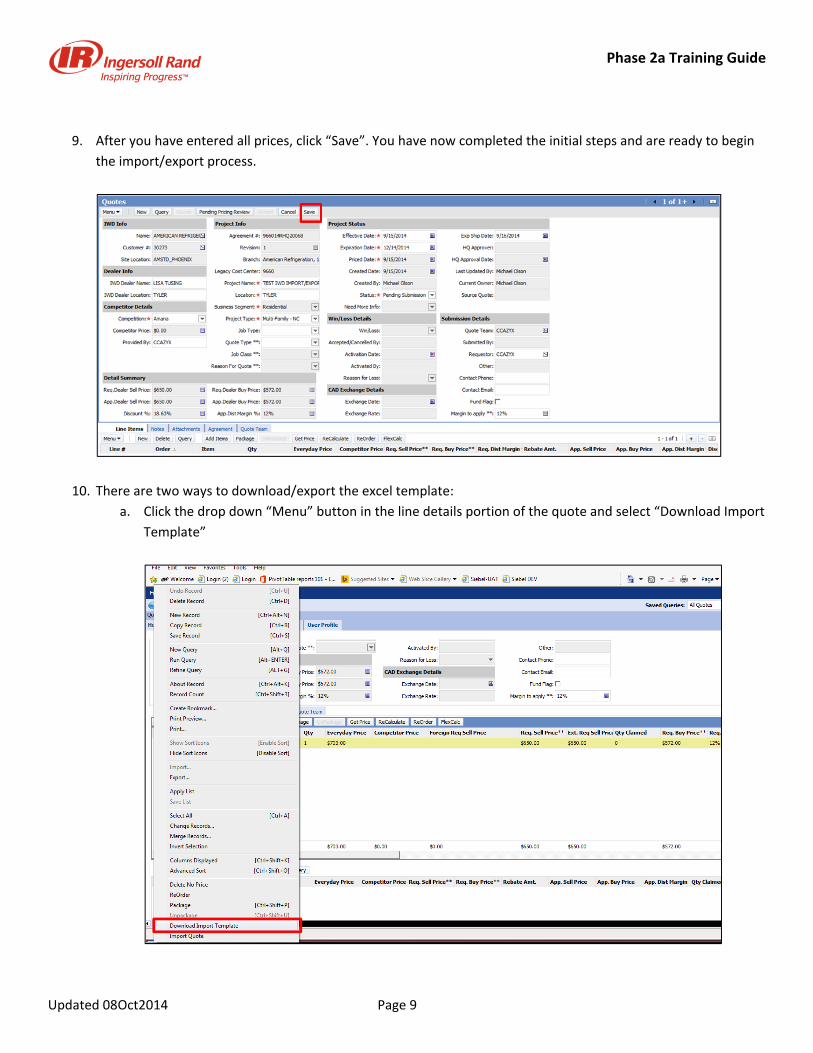
16. Once all lines in excel have been successfully validated, save the excel template. You are now ready to begin the
import process in Siebel.
17. Go into Siebel and pull up the quote you created to import line items. Make sure you have opened the quote and
the quote details are visible in the bottom portion of your screen.
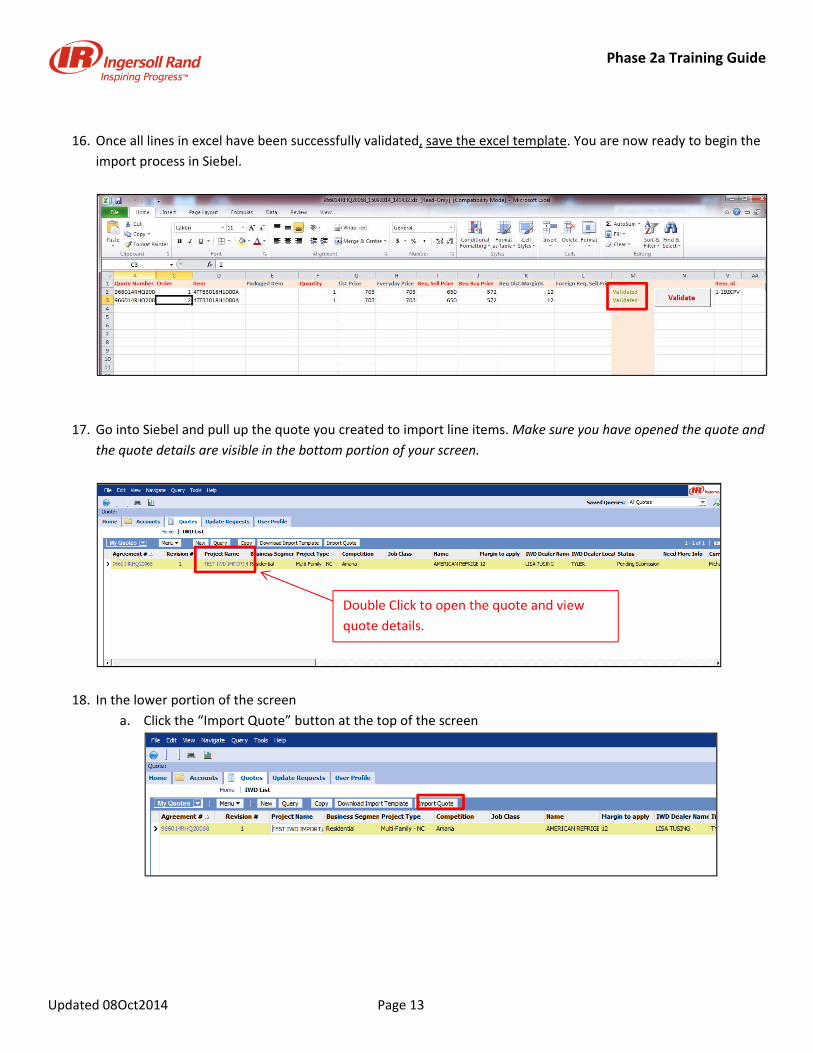
18. In the lower portion of the screen
a. Click the “Import Quote” button at the top of the screen
Double Click to open the quote and view
quote details.
Phase 2a Training Guide
Updated 08Oct2014 Page 14
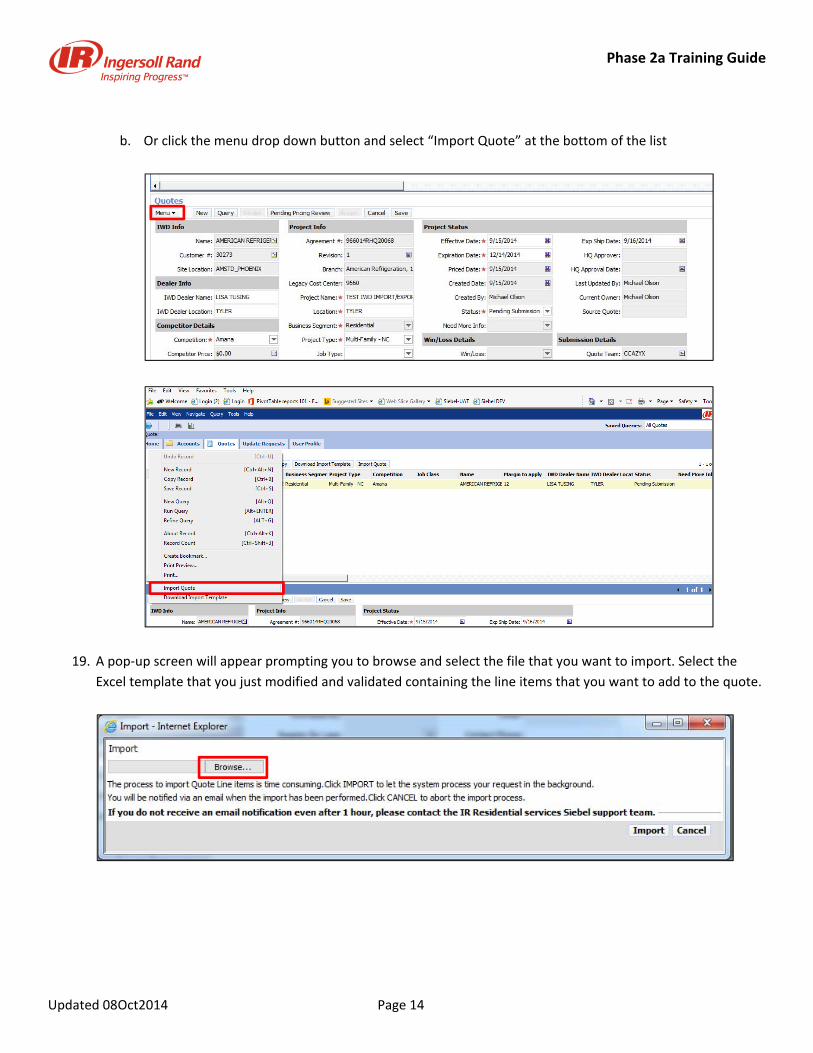
b. Or click the menu drop down button and select “Import Quote” at the bottom of the list
19. A pop‐up screen will appear prompting you to browse and select the file that you want to import. Select the
Excel template that you just modified and validated containing the line items that you want to add to the quote.

Phase 2a Training Guide
Updated 08Oct2014 Page 15
20. Once you have selected the excel template that you want to upload, click the “Import” button. Siebel will begin
importing line items. This process will run in the background and an email notification will be sent once the
import is successfully completed.
IMPORTANT: Do NOT click the refresh button or make any changes to the quote until you receive the email
notification.
21. In Siebel, once the import is complete, you will be able to see the line items added the quote from the template.
You will also be able to find the file that was imported under the “Attachment” tab in the quote.
PACKAGING A MODEL/MODELS IN EXCEL
To package a model or models in Excel, you will enter the line items into the Excel template just as you normally would,
making sure to input all required fields.
Packaging a model/models requires two extra steps when inputting them in to the template.
1. Once you have the model/models listed that you want to package, put “Sub‐Total” on a separate line with the
word “Sub‐Total” in Column D (Item).
2. The number in Column C (Order) on the line containing “Sub‐Total” as the item, is the number that you will put
in Column E for items you want to package. This number also needs to be present in Column E for the line
containing “Sub‐Total”. See example below.

Phase 2a Training Guide
Updated 08Oct2014 Page 16

Phase 2a Training Guide
Updated 08Oct2014 Page 17
Pricing Change Flag
IWD users now have the ability to identify if any prices were modified by the pricing team within the same version of the
quote. Price changes can now be identified by a check ( ) in the box under the Price Change column within the quote.
1. Initially, when the IWD user creates a quote and submits it to Pricing as “Pending Pricing Review”, the Price
Change column is not checked (flagged).
2. Once the pricing team has reviewed the quote and submitted it as “Pending Sales Review”, any line items that
had a change in price by the pricing team are now identifiable by the check ( ) in the Price Change column
within the quote. If there was no price change that field will remain blank.

Phase 2a Training Guide
Updated 08Oct2014 Page 18
Agreements – Pre & Post Approval
There are two types of proposals/contracts that are generated depending on the status of your quote.
When the quote is in pending status, the document generated will read “Pending Sell Price”, “Pending Buy
Price” and “Pending Dist Margin %”
Once a quote has been accepted, the proposal/contract will read “App. Sell Price”, “Approved Buy Price” and
“Approved Dist Margin %”
Examples of both, as well as how to generate the two documents can be found below.
1. Log in to Siebel and click on the “Quotes” tab from the homepage.
2. On the Quotes homepage, click “My Quotes – IWD”.
Phase 2a Training Guide
Updated 08Oct2014 Page 19
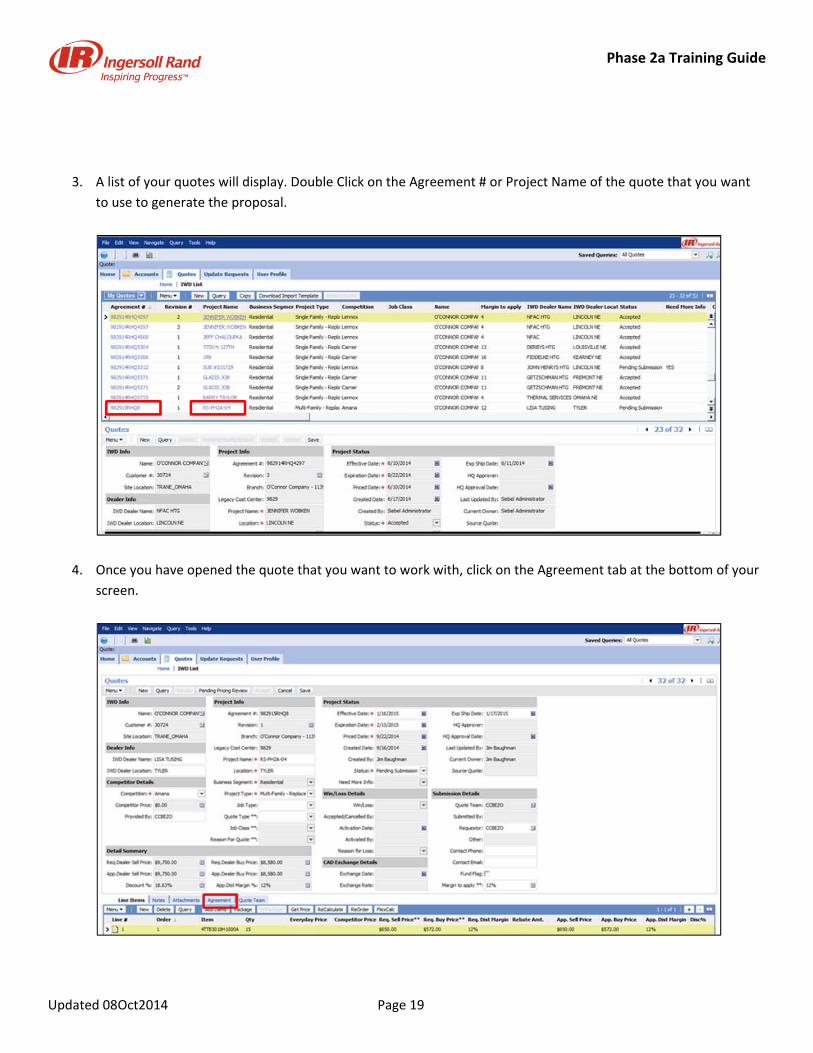
3. A list of your quotes will display. Double Click on the Agreement # or Project Name of the quote that you want
to use to generate the proposal.
4. Once you have opened the quote that you want to work with, click on the Agreement tab at the bottom of your
screen.

Phase 2a Training Guide
Updated 08Oct2014 Page 20
5. Click the “New” button to create a new request to generate a draft of the Agreement for this quote.
6. First, fill in the name field. This is whatever name you want to call this document/draft.

Phase 2a Training Guide
Updated 08Oct2014 Page 21
7. Next, click the drop down menu in the Template column and select “Agreement”.
8. Next, click “Generate Draft”. The Status will read “In Queue” while the system is generating the document.

Phase 2a Training Guide
Updated 08Oct2014 Page 22
9. The status will change from “In Queue” to “Generating” to “Completed”. You can click on the magnifying glass
with the blue arrow in the upper right hand corner of your screen to refresh the system process and get an
updated status while the system is generating your document.
10. When the system has finished generating the document and it is ready to view, the Status will read
“Completed”.
11. Click the hyperlink under draft name to download the document.

Phase 2a Training Guide
Updated 08Oct2014 Page 23
12. Below is an example of an Agreement generated before it has been accepted. Note that Sell Price, Buy Price and
Dist Margin % are all “Pending”.

Phase 2a Training Guide
Updated 08Oct2014 Page 24
The process is the same for generating Agreements for accepted quotes. However, the wording on the
Agreement will be different once the quote has an accepted status.
13. Follow the same steps as above to generate an Agreement for an Accepted quote. Go into the quote details and
click the Agreement tab at the bottom of the screen.
14. Click “New” and fill in the Name field.

Phase 2a Training Guide
Updated 08Oct2014 Page 25
15. Next, click the drop down menu in the Template column.
16. Once you have selected the template you want to use, click “Generate Draft”. The Status will read “In Queue”
while the system is generating the document.
17. The status will change from “In Queue” to “Generating” to “Completed”. You can click on the magnifying glass
with the blue arrow in the upper right hand corner of your screen to refresh the system process and get an
updated status while the system is generating your document.

Phase 2a Training Guide
Updated 08Oct2014 Page 26
18. When the system has finished generating the document and it is ready to view, the Status will read
“Completed”.
19. Click the hyperlink under draft name to download the document.
Phase 2a Training Guide
Updated 08Oct2014 Page 27
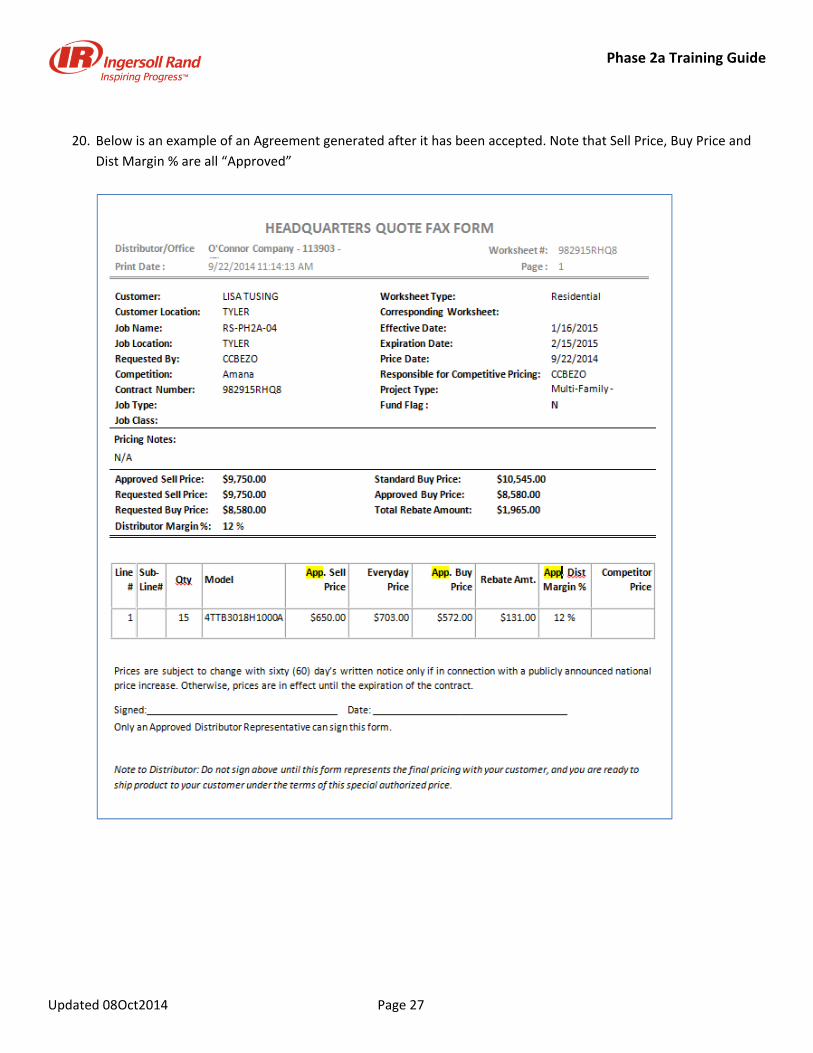
20. Below is an example of an Agreement generated after it has been accepted. Note that Sell Price, Buy Price and
Dist Margin % are all “Approved”

Phase 2a Training Guide
Updated 08Oct2014 Page 28
For Support:
For questions on how to use the application, please contact Susan Garrison ([email protected]), Barbara Riggins
([email protected]) or Keith Hays ([email protected]).
For technical support, please call IR helpdesk 1‐800‐872‐6381 and create a ticket. Please provide the details below so
your ticket is routed to the correct Siebel support team.
Provide the Queue Name as: RS‐HVAC‐SIEBEL (remember to mention this to the helpdesk person)
Issue Description (Please provide Quote #, screenshot or error message, Customer # etc.)
Your Siebel Id, Full Name, Contact Phone # and email or if you are raising a ticket on behalf of someone, then
provide the details for that person
Finally after creating the ticket, email the ticket # to rs‐hvac‐siebel‐[email protected]