
Shya_Documentation
43
HOME AUTOMATION Control Your House, Just By Touch. A Prototype which let you control your home using your android phone, your laptop or internet web application. It shows a tiny part of Internet of Things and Home Automation Model . ON YOUR THUMB ON YOUR PHONE ON YOUR LAPTOP OVER INTERNET MAKE YOUR HOME REMOTE ACCESIBLE. ABHISHEK SINGH CHANDAN KUMAR KUNAL JAISWAL ABHISHEK KR. RAVI
-
Upload
abhishek-kumar-ravi -
Category
Documents
-
view
6 -
download
0
Transcript of Shya_Documentation

HOME
AUTOMATION
Control Your House, Just By Touch.
A Prototype which let you control your home using your android
phone, your laptop or internet web application. It shows a tiny part
of Internet of Things and Home Automation Model .
ON YOUR THUMB
ON YOUR PHONE
ON YOUR LAPTOP
OVER INTERNET
MAKE
YOUR HOME
REMOTE
ACCESIBLE.
ABHISHEK SINGH
CHANDAN KUMAR
KUNAL JAISWAL
ABHISHEK KR. RAVI

CERTIFICATE
Bengal College of Engineering & Technology, Durgapur-713212
This is to certify that this project “Shya- Home Automation” is a bonafied record of
work done by:
Abhishek Singh
Chandan Kumar
Kunal Jaiswal
Abhishek Kumar Ravi
We are satisfied with the work, which is being presented for the partial fulfilment of the degree of
Bachelor of Technology in Computer Science of Engineering.
Dr. P.K. Prasad
Principal
BCET, Durgapur
Md. Rahim
HOD of CSE
BCET, Durgapur
Souymakanti Bhattrachya
Asst. Professor
BCET, Durgapur

PROJECT TITLE
Project Submitted to the Department of Computer Science of Engineering & Technology affiliated
to West Bengal University of Technology for the partial fulfillment of requirements for degree of
B.Tech
Project Submitted By,
Abhishek Singh
Chandan Kumar
Kunal Jaiswal
Abhishek Kumar Ravi
Under the Guidance of,
Soumyakanti Bhattacharya
Asst. Professor
Computer Science of Engineering
Bengal College of Engineering & Technology, Durgapur-713212

ACKNOWLEDGEMENT
Bengal College of Engineering & Technology, Durgapur-713212
We take this opportunity to express our deep gratitude and sincerest thank to our
facilitator, Mr. Souymakanti Bhattacharya for giving most valuable suggestion, helpful
guidance and encouragement in the execution of this project.
We are also thankful to our College, Bengal College of Engineering & Technology for
providing us the opportunity to undertake this project, ‘Shya- Home Automation’.
Finally we would like to thank our parents, family and friends for their help and moral
support throughout the development of this project.

CONTENT
Abstract Idea about Project
Illustrated View
About IoT (Internet Of Things)
Illustrated Idea about IoT
Bluetooth Module (HC-05) and its Specification
Android UNO Microcontroller and its Specification
LCD 1602 Display
About Serial Port
Ethernet Shield and its Specification
Windows Form App for Desktop/Laptop
AndruDroid App for Android
IoT Web Application for Home Automation
Sketch for Home Automation
Sketch for IoT Web Model
Conclusion
References

HOME AUTOMATION
“
Home automation (also known as domotics ) refers to the automatic and electronic control of
household features, activity, and appliances. Various control systems are utilized in this residential
extension of building automation.
”

ABSTRACT
Home Automation is a complete commercial project which is already implemented in western
countries like USA and UK. Along with the huge potential, it has huge setup & product cost. Along
with all, there are lot of confusion regarding automation threat. So, in this project we are trying to
implement a real-model which show all the basic feature of this automation thing.
Here, we will have a prototype model (wooden house) where we have implemented tasks:
Turning ON/OFF Lights
Automated Door
Leave a Message
Ring Door Bell
In this prototype, we‘ve approached automation via basic devices. Either you own a laptop or an
Android phone or have an Internet connection. All these are feasible to do job.
Android App works on Bluetooth communication, where Laptop application work on Serial
communication. And, in Web Application Technique we use Ethernet communication.
A home automation system integrates electrical devices in a house with each other. The techniques
employed in home automation include those in building automation as well as the control of
domestic activities, such as home entertainment systems, houseplant and yard watering, pet feeding,
changing the ambiance "scenes" for different events (such as dinners or parties), and the use
of domestic robots. Devices may be connected through a home network to allow control by
a personal computer, and may allow remote access from the internet. Through the integration
of information technologies with the home environment, systems and appliances can communicate in
an integrated manner which results in convenience, energy efficiency, and safety benefits.
The popularity of home automation has been increasing greatly in recent years due to much higher
affordability and simplicity through smartphone and tablet connectivity. The concept of the "Internet
of Things" has tied in closely with the popularization of home automation.
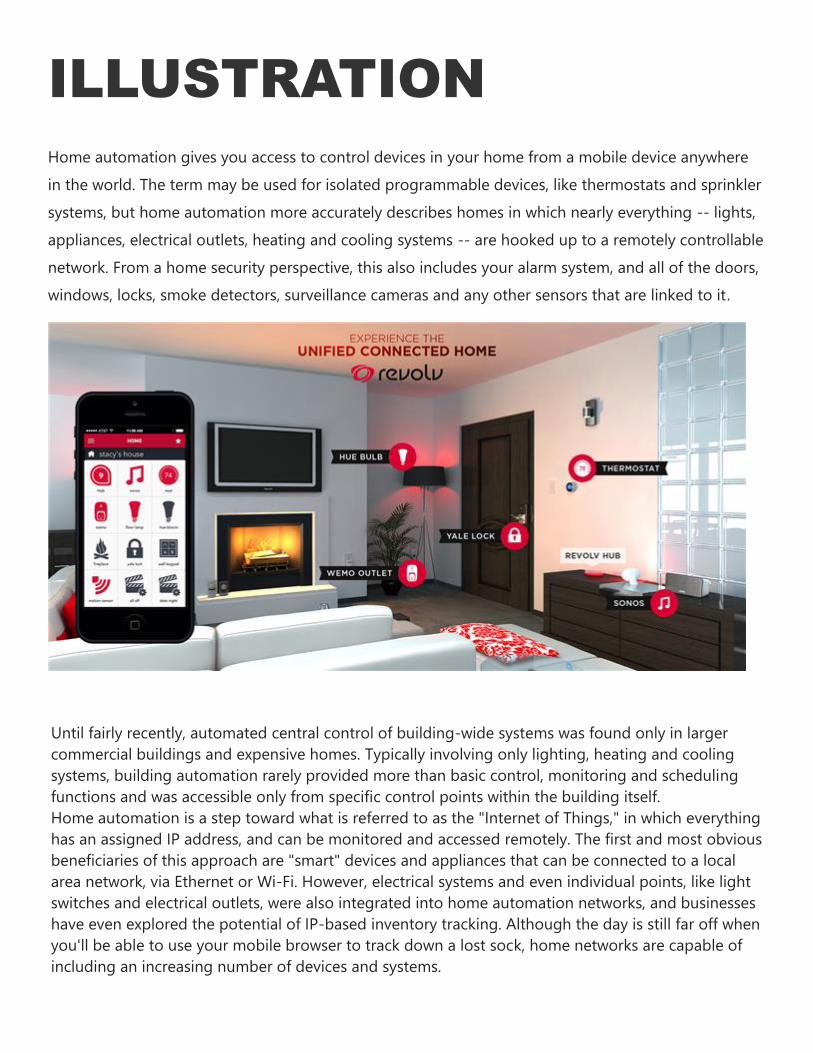
ILLUSTRATION
Home automation gives you access to control devices in your home from a mobile device anywhere
in the world. The term may be used for isolated programmable devices, like thermostats and sprinkler
systems, but home automation more accurately describes homes in which nearly everything -- lights,
appliances, electrical outlets, heating and cooling systems -- are hooked up to a remotely controllable
network. From a home security perspective, this also includes your alarm system, and all of the doors,
windows, locks, smoke detectors, surveillance cameras and any other sensors that are linked to it.
Until fairly recently, automated central control of building-wide systems was found only in larger
commercial buildings and expensive homes. Typically involving only lighting, heating and cooling
systems, building automation rarely provided more than basic control, monitoring and scheduling
functions and was accessible only from specific control points within the building itself.
Home automation is a step toward what is referred to as the "Internet of Things," in which everything
has an assigned IP address, and can be monitored and accessed remotely. The first and most obvious
beneficiaries of this approach are "smart" devices and appliances that can be connected to a local
area network, via Ethernet or Wi-Fi. However, electrical systems and even individual points, like light
switches and electrical outlets, were also integrated into home automation networks, and businesses
have even explored the potential of IP-based inventory tracking. Although the day is still far off when
you'll be able to use your mobile browser to track down a lost sock, home networks are capable of
including an increasing number of devices and systems.

So, we have few jargons in this model. And, one of them is Automation.
Automation
Automation is, unsurprisingly, one of the two main characteristics of home automation. Automation
refers to the ability to program and schedule events for the devices on the network. The
programming may include time-related commands, such as having your lights turn on or off at
specific times each day. It can also include non-scheduled events, such as turning on all the lights in
your home when your security system alarm is triggered.
Once you start to understand the possibilities of home automation scheduling, you can come up with
any number of useful and creative solutions to make your life better. Is that west-facing window
letting in too much light? Plug your motorized blinds into a "smart" outlet and program it to close at
noon each day. Do you have someone come by at the same time each day to walk the dog? Program
your home automation system to unlock the front door for them, and lock it up again when they're
done.
Remote Control
The other main characteristic of cutting-edge home automation is remote monitoring and access.
While a limited amount of one-way remote monitoring has been possible for some time, it's only
since the rise in smartphones and tablets that we've had the ability to truly connect to our home
networks while we're away. With the right home automation system, you can use any Internet-
connected device to view and control the system itself and any attached devices.
Monitoring apps can provide a wealth of information about your home, from the status of the current
moment to a detailed history of what has happened up to now. You can check your security system's
status, whether the lights are on, whether the doors are locked, what the current temperature of your
home is and much more. With cameras as part of your home automation system, you can even pull
up real-time video feeds and literally see what's going on in your home while you're away.
Even simple notifications can be used to perform many important tasks. You can program your
system to send you a text message or email whenever your security system registers a potential
problem, from severe weather alerts to motion detector warnings to fire alarms. You can also get
notified for more mundane events, such as programming your "smart" front door lock to let you know
when your child returns home from school.
The real hands-on control comes in when you start interacting with the home automation system
from your remote app. In addition to arming and disarming your security system, you can reprogram
the scheduling, lock and unlock doors, reset the thermostat and adjust the lights all from your phone,
from anywhere in the world. As manufacturers are creating more and more "smart" devices and
appliances all the time, the possibilities for home automation are virtually limitless.

Home Automation Components
What kinds of things can be part of a home automation system? Ideally, anything that can be
connected to a network can be automated and controlled remotely. In the real world (outside of
research labs and the homes of the rich and famous), home automation most commonly connects
simple binary devices. This includes "on and off" devices such as lights, power outlets and electronic
locks, but also devices such as security sensors which have only two states, open and closed.
Where home automation becomes truly "smart" is in the Internet-enabled devices that attach to this
network and control it. The classic control unit is the home computer, for which many of the earlier
home automation systems were designed. Today's home automation systems are more likely to
distribute programming and monitoring control between a dedicated device in the home, like the
control panel of a security system, and a user-friendly app interface that can be accessed via an
Internet-enabled PC, smartphone or tablet.
Manufacturers have produced a wide variety of "smart" devices, many of which are full of innovative
features but few of which offer the kind of integration needed to be part of a complete home
automation system. Much of the problem has been that each manufacturer has a different idea of
how these devices should be connected and controlled. So while you may have a "smart" TV, washing
machine, refrigerator, thermostat, coffee maker or any of the other Internet-ready household devices
on the market, the end result is usually a separate control scheme for each device.
In the near future, home automation may be standardized to let us truly take advantage of all of
these additional possibilities. For the time being, the home security providers that specialize in home
automation have focused on the most critical and useful parts of a connected home. At a basic level,
this means the doors and windows and environmental devices (thermostat, smoke detectors,
temperature, humidity, fire and carbon dioxide sensors) that keep you safe and comfortable. For
additional real-time security, convenience and control, home automation systems from security
providers should also include options for video cameras. With the best systems, you'll also be able to
include lights and individual electrical outlets into your home automation package.
Energy Efficiency
One clear advantage of home automation is the unmatched potential for energy savings, and
therefore cost savings. Your thermostat is already "smart" in the sense that it uses a temperature
threshold to govern the home's heating and cooling system. In most cases, thermostats can also be
programmed with different target temperatures in order to keep energy usage at a minimum during
the hours when you're least likely to benefit from the heating and cooling.
At the most basic level, home automation extends that scheduled programmability to lighting, so
that you can suit your energy usage to your usual daily schedule. With more flexible home
automation systems, electrical outlets or even individual devices can also be automatically powered
down during hours of the day when they're not needed. As with isolated devices like thermostats and
sprinkler systems, the scheduling can be further broken down to distinguish between weekends and
even seasons of the year, in some cases.
Set schedules are helpful, but many of us keep different hours from day to day. Energy costs can be
even further reduced by programming "macros" into the system and controlling it remotely whenever
needed. In other words, you could set up a "coming home" event that turns on lights and heating as
you're driving home after work, for example, and activate it all with one tap on your smartphone. An
opposite "leaving home" event could save you from wasting energy on forgotten lights and
appliances once you've left for the day.

IOT Internet of Things.
“
he Internet of Things (IoT) refers to the ever-growing network of physical objects that feature an IP
address for internet connectivity, and the communication that occurs between these objects and other
Internet-enabled devices and systems.
”

ILLUSTRATION
A thing, in the Internet of Things, can be a person with a heart monitor implant, a farm animal with
a biochip transponder, an automobile that has built-in sensors to alert the driver when tire pressure is
low -- or any other natural or man-made object that can be assigned an IP address and provided with
the ability to transfer data over a network. So far, the Internet of Things has been most closely
associated with machine-to-machine (M2M) communication in manufacturing and power, oil and gas
utilities. Products built with M2M communication capabilities are often referred to as being smart.
Although the concept wasn't named until 1999, the Internet of Things has been in development for
decades. The first Internet appliance, for example, was a Coke machine at Carnegie Melon University
in the early 1980s. The programmers could connect to the machine over the Internet, check the status
of the machine and determine whether or not there would be a cold drink awaiting them, should they
decide to make the trip down to the machine.
Kevin Ashton, cofounder and executive director of the Auto-ID Center at MIT, first mentioned the
Internet of Things in a presentation he made to Procter & Gamble. Here’s how Ashton explains the
potential of the Internet of Things:
“
Today computers -- and, therefore, the Internet -- are almost wholly dependent on human beings for information. Nearly all of the roughly 50 petabytes (a petabyte is 1,024 terabytes) of data available on the
Internet were first captured and created by human beings by typing, pressing a record button, taking a digital picture or scanning a bar code.
The problem is, people have limited time, attention and accuracy -- all of which means they are not very good at capturing data about things in the real world. If we had computers that knew everything there was to know about things -- using data they gathered without any help from us -- we would be able to track and count everything and greatly reduce waste, loss and cost. We would know when things needed replacing,
repairing or recalling and whether they were fresh or past their best.
”
The “Internet of things” (IoT) is becoming an increasingly growing topic of conversation both in the
workplace and outside of it. It’s a concept that not only has the potential to impact how we live but
also how we work. But what exactly is the “Internet of things” and what impact is it going to have on
you if any? There are a lot of complexities around the “Internet of things” but I want to stick to the
basics. Lots of technical and policy related conversations are being had but many people are still just
trying to grasp the foundation of what the heck these conversations are about.
Let’s start with understanding a few things.
Broadband Internet is become more widely available, the cost of connecting is
decreasing, more devices are being created with wifi capabilities and censors built
into them, technology costs are going down, and smart phone penetration is sky-
rocketing. All of these things are creating a “perfect storm” for the IoT.
So what is the Internet of things?
Simply put this is the concept of basically connecting any device with an on and off
switch to the Internet (and/or to each other). This includes everything from cell
phones, coffee makers, washing machines, headphones, lamps, wearable devices
and almost anything else you can think of. This also applies to components of
machines, for example a jet engine of an airplane or the drill of an oil rig. As I
mentioned, if it has an on and off switch then chances are it can be a part of the
IoT. The analyst firm Gartner says that by 2020 there will be over 26 billion
connected devices…that’s a lot of connections (some even estimate this number to
be much higher, over 100 billion). The IoT is a giant network of connected “things”
(which also includes people). The relationship will be between people-people,
people-things, and things-things.
How does this impact you?
The new rule for the future is going to be, “anything that can be connected, will be
connected.” But why on earth would you want so many connected devices talking
to each other? There are many examples for what this might look like or what the
potential value might be. Say for example you are on your way to a meeting, your
car could have access to your calendar and already know the best route to take,
and if the traffic is heavy your car might send a text to the other party notifying
them that you will be late. What if your alarm clock wakes up you at 6 am and
then notifies your coffee maker to start brewing coffee for you? What if your office

equipment knew when it was running low on supplies and automatically re-
ordered more? What if the wearable device you used in the workplace could tell
you when and where you were most active and productive and shared that
information with other devices that you used while working?
On a broader scale the IoT can be applied to things like transportation networks “smart cities” which
can help us reduce waste and improve efficiency for things such as energy use; this helping us
understand and improve how we work and live. Take a look at the visual below to see what
something like that can look like.

The reality is that the IoT allows for virtually endless opportunities and connections
to take place, many of which we can’t even think of or fully understand the impact
of today. It’s not hard to see how and why the IoT is such a hot topic today, it
certainly opens the door to a lot of opportunities but also to many
challenges. Security is big issues that is oftentimes brought up. With billions of
devices being connect together what can people to do make sure that their
information stays secure? Will someone be able to hack into your toaster and
thereby get access to your entire network? The IoT also opens up companies all
over the world to more security threats. Then we have the issue of privacy and
data sharing. This is a hot button topic even today so one can only imagine how
the conversation and concerns will escalate when we are talking about many
billions of devices being connected. Another issue that many companies
specifically are going to be faced with is around the massive amounts data that all
of these devices are going to produce. Companies need to figure out a way to
store, track, analyze, and make sense of the vast amounts of data that will be
generated.
So what now?
Conversations about the IoT are (and have been for several years) taking place all
over the world as we seek to understand how this will impact our lives. We are
also trying to understand what the many opportunities and challenges are going
to be as more and more devices start to join the IoT. For now the best thing that
we can do is educate ourselves about what the IoT is and the potential impacts
that can be seen on how we work and live.

MODULES Used in Prototype Modeling.

BLUETOOTH Arduino Bluetooth Module (HC-05)
It’s a Bluetooth Module which is compatible to Arduino Microcontroller. More precisely, it’s a HC-05
module which is a Bluetooth SPP (Serial Port Protocol) module. And, it is designed for ‘Transparent
Wireless Communication’.
Serial Port Bluetooth Module is fully qualified v2.0+EDR (Enhanced Data Rate) 3Mbps Modulation
with complete 2.4GHz radio transceiver and baseband. It uses CSR Bluecore 04-External single chip
Bluetooth system with CMOS technology and with AFH (Adaptive Frequency Hopping Feature). It has
the footprint as small as 12.7mmx27mm. Hope it will simplify your overall design/development cycle.
The remote unit can be powered from 3.3V up to 6V for easy battery attachment. All signal pins on
the remote unit are 3V-6V tolerant. No level shifting is required. Do not attach this device directly to a
serial port. You will need an RS232 to TTL converter circuit if you need to attach this to a computer.
You can either solder a 6-pin header or individual wires.

Specifications
Hardware
Chipset CSR BC417143 (BlueCore4External)
Bluetooth version V2.0+EDR
Class 2 module with PCB antenna
Flash 8Mbit
Interface I2C UART PCM USB
Support for 802.11 co-existence
3.3-6V operation
SPP firmware
Support for up to seven slaves
ISM Band:2.40GHz~2.48GHz
Master/Slave/Loopback working roles
XBee compatible socket
Rohs: Yes
Software
Supported baud rate: 9600,19200,38400,57600,115200,230400,460800.
Use CTS and RTS to control the data stream.
Auto-reconnect in 30 min when disconnected as a result of beyond the range of connection.
Auto-connect the last device on power as default.
Permit matched device connect by default.
Default Baud rate: 38400(Here, we‘ve use 9600), Data bits: 8, Stop bit: 1, Parity: No parity, Data
control: has.
Default PINCODE:”1234”.
Specifications
HARDWARE FEATURES

ARDUINO BOARD Arduino UNO (REVISION 3) Single - Board Microcontroller
Arduino is an open-source computer hardware
and software company, project and user
community that designs and manufactures kits
for building digital devices and interactive
objects that can sense and control the physical
world.
The project is based on a family of
microcontroller board designs manufactured
primarily by Smart Projects in Italy, and also by
several other vendors, using various 8-bit Atmel
AVR microcontrollers or 32-bit Atmel ARM
processors. These systems provide sets of digital
and analog I/O pins that can be interfaced to
various extension boards and other circuits. The
boards feature serial communications interfaces,
including USB on some models, for loading
programs from personal computers. For
programming the microcontrollers, the Arduino
platform provides an integrated development
environment (IDE) based on the Processing
project, which includes support for C and C++
programming languages.
“ Arduino is a tool for making computers that can sense and control more of the physical world than your desktop
computer. It's an open-source physical computing platform based on a simple microcontroller board, and a
development environment for writing software for the board.
”
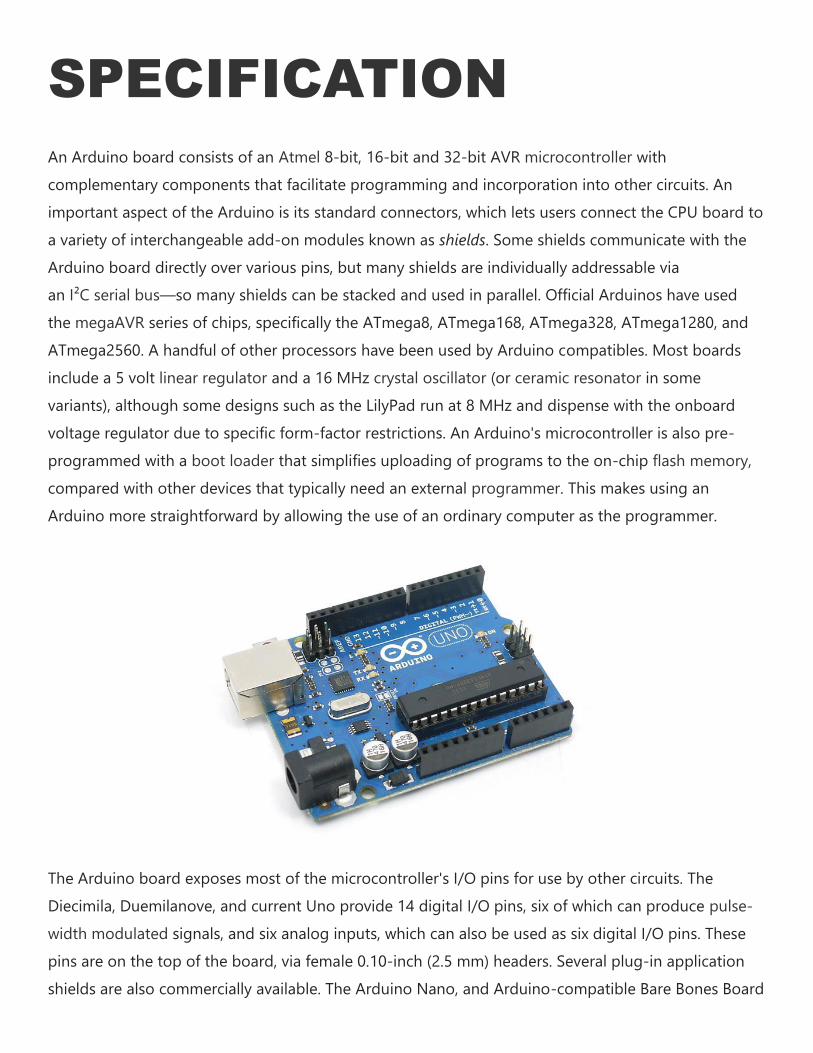
SPECIFICATION
An Arduino board consists of an Atmel 8-bit, 16-bit and 32-bit AVR microcontroller with
complementary components that facilitate programming and incorporation into other circuits. An
important aspect of the Arduino is its standard connectors, which lets users connect the CPU board to
a variety of interchangeable add-on modules known as shields. Some shields communicate with the
Arduino board directly over various pins, but many shields are individually addressable via
an I²C serial bus—so many shields can be stacked and used in parallel. Official Arduinos have used
the megaAVR series of chips, specifically the ATmega8, ATmega168, ATmega328, ATmega1280, and
ATmega2560. A handful of other processors have been used by Arduino compatibles. Most boards
include a 5 volt linear regulator and a 16 MHz crystal oscillator (or ceramic resonator in some
variants), although some designs such as the LilyPad run at 8 MHz and dispense with the onboard
voltage regulator due to specific form-factor restrictions. An Arduino's microcontroller is also pre-
programmed with a boot loader that simplifies uploading of programs to the on-chip flash memory,
compared with other devices that typically need an external programmer. This makes using an
Arduino more straightforward by allowing the use of an ordinary computer as the programmer.
The Arduino board exposes most of the microcontroller's I/O pins for use by other circuits. The
Diecimila, Duemilanove, and current Uno provide 14 digital I/O pins, six of which can produce pulse-
width modulated signals, and six analog inputs, which can also be used as six digital I/O pins. These
pins are on the top of the board, via female 0.10-inch (2.5 mm) headers. Several plug-in application
shields are also commercially available. The Arduino Nano, and Arduino-compatible Bare Bones Board

and Boarduino boards may provide male header pins on the underside of the board that can plug
into solder less breadboards.
Software
The Arduino integrated development environment (IDE) is a cross-platform application written in Java, and derives
from the IDE for the Processing programming language and the Wiring projects. It is designed to introduce
programming to artists and other newcomers unfamiliar with software development. It includes a code editor with
features such as syntax highlighting, brace matching, and automatic indentation, and is also capable of compiling
and uploading programs to the board with a single click. A program or code written for Arduino is called a "sketch".
Arduino programs are written in C or C++. The Arduino IDE comes with a software library called "Wiring" from the
original Wiring project, which makes many common input/output operations much easier. The users need only to
define two functions to make an executable cyclic executive program:
setup() : a function run once at the start of a program that can initialize settings
loop() : a function called repeatedly until the board powers off

Development
Arduino is open-source hardware: the Arduino hardware reference designs are distributed under
a Creative Commons Attribution Share-Alike 2.5 license and are available on the Arduino Web site.
Layout and production files for some versions of the Arduino hardware are also available. The source
code for the IDE is available and released under the GNU General Public License, version 2.
Although the hardware and software designs are freely available under copy left licenses, the
developers have requested that the name "Arduino" be exclusive to the official product and not be
used for derivative works without permission. The official policy document on the use of the Arduino
name emphasizes that the project is open to incorporating work by others into the official
product. Several Arduino-compatible products commercially released have avoided the "Arduino"
name by using "-duino" name variants.
Massimo Banzi is the co-founder of the Arduino project. He is an Interaction Designer, Educator and
Open Source Hardware advocate. He has worked as a consultant for clients such as: Prada, Artemide,
Persol, Whirlpool, V&A Museum and Adidas.

LCD DISPLAY Matrix Display 1602 (16x2) with 16 Columns & 2 Rows
This is another great LCD display from Arduino.
With the limited pin resources, your project may
be out of resources using normal LCD shield.
With this I2C interface LCD module, you only
need 2 lines (I2C) to display the information. If
you already has I2C devices in your project, this
LCD module actually cost no more resources at
all. Fantastic for Arduino based project.
The Liquid Crystal library allows you to control
LCD displays that are compatible with the
Hitachi HD44780 driver. There are many of them
out there, and you can usually tell them by the
16-pin interface.
The LCDs have a parallel interface, meaning that
the microcontroller has to manipulate several
interface pins at once to control the display

HARDWARE FEATURES
SERVO Servo Motor (45 Watt.) can rotate on directed angle.
A Servo Motor is a rotary actuator that allows for precise control of angular position, velocity and
acceleration. It consists of a suitable motor coupled to a sensor for position feedback. It also requires
a relatively sophisticated controller, often a dedicated module designed specifically for use with
servomotors.
This library (Servo.h) allows an Arduino board to control RC (hobby) servo motors. Servos have
integrated gears and a shaft that can be precisely controlled. Standard servos allow the shaft to be
positioned at various angles, usually between 0 and 180 degrees. Continuous rotation servos allow
the rotation of the shaft to be set to various speeds.
The Servo library supports up to 12 motors on most Arduino boards and 48 on the Arduino Mega. On
boards other than the Mega, use of the library disables analogWrite() (PWM) functionality on pins 9
and 10, whether or not there is a Servo on those pins. On the Mega, up to 12 servos can be used
without interfering with PWM functionality; use of 12 to 23 motors will disable PWM on pins 11 and
12.

Circuit
Servo motors have three wires: power, ground, and signal. The power wire is typically red, and should
be connected to the 5V pin on the Arduino board. The ground wire is typically black or brown and
should be connected to a ground pin on the Arduino board. The signal pin is typically yellow, orange
or white and should be connected to a digital pin on the Arduino board. Note that servos draw
considerable power, so if you need to drive more than one or two, you'll probably need to power
them from a separate supply (i.e. not the +5V pin on your Arduino). Be sure to connect the grounds of
the Arduino and external power supply together.

SERIAL PORT A vital part of Arduino Monitoring.
What is Serial Port?
An Asynchronous port on the computer used to connect a serial device to the computer and capable
of transmitting one bit at a time. Serial ports are typically identified on IBM compatible computers as
COM (communications) ports. For example, a mouse might be connected to COM1 and a modem to
COM2. With the introduction of USB, FireWire, and other faster solutions serial ports are rarely used
when compared to how often they've been used in the past. The picture shows the DB9 serial port on
the back of a computer.
“ A serial port is a general-purpose interface that can be used for almost any type of device, including
modems, mice, and printers (although most printers are connected to a parallel port).
”

ETHERNET SHIELD Arduino Compatible Ethernet Shield W5100
The Arduino Ethernet shield allows an Arduino board to connect to the internet using the Ethernet
library and to read and write an SD card using the SD library.
To use the shield, mount it on top of an Arduino board (e.g. the Uno). To upload
sketches to the board, connect it to your computer with a USB cable as you normally
would. Once the sketch has been uploaded, you can disconnect the board from your
computer and power it with an external power supply.
Connect the shield to your computer or a network hub or router using a standard
ethernet cable (CAT5 or CAT6 withRJ45 connectors). Connecting to a computer may
require the use of a cross-over cable (although many computers, including all recent
Macs can do the cross-over internally).

NETWORK SETTINGS
The shield must be assigned a MAC address and a fixed IP address using
the Ethernet.begin() function. A MAC address is a globally unique identifier for a particular device.
Current Ethernet shields come with a sticker indicating the MAC address you should use with them.
For older shields without a dedicated MAC address, inventing a random one should work, but don't
use the same one for multiple boards. Valid IP addresses depend on the configuration of your
network. It is possible to use DHCP to dynamically assign an IP to the shield. Optionally, you can also
specify a network gateway and subnet.
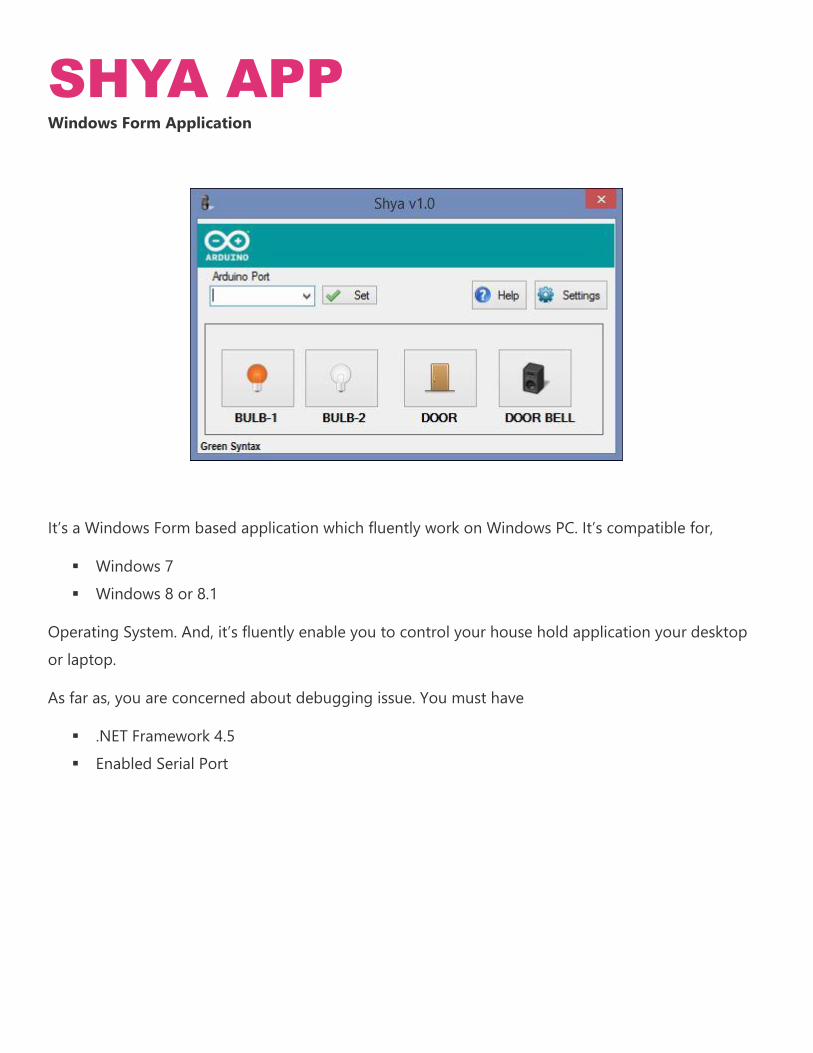
SHYA APP Windows Form Application
It’s a Windows Form based application which fluently work on Windows PC. It’s compatible for,
Windows 7
Windows 8 or 8.1
Operating System. And, it’s fluently enable you to control your house hold application your desktop
or laptop.
As far as, you are concerned about debugging issue. You must have
.NET Framework 4.5
Enabled Serial Port

SHYA ANDROID APP Android App which enable you to control your Arduino model.
It’s an android app developed by techbitar.com which enable you to set communicate between
Arduino UNO and android phone. It’s work upon Bluetooth network. Implicitly, it is designed to
transfer their data over serial bus.

SHYA WEB APP An interactive Web Application
A small HTML web application which control your Arduino Module using Ethernet port. And, it can
be implemented on Internet to show data and statistics. You need a DNS Hosting to put this over
Internet. Or, try some free DNS Hosting System like http://noip.com

SKETCH Source Code of Shya v1.0 (Automation)
#include <Servo.h>
#include <SPI.h>
#include <Ethernet.h>
/*
******************************************************
====== SHYA v.1.0.0 (APLHA)===========================
Version: v1.0.0
Starting Date: 21st April 2015
Last Modified Date: 21st April 2015
Time: 4:00AM
Author: Abhishek Kumar Ravi (@greenSyntax)
GitHub: http://github.com/greenSyntax
Facebook: http://facebook.com/elmnt.abhishek
Twitter: @greenSyntax
-----------------------------------------------------
SPECIFICATION
LED 1 #PIN 8
LED 2 #PIN 12
LED RED #PIN 7
LED GREEN #PIN 4
BUZZER #PIN ~9
SERVO (Yellow) #PIN2
******************************************************
*/
int bulbFirst= 8;
int bulbSecond= 12;
int ledRed= 7;
int ledGreen= 4;
int buzzer= 9;

static int state_bulb_first=0; //off
static int state_bulb_second=0; //off
static int state_door=0;// closed
static int state_bell=0; // No Sound
// Instances
Servo servo;
int pos;
void setup() {
// Baud Rate is 9600 (Defualt)
Serial.begin(9600);
pinMode(bulbFirst, OUTPUT);
pinMode(bulbSecond, OUTPUT);
pinMode(ledRed, OUTPUT);
pinMode(ledGreen, OUTPUT);
pinMode(buzzer, OUTPUT);
//Servo
servo.attach(2); //PIN 2
//Default Cases
Serial.flush(); // Flush Memory
digitalWrite(ledRed, HIGH);
//int num= 01/10;
//String myString=String(num);
//Serial.println(myString);
//Bluetooth HC-05
}
void loop() {
// put your main code here, to run repeatedly:
if(Serial.available()>0)
{
int choice= Serial.read()-'0'; //Ask From SerialMonitor
//String choice= String(input);
//Decision Panel
switch(choice)
{
//==============================================================
// ******************* BULB - FIRST ***************************
//--------------------------------------------------------------
case 9: // # BULB-1 ON #
Serial.println(">> Case 1: Light-ON BULB-1");

if(LightBulb_First()==1)
{
//Successfully Lighted UP
Serial.println("# BULB-1 is ON #");
}
else
{
//Unssucessfull Return ()
Serial.println("# Error for BULB-1 #");
}
break;
case 2: // # BULB-1 OFF #
Serial.println(">> Case 2: Ligh-OFF BULB-2");
digitalWrite(bulbFirst, LOW);
state_bulb_first=0; // Bulb-1 Off
break;
//================================================================
//==============================================================
// ******************* BULB - FIRST ***************************
//--------------------------------------------------------------
case 3: // # BULB-2 ON #
Serial.println(">> Case 3: Light-ON BULB-2");
if(LightBulb_Second()==1)
{
//Successfully Lighted UP
Serial.println("# BULB-2 is ON #");
}
else
{
//Unssucessfull Return ()
Serial.println("# Error for BULB-2 #");
}
break;
case 4: // # BULB-2 OFF #
Serial.println(">> Case 4: Ligh-OFF BULB-2");
digitalWrite(bulbSecond, LOW);
state_bulb_second=0; // Bulb-1 Off
break;
//================================================================
//================================================================
case 5: //Buzzer
Serial.println(">> Case 5: Pop Buzzer");
BuzzerBeep(500);
break;
//=================================================================
// ================================================================

case 6: //Open Door
Serial.println(">> Case 6: Open Door");
OpenDoor();
Serial.println(">> Successfully");
break;
//=================================================================
// ================================================================
case 7: //Close Door
Serial.println(">> Case 7: Close Door");
CloseDoor();
Serial.println(">> Successfully");
break;
//=================================================================
}
Serial.println("*END*");
}
}
int LightBulb_First()
{
//Only when, Bulb is OFF
if(state_bulb_first == 0)
{
//Will LIGHT Bulb : ON
digitalWrite(bulbFirst,HIGH);
Serial.println("# Called Light() BULB-1");
state_bulb_first= 1;
return 1; // Successfully Lighted Up
}
else
{
Serial.println("# Called No-Light() BULB-1 ");
return 0; //Unsuccessfull
}
}
int LightBulb_Second()
{
//Only when, Bulb is OFF
if(state_bulb_second == 0)
{
//Will LIGHT Bulb : ON
digitalWrite(bulbSecond,HIGH);
Serial.println("# Called Light() BULB-2");
state_bulb_second= 1;
return 1; // Successfully Lighted Up
}
else
{
Serial.println("# Called No-Light() BULB-2 ");
return 0; //Unsuccessfull
}
}
void BuzzerBeep(unsigned char delayTime)
{
analogWrite(9,20);// TURN ON
delay(delayTime);
analogWrite(9,20); //TURN OFF
delay(delayTime);
analogWrite(9,0);
}
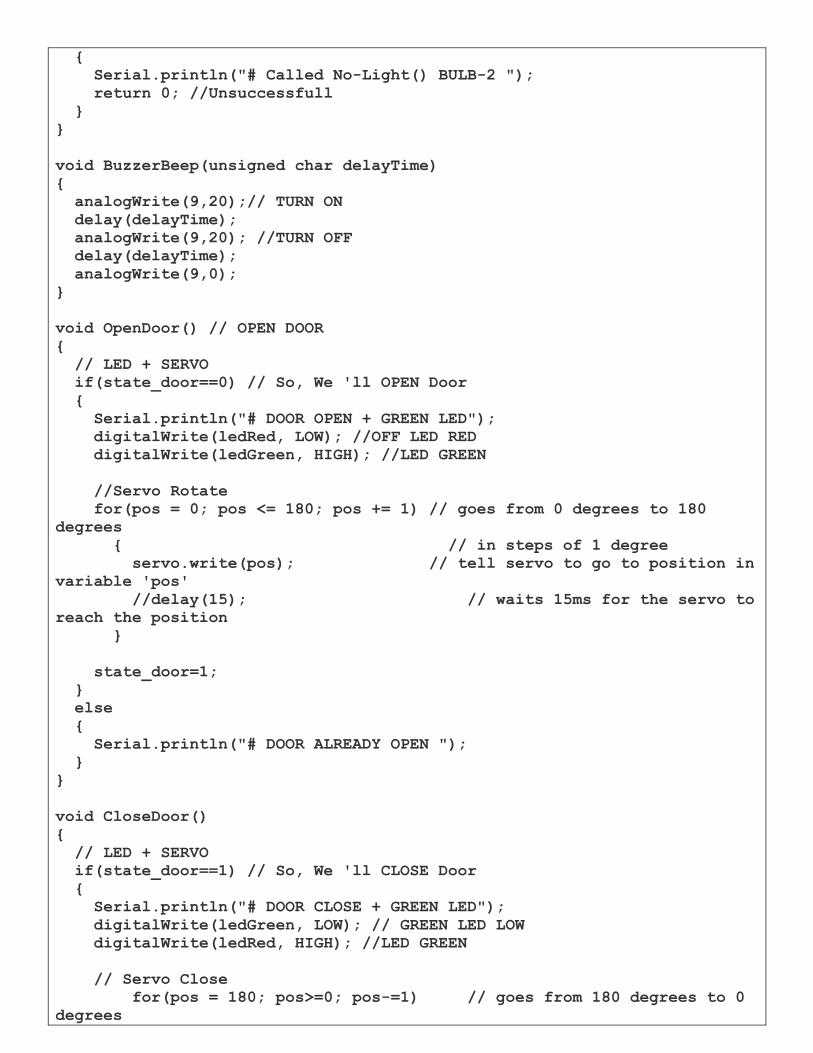
void OpenDoor() // OPEN DOOR
{
// LED + SERVO
if(state_door==0) // So, We 'll OPEN Door
{
Serial.println("# DOOR OPEN + GREEN LED");
digitalWrite(ledRed, LOW); //OFF LED RED
digitalWrite(ledGreen, HIGH); //LED GREEN
//Servo Rotate
for(pos = 0; pos <= 180; pos += 1) // goes from 0 degrees to 180
degrees
{ // in steps of 1 degree
servo.write(pos); // tell servo to go to position in
variable 'pos'
//delay(15); // waits 15ms for the servo to
reach the position
}
state_door=1;
}
else
{
Serial.println("# DOOR ALREADY OPEN ");
}
}
void CloseDoor()
{
// LED + SERVO
if(state_door==1) // So, We 'll CLOSE Door
{
Serial.println("# DOOR CLOSE + GREEN LED");
digitalWrite(ledGreen, LOW); // GREEN LED LOW
digitalWrite(ledRed, HIGH); //LED GREEN
// Servo Close
for(pos = 180; pos>=0; pos-=1) // goes from 180 degrees to 0
degrees

{
servo.write(pos); // tell servo to go to
position in variable 'pos'
//delay(15); // waits 15ms for the
servo to reach the position
}
state_door=0;
}
else
{
Serial.println("# DOOR ALREADY CLOSE ");
}
}

SKETCH Source Code of IoT
#include <SPI.h>
#include <Ethernet.h>
// MAC address from Ethernet shield sticker under board
byte mac[] = { 0xDE, 0xAD, 0xBE, 0xEF, 0xFE, 0xED };
IPAddress ip(192, 168, 1, 20); // IP address, may need to change
depending on network
EthernetServer server(80); // create a server at port 80
String HTTP_req; // stores the HTTP request
boolean LED_status = 0; // state of LED, off by default
void setup()
{
Ethernet.begin(mac, ip); // initialize Ethernet device
server.begin(); // start to listen for clients
Serial.begin(9600); // for diagnostics
pinMode(2, OUTPUT); // LED on pin 2
}
void loop()
{
EthernetClient client = server.available(); // try to get client
if (client) { // got client?
boolean currentLineIsBlank = true;
while (client.connected()) {
if (client.available()) { // client data available to read
char c = client.read(); // read 1 byte (character) from
client
HTTP_req += c; // save the HTTP request 1 char at a time
// last line of client request is blank and ends with \n
// respond to client only after last line received
if (c == '\n' && currentLineIsBlank) {
// send a standard http response header
client.println("HTTP/1.1 200 OK");
client.println("Content-Type: text/html");
client.println("Connection: close");
client.println();
// send web page
client.println("<!DOCTYPE html>");
client.println("<html>");
client.println("<head>");
client.println("<title>Shya v1.0 | Arduino</title>");

client.println("<link
href=\"http://maxcdn.bootstrapcdn.com/bootstrap/3.3.4/css/bootstrap.min.c
ss\" rel=\"stylesheet\">");
client.println("<link
href='http://fonts.googleapis.com/css?family=Oswald' rel='stylesheet'
type='text/css'>");
client.println("<link
href='http://fonts.googleapis.com/css?family=Ubuntu' rel='stylesheet'
type='text/css'>");
client.println("<style>");
client.println(".header{font-family: 'Oswald', sans-
serif;}");
client.println(".subhead{font-family: 'Ubuntu', sans-
serif;}");
client.println("</style>");
client.println("</head>");
client.println("<body>");
client.println("<div class=\"container\"> ");
client.println("<div class=\"col-sm-12 text-
center\">");
client.println("<div class=\"page-header\">");
//client.println("<img
src='http://www.treehouselabs.com/images/applicationsAutomationIcon.png'
width='70' height='70' class='img-thumbnail'>");
client.println("<h2 class='header text-success'>SHYA
v1.0 </h2>");
client.println("</div>");
client.println("<h1 class='header'>Home Automation
using IoT</h1>");
client.println("<p class='subhead'>Click on the check
box to Turn On/Off.</p>");
client.println("<form method=\"get\">");
ProcessCheckbox(client);
client.println("</form>");
client.println("<hr>");
client.println("<p class='text-
primary'><strong>© GREEN SYNTAX </strong></p>");
client.println("</div>");
client.println("</div>");
client.println("</body>");
client.println("</html>");
Serial.print(HTTP_req);
HTTP_req = ""; // finished with request, empty
string
break;
}
// every line of text received from the client ends with
\r\n
if (c == '\n') {
// last character on line of received text
// starting new line with next character read
currentLineIsBlank = true;
}
else if (c != '\r') {

// a text character was received from client
currentLineIsBlank = false;
}
} // end if (client.available())
} // end while (client.connected())
delay(1); // give the web browser time to receive the data
client.stop(); // close the connection
} // end if (client)
}
// switch LED and send back HTML for LED checkbox
void ProcessCheckbox(EthernetClient cl)
{
// ================================================================
// BULB 1
//================================
if (HTTP_req.indexOf("LED1=1") > -1) { // see if checkbox was
clicked
// the checkbox was clicked, toggle the LED
if (LED_status) {
LED_status = 0;
}
else {
LED_status = 1;
}
}
// -------------------------------------
if (LED_status == 1) { // switch LED on
digitalWrite(2, HIGH);
// checkbox is checked
cl.println("<input type=\"checkbox\" name=\"LED1\" value=\"1\" \
onclick=\"submit();\" checked > LED1");
}
else { // switch LED off
digitalWrite(2, LOW);
// checkbox is unchecked
cl.println("<input type=\"checkbox\" name=\"LED1\" value=\"1\" \
onclick=\"submit();\"> LED1");
}
// ----------------------------------
}

CONCLUSION
It’s a Smart House powered by Arduino Microcontroller. Where, we tried to model a wooden house
with automated bulb, near-by LCD screen, sound buzzer and automated door.
As far as technology is concerned, we will totally focused on automation technique using Bluetooth
and sensors. Apart from these, we tried to implement an IoT (Internet of Things).
Where, we used the Ethernet model which we can easily implement on internet. And, here we put a
small web application which enable you to do the same thing what you can do in your automation
model.

FUTURE SCOPE
Home Automation is a real project which we can easily implement in our home. And, it has that
capability which can change your way of living. Certainly, this model comes with flaws and we will try
to figure out in future. On the better half, we try list some points for future aspect,
Since, this model is in DC power system. As, we know our home appliances work in AC power
system. These two power model are polar apart but, using a ‘relay’ we can use this prototyping
in AC power system too.
As far as privacy is concerned, we haven’t have any security feature which come with a serious
flaw. In future model, we try to add some security package to enhance privacy.
In case of full flow of Door, we have low watt servo rotor which doesn’t allow us to rotate full
door 180 degree. Along with it, we have manual error which limit the exact displacement of
door path.
We can have a customized-own app for android and other mobile platform.
In desktop application or manual model, we can implement a voice command feature.
Since, we work in lower version of Arduino and it doesn’t allow to store huge chuck of code.
Due to this memory limitation, we can’t implement IoT model in automation code.
By, Arduino Mega or Arduino YEN we can do it easily.

REFERENCE
Getting Started with Arduino by Maasimo Banzi
White Paper on Arduino UNO by Instructable.com
Adafruits.com Articles
Element 14 YouTube Videos


