
SHURflo ProPack Rechargeable Electric Backpack...
19
SHURflo ProPack ™ Rechargeable Electric Backpack Sprayer Model SRS 600 Instruction Manual- Owner’s Manual
Transcript of SHURflo ProPack Rechargeable Electric Backpack...

SHURflo ProPack™
Rechargeable ElectricBackpack SprayerModel SRS 600
Carefully read and follow all safety precautions in Owner’s Manual. Improper usecan cause serious injury to user andbystanders!
Instruction Manual-Owner’s Manual

Contents
Guide to Manual 1
Safety Precautions 1-3
Parts Diagram 4
Assembly 5
Charging the Battery 6
Filling the Tank 7
Turning The Power On 9
Speed Settings 9-10
Turning The Power Off 10
Safety Time Out 10
Low Battery Indication 10
Transportation 11
Cleaning and Storage 12
Troubleshooting 13
Spare Parts 14
Specifications 15
Warranty/Return Policy 16
NOTE: BATTERY MUST BE CHARGED 24 HRS. BEFORE USE! See page 6 for instructions.
Allow only persons who fully understand this manual to operate your sprayer.
To obtain maximum performance, life and satisfaction from your sprayer, it is very important that you read and
understand the safety precautions and maintenance instructions on page 1 before using your sprayer.
Because a backpack sprayer involves weight bearing of the tool itself on the users body, special safety precautions
must be observed.

Guide to this Manual
This manual includes operating instructions for the ProPack™ Sprayer.
It also includes information other than operating instructions that requires your special attention. Special symbols
are used to bring your attention to important information.
Where there is a risk of personal injury to the user, a bystander, or property damage.
Where there is a risk of damage to the sprayer or sprayer components.
Note on correct procedure for preventing environmental damage.
Failure to follow the instructions for use and maintenance of this product will void the expressed product warranty
and any implied warranty.
Safety Precautions
Use of backpack sprayers can be dangerous. You must read, understand, and comply with the
following safety precautions for your protection and the protection of others. If you lose this manual, Shurflo will
provide you with a replacement manual free of charge.
Improper or careless use of this sprayer can cause serious injury. Minors should never be
allowed to use this sprayer. This sprayer should not be used when bystanders or animals are in the area. This
sprayer should never be used while children are in the area.
Never leave the sprayer unattended without turning off the power, disconnecting the power plug,
relieving the line pressure, and flushing the sprayer of any harmful chemicals.
Never lend or rent this sprayer without the owner’s manual.
Make sure anyone using your sprayer understands all of the information included in this manual.
1

Operator Physical Condition
When worn as a backpack this sprayer places weight directly on the back and shoulders of the
user as well as indirectly on the lower body.
If you have any previous injuries to your back, neck, shoulders, arms or lower body, DO NOT use this product
without first consulting your physician.
If you feel any pain or discomfort in your back neck or shoulders, arms or lower body, DO NOT use this product
without consulting your physician.
You must be in good physical condition to operate this sprayer.If you have, or suspect you may have any physical condition that may be aggravated by carrying weight on your
back, or any strenuous activity, consult your physician before using this sprayer.
You must be in good mental health to operate this sprayer and not be under the influence of
alcohol or any drugs that could impair your vision, physical strength, dexterity, judgment, or mental capacity.
If you become tired while operating your sprayer, stop immediately, and rest. Operating your sprayer while tired
may impair your strength and balance, and could result in injury if you slip or fall, or other damage if you lose
control of the sprayer.
Use of this sprayer under dangerous conditions may cause injury to the operator, bystanders
and physical property. Carefully read and understand the instructions for operation of this sprayer on pages 7 -10
of this manual.
Do not modify the sprayer in any way.
Never use this product to store or spray flammable chemicals. Explosion and death may occur.
Observe all local regulations, ordinances and laws regarding spraying, chemical use and waste disposal.
Do not operate the sprayer in the rain. Do not operate the sprayer on steep slopes, on loose
ground surfaces, on wet ground, or in any other terrain or conditions affecting balance or footing, that may cause
the user to slip or fall.
Clothing
Do not wear loose fitting clothing that may become caught on obstacles while spraying. Be sure that your clothing
will allow complete freedom of movement. Long hair should be confined in such a way that it does not become
caught between the users back and the sprayer tank, or the tank straps and the user’s shoulders.
Good footing is a must to prevent injury from slips or falls. Wear sturdy shoes or boots with
non-slip soles. Always wear proper protective clothing when handling or spraying chemicals. Protective clothing
must include eye and respiratory protection as well as body and hand protection.
Carefully read and follow safety and handling instructions on chemical containers prior to chemical use. Proper eye
protection and respiratory protection is a must when spraying or handling any chemical.
2

Use of the Sprayer
See page 4 for a diagram of the sprayer parts.
Never operate the sprayer if it is not properly and completely assembled, or if it is damaged.
Carefully inspect the unit and make sure there are no leaks. Check the operation of the spray wand before use.
Make sure the battery pack is properly installed with the battery pack retainers locked into position prior to use.
See page 6 for illustration.
Place the tank on bare, flat, level ground when filling. Always make sure the inlet strainer is in place in the tank prior
to filling. Remove the straps/back pad when filling the tank. Wipe any spillage from the outside of the sprayer after
filling. Make sure the lid is fully tightened before use.
The ProPack™ is designed for use with most agricultural chemicals, pesticides, cleaning agents
and many other solutions. Do not spray caustic or corrosive solutions. Contact SHURflo if you are unsure if the
chemical you are spraying is compatible with the sprayer.
Do not use wettable powders with this sprayer, as it is not equipped with an agitator. Soluble
powders may be used if properly mixed. Follow the filling and mixing instructions in this manual.
Make sure the straps are properly attached prior to using the sprayer. Make sure the straps and waste belt are
properly adjusted prior to use.
Never point the spray wand at another person or animal, whether the sprayer is on or not.
Do not use the sprayer in windy conditions that will cause the liquid spray to be carried by the wind or "drift" to
unintended areas.
Transporting the Sprayer
Your ProPack™ includes a feature in the electronics that will turn of the power to the pump if left
unused for 8-10 minutes. However, always make sure the unit is turned off, the power plug is removed from the
battery jack and the pressure is relieved from the sprayer prior to transporting. Always secure the sprayer when
transporting to prevent it from turning over, or becoming damaged.
Maintenance and Storage
Follow the maintenance and storage instructions in this manual. Use only SHURflo supplied parts and follow
service instructions. Using non-approved parts will void the product warranty.
The electronics in this sprayer are engineered to work properly only with batteries supplied by SHURflo. Using
non-approved batteries will void the warranty. Properly dispose of batteries only at an approved recycling center.
3

4
Tri-Glide
Tension Lock
Waist Belt
Waist BeltBuckle (Female)Waist Belt
Buckle (Male)
UpperStrap Holder
BatteryRetainer
LowerStrap Holder
Battery Pack
Pump Cover
Charging Jack
Power PlugControl Panel
Jamb Nut
Hand Lever
Cutaway View of Tank to ShowLocation of Inlet Strainer
Parts Diagram
Inlet Strainer
Strainer

Attaching the Waist Belt
1. Pass one end of the waist belt through one lower strap holder, then the other as shown. (A, B)
2. Attach the male buckle end to the belt as shown. (C, D)
Your Sprayer is now fully assembled. Although your battery was shipped fully charged it will require charging prior
to use since some time may have passed since shipping.
5
A B C D

Charging the Battery
NOTE: Battery must be charged 24 hours before first use.
Your ProPack™ uses a high capacity 12 Volt battery, which will provide several hours of intermittent use when fully
charged, with intermittent use defined as one minute on, one minute off. For maximum life this battery requires a
low amperage charge rate. A fully depleted battery will take approximately 14 hours to fully recharge. Always
charge battery for approximately 8 hours after each use to prevent battery from reaching a low state.
The wall mount charger is a two-stage unit. It will provide maximum amperage to fully charge the battery and
automatically switch to a maintenance charge rate once the battery is at full capacity to prevent overcharging.
Your ProPack™ battery "pack" is a self-contained assembly that can be completely removed from the sprayer
without tools, allowing the battery pack to be charged remotely from the sprayer. A spare battery pack can be
purchased separately for heavy use situations, allowing the user to change out the battery and continue working
while charging the depleted battery remotely.
To Charge the Battery:
1. Fully loosen the shoulder straps and back pad assembly as shown
to allow easy access to the battery pack. (A)
2. Unlock the battery pack away from the compartment. (D, E, F)
3. Pull the battery pack away from compartment.
4. Remove the power plug from the charging jack as shown. (B)
5. Insert the charger plug into the charging jack as shown. (C)
6. Plug the charger into a grounded 115 Volt wall receptacle.
7. When fully charged, remove cable plug from the charging jack
and push power plug back into place ensuring it is fully seated.
8. Make sure the battery retainers are in the open position as shown. (F)
9. Return the battery pack to tank compartment.
10. Rotate the battery retainers to the locked position as shown. (D)
Your battery retainers are brightly colored for your safety. If you see the latches showing outside
of the back pad on your sprayer as shown, (G) the latches will not be properly secured. Check the latches to
ensure they are locked in place prior to using the sprayer as shown. (H) With your battery fully charged you are now
ready to operate the ProPack™.
6
A
B C
D E F
G H
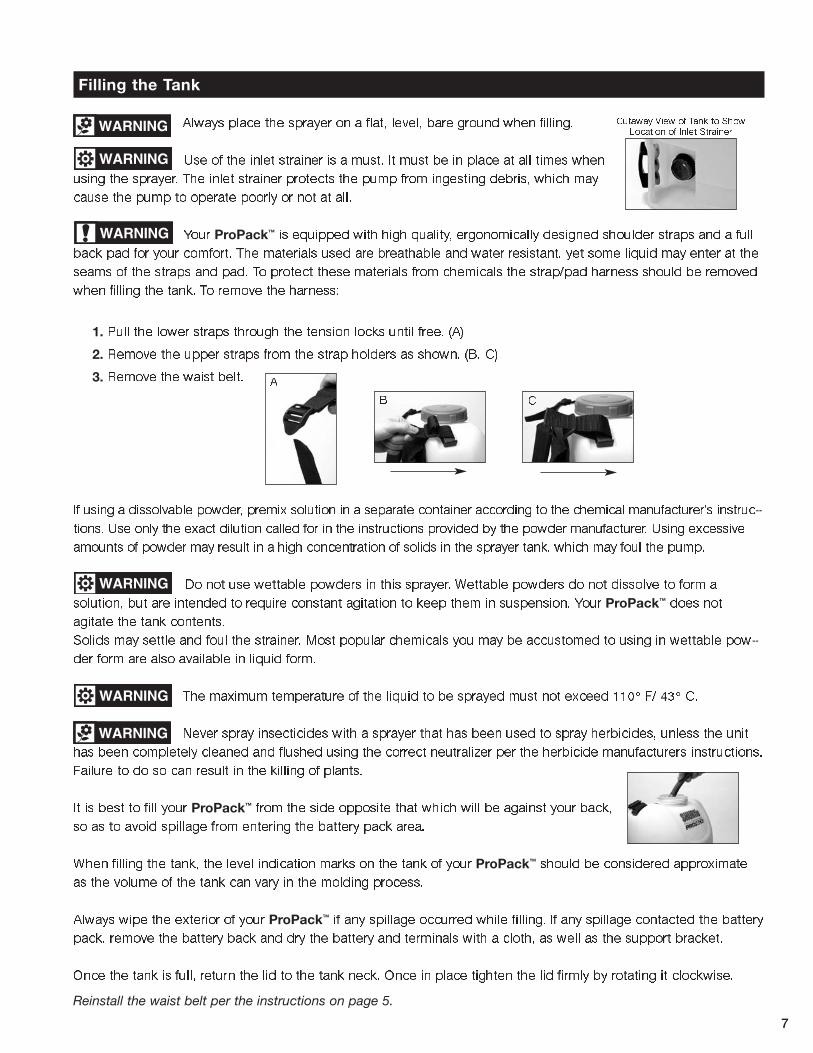
Filling the Tank
Always place the sprayer on a flat, level, bare ground when filling.
Use of the inlet strainer is a must. It must be in place at all times when
using the sprayer. The inlet strainer protects the pump from ingesting debris, which may
cause the pump to operate poorly or not at all.
Your ProPack™ is equipped with high quality, ergonomically designed shoulder straps and a full
back pad for your comfort. The materials used are breathable and water resistant, yet some liquid may enter at the
seams of the straps and pad. To protect these materials from chemicals the strap/pad harness should be removed
when filling the tank. To remove the harness:
1. Pull the lower straps through the tension locks until free. (A)
2. Remove the upper straps from the strap holders as shown. (B, C)
3. Remove the waist belt.
If using a dissolvable powder, premix solution in a separate container according to the chemical manufacturer’s instruc-
tions. Use only the exact dilution called for in the instructions provided by the powder manufacturer. Using excessive
amounts of powder may result in a high concentration of solids in the sprayer tank, which may foul the pump.
Do not use wettable powders in this sprayer. Wettable powders do not dissolve to form a
solution, but are intended to require constant agitation to keep them in suspension. Your ProPack™ does not
agitate the tank contents.
Solids may settle and foul the strainer. Most popular chemicals you may be accustomed to using in wettable pow-
der form are also available in liquid form.
The maximum temperature of the liquid to be sprayed must not exceed 110° F/ 43° C.
Never spray insecticides with a sprayer that has been used to spray herbicides, unless the unit
has been completely cleaned and flushed using the correct neutralizer per the herbicide manufacturers instructions.
Failure to do so can result in the killing of plants.
It is best to fill your ProPack™ from the side opposite that which will be against your back,
so as to avoid spillage from entering the battery pack area.
When filling the tank, the level indication marks on the tank of your ProPack™ should be considered approximate
as the volume of the tank can vary in the molding process.
Always wipe the exterior of your ProPack™ if any spillage occurred while filling. If any spillage contacted the battery
pack, remove the battery back and dry the battery and terminals with a cloth, as well as the support bracket.
Once the tank is full, return the lid to the tank neck. Once in place tighten the lid firmly by rotating it clockwise.
Reinstall the waist belt per the instructions on page 5.
7
A
B C
Cutaway View of Tank to ShowLocation of Inlet Strainer

8
Replace the Harness Assembly by:
1. Slip the loose end of the upper strap through the upper strap holder.
2. Fold the loose end back toward the tri-glide (A), and pass through the first opening of the tri-glide, pulling the
slack through. (B)
3. Then run the loose end through the second opening of the tri-glide. (C) pulling the slack through, and then
pulling the loose end firmly to remove all slack. (D)
4. Repeat this procedure for the opposite upper strap.
5. Pass the loose end of lower strap through the lower strapholder as shown. (E)
6. Then pass the loose end of the lower strap through the bottom opening
of the tension lock as shown. (F)
7. Fold the loose end back, passing it through the
remaining opening of the tension lock as shown. (G)
Putting on Your ProPack™
With your ProPack™ ready for use, it is recommended you place the pack on a table or other high, level surface.
Once on a table or waist high, level surface, you may put both arms through the shoulder straps, and then pull
firmly down on the loose ends to tighten the straps. By using this method, you will avoid unnecessary twisting or
turning, and better be able to tighten the shoulder straps.
Once your ProPack™ is on your back with the shoulder straps tightened, buckle the waist belt and pull firmly on the
loose end of the waist belt to tighten.
A B
C D
E
F G
Turning the Power On
Your ProPack™ features on demand operation. This means that once the power is switched on, simply squeeze the
hand lever to begin spraying, and release the lever to stop. When the tank runs out of liquid, the pump will continue
to run even though the wand is closed because the pump is not making enough pressure to activate the demand
switch. When this occurs simply turn off the pump as described below.
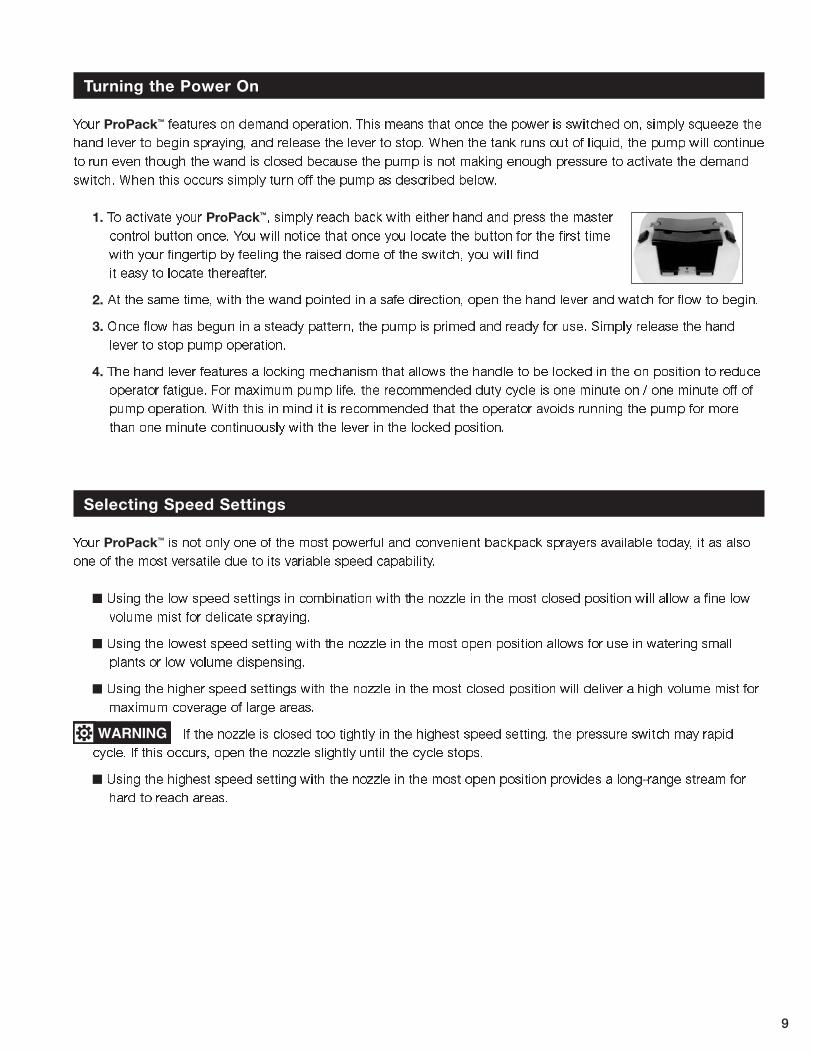
1. To activate your ProPack™, simply reach back with either hand and press the master
control button once. You will notice that once you locate the button for the first time
with your fingertip by feeling the raised dome of the switch, you will find
it easy to locate thereafter.
2. At the same time, with the wand pointed in a safe direction, open the hand lever and watch for flow to begin.
3. Once flow has begun in a steady pattern, the pump is primed and ready for use. Simply release the hand
lever to stop pump operation.
4. The hand lever features a locking mechanism that allows the handle to be locked in the on position to reduce
operator fatigue. For maximum pump life, the recommended duty cycle is one minute on / one minute off of
pump operation. With this in mind it is recommended that the operator avoids running the pump for more
than one minute continuously with the lever in the locked position.
Selecting Speed Settings
Your ProPack™ is not only one of the most powerful and convenient backpack sprayers available today, it as also
one of the most versatile due to its variable speed capability.
n Using the low speed settings in combination with the nozzle in the most closed position will allow a fine low
volume mist for delicate spraying.
n Using the lowest speed setting with the nozzle in the most open position allows for use in watering small
plants or low volume dispensing.
n Using the higher speed settings with the nozzle in the most closed position will deliver a high volume mist for
maximum coverage of large areas.
If the nozzle is closed too tightly in the highest speed setting, the pressure switch may rapid
cycle. If this occurs, open the nozzle slightly until the cycle stops.
n Using the highest speed setting with the nozzle in the most open position provides a long-range stream for
hard to reach areas.
9

To Change Pump Speeds:
1. Once your ProPack™ is primed per the procedure on page 9, simply press the master control button once to
advance to the next speed setting.
2. Each time the master control is pressed once, the pump will advance to the next speed setting.
3. When on speed 4, the highest setting, pressing the master control will shut the power off. To turn the power
on again, simply push the master control once, and follow the above steps to advance the speed.
4. The speed may be advanced while the pump is operating with the hand lever squeezed while spraying, or
with the hand lever closed, simply by pressing the master control.
5. The spray tip may be opened to the stream setting or tightened to deliver the desired cone pattern at any of
the speed settings.
Turning the Power Off
1. To turn the power off, simply push the master control button, and hold the button down for two seconds. This
will turn the power off no matter what speed setting the control was set at.
2. After shutting off the power, always relieve the system pressure for safety, by pointing the wand in a safe
direction and squeezing the hand lever on the spray wand for several seconds.
3. After turning the power off and relieving the system pressure, always disconnect the power plug for safety.
Safety Time Out Feature
If left unused for approximately 8-10 minutes, your ProPack™ will automatically shut the power to the pump off. To
reactivate, simply push the master control button once.
Low Battery Indicator
When the battery in your ProPack™ needs to be recharged, the pump will automatically shut off and the indicator
lamp will blink.
Because your ProPack™ has an advanced microprocessor that maintains a steady pump speed as battery charge
level drops, you will not notice the pump slowing as the battery drains. With this in mind and although a single
charge can last for many hours, there is no warning that your battery is near the level at which it will need to be
rehcarged.
It is not necessary to fully deplete the battery before recharging. After any period of use, the battery may be
charged and returned to full capacity without risk of damage or reduction of cycle life.
10

Transportation
When transporting your ProPack™ always follow the steps in the Turning the ProPack™ off instructions above.
Always secure the ProPack™ in an upright position when transporting and protect the hose from sharp objects.
If the ProPack™ is tipped over, it is possible for the contents to seep from the lid vent. Never transport the
ProPack™ on its sides and never transport the ProPack™ with harmful chemicals in the tank.
Cleaning and Storage
When finished spraying, turn the power off by pressing the master control button and holding it down for at least
two seconds. With the wand pointed in a safe direction, squeeze the hand lever to relieve the pressure in the
discharge line.
When facing the label side of the tank, reach into the bottom left corner of the sprayer tank and remove the inlet
strainer, you may need the assistance of someone with a smaller arm to access this hard to reach area. Once
removed clear any debris from the strainer by placing it under running water. Reinstall the strainer taking care that it
is firmly in place.
Disconnect the power plug form the battery jack to ensure that the pump will not be unintentionally activated.
Remove the strap assembly as described on page 8, and pour any remaining contents of the tank into an
appropriate storage container for future use or disposal in accordance with local regulations.
Clean the tank and other exterior surfaces of your ProPack™ by wiping with a damp cloth. Do not use abrasive
cleaners or solvents to clean the tank and exterior surfaces as they may cause deterioration.
Flushing the Tank
When flushing the tank it is recommended that you follow the chemical manufacturers flushing
instructions carefully for the chemical you are spraying. Failure to do so can result in damage to humans and the
environment.
It is safe to use most flushing solutions recommended by your chemical dealer so long as the solution is formulated
for use with sprayers and does not include flammable or petroleum products. Follow the instructions carefully if
using a flushing solution.
You may also flush the tank by adding several gallons of clean water, and after ensuring the tank lid is firmly
tightened, shaking the tank to agitate the clean water and dissolve any remaining chemical. Properly dispose of the
contents of the tank in accordance with local regulations.
After flushing the tank, add one gallon of clean water to the tank. Set the master control to the highest speed
setting and with the wand pointed in a safe direction, squeeze the hand lever and allow the pump to run until the
tank is empty. This will flush the hose and wand.
Turn the sprayer off, remove the plug from the battery jack and bleed the discharge pressure by pointing the wand
in a safe direction and squeezing the hand lever for several seconds. Pour out any residual contents of the tank.
11

Storage
Store your ProPack™ in an upright position with the tank empty, pressure relieved from the discharge line and
wand, and the power plug removed from the battery jack. Store the unit away from direct sunlight, and out of the
reach of children.
When storing your ProPack™ in freezing conditions, follow the flushing procedure as described above and then
completely clear the system of fluid as follows:
Once the tank is empty, to completely clear the pump, discharge hose and wand of liquid; place the ProPack™ on
a table or high flat surface so that the wand and hose can be held below the level of the tank and allow the pump
to run until the line is visibly clear of liquid.
Warning the system must be flushed, drained and relieved of pressure prior to storage infreezing conditions to prevent damage to the pump.
12

Troubleshooting
13
Problem: Check:
Power indicator lamp does not illuminate / pump will not run.
Remove battery pack and check wire connections
at battery terminals, black wire to (-) battery
connection and black and white wire to (+) battery
connection.
Remove the power plug and check the battery
jack to ensure it is clear of debris, chemical
residue and is dry. If chemical residue is found it
can be cleaned with a light spray of WD-40 which
will restore use. Reinstall the power plug.
Bypass the PC board by disconnecting the wire
connections to the pump from the PCB and apply
power directly to the pump terminals. If pump
runs, replace the PCB. If pump does not run,
replace pump and PCB.
Power indicator illuminates / pumpwill not run.
Bypass the PC board by disconnecting the wire
connections to the pump from the PCB and apply
power directly to the pump wires; red (+), black
(-). If pump runs, replace the PCB. If pump does
not run, replace pump and PCB.
Power indicator illuminates, pumpmotor runs but does not pump fluid.
Check pump inlet hose to ensure it is not
blocked, or leaking.
Check discharge hose, wand tip inlet strainer and
strainer in the spray wand handle to ensure they
are not blocked.
Open the spray tip slightly until the pump stops
cycling. Turn off pump, bleed system pressure,
disconnect spray lance from handle and check
that the spring loaded plunger in the handle is
free of debris and the valve seat on the spray
lance fitting is free of debris.
Check all discharge hose connections, including
connection at pump, for leaks.
Pump operates but cycles or will notshut off when wand handle isreleased.
Pump operates but flow rate isreduced.
Check the inlet strainer and strainer in the spray
wand handle to ensure it is clear of debris.
Remove the battery pack and check the battery
with a voltmeter. If the battery shows less than
11.5 volts replace battery.

KitLid
Inlet Strainer
Tri-glide Kit
Harness Kit
Waist Belt
Battery Pack
Wall Charger
Pump Assembly
PC Board
Sprayer Tank
Spray Wand
Pump Cover
Spray Hose
Part Number94-531-00
94-532-00
94-533-00
94-534-00
94-535-00
94-536-00
94-537-00
94-538-00
94-539-00
94-541-00
94-542-00
94-543-00
94-544-00
IncludesLid
Inlet Strainer
Tri-glides (2)
Shoulder Harness
Waist Belt and Buckles
Complete Battery PackAssembly
Wall Charger and Cable
Complete Pump Assemblywith Inlet and OutletHoses and Hardware
PCB with Wire Harness
Tank Only
Spray Wand with HoseClamp and Inline Strainer
Pump Cover and MountingScrews
Spray Hose and Hardware
Spare Parts Kits
14
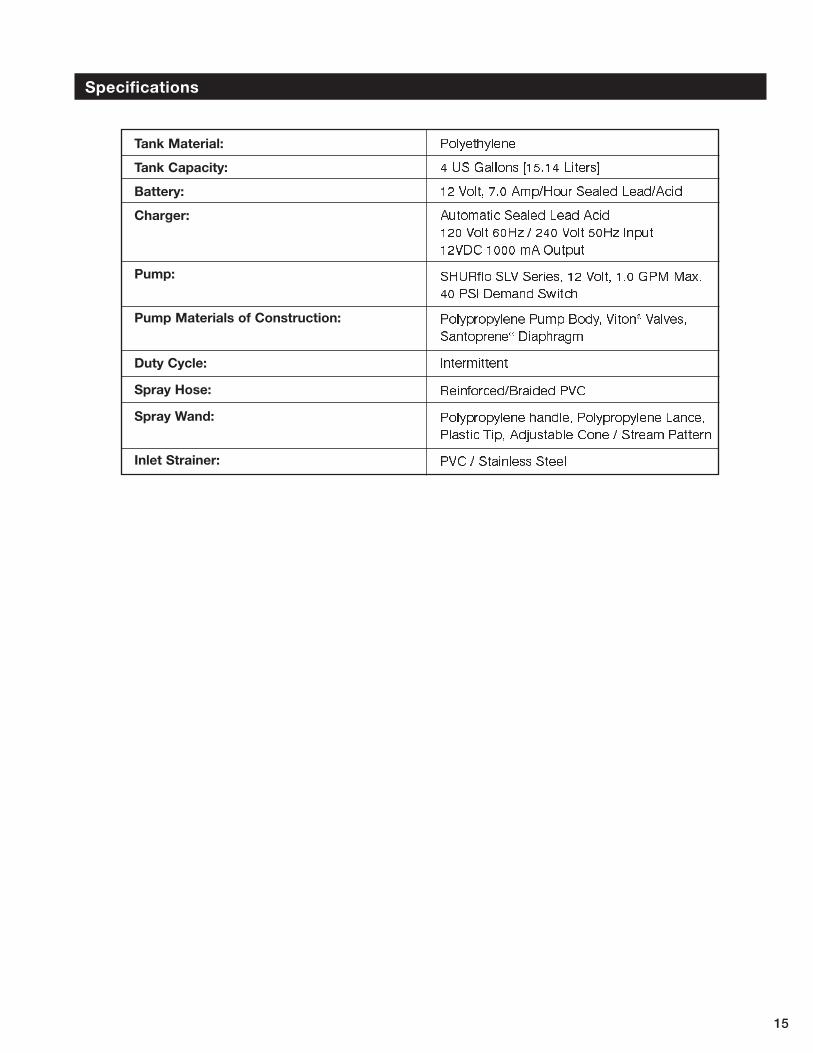
Specifications
Tank Material:
Tank Capacity:
Battery:
Charger:
Pump:
Pump Materials of Construction:
Duty Cycle:
Spray Hose:
Spray Wand:
Inlet Strainer:
Polyethylene
4 US Gallons [15.14 Liters]
12 Volt, 7.0 Amp/Hour Sealed Lead/Acid
Automatic Sealed Lead Acid
120 Volt 60Hz / 240 Volt 50Hz Input
12VDC 1000 mA Output
SHURflo SLV Series, 12 Volt, 1.0 GPM Max.
40 PSI Demand Switch
Polypropylene Pump Body, Viton® Valves,
Santoprene® Diaphragm
Intermittent
Reinforced/Braided PVC
Polypropylene handle, Polypropylene Lance,
Plastic Tip, Adjustable Cone / Stream Pattern
PVC / Stainless Steel
15

16
Industrial Product Limited Warranty
SHURflo Industrial pumps and products are warranted to be free of defects in material and workmanship under
normal use, for a period of one (1) year from the date of manufacture, or one (1) year of use, with proof of pur-
chase. This limited warranty will not exceed two (2) years, in any event.
The limited warranty will not apply to pumps/products that were improperly installed, misapplied, damaged, altered,
incompatible with fluids or components not manufactured by SHURflo.
All Industrial pumps/products must be flushed of any chemicals before shipping, All warranty consideration are
governed by SHURflo’s written return policy.
Returns are to be shipped postage prepaid to either service center; SHURflo Cypress, CA or Elkhart, IN. SHURflo
shall not be liable for freight damage incurred during shipping. Package returns carefully.
SHURflo’s obligation under this warranty policy is limited to the repair or replacement of the pump/product. All
returns will be tested per SHURflo factory criteria. Products found not defective (under the terms of this limited
warranty) are subject to charges paid by the returnee for the testing and packaging of “tested good” non-warranty
returns.
No credit or labor allowances will be given for pumps or products returned as defective. Warranty replacement will
be shipped on a freight allowed basis. SHURflo reserves the right to choose the method of transportation.
This limited warranty is in lieu of all other warranties, expressed or implied, and no other person is authorized to
give any other warranty or assume obligation or liability on SHURflo’s behalf. SHURflo shall not be liable for any
labor, damage or other expense, nor shall SHURflo be liable for any indirect, incidental or consequential damages
of any kind incurred by the reason of the use or sale of any defective product or part. This limited warranty covers
industrial products distributed within the United States of America. Other world market areas should consult with
the actual distributor for any deviation from this document.
Return Policy
All industrial pumps/products must be flushed of any chemical (ref. OSHA section 1910.1200 (d) (e) (f) (g) (h) and
hazardous chemicals must be labeled/tagged before being shipped* to SHURflo for service or warranty considera-
tion. SHURflo reserves the right to request a Material Safety Data Sheet from the returnee for any pump/product it
deems necessary. SHURflo reserves the right to “disposition as scrap” pumps/products returned which contain
unknown fluids. SHURflo reserves the right to charge the returnee for any and all costs incurred for chemical test-
ing, and proper disposal of components containing unknown fluids. SHURflo request this in order to protect the
environment and personnel from the hazards of handling unknown fluids.
*Carriers, including U.S.P.S., airlines, UPS, ground freight, etc., require specific identification of any hazardous
material to be shipped. Failure to do so may result in a substantial fine and/or prison term. Check with your ship-
ping company for specific instructions.

Headquarters*5900 Katella AvenueCypress, CA 90630Tel: (562) 795-5200 or (800) 854-3218
Fax: (562) 795-7554
www.shurflo.com
East52748 Park Six CourtElkhart, Indiana 46514-5427Tel: (800) 762-8094 or (574) 262-0478
Fax: (574) 264-2169
Europe*SHURflo LimitedUnit 5, Sterling ParkGatwick Road, CrawleyWest Sussex, RH10 2QT, UKTel: 44-(0) 1293-424050Fax: 44-(0) 1293-421880
*ISO 9001:2000 Registered Site
911-624 Rev. D 04/05©2003-2005 SHURflo, LLC All Rights Reserved.