SHOWER TRAY INSTRUCTION - · PDF fileSHOWER TRAY INSTRUCTION Pentangle Shower Tray B Ensure...
5
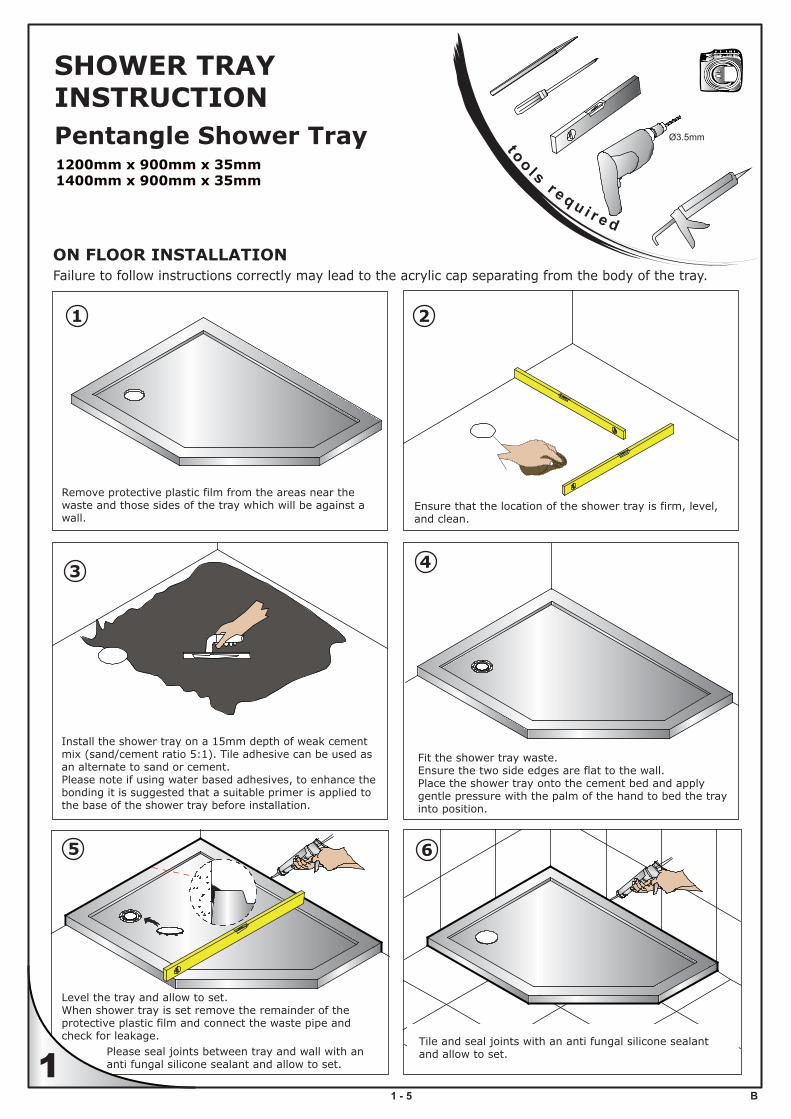
SHOWER TRAY INSTRUCTION Pentangle Shower Tray B Ensure that the location of the shower tray is firm, level, and clean. 2 3 1 - 5 1 Remove protective plastic film from the areas near the waste and those sides of the tray which will be against a wall. 1 t o o l s r e q u i r e d Ø3.5mm 1200mm x 900mm x 35mm 1400mm x 900mm x 35mm ON FLOOR INSTALLATION Failure to follow instructions correctly may lead to the acrylic cap separating from the body of the tray. Install the shower tray on a 15mm depth of weak cement mix (sand/cement ratio 5:1). Tile adhesive can be used as an alternate to sand or cement. Please note if using water based adhesives, to enhance the bonding it is suggested that a suitable primer is applied to the base of the shower tray before installation. Fit the shower tray waste. Ensure the two side edges are flat to the wall. Place the shower tray onto the cement bed and apply gentle pressure with the palm of the hand to bed the tray into position. 4 5 Level the tray and allow to set. When shower tray is set remove the remainder of the protective plastic film and connect the waste pipe and check for leakage. Please seal joints between tray and wall with an anti fungal silicone sealant and allow to set. 6 Tile and seal joints with an anti fungal silicone sealant and allow to set.
Transcript of SHOWER TRAY INSTRUCTION - · PDF fileSHOWER TRAY INSTRUCTION Pentangle Shower Tray B Ensure...
SHOWER TRAY INSTRUCTIONPentangle Shower Tray
B
Ensure that the location of the shower tray is firm, level, and clean.
2
3
1 - 5
1
Remove protective plastic film from the areas near the waste and those sides of the tray which will be against a wall.
1
t o o l s r e q u i r e d
Ø3.5mm
1200mm x 900mm x 35mm 1400mm x 900mm x 35mm
ON FLOOR INSTALLATIONFailure to follow instructions correctly may lead to the acrylic cap separating from the body of the tray.
Install the shower tray on a 15mm depth of weak cement mix (sand/cement ratio 5:1). Tile adhesive can be used as an alternate to sand or cement.Please note if using water based adhesives, to enhance the bonding it is suggested that a suitable primer is applied to the base of the shower tray before installation.
Fit the shower tray waste.Ensure the two side edges are flat to the wall.Place the shower tray onto the cement bed and applygentle pressure with the palm of the hand to bed the trayinto position.
4
5
Level the tray and allow to set.When shower tray is set remove the remainder of theprotective plastic film and connect the waste pipe andcheck for leakage.
Please seal joints between tray and wall with an anti fungal silicone sealant and allow to set.
6
Tile and seal joints with an anti fungal silicone sealant and allow to set.
B
1x4x
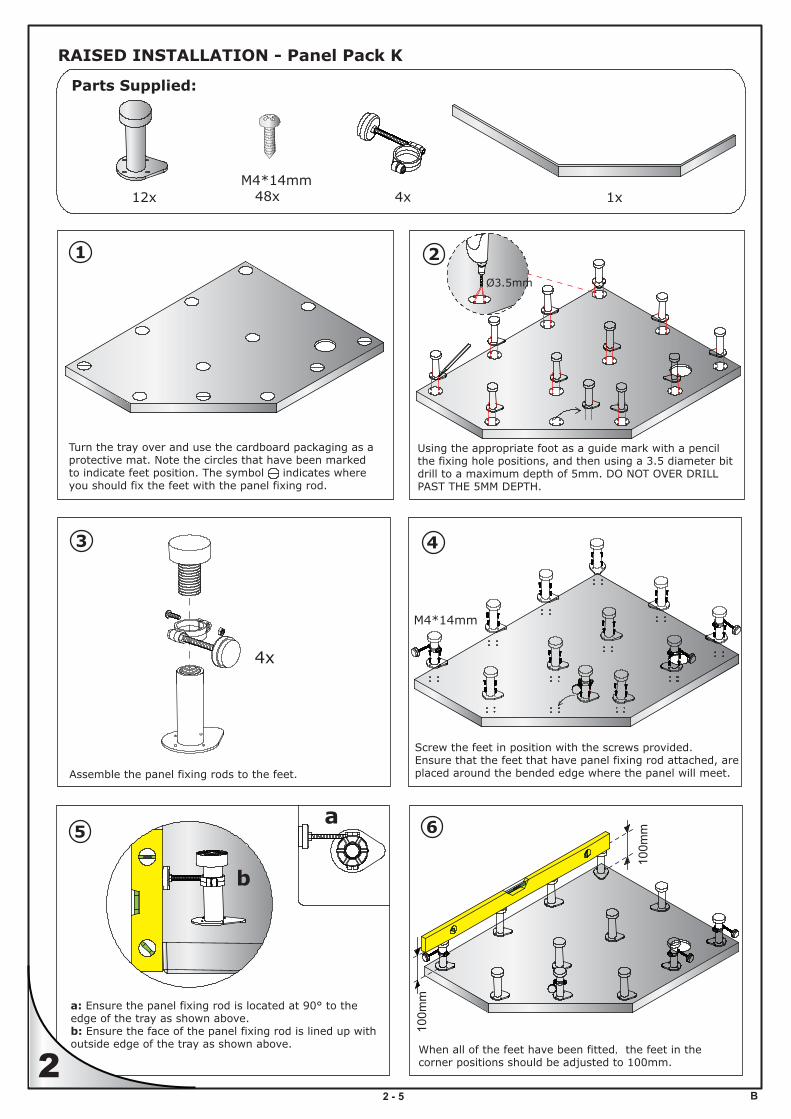
RAISED INSTALLATION - Panel Pack K
2
Assemble the panel fixing rods to the feet.
4x
Screw the feet in position with the screws provided. Ensure that the feet that have panel fixing rod attached, are placed around the bended edge where the panel will meet.
4
6
3
5
Parts Supplied:
2 - 5
a: Ensure the panel fixing rod is located at 90° to the edge of the tray as shown above.b: Ensure the face of the panel fixing rod is lined up with outside edge of the tray as shown above.
1
2
M4*14mm 48x12x
Using the appropriate foot as a guide mark with a pencil the fixing hole positions, and then using a 3.5 diameter bit drill to a maximum depth of 5mm. DO NOT OVER DRILL PAST THE 5MM DEPTH.
Turn the tray over and use the cardboard packaging as a protective mat. Note the circles that have been marked to indicate feet position. The symbol indicates where you should fix the feet with the panel fixing rod.
When all of the feet have been fitted, the feet in the corner positions should be adjusted to 100mm.
100m
m
100m
m
b
a
Ø3.5mm
M4*14mm
B
8
11
3 - 5
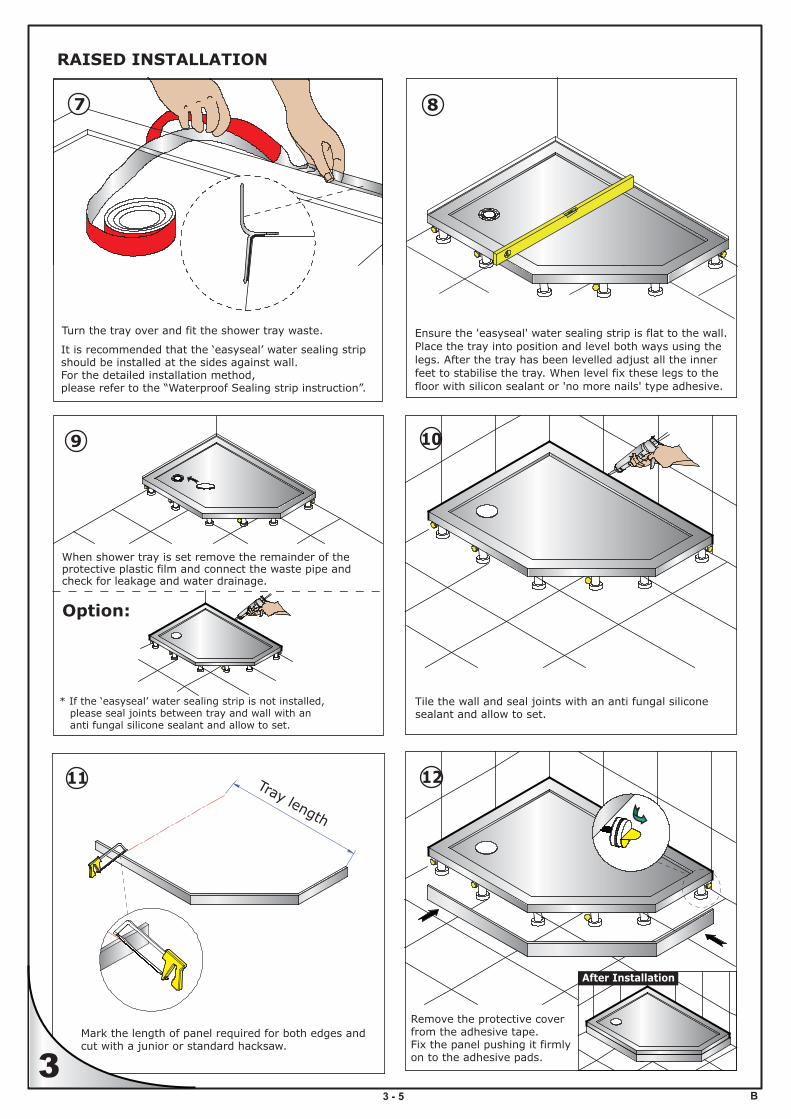
RAISED INSTALLATION
3
Turn the tray over and fit the shower tray waste.
It is recommended that the ‘easyseal’ water sealing strip should be installed at the sides against wall.For the detailed installation method, please refer to the “Waterproof Sealing strip instruction”.
7
Ensure the 'easyseal' water sealing strip is flat to the wall. Place the tray into position and level both ways using the legs. After the tray has been levelled adjust all the inner feet to stabilise the tray. When level fix these legs to the floor with silicon sealant or 'no more nails' type adhesive.
9
When shower tray is set remove the remainder of the protective plastic film and connect the waste pipe and check for leakage and water drainage.
Option:
* If the ‘easyseal’ water sealing strip is not installed, please seal joints between tray and wall with an anti fungal silicone sealant and allow to set.
Tile the wall and seal joints with an anti fungal silicone sealant and allow to set.
10
Mark the length of panel required for both edges and cut with a junior or standard hacksaw.
Tray length
12
Remove the protective cover from the adhesive tape.Fix the panel pushing it firmly on to the adhesive pads.
After Installation
Shower Tray - Installation
Important Please read instructions carefully before starting the installation procedure. We advise that the shower tray should be installed by a qualified Plumber or Engineer. It is recommended that the shower tray is installed before tiling. This ensures that the tray is rebated into the plaster behind where the tile face will be, and will help to achieve a watertight joint. With a rebate or partial rebate the amount of adjustment on the shower screen could be affected. Therefore make sure that the shower enclosure to be fitted has sufficient adjustment to fit with the shower tray in rebate or partial rebate. Please pass this document to the householder for future reference.
This shower tray is manufactured with anti-slip.
We recommend the use of a grab rail situated above the shower tray.
Procedures – Please read each point, and review the diagram on reverse side first. 1. Remove the protective film from the waste area and the sides of the tray only. Leave the film intact
on the main surface of the tray. 2. Position the shower tray in desired location to check that the tray waste hole, and the shower trap
and any drainage pipe work is in uniform position. 3. Place the shower waste trap in position, and connect it to the waste pipe. Position the shower waste
trap so that it will align with the shower tray waste hole. Seal the joint between the shower waste and the shower tray with silicone sealant.
4. Ensure that the floor is clean, dry, firm, and level. If positioning the shower tray on a relatively level wooden/concrete floor, use a silicone based adhesive to the base for fixing of the tray. If the floor is a rough but relatively level concrete floor it is suggested the installer should use a purpose made floor screed to smooth the area beforehand.
5. Reposition the shower tray in desired location and ensure that it is level on all sides. Pack up accordingly and connect the waste trap.
6. The tray must be level on all sides to ensure consistent drainage. The main surface of the shower tray has built in fall to allow for drainage. Please check the ledges of the tray with a spirit level.
7. Seal the joint between the shower tray, and adjoining wall with silicone sealant to provide first seal. 8. The area is now ready for tiling, and then further application of silicone sealant for second seal. 9. Once tiled area has cured then installation of shower screen can be installed. 10. Only remove the remainder of protective film from the main surface of the shower tray, after the
shower screen has been completely installed.
After Care Providing the shower tray has been correctly installed, difficulties should not be encountered. If any maintenance is required then it must be carried out by a qualified Plumber or Engineer.
The acrylic surface of this shower tray has good resistance properties to acids but should not come into contact with alkalis or organic solvents, such as caustic soda, dry cleaning agents and paint strippers.
B4 - 5
4
The Anti-Slip coating is a dirt and water repellant system, therefore it is not difficult to clean. More importantly, the coating is anti-bacterial and resistant to disinfectants. We recommend cleaning a tray with Anti-Slip once a week using a soft brush and a normal bathroom cleaner, to remove any insoluble products. And then the tray should be wiped. Doing so, the coating will last very long.
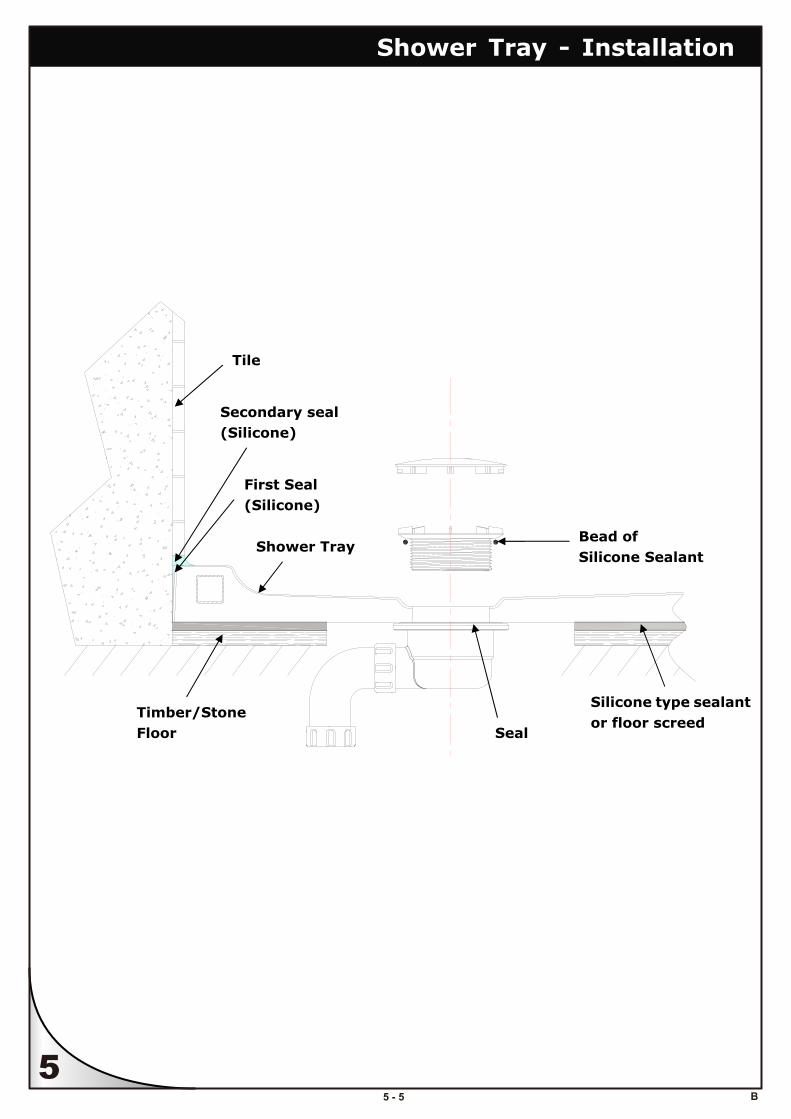
Silicone type sealant or floor screed
Bead of Silicone Sealant
Timber/StoneFloor
Tile
Shower Tray
Secondary seal (Silicone)
First Seal (Silicone)
Seal
Shower Tray - Installation
B5 - 5
5