Shooting Boards— The Essential Aids to Hand-Cut Miters ... · PDF fileThe Essential Aids...
21
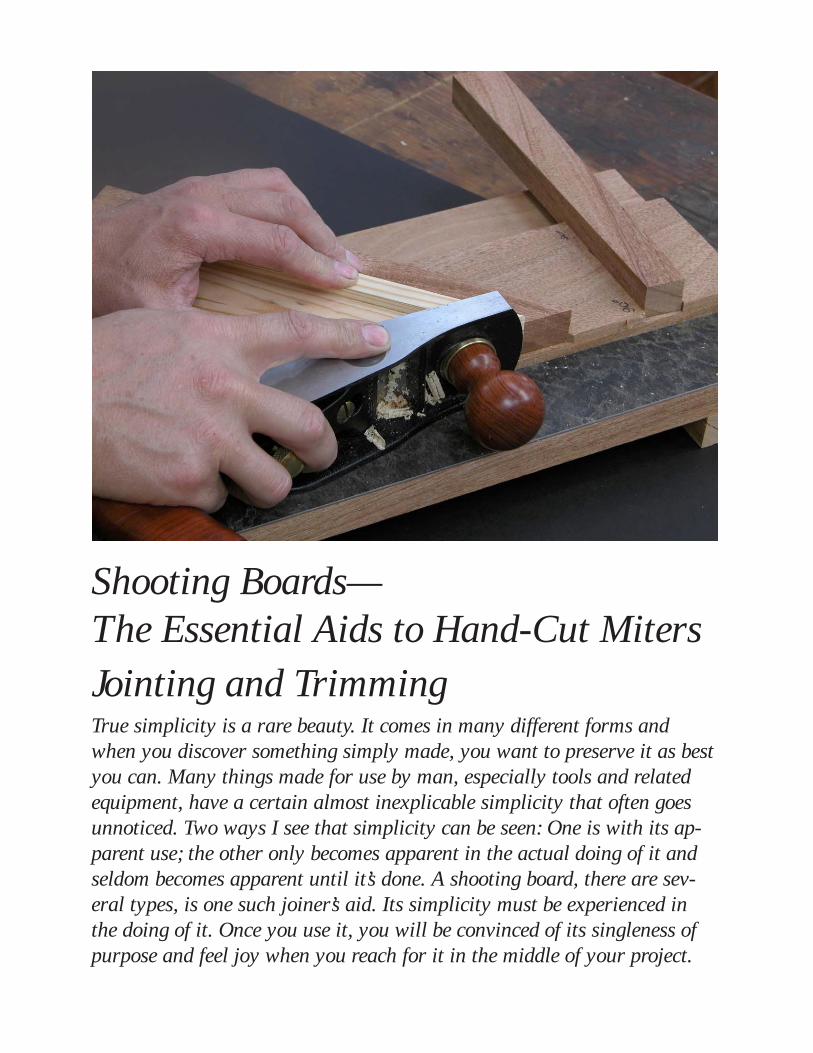
Shooting Boards— The Essential Aids to Hand-Cut Miters Jointing and Trimming True simplicity is a rare beauty. It comes in many different forms and when you discover something simply made, you want to preserve it as best you can. Many things made for use by man, especially tools and related equipment, have a certain almost inexplicable simplicity that often goes unnoticed. Two ways I see that simplicity can be seen: One is with its ap- parent use; the other only becomes apparent in the actual doing of it and seldom becomes apparent until it’s done. A shooting board, there are sev- eral types, is one such joiner’s aid. Its simplicity must be experienced in the doing of it. Once you use it, you will be convinced of its singleness of purpose and feel joy when you reach for it in the middle of your project.
Transcript of Shooting Boards— The Essential Aids to Hand-Cut Miters ... · PDF fileThe Essential Aids...
Shooting Boards—The Essential Aids to Hand-Cut MitersJointing and TrimmingTrue simplicity is a rare beauty. It comes in many different forms andwhen you discover something simply made, you want to preserve it as bestyou can. Many things made for use by man, especially tools and relatedequipment, have a certain almost inexplicable simplicity that often goesunnoticed. Two ways I see that simplicity can be seen: One is with its ap-parent use; the other only becomes apparent in the actual doing of it andseldom becomes apparent until it’s done. A shooting board, there are sev-eral types, is one such joiner’s aid. Its simplicity must be experienced inthe doing of it. Once you use it, you will be convinced of its singleness ofpurpose and feel joy when you reach for it in the middle of your project.

Three PrincipleTypes of Miters
Used inWoodworking
Face or Frame Miter:Used around door casings, windowframes and to cover the face ofcabinets by forming a decorative orand protective trim.
Base or Case Miter:A vertical miter used around the base of cabinets toprovide a decorative transition at the base of a cabinetand to give protection from sweeping brooms or andvacuum cleaner attachments. Also, most houses havebase trim around interior walls to again protect thewalls and provide a transition between two flat surfaces.
Long Grain & Coopered Miter:We use 45° (and other angles) long-grain miters to form corners for avariety of different situations, usuallybut not necessarily for protective trim.A Coopered miter (shown here) can beused to form arched tops for chests orcabinet fronts such as for cornercabinets.
Coopered Mitering
45° Mitering
45° Mitering
45° Mitering

To fully understand shooting boards and their importance to hand tool woodworking you must first understandthe different applications of the miters themselves. There are internal miters, external miters and flat-facemiters, each one of which satisfies different situations that occur throughout all areas of woodworking. Thereare three basic ways to miter stock, whether molded, angular or square, for three different applications.
StockProfile
The flat shooting board will readily miter both flat and molded stock along the broad width but will not mitervertical cuts. Three other types of miter trimming devices facilitate fine trimming of vertical and large stockmiters—the donkey’s-ear shooting board, the miter shooting box and the screw miter shooting clamp. (Seedrawings)
Internal and external vertical (broad-face) miter:Cut on a miter shooting box, screw miter shooting clamp or adonkey’s-ear shooting board.
External Vertical(Broad-face) Miter
Flat Miter:Both flat and molded stock can betrimmed on a standard shooting board.
Square stock: Squaredon a shooting board
Internal Vertical(Broad-ace) Miter

Inclined Shooting Board:Another type of shooting board for both long-grain and cross-grain (end-grain) shooting is this inclined shooting board.The sloping recess holds and guides the plane to allow full use of the whole width of the plane’s cutting iron. The slopingguide allows the plane to cut at an oblique cutting angle, which, because of the slicing action, is more efficient thansquare cutting. Again, we generally use this type of shooting board for wider, longer boards as well as thinner boards andveneers.Of course you can cut and trim miters, square ends and plane long grain edges using freehand methods and be fairlyaccurate, but shooting boards will greatly enhance your accuracy and at the same time speed up the work in hand.
Basic Shooting Board:We use this type of shooting board for both long-grain and cross-grain (end-grain) shooting to establish straight edges.They can be made to custom length from any type of material. Plywood works well because of the extra width and lengthneeded and also because of its stability. We generally use this type of shooting board for wider, longer boards as well asthinner stock and veneers, to establish a perfect meeting joint.
Basic Shooting Boards

The Donkey’s-Ear Shooting Board:Another type of shooting board used for shootingboth cross-grain and long-grain miters is thedonkey’s ear shooting board. Both square andmolded stock can be trimmed on these types ofshooting board, but craftsmen generally madethem to suit their individual needs and so theycome in a variety of different configurations andsizes. Here are some examples for ideas.
Two Types of Donkey’s-ear Shooting Board:These two shooting boards are ideal for forming long-grainmiters and miters in wide boards. They can also be made toany angle to suit a particular need.
The Donkey’s-Ear Shooting Boards

A Miter Shooting Box:A miter shooting box accommodates large, wide molds by holding the stock within the box and using the outside, angledwalls to guide the sole of the plane. The molding can be held in place by using a dowel as a retaining bar and wedging thestock in place with a wedge. You may also need a packing to support the unsupported side of the mold, depending on theshape complexity of the mold. Often you can reverse another piece of the same mold to counterpoise the stock beingworked. You can of course also use this miter shooting box to cut reverse miters (internal miters). We use the mitershooting box mainly for cutting vertical (broad face) miters.
This miter box cuts bothinternal and externalmiters
Internal Miter
External Miter
The Miter Shooting Box

Screw Miter Shooting Clamp:As with the miter shooting box, the screw miter shootingclamp accommodates large, wide moldings, but this clamphas a clamping mechanism that holds the wood to be planedat the correct angle. The outside, angled walls guide thesole of the plane.
Screw Miter Shooting Clamp

Shooting boards are not intended as a miter cutting guide but for trimming and establishing a precise finish cutto pieces previously cross cut or mitered using a saw and miter box or miter sawing block. Most of us were givento understand that the miter box provided the finished cut, so it’s no wonder that we were disappointed with ourendeavors at hand cutting miters and square cuts. In reality, the miter box or miter block was only the meanswith which we made the preliminary cut. Final trimming and fitting for fine work was always accomplishedwith the shooting board.
Miter Box:The miter box guides the sawon both sides of the materialbeing cut and tends to be moreaccurate for cutting largermaterial. The box shown hereis intended for cutting miters,but we use the same principlefor square cutting too.
Miter Sawing Block:Ideal for cutting small sectionsof wood and molding. They canbe made from rebated stock ortwo separate boards gluedtogether.
Cutting Miters:
(Miter sawing blocks can be made to any size and to suit any profilefrom either single rabbeted stock or scraps glued and screwed together.)
Note:If you want truly accurate miters directly from your miter box, removemost of the set on your finest saw and use the same saw to make yourmiter box or block.
Miter Boxes

Long-grain miters canbe cut to any angle ifyou make the shootingboard to accomodate theneed.
Flat and long-grain miterscan be cut with angles tosuit the number of sides
Less Conventional Types of Miters

Shooting BoardsMany devices once left out of use for a generation or twoeventually become lost to the ensuing generations and so becomeposted in the ‘what’s it’ column of magazines for rediscovery assome ancient relic of antiquity left behind because their true valuewasn’t necessary for those generations that followed. As withmost antiques, we tend to think that all things from those earlierdays were bettered by some evolutionary process of industrialismand therefore abandoned because they either didn’t really workthat well or what replaced them was an infinite improvement. It’soften difficult to confine an article to the absolute essentialswhen the essentials change with each generation of new powerequipment. But in hand tool woodworking many if not all theessentials never change. This consistency is due to the fact thatmany of our early craftsmen developed their tools, aids andother equipment for long-term use, and seriously consideredevery aspect of what they made with longevity and function inmind. Don’t dismiss shooting boards as archaic. They are just asessential today as they were for craftsmen in centuries past.For me, and I suspect for many others too, anything that worksefficiently and yet doesn’t need anything more than hand power to drive it is worth adding into the equation. Noise alone is not the only factor to be considered, we shouldn’tdismiss the unseen factors not so readily apparent. Life without ear and eye protection or wearing a dust maskfor eight hours a day, to say nothing of dust extraction and clean up from every shelf and nook in the shop orfiltering the air to make it breathable will make woodworking much more enjoyable. In my experience mostwoodworkers don’t realize that simply using hand planes and scrapers minimizes the need for power equipmentand sanders and will in most cases reduce dust in the atmosphere by up to 80%. Equally if not more importantis the reality that for the main part, most modern-day woodworkers spend much of their thought timeanxiously considering their personal safety and what might go wrong to cause damage to their health and thematerial they work with, whereas using some of the earlier devices means that they could give their wholeattention to the love of woodworking rather than self-preservation, safety and protection.Many aids to woodworking were actually fairly ingenious, very efficient and simple to use because they acted aspositive guides to hand tools. The shooting board in all its various forms is one such device. Making a basicshooting board is a fairly simple process requiring minimal skill and time. Once you’ve made one you will have itfor a lifetime and the accuracy is positively stunning provided you use a keenly sharpened well-adjusted plane.I know that it’s hard to imagine in our modern-day world of working wood, with all the sophisticated machines,laser guides, digital readouts and sensor controls giving minute-by-minute data, that craftsmen of times pastaccomplished extremely advanced levels of woodworking long before the advent of machines. Not only that,many of the methods they used were even faster than setting up the jigs and machines we now depend so heavily onto guide our routers and skillsaws to accomplish even the simplest of tasks. Even with the best intentions, in manycases most of the gadgets and aids manufactured for woodworkers to work with serve only to substitute fordeveloping true and substantive skills. I can think of a dozen or two right now. But occasionally you will comeacross photographs or drawings of old workshops depicting craftsman of old working with hand tools. The aidsthey used, often seen hanging from the walls and ceilings, give some indication as to what was important andnecessary for them to accomplish those high standards: Bow saws, froes, clamping devices, axes and so on. Forme, looking back on my past in English woodshops I went to and worked in during my youth, it’s the shootingboard. I recall them as unsophisticated, functional, efficient and with pretension. These aids were the answer toprecise trimming that ensured perfect intersections between flat boards and molded trim that was as a matter ofcourse so common to the pre-compound-chop saw era of woodworking.There are three basic types of shooting board designed to accommodate trimming solid wood, veneers and so on.The most common types were developed to facilitate the trimming of end-grain fibers of small sections of wood for

various reasons and applications. Mostwoodworkers will tell you that squaring end grainand mitered ends with a hand plane takes muchpractice to maintain consistent accuracy, and thisis indeed true. The main difficulty lies in the factthat two dimensions must be accurately trimmedat the same time and it takes skill to adjust andbalance the plane square in both directions, evenfor competent craftsmen. Add to this the wiry andfibrous nature of inconsistent wood grain withinfinitely varying densities and wild grainstructures and you can begin to understand thecomplexity of problems we face. Though as I said,many gadgets and aids substitute for developingreal skill, I recommend shooting boards becausethey absolutely guarantee the necessary accuracyneeded for precise trimming after sawing, even after sawing with chop saws and radial arm saws in many cases.Look at any old or antique project requiring accurately coopered facets, miters or square end cuts and you will seethat in the pre-machine era, craftsmen worked with perfect simplicity and accuracy, a simple accuracy that trulymatches our modern-day methods and in many cases exceeds them. How is that possible? Many woodworkerstruly believe that in the evolutionary process of woodworking each mechanized method replaces those existingwith something better. In reality the old methods were never abandoned because they didn’t work and work well,they were abandoned simply because they didn’t keep pace with an ever-industrializing world. So just how didthey accomplish such exactingly high standards in crosscutting, trimming and general fitting?
Shooting BoardsThough a regular bench plane will work well with your shooting board, using a low-angle plane of any typewill really refine the cut surface of the wood exponentially, producing both a perfectly planed surface and anaccurate cut. I use two low-angle planes by Veritas, both of which work extremely well but the weight and heftof the low-angle jackplane, combined with its 3/16" thick iron and the accurate machining throughout theplane itself make this tool my first choice for shooting wood of all types. I should reiterate at this point that adull plane is extremely counterproductive to accuracy. Even though you may make a perfect shooting board,with all the angles and stops accurately cut, you will not be able to produce the crisp, clean, precise cuts youdesire without a well-sharpened plane iron. When a cutting iron dulls through use it actually develops a micro-round on the very cutting edge. Instead of slicing cleanly through the wood in a continuous single plane, thecutting iron itself causes the plane to incrementally rise as it continues through the cut and so produces a roundor hollow instead of a truly flat plane.
Special PlanesThough a regular bench plane will work well with your shooting board, using a low-angle plane of any typewill really refine the cut surface of the wood exponentially, producing both a perfectly planed surface and anaccurate cut. I use two low-angle planes by Veritas both of which work extremely well but the weight and heftof the low-angle jackplane, combined with its 3/26" thick iron and the accurate machining of the plane itselfmake this tool my first choice for shooting wood of all types. I want to point out at this point that a dull planeis extremely counterproductive to accuracy. Even though you may make a perfect shooting board, with all theangles and stops accurately cut, you will not be able to produce the crisp, clean, precise cuts you desire withouta well-sharpened plane iron. When a cutting iron dulls through use it actually develops a micro-round on thevery cutting edge. Instead of slicing cleanly through the wood in a continuous single plane, the cutting ironitself causes the plane to incrementally rise as it continues through the cut and so produces a round or hollowinstead of a truly flat plane.Variations on the ThemeYou are not of course restricted to 90° and 45° trimming. You can make or adapt a shooting board to suit anyspecific angle for a particular project. A shooting board will ensure that you create accurate angles for all kinds of

segmented work. Window frames or pictureframes or circular clock face doors,pediments to name a few. A donkey’s earshooting board can be used for creatingcolumns, which can be used as they are withflat facets or turned round on the lathe. Youcan make a tapered column by using taperedboards and planing the angles on a long-grain shooting board. To determine theangles, simply divide 360 by the number offacets you want and then halve the number.Example: 360° divided by 4 = 90° divided by
2 = 45°.
Removable StopsStops are by necessity disposable. Inevitablythe stops wear, shrink, bruise and in otherways distort through continued use. Theytake a lot of beating and so removeable stops became the answer. Not only that, making tapered stops ensured thatthe stops could by kept tight against the angled shoulders even if shrinkage took place in different seasons whenatmospheric changes in humidity levels would shrink or and expand the stops. As I said, shooting boards arerelatively simple to make and use. I recommend you make them simply because they will simplify many aspectsof your woodworking life, produce accurate work and also save you time. The most commonly used shootingboard is the miter shooting board, primarily because we use miters in exposed locations as distinctive featuresto trim out or accent certain aspects of a project such as the architrave (door trim) around door and windowframes for instance. Both square and miter trimming can be accommodated in the same shooting board. Thesecond shooting board used in days past is one developed for trimming wider sections of wood such as thevertical miter on base boards. Another shooting board, the donkey’s-ear shooting board, is probably the leastused but very practical. Those outlined here are simple to make and work well. There is another shootingdevice made to surface plane mitered sections is the screw miter shooting clamp, which uses a screw-threadedtightening mechanism to hold the wood.To make a basic shooting board you will need either a suitable hardwood, or you can combine hardwood withsome type of hardwood plywood such as Finnish birch; using the plywood for the main baseboard. I usedmahogany to make mine. Other woods such as cherry, walnut or oak would also work well, but whicheverwood you use you must make sure that the wood is well seasoned to minimize the possibility of any distortionthat might affect the stability or accuracy of the board. To make a shooting board of any type you must workaccurately. Any discrepancy will be transferred to your project so take your time and follow the patterns forwell-made shooting boards that will last you through a lifetime of use.To make this shooting board you will need a few simple hand tools that must be sharp, well adjusted andaccurate. This shooting board will accommodate both 90° and 45°. You will need the following materials:
Main base board 1" x 8 3/4" x 23" longFence platform 1/2” x 4” x 23" longStop 1" x 1 1/2” x 12"Under stop 1" x 1 1/2” x 12"
Three Types of Miter JointA miter joint is not technically a joint. It’s usually the simple butting up of one piece of wood against another, bothof which are then usually nailed in place. For a true joint, one piece of wood is reduced and formed in some way tofit into or though a second piece of wood which in some way is also reduced to receive the other. Three commonapplications that require mitered joints are shown below. In most cases mitered pieces of wood and boards serve toprovide a transition between two planes while at the same time providing protection to vulnerable points. This canbe in the larger context of a building or in smaller projects such as cabinets and furniture pieces.

Ask anyone how to cut a miter of any kind and they will most likely answer by saying use a chop saw or aradial arm saw. In most cases woodworkers today would give their opinion that the chop saw gives a superiormore accurate cut than the miter box, which is of course true. But most woodworkers nowadays don’t realizethat the miter box was only the preparatory first step to remove the bulk of the waste. It was the first stage in atwo-step process, the second of which could actually produce a more superior cut to those produced by mostmodern-day machine methods. Obviously a chop saw gives thousands of minute cuts to attain the results itdoes. How then could a back saw possibly produce what a chop saw can when it relies on just a handful ofstrokes powered by frail human hands. But I know, and so do so many who have studied antiques of the earliercenturies, that some of the finest levels of woodworking ever done was accomplished before the advent ofindustrial machines. Looking back may be much more advantageous than you may think. In fact I stronglyadvise that you do. Read any old books on woodworking and you will inevitably find that the those earlierwoodworkers had a wholedifferent perspective on handtools, methods of work and soon than we do today. WheneverI look through those earlypublications I am alwaysamazed at the wealth ofinformation there is on any subjectto do with woodworking, including thedevices they used to accomplish thoseaforementioned high standards. To give youa comparison, I looked up some information onshooting boards, first in an old 1905 publication,and then in a 1999 one. In Paul Hasluck’s book‘Woodworking’, he describes a shooting board as follows:“Not withstanding the large number of patented miteringmachines in the market, skilled joiners, when any particular good piece of work is in hand, still prefer to usethe ordinary home made wooden shoot. The machines, whilst new and in good condition, are undoubtedly themore expedious in use, but if carelessly handled they are apt to get out of order, and then their work is far fromsatisfactory; whilst the wood shoot will stand a deal of rough usage, and is also easily repaired.” On the otherhand the more modern publication sadly declares that “A shooting board is a good aid for getting a feel forjointing or for jointing really thin pieces; otherwise, I find that it’s more trouble setting everything up than it’sworth.” The author then went on to show two exceptionally poor examples of what could be accomplishedusing shooting boards, neither of which could possibly work effectively. Sadly, anyone reading the commentswould likely believe the author, and therefor never discover the reality that simple well-made shooting boardswill exponentially improve all types of squaring, jointing, mitering, trimming and fitting, to say nothing ofnever discovering the true value of working with a well-made shooting board. Don’t rely on only the modernauthors for their opinions. Find some of the old books and read what they have to say as well. I’ve gone throughmuch of my life without questioning many of the traditions of my craft passed down from my forefathers. I feelthey knew well the essentials and passed them on to me. Many today discount those early values that held goodfor generations and yet who knew better than the economy of time and effort than those early craftsmen.Efficiency was no stranger to them and waste an unknown product.The shooting board is an extremely valuable aid even to and I would say especially for modern-daywoodworkers striving for those standards that serve as the signature of craftsmanship.
Using a Shooting BoardFirst of all, the purpose of the shooting board is twofold. The first and primary function is to simply support thewood while holding it at the correct angle and, secondly, to line up and guide the plane as it passes along thefence and carriage to trim off minute thicknesses of wood at exactly the right angles.Shooting boards must be precisely made. Though there is no adjustment in the shooting board itself to correctany inaccuracies, you can readily micro-adjust the adjustment features in the plane itself by using the depthadjustment to adjust the amount of stock you remove, and also by adjusting the lateral adjustment lever to set
your iron at 90° to the platform so that the angles are perfectly perpendicular to the stock being trimmed. Usinga low-angle plane with an adjustable mouth enables you to open and close the throat of the plane to suit yourneeds.It’s a mistake to think that if the shooting board is accurately made, then the miter orsquare end being trimmed will also be accurate. You must consider the tool used toexpedite the cut to be of equal importance and also the actual adjustments in theplane itself. Your cutting edge must be extremely sharp, I hone and polish to amirror-finish. Otherwise the plane iron will ‘ride’ the cut, which serves onlyto create a scalloped miter rather than a true plane. A sharp plane alsoensures that you can trim even molded stock without damaging anyunsupported fibers that occur when trimming molds. Anotherimportant consideration is that the sole of the plane mustbe truly flat and milled 90° to the walls.Adjusting the depth of cut is not very scientificwith a combination of tweaking the stock,clamping it with hand pressure only andadjusting the plane setting, you remove asminute an amount from the stock as possible,repeatedly passing the plane back and forththrough the cuts until you accomplish acomplete shaving with one continuous pass. Itmay take a few passes with the plane before youachieve a full shaving. Once you do, take a fewmore shavings to establish crisp clean lines to allthe angles or shapes of the pieces being worked.If the stock ‘creeps’ as you plane, consider using a light spray adhesive to glue medium-grit sandpaper to thesurface of the stop or fence platform, keeping the grit away from the cutting edge of your plane. The grit willhelp grip and hold the stock as you plane.The stops in the shooting board may splinter as you repeatedly trim stock. I prefer tointerpose a sacrificial piece of wood between the material I’m working and the stop,before the stop itself breaks down. Customizing the sacrificial stop preserves thepermanent stop and provides the exact support where I need it.
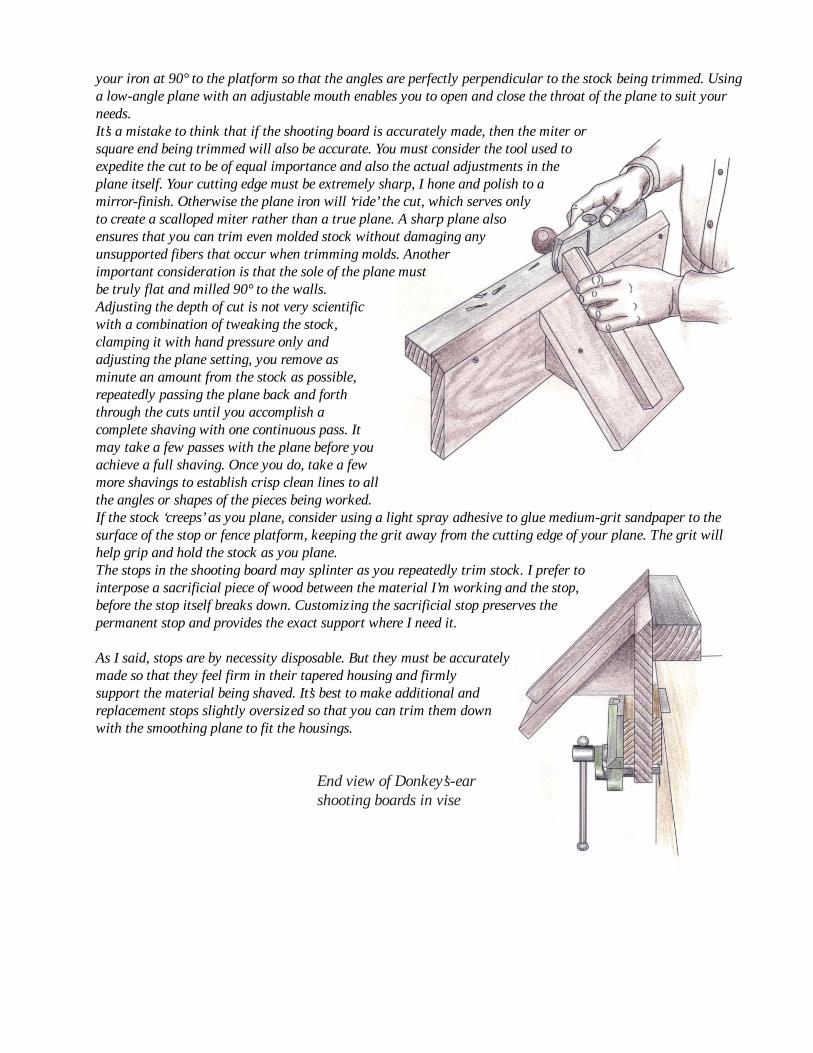
As I said, stops are by necessity disposable. But they must be accuratelymade so that they feel firm in their tapered housing and firmlysupport the material being shaved. It’s best to make additional andreplacement stops slightly oversized so that you can trim them downwith the smoothing plane to fit the housings.
End view of Donkey’s-earshooting boards in vise

1 1/4”
1 ”
12”1 1/2”
Cut two or three fence stops according to the drawing. You will need onefor 90° cuts and another for 45° cuts. Cut them accurately and exactly thesame.
Making a Classic Shooting Board
The Components forMaking a Shooting Board
1) Square Stop2) Angled Stop3) Fence Platform4) Main Base Board5) Underside Stops
The FinishedShooting Board
1)
2)
3)
4)
5)
5)

Layout for Building a ConventionalShooting Board for 45° and 90° Cuts
Lay out the 90° and 45° lines only onto the flat face of the 4” wide boardusing the combination square and pencil according to the drawing.
Place the tapered stop against the 90° and the 45° pencil lines and mark the position of the taperedlines according to the drawing.
Square the lines onto both of the edges.
Use a marking gauge set to 1/4” deep to scorethe depth lines on both sides of the board
1 3/4” 1 1/4” 1 1/4” 1 3/4”8 1/2”8 1/2”
8 3/4”
2 3/8”
2 3/8”
4”
90°90° 45° 45°
FencePlatform
Main Base Board
Main Base Board
Plastic Laminate Gluedto Main Base Board
Tapered recesses to receiveremovable tapered stop
23”
90° 90°45°45°
FencePlatform Layout
8 1/2” 8 1/2”3” 3”

With the pencil lines in place and the depth marks scored, use the knife andcombination square to cut the 90° and the 45° lines only. (Not the taperedlines at this stage. The other tapered lines will be marked directly from thetapered stop to ensure that the taper of the wedge-shaped recess correspondsto the tapered stop.)
On the 90° and 45° knife cut, chisel a slight angled recess in preparation forguiding the saw cuts. This knife cut will ensure that the saw follows to theknife wall exactly.
Use a small back saw to cut down the walls of your recess to thegauge line.
Make deeper cuts in towards the wall of your recess, down to justslightly above the depth line
Place your stop in against the wall of your recess and use a knifeto score the angled line of your stop

With a 1” chisel, define the second, opposite knife walls.
Use the saw to cut down to just above the depth line.
Remove the waste wood with a chisel but stay slightly above thefinal depth.
Use a hand router to surface-trim the bottom of the recesses level.
Use a marking gauge set to to 2 3/8” to mark a parallel line alongthe length of the main base board

Apply glue to the underside of the fence platform and position it against thegauge line on the main base board with the recesses uppermost.
Clamp the fence platform to the main base board using protective cauls toprevent damage to the shooting board.
Fit the wedged-shaped stop into the tapered recess and tighten by lightly tapping with a small hammer.
If the stop overhangs, remove the excess with a small saw. If it fallsshort of the outside edge, shave off some of the width of the stopwith a plane.
Grip the board in the vise and plane the fence stop flush with theoutside edge of the fence platform.
For added wear resistance and to reduce friction, glue a piece ofplastic laminate to the main base board rebate.

To use the shooting board, lay a plane on its side in the rebate asshown and slice off a few shavings at both 45° and 90°.
Compare the surface of a hand planed miter with a machined miter,machined on the left, hand planed on the right.
I used two low-angle planes for trying out the shootingboards. The low-angle of the cutting iron in relation tothe plane body proved ideal for all types of trimmingand shooting. I used the heavier low-angle jack plane forlarger stock and shooting long edges, and the shorterlow-angle smoothing plane for smaller stock, eventhough the either plane will do the work of the otherwithout fault.
If you find your miter or square cuts are less than perfect, trim themby adjusting the wall of the recess with a sharp knife against thesquare.
When you use the shooting board for the first time, the protrudingplane iron will form a small rabbet on the fence and soautomatically line up the rabbet with the stop. The edge corner ofthe plane sole will then be guided by the fence platform.

Even quarter-sawn ponderosa pine produced crisp, see-through shavings with a well-sharpened plane.
I made a miniature mitered frame from 1/2” x 3/4” stockto test the accuracy of my shooting board. The framemeasures 2 1/4” square.
Front and backviews