SharpSchool - New Course Missing from...
71
Scheduling FAQs General Q. Do I need to build a new schedule every year? A. No. It is only necessary to build a new schedule when making major changes to the existing schedule. For example, if your school is adding or subtracting terms, days, and/or periods from the existing schedule, it is advised that a new schedule be built. If there are only minor changes, such as moving sections to different days or periods, or adding or deleting sections in the existing schedule, then you do not need to build a new schedule and can use a Load Only scheduling Scenario. Parameters Catalogs Q. Do I need to create a new Course Catalog every year for scheduling? A. No. Existing Course Catalogs in PowerScheduler may be used for any scheduling scenario, adding or removing active courses as needed. Q: Course not able to be selected in PowerScheduler A: See Knowledgebase article #: 6289 for the walkthrough. Q: A newly created course does not show up in PowerScheduler A: Knowledgebase article #: 7186 shows how to resolve this. Periods Q: What Is A "Core" Period?
Transcript of SharpSchool - New Course Missing from...

Scheduling FAQsGeneral
Q. Do I need to build a new schedule every year?
A. No. It is only necessary to build a new schedule when making major changes to the existing schedule. For example, if your school is adding or subtracting terms, days, and/or periods from the existing schedule, it is advised that a new schedule be built. If there are only minor changes, such as moving sections to different days or periods, or adding or deleting sections in the existing schedule, then you do not need to build a new schedule and can use a Load Only scheduling Scenario.
Parameters
Catalogs
Q. Do I need to create a new Course Catalog every year for scheduling?
A. No. Existing Course Catalogs in PowerScheduler may be used for any scheduling scenario, adding or removing active courses as needed.
Q: Course not able to be selected in PowerScheduler
A: See Knowledgebase article #: 6289 for the walkthrough.
Q: A newly created course does not show up in PowerScheduler
A: Knowledgebase article #: 7186 shows how to resolve this.
Periods
Q: What Is A "Core" Period?
A: Please see Knowledgebase article #: 8976.
Years & Terms
Q. I don't know our exact term dates yet. Can I change them later?
A. Yes, term dates may be changed at any time prior to committing the schedule, but student schedules will need to be reloaded in order to correctly align the enrollment dates with the terms.
Q. Can I add terms to the scenario I'm using after I've started scheduling?
A. If you need to add terms, you should create a new scheduling scenario with the terms required and rebuild the schedule.
Q. Should I add extra days for snow days when I enter the term start and end dates?
A. We recommend that no "extra days", either at the beginning or end of the terms, should be added when creating terms. Start and end dates for the Full Year and all subsequent terms should line up with each other. For example, if the Full Year starts on 8/5/2007 and ends on 6/23/2008, Semester 1 and Quarter 1 should have start dates of 8/5/2007. Semester 2 and Quarter 4 would have an end date of 6/23/2008. If you need to add days during the course of the school year for snow cancellations, etc., follow the instructions described in KnowledgeBase article #783 and contact PSS Technical Support so that the calendar can be re-initialized.
Q: A non-matching Build Year and Scheduling Year can cause various issues
A: Look at Knowledgebase article #: 9537 for the workaround.
Processing
Course Rank
Q: How PowerScheduler Calculates Course Rank
A: See Knowledgebase article #: 9610.
Build (Q)
Q: Scheduling Engine throws an 'Error 7 Connect Failed' message and won't build.
A: Reference Knowledgebase article #: 5664 for the workaround.
Load (Q)
Q: Scheduling Engine throws an 'Error 7 Connect Failed' message and won't load.
A: go to knowledgebase article #: 5664 for the workaround.

Q: Load does not schedule any students
A: Knowledgebase article #: 6594 can help.
Q: Why are Students Enroll & Leave dates listed as 0/0/0?
A: Knowledgebase article #: 8152 gives a workaround.
Commit
Q. We plan to split our Year Long sections before we commit our schedule. Will splitting the sections into semesters also split the credits for the course?
A. No. If you plan to split section using the Split Year-Long Classes function the credit entered on the Course Setup page should be divided among the terms you plan to split the course into, so for example, if the Year Long course would have 1 credit, and it is going to be split into Semesters, the credit assigned on the Course Setup page should be .5. PowerScheduler does not take credit into consideration during the split process.
Q: Committing the schedule results in "Full year term must be selected..." error
A: See Knowledgebase article #: 6597 for the resolution.
Live-Side Scheduling
Q. We plan to do "live-side" scheduling at our elementary schools. Can we do that before the end of the current school year?
A. The students cannot be enrolled into their classes for next year until after the End Of Year process has been completed. The Years & Terms for the next school year can be created, the Master Schedule copied, and any needed modifications to the schedule can be made during the current year. Before performing these steps on the "live-side", a scheduling scenario for the next school year should be created in PowerScheduler using the Auto Scheduler Setup function that has at minimum the Full Year term dates, and the desired number of periods and days defined. The Schedule Year in PowerScheduler should be set for the upcoming year once the scenario has been created.
Q: How to transfer a student from one school to another school.
A: It's in Knowledgebase article #: 6207.
Q: How to unlock enrollments in a student's Modify Schedule page
A: See Knowledgebase article #: 7169 for the walkthrough.
Q: How To Mass Drop Section Enrollments Using DDA*
A: See Knowledgebase article #: 7194.
Q: School unavailable in Next School Indicator field on Scheduling Setup page
A: Knowledgebase article #: 7875 says why.
Q: How to identify and delete a duplicate class enrollment (CC record)
A: See the workflow in Knowledgebase article #: 7991.
Q: How to remove a current Enrollment Record
A: Follow the steps in Knowledgebase article #: 8351.
Q: What's with the 'Pending Transfer' message when transferring a student out of school?
A: See Knowledgebase article #: 10692.
Requesting
Request Screen Setup
Q: Missing Requests In PowerScheduler
A: See Knowledgebase article #: 6287.
Q: Why does the Student Request screen display courses as "Unknown Course"?
A: Knowledgebase article #: 8078 gives the solution.
Q: Requesting screens show courses from another school
A: See Knowledgebase article #: 5947.
Q: How to disable the "enter course request" feature for Guardians and Students
A: Follow Knowledgebase article #: 5691.
Q: How to mass-remove student requests by year or course
A: It's in Knowledgebase article #: 5630.
Q: Must previous years' requests be deleted before entering next year's requests?
A: No. You should not have to delete old request because they are associated to a unique termID value. If you use the Request Modify Future function, it should associate those requests to next year's scheduling term.
On the PowerScheduler side, if you select a student -> requests -> new -> it should also associate the request to the next scheduling year.
Q: Registration pages are not available for incoming students from another school
A: Knowledgebase article #: 6704 has the answer.
Q: The wrong school appears in the welcome message on the Request Modify Future screen
A: Knowledgebase article #: 6638 gives the steps to resolve this.
Q: How are student requests processed by PowerScheduler?
A: Please see Knowledgebase article #: 7017.
Q: How To Re-Use Student Request Screens
A: Go to Knowledgebase article #: 8031.
Q: What sets the order of courses on Requests View Future page?
A: Knowledgebase article #: 11059 has the answer.
Resources
Constraints
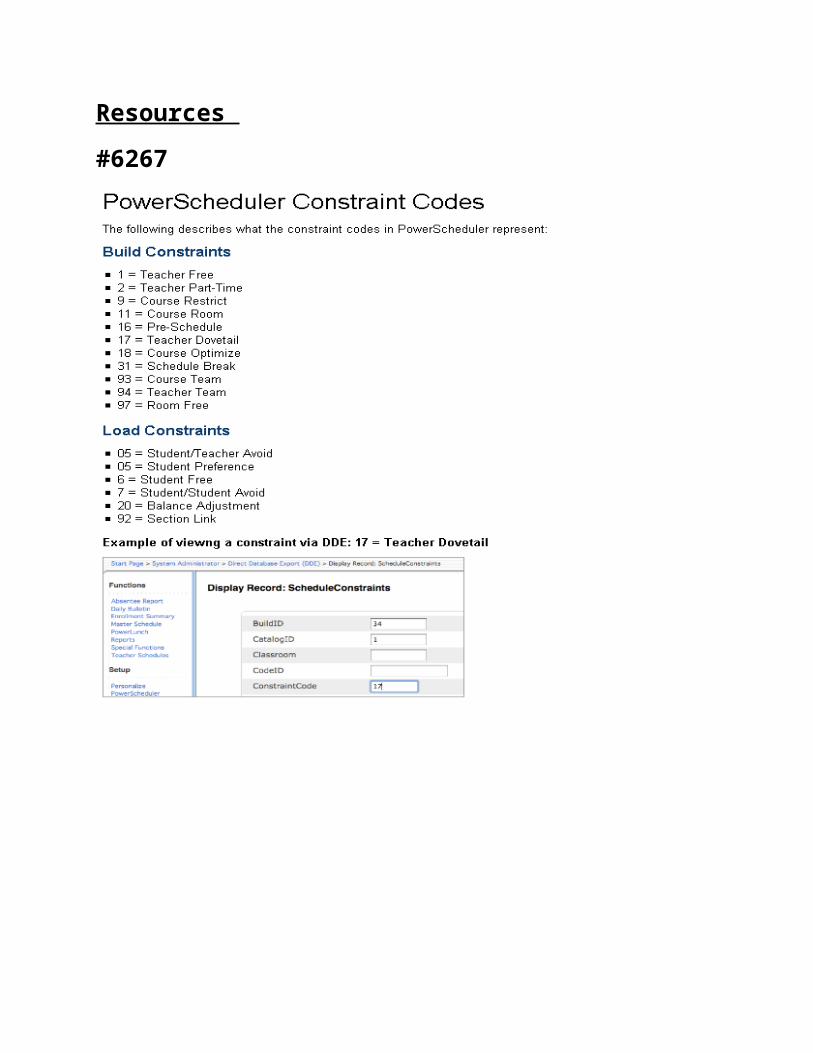
Q: What are the scheduling constraint codes by number?
A: Knowledgebase article #: 6267 lists them.
Q: How to Add a Balance Adjustment Constraint
A: See Knowledgebase article #: 7781.
Courses
Q: How the "Don't Allow Student Substitutions" checkbox works
A: Knowledgebase article #: 7945 discusses this.
Rooms
Q: My rooms have been deleted in PowerScheduler. How can I get them back?
A: Knowledgebase article #: 7246 has a workflow.
Students
Q: How do I pre-register a student for next year in PowerSchool?
A: Knowledgebase article #: 5683 gives the steps.
Q. We have students coming in from outside of our district next year. Do we need to set up a "feeder school" in PowerSchool to schedule them?
A. No. The students can be pre-registered at the schools they will be attending. Set their scheduling preferences so that the next grade shown is the grade they will be in next year, set the next school to the school in which they are pre-registered, and check the "Schedule this student" checkbox. The students can now be assigned requests and scheduled through PowerScheduler like any currently enrolled student.
Q: Transfer Info Page displays "No FTEs defined for this school".
A: Knowledgebase article #: 6224 gives the workaround.
Q: Transfer info is incorrect for students transferred to a new school but not yet re-enrolled.
A: See Knowledgebase article #: 6519.
Q: Matrix View versus Student Schedule Screens.
A: Knowledgebase article #: 5943 shows why these can look different from one another.
Q: How To Select Students From Multiple Schools For Running A Load in PowerScheduler.
A: Follow the steps outlined in Knowledgebase article #: 7997.
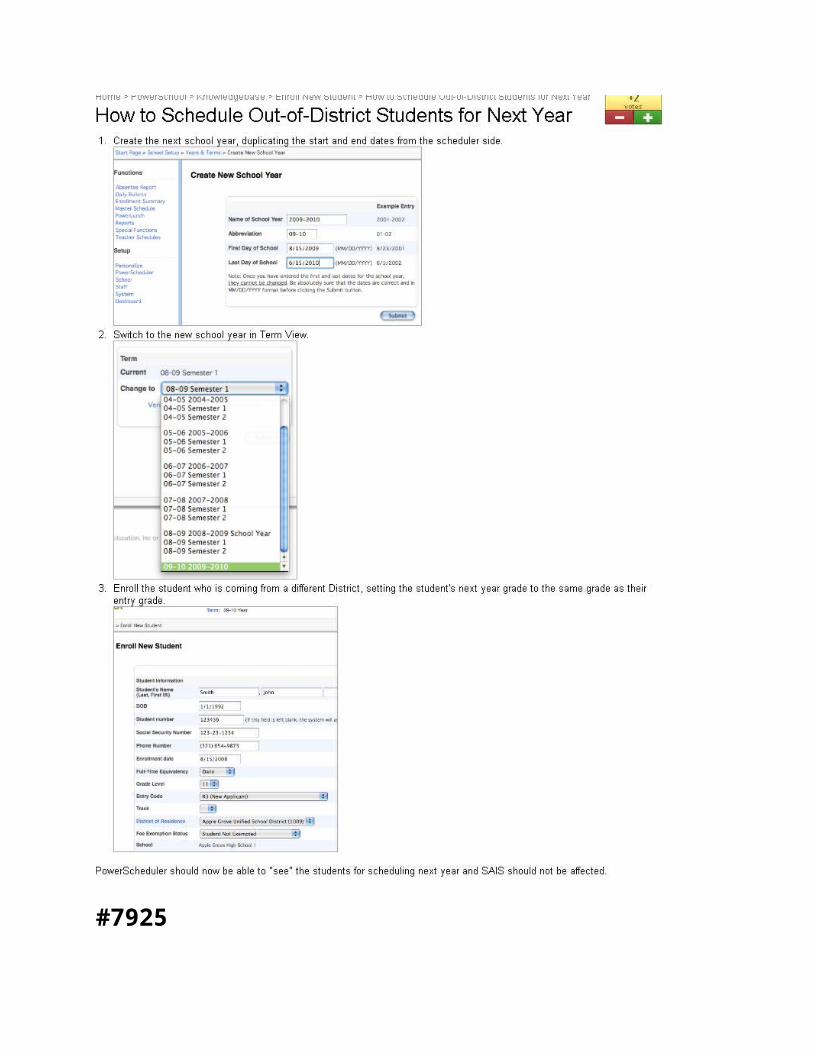
Q: How to schedule out-of-district students for next year
A: See Knowledgebase article #: 8011.
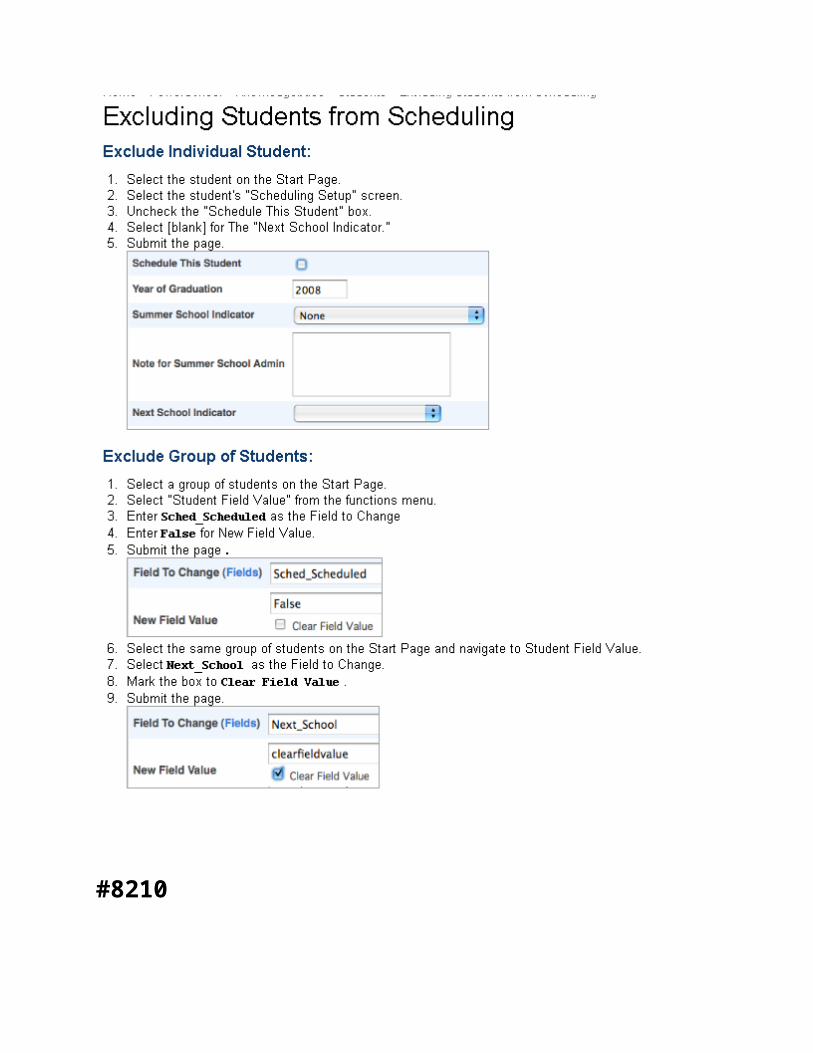
Q: How to exclude students from Scheduling
A: Knowledgebase article #: 7925 lists 4 steps.
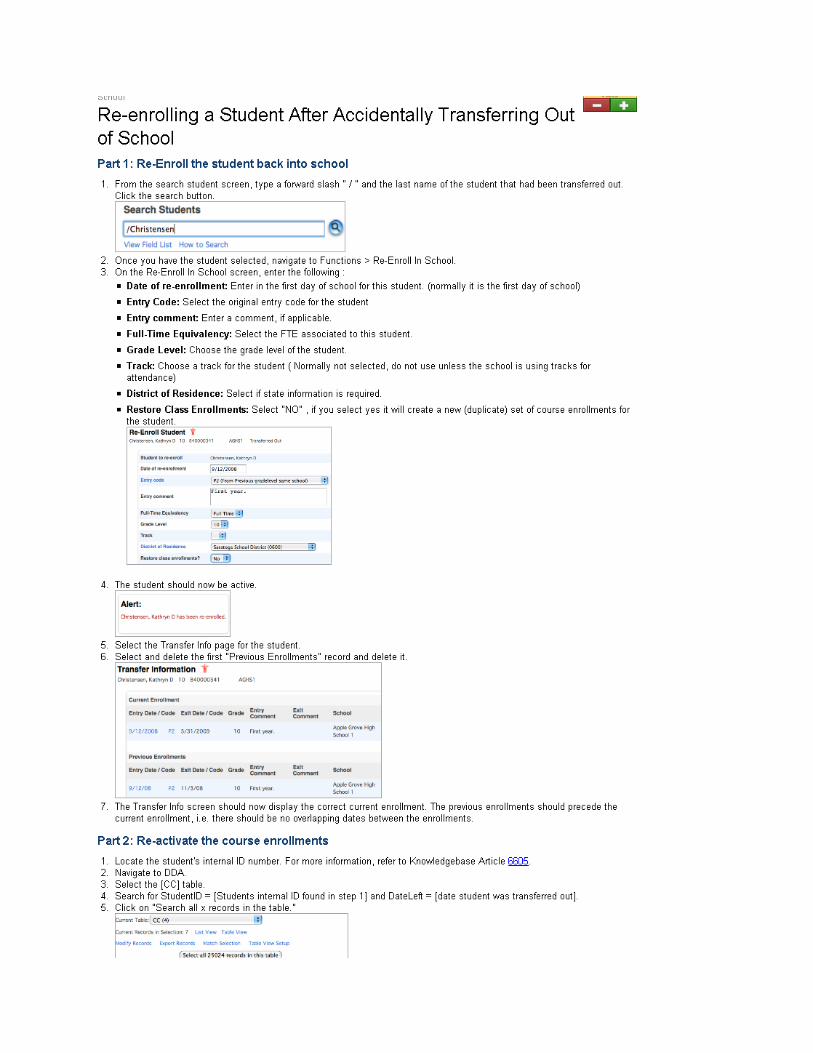
Q: How to reenroll a student who has been accidentally transferred out of school
A: Go to Knowledgebase article #: 8210.
Teachers
Q: Teacher Schedule Class Count (Size) Displays Zero (0).
A: Knowledgebase article #: 6244 gives a workaround.
Q: Teacher assignments, configuration and troubleshooting.
A: See Knowledgebase article #: 5768.
Q: Unable to change a Teacher's Schedule Setup
A: Knowledgebase article #: 7769 explains why.
Q: Teacher Set to "No Longer Here" Still Shows in PowerScheduler
A: Knowledgebase article #: 7995 shows how to resolve this issue.
Q: How to View Teacher Scheduling Assignments
A: Knowledgebase article #: 8025 shows how.
Schedule
Master Schedule
Q: How to indentify the current Build ID
A: Look at Knowledgebase article #: 10074.
Q: Master Schedule is not displaying all the sections
A: Knowledgebase article #: 6040 gives the answers.
Q: Copy Master Schedule error: "Destination year must be greater than source year"
A: Knowledgebase article #: 6354 has a walkthrough.
Q: Some classes are missing from the Master Schedule
A: Follow Knowledgebase article #: 7277 for a possible solution.
Q: Why are my section numbers different after copying the Master Schedule?
A: Knowledgebase article #: 7691 explains.
Sections
Q: Class Roster doesn't show a newly enrolled student
A: See Knowledgebase article #: 7156 for a possible solution.
Q: Only the full year term is available to choose from when adding sections in Powerscheduler
A: Knowledgebase article #: 7963 has a workflow to resolve this.
Q: How to reactivate a Section Enrollment (CC record)
A: The steps are in Knowledgebase article #: 11062.
Q: Is there a 'Reset Section Meetings' Command or Function?
A: In later versions of PowerSchool Premier (5.1.1.6 and greater), a Special Operation* is available to reset (deletion and recreation) Section_Meeting records in PowerSchool Admin.
Use the following procedure to reset the Section_Meeting records:
1. Go to the Special Operation*s page (Start > System > Special Operation*s).2. Select Reset Section Meetings on the Operation drop-down menu.3. Enter the value of the school year start year (such as 2007 for the 2007-2008 school
year) in the Param 1 field.
Note: if a user enters nothing or characters other than numbers, the value becomes zero (0), and the Special Operation* will not run.
4. Type 'resetsm' in the Code field.5. Click Submit.
Note: The current school setting determines which school(s) records are processed. If set to a school, only that school's Section_Meeting records are recreated. If set to the district office, all school's section_Meeting records are recreated.
Note: this Special Operation* should be run after hours.# Master Schedule
Tools
Engine
Q: Permissions errors when installing Scheduling Engine
A: Knowledgebase article #: 6733 has a possible resolution.
Q: Unable to connect to scheduling engine (Automated Walk in Scheduler)
A: See Knowledgebase article #: 7252.
Q: How to re-establish the PSLoader file association in Windows
A: See Knowledgebase article #: 7033.
Reports
Q: How many students had successful requests per course?
A: See Knowledgebase article #: 5854 for a recommendation.
Q: How to view section balance results (Master Schedule reporting in PowerScheduler)
A: See Knowledgebase article #: 5970.
Q: How to print next year's student schedules
A: Knowledgebase article #: 5845 discusses this.
Q: The wrong teacher listed when printing Future Schedules
A: See Knowledgebase article #: 8149.
Q: How to print future schedules for pre-registered students
A: See Knowledgebase article #: 8196.
Q: Why does the Student Schedule Matrix report show nothing?
A: Knowledgebase article #: 10174 gives troubleshooting steps.
∞End of Frequently Asked PowerScheduler Questions∞
Articles from PowerSource knowledgebase:
*any reference in these articles made to DDA or special operations will require district technical support, deleting sections, CC records and enrollment records will require district intervention as well. The articles were included to help users determine if the recommended actions seems appropriate to the situation, again school users will not be able to use DDA or special operations to fix errors
Parameters
#6289
Course Unavailable in PowerSchedulerIf a course is showing within the school on the live data side, but cannot be selected within PowerScheduler, the course probably is not loaded within the catalog for the active scenario. To resolve this issue:
1. Navigate to Start Page > PowerScheduler.2. Select "Catalogs" under Parameters.3. Click on "Edit Course Catalog" link.
4. Verify that the course you are missing has a check mark selected.5. If not, mark the course and submit the page.
6. Navigate to PowerScheduler > Courses to verify that the course now appears.
#7186
New Course Missing from PowerScheduler Master Course List
After creating a new course either via the District or the School, the course does not automatically display in PowerScheduler. You must select the course at the school you are working with in PowerScheduler before it will be listed in Course Catalog or Course Groups.
For example, in order to see French III in the PowerScheduler Master Course List, the course needs to be added to the live-side Master Course List.
Courses in bold have been associated to the school on the live side of PowerSchool.
Add French III to the Master Course List on the live-side:
French III is now available to be added to the Master Course List in PowerScheduler:
Note that French 2 French III and General Math are listed in bold, indicating that these courses have been associated with the school on the live-side.
#8976
*would only apply if you use core periods (we did not recommend use of core periods)
Periods
PowerScheduler: What Is A "Core" Period?Core periods represent the "core learning time" periods of the day, during which most students attend class.
Core periods affect the "% Scheduled" numbers on PowerScheduler reports. The "core" number reflects how much of the "core" time a particular student is enrolled.
For example, School A has a 10-period schedule with periods "0" and "9" scheduled before and after school. Periods 1 - 8 are core periods. If a student is "80% Scheduled," administrators need
to know if 80% means 8 "core" periods (a full schedule) or 6 "core" periods and a before-school and after-school activity (leaving a 2-period "hole" in the student's schedule).
Core periods are not used elsewhere in PowerSchool, and have no effect on how the scheduling engine or manual load processes occur. The function exists so that a school with scheduled before- or after-school activities can find under-scheduled students more easily.
Years and Terms
#9537
Mismatched Build Year and Scheduling Year can cause various issuesWhen the Build Year on the current active scenario does not match the scheduling year, (PowerScheduler > Functions > Set Scheduling Year), various issue can occur.
Example:
builds,loads, and various other PowerScheduler reports don't make sense given the sections you may be seeing on screen. Or, an error message displays indicating that there is no previous year data available when attempting to use the Move Previous Year Data function.
Workaround:
Use the Automated Scheduler Setup feature to create the initial Years and Terms. Once completed, activate the scenario. Go to PowerScheduler > Years & Terms, select the newly created year and change the default 'Full Year' name to 2007-2008 or another value representing the current school year. Finally, go to PowerScheduler > Functions > Set Schedule Year and choose the newly created Year. This should create a good instance of Years and Terms with matching Build Year and Scheduling Year
Processing (most of these solutions would require district intervention)
#9610
How PowerScheduler Calculates Course RankThe Course Rank in PowerScheduler defines the order in which the system schedules courses into the master schedule. The rank is a value that the system assigns to a course according to how difficult it is to schedule. As the system fills the master schedule with courses during the build, it becomes more difficult to schedule each successive course. Therefore, the order in which the system schedules courses is important.
First, the system builds the course rank based upon the following items (listed in no specific order):
Sections offered on the course Request conflicts Pre-Schedule and Course Restrict Constraints Length of each section (periods/days/terms) Block Relationships with other courses
The system then assigns each course a sequential number in increments of ten (such as 10, 20, 30). Additionally, you can manually change the rank of some courses based on your experience or special circumstances not reflected in course definitions or constraints.
For example, courses that are offered only once per term are scheduled before multiple courses because there are fewer choices. Scheduling these courses first assures a better schedule for the students that request courses offered once per term.
It is important to keep the course rank file up-to-date as you build your schedule and adjust your courses, teachers, constraints, and other parameters.
#5664
*this should be done in conjunction with help desk so it can be monitored
PowerScheduler Engine: Error 7 Connect FailedIssue:
The Scheduling Engine has been downloaded and installed correctly, but when attempting to Build or Load schedules, the schedule engine does not run, and an Error 7 is returned, indicating a failed connection:
Input; Error 7: Connect failed Error 7: Connect failed Error 7: Connect failed Could not get file at http://64.64.64.64/EnginePutData/?Callback_id=8 .."
Workaround:
1. Find and delete any Helper Applications or File Associations in your browser or OS that relate to the engine.psengine file, and the PS Loader Engine:
o For PCs: go to Windows Explorer > Tools > Folder Options > File Types.2. After finding and removing the associations, try running the build or load process again.
You should be prompted, after a few moments wait, for what action to take with the resulting file.
3. Save the file to your desktop, or other folder where you can locate it conveniently.4. The file, once saved, will be named engine.psengine. Locate this file and open it with any
text editor.5. Find the lines which say " url.input", and "url.output" and edit the IP address shown
there (the numbers with the periods between them located between the slashes) to be the same as the IP number or DNS name used in the address bar of your browser to connect to PowerSchool.
6. Once the changes have been made, save the file, then drag and drop it onto the PS Engine Loader application file.
7. The build or load process should now run without the error 7 occurring. It will be necessary to edit the engine.psengine file each time a build or load is run, or, edit the properties files as follows for your operating system:
#6594
PowerScheduler Load: Students Not LoadedSymptom:
A student course request screen was created and students entered their requests. However, when the Load process is run in PowerScheduler, students are not scheduled.
Cause:
The students have submitted requests, but the requests have not been confirmed in PowerScheduler.
Solution:

In PowerScheduler:
1. Navigate to Start Page > PowerScheduler > Students.2. Select a student.3. Select the "Requests" screen and submit the page to accept the requests.4. Select the "Preferences" screen and verify that the checkbox next to "Schedule This
Student" is checked5. Run another Load.
#8152 *this would have to be done by the district techs
PowerScheduler: Students Enroll & Leave Dates Display 0/0/0Cause:
This issue is caused by an incorrect Build Year tied to the active scenario.
Solution:
1. Navigate to DDA*.2. Select the ScheduleBuilds (105) table.3. Search the table by the SchoolID.4. Select the List View link.5. You should be able to identify the appropriate scenario by name.6. Check the BuildYear field.7. The BuildYear field should have a value of 18 for the 08-09 School Year, or 19 for the 09-
10 School Year.8. Edit the field and click submit at the bottom of the screen.9. Run another Load and import the results. The correct Enroll & Leave dates will now
appear.
Caution: Manual modifications to database records should only be attempted by authorized technical contacts, and can result in the loss of information if not executed properly. Before making any changes via Direct Database Access, you should perform a manual backup of your PowerSchool database. For instructions on how to perform a manual backup in PowerSchool Pro, click here. For instructions on how to perform a manual backup in PowerSchool Premier, click here.
#6597
PowerScheduler: Committing Schedule Error: "Full year term must be selected..."Symptom:
When committing the schedule in PowerScheduler, the following error occurs:
"Full year term must be selected as a term to be committed"
Cause:
The problem is due to the term in the scenario that is not properly associated with the term in the scenario.
Solution:
1. Click on PowerScheduler.2. Click on Scenarios.3. Click on the name of the active build scenario; do not click on Edit.
4. Click on "Associate" next to the terms setting.
5. Select the checkbox for the full-year term and click Submit.
#6207
How to Transfer Student from One School to Another SchoolThis article describes the process for transferring a student from one school to another. The process to transfer a student from one school to another includes three major steps:
1. Transfer the student out of one school.
2. Transfer the student to another school.3. Enroll the student as an active student at the new school.
The process of transferring a student out of school is described in full detail below:
1. Select the student at the school in which the student is currently enrolled.2. Navigate to the Functions student screen.3. Click Transfer Out of School.4. Enter the appropriate transfer info including the Exit Date, Transfer Comments, and Exit
Code.5. Click the Submit button.
6. Verify that the student was transferred out of school. Note: If the transfer is in the pending status, do not proceed with the rest of these steps as the student has not been transferred out.
7. Navigate to the Functions student screen.8. Click Transfer to Another School.9. Select a destination school from the drop-down menu.10. Click Submit. The student will be moved to the destination school but will not yet be
active.
11. Switch to the destination school.12. Select the student that has just been transferred over. Note: The student will not show
up in a regular search. Be sure to precede your search string with the / character to include inactive students in your search.
13. Navigate to the Functions student screen.14. Click Re-Enroll in School.15. Enter the appropriate enrollment information such as the Entry Date, Entry Code, Entry
Comment, Full Time Equivalency, and Grade Level.16. Click Submit.
17. Verify that the student is now an active student at the new school.
#7169
Modify Schedule - Unlocking EnrollmentsIssue:
When viewing a student's "Modify Schedule" page, the enrollment records are locked and administrative users are unable to modify the records.
Cause:
This issue is to the fact that the student is no longer enrolled in the school and/or course.
Resolution:
In order to modify the record:
1. Check the date of the enrollment record by viewing the selected course in the "All Enrollments" Student screen.
2. Click the "Edit" link next to the locked record.3. If the date is outside the curent date/term, temporarily modify the exit date to
tomorrow's date.
4. Go to the "Modify Schedule" screen and unlock the enrollment record.5. Once the enrollment has been modified, change the exit date to the day after the
student's last day in class. For example, if the student last attended the class on Friday March 13th, then the exit date is Saturday March 14th. The exit date must be after the student's last day in class in order to take attendance on the last day (attendance cannot be taken on the exit date).
#7194*This operation could only be performed by district techs
How To Mass Drop Section Enrollments Using DDA*Note: These instructions are intended to drop ALL enrollments for a particular section.
1. Make a manual backup of your data.
2. Attendance: Remove attendance records for the students associated with the section that occur on or after the last day in class.
3. Note the ID of the section from which you wish to drop students. The Section ID is displayed at the bottom of the Edit Section page.
4. From the Start page, navigate to System > Direct Database Export (DDE).5. Choose the CC (4) table.6. Search for:
SectionID = [SectionID for this section] TermID = [TermID for this section]
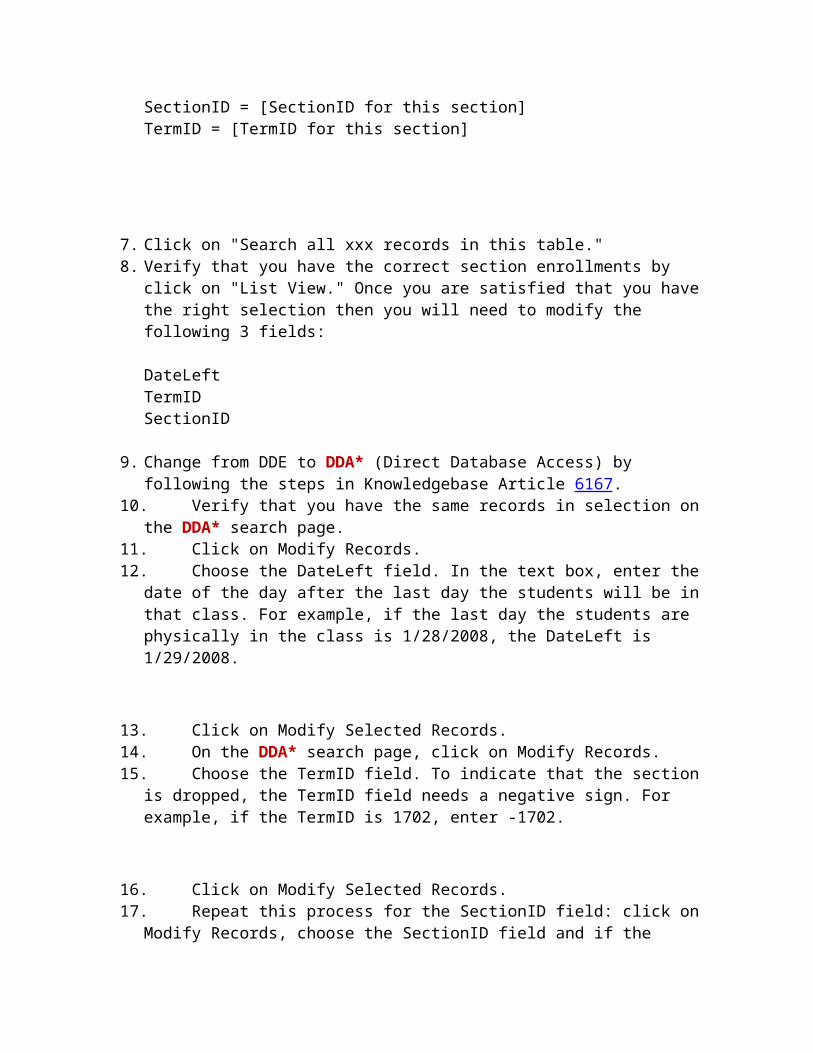
7. Click on "Search all xxx records in this table."8. Verify that you have the correct section enrollments by click on "List View." Once you
are satisfied that you have the right selection then you will need to modify the following 3 fields:
DateLeft TermID SectionID
9. Change from DDE to DDA* (Direct Database Access) by following the steps in Knowledgebase Article 6167.
10. Verify that you have the same records in selection on the DDA* search page.11. Click on Modify Records.12. Choose the DateLeft field. In the text box, enter the date of the day after the last day the
students will be in that class. For example, if the last day the students are physically in the class is 1/28/2008, the DateLeft is 1/29/2008.
13. Click on Modify Selected Records.14. On the DDA* search page, click on Modify Records.15. Choose the TermID field. To indicate that the section is dropped, the TermID field needs
a negative sign. For example, if the TermID is 1702, enter -1702.
16. Click on Modify Selected Records.17. Repeat this process for the SectionID field: click on Modify Records, choose the
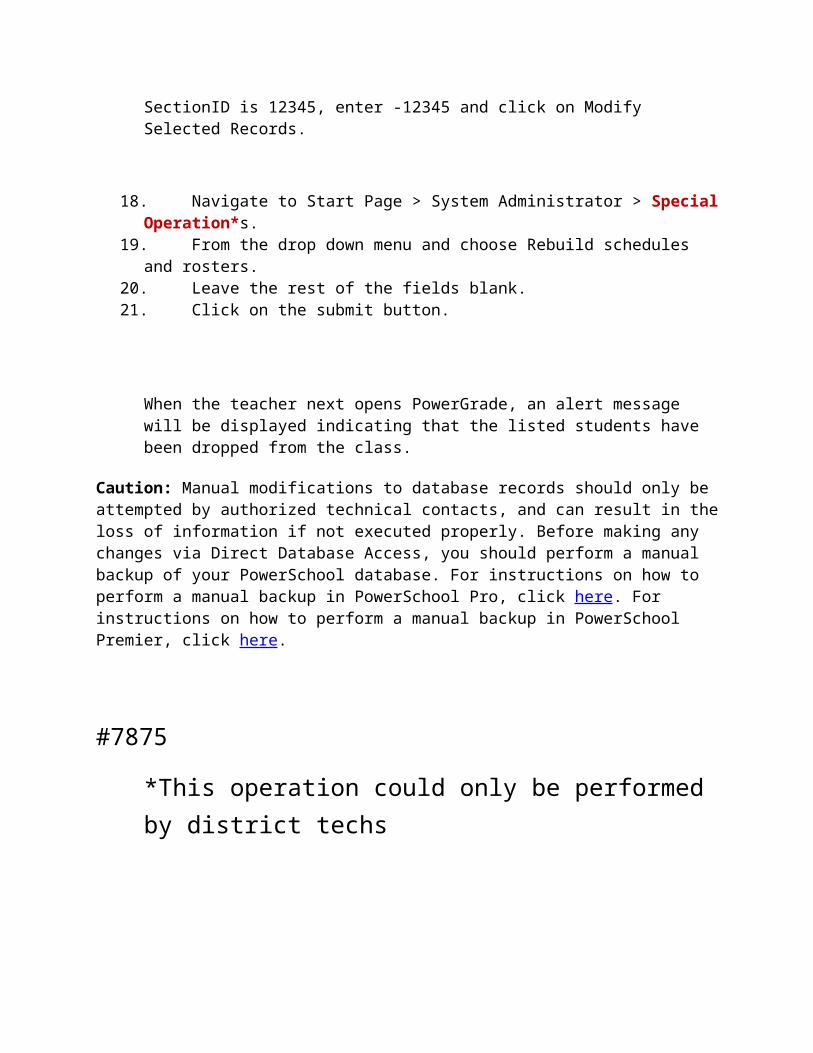
SectionID field and if the SectionID is 12345, enter -12345 and click on Modify Selected

Records.
18. Navigate to Start Page > System Administrator > Special Operation*s.19. From the drop down menu and choose Rebuild schedules and rosters.20. Leave the rest of the fields blank.21. Click on the submit button.
When the teacher next opens PowerGrade, an alert message will be displayed indicating that the listed students have been dropped from the class.
Caution: Manual modifications to database records should only be attempted by authorized technical contacts, and can result in the loss of information if not executed properly. Before making any changes via Direct Database Access, you should perform a manual backup of your PowerSchool database. For instructions on how to perform a manual backup in PowerSchool Pro, click here. For instructions on how to perform a manual backup in PowerSchool Premier, click here.
#7875
*This operation could only be performed by district techs
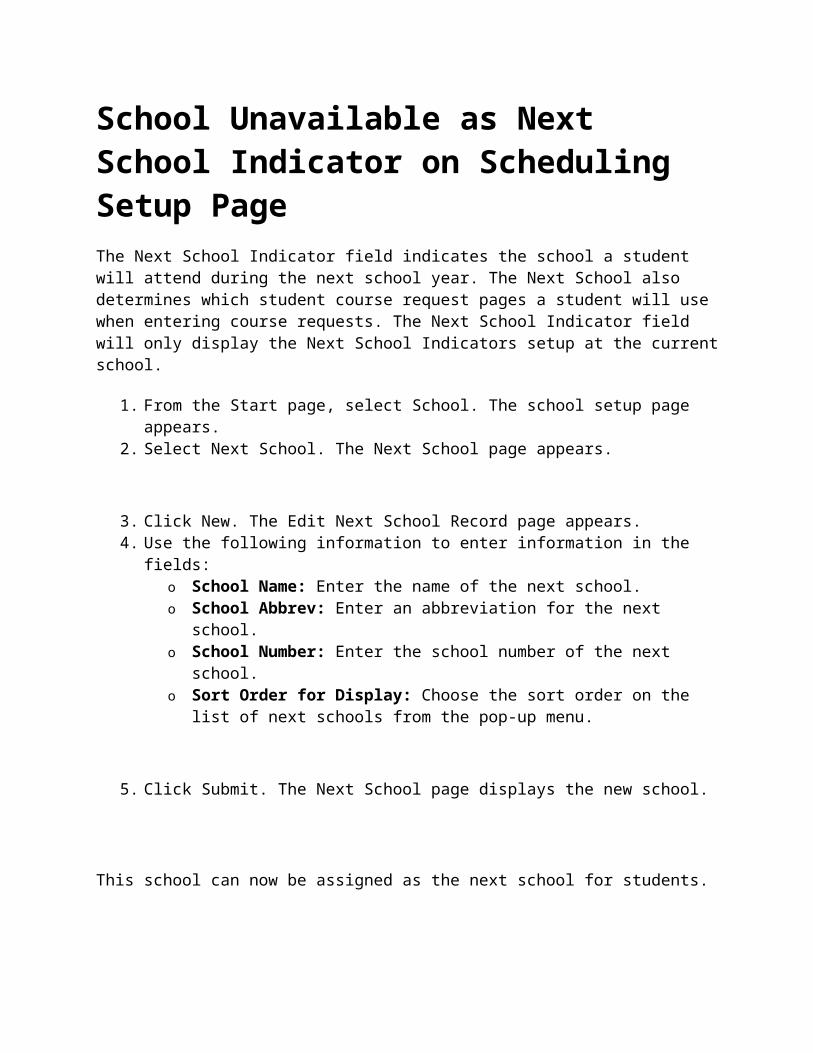
School Unavailable as Next School Indicator on Scheduling Setup PageThe Next School Indicator field indicates the school a student will attend during the next school year. The Next School also determines which student course request pages a student will use when entering course requests. The Next School Indicator field will only display the Next School Indicators setup at the current school.
1. From the Start page, select School. The school setup page appears.

2. Select Next School. The Next School page appears.
3. Click New. The Edit Next School Record page appears.4. Use the following information to enter information in the fields:
o School Name: Enter the name of the next school.o School Abbrev: Enter an abbreviation for the next school.o School Number: Enter the school number of the next school.o Sort Order for Display: Choose the sort order on the list of next schools from the
pop-up menu.
5. Click Submit. The Next School page displays the new school.
This school can now be assigned as the next school for students.
#7991
*This operation could only be performed by district techs
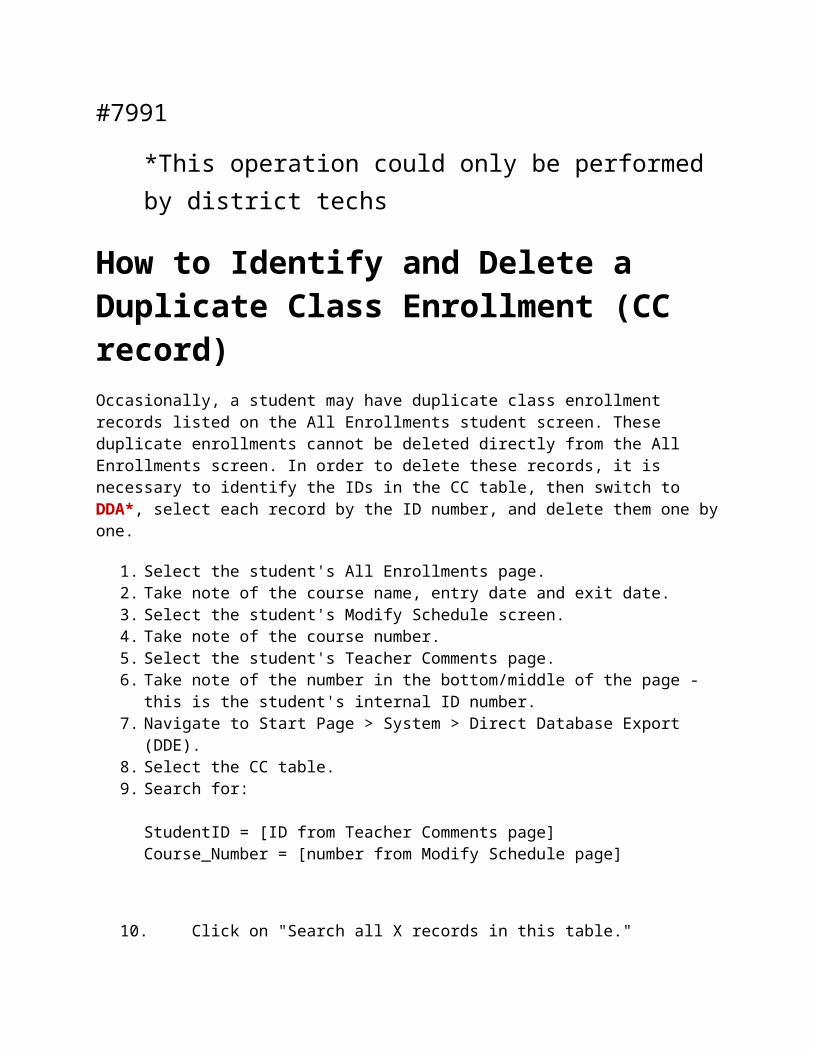
How to Identify and Delete a Duplicate Class Enrollment (CC record)Occasionally, a student may have duplicate class enrollment records listed on the All Enrollments student screen. These duplicate enrollments cannot be deleted directly from the All Enrollments screen. In order to delete these records, it is necessary to identify the IDs in the CC table, then switch to DDA*, select each record by the ID number, and delete them one by one.
1. Select the student's All Enrollments page.2. Take note of the course name, entry date and exit date.3. Select the student's Modify Schedule screen.4. Take note of the course number.5. Select the student's Teacher Comments page.
6. Take note of the number in the bottom/middle of the page - this is the student's internal ID number.
7. Navigate to Start Page > System > Direct Database Export (DDE).8. Select the CC table.9. Search for:
StudentID = [ID from Teacher Comments page] Course_Number = [number from Modify Schedule page]
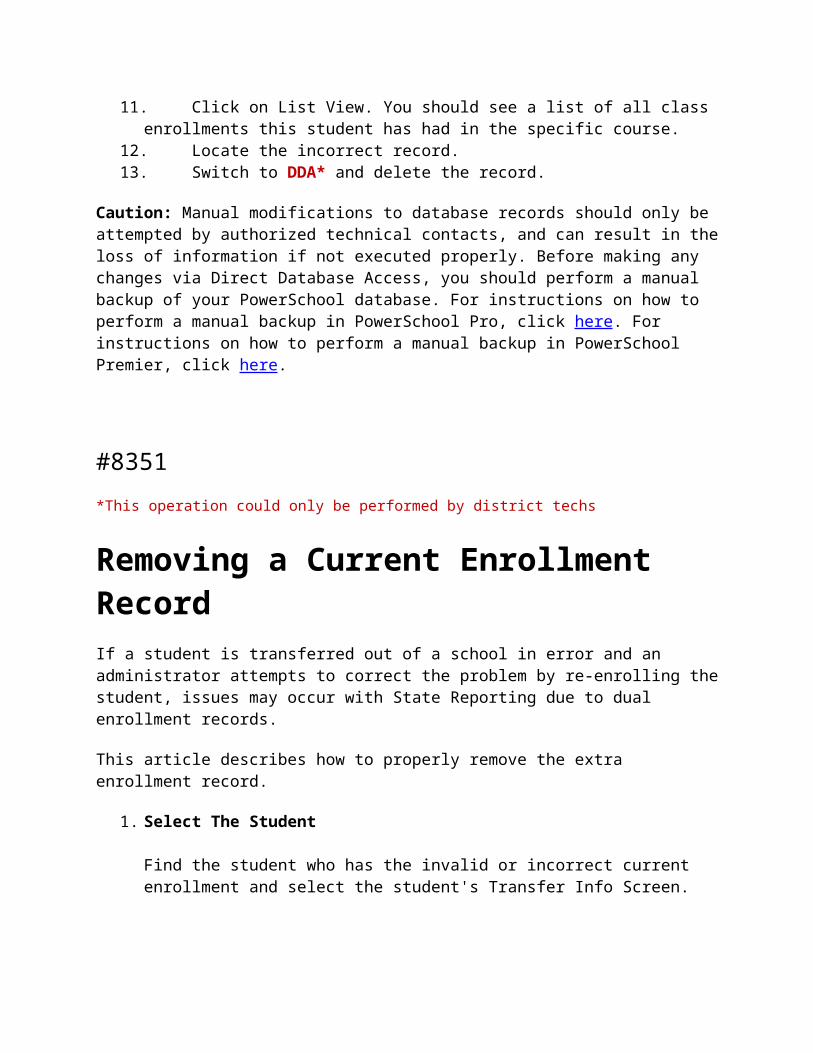
10. Click on "Search all X records in this table."11. Click on List View. You should see a list of all class enrollments this student has had in
the specific course.12. Locate the incorrect record.13. Switch to DDA* and delete the record.
Caution: Manual modifications to database records should only be attempted by authorized technical contacts, and can result in the loss of information if not executed properly. Before making any changes via Direct Database Access, you should perform a manual backup of your PowerSchool database. For instructions on how to perform a manual backup in PowerSchool Pro, click here. For instructions on how to perform a manual backup in PowerSchool Premier, click here.
#8351*This operation could only be performed by district techs
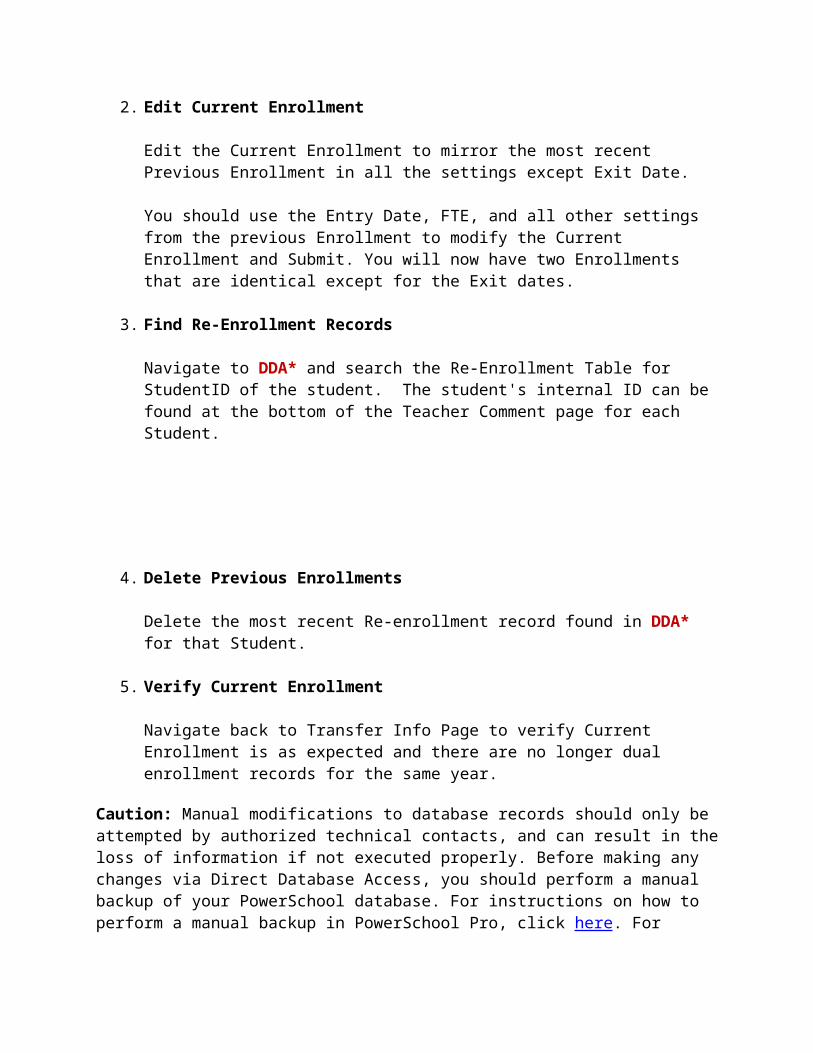
Removing a Current Enrollment RecordIf a student is transferred out of a school in error and an administrator attempts to correct the problem by re-enrolling the student, issues may occur with State Reporting due to dual enrollment records.
This article describes how to properly remove the extra enrollment record.
1. Select The Student
Find the student who has the invalid or incorrect current enrollment and select the
student's Transfer Info Screen.
2. Edit Current Enrollment
Edit the Current Enrollment to mirror the most recent Previous Enrollment in all the settings except Exit Date.
You should use the Entry Date, FTE, and all other settings from the previous Enrollment to modify the Current Enrollment and Submit. You will now have two Enrollments that are identical except for the Exit dates.
3. Find Re-Enrollment Records
Navigate to DDA* and search the Re-Enrollment Table for StudentID of the student. The student's internal ID can be found at the bottom of the Teacher Comment page for each Student.
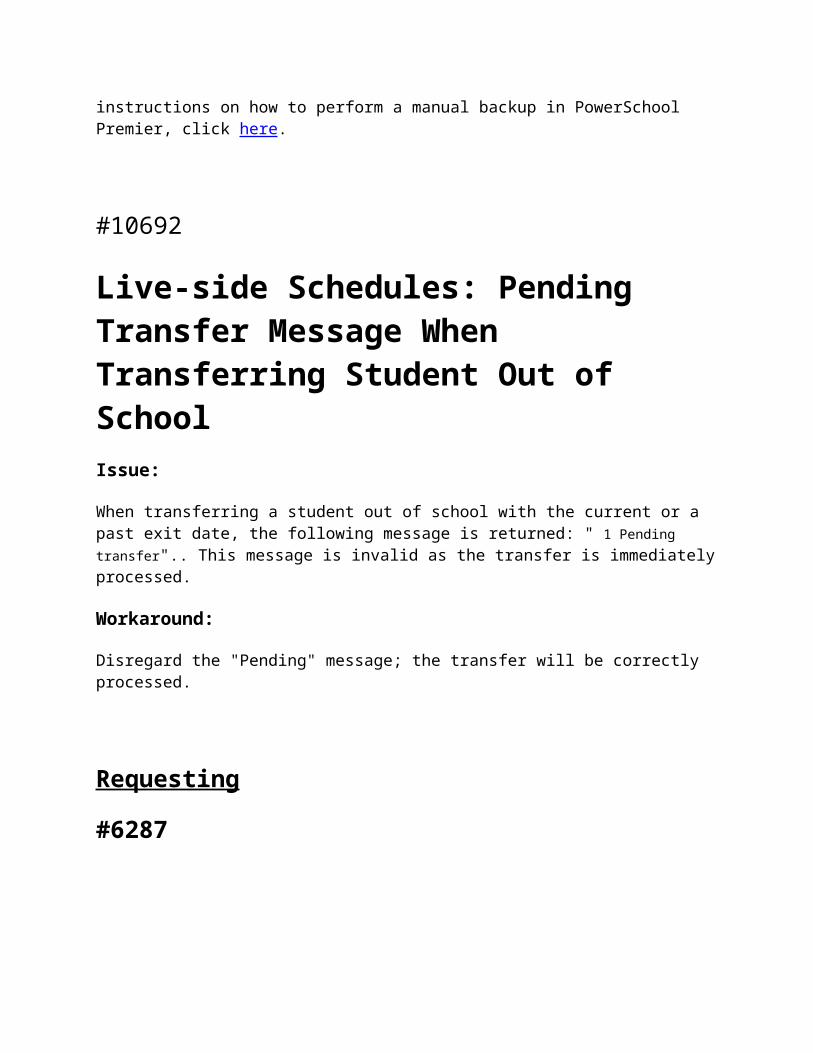
4. Delete Previous Enrollments
Delete the most recent Re-enrollment record found in DDA* for that Student.
5. Verify Current Enrollment
Navigate back to Transfer Info Page to verify Current Enrollment is as expected and there are no longer dual enrollment records for the same year.
Caution: Manual modifications to database records should only be attempted by authorized technical contacts, and can result in the loss of information if not executed properly. Before making any changes via Direct Database Access, you should perform a manual backup of your PowerSchool database. For instructions on how to perform a manual backup in PowerSchool Pro, click here. For instructions on how to perform a manual backup in PowerSchool Premier, click here.
#10692
Live-side Schedules: Pending Transfer Message When Transferring Student Out of SchoolIssue:
When transferring a student out of school with the current or a past exit date, the following message is returned: " 1 Pending transfer".. This message is invalid as the transfer is immediately processed.
Workaround:
Disregard the "Pending" message; the transfer will be correctly processed.
Requesting
#6287
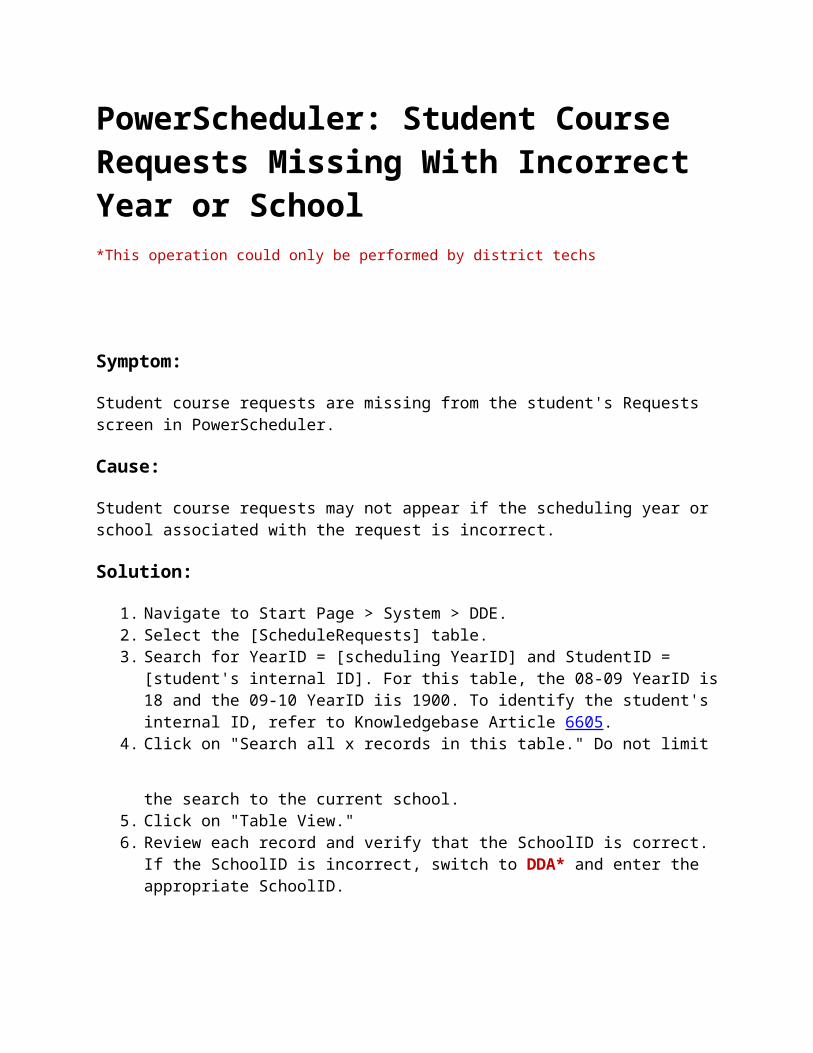
PowerScheduler: Student Course Requests Missing With Incorrect Year or School*This operation could only be performed by district techs
Symptom:
Student course requests are missing from the student's Requests screen in PowerScheduler.
Cause:
Student course requests may not appear if the scheduling year or school associated with the request is incorrect.
Solution:
1. Navigate to Start Page > System > DDE.2. Select the [ScheduleRequests] table.3. Search for YearID = [scheduling YearID] and StudentID = [student's internal ID]. For this
table, the 08-09 YearID is 18 and the 09-10 YearID iis 1900. To identify the student's internal ID, refer to Knowledgebase Article 6605.
4. Click on "Search all x records in this table." Do not limit the search to the current school.
5. Click on "Table View."6. Review each record and verify that the SchoolID is correct. If the SchoolID is incorrect,
switch to DDA* and enter the appropriate SchoolID.
Caution: Manual modifications to database records should only be attempted by authorized technical contacts, and can result in the loss of information if not executed properly. Before making any changes via Direct Database Access, you should perform a manual backup of your PowerSchool database. For instructions on how to perform a manual backup in PowerSchool Pro, click here. For instructions on how to perform a manual backup in PowerSchool Premier, click here.
#8078
Student Course Request Screen Displays Courses as "Unknown Course"Symptom:
Student request screens display courses as "Unknown Course."
Cause:
Duplicate Course Groups:
Course group names must be unique across all schools in the district. For example, a course group named "Electives" may exist at both the Middle School and the High School. In this case, the requesting screens display "unknown course" for all courses in the "Electives" course group.
Course Inactive on Live-Side:
Navigate to Start Page > School Setup > Courses > View Master Course List. Verify the course box is checked and submit page.
Course Inactive in PowerScheduler:
Navigate to Start Page > PowerScheduler > Catalogs > Edit Course Catalog. Verify the course box is checked and submit page.
Incorrect Schedule Year:
Navigate to Start Page > PowerScheduler > Functions > Set Schedule Year. Verify that the correct Schedule Year is selected and submit the page.
Course Setup Incomplete:
Navigate to Start Page > PowerScheduler > Courses and select the appropriate course to complete the course setup.
Space [ ] in Course Number:
Navigate to Start Page > PowerScheduler > Courses and select the appropriate course to determine whether there is a space at the beginning or end of the course number. To edit the course number, make a backup of PowerSchool, then navigate to Start Page > System Administrator > Change Course Number.
#5947
Scheduling Requst Screen Displays Courses from Different SchoolSymptom:
The student course request screen displays courses from the wrong school.
Cause:
Course groups used to create the request screen options have names that are not unique. For example, a course group named "Electives" may exist at both the Middle School and the High
School. In this case, the requesting screens display "unknown course" for all courses in the "Electives" course group.
Solution:
Change course group names so that they are all unique.
#5691
Scheduling: Disabling "Enter Course Request" Feature for Guardians and StudentsFollow the steps below to disable the "enter course request" feature in the parent portal.
1. Navigate to Start Page > PowerScheduler > Screen Setup.2. Click on a grade level.3. Deselect the box next to "This grade may register for classes."4. Submit the page.5. Repeat for the other grade levels.
#5630
*This operation could only be performed by district techs
PowerScheduler: Mass Removing Student Requests via DDA*The steps below provide instructions for mass deleting student request records by school, year and course.
1. Navigate to DDA*.2. Select the [ScheduleRequests (82)] table.
3. Search for CourseNumber = [appropriate course number] and YearID = [appropriate YearID]. For this table, the YearID for the 08-09 year is 1800 and the YearID for the 09-10 year is 1900.
4. Check the box to "Search only within records belonging to x school."
5. Click on "Search all x records in this table."6. Click on "List View."7. Verify that the correct records are in the selection.8. On the DDA* search page, click on "Modify Records."9. Mark the box that reads, "Check here to verify a delete command."10. Click on "Delete Selected Records."
#6704
Requests Page Missing for Incoming StudentsSymptom:
Request pages do not appear on the live-side for incoming students (students enrolling from a different school). For example, students in middle school may want to request courses at the high school.
Cause:
The Years & Terms and Schedule Year are not setup in PowerScheduler.
Solution:
1. Switch to the school the Students are currently enrolled at (e.g. Middle School for Students who will attend High School next year)
2. From the Start page, click the PowerScheduler link3. Under the Processing menu, click Years & Terms.4. If the year you wish to schedule for is displayed on the Schedule Years & Terms page,
skip to step 6. If it is not, refer to Article 7290 regarding Auto Scheduler Setup in PowerScheduler*.
5. Complete Auto Scheduler Setup, creating the Full Year term with appropriate start and ending dates.
6. From the PowerScheduler Tools menu, click the Functions link.
7. On the Functions menu, click on the Set Schedule Year link.8. Select the appropriate Schedule Year from the drop-down menu and click Submit.9. Repeat this process for the students destination school if required.
Note: While it is possible to create years and terms manually before setting the schedule year, it is strongly recommended that you use Auto Scheduler Setup in PowerScheduler to do so for all schools. This is especially true if you will later use PowerScheduler for scheduling at the other school (e.g. the Middle School for Students who will attend Middle School next year).
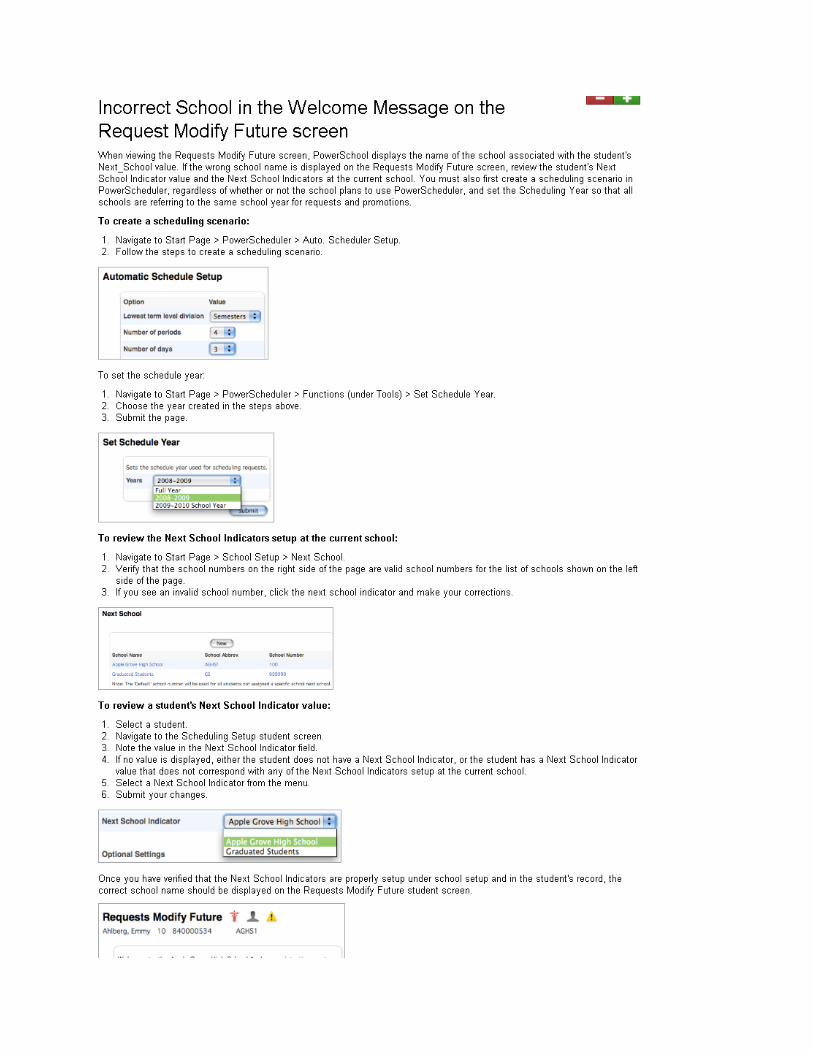
#6638
#7017
How Student Requests are Processed by PowerSchedulerA student may request Academic, Electives or Alternate courses.
Academic Courses
PowerScheduler attempts to fill Academic courses first, according to class rank. Within Academic courses, the engine attempts to fill the course request with the following options:
1. Actual course2. Alternate course number, as defined during course creation3. Student Alternate 1 associated with that course on the student's request screen4. Any global substitutions defined in the course preferences
Elective Courses
Once the engine has completed all Academic courses, then the system will look at any Electives requested and go through the same four step process as with Academic courses, based on course rank between electives.
Alternate Courses
Once the engine has completed all Elective courses, PowerSchool considers any Alternate courses requested. The engine attempts to schedule Alternates based on the Alternate priority set on the student request screen (0 is not a priority, set it between 1-99 with 1 being the highest priority).
Example
If both Geology and Advanced Drawing are Academic courses, the engine will attempt to schedule both based on course rank, working through the four step process for scheduling a course. Once completed for all Academic courses the system moves on to Electives.
If Advanced Drawing is an Elective, the engine attempts to schedule the course based on course rank, working through the same process with Electives as with Academic courses. Once completed for all Elective courses, the system moves on to Alternates.

If Advanced Drawing is a student requested Alternate course, one not associated with a specific Academic or Elective course, then the engine will attempt to schedule this course based on the alternate priority.
#8031*This operation could only be performed by district techs
How To Re-Use Student Request ScreensThis article describes how to reuse student request screens. You must have access to DDA* to complete these steps.
1. Switch to the appropriate school.2. Navigate to DDA*.3. Select the [RegistReq] table.4. Search for YearID = [current year TermID]. In this table, the TermID for 08-09 is 1800.
For 09-10, the TermID is 1900.5. Check the box to "Search only within records belonging to [current school]."6. Click on "Search all x records in this table."
7. Click on List View to verify that the correct records are in the selection.8. On the DDA* search page select "Modify Records."9. Modify the YearID to equal the upcoming year's Term ID value. For example, the value
for the 2009-2010 school year is 1900.
Note: Most tables in PowerSchool use the 2-digit year ID. However, the values used YearID field of the RegistReq table are the same as the 4-digit TermID.
#11059
How it Works: Order of Courses on Requests View Future pageRequest Courses
The courses are requested either by students via the PowerSchool public portal, or by counselors via the Requests Modify Future student page in the PowerSchool admin portal.
Course List Order
Courses are listed on the Requests View Future page by:
1. Type: Required, Elective, Alternate2. Course number
For example, if a student requests two Alternate courses, the courses will be listed under "Alternate" by course number: 100, 200, 300, etc.
Course Selection Order
The order in which courses are selected on the Requests Modify Future page does not determine priority or weighting for assigning the course to the student.
The method that PowerScheduler uses to fulfill requests is explained in Knowledgebase Article 7017.

Resources
#6267
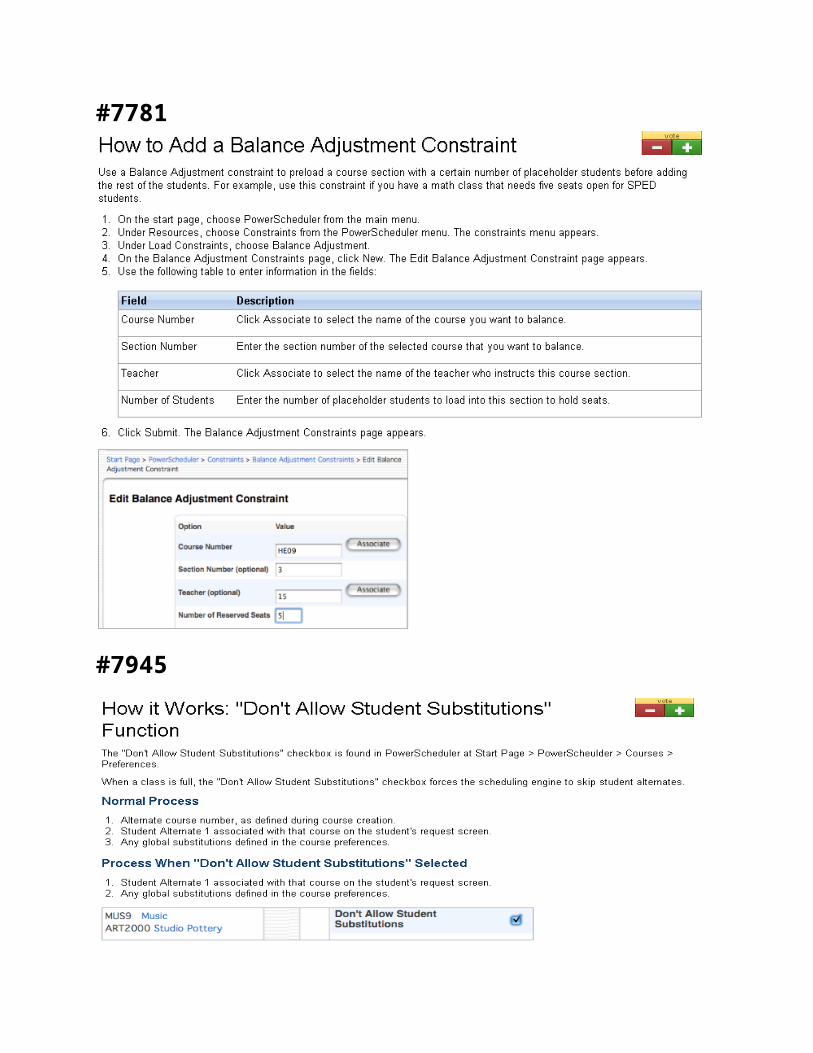
#7781
#7945

#7246

#5683
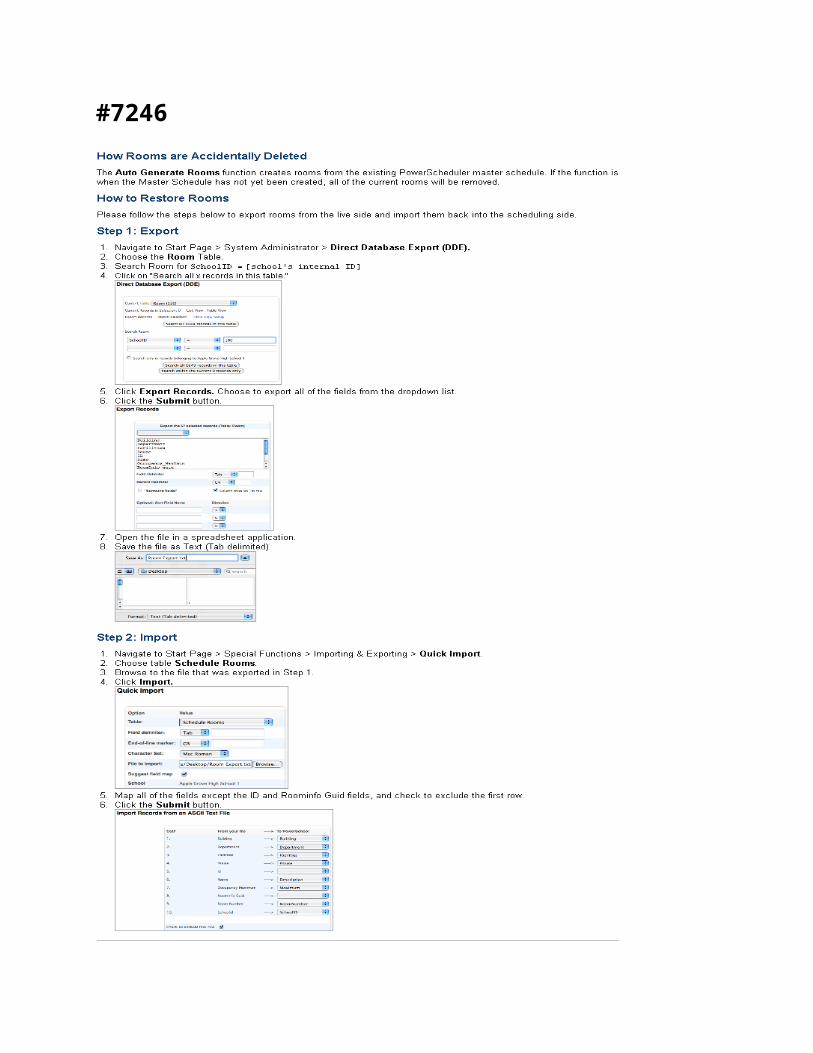
How to Pre-register Students for Next School YearTo pre-register a student for the upcoming school year, follow the steps below.
1. Log into the appropriate school.2. Navigate to Start Page > School > Years & Terms and verify that the Years & Terms for
the upcoming school year have been created.3. Change the term at the top of the page to the year term for the upcoming school year.4. Navigate to Start Page > Special Functions > Enroll New Student.5. Populate the fields. For enrollment date, enter the first day of next year's school year.
Also, verify that the grade level are school correct for the next year.6. Submit the page.
Correctly pre-registering students will create a student record with an enroll status of -1 (Pre-Registered). It also creates a pending enrollment that will become active during nightly process at 12 am on the date entered on the "Enroll New Student" page.
Incorrect pre-registering can cause enrollment summary issues. Students that are incorrectly pre-registered may receive and enroll status of 0 (Active) and will be promoted during End-of-Year (EOY) process. They will also receive a dual enrollment and re-enrollment record resulting in duplicate numbers on the enrollment summary report.
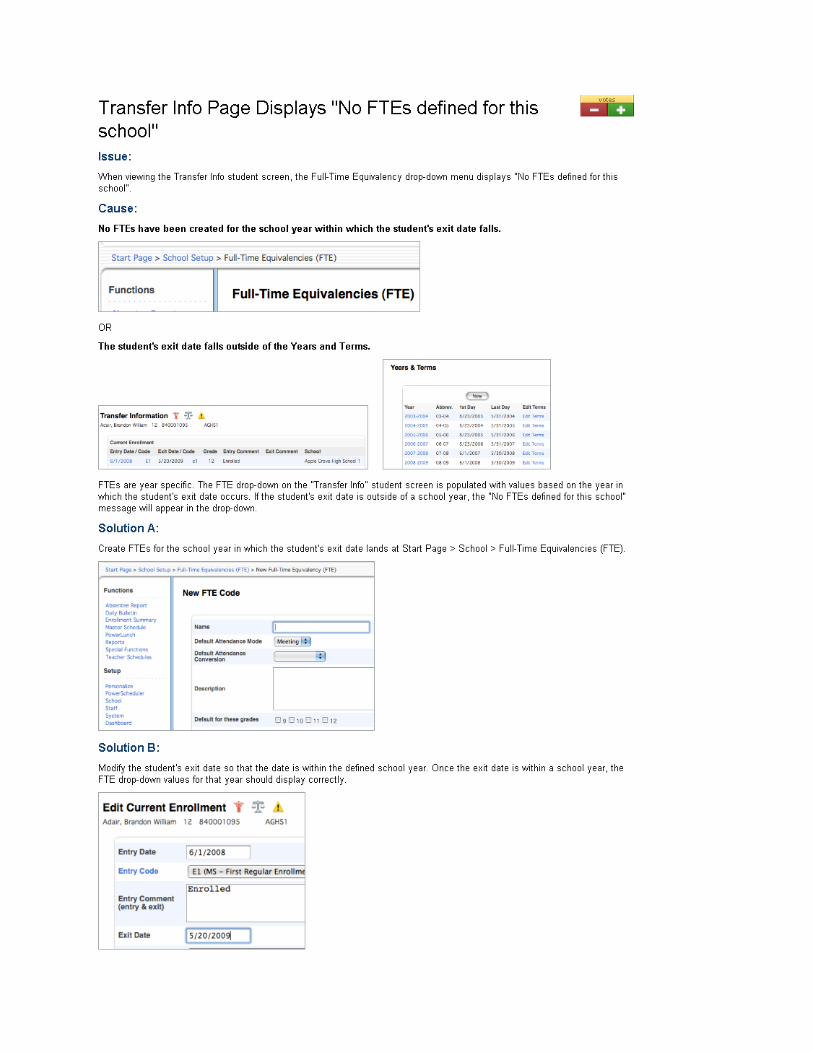
6224
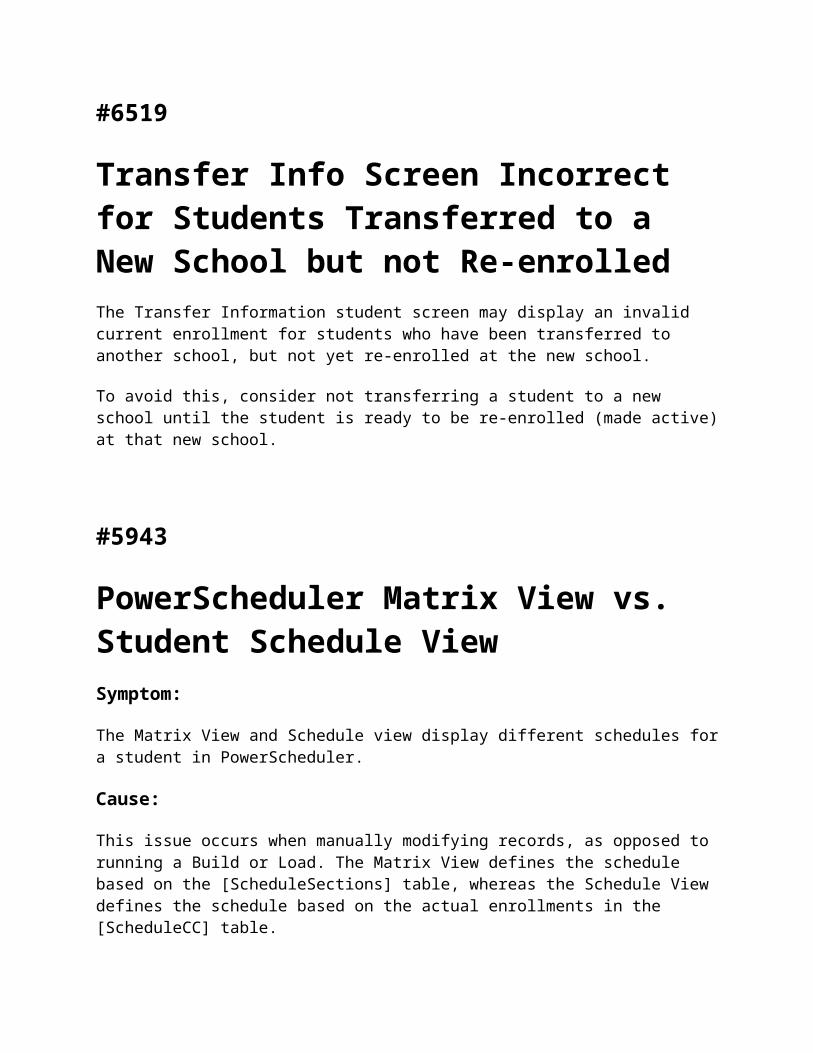
#6519
Transfer Info Screen Incorrect for Students Transferred to a New School but not Re-enrolledThe Transfer Information student screen may display an invalid current enrollment for students who have been transferred to another school, but not yet re-enrolled at the new school.
To avoid this, consider not transferring a student to a new school until the student is ready to be re-enrolled (made active) at that new school.
#5943
PowerScheduler Matrix View vs. Student Schedule ViewSymptom:
The Matrix View and Schedule view display different schedules for a student in PowerScheduler.
Cause:
This issue occurs when manually modifying records, as opposed to running a Build or Load. The Matrix View defines the schedule based on the [ScheduleSections] table, whereas the Schedule View defines the schedule based on the actual enrollments in the [ScheduleCC] table.
Workaround:
None.
#8011
#7925

#8210

#6244
How it Works: Teacher Schedule Class Count (Size) Displays Zero (0).When viewing a section via the Teacher Schedule page, the "size" (class count) for a section includes only students who are currently enrolled in the section.
Students who are scheduled for the section, but not currently enrolled in the section will not be included in the total. For example, if today is 11/3/2008 and a student's Start Date for the section is 11/4/2008, the student is not included in the "size" today. The same rule applies for students with an Exit Date from the class before today's date.
#7769
Error When Editing Teacher's Schedule Preferences: Z_LST_DEALLOC line 81Issue:
The following error message appears on the server when attempting to edit Teacher Scheduling Setup while logged into the District Office:
Z_LST_DEALLOC line 81
Workaround:
Access the teacher's Scheduling Setup page while logged into their school, rather than the District office.
#7995
#8025
How to View Teacher Scheduling Assignments1. On the Start Page, choose PowerScheduler from the main menu.2. Under Resources, choose Teachers from the PowerScheduler menu. The teachers menu
appears.3. Choose Assignments from the pop-up menu.4. Click the name of the teacher whose assignments you want to view. The Teacher
Assignments page appears.
Schedule
#10074
#6040
Master Schedule Missing SectionsIf the master schedule is missing sections, verify that the term at the top of the page is correct. For example, in order to view year-long sections, the term at the top of the page must be the year-long term, as opposed to Semester 1, or Quarter 1.
#6354

#7277
#7691
Copy Master Schedule Increments Section NumbersThe PowerScheduler Copy Master Schedule function copies the structure of the Master Schedule and creates new section numbers.
The section numbers increment from the greatest section number used last year. For example, if there was a course with sections numbered 1, 2, and 3, copying the Master Schedule will generate sections numbered 4, 5, 6 for that course.
If you need to use the same section numbers as last year, copy the Master Schedule and change the section numbers manually at Start Page > PowerScheduler > Sections.
#7156
#11062
Tools
#6733
Permissions errors when installing Scheduling EngineIf error dialogs relating to permissions appear when installing the Scheduling Engine, it may indicate that the currently logged-in user does not have sufficient permissions to install new
applications. To eliminate this problem, make sure the user account has permission to install applications, or have a user with administrative rights install the Scheduling Engine.
#7252
Unable to connect to scheduling engine (Automated Walk in Scheduler)*should only be attempted with district tech help
When running the Automated Walk in Scheduler (AWI), the following error occurs when the process is sending data to the scheduling engine:
Unable to connect to scheduling engine at (Server IP address) Unable to retrieve results.
From the server, verify the scheduling engine is running. You can verify by looking on the desktop of the server. On Mac OS X, there should be a window with the title "Powerschool Scheduling engine." On a Windows server, the window will show within the PowerSchool application window.
If the scheduling engine not visible, you can start the engine up by going to the folder (normally in Applications on a Mac and Program Files on a Windows server) PowerSchoolengine and launching the pschedengine startup file.
After startup of the engine, the AWI should now process correctly without error.
#7033
Re-establish PSLoader File Association in WindowsUpon initial installation of the PSEngine, a file association is created between psengine files and the PSLoader.exe application. Sometimes Windows looses this file association and cannot seem
to regain that association through normal Microsoft suggested methods. This walkthrough is intended to assist in re-establishing the expected file association.
*should only be attempted with district tech help
Re-establish PSLoader File Association in Windows
1. Uninstall the PowerScheduler Engine from Windows. This is generally done by navigating to Control Panel and selecting Add/Remove Programs. Locate the PowerScheduler Loader application from the list and select the Remove button.
2. Download the latest PowerScheduling Engine executable for Windows.
3. Re-Install the PowerScheduling Engine. Locate the downloaded *.exe file and double-click to install. Follow the prompts and click Finish when the final screen appears.
4. Run a Validate and Save to Desktop. Log into PowerSchool via a web browser. Run a Build/Load validate and when prompted to Open or Save to Disk, save it to disk.
5. Associate the PSEngine file with the PSLoader application. Locate the newly saved file (probably on the Desktop), right-click and select Open with . . ., then Choose Program. Locate the PSLoader application from the list. Highlight and put a check in the box to Always use this program to open these files; then click OK.
6. Run a Validate for the Second Time. Run a second validate. This time when prompted to Open or Save to Disk the Open option should be followed by the PSLoader application as the default application next to the browse button. Clicking OK should automatically launch the psengine file in the PSLoader application due to correct file association having been re-established.
#5854
How it Works: Schedule Course Enrollment ReportAfter processing a Load in PowerScheduler, the "Schedule Course Enrollment" report is useful for determining the number of satisfied student requests per course. The report includes the following items:
1. Course number2. Course name3. Seats available (maximum enrollment)4. How many requests were placed5. How many seats (requests + alternates) were filled6. How many seats are now empty7. How many requests went unfulfilled
The numbers listed in the report results conveniently link to a list of students for each category. The group of students can be made into the current selection and then modified using a group function.
Example:
All students enrolled in 4th period Algebra 101 are required to take Lunch during 5th period.
After running the "Schedule Course Enrollment" report, scroll down to Algebra 101 and select the number of students under the "Seats Filled" column. The students in Algebra 101 are now in the current selection. Navigate to the functions menu and "Schedule Mass Enroll" these students into the 5th period Lunch course.
#5845
Report Card Option: Printing Future Student SchedulesSee Knowledgebase article 58176 for a tutorial on creating and printing current or future student schedules using the Report Card feature in PowerSchool.
To Print Future Student Schedules:
1. Navigate to Start Page > Reports > Report Setup > Report Cards and select the appropriate report card.
2. Select Schedule Listing.3. Check the box to use future schedule.
With the box checked, the report will print information from the [ScheduleCC] table, rather than the [CC] table, accessing the information setup in PowerScheduler for the next year's schedule.
#8149
Printing Future Schedules: Incorrect Teacher ListedSymptom:
The incorrect teacher is listed for a course when printing future schedules.
Cause:
If a Teacher Assignment is changed manually in PowerScheduler after a build, the associated Enrollment Record (ScheduleCC table) is not updated with the new TeacherID. Hence, the Future Schedules Report Card, which pulls the information for the students schedule from the ScheduleCC table, prints out the name of the teacher assigned to the course when the last Build or Load was processed, instead of the teacher currently assigned to the class.
Workaround:
There are three possible workarounds:
Commit the schedule in PowerScheduler, then switch to the future term on the live-side and run the report card with the "Use Future Schedules" box unchecked.
Manually change the TeacherID in the ScheduleCC table to the correct TeacherID using DDA*.
Run another load (although this will create a new, different schedule).
Caution: Manual modifications to database records should only be attempted by authorized technical contacts, and can result in the loss of information if not executed properly. Before making any changes via Direct Database Access, you should perform a manual backup of your PowerSchool database. For instructions on how to perform a manual backup in PowerSchool Pro, click here. For instructions on how to perform a manual backup in PowerSchool Premier, click here.
#8196
Printing Future Schedules for Pre-registered StudentsFollow the steps below to print a list of future classes for a pre-registered student:
1. Change the term at the top of the page to the future year. For example, if the current year is 08-09, then change the term to 09-10.
2. Navigate to Start Page > Report > Report Setup > Report Cards and select a report card.3. Verify that the check box next to "Use Future Schedules Box" is not selected.4. Select the pre-registered student on the Start Page.5. Navigate to Functions > Print Reports for this Student.6. Select the report.7. Choose any selection for "If printing student schedule, use..."8. Submit the page.
#10174