SharePoint Security - NETWORKOLOGIST Security Overview.pdf · based on Security Assertion Markup...
106
SharePoint Security This document is provided "as-is". Information and views expressed in this document, including URL and other Internet Web site references, may change without notice. This document does not provide you with any legal rights to any intellectual property in any Microsoft product or product name. You may copy and use this document for your internal, reference purposes. You may modify this document for your internal, reference purposes.© 2013 Microsoft. All rights reserved. Terms of Use (http://technet.microsoft.com/cc300389.aspx) | Trademarks (http://www.microsoft.com/library/toolbar/3.0/trademarks/en-us.mspx)
-
Upload
hoangnguyet -
Category
Documents
-
view
331 -
download
14
Transcript of SharePoint Security - NETWORKOLOGIST Security Overview.pdf · based on Security Assertion Markup...

SharePoint Security
This document is provided "as-is". Information and views expressed in this document, including URL and other Internet Web site references, may change without
notice. This document does not provide you with any legal rights to any intellectual property in any Microsoft product or product name. You may copy and use
this document for your internal, reference purposes. You may modify this document for your internal, reference purposes.© 2013 Microsoft. All rights reserved.Terms of Use (http://technet.microsoft.com/cc300389.aspx) | Trademarks (http://www.microsoft.com/library/toolbar/3.0/trademarks/en-us.mspx)

Table Of ContentsChapter 1
Authentication planning
Configure claims authentication
People Picker and claims provider planning
Security planning for sites and content
Security
Security hardening
Automatic password change planning
User permissions and permission levels
Business Connectivity Services security overview

Chapter 1

Plan authentication (SharePoint Foundation 2010)
Applies to: SharePoint Foundation 2010
Topic Last Modified: 2011-12-12
This section describes how to plan for authentication.
In this section:
Plan authentication methods (SharePoint Foundation 2010)
People Picker and claims provider planning (SharePoint Foundation 2010)
Plan for Kerberos authentication (SharePoint Foundation 2010)
Forefront UAG integration (SharePoint Foundation 2010)
Claims-based authentication with Microsoft UAG 2010 (SharePoint Foundation 2010)
Plan for claims-based authentication or classic-mode authentication (SharePoint Foundation 2010)
© 2014 Microsoft

Plan authentication methods (SharePoint Foundation 2010)
Applies to: SharePoint Foundation 2010
Topic Last Modified: 2012-02-03
This article describes the authentication methods and authentication modes that are supported by Microsoft SharePoint Foundation 2010.
Authentication is the process of validating a user's identity. An authentication method is a specific exchange of account credentials and other attributes that assert that
identity. After a user's identity is validated, the authorization process determines which sites, content, and other features the user can access.
In this article:
Supported authentication methods
Authentication modes — classic or claims‐based
Implementing Windows authentication methods
Implementing forms-based authentication
Implementing SAML token-based authentication
Choosing authentication for LDAP environments
Planning zones for Web applications
Architecture for SAML token-based providers
Supported authentication methods
SharePoint Foundation 2010 supports authentication methods that were included in previous versions and also introduces support for token-based authentication that is
based on Security Assertion Markup Language (SAML). The following table lists the supported authentication methods.
Method category Authentication methods Notes
Windows authenticationNTLM
Kerberos
Anonymous
Basic
Digest
Forms-based authenticationLightweight Directory Access
Protocol (LDAP)
Microsoft SQL Server database or
other database
Custom or third-party
membership and role providers
SAML token-based authentication (new with
SharePoint Foundation 2010) Active Directory Federation
Services (AD FS) 2.0
Third-party identity provider
Lightweight Directory Access
Protocol (LDAP)
Supported only with SAML 1.1 that uses the WS-Federation Passive
Requestor Profile (WS-F PRP).
Client certificate authentication is possible through integration with AD
FS 2.0.
For additional information, see Configure Client Certificate
Authentication (SharePoint Foundation 2010).
Authentication modes — classic or claims‐based
Authentication modes determine how client computers authenticate with SharePoint Foundation 2010 resources. SharePoint Foundation 2010 introduces support for a
claims-based authentication mode. You can use any of the supported authentication methods with the claims-based authentication mode or you can use classic mode
authentication, which supports only Windows authentication.
User identity in Active Directory Domain Services (AD DS) is based on a user account. For successful authentication, the user provides the account name and proof of
knowledge of the password. To determine access to resources, applications might need to query AD DS for account attributes and other information, such as group
membership or role on the network. While this works well for Windows environments, it does not scale to third-party authentication protocols and directory providers
and multi-vendor environments that support Internet, partner, or cloud-based computing models.
Claims-based identity is based on the user obtaining a security token that is digitally signed by a commonly trusted identity provider and contains a set of claims. Each

claim represents a specific item of data about the user such as his or her name, group memberships, and role on the network. Claims-based authentication is user
authentication that utilizes claims-based identity technologies and infrastructure. Applications that support claims-based authentication obtain the security token from the
user and use the information within the claims to determine access to resources. No separate query to a directory service like AD DS is needed.
Claims-based authentication in Windows is built on Windows Identity Foundation (WIF), which is a set of .NET Framework classes that is used to implement claims-based
identity. Claims-based authentication relies on standards such as WS-Federation, WS-Trust, and protocols such as SAML.
For more information about claims-based authentication, see the following resources:
Claims-based Identity for Windows (white paper) (http://go.microsoft.com/fwlink/p/?LinkId=198942)
Windows Identity Foundation home page (http://go.microsoft.com/fwlink/p/?LinkId=198943)
For new deployments of SharePoint Foundation 2010, we recommend claims-based authentication. If you use claims-based authentication, all supported authentication
methods are available for your Web applications.
When you create a Web application, you select one of the two authentication modes to use with the Web application, either claims-based or classic-mode.
If you select Classic-Mode Authentication, you can configure the Web application to use Windows authentication and the user accounts are treated by SharePoint
Foundation 2010 as Active Directory Domain Services (AD DS) accounts.
If you select Claims-Based Authentication, SharePoint Foundation 2010 automatically changes all user accounts to claims identities, resulting in a claims token for each
user. The claims token contains the claims pertaining to the user. Windows accounts are converted into Windows claims. Forms-based membership users are
transformed into forms-based authentication claims. Claims that are included in SAML-based tokens can be used by SharePoint Foundation 2010. Additionally,
SharePoint developers and administrators can augment user tokens with additional claims. For example, Windows user accounts and forms-based accounts can be
augmented with additional claims that are used by SharePoint Foundation 2010.
A SharePoint Foundation 2010 farm can include a mix of Web applications that use both modes. Some services do not differentiate between user accounts that are
traditional Windows accounts and Windows claims accounts. For example, a user who belongs to sites that are configured to use a mix of authentication modes may
receive search results that include results from all the sites that the user has access to, regardless of the authentication mode that is configured for Web applications. In
this scenario, the user is not interpreted as multiple user accounts. This is because services and service applications use claims identities for inter-farm communication
regardless of the mode that is selected for Web applications and users. However, users who belong to more than one user repository that is recognized by SharePoint
Foundation Web applications are treated as separate user accounts, depending on which identity they use to log in.
You do not have to be a claims architect to use claims-based authentication in SharePoint Foundation 2010. However, implementing SAML token-based authentication
requires coordination with administrators of your claims‐based environment, as described in the “Implementing SAML token‐based authentication” section of this article.
Implementing Windows authentication methods
The process of implementing Windows authentication methods is similar for both authentication modes (classic or claims-based). Choosing claims-based authentication
for a Web application does not increase the complexity of implementing Windows authentication methods. This section summarizes the process for each method.
Kerberos and NTLM
Both the Kerberos protocol and NTLM are Integrated Windows authentication methods, which let users seamlessly authenticate without being prompted for credentials.
Users who access SharePoint sites from Internet Explorer will authenticate by using the credentials the Internet Explorer process is running under. By default, these
credentials are the credentials that the user used to log on to the computer. Services or applications that access SharePoint Server resources using Integrated Windows
authentication methods will attempt to authenticate by using the credentials of the running thread, which by default is the identity of the process.
NTLM is the simplest form of Windows authentication to implement. Simply select this option when you are creating a Web application.
Kerberos is a secure protocol that supports ticketing authentication. Use of the Kerberos protocol requires additional configuration of the environment. To enable
Kerberos authentication, the client and server computers must have a trusted connection to the domain Key Distribution Center (KDC). Configuring the Kerberos
protocol involves setting up service principal names (SPNs) in AD DS before you install SharePoint Foundation 2010.
The following steps summarize the process of configuring Kerberos authentication:
1. Configure Kerberos authentication for SQL Server communications by creating SPNs in AD DS for the SQL Server service account.
2. Create SPNs for Web applications that will use Kerberos authentication.
3. Install the SharePoint Foundation 2010 farm.
4. Configure specific services within the farm to use specific accounts.
5. Create the Web applications that will use Kerberos authentication.
For more information, see Plan for Kerberos authentication (SharePoint Foundation 2010).

Additionally, for claims-authentication Web applications, the Claims to Windows Token Service (C2WTS) must be configured for constrained delegation. Constrained
delegation is required to convert claims to Windows tokens.
Note
The C2WTS does not support crossing domain boundaries between forests.
Kerberos authentication allows delegation of client credentials to access back-end data systems, which requires additional configuration depending on the scenario. The
following table provides examples.
Scenario Additional configuration required
Delegating a client's identity to a back-end server.
Displaying RSS feeds to authenticated content.
Configure Kerberos constrained delegation for computers and service accounts.
Identity delegation for Microsoft SQL Server Reporting Services (SSRS) Configure SPNs for SQL Server Reporting Services accounts.
Configure delegation for SQL Server Reporting Services.
Identity delegation for Excel Services in SharePoint Configure constrained delegation for servers that run Excel Services.
Configure constrained delegation for the Excel Services service account.
For more information about how to configure Kerberos authentication, including configuration steps for common scenarios, see Configuring Kerberos Authentication for
Microsoft SharePoint 2010 Products and Technologies (white paper) (http://go.microsoft.com/fwlink/p/?LinkID=197178).
Digest and Basic
Implementing Digest and Basic authentication requires configuring these authentication methods directly in Internet Information Services (IIS).
Implementing forms-based authentication
Forms-based authentication is an identity management system that is based on ASP.NET membership and role provider authentication. In SharePoint Foundation 2010,
forms-based authentication is available only when you use claims-based authentication.
Forms-based authentication can be used against credentials stored in AD DS, in a database such as a SQL Server database, or in an LDAP data store such as Novell
eDirectory, Novell Directory Services (NDS), or Sun ONE. Forms-based authentication enables user authentication based on validation of credential input from a logon
form. Unauthenticated requests are redirected to a logon page, where the user must provide valid credentials and submit the form. If the request can be authenticated,
the system issues a cookie that contains a key for reestablishing the identity for subsequent requests.
To use forms-based authentication to authenticate users against an identity management system that is not based on Windows or that is external, you must register the
membership provider and role manager in the Web.config file. Registering the role manager is a new requirement for SharePoint Foundation 2010. In the previous
version, this was optional. SharePoint Foundation 2010 uses the standard ASP.NET role manager interface to gather group information about the current user. Each
ASP.NET role is treated as a domain group by the authorization process in SharePoint Foundation 2010. You register role managers in the Web.config file the same way
that you register membership providers for authentication.
If you want to manage membership users or roles from the SharePoint Central Administration Web site, you must register the membership provider and the role
manager in the Web.config file for the Central Administration Web site. You must also register the membership provider and the role manager in the Web.config file for
the Web application that hosts the content.
For detailed steps to configure forms-based authentication, see Configure forms-based authentication for a claims-based Web application (SharePoint Foundation 2010)
For additional information about forms-based authentication, see the following resources:
MSDN blog article: Claims-based authentication "Cheat Sheet" Part 1 (http://go.microsoft.com/fwlink/p/?LinkId=198944)
MSDN article: Forms Authentication in SharePoint Products and Technologies (Part 2): Membership and Role Provider Samples (http://go.microsoft.com/fwlink/p/?
LinkId=198945)
For information about features that do not work with forms-based authentication or features that require additional configuration in order to work with forms-based
authentication, see Plan for claims-based authentication or classic-mode authentication (SharePoint Foundation 2010).
Implementing SAML token-based authentication
SAML token-based authentication requires coordination with administrators of a claims-based environment, whether it is your own internal environment or a partner
environment. AD FS 2.0 is an example of a claims-based environment.
A claims-based environment includes an identity provider security token service (IP-STS). The IP-STS issues SAML tokens on behalf of users who are included in the
associated user directory. Tokens can include any number of claims about a user, such as a user name and groups the user belongs to.
SharePoint Foundation 2010 takes advantage of claims that are included in tokens provided by an IP-STS to authorize users. In claims environments, an application that
accepts SAML tokens is known as a relying party STS (RP-STS). A relying party application receives the SAML token and uses the claims inside to decide whether to grant
the client access to the requested resource. In SharePoint Foundation 2010, each Web application that is configured to use a SAML provider is added to the IP-STS
server as a separate RP-STS entry. A SharePoint farm can include multiple RP-STS entries.

Implementing SAML token-based authentication with SharePoint Foundation 2010 involves the following processes that require planning in advance:
1. Export the token-signing certificate from the IP-STS. This certificate is known as the ImportTrustCertificate. Copy the certificate to a server in the SharePoint
Foundation 2010 farm.
2. Define the claim that will be used as the unique identifier of the user. This is known as the identity claim. Many examples of this process use the user e-mail name
as the user identifier. Coordinate with the administrator of the IP-STS to determine the correct identifier because only the owner of the IP-STS knows the value in
the token that will always be unique per user. Identifying the unique identifier for the user is part of the claims-mapping process. Claims mappings are created by
using Windows PowerShell.
3. Define additional claims mappings. Define the additional claims from the incoming token that will be used by the SharePoint Foundation 2010 farm. User roles are
an example of a claim that can be used to assign permissions to resources in the SharePoint Foundation 2010 farm. All claims from an incoming token that do not
have a mapping will be discarded.
4. Create a new authentication provider by using Windows PowerShell to import the token-signing certificate. This process creates the SPTrustedIdentityTokenIssuer.
During this process, you specify the identity claim and additional claims that you have mapped. You must also create and specify a realm that is associated with
the first SharePoint Web applications that you are configuring for SAML token-based authentication. After the SPTrustedIdentityTokenIssuer is created, you can
create and add more realms for additional SharePoint Web applications. This is how you configure multiple Web applications to use the same
SPTrustedIdentityTokenIssuer.
5. For each realm that is added to the SPTrustedIdentityTokenIssuer, you must create an RP-STS entry on the IP-STS. This can be done before the SharePoint Web
application is created. Regardless, you must plan the URL before you create the Web applications.
6. Create a new SharePoint Web application and configure it to use the newly created authentication provider. The authentication provider will appear as an option
in Central Administration when claims mode is selected for the Web application.
You can configure multiple SAML token-based authentication providers. However, you can only use a token-signing certificate once in a farm. All providers that are
configured will appear as options in Central Administration. Claims from different trusted STS environments will not conflict.
If you are implementing SAML token-based authentication with a partner company and your own environment includes an IP-STS, we recommend that you work with the
administrator of your internal claims environment to establish a trust relationship from your internal IP-STS to the partner STS. This approach does not require adding an
additional authentication provider to your SharePoint Foundation 2010 farm. It also allows your claims administrators to manage the whole claims environment.
Important
You need to set network load balancing to single affinity when using claims-based authentication. If you use SAML token-based authentication with AD FS on a
SharePoint Foundation 2010 farm that has multiple Web servers in a load-balanced configuration, there will be an effect on the performance and functionality of client
Web-page views. When AD FS provides the authentication token to the client, that token is submitted to SharePoint Foundation 2010 for each permission-restricted
page element. If the load-balanced solution is not using affinity, each secured element is authenticated to more than one SharePoint Foundation 2010 server, which
will result in rejection of the token. After the token is rejected, SharePoint Foundation 2010 redirects the client to authenticate again back to the AD FS server. After this
occurs, an AD FS server will reject multiple requests that are made in a short time period. This behavior is by design, to protect against a denial of service attack. If
performance is adversely affected or pages do not load completely, set network load balancing to single affinity. This isolates the requests for SAML tokens to a
single Web server.
For information about configuring Active Directory Federation Services (AD FS) 2.0 in SharePoint Foundation 2010, see How to configure AD FS v 2.0 in SharePoint
Foundation 2010.
Note
When a Web application is configured to use SAML token-based authentication, the SPTrustedClaimProvider class does not provide search functionality to the People
Picker control. Any text entered in the People Picker control will automatically be displayed as if it had been resolved, regardless of whether it is a valid user, group,
or claim. If your SharePoint Foundation solution will use SAML token-based authentication, you should plan to create a custom claims provider that implements
custom search and name resolution.
For more information, see Custom claims providers for People Picker (SharePoint Foundation 2010).
For detailed steps to configure SAML token-based authentication, see Configure authentication using a SAML security token (SharePoint Foundation 2010).
For additional information about SAML token-based authentication, see the following resources:
MSDN blog article: Claims-based authentication "Cheat Sheet" Part 2 (http://go.microsoft.com/fwlink/p/?LinkId=198946)
TechNet blog article: Planning Considerations for Claims Based Authentication in SharePoint 2010 (http://go.microsoft.com/fwlink/p/?LinkId=198947)
TechNet blog article: Creating both an Identity and Role Claim for a SharePoint 2010 Claims Auth Application (http://go.microsoft.com/fwlink/p/?LinkId=198948)
TechNet blog article: How to Create Multiple Claims Auth Web Apps in a Single SharePoint 2010 Farm (http://go.microsoft.com/fwlink/p/?LinkId=198949)
For information about features that do not work with SAML security tokens or features that require additional configuration in order to work with SAML security tokens,
see Plan for claims-based authentication or classic-mode authentication (SharePoint Foundation 2010).
Choosing authentication for LDAP environments
LDAP environments can be implemented by using either forms-based authentication or SAML token-based authentication. We recommend that you use forms-based
authentication because it is less complex. However, if the environment supports WS-Federation 1.1 and SAML Token 1.1, then SAML is recommended.
Planning zones for Web applications
Zones represent different logical paths for gaining access to the same sites in a Web application. Each Web application can include as many as five zones. When a Web

application is created, the default zone is created. Additional zones are created by extending the Web application and selecting one of the remaining zone names:
intranet, extranet, Internet, or custom.
In previous versions of SharePoint Foundation, zones are used to implement different types of authentication for users coming from different networks or authentication
providers. In the current version, claims authentication allows multiple types of authentication to be implemented on the same zone.
Your plan for zones will depend on which of the following authentication modes you select for a Web application:
Classic mode — Similar to previous versions, only one type of authentication can be implemented per zone. However, in SharePoint Foundation 2010, onlyWindows authentication can be implemented when classic mode is selected. Consequently, multiple zones can be used only to implement multiple types of
Windows authentication, or to implement the same type of Windows authentication against different Active Directory stores.
Claims‐based authentication — Multiple authentication providers can be implemented on a single zone. Multiple zones can also be used.
Implementing more than one type of authentication on a single zone
If you are using claims authentication and implementing more than one authentication method, we recommend that you implement multiple authentication methods on
the default zone. This results in the same URL for all users.
When you are implementing multiple authentication methods on the same zone, the following restrictions apply:
Only one instance of forms-based authentication can be implemented on a zone.
Central Administration allows you to use both an Integrated Windows method and Basic at the same time. Otherwise, more than one type of Windows
authentication cannot be implemented on a zone.
If multiple SAML token-based authentication providers are configured for a farm, these will all appear as options when you create a Web application or a new zone.
Multiple SAML providers can be configured on the same zone.
The following diagram illustrates multiple types of authentication implemented on the default zone for a partner collaboration site.
In the diagram, users from different directory stores access the partner Web site by using the same URL. A dashed box surrounding partner companies shows the
relationship between the user directory and the authentication type that is configured in the default zone. For more information about this design example, see Design
sample: Corporate deployment (SharePoint Server 2010).
Planning for crawling content
The crawl component requires access to content using NTLM. At least one zone must be configured to use NTLM authentication. If NTLM authentication is not
configured on the default zone, the crawl component can use a different zone that is configured to use NTLM authentication.
Implementing more than one zone
If you plan to implement more than one zone for Web applications, use the following guidelines:
Use the default zone to implement your most secure authentication settings. If a request cannot be associated with a specific zone, the authentication settings and
other security policies of the default zone are applied. The default zone is the zone that is created when you initially create a Web application. Typically, the most
secure authentication settings are designed for end-user access. Consequently, end users are likely to access the default zone.
Use the minimum number of zones that are required to provide access to users. Each zone is associated with a new IIS site and domain for accessing the Web
application. Only add new access points when these are required.

Ensure that at least one zone is configured to use NTLM authentication for the crawl component. Do not create a dedicated zone for the index component unless
it is necessary.
The following diagram illustrates multiple zones that are implemented to accommodate different authentication types for a partner collaboration site.
In the diagram, the default zone is used for remote employees. Each zone has a different URL associated with it. Employees use a different zone depending on whether
they are working in the office or are working remotely. For more information about this design example, see Design sample: Corporate deployment (SharePoint Server
2010).
Architecture for SAML token-based providers
The architecture for implementing SAML token-based providers includes the following components:
SharePoint security token service This service creates the SAML tokens that are used by the farm. The service is automatically created and started on all servers in a
server farm. The service is used for inter-farm communication because all inter-farm communication uses claims authentication. This service is also used for
authentication methods that are implemented for Web applications that use claims authentication, including Windows authentication, forms-based authentication, and
SAML token-based authentication. You must configure the security token service during the deployment process.
For more information, see Configure the security token service (SharePoint Foundation 2010).
Token-signing certificate (ImportTrustCertificate) This is the certificate that is exported from an IP-STS. The certificate is copied to one server in the farm. Once you
use this certificate to create an SPTrustedIdentityTokenIssuer, you cannot use it again to create another one. If you want to use the certificate to create a different
SPTrustedIdentityTokenIssuer, you must delete the existing one first. Before you delete an existing one, you must disassociate it from any Web applications that may be
using it.
Identity claim The identity claim is the claim from a SAML token that is the unique identifier of the user. Only the owner of the IP-STS knows which value in the token
will always be unique for each user. The identity claim is created as a regular claims mapping during the process of mapping all desired claims. The claim that serves as
the identity claim is declared when the SPTrustedIdentityTokenIssuer is created.
Other claims These claims consist of additional claims from a SAML ticket that describe users. These can include user roles, user groups, or other kinds of claims such
as age. All claims mappings are created as objects that are replicated across the servers in a SharePoint Foundation farm.
Realm In the SharePoint claims architecture, the URI or URL that is associated with a SharePoint Web application that is configured to use a SAML token-based
provider represents a realm. When you create a SAML-based authentication provider on the farm, you specify the realms, or Web application URLs, that you want the IP-
STS to recognize, one at a time. The first realm is specified when you create the SPTrustedIdentityTokenIssuer. Additional realms can be added after the
SPTrustedIdentityTokenIssuer is created. Realms are specified by using syntax similar to the following: $realm = "urn:sharepoint:mysites". After you add the realm to the
SPTrustedIdentityTokenIssuer, you must create an RP-STS trust with the realm on the IP-STS server. This process involves specifying the URL for the Web application.
SPTrustedIdentityTokenIssuer This is the object that is created on the SharePoint farm that includes the values necessary to communicate with and receive tokens
from the IP-STS. When you create the SPTrustedIdentityTokenIssuer, you specify which token-signing certificate to use, the first realm, the claim that represents the
identity claim, and any additional claims. You can only associate a token-signing certificate from an STS with one SPTrustedIdentityTokenIssuer. However, after you create
the SPTrustedIdentityTokenIssuer, you can add more realms for additional Web applications. After a realm is added to the SPTrustedIdentityTokenIssuer, it must also be
added to the IP-STS as a relying party. The SPTrustedIdentityTokenIssuer object is replicated across servers in the SharePoint Foundation farm.
Relying party security token service (RP-STS) In SharePoint Foundation 2010, each Web application that is configured to use a SAML provider is added to the IP-STS
server as an RP-STS entry. A SharePoint Foundation farm can include multiple RP-STS entries.
Identity provider security token service (IP-STS) This is the secure token service in the claims environment that issues SAML tokens on behalf of users who are
included in the associated user directory.
The following diagram illustrates the SharePoint 2010 Products claims architecture.

The SPTrustedIdentityTokenIssuer object is created by using several parameters. The following diagram illustrates the key parameters.
As the diagram illustrates, an SPTrustedIdentityTokenIssuer can include only one identity claim, one SignInURL parameter, and one Wreply parameter. However, it can
include multiple realms and multiple claims mappings. The SignInURL parameter specifies the URL to redirect a user request to in order to authenticate to the IP-STS.
Some IP-STS servers require the Wreply parameter, which is set to either true or false and is false by default. Only use the Wreply parameter if it is required by the IP-
STS.
See Also
Other ResourcesResource Center: Security and Authentication for SharePoint Foundation 2010
© 2014 Microsoft

People Picker and claims provider planning (SharePointFoundation 2010)
Applies to: SharePoint Foundation 2010
Topic Last Modified: 2011-06-07
People Picker is a Web control used to find and select users, groups, and claims to grant permission to items such as lists, libraries, or sites in Microsoft SharePoint
Foundation 2010. When a Web application uses claims authentication mode, the People Picker control uses a claims provider to list, resolve, search, and determine the
"friendly" display of users, groups, and claims. A claims provider in SharePoint Foundation 2010 issues claims, which SharePoint Foundation 2010 then packages into
security tokens for users. Although People Picker is used by site, list, and library owners to assign permissions to sites and content in SharePoint Foundation 2010, its
behavior is heavily dependent on how authentication has been configured for the whole Web application. It is important to plan for People Picker and claims providers
when you plan authentication methods for your SharePoint Foundation 2010 solution.
The articles in this section are designed to help you understand and plan for using People Picker and custom claims providers in SharePoint Foundation 2010:
People Picker overview (SharePoint Foundation 2010)
This article describes the People Picker control and how it works, its relationship to authentication and claims providers, and includes considerations for planning for
People Picker.
Custom claims providers for People Picker (SharePoint Foundation 2010)
This article describes the use and benefits of claims providers, their architecture, special considerations for custom claims providers, and considerations for
planning for them.
See Also
ConceptsPlan authentication (SharePoint Foundation 2010)
Configure People Picker (SharePoint Foundation 2010)
© 2014 Microsoft

People Picker overview (SharePoint Foundation 2010)
Applies to: SharePoint Foundation 2010
Topic Last Modified: 2011-09-19
The People Picker control is used to find and select people, groups, and claims when a site, list, or library owner assigns permissions in Microsoft SharePoint Foundation
2010. This article describes the People Picker control and how it works, its relationship to authentication and claims providers, and how to plan for People Picker. For
information about how to configure People Picker, see Configure People Picker (SharePoint Foundation 2010).
Before reading this article, you should understand the concepts described in Plan authentication methods (SharePoint Foundation 2010)and in The Role of Claims
(http://go.microsoft.com/fwlink/p/?LinkID=208326). For additional information about claims-based authentication, see SharePoint Claims-Based Identity
(http://go.microsoft.com/fwlink/p/?LinkID=196647).
In this article:
Uses and benefits
Architecture
About the People Picker control
People Picker and authentication
People Picker and claims providers
Configuring People Picker
Using People Picker with multiple forests or domains
Considerations for People Picker
Uses and benefits
The People Picker control is used to select users, groups, and claims to grant permission to items such as lists, libraries, and sites. For example, your site has a
document library that you want to restrict to a certain list of users. When you use the library permissions page to give users permission levels for the library, you use the
People Picker control either to type user names and verify that the user accounts are valid, or to search for a name or partial string and return a list of users, groups, or
claims that match the value you entered. For more information about permissions, see Plan site permissions (SharePoint Foundation 2010).
Architecture
The People Picker control is a central component of SharePoint Foundation 2010. The control provides basic functionality for finding and selecting users, groups, and
claims to assign permissions in a site. The exact sources of those users, groups, and claims depend on the authentication method used by the Web application that
contains the site collection. For more information about authentication methods, see People Picker and authentication later in this article.
People Picker is configured at the zone level for a farm by using the Stsadm setproperty operation. By configuring the settings for the control, you can filter and restrict
the results that are displayed when a user searches for a user, group, or claim. Those settings will apply to every site within a specific site collection. For more
information about configuring People Picker, see Configure People Picker (SharePoint Foundation 2010).
Note
There are no Windows PowerShell commands to configure People Picker.
When a Web application is configured to use claims-based authentication, People Picker uses claims providers to resolve and display users, groups, and claims in the
Select People and Groups dialog box. The information that is displayed in the Select People and Groups dialog box depends on the claims provider used by the
authentication method that was configured for the Web application. For more information about claims providers, see Custom claims providers for People Picker
(SharePoint Foundation 2010).
About the People Picker control
The People Picker control consists of a text box and two buttons: the Check Names button and the Browse button. The following illustration shows an example of the
People Picker control.
The user types a user name, group name, or claim (such as an e-mail address) into the text box, and then clicks the Check Names button to resolve the search item
exactly as it was entered. If People Picker is able to resolve the search item, the name is replaced with a resolved identity. If the search item cannot be resolved exactly as
entered, People Picker performs a search. If no match is found, or if more than one match is found, a red underline is displayed under the search item and the following
error message appears: No exact match found. Click the item(s) that did not resolve for more options. When the item is clicked, a pop-up menu displays a list of
available users, groups, or claims that match the query, if applicable. The menu also contains a Remove button to remove the resolved user, group, or claim from the
text box, and a More Names button, which opens the Select People and Groups dialog box.
If the user clicks the Browse button, the Select People and Groups dialog box is displayed. The user types a full or partial user name, group name, or claim into the text
box, and then presses Enter. The results of the query are displayed in the dialog box. The claims providers that People Picker interacts with determine the query results
and the way those results are displayed in the dialog box. The user selects a resolved identity, clicks Add, and then clicks OK. The selected user, group, or claim is then
added to the text box in the People Picker control.
When a Web application is configured to use Windows authentication, you can limit the results that are displayed to users in the Select People and Groups dialog box
by using the Stsadm setproperty operation to change the settings for the People Picker control. For example, you can configure People Picker to return only users,
groups, and claims that belong to a certain Active Directory domain or are members of a specific site collection. For more information about configuring the People
Picker control, see Configure People Picker (SharePoint Foundation 2010).
People Picker and authentication
People Picker relies on the authentication method used by the Web application that contains the site collection from which it is queried to determine what results to
display to a user. If the Web application is configured to use Windows authentication in classic mode, SharePoint Foundation 2010 treats user accounts as Active
Directory Domain Services (AD DS) accounts. If the Web application is configured to use claims-based authentication, you can specify whether to use Windows
authentication, forms-based authentication (FBA), or Security Assertion Markup Language (SAML) token-based authentication. In claims mode, People Picker searches
and resolves queries based on the claims provider that is specified for the authentication method used by the Web application and zone. The following sections
describe People Picker behavior for both classic-mode authentication and claims-based authentication. For more information about zones and authentication, see Plan
authentication methods (SharePoint Foundation 2010).
Classic-mode authentication
When Windows classic-mode authentication is used, the People Picker control queries Active Directory to retrieve a list of users, groups, or claims that match the
search item typed in the text box. You can configure People Picker to query Active Directory by using Lightweight Directory Access Protocol (LDAP) queries, which
enables you to apply custom Active Directory filters, limit the scope of search queries, and search across forests and domains.
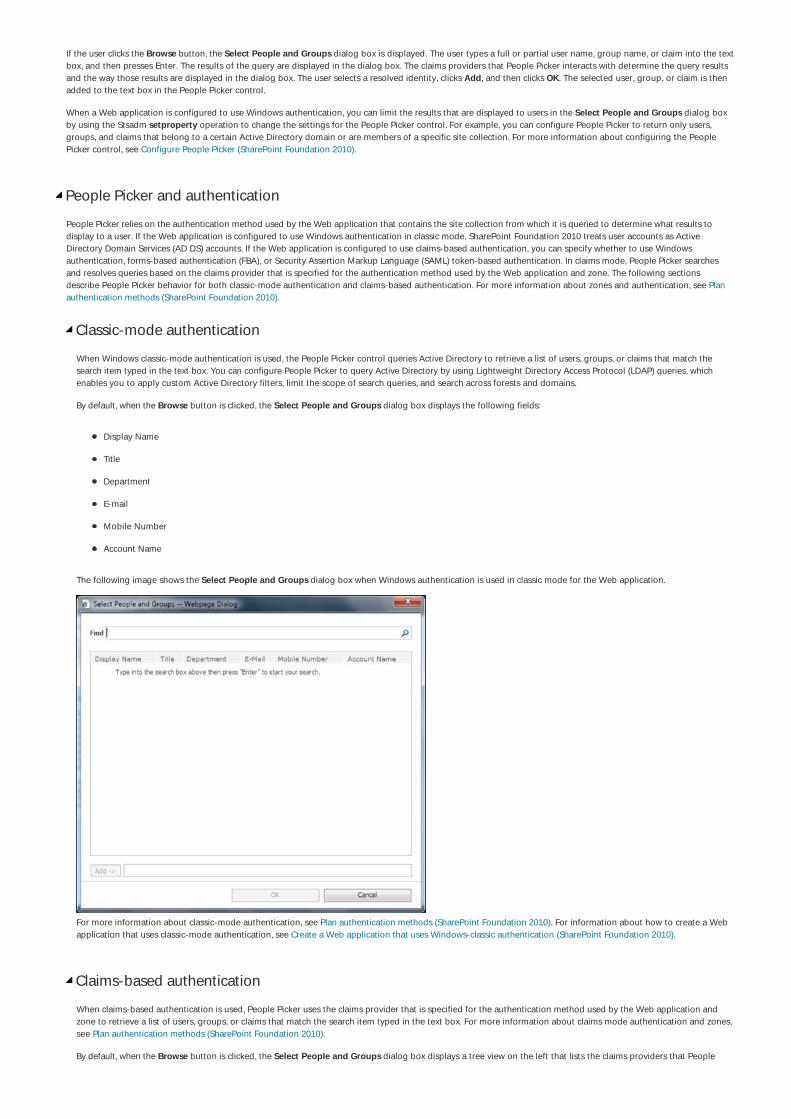
By default, when the Browse button is clicked, the Select People and Groups dialog box displays the following fields:
Display Name
Title
Department
Mobile Number
Account Name
The following image shows the Select People and Groups dialog box when Windows authentication is used in classic mode for the Web application.
For more information about classic-mode authentication, see Plan authentication methods (SharePoint Foundation 2010). For information about how to create a Web
application that uses classic-mode authentication, see Create a Web application that uses Windows-classic authentication (SharePoint Foundation 2010).
Claims-based authentication
When claims-based authentication is used, People Picker uses the claims provider that is specified for the authentication method used by the Web application and
zone to retrieve a list of users, groups, or claims that match the search item typed in the text box. For more information about claims mode authentication and zones,
see Plan authentication methods (SharePoint Foundation 2010).
By default, when the Browse button is clicked, the Select People and Groups dialog box displays a tree view on the left that lists the claims providers that People

Picker will query. The right side of the dialog box is where query results are displayed. When claims-based authentication is used, the results are displayed in one of
two views: Detailed View or List View. By default, Detailed View is displayed.
The following illustration shows the Select People and Groups dialog box when Windows authentication is used in claims mode for a Web application.
In Detailed View, the query results are grouped by the sources where the query results were found. For example, if a search item is found in a SharePoint group and
in Active Directory, the results are organized into a list of SharePoint groups followed by a list of Active Directory users and groups.
In List View, the query results are returned in a list that contains the following fields:
Display Name
E-mail Address
Title
Department
Presence
Work Phone
Location
You can write a custom claims provider to control what information is displayed and what results are returned in response to a query from the People Picker control.
When a custom claims provider is registered on the server, you can also configure it for use in a specific Web application and zone. This means that a custom claims
provider that is configured for only one zone will only be displayed in the Select People and Groups dialog box for Web sites in that zone. For more information
about custom claims providers, see Custom claims providers for People Picker (SharePoint Foundation 2010).
Note
In the Central Administration Web site, People Picker will return users, groups, and claims from all claims providers used in all Web applications in the farm,
regardless of the Web application or zone in which the claims providers are configured.
By default, when you use SAML token-based authentication, all queries entered in the text box are automatically displayed as if they had been resolved, regardless of
whether they are valid users or groups. If your SharePoint Foundation 2010 solution will use SAML token-based authentication, you should plan to create a custom
claims provider that will implement custom search, name resolution, and list features. For more information about custom claims providers, see Custom claims
providers for People Picker (SharePoint Foundation 2010).
For information about how to create a Web application that uses claims-mode authentication, see Create a Web application that uses Windows-claims authentication
(SharePoint Foundation 2010). For information about configuring claims-based authentication for Web applications, see Configure claims authentication (SharePoint
Foundation 2010).
People Picker and claims providers
A claims provider lists, resolves, searches, and determines the "friendly" display of users, groups, and claims in the People Picker when claims-based authentication is
used. If your Web application uses claims-based authentication, you must decide whether to use one of the default claims providers or create a custom claims provider
that will meet the business needs of your organization.
For more information about how claims providers are related to the People Picker control, see Custom claims providers for People Picker (SharePoint Foundation 2010).
Configuring People Picker

The information in this section applies only to Web applications that use Windows authentication in either classic mode or claims mode.
You can configure People Picker to filter query results and to restrict the directories that People Picker uses as a source of those results by using property names for the
Stsadm setproperty operation. To see what property settings have been configured, use the Stsadm getproperty operation. For more information, see Peoplepicker:
Stsadm properties (Office SharePoint Server 2007). The settings for People Picker are applied to each URL zone for a Web application.
Note
There are no Windows PowerShell commands to configure People Picker.
The following table describes the properties that can be used to configure People Picker.
Property name Description
Peoplepicker-activedirectorysearchtimeout Configures the timeout when a query is issued to Active Directory. The default timeout value is 30 seconds.
For more information, see Peoplepicker-activedirectorysearchtimeout.
Peoplepicker-distributionlistsearchdomains Restricts the search of a distribution list to a specific subset of domains. For more information, see
Peoplepicker-distributionlistsearchdomains.
Peoplepicker-
nowindowsaccountsfornonwindowsauthenticationmode
Specifies not to search Active Directory when the current port is using forms-based authentication. For more
information, see Peoplepicker-nowindowsaccountsfornonwindowsauthenticationmode.
Peoplepicker-onlysearchwithinsitecollection Displays only users who are members of the site collection when the Select People and Groups dialog box
is used. For more information, see Peoplepicker-onlysearchwithinsitecollection.
Peoplepicker-
peopleeditoronlyresolvewithinsitecollection
Displays only users who are members of the current site collection when the Check Names button is clicked.
For more information, see. Peoplepicker-peopleeditoronlyresolvewithinsitecollection: Stsadm property
(SharePoint Foundation 2010).
Peoplepicker-searchadcustomfilter Enables a farm administrator to specify a unique search query. For more information, see Peoplepicker-
searchadcustomfilter.
Peoplepicker-searchadcustomquery Permits the administrator to set the custom query that is sent to Active Directory. For more information, see
Peoplepicker-searchadcustomquery.
Peoplepicker-searchadforests Permits a user to search from a second one-way trusted forest or domain. For more information, see
Peoplepicker-searchadforests.
Peoplepicker-serviceaccountdirectorypaths Enables a farm administrator to manage the site collection that has a specific organizational unit (OU)
setting as defined in the Setsiteuseraccountdirectorypath setting. For more information, see Peoplepicker-
serviceaccountdirectorypaths.
For more information about configuring People Picker, see Configure People Picker (SharePoint Foundation 2010).
Using People Picker with multiple forests or domains
By default, People Picker will only return users, groups, and claims from the domain on which SharePoint Foundation 2010 is installed. If you want People Picker to return
query results from more than one forest or domain, you must either have a two-way trust between the forests or domains, or you must configure People Picker to use
an encrypted account and password for a one-way trust between forests and domains. For more information about trusts, see Managing Trusts
(http://go.microsoft.com/fwlink/p/?LinkId=207573).
To configure People Picker for a one-way trust, you must first use the Stsadm setapppassword operation to set the password for use on the trusted forest or domain,
and then use the Peoplepicker-searchadforests property for the setproperty operation to specify the forest or domain to search. Remember that the settings for
People Picker are configured per zone for a Web application, so if you have more than one forest or domain in your farm, you must combine the accounts and
passwords into a single command for the setproperty operation. For more information, see Peoplepicker-searchadforests: Stsadm property (Office SharePoint Server).
Considerations for People Picker
Planning for People Picker largely depends on what forests and domains you want users to be able to query, and what users, groups, and claims you want to display in
query results. As you plan for the forests and domains you want users to query, consider the following questions:
Do users need to query across a forest or a domain?
What is the DNS name for each forest or domain you want users to query?
Will your forest or domain have a one-way or two-way trust with other forests or domains?
If you will be using a one-way trust, what credentials will be used to query the other farms or domains
Planning for the users, groups, and claims you want to display in the query results in People Picker will help you determine how to configure People Picker to return and
display results from claims providers. As you plan for the users, groups, and claims you want to display in query results, consider the following questions:

Are there certain LDAP filters you want to apply to query results?
Do you want to restrict the query results to users, groups, or claims in a specific site collection?
Do you want to restrict the query results to users, groups, or claims in a certain Active Directory organizational unit (OU)
See Also
ConceptsPlan authentication methods (SharePoint Foundation 2010)
Custom claims providers for People Picker (SharePoint Foundation 2010)
Configure People Picker (SharePoint Foundation 2010)
Other ResourcesResource Center: Security and Authentication for SharePoint Foundation 2010
© 2014 Microsoft

Custom claims providers for People Picker (SharePoint Foundation2010)
Applies to: SharePoint Foundation 2010
Topic Last Modified: 2011-09-08
A claim consists of information about the identity of a user, such as a name, e-mail address, or group membership. A claims provider in Microsoft SharePoint Foundation
2010 issues claims, which SharePoint Foundation 2010 then packages into security tokens for users. When a user signs in to SharePoint Foundation 2010, the user's token is
validated and then used to sign in to SharePoint Foundation 2010. Claims providers are displayed in the user interface of the Select People and Groups dialog box in the
People Picker control. They provide the functionality used to find and select users, groups, and claims when permissions are assigned to items such as lists, libraries, and
sites in SharePoint Foundation 2010. For information about the People Picker control, see People Picker overview (SharePoint Foundation 2010).
This article describes the use and benefits of claims providers, their architecture, special considerations for custom claims providers, and how to plan for them. It does not
explain how to create or configure custom claims providers. For information about how to create a custom claims provider, see Claims How Tos
(http://go.microsoft.com/fwlink/p/?LinkId=207578) and Creating Custom Claims Providers in SharePoint 2010 (http://go.microsoft.com/fwlink/p/?LinkId=211324).
Before reading this article, you should understand the concepts described in Plan authentication methods (SharePoint Foundation 2010) and The Role of Claims
(http://go.microsoft.com/fwlink/p/?LinkID=208326). For additional information about claims-based authentication, see SharePoint Claims-Based Identity
(http://go.microsoft.com/fwlink/p/?LinkID=196647) and A Guide to Claims-based Identity and Access Control (http://go.microsoft.com/fwlink/p/?LinkID=187911).
In this article:
Uses and benefits
Architecture
About custom claims providers
Deploying and configuring custom claims providers
Using custom claims on more than one farm
Considerations for custom claims providers
Uses and benefits
A claims provider in SharePoint Foundation 2010 is used primarily for two reasons:
To augment claims
To provide name resolution
In the augmentation role, a claims provider augments a user token with additional claims during sign-in. For more information about claims augmentation, see Claims
Provider (http://go.microsoft.com/fwlink/p/?LinkID=207579).
In the picking role, a claims provider lists, resolves, searches, and determines the "friendly" display of users, groups, and claims in the People Picker. Claims picking
enables an application to surface claims in the People Picker, for example when configuring the security of a SharePoint site or SharePoint service. For more information
about People Picker, see People Picker overview (SharePoint Foundation 2010).
You can use the claims providers that are included with SharePoint Foundation 2010, or you can create your own custom claims providers to provide additional claims in
the security token for a user or to connect to additional sources of claims. For example, if you have a CRM application that contains roles that are not found in the user
repository in Active Directory, you can create a custom claims provider to connect to that database and add CRM role data to a user's original claims token. For more
information about claims provider usage scenarios, see Claims Provider (http://go.microsoft.com/fwlink/p/?LinkID=207579).
Architecture
When a Web application is configured to use claims-based authentication, SharePoint Foundation 2010 automatically uses two default claims providers:
The SPSystemClaimProvider (http://go.microsoft.com/fwlink/p/?LinkId=210011) class provides claims information related to the server farm where SharePoint
Foundation 2010 is installed.
The SPAllUserClaimProvider (http://go.microsoft.com/fwlink/p/?LinkId=210012) class provides an All Users claim that is displayed in the Select People and
Groups dialog box for People Picker.
Depending on the authentication method selected for a zone of a Web application, SharePoint Foundation 2010 also uses one or more of the default claims providers
listed in the following table.
Authentication method Claims provider
Windows authentication SPActiveDirectoryClaimProvider (http://go.microsoft.com/fwlink/p/?LinkID=208325)

Forms-based authentication SPFormsClaimProvider (http://go.microsoft.com/fwlink/p/?LinkId=210013)
Security Assertion Markup Language (SAML) token-based authentication SPTrustedClaimProvider (http://go.microsoft.com/fwlink/p/?LinkId=210014)
These claims providers are displayed in the Select People and Groups dialog box for People Picker. You can see a list of claims providers for a farm by using the Get-
SPClaimProvider Windows PowerShell cmdlet.
Note
When a Web application is configured to use SAML token-based authentication, the SPTrustedClaimProvider class does not provide search functionality to the People
Picker control. Any text entered in the People Picker control will automatically be displayed as if it had been resolved, regardless of whether it is a valid user, group,
or claim. If your SharePoint Foundation 2010 solution will use SAML token-based authentication, you should plan to create a custom claims provider to implement
custom search and name resolution.
Claims providers are registered on a server farm as features that are deployed to the farm. They are scoped at the farm level. Each claims provider object uses the
SPClaimProviderDefinition class to include information about the claims provider, such as display name, description, assembly, and type. Two important properties of the
SPClaimProviderDefinition class are IsEnabled and IsUsedByDefault. These properties determine whether a registered claims provider is enabled for use in the farm, and
whether the claims provider is used by default in a particular zone. By default, all claims providers are enabled when they are deployed to a server farm. For information
about the SPClaimProviderDefinition class, see SPClaimProviderDefinition Class (http://go.microsoft.com/fwlink/p/?LinkId=207595).
For more information about zones and authentication, see Plan authentication methods (SharePoint Foundation 2010).
For information about how to write a custom claims provider, see Creating Custom Claims Providers in SharePoint 2010 (http://go.microsoft.com/fwlink/p/?
LinkID=211324) and Claims Walkthrough: Writing Claims Providers for SharePoint 2010 (http://go.microsoft.com/fwlink/p/?LinkId=207589). For information about how to
override the default claims provider, see How to Override the Default Name Resolution and Claims Provider for SharePoint 2010 (http://go.microsoft.com/fwlink/p/?
LinkId=207591).
About custom claims providers
By default, the information that is resolved in People Picker when a query is performed depends on the information supplied by the claims provider. You cannot change
what information is supplied and how it is displayed when you use an out-of-box claims provider. To do this, you must have a developer create a custom claims
provider that will meet the needs of your solution for finding and selecting users, groups, and claims when a user assigns permissions to items such as a site, list, or
library.
For example, if your Web application uses SAML authentication and you also want to resolve users from Active Directory, you will need to create a custom claims
provider. For additional examples of claims provider use scenarios, see Claims Provider (http://go.microsoft.com/fwlink/p/?LinkID=207579).
When you create a custom claims provider, you can control what information is displayed and what results are returned in response to a query from the People Picker
control. By default, you configure the Web application to use claims authentication, and then register the claims provider on the server.
Note
You cannot control the order in which claims providers are displayed in the Select People and Groups dialog box in People Picker.
For information about how to write a custom claims provider, see How to: Create a Claims Provider (http://go.microsoft.com/fwlink/p/?LinkId=207588) and Claims
Walkthrough: Writing Claims Providers for SharePoint 2010 (http://go.microsoft.com/fwlink/p/?LinkId=207589). For information about how to override the default claims
provider, see How to Override the Default Name Resolution and Claims Provider for SharePoint 2010 (http://go.microsoft.com/fwlink/p/?LinkId=207591).
Deploying and configuring custom claims providers
By default, when you register a custom claims provider on the farm, the IsEnabled and IsUsedByDefault properties are both set to True. Unless the IsUsedByDefault
property is set to False, the custom claims provider is displayed in the Select People and Groups dialog box in People Picker for all zones. Depending on the number of
zones needed for your SharePoint Foundation 2010 solution, the authentication methods used by each zone, and the users for each zone, you may want to limit the
zones in which your custom claims provider is displayed in People Picker.
Because claims providers are scoped at the farm level and enabled at the zone level, you must carefully plan the zones in which you want the custom claims provider to
be displayed. In general, you should make sure that the IsUsedByDefault property is set to False, and then configure the SPIisSettings class for each zone in which you
want to use the custom claims provider. To configure a custom claims provider for select zones, you can create a Windows PowerShell script that sets the claims
provider for a zone by using the SPIisSettings.ClaimsProviders property, or you can create a custom application to allow you to enable a custom claims provider for
select zones. For information about the SPIisSettings.ClaimsProvider property, see SPIisSettings.ClaimsProvider Property (http://go.microsoft.com/fwlink/p/?
LinkId=207597). For information about how to create a custom application to configure claims providers for select zones, see the TechNet blog post, Configuring a
Custom Claims Provider to be Used only on Select Zones in SharePoint 2010 (http://go.microsoft.com/fwlink/p/?LinkId=207592).
For example, consider a scenario where there are two Web applications: The first Web application, PartnerWeb, has two zones — one intranet that uses Windowsclaims‐based authentication and one extranet that uses forms‐based authentication — and is used for collaboration among employees and partners. The second Webapplication, PublishingWeb, has only one zone that uses forms-based authentication and is an Internet publishing site for employees, business partners, and customer
partners. Now, suppose that for the extranet zone on PartnerWeb, you want employees to be able to collaborate with business partners but not customer partners. To
do this, you write a custom claims provider that determines whether the current user is a business partner or customer partner, based on the user's identity. In this
example, users from fabrikam.com are business partners, while users from contoso.com are customer partners. When a user who is a business partner is authenticated
in the PartnerWeb Web application, a claim for a role called BusinessPartner is added to the claim token; when a customer partner is authenticated, a claim for a role
called CustomerPartner is added to the claim token. To make sure that customer partners are never added to the extranet collaboration site, you add a Web application
policy on the PartnerWeb Web application for the extranet zone that explicitly denies access to any user who has a claim for a role called CustomerPartner. The custom
claims provider would also need to implement search and type-in support for the Web application policy to resolve the CustomerPartner role claim so it can be added
to the Web application policy. Finally, to enable this functionality on the extranet zone, you configure the SPIisSettings class for that zone to use the custom claims
provider. The following diagram illustrates the authentication methods and claims provider settings for each Web application and zone.

Note
On the Central Administration Web site, all claims providers are displayed in the Select People and Groups dialog box in People Picker, regardless of whether the
IsUsedByDefault property is set to True.
You can set the IsUsedByDefault property by configuring it in a feature receiver that you create for your custom claims provider. For information about how to use a
feature receiver to deploy a custom claims provider, see Sample: Feature Receiver to Deploy a Claims Provider (http://go.microsoft.com/fwlink/p/?LinkId=207590).
You can also override the settings of the IsEnabled and IsUsedByDefault properties by using the Set-SPClaimProvider Windows PowerShell cmdlet.
Important
Changing the IsEnabled property to False will disable the claims provider for the entire server farm. This can be useful if you need to troubleshoot issues that might
be caused by a custom claims provider. However, in general, the IsEnabled property should be set to True.
Using custom claims on more than one farm
Claim values are a combination of the claim itself, the claims provider name, and the order in which the claims provider was installed on the server. Therefore, if you
want to use a claim across multiple farms or environments, you must install the claims providers in the same order on each farm in which you want to use the claim. Use
the following steps when you have installed a custom claims provider on a farm and you want to use the same claim on additional farms.
1. Register the claims providers on the additional farms in the same order that they were registered on the first farm.
2. Perform a backup of the first farm. For information about how to back up a farm, see Back up a farm (SharePoint Foundation 2010).
3. Use the back up from the first farm to restore the other farms. For information about how to restore a farm, see Restore a farm (SharePoint Foundation 2010).
Considerations for custom claims providers
As you plan custom claims providers for use with People Picker in your SharePoint solution, consider the following questions:
What zones does your Web application have, and what authentication methods are used in each zone?
Are there any custom claims that should be added to users to enable more advanced security scenarios?
Will you be using SAML authentication with a trusted identity provider?
What will be the source of the values for the users and roles that will be displayed in People Picker query results?
What claim data do you want to resolve in the Select People and Groups dialog box?
The SharePoint Foundation 2010 Content Publishing team would like to thank Steve Peschka for contributing to this article. His blog can be found here
(http://go.microsoft.com/fwlink/p/?LinkId=210274).
See Also
ConceptsPlan authentication methods (SharePoint Foundation 2010)
© 2014 Microsoft

Plan for Kerberos authentication (SharePoint Foundation 2010)
Applies to: SharePoint Foundation 2010
Topic Last Modified: 2012-04-26
Microsoft SharePoint Foundation 2010 supports several methods of authentication. Deployments that require secure authentication, client identity delegation, and low
network traffic can choose Kerberos authentication. For more information, see Plan authentication methods (SharePoint Foundation 2010).
In this article:
Kerberos authentication and SharePoint 2010
Kerberos authentication and claims-based authentication
Kerberos authentication and Microsoft SharePoint Foundation 2010
Why you should consider Kerberos authentication Why Kerberos authentication might not be appropriate for a deployment scenario
Kerberos is the most secure Integrated Windows authentication
protocol, and supports advanced security features including Advanced
Encryption Standard (AES) encryption and mutual authentication.
Kerberos authentication requires additional configuration of infrastructure and
environment to function properly. In many cases, domain administrator permission is
required to configure Kerberos. Kerberos authentication can be difficult to set up and
manage. Misconfiguring Kerberos can prevent successful authentication to your sites.
Kerberos enables delegation of client credentials. Kerberos authentication requires client computer connectivity to a Key Distribution Center
(KDC), and client computer connectivity to an Active Directory Domain Services (AD DS)
domain controller. In a Windows deployment, the KDC is an AD DS domain controller.
While this is a common network configuration in a corporate environment, Internet-facing
deployments are typically not configured this way.
Kerberos supports mutual authentication of clients and servers.
Of the available secure authentication methods, Kerberos requires the
least amount of network traffic to domain controllers. Kerberos can
reduce page latency in certain scenarios, or increase the number of
pages that a front-end Web server can serve in certain scenarios.
Kerberos can also reduce the load on domain controllers.
Kerberos is an open protocol that is supported by many platforms and
vendors.
Kerberos is a secure protocol that supports an authentication method that uses tickets provided by a trusted source. Kerberos tickets represent the network credentials
of a user who is associated with a client computer. The Kerberos protocol defines the way in which users interact with a network authentication service to gain access to
network resources. The Kerberos KDC issues a ticket to a client computer on behalf of a user. After a client computer establishes a network connection to a server, the
client computer requests network access by presenting the Kerberos authentication ticket to the server. If the request contains acceptable user credentials, the KDC
grants the request. For service applications, the authentication ticket must also contain an acceptable Service Principal Name (SPN). To enable Kerberos authentication,
the client and server computers must already have a trusted connection to the KDC. The client and server computers must also be able to access Active Directory
Domain Services (AD DS).
Kerberos delegation
Kerberos authentication supports the delegation of client identity. This means that a service can impersonate an authenticated client’s identity. Impersonation enables aservice to pass the authenticated identity to other network services on behalf of the client. Claims-based authentication can also be used to delegate client credentials,
but it requires the backend application to be claims-aware. Several important services are not currently claims-aware.
Used in conjunction with Microsoft SharePoint Foundation 2010, Kerberos delegation enables a front‐end service to authenticate a client and then use the client’s identityto authenticate to a backend system. The backend system then performs its own authentication. When a client uses Kerberos authentication to authenticate with a front-
end service, Kerberos delegation can be used to pass a client's identity to a backend system. The Kerberos protocol supports two types of delegation:
Basic Kerberos delegation (unconstrained)
Kerberos constrained delegation
Basic Kerberos delegation and Kerberos constrained delegation
Although basic Kerberos delegation can cross domain boundaries within the same forest, basic Kerberos delegation cannot cross a forest boundary. Kerberos
constrained delegation cannot cross domain boundaries or forest boundaries. Depending on the service applications that are part of a SharePoint Foundation 2010
deployment, implementing Kerberos authentications with SharePoint Foundation 2010 can require the use of Kerberos constrained delegation. Therefore, to deploy
Kerberos authentication with any of the following service applications, SharePoint Foundation 2010 and all external data sources must reside in the same Windows
domain:
Excel Services
PerformancePoint Services
InfoPath Forms Services
Visio Services
To deploy Kerberos authentication with any of the following service applications, SharePoint Foundation 2010 can use either basic Kerberos delegation or Kerberos
constrained delegation:
Business Data Connectivity service and Microsoft Business Connectivity Services
Access Services
Microsoft SQL Server Reporting Services (SSRS)
Microsoft Project Server 2010
Services that are enabled for Kerberos authentication can delegate identity multiple times. As an identity travels from service to service, the delegation method can
change from basic Kerberos to Kerberos constrained. However, the reverse is not possible. The delegation method cannot change from Kerberos constrained to basic
Kerberos. Therefore, it is important to anticipate and plan for whether or not a backend service will require basic Kerberos delegation. This can impact the planning and
design of domain boundaries.
A Kerberos enabled service can use protocol transition to convert a non-Kerberos identity to a Kerberos identity that can be delegated to other Kerberos enabled
services. This capability can be used, for example, to delegate a non-Kerberos identity from a front-end service to a Kerberos identity on a backend service.
Important
Protocol transition requires Kerberos constrained delegation. Therefore, protocol transitioned identities cannot cross domain boundaries.
Claims‐based authentication can be used as an alternative to Kerberos delegation. Claims‐based authentication enables a client’s authentication claim to be passedbetween two different services if the services meet all of the following criteria:
There must be a trust relationship between the services.
Both services must be claims-aware.
For more information about Kerberos authentication, see the following resources:
How the Kerberos Version 5 Authentication Protocol Works (http://go.microsoft.com/fwlink/p/?LinkID=196644)
Microsoft Kerberos (http://go.microsoft.com/fwlink/p/?LinkID=125740)
Kerberos Explained
Kerberos authentication and claims-based authentication
SharePoint Foundation 2010 supports claims-based authentication. Claims-based authentication is built on Windows Identity Foundation (WIF), which is a set of .NET
Framework classes that are used to implement claims-based identity. Claims-based authentication relies on standards such as WS-Federation and WS-Trust. For more
information about claims-based authentication, see the following resources:
Claims-based Identity for Windows: An Introduction to Active Directory Federation Services 2.0, Windows CardSpace 2.0, and Windows Identity Foundation (white
paper) (http://go.microsoft.com/fwlink/p/?LinkId=198942)
Windows Identity Foundation home page (http://go.microsoft.com/fwlink/p/?LinkId=198943)
An Introduction to Claims (http://go.microsoft.com/fwlink/p/?LinkId=217399)
SharePoint Claims-Based Identity (http://go.microsoft.com/fwlink/p/?LinkID=196647)
When you create a SharePoint Foundation 2010 Web application, you have the option of selecting either of two authentication modes: claims-based or classic-mode. For
new implementations of SharePoint Foundation 2010, you should consider using claims-based authentication. By using claims-based authentication, all supported
authentication types are available for your Web applications.
The following service applications require the translation of claims-based credentials to Windows credentials. This process of translation uses the Claims to Windows
Token Service (C2WTS):
Excel Services
PerformancePoint Services
InfoPath Forms Services
Visio Services
The service applications that require the C2WTS must use Kerberos constrained delegation. This is because the C2WTS requires protocol transition, and protocol
transition is only supported by Kerberos constrained delegation. For the service applications in the preceding list, the C2WTS translates claims within the farm to
Windows credentials for outbound authentication. It is important to understand that these service applications can leverage the C2WTS only if the incoming
authentication method is either claims-based or classic-mode. Service applications that are accessed through Web applications and that use SAML claims or forms-

based authentication claims do not use the C2WTS, and, therefore, cannot translate claims to Windows credentials.
For comprehensive guidance for configuring Kerberos in nine specific scenarios, including core deployment, three Microsoft SQL Server solutions, and scenarios that
use Excel Services, PowerPivot for SharePoint, Visio Services, PerformancePoint Services, and Business Connectivity Services, see Configuring Kerberos authentication for
SharePoint 2010 Products (http://go.microsoft.com/fwlink/p/?LinkId=197178).
© 2014 Microsoft

Forefront UAG integration (SharePoint Foundation 2010)
Applies to: SharePoint Foundation 2010
Topic Last Modified: 2011-08-05
Information technology (IT) professionals who manage websites that use Microsoft SharePoint Foundation 2010 may want to make them available to users who are outside
of their corporate network. This concept is referred to as publishing, and this is made possible by using edge protection software such as Microsoft Forefront Unified
Access Gateway 2010 (UAG).
Publishing SharePoint Sites with UAG
The following articles contain procedures that are required to publish SharePoint websites through Forefront UAG.
SharePoint publishing solution guide (http://go.microsoft.com/fwlink/p/?LinkId=206256)
Intended for system administrators who are responsible for publishing SharePoint websites for extranet users.
Publishing SharePoint Workspace Mobile on Forefront UAG (http://go.microsoft.com/fwlink/p/?LinkId=206257)
Describes how to publish the SharePoint 2010 mobile workspace for extranet users.
© 2014 Microsoft
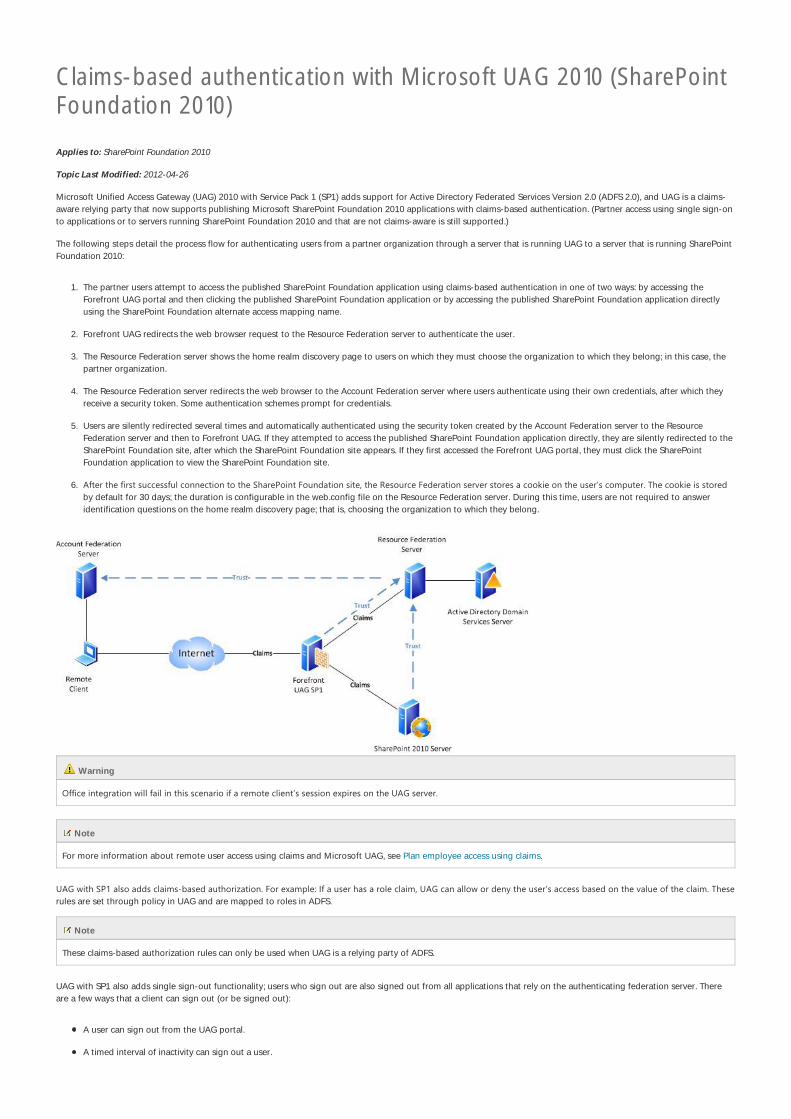
Claims-based authentication with Microsoft UAG 2010 (SharePointFoundation 2010)
Applies to: SharePoint Foundation 2010
Topic Last Modified: 2012-04-26
Microsoft Unified Access Gateway (UAG) 2010 with Service Pack 1 (SP1) adds support for Active Directory Federated Services Version 2.0 (ADFS 2.0), and UAG is a claims-
aware relying party that now supports publishing Microsoft SharePoint Foundation 2010 applications with claims-based authentication. (Partner access using single sign-on
to applications or to servers running SharePoint Foundation 2010 and that are not claims-aware is still supported.)
The following steps detail the process flow for authenticating users from a partner organization through a server that is running UAG to a server that is running SharePoint
Foundation 2010:
1. The partner users attempt to access the published SharePoint Foundation application using claims-based authentication in one of two ways: by accessing the
Forefront UAG portal and then clicking the published SharePoint Foundation application or by accessing the published SharePoint Foundation application directly
using the SharePoint Foundation alternate access mapping name.
2. Forefront UAG redirects the web browser request to the Resource Federation server to authenticate the user.
3. The Resource Federation server shows the home realm discovery page to users on which they must choose the organization to which they belong; in this case, the
partner organization.
4. The Resource Federation server redirects the web browser to the Account Federation server where users authenticate using their own credentials, after which they
receive a security token. Some authentication schemes prompt for credentials.
5. Users are silently redirected several times and automatically authenticated using the security token created by the Account Federation server to the Resource
Federation server and then to Forefront UAG. If they attempted to access the published SharePoint Foundation application directly, they are silently redirected to the
SharePoint Foundation site, after which the SharePoint Foundation site appears. If they first accessed the Forefront UAG portal, they must click the SharePoint
Foundation application to view the SharePoint Foundation site.
6. After the first successful connection to the SharePoint Foundation site, the Resource Federation server stores a cookie on the user’s computer. The cookie is storedby default for 30 days; the duration is configurable in the web.config file on the Resource Federation server. During this time, users are not required to answer
identification questions on the home realm discovery page; that is, choosing the organization to which they belong.
Warning
Office integration will fail in this scenario if a remote client’s session expires on the UAG server.
Note
For more information about remote user access using claims and Microsoft UAG, see Plan employee access using claims.
UAG with SP1 also adds claims‐based authorization. For example: If a user has a role claim, UAG can allow or deny the user’s access based on the value of the claim. Theserules are set through policy in UAG and are mapped to roles in ADFS.
Note
These claims-based authorization rules can only be used when UAG is a relying party of ADFS.
UAG with SP1 also adds single sign-out functionality; users who sign out are also signed out from all applications that rely on the authenticating federation server. There
are a few ways that a client can sign out (or be signed out):
A user can sign out from the UAG portal.
A timed interval of inactivity can sign out a user.

Scheduled sign-out times of UAG can sign out a user.
For more information about single sign-out, see Overview of AD FS 2.0 with Forefront UAG (http://go.microsoft.com/fwlink/p/?LinkId=207207).
UAG can still provide single sign-on (SSO) access if an application uses NTLM or Kerberos authentication, and UAG performs Kerberos translation for clients. For more
information, see Configuring single sign-on with Kerberos constrained delegation to non-claims-aware applications (http://go.microsoft.com/fwlink/p/?LinkId=207208).
See Also
Other ResourcesPlan employee access using claims
Overview of AD FS 2.0 with Forefront UAG (http://go.microsoft.com/fwlink/p/?LinkId=207207)
Configuring single sign-on with Kerberos constrained delegation to non-claims-aware applications (http://go.microsoft.com/fwlink/p/?LinkId=207208)
© 2014 Microsoft

Plan for claims-based authentication or classic-modeauthentication (SharePoint Foundation 2010)
Applies to: SharePoint Foundation 2010
Topic Last Modified: 2012-01-23
In Microsoft SharePoint Foundation 2010, you can choose between claims-based authentication and classic-mode authentication when you create a Web application.
For more information about these two authentication modes, see Plan authentication methods (SharePoint Foundation 2010).
Choosing classic-mode or claims-based authentication
Choosing between classic-mode and claims-based authentication should be based on business needs. For example, if you need to support user accounts in identity
providers that are not based on Active Directory Domain Services (AD DS), and you implement forms-based authentication, you must use forms-based authentication
with claims-based authentication in SharePoint Foundation 2010. We recommend that you use claims-based authentication whenever possible.
The following chart summarizes the support for authentication types by each authentication mode.
Type Classic-mode authentication Claims-based authentication
Windows authentication methods
NTLM
Kerberos
Anonymous
Basic
Digest
Yes Yes
Forms-based authentication methods
LDAP
SQL Server database or other database
Custom or third-party membership and role providers
No Yes
SAML token-based authentication methods
AD FS 2.0
Third-party identity provider
LDAP
N/A Yes
Upgrading to SharePoint Foundation 2010
If you are upgrading from Windows SharePoint Services 3.0 to SharePoint Foundation 2010, you should consider the following information:
If you are upgrading an earlier version solution to SharePoint Foundation 2010 and the solution includes only Windows accounts, you can use either mode of
Windows authentication: Windows Claims or Windows Classic. We recommend that you use claims-based authentication whenever possible. For more information
about using claims-based authentication, see Implementing Claims-Based Authentication with SharePoint Server 2010 (whitepaper).
If you are upgrading a solution that requires forms-based authentication, the only option is to upgrade to claims-based authentication.
Custom code that uses Windows identities might have to be updated. If you have custom code that uses Windows identities, you can use classic-mode
authentication until your code is updated and tested. For example, if you wrote a custom Web part for Windows SharePoint Services 3.0 that retrieved the current
user identity and you are upgrading to SharePoint Foundation 2010, you should use SPWeb.CurrentUser() instead of HttpContext.Current.User.Identity() in
order to retrieve the identity.
The migration time will vary, depending on the number of users that are listed in the UserInfo table in the content database. When you change a Web application
from Windows classic mode to Windows claims, you must use Windows PowerShell to convert Windows identities to Windows claims identities. Be sure to allow
for enough time during the upgrade process to complete this task.
You can search and list names in people picker when you are using SAML token-based authentication, but they cannot be checked for validity unless you write a
custom claims provider.
For more information about how to write a customer claim provider, see Custom claims providers for People Picker (SharePoint Foundation 2010).
If you are using the Outlook social connector, you must use either Windows classic-mode authentication or Windows claims authentication.
The following table illustrates several compatibility considerations when you migrate from Windows SharePoint Services 3.0 to SharePoint Foundation 2010.

To SharePoint Foundation
2010
Windows classic mode
authentication
To SharePoint Foundation
2010
Windows claims
authentication methods
To SharePoint Foundation
2010
forms-based
authentication methods
To SharePoint Foundation 2010
SAML token-based
authentication methods
From Windows SharePoint
Services 3.0
Windows authentication
methods
Supported Supported Not supported Not supported
From Windows SharePoint
Services 3.0
forms-based authentication
methods
Not supported Not supported Supported1 Supported2
From Windows SharePoint
Services 3.0
Web single sign-on
Not supported Not supported Not supported3 Not supported3
Notes for the previous table of compatibility considerations:
1. This upgrade path is supported by migrating to claims authentication.
2. This upgrade path is supported, but it requires additional configuration in order to complete the migration.
3. This upgrade path is not supported, but the same level of functionality is provided through SAML token-based authentication.
For additional information about migrating, see the following topics:
Upgrading to SharePoint Foundation 2010
Migrate from forms-based authentication to claims-based authentication (SharePoint Foundation 2010)
Migrate from classic-mode to claims-based authentication (SharePoint Foundation 2010)
Features that do not work with forms-based authentication or SAML security tokens
The following SharePoint Foundation 2010 features do not work when you switch to a claims-based Web application that uses forms-based authentication or Security
Assertion Markup Language (SAML) security tokens. These features do not work because claims-based authentication does not generate a Windows security token,
which is necessary for these features.
Search Alerts
SharePoint Foundation 2010 Explorer View
Claims to Windows Token Service (C2WTS)
InfoPath Forms Services
Search crawling
Note
If you are using forms-based authentication or SAML token-based authentication, you will still need a separate zone that supports Windows authentication to
enable Microsoft Search Server 2010 to crawl your content.
Certificate Authentication
Note
Certificate authentication is not supported in SharePoint Foundation 2010, but you can configure Unified Access Gateway (UAG) as a front-end to SharePoint
Foundation 2010 to enable certificate authentication by integrating with Active Directory Federated Services (AD FS) and SAML token-based authentication.
For more information about configuring SharePoint Foundation 2010 with UAG, see Forefront UAG integration (SharePoint Foundation 2010).
Features that require additional configuration in order to work with forms-based authentication or
SAML security tokens
There are several SharePoint Foundation 2010 features that require additional configuration to work with forms-based authentication or SAML security tokens.
Business Intelligence (BI)

BI clients must either use Windows Claims authentication, Windows Classic authentication, or the Secure Store Service. When you are using the Secure Store
Service, SAML claims are not translated to Windows tokens, so other services will not detect the SAML identity; the identity will be the service account, an
anonymous account, or an unattended account.
Information Rights Management (IRM)
A hotfix that enables basic IRM functionality with claims and SAML is available from Microsoft. For more information, see Microsoft Knowledge Base article
Description of the SharePoint Foundation 2010 hotfix package: June 30, 2011(http://go.microsoft.com/fwlink/?LinkId=236873).
© 2014 Microsoft

Configure claims authentication (SharePoint Server 2010)
Applies to: SharePoint Server 2010, SharePoint Foundation 2010
Topic Last Modified: 2011-09-25
In this section:
Create claims-based web applications in SharePoint 2010
Configure anonymous access for a claims-based Web application (SharePoint Server 2010)
Configure forms-based authentication for a claims-based Web application (SharePoint Server 2010)
Configure Kerberos authentication for the claims to Windows token service (SharePoint Server 2010)
Configure authentication using a SAML security token (SharePoint Server 2010)
Configure claims-based authentication using Windows Live ID (SharePoint Server 2010)
Configure Digest authentication for a claims-based Web application (SharePoint Server 2010)
Configure Basic authentication for a claims-based Web application (SharePoint Server 2010)
Configure Client Certificate Authentication (SharePoint Server 2010)
See Also
Other ResourcesResource Center: Installation and Deployment for SharePoint Server 2010
© 2014 Microsoft

Configure anonymous access for a claims-based Web application(SharePoint Server 2010)
Applies to: SharePoint Server 2010, SharePoint Foundation 2010
Topic Last Modified: 2011-03-11
Administrators can configure anonymous access, which is not enabled by default, for a claims-based Web application.
This article is obsolete.
For information about how to configure anonymous access for a claims-based Web application, see Create claims-based web applications in SharePoint 2010.
See Also
ConceptsPlan authentication methods (SharePoint Server 2010)
Choose security groups (SharePoint Server 2010)
© 2014 Microsoft

Configure forms-based authentication for a claims-based Webapplication (SharePoint Server 2010)
Applies to: SharePoint Server 2010, SharePoint Foundation 2010
Topic Last Modified: 2012-01-16
Procedures in this article illustrate how to configure a forms-based Web application to use an LDAP provider.
The procedures in this article provide guidance to enable you to configure forms-based authentication for a Microsoft SharePoint Server 2010 claims-based Web
application. If you need to migrate an existing Microsoft Office SharePoint Server 2007 Web application from forms-based authentication to claims-based authentication in
SharePoint Server 2010, see Migrate from forms-based authentication to claims-based authentication (SharePoint Server 2010).
Configure a forms-based Web application to use an LDAP provider by using Central Administration
Configure the LDAP Web.Config files
Configure a forms-based Web application to use an LDAP provider by using Windows PowerShell
Configure a forms-based Web application to use an LDAP provider by using Central Administration
Perform the steps in the following procedure to use Central Administration to configure forms-based authentication for a claims-based Web application.
To configure forms-based authentication for a claims-based Web application by using Central Administration
1. Verify that the user account that is performing this procedure is a site collection administrator.
2. In Central Administration, in the Application Management section, click Manage web applications.
3. In the Contribute group of the ribbon, click New.
4. In the Authentication section of the Create New Web Application dialog box, click Claims Based Authentication.
5. In the Claims Authentication Types section, select Enable Forms Based Authentication (FBA).
6. Type a membership provider name and a role manager name. In the example Web.Config file depicted in this article, the name of the membership provider is
membership, and the name of the role manager is rolemanager.
7. Click OK to create the Web application.
Configure the LDAP Web.Config files
After you have successfully created the Web application (described in the preceding procedure), modify the following Web.Config files:
The Central Administration Web application Web.Config file
The Security Token Service Web.Config file
The forms-based authentication claims-based Web application Web.Config file
To configure the Central Administration Web.Config file
1. Start IIS Manager by typing INETMGR at a command prompt.
2. Go to the SharePoint Central Administration site in IIS.
3. Right-click SharePoint Central Administration and then click Explore.
4. Open the Web.Config file.
5. Find the <Configuration> <system.web> section and add the following entry:
<membership defaultProvider="AspNetSqlMembershipProvider">
<providers>
<add name="membership"
type="Microsoft.Office.Server.Security.LdapMembershipProvider, Microsoft.Office.Server, Version=14.0.0.0, Culture=neutral, PublicKeyToken=71e9bce111e9429c"
server="yourserver.com"
port="389"
useSSL="false"
userDNAttribute="distinguishedName"
userNameAttribute="sAMAccountName"
userContainer="OU=UserAccounts,DC=internal,DC=yourcompany,DC= distinguishedName (of your userContainer)"

Important
After you have added the preceding entry, save and close the Web.Config file.
To configure the Security Token Service Web.Config file
1. Start IIS Manager by typing INETMGR at a command prompt.
2. Go to the SharePoint Web Services site.
3. Go to the SecurityTokenServiceApplication sub-site.
4. Right-click SecurityTokenServiceApplication and then click Explore.
5. Open the Web.Config file.
6. Find the <Configuration> <system.web> section and add the following entry:
Important
userObjectClass="person"
userFilter="(ObjectClass=person)"
scope="Subtree"
otherRequiredUserAttributes="sn,givenname,cn" />
</providers>
</membership>
<roleManager enabled="true" defaultProvider="AspNetWindowsTokenRoleProvider" >
<providers>
<add name="roleManager"
type="Microsoft.Office.Server.Security.LdapRoleProvider, Microsoft.Office.Server, Version=14.0.0.0, Culture=neutral, PublicKeyToken=71e9bce111e9429c"
server="yourserver.com"
port="389"
useSSL="false"
groupContainer="DC=internal,DC=yourcompany,DC= distinguishedName (of your groupContainer)"
groupNameAttribute="cn"
groupNameAlternateSearchAttribute="samAccountName"
groupMemberAttribute="member"
userNameAttribute="sAMAccountName"
dnAttribute="distinguishedName"
groupFilter="((ObjectClass=group)"
userFilter="((ObjectClass=person)"
scope="Subtree" />
</providers>
</roleManager>
<membership>
<providers>
<add name="membership"
type="Microsoft.Office.Server.Security.LdapMembershipProvider, Microsoft.Office.Server, Version=14.0.0.0, Culture=neutral, PublicKeyToken=71e9bce111e9429c"
server="yourserver.com"
port="389"
useSSL="false"
userDNAttribute="distinguishedName"
userNameAttribute="sAMAccountName"
userContainer="OU=UserAccounts,DC=internal,DC=yourcompany,DC=com"
userObjectClass="person"
userFilter="(&(ObjectClass=person))"
scope="Subtree"
otherRequiredUserAttributes="sn,givenname,cn" />
</providers>
</membership>
<roleManager enabled="true" >
<providers>
<add name="rolemanager"
type="Microsoft.Office.Server.Security.LdapRoleProvider, Microsoft.Office.Server, Version=14.0.0.0, Culture=neutral, PublicKeyToken=71e9bce111e9429c"
server="yourserver.com"
port="389"
useSSL="false"
groupContainer="DC=internal,DC=yourcompany,DC=com"
groupNameAttribute="cn"
groupNameAlternateSearchAttribute="samAccountName"
groupMemberAttribute="member"
userNameAttribute="sAMAccountName"
dnAttribute="distinguishedName"
groupFilter="(&(ObjectClass=group))"
userFilter="(&(ObjectClass=person))"
scope="Subtree" />
</providers>
</roleManager>

After you have added the preceding entry, save and close the Web.Config file.
To configure the forms-based authentication claims-based Web application Web.Config file
1. Start IIS Manager by typing INETMGR at a command prompt.
2. Go to the Claims Forms site.
3. Right-click Claims Forms and then click Explore.
4. Open the Web.Config file.
5. Find the <Configuration> <system.web> section.
6. Find the <membership defaultProvider="i"> section and add the following entry:
Find the <roleManager defaultProvider="c" enabled="true" cacheRolesInCookie="false"> section and add the following entry:
Important
After you have added the preceding entry, save and close the Web.Config file.
Warning
Do not overwrite any existing entries in this Web.Config file.
Configure a forms-based Web application to use an LDAP provider by using Windows PowerShell
Perform the steps in the following procedure to use Windows PowerShell to configure forms-based authentication for a claims-based Web application.
To configure a forms-based Web application to use an LDAP provider by using Windows PowerShell
1. Verify that you meet the following minimum requirements: See Add-SPShellAdmin.
2. On the Start menu, click All Programs.
3. Click Microsoft SharePoint 2010 Products.
4. Click SharePoint 2010 Management Shell.
5. From the Windows PowerShell command prompt, type the following:
<add name="membership"
type="Microsoft.Office.Server.Security.LdapMembershipProvider, Microsoft.Office.Server, Version=14.0.0.0, Culture=neutral, PublicKeyToken=71e9bce111e9429c"
server="yourserver.com"
port="389"
useSSL="false"
userDNAttribute="distinguishedName"
userNameAttribute="sAMAccountName"
userContainer="OU=UserAccounts,DC=internal, DC=yourcompany,DC=com"
userObjectClass="person"
userFilter="(&(ObjectClass=person))"
scope="Subtree"
otherRequiredUserAttributes="sn,givenname,cn" />
<add name="roleManager"
type="Microsoft.Office.Server.Security.LdapRoleProvider, Microsoft.Office.Server, Version=14.0.0.0, Culture=neutral, PublicKeyToken=71e9bce111e9429c"
server="yourserver.com"
port="389"
useSSL="false"
groupContainer="DC=internal,DC=yourcompany,DC=com"
groupNameAttribute="cn"
groupNameAlternateSearchAttribute="samAccountName"
groupMemberAttribute="member"
userNameAttribute="sAMAccountName"
dnAttribute="distinguishedName"
groupFilter="(&(ObjectClass=group))"
userFilter="(&(ObjectClass=person))"
scope="Subtree" />
$ap = New-SPAuthenticationProvider -Name "ClaimsForms" -ASPNETMembershipProvider "membership" -ASPNETRoleProviderName "rolemanager"
$wa = New-SPWebApplication -Name "Claims Windows Web App" -ApplicationPool "Claims App Pool" -ApplicationPoolAccount "internal\appool"

Note
The value of the ApplicationPoolAccount parameter must be a managed account on the farm.
6. After you have successfully created an authentication provider and a Web application, modify the following Web.Config files by using the sample entries provided
in the Configure the LDAP Web.Config files section of this article:
The Central Administration Web application Web.Config file
The Security Token Service Web.Config file
The forms-based authentication claims-based Web application Web.Config file
7. After you have modified the Web.Config files, create a SPClaimsPrincipal and a site collection, as shown in the following example:
For more information, see New-SPClaimsPrincipal.
Note
We recommend that you use Windows PowerShell when performing command-line administrative tasks. The Stsadm command-line tool has been deprecated, but is
included to support compatibility with previous product versions.
See Also
ConceptsMigrate from forms-based authentication to claims-based authentication (SharePoint Server 2010)
Other ResourcesResource Center: Security and Authentication for SharePoint Server 2010
© 2014 Microsoft
-Url http://servername -Port 80 -AuthenticationProvider $ap
$cp = New-SPClaimsPrincipal -Identity "membership:SiteOwner" -IdentityType FormsUser
$sp = New-SPSite http://servername:port -OwnerAlias $cp.Encode() -Template "STS#0"

Configure Kerberos authentication for the claims to Windowstoken service (SharePoint Server 2010)
Applies to: SharePoint Server 2010, SharePoint Foundation 2010
Topic Last Modified: 2011-09-26
This article is obsolete.
For information about how to configure Kerberos authentication, see Configuring Kerberos Authentication for Microsoft SharePoint 2010 Products and Technologies (white
paper). (http://go.microsoft.com/fwlink/p/?LinkID=197178) white paper.
See Also
ConceptsPlan authentication methods (SharePoint Server 2010)
Other ResourcesResource Center: Installation and Deployment for SharePoint Server 2010
© 2014 Microsoft

Configure authentication using a SAML security token (SharePointServer 2010)
Applies to: SharePoint Server 2010, SharePoint Foundation 2010
Topic Last Modified: 2013-01-21
The procedures in this article explain how to configure authentication using a Security Assertion Markup Language (SAML) security token for a Microsoft SharePoint Server
2010 claims-based Web application.
SAML sign-in is typically used in enterprise federation scenarios, for example, to provide access to a business partner. SAML sign-in is also deployed to provide access to
internal users whose accounts reside in a domain that is not part of the forest that contains SharePoint Server 2010.
Before you configure authentication using a SAML security token for a SharePoint Server 2010 claims-based Web application, you must configure an identity provider that
supports WS-Federation, such as Active Directory Federation Services (AD FS) 2.0. For information about configuring a server to run AD FS 2.0, see the AD FS 2.0
Deployment Guide (http://go.microsoft.com/fwlink/p/?LinkId=191723).
In this article:
Configure an Identity Provider STS (IP-STS) Web application by using Windows PowerShell
Configure a Relying Party STS (RP-STS) Web application
Establish a trust relationship between the IP-STS and the RP-STS by using Windows PowerShell
Export the trusted IP-STS certificate by using Windows PowerShell
Define a unique identifier for claims mapping by using Windows PowerShell
Create a new SharePoint Web application and configure it to use SAML sign-in
Enable replay protection
Configure an Identity Provider STS (IP-STS) Web application by using Windows PowerShell
Perform the following procedures to use Windows PowerShell to configure a SharePoint claims-based Web application.
To configure an Identity Provider STS (IP-STS) Web application by using Windows PowerShell
1. Verify that you meet the following minimum requirements: See Add-SPShellAdmin.
2. On the Start menu, click All Programs.
3. Click Microsoft SharePoint 2010 Products.
4. Click SharePoint 2010 Management Shell.
5. From the Windows PowerShell command prompt, create an x509Certificate2 object, as shown in the following example:
6. Create a claim type mapping to use in your trusted authentication provider, as shown in the following example:
7. Create a trusted login provider by first creating a value for the realm parameter, as shown in the following example:
8. Create a value for the signinurl parameter that points to the Security Token Service Web application, as shown in the following example:
9. Create the trusted login provider, using the same IdentifierClaim value as in a claim mapping ($map1.InputClaimType), as shown in the following
example:
$cert = New-Object
System.Security.Cryptography.X509Certificates.X509Certificate2("path to cert file")
New-SPClaimTypeMapping "http://schemas.xmlsoap.org/ws/2005/05/identity/claims/emailaddress"
-IncomingClaimTypeDisplayName "EmailAddress" -SameAsIncoming
$realm = "urn:" + $env:ComputerName + ":domain-int"
$signinurl = "https://test-2/FederationPassive/"

10. Create a Web application by first creating a value for the application pool account (for the current user), as shown in the following example:
Note
The application pool account must be a managed account. To create a managed account, use New-SPManagedAccount.
11. Create a value for the Web application URL ($webappurl = "https://" + $env:ComputerName), as shown in the following example:
12. Create a site by first creating a claim object, as shown in the following example:
13. Create a site, as shown in the following example:
Configure a Relying Party STS (RP-STS) Web application
Use the procedure in this section to configure a relying-party STS Web application.
To configure a Relying Party STS (RP-STS) Web application
1. Open the Active Directory Federation Services (AD FS) 2.0 Management console.
2. In the left pane, expand Policy, and select Relying Parties.
3. In the right pane, click Add Relying Party. This opens the Active Directory Federation Services (AD FS) 2.0 configuration wizard.
4. On the first page of the wizard, click Start.
5. Select Enter relying party configuration manually, and click Next.
6. Type a relying party name and click Next.
7. Make sure Active Directory Federation Services (AD FS) 2.0 Server Profile is selected, and click Next.
8. Do not use an encryption certificate. Click Next.
9. Select Enable support for Web-browser-based identity federation.
10. Type the name of the Web application URL, and append /_trust/ (for example: https://servername/_trust/). Click Next.
11. Type the name of an identifier (for example: urn:COMPUTERNAME:Geneva), and click Add. Click Next.
12. On the Summary page, click Next and then click Close. This opens the Rules Editor Management console. Use this console to configure the mapping of claims
from an LDAP Web application to SharePoint.
13. In the left pane, expand New Rule, and select Predefined Rule.
14. Select Create Claims from LDAP Attribute Store.
15. In the right pane, from the Attribute Store drop-down list, select Enterprise Active Directory User Account Store.
16. Under LDAP Attribute, select sAMAccountName.
$ap = New-SPTrustedIdentityTokenIssuer -Name
"WIF" ‐Description "Windows® Identity Foundation" ‐Realm$realm -ImportTrustCertificate $cert
-ClaimsMappings $map1[,$map2..] -SignInUrl
$signinurl -IdentifierClaim $map1.InputClaimType
$account = "DOMAIN\" + $env:UserName
$wa = New-SPWebApplication -name "Claims WIF"
-SecureSocketsLayer -ApplicationPool "SharePoint SSL"
-ApplicationPoolAccount $account -Url $webappurl -Port 443
-AuthenticationProvider $ap
$claim = New-SPClaimsPrincipal
-TrustedIdentityTokenIssuerr $ap -Identity
$env:UserName
$site = New-SPSite $webappurl -OwnerAlias
$claim.ToEncodedString() -template "STS#0"
17. Under Outgoing Claim Type, select E-Mail Address.
18. In the left pane, click Save.
Establish a trust relationship with an Identity Provider STS (IP-STS) by using Windows PowerShell
Use the procedure in this section to establish a trust relationship with an IP-STS.
To establish a trust relationship with an IP-STS by using Windows PowerShell
1. Verify that you meet the following minimum requirements: See Add-SPShellAdmin.
2. On the Start menu, click All Programs.
3. Click Microsoft SharePoint 2010 Products.
4. Click SharePoint 2010 Management Shell.
5. From the Windows PowerShell command prompt, establish a trust relationship, as shown in the following example:
Export the trusted IP-STS certificate by using Windows PowerShell
Use the procedure in this section to export the certificate of the IP-STS with which you want to establish a trust relationship, and then copy the certificate to a location
that Microsoft SharePoint Server 2010 can access.
To export the trusted IP-STS certificate by using Windows PowerShell
1. Verify that you meet the following minimum requirements: See Add-SPShellAdmin.
2. On the Start menu, click All Programs.
3. Click Microsoft SharePoint 2010 Products.
4. Click SharePoint 2010 Management Shell.
5. From the Windows PowerShell command prompt, export the trusted IP-STS certificate, as shown in the following example:
Define a unique identifier for claims mapping by using Windows PowerShell
Use the procedure in this section to define an e-mail address that will serve as a unique identifier for claims mapping. Typically, the administrator of the trusted STS will
have to provide this information because only the owner of the STS knows which value in the token will be always unique for each user. Note that the administrator of the
trusted STS can create a URI to represent the e-mail address.
To define a unique identifier for claims mapping by using Windows PowerShell
1. Verify that you meet the following minimum requirements: See Add-SPShellAdmin.
2. On the Start menu, click All Programs.
3. Click Microsoft SharePoint 2010 Products.
4. Click SharePoint 2010 Management Shell.
5. From the Windows PowerShell command prompt, create a mapping, as shown in the following example:
Create a new authentication provider
Use the procedure in this section to create a new authentication provider that the Web application will use.
To create a new authentication provider by using Windows PowerShell
1. Verify that you meet the following minimum requirements: See Add-SPShellAdmin.
$waurl = "https://" + $env:ComputerName
$title = "SAML-Claims"
$cert = New-Object System.Security.Cryptography.X509Certificates.X509Certificate2("c:\geneva.cer")
$map = New-SPClaimTypeMapping -IncomingClaimType "http://schemas.xmlsoap.org/ws/2005/05/identity/claims/emailaddress" -IncomingClaimTypeDisplayName "EmailAddress" -SameAsIncoming

2. On the Start menu, click All Programs.
3. Click Microsoft SharePoint 2010 Products.
4. Click SharePoint 2010 Management Shell.
5. From the Windows PowerShell command prompt, create a new authentication provider, as shown in the following example. Note that the realm is the parameter
used by the trusted STS to identify a specific SharePoint farm.
Create a new SharePoint Web application and configure it to use SAML sign-in
In this step, you create and configure the Web application.
To create a new SharePoint Web application and configure it to use SAML sign-in by using Windows PowerShell
1. Verify that you meet the following minimum requirements: See Add-SPShellAdmin.
2. On the Start menu, click All Programs.
3. Click Microsoft SharePoint 2010 Products.
4. Click SharePoint 2010 Management Shell.
5. From the Windows PowerShell command prompt, create a new SharePoint Web application and configure it to use SAML sign-in. Note that you must replace
"WebAppUrl" and "domain\admin" with the valid values.
Note
You are enabling SSL, because with SAML sign-in, cookies are used as the single sign-on ticket for the user. This allows administrators to grant access to the
SharePoint resources for the duration of the token without the need of re-authenticate the user. Without SSL, these cookies can be easily hijacked by a
malicious user and be used to impersonate the original user.
When you have completed these procedures, create a SharePoint site and assign an owner. For information about creating a SharePoint site, see Create a site collection
(SharePoint Server 2010).
Enable token replay protection
To provide additional security for UNRESOLVED_TOKEN_VAL(1st_OSS_14) web applications that use SAML-based claims authentication, you can use the
UNRESOLVED_TOKEN_VAL(IDFX_O15_supported_1st) token replay detection feature. Token replay protection can prevent an attacker from trying to intercept and use a
user’s security token. For more information, see Replay Detection.
Use the procedure in this section to enable replay detection on a UNRESOLVED_TOKEN_VAL(1st_OSS_14) web application that is configured for SAML claims
authentication.
To enable replay protection
1. On the server running UNRESOLVED_TOKEN_VAL(1st_OSS_14), open the Internet Information Services (IIS) Manager snap-in.
2. In the console tree of Internet Information Services (IIS) Manager, right-click the site that corresponds to the name of the web application, and then click Explore.
3. In the folder window, double-click the Web.Config file.
4. In the <Configuration> section, find the <microsoft.identityModel> section.
5. Add the following as a new section to the <microsoft.identityModel> section:
in which:
<NumberOfTokensToBeCached> is the number of tokens to store in the token replay detection cache.
<TokenCacheExpiration> is the time after which a token in the replay detection cache is removed, in <hours>:<minutes>:<seconds> format.
$realm = "urn:" + $env:ComputerName + ":Geneva"
$ap = New-SPTrustedIdentityTokenIssuer -Name "Geneva" -Description "Geneva" -Realm $realm -ImportTrustCertificate $cert -ClaimsMappings $map -SignInUrl "https:// test-2/FederationPassive/" -IdentifierClaim "http://schemas.xmlsoap.org/ws/2005/05/identity/claims/emailaddress"
$wa = New-SPWebApplication -Name "SAML Sign-In" -SecureSocketsLayer -ApplicationPool "SAML Sign-In" -ApplicationPoolAccount "domain\admin" -
Url "WebAppUrl" -Port 443 -AuthenticationProvider $ap
<service>
<tokenReplayDetection enabled="true" capacity="<NumberOfTokensToBeCached>" expirationPeriod="<TokenCacheExpiration>">
</service>

6. Save your changes to the Web.Config file.
For important considerations about enabling token replay protection in a load-balanced environment, see ACS Security Guidelines.
See Also
Other ResourcesResource Center: Security and Authentication for SharePoint Server 2010
© 2014 Microsoft
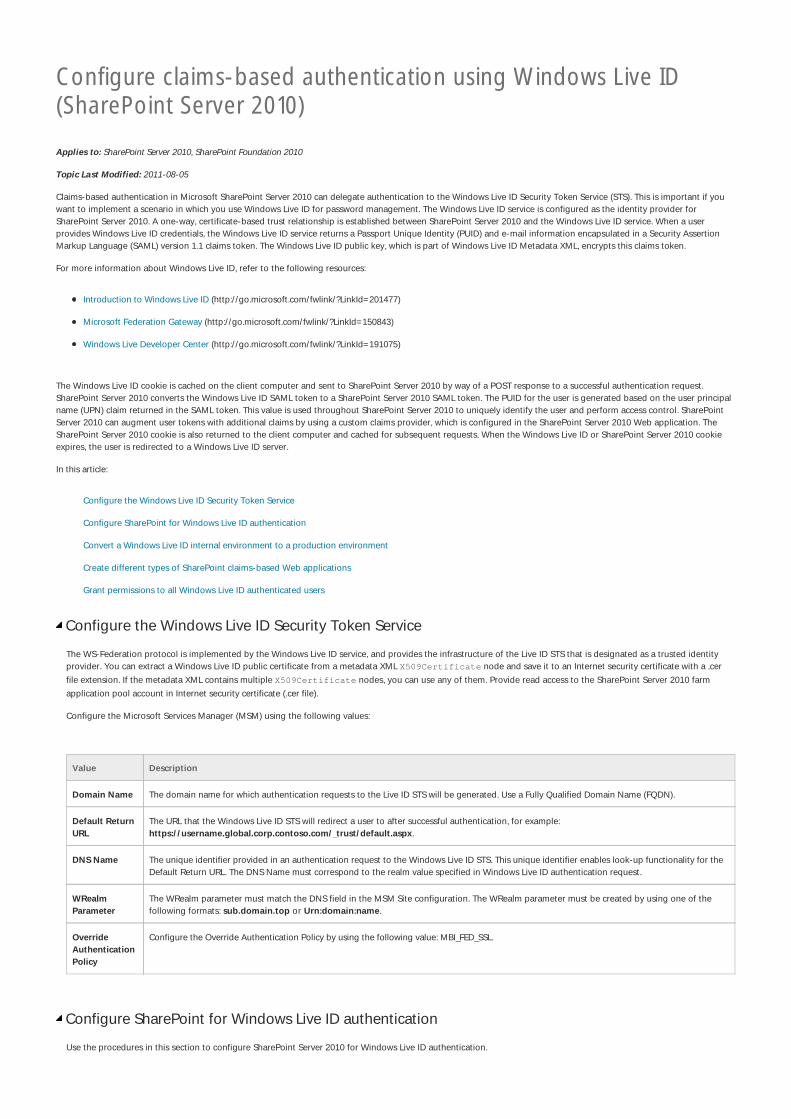
Configure claims-based authentication using Windows Live ID(SharePoint Server 2010)
Applies to: SharePoint Server 2010, SharePoint Foundation 2010
Topic Last Modified: 2011-08-05
Claims-based authentication in Microsoft SharePoint Server 2010 can delegate authentication to the Windows Live ID Security Token Service (STS). This is important if you
want to implement a scenario in which you use Windows Live ID for password management. The Windows Live ID service is configured as the identity provider for
SharePoint Server 2010. A one-way, certificate-based trust relationship is established between SharePoint Server 2010 and the Windows Live ID service. When a user
provides Windows Live ID credentials, the Windows Live ID service returns a Passport Unique Identity (PUID) and e-mail information encapsulated in a Security Assertion
Markup Language (SAML) version 1.1 claims token. The Windows Live ID public key, which is part of Windows Live ID Metadata XML, encrypts this claims token.
For more information about Windows Live ID, refer to the following resources:
Introduction to Windows Live ID (http://go.microsoft.com/fwlink/?LinkId=201477)
Microsoft Federation Gateway (http://go.microsoft.com/fwlink/?LinkId=150843)
Windows Live Developer Center (http://go.microsoft.com/fwlink/?LinkId=191075)
The Windows Live ID cookie is cached on the client computer and sent to SharePoint Server 2010 by way of a POST response to a successful authentication request.
SharePoint Server 2010 converts the Windows Live ID SAML token to a SharePoint Server 2010 SAML token. The PUID for the user is generated based on the user principal
name (UPN) claim returned in the SAML token. This value is used throughout SharePoint Server 2010 to uniquely identify the user and perform access control. SharePoint
Server 2010 can augment user tokens with additional claims by using a custom claims provider, which is configured in the SharePoint Server 2010 Web application. The
SharePoint Server 2010 cookie is also returned to the client computer and cached for subsequent requests. When the Windows Live ID or SharePoint Server 2010 cookie
expires, the user is redirected to a Windows Live ID server.
In this article:
Configure the Windows Live ID Security Token Service
Configure SharePoint for Windows Live ID authentication
Convert a Windows Live ID internal environment to a production environment
Create different types of SharePoint claims-based Web applications
Grant permissions to all Windows Live ID authenticated users
Configure the Windows Live ID Security Token Service
The WS-Federation protocol is implemented by the Windows Live ID service, and provides the infrastructure of the Live ID STS that is designated as a trusted identity
provider. You can extract a Windows Live ID public certificate from a metadata XML X509Certificate node and save it to an Internet security certificate with a .cer
file extension. If the metadata XML contains multiple X509Certificate nodes, you can use any of them. Provide read access to the SharePoint Server 2010 farm
application pool account in Internet security certificate (.cer file).
Configure the Microsoft Services Manager (MSM) using the following values:
Value Description
Domain Name The domain name for which authentication requests to the Live ID STS will be generated. Use a Fully Qualified Domain Name (FQDN).
Default Return
URL
The URL that the Windows Live ID STS will redirect a user to after successful authentication, for example:
https://username.global.corp.contoso.com/_trust/default.aspx.
DNS Name The unique identifier provided in an authentication request to the Windows Live ID STS. This unique identifier enables look-up functionality for the
Default Return URL. The DNS Name must correspond to the realm value specified in Windows Live ID authentication request.
WRealm
Parameter
The WRealm parameter must match the DNS field in the MSM Site configuration. The WRealm parameter must be created by using one of the
following formats: sub.domain.top or Urn:domain:name.
Override
Authentication
Policy
Configure the Override Authentication Policy by using the following value: MBI_FED_SSL.
Configure SharePoint for Windows Live ID authentication
Use the procedures in this section to configure SharePoint Server 2010 for Windows Live ID authentication.

To configure SharePoint for Windows Live ID authentication by using Windows PowerShell
1. Verify that you meet the following minimum requirements: See Add-SPShellAdmin.
2. On the Start menu, click All Programs.
3. Click Microsoft SharePoint 2010 Products.
4. Click SharePoint 2010 Management Shell.
5. From the Windows PowerShell command prompt (that is, PS C:\>), define the realm value to match the DNS Name value specified in the Microsoft Services
Manager. The realm value in Windows Live ID integration should correspond to the correct DNS name, as shown in the following example:
6. Get the PUID value of the account that you will use as the Farm Administrator account by first signing in to following Web site: Windows Live
ID(https://accountservices.passport-int.net/?ru=https://accountservices.passport-int.net/Credentials.srf%3Fvv%3D750%26mkt%3DEN-
US%26lc%3D1033&vv=750&mkt=EN-US&lc=1033&id=10), and then locating the Unique ID field on the Credentials page.
7. Specify the PUID value using the following format: [email protected].
8. Locate one of the <X509Certificate> nodes in the following source: Metadata XML URL (https://nexus.passport-int.com/federationmetadata2/2007-
06/federationmetadata.xml).
9. Copy the contents of either of the two X509Certificate nodes, as shown in the following example:
10. Paste the contents of either X509Certificate node into a new Notepad file and save the Notepad file with the following file name: LiveID-INT.cer.
11. Configure the Windows Live ID certificate (extracted from metadata XML), as shown in the following example:
12. Define a new trusted root authority in SharePoint Server 2010, as shown in the following example:
13. Create an object with a Windows Live ID certificate, as shown in the following example:
14. Define the claim you will use as the unique identifier of the user. Map the UPN claim to the reserved claim name Identifier. The e-mail Address claim can also be
mapped, as shown in the following example:
15. Create a new SharePoint Server 2010 authentication provider for a new Web application, as shown in the following example:
$realm = "urn:" + $env:ComputerName + ":ServerName"
MIICWzCCAcSgAwIBAgIJAJEzHoaEodSoMA0GCSqGSIb3DQEBBQUAMCkxJzAlBgNV
BAMTHkxpdmUgSUQgU1RTIFNpZ25pbmcgUHVibGljIEtleTAeFw0wODEwMzAyMjA5
MjNaFw0xMzEwMjkyMjA5MjNaMCkxJzAlBgNVBAMTHkxpdmUgSUQgU1RTIFNpZ25p
bmcgUHVibGljIEtleTCBnzANBgkqhkiG9w0BAQEFAAOBjQAwgYkCgYEArz97XPae
GNAC4UnKl5zReyhgk3Bzf08U+CgD0R9+GZOahmpakJXFpI213gQWiHrUGaMN9nsK
4kzSfDPiquAMsV6vBYyWuPLZ0XrMzTAOV/WHSK3bCsYWWQZeH9Xn8G1Hkz+gQSC/
92lBbq9oBCZfLv3OlkobOmT8d+ldRKGU4pUCAwEAAaOBijCBhzAdBgNVHQ4EFgQU
VbJyIcGL0AjB4/Wm4DqUZux6uUkwWQYDVR0jBFIwUIAUVbJyIcGL0AjB4/Wm4DqU
Zux6uUmhLaQrMCkxJzAlBgNVBAMTHkxpdmUgSUQgU1RTIFNpZ25pbmcgUHVibGlj
IEtleYIJAJEzHoaEodSoMAsGA1UdDwQEAwIBxjANBgkqhkiG9w0BAQUFAAOBgQAO
/5vGfu+Vg1TKBuxsAIMqjqKXX7aRrANNZM/5ACdwAUtMDG/n8INoXgOKr851fbF6
4yBesmFjg2TbR8y0/ITAD+d+iyEpR7IO3/is9rWAj4ggbw8yqaDWn26eh3bAdoa+
p38qtqJHkUGF5vApeHiu6zO573bKs+nXcKVM8mNbjA==
$certloc = "C:\LiveIDWithSAML\LiveID-INT.cer"
$rootcert = Get-PfxCertificate $certloc
New-SPTrustedRootAuthority "NewRootAuthority" -Certificate $rootcert | Out-Null
$cert = New-Object System.Security.Cryptography.X509Certificates.X509Certificate2($certloc)
$map1 = New-SPClaimTypeMapping -IncomingClaimType "http://schemas.xmlsoap.org/claims/EmailAddress" -IncomingClaimTypeDisplayName "http://schemas.xmlsoap.org/claims/EmailAddress" -SameAsIncoming
$map2 = New-SPClaimTypeMapping -IncomingClaimType "http://schemas.xmlsoap.org/ws/2005/05/identity/claims/nameidentifier" -IncomingClaimTypeDisplayName "UPN" -LocalClaimType "http://schemas.xmlsoap.org/ws/2005/05/identity/claims/upn"
$apSAML = New-SPTrustedIdentityTokenIssuer -Name "LiveID" -Description "LiveID" -Realm $realm -ImportTrustCertificate $cert -ClaimsMappings $map1,$map2 -SignInUrl "https://login.live-int.com/login.srf" -IdentifierClaim "http://schemas.xmlsoap.org/ws/2005/05/identity/claims/nameidentifier"

16. Create a new SharePoint Server 2010 Web application to use with the authentication provider created in the previous step, as shown in the following example:
17. Start IIS Manager by typing INETMGR at a command prompt.
18. Go to the Claims Web Application site in IIS.
19. In the left pane, right-click Claims Web Application, and select Edit Bindings.
20. Select https and click Edit.
21. Under SSL Certificate, select any listed certificate. Consider using a self-signed certificate.
22. Import the Windows Live ID public certificate to the Local computer, SharePoint Server 2010, and Trusted People folders.
Convert a Windows Live ID internal environment to a production environment
Use the procedures in this section to convert a Windows Live ID internal environment to a production environment.
To convert a Windows Live ID internal environment to a production environment
1. Make sure the site is migrated to a production environment in MSM, and that compliance is complete. A compliance review is not required if the Windows Live ID
environment in MSM is internal.
2. Make sure that the authentication policy of the Windows Live ID production environment is configured with the following value: MBI_FED_SSL.
3. Make sure that the Windows Live ID production environment uses HTTPS-based URLs because the production environment authentication policy is configured for
SSL transport. The production environment sites send POST requests over SSL to https://login.live.com. In the SPTrustedIdentityTokenIssuer there is a
Provider URI that should be the live login URI. Make sure the live logon URI is HTTPS-based.
4. If the Windows Live ID claims provider is configured to use an e-mail address instead of a PUID, the production environment site should be in the Microsoft policy
group. Be aware that this policy group is auto-approved for internal partners, and explicit approval is required for external partners.
Create different types of SharePoint claims-based Web applications
Use the procedures in this section to run a Windows PowerShell script to create different types of SharePoint Server 2010 claims-based Web applications.
To create different types of SharePoint claims-based Web applications by using Windows PowerShell
1. Verify that you meet the following minimum requirements: See Add-SPShellAdmin.
2. On the Start menu, click All Programs.
3. Click Microsoft SharePoint 2010 Products.
4. Click SharePoint 2010 Management Shell.
5. From the Windows PowerShell command prompt, run the DeployLiveIdWithSAML script, as shown in the following example:
$waurl = https://" + $env:ComputerName - You might use FQDN url of your site here.
$title = "Site Title"
$waexe = New-SPWebApplication -Name $title -ApplicationPool $title -ApplicationPoolAccount $owner -Url $waurl -AuthenticationProvider
$scexe = New-SPSite $siteurl -Name $title -Description $title -Template 'STS#1' -OwnerAlias
#.SYNOPSIS
# Script for creating different types of claims web applications from the Windows PowerShell command line.
#.DESCRIPTION
# Script will create ANON, WIN, FBA, MULTI, MIXED, SAML and combinations of these web applications.
#.NOTES
# Script: ClaimsWA.ps1
# Remark: The script will load/unload additional snap-ins depending on where it's being executed from.
# Update: 1/15/2010 (v2.0)
#.PARAMETER type
# Indicates the type of claims web app to create (see examples for full list of valid supported types)
#If not specified, this will default to ALL and each of the supported types of claims web apps will be created
#.PARAMETER port
# Indicates the port number to create the web app on (See reserved ports at http://support.microsoft.com/kb/832017)
#If not specified, this will default to port 201 and will be incremented in sequence for multiple web apps
#.PARAMETER owner
# Indicates the domain account that will be used for App Pool (should be registered as a SharePoint Server managed account)
#If not specified, this will default to logged on user and will use USERDOMAIN & USERNAME environment values
#.EXAMPLE
# claimswa.ps1 WIN (create WIN-claims web app at port# 201 and use logged on user for app pool account)
#
# Here are some more examples of HOWTO use the script:
# claimswa.ps1 ANON (create ANON web app at port# 201)
# claimswa.ps1 ANON/FBA 701 (create ANON/FBA web app at port# 701)
# claimswa.ps1 FBA (create FBA web app at port# 201 using LDAP provider; default is REDMOND instance)

# claimswa.ps1 FBA/IBM (create FBA web app at port# 201 using LDAP provider pointing to the IBM instance)
# claimswa.ps1 FBA/SQL 851 (create forms-based authentication web app at port# 851 using SQL provider)
# claimswa.ps1 WIN/FBA/MIXED 501 (create Windows/forms-based authentication mixed-mode web apps at port# 501)
# claimswa.ps1 WIN/SAML/MULTI 901 (create Windows/SAML multi-auth web apps at port# 901)
#
# Here is the full list of all the support TYPEs (combine options delimited with slash for your config):
#
# Basic auth types:
# WIN : create Windows claims web application on the port# specified on command line
# FBA : create forms-based authentication claims web apps with the specified membership provider (SQL Server/LDAP listed below)
# SAML : create SAML-claims web application on the default HTTPS port# 443
# ANON : indicator switch for creating the web application to allow ANON mode
# Complex auth types:
# MULTI : create claims web application with multiple auth types using a single URL to access
# MIXED : create claims web application with multiple auth types using multiple URLs to access
# FBA membership/rolemanager providers
# RED : use the REDMOND domain LDAP provider; this is the default setting if a provider is not specified
# SQL : use the SQL Server provider for connecting to forms-based authentication web apps (connects to the ASPNETDB instance on ZADANG)
# PPL : use the PEOPLEDC domain LDAP provider that is a private domain used for testing PEOPLE features
# SUN : use the SUNOne LDAP provider in the PEOPLEDC domain which is used for profile import/sync testing
# IBM : use the IBM LDAP provider in the PEOPLEDC domain which is used for profile import/sync testing
# NVL : use the Novell LDAP provider in the PEOPLEDC domain which is used for profile import/sync testing
# TODO (no specific ETA for these updates):
# 1. Set the default IIS cert bindings for SAML web
# 2. Use IIS CMDlets instead of updating XML object
# 3. We should be able to define MixedMode base auth
# 4. Use the domain for logged on user for LDAP string
# 5. Do not attempt to write to CA/STS if running on WFE
# Define the args list that we will accept & work with
param ([string]$type, [int]$port, [string]$owner)
function main() {
# Valid options list
$auths = @("WIN", "FBA", "SAML", "ANON")
$extnd = @("MULTI", "MIXED")
$provs = @("SQL", "RED", "PPL", "SUN", "IBM", "NVL")
$optns = @("APP", "FIX")
$typeOK = $true
# Do we have the minimum args data before we can proceed
# I'm not doing extensive validation but at least minimum
foreach ($arg in $type.split("/")) {
if (($auths+$extnd+$optns+$provs) -notcontains $arg) {
write-host -Fore Red "`nInvalid TYPE argument was specified; execution aborted!`nTo see a list of valid TYPEs, execute with -examples option`n"
$typeOK=$false; break
}
}
if ($typeOK) {
$type = @($type.toupper().split("/") | Sort | Get-Unique)
switch ($type.count) {
1 {
foreach ($arg in $type) {
if (($auths+$extnd+$optns) -notcontains $arg) {
write-host -Fore Red "`nInvalid AUTH argument was specified; execution aborted!`nTo see a list of valid AUTHs, execute with -examples option`n"
$typeOK=$false; break
}
}
if (($type -eq "MULTI") -or ($type -eq "MIXED")) {
$type += @("WIN", "FBA"); write-host -Fore Yellow "MULTI/MIXED auth combo not specified; defaulting to $type"
}
if ($type -eq "ANON") {
$type += @("WIN"); write-host -Fore Yellow "ANON auth combo not specified; defaulting to $type"
}
}
2 {
if ($type -contains "ANON") {
foreach ($arg in $type) {
if ($auths -notcontains $arg) {
write-host -Fore Red "`nInvalid ANON combo was specified; execution aborted!`nTo see a list of valid PROVIDERs, execute with -examples option`n"
$typeOK=$false; break
}
}
}
else {
$multiOK=$true
foreach ($arg in $type) {
if ($auth -notcontains $arg) {
$multiOK=$false; break
}
}
if ($multiOK) {$type += @("MULTI"); write-host -Fore Yellow "Multiple auth types specified; defaulting to $type"}
}
}

}
if (($type -contains "MULTI") -or ($type -contains "MIXED") -and ($type.count -lt 3)) {
write-host -Fore Red "`nMULTI/MIXED option requires 2 base auth types be specified!`nTo see a list of valid TYPEs, execute with -examples option`n"
$typeOK=$false
}
}
if ($typeOK) {
# We seem to have the TYPE argument, let's check the others
if (-not $port) {
if ($type -contains "SAML") {$port=443} else {$port=201}
write-host -Fore Yellow "PORT not specified; defaulting to $port"
}
if (-not $owner) {
$owner = $env:UserDomain + "\" + $env:UserName.tolower()
write-host -Fore Yellow "OWNER not specified; defaulting to $owner"
}
#In case somebody attempts to execute this script in the regular PS/ISE console,
#let's load the IIS/SP snap-in to ensure we have everything we need to work with
Manage-SnapIns (1)
# check what flavor of SERVER we're running
$product = Get-SPProduct | Where-Object {$_.ProductName.contains("SharePoint Server 2010")};
if ($product.ProductName.contains("Debug")) {$flavor="DEBUG"} else {$flavor="SHIP"}
write-host -Fore Green "Detected $flavor flavor of MOSS installed on this farm!"
if ($type -contains "APP") {
Write-WEBConfigs 0 "APP"
}
elseif ($type -contains "FIX") {
Fix-Environment
}
else {
Create-WebApp $type $port
}
# We're done with the snap-ins, so let's unload them
Manage-SnapIns (0)
}
}
function Fix-Environment {
# This is just a series of steps to clean up
# Not recommended to use unless you know why!
Remove-SPTrustedRootAuthority NewRootAuthority
Remove-SPTrustedIdentityTokenIssuer ServerName
# I need to add the other clean up stuff here...
}
# This is the core script block that creates the different web apps
function Create-WebApp ([string]$type, [int]$port) {
$waurl = http://" + $env:ComputerName
if ($type.contains("SAML")) { $waurl = $waurl.replace("http", "https") }
$siteurl = $waurl + ":" + $port
$title = "ClaimsWA-$port-" + $type.replace(" ","-")
# Let's construct the WA/SC CMDlet call that we'll invoke later
$waexe = "New-SPWebApplication -Name $title -ApplicationPool $title -ApplicationPoolAccount $owner -Url $waurl -AuthenticationProvider"
$scexe = "New-SPSite $siteurl -Name $title -Description $title -Template 'STS#1' -OwnerAlias"
write-host -Fore Cyan "`nSetting up $title on port $port now:"
if ($type.contains("WIN")) {
$apWIN = New-SPAuthenticationProvider -DisableKerberos:$true
$cpWIN = New-SPClaimsPrincipal -Identity $owner -IdentityType 1
}
if ($type.contains("FBA")) {
if ($type.contains("SQL")) {
$membership="SQLms"; $rolemanager="SQLrm"; $identity = "sqlms:user1"
}
elseif ($type.contains("PPL")) {
$membership="PPLms"; $rolemanager="PPLrm"; $identity = "pplms:fbauser1"
}
elseif ($type.contains("SUN")) {
$membership="SUNms"; $rolemanager="SUNrm"; $identity = "sunms:fbauser1"
}
elseif ($type.contains("IBM")) {
$membership="IBMms"; $rolemanager="IBMrm"; $identity = "ibmms:fbauser1"
}
elseif ($type.contains("NVL")) {
$membership="NVLms"; $rolemanager="NVLrm"; $identity = "nvlms:fbauser1"

}
else {
$membership="REDms"; $rolemanager="REDrm"; $identity = ("redms:$env:UserName").tolower()
}
$apFBA = New-SPAuthenticationProvider -ASPNETMembershipProvider $membership -ASPNETRoleProviderName $rolemanager;
$cpFBA = New-SPClaimsPrincipal -Identity $identity -IdentityType 4
}
if ($type.contains("SAML")) {
$realm = "urn:" + $env:ComputerName + ":ServerName"
$user = "[email protected]"
$certloc = "C:\LiveIDWithSAML\LiveID-INT.cer"
$rootcert = Get-PfxCertificate $certloc
New-SPTrustedRootAuthority "NewRootAuthority" -Certificate $rootcert | Out-Null
$cert = New-Object System.Security.Cryptography.X509Certificates.X509Certificate2($certloc)
$map1 = New-SPClaimTypeMapping -IncomingClaimType "http://schemas.xmlsoap.org/claims/EmailAddress" -IncomingClaimTypeDisplayName "http://schemas.xmlsoap.org/claims/EmailAddress" -SameAsIncoming
$map2 = New-SPClaimTypeMapping -IncomingClaimType "http://schemas.xmlsoap.org/ws/2005/05/identity/claims/nameidentifier" -IncomingClaimTypeDisplayName "UPN" -LocalClaimType "http://schemas.xmlsoap.org/ws/2005/05/identity/claims/upn"
$apSAML = New-SPTrustedIdentityTokenIssuer -Name "LiveID" -Description "LiveID" -Realm $realm -ImportTrustCertificate $cert -ClaimsMappings $map1,$map2 -SignInUrl "https://login.live-int.com/login.srf" -IdentifierClaim "http://schemas.xmlsoap.org/ws/2005/05/identity/claims/nameidentifier"
$cpSAML = New-SPClaimsPrincipal -TrustedIdentityTokenIssuer $apSAML -Identity $user.tolower()
}
if ($type.contains("WIN")) {
$waexe += " `$apWIN"; $scexe += " `$cpWIN.ToEncodedString()"
}
elseif ($type.contains("FBA")) {
$waexe += " `$apFBA"; $scexe += " `$cpFBA.ToEncodedString()"
}
else {
$waexe += " `$apSAML -SecureSocketsLayer"; $scexe += " `$cpSAML.ToEncodedString()"
}
if ($type.contains("MULTI")) {
if ($type.contains("WIN")) {
if ($type.contains("FBA")) {
$waexe += ",`$apFBA"; $scexe += " -SecondaryOwnerAlias `$cpFBA.ToEncodedString()"
}
if ($type.contains("SAML")) {
$waexe += ",`$apSAML -SecureSocketsLayer"; if (!$scexe.contains("Secondary")) { $scexe += " -SecondaryOwnerAlias `$cpSAML.ToEncodedString()" }
}
}
else {
$waexe += ",`$apSAML -SecureSocketsLayer"; $scexe += " -SecondaryOwnerAlias `$cpSAML.ToEncodedString()"
}
}
# Check if we're creating the ANON web apps
if ($type.contains("ANON")) { $waexe += " -AllowAnonymousAccess" }
$waexe += " -Port $port | Out-Null"; $scexe += " | Out-Null"
write-host -Fore Cyan "Deploying app..." -noNewLine
Invoke-Expression $waexe
# We could do this with a simple if/else but there may be other auth types too
if ($type.contains("WIN")) { Create-UserPolicy $siteurl $cpWIN.ToEncodedString() }
if ($type.contains("FBA")) { Create-UserPolicy $siteurl $cpFBA.ToEncodedString() }
if ($type.contains("SAML")) { Create-UserPolicy $siteurl $cpSAML.ToEncodedString() }
write-host -Fore Cyan "Creating site..." -noNewLine
Invoke-Expression $scexe
# If this is the ANON web app, then set the root site access to entire web
if ($type.contains("ANON")) { $web = Get-SPWeb $siteurl; $web.AnonymousState="On"; $web.Update() }
# At this time, let's also check if it's going to be a MixedMode web app
if ($type.contains("MIXED")) {
# If it's a Mixed-Mode web app we need to extend the base app to another auth type too
$port++; write-host -Fore Cyan "Extending port $port..." -noNewLine
$waurl = $waurl.replace("https", "http")
$waexe = "Get-SPWebApplication $siteurl | New-SPWebApplicationExtension -Name $title-Ext -Zone `"Intranet`" -URL $waurl -Port $port -AuthenticationProvider"
if ($type.contains("WIN")) {
if ($type.contains("FBA")) { $waexe += " `$apFBA" } else { $waexe += " `$apSAML" }
}
else {
$waexe += " `$apSAML"
}
Invoke-Expression $waexe
}
# If we've created a FBA web app, then it's time to update the CA/STS/FBA web.config files
if ($type.contains("FBA")) { Write-WEBConfigs 0 $port.tostring() }; write-host -Fore Cyan "done!"
}
function Create-UserPolicy ([string]$weburl, [string]$encodeduser) {

$webapp = Get-SPWebApplication $weburl
$policy = $webapp.Policies.Add($encodeduser, "ClaimsWA.ps1 User")
$role = $webapp.PolicyRoles.GetSpecialRole([Microsoft.SharePoint.Administration.SPPolicyRoleType]::FullControl)
$policy.PolicyRoleBindings.Add($role)
$webapp.Update()
}
function Write-WEBConfigs ([int]$begin, [string]$vroot) {
# For now I'm using the XML object to load/save the config files
# Eventually we should use the IIS:CMDlets from WebAdministration
write-host -Fore Cyan "Writing WEBConfig..." -noNewLine
#$filei = "\\back\scratch\suntoshs\backup\webconfigs.xml"
$filei = "\\back\scratch\suntoshs\scripts\oobinstall\webconfigs.xml"
$xmli = [xml](get-content $filei)
$root = $xmli.get_DocumentElement()
for ($j=$begin; $j -le 2; $j++) {
if ($j -eq 0) {
[void][reflection.assembly]::LoadWithPartialName("Microsoft.SharePoint")
$fileo = [Microsoft.SharePoint.Administration.SPAdministrationWebApplication]::Local.IisSettings.get_Item(0).Path.FullName + "\web.config"
}
elseif ($j -eq 1) {
$fileo = $env:CommonProgramFiles + "\Microsoft Shared\Web Server Extensions\14\WebServices\SecurityToken\web.config"
if ($flavor -eq "DEBUG") { $fileo = $fileo.replace("Shared", "Shared Debug") }
}
else {
if ($vroot -ne "APP") { $fileo = $env:HomeDrive + "\inetpub\wwwroot\wss\VirtualDirectories\$vroot\web.config" }
}
$xmlo = [xml](get-content $fileo)
$perf = $xmlo.CreateElement("clear")
if ($flavor -eq "DEBUG") {
$ship = $root.config[1].tokens.token[0].value
$debug = $root.config[1].tokens.token[1].value
$token = $root.config[0]["system.web"].membership.providers.add[0].type
$root.config[0]["system.web"].membership.providers.add[0].SetAttribute("type", $token.replace($ship,$debug)) | Out-Null
$token = $root.config[0]["system.web"].rolemanager.providers.add[0].type
$root.config[0]["system.web"].rolemanager.providers.add[0].SetAttribute("type", $token.replace($ship,$debug)) | Out-Null
}
if ($j -eq 0) {
# Update the CA web config
if (-not $xmlo.SelectSingleNode("/configuration/connectionStrings")) {
$xmlo.configuration["system.web"].membership.ParentNode.RemoveChild($xmlo.configuration["system.web"].membership) | Out-Null
$xmlo.configuration["system.web"].roleManager.ParentNode.RemoveChild($xmlo.configuration["system.web"].roleManager) | Out-Null
$xmlo.SelectSingleNode("/configuration").AppendChild($xmlo.ImportNode($root.config[0]["connectionStrings"], $true)) | Out-Null
$xmlo.SelectSingleNode("/configuration/system.web").AppendChild($xmlo.ImportNode($root.config[0]["system.web"].membership, $true)) | Out-Null
$xmlo.SelectSingleNode("/configuration/system.web/membership/providers").PrependChild($xmlo.ImportNode($perf, $true)) | Out-Null
$xmlo.SelectSingleNode("/configuration/system.web").AppendChild($xmlo.ImportNode($root.config[0]["system.web"].rolemanager, $true)) | Out-Null
$xmlo.SelectSingleNode("/configuration/system.web/roleManager/providers").PrependChild($xmlo.ImportNode($perf, $true)) | Out-Null
}
}
elseif ($j -eq 1) {
# Update the STS web config
if (-not $xmlo.SelectSingleNode("/configuration/system.web")) {
$xmlo.SelectSingleNode("/configuration").AppendChild($xmlo.ImportNode($root.config[0]["connectionStrings"], $true)) | Out-Null
$xmlo.SelectSingleNode("/configuration").AppendChild($xmlo.ImportNode($root.config[0]["system.web"], $true)) | Out-Null
}
}
else {
# Update the FBA web config
if ($vroot -ne "APP") {
if ($type.contains("PPL")) {$provider=1} elseif ($type.contains("SUN")) {$provider=2} elseif ($type.contains("IBM")) {$provider=3} elseif ($type.contains("NVL")) {$provider=4} elseif ($type.contains("SQL")) {$provider=5} else {$provider=0}
$xmlo.SelectSingleNode("/configuration").AppendChild($xmlo.ImportNode($root.config[0]["connectionStrings"], $true)) | Out-Null
$xmlo.SelectSingleNode("/configuration/system.web/membership/providers").PrependChild($xmlo.ImportNode($root.config[0]["system.web"].membership.providers.add[$provider], $true)) | Out-Null
$xmlo.SelectSingleNode("/configuration/system.web/membership/providers").PrependChild($xmlo.ImportNode($perf, $true)) | Out-Null
$xmlo.SelectSingleNode("/configuration/system.web/roleManager/providers").PrependChild($xmlo.ImportNode($root.config[0]["system.web"].rolemanager.providers.add[$provider], $true)) | Out-Null
$xmlo.SelectSingleNode("/configuration/system.web/roleManager/providers").PrependChild($xmlo.ImportNode($perf, $true)) | Out-Null
}
}
$xmlo.Save($fileo)
}
}
function Manage-SnapIns ([int]$action) {
#The OWSTimer process always causes an update conflict (known bug) while
#creating multiple web apps; let's temporarily shut it down until we're done
if ($action -eq 1) { Stop-Service "SPTimerV4" }
# We need to do this only if we're running on ISE so check it
if ($host.name.contains("ISE")) {
if ($action -eq 1) {
write-host -Fore Yellow "Detecting host and loading dependent snap-ins..."
# Add-PSSnapIn WebAdministration (later!)
6. Start IIS Manager by typing INETMGR at a command prompt.
7. Go to the Claims Web Application site in IIS.
8. In the left pane, right-click Claims Web Application, and select Edit Bindings.
9. Select https and click Edit.
10. Under SSL Certificate, select any listed certificate. Consider using a self-signed certificate.
11. Import the Windows Live ID public certificate to the Local computer, SharePoint Server 2010, and Trusted People folders.
12. Perform IIS reset and browse the site URL.
Grant permissions to all Windows Live ID authenticated users
Use the procedures in this section to grant permissions to all Windows Live Id authenticated users.
To grant permissions to all Windows Live ID authenticated users
1. Browse to the SharePoint Server 2010 site that you created and log on using the administrator account.
2. On the Site Actions menu click Site Settings.
3. In the Users and Permissions section, click Site Permissions.
4. Click Site Name Visitors group, where Site Name is the name of the site.
5. Click New, and then click Add Users.
6. In the Grant Permissions window, click the browse icon.
7. In the Select People and Groups window, click All Users, and then click All Users (LiveIDSTS) in the right pane.
8. Click Add.
9. Click OK.
10. Verify that All Users (LiveIDSTS) is now part of the visitor’s group. You should now be able to log on to the SharePoint Server 2010 site with any other Live IDuser’s credentials.
About the author
Birendra Acharya is a Senior Software Design Engineer for MSIT at Microsoft.
See Also
Other ResourcesUnderstanding WS-Federation (http://go.microsoft.com/fwlink/p/?LinkId=192377)
© 2014 Microsoft
Add-PSSnapIn Microsoft.Sharepoint.PowerShell
}
else {
write-host -Fore Yellow "Unloading dependent snap-ins loaded earlier on..."
# Remove-PSSnapIn WebAdministration (later!)
Remove-PSSnapIn Microsoft.Sharepoint.PowerShell
}
}
if ($action -eq 0) {Start-Service "SPTimerV4"; write-host -Fore Yellow "`nAll done; if there were errors please research PS database for known issues!`n"}
}
main
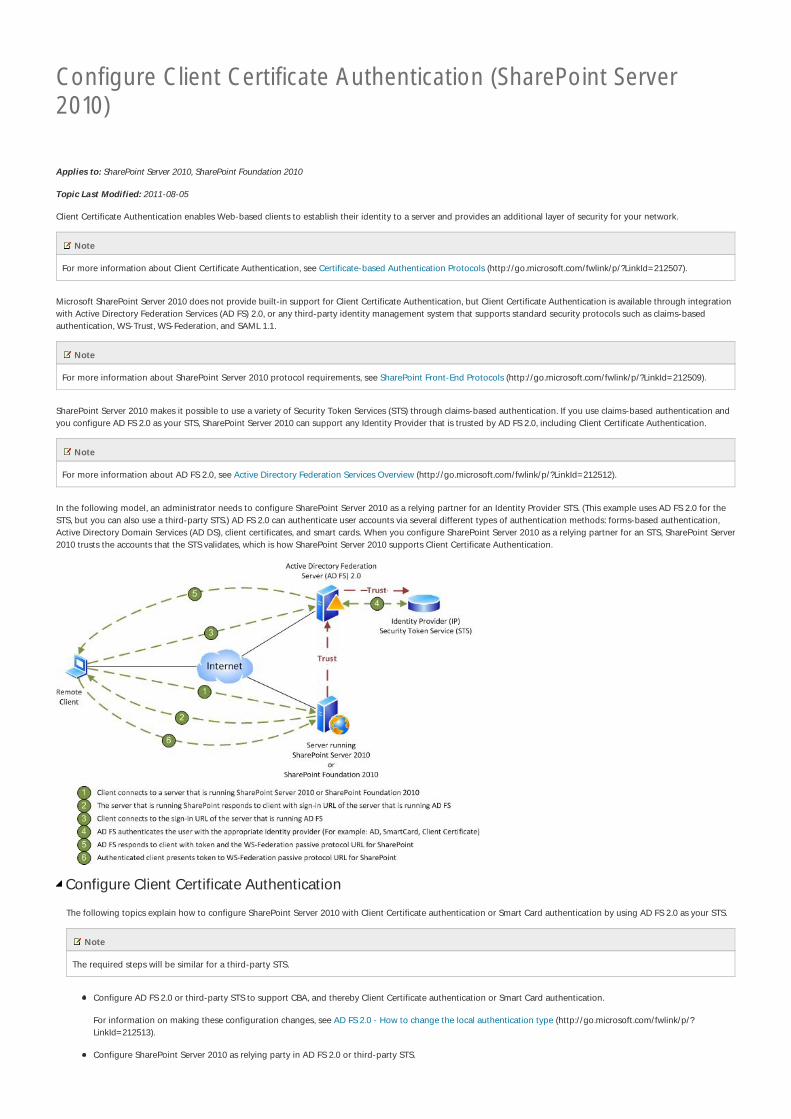
Configure Client Certificate Authentication (SharePoint Server2010)
Applies to: SharePoint Server 2010, SharePoint Foundation 2010
Topic Last Modified: 2011-08-05
Client Certificate Authentication enables Web-based clients to establish their identity to a server and provides an additional layer of security for your network.
Note
For more information about Client Certificate Authentication, see Certificate-based Authentication Protocols (http://go.microsoft.com/fwlink/p/?LinkId=212507).
Microsoft SharePoint Server 2010 does not provide built-in support for Client Certificate Authentication, but Client Certificate Authentication is available through integration
with Active Directory Federation Services (AD FS) 2.0, or any third-party identity management system that supports standard security protocols such as claims-based
authentication, WS-Trust, WS-Federation, and SAML 1.1.
Note
For more information about SharePoint Server 2010 protocol requirements, see SharePoint Front-End Protocols (http://go.microsoft.com/fwlink/p/?LinkId=212509).
SharePoint Server 2010 makes it possible to use a variety of Security Token Services (STS) through claims-based authentication. If you use claims-based authentication and
you configure AD FS 2.0 as your STS, SharePoint Server 2010 can support any Identity Provider that is trusted by AD FS 2.0, including Client Certificate Authentication.
Note
For more information about AD FS 2.0, see Active Directory Federation Services Overview (http://go.microsoft.com/fwlink/p/?LinkId=212512).
In the following model, an administrator needs to configure SharePoint Server 2010 as a relying partner for an Identity Provider STS. (This example uses AD FS 2.0 for the
STS, but you can also use a third-party STS.) AD FS 2.0 can authenticate user accounts via several different types of authentication methods: forms-based authentication,
Active Directory Domain Services (AD DS), client certificates, and smart cards. When you configure SharePoint Server 2010 as a relying partner for an STS, SharePoint Server
2010 trusts the accounts that the STS validates, which is how SharePoint Server 2010 supports Client Certificate Authentication.
Configure Client Certificate Authentication
The following topics explain how to configure SharePoint Server 2010 with Client Certificate authentication or Smart Card authentication by using AD FS 2.0 as your STS.
Note
The required steps will be similar for a third-party STS.
Configure AD FS 2.0 or third-party STS to support CBA, and thereby Client Certificate authentication or Smart Card authentication.
For information on making these configuration changes, see AD FS 2.0 - How to change the local authentication type (http://go.microsoft.com/fwlink/p/?
LinkId=212513).
Configure SharePoint Server 2010 as relying party in AD FS 2.0 or third-party STS.

For information on making these configuration changes using AD FS 2.0, see Configuring SharePoint 2010 and AD FS v2 End to End
(http://go.microsoft.com/fwlink/p/?LinkID=207629).
Configure the Identity Provider STS, for example AD FS 2.0, inside SharePoint Server 2010 as a trusted identity provider.
For information on making these configuration changes using AD FS 2.0, see Configure authentication using a SAML security token (SharePoint Server 2010).
Create a Web application that uses Claims-Based Authentication with a SAML security token, and thereby Client Certificate authentication or Smart Card
authentication.
For information on creating a Web application that uses SAML security tokens, see Configure authentication using a SAML security token (SharePoint Server 2010).
See Also
ConceptsConfigure the security token service (SharePoint Server 2010)
Configure authentication using a SAML security token (SharePoint Server 2010)
Other ResourcesPlanning and Architecture: AD FS 2.0 (http://go.microsoft.com/fwlink/p/?LinkId=212521)
AD FS 2.0 Deployment Guide (http://go.microsoft.com/fwlink/p/?LinkId=212520)
Using Active Directory Federation Services 2.0 in Identity Solutions (http://go.microsoft.com/fwlink/p/?LinkID=209776)
Configure SharePoint as relying party in ADFS 2.0 or third-party STS (http://go.microsoft.com/fwlink/?LinkID=207629)
© 2014 Microsoft

Configure Digest authentication for a claims-based Webapplication (SharePoint Server 2010)
Applies to: SharePoint Server 2010, SharePoint Foundation 2010
Topic Last Modified: 2011-08-05
This article describes how to configure digest authentication for one or more zones within a Microsoft SharePoint Server 2010 claims-based Web application. A Web
application is an IIS Web site thatSharePoint Server 2010 creates and uses. Zones represent different logical paths for gaining access to the same Web application. Within
each Web application, you can create up to five zones. A different Web site in IIS represents each zone. Use zones to enforce different access and policy conditions for
large groups of users. To configure digest authentication for one or more zones in a SharePoint Server 2010 Web application, use the IIS Management Console to directly
configure IIS.
Although digest authentication provides the same functionality as basic authentication, digest authentication encrypts user credentials to increase security. User credentials
are sent as an MD5 message digest in which the original user name and password cannot be deciphered. Digest authentication uses a challenge/response protocol that
requires the authentication requestor to present valid credentials in response to a challenge from the server. To authenticate against the server, the client has to supply an
MD5 message digest in a response that contains a shared secret password string. The MD5 Message-Digest Algorithm is described in detail in RFC 1321. For access to
RFC 1321, see The Internet Engineering Task Force (http://go.microsoft.com/fwlink/p/?LinkId=159913).
To use digest authentication, note the following requirements:
The user and IIS server must be members of, or trusted by, the same domain.
Users must have a valid Windows user account stored in Active Directory Domain Services (AD DS) on the domain controller.
The domain must use a Microsoft Windows Server 2008 domain controller.
Configure IIS to enable digest authentication
Use the IIS Management Console to configure IIS to enable digest authentication for one or more of the following zones for a claims-based Web application:
Note
The Default zone is the zone that is first created when a Web application is created. The other zones are created by extending a Web application.
Default
Intranet
Extranet
To configure IIS to enable digest authentication
1. Verify that you have one of the following administrative credentials:
You must be a member of the Administrators group on the server on which you are configuring IIS.
2. On the Start menu, point to All Programs, click Administrative Tools , and then click Internet Information Services (IIS) Manager to start the IIS Management
Console.
3. Expand Sites on the console tree, right-click the IIS Web site that corresponds to the Web application zone on which you want to configure digest authentication.
4. In Features View, double-click Authentication.
5. On the Authentication page, select Digest Authentication.
6. In the Actions pane, click Enable to use Digest authentication with the default settings.
7. In the Actions pane, click Edit to enter a realm name.
8. In the Edit Digest Authentication Settings dialog box, in the Realm text box, type the appropriate realm and click OK.
At this point, the Web site is configured to use digest authentication.
See Also
Other ResourcesWhat is Digest Authentication? (http://go.microsoft.com/fwlink/p/?LinkId=209085)
© 2014 Microsoft

Configure Basic authentication for a claims-based Web application(SharePoint Server 2010)
Applies to: SharePoint Server 2010, SharePoint Foundation 2010
Topic Last Modified: 2011-07-04
This article describes how to configure basic authentication for one or more zones within a Microsoft SharePoint Server 2010 claims-based Web application. A Web
application is an Internet Information Services (IIS) Web site that SharePoint Server 2010 creates and uses. Zones represent different logical paths for gaining access to the
network services that are available within the same Web application. Within each Web application, you can create up to five zones. A different Web site in IIS represents
each zone. Use zones to enforce different access and policy conditions for large groups of users. To configure basic authentication for one or more zones in a SharePoint
Server 2010 Web application, use the IIS Management Console to directly configure IIS.
Basic authentication requires previously assigned Windows account credentials for user access. Basic authentication enables a Web browser to provide credentials when
the browser makes a request during an HTTP transaction. Because user credentials are not encrypted for network transmission but are sent over the network in plaintext,
we do not recommend using basic authentication over an unsecured HTTP connection. To use basic authentication, you should enable Secure Sockets Layer (SSL)
encryption.
Configure IIS to enable basic authentication
Use the IIS Management Console to configure IIS to enable basic authentication for one or more of the following zones for a claims-based Web application:
Note
The Default zone is the zone that is first created when a Web application is created. The other zones are created by extending a Web application.
Default
Intranet
Extranet
To configure IIS to enable basic authentication
1. Verify that you have one of the following administrative credentials:
You must be a member of the Administrators group on the server on which you are configuring IIS.
2. On the Start menu, point to All Programs, click Administrative Tools , and then click Internet Information Services (IIS) Manager to start the IIS Management
Console.
3. Expand Sites on the console tree, right-click the IIS Web site that corresponds to the Web application zone on which you want to configure Basic authentication.
4. In Features View, double-click Authentication.
5. On the Authentication page, select Basic Authentication.
6. In the Actions pane, click Enable to use Basic authentication with the default settings.
7. In the Actions pane, click Edit to enter a realm name.
8. In the Edit Basic Authentication Settings dialog box, in the Realm text box, type the appropriate realm and click OK.
At this point, the Web site is configured to use basic authentication.
For information about creating a claims-based Web application in SharePoint Server 2010, see Create claims-based web applications in SharePoint 2010.
If you want credentials of users to be sent over a network in a form that is not encrypted, select Basic authentication (password is sent in clear text).
Security Note
You can select basic authentication or integrated Windows authentication, or both. If you select both, SharePoint Server 2010 will offer both authentication types to
the client Web browser. The client Web browser then determines the type of authentication to use. If you only select basic authentication, ensure that SSL is enabled;
otherwise, the credentials can be intercepted by a malicious user.
© 2014 Microsoft

People Picker and claims provider planning (SharePointFoundation 2010)
Applies to: SharePoint Foundation 2010
Topic Last Modified: 2011-06-07
People Picker is a Web control used to find and select users, groups, and claims to grant permission to items such as lists, libraries, or sites in Microsoft SharePoint
Foundation 2010. When a Web application uses claims authentication mode, the People Picker control uses a claims provider to list, resolve, search, and determine the
"friendly" display of users, groups, and claims. A claims provider in SharePoint Foundation 2010 issues claims, which SharePoint Foundation 2010 then packages into
security tokens for users. Although People Picker is used by site, list, and library owners to assign permissions to sites and content in SharePoint Foundation 2010, its
behavior is heavily dependent on how authentication has been configured for the whole Web application. It is important to plan for People Picker and claims providers
when you plan authentication methods for your SharePoint Foundation 2010 solution.
The articles in this section are designed to help you understand and plan for using People Picker and custom claims providers in SharePoint Foundation 2010:
People Picker overview (SharePoint Foundation 2010)
This article describes the People Picker control and how it works, its relationship to authentication and claims providers, and includes considerations for planning for
People Picker.
Custom claims providers for People Picker (SharePoint Foundation 2010)
This article describes the use and benefits of claims providers, their architecture, special considerations for custom claims providers, and considerations for
planning for them.
See Also
ConceptsPlan authentication (SharePoint Foundation 2010)
Configure People Picker (SharePoint Foundation 2010)
© 2014 Microsoft

People Picker overview (SharePoint Foundation 2010)
Applies to: SharePoint Foundation 2010
Topic Last Modified: 2011-09-19
The People Picker control is used to find and select people, groups, and claims when a site, list, or library owner assigns permissions in Microsoft SharePoint Foundation
2010. This article describes the People Picker control and how it works, its relationship to authentication and claims providers, and how to plan for People Picker. For
information about how to configure People Picker, see Configure People Picker (SharePoint Foundation 2010).
Before reading this article, you should understand the concepts described in Plan authentication methods (SharePoint Foundation 2010)and in The Role of Claims
(http://go.microsoft.com/fwlink/p/?LinkID=208326). For additional information about claims-based authentication, see SharePoint Claims-Based Identity
(http://go.microsoft.com/fwlink/p/?LinkID=196647).
In this article:
Uses and benefits
Architecture
About the People Picker control
People Picker and authentication
People Picker and claims providers
Configuring People Picker
Using People Picker with multiple forests or domains
Considerations for People Picker
Uses and benefits
The People Picker control is used to select users, groups, and claims to grant permission to items such as lists, libraries, and sites. For example, your site has a
document library that you want to restrict to a certain list of users. When you use the library permissions page to give users permission levels for the library, you use the
People Picker control either to type user names and verify that the user accounts are valid, or to search for a name or partial string and return a list of users, groups, or
claims that match the value you entered. For more information about permissions, see Plan site permissions (SharePoint Foundation 2010).
Architecture
The People Picker control is a central component of SharePoint Foundation 2010. The control provides basic functionality for finding and selecting users, groups, and
claims to assign permissions in a site. The exact sources of those users, groups, and claims depend on the authentication method used by the Web application that
contains the site collection. For more information about authentication methods, see People Picker and authentication later in this article.
People Picker is configured at the zone level for a farm by using the Stsadm setproperty operation. By configuring the settings for the control, you can filter and restrict
the results that are displayed when a user searches for a user, group, or claim. Those settings will apply to every site within a specific site collection. For more
information about configuring People Picker, see Configure People Picker (SharePoint Foundation 2010).
Note
There are no Windows PowerShell commands to configure People Picker.
When a Web application is configured to use claims-based authentication, People Picker uses claims providers to resolve and display users, groups, and claims in the
Select People and Groups dialog box. The information that is displayed in the Select People and Groups dialog box depends on the claims provider used by the
authentication method that was configured for the Web application. For more information about claims providers, see Custom claims providers for People Picker
(SharePoint Foundation 2010).
About the People Picker control
The People Picker control consists of a text box and two buttons: the Check Names button and the Browse button. The following illustration shows an example of the
People Picker control.
The user types a user name, group name, or claim (such as an e-mail address) into the text box, and then clicks the Check Names button to resolve the search item
exactly as it was entered. If People Picker is able to resolve the search item, the name is replaced with a resolved identity. If the search item cannot be resolved exactly as
entered, People Picker performs a search. If no match is found, or if more than one match is found, a red underline is displayed under the search item and the following
error message appears: No exact match found. Click the item(s) that did not resolve for more options. When the item is clicked, a pop-up menu displays a list of
available users, groups, or claims that match the query, if applicable. The menu also contains a Remove button to remove the resolved user, group, or claim from the
text box, and a More Names button, which opens the Select People and Groups dialog box.

If the user clicks the Browse button, the Select People and Groups dialog box is displayed. The user types a full or partial user name, group name, or claim into the text
box, and then presses Enter. The results of the query are displayed in the dialog box. The claims providers that People Picker interacts with determine the query results
and the way those results are displayed in the dialog box. The user selects a resolved identity, clicks Add, and then clicks OK. The selected user, group, or claim is then
added to the text box in the People Picker control.
When a Web application is configured to use Windows authentication, you can limit the results that are displayed to users in the Select People and Groups dialog box
by using the Stsadm setproperty operation to change the settings for the People Picker control. For example, you can configure People Picker to return only users,
groups, and claims that belong to a certain Active Directory domain or are members of a specific site collection. For more information about configuring the People
Picker control, see Configure People Picker (SharePoint Foundation 2010).
People Picker and authentication
People Picker relies on the authentication method used by the Web application that contains the site collection from which it is queried to determine what results to
display to a user. If the Web application is configured to use Windows authentication in classic mode, SharePoint Foundation 2010 treats user accounts as Active
Directory Domain Services (AD DS) accounts. If the Web application is configured to use claims-based authentication, you can specify whether to use Windows
authentication, forms-based authentication (FBA), or Security Assertion Markup Language (SAML) token-based authentication. In claims mode, People Picker searches
and resolves queries based on the claims provider that is specified for the authentication method used by the Web application and zone. The following sections
describe People Picker behavior for both classic-mode authentication and claims-based authentication. For more information about zones and authentication, see Plan
authentication methods (SharePoint Foundation 2010).
Classic-mode authentication
When Windows classic-mode authentication is used, the People Picker control queries Active Directory to retrieve a list of users, groups, or claims that match the
search item typed in the text box. You can configure People Picker to query Active Directory by using Lightweight Directory Access Protocol (LDAP) queries, which
enables you to apply custom Active Directory filters, limit the scope of search queries, and search across forests and domains.
By default, when the Browse button is clicked, the Select People and Groups dialog box displays the following fields:
Display Name
Title
Department
Mobile Number
Account Name
The following image shows the Select People and Groups dialog box when Windows authentication is used in classic mode for the Web application.
For more information about classic-mode authentication, see Plan authentication methods (SharePoint Foundation 2010). For information about how to create a Web
application that uses classic-mode authentication, see Create a Web application that uses Windows-classic authentication (SharePoint Foundation 2010).
Claims-based authentication
When claims-based authentication is used, People Picker uses the claims provider that is specified for the authentication method used by the Web application and
zone to retrieve a list of users, groups, or claims that match the search item typed in the text box. For more information about claims mode authentication and zones,
see Plan authentication methods (SharePoint Foundation 2010).
By default, when the Browse button is clicked, the Select People and Groups dialog box displays a tree view on the left that lists the claims providers that People
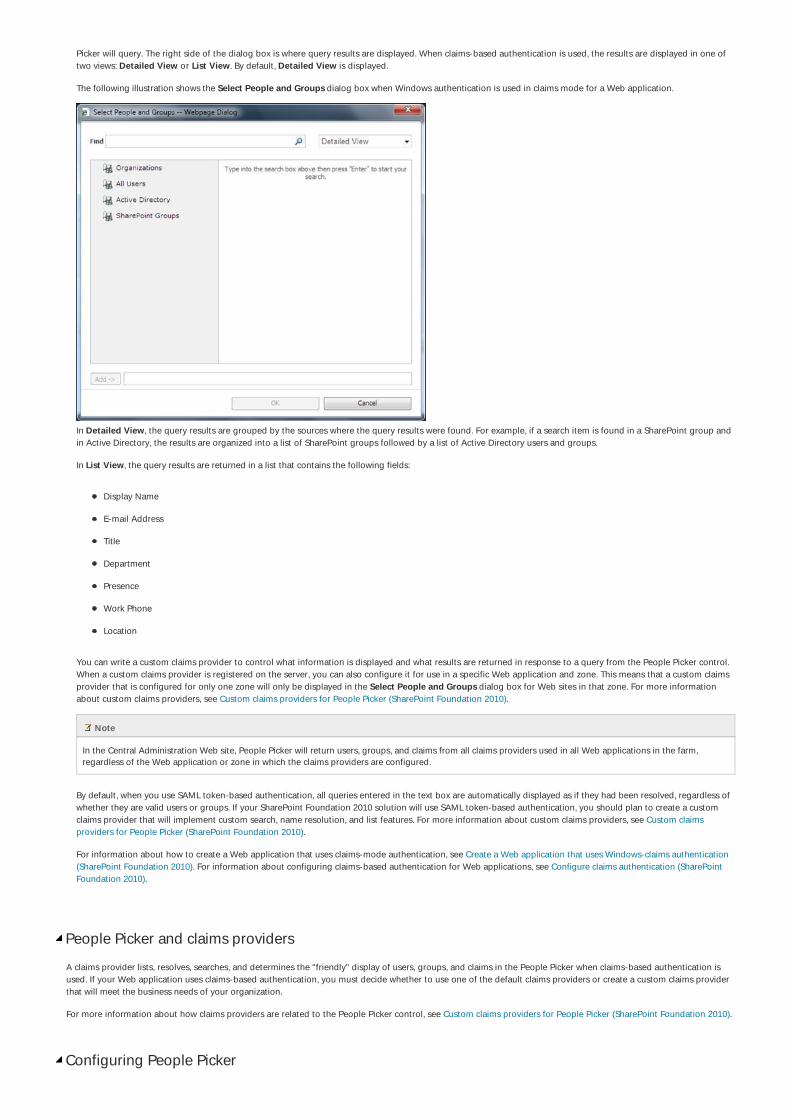
Picker will query. The right side of the dialog box is where query results are displayed. When claims-based authentication is used, the results are displayed in one of
two views: Detailed View or List View. By default, Detailed View is displayed.
The following illustration shows the Select People and Groups dialog box when Windows authentication is used in claims mode for a Web application.
In Detailed View, the query results are grouped by the sources where the query results were found. For example, if a search item is found in a SharePoint group and
in Active Directory, the results are organized into a list of SharePoint groups followed by a list of Active Directory users and groups.
In List View, the query results are returned in a list that contains the following fields:
Display Name
E-mail Address
Title
Department
Presence
Work Phone
Location
You can write a custom claims provider to control what information is displayed and what results are returned in response to a query from the People Picker control.
When a custom claims provider is registered on the server, you can also configure it for use in a specific Web application and zone. This means that a custom claims
provider that is configured for only one zone will only be displayed in the Select People and Groups dialog box for Web sites in that zone. For more information
about custom claims providers, see Custom claims providers for People Picker (SharePoint Foundation 2010).
Note
In the Central Administration Web site, People Picker will return users, groups, and claims from all claims providers used in all Web applications in the farm,
regardless of the Web application or zone in which the claims providers are configured.
By default, when you use SAML token-based authentication, all queries entered in the text box are automatically displayed as if they had been resolved, regardless of
whether they are valid users or groups. If your SharePoint Foundation 2010 solution will use SAML token-based authentication, you should plan to create a custom
claims provider that will implement custom search, name resolution, and list features. For more information about custom claims providers, see Custom claims
providers for People Picker (SharePoint Foundation 2010).
For information about how to create a Web application that uses claims-mode authentication, see Create a Web application that uses Windows-claims authentication
(SharePoint Foundation 2010). For information about configuring claims-based authentication for Web applications, see Configure claims authentication (SharePoint
Foundation 2010).
People Picker and claims providers
A claims provider lists, resolves, searches, and determines the "friendly" display of users, groups, and claims in the People Picker when claims-based authentication is
used. If your Web application uses claims-based authentication, you must decide whether to use one of the default claims providers or create a custom claims provider
that will meet the business needs of your organization.
For more information about how claims providers are related to the People Picker control, see Custom claims providers for People Picker (SharePoint Foundation 2010).
Configuring People Picker

The information in this section applies only to Web applications that use Windows authentication in either classic mode or claims mode.
You can configure People Picker to filter query results and to restrict the directories that People Picker uses as a source of those results by using property names for the
Stsadm setproperty operation. To see what property settings have been configured, use the Stsadm getproperty operation. For more information, see Peoplepicker:
Stsadm properties (Office SharePoint Server 2007). The settings for People Picker are applied to each URL zone for a Web application.
Note
There are no Windows PowerShell commands to configure People Picker.
The following table describes the properties that can be used to configure People Picker.
Property name Description
Peoplepicker-activedirectorysearchtimeout Configures the timeout when a query is issued to Active Directory. The default timeout value is 30 seconds.
For more information, see Peoplepicker-activedirectorysearchtimeout.
Peoplepicker-distributionlistsearchdomains Restricts the search of a distribution list to a specific subset of domains. For more information, see
Peoplepicker-distributionlistsearchdomains.
Peoplepicker-
nowindowsaccountsfornonwindowsauthenticationmode
Specifies not to search Active Directory when the current port is using forms-based authentication. For more
information, see Peoplepicker-nowindowsaccountsfornonwindowsauthenticationmode.
Peoplepicker-onlysearchwithinsitecollection Displays only users who are members of the site collection when the Select People and Groups dialog box
is used. For more information, see Peoplepicker-onlysearchwithinsitecollection.
Peoplepicker-
peopleeditoronlyresolvewithinsitecollection
Displays only users who are members of the current site collection when the Check Names button is clicked.
For more information, see. Peoplepicker-peopleeditoronlyresolvewithinsitecollection: Stsadm property
(SharePoint Foundation 2010).
Peoplepicker-searchadcustomfilter Enables a farm administrator to specify a unique search query. For more information, see Peoplepicker-
searchadcustomfilter.
Peoplepicker-searchadcustomquery Permits the administrator to set the custom query that is sent to Active Directory. For more information, see
Peoplepicker-searchadcustomquery.
Peoplepicker-searchadforests Permits a user to search from a second one-way trusted forest or domain. For more information, see
Peoplepicker-searchadforests.
Peoplepicker-serviceaccountdirectorypaths Enables a farm administrator to manage the site collection that has a specific organizational unit (OU)
setting as defined in the Setsiteuseraccountdirectorypath setting. For more information, see Peoplepicker-
serviceaccountdirectorypaths.
For more information about configuring People Picker, see Configure People Picker (SharePoint Foundation 2010).
Using People Picker with multiple forests or domains
By default, People Picker will only return users, groups, and claims from the domain on which SharePoint Foundation 2010 is installed. If you want People Picker to return
query results from more than one forest or domain, you must either have a two-way trust between the forests or domains, or you must configure People Picker to use
an encrypted account and password for a one-way trust between forests and domains. For more information about trusts, see Managing Trusts
(http://go.microsoft.com/fwlink/p/?LinkId=207573).
To configure People Picker for a one-way trust, you must first use the Stsadm setapppassword operation to set the password for use on the trusted forest or domain,
and then use the Peoplepicker-searchadforests property for the setproperty operation to specify the forest or domain to search. Remember that the settings for
People Picker are configured per zone for a Web application, so if you have more than one forest or domain in your farm, you must combine the accounts and
passwords into a single command for the setproperty operation. For more information, see Peoplepicker-searchadforests: Stsadm property (Office SharePoint Server).
Considerations for People Picker
Planning for People Picker largely depends on what forests and domains you want users to be able to query, and what users, groups, and claims you want to display in
query results. As you plan for the forests and domains you want users to query, consider the following questions:
Do users need to query across a forest or a domain?
What is the DNS name for each forest or domain you want users to query?
Will your forest or domain have a one-way or two-way trust with other forests or domains?
If you will be using a one-way trust, what credentials will be used to query the other farms or domains
Planning for the users, groups, and claims you want to display in the query results in People Picker will help you determine how to configure People Picker to return and
display results from claims providers. As you plan for the users, groups, and claims you want to display in query results, consider the following questions:
Are there certain LDAP filters you want to apply to query results?
Do you want to restrict the query results to users, groups, or claims in a specific site collection?
Do you want to restrict the query results to users, groups, or claims in a certain Active Directory organizational unit (OU)
See Also
ConceptsPlan authentication methods (SharePoint Foundation 2010)
Custom claims providers for People Picker (SharePoint Foundation 2010)
Configure People Picker (SharePoint Foundation 2010)
Other ResourcesResource Center: Security and Authentication for SharePoint Foundation 2010
© 2014 Microsoft

Custom claims providers for People Picker (SharePoint Foundation2010)
Applies to: SharePoint Foundation 2010
Topic Last Modified: 2011-09-08
A claim consists of information about the identity of a user, such as a name, e-mail address, or group membership. A claims provider in Microsoft SharePoint Foundation
2010 issues claims, which SharePoint Foundation 2010 then packages into security tokens for users. When a user signs in to SharePoint Foundation 2010, the user's token is
validated and then used to sign in to SharePoint Foundation 2010. Claims providers are displayed in the user interface of the Select People and Groups dialog box in the
People Picker control. They provide the functionality used to find and select users, groups, and claims when permissions are assigned to items such as lists, libraries, and
sites in SharePoint Foundation 2010. For information about the People Picker control, see People Picker overview (SharePoint Foundation 2010).
This article describes the use and benefits of claims providers, their architecture, special considerations for custom claims providers, and how to plan for them. It does not
explain how to create or configure custom claims providers. For information about how to create a custom claims provider, see Claims How Tos
(http://go.microsoft.com/fwlink/p/?LinkId=207578) and Creating Custom Claims Providers in SharePoint 2010 (http://go.microsoft.com/fwlink/p/?LinkId=211324).
Before reading this article, you should understand the concepts described in Plan authentication methods (SharePoint Foundation 2010) and The Role of Claims
(http://go.microsoft.com/fwlink/p/?LinkID=208326). For additional information about claims-based authentication, see SharePoint Claims-Based Identity
(http://go.microsoft.com/fwlink/p/?LinkID=196647) and A Guide to Claims-based Identity and Access Control (http://go.microsoft.com/fwlink/p/?LinkID=187911).
In this article:
Uses and benefits
Architecture
About custom claims providers
Deploying and configuring custom claims providers
Using custom claims on more than one farm
Considerations for custom claims providers
Uses and benefits
A claims provider in SharePoint Foundation 2010 is used primarily for two reasons:
To augment claims
To provide name resolution
In the augmentation role, a claims provider augments a user token with additional claims during sign-in. For more information about claims augmentation, see Claims
Provider (http://go.microsoft.com/fwlink/p/?LinkID=207579).
In the picking role, a claims provider lists, resolves, searches, and determines the "friendly" display of users, groups, and claims in the People Picker. Claims picking
enables an application to surface claims in the People Picker, for example when configuring the security of a SharePoint site or SharePoint service. For more information
about People Picker, see People Picker overview (SharePoint Foundation 2010).
You can use the claims providers that are included with SharePoint Foundation 2010, or you can create your own custom claims providers to provide additional claims in
the security token for a user or to connect to additional sources of claims. For example, if you have a CRM application that contains roles that are not found in the user
repository in Active Directory, you can create a custom claims provider to connect to that database and add CRM role data to a user's original claims token. For more
information about claims provider usage scenarios, see Claims Provider (http://go.microsoft.com/fwlink/p/?LinkID=207579).
Architecture
When a Web application is configured to use claims-based authentication, SharePoint Foundation 2010 automatically uses two default claims providers:
The SPSystemClaimProvider (http://go.microsoft.com/fwlink/p/?LinkId=210011) class provides claims information related to the server farm where SharePoint
Foundation 2010 is installed.
The SPAllUserClaimProvider (http://go.microsoft.com/fwlink/p/?LinkId=210012) class provides an All Users claim that is displayed in the Select People and
Groups dialog box for People Picker.
Depending on the authentication method selected for a zone of a Web application, SharePoint Foundation 2010 also uses one or more of the default claims providers
listed in the following table.
Authentication method Claims provider
Windows authentication SPActiveDirectoryClaimProvider (http://go.microsoft.com/fwlink/p/?LinkID=208325)

Forms-based authentication SPFormsClaimProvider (http://go.microsoft.com/fwlink/p/?LinkId=210013)
Security Assertion Markup Language (SAML) token-based authentication SPTrustedClaimProvider (http://go.microsoft.com/fwlink/p/?LinkId=210014)
These claims providers are displayed in the Select People and Groups dialog box for People Picker. You can see a list of claims providers for a farm by using the Get-
SPClaimProvider Windows PowerShell cmdlet.
Note
When a Web application is configured to use SAML token-based authentication, the SPTrustedClaimProvider class does not provide search functionality to the People
Picker control. Any text entered in the People Picker control will automatically be displayed as if it had been resolved, regardless of whether it is a valid user, group,
or claim. If your SharePoint Foundation 2010 solution will use SAML token-based authentication, you should plan to create a custom claims provider to implement
custom search and name resolution.
Claims providers are registered on a server farm as features that are deployed to the farm. They are scoped at the farm level. Each claims provider object uses the
SPClaimProviderDefinition class to include information about the claims provider, such as display name, description, assembly, and type. Two important properties of the
SPClaimProviderDefinition class are IsEnabled and IsUsedByDefault. These properties determine whether a registered claims provider is enabled for use in the farm, and
whether the claims provider is used by default in a particular zone. By default, all claims providers are enabled when they are deployed to a server farm. For information
about the SPClaimProviderDefinition class, see SPClaimProviderDefinition Class (http://go.microsoft.com/fwlink/p/?LinkId=207595).
For more information about zones and authentication, see Plan authentication methods (SharePoint Foundation 2010).
For information about how to write a custom claims provider, see Creating Custom Claims Providers in SharePoint 2010 (http://go.microsoft.com/fwlink/p/?
LinkID=211324) and Claims Walkthrough: Writing Claims Providers for SharePoint 2010 (http://go.microsoft.com/fwlink/p/?LinkId=207589). For information about how to
override the default claims provider, see How to Override the Default Name Resolution and Claims Provider for SharePoint 2010 (http://go.microsoft.com/fwlink/p/?
LinkId=207591).
About custom claims providers
By default, the information that is resolved in People Picker when a query is performed depends on the information supplied by the claims provider. You cannot change
what information is supplied and how it is displayed when you use an out-of-box claims provider. To do this, you must have a developer create a custom claims
provider that will meet the needs of your solution for finding and selecting users, groups, and claims when a user assigns permissions to items such as a site, list, or
library.
For example, if your Web application uses SAML authentication and you also want to resolve users from Active Directory, you will need to create a custom claims
provider. For additional examples of claims provider use scenarios, see Claims Provider (http://go.microsoft.com/fwlink/p/?LinkID=207579).
When you create a custom claims provider, you can control what information is displayed and what results are returned in response to a query from the People Picker
control. By default, you configure the Web application to use claims authentication, and then register the claims provider on the server.
Note
You cannot control the order in which claims providers are displayed in the Select People and Groups dialog box in People Picker.
For information about how to write a custom claims provider, see How to: Create a Claims Provider (http://go.microsoft.com/fwlink/p/?LinkId=207588) and Claims
Walkthrough: Writing Claims Providers for SharePoint 2010 (http://go.microsoft.com/fwlink/p/?LinkId=207589). For information about how to override the default claims
provider, see How to Override the Default Name Resolution and Claims Provider for SharePoint 2010 (http://go.microsoft.com/fwlink/p/?LinkId=207591).
Deploying and configuring custom claims providers
By default, when you register a custom claims provider on the farm, the IsEnabled and IsUsedByDefault properties are both set to True. Unless the IsUsedByDefault
property is set to False, the custom claims provider is displayed in the Select People and Groups dialog box in People Picker for all zones. Depending on the number of
zones needed for your SharePoint Foundation 2010 solution, the authentication methods used by each zone, and the users for each zone, you may want to limit the
zones in which your custom claims provider is displayed in People Picker.
Because claims providers are scoped at the farm level and enabled at the zone level, you must carefully plan the zones in which you want the custom claims provider to
be displayed. In general, you should make sure that the IsUsedByDefault property is set to False, and then configure the SPIisSettings class for each zone in which you
want to use the custom claims provider. To configure a custom claims provider for select zones, you can create a Windows PowerShell script that sets the claims
provider for a zone by using the SPIisSettings.ClaimsProviders property, or you can create a custom application to allow you to enable a custom claims provider for
select zones. For information about the SPIisSettings.ClaimsProvider property, see SPIisSettings.ClaimsProvider Property (http://go.microsoft.com/fwlink/p/?
LinkId=207597). For information about how to create a custom application to configure claims providers for select zones, see the TechNet blog post, Configuring a
Custom Claims Provider to be Used only on Select Zones in SharePoint 2010 (http://go.microsoft.com/fwlink/p/?LinkId=207592).
For example, consider a scenario where there are two Web applications: The first Web application, PartnerWeb, has two zones — one intranet that uses Windowsclaims‐based authentication and one extranet that uses forms‐based authentication — and is used for collaboration among employees and partners. The second Webapplication, PublishingWeb, has only one zone that uses forms-based authentication and is an Internet publishing site for employees, business partners, and customer
partners. Now, suppose that for the extranet zone on PartnerWeb, you want employees to be able to collaborate with business partners but not customer partners. To
do this, you write a custom claims provider that determines whether the current user is a business partner or customer partner, based on the user's identity. In this
example, users from fabrikam.com are business partners, while users from contoso.com are customer partners. When a user who is a business partner is authenticated
in the PartnerWeb Web application, a claim for a role called BusinessPartner is added to the claim token; when a customer partner is authenticated, a claim for a role
called CustomerPartner is added to the claim token. To make sure that customer partners are never added to the extranet collaboration site, you add a Web application
policy on the PartnerWeb Web application for the extranet zone that explicitly denies access to any user who has a claim for a role called CustomerPartner. The custom
claims provider would also need to implement search and type-in support for the Web application policy to resolve the CustomerPartner role claim so it can be added
to the Web application policy. Finally, to enable this functionality on the extranet zone, you configure the SPIisSettings class for that zone to use the custom claims
provider. The following diagram illustrates the authentication methods and claims provider settings for each Web application and zone.

Note
On the Central Administration Web site, all claims providers are displayed in the Select People and Groups dialog box in People Picker, regardless of whether the
IsUsedByDefault property is set to True.
You can set the IsUsedByDefault property by configuring it in a feature receiver that you create for your custom claims provider. For information about how to use a
feature receiver to deploy a custom claims provider, see Sample: Feature Receiver to Deploy a Claims Provider (http://go.microsoft.com/fwlink/p/?LinkId=207590).
You can also override the settings of the IsEnabled and IsUsedByDefault properties by using the Set-SPClaimProvider Windows PowerShell cmdlet.
Important
Changing the IsEnabled property to False will disable the claims provider for the entire server farm. This can be useful if you need to troubleshoot issues that might
be caused by a custom claims provider. However, in general, the IsEnabled property should be set to True.
Using custom claims on more than one farm
Claim values are a combination of the claim itself, the claims provider name, and the order in which the claims provider was installed on the server. Therefore, if you
want to use a claim across multiple farms or environments, you must install the claims providers in the same order on each farm in which you want to use the claim. Use
the following steps when you have installed a custom claims provider on a farm and you want to use the same claim on additional farms.
1. Register the claims providers on the additional farms in the same order that they were registered on the first farm.
2. Perform a backup of the first farm. For information about how to back up a farm, see Back up a farm (SharePoint Foundation 2010).
3. Use the back up from the first farm to restore the other farms. For information about how to restore a farm, see Restore a farm (SharePoint Foundation 2010).
Considerations for custom claims providers
As you plan custom claims providers for use with People Picker in your SharePoint solution, consider the following questions:
What zones does your Web application have, and what authentication methods are used in each zone?
Are there any custom claims that should be added to users to enable more advanced security scenarios?
Will you be using SAML authentication with a trusted identity provider?
What will be the source of the values for the users and roles that will be displayed in People Picker query results?
What claim data do you want to resolve in the Select People and Groups dialog box?
The SharePoint Foundation 2010 Content Publishing team would like to thank Steve Peschka for contributing to this article. His blog can be found here
(http://go.microsoft.com/fwlink/p/?LinkId=210274).
See Also
ConceptsPlan authentication methods (SharePoint Foundation 2010)
© 2014 Microsoft

Security planning for sites and content (SharePoint Foundation2010)
Applies to: SharePoint Foundation 2010
Topic Last Modified: 2011-06-20
Some of the sites in your enterprise probably contain content that should not be available to all users. For example, proprietary technical information should be accessible
only on a need-to-know basis. An intranet portal for employee benefits should be available only to full-time employees, whereas the home page of an Internet Web site is
accessible by anonymous clients.
Permissions control access to your sites and site content. You can manage permissions by using Microsoft SharePoint Foundation 2010 groups, which control membership,
and fine-grained permissions, which help to secure content at the item and document level. This section describes permissions for sites and site content and provides
considerations for choosing permissions.
In this section:
Plan site permissions (SharePoint Foundation 2010) helps you understand how permissions are assigned and helps you choose the appropriate permissions to use
in your site collection or subsite.
Determine permission levels and groups (SharePoint Foundation 2010) reviews the available permission levels and groups, and helps you determine whether you
need additional permission levels or groups.
Choose security groups (SharePoint Foundation 2010) helps you determine which Microsoft Windows security groups and user accounts to use to grant access to
sites, decide whether to use the Authenticated Users group, and decide whether to allow anonymous access.
Choose administrators and owners for the administration hierarchy (SharePoint Foundation 2010) defines the levels of administration from the server level to the
subsite level and helps you choose administrators for each level.
Best practices for using fine-grained permissions (white paper) (SharePoint Foundation 2010)
Provides guidance about how to use fine-grained permissions in Microsoft SharePoint 2010 Products.
Contribute permission level overview (SharePoint Foundation 2010)
Provides information about the Contribute permission level and the tasks that you can complete if you have these permissions.
Security Note
SharePoint Foundation 2010 does not currently comply with Federal Information Processing Standard (FIPS) 140-2 - Security Requirements for Cryptographic Modules. FIPS
140-2 defines security standards which the United States and Canadian governments use to validate security levels for products that implement cryptography.
For more information about FIPS 140-2, see the following references:
FIPS 140 Evaluation
FIPS Publications
© 2014 Microsoft
Plan site permissions (SharePoint Foundation 2010)
Applies to: SharePoint Foundation 2010
Topic Last Modified: 2011-09-29
This article helps you plan access control at the site collection, site, subsite, and site content (list or library, folder, item or document) levels. This article also describes the
concepts about permission inheritance and fine-grained permissions.
This article does not address planning the security of your entire server or server farm. For more information about planning other aspects of security, such as
authentication methods and authentication modes, see Plan authentication methods (SharePoint Foundation 2010).
In this article:
About site permissions
About permission inheritance
Plan for site permissions
Plan for permission inheritance
Worksheet
Introduction
You can control access to site and site content by assigning permissions to users or groups for a specific site or site content at the following levels within a site
collection:
Site
Library or list
Folder
Document or item
Before developing your plan for site and content access, you should consider the following questions:
To what granularity do you want to control permissions for the site or site content? For example, you might want to control access at the site level, or you might
need more restrictive security settings for a specific list, folder, or item.
How do you want to categorize and manage your users by using SharePoint groups? Groups do not have any permission until they are assigned a permission
level for a specific site or for specific site content. When you assign permission levels to SharePoint groups at the site collection level, by default, all sites and site
content inherit those permission levels.
For more information about using groups to help manage permissions, see Choose security groups (SharePoint Foundation 2010)).
About site permissions
You should understand the following concepts before designing your permissions plan.
Permissions Permissions grant a user the ability to perform specific actions. For example, the View Items permission allows a user to view items in a list or
folder, but not to add or remove items. Permissions can be granted to individual users at site or site content levels.
For information about available permissions, see User permissions and permission levels (SharePoint Foundation 2010).
Fine-grained permissions Fine-grained permissions are unique permissions on securable objects that are at a lower level in a site hierarchy, such as
permissions on a list or library, folder, or item or document. Fine-grained permissions allow for greater granularity and customization of user permissions in a
site collection.
Permission level Permission levels are collections of permissions that allow users to perform a set of related tasks. For example, the Read permission level
includes the View Items, Open Items, View Pages, and View Versions permissions (among others), all of which are needed to view pages, documents, and items in
a SharePoint site. Permissions can be included in more than one permission level.
Permission levels are defined at the site collection level and can be customized by any user or group whose permission level includes the Manage Permissions
permission. For more information about customizing permission levels, see Configure custom permissions (SharePoint Foundation 2010).
The default permission levels are Limited Access, Read, Contribute, Design, and Full Control. For information about default permission levels and the permissions
included in each level, see User permissions and permission levels (SharePoint Foundation 2010).
SharePoint group A SharePoint group is a group of users that are defined at site collection level for easy management of permissions. Each SharePoint group
is assigned a default permission level. For example, the default SharePoint groups are Owners, Visitors, and Members, with Full Control, Read, and Contribute as
their default permission levels respectively. Anyone with Full Control permission can create custom groups.

User A user can be a person with a user account from any authentication provider supported by the Web application. We recommend that you assign
permissions to groups rather than users, although you can directly grant individual users permissions to a site or specific content. Because it is inefficient to
maintain individual user accounts, you should assign permissions on a per-user basis only as an exception.
Securable object A securable object is a site, list, library, folder, document, or item for which permissions levels can be assigned to users or groups. By default,
all lists and libraries within a site inherit permissions from the site. You can use list-level, folder-level, and item-level permissions to further control which users can
view or interact with site content. You must first break the permission inheritance before you change or assign permissions for that securable object. You can
resume inheriting permissions from the parent list or site at any time.
You can assign a user or group permissions for a specific securable object. Individual users or groups can have different permissions for different securable objects.
The following diagram illustrates the relationships among permissions, users and groups, and securable objects.
About permission inheritance
Permissions on securable objects within a site are inherited from the parent object by default. You can break inheritance and use fine‐grained permissions — uniquepermissions on the list or library, folder, or item or document level — to gain more control of the actions users can take on your site. For more information about thebest practices for using fine-grained permissions, see Best practices for using fine-grained permissions
Stopping inheriting permissions copies the groups, users, and permission levels from the parent object to the child object, and then breaks the inheritance. When
permission inheritance is broken, all permissions are explicit and any changes to parent object do not affect the child object. If you restore inherited permissions, the
child object will inherit its users, groups, and permission levels from the parent again, and you will lose any users, groups, or permission levels that were unique to the
child object.
For ease of management, use permission inheritance wherever possible.
Tip
If you choose to break inheritance and use fine-grained permissions, you should use groups to avoid having to track individual users. Because people move in and
out of teams and change responsibilities frequently, tracking those changes and updating the permissions for uniquely secured objects would be time-consuming
and error-prone.
Plan for site permissions
When you create permissions, you must balance the ease of administration and performance against the need to control access to individual items. If you use fine-
grained permissions extensively, you will spend more time managing the permissions, and users may experience slower performance when they try to access site
content.
Use the following guidelines to plan site permissions:
1. Follow the principle of least privilege: Users should have only the permission levels or individual permissions they need to perform their assigned tasks.
2. Use standard groups (such as Members, Visitors, and Owners) and control permissions at the site level.
Make most users members of the Members or Visitors groups. By default, users in the Members group can contribute to the site by adding or removing
items or documents, but cannot change the structure, site settings, or appearance of the site. The Visitors group has read-only access to the site, which
means that they can see pages and items, and open items and documents, but cannot add or remove pages, items, or documents.
Limit the number of people in the Owners group. Only those users you trust to change the structure, settings, or appearance of the site should be in the
Owners group.

3. Use permission levels rather than assign individual permissions.
Note
1. You can create additional SharePoint groups and permission levels if you need more control over the actions that your users can take. For example, if you do
not want the Read permission level on a specific subsite to include the Create Alerts permission, break the inheritance and customize the Read permission level
for that subsite.
2. Microsoft SharePoint Foundation 2010 and SharePoint Server 2010 use Check Permissions to determine a user or group’s permissions on all resources withina site collection. You can now find both the user's directly assigned permissions and the permissions assigned to any groups of which the user is a member by
checking permissions for a specific site or site content.
Plan for permission inheritance
It is much easier to manage permissions when there is a clear hierarchy of permissions and inherited permissions. It becomes more difficult when some lists within a site
have fine-grained permissions applied, and when some sites have subsites with unique permissions and others with inherited permissions.
For example, it's much easier to manage a site that has permission inheritance as described in the following table.
Securable object Description Unique or inherited permissions
SiteA Group home page Unique
SiteA/SubsiteA Sensitive group Unique
SiteA/SubsiteA/ListA Sensitive data Unique
SiteA/SubsiteA/LibraryA Sensitive documents Unique
SiteA/SubsiteB Group shared project information Inherited
SiteA/SubsiteB/ListB Non-sensitive data Inherited
SiteA/SubsiteB/LibraryB Non-sensitive documents Inherited
However, it is not as easy to manage a site that has permission inheritance as shown in the following table.
Securable object Description Unique or inherited permissions
SiteA Group home page Unique
SiteA/SubsiteA Sensitive group Unique
SiteA/SubsiteA/ListA Non-sensitive data Unique, but same permissions as SiteA
SiteA/SubsiteA/LibraryA Non-sensitive documents, but with one or two sensitive documents Inherited, with unique permissions at the document level
SiteA/SubsiteB Group shared project information Inherited
SiteA/SubsiteB/ListB Non-sensitive data, but with one or two sensitive items Inherited, with unique permissions at the item level
SiteA/SubsiteB/LibraryB Non-sensitive documents, but with a special folder containing sensitive
documents
Inherited, with unique permissions at the folder and
document level
Worksheet
Use the following worksheet to fill in your site hierarchy, and then list the permissions needed at each level of the hierarchy and any permission inheritance:
Site and content security worksheet (http://go.microsoft.com/fwlink/p/?LinkID=213967&clcid=0x409)
See Also
Other ResourcesResource Center: Security and Authentication for SharePoint Foundation 2010

© 2014 Microsoft

Determine permission levels and groups (SharePoint Foundation2010)
Applies to: SharePoint Foundation 2010
Topic Last Modified: 2011-08-05
A SharePoint group is a set of users that can be managed together. A permission level is a set of permissions that can be assigned to a specific group for a specific
securable object. SharePoint groups and permission levels are defined at the site collection level and are inherited from the parent object by default. This article describes
default groups and permission levels and helps you decide whether to use them as they are, customize them, or create different groups and permission levels.
In this article:
Review available default groups
Review available permission levels
Determine whether you need custom permission levels or groups
Worksheet
The most important decision about your site and content security in Microsoft SharePoint Foundation 2010 is how to group your users and which permission levels to
assign.
Review available default groups
SharePoint groups enable you to manage sets of users instead of individual users. These groups can contain many individual users, or they can include the contents of
any corporate identity system, including Active Directory Domain Services (AD DS), LDAPv3-based directories, application-specific databases and new user-centric
identity models, such as Windows Live ID. SharePoint groups do not confer specific rights to the site; they are a way to designate a set of users. You can organize your
users into any number of groups, depending on the size and complexity of your organization or Web site. SharePoint groups cannot be nested.
The following table displays default groups that are created by using team site templates in SharePoint Foundation 2010. Each default group is assigned a default
permission level.
Group name Default permission level Description
Visitors Read Use this group to grant people Read permissions to the SharePoint site.
Members Contribute Use this group to grant people Contribute permissions to the SharePoint site.
Owners Full Control Use this group to grant people Full Control permissions to the SharePoint site.
Make most users members of the Visitors or Members groups. By default, users in the Members group can contribute to the site by adding or removing items or
documents, but cannot change the structure, site settings, or appearance of the site. The Visitors group has read-only access to the site, which means that they can see
pages and items, and open items and documents, but cannot add or remove pages, items, or documents.
If the default groups do not map to the exact user groups in your organization, you can create custom groups. For more information about how to determine whether
you need additional groups, see Determine whether you need additional permission levels or groups.
Besides the above SharePoint groups, there are also administrator groups for higher-level administration tasks. They are Windows administrators, SharePoint farm
administrators, and site collection administrators.
For more information, see Choose administrators and owners for the administration hierarchy (SharePoint Foundation 2010).
Review available permission levels
The ability to view, change, or manage a site is determined by the permission level that you assign to a user or group. This permission level controls all permissions for
the site and the child objects that inherit the site’s permissions. Without the appropriate permission levels, your users might be unable to perform their tasks, or theymight be able to perform tasks that you did not want them to perform.
By default, the following permission levels are available:
Limited Access Includes permissions that enable users to view specific lists, document libraries, list items, folders, or documents, without giving users access to
all the elements of a site. You cannot edit this permission level directly.
Note
If this permission level is removed, group members might be unable to navigate the site to access items, even if they have the correct permissions for an item
within the site.

Read Includes permissions that enable users to view items on the site pages.
Contribute Includes permissions that enable users to add or change items on the site pages or in lists and document libraries.
Design Includes permissions that enable users to change the layout of site pages by using the browser or Microsoft SharePoint Designer 2010.
Full Control Includes all permissions.
For more information about permissions that are included in the default permission levels, see User permissions and permission levels (SharePoint Foundation 2010).
Determine whether you need custom permission levels or groups
The default groups and permission levels provide a general framework for permissions, covering many different organization types and roles within those organizations.
However, they might not map exactly to how your users are organized or to the many different tasks that your users perform on your sites. If the default groups and
permission levels do not suit your organization, you can create custom groups, change the permissions included in specific permission levels, or create custom
permission levels.
Do you need custom groups?
The decision to create custom groups is fairly straightforward and has little effect on your site's security. You should create custom groups instead of using the
default groups if either of the following situations applies:
You have more (or fewer) user roles within your organization than are apparent in the default groups. For example, if in addition to Designers, you have a set
of people who are tasked with publishing content to the site, you might want to create a Publishers group.
There are well-known names for unique roles within your organization that perform very different tasks in the sites. For example, if you are creating a public
site to sell your organization's products, you might want to create a Customers group that replaces Visitors or Viewers.
You want to preserve a one-to-one relationship between Windows security groups and the SharePoint groups. For example, if your organization has a security
group called Web Site Managers, you might want to use that name as a group name for easy identification when managing the site.
You prefer other group names.
Do you need custom permission levels?
The decision to customize permission levels is less straightforward than the decision to customize SharePoint groups. If you customize the permissions assigned to a
permission level, you must keep track of that change, verify that it works for all groups and sites affected by the change, and ensure that the change does not
negatively affect your security or your server capacity or performance.
For example, if you customize the Contribute permission level to include the Create Subsites permission that is typically part of the Full Control permission level,
Contributors can create and own subsites, and can potentially invite malicious users to their subsites or post unapproved content. If you change the Read permission
level to include the Create Alerts permission that is typically part of the Contribute permission level, all members of the Visitors group can create alerts, which might
cause performance issues.
You should customize the default permission levels if either of the following situations applies:
A default permission level includes all permissions except one that your users need to do their jobs, and you want to add that permission.
A default permission level includes a permission that your users do not need.
Note
Do not customize the default permission levels if your organization has security or other concerns about a specific permission that is part of the permission
level. If you want to make that permission unavailable for all users assigned to the permission level or levels that include that permission, turn off the
permission for all Web applications in your server farm, rather than change all of the permission levels. To manage permissions for a Web application, see
Manage permissions for a Web application (SharePoint Foundation 2010).
If you need to make several changes to a permission level, create a custom permission level that includes all of the permissions you need.
You might want to create additional permission levels if either of the following conditions applies:
You want to exclude several permissions from a specific permission level.
You want to define a unique set of permissions for a new permission level.
To create a permission level, you can create a permission level and then select the permissions that you want to include.
For more information about how to configure custom permissions, see Configure custom permissions (SharePoint Foundation 2010).
Note
Some permissions depend on other permissions. If you clear a permission that another permission depends on, the other permission is also cleared.

Worksheet
Use the following worksheet to determine permission levels and groups to use:
Custom permission levels and groups worksheet (http://go.microsoft.com/fwlink/p/?LinkID=213966&clcid=0x409)
© 2014 Microsoft

Choose security groups (SharePoint Foundation 2010)
Applies to: SharePoint Foundation 2010
Topic Last Modified: 2011-08-05
This article describes the security and distribution groups that comprise the Active Directory® Domain Services ﴾ADDS﴿. This article also provides recommendations forusing those groups to organize the users of your SharePoint sites.
In this article:
Decide whether to add security groups
Determine which security groups to use for granting access to sites
Decide whether to allow access to all authenticated users
Decide whether to allow access to anonymous users
Worksheet
Introduction
Managing users of SharePoint sites is easier if you assign permission levels to groups rather than to individual users. SharePoint group is a set of individual users and
can also include Active Directory groups. In Active Directory Domain Services (ADDS), the following groups are commonly used to organize users:
Distribution group A group that is used only for e-mail distribution and that is not security-enabled. Distribution groups cannot be listed in discretionary
access control lists (DACLs), which are used to define permissions on resources and objects.
Security group A group that can be listed in DACLs. A security group can also be used as an e-mail entity.
You can use security groups to control permissions for your site by adding security groups to SharePoint groups and granting permissions to the SharePoint groups.
You cannot add distribution groups to SharePoint groups, but you can expand a distribution group and add the individual members to a SharePoint group. If you use
this method, you must manually keep the SharePoint group synchronized with the distribution group. If you use security groups, you do not need to manage the
individual users in the SharePoint application. Because you included the security group instead of the individual members of the group, ADDS manages the users for you.
Note
For ease of security management, the following items are not recommended in managing Active Directory groups.
Assign permission levels directly to Active Directory groups.
Adding security groups that contain nested security groups, contacts, or distribution lists.
Decide whether to add security groups
Adding security groups to SharePoint groups provides centralized management of groups and security. The security group is the only place where you manage
individual users. Once you add the security group to a SharePoint group, you do not have to manage security group members in that SharePoint group. If a user is
removed from the security group, the user will be automatically removed from the SharePoint group.
However, using security groups in SharePoint sites does not provide full visibility of what is happening. For example, when a security group is added to a SharePoint
group for a specific site, the site will not appear in the users’ My Sites. The User Information List will not show individual users until they have contributed to the site. Inaddition, security groups with deep nested structure might break SharePoint sites.
Considering the previous advantages and disadvantages, here are the recommendations:
For intranet sites that are broadly accessed by your users, use security groups because you do not care about the individual users who accessed the intranet site
home page.
For collaboration sites that are accessed by a small group of users, add users directly to SharePoint groups. In this case, there is more of a need to know who is
a member so the group members know each other’s e‐mail addresses and how to contact each other.
Determine which security groups to use for granting access to sites
Each organization sets up its security groups differently. For easier permission management, security groups should be:
Large and stable enough that you are not continually adding additional security groups to your SharePoint sites.
Small enough that you can assign appropriate permissions.

For example, a security group called "all users in building 2" is probably not small enough to assign permissions, unless all users in building 2 have the same job
function, such as accounts receivable clerks. This is rarely the case, so you should look for a smaller, more specific set of users, such as “Accounts Receivable”.
Decide whether to allow access for all authenticated users
If you want all users within your domain to be able to view content on your site, consider granting access to all authenticated users (the Domain Users Windows security
group). This special group allows all members of your domain to access a Web site (at the permission level you choose), without your having to enable anonymous
access.
Decide whether to allow access for anonymous users
You can enable anonymous access to allow users to view pages anonymously. Most Internet Web sites allow anonymous viewing of a site, but might ask for
authentication when someone wants to edit the site or buy an item on a shopping site. Anonymous access is disabled by default and must be granted at the Web
application level at the time that the Web application is created.
If anonymous access is allowed for the Web application, site administrators can decide whether to grant anonymous access to a site or any of the content on that site.
Anonymous access relies on the anonymous user account on the Web server. This account is created and maintained by Microsoft Internet Information Services (IIS), not
by your SharePoint site. By default in IIS, the anonymous user account is IUSR. When you enable anonymous access, you are in effect granting that account access to the
SharePoint site. Allowing access to a site, or to lists and libraries, grants the View Items permission to the anonymous user account. Even with the View Items permission,
however, there are restrictions to what anonymous users can do. Anonymous users cannot:
Open sites for editing in Microsoft Office SharePoint Designer.
View sites in My Network Places.
Upload or edit documents in document libraries, including wiki libraries.
Important
To improve security for sites, lists, or libraries, do not enable anonymous access. Enabling anonymous access allows users to contribute to lists, discussions,
and surveys, which will possibly use up server disk space and other resources. Anonymous access also allows anonymous users to discover site information,
including user e-mail addresses and any content posted to lists, and libraries, and discussions.
Permission policies provide a centralized way to configure and manage a set of permissions that applies to only a subset of users or groups in a Web application. You
can manage permission policy for anonymous users by enabling or disabling anonymous access for a Web application. If you enable anonymous access for a Web
application, site administrators can then grant or deny anonymous access at the site collection, site, or item level. If anonymous access is disabled for a Web application,
no sites within that Web application can be accessed by anonymous users.
None No policy. This is the default option. No additional permission restrictions or additions are applied to site anonymous users.
Deny Write Anonymous users cannot write content, even if the site administrator specifically attempts to grant the anonymous user account that permission.
Deny All Anonymous users cannot have any access, even if site administrators specifically attempt to grant the anonymous user account access to their sites.
For more information about permission policies, see Manage permission policies for a Web application (SharePoint Foundation 2010).
Worksheet
Use the following worksheet to list the security groups that you will use and the permission levels that the groups will need at each level of your site hierarchy.
Site and content security worksheet (http://go.microsoft.com/fwlink/p/?LinkID=213967&clcid=0x409)
© 2014 Microsoft

Choose administrators and owners for the administration hierarchy(SharePoint Foundation 2010)
Applies to: SharePoint Foundation 2010
Topic Last Modified: 2011-08-05
This article describes the administrator roles that correspond to the Microsoft SharePoint Foundation 2010 server and site hierarchy. Many people can be involved in
managing SharePoint Foundation 2010. Administration of Microsoft SharePoint Foundation occurs at the following levels:
Windows server or SharePoint server farm
Shared services
Web application
Sites
Document library or list
Individual items
In this article:
Levels of administration
Worksheet
Levels of administration
Most levels of the server and site hierarchy have a corresponding administration group. The administration groups who have administrative permissions at different
levels are described in the following list:
Windows server or server farm level
Farm Administrators group Members of the Farm Administrators group have permissions to and responsibility for all servers in the server farm.
Members can perform all administrative tasks in Central Administration for the server or server farm. They can assign administrators to manage service
applications, which are instances of shared services. This group does not have access to individual sites or their content by default. However, they can
grant themselves access if need be.
Windows Administrators group Members of the Windows Administrators group on the local server can perform all farm administrator actions.
Administrators on the local server can perform additional tasks, such as installing new products or applications, deploying Web Parts and new features to
the global assembly cache, creating new Web applications and new Internet Information Services (IIS) Web sites, and starting services. Like farm
administrators, members of this group on the local server have no access to site content by default.
Note
Farm administrators and members of the local Administrators group can take ownership of specific site collections if necessary. For example, if a site
administrator leaves the organization and a new administrator must be added, the farm administrator or a member of the local Administrators group
can take ownership of the site collection to make the change. To take ownership, they can add themselves as the site collection administrator on the
Application Management page.
Shared services level
Service application administrators These administrators are designated by the farm administrator. They can configure settings for a specific service
application within a farm. However, these administrators cannot create service applications, access any other service applications in the farm, or perform
any farm-level operations, including topology changes. For example, the service application administrator for a Search service application in a farm can
configure settings for that Search service application only.
Feature administrators A feature administrator is associated with a specific feature or features of a service application. These administrators can
manage a subset of service application settings, but not the entire service application. For example, a Feature administrator might manage the Audiences
feature of the User Profile service application.
Web application level
The Web application level does not have a unique administrator group, but farm administrators have control over the Web applications within their scope.
Members of the Farm Administrators group and members of the Administrators group on the local server can define a policy to grant individual users
permissions at the Web application level. For more information about policy, see "Policy for Web applications" in the Logical architecture components
(SharePoint Server 2010) article.
Site level
Site collection administrators These administrators have the Full Control permission level on all Web sites within a site collection. They have Full Control
access to all site content in that site collection, even if they do not have explicit permissions on that site. They can audit all site content and receive any

administrative alert. A primary and a secondary site collection administrator can be specified during the creation of a site collection.
Site owners By default, members of the Owners group for a site have the Full Control permission level on that site. They can perform administrative tasks
on the site, and on any list or library within that site. They receive e-mail notifications for events, such as the pending automatic deletion of inactive sites
and requests for site access.
Worksheet
Use the following worksheet to choose administrators and owners for the administration hierarchy:
Administrators and owners worksheet (http://go.microsoft.com/fwlink/p/?LinkID=213965&clcid=0x409)
© 2014 Microsoft
Best practices for using fine-grained permissions (white paper)(SharePoint Foundation 2010)
Applies to: SharePoint Foundation 2010
Topic Last Modified: 2011-08-05
This white paper describes best practices for fine-grained permissions (FGP) and how to use them within your organization when implementing Microsoft SharePoint
Foundation 2010.
Download the white paper from the following link: http://go.microsoft.com/fwlink/p/?LinkId=201596
© 2014 Microsoft
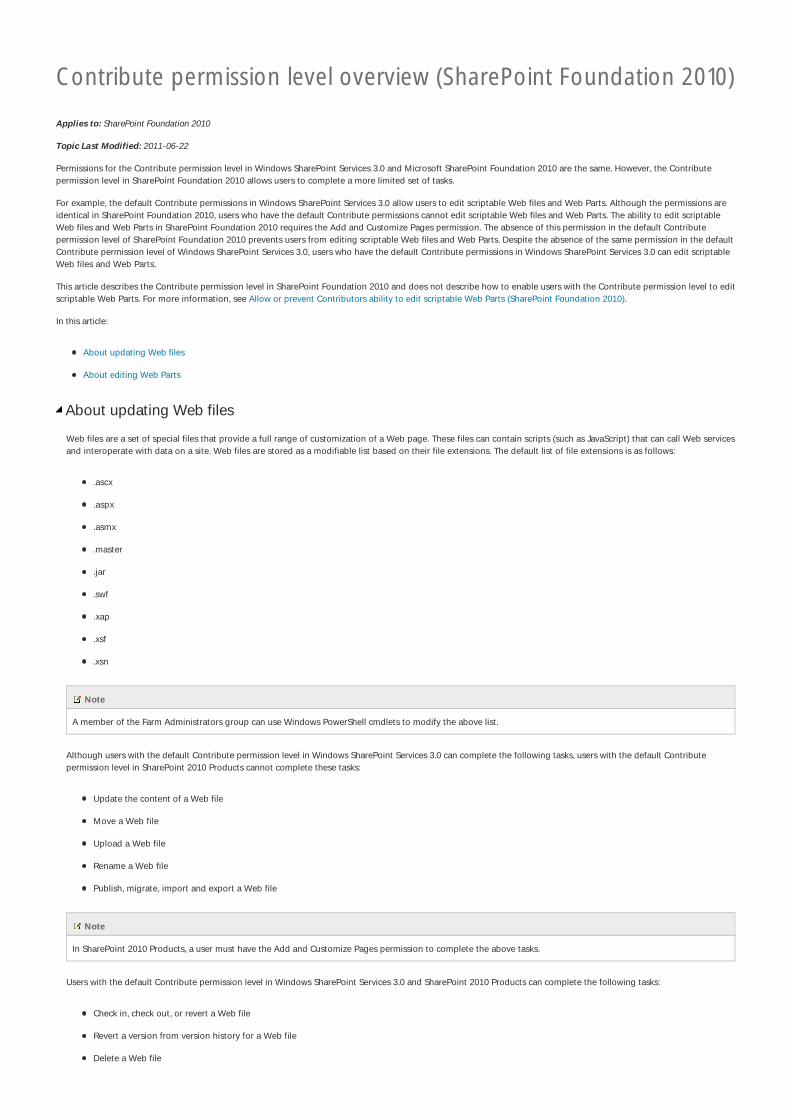
Contribute permission level overview (SharePoint Foundation 2010)
Applies to: SharePoint Foundation 2010
Topic Last Modified: 2011-06-22
Permissions for the Contribute permission level in Windows SharePoint Services 3.0 and Microsoft SharePoint Foundation 2010 are the same. However, the Contribute
permission level in SharePoint Foundation 2010 allows users to complete a more limited set of tasks.
For example, the default Contribute permissions in Windows SharePoint Services 3.0 allow users to edit scriptable Web files and Web Parts. Although the permissions are
identical in SharePoint Foundation 2010, users who have the default Contribute permissions cannot edit scriptable Web files and Web Parts. The ability to edit scriptable
Web files and Web Parts in SharePoint Foundation 2010 requires the Add and Customize Pages permission. The absence of this permission in the default Contribute
permission level of SharePoint Foundation 2010 prevents users from editing scriptable Web files and Web Parts. Despite the absence of the same permission in the default
Contribute permission level of Windows SharePoint Services 3.0, users who have the default Contribute permissions in Windows SharePoint Services 3.0 can edit scriptable
Web files and Web Parts.
This article describes the Contribute permission level in SharePoint Foundation 2010 and does not describe how to enable users with the Contribute permission level to edit
scriptable Web Parts. For more information, see Allow or prevent Contributors ability to edit scriptable Web Parts (SharePoint Foundation 2010).
In this article:
About updating Web files
About editing Web Parts
About updating Web files
Web files are a set of special files that provide a full range of customization of a Web page. These files can contain scripts (such as JavaScript) that can call Web services
and interoperate with data on a site. Web files are stored as a modifiable list based on their file extensions. The default list of file extensions is as follows:
.ascx
.aspx
.asmx
.master
.jar
.swf
.xap
.xsf
.xsn
Note
A member of the Farm Administrators group can use Windows PowerShell cmdlets to modify the above list.
Although users with the default Contribute permission level in Windows SharePoint Services 3.0 can complete the following tasks, users with the default Contribute
permission level in SharePoint 2010 Products cannot complete these tasks:
Update the content of a Web file
Move a Web file
Upload a Web file
Rename a Web file
Publish, migrate, import and export a Web file
Note
In SharePoint 2010 Products, a user must have the Add and Customize Pages permission to complete the above tasks.
Users with the default Contribute permission level in Windows SharePoint Services 3.0 and SharePoint 2010 Products can complete the following tasks:
Check in, check out, or revert a Web file
Revert a version from version history for a Web file
Delete a Web file

Recycle a deleted Web file
About editing Web Parts
Users who have the default Contribute permission level in Windows SharePoint Services 3.0 can add or edit Web Parts that developers have marked as unsafe for
editing. However, users who have the default Contribute permission level in SharePoint 2010 Products cannot add or edit the same Web Parts.
Note
To add or edit Web Parts that developers have marked as unsafe for editing, users in SharePoint 2010 Products must have the Add and Customize Pages permission.
The following Web Parts are marked as safe for editing by default and can be added or edited by users who have the default Contribute permission level:
Basic Chart Web Part
Image Web part
Page Viewer Web Part
Picture Slideshow Web Part
Relevant Documents Web Part
Site Users Web Part
Title Bar Web Part
User Tasks Web Part
A member of the Farm Administrators group can update permissions to allow users with the default Contribute permission level to add or edit Web Parts that are
marked as unsafe for editing. For more information, see Allow or prevent Contributors ability to edit scriptable Web Parts (SharePoint Foundation 2010).
See Also
ConceptsAllow or prevent Contributors ability to edit scriptable Web Parts (SharePoint Foundation 2010)
© 2014 Microsoft

Security planning for server farms (SharePoint Foundation 2010)
Applies to: SharePoint Foundation 2010
Topic Last Modified: 2011-08-26
This section contains security articles designed to help you to plan server farms environments and configurations.
In this section:
Plan administrative tasks in a least-privilege environment (SharePoint Foundation 2010)
Plan for administrative and service accounts (SharePoint Foundation 2010)
© 2014 Microsoft
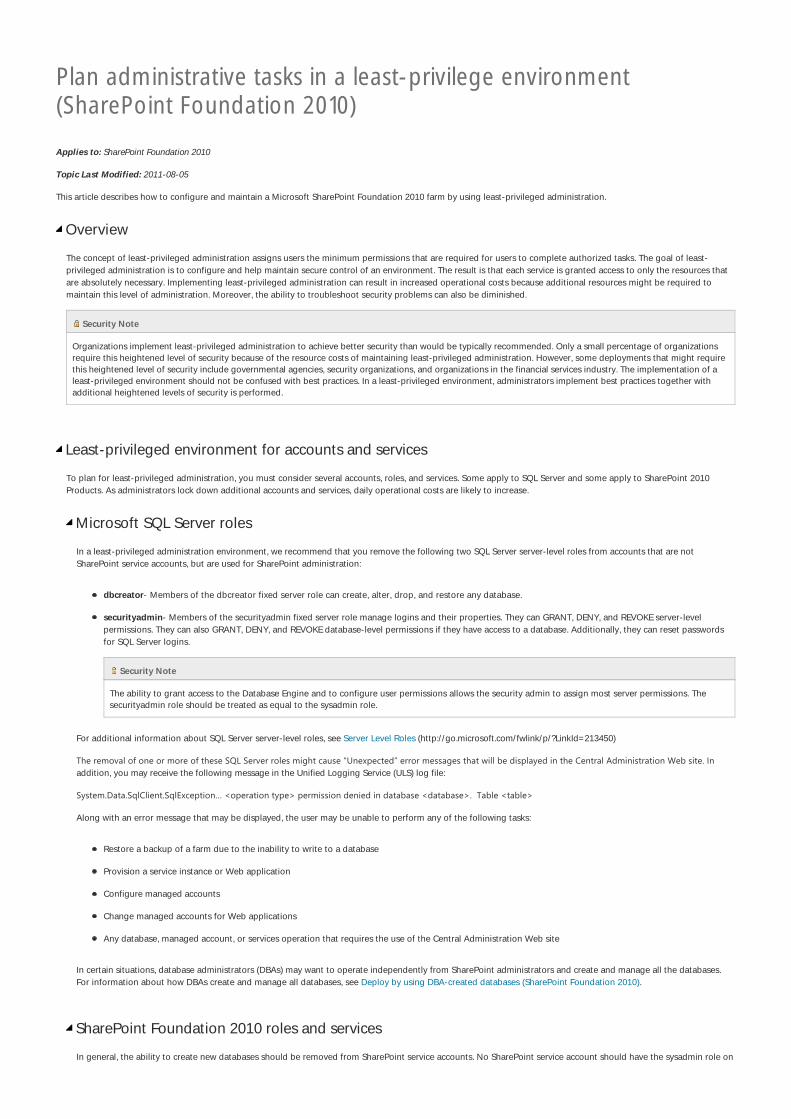
Plan administrative tasks in a least-privilege environment(SharePoint Foundation 2010)
Applies to: SharePoint Foundation 2010
Topic Last Modified: 2011-08-05
This article describes how to configure and maintain a Microsoft SharePoint Foundation 2010 farm by using least-privileged administration.
Overview
The concept of least-privileged administration assigns users the minimum permissions that are required for users to complete authorized tasks. The goal of least-
privileged administration is to configure and help maintain secure control of an environment. The result is that each service is granted access to only the resources that
are absolutely necessary. Implementing least-privileged administration can result in increased operational costs because additional resources might be required to
maintain this level of administration. Moreover, the ability to troubleshoot security problems can also be diminished.
Security Note
Organizations implement least-privileged administration to achieve better security than would be typically recommended. Only a small percentage of organizations
require this heightened level of security because of the resource costs of maintaining least-privileged administration. However, some deployments that might require
this heightened level of security include governmental agencies, security organizations, and organizations in the financial services industry. The implementation of a
least-privileged environment should not be confused with best practices. In a least-privileged environment, administrators implement best practices together with
additional heightened levels of security is performed.
Least-privileged environment for accounts and services
To plan for least-privileged administration, you must consider several accounts, roles, and services. Some apply to SQL Server and some apply to SharePoint 2010
Products. As administrators lock down additional accounts and services, daily operational costs are likely to increase.
Microsoft SQL Server roles
In a least-privileged administration environment, we recommend that you remove the following two SQL Server server-level roles from accounts that are not
SharePoint service accounts, but are used for SharePoint administration:
dbcreator- Members of the dbcreator fixed server role can create, alter, drop, and restore any database.
securityadmin- Members of the securityadmin fixed server role manage logins and their properties. They can GRANT, DENY, and REVOKE server-level
permissions. They can also GRANT, DENY, and REVOKE database-level permissions if they have access to a database. Additionally, they can reset passwords
for SQL Server logins.
Security Note
The ability to grant access to the Database Engine and to configure user permissions allows the security admin to assign most server permissions. The
securityadmin role should be treated as equal to the sysadmin role.
For additional information about SQL Server server-level roles, see Server Level Roles (http://go.microsoft.com/fwlink/p/?LinkId=213450)
The removal of one or more of these SQL Server roles might cause “Unexpected” error messages that will be displayed in the Central Administration Web site. Inaddition, you may receive the following message in the Unified Logging Service (ULS) log file:
System.Data.SqlClient.SqlException… <operation type> permission denied in database <database>. Table <table>
Along with an error message that may be displayed, the user may be unable to perform any of the following tasks:
Restore a backup of a farm due to the inability to write to a database
Provision a service instance or Web application
Configure managed accounts
Change managed accounts for Web applications
Any database, managed account, or services operation that requires the use of the Central Administration Web site
In certain situations, database administrators (DBAs) may want to operate independently from SharePoint administrators and create and manage all the databases.
For information about how DBAs create and manage all databases, see Deploy by using DBA-created databases (SharePoint Foundation 2010).
SharePoint Foundation 2010 roles and services
In general, the ability to create new databases should be removed from SharePoint service accounts. No SharePoint service account should have the sysadmin role on

the Microsoft SQL Serverinstance and no SharePoint service account should be a local Administrator on the server that runs Microsoft SQL Server.
However, you could lock down several other SharePoint Foundation 2010 services and accounts:
SharePoint_Shell_Access role
When this Microsoft SQL Server role is removed, the ability to write entries to the configuration and content database is removed. For additional information
about this role, see Add-SPShellAdmin.
SharePoint Timer service (SPTimerV4)
By default, this service is installed and maintains configuration cache information. If the service type is set to disabled the following behavior may occur:
No timer jobs will run
Health analyzer rules will not run
Maintenance and farm configuration will be out of date
SharePoint Administration service (SPAdminV4)
This service performs automated changes that require local administrator permission on the server. When the service is not running, you must manually
process server-level administrative changes. If the service type is set to disabled, the following behavior may occur:
Administrative timer jobs will not run
Web configuration files will not be updated
Security and local groups will not be updated
Registry values and keys will not be written
Services may be unable to be started or restarted
Provisioning of services may be unable to be completed
SPUserCodeV4 Service
This service lets a site collection administrator upload sandboxed solutions to the Solutions gallery. For additional information about sandboxed solutions, see
Sandboxed solutions overview (SharePoint Foundation 2010).
For more information services, see SharePoint Administration service is disabled (SharePoint 2010 Products).
Depending on an organization's business requirements, if any SharePoint Foundation 2010 services or roles are implemented, the behavior to the following features
may occur:
Backup and restore
The ability to perform a restore from a backup may fail if database permissions have been removed.
Upgrade
The upgrade process will start correctly, but then fail as you do not have suitable permissions to databases. If your organization is already in a least-privileged
environment, the workaround is move to a best practices environment to complete the upgrade, and then move back to a least-privileged environment.
Update
The ability to apply a software update to a farm will succeed for the schema of the configuration database, but fail on the content database and services.
Additional requirements to consider
In addition to the preceding considerations, you might have to consider more operations. The following list is not complete. Selectively use the items at your own
discretion:
Setup user administrator account- This account is used to set up each server in a farm. The account must be a member of the Administrators group on each
server in the Microsoft SharePoint Server 2010 farm. For additional information about this account, see Administrative accounts
My Site host application pool account- This is the account under which the My Site application pool runs. To configure this account, you need to be a
member in the Farms Administrators group.
Built-in user group- Removing the built-in user security group or changing the permissions may have unanticipated consequences.
Group permissions-By default the WSS_ADMIN_WPG SharePoint group has read and write access to local resources. The following WSS_ADMIN_WPG file
system locations, %WINDIR%\System32\drivers\etc\HOSTS and %WINDIR%\Tasks are needed for Microsoft SharePoint Foundation to work properly. If other
services or applications are running on a server, you may consider how they access the Tasks or HOSTS folder locations. For additional information about
account settings, see Account permissions and security settings (SharePoint Server 2010)
Change permission of a service- A change of a permission of a service may have unanticipated consequences. For example, if the following registry key,
HKLM\System\CurrentControlSet\Services\PerfProc\Performance\Disable Performance Counters, has the value of 0, the User Code Host service would be
disabled which would cause sandboxed solutions to stop working. For additional information about the User Code service not working, see The SharePoint
2010 User Code Host service fails to start (http://go.microsoft.com/fwlink/p/?LinkId=225642)

© 2014 Microsoft

Plan for administrative and service accounts (SharePointFoundation 2010)
Applies to: SharePoint Foundation 2010
Topic Last Modified: 2011-09-29
This article describes the accounts that that you must plan for and describes the deployment scenarios that affect account requirements.
In this article:
About administrative and service accounts
Single server standard requirements
Server farm standard requirements
Use this article with the following deployment article: Initial deployment administrative and service accounts (SharePoint Foundation 2010)
The initial deployment administrative and service accounts article describes the specific account and permissions that you need to grant prior to running Setup.
This article does not describe security roles and permissions required to administer in Microsoft SharePoint Foundation 2010.
About administrative and service accounts
This section lists and describes the accounts that you must plan for. The accounts are grouped according to scope.
After you complete installation and configuration of accounts, ensure that you do not use the Local System account to perform administration tasks or to browse sites.
Server farm-level accounts
The following table describes the accounts that are used to configure Microsoft SQL Server database software and to install SharePoint Foundation 2010.
Account Purpose
SQL Server service
account
SQL Server prompts for this account during SQL Server Setup. This account is used as the service account for the following SQL Server
services:
MSSQLSERVER
SQLSERVERAGENT
If you are not using the default instance, these services will be shown as:
MSSQL$InstanceName
SQLAgent$InstanceName
Setup user account The user account that is used to run:
If you run Windows PowerShell cmdlets that affect a database, this account must be a member of the db_owner fixed database role for
the database.
Setup on each server computer
SharePoint Products Configuration Wizard
The Psconfig command-line tool
The Stsadm command-line tool
Server farm account This account is also referred to as the database access account.
This account is:
The application pool identity for the SharePoint Central Administration Web site.
The process account for the Windows SharePoint Services Timer service.
Service application accounts

The following table describes the accounts that are used to set up and configure a service application. Plan one set of an application pool and proxy group for each
service application you plan to implement.
For additional information about service application endpoints, see Using Service Endpoints (http://go.microsoft.com/fwlink/p/?LinkId=227293).
Account Service Purpose Requirements
Service
Application
Endpoint
Business Data
Connectivity Service
Search Service
Usage and Health
Data Collection Service
Used as the identity for the service application endpoint application pool. Unless
there are specific isolation requirements, the application pool can be used to host
multiple service application endpoints.
Must be a member of the Farm
Administrators group.
Application Discovery
and Load Balancer
Service Application
Used as the identity for the service application endpoint application pool. This
account must be the Farm Account and the application pool is created automatically
by the SharePoint Products Configuration Wizard.
Must be a member of the Farm
Administrators group.
Default
Content
Access
Search Service The default account when crawling content. Note that additional accounts can be
specified per crawl rule.
Must have Read Access to the
content being crawled.
Full Read permissions must be
granted explicitly to content that is
outside the local farm.
Full Read permissions are
automatically configured for
content databases in the local
farm.
Search
Service
Search Service This is the Windows Service account for the SharePoint Server Search Service. This
setting affects all Search service applications in the farm.
Must be a domain user account.
Microsoft SharePoint Foundation 2010 search service accounts
The following table describes the accounts that are used for the SharePoint Foundation 2010 search service account.
SharePoint Foundation 2010 uses these accounts only for searching Help content in response to user search queries. There is only one instance of the SharePoint
Foundation 2010 Search service in a farm.
Account Purpose
SharePoint Foundation 2010 Search
Service
Used as the service account for the SharePoint Foundation 2010 Search Service. This account cannot be a built-in account,
such as Local Service or Network Service.
SharePoint Foundation 2010 Search
Content Access
Used to crawl Help content. For proper search functionality and information security, do not use an administrator account
or an account that can modify content.
Used to crawl Help content. For proper search functionality and information security, do not use an administrator account
or an account that can modify content.
Additional application pool identity accounts
If you create additional application pools to host sites, plan for additional application pool identity accounts. The following table describes the application pool
identity account. Plan one application pool account for each application pool you plan to implement.
Account Purpose
Application
pool identity
The user account that the worker processes that service the application pool use as their process identity. This account is used to access content
databases associated with the Web applications that reside in the application pool.
Single server standard requirements
If you are deploying to a single server computer, account requirements are greatly reduced. In an evaluation environment, you can use a single account for all of the
account purposes. In a production environment, ensure that the accounts you create have the appropriate permissions for their purposes.

For a list of account permissions for single server environments, see Initial deployment administrative and service accounts (SharePoint Foundation 2010).
Server farm requirements
If you are deploying to more than one server computer, use the server farm standard requirements to ensure that accounts have the appropriate permissions to
perform their processes across multiple computers. The server farm standard requirements detail the minimum configuration that is necessary to operate in a server
farm environment.
For a more secure environment, see Plan administrative tasks in a least-privilege environment (SharePoint Foundation 2010)
For a list of standard requirements for server farm environments see the requirements listed in the Technical reference: Account requirements by scenario section of this
article.
For some accounts, additional permissions or access to databases are configured when you run Setup. These are noted in the accounts planning tool. An important
configuration for database administrators to be aware of is the addition of the WSS_Content_Application_Pools database role. Setup adds this role to the following
databases:
SharePoint_Config database (configuration database)
SharePoint_AdminContent database
Members of the WSS_Content_Application_Pools database role are granted the Execute permission to a subset of the stored procedures for the database.
Additionally, members of this role are granted the Select permission to the Versions table (dbo.Versions) in the SharePoint_AdminContent database.
For other databases, the accounts planning tool indicates that access to read from these databases is automatically configured. In some cases, limited access to write to
a database is also automatically configured. To provide this access, permissions to stored procedures are configured. For the SharePoint_Config database, for example,
access to the following stored procedures is automatically configured:
proc_dropEmailEnabledList
proc_dropEmailEnabledListsByWeb
proc_dropSiteMap
proc_markForDeletionEmailEnabledList
proc_markForDeletionEmailEnabledListsBySite
proc_markForDeletionEmailEnabledListsByWeb
proc_putDistributionListToDelete
proc_putEmailEnabledList
proc_putSiteMap
Technical reference: Account requirements by scenario
This section lists account requirements by scenario:
Single server standard requirements
Server farm standard requirements
Single server standard requirements
Server farm-level accounts
Account Requirements
SQL Server service Local System account (default)
Setup user Member of the Administrators group on the local computer
Server farm Network Service (default)
No manual configuration is necessary.
Microsoft SharePoint Foundation 2010 Search service accounts

Account Requirements
SharePoint Foundation 2010
Search Service
Must not be a built-in account, such as Local Service or Network Service.
SharePoint Foundation 2010
Search Service Content Access
For proper search functionality and information security, do not use an administrator account or an account that can modify
content. This account is automatically added to the Full Read policy, giving it read-only access to all Help content.
Additional application pool identity accounts
Account Requirements
Application pool identity No manual configuration is necessary.
The Network Service account is used for the default Web site that is created during Setup and configuration.
Server farm standard requirements
Server farm-level accounts
Account Requirements
SQL
Server
service
account
Use either a Local System account or a domain user account.
If a domain user account is used, this account uses Kerberos authentication by default, which requires additional configuration in your network
environment. If SQL Server uses a service principal name (SPN) that is not valid (that is, that does not exist in the Active Directory service
environment), Kerberos authentication fails, and then NTLM is used. If SQL Server uses an SPN that is valid but is not assigned to the appropriate
container in Active Directory, authentication fails. Authentication will always try to use the first SPN it finds, so ensure that there are no SPNs assigned
to inappropriate containers in Active Directory.
If you plan to back up to or restore from an external resource, permissions to the external resource must be granted to the appropriate account. If
you use a domain user account for the SQL Server service account, grant permissions to that domain user account. However, if you use the Network
Service or the Local System account, grant permissions to the external resource to the machine account (domain_name\SQL_hostname$).
Setup
user
account
Domain user account.
Member of the Administrators group on each server on which Setup is run.
SQL Server login on the computer running SQL Server.
Member of the following SQL Server security roles:
securityadmin fixed server role
dbcreator fixed server role
If you run Stsadm commands that affect a database, this account must be a member of the db_owner fixed database role for the database.
Server
farm
account
Domain user account.
If the server farm is a child farm with Web applications that consume shared services from a parent farm, this account must be a member of
the db_owner fixed database role on the configuration database of the parent farm.
Additional permissions are automatically granted for this account on Web servers and application servers that are joined to a server farm.
This account is automatically added as a SQL Server login on the computer running SQL Server and added to the following SQL Server security roles:
dbcreator fixed server role
securityadmin fixed server role
db_owner fixed database role for all databases in the server farm
Note if you configure the Secure Store Service, the server farm account will not automatically be given db_owner access to the Secure Store Service
database.
Microsoft SharePoint Foundation 2010 Search accounts
Account Requirements

Microsoft SharePoint Foundation 2010 Search service accountMust be a domain user account.
Must not be a member of the Farm Administrators group.
The following are automatically configured:
Access to read from the configuration database and the SharePoint_Admin content
database.
Membership in the db_owner role for the WSS_ Search database.
Microsoft SharePoint Foundation 2010 Search content access
account Same requirements as the SharePoint Foundation Search Service account.
Automatically added to the Web application Full Read policy for the farm.
Additional application pool identity accounts
Account Requirements
Application pool identity No manual configuration is necessary.
The following are automatically configured:
Membership in the db_owner role for content databases and search databases associated with the Web application.
Membership in specific application pool roles for the configuration and the SharePoint_AdminContent databases.
Additional permissions for this account to front-end Web servers and application servers are automatically granted.
© 2014 Microsoft

Plan security hardening (SharePoint Foundation 2010)
Applies to: SharePoint Foundation 2010
Topic Last Modified: 2011-09-17
This article describes security hardening for Microsoft SharePoint Foundation 2010 Web server, application server, and database server roles, and gives detailed guidance
about the specific hardening requirements for ports, protocols, and services in Microsoft SharePoint 2010 Products.
In this article:
Secure server snapshots
Specific port, protocol, and service guidance
Secure server snapshots
In a server farm environment, individual servers play specific roles. Security hardening recommendations for these servers depend on the role each server plays. This
article contains secure snapshots for two categories of server roles:
Web server and application server roles
Database server role
The snapshots are divided into common configuration categories. The characteristics defined for each category represent the optimal hardened state for Microsoft
SharePoint 2010 Products. This article does not include hardening guidance for other software in the environment.
Web server and application server roles
This section identifies hardening characteristics for Web servers and application servers. Some of the guidance applies to specific service applications; in these cases,
the corresponding characteristics need to be applied only on the servers that are running the services associated with the specified service applications.
Category Characteristic
Services listed
in the Services
MMC snap-in
Enable the following services:
File and Printer Sharing
World Wide Web Publishing Service
Ensure that these services are not disabled:
Claims to Windows Token Service
SharePoint 2010 Administration
SharePoint 2010 Timer
SharePoint 2010 Tracing
SharePoint 2010 VSS Writer
Ensure that these services are not disabled on the servers that host the corresponding roles:
SharePoint 2010 User Code Host
SharePoint Foundation Search V4
Ports and
protocols TCP 80, TCP 443 (SSL)
File and Printer Sharing service —either of the following, used by search roles:
Direct‐hosted SMB ﴾TCP/UDP 445﴿ — this is the recommended portNetBIOS over TCP/IP ﴾NetBT﴿ ﴾TCP/UDP ports 137, 138, 139﴿ — disable this port if you do not use it
Ports required for communication between Web servers and service applications (the default is HTTP):
HTTP binding: 32843
HTTPS binding: 32844
net.tcp binding: 32845 (only if a third party has implemented this option for a service application)
UDP port 1434 and TCP port 1433 — default ports for SQL Server communication. If these ports are blocked on the SQL Servercomputer (recommended) and databases are installed on a named instance, configure a SQL Server client alias for connecting to the
named instance.
TCP/IP 32846 for the Microsoft SharePoint Foundation User Code Service ﴾for sandbox solutions﴿ — This port must be open foroutbound connections on all Web servers. This port must be open for inbound connections on Web servers or application servers where
this service is turned on.
Ensure that ports remain open for Web applications that are accessible to users.

Block external access to the port that is used for the Central Administration site.
TCP/25 (SMTP for e-mail integration)
Registry No additional guidance
Auditing and
logging
If log files are relocated, ensure that the log file locations are updated to match. Update directory access control lists (ACLs) also.
Code access
security
Ensure that you have a minimal set of code access security permissions enabled for your Web application. The <trust> element in the
Web.config file for each Web application should be set to WSS_Minimal (where WSS_Minimal has its low defaults as defined in
14\config\wss_minimaltrust.config or by your own custom policy file, which is minimally set.)
Web.config Follow these recommendations for each Web.config file that is created after you run Setup:
Do not allow compilation or scripting of database pages via the PageParserPaths elements.
Ensure <SafeMode> CallStack=""false"" and AllowPageLevelTrace=""false"".
Ensure that the Web Part limits around maximum controls per zone is set low.
Ensure that the SafeControls list is set to the minimum set of controls needed for your sites.
Ensure that your Workflow SafeTypes list is set to the minimum level of SafeTypes needed.
Ensure that customErrors is turned on (<customErrors mode=""On""/>).
Consider your Web proxy settings as needed (<system.net>/<defaultProxy>).
Set the Upload.aspx limit to the highest size you reasonably expect users to upload (default is 2 GB). Performance can be affected by
uploads that exceed 100 MB.
Database server role
The primary recommendation forSharePoint 2010 Products is to secure inter-farm communication by blocking the default ports used for Microsoft SQL Server
communication and establishing custom ports for this communication instead. For more information about how to configure ports for SQL Server communication, see
Blocking the standard SQL Server ports, later in this article.
Category Characteristic
PortsBlock UDP port 1434.
Consider blocking TCP port 1433.
This article does not describe how to secure SQL Server. For more information about how to secure SQL Server, see Securing SQL Server
(http://go.microsoft.com/fwlink/p/?LinkId=186828).
Specific port, protocol, and service guidance
The rest of this article describes in greater detail the specific hardening requirements for SharePoint 2010 Products.
In this section:
Blocking the standard SQL Server ports
Service application communication
File and Printer Sharing service requirements
Service requirements for e-mail integration
SharePoint 2010 Products services
Web.config file
Blocking the standard SQL Server ports
The specific ports used to connect to SQL Server are affected by whether databases are installed on a default instance of SQL Server or a named instance of SQL
Server. The default instance of SQL Server listens for client requests on TCP port 1433. A named instance of SQL Server listens on a randomly assigned port number.
Additionally, the port number for a named instance can be reassigned if the instance is restarted (depending on whether the previously assigned port number is
available).
By default, client computers that connect to SQL Server first connect by using TCP port 1433. If this communication is unsuccessful, the client computers query the SQL
Server Resolution Service that is listening on UDP port 1434 to determine the port on which the database instance is listening.
The default port-communication behavior of SQL Server introduces several issues that affect server hardening. First, the ports used by SQL Server are well-publicized
ports and the SQL Server Resolution Service has been the target of buffer overrun attacks and denial-of-service attacks, including the "Slammer" worm virus. Even if
SQL Server is updated to mitigate security issues in the SQL Server Resolution Service, the well-publicized ports remain a target. Second, if databases are installed on

a named instance of SQL Server, the corresponding communication port is randomly assigned and can change. This behavior can potentially prevent server-to-server
communication in a hardened environment. The ability to control which TCP ports are open or blocked is essential to securing your environment.
Consequently, the recommendation for a server farm is to assign static port numbers to named instances of SQL Server and to block UDP port 1434 to prevent
potential attackers from accessing the SQL Server Resolution Service. Additionally, consider reassigning the port used by the default instance and blocking TCP port
1433.
There are several methods you can use to block ports. You can block these ports by using a firewall. However, unless you can be sure that there are no other routes
into the network segment and that there are no malicious users that have access to the network segment, the recommendation is to block these ports directly on the
server that hosts SQL Server. This can be accomplished by using Windows Firewall in Control Panel.
Configuring SQL Server database instances to listen on a nonstandard port
SQL Server provides the ability to reassign the ports that are used by the default instance and any named instances. In SQL Server 2005 and SQL Server 2008, you
reassign ports by using SQL Server Configuration Manager.
Configuring SQL Server client aliases
In a server farm, all front-end Web servers and application servers are SQL Server client computers. If you block UDP port 1434 on the SQL Server computer, or
you change the default port for the default instance, you must configure a SQL Server client alias on all servers that connect to the SQL Server computer.
To connect to an instance of SQL Server 2005 or SQL Server 2008, you install SQL Server client components on the target computer and then configure the SQL
Server client alias by using SQL Server Configuration Manager. To install SQL Server client components, run Setup and select only the following client components
to install:
Connectivity Components
Management Tools (includes SQL Server Configuration Manager)
For specific hardening steps for blocking the standard SQL ports, see Harden SQL Server for SharePoint environments (SharePoint Foundation 2010).
Service application communication
By default, communication between Web servers and service applications within a farm takes place by using HTTP with a binding to port 32843. When you publish a
service application, you can select either HTTP or HTTPS with the following bindings:
HTTP binding: port 32843
HTTPS binding: port 32844
Additionally, third parties that develop service applications can implement a third choice:
net.tcp binding: port 32845
You can change the protocol and port binding for each service application. On the Service Applications page in Central Administration, select the service application,
and then click Publish.
Communication between service applications and SQL Server takes place over the standard SQL Server ports or the ports that you configure for SQL Server
communication.
File and Printer Sharing service requirements
Several core features depend on the File and Printer Sharing service and the corresponding protocols and ports. These include, but are not limited to, the following:
Search queries All search queries require the File and Printer Sharing service.
Crawling and indexing content To crawl content, servers that include crawl components send requests through the front-end Web server. The front-end
Web server communicates with content databases directly and sends results back to the servers that include crawl components. This communication requires
the File and Printer Sharing service.
The File and Printer Sharing service requires the use of named pipes. Named pipes can communicate by using either direct-hosted SMB or NetBT protocols. For a
secure environment, direct-hosted SMB is recommended instead of NetBT. The hardening recommendations provided in this article assume that SMB is used.
The following table describes the hardening requirements that are introduced by the dependency on the File and Printer Sharing service.
Category Requirements Notes
Services File and Printer Sharing Requires the use of named pipes.

Protocols Named pipes that use direct-hosted SMB
Disable NetBT
Named pipes can use NetBT instead of direct-hosted SMB. However, NetBT is not considered as
secure as direct-hosted SMB.
Ports Either of the following:
Direct‐hosted SMB ﴾TCP/UDP 445﴿ —recommended
NetBT (TCP/UDP ports 137, 138, 139)
Disable NetBT (ports 137, 138, and 139) if it is not being used
For more information about how to disable NetBT, see the Microsoft Knowledge Base article 204279, Direct hosting of SMB over TCP/IP
(http://go.microsoft.com/fwlink/p/?LinkId=76143).
Service requirements for e-mail integration
E-mail integration requires the use of two services:
SMTP service
Microsoft SharePoint Directory Management service
SMTP service
E-mail integration requires the use of the Simple Mail Transfer Protocol (SMTP) service on at least one of the front-end Web servers in the server farm. The SMTP
service is required for incoming e-mail. For outgoing e-mail, you can either use the SMTP service or route outgoing email through a dedicated e-mail server in your
organization, such as a Microsoft Exchange Server computer.
Microsoft SharePoint Directory Management service
SharePoint 2010 Products include an internal service, the Microsoft SharePoint Directory Management Service, for creating e-mail distribution groups. When you
configure e-mail integration, you have the option to enable the Directory Management Service feature, which lets users create distribution lists. When users create a
SharePoint group and they select the option to create a distribution list, the Microsoft SharePoint Directory Management Service creates the corresponding Active
Directory distribution list in the Active Directory environment.
In security-hardened environments, the recommendation is to restrict access to the Microsoft SharePoint Directory Management Service by securing the file
associated with this service, which is SharePointEmailws.asmx. For example, you might allow access to this file by the server farm account only.
Additionally, this service requires permissions in the Active Directory environment to create Active Directory distribution list objects. The recommendation is to set
up a separate organizational unit (OU) in Active Directory for SharePoint 2010 Products objects. Only this OU should allow write access to the account that is used
by the Microsoft SharePoint Directory Management Service.
SharePoint 2010 Products services
Do not disable services that are installed by SharePoint 2010 Products (listed in the snapshot previously).
If your environment disallows services that run as a local system, you can consider disabling the SharePoint 2010 Administration service only if you are aware of the
consequences and can work around them. This service is a Win32 service that runs as a local system.
This service is used by the SharePoint 2010 Timer service to perform actions that require administrative permissions on the server, such as creating Internet
Information Services (IIS) Web sites, deploying code, and stopping and starting services. If you disable this service, you cannot complete deployment-related tasks
from the Central Administration site. You must use Windows PowerShell to run the Start-SPAdminJob cmdlet (or use the Stsadm.exe command-line tool to run the
execadmsvcjobs operation) to complete multiple-server deployments for SharePoint 2010 Products and to run other deployment-related tasks.
Web.config file
The .NET Framework, and ASP.NET in particular, use XML-formatted configuration files to configure applications. The .NET Framework relies on configuration files to
define configuration options. The configuration files are text-based XML files. Multiple configuration files can, and typically do, exist on a single system.
System-wide configuration settings for the .NET Framework are defined in the Machine.config file. The Machine.config file is located in the
%SystemRoot%\Microsoft.NET\Framework\%VersionNumber%\CONFIG\ folder. The default settings that are contained in the Machine.config file can be modified to
affect the behavior of applications that use the .NET Framework on the whole system.
You can change the ASP.NET configuration settings for a single application if you create a Web.config file in the root folder of the application. When you do this, the
settings in the Web.config file override the settings in the Machine.config file.
When you extend a Web application by using Central Administration, SharePoint 2010 Products automatically create a Web.config file for the Web application.
The Web server and application server snapshot presented earlier in this article lists recommendations for configuring Web.config files. These recommendations are
intended to be applied to each Web.config file that is created, including the Web.config file for the Central Administration site.
For more information about ASP.NET configuration files and editing a Web.config file, see ASP.NET Configuration (http://go.microsoft.com/fwlink/p/?LinkID=73257).
See Also
Other ResourcesResource Center: Security and Authentication for SharePoint Foundation 2010
© 2014 Microsoft

Plan automatic password change (SharePoint Foundation 2010)
Applies to: SharePoint Foundation 2010
Topic Last Modified: 2011-09-17
To simplify password management, the automatic password change feature enables you to update and deploy passwords without having to perform manual password
update tasks across multiple accounts, services, and Web applications. You can configure the automatic password change feature to determine if a password is about to
expire and reset the password using a long, cryptographically-strong random string. To implement the automatic password change feature, you have to configure
managed accounts.
In this article:
Configuring managed accounts
Resetting passwords automatically on a schedule
Detecting password expiration
Resetting the account password immediately
Synchronizing SharePoint Foundation account passwords with Active Directory Domain Services
Resetting all passwords immediately
Credential change process
Configuring managed accounts
Microsoft SharePoint Foundation 2010 supports the creation of managed accounts to improve security and ensure application isolation. Using managed accounts, you
can configure the automatic password change feature to deploy passwords across all services in the farm. You can configure SharePoint Web applications and services,
running on application servers in a SharePoint farm, to use different domain accounts. You can create multiple accounts in Active Directory Domain Services (AD DS), and
then register each of these accounts in SharePoint Foundation 2010. You can map managed accounts to various services and Web applications in the farm.
Resetting passwords automatically on a schedule
Prior to the implementation of the automatic password change feature, updating passwords required resetting each account password in AD DS and then manually
updating account passwords on all of the services running on all the computers in the farm. To do this, you had to run the Stsadm command-line tool or use the
SharePoint Central Administration Web application. Using the automatic password change feature, you can now register managed accounts and enable SharePoint
Foundation 2010 to control account passwords. Users have to be notified about planned password changes and related service interruptions, but the accounts used by
a SharePoint farm, Web applications, and various services can be automatically reset and deployed within the farm as necessary, based on individually configured
password reset schedules.
Detecting password expiration
IT departments typically impose a policy requiring that all domain account passwords be reset on a regular basis, for example, every 60 days. SharePoint Foundation
2010 can be configured to detect imminent password expiration, and send an e-mail notification to a designated administrator. Even without administrator intervention,
SharePoint Foundation 2010 can be configured to generate and reset passwords automatically. The automatic password reset schedule is also configurable to ensure
that the impact of possible service interruptions during a password reset will be minimal.
Resetting the account password immediately
You can always override any automatic password reset schedule and force an immediate service account password reset, using a specific password value. In this
scenario, the password for the service account can also be changed in AD DS by SharePoint Foundation 2010. The new password is then immediately propagated to
other servers in the farm.
Synchronizing SharePoint Foundation account passwords with Active Directory Domain Services
If AD DS and SharePoint Foundation 2010 account passwords are not synchronized, services in the SharePoint farm will not start. If an Active Directory administrator
changes an Active Directory account password without coordinating the password change with a SharePoint administrator, there is a risk of service interruptions. In this
scenario, a SharePoint administrator can immediately reset the password from the Account Management page using the password value that was changed in AD DS. The
password is updated and immediately propagated to the other servers in the SharePoint farm.
Resetting all passwords immediately
If an administrator suddenly leaves your organization, or if the service account passwords need to be immediately reset for any other reason, you can quickly create a
Windows PowerShell script that calls the password change cmdlets. You can use the script to generate new random passwords and deploy the new passwords
immediately.

Credential change process
When SharePoint Foundation 2010 changes the credentials for a managed account, the credential change process will occur on one server in the farm. Each server in the
farm will be notified that the credentials are about to change and servers can perform critical pre-change actions, if necessary. If the account password has not yet been
changed, then SharePoint Foundation 2010 will attempt to change the password using either a manually entered password, or a long, cryptographically-strong random
string. The complexity settings will be queried from the appropriate policy (network or local), and the generated password will be equivalent to the detected settings.
SharePoint Foundation 2010 will attempt to commit a password change. If it is unable to commit the password change, it will retry, using a new sequence, for a specified
number of times. If the account password update process succeeds, it will proceed to the next dependent service, where it will again attempt to commit a password
change. If it does not ultimately succeed, each dependent service will be notified that they can resume normal activity. Either success in committing a password change
or failure to commit will result in the generation of an automated password change status notification that will be sent by e-mail to farm administrators.
See Also
ConceptsConfigure automatic password change (SharePoint Foundation 2010)
Other ResourcesResource Center: Security and Authentication for SharePoint Foundation 2010
© 2014 Microsoft

User permissions and permission levels (SharePoint Foundation2010)
Applies to: SharePoint Foundation 2010
Topic Last Modified: 2011-01-04
This article describes the default permission levels as well as the user permissions in Microsoft SharePoint Foundation 2010.
In this article:
Default permission levels
User permissions
Default permission levels
Permission levels are collections of permissions that allow users to perform a set of related tasks. SharePoint Foundation 2010 includes five permission levels by default.
You can customize the permissions available in these permission levels (except for the Limited Access and Full Control permission levels), or you can create customized
permission levels that contain only the permissions you need. For more information about how to customize permission levels, see Configure custom permissions
(SharePoint Foundation 2010).
Note
Although you cannot directly edit the Limited Access and Full Control permission levels, you can make individual permissions unavailable for the entire Web
application, which removes those permissions from the Limited Access and Full Control permission levels. For more information about how to manage permissions
for a Web application, see Manage permissions for a Web application (SharePoint Foundation 2010).
The following table lists the default permission levels for team sites in SharePoint Foundation 2010.
Permission
levelDescription
Permissions
included by
default
Limited
Access
Allows access to shared resources in the Web site so that the users can access an item within the site. Designed to be combined
with fine-grained permissions to give users access to a specific list, document library, folder, list item, or document, without
giving them access to the entire site. Cannot be customized or deleted.
View
Application
Pages
Browse User
Information
Use Remote
Interfaces
Use Client
Integration
Features
Open
Read View pages, list items and download documents.Limited
Access
permissions,
plus:
View Items
Open Items
View
Versions
Create Alerts
Use Self-
Service Site
Creation
View Pages
Contribute View, add, update, and delete items in the existing lists and document libraries.Read
permissions,
plus:
Add Items
Edit Items
Delete Items
Delete
Versions
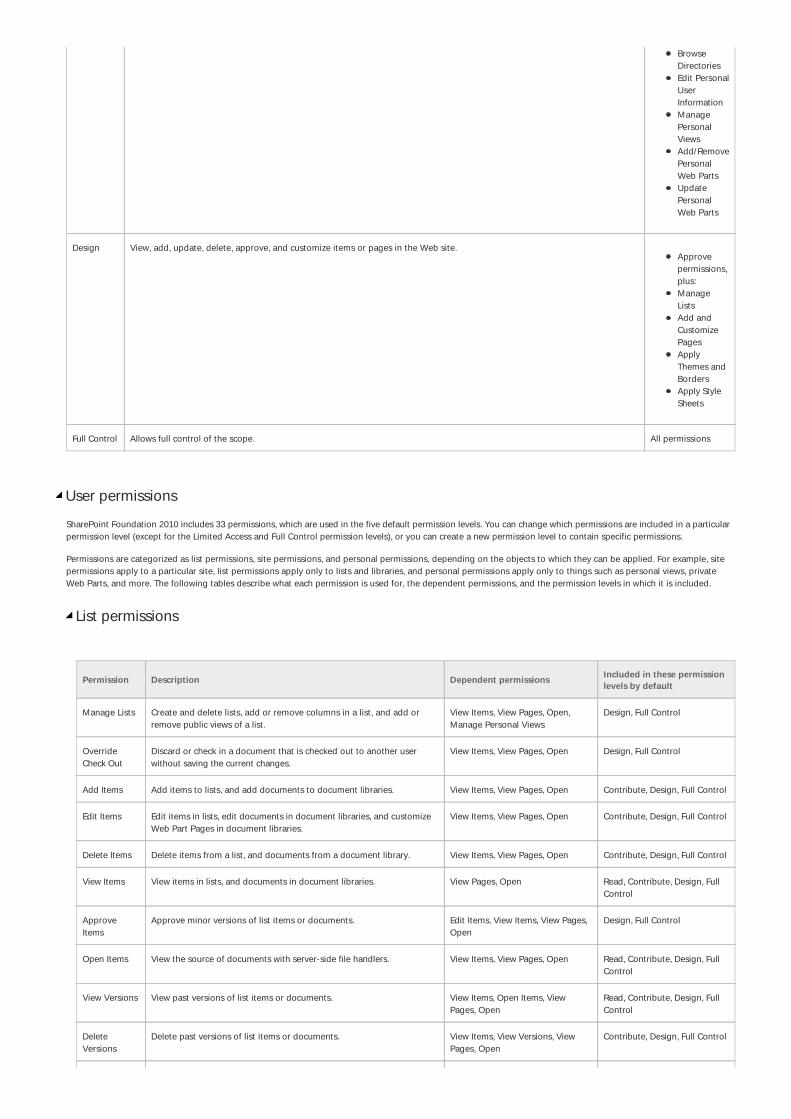
Browse
Directories
Edit Personal
User
Information
Manage
Personal
Views
Add/Remove
Personal
Web Parts
Update
Personal
Web Parts
Design View, add, update, delete, approve, and customize items or pages in the Web site.Approve
permissions,
plus:
Manage
Lists
Add and
Customize
Pages
Apply
Themes and
Borders
Apply Style
Sheets
Full Control Allows full control of the scope. All permissions
User permissions
SharePoint Foundation 2010 includes 33 permissions, which are used in the five default permission levels. You can change which permissions are included in a particular
permission level (except for the Limited Access and Full Control permission levels), or you can create a new permission level to contain specific permissions.
Permissions are categorized as list permissions, site permissions, and personal permissions, depending on the objects to which they can be applied. For example, site
permissions apply to a particular site, list permissions apply only to lists and libraries, and personal permissions apply only to things such as personal views, private
Web Parts, and more. The following tables describe what each permission is used for, the dependent permissions, and the permission levels in which it is included.
List permissions
Permission Description Dependent permissionsIncluded in these permission
levels by default
Manage Lists Create and delete lists, add or remove columns in a list, and add or
remove public views of a list.
View Items, View Pages, Open,
Manage Personal Views
Design, Full Control
Override
Check Out
Discard or check in a document that is checked out to another user
without saving the current changes.
View Items, View Pages, Open Design, Full Control
Add Items Add items to lists, and add documents to document libraries. View Items, View Pages, Open Contribute, Design, Full Control
Edit Items Edit items in lists, edit documents in document libraries, and customize
Web Part Pages in document libraries.
View Items, View Pages, Open Contribute, Design, Full Control
Delete Items Delete items from a list, and documents from a document library. View Items, View Pages, Open Contribute, Design, Full Control
View Items View items in lists, and documents in document libraries. View Pages, Open Read, Contribute, Design, Full
Control
Approve
Items
Approve minor versions of list items or documents. Edit Items, View Items, View Pages,
Open
Design, Full Control
Open Items View the source of documents with server-side file handlers. View Items, View Pages, Open Read, Contribute, Design, Full
Control
View Versions View past versions of list items or documents. View Items, Open Items, View
Pages, Open
Read, Contribute, Design, Full
Control
Delete
Versions
Delete past versions of list items or documents. View Items, View Versions, View
Pages, Open
Contribute, Design, Full Control

Create Alerts Create e-mail alerts. View Items, View Pages, Open Read, Contribute, Design, Full
Control
View
Application
Pages
View forms, views, and application pages. Enumerate lists. Open All
Site permissions
Permission Description Dependent permissions
Included in these
permission levels
by default
Manage
Permissions
Create and change permission levels on the Web site and
assign permissions to users and groups.
View Items, Open Items, View Versions, Browse
Directories, View Pages, Enumerate Permissions, Browse
User Information, Open
Full Control
View Usage
Data
View reports on Web site usage. View Pages, Open Full Control
Create
Subsites
Create subsites such as team sites, Meeting Workspace sites,
and Document Workspace sites.
View Pages, Browse User Information, Open Full Control
Manage
Web Site
Perform all administration tasks for the Web site, and manage
content.
View Items, Add and Customize Pages, Browse
Directories, View Pages, Enumerate Permissions, Browse
User Information, Open
Full Control
Add and
Customize
Pages
Add, change, or delete HTML pages or Web Part pages, and
edit the Web site by using a Windows SharePoint Services-
compatible editor.
View Items, Browse Directories, View Pages, Open Design, Full Control
Apply
Themes and
Borders
Apply a theme or borders to the entire Web site. View Pages, Open Design, Full Control
Apply Style
Sheets
Apply a style sheet (.css file) to the Web site. View Pages, Open Design, Full Control
Create
Groups
Create a group of users that can be used anywhere within the
site collection.
View Pages, Browse User Information, Open Full Control
Browse
Directories
Enumerate files and folders in a Web site by using Microsoft
SharePoint Designer 2010 and Web DAV interfaces.
View Pages, Open Contribute, Design,
Full Control
Use Self-
Service Site
Creation
Create a Web site by using Self-Service Site Creation. View Pages, Browse User Information, Open Read, Contribute,
Design, Full Control
View Pages View pages in a Web site. Open Read, Contribute,
Design, Full Control
Enumerate
Permissions
Enumerate permissions on the Web site, list, folder, document,
or list item.
Browse Directories, View Pages, Browse User Information,
Open
Full Control
Browse User
Information
View information about users of the Web site. Open All
Manage
Alerts
Manage alerts for all users of the Web site. View Items, View Pages, Open Full Control
Use Remote
Interfaces
Use SOAP, Web DAV, or SharePoint Designer 2010 interfaces
to access the Web site.
Open All
Use Client
Integration
Features
Use features that start client applications. Without this
permission, users must work on documents locally and then
upload their changes.
Use Remote Interfaces, Open All
Open Open a Web site, list, or folder to access items inside that
container.
None All
Edit
Personal
User
Information
Users can change their own user information, such as adding a
picture.
Browse User Information, Open Contribute, Design,
Full Control

Personal permissions
Permission Description Dependent permissionsIncluded in these permission levels by
default
Manage Personal Views Create, change, and delete personal views of lists. View Items, View Pages,
Open
Contribute, Design, Full Control
Add/Remove Personal Web
Parts
Add or remove personal Web Parts on a Web Part
page.
View Items, View Pages,
Open
Contribute, Design, Full Control
Update Personal Web Parts Update Web Parts to display personalized
information.
View Items, View Pages.
Open
Contribute, Design, Full Control
See Also
ConceptsConfigure custom permissions (SharePoint Foundation 2010)
© 2014 Microsoft
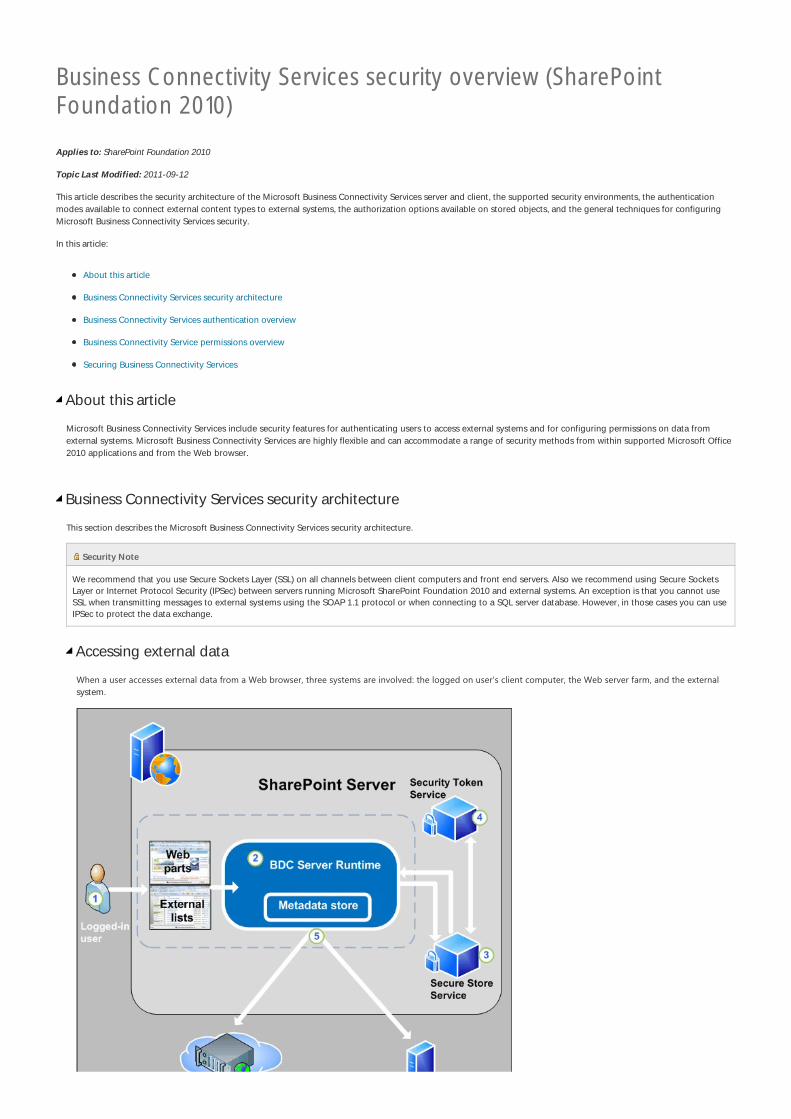
Business Connectivity Services security overview (SharePointFoundation 2010)
Applies to: SharePoint Foundation 2010
Topic Last Modified: 2011-09-12
This article describes the security architecture of the Microsoft Business Connectivity Services server and client, the supported security environments, the authentication
modes available to connect external content types to external systems, the authorization options available on stored objects, and the general techniques for configuring
Microsoft Business Connectivity Services security.
In this article:
About this article
Business Connectivity Services security architecture
Business Connectivity Services authentication overview
Business Connectivity Service permissions overview
Securing Business Connectivity Services
About this article
Microsoft Business Connectivity Services include security features for authenticating users to access external systems and for configuring permissions on data from
external systems. Microsoft Business Connectivity Services are highly flexible and can accommodate a range of security methods from within supported Microsoft Office
2010 applications and from the Web browser.
Business Connectivity Services security architecture
This section describes the Microsoft Business Connectivity Services security architecture.
Security Note
We recommend that you use Secure Sockets Layer (SSL) on all channels between client computers and front end servers. Also we recommend using Secure Sockets
Layer or Internet Protocol Security (IPSec) between servers running Microsoft SharePoint Foundation 2010 and external systems. An exception is that you cannot use
SSL when transmitting messages to external systems using the SOAP 1.1 protocol or when connecting to a SQL server database. However, in those cases you can use
IPSec to protect the data exchange.
Accessing external data
When a user accesses external data from a Web browser, three systems are involved: the logged on user’s client computer, the Web server farm, and the externalsystem.

1. From Web browsers, users typically interact with external data in external lists or by using Web Parts.
2. The BDC Server Runtime on front-end servers uses data from the Business Data Connectivity service to connect to and execute operations on external systems.
3. The Secure Store Service securely stores credential sets for external systems and associates those credential sets to individual or group identities.
Important
The Secure Store Service is not included in SharePoint Foundation 2010. If you need a secure store in SharePoint Foundation 2010, you must supply a
custom secure store provider.
4. The Security Token Service is a Web service that responds to authentication requests by issuing security tokens made up of identity claims that are based on
user account information.
5. Microsoft Business Connectivity Services can pass credentials to databases and Web services that are configured to use claims-based authentication. For an
overview of claims-based authentication, see Plan authentication methods (SharePoint Foundation 2010).
Business Connectivity Services authentication overview
Microsoft Business Connectivity Services can be configured to pass authentication requests to external systems by using the following types of methods:
Credentials These are typically in the form of name/password. Some external systems may also require additional credentials such as a personal identification
number (PIN) value.
Claims Security Assertion Markup Language (SAML) tickets can be passed to claims-aware services that supply external data.
Configuring Business Connectivity Services for credentials authentication
Microsoft Business Connectivity Services can use credentials that a user supplies to authenticate requests for external data. The following methods by which users can
supply credentials for accessing external data are supported:
Windows authentication:
Windows Challenge/Response (NTLM)
Microsoft Negotiate
Authentication other than Windows
Forms-based
Digest
Basic
When configuring Microsoft Business Connectivity Services to pass credentials, the solution designer adds authentication-mode information to external content types.
The authentication mode gives Microsoft Business Connectivity Services information about how to process an incoming authentication request from a user and map
that request to a set of credentials that can be passed to the external content system. For example, an authentication mode could specify that the user’s credentials bepassed directly through to the external data system. Alternatively, it could specify that the user’s credentials should be mapped to an account that is stored in aSecure Store Service which should then be passed to the external system.
You associate an authentication mode with an external content type in the following ways:
When you create an external content type in Microsoft SharePoint Designer.
If the external system is a Web service, you can use the Microsoft Business Connectivity Services administration pages to specify the authentication mode.
You can specify the authentication mode by directly editing the .XML file that defines the external content type.
The following table describes the authentication modes of the Microsoft Business Connectivity Services:
Authentication
modeDescription
PassThrough Passes the credentials of the logged‐on user to the external system. This requires that the user’s credentials are known to the externalsystem.
Note

If the Web application is not configured to authenticate with Windows credentials, the NT Authority/Anonymous Logon account is passed
to the external system rather than the user's credentials.
This mode is called User’s Identity in the Microsoft Business Connectivity Services administration pages and in SharePoint Designer 2010.
RevertToSelf When the user is accessing external data from a Web browser, this mode ignores the user’s credentials and sends the application poolidentity account under which the BCS runtime is running on the Web server to the external system. When the user is accessing external data
from an Office client application, this mode is equivalent to PassThrough mode, because Microsoft Business Connectivity Services running
on the client will be running under the user’s credentials.
This mode is called BDC Identity in the Microsoft Business Connectivity Services administration pages and in SharePoint Designer 2010.
Note
By default, RevertToSelf mode is not enabled. You must use Windows PowerShell to enable RevertToSelf mode before you can create
or import models that use RevertToSelf. For more information, see RevertToSelf authentication mode. RevertToSelf mode is not
supported in hosted environments.
WindowsCredentials For external Web services or databases, this mode uses a Secure Store Service to map the user’s credentials to a set of Windowscredentials on the external system.
This mode is called Impersonate Windows Identity in the Microsoft Business Connectivity Services administration pages and in SharePoint
Designer 2010.
Credentials For an external Web service, this mode uses a Secure Store Service to map the user’s credentials to a set of credentials that are supplied bya source other than Windows and that are used to access external data. The Web service should use basic or digest authentication when
this mode is used.
Important
To help preserve security in this mode, we recommend that the connection between the Microsoft Business Connectivity Services and the
external system should be secured by using Secure Sockets Layer (SSL) or Internet Protocol Security (IPSec).
This mode is called Impersonate Custom Identity in the Microsoft Business Connectivity Services administration pages and in Office
SharePoint Designer.
RDBCredentials For an external database, this mode uses a Secure Store Service to map the user’s credentials to a set of credentials that are supplied by asource other than Windows. To help preserve security in this mode, we recommend that the connection between the Microsoft Business
Connectivity Services and the external system should be secured by using Secure Sockets Layer (SSL) or IPSec.
This mode is called Impersonate Custom Identity in the Microsoft Business Connectivity Services administration pages and in Office
SharePoint Designer.
DigestCredentials For a WCF Web service, this mode uses a Secure Store Service to map the user’s credentials to a set of credentials using Digestauthentication.
This mode is called Impersonate Custom Identity – Digest in the Microsoft Business Connectivity Services administration pages and in
SharePoint Designer 2010.
The following illustration shows the Microsoft Business Connectivity Services authentication modes when it uses credentials.

In PassThrough ﴾User’s Identity﴿ mode ﴾A﴿ the logged‐on user’s credentials are passed directly to the external system.
In RevertToSelf ﴾BDC Identity﴿ mode ﴾B﴿ the user’s logon credentials are replaced with the credentials of the process account under which Microsoft BusinessConnectivity Services is running, and those credentials are passed to the external system.
Three modes use the Secure Store Service: WindowsCredentials (Impersonate Windows ID,) RdbCredentials (Impersonate Custom ID,) and Credentials. In those
modes, the user’s credentials are mapped to a set of credentials for the external system and Microsoft Business Connectivity Services passes those credentialsto the external system. Solution administrators can either map each user’s credentials to a unique account on the external system or they can map a set ofauthenticated users to a single group account.
Configuring Business Connectivity Services for claims-based authentication
Microsoft Business Connectivity Services can provide access to external data based on an incoming security tokens and it can pass security tokens to external systems.
A security token is made up of a set of identity claims about a user, and the use of security tokens for authentication is called “claims‐based authentication.”SharePoint Foundation includes a Security Token Service that issues security tokens.
The following illustration shows how the Security Token Service and the Secure Store Service work together in claims-based authentication:
1. A user tries an operation on an external list that is configured for claims authentication.
2. The client application requests a security token from the Security Token Service.
3. Based on the requesting user’s identity, the Security Token Service issues a security token that contains a set of claims and a target application identifier. TheSecurity Token Service returns the security token to the client application.
4. The client passes the security token to the Secure Store Service.
5. The Secure Store Service evaluates the security token and uses the target application identifier to return a set of credentials that apply to the external system.
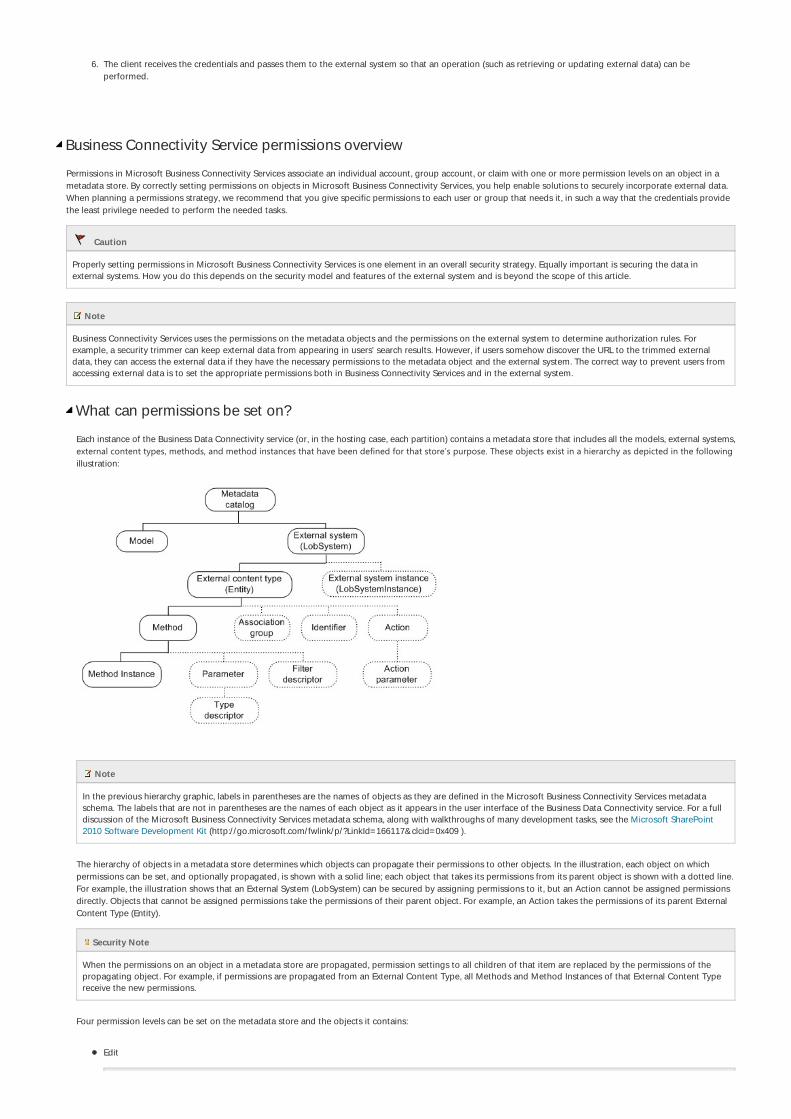
6. The client receives the credentials and passes them to the external system so that an operation (such as retrieving or updating external data) can be
performed.
Business Connectivity Service permissions overview
Permissions in Microsoft Business Connectivity Services associate an individual account, group account, or claim with one or more permission levels on an object in a
metadata store. By correctly setting permissions on objects in Microsoft Business Connectivity Services, you help enable solutions to securely incorporate external data.
When planning a permissions strategy, we recommend that you give specific permissions to each user or group that needs it, in such a way that the credentials provide
the least privilege needed to perform the needed tasks.
Caution
Properly setting permissions in Microsoft Business Connectivity Services is one element in an overall security strategy. Equally important is securing the data in
external systems. How you do this depends on the security model and features of the external system and is beyond the scope of this article.
Note
Business Connectivity Services uses the permissions on the metadata objects and the permissions on the external system to determine authorization rules. For
example, a security trimmer can keep external data from appearing in users' search results. However, if users somehow discover the URL to the trimmed external
data, they can access the external data if they have the necessary permissions to the metadata object and the external system. The correct way to prevent users from
accessing external data is to set the appropriate permissions both in Business Connectivity Services and in the external system.
What can permissions be set on?
Each instance of the Business Data Connectivity service (or, in the hosting case, each partition) contains a metadata store that includes all the models, external systems,
external content types, methods, and method instances that have been defined for that store’s purpose. These objects exist in a hierarchy as depicted in the followingillustration:
Note
In the previous hierarchy graphic, labels in parentheses are the names of objects as they are defined in the Microsoft Business Connectivity Services metadata
schema. The labels that are not in parentheses are the names of each object as it appears in the user interface of the Business Data Connectivity service. For a full
discussion of the Microsoft Business Connectivity Services metadata schema, along with walkthroughs of many development tasks, see the Microsoft SharePoint
2010 Software Development Kit (http://go.microsoft.com/fwlink/p/?LinkId=166117&clcid=0x409 ).
The hierarchy of objects in a metadata store determines which objects can propagate their permissions to other objects. In the illustration, each object on which
permissions can be set, and optionally propagated, is shown with a solid line; each object that takes its permissions from its parent object is shown with a dotted line.
For example, the illustration shows that an External System (LobSystem) can be secured by assigning permissions to it, but an Action cannot be assigned permissions
directly. Objects that cannot be assigned permissions take the permissions of their parent object. For example, an Action takes the permissions of its parent External
Content Type (Entity).
Security Note
When the permissions on an object in a metadata store are propagated, permission settings to all children of that item are replaced by the permissions of the
propagating object. For example, if permissions are propagated from an External Content Type, all Methods and Method Instances of that External Content Type
receive the new permissions.
Four permission levels can be set on the metadata store and the objects it contains:
Edit
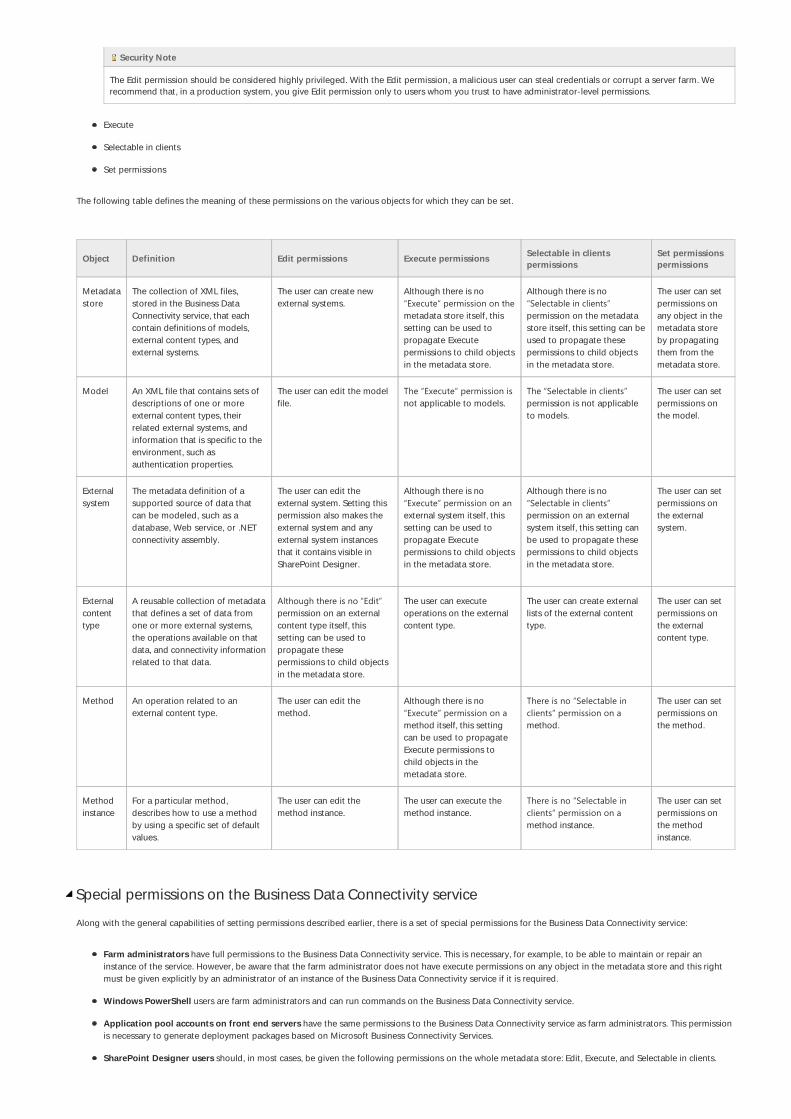
Security Note
The Edit permission should be considered highly privileged. With the Edit permission, a malicious user can steal credentials or corrupt a server farm. We
recommend that, in a production system, you give Edit permission only to users whom you trust to have administrator-level permissions.
Execute
Selectable in clients
Set permissions
The following table defines the meaning of these permissions on the various objects for which they can be set.
Object Definition Edit permissions Execute permissionsSelectable in clients
permissions
Set permissions
permissions
Metadata
store
The collection of XML files,
stored in the Business Data
Connectivity service, that each
contain definitions of models,
external content types, and
external systems.
The user can create new
external systems.
Although there is no
“Execute” permission on themetadata store itself, this
setting can be used to
propagate Execute
permissions to child objects
in the metadata store.
Although there is no
“Selectable in clients”permission on the metadata
store itself, this setting can be
used to propagate these
permissions to child objects
in the metadata store.
The user can set
permissions on
any object in the
metadata store
by propagating
them from the
metadata store.
Model An XML file that contains sets of
descriptions of one or more
external content types, their
related external systems, and
information that is specific to the
environment, such as
authentication properties.
The user can edit the model
file.
The “Execute” permission isnot applicable to models.
The “Selectable in clients”permission is not applicable
to models.
The user can set
permissions on
the model.
External
system
The metadata definition of a
supported source of data that
can be modeled, such as a
database, Web service, or .NET
connectivity assembly.
The user can edit the
external system. Setting this
permission also makes the
external system and any
external system instances
that it contains visible in
SharePoint Designer.
Although there is no
“Execute” permission on anexternal system itself, this
setting can be used to
propagate Execute
permissions to child objects
in the metadata store.
Although there is no
“Selectable in clients”permission on an external
system itself, this setting can
be used to propagate these
permissions to child objects
in the metadata store.
The user can set
permissions on
the external
system.
External
content
type
A reusable collection of metadata
that defines a set of data from
one or more external systems,
the operations available on that
data, and connectivity information
related to that data.
Although there is no “Edit”permission on an external
content type itself, this
setting can be used to
propagate these
permissions to child objects
in the metadata store.
The user can execute
operations on the external
content type.
The user can create external
lists of the external content
type.
The user can set
permissions on
the external
content type.
Method An operation related to an
external content type.
The user can edit the
method.
Although there is no
“Execute” permission on amethod itself, this setting
can be used to propagate
Execute permissions to
child objects in the
metadata store.
There is no “Selectable inclients” permission on amethod.
The user can set
permissions on
the method.
Method
instance
For a particular method,
describes how to use a method
by using a specific set of default
values.
The user can edit the
method instance.
The user can execute the
method instance.
There is no “Selectable inclients” permission on amethod instance.
The user can set
permissions on
the method
instance.
Special permissions on the Business Data Connectivity service
Along with the general capabilities of setting permissions described earlier, there is a set of special permissions for the Business Data Connectivity service:
Farm administrators have full permissions to the Business Data Connectivity service. This is necessary, for example, to be able to maintain or repair an
instance of the service. However, be aware that the farm administrator does not have execute permissions on any object in the metadata store and this right
must be given explicitly by an administrator of an instance of the Business Data Connectivity service if it is required.
Windows PowerShell users are farm administrators and can run commands on the Business Data Connectivity service.
Application pool accounts on front end servers have the same permissions to the Business Data Connectivity service as farm administrators. This permission
is necessary to generate deployment packages based on Microsoft Business Connectivity Services.
SharePoint Designer users should, in most cases, be given the following permissions on the whole metadata store: Edit, Execute, and Selectable in clients.

SharePoint Designer users should not be given Set permissions permissions. If necessary, you can limit the permissions of the SharePoint Designer user to a
subset of the metadata store.
Caution
To help ensure a secure solution, SharePoint Designer should be used to create external content types in a test environment in which Edit permissions can
be assigned freely. When deploying the tested solution to a production environment, remove the edit permissions to help protect the integrity of the
external data.
Common tasks and their related permissions
This section describes common tasks in the Business Data Connectivity service and the required permissions to perform them.
Task Permissions
Create a new
object in the
metadata store
To create a new metadata object, a user must have edit permissions on the parent metadata object. For example, to create a new method in
an external content type, a user must have permissions on the external content type. See the illustration earlier in this article for child/parent
relationships among objects in the metadata store.
Delete an object
from the metadata
store
To delete a metadata object, a user must have edit permissions on that object. To delete an object and all its child objects (such as deleting
an external content type and all its methods) the edit permission is also required on all the child objects.
Adding an external
content type to a
model
To add an external content type to a model, a user must have edit permissions on the model.
Importing models To import a model to the metadata store, a user must have edit permissions on the metadata store. If explicit permissions are not assigned
on the model, the user who imported it will be given edit permissions on the model.
Exporting models To export a model from the metadata store, a user must have edit permissions on the model and on all external systems contained in the
model.
Generating a
deployment
package
Deployment packages are generated by the application pool account that is used by the front-end server. This account has full permissions
to the metadata store so that it can perform this task.
Setting initial
permissions on the
metadata store.
When an instance of the Business Data Connectivity service is first created, its metadata store is empty. The farm administrator has full
permissions to the store and can set initial permissions.
Securing Business Connectivity Services
This section discusses additional measures that can be used to help secure Business Connectivity Services
Service account
For security isolation, the Business Data Connectivity service application and the front-end server should not use the same service account.
Server to server communication
Securing the communication between the Business Data Connectivity service application and external systems helps ensure that sensitive data is not compromised.
You need to use an encrypted communication channel to protect data that is sent between servers running SharePoint Foundation 2010 and external systems. Internet
Protocol security (IPsec) is one method that can be used to help protect communication. The choice of which method to use depends on the specific communication
channels you are securing and the benefits and tradeoffs that are most appropriate for your organization.
Applications that use FileBackedMetadataCatalog
For security reasons, RevertToSelf authentication mode is disabled on SharePoint Foundation 2010 by default. However, this does not prevent applications that use the
FileBackedMetadataCatalog class from importing models and executing calls that use RevertToSelf authentication. This can result in elevating privileges for users by
granting privileges to the application pool account. You should review all applications to ensure that they do not use FileBackedMetadataCatalog class and
RevertToSelf authentication before installing them on a production system.

See Also
Other ResourcesResource Center: What's New in SharePoint Foundation 2010
© 2014 Microsoft


![SharePoint Security Playbook [eBook]](https://static.fdocuments.in/doc/165x107/555a5b39d8b42a47748b503b/sharepoint-security-playbook-ebook.jpg)