Setting up your NW Digital Radio DV3000 board up your NW Digital Radio DV3000 board Page 6 Get a new...
58
Companion guide to AmateurLogic 75: DV3000 Raspberry Hot Spot Prepared By Mike, VE3MIC 3/10/2015 SECOND EDITION Setting up your NW Digital Radio DV3000 board
Transcript of Setting up your NW Digital Radio DV3000 board up your NW Digital Radio DV3000 board Page 6 Get a new...

Companion guide
to AmateurLogic 75:
DV3000 Raspberry Hot Spot
Prepared By
Mike, VE3MIC
3/10/2015
SECOND EDITION
Setting up your NW Digital Radio DV3000 board

Setting up your NW Digital Radio DV3000 board Page 2
So your DV3000 GPIO Board or ThumbDV arrived from NW Digital Radio –Now What? Stuff you’ll need:
• A NW Digital Radio DV3000 board or ThumbDV(DV3000U) USB stick ● Raspberry Pi model ‘B’ Note: If you don’t already have a Raspberry Pi, seriously
consider purchasing a Raspberry Pi 2 model ‘B’. For the same $35 price tag, it provides up to 6x (times) the performance as an original Raspberry Pi model ‘B’ or ‘B+’.
But no worries, although there are slight differences, all model ‘B’s will work. ● (Raspbian supported) USB audio adapter (with audio IN) or USB headset with mic. ● SD card (4GB minimum), microSD card (B+, Pi 2) ● Raspian image (Debian ‘Weezy’) file ● A full-time internet connection (eg. cable, ADSL), and admin access to your internet
router (to access firewall settings) Stuff that you need to know: (new Linux users may find the following useful) The following isn’t intended to be a complete UNIX manual, but rather a “cheat sheet” of sorts. I’ve listed the important stuff that you will need to know in order to get your DV3000 AMBE vocoder board working on the Raspberry Pi, and operational on D-Star. For simplicity,(and to reduce the chance of a mis-type) Commands are highlighted as you would type them in on the command line, or as it is to appear in a configuration file. For convenience, you can cut these highlighted commands from this document and paste them directly into the command line if using a terminal session or working from the console. Remember that Linux commands are Case Sensitive. Uppercase(capital) letters are treated differently than lower case letters. Default user account: pi Password: raspberry Good practice dictates changing the password, especially since this project will require an outside connection to the internet. Be sure to keep a copy(write it down) of your password in secure place in case you forget it.

Setting up your NW Digital Radio DV3000 board Page 3
Terms that you need to know: (if you don’t already) "console" connecting to the 'console' simply means that you are directly connected to the Pi using a keyboard, mouse, and monitor as opposed to a remote connection from another computer using a Telnet session. “daemon” sometimes pronounced as “demon” –see “service” "DHCP" Dynamic Host Configuration Protocol is much like those "take a number" systems. Let’s say that you arrive at a busy deli counter, you take a number, and wait to be called. DHCP works similarly, in that you are assigned the next available IP address(number) from a range(pool) of unassigned(unused) IP addresses. At some point, the counter is reset, and the numbers(or your ticket number in our example) are reused. “GUI” Graphical User Interface, or desktop graphical environment. Gnome, KDE, and LXDE, are popular Linux desktop environments. "headless" operation means that you are not connecting directly to the Pi with a mouse, keyboard, or even a monitor. To operate headless, you will be establishing a Telnet connection -using another computer as a terminal to connect to the Pi. Telnet does not support GUI(graphics), so we're talking about a command-line only connection. I recommend that even if you wish to operate headless, get things setup first by attaching a keyboard, mouse, and monitor if possible. “IP Address” Current IP version 4 (which is still currently the internet “standard”) is a number or address in the form of 0-225.0-255.0-255.0-255 -Much like a street address, this unique identifier is responsible for allowing data to get to it’s intended destination. “IP Port#” A number ranging from 0-65535. A port number, in addition to an IP address(IP number), permits data to get different destinations at the same IP address. Think of an apartment building -it has only one street address (IP address/# in our example) but has many individual suites (Port address/# in our example). If you were to send a letter to someone that lived in an apartment building, you would mail it to something like…”123 First Street, suite 206”. This is a crude example, but you get the idea. Most of us only have a single IP address assignment, so in order to get data routed to multiple destinations within our home network, we need to segregate it by using different port numbers. "nano" A simple, easy to use (my favourite) screen/line editor that we'll be using to text edit scripts and configuration files. Preface with sudo eg.‘sudo nano (path/filename)’ or you won’t be permitted to save your changes.
Setting up your NW Digital Radio DV3000 board Page 4
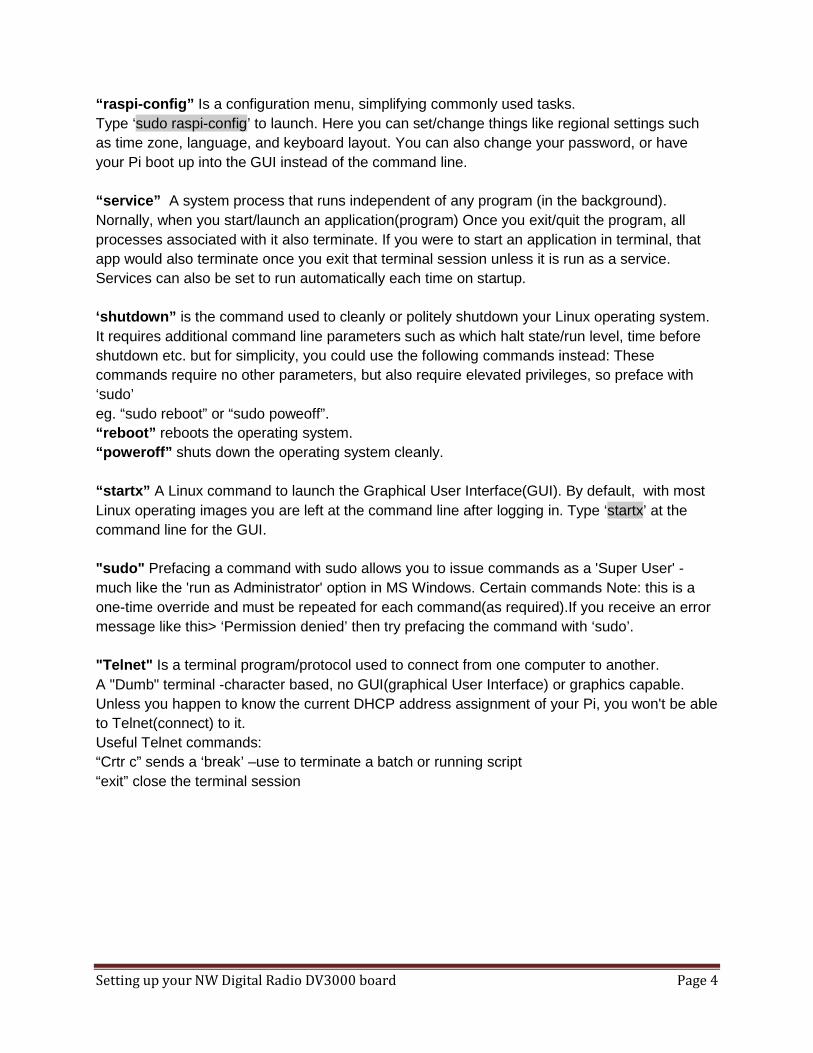
“raspi-config” Is a configuration menu, simplifying commonly used tasks. Type ‘sudo raspi-config’ to launch. Here you can set/change things like regional settings such as time zone, language, and keyboard layout. You can also change your password, or have your Pi boot up into the GUI instead of the command line. “service” A system process that runs independent of any program (in the background). Nornally, when you start/launch an application(program) Once you exit/quit the program, all processes associated with it also terminate. If you were to start an application in terminal, that app would also terminate once you exit that terminal session unless it is run as a service. Services can also be set to run automatically each time on startup. ‘shutdown” is the command used to cleanly or politely shutdown your Linux operating system. It requires additional command line parameters such as which halt state/run level, time before shutdown etc. but for simplicity, you could use the following commands instead: These commands require no other parameters, but also require elevated privileges, so preface with ‘sudo’ eg. “sudo reboot” or “sudo poweoff”. “reboot” reboots the operating system. “poweroff” shuts down the operating system cleanly. “startx” A Linux command to launch the Graphical User Interface(GUI). By default, with most Linux operating images you are left at the command line after logging in. Type ‘startx’ at the command line for the GUI. "sudo" Prefacing a command with sudo allows you to issue commands as a 'Super User' -much like the 'run as Administrator' option in MS Windows. Certain commands Note: this is a one-time override and must be repeated for each command(as required).If you receive an error message like this> ‘Permission denied’ then try prefacing the command with ‘sudo’. "Telnet" Is a terminal program/protocol used to connect from one computer to another. A "Dumb" terminal -character based, no GUI(graphical User Interface) or graphics capable. Unless you happen to know the current DHCP address assignment of your Pi, you won't be able to Telnet(connect) to it. Useful Telnet commands: “Crtr c” sends a ‘break’ –use to terminate a batch or running script “exit” close the terminal session

Setting up your NW Digital Radio DV3000 board Page 5
The following steps outline the process: From your Windows computer:
• Download lastest Raspian image> http://www.raspberrypi.org/downloads/ • Download SD Card Formatter> https://www.sdcard.org/downloads/ • Download Win32 Disk Imager> http://win32diskimager.sourceforge.net/ • Format SD or microSD card using SD Card Formatter program • Unzip(extract) Raspian image(.img) file • Write Raspian image file to SD card using Win32 Disk Imager program
On your Raspberry Pi:
• Install SD/microSD card and boot (power up) Raspberry Pi • Expand filesystem • Set Internationalisation options such as Language, Time Zone, Keyboard etc. • Set static IP address • Update catalogs & upgrade • Install AMBEServer and install DV3000 GPIO board or ThumbDV USB stick • apt-get & install x11VNC • Launch raspi-config and set to boot Graphical User Interface (LXDE GUI) on startup • sudo reboot, and wait for deskop GUI to appear • Open a terminal, apt-get & install synaptic package manager • Launch Synaptic(preferred method), and install ircDDBGatway & Dummy Repeater • Configure ircDDBGateway & Dummy Repeater settings • Set audio levels • Open required router/firewall ports • Launch Dummy Repeater & ircDDBGateway

Setting up your NW Digital Radio DV3000 board Page 6
Get a new image: There are a couple of different ways to prepare a bootable Linux SD card for the Raspberry Pi, the easiest being the NOOBs method. There is a lot of information already available on this subject, so we'll assume that you already have a working Raspbian image on your Raspberry Pi. If you need help in this area, checkout> http://www.raspberrypi.org/help/noobs-setup/ Or, http://www.raspberrypi.org/documentation/installation/installing-images/ Note: If you are using the new Raspberry Pi 2, be sure to use a newer version of Raspbian that will take full advantage of it’s multi-core processor. Use NOOBs v 1.4.0 or later, or Raspbian Wheezy version February 2015 or later. Expand your file system launch raspi-config from the command line ‘sudo raspi-config’, and select: 1. Expand the File System This will make all unused(free) space on your SD card available for use. If you are using one of the NOOBs images, you will receive a message stating that expansion is not necessary. While you are at it, you may wish to set some of the other options such as your regional settings. A reboot, or restart is required once you are finished, and exit. Assign a static(fixed) IP address Knowing that the IP (network) address on the Raspberry Pi will always remain the same -even after rebooting, or if it hasn't been turned on for awhile is important. By default, DHCP is enabled. In most cases, the Pi receives an available IP address automatically (eg. from your home network's router). While this may sound convenient, we need to ensure that this address does not change (as it does periodically when using DHCP) because, you will need to open up the required port numbers in your firewall(your internet router). When you create exceptions in your router's firewall to permit traffic to flow back(and sometimes forth) from the public internet to your home network, you have to specify exactly, the destination IP address(a particular computer) that you are creating the firewall rule for. This is why we want the IP address on the Pi to remain static. Unless you already know your home computer network assignment (usually something like 192.168.x.x) we'll need to check.. From the command(shell) prompt: (step 1a) $ ifconfig (make note of the following information: inet addr, Mask, Bcast) (step 1b) $ netstat -nr (make note of the following information: Gateway, Destination)
Setting up your NW Digital Radio DV3000 board Page 7
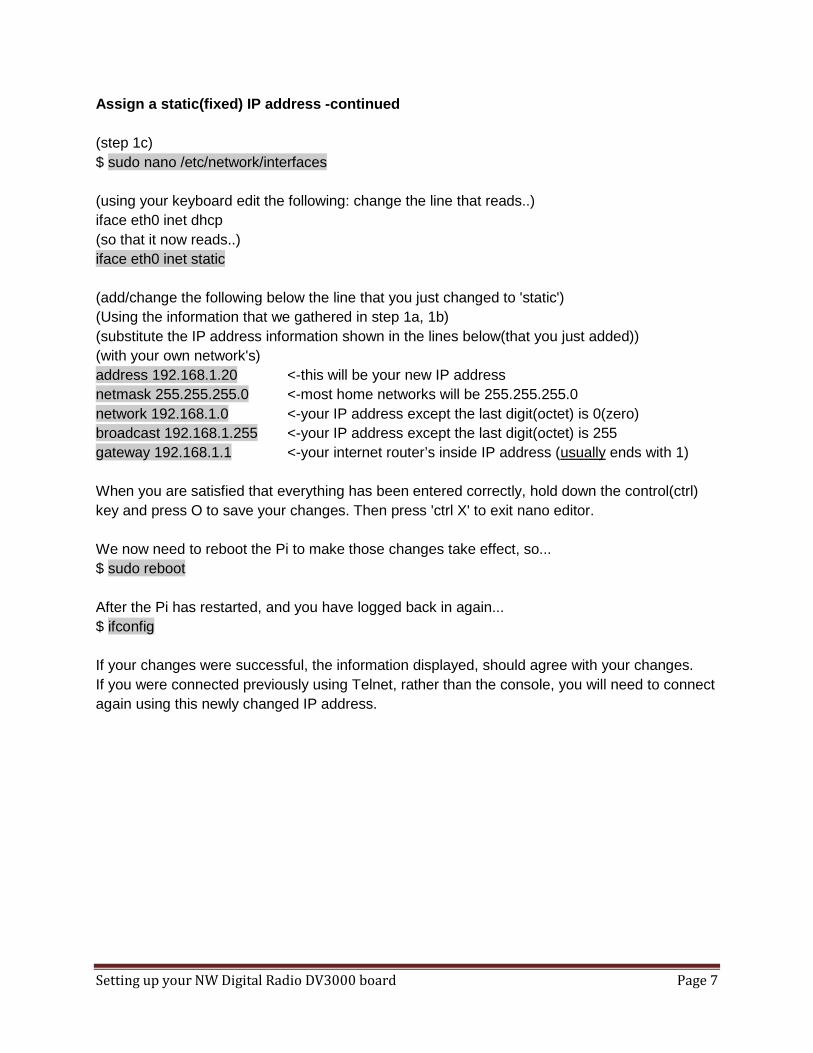
Assign a static(fixed) IP address -continued (step 1c) $ sudo nano /etc/network/interfaces (using your keyboard edit the following: change the line that reads..) iface eth0 inet dhcp (so that it now reads..) iface eth0 inet static (add/change the following below the line that you just changed to 'static') (Using the information that we gathered in step 1a, 1b) (substitute the IP address information shown in the lines below(that you just added)) (with your own network's) address 192.168.1.20 <-this will be your new IP address netmask 255.255.255.0 <-most home networks will be 255.255.255.0 network 192.168.1.0 <-your IP address except the last digit(octet) is 0(zero) broadcast 192.168.1.255 <-your IP address except the last digit(octet) is 255 gateway 192.168.1.1 <-your internet router’s inside IP address (usually ends with 1) When you are satisfied that everything has been entered correctly, hold down the control(ctrl) key and press O to save your changes. Then press 'ctrl X' to exit nano editor. We now need to reboot the Pi to make those changes take effect, so... $ sudo reboot After the Pi has restarted, and you have logged back in again... $ ifconfig If your changes were successful, the information displayed, should agree with your changes. If you were connected previously using Telnet, rather than the console, you will need to connect again using this newly changed IP address.

Setting up your NW Digital Radio DV3000 board Page 8
Getting ready to install the DV3000 AMBE vocoder board Note: Ignore this section if using an a NW Digital ThumbDV/DV3000U USB dongle and skip ahead to: AMBEserver installation:(DV3000 and ThumbDV/DV3000U) below In this section we will be:
increasing the UART clock rate on the Pi, disabling the getty(short for "get teletype") from running on the Pi’s serial port, and disabling the console on the serial port.
(edit the file /boot/config.txt and add the line) $ sudo nano /boot/config.txt init_uart_clock=3686400 When you are satisfied that everything has been entered correctly, hold down the control(ctrl) key and press O to save your changes. Then press 'ctrl X' to exit nano editor. (edit the file /etc/inittab and comment out the line(or delete the line entirely)) $ sudo nano /etc/inittab T0:23:respawn:/sbin/getty -L ttyAMA0 115200 vt100 with:(or delete the line entirely) #T0:23:respawn:/sbin/getty -L ttyAMA0 115200 vt100 When you are satisfied that everything has been entered correctly, hold down the control(ctrl) key and press O to save your changes. Then press 'ctrl X' to exit nano editor. (edit the file /boot/cmdline.txt and replace) (Note: these lines are wrapped in this guide, however they should appear as a single line in the file): $ sudo nano /boot/cmdline.txt dwc_otg.lpm_enable=0 console=ttyAMA0,115200 kgdboc=ttyAMA0,115200 console=tty1 root=/dev/mmcblk0p2 rootfstype=ext4 elevator=deadline rootwait with: (Note: the following is 1 single line, not 2) dwc_otg.lpm_enable=0 console=tty1 root=/dev/mmcblk0p2 rootfstype=ext4 elevator=deadline rootwait When you are satisfied that everything has been entered correctly, hold down the control(ctrl) key and press O to save your changes. Then press 'ctrl X' to exit nano editor. (Power down the Pi) $ sudo poweroff Read> IMPORTANT! Shutting down the Pi “politely”: near the end of this guide, then remove the micro USB power cable from the Pi before continuing on to the next step.

Setting up your NW Digital Radio DV3000 board Page 9
Install(mount) the DV3000 board on to the Raspberry Pi The DV3000 board comes fitted with a short aluminum standoff to facilitate securing (with the included machine screw) to late model Raspberry (model B) and B+ Pis. You should insulate the area of the circuit board on older model Bs, and the new Pi 2 model B, as the metal standoff does not line up with the new mounting holes. This is a precautionary measure to prevent shorts or damaging the Pi circuit board. I found the standoff to be a little too short, so I eliminated both the potential for a short, and also made up for the gap by adding a small self-adhesive felt pad to the bottom of the standoff. Alternatively, you might consider removing the aluminum standoff altogether. Original Model ‘B’ fitted with DV3000
Model B+ or Pi 2 fitted with DV3000

Setting up your NW Digital Radio DV3000 board Page 10
Before continuing on, check to ensure that the DV3000 header pins are properly inserted into the Pi’s GPIO connector or the ThumbDV is plugged into a USB port before reconnecting power to the Pi.
● Power up the Pi by reconnecting the micro USB power cable. AMBEserver installation: (DV3000 and ThumbDV/DV3000U) (install git -a distributed revision control system) $ sudo apt-get install git $ cd $ git clone https://github.com/dl5di/OpenDV.git Cloning into 'OpenDV'... remote: Counting objects: 2239, done. remote: Total 2239 (delta 0), reused 0 (delta 0) Receiving objects: 100% (2239/2239), 29.65 MiB | 438 KiB/s, done. Resolving deltas: 100% (1478/1478), done. Checking out files: 100% (2714/2714), done. $ mv OpenDV/DummyRepeater/DV3000 DV3000 $ rm -rf OpenDV $ cd DV3000 $ ls AMBEserver.c AMBEtest2.py AMBEtest3.py dv3000d-AMBEserver.pdf dv3000d.c init.d Makefile README-dv3000d.txt README.txt (read the README.txt file for the latest changes) $ more README.txt
Setting up your NW Digital Radio DV3000 board Page 11
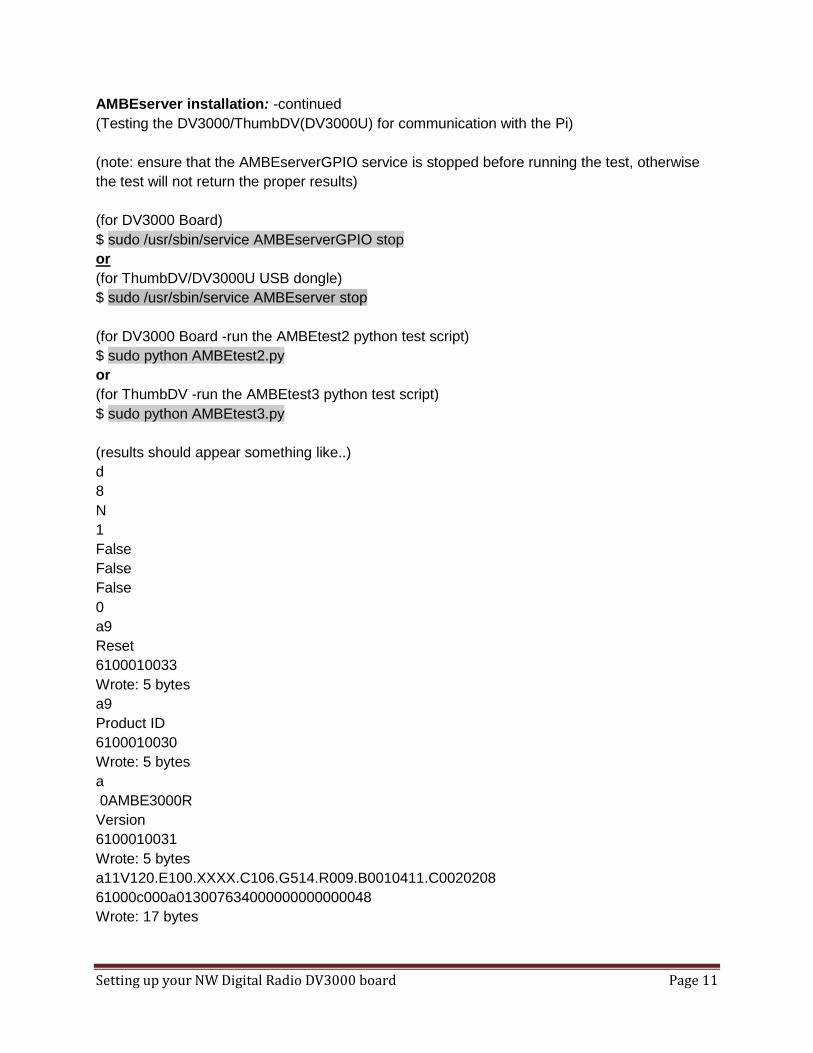
AMBEserver installation: -continued (Testing the DV3000/ThumbDV(DV3000U) for communication with the Pi) (note: ensure that the AMBEserverGPIO service is stopped before running the test, otherwise the test will not return the proper results) (for DV3000 Board) $ sudo /usr/sbin/service AMBEserverGPIO stop or (for ThumbDV/DV3000U USB dongle) $ sudo /usr/sbin/service AMBEserver stop (for DV3000 Board -run the AMBEtest2 python test script) $ sudo python AMBEtest2.py or (for ThumbDV -run the AMBEtest3 python test script) $ sudo python AMBEtest3.py (results should appear something like..) d 8 N 1 False False False 0 a9 Reset 6100010033 Wrote: 5 bytes a9 Product ID 6100010030 Wrote: 5 bytes a 0AMBE3000R Version 6100010031 Wrote: 5 bytes a11V120.E100.XXXX.C106.G514.R009.B0010411.C0020208 61000c000a013007634000000000000048 Wrote: 17 bytes

Setting up your NW Digital Radio DV3000 board Page 12
AMBEserver installation: -continued (delete all of the already compiled object files) $ make clean (build from source) $ sudo make You should see something like... gcc -O2 -DRASPBERRY_PI -Wall -c dv3000d.c gcc -o dv3000d dv3000d.o -lwiringPi gcc -O2 -Wall -c AMBEserver.c gcc -o AMBEserver AMBEserver.o gcc -O2 -DRASPBERRY_PI -Wall -o AMBEserverGPIO.o -c AMBEserver.c gcc -o AMBEserverGPIO AMBEserverGPIO.o -lwiringPi However: if you receive the following error - gcc -O2 -DRASPBERRY_PI -Wall -c dv3000d.c dv3000d.c:36:22: fatal error: wiringPi.h: No such file or directory compilation terminated. Makefile:13: recipe for target 'dv3000d.o' failed make: *** [dv3000d.o] Error 1 Your version of Raspbian does not already have WiringPi installed , install it as per the following steps...
• $ git clone git://git.drogon.net/wiringPi • $ cd wiringPi • $ sudo ./build then repeat these AMBEserver installation steps again.>$ make clean then $ sudo make
(install and create files) $ sudo make install $ sudo make init-install DV3000 board (use the following to start and stop the AMBE service) $ sudo /usr/sbin/service AMBEserverGPIO start (or) $ sudo /usr/sbin/service AMBEserverGPIO stop (to startup the AMBE service automatically(as a service), -always on bootup) $ sudo apt-get install chkconfig (to start the AMBE service automatically) $ sudo chkconfig AMBEserverGPIO on (or, to stop the AMBE service from starting on bootup) $ sudo chkconfig AMBEserverGPIO off

Setting up your NW Digital Radio DV3000 board Page 13
AMBEserver installation: -continued ThumbDV-DV3000U USB dongle (use the following to start and stop the AMBEserverGPIO service) $ sudo /usr/sbin/service AMBEserver start (or) $ sudo /usr/sbin/service AMBEserver stop (to startup the AMBE service automatically(as a service), -always on bootup) $ sudo apt-get install chkconfig (to start the AMBE service automatically) $ sudo chkconfig AMBEserver on (or, to stop the AMBE service from starting on bootup) $ sudo chkconfig AMBEserver off Note: At this point, AMBEServerGPIO(DV3000) or AMBEServer(ThumbDV/DV3000U) should be running, follow the steps in the guide for Installing IRCDDBGateway: and Installing Dummy Repeater: if you wish to operate D-STAR right from your Raspberry Pi. OR. if you intend on running remotely, seeOperating D-Star from another computer:

Setting up your NW Digital Radio DV3000 board Page 14
Next Steps: At this point, the AMBEServer should be functional –able to encode / decode digital (D-Star) audio. However, you will still need to install and configure a couple of additional software applications in order to operate D-Star. In the following steps, we’ll be discussing the installation of IRCDDBGateway, and Dummy Repeater. You can install & run these applications either directly from the Raspberry Pi itself, or to a Windows, Linux, or Apple(Mac OS/X) computer. Although you can install IRCDDBGateway & Dummy Repeater on as many computers as you wish, it is important that only one instance of IRCDDBGateway & Dummy Repeater be active at a time, If you plan on operating remotely from another computer, but sure that if you do decide to install IRCDDBGateway & Dummy Repeater on the Pi, that you don’t set those applications to start automatically. The next steps will walk you through the installation and configuration of IRCDDBGateway & Dummy Repeater for the Raspberry Pi. See: Operating D-Star from another computer: DV3000 later in this guide for installation on a Windows computer.
Setting up your NW Digital Radio DV3000 board Page 15
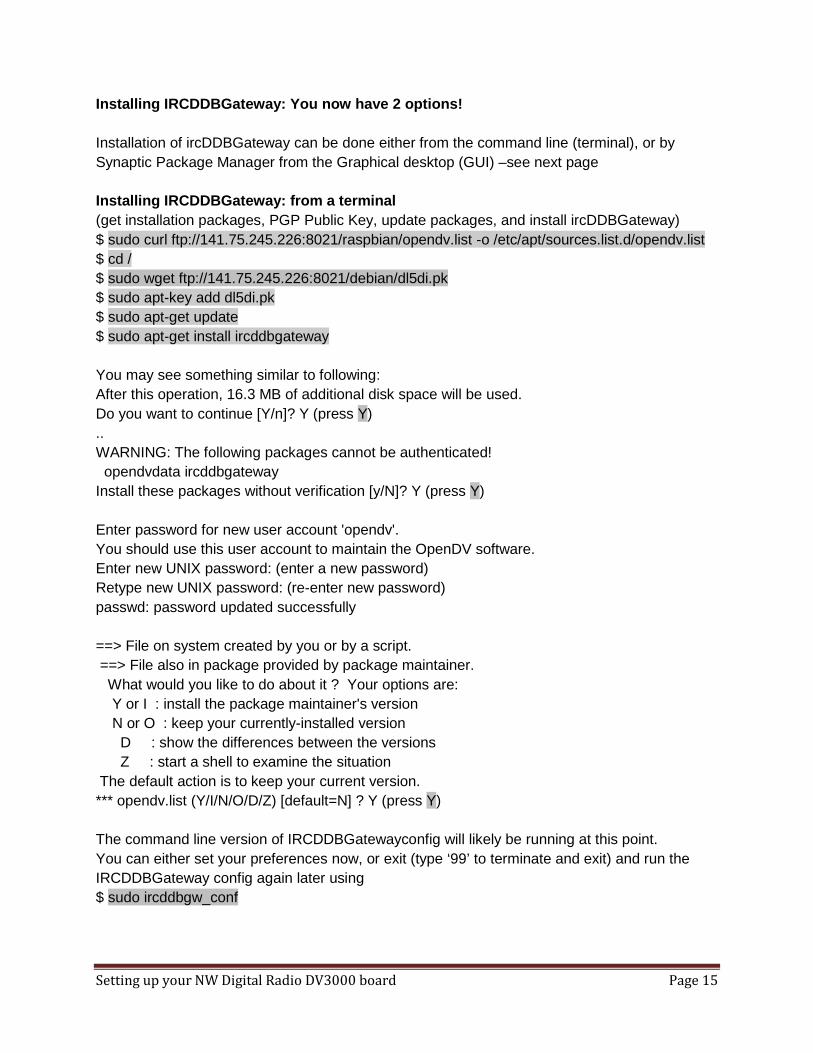
Installing IRCDDBGateway: You now have 2 options! Installation of ircDDBGateway can be done either from the command line (terminal), or by Synaptic Package Manager from the Graphical desktop (GUI) –see next page Installing IRCDDBGateway: from a terminal (get installation packages, PGP Public Key, update packages, and install ircDDBGateway) $ sudo curl ftp://141.75.245.226:8021/raspbian/opendv.list -o /etc/apt/sources.list.d/opendv.list $ cd / $ sudo wget ftp://141.75.245.226:8021/debian/dl5di.pk $ sudo apt-key add dl5di.pk $ sudo apt-get update $ sudo apt-get install ircddbgateway You may see something similar to following: After this operation, 16.3 MB of additional disk space will be used. Do you want to continue [Y/n]? Y (press Y) .. WARNING: The following packages cannot be authenticated! opendvdata ircddbgateway Install these packages without verification [y/N]? Y (press Y) Enter password for new user account 'opendv'. You should use this user account to maintain the OpenDV software. Enter new UNIX password: (enter a new password) Retype new UNIX password: (re-enter new password) passwd: password updated successfully ==> File on system created by you or by a script. ==> File also in package provided by package maintainer. What would you like to do about it ? Your options are: Y or I : install the package maintainer's version N or O : keep your currently-installed version D : show the differences between the versions Z : start a shell to examine the situation The default action is to keep your current version. *** opendv.list (Y/I/N/O/D/Z) [default=N] ? Y (press Y) The command line version of IRCDDBGatewayconfig will likely be running at this point. You can either set your preferences now, or exit (type ‘99’ to terminate and exit) and run the IRCDDBGateway config again later using $ sudo ircddbgw_conf

Setting up your NW Digital Radio DV3000 board Page 16
Installing IRCDDBGateway: from the GUI Install the Synaptic Package Manager by opening up a terminal $ sudo apt-get install synaptic (Launch Synaptic package manager, and install Dummy Repeater) Click ‘Menu’ -> ‘Preferences’ -> ‘Synaptic Package Manager’
A popup window will appear: ‘Authentication is required to run the Synaptic Package Manager’
Enter your login password, and click ‘OK’

Setting up your NW Digital Radio DV3000 board Page 17
Installing IRCDDBGateway: from the GUI (continued) Select ‘Amateur Radio’ -> ‘IRCDDBGATEWAY’ check the checkbox –‘Mark for installation’, then click ‘Apply’ to proceed
(ignore any ‘can’t be authenticated!’ messages by clicking ‘Mark’ and ‘Apply)

Setting up your NW Digital Radio DV3000 board Page 18
Installing IRCDDBGateway: from the GUI (continued) Note: If you do not see ircddbgateway in the list, try updating the packages list by typing ‘CTRL R’ then recheck the Amateur Radio list for ‘IRCDDBGATEWAY’
(Ignore any ‘Could not download all repository indexes’ messages by clicking ‘Close’)

Setting up your NW Digital Radio DV3000 board Page 19
Installing IRCDDBGateway: from the GUI (continued)
Click ‘Close’ to exit

Setting up your NW Digital Radio DV3000 board Page 20
IRCDDBGateway Settings: Launch ircgatewayconfig Click ‘Menu’ -> ‘Run’, then type ‘sudo ircddbgatewayconfig’ and click ‘OK’
Refer to the “IRCDDBGateway Settings:” section on the following pages for setup parameters

Setting up your NW Digital Radio DV3000 board Page 21
IRCDDBGateway Settings: Gateway
• Provides gating of D-STAR positions to APRS-IS. Enter your callsign, as this will allow the gateway to see the datastream and gate the D-PRS information to APRS-IS.
• Enter your location data and website information as you would like it to appear on the APRS map.

Setting up your NW Digital Radio DV3000 board Page 22
IRCDDBGateway Settings: Repeater 1
• Select a value (A,B,C,or D) from the drop-down list. Since we are a dongle user, your choice does not matter in this case.
• Optionally, you may choose a default reflector and module to connect to on startup

Setting up your NW Digital Radio DV3000 board Page 23
IRCDDBGateway Settings: ircDDB
• The ircDDB-Network provides data to all its clients making them able to route digital voice to the correct destination. The exchange of data is done using the Internet Relay Chat technology (IRC).
• Enter your callsign in the Username field. The Password may be left blank as the ircDDB - standalone versions do not require user registration.

Setting up your NW Digital Radio DV3000 board Page 24
IRCDDBGateway Settings: D-PRS
• Provides gating of D-STAR positions to APRS-IS. (repeater callsign with a "G" in the eighth character position). This will allow the gateway to see the datastream and gate the D-PRS information to APRS-IS. Leave the(default) port set to 14580
Setting up your NW Digital Radio DV3000 board Page 25
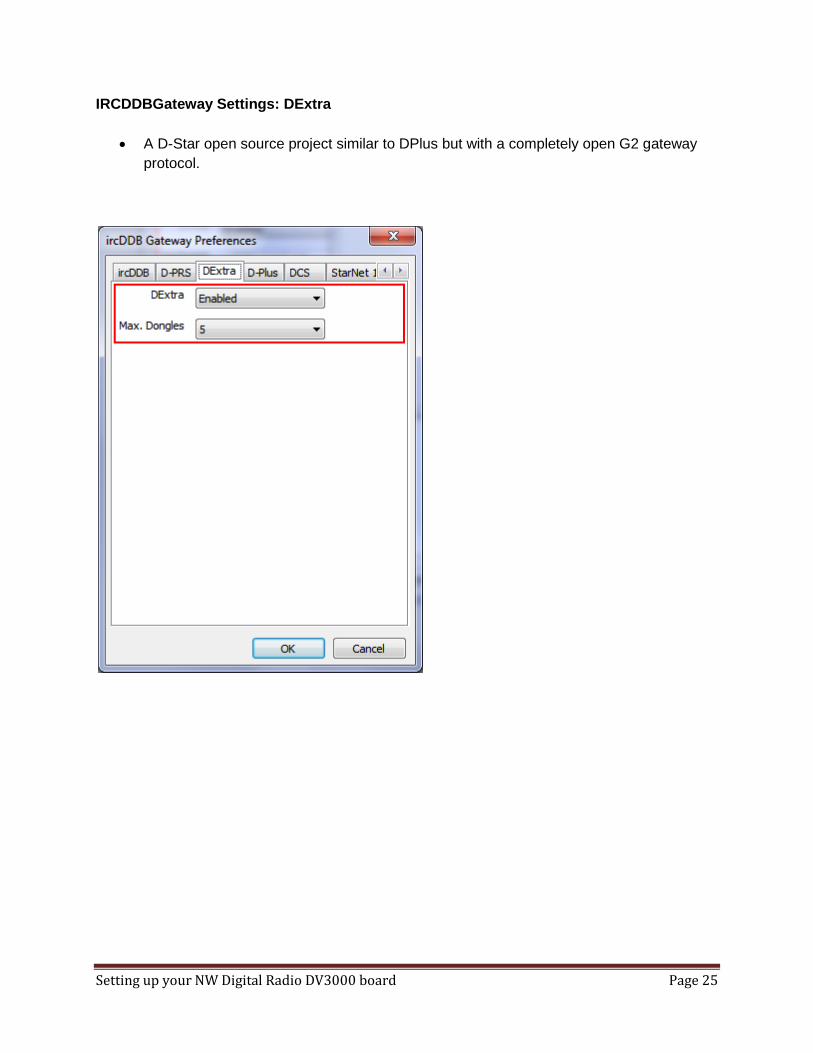
IRCDDBGateway Settings: DExtra
• A D-Star open source project similar to DPlus but with a completely open G2 gateway protocol.

Setting up your NW Digital Radio DV3000 board Page 26
IRCDDBGateway Settings: D-Plus
• D-Star reflector system: The "REF" system is run on the D-Plus network and protocols. • Gives the ability for DV3000, & DV-Dongle users to communicate from the Internet to the
radio users on the repeaters. Enter your callsign into the Login box.

Setting up your NW Digital Radio DV3000 board Page 27
IRCDDBGateway Settings: DCS
• D-Star reflector system: "DCS" system is run under the DCS network protocols (ircDDB),

Setting up your NW Digital Radio DV3000 board Page 28
IRCDDBGateway Settings: Remote
• Used for optional remote control software such as IRCDDB remote –see below.
Tip! You can control the ircDDB gateway software remotely using an Android or IOS device. ‘ ircDDB remote’ is a free app available from the Google Play Store and Apple iTunes App Store See Amateurlogic.TV episode #74 where Tommy presents the IRCDDB Remote App to make D-Star easier.

Setting up your NW Digital Radio DV3000 board Page 29
IRCDDBGateway Settings: Misc .
• Set your language and optional preferences such as DTMF control, D-RATS, here

Setting up your NW Digital Radio DV3000 board Page 30
Starting IRCDDBGateway: (We’ll be doing this later, but in case you’re curious this is how ircDDBGateway is started,,,) Click ‘Menu’ -> ‘Run’, then type ‘sudo ircddbgateway –gui -nolog’ and click ‘OK’

Setting up your NW Digital Radio DV3000 board Page 31
Installing Dummy Repeater: You now have 2 options! Installation of Dummy Repeater can be done either from the command line (terminal), or by installing the Synaptic Package Manager from the Graphical desktop (GUI) from a terminal (get installation packages and install Dummy Repeater) $ cd ~ $ wget https://dl.dropboxusercontent.com/u/31910649/pidummyrepeater $ sudo install pidummyrepeater /usr/bin/dummyrepeater Or Installing Dummy Repeater: from the GUI (launch Synaptic package manager, and install Dummy Repeater) Click ‘Menu’ -> ‘Preferences’ -> ‘Synaptic Package Manager’

Setting up your NW Digital Radio DV3000 board Page 32
Installing Dummy Repeater: from the GUI (continued) A popup window will appear: Authentication is required to run the Synaptic Package Manager Enter your login password, and click ‘OK’ Select ‘Amateur Radio’ -> ‘Dummy Repeater’ check the checkbox –marking it for installation, then click ‘Apply’ to proceed. (ignore any ‘can’t be authenticated!’ messages by clicking ‘Mark’ and ‘Apply)
(note: if you do not see Dummy Repeater in the list, you’ll need to update package lists $ sudo apt-get update then reboot $ sudo reboot, and check the Synaptic list again)

Setting up your NW Digital Radio DV3000 board Page 33
Installing Dummy Repeater: from the GUI (continued)
click “Close’ to exit
Setting up your NW Digital Radio DV3000 board Page 34
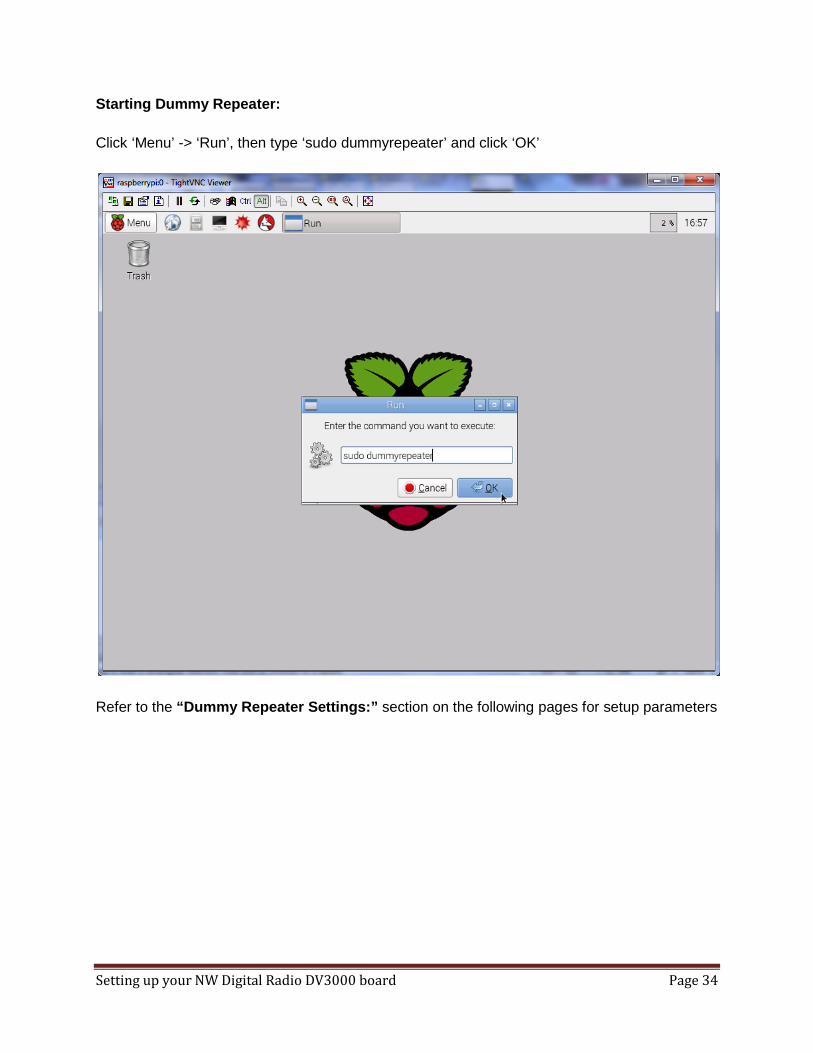
Starting Dummy Repeater: Click ‘Menu’ -> ‘Run’, then type ‘sudo dummyrepeater’ and click ‘OK’
Refer to the “Dummy Repeater Settings:” section on the following pages for setup parameters
Setting up your NW Digital Radio DV3000 board Page 35
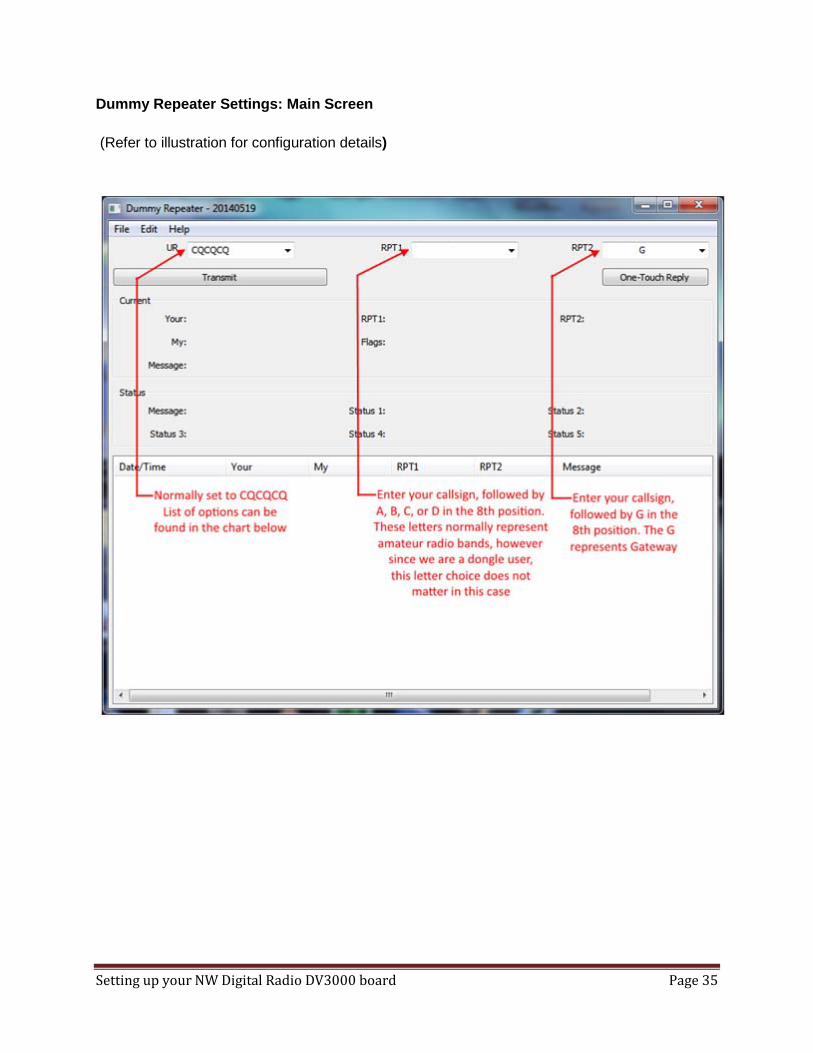
Dummy Repeater Settings: Main Screen (Refer to illustration for configuration details)

Setting up your NW Digital Radio DV3000 board Page 36
Dummy Repeater Settings: UR options (Note:substitute your callsign for MYCALL) Enter command into UR field, and click “Transmit” for a second or two to execute. Remember to set UR back to CQCQCQ when you are finished (Note:spaces NOT underscores) CALL TYPE URCALL DESCRIPTION SIMULCAST MYCALL_ _ Transmit on all(3) local DV ports CALLSIGN MYCALL Route call to last location where 'MYCALL' was heard REFLECTOR LINK START REF001CL Link to module 'C' on 'REF001' GATEWAY QSO CQCQCQ Sends DV traffic to remote Reflector or Gateway UNLINK _ _ _ _ _ _ _ U Unlink current Reflector or Gateway LOCAL RF ACTIVITY _ _ _ _ _ _ _ A Last local radio(RF) user by text message GATEWAY LINK _ _ _ _ _ _ IX Audio description of current link configuration LINK TO BUSY REFLECTOR _ _ _ _ _ _ LX Link to last busy Reflector LINK TO RANDOM REFLECTOR _ _ _ _ _ _ RX Link(random) to recently active Reflector ECHO(PARROT) TEST _ _ _ _ _ _ _ E Playback your transmission REPEATER ID _ _ _ _ _ _ _ I Repeater ID (if unlinked), System Linked msg (if linked)

Setting up your NW Digital Radio DV3000 board Page 37
Dummy Repeater Settings: Callsign Note: Dummy Repeater configuration settings can be found under the ‘Edit’ menu 1. Enter your callsign, followed by(after the slash) a 4 character descriptor.
(Tip: Many hams enter the model number of their radio here)
Dummy Repeater Settings: Sound Card
2. Select the sound card’s Input and Output from the drop-down list. If your audio device doesn’t appear in the list, then it may not be connected, or you are missing a device driver.

Setting up your NW Digital Radio DV3000 board Page 38
Dummy Repeater Settings: Dongle
3. DummyRepeater (20150209 and newer) now supports DV3000/ThumbDV™ directly as a serial device. Select (Type)'DV3000 Serial' and set the appropriate serial/COM port from the (Device) list box, Select (Type)"DV3000 Network" if the DV3000/ThumbDV is located remotely and enter it's IP address.
Dummy Repeater Settings: Network
4. Leave the (IRCDDB)Gateway Address set to 127.0.0.1 as IRCDDBGateway is running on the same computer. Local Address should also be set to 127.0.0.1. Ports set as shown.

Setting up your NW Digital Radio DV3000 board Page 39
Dummy Repeater Settings: Controller
5. For optional PTT controller interface use only –see drop down list for supported types
Dummy Repeater Settings: Timeout
6. Timeout timer setting (seconds)

Setting up your NW Digital Radio DV3000 board Page 40
Dummy Repeater Settings: Message
7. Enter a greeting or message here
Dummy Repeater Settings: Bleep
8. Beep! –audible confirmation beep
Setting up your NW Digital Radio DV3000 board Page 41
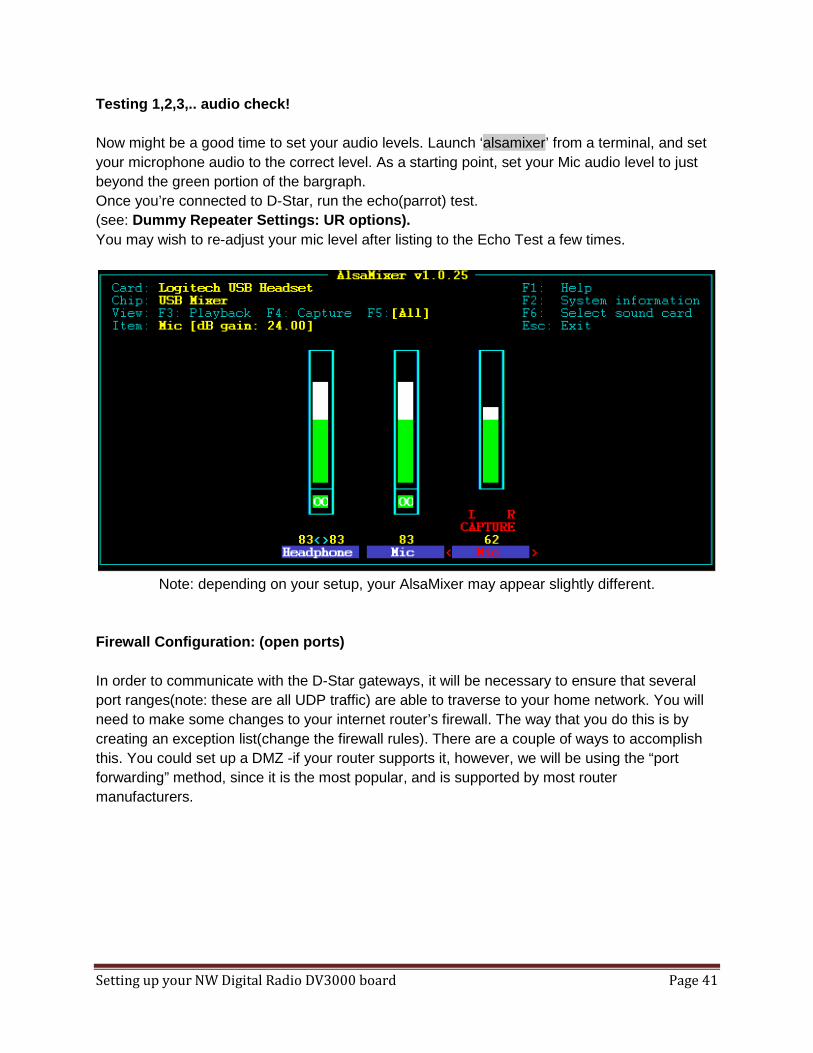
Testing 1,2,3,.. audio check! Now might be a good time to set your audio levels. Launch ‘alsamixer’ from a terminal, and set your microphone audio to the correct level. As a starting point, set your Mic audio level to just beyond the green portion of the bargraph. Once you’re connected to D-Star, run the echo(parrot) test. (see: Dummy Repeater Settings: UR options). You may wish to re-adjust your mic level after listing to the Echo Test a few times.
Note: depending on your setup, your AlsaMixer may appear slightly different.
Firewall Configuration: (open ports) In order to communicate with the D-Star gateways, it will be necessary to ensure that several port ranges(note: these are all UDP traffic) are able to traverse to your home network. You will need to make some changes to your internet router’s firewall. The way that you do this is by creating an exception list(change the firewall rules). There are a couple of ways to accomplish this. You could set up a DMZ -if your router supports it, however, we will be using the “port forwarding” method, since it is the most popular, and is supported by most router manufacturers.

Setting up your NW Digital Radio DV3000 board Page 42
Firewall Configuration: (open ports) -continued You will need to access your internet router. Open a web browser, navigate to it’s (inside) IP address. In your router’s main menu, look for something like “Firewall” or it may be under the “Administration” menu. Once you have located your router’s firewall configuration screen, look for “Port Forwarding” or “Allowed applications”. Here you can enter in a list of firewall “exceptions” and permit data coming in from the internet (regardless of the source IP address, as long as it matches the port#s in your list) to a single, inside destination (a single IP address on your home network). If your router doesn’t support “Port Range Forwarding”, no worries, look for “Port Forwarding”. It’s the same thing, except that you must specify each port individually rather than an entire range of ports at once. Port Triggering is another (&flexible) option –if your router supports it. Note: ‘IP Address’ below is the IP address of the computer running IRCDDBGateway & Dummy Repeater applications
Once you have finished entering in all of the port#s (see image above for the required port#s), don’t forget to save your changes. In most cases, you will need to reboot your router in order for those changes (firewall exceptions) to take effect. You may want to test to ensure that you have successfully opened up those ports. You can use one of the popular online test websites such as> http://www.canyouseeme.org/ or http://portchecker.co/ Also, if you prefer, download and install PFPortChecker -a free Windows utility that is part of the Network Utilities Bundle If you have confirmed that all the required IP port numbers are “open”, and have completed the configuration steps of IRCDDBGateway & Dummy Repeater, then you should be to connect to the D-Star network via one of the gateways. If for some reason, you’re not getting a connection or are seeing an error message, then refer to the troubleshooting section in this guide.

Setting up your NW Digital Radio DV3000 board Page 43
Network Diagram:
Setting up your NW Digital Radio DV3000 board Page 44
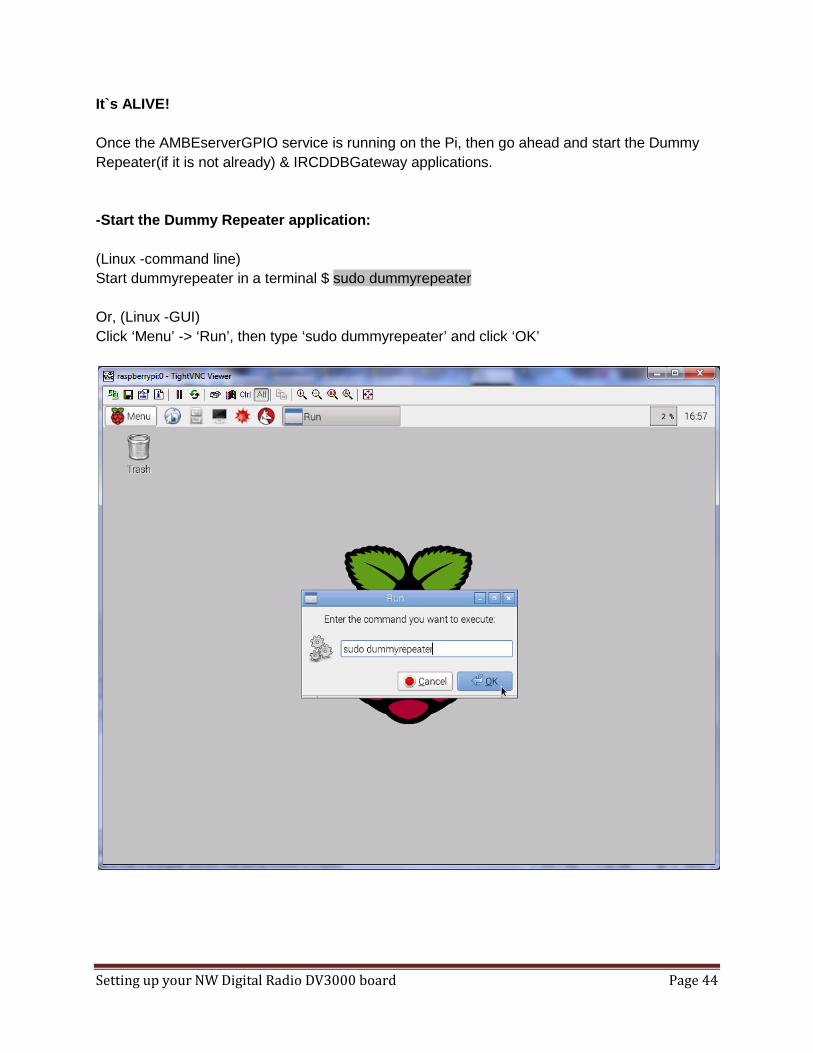
It`s ALIVE! Once the AMBEserverGPIO service is running on the Pi, then go ahead and start the Dummy Repeater(if it is not already) & IRCDDBGateway applications. -Start the Dummy Repeater application: (Linux -command line) Start dummyrepeater in a terminal $ sudo dummyrepeater Or, (Linux -GUI) Click ‘Menu’ -> ‘Run’, then type ‘sudo dummyrepeater’ and click ‘OK’
Setting up your NW Digital Radio DV3000 board Page 45
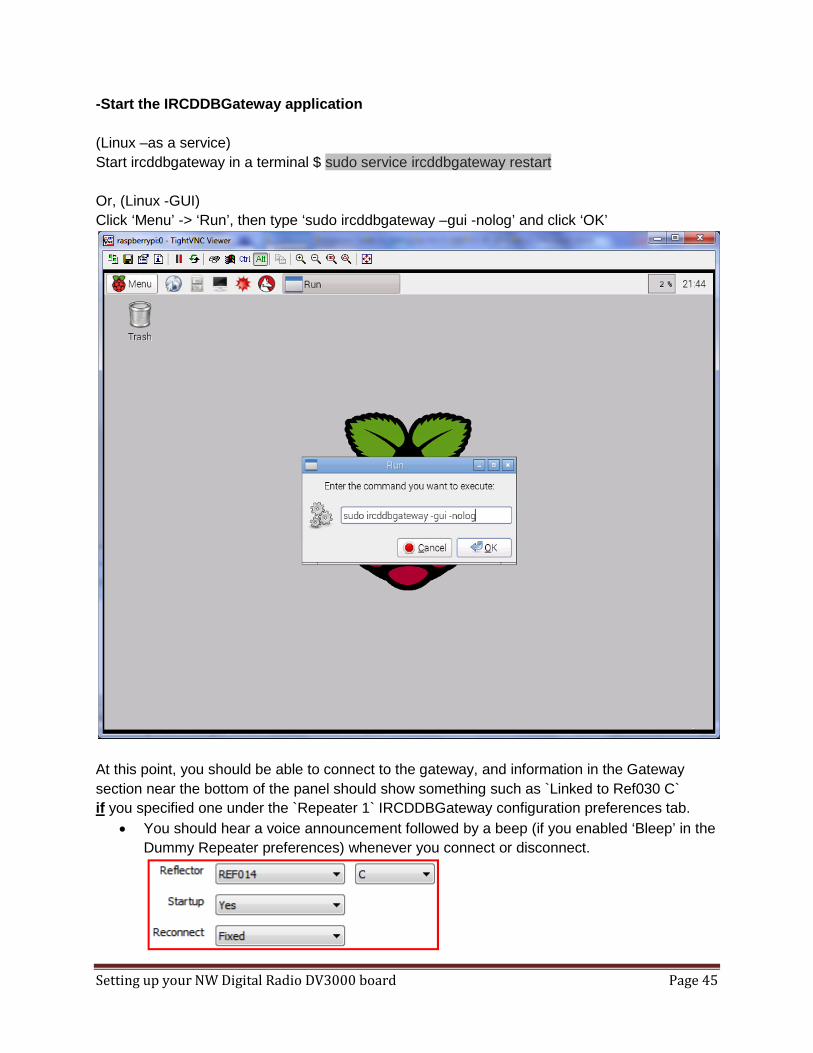
-Start the IRCDDBGateway application (Linux –as a service) Start ircddbgateway in a terminal $ sudo service ircddbgateway restart Or, (Linux -GUI) Click ‘Menu’ -> ‘Run’, then type ‘sudo ircddbgateway –gui -nolog’ and click ‘OK’
At this point, you should be able to connect to the gateway, and information in the Gateway section near the bottom of the panel should show something such as `Linked to Ref030 C` if you specified one under the `Repeater 1` IRCDDBGateway configuration preferences tab.
• You should hear a voice announcement followed by a beep (if you enabled ‘Bleep’ in the Dummy Repeater preferences) whenever you connect or disconnect.

Setting up your NW Digital Radio DV3000 board Page 46
That`s all, -you`re ready to go! If you need help operating D-Star, there are many websites and resources that can help. You may wish to start here> http://www.dstarinfo.com/operating-d-star.aspx One final note: IMPORTANT! Shutting down the Pi “politely”: One last important note before you “pull the plug” (literally) on the Raspberry Pi. Most computer users know the importance of shutting down an operating system cleanly, and although most modern operating systems can handle an unexpected shutdown, you want to avoid the risk of corrupting files on the SD Card. You can safely shutdown by several different methods, but for simplicity, I’d recommend using... $ sudo poweroff If connected to a monitor, the display will go “dark” when Raspian shuts down –no blinking cursor. Depending on your monitor that’s connected, you may see a message like “No Signal”. Also, if you can visibly see the Pi, only the red(power) LED should be illuminated. There should be no other activity from any of the other LEDs. These are your visual clues that it is now safe to remove power from the Pi.

Setting up your NW Digital Radio DV3000 board Page 47
Operating D-Star from another computer: DV3000 The information in this guide up until this point assumes that the AMBEserverGPIO, IRCDDBGateway, and Dummy Repeater are all running on the Raspberry Pi. But wouldn’t it be nice to be able to operate D-Star on a Windows laptop or computer in your house without having to be tethered directly to the Pi? Well you can. -here’s how. Of course, the DV3000 is a plug-in board that is attached to the Raspberry Pi, so it will be necessary to continue to run the Pi, but just as an AMBE vocoder server. We’ll be installing and running the IRCDDBGateway & Dummy Repeater (Windows) applications on our Windows laptop instead Note: ensure that IRCDDBGateway & Dummy Repeater are not running on the Pi. The steps are basically the same... Follow these steps (refer to sections in this guide)
1. Prepare your Pi: Getting ready to install the DV3000 AMBE vocoder board 2. Install(mount) the DV3000 board on to the Raspberry Pi 3. AMBEserverGPIO installation: 4. Download & install to your Windows computer, the IRCDDBGateway, and Dummy
Repeater software. It is available here>
5. Join Yahoo! Group ircDDBGateway and download from “Files” > “Beta”:
ircDDBGateway-20140602.exe or newer
6. Join Yahoo! Group pcrepeatercontroller and download from “Files” > “Release”:
DummyRepeater-20140519.exe or newer
7. Configure IRCDBBGateway & Dummy Repeater: (refer to IRCDDBGateway Settings: & Dummy Repeater Settings: sections in this guide)
Note: The IP Address should be the IP address of the Pi that your DV3000 is connected to (normally this address is set to 127.0.0.1)
Use these settings

Setting up your NW Digital Radio DV3000 board Page 48
Operating D-Star from Windows: ThumbDV(DV3000U) Installing the AMBEServerWin, IRCDDBGateway & Dummy Repeater (Windows) applications. The first time that you plug in your ThumbDV, Windows should detect and install the appropriate USB serial port driver. Verify that this has occurred by going to the Windows ‘Control Panel’ > ‘Device Manager’. You should see which serial Com port the ThumbDV is assigned to whenever it is plugged in: (COM3 in the example below) See: http://www.ftdichip.com/Support/Documents/InstallGuides.htm if you require help in getting Windows to recognise your ThumbDV.
Make note of this Com port assignment as you will need to specify in the Dummy Repeater configuration. Also note that if you plug your ThumbDV into a different USB port in the future, it may get assigned to a different Com port. If it was working previously, but no longer, check Device Manager to verify that it is still assigned to the same com port, if not, you will need to change the com port in Dummy Repeater so that it matches the setting in Windows Device Manager.
1. Download the AMBEServerWin.zip file the link below, and unzip to a folder http://nwdigitalradio.com/wp-content/uploads/2014/12/AMBEServerWin.zip
2. Open a command line (CMD), change(navigate) to the zip folder, and enter AMBEserver.exe -c 3 <-(Note: ‘3’ denotes the com port we identified previously –change as appropriate | type AMBEserver -? For command line options)
3. Join Yahoo! Group ircDDBGateway and download from “Files” > “Beta”:
ircDDBGateway-20140602.exe or newer
4. Join Yahoo! Group pcrepeatercontroller and download from “Files” > “Release”:
DummyRepeater-20140519.exe or newer
5. Refer to IRCDDBGateway Settings: & Dummy Repeater Settings: sections
Use these settings

Setting up your NW Digital Radio DV3000 board Page 49
‘No Cost’ options: The following steps are optional, but most may want to set things up in this manner for simplicity. Remote Desktop: setup x11VNC (a Virtual Network Computing (VNC) server program) The biggest obstacle in connecting your Raspberry Pi, may be not having an HDMI or composite monitor available. If your Pi is connected to your home's network, and know it's IP address, then you can simply open up a terminal(Telnet) session on another computer as long as it's also on your home network. If you don't know the current IP address assigned to your pi, then you have some detective work to do. You can try “ping’ing” the entire address range of your home network and determine it from the response, or if you have access to your internet router, you may find that information in one of the menus. Look for something like "IP address Assignments". When you determine the Pi's address, open a Telnet session on another computer, and log in with the default username and password. But there’s another way… Wouldn’t it be nice if you could connect to your Pi remotely using another computer, and have the same GUI experience(as if you were working directly from the console), rather than be limited to the command line? VNC is a popular (&free) remote desktop connection application that you can install x11VNC server on the Pi, and a VNV client such as TightVNC on the remote computer http:// www.tightvnc.com Note: I should mention that VNC (at least most editions) don’t support the passing of audio, so you won’t be able to operate D-Star entirely from the Pi remotely using VNC. See the ‘Operating D-Star from another computer:’ sections near the end of this guide if you wish to do so. Here’s how: (Install the following on the Pi) $ sudo apt-get install x11vnc (do not run the next cmd as SU or sudo) $ x11vnc -storepasswd Enter VNC password: Verify password: Write password to /home/pi/.vnc/passwd? [y]/n (create xsessionrc file) $ sudo nano ~/.xsessionrc (add the following lines) # Start X11VNC x11vnc -bg -nevershared -forever -tightfilexfer -usepw -display :0 (Press CTRL+O then ENTER to write (save) the file then CTRL+X to exit) $ sudo chmod 775 ~/.xsessionrc

Setting up your NW Digital Radio DV3000 board Page 50
Remote Desktop: setup x11VNC -continued $ sudo nano /boot/config.txt (uncomment the following to force HDMI & disable composite video) (from) #hdmi_force_hotplug=1 (to this) hdmi_force_hotplug=1 (change hdmi_mode & hdmi_group values to set default resolution) (refer to table values here > http://elinux.org/RPiconfig ) (from) #hdmi_group=1 #hdmi_mode=1 (to:- the values below set resolution to 1024x768 @60Hz) hdmi_group=2 hdmi_mode=16 (Press CTRL+O then ENTER to write (save) the file then CTRL+X to exit) (launch 'raspi-config' –we need to startup into Desktop(GUI) on bootup $ sudo raspi-config Select menu3-‘Enable Boot to Desktop/Scratch’, Choose the 2nd option- ‘Desktop Log in as user 'pi' at the graphical desktop’(GUI). Click ‘Ok’, and click ‘Finish’. A message should appear: ‘Would you like to Reboot Now?’ click “Y”. If not, then no changes have been made, so repeat the step above to ensure that you are set to ‘Desktop Log in as user 'pi' at the graphical desktop’

Setting up your NW Digital Radio DV3000 board Page 51
Remote Desktop: setup x11VNC -continued If you don’t have one already, download and install your favourite VNC client on the remote computer. There are several free VNC clients available such as the popular> http:// www.tightvnc.com Note: I should mention that VNC (at least most editions) don’t support the passing of audio, so you won’t be able to operate D-Star entirely from the Pi remotely using VNC. See the ‘Operating D-Star from another computer:’ sections near the end of this guide if you wish to do so. Also, be sure that your VNC client is also set to the same port (default=:0)

Setting up your NW Digital Radio DV3000 board Page 52
Autostart IRCDDBGateway and Dummy Repeater: (don’t do this if you plan on running IRCDDBGateway & Dummy Repeater on another computer) The following steps automatically launch ircDDBGateway, and the Dummy Repeater programs on the LXDE desktop. Note: if using a different Raspian desktop other than LXDE, the path/filename may differ from the example below. $ sudo nano /etc/xdg/lxsession/LXDE-pi/autostart (the file will look like this..). @lxpanel --profile LXDE @pcmanfm --desktop --profile LXDE @xscreensaver -no-splash@ (add the applications that you want to autostart like this...) @lxpanel --profile LXDE @pcmanfm --desktop --profile LXDE @xscreensaver -no-splash@ @ircddbgateway –gui -nolog @dummyrepeater When you are satisfied that everything has been entered correctly, hold down the control(ctrl) key and press O to save your changes. Then press 'ctrl X' to exit nano editor. (now restart/reboot the Pi, and note that ircDDBGateway & Dummy Repeater are open an running on the LXDE desktop) $sudo reboot

Setting up your NW Digital Radio DV3000 board Page 53
Desktop shortcuts: While we’re at it, let’s add some shortcuts to the desktop Right mouse click anywhere on the desktop, then select ‘Create New’ -> ‘Empty File’
Enter a name for the empty file (a new icon will appear on the desktop) Right click -> Text Editor In the Text Editor window, enter the following (for ircDDBGateway) #!/bin/bash # Script to start ircDDBGateway sudo ircddbgateway -gui -nolog & <-note the ‘&’ which must appear at the end of the cmd line then click ‘File’ -> ‘Save’ *Repeat the above steps for additional shortcuts

Setting up your NW Digital Radio DV3000 board Page 54
Desktop shortcuts: -continued Repeat the above steps for any additional shortcuts. (Now we need to change the Permissions so it can be executed) Right mouse click on the icon, then click the Permissions tab. Change the ‘Execute’ permission to ‘Anyone’, the click ‘OK’
Click ‘Execute’ to launch application

Setting up your NW Digital Radio DV3000 board Page 55
Remote Control: You can control the ircDDB gateway software remotely using an Android or IOS device. ‘ ircDDB remote’ is a free app available from the Google Play Store and Apple iTunes App Store See Amateurlogic.TV episode #74 where Tommy presents the IRCDDB Remote App to make D-Star easier.

Setting up your NW Digital Radio DV3000 board Page 56
Troubleshooting Tips: When testing the DV3000 communication with the Pi: If you do not see the following line appear while testing the DV3000 for communication with the Pi, it is likely because the AMBEserverGPIO service is running. a11V120.E100.XXXX.C106.G514.R009.B0010411.C0020208 You must ensure that the service is stopped before running the test, otherwise the test will not return the proper results. (stop the AMBEserverGPIO service) $ sudo /usr/sbin/service AMBEserverGPIO stop Unable to connect to Dongle: If the AMBEserver is not running, or you have specified an incorrect IP address in the Dummy Repeater configuration, the following error message is displayed. If you are running the Dummy Repeater on the Pi, this IP address(under the Dongle tab) should be 127.0.0.1
Can’t get connected: (eg. to any D-Star reflector) Check to ensure that data is able to traverse your internet router’s firewall. see the ‘Firewall Configuration’ section for how to test Low, or no audio:. The Raspberry Pi -out of the box as you know, has no audio input (no mic in) just audio out. You will either need a USB audio adapter (with audio input), or a USB headset (with Mic) Check your input audio level. If you need to adjust your microphone (or speaker output) level, then launch ‘alsamixer’ $ alsamixer Unable to write file, or save changes: You may need elevated privileges, so try prefacing the command with ‘sudo’ My Raspberry Pi was working before, but now it won’t boot: If your Pi was working before, but now won’t even start up to the command line, it may be that your Raspbian Linux operating system may have corrupt files. Also, you could be using an SD Card that has known compatibility issues, is defective, or fake> http://goo.gl/D1PVPW Also, check the hardware compatibility list> http://goo.gl/270VH6

Setting up your NW Digital Radio DV3000 board Page 57
Troubleshooting Tips: (continued) Dummy Repeater or ircDDBGateway does not appear in the Synaptic packages list: (download the package list from repository & update) $ sudo curl ftp://141.75.245.226:8021/raspbian/opendv.list -o /etc/apt/sources.list.d/opendv.list $ sudo apt-get update When setting up parameters in ircDDBGatewayconfig, I don’t see all the reflectors: There are several host lists files for the various D-Star gateways located in /home/opendv/data CCS_Hosts.txt, DCS_Hosts.txt, DExtra_Hosts.txt, DPlus_Hosts.txt. If you find that not all of the reflectors are appearing in the drop-down list, then try rebooting, and then check to see if the additional reflectors appear in the list under the Repeater tabs. I don’t see anything appear in the ircDDBGateway log window: By default, ‘GUI Updates’ is not enabled, Under the “View” tab, check the “GUI Updates’ checkbox. Note, that it may take several minutes to connect to the gateways and establish connections. Also, there have been reports that if running all from the Raspberry Pi, that Dummy Repeater needs to be started before you start ircDDBGateway. Try starting Dummy Repeater first, then ircDDBGateway if you are unable to get connected,

Setting up your NW Digital Radio DV3000 board Page 58
Keeping things up to date: Updating ircDDBGateway & Dummy Repeater: Periodically, these applications and their corresponding file repositories will be updated. If you wish to update, here’s how. From a Terminal (update libraries) $ sudo apt-get update (check and install upgrades) $ sudo apt-get upgrade ircddbgateway or $ sudo apt-get upgrade DummyRepeater If there are no new upgrades available a message similar to this is displayed Reading package lists... Done Building dependency tree Reading state information... Done 0 upgraded, 0 newly installed, 0 to remove and 0 not upgraded. From the GUI –Synaptic Launch Synaptic Package Manager: Click ‘Menu’ -> ‘Preferences’ -> ‘Synaptic Package Manager’ then press “CTRL R’
Then compare the ‘Installed Version’ vs. ‘Latest Version’ to see if an updated version is available.