Setting Up Your myABILITY Account V1.2 final - ABILITY Network · ability to select and configure...
22
ABILITY ® Network Inc Your new myABILITY TM Account Setup Guide
Transcript of Setting Up Your myABILITY Account V1.2 final - ABILITY Network · ability to select and configure...

ABILITY® Network Inc
Your new myABILITYTM Account
Setup Guide

myABILITYTM Overview At ABILITY®, our mission is to provide innovative products and services that reduce the administrative complexities of healthcare. The myABILITY platform provides you with streamlined, easy-to-use access and navigation to all your ABILITY solutions. As the name implies, myABILITY gives you the ability to select and configure network services specific to your business requirements. Whether you are a biller, administrator, or supervisor; provide patient access and scheduling; or carry out other billing-related functions, myABILITY makes your job easier! The myABILITY platform provides unified access to ABILITY innovative services including:
• ABILITY | EASETM • ABILITY | COMPLETETM • ABILITY | IVANS NOWTM (DDE/FISS) • ABILITY | CHOICETM Medicare Claims
About this guide This guide provides you with easy, step-by-step instructions to configure your account and services and launch myABILITY for use by your organization. In three simple steps, you can configure myABILITY by:
1. Completing the setup of your System Administrator account. 2. Configuring your ABILITY services. 3. Inviting additional users to myABILITY.
After setup is complete, you will perform simple service tests to demonstrate the innovative services in myABILITY.
ABILITY NETWORK INC | myABILITY SET-UP GUIDE 2

Before you start Before you begin setting up myABILITY, there are 4 things you’ll want to do:
• Verify your Internet browser is supported by myABILITY • Gather the appropriate Medicare credential information • Collect a list of the names and email addresses of users you wish to setup in MyABILITY • Download all remits and other files from any existing connectivity software you are using
Internet browser supported by myABILITY The myABILITY platform uses Microsoft’s ClickOnce technology that only works with Internet Explorer. The myABILITY platform supports Internet Explorer versions 8, 9, and 10. Once your account has been setup, you can access myABILITY at myABILITYnetwork.com. Prior to this, please use the URL provided in your welcome letter to create your password.
Medicare credential information gathered All system users will have access to the ABILITY | IVANS NOW service, which provides secure access to the Medicare Data Centers for DDE and PPTN usage. In order to access the DDE and PPTN systems, you will need login credentials. Contact your MAC contractor to obtain login credentials. In addition to DDE credentials, the following Medicare information will be required, depending on the ABILITY service you purchased:
Service Requirements ABILITY | IVANS NOWTM DDE credentials
ABILITY | CHOICETM Medicare Claims MAC submitter credentials (username, password)
ABILITY | COMPLETETM National Provider Identifier (NPI) Federal Tax ID
If you plan to use any of these services and do not have the required Medicare credentials or identifiers, please contact your MAC contractor.
Usernames and emails collected As administrator you will have the ability to add and/or remove users to your organization’s account. To add a user you will be required to provide their name and email address. Since the email address is used to invite the new user to myABILITY, make sure the user’s email address is entered correctly!
Remits and files downloaded
Be sure to download all files, such as ERAs/Remits, from any other software you may be using to manage your billing BEFORE you setup your myABILITY portal. You may not be able to access the files in the other software once the myABILITY portal has been configured.
ABILITY NETWORK INC | myABILITY SET-UP GUIDE 3

Getting started As your organization’s designated contact with ABILITY®, you have been setup as the System Administrator for your myABILITY account. As System Administrator, you can configure your organization’s account, including setting up and managing user accounts, NPIs and MACs. Not the right person for the job? No problem – we’ll walk you through setting up additional System Administrator accounts. You can configure myABILITY in three simple steps:
1. Complete the setup of your System Administrator account. 2. Configure your ABILITY services. 3. Invite additional users to myABILITY.
Step 1. Configuring your account
To get started, a welcome email was sent to you from [email protected]. This email contains a link to the myABILITY portal and your username. Remember, the invitation is time-sensitive, so don’t delay!
Enter a new password Click on the link provided in your welcome email to access myABILITY. The first time you access myABILITY, you will be prompted to set a password for your account. Type in your password and then confirm the password by typing it a second time. As an added layer of authentication, you will be asked to select a security question and provide an answer to that question.
ABILITY NETWORK INC | myABILITY SET-UP GUIDE 4

Sample security questions are:
• What was your childhood nickname? • What is the name of your favorite childhood friend? • What street did you live on in third grade? • What school did you attend for sixth grade? • What was the name of your elementary / primary school?
The security question helps authenticate users for future password resets. Finally, enter the words provided in the CAPTCHA. The CAPTCHA contains words, or sequences of letters and numbers, that serve as an additional security measure. On rare occasion, the CAPTCHA may not be displayed and you will see a red “x” in the box where the image should be. Most often, refreshing your browser will result in the CAPTCHA being displayed. If you still experience problems, please contact the ABILITY Customer Support team. Remember, your password needs to meet the following criteria:
• Minimum of 8 characters • Contains at least one upper case letter • Contains at least one number • Contains at least one special character (!,%,&,@,#,$,^,*,?,_,~)
Login
You are now ready to log into myABILITY. On the login page you will find important information about ABILITY® product information, services, and events. Log in to myABILITY using your username (your email address) and the password you established. Click the “Remember Me” box if you wish to store your login credentials for faster access in the future.
ABILITY NETWORK INC | myABILITY SET-UP GUIDE 5

As System Administrator, you control your organization’s use of myABILITY. You can:
• Add and modify user accounts • Set permission levels for user accounts • Provide users with access to myABILITY services • Add and edit MAC credentials if you have purchased ABILITY | CHOICE Medicare Claims • Add and edit NPIs if you have purchased any eligibility product • Configure Payers for ABILITY | COMPLETE • Configure dashboard, Add or Edit Batch Eligibility Requests and add Payer Notes • Manage and pay your bills online
Multiple users may be designated as System Administrators. System Administrators have full permissions to all available products and configuration options. There must be at least one System Administrator active for the account at all times.
Step 2. Configuring myABILITY services
The myABILITY platform provides unified access to services that help you manage your entire revenue cycle. The myABILITY platform comes with ABILITY | IVANS NOW, providing you with interactive DDE connectivity. Additional ABILITY® services may be purchased to meet the needs of your organization. Some services are configurable, allowing greater control for you as a user. The next step is to configure these services. The table below shows the ABILITY products with configurable options. Service Configurable Options ABILITY | CHOICE Medicare Claims Medicare Administrative Contractor (MAC)
Submitter Credentials (username password) ABILITY | COMPLETE National Provider Identifier (NPI) Payer Configuration Dashboard Configuration
ABILITY NETWORK INC | myABILITY SET-UP GUIDE 6
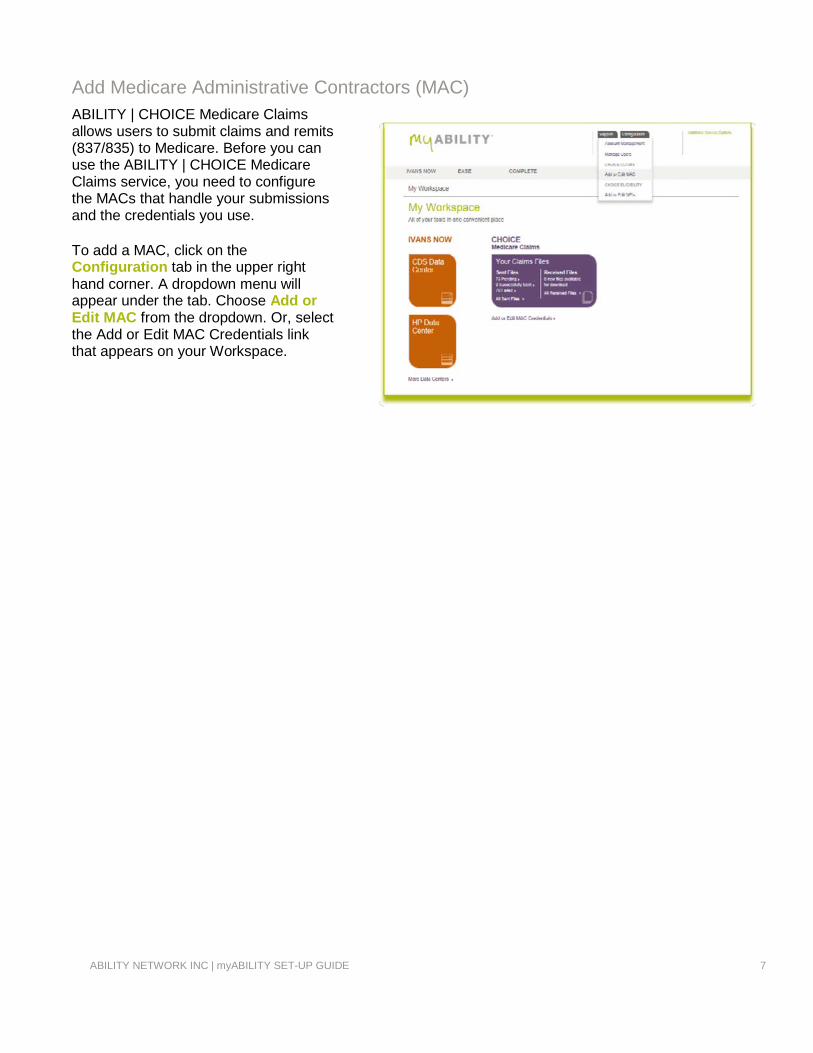
Add Medicare Administrative Contractors (MAC) ABILITY | CHOICE Medicare Claims allows users to submit claims and remits (837/835) to Medicare. Before you can use the ABILITY | CHOICE Medicare Claims service, you need to configure the MACs that handle your submissions and the credentials you use. To add a MAC, click on the Configuration tab in the upper right hand corner. A dropdown menu will appear under the tab. Choose Add or Edit MAC from the dropdown. Or, select the Add or Edit MAC Credentials link that appears on your Workspace.
ABILITY NETWORK INC | myABILITY SET-UP GUIDE 7
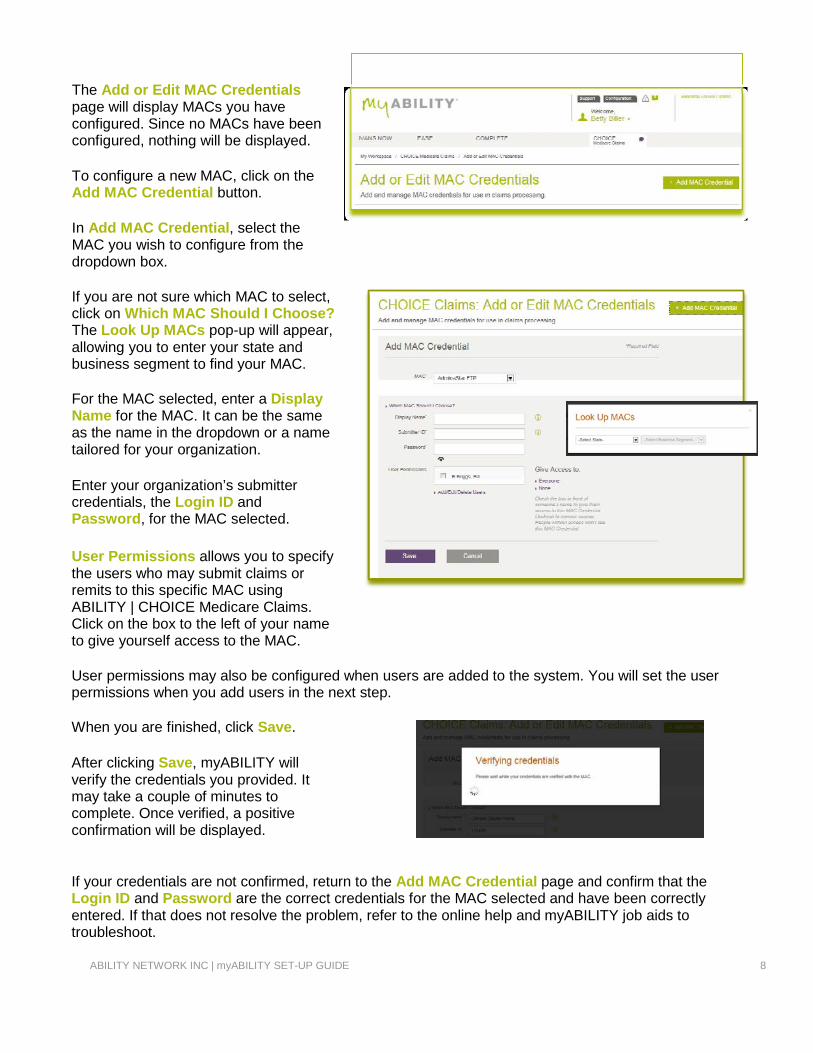
The Add or Edit MAC Credentials page will display MACs you have configured. Since no MACs have been configured, nothing will be displayed. To configure a new MAC, click on the Add MAC Credential button. In Add MAC Credential, select the MAC you wish to configure from the dropdown box. If you are not sure which MAC to select, click on Which MAC Should I Choose? The Look Up MACs pop-up will appear, allowing you to enter your state and business segment to find your MAC. For the MAC selected, enter a Display Name for the MAC. It can be the same as the name in the dropdown or a name tailored for your organization. Enter your organization’s submitter credentials, the Login ID and Password, for the MAC selected. User Permissions allows you to specify the users who may submit claims or remits to this specific MAC using ABILITY | CHOICE Medicare Claims. Click on the box to the left of your name to give yourself access to the MAC. User permissions may also be configured when users are added to the system. You will set the user permissions when you add users in the next step. When you are finished, click Save. After clicking Save, myABILITY will verify the credentials you provided. It may take a couple of minutes to complete. Once verified, a positive confirmation will be displayed. If your credentials are not confirmed, return to the Add MAC Credential page and confirm that the Login ID and Password are the correct credentials for the MAC selected and have been correctly entered. If that does not resolve the problem, refer to the online help and myABILITY job aids to troubleshoot.
ABILITY NETWORK INC | myABILITY SET-UP GUIDE 8

Add National Provider Identifier (NPI) ABILITY | COMPLETE allow you to verify a beneficiary’s eligibility for services. In order to do so, myABILITY needs to be configured with your National Provider Identifier (NPI). Your NPI is a unique 10-digit identification number issued to health care providers in the United States by the Centers for Medicare & Medicaid Services (CMS). Your will also need to provide the Federal Tax ID for the NPI you are entering if you have ABILITY | COMPLETE. To add an NPI, click on the Configuration tab in the upper right hand corner. A dropdown menu will appear under the tab. Choose Add or Edit NPIs from the dropdown. Or, select the Add or Edit NPI link in your Workspace. From the Add or Edit NPI page, click on Add NPI. An Add NPI, enter the NPI and the Display Name. It should be a user- friendly reference for the NPI, meaningful to your organization. Add Federal Tax ID (if required). Providers of Mental Health or Psychiatric Services can designate the NPI as such on this page. By selecting the checkbox, eligibility requests sent to Medicare with this NPI will include this service type. User Permissions allows you to specify the users who may perform eligibility checks using a particular NPI. Click on the box to the left of your name to give yourself access to that NPI.
ABILITY NETWORK INC | myABILITY SET-UP GUIDE 9

Like MAC credentials, user permissions may also be configured when users are added to the system. You will set the user permissions when you add users in the next step. When you are finished, click Save. Please note: NPIs need to be verified with CMS before they can be used. This may take up to 48 hours.
Configure Payers ABILITY | COMPLETE offers access to over 400 payers. Some payers require additional information to be sent an eligibility request. The Configure Payers page display a list of all payers that you can scan in order to see if any payers you plan to send requests to are missing required information.
The user can expand the payer they want to configure and enter the information that is missing. A list of the NPIs associated with the account is displayed and the user is alerted to which NPIs are missing information when they select a payer row.
Selecting an NPI will display a dialog box with the fields required for that payer.
You can click the “NPI Payer Details” link at the bottom of the page to view payer configuration per NPI.
Manual Enrollment Some payers require additional information in order to be registered for sending eligibility requests. These payers have a “Yes” in the “Manual Config Required” column in the Payer Table. Depending upon the payer, this may be documentation to be sent to an ABILITY representative.
ABILITY NETWORK INC | myABILITY SET-UP GUIDE 10

Once the user has successfully enrolled the NPI(s) with that payer, you must confirm this information to begin to send eligibility requests to that payer. To do this, select the NPIs that have completed this process and confirm that you have completed enrollment using the dialog box that opens. Now the payer is configured within the system.
Payer Notes
ABILITY | COMPLETE allows you to add Payer Notes to payers from the Payer Configuration admin page to share payer-specific information with other users. These will appear when users hover the icon next to that payer when creating eligibility requests and viewing responses.
Configure Dashboard The Dashboard is a shared workspace available in ABILITY | COMPLETETM. The purpose of the Dashboard is for you and other users to manage eligibility requests, set follow-up procedures, and view payer-specific information. The dashboard is very flexible and can be configured to meet various business needs and workflows.
ABILITY NETWORK INC | myABILITY SET-UP GUIDE 11

Custom Follow-up Status
You can add custom follow-up statuses and assign colors to those statuses. Depending on the needs of your facility, you can choose to show or hide default follow-up statuses that are available.
Follow-up statuses can be used to easily group similar types of requests together on the Dashboard.
ABILITY NETWORK INC | myABILITY SET-UP GUIDE 12

Step 3. Configuring Additional Users To add a new user, click on the Configuration tab in the upper right hand corner. A dropdown menu will appear under the tab. Choose Manage Users from the dropdown. Only System Administrators or those with Manage Users permission can access the Manage Users page. This page lets you manage your organization’s user accounts. Use the green Import Users button, to create multiple users by importing a spreadsheet. You can add up to 500 users with one spreadsheet. Click on the green Add User button to add new users individually. You can select any number of users on your account using the check box to the left of the name column. There are three purple drop-down boxes: Actions – Delete, deactivate, or activate selected users. You can only delete users if there is no activity associated with them. Administrative Permissions – Update administrative permissions for selected users. Application Permissions – Update the application / product permissions for selected users.
ABILITY NETWORK INC | myABILITY SET-UP GUIDE 13

On the Add User page, type in the user’s Email, First Name and Last Name. Select the user’s Job Category from the dropdown list and Business Type. Setting the job category and business type ensures we get the right Medicare information to you. The Application Access Permissions allows you to designate the applications the user is permitted to access. By default, all users have access to ABILITY | IVANS NOW. This box is automatically checked. Click on the box to the left of the service name to indicate the services the user may access. The services you select appear in the user’s workspace page upon login, as well as in the top navigation bar on their myABILITY pages. For some services, you may further refine the services a user accesses or how they access it. For ABILITY | CHOICE Medicare Claims, you may designate the MACs that a user may submit claims to. For eligibility products, you may designate the NPIs that may be used by the user for eligibility verification. For these services, a pop-up box will appear offering the choice of MACs or NPIs you can associate with the user. Click Associate for each MAC or NPI you wish to allow the user to access, then click Done.
ABILITY NETWORK INC | myABILITY SET-UP GUIDE 14

You may wish to provide users with additional permissions in Administrative Permissions. Administrative Permissions provides users with additional permissions to manage and configure user, service, and account options:
• System Admin allows the user full access to all available products and configuration options.
• Add/Edit Users allows the user to setup and configure user accounts.
• Configure Services allows the user to configure service options such as MAC credentials or NPIs.
• Manage Account allows the user to view and pay ABILITY® invoices online and configure account options such as password expiration and security questions.
• Add/Edit Batch Eligibility Requests allows the user to create and update eligibility batches, including importing .CSV files in ABILITY | COMPLETE.
Since assigning System Admin privileges provides full access to all user and service configurations, you will be asked to confirm that you want to assign System Admin permissions to a user. A pop-up box will appear asking you to confirm. Click on Make a System Admin to confirm. Assigning System Admin permissions to a user automatically provides the user with all other administrative permissions as well. Note, you must have a minimum of one System Administrator for your organization’s account, but are allowed more if needed. When you have entered all the information for the user, click on Save User. An email will be sent to the new user at the email address you provided, inviting the user to myABILITY. It will contain the URL for the user to setup a password and will walk the user through the password setup process. Like the email you received, emails inviting users to myABILITY will be time-sensitive. If the invitation expires before the user can complete the process, the invitation may be re-sent. Once users have logged in to their new myABILITY account, they can link their ABILITY | EASE account to myABILITY allowing easy access to their ABILITY products with a single sign-on. Linking of ABILITY | EASE and myABILITY accounts is done at the individual user level and does not require special permissions. See the EASE section in myABILITY Services for linking an ABILITY | EASE account to myABILITY. Please note that a myABILITY account can only be linked to one ABILITY | EASE account, and vice versa.
ABILITY NETWORK INC | myABILITY SET-UP GUIDE 15

Your myABILITY services Now that your account and basic services are configured, you can begin using other ABILITY® services that you may have purchased. ABILITY | IVANS NOW is included as part of the myABILITY platform; the services listed below are also available within the myABILITY platform to help you operate with greater efficiency and effectiveness:
• ABILITY | CHOICETM Medicare Claims • ABILITY | EASETM Medicare Revenue Cycle Management Tool
ABILITY | IVANS NOWTM Every myABILITY account provides ABILITY | IVANS NOW access to the Medicare data centers for DDE and PPTN usage. You access the ABILITY | IVANS NOW services from My Workspace. My Workspace is the first page you see after logging in to myABILITY. The products or services you have are “tiled” on this page, with the two most frequently accessed Medicare data centers tiled on the left hand side of the page under IVANS NOW. Additional options are available by clicking on More Data Centers under the tiles. Click on the data center associated with your Medicare data center login credentials. A TN3270 emulator is launched and you can now login to the data center.
ABILITY NETWORK INC | myABILITY SET-UP GUIDE 16
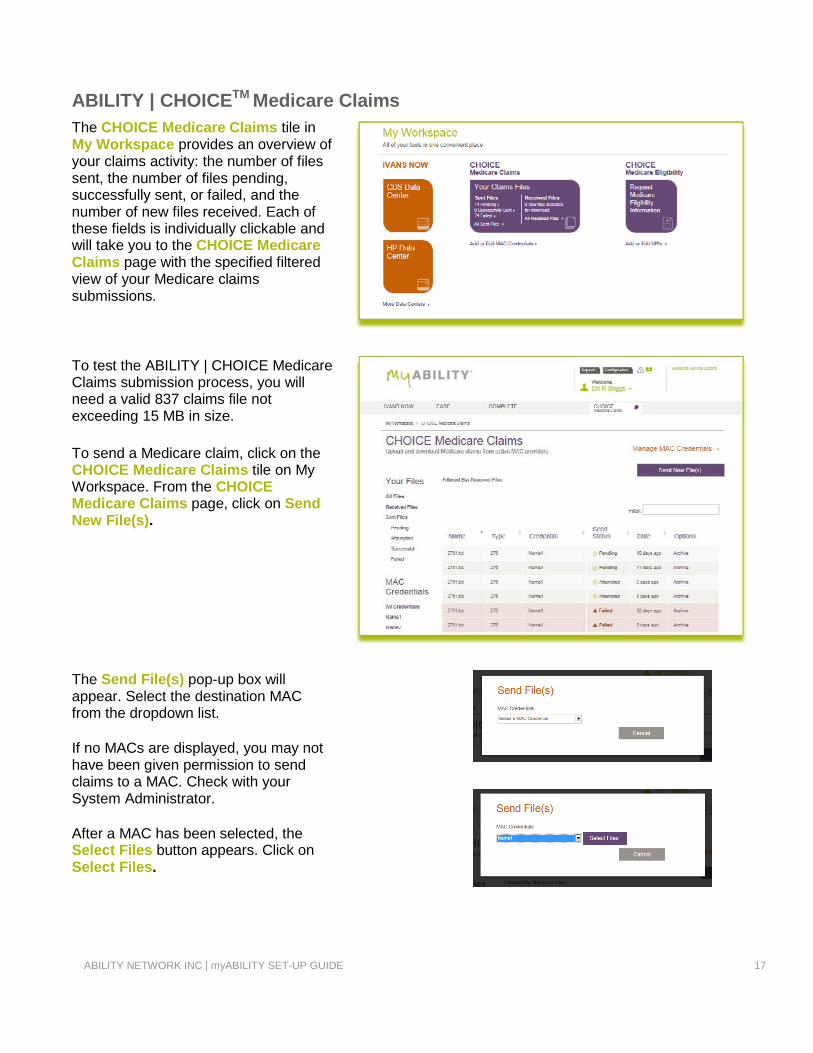
ABILITY | CHOICETM Medicare Claims The CHOICE Medicare Claims tile in My Workspace provides an overview of your claims activity: the number of files sent, the number of files pending, successfully sent, or failed, and the number of new files received. Each of these fields is individually clickable and will take you to the CHOICE Medicare Claims page with the specified filtered view of your Medicare claims submissions. To test the ABILITY | CHOICE Medicare Claims submission process, you will need a valid 837 claims file not exceeding 15 MB in size. To send a Medicare claim, click on the CHOICE Medicare Claims tile on My Workspace. From the CHOICE Medicare Claims page, click on Send New File(s). The Send File(s) pop-up box will appear. Select the destination MAC from the dropdown list. If no MACs are displayed, you may not have been given permission to send claims to a MAC. Check with your System Administrator. After a MAC has been selected, the Select Files button appears. Click on Select Files.
ABILITY NETWORK INC | myABILITY SET-UP GUIDE 17

A Windows pop-up appears allowing you to browse your system for your claims files. Click on the file that you want to upload and click Open. You may select multiple files for uploading. Once you have selected the claim(s) you want to submit, click Send Files. A “Files have been sent” message will appear at the top of the screen. Once a file is submitted, it cannot be cancelled by the user. The Send Status reflects the status of transmitting a file to CMS. It does not indicate if the claim submitted was a valid claim. A file can have one of the following statuses: Pending, Failed, Successful or Attempted.
• Pending files are being prepared to be sent to the MAC contractor. • Attempted files indicate that myABILITY has attempted to send the files to the MAC and will
continue to attempt to send for up to 24 hours until a Failed or Successful status has been achieved.
• A Failed file status means that after a number of delivery attempts, myABILITY failed to deliver the file(s) due to invalid password, networking problems or configuration issues. Refer to the online help for assistance with failed files and next steps.
• A Successful status indicates that the files have been successfully sent to the MAC contractor.
ABILITY NETWORK INC | myABILITY SET-UP GUIDE 18

ABILITY | EASETM
The ABILITY | EASE system is designed to automate many of the tedious and time-consuming tasks involved in the Medicare billing process. With myABILITY, you can link your ABILITY | EASE account to your myABILITY account, allowing you to access all your ABILITY services from a single workspace and centralize management of your user profile. Linking your ABILITY | EASE account to myABILITY is easy! First, you need to have ABILITY | EASE and myABILITY installed and accounts setup on both. When logged in to your account on myABILITY, click on the EASE tab at the top of your workspace page. You will be prompted to enter in your ABILITY | EASE username and password. Enter the information requested and click Link. Please note that a myABILITY account can only be linked to one ABILITY | EASE account, and vice versa. Your ABILITY | EASE account is now linked to myABILITY. From now on, when you want to access your ABILITY | EASE account, you will do so from myABILITY. After the initial set-up is complete, when you click on the EASE tab at the top of your workspace, you will be taken to a new window – already logged in to ABILITY | EASE and ready to handle your claims processing. If you try to log in to ABILITY | EASE directly, you will be reminded to use myABILITY to login. Likewise, you will be reminded to use myABILITY for password changes on your user account if you try to change your user password on ABILITY | EASE.
ABILITY NETWORK INC | myABILITY SET-UP GUIDE 19

Managing your Account Manage Account page The Manage Account page allows you to view and pay your ABILITY® invoices online by credit card (one-time and recurring payments) and ACH (recurring payments only) and to configure account options such as password expiration and security questions.
You access the Manage Account page from the Configuration tab. To access this page you need the Manage Account or System Admin permission. Consult your System Administrator for help. The profile page shows your basic account information; e.g., account number and current balance due.
ACH recurring payments The ACH recurring payment page is used to sign up for recurring ACH payment, update your bank information, and change your billing email address for ACH recurring payments. Enter in your bank account information, and then accept the terms and conditions. The set-up process can take 5-7 days depending on your bank.
ABILITY NETWORK INC | myABILITY SET-UP GUIDE 20

The tooltips icon to the right of the input fields will help you understand where to find the information the field is asking for.
Once the information is entered you will need to accept the terms and conditions by selecting the checkbox.
Credit card payments The Credit Card Payments link/page allows you to view the total balance of your ABILITY® account; make one-time payments; setup recurring credit card payments; and view your invoice history through the ABILITY ePay website.
Paying a bill within ePay To pay a bill, click on View All Open Invoices. This will take you to the Outstanding Invoices page. Now, check the PAY IN FULL box or fill in a PAYMENT AMOUNT, and then select the PAY button at the bottom of the screen. All invoices and payments are available in PDF format for download by clicking the invoice number and saving to your computer.
ABILITY NETWORK INC | myABILITY SET-UP GUIDE 21
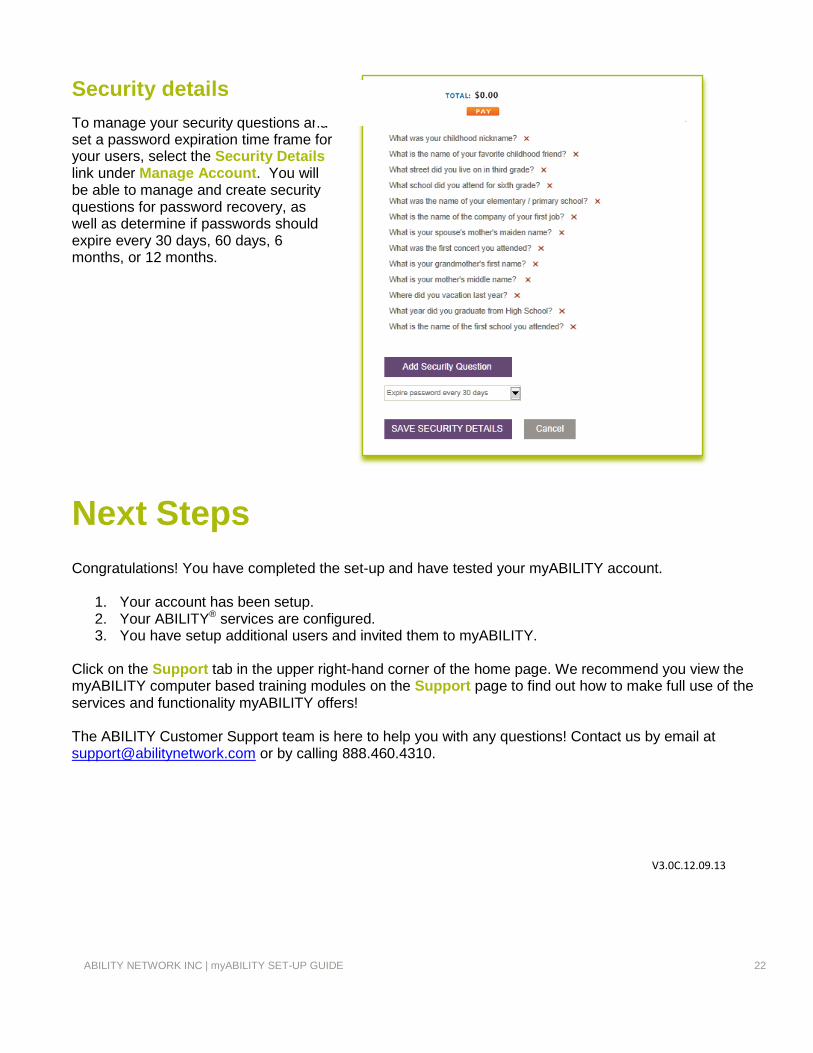
Security details To manage your security questions and set a password expiration time frame for your users, select the Security Details link under Manage Account. You will be able to manage and create security questions for password recovery, as well as determine if passwords should expire every 30 days, 60 days, 6 months, or 12 months.
Next Steps
Congratulations! You have completed the set-up and have tested your myABILITY account.
1. Your account has been setup. 2. Your ABILITY® services are configured. 3. You have setup additional users and invited them to myABILITY.
Click on the Support tab in the upper right-hand corner of the home page. We recommend you view the myABILITY computer based training modules on the Support page to find out how to make full use of the services and functionality myABILITY offers! The ABILITY Customer Support team is here to help you with any questions! Contact us by email at [email protected] or by calling 888.460.4310.
V3.0C.12.09.13
ABILITY NETWORK INC | myABILITY SET-UP GUIDE 22