
Setting up Installer Oracle FLEXCUBE Universal …...1. Setting up Oracle FLEXCUBE Installer 1.1...
18
Setting up Installer Oracle FLEXCUBE Universal Banking Release 12.1.0.0.0 [October] [2015]
Transcript of Setting up Installer Oracle FLEXCUBE Universal …...1. Setting up Oracle FLEXCUBE Installer 1.1...

Setting up Installer Oracle FLEXCUBE Universal Banking
Release 12.1.0.0.0 [October] [2015]
Table of Contents 1. SETTING UP ORACLE FLEXCUBE INSTALLER ................................................................................... 1-1
1.1 INTRODUCTION ........................................................................................................................................... 1-1 1.2 SCOPE OF INSTALLER .................................................................................................................................. 1-1 1.3 RUNNING ORACLE FLEXCUBE INSTALLER ON WINDOWS ........................................................................ 1-2 1.4 RUNNING ORACLE FLEXCUBE INSTALLER ON UNIX/LINUX ................................................................. 1-5
1.4.1 Login to PUTTY ................................................................................................................................. 1-5 1.4.2 Running Oracle FLEXCUBE Installer through XManager ............................................................... 1-7
2. RUNNING ORACLE FLEXCUBE INSTALLER IN SILENT MODE ..................................................... 2-1 2.1.1 Running Installer in Silent Mode in Windows ................................................................................... 2-2 2.1.2 Running Installer in Silent Mode in Linux ......................................................................................... 2-4
1-1
1. Setting up Oracle FLEXCUBE Installer 1.1 Introduction
Before installing Oracle FLEXCUBE, you need to set up Oracle FLEXCUBE Installer on the server. This document explains the methods of setting up the installer.
The Oracle FLEXCUBE Installer picks up the source files from the Source Directory and builds the enterprise archive file. The enterprise archive file is then deployed on the Application Server using the Application Server admin console.
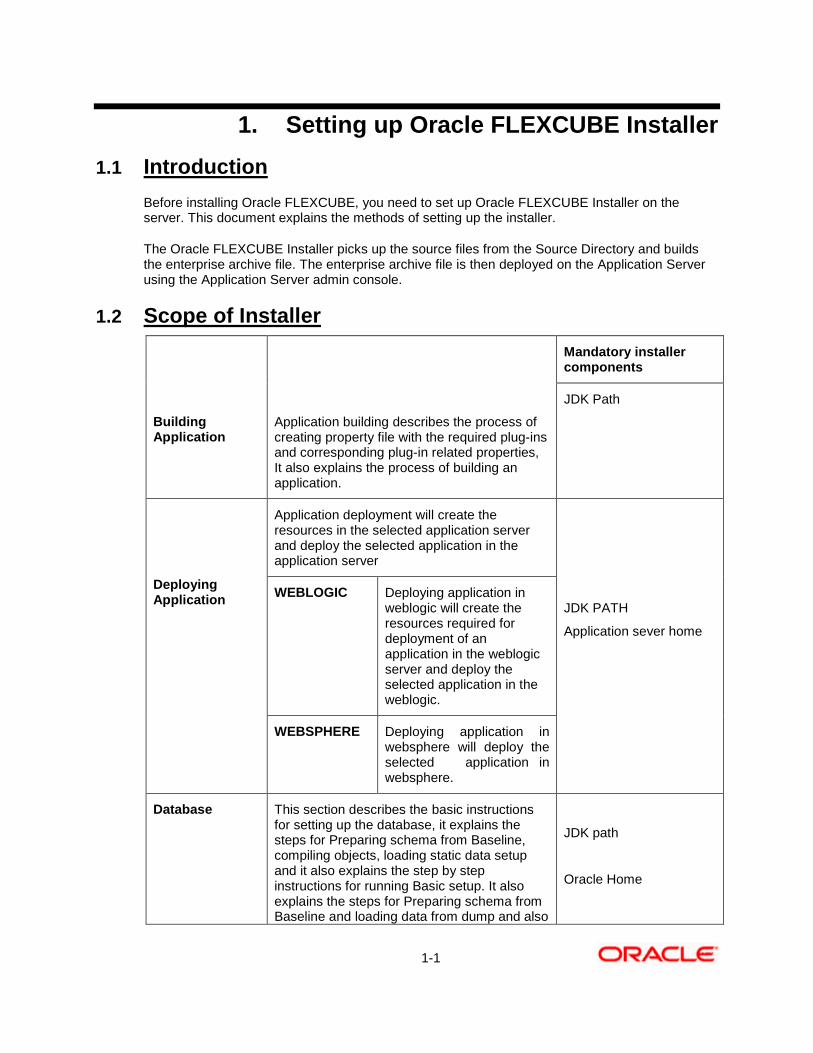
1.2 Scope of Installer
Building Application
Application building describes the process of creating property file with the required plug-ins and corresponding plug-in related properties, It also explains the process of building an application.
Mandatory installer components
JDK Path
Deploying Application
Application deployment will create the resources in the selected application server and deploy the selected application in the application server
JDK PATH
Application sever home
WEBLOGIC Deploying application in weblogic will create the resources required for deployment of an application in the weblogic server and deploy the selected application in the weblogic.
WEBSPHERE Deploying application in websphere will deploy the selected application in websphere.
Database This section describes the basic instructions for setting up the database, it explains the steps for Preparing schema from Baseline, compiling objects, loading static data setup and it also explains the step by step instructions for running Basic setup. It also explains the steps for Preparing schema from Baseline and loading data from dump and also
JDK path
Oracle Home
1-2
explains the instructions for compiling objects and loading static data and imp dump
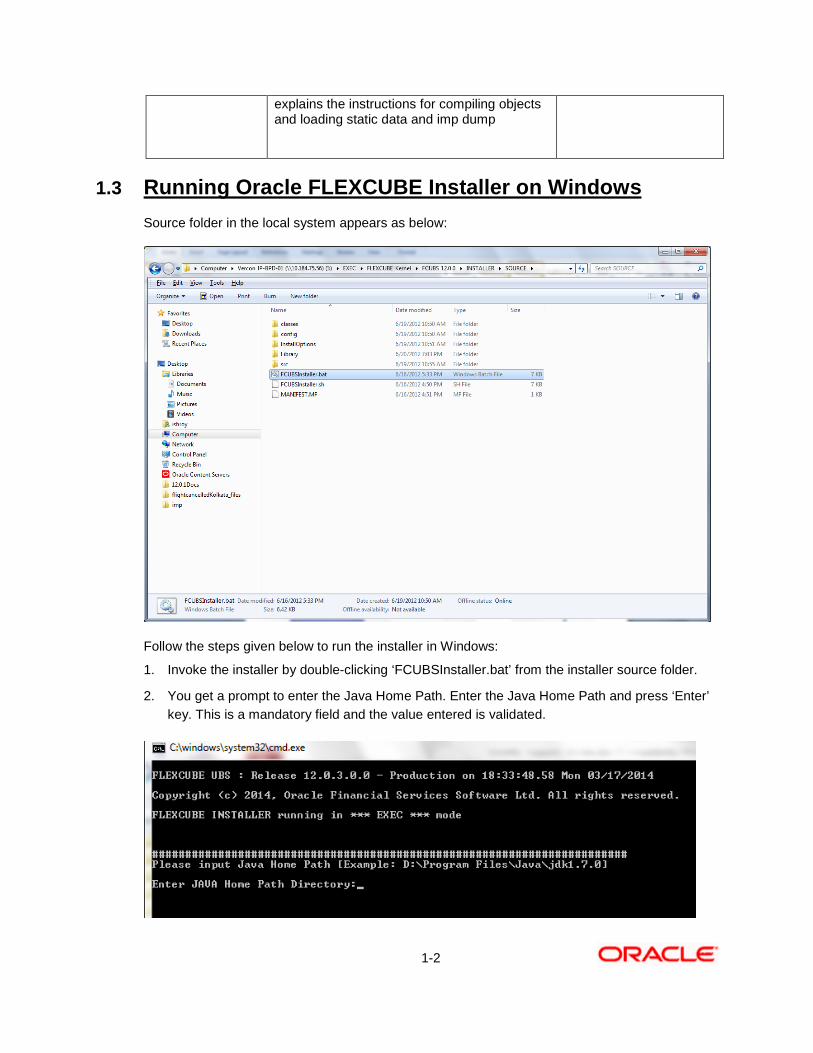
1.3 Running Oracle FLEXCUBE Installer on Windows Source folder in the local system appears as below:
Follow the steps given below to run the installer in Windows:
1. Invoke the installer by double-clicking ‘FCUBSInstaller.bat’ from the installer source folder.
2. You get a prompt to enter the Java Home Path. Enter the Java Home Path and press ‘Enter’ key. This is a mandatory field and the value entered is validated.
1-3
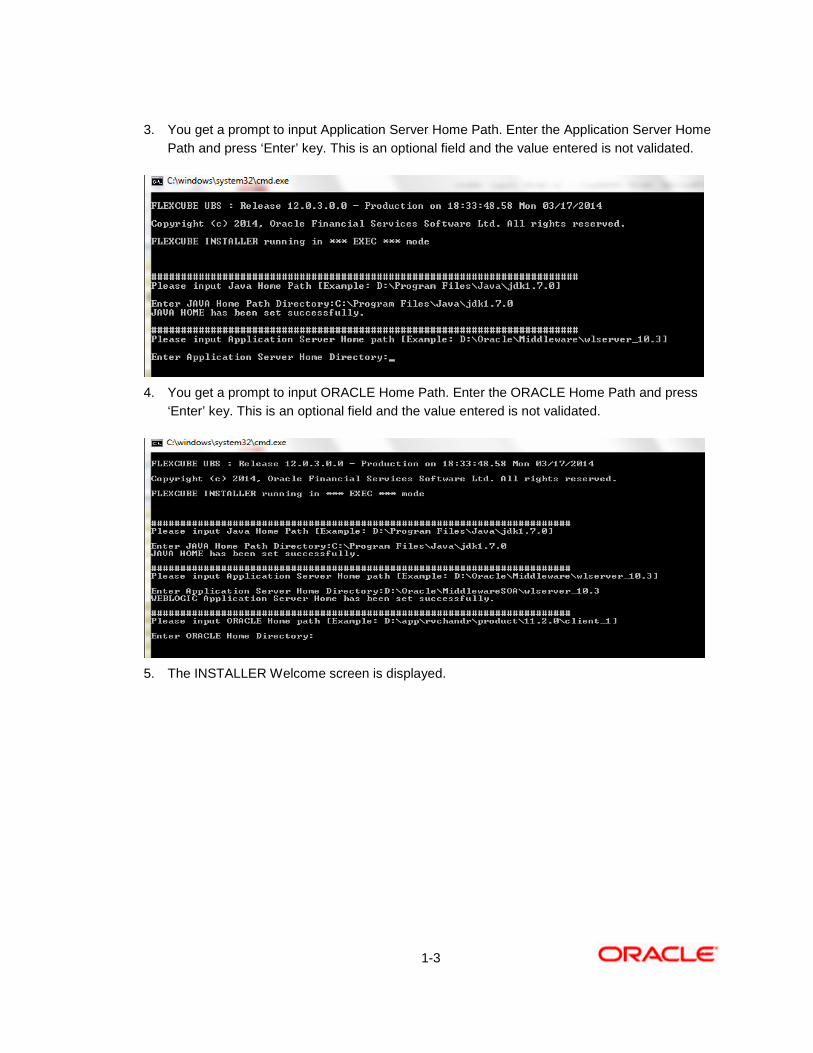
3. You get a prompt to input Application Server Home Path. Enter the Application Server Home Path and press ‘Enter’ key. This is an optional field and the value entered is not validated.
4. You get a prompt to input ORACLE Home Path. Enter the ORACLE Home Path and press
‘Enter’ key. This is an optional field and the value entered is not validated.
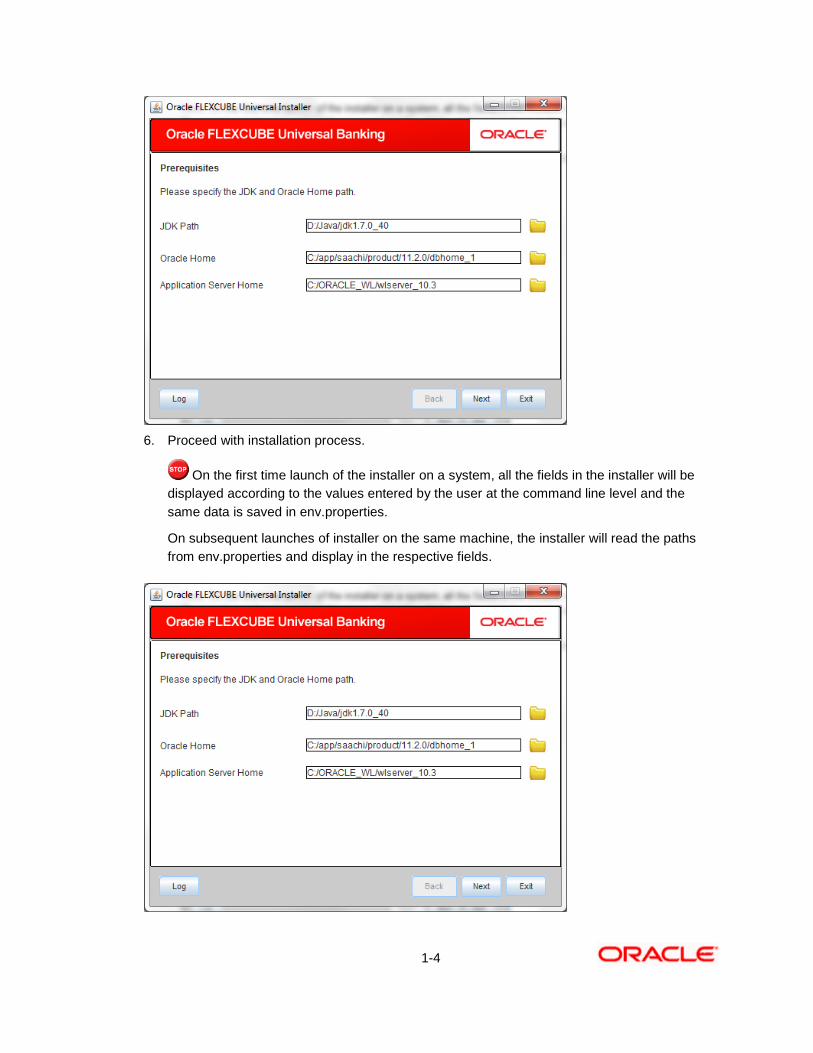
5. The INSTALLER Welcome screen is displayed.
1-4
6. Proceed with installation process.
On the first time launch of the installer on a system, all the fields in the installer will be displayed according to the values entered by the user at the command line level and the same data is saved in env.properties.
On subsequent launches of installer on the same machine, the installer will read the paths from env.properties and display in the respective fields.
1-5
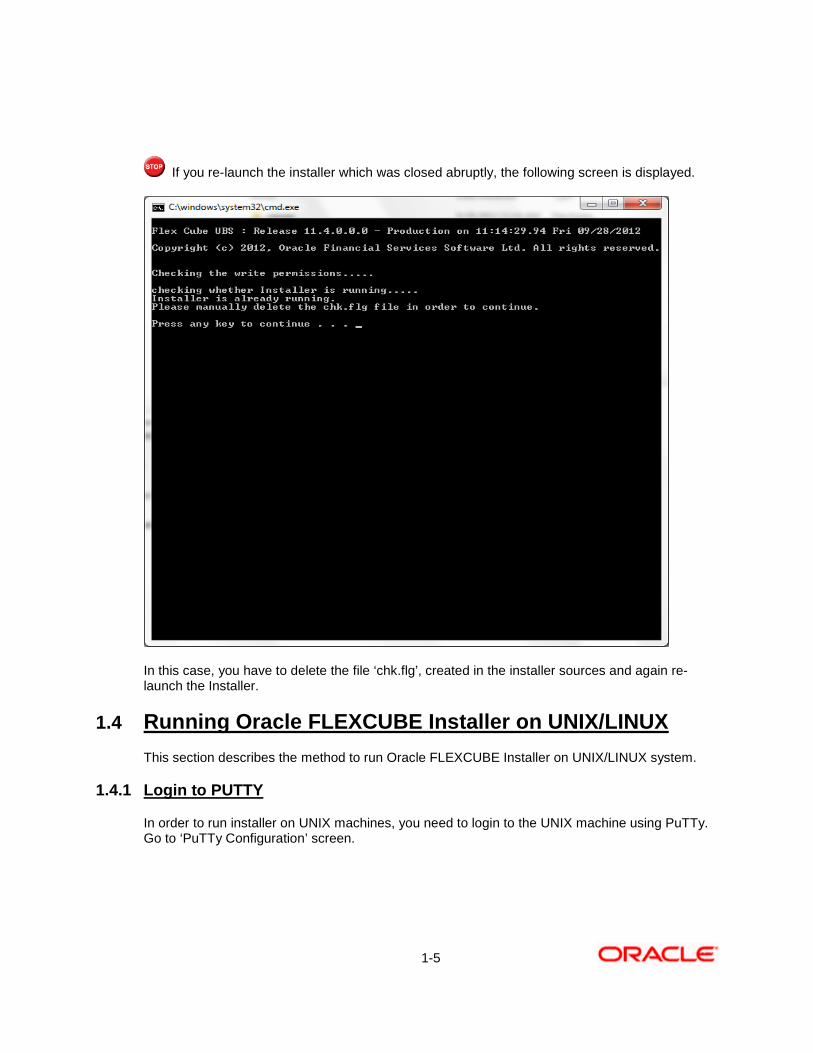
If you re-launch the installer which was closed abruptly, the following screen is displayed.
In this case, you have to delete the file ‘chk.flg’, created in the installer sources and again re-launch the Installer.
1.4 Running Oracle FLEXCUBE Installer on UNIX/LINUX This section describes the method to run Oracle FLEXCUBE Installer on UNIX/LINUX system.
1.4.1 Login to PUTTY
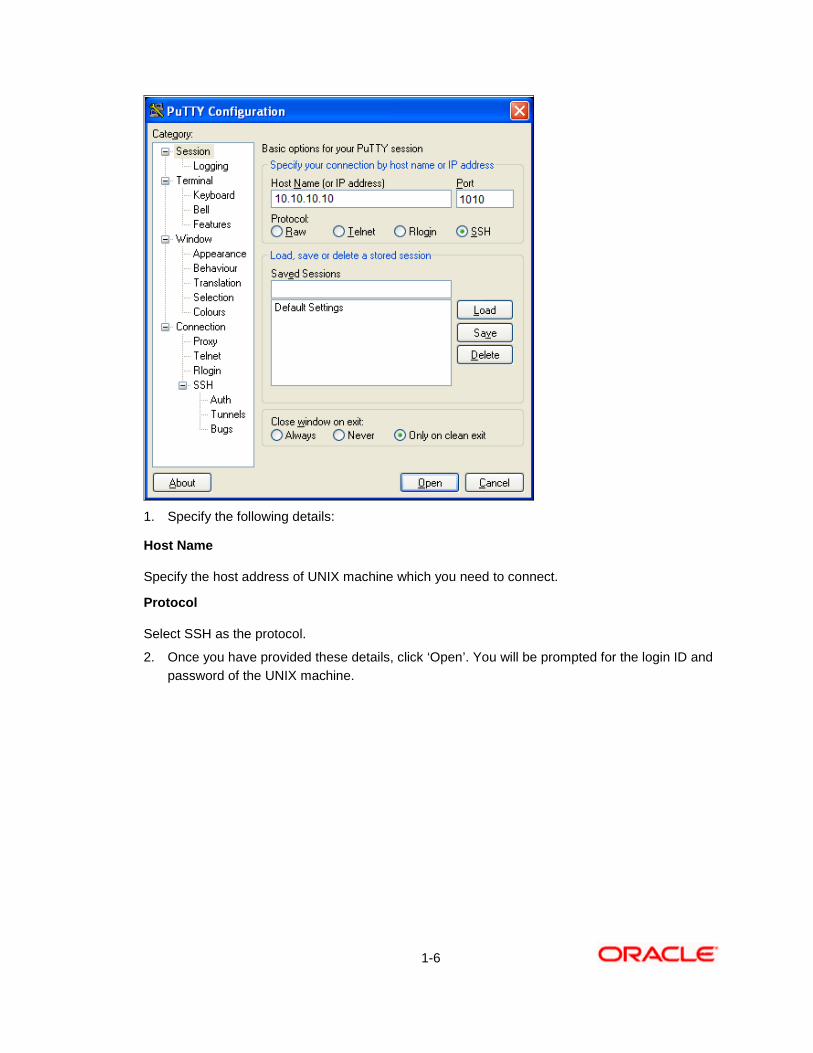
In order to run installer on UNIX machines, you need to login to the UNIX machine using PuTTy. Go to ‘PuTTy Configuration’ screen.
1-6
1. Specify the following details:
Host Name
Specify the host address of UNIX machine which you need to connect.
Protocol
Select SSH as the protocol.
2. Once you have provided these details, click ‘Open’. You will be prompted for the login ID and password of the UNIX machine.
1-7
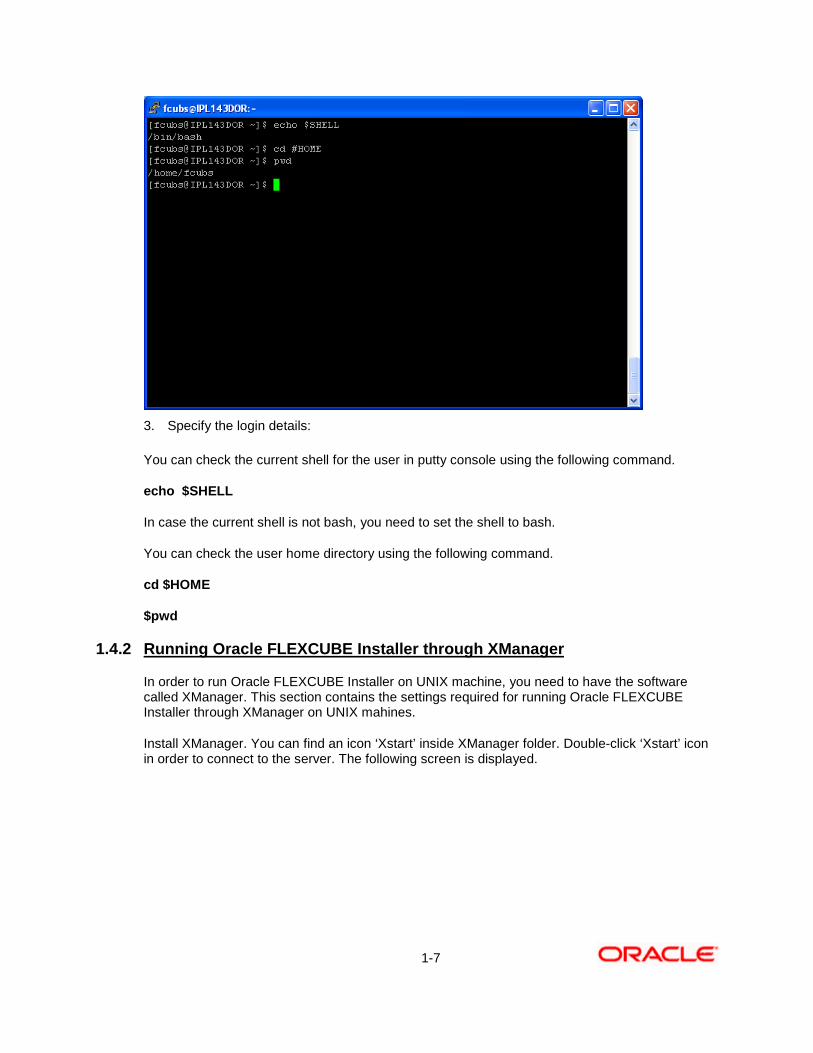
3. Specify the login details:
You can check the current shell for the user in putty console using the following command.
echo $SHELL
In case the current shell is not bash, you need to set the shell to bash.
You can check the user home directory using the following command.
cd $HOME
$pwd
1.4.2 Running Oracle FLEXCUBE Installer through XManager
In order to run Oracle FLEXCUBE Installer on UNIX machine, you need to have the software called XManager. This section contains the settings required for running Oracle FLEXCUBE Installer through XManager on UNIX mahines.
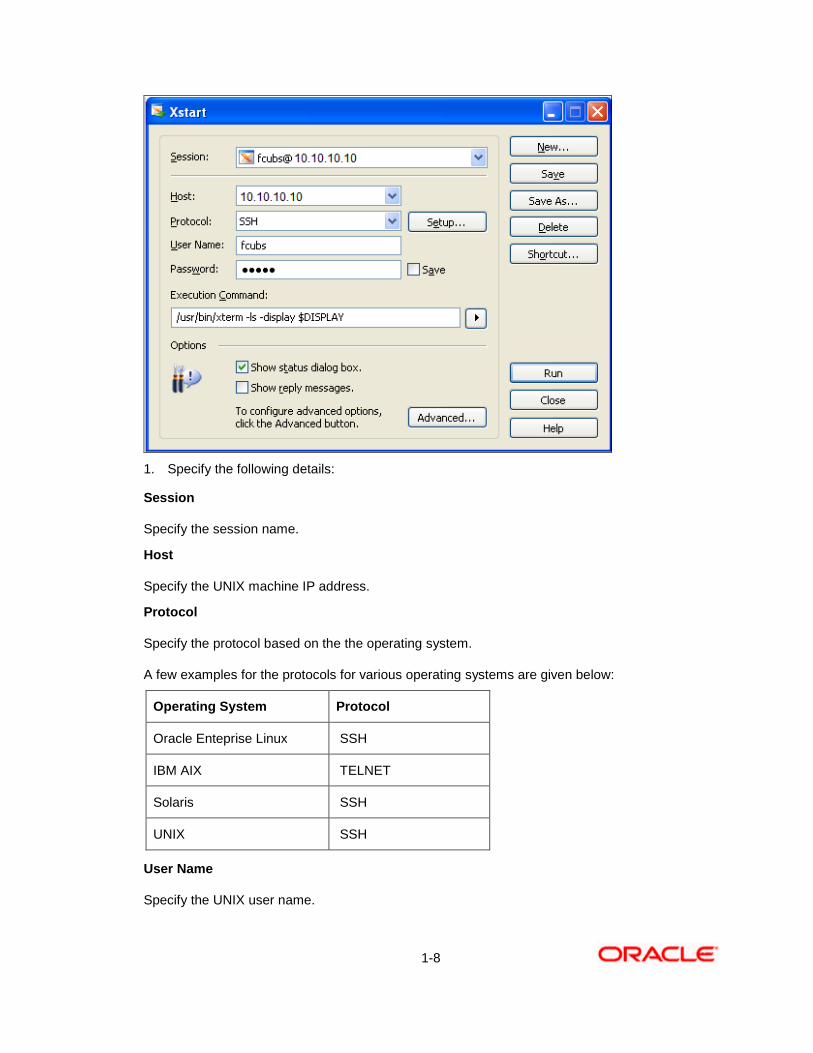
Install XManager. You can find an icon ‘Xstart’ inside XManager folder. Double-click ‘Xstart’ icon in order to connect to the server. The following screen is displayed.
1-8
1. Specify the following details:
Session
Specify the session name.
Host
Specify the UNIX machine IP address.
Protocol
Specify the protocol based on the the operating system.
A few examples for the protocols for various operating systems are given below:
Operating System Protocol
Oracle Enteprise Linux SSH
IBM AIX TELNET
Solaris SSH
UNIX SSH
User Name
Specify the UNIX user name.
1-9
Password
Specify the password for the UNIX user name.
Excution Command
Specify the execution command based on the operating system.
Operating System Execution Command
Oracle Enteprise Linux /usr/bin/xterm -ls -display $DISPLAY
IBM AIX /usr/dt/bin/dtterm -ls -display $DISPLAY
Solaris /usr/openwin/bin/xterm -ls -display $DISPLAY
UNIX /usr/bin/X11/xterm -ls -display $DISPLAY
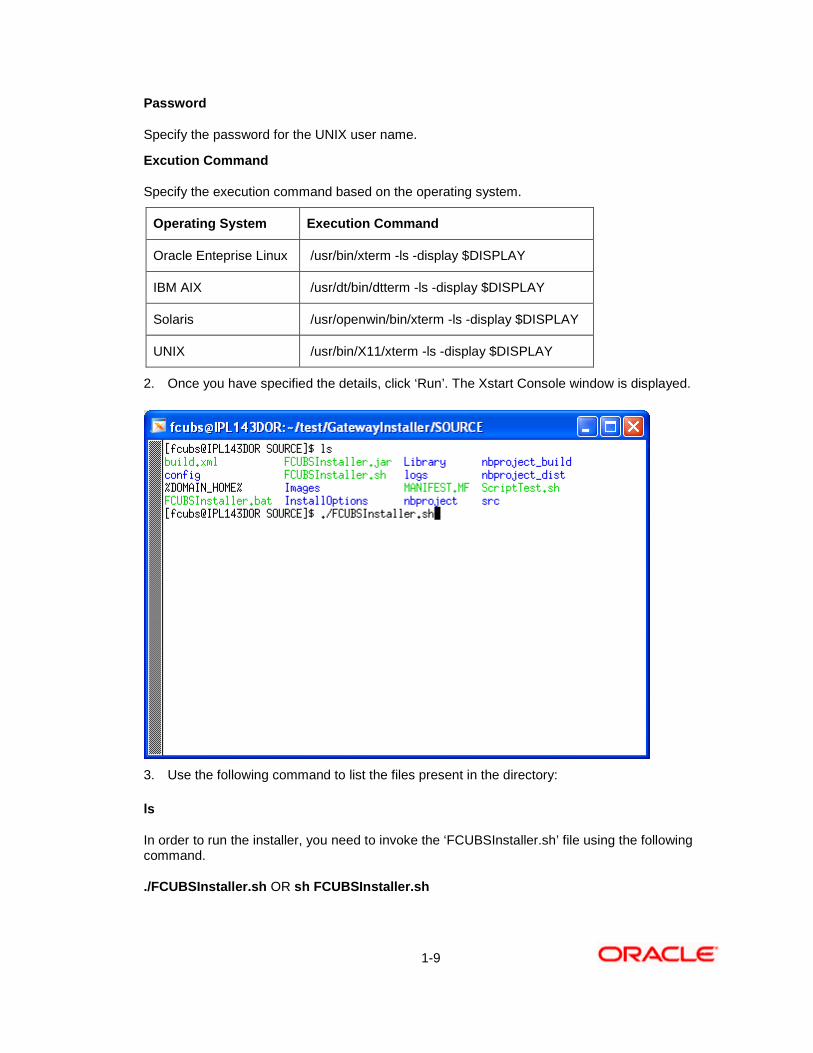
2. Once you have specified the details, click ‘Run’. The Xstart Console window is displayed.
3. Use the following command to list the files present in the directory:
ls
In order to run the installer, you need to invoke the ‘FCUBSInstaller.sh’ file using the following command.
./FCUBSInstaller.sh OR sh FCUBSInstaller.sh
1-10
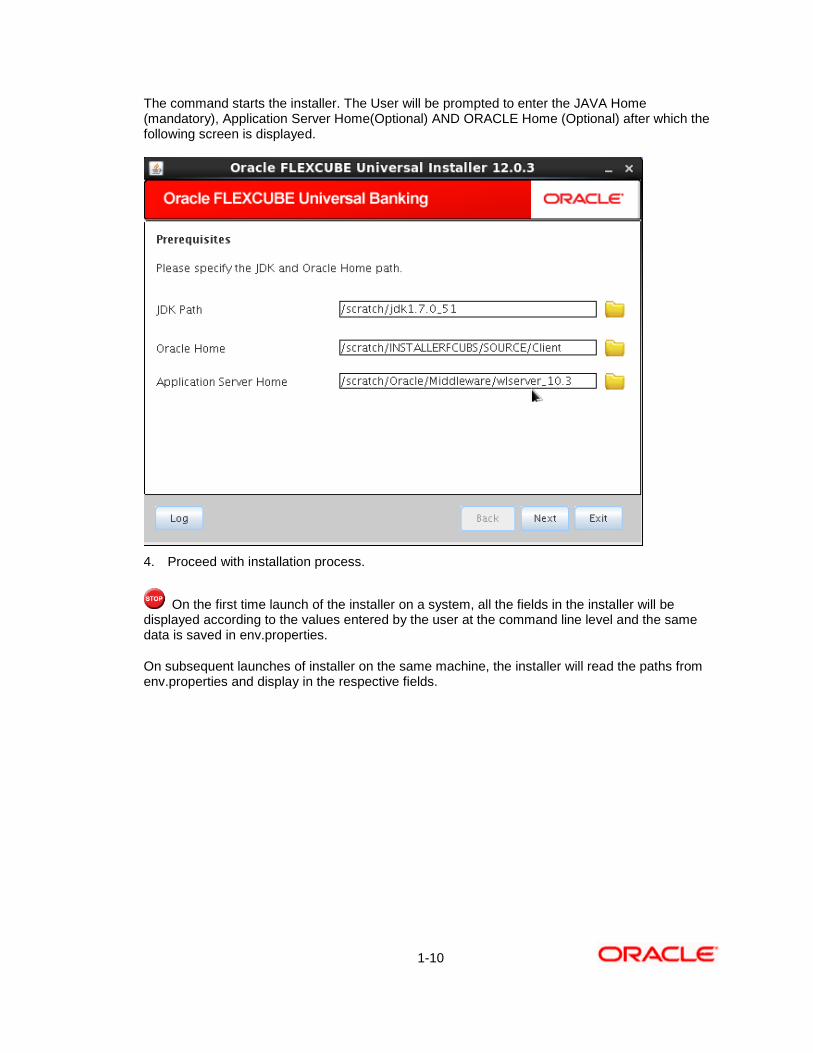
The command starts the installer. The User will be prompted to enter the JAVA Home (mandatory), Application Server Home(Optional) AND ORACLE Home (Optional) after which the following screen is displayed.
4. Proceed with installation process.
On the first time launch of the installer on a system, all the fields in the installer will be displayed according to the values entered by the user at the command line level and the same data is saved in env.properties.
On subsequent launches of installer on the same machine, the installer will read the paths from env.properties and display in the respective fields.
1-11
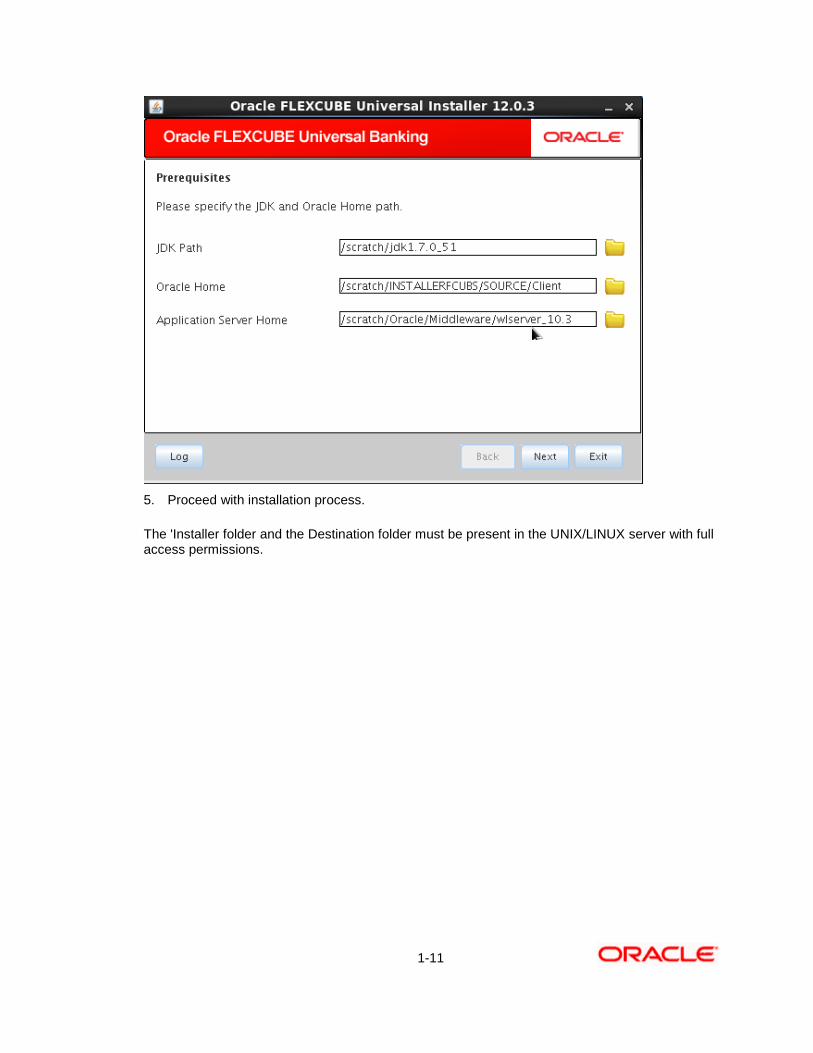
5. Proceed with installation process.
The 'Installer folder and the Destination folder must be present in the UNIX/LINUX server with full access permissions.
2-1
2. Running Oracle FLEXCUBE Installer in Silent Mode
This section describes the method to run Oracle FLEXCUBE Installer in silent mode.
Following features are supported in silent mode:
1. EAR Build (FCUBS,Gateway)
2. EAR Build(ELCM)
3. Data Base Installation
4. User Creation and Report DSN
5. Payment Gateway Job Framework EAR
6. Payment Gateway Scheduler EAR
7. FC Messaging EAR
8. Deployment on Weblogic and WAS
In order to run Oracle FLEXCUBE Installer in silent mode, you need to modify/edit the following properties files with proper values:
Path: <INSTALLER>/config (<INSTALLER> is placeholder for SOURCE folder of installer)
• ‘silentConfigBuild.properties’ to build Application in silent mode • ‘silentConfigDatabase.properties’ to setup Database in silent mode • ‘silentUserCreation_ReportsDSNproperties’ to set up user creation and report DSN. • ‘silentConfigBuildFCM.properties’ to build FCM EAR. • ‘silentConfigBuildPGPS.properties’ to build Payment Scheduler and Payment Gateway EAR. • ‘silentELCMConfigBuild.properties’ to build ELCM EAR • ‘silentAppDeployment.properties’ to deploy EAR on Weblogic • ‘silentWASDeployment.properties’ to deploy EAR on WAS
2-2
•
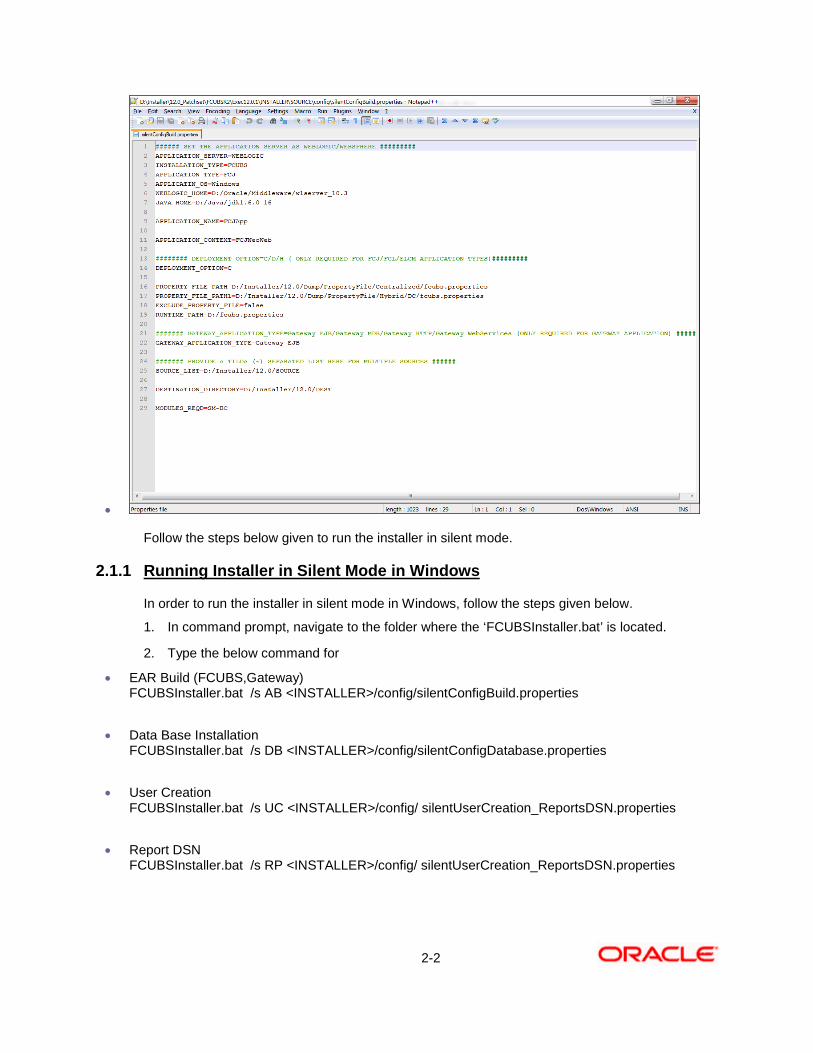
Follow the steps below given to run the installer in silent mode.
2.1.1 Running Installer in Silent Mode in Windows
In order to run the installer in silent mode in Windows, follow the steps given below.
1. In command prompt, navigate to the folder where the ‘FCUBSInstaller.bat’ is located.
2. Type the below command for
• EAR Build (FCUBS,Gateway) FCUBSInstaller.bat /s AB <INSTALLER>/config/silentConfigBuild.properties
• Data Base Installation FCUBSInstaller.bat /s DB <INSTALLER>/config/silentConfigDatabase.properties
• User Creation FCUBSInstaller.bat /s UC <INSTALLER>/config/ silentUserCreation_ReportsDSN.properties
• Report DSN FCUBSInstaller.bat /s RP <INSTALLER>/config/ silentUserCreation_ReportsDSN.properties
2-3
• FC Messaging FCUBSInstaller.bat /s FM <INSTALLER>/config/ silentConfigBuildFCM.properties
• Payment Scheduler FCUBSInstaller.bat /s PS <INSTALLER>/config/ silentConfigBuildPGPS.properties
• Payment Gateway FCUBSInstaller.bat /s PG <INSTALLER>/config/ silentConfigBuildPGPS.properties
• ELCM FCUBSInstaller.bat /s AB <INSTALLER>/config/ silentELCMConfigBuild.properties
• Weblogic Deployment FCUBSInstaller.bat /s AD <INSTALLER>/config/ silentAppDeployment.properties
• WAS Deployment FCUBSInstaller.bat /s AD <INSTALLER>/config/ silentWASDeployment.properties
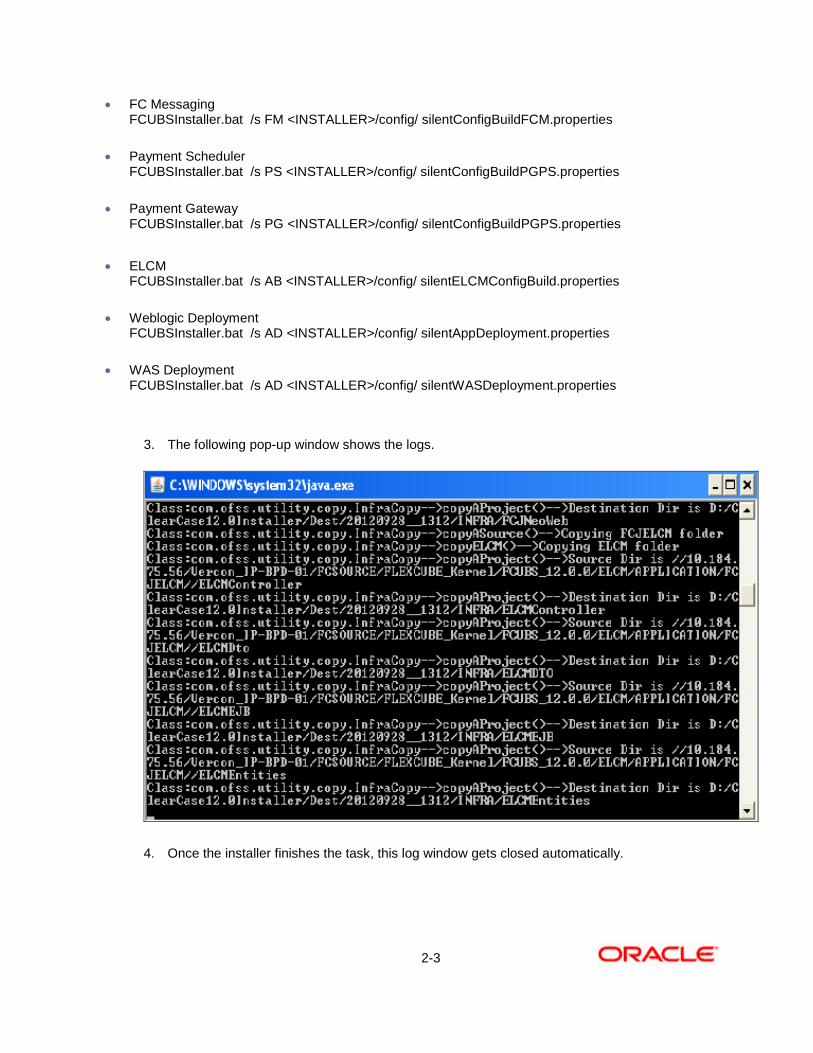
3. The following pop-up window shows the logs.
4. Once the installer finishes the task, this log window gets closed automatically.
2-4
2.1.2 Running Installer in Silent Mode in Linux
You can run Oracle FLEXCUBE UBS Installer in silent mode using the following command:
The command should be given in a single line.
• EAR Build (FCUBS,Gateway) sh FCUBSInstaller.sh /s AB <INSTALLER>/config/ silentConfigBuild.properties
• Data Base Installation sh FCUBSInstaller.sh /s DB <INSTALLER>/config/ silentConfigDatabase.properties
• User Creation sh FCUBSInstaller.sh /s UC <INSTALLER>/config/silentUserCreation_ReportsDSN.properties
• Report DSN sh FCUBSInstaller.sh /s RP <INSTALLER>/config/ silentUserCreation_ReportsDSN.properties
• FC Messaging sh FCUBSInstaller.sh /s FM <INSTALLER>/config/ silentConfigBuildFCM.properties
• Payment Scheduler sh FCUBSInstaller.sh /s PS <INSTALLER>/config/ silentConfigBuildPGPS.properties
• Payment Gateway sh FCUBSInstaller.sh /s PG <INSTALLER>/config/ silentConfigBuildPGPS.properties
• ELCM sh FCUBSInstaller.sh /s AB <INSTALLER>/config/ silentELCMConfigBuild.properties
• Weblogic Deployment sh FCUBSInstaller.sh /s AD <INSTALLER>/config/ silentAppDeployment.properties
• WAS Deployment sh FCUBSInstaller.sh /s AD <INSTALLER>/config/ silentWASDeployment.properties
Use the exact folder location instead of ‘<INSTALLER>’ in the command.
Setting up Installer [October] [2015] Version 12.1.0.0.0 Oracle Financial Services Software Limited Oracle Park Off Western Express Highway Goregaon (East) Mumbai, Maharashtra 400 063 India Worldwide Inquiries: Phone: +91 22 6718 3000 Fax:+91 22 6718 3001 www.oracle.com/financialservices/ Copyright © [2007], [2015], Oracle and/or its affiliates. All rights reserved. Oracle and Java are registered trademarks of Oracle and/or its affiliates. Other names may be trademarks of their respective owners. U.S. GOVERNMENT END USERS: Oracle programs, including any operating system, integrated software, any programs installed on the hardware, and/or documentation, delivered to U.S. Government end users are "commercial computer software" pursuant to the applicable Federal Acquisition Regulation and agency-specific supplemental regulations. As such, use, duplication, disclosure, modification, and adaptation of the programs, including any operating system, integrated software, any programs installed on the hardware, and/or documentation, shall be subject to license terms and license restrictions applicable to the programs. No other rights are granted to the U.S. Government. This software or hardware is developed for general use in a variety of information management applications. It is not developed or intended for use in any inherently dangerous applications, including applications that may create a risk of personal injury. If you use this software or hardware in dangerous applications, then you shall be responsible to take all appropriate failsafe, backup, redundancy, and other measures to ensure its safe use. Oracle Corporation and its affiliates disclaim any liability for any damages caused by use of this software or hardware in dangerous applications. This software and related documentation are provided under a license agreement containing restrictions on use and disclosure and are protected by intellectual property laws. Except as expressly permitted in your license agreement or allowed by law, you may not use, copy, reproduce, translate, broadcast, modify, license, transmit, distribute, exhibit, perform, publish or display any part, in any form, or by any means. Reverse engineering, disassembly, or decompilation of this software, unless required by law for interoperability, is prohibited. The information contained herein is subject to change without notice and is not warranted to be error-free. If you find any errors, please report them to us in writing. This software or hardware and documentation may provide access to or information on content, products and services from third parties. Oracle Corporation and its affiliates are not responsible for and expressly disclaim all warranties of any kind with respect to third-party content, products, and services. Oracle Corporation and its affiliates will not be responsible for any loss, costs, or damages incurred due to your access to or use of third-party content, products, or services.

![Oracle FLEXCUBE Process Flow Guide Oracle FLEXCUBE ... … · Oracle FLEXCUBE Process Flow Guide . Oracle FLEXCUBE Investor Servicing . Release 12.1.0.0.0 [October] [2015]](https://static.fdocuments.in/doc/165x107/5edb3fe7ad6a402d66655cdd/oracle-flexcube-process-flow-guide-oracle-flexcube-oracle-flexcube-process.jpg)


![Oracle FLEXCUBE Process Flow Guide Oracle FLEXCUBE Universal Banking ... · Oracle FLEXCUBE Process Flow Guide Oracle FLEXCUBE Universal Banking Release 12.4.0.0.0 [May] [2017] 1-1](https://static.fdocuments.in/doc/165x107/5bb9760609d3f2d4678b7cf2/oracle-flexcube-process-flow-guide-oracle-flexcube-universal-banking-oracle.jpg)
![Implementation Oracle FLEXCUBE Universal BankingImplementation . Oracle FLEXCUBE Universal Banking . Release 12.0 [May] [2012] Oracle Part Number E51465-01](https://static.fdocuments.in/doc/165x107/5f796a8ba97cd033cd1c743e/implementation-oracle-flexcube-universal-banking-implementation-oracle-flexcube.jpg)


![Installer Property File Creation Oracle FLEXCUBE … Property File Creation Oracle FLEXCUBE Installer Release 12.3.0.0.0 [November] [2016] Table of Contents 1. CREATING PROPERTY FILE](https://static.fdocuments.in/doc/165x107/5aa63d467f8b9a185d8e5b70/installer-property-file-creation-oracle-flexcube-property-file-creation-oracle.jpg)