Setting up Hyper-V 2012 Replication on Workgroup...
28
Setting up Hyper-V 2012 Replication on Workgroup Servers A Guide Ron Palmer Arizona Geological Survey OPEN-FILE REPORT OFR-14-04 March 2014 Arizona Geological Survey www.azgs.az.gov | repository.azgs.az.gov
Transcript of Setting up Hyper-V 2012 Replication on Workgroup...

Setting up Hyper-V 2012 Replication on Workgroup Servers
A Guide
Ron Palmer Arizona Geological Survey
OPEN-FILE REPORT OFR-14-04 March 2014
Arizona Geological Survey www.azgs.az.gov | repository.azgs.az.gov

Arizona Geological Survey
M. Lee Allison, State Geologist and Director
Manuscript approved for publication in March 2014Printed by the Arizona Geological Survey
All rights reserved
For an electronic copy of this publication: www.repository.azgs.az.govPrinted copies are on sale at the Arizona Experience Store
416 W. Congress, Tucson, AZ 85701 (520.770.3500)
For information on the mission, objectives or geologic products of the Arizona Geological Survey visit www.azgs.az.gov.
Disclaimer: “This report was prepared as an account of work sponsored by an agency of the United States Government. Neither the United States Government nor any agency thereof, nor any of their employees, makes any warranty, express or implied, or assumes any legal liability or responsibility for the accuracy, completeness, or usefulness of any information, apparatus, product, or process disclosed, or represents that its use would not infringe privately owned rights. Reference herein to any specific commercial product, process, or service by trade name, trademark, manufacturer, or otherwise does not necessarily constitute or imply its endorsement, recommendation, or favoring by the United States Government or any agency thereof. The views and opinions of authors expressed herein do not necessarily state or reflect those of the United States Government or any agency thereof.”
___________________________
Recommended Citation: Palmer, R., 2014, Setting up Hyper-V 2012 Replication on Workgroup Servers: A Guide. Arizona Geological Survey Open File Report, OFR-14-04, 27 p.
Acknowledgments: This research was supported primarily by the U.S. Department of Energy’s Geothermal Technologies Program an Office of Energy Efficiency & Renewable Energy program, under Award No. DE-E0002850.

Page 1 of 26
Setting up Hyper-V 2012 Replication on Workgroup Servers: A Guide
Ron Palmer
Introduction Hyper-V is a virtualization solution from Microsoft designed to create and operate virtual machines. Hyper-V replication is a feature of Hyper-V
that provides the ability to make a copy of a virtual machine at a different geographic location for disaster recovery purposes. In 2013, we
installed Hyper-V 2012 on an Arizona Geological Survey server to support regional nodes of the National Geothermal Data System (NGDS),
including: Arizona Geological Survey, Nevada Bureau of Mines and Geology, Kentucky Geological Survey, Illinois State Geological Survey, and the
State Geological Survey hub.
In September 2013, the NGDS virtual server at the Nevada Bureau of Mines and Geology (NBMG) failed catastrophically with a loss of 200
gigabytes of data. Fortunately, Hyper-V replication was engaged and the server mirrored, insuring that all NBMG data survived. We used the
Hyper-V mirror to restore 100% of the data, thereby avoiding a catastrophic loss of data that would have taken 100s of hours to reconstitute.
This document provides instructions regarding the use of the Hyper-V 2012 replication feature to replicate virtual servers running on Hyper-V
2012. This process makes it easy to back up entire servers and their contents. Hyper-V is a Windows Server Role that can be installed on
Windows Server 2012 platforms.
Prerequisites 1. A minimum of two Windows Server 2012 Hyper-V host servers:
a. One host server will act as the primary server, of which copies will be made;
b. Another host server will act as a replica server used to receive replica copies of virtual machines from the primary host server.
Installation and Setup Step 1) Set up a Windows Server 2012 instance in a workgroup; do not join the server to a domain.
Step 2) To install the Windows 2012 Hyper-V role on a Windows Server 2012 host server, open the Windows Server 2012 Server Manager.

Page 2 of 26
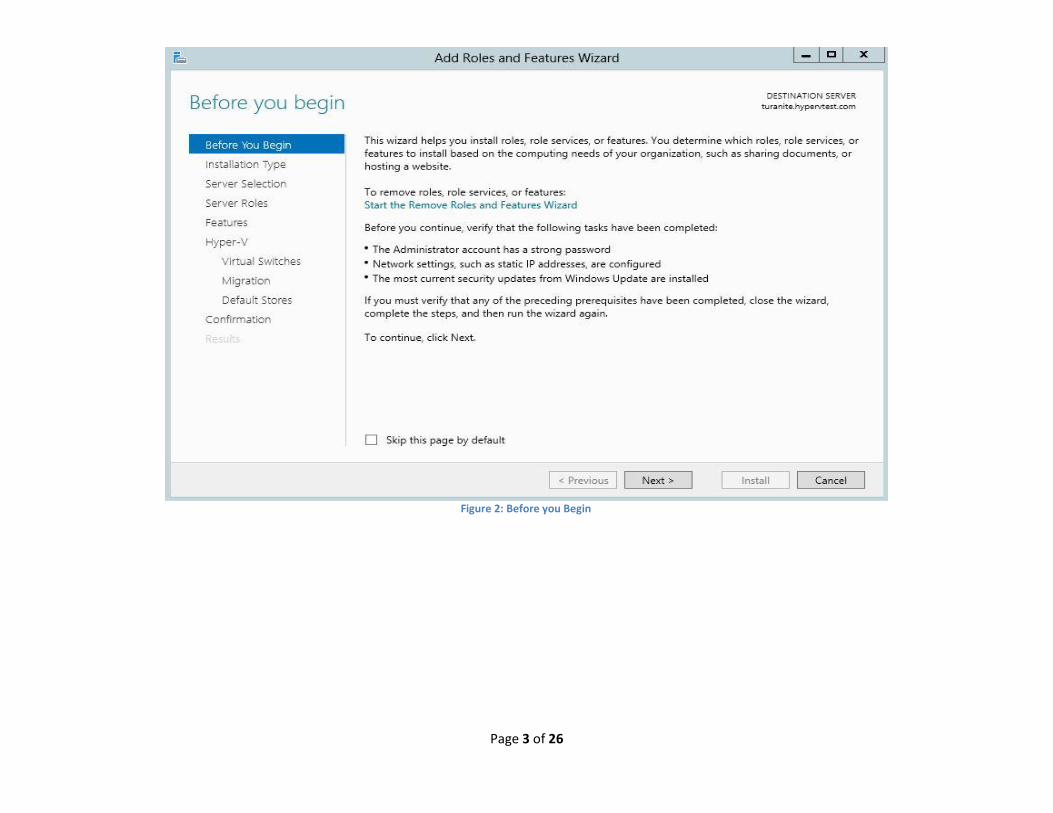
Step 3) Select Local Server (Figure 1); click Manage, then select Add Roles and Features; this will open the Before you Begin page of the Add
Roles and Features wizard (Figure 2). Click Next to continue.
Figure 1: The Local Server window
Page 3 of 26
Figure 2: Before you Begin

Page 4 of 26
Step 4) On the Installation Type page of the Add Roles and Features Wizard (Figure 3), click the Role-based or feature-based installation radio
button; click Next to continue.
Figure 3: The Installation Type page of the Add Roles and Features Wizard

Page 5 of 26
Step 5) On the Server Selection page of the Add Roles and Features Wizard (Figure 4), select the destination server to which you wish to install
Hyper-V and click Next to continue.
Figure 4: Server Selection

Page 6 of 26
Step 6) On the Server Roles page of the Add Roles and Features Wizard (Figure 5), select the Hyper-V server role and click Next to continue.
Figure 5: Server Roles

Page 7 of 26
Step 7) On the Features page of the Add Roles and Features Wizard (Figure 6), select any desired features to be installed; note that for the
purposes of this tutorial, the default features are sufficient. When finished, click Next to continue.
Figure 6: Features

Page 8 of 26
Step 8) On the Hyper-V page of the Add Roles and Features Wizard (Figure 7), peruse information about Hyper-V; when you are finished, click
Next to continue.
Figure 7: Information about Hyper-V

Page 9 of 26
Step 9) In the Virtual Switches page of the Add Roles and Features wizard (Figure 8), create a virtual switch for your Hyper-V installation by
clicking the checkbox that corresponds with the network adaptor you wish to emulate. When you have made your selection, click Next to
continue.
Figure 8: Virtual Switches

Page 10 of 26
Step 10) On the Migration page of the Add Roles and Features Wizard (Figure 9), do not check the box enabling your Hyper-V installation to be
able to send and receive live migrations of virtualized machines. Click Next to continue.
Figure 9: Virtual Machine Migration

Page 11 of 26
Step 11) On the Default Stores page of the Add Roles and Features Wizard (Figure 10), click Browse to navigate to the location on which you
wish to store virtualized hard disks and configuration files. Click Next to continue.
Figure 10: Default Stores

Page 12 of 26
Step 12) On the Confirmation page of the Add Roles and Features wizard (Figure 11), review the roles, role services, and features you wish to
install; when you are finished, click Install to begin the installation process.
Step 13) After the installation is complete, restart the server on which the Hyper-V role has been installed.
Step 14) After the server has restarted, access the Control Panel. Open Administrative Tools and right-click Hyper-V Manager; in the context
menu that appears, select Send to Desktop to create a desktop shortcut that will simplify access to the Hyper-V Manager.
Figure 11: Confirmation

Page 13 of 26
Step 15) Provide each Windows Server 2012 instance with a Fully Qualified Domain Name (FQDN)
This step furnishes each Hyper-V host server with a domain name without joining a domain or registering a domain with a domain name server
on the Internet.
1. Open the hosts file1 on each Hyper-V host server:
a. Locate the hosts file;
b. Right-click the hosts file; in the context menu that appears, click Open;
c. In the Open with window that appears, select Notepad (or an equivalent text editor) and click OK.
2. In each hosts file, map each IP address on the network to the appropriate domain name by appending entries2 to the hosts file. For
example:
192.168.25.108 turanite.hypervtest.com
192.168.25.100 scottyite.hypervtest.com
3. Append the primary and replica server IP addresses; map them to FQDNs of your choice.
4. Save your edits.
5. Remove any file extensions appended by the act of saving the hosts file3.
1 The hosts file is typically found at the following location:
C:\Windows\System32\drivers\etc 2 Entries should not be commented out (there should be no # signs in front of them) and should use the following syntax:
NNN.NNN.NNN.NNN hostname.domainname.com 3 Note: The act of editing the hosts file using a text editor can be problematic because saving your edits will prompt the text editor to assign a file extension to the hosts file; but the hosts file should not have a file extension; consequently, if you plan to edit the hosts file using a text editor, you will need to remove any file extensions assigned to the hosts file after editing it. To do so:
1. In the Windows Explorer menu bar, click Tools > Folder options… 2. In the Folder Options window, click the View tab 3. In the View tab, uncheck the Hide extensions for known file types checkbox and click OK 4. Rename the hosts file; delete the file extension (such as “.txt”) 5. In the Rename dialogue box that appears, click Yes

Page 14 of 26
Step 16) Open the Windows Server 2012 Server Manager and select Local Server (Figure 12); click on the name of the server in the Computer
name field to access the System Properties window (Figure 13).
Figure 12: The Windows Server 2012 Server Manager

Page 15 of 26
Step 17) In the System Properties Window (Figure 13), click Change… to bring up the Computer Name/Domain Changes window (Figure 14).
Here, click More… to bring up the DNS Suffix and NetBIOS Computer Name window (Figure 15).
Figure 13: The System Properties window
Figure 14: The Computer Name/ Domain Changes window

Page 16 of 26
Step 18) In the DNS Suffix and NetBIOS Computer Name window (Figure 15), enter the domain name you established in Step 15 into the
Primary DNS suffix of this computer field. Click OK on all three preceding windows (Figures 15-13).
Step 19) Restart the server. After the server is restarted, the server name will include the FQDN.
Step 20) Install the Windows SDK for Windows 7 on each server.
1. Download the Windows SDK for Windows 7 ISO (http://www.microsoft.com/en-us/download/details.aspx?id=8442).
2. Install Windows SDK for Windows 7.
Step 21) Create a directory in which you will store certificate files; this directory will be used later in this tutorial.
Step 22) Install SSL certificates for both the primary server and the replica server.
1. Open a command prompt
2. On the taskbar, right-click the icon representing the command prompt you just opened; in the context menu that appears, right-click
Command Prompt; click Run as administrator.
3. In the elevated command prompt you just established, run a series of MS-DOS commands; make the substitutions listed below:
a. Substitutions:
i. Replace primaryhostname with the FQDN of the primary server created in Step 15;
ii. Replace replicahostname with the FQDN of the replica server created in Step 15.
Figure 145: The DNS Suffix and NetBIOS Computer Name window

Page 17 of 26
b. On the replica server, navigate to the directory you created in Step 21 and run the following commands:
makecert -pe -n "CN=ReplicaTestRootCA" -ss root -sr LocalMachine -sky signature -r
"ReplicaTestRootCA.cer"
makecert -pe -n "CN=replicahostname" -ss my -sr LocalMachine -sky exchange -eku
1.3.6.1.5.5.7.3.1,1.3.6.1.5.5.7.3.2 -in "ReplicaTestRootCA" -is root -ir LocalMachine -sp "Microsoft
RSA SChannel Cryptographic Provider" -sy 12 PrimaryTestCert.cer
c. On the primary server, navigate to the directory you created in Step 21 and run the following commands:
makecert -pe -n "CN=PrimaryTestRootCA" -ss root -sr LocalMachine -sky signature -r
"PrimaryTestRootCA.cer"
makecert -pe -n "CN=primaryhostname" -ss my -sr LocalMachine -sky exchange -eku
1.3.6.1.5.5.7.3.1,1.3.6.1.5.5.7.3.2 -in "PrimaryTestRootCA" -is root -ir LocalMachine -sp "Microsoft
RSA SChannel Cryptographic Provider" -sy 12 PrimaryTestCert.cer
4. On both the primary and replica servers, use the Run command to run mmc (the Microsoft Management Console); once in the console,
click File > Add/Remove Snap-in…
a. In the Add or Remove Snap-ins window, select Certificates from the Available Snap-ins list;
b. Click Add >; the Certificates snap-in window will appear;
c. In the Certificates snap-in window, click the Computer account radio button; click Next to continue;
d. In the Select Computer window, make sure the Local computer radio button is clicked; then click Finish;
e. In the Add or Remove Snap-ins window, click OK.
5. In the Microsoft Management Console on the primary server, expose the contents of Certificates (Local Computer), which can be found
under the Console Root directory:
a. Expose the contents of the Personal directory; click the Certificates directory;
b. Right-click ReplicaTestRootCA.cer; in the context menu that appears, mouse over All Tasks >; in the submenu that appears, click
Export…;
c. In the Certificate Export Wizard that appears, click the Yes, Export the private key radio button and click Next;
d. On the next page of the Certificate Export Wizard, click Finish.
6. Copy the PrimaryTestRootCA.cer file and the RecoveryServer.pfx file you just created from the primary server to the directory you
created in Step 21 on the replica server, and run the following command in an elevated command prompt on the replica server:
certutil -addstore -f Root "PrimaryTestRootCA.cer"

Page 18 of 26
7. In the Microsoft Management Console on the replica server, expose the contents of Certificates (Local Computer), which can be found
under the Console Root directory:
a. Expose the contents of the Personal directory;
b. Right-click on the Certificates directory; in the context menu that appears, mouse over All Tasks >; in the submenu that appears,
click Import…;
c. Locate the RecoveryServer.pfx file.
8. Copy the ReplicaTestRootCA.cer file from the replica server to the directory you created on the primary server in Step 21, in an elevated
command prompt, navigate to the directory you created on the primary server in Step 21 and run the following command:
certutil -addstore -f Root "ReplicaTestRootCA.cer"
9. On both the primary and the replica servers, run an elevated command prompt, navigate to the directory you created in Step 21, and
run the following commands:
reg add "HKLM\SOFTWARE\Microsoft\Windows NT\CurrentVersion\Virtualization\FailoverReplication" /v
DisableCertRevocationCheck /d 1 /t REG_DWORD /f
reg add "HKLM\SOFTWARE\Microsoft\Windows NT\CurrentVersion\Virtualization\Replication" /v
DisableCertRevocationCheck /d 1 /t REG_DWORD /f

Page 19 of 26
Step 23) Enable replication on the Primary and Replica servers
1. Open the Hyper-V Manager (Figure 16).
2. In the Hyper-V Manager (Figure 16), right-click the primary server; in the context menu that appears, click Hyper-V Settings…
3. In the Hyper-V Settings window (Figure 17), click Replication Configuration:
a. Click the Enable this computer as a Replica server checkbox;
b. Click the Use certificate-based Authentication (HTTPS) checkbox;
Figure 16: The Hyper-V Manager

Page 20 of 26
c. Click the Select Certificate… button; specify the SSL certificate you installed in Step X;
d. Click Apply; a dialogue box will appear prompting you to open Port 443 in your local fire wall; do so.
4. Repeat Steps 21-2 through 21-3 for each Hyper-V host server that you want to enable replication on.
Figure 17: The Hyper-V Settings window

Page 21 of 26
Step 24). Enable replication
1. In Hyper-V Manager, right-click the virtual machine that you wish to replicate; in the context menu that appears, click Enable
Replication. This will bring up the Enable Replication Wizard.
2. Read the Before You Begin page of the Enable Replication wizard (Figure 18); when you are ready, click Next to continue.
Figure 18: Before You Begin

Page 22 of 26
3. On the Specify Replica Server page of the Enable Replication Wizard (Figure 19), enter the host name and FQDN of the replica server, as
specified in Step 15 and Step 22; click Next to continue.
Figure 19: Specify Replica Server

Page 23 of 26
4. On the Specify Connection Parameters page of the Enable Replication Wizard (Figure 20), click Select Certificate… to locate the SSL
certificate you created in Step 22; click Next to continue.
Figure 20: Specify Connection Parameters

Page 24 of 26
5. On the Choose Replication VHDs page of the Enable Replication Wizard (Figure 21), click the checkboxes indicating the virtual hard disks
(VHDs) you wish to replicate; typically, all VHDs are selected. Click Next to continue.
Figure 21: Choose Replication VHDs

Page 25 of 26
6. On the Configure Recovery History page of the Enable Replication Wizard (Figure 22), specify the recovery points you wish to replicate.
In this example, only the latest recovery point will be replicated, but it is possible to specify the replication of additional recovery points.
Click Next to continue.
Figure 22: Configure Recovery History

Page 26 of 26
7. On the Choose Initial Replication Method page of the Enable Replication Wizard (Figure 23), click the Send initial copy over the
network radio button. If the virtual machine being replicated is very large, you might want to consider using external media to seed the
initial copy.
In addition, specify the date and time at which the initial replication will occur. If you elect to start replication immediately, replication
will begin as soon as this wizard is finished. Click Next to continue.
8. On the Summary page of the Enable Replication Wizard, review your settings and click Finish.
Figure 23: Choose Initial Replication Method