Set up and manage the inventory - Tekla...1Set up and manage the inventory The Inventory module in...
68
Tekla EPM 2019 Set up and manage the inventory April 2019 ©2019 Trimble Solutions Corporation
Transcript of Set up and manage the inventory - Tekla...1Set up and manage the inventory The Inventory module in...

Tekla EPM 2019Set up and manage the inventory
April 2019
©2019 Trimble Solutions Corporation

Contents
1 Set up and manage the inventory............................................... 51.1 Define the default inventory settings............................................................ 6
Define company standard settings for Inventory................................................................ 6Define the countries of origin................................................................................................ 8
1.2 Open the Inventory module.............................................................................9View only particular material dimensions, jobs, or locations in the Inventorydialog box............................................................................................................................... 11Filter information in the Inventory dialog box................................................................... 12Search for items in the Inventory dialog box..................................................................... 13
Search for items by material shape, grade, or size...................................................... 13Search for an item by heat number............................................................................... 14Search for an item by serial number............................................................................. 14
1.3 Open Inventory History..................................................................................141.4 Store document references for inventory....................................................15
Manage document reference categories............................................................................16Add document references to the inventory....................................................................... 18
Add new files.....................................................................................................................18Add a Microsoft Outlook email....................................................................................... 19Add an attachment from a Microsoft Outlook email................................................... 19Search for and add a file already in Document Index................................................. 20Browse for and add a file already in Document Index................................................ 21
Open a document reference................................................................................................ 22Modify a document reference..............................................................................................23Attach a document reference to an email.......................................................................... 23Delete a document reference.............................................................................................. 24
1.5 Manage inventory items................................................................................ 24Add an item to inventory...................................................................................................... 25Copy an inventory item.........................................................................................................31Modify inventory items......................................................................................................... 32
Define serial numbers for an inventory item................................................................32Modify a single inventory item....................................................................................... 33Modify multiple inventory items.................................................................................... 33Modify selected inventory items.................................................................................... 34Modify the shape, grade, dimension, or length of inventory items...........................35Modify the shape, grade, dimensions, or length of the selected inventory items...36
Take material from stock and return material to stock.................................................... 37Take selected materials from stock................................................................................38
Move an item to another inventory location......................................................................39Add inventory items to Order Entry.................................................................................... 40
Reserve items for a customer order.............................................................................. 40Send items to a customer order ....................................................................................40
Delete inventory items..........................................................................................................42Combine inventory items manually.................................................................................... 42
Switch to the manual combine mode............................................................................42Combine materials........................................................................................................... 42
2

Uncombine materials...................................................................................................... 43Switch back to the input mode....................................................................................... 44
1.6 Add, modify, and delete stock quantities to be maintained..................... 44Add a new stock record.........................................................................................................44Modify stock records............................................................................................................. 45Delete stock records..............................................................................................................45Load stock items to a requisition.........................................................................................45Load stock items to a purchase order.................................................................................46
1.7 View inventory details....................................................................................47View heat documents attached to inventory items...........................................................47View the location of barcoded materials............................................................................ 49
View the location of barcoded materials.......................................................................49Delete a location sweep...................................................................................................50Cancel remaining items from a location sweep........................................................... 50Complete the location sweep and move remaining items..........................................50View, print or export reports of an existing location sweep....................................... 50
View the value of inventory materials.................................................................................51View the current material value in inventory or the material value on a specific
date and time....................................................................................................................................52View the material value on a specific date.................................................................... 53View the value from an archive file................................................................................ 53
View the transaction history in the Inventory module......................................................54View the transaction history of an item.........................................................................55Find a transaction by transaction number.................................................................... 55Create transaction history reports................................................................................. 55View all changes in the transaction history...................................................................56
View and print TFS reports................................................................................................... 57View, print, and export inventory reports...........................................................................58
View inventory reports.....................................................................................................59Print inventory reports.................................................................................................... 59Export inventory reports................................................................................................. 59
1.8 Import and export inventory information...................................................60Export inventory information to the KSTK format.............................................................60Export inventory transactions to Timberline......................................................................60Synchronize inventory information with ProNest............................................................. 61Export inventory information to XML..................................................................................61Archive jobs............................................................................................................................ 62Import inventory information from an HTML file..............................................................62Import ProNest cut lists to Tekla EPM................................................................................. 63
3

4

1 Set up and manage theinventory
The Inventory module in Tekla EPM consists of two separate parts: inventoryand inventory history. In Inventory, you can take items from stock, returnthem to stock, reserve items for a customer order, and so on. In InventoryHistory, you can view the entire history of items in the inventory.
Any item in Tekla EPM becomes an inventory item when it is loaded into apurchase order. Note that you cannot modify the properties of these types ofitems as long as the items have not yet been received.
For more information, see the following links:
Define the default inventory settings (page 6)
Open the Inventory module (page 9)
Open Inventory History (page 14)
Add an item to inventory (page 24)
Copy an inventory item (page 31)
Modify inventory items (page 32)
Take material from stock and return material to stock (page 36)
Move an item to another inventory location (page 39)
Delete inventory items (page 41)
Add, modify, and delete stock quantities to be maintained (page 44)
Store document references for inventory (page 15)
Add inventory items to Order Entry (page 39)
Combine inventory items manually (page 42)
View inventory details (page 47)
Import and export inventory information (page 60)
Set up and manage the inventory 5

1.1 Define the default inventory settingsBefore you start using the Inventory module for making orders, takingmaterial from stock, and so on, we recommend that you define defaultsettings for the Inventory module. Define the company standard settings andthe countries of origin, adjust the visible input and display fields of bothInventory and Inventory History, and customize the drop-down menucommands in the Inventory module.
For more information, see the following links:
Define company standard settings for Inventory (page 6)
Define the countries of origin (page 8)
Define company standard settings for InventoryIn the Inventory Company Standards dialog box, define the default settingsfor the Inventory module.
1. Click the Maintenance ribbon tab.
2. In the menu, select Inventory --> Company Standards .
3. In the Inventory Company Standards dialog box, set the followingproperties according to your needs:
Option DescriptionAuto-Calc Part # When selected, Tekla EPM automatically enters a
part number for each item when new material isreceived. When cleared, you need to enter the partnumber manually.
Part # Format The part number format.
To change the part number format, click the arrowon the right side of the Part # Format field, andselect an option in the list.
The options are:
• [PO#]-[Item#]-[Receive Count]-[RTS Count]:
The part number consists of the purchase ordernumber, purchase order item number, receivecount, and return to stock count.
Note that the receive count number does notrefer to the quantity received, but theoccurrence of receiving the material. The
Set up and manage the inventory 6 Define the default inventory settings

Option Descriptionreturned to stock count number indicates howmany times the material has been cut.
For example, if the purchase order number was123, the item number 50, quantity 5, and 2 arereceived, the part number would be 123-50-1-0.When the remaining 3 pieces were received, thepart number would be 123-50-2-0. If the lengthof the material was 40’-0 and you took 25’-0 andreturned 15’-0 to inventory, the part numberwould be 123-50-1-1.
• Sequential, Increments each receipt:
The part numbering starts from 00001, andeach time an item is received on a purchaseorder, the item is assigned an incremented partnumber (for example, 00002).
• Sequential, Increments each receipt, withRTS count:
The part number consists of a sequentialnumber and the returned to stock count.
The part numbering starts from 00001, andeach time an item is received on a purchaseorder, the item is assigned an incremented partnumber (for example, 00002). The returned tostock count indicates how many times thematerial has been cut.
An example part number could be 00003-1.Inventory History -Default number ofdays to view (0 for all)
Allows you to set a filter that defines the number ofdays that items remain visible in the InventoryHistory dialog box.
Note that you can clear the filter in the InventoryHistory dialog box to display all items in theinventory history again.
Enter a number in the field. To always display allitems in the Inventory History dialog box, enter 0.
Transaction History -New Method
When selected, the Transaction History opensmore quickly.
We recommend that you do not clear theTransaction History - New Method check box.
4. To adjust the units used in the Inventory module, click Input/DisplayUnits.
Set up and manage the inventory 7 Define the default inventory settings

5. In the Input/Display Units dialog box, click the arrows on the right side ofthe fields to select the units and the length input type.
Note that there are multiple options depending on the required precisionand the desired input method.
6. Click OK.
7. At the bottom of the Inventory Company Standards dialog box, clickSave.
The default settings of the Inventory module are updated.
Define the countries of originIn the Countries dialog box, you can add new countries of origin for items inthe inventory. If necessary, modify or delete any existing countries to matchthe countries used by your company.
1. Click the Maintenance ribbon tab.
2. In the menu, select Inventory --> Countries of Origin .
3. In the Countries dialog box, do any of the following according to yourneeds:
To Do thisAdd a new country a. Click New.
b. Type the country and an abbreviation for it.
Only the abbreviation will be shown when youset a country of origin for an item in theInventory dialog box.
c. Click Add.
The new country is now available in the Inventorydialog box.
Modify an existingcountry
a. Select the country that you want to modify.
b. Modify the country and its abbreviation.
c. Click Edit to save the changes.Delete a country a. Select the country that you want to delete.
b. Click Delete.
c. In the confirmation dialog box, click Yes topermanently delete country.
4. To close the dialog box, click the Close button (X) in the upper-rightcorner.
Set up and manage the inventory 8 Define the default inventory settings

1.2 Open the Inventory moduleTo access the Inventory module, do the following:
• In the Tekla EPM dialog box, click the Inventory icon.
The Inventory dialog box opens. See the elements of the dialog box in thefollowing image:
(1) The summary grid shows the quantities, weights, and valuations of items instock and on order.
(2) The navigation trees on the left to select which items you want to view. Theupper navigation tree allows you to only view selected shapes, whereas thelower navigation tree allows you to only view items in a selected job orinventory location.
You can click + to expand the list. Then, click the items that you want to view inthe display area.
For detailed instructions, see View only particular material dimensions, jobs, orlocations in the Inventory dialog box (page 11).
(3) The display area lists all material items in the inventory.
(4) The leftmost unnamed column shows the statuses of different materialitems. The status indicators consist of the following abbreviations:
• PO: Items are on a purchase order
Set up and manage the inventory 9 Open the Inventory module

• O: Items are on order (not yet received)
• R: Items are reserved for a job
• C: Items have been combined
For example, items labeled PO-O-R-C have been combined and are on apurchase order, have been reserved for a job, and have not yet been received.
Items without any status indicator in this column are open stock items andwere entered manually.
(5) Zero quantity items are placeholders for items that have been received ona purchase order, but have not been finalized yet. Zero quantity items cannotbe modified in the inventory, and the combining details table below the inputarea does not display any information about whether items are properlylinked to production control jobs.
Using zero quantity items in the inventory allows Tekla EPM to properly modifythe base pricing if the pricing in the purchase order is modified after thematerials have been received and split into different line items.
You can hide the zero quantity items by creating and saving a filter thatexcludes these items. This way, you will not mistake them for additionalmaterial items in the inventory. For more information, see Filter information inthe Inventory dialog box (page 12).
(6) The input area allows you to add information for existing or new items. Italso displays the properties of an item selected in the display area.
Note that properties of items that are on a purchase order or that areplaceholders with zero quantity cannot be modified, so the input fieldsbecome inactive if you select them in the display area.
You can modify the available fields in the Edit Input Fields dialog box.
(7) The combining details table shows the parts to be cut from the itemselected in the display area.
Note that under the combining details table, you can see if the items that arecombined to the selected inventory item are properly linked to a productioncontrol job.
See also
View only particular material dimensions, jobs, or locations in the Inventorydialog box (page 11)
Filter information in the Inventory dialog box (page 12)
Search for items in the Inventory dialog box (page 13)
Add an item to inventory (page 24)
Modify inventory items (page 32)
Take material from stock and return material to stock (page 36)
Delete inventory items (page 41)
Set up and manage the inventory 10 Open the Inventory module

View only particular material dimensions, jobs, or locationsin the Inventory dialog boxUse the navigation trees on the left side of the Inventory dialog box to onlyview particular material dimensions, items reserved for specific jobs, anditems in specific inventory locations.
• In the Inventory dialog box, do any of the following:
To Do thisView items of theselected shape, grade,and material dimension
1. In the upper navigation tree, click + to show allshapes in the estimating job.
2. In the upper navigation tree, click a shapeindicator.
3. Optionally, select a material grade anddimension as well.
Only items of the selected shape, grade, andmaterial dimension are shown in the display area.
View items of all shapes • Click All Items at the top of the uppernavigation tree.
View items reserved fora particular job
1. In the lower navigation tree, click + to show alljobs.
2. Click to select a job number.
Only items reserved for that job number are shownin the display area.
View all open stockitems
1. In the lower navigation tree, click + on the leftside of All Jobs to show all jobs.
2. Click the blank branch directly under All Jobs.
Only items that are not received for any job areshown in the display area.
View items in all jobs • In the lower navigation tree, click All Jobs.View items in a specificinventory location
1. In the lower navigation tree, click + on the leftside of All Locations to show all jobs.
2. Click the location.
Only items in that inventory location are shown inthe display area.
View items withoutinventory location
1. In the lower navigation tree, click + on the leftside of All Locations to show all jobs.
Set up and manage the inventory 11 Open the Inventory module

To Do this2. Click the blank branch directly under All
Locations.
Only items that have not been assigned aninventory location are shown in the display area.
View items in alllocations
• In the lower navigation tree, click All Locations.
The current selections in the navigation trees are shown above the navigationtrees.
Note that the navigation trees also work together, so that you can also limitthe displayed information also by selecting items in both navigation trees. Forexample, you can view items of a specific dimension in a specific job orinventory location.
See also
Filter information in the Inventory dialog box (page 12)
Search for items in the Inventory dialog box (page 13)
Filter information in the Inventory dialog boxUse the Filter command to only show the desired items in the Inventorydialog box. Filters can be handy for viewing specific inventory materials. Youcan reset the applied filters at any time by clicking Clear Filters at the upper-left corner of the dialog box, so that all items are displayed again.
Note that using filters only affects the way you see the Inventory dialog box,so you cannot accidentally change other users' settings.
1. In the Inventory dialog box, click the Inventory ribbon tab.
2. In the menu, select Filter.
The Inventory Filters dialog box opens.
3. To filter the displayed items according to selected criteria, select a filtertype in the Type list, and click Select.
For some filter types, such as location, reference number, or heat number,you can also click Find and type the desired value in the blank field to useit. This way, you do not have to scroll through all the available items.
4. In the Filter dialog box, do one of the following depending on the filtertype:
• Click the arrow buttons to move the items that you want to display tothe Included list..
• Type the maximum and minimum values for the items that you wantto display.
Set up and manage the inventory 12 Open the Inventory module

5.
6. Click OK.
If you want to further filter the information displayed in the Inventorydialog box, repeat steps 3 to 5 for different items.
If you want to clear all filter settings, click Reset.
7. To save commonly used filters, do the following:
a. Click Filter Types in the lower-left corner.
b. Click New.
c. Type a description for the filter type.
d. Create the filter settings.
For more information, see steps 3 to 5.
e. Click Add.
f. To close the dialog box, click the Close button (X) in the upper-rightcorner.
The newly created filter type is selected in the Filter Types list.
g. To apply the filter type, click Set.
8. According to your needs, do one of the following:
• To use the filter, click Apply Filter.
• To use the filter in the job and save it until a new filter is set or the filteris cleared, click Apply Filter & Save.
Note that the filter will remain in use even if you close and re-open thejob. After you clear the filters, the filter settings cannot be used again.
The Filters dialog box closes, and the Inventory dialog box is filteredaccording to the settings you made.
To display all information in the Inventory dialog box again, click Clear Filtersin the upper-left corner.
Search for items in the Inventory dialog boxUse the different Find commands in the Inventory dialog box to quickly findthe needed material items. You can search for items by material shape, grade,or size, heat number, or serial number.
Search for items by material shape, grade, or size1. At the top of the Inventory dialog box, click Find Shape/Grade/Size, or
press Ctrl+F5.
Set up and manage the inventory 13 Open the Inventory module

2. Select the material shape, and optionally grade and dimensions in theappropriate lists.
You can also type the shape, grade, and dimensions in the appropriatefields.
3. Do any of the following:
• To find items with the selected material shape, click Find Shape.
• To find items with the selected material shape and grade, click FindGrade.
• To find items with the selected material shape and dimensions, clickFind Size.
Only items that match your search are displayed in the Inventory dialog box.The selected material shape, grade, and dimensions are shown above thenavigation trees on the left side of the dialog box.
To view all items again, click All Items in the upper navigation tree.
Search for an item by heat number1. At the top of the Inventory dialog box, click Find Heat #.
2. Select the heat number in the list, or type it in the field.
3. Click Find Heat #.
The item with the selected heat number is selected the Inventory dialog box.
Search for an item by serial number1. At the top of the Inventory dialog box, click Find Serial #.
2. Select the serial number in the list, or type it in the field.
3. Click Find Serial #.
The item with the selected serial number is selected the Inventory dialog box.
1.3 Open Inventory HistoryIn the Inventory History dialog box, you can view all material that has beentaken from stock for a job.
1. While in the Inventory dialog box, click the Inventory ribbon tab.
2. In the menu, select Inventory History.
TIP If you hold down Shift when selecting the Inventory Historycommand, the Inventory History opens in a new dialog box. This
Set up and manage the inventory 14 Open Inventory History

way, you can view the inventory and the inventory history at thesame time.
The Inventory History dialog box opens.
TIP Use the navigation trees on the left of the dialog box to filter which itemsare visible. For example, to only show items in a specific job, click a jobnumber in the lower navigation tree.
To return to the Inventory dialog box, do the following:
1. Click the Inventory ribbon tab.
2. In the menu, select Inventory.
1.4 Store document references for inventoryDocument Index is where you can store documents for reference. When youstore documents in Document Index, each user that has access to inventorycan view them, so it is easy to keep up-to-date. You can save all heat
Set up and manage the inventory 15 Store document references for inventory

documents, as well as Microsoft Outlook emails and their attachments, inDocument Index.
To access Document Index in the Inventory module, do the following:
1. In the Inventory dialog box, click the Inventory ribbon tab.
2. In the menu, select Document Index.
The Document Index - By Category dialog box opens. Next, you can eithermodify the available folders for document references, or add, modify, delete,open, and email document reference files.
See also
Manage document reference categories (page 16)
Add document references to the inventory (page 17)
Open a document reference (page 22)
Modify a document reference (page 22)
Attach a document reference to an email (page 23)
Delete a document reference (page 24)
Manage document reference categoriesUse the Edit Categories command in Document Index to manage thecategories that you can use to organize document references. You can addnew categories, rename categories, and delete unnecessary categories. Youcan also change the default folder where document references are saved.
1. At the bottom of the Document Index - By Category dialog box, click EditCategories.
2. In the Document Index - Edit Categories dialog box, do any of thefollowing:
To Do thisAdd a new category a. In the navigation tree at the top of the dialog
box, select the parent category for the newcategory.
b. Click Add.
c. Type a name for the new category.
For example, Miscellaneous documents.
d. Click OK.
The new category is added to the list.
Set up and manage the inventory 16 Store document references for inventory

To Do thisRename a category a. In the navigation tree at the top of the dialog
box, select the category that you want torename.
b. Type a new name for the category.
c. Click OK.
The category name is updated.Delete a category a. In the navigation tree at the top of the dialog
box, select the category that you want todelete.
b. Click Delete.
Note that you cannot delete a category thathas sub-categories.
c. To permanently delete the category, click Yesin the confirmation dialog box.
Change the defaultfolder where documentsare saved
When documents are added in Document Index,the selected document can be either moved orcopied to the selected folder. This way, Tekla EPMretains all documents that have been saved toDocument Index, even if the original documentsare moved or deleted.
The default folder for saving documents needs tobe in the Tekla EPM default folders, so that allusers can view the attached documents. Filessaved elsewhere than the default location cannotbe viewed by other Tekla EPM users.
a. Click Default Dir.
b. Do one of the following:
• Select the folder that you want to use asthe default folder.
• Click Make New Folder to add a newfolder under the currently selected one,and click it to use it as the default folder.
c. Click OK.
3. To close the dialog box, click the Close button (X) in the upper-rightcorner.
Set up and manage the inventory 17 Store document references for inventory

Add document references to the inventoryYou can either upload completely new document references, such as files,emails, and email attachments to Document Index, or add files that arealready loaded to Document Index to the list of inventory documentreferences.
Add new files1. In the navigation tree of the Document Index - By Category dialog box,
select the category where you want to save the document.
2. Click Add Document Reference.
3. In the Document Index - Add Document Reference dialog box, click AddFile.
4. In the Open dialog box, browse to find the document that you want toadd, and select the document.
5. Click Open.
If you want to add more documents with the same settings, click AddAdditional File and repeat steps 4 to 6 for each document.
6. In the Add File dialog box, select the company and contact that providedyou with the document in the File Source lists.
You can also drag and drop files to the Add File dialog box.
7. According to your needs, do one of the following:
• To compress multiple documents into one archive, select theCompress Files into a Single Archive option.
• To leave the documents that you added uncompressed, select theLeave Files Uncompressed option.
8. According to your needs, do one of the following:
• To move the original document to the selected folder, select the MoveFile option.
• To copy the document to the selected folder but leave the originaluntouched, select the Copy File (Leave Original) option.
9. Type a description for the attached document.
10. Click Add File.
11. For heat documents, select the supplier, purchase order number, andheat number in the available lists, or type new values in the fields.
If you are adding a heat document for an item, note that the heat numberof the document reference must match the heat number of the item,entered in the Inventory dialog box.
Set up and manage the inventory 18 Store document references for inventory

12. Type a description for the entire document reference.
This description applies to all documents, emails, and email attachmentsthat you add.
13. When you have added all necessary documents, emails and emailattachments, click Add Document Reference.
The Document Index - Add Document Reference closes, and the documentsare added to Document Index. You can see all added documents in the list inthe Document Index - By Category dialog box.
Add a Microsoft Outlook email1. In Microsoft Outlook, select the email that you want to add.
2. In the navigation tree of the Document Index - By Category dialog box,select the category where you want to save the email.
3. Click Add Document Reference.
4. In the Document Index - Add Document Reference dialog box, click AddOutlook Email.
A copy of the email is added to Document Index.
The text of the email is added to the Description field.
5. Click Add File.
6. Type a description for the entire document reference.
This description applies to all documents, emails, and email attachmentsthat you add.
7. When you have added all necessary documents, emails and emailattachments, click Add Document Reference.
The Document Index - Add Document Reference closes, and the emails areadded to Document Index.
Add an attachment from a Microsoft Outlook email1. In Microsoft Outlook, select the email with the attachment that you want
to add.
2. In the navigation tree of the Document Index - By Category dialog box,select the category where you want to save the attachment.
3. Click Add Document Reference.
4. In the Document Index - Add Document Reference dialog box, click AddOutlook Attachments.
5. Browse to the folder where you want to save the email attachment, andclick the folder to select it.
6. Click Open.
Set up and manage the inventory 19 Store document references for inventory

7. In the Add File dialog box, select the company and contact that providedyou with the document in the File Source lists.
8. According to your needs, do one of the following:
• To compress multiple documents into one archive, select theCompress Files into a Single Archive option.
• To leave the documents that you added uncompressed, select theLeave Files Uncompressed option.
9. Type a description for the email attachment.
10. Click Add File.
11. Select the supplier, purchase order number, and heat number in theavailable lists, or type new values in the fields.
If you are adding a heat document for an item, note that the heat numberof the document reference must match the heat number of the itementered in the Inventory dialog box.
12. Type a description for the entire document reference.
This description applies to all documents, emails, and email attachmentsthat you add.
13. When you have added all necessary documents, emails and emailattachments, click Add Document Reference.
The Document Index - Add Document Reference closes, and the emailattachments are added to Document Index.
Search for and add a file already in Document IndexTo find and add files that already exist in the document index directory to theinventory side of Document Index, use the Search command.
1. In the navigation tree of the Document Index - By Category dialog box,select the category where you want to save the file.
2. Click Add Document Reference.
3. In the Document Index - Add Document Reference dialog box, clickSearch.
4. In the Search dialog box, click Browse and select the folder where youwant to look for documents.
TIP To also search from the sub-folders of the selected folder, select theSub-Directories check box.
5. To narrow the search, do one or more of the following:
• Type the document name, document size, and file name extension.
Set up and manage the inventory 20 Store document references for inventory

• In File Date, select the dates between which the document has beencreated or downloaded onto your computer.
• In Date Loaded, select the dates between which the document hasbeen added to Document Index.
• In the Source lists, select the contact and company that have providedthe document.
6. To include archived documents in the search, select the Include AllArchive Files check box.
7. Click Search.
The search results appear at the top of the Search dialog box.
8. In the search results, double-click the document that you want to add.
9. Select the supplier, purchase order number, and heat number in theavailable lists, or type new values in the fields.
If you are adding a heat document for an item, note that the heat numberof the document reference must match the heat number of the item,entered in the Inventory dialog box.
10. Type a description for the entire document reference.
This description applies to all documents, emails, and email attachmentsthat you add.
11. When you have added all necessary documents, emails and emailattachments, click Add Document Reference.
The file is added to the list of inventory documents in Document Index.
Browse for and add a file already in Document IndexTo browse for and add files that already exist in the document index directoryto the inventory side of Document Index, use the Find By Directorycommand. You can also add new files, delete existing files, rename folders andfiles, move files to other folders, and open files.
1. In the navigation tree of the Document Index - By Category dialog box,select the category where you want to save the file.
2. Click Add Document Reference.
3. In the Document Index - Add Document Reference dialog box, clickFind By Directory.
4. In the navigation tree on the left of the Document Index - By Directorydialog box, select a category.
If you want to rename the selected category, you can click RenameDirectory, type a new name, and click OK.
The documents within the category are listed in the display area of thedialog box.
Set up and manage the inventory 21 Store document references for inventory

5. Select a document.
6. In the lower-right corner, click Select.
Note that besides adding an existing document to the current job, you canalso use the buttons at the bottom of the dialog box to:
• Add new documents (Add File).
• Delete a document (Delete File).
• Move a document to another folder within the document index folder(Move File).
• Rename a document (Rename File).
• Open a document (Open File).
7. Select the supplier, purchase order number, and heat number in theavailable lists, or type new values in the fields.
If you are adding a heat document for an item, note that the heat numberof the document reference must match the heat number of the item,entered in the Inventory dialog box.
8. Type a description for the entire document reference.
This description applies to all documents, emails, and email attachmentsthat you add.
9. When you have added all necessary documents, emails and emailattachments, click Add Document Reference.
The file is added to the list of inventory documents in Document Index.
Open a document referenceUse the Open File command to open and view a document reference.
1. In the Document Index - By Category, select the document that youwant to open.
2. Click Open File.
The selected document opens.
See also
Add document references for estimating jobs (page 0 )
Modify a document reference (page 22)
Attach a document reference to an email (page 23)
Delete a document reference (page 24)
Set up and manage the inventory 22 Store document references for inventory

Modify a document referenceUse the Edit Document Reference command to modify the source anddescription of a document in Document Index.
1. In the Document Index - By Category dialog box, select the documentthat you want to modify.
2. Click Edit Document Reference.
3. In the Document Reference Details dialog box, click Filename.
4. In the File Details dialog box, modify the file source and descriptionaccording to your needs.
5. Click Save.
6. To close the File Details dialog box, click the Close button (X) in theupper-right corner.
7. Modify the description according to your needs.
Entering a description in the Document Reference Details dialog box willoverride the description that you entered in the File Details dialog box.This description will then appear in the Description column in theDocument Index - By Category dialog box.
8. Click Save.
9. To close the Document Reference Details dialog box, click the Closebutton (X) in the upper-right corner.
See also
Add document references for estimating jobs (page 0 )
Open a document reference (page 22)
Delete a document reference (page 24)
Attach a document reference to an emailUse the Email File command to create a new Microsoft Outlook email andsend a document to the desired recipients via email.
1. In the Document Index - By Category dialog box, select the documentthat you want to send via email.
2. Click Email File.
Microsoft Outlook opens. A new email with the selected document iscreated, with the selected document attached to it.
3. Add recipients and modify the text of the email.
4. Send the email.
Set up and manage the inventory 23 Store document references for inventory

See also
Add document references for estimating jobs (page 0 )
Open a document reference (page 22)
Delete a document referenceDeleting a document reference from Document Index is permanent andcannot be undone. If you delete a document reference, you or any other TeklaEPM users will not be able to access the document reference or anydocuments, emails, or attachments that it contains, from Document Index.
1. In the Document Index - By Category dialog box, select the documentreference that you want to delete.
2. Click Delete Document Reference.
3. To permanently delete the document reference, click Yes in theconfirmation dialog box.
See also
Add document references for estimating jobs (page 0 )
Modify a document reference (page 22)
Open a document reference (page 22)
1.5 Manage inventory itemsYou can manage inventory items in multiple ways. After adding the necessaryinventory items, you can copy and modify the items according to your needs.You can also take material from stocks and return the remaining material tostock, reserve or send inventory items to customer orders, combine inventoryitems, or delete unnecessary inventory items.
For more information, see the following links:
Add an item to inventory (page 24)
Copy an inventory item (page 31)
Modify inventory items (page 32)
Take material from stock and return material to stock (page 36)
Add inventory items to Order Entry (page 39)
Combine inventory items manually (page 42)
Delete inventory items (page 41)
Set up and manage the inventory 24 Manage inventory items

Add an item to inventoryTo add new items manually to the inventory, do the following:
1. In the Inventory dialog box, click New.
2. Modify the item properties according to your needs:
The properties marked with an asterisk (*) in the following table aremandatory information.
Option DescriptionOriginal Date * The date on which the item has
originally been added to inventory.
Click the arrow on the right side of theOriginal Date field and select a datein the calendar.
Quantity * The number of pieces to be added.
Use the numeric keypad in thequantity field to add, multiply, divide,or subtract numbers to adjust thequantity.
Shape * The material shape of each piece.
Either click the arrow on the right sideof the Shape field to select the shape,or type the shape indicator in the field(for example, HSS).
Grade The material grade of each piece.
Depending on the shape, the gradecan also be mandatory information.
Either click the arrow on the right sideof the Grade list to select the grade,or type the grade indicator in thefield.
Dimensions The material dimension, or materialsize, of each piece.
Depending on the shape, thedimension can also be mandatoryinformation.
Click the Dimensions field to selectan available material dimension, anddouble-click the desired dimension inthe list.
TIP You can also use a custommaterial dimension. Note that
Set up and manage the inventory 25 Manage inventory items

Option Description
the dimension is notautomatically added to thematerial database.
To use a custom dimension, dothe following:
a. Click in the Dimensionsfield.
b. Click Add Size.
c. Define the dimensionproperties.
d. Click Save.
You can now select thedimension and use it.
Length The length of each piece.
Default length input settings are set inCompany Standards, but you canmodify them for each job.
Base Price The base price of the material item.We recommend that you use baseprices to create more detailedreports.
Type the base price in the Base Pricefield.
To change the base price units andconvert the current price to theselected units, right-click the BasePrice field, and select an appropriateoption in the context menu.
On Order When selected, the material item ison order and has not yet beenreceived. When cleared, the materialitem is marked as received.
Items that are on order are markedwith an O in the leftmost column ofthe Inventory dialog box.
Job No. Any job number. For example, youcan use the Job No. field to reserve
Set up and manage the inventory 26 Manage inventory items

Option Descriptionmaterial for the shop or maintenance,so that it cannot be used elsewhere.
Type any desired information in theJob No. field.
Location The inventory location of the materialitem.
Click the arrow on the right side of theLocation field and select a location inthe list, or type a new location in theLocation field.
Secondary Loc The secondary inventory location ofthe material item.
Click the arrow on the right side of theSecondary Loc field and select alocation in the list, or type a newsecondary location in the SecondaryLoc field.
For example, you can use secondarylocations to represent the inventorysites or the date the location wasverified.
You can also use the Secondary Locfield to provide a temporary locationfor storing some pieces of a materialitem. This way, you can split thequantity of the material item withoutaffecting the location.
Stock Any stock information about the item.
Type any information in the Stockfield.
NOTE Use the Stock/Reordercommand to set stockquantities to be maintained.See Add, modify, and deletestock quantities to bemaintained (page 44).
Reorder Any reordering information about theitem.
Type any information in the Reorderfield.
Set up and manage the inventory 27 Manage inventory items

Option Description
NOTE Use the Stock/Reordercommand to set stockquantities to be maintained.See Add, modify, and deletestock quantities to bemaintained (page 44).
Heat # The heat number of the materialitem.
Type the heat number in the Heat #field.
Note that you need to type a heatnumber for a material item beforeattaching documents to it inDocument Index.
P.O. # The number of the purchase orderthat contains the material item.
Type the purchase order number inthe P.O. # field.
Note that you need to type apurchase order number for a materialitem before attaching documents to itin Document Index.
B/L # The bill of lading number or theshipment number that the materialitem was received on.
Type the number in the B/L # field.Supplier The supplier of the material item.
Either type a supplier in the Supplierfield, or click the arrow on the rightside of the Supplier field and click thesupplier that you want to select.
Note that you need to type a supplierfor a material item before attachingdocuments to it in Document Index.
Date Delivered The date when the material item hasarrived to inventory.
Do one of the following:
Set up and manage the inventory 28 Manage inventory items

Option Description• Type the date in the Date
Delivered field.
The acceptable formats areYYYY/MM/DD, YY/MM/DD,MM/DD/YYYY, and MM/DD/YY.
• Click the arrow on the right side ofthe Date Delivered field andselect the delivery date in thecalendar.
Note that the Date Delivered field isonly available if the On Order checkbox is cleared.
Re Any comments or remarks that youwant to add about the material item.
Type the remarks in the Re field, orclick the arrow on the right side of theRe field and click an existingcomment in the list to use it.
Reference Number A reference number that links itemsin inventory or purchasing to theproduction control job.
The reference number can bedifferent depending on the case:
• If an item is sent from ProductionControl to Purchasing orInventory, Tekla EPM creates acopy of the record, and the item islinked to include the referencenumber.
• If an item is sent to purchasingfrom an advanced bill of material,the system mark number or acombination of the page numberand the item number in thecombining job (for example, 1-30)becomes the reference number.
• If the item is sent to purchasinglater in the process, the referencenumber is the mark or piece marknumber.
However, if the reference numberhas been assigned in theproduction control job, that
Set up and manage the inventory 29 Manage inventory items

Option Descriptionreference number is maintained inthe inventory as well.
We recommend that you do not typeinformation in the ReferenceNumber field when adding items tothe inventory manually.
Serial # The serial number of the materialitem.
To add a serial number, click theSerial # button. For moreinformation, see Define serialnumbers for an inventory item(page 32).
Part Number The part number of the material item.
Type the part number in the PartNumber field.
To adjust part number settings, seeDefine the default inventory settings(page 6).
Lot # The lot identification assigned to thematerial item in Production Control.
We recommend that you do not typeany information in the Lot # fieldwhen you add inventory itemsmanually.
Note that if you type any informationmanually in the Lot # field, theinformation will be overwritten if youcombine or link material fromProduction Control to the inventoryitem.
Sequence The sequence number assigned tothe item in Production Control.
We recommend that you do not typeany information in the Sequence fieldwhen you add inventory itemsmanually.
Note that if you type any informationmanually in the Sequence field, theinformation will be overwritten if youcombine or link material fromProduction Control to the inventoryitem.
Set up and manage the inventory 30 Manage inventory items

Option DescriptionCategory
Sub-Category
Classes used for sorting items,assigned to the item in ProductionControl. Categories and sub-categories can be used for filteringinformation.
We recommend that you do not typeany information in the Category andSub-Category fields when you addinventory items manually.
Note that if you type any informationmanually in the Category or Sub-Category field, the information willbe overwritten if you combine or linkmaterial from Production Control tothe inventory item.
Country The country of origin of the materialitem.
Click the arrow on the right side of theCountry field, and select a country inthe list.
The available countries can bemodified in the Countries dialog box.For more information, see Define thecountries of origin (page 8).
Heat SN A property that ensures that heatnumbers are not duplicated.However, duplications are extremelyrare, so using the Heat SN field isoptional.
If necessary, type a value in the HeatSN field.
3. Click Add.
The new material item is added to the list in the Inventory dialog box.
Copy an inventory itemCopy a material item in the Inventory dialog box and use it as the basis of asimilar item. Then, adjust any properties according to your needs. By copyingitems, you can save time and avoid entering the same data multiple times.
1. In the Inventory dialog box, click the material item that you want to copy.
2. At the bottom of the dialog box, click Copy.
Set up and manage the inventory 31 Manage inventory items

The item is copied and added in the list.
Note that not all values in the leftmost column are copied. For example, POindicates that the item has been sent to a purchase order, so it is not used fornew, manually added inventory items.
Modify inventory itemsYou can either modify items in inventory one by one, or use the differentGlobal Edit commands to modify multiple items at one go. Note thatinventory items that are on a purchase order or that are placeholders withzero quantity cannot be modified, so the input fields become inactive if youselect them in the display area.
For more information, see the following links:
Modify multiple inventory items (page 33)
Modify selected inventory items (page 34)
Modify the shape, grade, dimension, or length of inventory items (page 35)
Modify the shape, grade, dimensions, or length of the selected inventory items(page 36)
Define serial numbers for an inventory itemYou can add serial numbers for a material item in the Inventory dialog box.Note that you can only add a serial number for items that have been markedas received, and are not on order.
1. In the Inventory dialog box, click a material item to select it.
2. On the right side of the dialog box, click Serial # under the ReferenceNumber field.
3. In the Serial Numbers dialog box, do one of the following:
• To assign a different serial number for each piece of the material item,select the Serialized option.
If you use or plan to use bar codes, do not select the Serialized option.Using the Serialized option prevents displaying serial numbers insome reports.
• To use the same serial number for all pieces of the material item,select the Non-Serialized option.
4. Click Update.
5. Click New to define a new serial number.
6. Enter the serial number in the Serial # field.
7. Click Add.
Set up and manage the inventory 32 Manage inventory items

Repeat steps 5 to 7 for each serial number that you want to create.
If necessary, you can:
• Modify a serial number, and update it by clicking Save.
• Delete a serial number by clicking Delete, and then, clicking Yes toconfirm.
8. To close the dialog box, click the Close button (X) in the upper-rightcorner.
The serial numbers appear under the Serial # button in the Inventory dialogbox.
Modify a single inventory itemYou can modify the properties of a single inventory item directly in theInventory dialog box.
Note that if you only want to modify some pieces in an item, you need to splitthe item first. You can do so by either moving the desired quantity of pieces toa different location or secondary location, or changing the reservation of thequantity.
1. In the Inventory dialog box, select the item that you want to modify.
2. On the right side of the dialog box, modify the item properties accordingto your needs.
3. Click Edit to save the changes.
See also
Modify selected inventory items (page 34)
Modify multiple inventory items (page 33)
Modify the shape, grade, dimension, or length of inventory items (page 35)
Modify the shape, grade, dimensions, or length of the selected inventory items(page 36)
Modify multiple inventory itemsUse the Global Edit command to make specific changes to the properties of allor multiple items in the inventory at one go. This way, you can save time, asyou do not need to change the properties of each item individually.
1. In the Inventory dialog box, click the Inventory ribbon tab.
2. In the menu, select Global Edit --> Global Edit .
3. To only modify specific types of items, select a filter type in the Type list,and click Select.
Set up and manage the inventory 33 Manage inventory items

4. In the Filter dialog box, click the arrow buttons to move the items whoseproperties you want to modify to the Included list.
5. Click OK.
To further limit the items to modify, repeat steps 3 to 5 for all necessaryfilter types.
6. Click OK at the bottom of the Inventory Global Edit Filters dialog box.
7. In the Global Edit dialog box, select check boxes next to the propertiesthat you want to update.
You can also use the Un-check All and Check Changed Fields buttons toquickly clear or select check boxes.
8. Modify any properties in the Global Edit dialog box according to yourneeds.
For example, you can change the category of the items by selecting anoption in the Category list, or type a comment for the items.
9. Click Update.
10. To update the selected properties, click Yes in the confirmation dialog box.
The Global Edit dialog box closes. The changes you made to the inventoryitem properties are updated to the Inventory dialog box.
See also
Modify selected inventory items (page 34)
Modify the shape, grade, dimension, or length of inventory items (page 35)
Modify the shape, grade, dimensions, or length of the selected inventory items(page 36)
Modify selected inventory itemsUse the Global Edit Selected command to select a group of inventory itemsand modify their properties at one go.
1. In the Inventory dialog box, select the items that you want to modify.
To select multiple items, hold down Ctrl.
To select a range of subsequent items, hold down Shift.
2. Click the Inventory ribbon tab.
3. In the menu, select Global Edit --> Global Edit Selected .
4. In the Global Edit dialog box, select check boxes next to the propertiesthat you want to update.
You can also use the Un-check All and Check Changed Fields buttons toquickly clear or select check boxes.
Set up and manage the inventory 34 Manage inventory items

5. Modify any properties in the Global Edit dialog box according to yourneeds.
For example, you can change the category of the items by selecting anoption in the Category list, or type a comment for the items.
6. Click Update.
The Global Edit dialog box closes. The changes you made to the inventoryitem properties are updated to the Inventory dialog box.
See also
Modify the shape, grade, dimension, or length of inventory items (page 35)
Modify multiple inventory items (page 33)
Modify the shape, grade, dimensions, or length of the selected inventory items(page 36)
Modify the shape, grade, dimension, or length of inventory itemsUse the Global Edit By Shape command to modify the shape, grade,dimension, or length of the filtered items in the Inventory dialog box.
1. In the Inventory dialog box, click the Inventory ribbon tab.
2. In the menu, select Global Edit --> Global Edit By Shape .
3. To only modify specific types of items, select a filter type in the Type list,and click Select.
4. In the Filter dialog box, click the arrow buttons to move the items whoseproperties you want to modify to the Included list.
5. Click OK.
To further limit the items to be modified, repeat steps 3 to 5 for allnecessary filter types.
6. At the bottom of the dialog box, click OK.
The Global Edit dialog box opens.
7. Modify any properties in the Global Edit dialog box according to yourneeds.
For example, you can change the category of the items by selecting anoption in the Category list, or type a comment for the items.
8. In the Global Edit dialog box, select check boxes next to the propertiesthat you want to update.
You can also use the Un-check All and Check Changed Fields buttons toquickly clear or select check boxes.
9. Click Update.
Set up and manage the inventory 35 Manage inventory items

10. In the confirmation dialog box, click Yes to update the properties.
The Global Edit dialog box closes. The changes you made to the inventoryitem properties are updated to the Inventory dialog box.
See also
Modify multiple inventory items (page 33)
Modify selected inventory items (page 34)
Modify the shape, grade, dimensions, or length of the selected inventory items(page 36)
Modify the shape, grade, dimensions, or length of the selectedinventory itemsUse the Global Edit Selected By Shape command to modify the materialshape, grade, dimensions, or length of the selected items in the inventory.
1. In the Inventory dialog box, select the items that you want to modify.
To select multiple items, hold down Ctrl.
To select a range of subsequent items, hold down Shift.
2. Click the Inventory ribbon tab.
3. In the menu, select Global Edit --> Global Edit Selected By Shape .
The Global Edit dialog box opens. The shape to be updated is shown atthe top of the dialog box.
4. In the Global Edit dialog box, select check boxes next to the propertiesthat you want to update.
You can also use the Un-check All and Check Changed Fields buttons toquickly clear or select check boxes.
5. Modify any properties in the Global Edit dialog box according to yourneeds.
For example, you can change the category of the items by selecting anoption in the Category list, or type a comment for the items.
The changes you made to the inventory item properties are updated to theInventory dialog box.
See also
Modify multiple inventory items (page 33)
Modify selected inventory items (page 34)
Modify the shape, grade, dimension, or length of inventory items (page 35)
Set up and manage the inventory 36 Manage inventory items

Take material from stock and return material to stockUse the TFS command to take materials from stock and cut them. Then, usethe RTS command to return the remaining lengths to stock.
1. In the Inventory dialog box, click items to select them.
To select multiple items, hold down Ctrl.
To select a range of subsequent items, hold down Shift.
2. Click TFS, or press Shift+F7.
Depending on whether the items are linked or combined to a job, one ofthe following happens:
• If the items are not linked or combined to a job or you have selectedmultiple items that are linked or combined to a job, the Take FromStock dialog box opens.
• If a single item is selected and it is linked or combined to a job, aconfirmation dialog box appears.
3. Do one of the following:
To Do thisTake from stock one ormultiple items that arenot linked or combinedto a job
a. In the Take From Stock dialog box, type thequantity of pieces and the job number.
Note that if you have selected multiple items,Tekla EPM automatically takes all availablepieces from stock.
b. If necessary, modify the category, sub-category, sequence, lot number, and releasenumber.
c. Click TFS to take the material from stock.
d. In the RTS section of the dialog box, type thequantity, width, length, location, and jobnumber of items that you want to return tostock.
e. Click RTS to return the remaining materiallengths to stock.
f. Click Apply.Take from stock multipleitems that are linked orcombined to a job
a. In the Take From Stock dialog box, type thejob number.
b. If necessary, modify the category, sub-category, sequence, lot number, and releasenumber.
Set up and manage the inventory 37 Manage inventory items

To Do thisc. To return all drop left from cutting to stock,
select the Return Drop of Combined Itemsto Stock check box.
d. Click TFS to take the material from stock.Take from stock a singleitem that is linked orcombined to a job
a. To update the linked production control whentaking the material from stock, click Yes in theconfirmation dialog box.
b. In the Enter Value dialog box, do one of thefollowing:
• Type the date in the Enter Value field.
The acceptable formats are YYYY/MM/DD,YY/MM/DD, MM/DD/YYYY, and MM/DD/YY.
• Click the arrow on the right side of theDate Required field and select the date inthe calendar.
c. Click OK.
d. To confirm taking the material item from stock,click Yes in the confirmation dialog box.
e. In the TFS dialog box, do one of the following:
• To close the dialog box and return to theInventory dialog box, click Close.
• To view or print TFS reports, click Reports.
For more information, see View and printTFS reports (page 57).
Take selected materials from stockUse the TFS - Selected command to take selected inventory items from stock,cut them, and move the cut lengths into the inventory history. The remainingdrop remains in the inventory. Once the materials have been taken from stock,you can view or print different reports for the materials.
1. In the lower navigation tree of the Inventory dialog box, select a jobnumber.
Only the items within the selected job are displayed in the display area.
2. Click the Inventory ribbon tab.
3. In the menu, select Production Control --> TFS - Selected .
The Enter Value dialog box opens.
4. Enter a date for taking the materials from stock.
Set up and manage the inventory 38 Manage inventory items

5. Click OK.
6. To take the selected materials from stock, click Yes in the confirmationdialog box.
The selected items are taken from stock. You can see the progress in theTFS dialog box. Wait until the process is completed.
7. Do any of the following:
To Do thisView or print a report onthe TFS process
a. Click Reports.
The Report Progress dialog box opens.
b. Select the report that you want to print orview.
c. Do any of the following:
• To view the report, click View.
• To print the report, click Print, select theprinter, and click OK.
d. To close the Report Progress dialog box, clickthe Close button (X) in the top right corner.
Close the TFS dialog box • Click Close.
Move an item to another inventory locationUse the Move command to move a single inventory item to another inventorylocation.
1. In the Inventory dialog box, select the item whose location you want tochange.
2. Click Move, or press Shift+F8.
The Move dialog box opens.
3. In the Quantity field, enter the number of pieces that you want to move.
4. Click the arrow on the right side of the Location list and select the newlocation.
5. If necessary, click the arrow on the right side of the Sec Location list toselect a secondary location.
6. Click Move, or press F4.
The selected quantity of items is moved to the selected location.
Set up and manage the inventory 39 Manage inventory items

Add inventory items to Order EntryUse the Add Selected to Order and Quick Quote commands to add items toOrder Entry. The Add Selected to Order command reserves the selecteditems for a customer order, whereas the Quick Quote command adds theselected items directly into a quote or a customer order. Note that you canonly add unreserved items to Order Entry.
Reserve items for a customer order1. In the Inventory dialog box, select the items that you want to load to a
customer order.
To select multiple items, hold down Ctrl.
To select a range of subsequent items, hold down Shift.
2. Click the Inventory ribbon tab.
3. In the menu, select Order Entry --> Add Selected to Order .
4. In the Select Quote/Order dialog box, select the customer order to whichyou want to load the items.
5. Click OK.
The Select Quote/Order dialog box closes. The items are reserved for theselected customer order.
Send items to a customer order1. In the Inventory dialog box, select the items that you want to add to a
quote or customer order.
To select multiple items, hold down Ctrl.
To select a range of subsequent items, hold down Shift.
2. Click the Inventory ribbon tab.
3. In the menu, select Order Entry --> Quick Quote .
The Quick Quote dialog box opens. The properties of the selected itemsare visible in the Details section of the dialog box.
4. In the Customer Name list, select the customer company.
Note that the customer must already be saved in the Address Book.
Tekla EPM automatically fills in the customer code and the default contact.
5. If necessary, in the Contact list, select another contact person.
6. According to your needs, do any of the following:
Set up and manage the inventory 40 Manage inventory items

To Do thisSend items to an existing quote orcustomer order
a. Click Save to Quote/Order.
The Select Quote/Order dialogbox opens.
b. Select the quote or order towhich you want to send theitems.
c. Click OK.
The items are sent to the selectedquote or order.
Send items to a new quote a. Click Save to New Quote.
b. To create a new quote and sendthe selected items to it, click Yesin the confirmation dialog box.
c. In the Quote dialog box, modifythe quote according to yourneeds.
For more information, see .
d. Click Save Quote Information.
e. To close the dialog box, click theClose button (X) in the upper-right corner.
Send items to a new customer order a. Click Save to New Order.
b. To create a new order and sendthe selected items to it, click Yesin the confirmation dialog box.
c. In the Order dialog box, modifythe order according to yourneeds.
For more information, see .
d. Click Save Order Information.
e. To close the dialog box, click theClose button (X) in the upper-right corner.
7. To close the Quick Quote dialog box, click the Close button (X) in theupper-right corner.
Set up and manage the inventory 41 Manage inventory items

Delete inventory itemsYou can delete unnecessary material items from inventory. Note that deletingthe items is permanent and cannot be undone.
You can still view the deleted items in the transaction history. For moreinformation, see View the transaction history in the Inventory module(page 54).
1. In the Inventory dialog box, click the items that you want to delete.
To select multiple items, hold down Ctrl.
To select a range of subsequent items, hold down Shift.
2. Click Delete.
3. To permanently delete the inventory item, click Yes in the confirmationdialog box.
Combine inventory items manuallyYou can manually combine items in the Inventory dialog box by activating themanual combine mode. You can select pieces to combine them into a stocklength, or uncombine pieces from a stock length.
Switch to the manual combine mode1. In the Inventory dialog box, click the Inventory ribbon tab.
2. In the menu, select Switch to Manual Combine Mode.
The Inventory dialog box changes to the manual combine mode. New buttonsappear at the bottom of the dialog box to enable adding and removingcombined items from the selected inventory item.
You can now combine inventory items manually.
Combine materialsUse the Add Items command to combine materials into a selected stocklength.
1. In the Inventory dialog box, click a stock length to select it.
2. At the bottom of the dialog box, click Add Items.
The Add Item dialog box opens. You can see all available uncombinedmaterials that can be combined to the selected stock length. If the dialog
Set up and manage the inventory 42 Manage inventory items

box is blank, no materials are available to be combined to the selectedstock length.
Note that the available materials come from requisitions. If the items thatyou want to combine are in a production control job, you need to addthem to a requisition before you can combine them manually.
3. In the Add Item dialog box, click an uncombined item to select it.
4. If necessary, modify the quantity of inventory items that you arecombining materials to.
If the quantity is greater than 1, the materials should be multiples of thatquantity in order to be displayed and selected in the Add Item dialog box.
5. To allow material grade substitutions, select the Use Grade Substitutionscheck box.
6. Click Add.
The selected material items are combined to the selected stock length.
Uncombine materialsUse the Remove Item to uncombine material items from a selected stocklength.
1. In the Inventory dialog box, click a stock length to select it.
2. At the bottom of the dialog box, click Remove Item.
If the selected stock length is not combined, the Remove Item button isnot available.
3. In the Remove Item dialog box, use the arrow buttons to move thematerials that you want to uncombine to the Included list.
To only move one piece of the selected item, click the Qty 1 buttons.
4. Click OK.
5. In the confirmation dialog box, do one of the following:
• To simply uncombine the pieces, click No.
Select the No option if you are removing items to clear the material ofitems that are no longer linked.
• To uncombine the pieces and return the items to the requisition fromwhich they were loaded to a purchase order, click Yes.
Set up and manage the inventory 43 Manage inventory items
The items are held in the requisition to be recombined and purchased,or combined into a different stock length.
If the requisition no longer exists or the material item was never on arequisition, Tekla EPM asks you to select a requisition or add a newone.
The confirmation dialog box and the Remove Item dialog box close. Thepieces are uncombined from the selected stock length.
Switch back to the input mode1. Click the Inventory ribbon tab.
2. In the menu, select Switch to Input Mode.
The Inventory dialog box changes back to the input mode.
1.6 Add, modify, and delete stock quantities to bemaintainedIn the Stock/Reorder dialog box, you can add, modify, and delete stockquantities that should always be maintained in inventory. This way, Tekla EPMcan alert you when you need to reorder items.
To access the Stock/Reorder dialog box, do the following:
• At the top of the Inventory dialog box, click Stock/Reorder.
The Stock/Reorder dialog box opens, displaying previously created records.
Note that the items in the Stock/Reorder dialog box are color-coded:
• Green items are equal or above the required stock quantity.
• Yellow items are below the required stock quantity.
• Red items are below both the required stock quantity and the requiredreorder quantity.
Add a new stock record1. At the bottom of the Stock/Reorder dialog box, click Add New Record.
The Stock/Reorder - Add dialog box opens.
2. Select the shape, dimensions, grade, and length to be ordered.
3. If necessary, in the Location list, select the location where the items willbe stored.
Note that if you select a location, the record only applies to the quantitiesof items in the assigned location.
Set up and manage the inventory 44 Add, modify, and delete stock quantities to bemaintained

4. In the Stock Qty field, enter the stock quantity that should be maintained.
5. In the Reorder Qty, enter the quantity at which Tekla EPM prompts you toreorder the item.
6. Click Add.
The Stock/Reorder - Add dialog box closes, and the new record is added tothe list in the Stock/Reorder dialog box.
Modify stock records1. In the list in the Stock/Reorder dialog box, click the record that you want
to modify.
To select multiple items, hold down Ctrl.
To select a range of subsequent items, hold down Shift.
2. Modify the values in the Stock Qty and Reorder Qty fields according toyour needs.
3. Click Save.
Delete stock records1. In the list in the Stock/Reorder dialog box, click the record that you want
to delete.
To select multiple items, hold down Ctrl.
To select a range of subsequent items, hold down Shift.
2. Click Delete Selected.
3. To permanently delete the record, click Yes in the confirmation dialog box.
Load stock items to a requisition1. In the list in the Stock/Reorder dialog box, click the items that you want
to send to a requisition.
To select multiple items, hold down Ctrl.
To select a range of subsequent items, hold down Shift.
2. Click Requisition.
Set up and manage the inventory 45 Add, modify, and delete stock quantities to bemaintained

3. In the Select Requisition dialog box, do one of the following according toyour needs:
To Do thisAdd the items into a newrequisition
a. Click Add.
b. Modify the requisition number and descriptionaccording to your needs.
c. If necessary, modify other requisitionproperties.
d. Click Save.
e. Select the new requisition in the list.
f. Click OK.Add the items into anexisting requisition
a. Select a requisition in the list.
b. Click OK.
The items are loaded to the selected requisition.
Load stock items to a purchase order1. In the list in the Stock/Reorder dialog box, click the items that you want
to send to a purchase order.
To select multiple items, hold down Ctrl.
To select a range of subsequent items, hold down Shift.
2. Click Purchase Order.
3. In the Select Purchase Order dialog box, do any of the followingaccording to your needs:
To Do thisAdd the items into a newrequisition
a. Click Add.
b. Modify the purchase order number accordingto your needs.
c. Add vendor details for the purchase order.
d. If necessary, modify other purchase orderproperties.
e. Click Save.
f. Select the new purchase order in the list.
g. Click OK.Add the items into anexisting requisition
a. Select a purchase order in the list.
Set up and manage the inventory 46 Add, modify, and delete stock quantities to bemaintained

To Do thisb. Click OK.
The items are loaded to the selected purchase order. In the Stock/Reorderdialog box, the items are color-coded to reflect the purchase activity.
1.7 View inventory detailsYou can view different details of inventory materials, including the heatdocuments attached to items, the location of barcoded materials, the totalvalue of inventory materials, and the transaction history. You can also view TFSreport and inventory reports, and print or export them according to yourneeds.
For more information, see the following links:
View heat documents attached to inventory items (page 47)
View the location of barcoded materials (page 49)
View the value of inventory materials (page 51)
View the transaction history in the Inventory module (page 54)
View and print TFS reports (page 57)
View, print, and export inventory reports (page 58)
View heat documents attached to inventory itemsUse the Check Heat Documents command to view if inventory items haveheat documents attached to them. You can also save or print the availableheat documents, or create reports on the items that have or do not have heatdocuments.
1. In the Inventory dialog box, click the Inventory ribbon tab.
2. In the menu, select Check Heat Documents.
3. To limit the item types whose heat documents you want to check, in theInventory - Check Heat Documents dialog box, select a filter type in theType list, and click Select.
4. In the Filter dialog box, do one of the following depending on the filtertype:
a. Click the arrow buttons to move the items whose heat documentsyou want to view to the Included list.
b. Type the maximum and minimum values for the items whose heatdocuments you want to view.
Set up and manage the inventory 47 View inventory details

5. Click OK.
To further limit the item types, repeat steps 3 to 5 for all necessary filtertypes.
6. Click Check Heat Documents.
All inventory items that match the filters that you set are displayed. If anitem has attached heat documents, you can see the number of the heatdocuments in the Docs column. If an item does not have attached heatdocuments, the Docs column is highlighted with red.
7. According to your needs, do any of the following:
To Do thisUpdate heat documentinformation
• Click Refresh.
Any new or modified information is updated.Add, modify, and deleteheat documents inDocument Index
a. Click Open Document Index.
Document Index opens. For more information,see Store document references for inventory(page 15).
Save heat documents a. Do one of the following:
• To only save particular heat documents,click the item whose documents you wantto save, and click Save Documents -->Save Documents - Selected .
• To save all available heat documents, clickSave Documents --> Save Documents -All .
b. In the Browse For Folder dialog box, browseto an empty folder where you want to save theheat document information.
c. Click OK.
A report of the heat documents opens.Print heat documents a. Do one of the following:
• To only print particular heat documents,click the items whose documents you wantto print, and click Print Documents -->Print Documents - Selected .
• To print all available heat documents, clickPrint Documents --> Print Documents -All .
b. In the Select Printer dialog box, click a printerto select it.
Set up and manage the inventory 48 View inventory details

To Do thisc. Click OK.
All or the selected heat documents are printed.Create reports a. Do one of the following:
• To create a report only containingparticular items, click the items to selectthem, and click Reports --> Reports -Selected .
• To create a report containing all items, clickReports --> Reports - All .
b. In the Report Selection dialog box, click thereport that you want to create.
c. Do one of the following:
• To view the report, click View.
• To print the report, change the number ofcopies by clicking the + and - buttons, andclick Print.
• To export the report, click Export, modifythe export format, file name, and location,and click Export again.
8. To close the dialog box, click the Close button (X) in the upper-rightcorner.
View the location of barcoded materialsUse the Location Sweep command to create location sweep reports, whichshow the location of yard materials that have been identified by barcodes.Note that the Location Sweep command is only available for items with serialnumbers.
To access the Inventory Location Sweeps dialog box, do the following:
1. While in the Inventory dialog box, click the Inventory ribbon tab.
2. In the menu, select Barcode --> Location Sweep .
The Inventory Location Sweeps dialog box opens.
According to your needs, do any of the following.
View the location of barcoded materials1. Click New Location Sweep.
Set up and manage the inventory 49 View inventory details

2. To only view locations of specific types of materials, select a filter type inthe Type list, and click Select.
3. In the Filter dialog box, click the arrow buttons to move the materials thatyou want to include in the location sweep to the Included list.
To further limit the materials included, you can repeat steps 2 to 3 for allnecessary filter types.
4. Click Make Report.
5. In the Report Selection dialog box, select the report that you want toview.
6. Click View.
The location sweep report opens in Tekla EPM Report Viewer.
Delete a location sweep1. Select an existing location sweep in the Inventory Location Sweeps
dialog box.
2. Click Delete Location Sweep.
3. To permanently delete the location sweep, click Yes in the confirmationdialog box.
Cancel remaining items from a location sweep1. Select an existing location sweep in the Inventory Location Sweeps
dialog box.
2. Click Cancel Remaining.
3. To cancel the remaining items, click Yes in the confirmation dialog box.
Complete the location sweep and move remaining items1. Select an existing location sweep in the Inventory Location Sweeps
dialog box.
2. Click Complete - Move Remaining.
3. To complete the location sweep and move the remaining items, click Yesin the confirmation dialog box.
View, print or export reports of an existing location sweep1. Select an existing location sweep in the Inventory Location Sweeps
dialog box.
2. Click Reports - Selected.
Set up and manage the inventory 50 View inventory details

3. In the Report Selection dialog box, select the report that you want toview, print, or export.
4. According to your needs, do any of the following:
To Do thisView the report • Click View.Print the report a. Change the number of the
printed copies by clicking the +and - buttons.
b. Click Print.
c. In the Select Printer dialog box,click a printer to select it.
d. Click OK.Export the report a. Click Export.
b. In the Export Format list, selectan export format.
c. Click Browse.
d. Browse to the location where youwant to save the exported file,and click Save.
e. Modify the file name according toyour needs.
f. If you want to attach theexported file to a MicrosoftOutlook email and send it to arecipient, select the Attach toEmail check box.
g. If you want to open the file afterexporting it, select the OpenExported Document check box.
h. Click Export.
The location sweep report is saved tothe selected location.
View the value of inventory materialsUse the Valuation command to view the value of materials in inventory. Youcan view the value either by date and time, by date, or by archive.
1. In the Inventory dialog box, click the Inventory ribbon tab.
Set up and manage the inventory 51 View inventory details

2. In the menu, select Valuation and one of the following options:
• Valuation by Date/Time: shows the current value of materials in stockor on order, or the value of materials on a specific date and time.
• Valuation by Date: shows the value of material on a specific date.
• Valuation from Archive: shows the valuation of materials in anarchive file.
According to your needs, see one of the following sets of instructions.
View the current material value in inventory or the material value on aspecific date and time1. In the menu, select Valuation --> Valuation by Date/Time .
2. In the Archive Date/Time dialog box, do one of the following:
• To view the material values on a specific date and time, select the dateand time in the appropriate lists, and click OK.
• To view the current material values, click Use Current Inventory.
3. To only include specific types of items in the valuation report, in theInventory Report Filters dialog box, select a filter type in the Type list,and click Select.
4. click the arrow buttons to move the item types that you want to include tothe Included list.
5. Click OK.
6. Click Make Report.
7. In the Report Selection dialog box, select the report that you want toview, print, or export.
8. According to your needs, do any of the following:
To Do thisView the report • Click View.
The Tekla EPM Report Vieweropens.
Print the report a. Change the number of theprinted copies by clicking the +and - buttons.
b. Click Print.
c. In the Select Printer dialog box,click a printer to select it.
d. Click OK.Export the report a. Click Export.
Set up and manage the inventory 52 View inventory details

To Do thisb. In the Export Format list, select
an export format.
c. Click Browse.
d. Browse to the location where youwant to save the exported file,and click Save.
e. Modify the file name according toyour needs.
f. If you want to attach theexported file to a MicrosoftOutlook email and send it to arecipient, select the Attach toEmail check box.
g. If you want to open the file afterexporting it, select the OpenExported Document check box.
h. Click Export.
9. To close the dialog box, click the Close button (X) in the upper-rightcorner.
View the material value on a specific date1. In the menu, select Valuation --> Valuation by Date .
The Inventory Valuation dialog box opens, showing the valuation ofmaterial in stock and on order on the current date.
2. In the Date list, select the date whose inventory valuation you want toview.
3. Click OK.
The valuation on the bottom of the dialog box updates.
4. To close the dialog box, click the Close button (X) in the upper-rightcorner.
View the value from an archive file1. In the menu, select Valuation --> Valuation from Archive .
2. In the Open dialog box, browse to find and click to select the archive filethat you want to use.
3. Click Open.
4. In the Select dialog box, select if you want to view inventory reports orinventory location reports.
Set up and manage the inventory 53 View inventory details
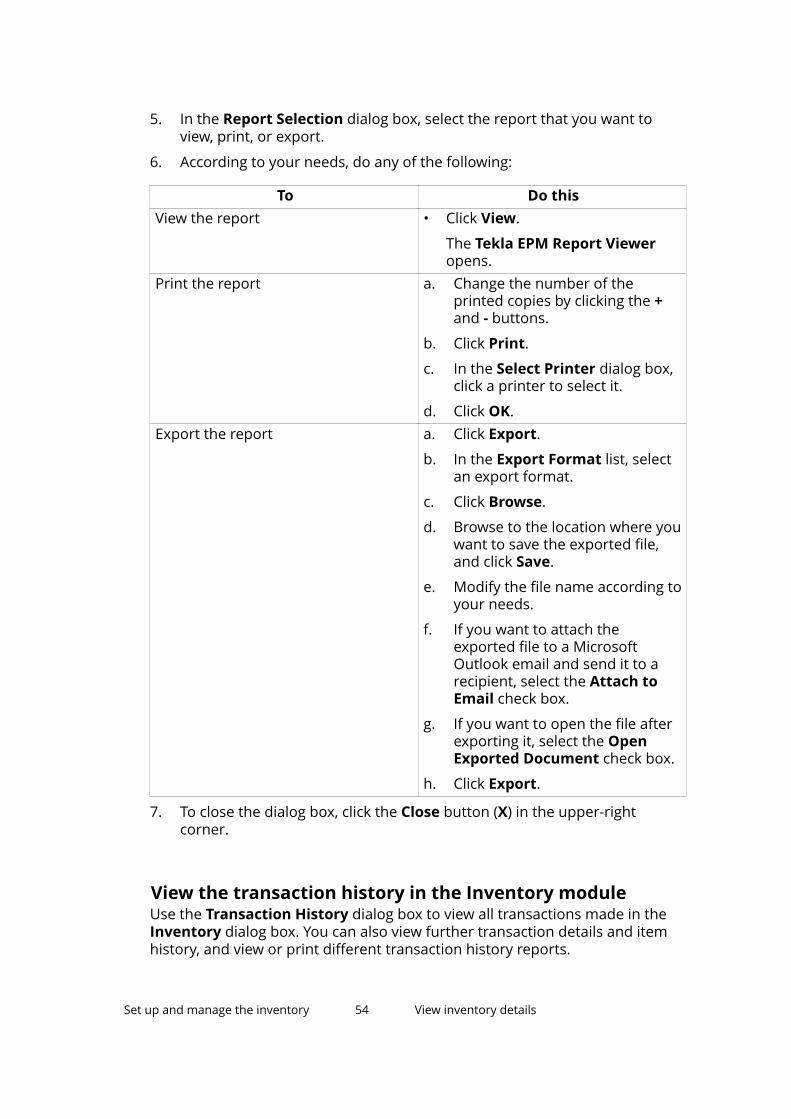
5. In the Report Selection dialog box, select the report that you want toview, print, or export.
6. According to your needs, do any of the following:
To Do thisView the report • Click View.
The Tekla EPM Report Vieweropens.
Print the report a. Change the number of theprinted copies by clicking the +and - buttons.
b. Click Print.
c. In the Select Printer dialog box,click a printer to select it.
d. Click OK.Export the report a. Click Export.
b. In the Export Format list, selectan export format.
c. Click Browse.
d. Browse to the location where youwant to save the exported file,and click Save.
e. Modify the file name according toyour needs.
f. If you want to attach theexported file to a MicrosoftOutlook email and send it to arecipient, select the Attach toEmail check box.
g. If you want to open the file afterexporting it, select the OpenExported Document check box.
h. Click Export.
7. To close the dialog box, click the Close button (X) in the upper-rightcorner.
View the transaction history in the Inventory moduleUse the Transaction History dialog box to view all transactions made in theInventory dialog box. You can also view further transaction details and itemhistory, and view or print different transaction history reports.
Set up and manage the inventory 54 View inventory details

View the transaction history of an item1. In either the Inventory or Inventory History dialog box, click the
Inventory ribbon tab.
2. In the menu, select Transaction History.
The Transaction History dialog box opens with the Transaction List tabopen.
3. To filter the displayed transactions, use the fields in the Filters section ofthe dialog box:
a. Click Edit next to a filtering option. The available filtering criteria arethe transaction date, the user that made the transaction, thetransaction type, and the operation type.
b. Do one of the following:
• For transaction date, enter the start and end dates to define arange within which the transactions have taken place.
• For user, transaction type, and operation type, use the arrowbuttons to move the desired items to the Included list.
c. Click OK.
To view all transactions again, click Reload.
4. To view more information about a transaction, do the following:
a. Click to select the transaction on the Transaction List tab.
b. Click the Transaction Details tab to view the details of the selectedtransaction.
c. Click the Item History tab to view the item history of the selectedtransaction.
According to your needs, see any of the following instructions:
Find a transaction by transaction number1. On the Transaction List tab, click Find Transaction #.
2. Enter the transaction number in the field.
3. Click OK.
The transaction with the selected transaction number is selected on theTransaction List tab.
Create transaction history reports1. Open the Reports tab.
Set up and manage the inventory 55 View inventory details

2. To only include specific items in the transaction history report, click Editnext to a filtering option.
3. Do one of the following:
• For dates, enter the start and end dates to define a range within whichthe transactions have taken place.
• For other filter criteria, use the arrow buttons to move the desireditems to the Included list.
4. Click OK.
5. Click Make Report.
6. In the Report Progress dialog box, select the report that you want to viewor print.
7. Do any of the following:
To Do thisView the report • Click View.Print the report a. Change the number of the
printed copies by clicking the +and - buttons.
b. In the Select Printer dialog box,click a printer to select it.
c. Click Print.
View all changes in the transaction historyTekla EPM records every change made in the system. This is useful becauseyou can view all changes made in the transaction history of items in apurchase order. You can then filter the information to see changes made by aparticular user or on a particular date. If necessary, you can also print the listof changes.
1. In the Inventory dialog box, click the Inventory ribbon tab.
2. In the menu, select List Of Changes.
3. In the Report Filter dialog box, do any of the following according to yourneeds:
To Do thisFilter changes by user a. Click Edit on the right side of the
User section.
b. Click the arrow buttons to movethe users whose changes youwant to view to the Included list.
c. Click OK.
Set up and manage the inventory 56 View inventory details

To Do thisFilter changes by date a. Click Edit on the right side of the
Date section.
b. Enter the start (Min) and end(Max) dates.
c. Click OK.
4. Click Make Report.
5. In the Report Progress dialog box, do any of the following according toyour needs:
To Do thisView the list of changes • Click View.Print the list of changes a. Change the number of the printed copies by
clicking the + and - buttons.
b. Click Print.
c. In the Select Printer dialog box, click a printerto select it.
d. Click OK.
6. To close the dialog box, click the Close button (X) in the upper-rightcorner.
View and print TFS reportsUse the TFS - Reports Only command to view and print reports for items thathave been or could be taken from stock. TFS reports show the cut details, butno items are actually cut or taken from stock when you use the TFS - ReportsOnly command.
1. In the lower navigation tree of the Inventory dialog box, select a jobnumber.
Only the items within the selected job are displayed in the display area.
2. Click the Inventory ribbon tab.
3. In the menu, select Production Control --> TFS - Reports Only .
4. In the TFS dialog box, click Reports.
5. In the Report Progress dialog box, select the report that you want to viewor print.
6. According to your needs, do any of the following:
To Do thisView the report • Click View
Set up and manage the inventory 57 View inventory details

To Do thisPrint the report a. Change the number of the printed copies by
clicking the + and - buttons.
b. Click Print.
c. In the Select Printer dialog box, click a printerto select it.
d. Click OK.
7. To close the dialog box, click the Close button (X) in the upper-rightcorner.
See also
Take material from stock and return material to stock (page 36)
Take selected materials from stock (page 38)
View, print, and export inventory reportsYou can create different inventory reports, such as subtotal reports, shapesummaries, or receiving tickets.
1. In the Inventory dialog box, click the Inventory ribbon tab.
2. In the menu, select Reports, or press Ctrl+R on the keyboard.
3. In the Inventory Report Filters dialog box, select either the InventoryReport or Inventory Location Report option according to your needs.
4. To only include specific items in the report, select a filter type in the Typelist, and click Select.
5. In the Filter dialog box, click the arrow buttons to move the items that youwant to include in the report to the Included list.
6. Click OK.
7. If you want to view the inventory situation of a previous date in thereports, do the following:
a. Click From Archive.
b. Select the archive date and time in the applicable lists.
c. Click OK.
8. To view barcode audit reports in the Report Selection dialog box, selectthe Barcode Audit check box.
9. Click Make Report.
10. In the Report Selection dialog box, click the report that you want to view,print, or export.
According to your needs, see one of the following sets of instructions.
Set up and manage the inventory 58 View inventory details

View inventory reports1. Click View.
The Tekla EPM Report Viewer dialog box opens, displaying the selectedreport.
2. In Tekla EPM Report Viewer, do any of the following according to yourneeds:
To Do thisMove between pages • Click the arrows at the top of
Tekla EPM Report Viewer.Go to a specific page of the report • Type the page number in the
empty field at the top Tekla EPMReport Viewer.
Find a text in the report a. Click the binocular icon.
b. In the blank field, type the textthat you want to find.
c. Click Find Next.
Any matching text is highlightedwith a red box.
Zoom in or out • Click the magnifying glass icon andselect the zoom value in the list.
Print inventory reports1. Change the number of the printed copies by clicking the + and - buttons.
2. Click Print.
3. In the Select Printer dialog box, click a printer to select it.
4. Click OK.
Export inventory reports1. Click Export.
2. In the Export Format list, select an export format.
3. Click Browse.
4. Browse to the location where you want to save the exported file, and clickSave.
5. Modify the file name according to your needs.
Set up and manage the inventory 59 View inventory details

6. If you want to attach the exported file to a Microsoft Outlook email andsend it to a recipient, select the Attach to Email check box.
7. If you want to open the file after exporting it, select the Open ExportedDocument check box.
8. Click Export.
The report is saved to the selected location.
1.8 Import and export inventory informationYou can import inventory information or a cut list to Tekla EPM, or exportinventory information from Tekla EPM to KSTK, ProNest, Timberline, and XMLformat.
For more information, see the following links:
Export inventory information to the KSTK format (page 60)
Export inventory transactions to Timberline (page 60)
Import inventory information from an HTML file (page 62)
Export inventory information to the KSTK formatUse the Export to KSTK command to save inventory information in the KSTKformat.
1. In the Inventory dialog box, click the Inventory ribbon tab.
2. In the menu, select Export to KSTK.
3. In the Save As dialog box, browse to the folder where you want to savethe file.
By default, Tekla EPM saves the file to the Export folder.
4. If necessary, modify the file name.
5. Click Save.
A message opens, showing where the inventory information was saved.
6. Click OK to close the message.
Export inventory transactions to TimberlineUse the Export Inventory Transactions to Timberline command to exportinventory information to the Timberline accounting software. Note thatTimberline must be open, so that it can receive the inventory information.
1. In the Inventory dialog box, click the Inventory ribbon tab.
Set up and manage the inventory 60 Import and export inventory information

2. In the menu, select Export Inventory Transactions to Timberline.
The Export Inventory Transactions to Timberline dialog box opens.
3. In the Export From Transaction # and To (leave blank for all) fields,enter the numbers of the first and last transactions that you want toexport.
4. In the Job # Export Option list, select how you want the job number to beexported.
5. Enter the general ledger code.
6. To not export material that has been received directly to inventory history,select the Ignore material received directly to inventory history checkbox.
7. Click Export Transactions.
The selected transactions are exported to Timberline.
Synchronize inventory information with ProNestUse the Sync with ProNest command to synchronize Tekla EPM inventoryinformation with ProNest and update the cut lists in ProNest. We recommendthat you synchronize the two software regularly.
1. In the Inventory dialog box, click the Inventory ribbon tab.
2. In the menu, select Export --> Sync with ProNest .
The inventory information in Tekla EPM is exported to ProNest tosynchronize the two software. You can view the process in the Statusdialog box.
3. When the synchronization process is completed, click OK to close theStatus dialog box.
You can now view the inventory information exported from Tekla EPM inProNest.
Export inventory information to XMLUse the Export to XML command to save inventory information in an XML file.
1. In the Inventory dialog box, click the Inventory ribbon tab.
2. In the menu, select Export --> Export to XML .
3. In the Save As dialog box, browse to the folder where you want to savethe file.
By default, Tekla EPM saves the file to the Export folder.
4. If necessary, modify the file name.
Set up and manage the inventory 61 Import and export inventory information

5. Click Save.
The Status dialog box opens, showing the status of the export process.
6. When the export is completed, click OK to close the Status dialog box.
The file is saved to the location you selected.
Archive jobsUse the Archive Jobs command to export jobs from Inventory History andsave them as KSTK or TXT files.
1. In the Inventory History dialog box, click the Inventory ribbon tab.
2. In the menu, select Export --> Archive Jobs .
The Archive Jobs dialog box opens.
3. Click the arrow buttons to move the jobs that you want to archive to theIncluded list.
4. If you want to delete the jobs from inventory history after archiving them,select the Purge Archived Jobs check box.
5. Click OK.
6. In the Save As dialog box, browse to the folder where you want to savethe file.
By default, Tekla EPM saves the file to the Export folder.
7. If necessary, modify the file name.
8. If necessary, select another file format in the Save as type list.
9. Click Save.
A message opens, showing you the location and the file where thearchived jobs have been saved.
10. Click OK to close the message.
Import inventory information from an HTML fileUse the Inventory From HTML command to import inventory informationfrom an HTML file to Tekla EPM.
1. In the Inventory dialog box, click the Inventory ribbon tab.
2. In the menu, select Import --> Inventory From HTML .
3. In the Open dialog box, browse to find and select the HTML file that youwant to import.
Set up and manage the inventory 62 Import and export inventory information

4. Click Open.
The inventory information is imported to Tekla EPM.
Import ProNest cut lists to Tekla EPMYou can import cut lists available in the ProNest nesting software to Tekla EPM.By importing cut lists, you receive information on the scrap of a ProNestnesting process to inventory.
Before sending cut lists to Tekla EPM, send the nest to CNC in ProNest.
1. In the Inventory dialog box, click the Inventory ribbon tab.
2. In the menu, select Import --> ProNest Cut List .
Tekla EPM imports the cut lists that are available in ProNest.
3. When the import is completed, click Open Import Log to view, print, orsave the import log.
4. To close the dialog box, click the Close button (X) in the upper-rightcorner.
Once a cut list is imported, it can be cut in Tekla EPM. This way, you canremove the used plate from inventory and add the proper scrap.
See also
Synchronize inventory information with ProNest (page 61)
Set up and manage the inventory 63 Import and export inventory information

Set up and manage the inventory 64 Import and export inventory information

Index
BBar codes
Location sweep........................................49
Delete a document referenceDocument Index .....................................24
DDocument index
Add document references to inventory....17Email file................................................... 23Modify document reference.................. 22Open file................................................... 22
Document indexAttach document reference to email....23Edit categories......................................... 16Manage categories..................................16Open document reference.....................22
Document referenceEdit............................................................ 22Email......................................................... 23Modify.......................................................22Open......................................................... 22
Document referencesDelete........................................................24Manage categories..................................16
EEstimating
View all changes in the transactionhistory.......................................................56
Exportinventory information to XML............... 61to KSTK......................................................60to Timberline............................................60
GGlobal edit by shape
inventory items........................................35Global edit
Inventory items........................................33Global edit selected by shape
inventory items........................................36Global edit selected
Inventory items........................................34
HHeat documents
Add............................................................17
IImport
inventory inforamtion from HTML........62ProNest cut list........................................ 63
InventoryManage....................................................... 5
InventoryAdd document references to inventory....17Search for items in the Inventory dialogbox............................................................ 13
InventoryFilter information in the Inventory dialogbox............................................................ 12
Inventory historyArchive jobs..............................................62
Inventory itemsRTS............................................................ 36TFS.............................................................36
Inventory itemsCombine manually.................................. 42Find........................................................... 13Manage.....................................................24
65

Modify shape...................................... 35,36Modify dimensions............................ 35,36Modify grade.......................................35,36Modify length......................................35,36
Inventory locationChange......................................................39
Inventory reportsExport....................................................... 58Print.......................................................... 58View...........................................................58
Inventory ....................................... 15,36,42,60Add inventory items to Order Entry......39Add item to inventory.............................24Add stock records....................................44Add, modify, and delete stock quantities...................................................................44Archive jobs..............................................62Check heat documents...........................47Copy item................................................. 31Create filter settings................................12Define company standards...................... 6Define company standard settings......... 6Define countries of origin.........................8Define default settings..............................6Define serial number for inventory item...................................................................32Delete items.............................................41Edit single inventory item.......................33Export inventory information to XML... 61Export inventory transactions toTimberline................................................ 60Import and export information............. 60Import inventory information from anHTML file.................................................. 62Import ProNest cut list........................... 63Manage items.......................................... 24Modify multiple inventory items........... 33Modify selected inventory items........... 34Modify single inventory item................. 33Modify the shape, grade, dimension, orlength of inventory items....................... 35Move item to another location.............. 39Navigation trees...................................... 11Open........................................................... 9Open Inventory History.......................... 14Set up..........................................................5Switch to manual combine mode......... 42
Synchronize inventory information withProNest.....................................................61Take material from stock and returnmaterial to stock......................................36Take selected materials from stock.......38View details.............................................. 47View and print TFS reports.....................57View heat documents............................. 47View location of barcoded materials.... 49View only particular materialdimensions, jobs, or locations...............11View the value of inventory materials.. 51View transaction history......................... 54View, print, and export inventory reports...................................................................58
InventoryEdit items..................................................32Modify items............................................ 32
Invetory itemsEdit............................................................ 33
Invetory itemsAdd............................................................24
OOrder entry
Load inventory items.............................. 39
RReorder quantities
Add............................................................44Delete........................................................44Modify.......................................................44
SStock quantities
Add............................................................44Delete........................................................44Modify.......................................................44
TTFS
Print reports.............................................57
66

Selected items......................................... 38View reports.............................................57
Transaction historyView...........................................................54
TransactionsExport to Timberline............................... 60
67

68