Service Reports (8XX, ANI, Card) an 8XX In Process Complementary Report 21 Running an 8XX Port Out...
49
Control Center User Guide February 2018 1 Confidential Copyright 2018. All rights reserved. No other use of the material is permitted without the express written consent of CenturyLink. Service Reports (8XX, ANI, Card) Overview Introduction This document discusses how to generate Service Reports in Control Center®, and provides a brief description of the reports that are available to you. Service Reports are accessed in Control Center > Reports tile > Other Reporting subtile > Service Reports. Note: Running reports does not interfere with the Control Center application. You can request a report, and then work in other parts of Control Center while the report runs in the background. Once the report is finished running, you can then view and save it. Appropriate system permissions are required to be able to view these menus and files. Please contact your Customer System Administrator (CSA) regarding permissions. For a list of CSAs, navigate to Control Center > Profile > My System Administrators. Tips: • Reports that save in CSV format output: o Columns with data that have leading zeros, such as CIC (0432) or TCSI codes, must be manually formatted as text. o Calling card numbers will display in scientific formula; to display properly, format calling card number column as number, no decimals. • Reports that save in Excel 2007 format output: Microsoft Office 2003 users can download the Microsoft compatibility tool. On Microsoft Downloads site, search for “compatibility tool.” Download and install to be able to view Excel 2007 files with extension .XLSX In this Document This document contains the following topics: Topic See Page Overview, Introduction and Tips 1 Accessing and Utilizing Service Reports 3 Available Reports – Descriptions and Fields 6 Running an 8XX Activity Report 17 Running an 8XX Completed Complementary Report 18
-
Upload
truonglien -
Category
Documents
-
view
223 -
download
0
Transcript of Service Reports (8XX, ANI, Card) an 8XX In Process Complementary Report 21 Running an 8XX Port Out...

Control Center User Guide February 2018
1
Confidential Copyright 2018. All rights reserved.
No other use of the material is permitted without the express written consent of CenturyLink.
Service Reports (8XX, ANI, Card)
Overview
Introduction This document discusses how to generate Service Reports in Control Center®, and provides a brief description of the reports that are available to you. Service Reports are accessed in Control Center > Reports tile > Other Reporting subtile > Service Reports. Note: Running reports does not interfere with the Control Center application. You can request a report, and then work in other parts of Control Center while the report runs in the background. Once the report is finished running, you can then view and save it. Appropriate system permissions are required to be able to view these menus and files. Please contact your Customer System Administrator (CSA) regarding permissions. For a list of CSAs, navigate to Control Center > Profile > My System Administrators. Tips:
• Reports that save in CSV format output: o Columns with data that have leading zeros, such as CIC
(0432) or TCSI codes, must be manually formatted as text. o Calling card numbers will display in scientific formula; to
display properly, format calling card number column as number, no decimals.
• Reports that save in Excel 2007 format output: Microsoft Office 2003 users can download the Microsoft compatibility tool. On Microsoft Downloads site, search for “compatibility tool.” Download and install to be able to view Excel 2007 files with extension .XLSX
In this Document
This document contains the following topics:
Topic See Page
Overview, Introduction and Tips 1
Accessing and Utilizing Service Reports 3
Available Reports – Descriptions and Fields 6
Running an 8XX Activity Report 17
Running an 8XX Completed Complementary Report 18

Control Center User Guide February 2018
2
Confidential Copyright 2018. All rights reserved.
No other use of the material is permitted without the express written consent of CenturyLink.
Running an 8XX History Report 19
Running an 8XX In Process Report 20
Running an 8XX In Process Complementary Report 21
Running an 8XX Port Out Report 22
Running an 8XX Port Rejects Report 23
Running an 8XX Zero Usage Report 24
Running an All 8XX Report 25
Running an All DED 8XX Detail Report 26
Running an All SWI 8XX Detail Report 27
Running an All ANI Report 28
Running an All ANI with CIC Report 29
Running an All ANI with PAC/VPAC Report 30
Running an All Active 8XX Report 31
Running an All Active ANI Report 32
Running an All Active Card Report 33
Running an All Blocked/Disconnected ANI Report 34
Running an All Card Report 35
Running an All Disconnected 8XX Report 36
Running an All Disconnected Card Report 37
Running an ANI Activity Report 38
Running an ANI History Report 39
Running an ANI Status Code Report 40
Running an ANI Zero Usage Report 41
Running a Card Activity Report 42
Running a Card History Report 43
Running a Card Zero Usage Report 44
Running a Disconnect Report 45
Running an Expiring 8XX Report 46
Running an Order ID Report 47
Running an Order Entry Reject Report 48

Control Center User Guide February 2018
3
Confidential Copyright 2018. All rights reserved.
No other use of the material is permitted without the express written consent of CenturyLink.
Accessing and Utilizing Service Reports
Procedure Follow the steps in the procedure below to access and utilize Service Reports in
Control Center.
Step Action
1 To Request a Report: In Control Center, click on Reports tile, Other Reporting subtile, then Service Status.
2 On Service Reports, click on “Request Report”

Control Center User Guide February 2018
4
Confidential Copyright 2018. All rights reserved.
No other use of the material is permitted without the express written consent of CenturyLink.
Step Action
3 Result: the “Reports” screen displays Utilize the “Select a Report” drop down menu to choose a Report
4 After requesting a report, an Information pop up will confirm the request
has been submitted:
5 To View a Report:
Click < Service Reports to return, or if checking back on a requested report, click Reports tile > Other Reporting subtile, then View Reports

Control Center User Guide February 2018
5
Confidential Copyright 2018. All rights reserved.
No other use of the material is permitted without the express written consent of CenturyLink.
Step Action
6 Under the sub menu Service Reports, select “View Report” Result: the “Active Reports” screen displays Click the “View Report” hyperlink in the URL column to open or save a specific report.

Control Center User Guide February 2018
6
Confidential Copyright 2018. All rights reserved.
No other use of the material is permitted without the express written consent of CenturyLink.
Step Action
* Note: Clicking in any date fields will pop up a calendar. You must use the calendar to select the date, you cannot type in the date field.
You can click on the Month Year area to select other months (and then day):
You can click on the Year to select other years (and then month, then day):

Control Center User Guide February 2018
7
Confidential Copyright 2018. All rights reserved.
No other use of the material is permitted without the express written consent of CenturyLink.
Available Reports
Report Description Available Fields
8XX Activity This report summarizes Switched
8XX activity within a specified
range of dates.
• Customer Account
• Order ID
• 8XX
• RTN
• Date Submitted
• Date Processed
• COS
• AOS
• LOA Date
• Status Code
• Status Date
• Current RespOrg ID
8XX Completed
Complementary
This report shows all Switched
8XX numbers once the
CenturyLink Network Ready
provisioning steps have been
completed.
Note: This report is applicable to
Resellers who are their own
RespOrg. Once complete, the
Reseller RespOrg can build the
routing.
• 8XX
• Customer Account
• Product Account
• Order Entry Date
• Days in Process
• Order ID
• COS
• Current Resp Org ID
• Resp Org Reject Code
• Resp Org Reject Message
• Resp Org Reject Date
• Network Routing Complete
Date
• Off-Net Routing Complete
Date
8XX History This report displays historical
information for a specific
Switched 8XX number.
• 8XX
• Current Status
• Account Number
• RTN
• PAC Digits
• PAC Index
• Area/Class of Service
• First Call Date

Control Center User Guide February 2018
8
Confidential Copyright 2018. All rights reserved.
No other use of the material is permitted without the express written consent of CenturyLink.
Report Description Available Fields
• Last Call Date
• Current RespOrg ID
• Current Reject Code
• End User Name
• Event
• Process Date
• Submit Date
• Receive Date
• Order ID
• GBUS Batch ID
• Ring to
• COS
• AOS
• CenturyLink as RespOrg Y/N
• Current RespOrg
• RespOrg Control Date
• Previous RespOrg
• RespOrg Reject Code
• RespOrg Reject Date
• RespOrg Reject Message
• Network Complete
• GBUS Msg Code
• GBUS Message
• User Name
8XX In Process This report provides the status of
any pending Switched 8XX
numbers.
This report follows the
provisioning of a Switched 8XX
number from Billing Ready to
Network Ready status.
• 8XX
• Customer Account
• Product Account
• Order Entry Date
• Days in Process
• Profile Active Date
• LOA Date
• Order ID
• COS
• Current RespOrg
• Carrier to be RespOrg?
• RespOrg Reject Code
• RespOrg Reject Message
• RespOrg Reject Date
• Network Routing Complete Date
• Off-Net Routing Complete

Control Center User Guide February 2018
9
Confidential Copyright 2018. All rights reserved.
No other use of the material is permitted without the express written consent of CenturyLink.
Report Description Available Fields
Date
• SMS Notify Date
• Terminate Method
8XX In Process
Complementary
This report provides status on
any pending Switched 8XX
numbers that have been sent for
On Net Routing, once a
successful Port to your RespOrg
has occurred.
Note: this report is applicable to
Resellers who are their own
RespOrg. The reseller should
route traffic to CenturyLink until
the On Net Routing is completed.
• 8XX
• Customer Account
• Product Account
• Order Entry Date
• Days in Process
• Profile Active Date
• LOA Date
• Order ID
• COS
• Current RespOrg
• Carrier to be RespOrg?
• RespOrg Reject Code
• RespOrg Reject Message
• RespOrg Reject Date
• Network Routing Complete Date
• Off-Net Routing Complete
Date
• SMS Notify Date
• Terminate Method
8XX Port Out This report provides a list of
Switched 8XX Port Outs within a
specified range of dates.
• Customer Account
• Product Account
• 8XX
• RespOrg Change Date
• Old RespOrg
• New RespOrg
8XX Port Rejects This report summarizes all
Switched 8XX activity within a
specific range of dates.
• 8XX
• Process Date
• RespOrg Reject Code
• RespOrg Reject Message
• RespOrg Reject Date
• Current RespOrg ID
• Customer Account
• Product Account
8XX Zero Usage This report lists all of the active
Switched 8XX numbers that have
experienced zero activity in the
last 30 days.
• Customer Account
• Component • Order ID • Date Received • Date Processed • Customer Status

Control Center User Guide February 2018
10
Confidential Copyright 2018. All rights reserved.
No other use of the material is permitted without the express written consent of CenturyLink.
Report Description Available Fields
• Status Code
All 8XX This report lists all of the
Switched 8XX numbers for a
specific account, including active
and disconnected Switched 8XX
numbers.
• 8XX
• RTN
• Account Number
All DED 8XX Detail
Report
This report lists 8XX details for a
specific account, including active
and disconnected DED 8XX
numbers.
• Customer Account
• 8XX • Product Account • Status • Bill Begin Date • Bill End Date • First Usage • Last Usage • Primary Trunk • Primary Switch City • Primary DNIS
• DTO1 Trunk • DTO1 Switch City • DTO1 DNIS • DTO2 Trunk • DTO2 Switch City • DTO2 DNIS • DTO ANI • End User Name • Resp Org • Class of Service • Origination Description • Complementary
Indicator
• Enhanced Indicator
• Termination • CenturyLink is Resp
Org Indicator (Y/N)
• RespOrg Reject Description
• CenturyLink Routing Date
• Off-Net Routing Date
• SMS Notify Date
• SMS Confirm Date
All Swi 8XX Detail
Report
This report lists 8XX details for a
specific account or all accounts,
• Customer Account
• 8XX • Product Account
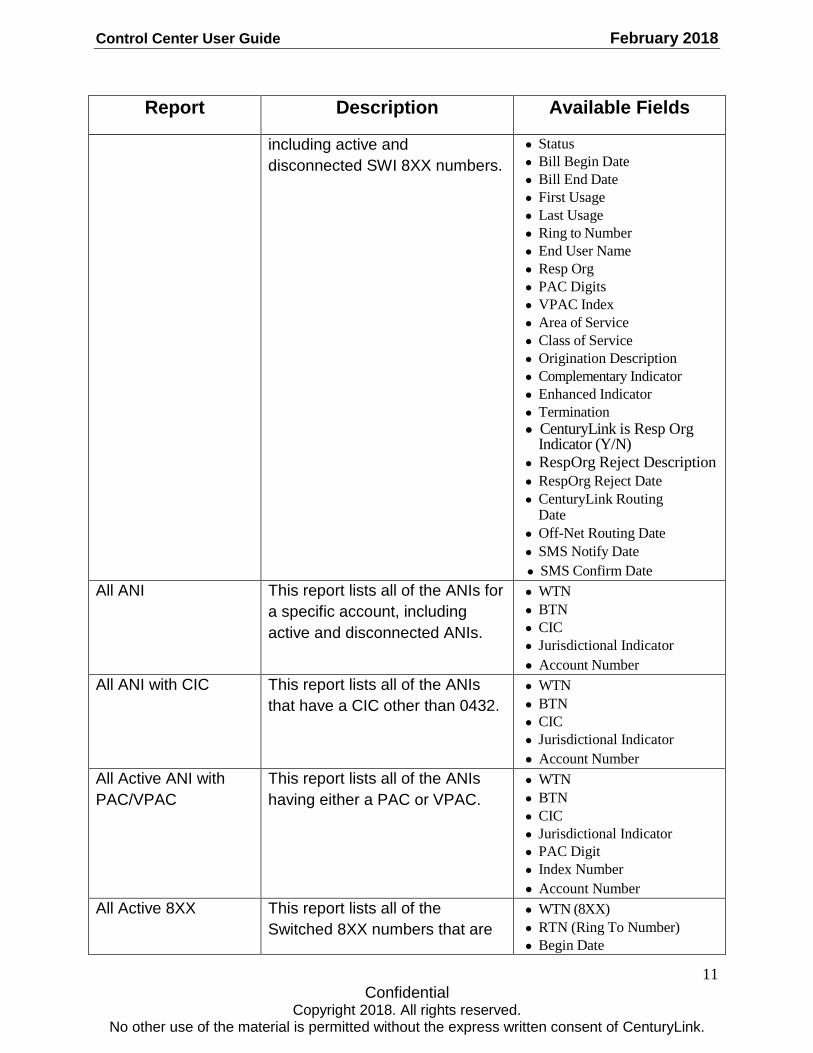
Control Center User Guide February 2018
11
Confidential Copyright 2018. All rights reserved.
No other use of the material is permitted without the express written consent of CenturyLink.
Report Description Available Fields
including active and
disconnected SWI 8XX numbers.
• Status • Bill Begin Date • Bill End Date • First Usage • Last Usage • Ring to Number • End User Name • Resp Org • PAC Digits • VPAC Index • Area of Service • Class of Service • Origination Description • Complementary Indicator • Enhanced Indicator • Termination • CenturyLink is Resp Org
Indicator (Y/N)
• RespOrg Reject Description
• RespOrg Reject Date • CenturyLink Routing
Date
• Off-Net Routing Date
• SMS Notify Date
• SMS Confirm Date
All ANI This report lists all of the ANIs for
a specific account, including
active and disconnected ANIs.
• WTN
• BTN • CIC • Jurisdictional Indicator
• Account Number
All ANI with CIC This report lists all of the ANIs
that have a CIC other than 0432.
• WTN
• BTN • CIC • Jurisdictional Indicator
• Account Number
All Active ANI with
PAC/VPAC
This report lists all of the ANIs
having either a PAC or VPAC.
• WTN
• BTN • CIC • Jurisdictional Indicator • PAC Digit • Index Number
• Account Number
All Active 8XX This report lists all of the
Switched 8XX numbers that are
• WTN (8XX)
• RTN (Ring To Number) • Begin Date
Control Center User Guide February 2018
12
Confidential Copyright 2018. All rights reserved.
No other use of the material is permitted without the express written consent of CenturyLink.
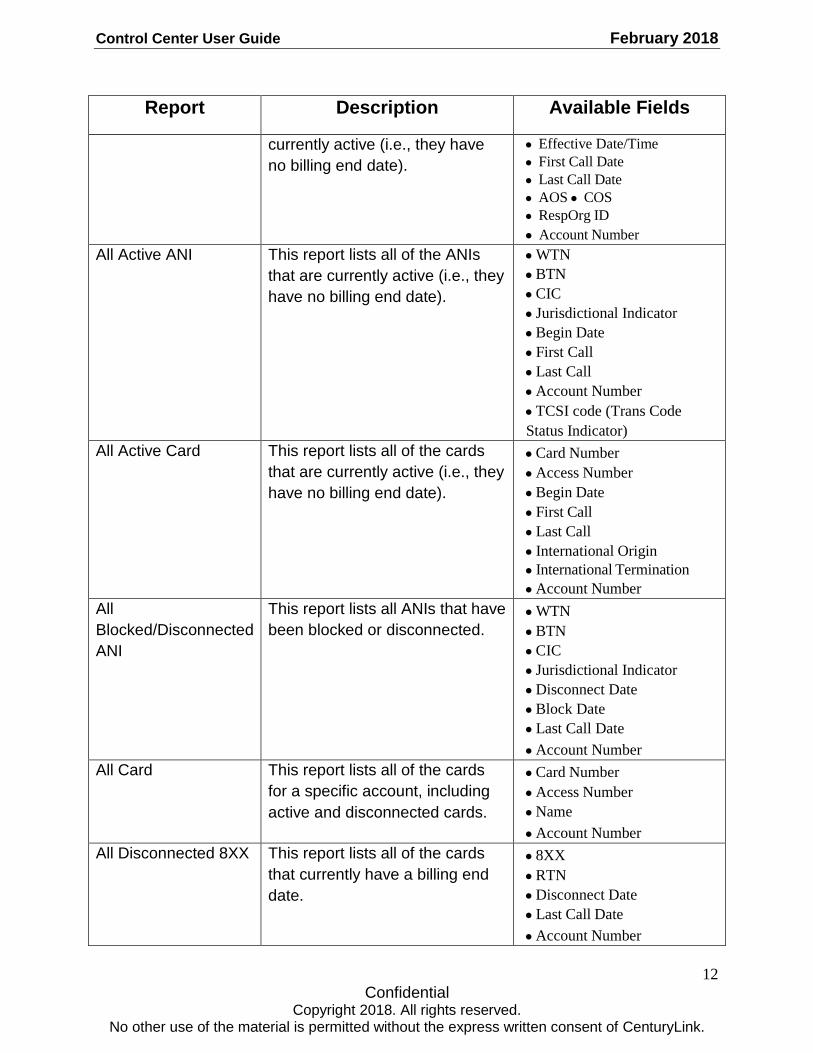
Report Description Available Fields
currently active (i.e., they have
no billing end date).
• Effective Date/Time • First Call Date • Last Call Date • AOS • COS • RespOrg ID
• Account Number
All Active ANI This report lists all of the ANIs
that are currently active (i.e., they
have no billing end date).
• WTN
• BTN
• CIC
• Jurisdictional Indicator
• Begin Date
• First Call
• Last Call
• Account Number
• TCSI code (Trans Code
Status Indicator)
All Active Card This report lists all of the cards
that are currently active (i.e., they
have no billing end date).
• Card Number
• Access Number
• Begin Date
• First Call
• Last Call
• International Origin
• International Termination
• Account Number
All
Blocked/Disconnected
ANI
This report lists all ANIs that have
been blocked or disconnected. • WTN
• BTN
• CIC
• Jurisdictional Indicator
• Disconnect Date
• Block Date
• Last Call Date
• Account Number
All Card This report lists all of the cards
for a specific account, including
active and disconnected cards.
• Card Number
• Access Number
• Name
• Account Number
All Disconnected 8XX This report lists all of the cards
that currently have a billing end
date.
• 8XX
• RTN
• Disconnect Date
• Last Call Date
• Account Number

Control Center User Guide February 2018
13
Confidential Copyright 2018. All rights reserved.
No other use of the material is permitted without the express written consent of CenturyLink.
Report Description Available Fields
All Disconnected Card This report lists all of the cards
that currently have a billing end
date.
• Card Number
• Access Number
• Disconnect Date
• Last Call Date
• Account Number
ANI Activity This report summarizes the ANI
activity for a specific ANI within a
specific range of dates.
• Customer Account
• Order ID
• WTN
• BTN
• CIC
• Date Submitted
• Date Processed
• LOA Date
• Status Date
• TC (Trans Code) / SI (Status
Indicator)
• Status Date
• Jurisdictional Indicator
ANI History This report provides six months
of historical information for a
specific ANI.
• WTN
• Current Status
• Event
• Process Date
• Submit Date
• Receive Date
• Order ID
• GBUS Batch ID
• Intralata
• Interlata
• PIC Request
• Status Date
• PAC Digits
• PAC Index
• GBUS Message Code
• GBUS Message
• User Name
ANI Status Code This report provides six months
of data for all of the ANIs with a
specific status code.
• Customer Account
• Component
• CIC
• Status Code
• Status Date

Control Center User Guide February 2018
14
Confidential Copyright 2018. All rights reserved.
No other use of the material is permitted without the express written consent of CenturyLink.
Report Description Available Fields
• Jurisdictional Indicator
ANI Zero usage This report lists all active ANIs
not used within the last 30 days. • Customer Account
• Component
• CIC
• Jurisdictional Indicator
• Order ID
• Date Received
• Date Processed
• Customer Status
• Status Code
Card Activity This report summarizes card
activity within a specific range of
dates.
• Customer Account
• Order ID
• Access Number
• Card Number
• Date Submitted
• Date Processed
• Network Effective Date
• International
Origination/Termination
Card History This report provides historical
information for a specific card.
• Account Number
• Access Number
• First Call Date
• Last Call Date
• Event
• Process Date
• Submit Date
• Receive Date
• Order ID
• GBUS Batch ID, Msg Code, Msg
• User Name
• Enduser Name
Card Zero Usage This report lists all active ANIs
not used within the last 30 days.
• Customer Account
• Component
• Access Number
• Order ID
• Date Received
• Date Processed
• Customer Status
• Status Code
Disconnect This report lists all ANIs and
Switched 8XX that currently have • Component Group
Code

Control Center User Guide February 2018
15
Confidential Copyright 2018. All rights reserved.
No other use of the material is permitted without the express written consent of CenturyLink.
Report Description Available Fields
a billing end date. • Component
• CIC
• Customer Account Number
• Product Account
• Disconnect Date
•Status Code
• Jurisdictional Indicator
Expiring 8XX This report lists all 8XX
reservations, including the date
each reservation was made, and
the date it expires.
Note: 8xx reservations expire
within 45 days. If CenturyLink
does not receive an order to
provision the 8XX within this
time, the number expires and is
returned to the SMS/SOMOS
Spare pool. Another carrier may
reserve the number once it is
released to this pool.
• Customer Account
• 8XX
• Date Reserved
• Expiration Date
Order Entry Rejects This report provides information
about a rejected order.
• Customer Account
• Product Account
• Submit Date
• Action Code
• Component Group Code (AN,
etc)
• ANI Type Code
• PAC Digits Number
• VPAC Index Number
• WTN
• BTN
• Requested Card Number
• Access Number
• LOA Date
• Primary Name
• Reject Code
• Order ID
• Intralata PIC Indicator
• Interlata PIC Indicator
• International PIC Indicator
• Local PIC Indicator
Control Center User Guide February 2018
16
Confidential Copyright 2018. All rights reserved.
No other use of the material is permitted without the express written consent of CenturyLink.
Report Description Available Fields
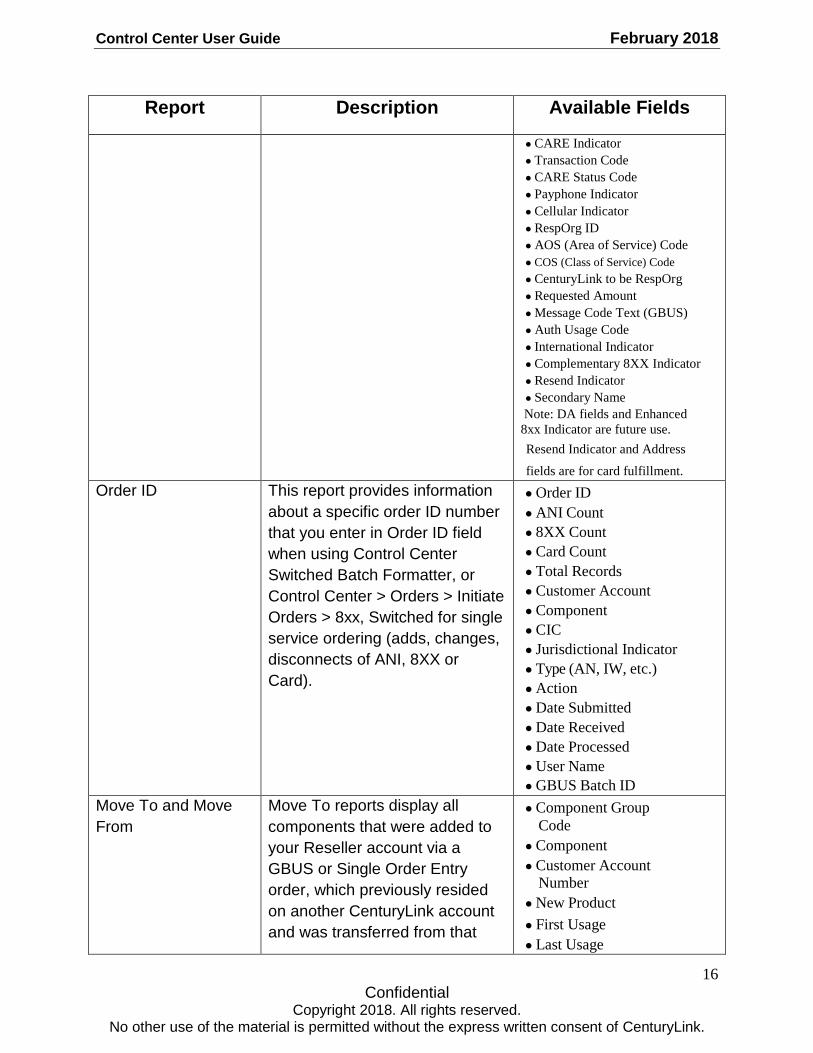
• CARE Indicator
• Transaction Code
• CARE Status Code
• Payphone Indicator
• Cellular Indicator
• RespOrg ID
• AOS (Area of Service) Code
• COS (Class of Service) Code
• CenturyLink to be RespOrg
• Requested Amount
• Message Code Text (GBUS)
• Auth Usage Code
• International Indicator
• Complementary 8XX Indicator
• Resend Indicator
• Secondary Name Note: DA fields and Enhanced
8xx Indicator are future use.
Resend Indicator and Address
fields are for card fulfillment.
Order ID This report provides information
about a specific order ID number
that you enter in Order ID field
when using Control Center
Switched Batch Formatter, or
Control Center > Orders > Initiate
Orders > 8xx, Switched for single
service ordering (adds, changes,
disconnects of ANI, 8XX or
Card).
• Order ID
• ANI Count
• 8XX Count
• Card Count
• Total Records
• Customer Account
• Component
• CIC
• Jurisdictional Indicator
• Type (AN, IW, etc.)
• Action
• Date Submitted
• Date Received
• Date Processed
• User Name
• GBUS Batch ID
Move To and Move
From
Move To reports display all
components that were added to
your Reseller account via a
GBUS or Single Order Entry
order, which previously resided
on another CenturyLink account
and was transferred from that
• Component Group Code
• Component
• Customer Account Number
• New Product
• First Usage
• Last Usage

Control Center User Guide February 2018
17
Confidential Copyright 2018. All rights reserved.
No other use of the material is permitted without the express written consent of CenturyLink.
Report Description Available Fields
account to your Reseller account.
The Move From report displays
ALL components that were
transferred from your Reseller
account to another CenturyLink
account, based upon a newer
LOA being submitted, or on traffic
still coming in on a component
which you had disconnected.
These reports are available in
Control Center > Admin > Tools
& Misc > My Downloads >
Miscellaneous.
See Control Center Using My
Downloads and My Uploads for
more information.
• Date of Transfer
• Record Count

Control Center User Guide February 2018
18
Confidential Copyright 2018. All rights reserved.
No other use of the material is permitted without the express written consent of CenturyLink.
Running an 8XX Activity Report
Procedure Follow the steps in the procedure below to run an 8XX Activity Report.
Step Action
1
From the Select a Report drop list, click 8XX Activity.
Result: the Reports page displays the fields necessary to gather information to run the report:
2 In the Begin Date field/calendar, select the first date you want the report
to cover.
3 In the End Date field/calendar, select the last date you want the report to
cover.
4 From the Account Number drop-down list, select a single account
number in the enterprise, or the ALL option.
5 Click Submit button.
Result: an Information pop up will confirm the request has been
submitted.
Note:
The amount of time to pull the requested data varies; go to View Report
to check the status of the report and view it when it is completed.

Control Center User Guide February 2018
19
Confidential Copyright 2018. All rights reserved.
No other use of the material is permitted without the express written consent of CenturyLink.
Running an 8XX Completed Complementary Report
Procedure Follow the steps in the procedure below to run an 8XX Completed Complementary
Report.
Step Action
1
From the Select a Report drop list, click 8XX Completed Complementary.
Result: the Reports page displays the fields necessary to gather information to run the report:
2 In the Begin Date field/calendar, select the first date you want the report
to cover.
3 In the End Date field/calendar, select the last date you want the report to
cover.
4 From the Account Number drop-down list, select a single account
number in the enterprise, or the ALL option.

Control Center User Guide February 2018
20
Confidential Copyright 2018. All rights reserved.
No other use of the material is permitted without the express written consent of CenturyLink.
5 Click Submit button.
Result: an Information pop up will confirm the request has been
submitted.
Note:
The amount of time to pull the requested data varies; go to View Report
to check the status of the report and view it when it is completed.
Running an 8XX History Report
Procedure Follow the steps in the procedure below to run an 8XX History Report.
Step Action
1
From the Select a Report drop list, click 8XX History.
Result: the Reports page displays the fields necessary to gather information to run the report:
2 In the 8XX Number field, enter the 8XX number for which you want to
see historical information.
3 Click Submit button.
Result: an Information pop up will confirm the request has been
submitted.
Note:
The amount of time to pull the requested data varies; go to View Report
to check the status of the report and view it when it is completed.

Control Center User Guide February 2018
21
Confidential Copyright 2018. All rights reserved.
No other use of the material is permitted without the express written consent of CenturyLink.
Running an 8XX In-Process Report
Procedure Follow the steps in the procedure below to run an 8XX In-Process Report.
Step Action
1
From the Select a Report drop list, click 8XX In-Process.
Result: the Reports page displays the fields necessary to gather information to run the report:
2 From the Account Number drop-down list, select a single account
number in the enterprise, or the ALL option.
3 Click Submit button.
Result: an Information pop up will confirm the request has been
submitted.
Note:
The amount of time to pull the requested data varies; go to View Report
to check the status of the report and view it when it is completed.

Control Center User Guide February 2018
22
Confidential Copyright 2018. All rights reserved.
No other use of the material is permitted without the express written consent of CenturyLink.
Running an 8XX In-Process Complementary Report
Procedure Follow the steps in the procedure below to run an 8XX In-Process Complementary
Report.
Step Action
1
From the Select a Report drop list, click 8XX In-Process Complementary.
Result: the Reports page displays the fields necessary to gather information to run the report:
2 From the Account Number drop-down list, select a single account
number in the enterprise, or the ALL option.
3 Click Submit button.
Result: an Information pop up will confirm the request has been
submitted.
Note:
The amount of time to pull the requested data varies; go to View Report
to check the status of the report and view it when it is completed.

Control Center User Guide February 2018
23
Confidential Copyright 2018. All rights reserved.
No other use of the material is permitted without the express written consent of CenturyLink.
Running an 8XX Port Out Report
Procedure Follow the steps in the procedure below to run an 8XX Port Out Report.
Step Action
1
From the Select a Report drop list, click 8XX Port Out.
Result: the Reports page displays the fields necessary to gather information to run the report:
2 In the Begin Date field/calendar, select the first date you want the report
to cover.
3 In the End Date field/calendar, select the last date you want the report to
cover.
4 From the Account Number drop-down list, select a single account
number in the enterprise, or the ALL option.
5 From the Resp Org ID drop-down list, select the responsible
organization on which you want to base the report.
6 Click Submit button.
Result: an Information pop up will confirm the request has been
submitted.
Note:
The amount of time to pull the requested data varies; go to View Report
to check the status of the report and view it when it is completed.

Control Center User Guide February 2018
24
Confidential Copyright 2018. All rights reserved.
No other use of the material is permitted without the express written consent of CenturyLink.
Running an 8XX Port Rejects Report
Procedure Follow the steps in the procedure below to run an 8XX Port Rejects Report.
Step Action
1
From the Select a Report drop list, click 8XX Port Rejects.
Result: the Reports page displays the fields necessary to gather information to run the report:
2 In the Begin Date field/calendar, select the first date you want the report
to cover.
3 In the End Date field/calendar, select the last date you want the report to
cover.
4 From the Account Number drop-down list, select a single account
number in the enterprise, or the ALL option.
5 In the Reject Code (XX or ALL) field, enter the reject code or ALL.
Note: See the Wholesale Services Guide – CenturyLink Wholesale
Reference Materials for a list of 8XX Reject Codes.
6 Click Submit button.
Result: an Information pop up will confirm the request has been
submitted.
Note:
The amount of time to pull the requested data varies; go to View Report
to check the status of the report and view it when it is completed.

Control Center User Guide February 2018
25
Confidential Copyright 2018. All rights reserved.
No other use of the material is permitted without the express written consent of CenturyLink.
Running an 8XX Zero Usage Report
Procedure Follow the steps in the procedure below to run an 8X Zero Usage Report.
Step Action
1
From the Select a Report drop list, click 8XX Zero Usage.
Result: the Reports page displays the fields necessary to gather information to run the report:
2 From the Account Number drop-down list, select a single account
number in the enterprise, or the ALL option.
3 Click Submit button.
Result: an Information pop up will confirm the request has been
submitted.
Note:
The amount of time to pull the requested data varies; go to View Report
to check the status of the report and view it when it is completed.

Control Center User Guide February 2018
26
Confidential Copyright 2018. All rights reserved.
No other use of the material is permitted without the express written consent of CenturyLink.
Running an All 8XX Report
Procedure Follow the steps in the procedure below to run an All 8XX Report.
Step Action
1
From the Select a Report drop list, click All 8XX.
Result: the Reports page displays the fields necessary to gather information to run the report:
2 From the Account Number drop-down list, select a single account
number in the enterprise, or the ALL option.
3 Click Submit button.
Result: an Information pop up will confirm the request has been
submitted.
Note:
The amount of time to pull the requested data varies; go to View Report
to check the status of the report and view it when it is completed.

Control Center User Guide February 2018
27
Confidential Copyright 2018. All rights reserved.
No other use of the material is permitted without the express written consent of CenturyLink.
Running an All DED 8XX Detail Report
Procedure Follow the steps in the procedure below to run an All DED 8XX Detail Report.
Step Action
1
From the Select a Report drop list, click All DED 8XX Detail.
Result: the Reports page displays the fields necessary to gather information to run the report:
2 From the Account Number drop-down list, select a single account
number in the enterprise, or the ALL option.
3 From the 8XX NPA (XXX or ALL) drop-down list, select a single 8XX
NPA, or ALL option.
4 Click Submit button.
Result: an Information pop up will confirm the request has been
submitted.
Note:
The amount of time to pull the requested data varies; go to View Report
to check the status of the report and view it when it is completed.

Control Center User Guide February 2018
28
Confidential Copyright 2018. All rights reserved.
No other use of the material is permitted without the express written consent of CenturyLink.
Running an All SWI 8XX Detail Report
Procedure Follow the steps in the procedure below to run an All SWI 8XX Detail Report.
Step Action
1
From the Select a Report drop list, click All SWI 8XX Detail.
Result: the Reports page displays the fields necessary to gather information to run the report:
2 From the Account Number drop-down list, select a single account
number in the enterprise, or the ALL option.
3 Click Submit button.
Result: an Information pop up will confirm the request has been
submitted.
Note:
The amount of time to pull the requested data varies; go to View Report
to check the status of the report and view it when it is completed.
Control Center User Guide February 2018
29
Confidential Copyright 2018. All rights reserved.
No other use of the material is permitted without the express written consent of CenturyLink.
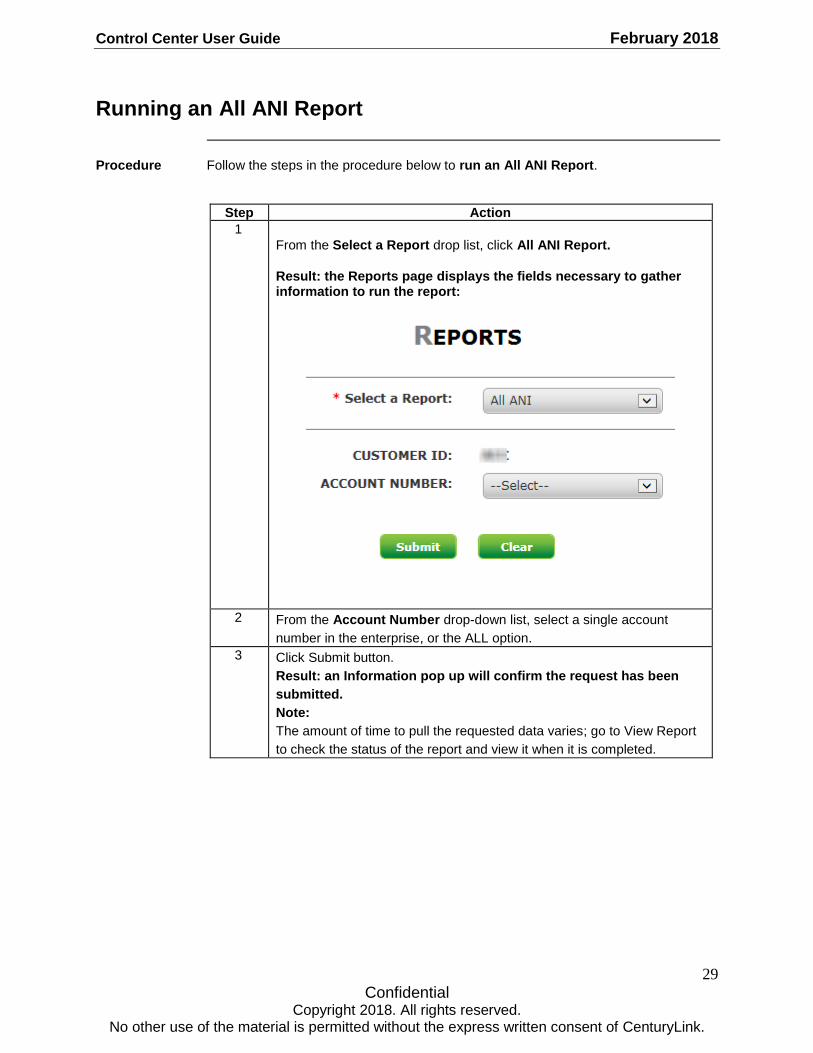
Running an All ANI Report
Procedure Follow the steps in the procedure below to run an All ANI Report.
Step Action
1
From the Select a Report drop list, click All ANI Report.
Result: the Reports page displays the fields necessary to gather information to run the report:
2 From the Account Number drop-down list, select a single account
number in the enterprise, or the ALL option.
3 Click Submit button.
Result: an Information pop up will confirm the request has been
submitted.
Note:
The amount of time to pull the requested data varies; go to View Report
to check the status of the report and view it when it is completed.

Control Center User Guide February 2018
30
Confidential Copyright 2018. All rights reserved.
No other use of the material is permitted without the express written consent of CenturyLink.
Running an All ANI with CIC Report
Procedure Follow the steps in the procedure below to run an All ANI with CIC Report.
Step Action
1
From the Select a Report drop list, click All ANI with CIC Report.
Result: the Reports page displays the fields necessary to gather information to run the report:
2 From the Account Number drop-down list, select a single account
number in the enterprise, or the ALL option.
3 From the CIC drop-down list, select a single CIC, or the ALL option if
available.
4 Click Submit button.
Result: an Information pop up will confirm the request has been
submitted.
Note:
The amount of time to pull the requested data varies; go to View Report
to check the status of the report and view it when it is completed.

Control Center User Guide February 2018
31
Confidential Copyright 2018. All rights reserved.
No other use of the material is permitted without the express written consent of CenturyLink.
Running an All ANI with PAC/VPAC Report
Procedure Follow the steps in the procedure below to run an All ANI with PAC/VPAC Report.
Step Action
1
From the Select a Report drop list, click All ANI with PAC/VPAC Report.
Result: the Reports page displays the fields necessary to gather information to run the report:
2 From the Account Number drop-down list, select a single account
number in the enterprise, or the ALL option.
3 Click Submit button.
Result: an Information pop up will confirm the request has been
submitted.
Note:
The amount of time to pull the requested data varies; go to View Report
to check the status of the report and view it when it is completed.

Control Center User Guide February 2018
32
Confidential Copyright 2018. All rights reserved.
No other use of the material is permitted without the express written consent of CenturyLink.
Running an All Active 8xx Report
Procedure Follow the steps in the procedure below to run an All Active 8xx Report.
Step Action
1
From the Select a Report drop list, click All ANI Active 8xx Report.
Result: the Reports page displays the fields necessary to gather information to run the report:
2 From the Account Number drop-down list, select a single account
number in the enterprise, or the ALL option.
3 Click Submit button.
Result: an Information pop up will confirm the request has been
submitted.
Note:
The amount of time to pull the requested data varies; go to View Report
to check the status of the report and view it when it is completed.

Control Center User Guide February 2018
33
Confidential Copyright 2018. All rights reserved.
No other use of the material is permitted without the express written consent of CenturyLink.
Running an All Active ANI Report
Procedure Follow the steps in the procedure below to run an All Active ANI Report.
Step Action
1
From the Select a Report drop list, click All ANI Active ANI Report.
Result: the Reports page displays the fields necessary to gather information to run the report:
2 In the Begin Date field/calendar, select the first date you want the report
to cover.
3 In the End Date field/calendar, select the last date you want the report to
cover.
4 From the Account Number drop-down list, select a single account
number in the enterprise, or the ALL option.
5 Click Submit button.
Result: an Information pop up will confirm the request has been
submitted.
Note:
The amount of time to pull the requested data varies; go to View Report
to check the status of the report and view it when it is completed.

Control Center User Guide February 2018
34
Confidential Copyright 2018. All rights reserved.
No other use of the material is permitted without the express written consent of CenturyLink.
Running an All Active Card Report
Procedure Follow the steps in the procedure below to run an All Active Card Report.
Step Action
1
From the Select a Report drop list, click All ANI Active Card Report.
Result: the Reports page displays the fields necessary to gather information to run the report:
2 From the Account Number drop-down list, select a single account
number in the enterprise, or the ALL option.
3 Click Submit button.
Result: an Information pop up will confirm the request has been
submitted.
Note:
The amount of time to pull the requested data varies; go to View Report
to check the status of the report and view it when it is completed.

Control Center User Guide February 2018
35
Confidential Copyright 2018. All rights reserved.
No other use of the material is permitted without the express written consent of CenturyLink.
Running an All Blocked/Disconnected ANI Report
Procedure Follow the steps in the procedure below to run an All Blocked/Disconnected ANI
Report.
Step Action
1
From the Select a Report drop list, click All Blocked/Disconnect ANI Report.
Result: the Reports page displays the fields necessary to gather information to run the report:
2 From the Account Number drop-down list, select a single account
number in the enterprise, or the ALL option.
3 Click Submit button.
Result: an Information pop up will confirm the request has been
submitted.
Note:
The amount of time to pull the requested data varies; go to View Report
to check the status of the report and view it when it is completed.

Control Center User Guide February 2018
36
Confidential Copyright 2018. All rights reserved.
No other use of the material is permitted without the express written consent of CenturyLink.
Running an All Card Report
Procedure Follow the steps in the procedure below to run an All Card Report.
Step Action
1
From the Select a Report drop list, click All Card Report.
Result: the Reports page displays the fields necessary to gather information to run the report:
2 From the Account Number drop-down list, select a single account
number in the enterprise, or the ALL option.
3 Click Submit button.
Result: an Information pop up will confirm the request has been
submitted.
Note:
The amount of time to pull the requested data varies; go to View Report
to check the status of the report and view it when it is completed.
Control Center User Guide February 2018
37
Confidential Copyright 2018. All rights reserved.
No other use of the material is permitted without the express written consent of CenturyLink.
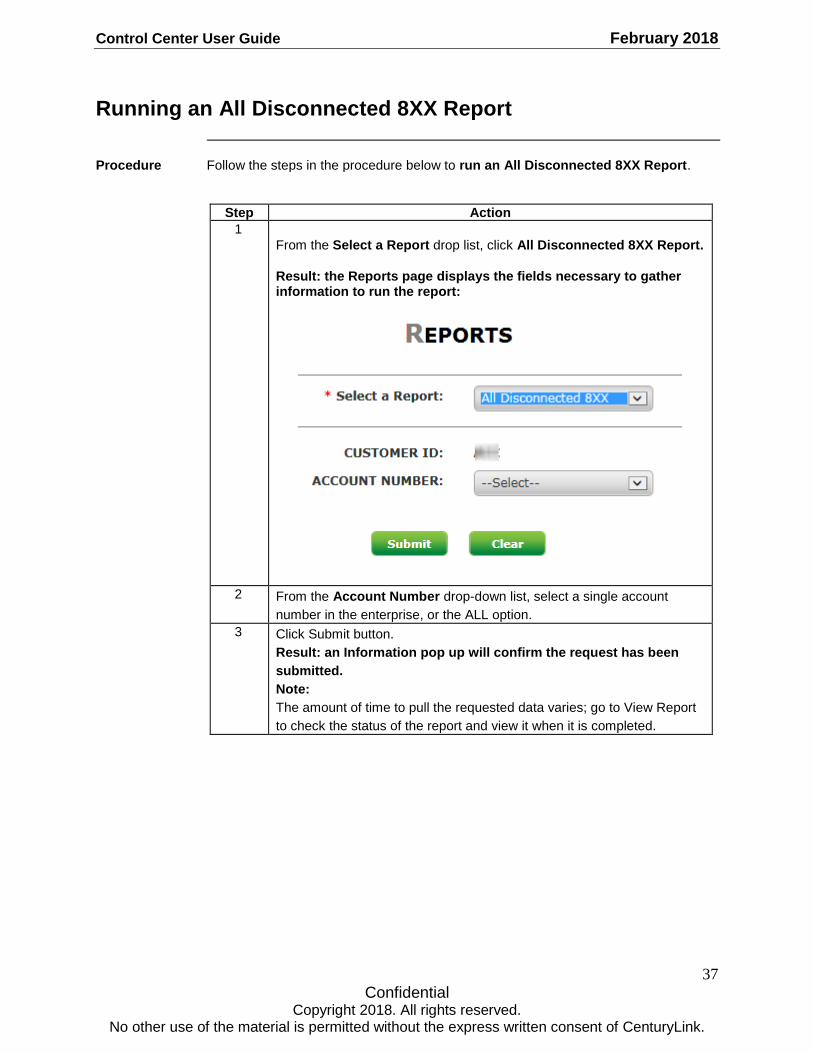
Running an All Disconnected 8XX Report
Procedure Follow the steps in the procedure below to run an All Disconnected 8XX Report.
Step Action
1
From the Select a Report drop list, click All Disconnected 8XX Report.
Result: the Reports page displays the fields necessary to gather information to run the report:
2 From the Account Number drop-down list, select a single account
number in the enterprise, or the ALL option.
3 Click Submit button.
Result: an Information pop up will confirm the request has been
submitted.
Note:
The amount of time to pull the requested data varies; go to View Report
to check the status of the report and view it when it is completed.

Control Center User Guide February 2018
38
Confidential Copyright 2018. All rights reserved.
No other use of the material is permitted without the express written consent of CenturyLink.
Running an All Disconnected Card Report
Procedure Follow the steps in the procedure below to run an All Disconnected Card Report.
Step Action
1
From the Select a Report drop list, click All Disconnected Card Report.
Result: the Reports page displays the fields necessary to gather information to run the report:
2 From the Account Number drop-down list, select a single account
number in the enterprise, or the ALL option.
3 Click Submit button.
Result: an Information pop up will confirm the request has been
submitted.
Note:
The amount of time to pull the requested data varies; go to View Report
to check the status of the report and view it when it is completed.

Control Center User Guide February 2018
39
Confidential Copyright 2018. All rights reserved.
No other use of the material is permitted without the express written consent of CenturyLink.
Running an ANI Activity Report
Procedure Follow the steps in the procedure below to run an ANI Activity Report.
Step Action
1
From the Select a Report drop list, click ANI Activity Report.
Result: the Reports page displays the fields necessary to gather information to run the report:
2 In the Begin Date field/calendar, select the first date you want the report
to cover.
3 In the End Date field/calendar, select the last date you want the report to
cover.
4 From the Account Number drop-down list, select a single account
number in the enterprise, or the ALL option.
5 Click Submit button.
Result: an Information pop up will confirm the request has been
submitted.
Note:
The amount of time to pull the requested data varies; go to View Report
to check the status of the report and view it when it is completed.
Control Center User Guide February 2018
40
Confidential Copyright 2018. All rights reserved.
No other use of the material is permitted without the express written consent of CenturyLink.
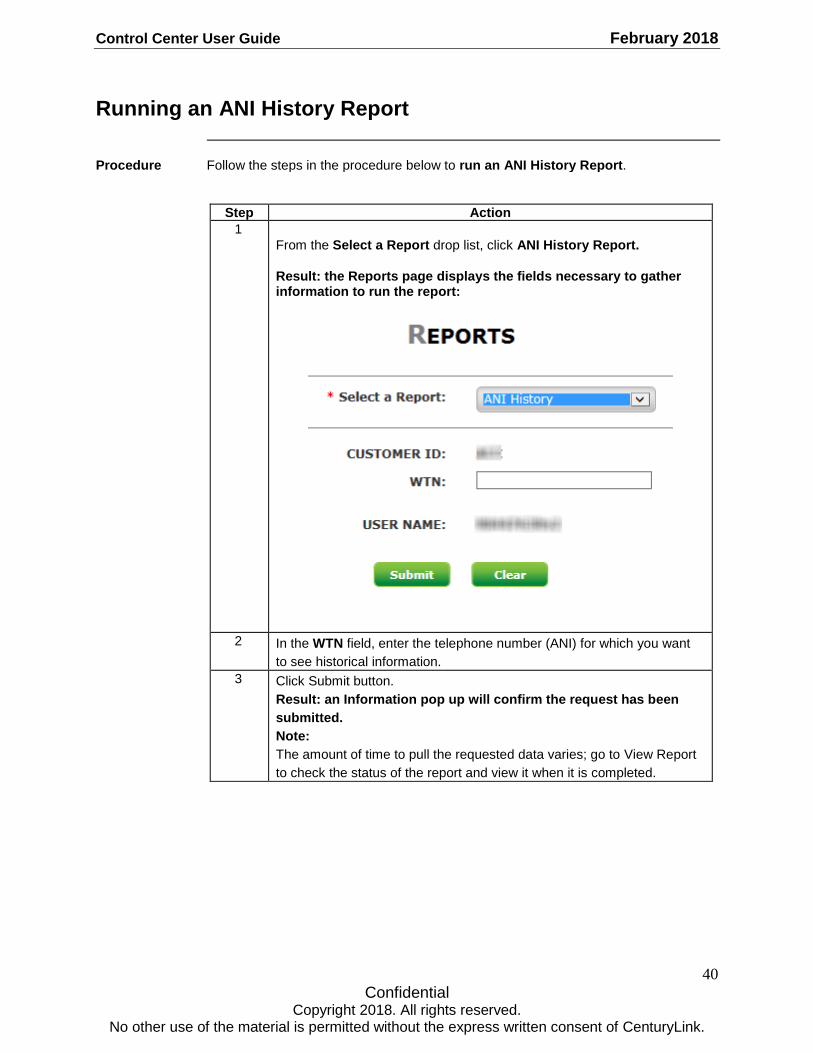
Running an ANI History Report
Procedure Follow the steps in the procedure below to run an ANI History Report.
Step Action
1
From the Select a Report drop list, click ANI History Report.
Result: the Reports page displays the fields necessary to gather information to run the report:
2 In the WTN field, enter the telephone number (ANI) for which you want
to see historical information.
3 Click Submit button.
Result: an Information pop up will confirm the request has been
submitted.
Note:
The amount of time to pull the requested data varies; go to View Report
to check the status of the report and view it when it is completed.

Control Center User Guide February 2018
41
Confidential Copyright 2018. All rights reserved.
No other use of the material is permitted without the express written consent of CenturyLink.
Running an ANI Status Code Report
Procedure Follow the steps in the procedure below to run an ANI Status Code Report.
Step Action
4
From the Select a Report drop list, click ANI Status Code Report.
Result: the Reports page displays the fields necessary to gather information to run the report:
5 In the Status Code field, enter the code for which you want to see
associated ANIs.
Note: See the Wholesale Services Guide – CenturyLink Wholesale
Reference Materials for a list of ANI Status Codes.
6 In the Begin Date field/calendar, select the first date you want the report
to cover.
7 In the End Date field/calendar, select the last date you want the report to
cover.
8 From the Account Number drop-down list, select a single account
number in the enterprise, or the ALL option.
9 Click Submit button.
Result: an Information pop up will confirm the request has been
submitted.
Note:
The amount of time to pull the requested data varies; go to View Report
to check the status of the report and view it when it is completed.

Control Center User Guide February 2018
42
Confidential Copyright 2018. All rights reserved.
No other use of the material is permitted without the express written consent of CenturyLink.
Running an ANI Zero Usage Report
Procedure Follow the steps in the procedure below to run an ANI Zero Usage Report.
Step Action
1
From the Select a Report drop list, click ANI Zero Usage Report.
Result: the Reports page displays the fields necessary to gather information to run the report:
2 From the Account Number drop-down list, select a single account
number in the enterprise, or the ALL option.
3 Click Submit button.
Result: an Information pop up will confirm the request has been
submitted.
Note:
The amount of time to pull the requested data varies; go to View Report
to check the status of the report and view it when it is completed.

Control Center User Guide February 2018
43
Confidential Copyright 2018. All rights reserved.
No other use of the material is permitted without the express written consent of CenturyLink.
Running a Card Activity Report
Procedure Follow the steps in the procedure below to run a Card Activity Report.
Step Action
1
From the Select a Report drop list, click Card Activity Report.
Result: the Reports page displays the fields necessary to gather information to run the report:
2 In the Begin Date field/calendar, select the first date you want the report
to cover.
3 In the End Date field/calendar, select the last date you want the report to
cover.
4 From the Account Number drop-down list, select a single account
number in the enterprise, or the ALL option.
5 Click Submit button.
Result: an Information pop up will confirm the request has been
submitted.
Note:
The amount of time to pull the requested data varies; go to View Report
to check the status of the report and view it when it is completed.

Control Center User Guide February 2018
44
Confidential Copyright 2018. All rights reserved.
No other use of the material is permitted without the express written consent of CenturyLink.
Running a Card History Report
Procedure Follow the steps in the procedure below to run a Card History Report.
Step Action
1
From the Select a Report drop list, click Card History Report.
Result: the Reports page displays the fields necessary to gather information to run the report:
2 In the Card Number field, enter the unique identifier assigned to the
card for which you want to see historical information.
3 Click Submit button.
Result: an Information pop up will confirm the request has been
submitted.
Note:
The amount of time to pull the requested data varies; go to View Report
to check the status of the report and view it when it is completed.

Control Center User Guide February 2018
45
Confidential Copyright 2018. All rights reserved.
No other use of the material is permitted without the express written consent of CenturyLink.
Running a Card Zero Usage Report
Procedure Follow the steps in the procedure below to run a Card Zero Usage Report.
Step Action
1
From the Select a Report drop list, click Card Zero Usage Report.
Result: the Reports page displays the fields necessary to gather information to run the report:
2 From the Account Number drop-down list, select a single account
number in the enterprise, or the ALL option.
3 Click Submit button.
Result: an Information pop up will confirm the request has been
submitted.
Note:
The amount of time to pull the requested data varies; go to View Report
to check the status of the report and view it when it is completed.

Control Center User Guide February 2018
46
Confidential Copyright 2018. All rights reserved.
No other use of the material is permitted without the express written consent of CenturyLink.
Running a Disconnect Report
Procedure Follow the steps in the procedure below to run a Disconnect Report.
Step Action
1
From the Select a Report drop list, click Disconnect Report.
Result: the Reports page displays the fields necessary to gather information to run the report:
2 From the Account Number drop-down list, select a single account
number in the enterprise, or the ALL option.
3 In the Days field, enter the number of days for which you want to see
disconnect information.
4 Click Submit button.
Result: an Information pop up will confirm the request has been
submitted.
Note:
The amount of time to pull the requested data varies; go to View Report
to check the status of the report and view it when it is completed.

Control Center User Guide February 2018
47
Confidential Copyright 2018. All rights reserved.
No other use of the material is permitted without the express written consent of CenturyLink.
Running an Expiring 8XX Report
Procedure Follow the steps in the procedure below to run an Expiring 8XX Report.
Step Action
1
From the Select a Report drop list, click Expiring 8XX Report.
Result: the Reports page displays the fields necessary to gather information to run the report:
2 From the Account Number drop-down list, select a single account
number in the enterprise, or the ALL option.
3 Click Submit button.
Result: an Information pop up will confirm the request has been
submitted.
Note:
The amount of time to pull the requested data varies; go to View Report
to check the status of the report and view it when it is completed.

Control Center User Guide February 2018
48
Confidential Copyright 2018. All rights reserved.
No other use of the material is permitted without the express written consent of CenturyLink.
Running an Order ID Report
Procedure Follow the steps in the procedure below to run an Order ID Report.
Step Action
1
From the Select a Report drop list, click Order ID Report.
Result: the Reports page displays the fields necessary to gather information to run the report:
2 In the Order ID field, type the unique identifier associated with the order
on which you want to base the report.
3 Click Submit button.
Result: an Information pop up will confirm the request has been
submitted.
Note:
The amount of time to pull the requested data varies; go to View Report
to check the status of the report and view it when it is completed.

Control Center User Guide February 2018
49
Confidential Copyright 2018. All rights reserved.
No other use of the material is permitted without the express written consent of CenturyLink.
Running an Order Entry Reject Report
Procedure Follow the steps in the procedure below to run an Order Entry Reject Report.
Step Action
1
From the Select a Report drop list, click Order Entry Reject Report.
Result: the Reports page displays the fields necessary to gather information to run the report:
2 In the Begin Date field/calendar, select the first date you want the report
to cover.
3 In the End Date field/calendar, select the last date you want the report to
cover.
4 From the Account Number drop-down list, select a single account
number in the enterprise, or the ALL option.
5 From the GBUS Reject Code drop-down list, select the reject code on
which you want to base the report, or ALL.
Note: See Control Center Switched Services Ordering Error Handling
for a list of GBUS Reject codes.
6 Click Submit button.
Result: an Information pop up will confirm the request has been
submitted.
Note:
The amount of time to pull the requested data varies; go to View Report
to check the status of the report and view it when it is completed.


![User Manua Srd 16xx, 8xx English_web 0722[1]](https://static.fdocuments.in/doc/165x107/577cdc9e1a28ab9e78aaf2db/user-manua-srd-16xx-8xx-englishweb-07221.jpg)