SERVICE & OPERATING MANUAL Manuals/SandPIPER Service Manuals... · Principle of Pump Operation ......
33
WARREN RUPP ® , INC. • A Unit of IDEX Corporation • P.O. Box 1568, Mansfield, Ohio 44901-1568 USA • Telephone (419) 524-8388 • Fax (419) 522-7867 • www.warrenrupp.com 520-222-000 11/04 Rev C ©Copyright 2004 Warren Rupp, Inc. All rights reserved. Engineering Data and Temperature Limitations .................................................. 1 Explanation of Pump Nomenclature .................................................................... 2 Performance Curve ............................................................................................... 3 Flange Dimensions .............................................................................................. 4 Metric Flange Dimensions ................................................................................... 5 Demensions ......................................................................................................... 6 Metric Demensions ............................................................................................... 7 Principle of Pump Operation ................................................................................ 8 Installation and Start-Up ....................................................................................... 8 Air Supply ............................................................................................................. 8 Air Valve Lubrication ............................................................................................. 8 Air Line Moisture .................................................................................................. 8 Air Inlet and Priming ............................................................................................. 8 Between Uses ...................................................................................................... 8 Installation Guide .................................................................................................. 9 Troubleshooting .................................................................................................. 10 Warranty ............................................................................................................. 10 Recycling ............................................................................................................ 11 Important Safety Information .............................................................................. 11 Material Codes ................................................................................................... 12 Composite Repair Parts Drawing ...................................................................... 14 Available Service and Conversion Kits .............................................................. 14 Composite Repair Parts List (S30) ..................................................................... 15 Composite Repair Parts List (T30) ..................................................................... 16 **Air Distribution Valve Assembly Drawing and Parts List ................................. 17 Air Distribution Valve Servicing .......................................................................... 18 **Air Distribution Valve w/Stroke Indicator Assembly Drawing and Parts List ...19 **Air Distribution Valve w/Stroke Indicator Servicing ......................................... 20 **Solenoid Shifted Air Valve Drawing ................................................................ 21 **Solenoid Shifted Air Valve Parts List ............................................................... 21 **Solenoid Shifted Air Distribution Valve Option ................................................ 22 Diaphragm Service Drawing, with Overlay ........................................................ 23 Diaphragm Service Drawing, Non-Overlay ....................................................... 23 Diaphragm Servicing .......................................................................................... 24 Overlay Diaphragm Servicing ............................................................................ 24 Actuator Plunger Servicing ................................................................................. 25 Check Valve Servicing ........................................................................................ 26 Check Valve Drawing ......................................................................................... 26 Optional Muffler Configurations ......................................................................... 27 Optional Muffler Configuration Drawing ............................................................ 27 Pumping Hazardous Liquids .............................................................................. 28 Converting Pump for Piping Exhaust Air ............................................................ 28 Converted Exhaust Illustration ........................................................................... 28 **RuppTech® Leak Detection Options & Drawing ............................................. 29 **RuppTech® Electronic Leak Detector Installation .......................................... 29 **RuppTech® Mechanical Leak Detector Installation ....................................... 29 **RuppTech® Pulse Output Kit Drawing ............................................................ 30 **RuppTech® Pulse Output Kit Options ............................................................. 30 Grounding the Pump .......................................................................................... 31 A WARREN RUPP PUMP BRAND SANDPIPER ® SERVICE & OPERATING MANUAL Model S30 Metallic Design Level 1 Model S30 Metallic Design Level 1 Model S30 Metallic Design Level 1 Model S30 Metallic Design Level 1 Model S30 Metallic Design Level 1 Including T30 FDA Compliant Models Including T30 FDA Compliant Models Including T30 FDA Compliant Models Including T30 FDA Compliant Models Including T30 FDA Compliant Models Table of Contents U.S. Patent # 5,996,627; 6,241,487 Other U.S. Patents Applied for CE I M2 c/b T5 II 2GD b T5 **Note: Not ATEX Compliant
Transcript of SERVICE & OPERATING MANUAL Manuals/SandPIPER Service Manuals... · Principle of Pump Operation ......

WARREN RUPP®, INC. • A Unit of IDEX Corporation • P.O. Box 1568, Mansfield, Ohio 44901-1568 USA • Telephone (419) 524-8388 • Fax (419) 522-7867 • www.warrenrupp.com
520-222-000 11/04 Rev C ©Copyright 2004 Warren Rupp, Inc. All rights reserved.
Engineering Data and Temperature Limitations .................................................. 1
Explanation of Pump Nomenclature .................................................................... 2
Performance Curve ............................................................................................... 3
Flange Dimensions .............................................................................................. 4
Metric Flange Dimensions ................................................................................... 5
Demensions ......................................................................................................... 6
Metric Demensions ............................................................................................... 7
Principle of Pump Operation ................................................................................ 8
Installation and Start-Up ....................................................................................... 8
Air Supply ............................................................................................................. 8
Air Valve Lubrication ............................................................................................. 8
Air Line Moisture .................................................................................................. 8
Air Inlet and Priming ............................................................................................. 8
Between Uses ...................................................................................................... 8
Installation Guide .................................................................................................. 9
Troubleshooting ..................................................................................................10
Warranty .............................................................................................................10
Recycling ............................................................................................................11
Important Safety Information ..............................................................................11
Material Codes ...................................................................................................12
Composite Repair Parts Drawing ......................................................................14
Available Service and Conversion Kits ..............................................................14
Composite Repair Parts List (S30) .....................................................................15
Composite Repair Parts List (T30) .....................................................................16
**Air Distribution Valve Assembly Drawing and Parts List .................................17
Air Distribution Valve Servicing ..........................................................................18
**Air Distribution Valve w/Stroke Indicator Assembly Drawing and Parts List ...19
**Air Distribution Valve w/Stroke Indicator Servicing .........................................20
**Solenoid Shifted Air Valve Drawing ................................................................21
**Solenoid Shifted Air Valve Parts List ...............................................................21
**Solenoid Shifted Air Distribution Valve Option ................................................22
Diaphragm Service Drawing, with Overlay ........................................................23
Diaphragm Service Drawing, Non-Overlay .......................................................23
Diaphragm Servicing ..........................................................................................24
Overlay Diaphragm Servicing ............................................................................24
Actuator Plunger Servicing .................................................................................25
Check Valve Servicing ........................................................................................26
Check Valve Drawing .........................................................................................26
Optional Muffler Configurations .........................................................................27
Optional Muffler Configuration Drawing ............................................................27
Pumping Hazardous Liquids ..............................................................................28
Converting Pump for Piping Exhaust Air ............................................................28
Converted Exhaust Illustration ...........................................................................28
**RuppTech® Leak Detection Options & Drawing .............................................29
**RuppTech® Electronic Leak Detector Installation ..........................................29
**RuppTech® Mechanical Leak Detector Installation .......................................29
**RuppTech® Pulse Output Kit Drawing ............................................................30
**RuppTech® Pulse Output Kit Options .............................................................30
Grounding the Pump ..........................................................................................31
A WARREN RUPP PUMP BRANDSANDPIPER®
SERVICE & OPERATING MANUAL
Model S30 Metallic Design Level 1Model S30 Metallic Design Level 1Model S30 Metallic Design Level 1Model S30 Metallic Design Level 1Model S30 Metallic Design Level 1Including T30 FDA Compliant ModelsIncluding T30 FDA Compliant ModelsIncluding T30 FDA Compliant ModelsIncluding T30 FDA Compliant ModelsIncluding T30 FDA Compliant Models
Table of Contents
U.S. Patent #5,996,627; 6,241,487Other U.S. PatentsApplied for CE
I M2 c/b T5II 2GD b T5
**Note: Not ATEX Compliant


520-222-000 11/04 Rev C Model S30 Metallic Design Level 1 Page 1
Quality SystemISO9001 Certified
EnvironmentalManagement System
ISO14001 Certified
A WARREN RUPP PUMP BRANDSANDPIPER®
S30S30S30S30S30 MetallicMetallicMetallicMetallicMetallicDesign Level 1Design Level 1Design Level 1Design Level 1Design Level 1Ball VBall VBall VBall VBall ValvealvealvealvealveAir-PoweredDouble-Diaphragm Pump
ENGINEERING, PERFORMANCE& CONSTRUCTION DATA
Buna N/White Nitrile General purpose, oil-resistant. Shows good solvent, oil, water and hydraulic fluid resistance.Should not be used with highly polar solvents like acetone and MEK, ozone, chlorinated 190°F -10°Fhydrocarbons and nitro hyrdrocarbons. 88°C -23°C
EPDM Shows very good water and chemical resistance. Has poor resistance to oil and solvents, 280°F -40°Fbut is fair in ketones and alcohols. 138°C -40°C
Neoprene All purpose. Resistant to vegetable oil. Generally not affected by moderate chemicals,fats, greases and many oils and solvents. Generally attacked by strong oxidizing acids, ketones, 200°F -10°Festers, nitro hydrocarbons and chlorinated aromatic hydrocarbons. 93°C -23°C
Santoprene® Injection molded thermoplastic elastomer with no fabric layer. Long mechanical flex 275°F -40°Flife. Excellent abrasion resistance. 135°C -40°C
Virgin PTFE Chemically inert, virtually impervious. Very few chemicals are known to react chemically withPTFE: molten alkali metals, turbulent liquid or gaseous fluorine and a few fluoro-chemicals such as 220°F -35°Fchlorine trifluoride or oxygen difluoride which readily liberate free fluorine at elevated temperatures. 104°C -37°C
Viton® Shows good resistance to a wide range of oils and solvents; especially all aliphatic, aromaticand halogenated hydrocarbons, acids, animal and vegetable oils. Hot water or hot aqueous solutions 350°F -40°F(over 70°F) will attack Viton. 177°C -40°C
Polypropylene 180°F 32°F82°C 0°C
Materials Maximum MinimumOperating Temperatures
For specific applications, always consult The Warren Rupp Chemical Resistance Chart
SANDPIPER® pumps are designed to be powered only by compressed air.
INTAKE/DISCHARGE PIPE SIZE3" NPT(internal) / 3" ANSI Flange
3" BSPT Tapered (internal)
CAPACITY0 to 235 gallons per minute(0 to 889 liters per minute)
AIR VALVENo-lube, no-stall
design
SOLIDS-HANDLINGUp to .25 in. (6mm)
HEADS UP TO125 psi or 289 ft. of water(8.6 Kg/cm2 or 86 meters)
DISPLACEMENT/STROKE.94 Gallon / 3.56 liter
CAUTION! Operating temperature limitations are as follows:
Air Inlet Side View
Air Exhaust Side View
CE
U.S. Patent #5,996,627; 6,241,487Other U.S. PatentsApplied for
I M2 c/b T5II 2GD b T5

520-222-000 11/04 Rev C Model S30 Metallic Design Level 1 Page 2
Explanation of Pump Nomenclature ** Note: ATEX compliant pumps must be ordered with a metal muffler and no kit options
Check Diaphragm/ Check Non-Wetted ShippingMODEL Pump Pump Valve Design Wetted Check Valve Valve Material Porting Pump Pump Kit Weight
Brand Size Type Level Material Materials Seat Options Options Style Options Options lbs. (kg)
S30B1ABBANS000. S 30 B 1 A B B A N S 0 00. 116 (53)S30B1AEEANS000. S 30 B 1 A E E A N S 0 00. 116 (53)S30B1AGTANS000. S 30 B 1 A G T A N S 0 00. 116 (53)S30B1ANNANS000. S 30 B 1 A N N A N S 0 00. 116 (53)S30B1A1EANS000. S 30 B 1 A 1 E A N S 0 00. 116 (53)S30B1AVTANS000. S 30 B 1 A V T A N S 0 00. 116 (53)S30B1IBBANS000. S 30 B 1 I B B A N S 0 00. 215 (98)S30B1IEEANS000. S 30 B 1 I E E A N S 0 00. 215 (98)S30B1IGTANS000. S 30 B 1 I G T A N S 0 00. 215 (98)S30B1INNANS000. S 30 B 1 I N N A N S 0 00. 215 (98)S30B1I1EANS000. S 30 B 1 I 1 E A N S 0 00. 215 (98)S30B1IVTANS000. S 30 B 1 I V T A N S 0 00. 215 (98)S30B1IEEANS000. S 30 B 1 I E E A N S 0 00. 215 (98)S30B1SBBANS000. S 30 B 1 S B B A N S 0 00. 194 (87)S30B1SGTANS000. S 30 B 1 S G T A N S 0 00. 194 (87)S30B1SNNANS000. S 30 B 1 S N N A N S 0 00. 194 (87)S30B1S1EANS000. S 30 B 1 S 1 E A N S 0 00. 194 (87)S30B1SVTANS000. S 30 B 1 S V T A N S 0 00. 194 (87)S30B1HGTANS000. S 30 B 1 H G T A N S 0 00. 235 (107)T30B1SFSWAS000. T 30 B 1 S F S W A S 0 00. 243 (110)
Pump BrandS= SandPIPER®
T= FDA Compliant
Pump Size30=3"
Check Valve TypeB= Ball
Design Level1= Design Level
Wetted MaterialA= AluminumI = Cast IronS= Stainless SteelH= Alloy C
Diaphragm Check Valve Materials1= Santoprene/SantopreneA= PTFE-FDA Nitrile/PTFEB= Buna/BunaC=Viton/PTFED=FDA Santoprene/FDA SantopreneE=EPDM/EPDMF= FDA Nitrile/FDA NitrileG=PTFE -Neoprene/PTFEI= EPDM/SantopreneN=Neoprene/NeopreneV=Viton/Viton
Check Valve SeatA=Aluminum B=BunaC=Carbon Steel E=EPDMN=Neoprene S=Stainless SteelT= PTFE V=Viton
Non-Wetted Material OptionsA= Painted AluminumI= Cast IronJ= Painted Aluminum w/PTFE
Coated Hardware
W=White Epoxy Coated Aluminummw/Stainless Steel HardwareY= Painted Aluminum w/
Stainless Steel HardwareZ= Cast Iron with Stainless
Steel Hardware
Porting OptionsA= ANSI FlangeD=DIN FlangeN=NPT ThreadsB= BSPT (Tapered) Threads
Pump StyleS= Standard
Pump Options0= None1= Sound Dampening Muffler2= Mesh Muffler3= High temperature Air Valve
w/Encapsulated Muffler4= High temperature Air Valve
w/Sound Dampening Muffler5= High temperature Air
Valve w/Mesh Muffler
6= Metal Muffler**
Kit Options
00.=None**P0.=0-30VDC Pulse Output KitP1.=Intrinsically-Safe 10-30VDC
Pulse Output KitP2.=110/120 or 220/240VAC
Pulse Output KitP3.=Intrinsically-Safe 110/120VAC
Pulse Output KitP4.=Intrinsically-Safe 220/240VAC
Pulse Output KitSP.=Stroke Indicator Pins

520-222-000 11/04 Rev C Model S30 Metallic Design Level 1 Page 3
Performance Curve, S30 Metallic Design Level 1
CapacityLiters per minute
BA
R
PS
I
Hea
d
10020(34) 40(68)
60(102)80(136)
100(170)
80
60
40
20
00
1
2
3
4
5
6
7
0 20 40 60 80 100 120 140 160 180 200
9008007006005004003002001000
220 240U.S. Gallons per minute
Displacement Per Stroke: .94 gallons3.56 liters
Flow Capacity: 0 to 235 gallons per minute0 to 889 liters per minute
120(204)
140(238)
100 PSI (6.8 Bar)
80 PSI (5.44 Bar)
60 PSI (4.08 Bar)
20 PSI (1.36 Bar) Air Inlet Pressure
40 PSI (2.72 Bar) 30
2025
1015
5
9.1
67.6
34.5
1.5
NP
SH
R
ME
TE
RS
FE
ET

520-222-000 11/04 Rev C Model S30 Metallic Design Level 1 Page 4
Dimensions: S30/T30 Metallic(Flanged)
Discharge Port3" 150 LB. FF ANSI FlangeØ3/4 4 Holes Equally SpacedOn A Ø6 Bolt Circle
Suction Port3" 150 LB. FF ANSI Flange
Ø3/4 4 Holes Equally SpacedOn A Ø6 Bolt Circle
1" NPT Exhaust PortFor Optional Piping ExhaustAir In Submerged Applications
Air Inlet3/4" NPT
Dimensions in InchesDimensional Tolerance:±1/8"
Dimension A B C D E
EncapsulatedMuffler
15 3/4
16 1/32Pulse OutputKit
Aluminum 31 3/4 4 1/8 18 29/32 35 11/16
30 27/32 4 7/32 19 35 25/32StainlessSteel
MeshMuffler
16 5/8
SoundDampening
Muffler16 5/8
MetalMuffler
16 1/8
Discharge Port3" 150 LB. FF ANSI FlangeØ3/4 4 Holes Equally SpacedOn A Ø6 Bolt Circle
Suction Port3" 150 LB. FF ANSI Flange
Ø3/4 4 Holes Equally SpacedOn A Ø6 Bolt Circle
1" NPT Exhaust PortFor Optional Piping ExhaustAir In Submerged Applications
Air Inlet3/4" NPT
35 25/32
19
19 21/32
14 11/32
7 7/32
2 15/32
11 3/4
5 7/8
4 1/8
4 7/32
30 27/32
4 1/8
7 7/8
A
4 7/810 1/8
5 1/16
5/8
6
12
S30
T30

520-222-000 11/04 Rev C Model S30 Metallic Design Level 1 Page 5
Dimensions in MillimetersDimensional Tolerance:± 3mm
Dimensions: S30/T30 Metallic(Flanged)
Air Inlet3/4" NPT
1" NPT Exhaust PortFor Optional Piping ExhaustAir In Submerged Applications
Suction Port80 DIN (10 Bar) Flange
Ø19mm 8 Holes Equally SpacedOn A Ø160mm Bolt Circle
Discharge Port80 DIN (10 Bar) FlangeØ19mm 8 Holes Equally Spaced On A Ø160mm Bolt Circle
Dimension A B C D E
EncapsulatedMuffler
400
407Pulse OutputKit
Aluminum 806 105 481 906
808 107 483 908StainlessSteel
MeshMuffler
422
SoundDampening
Muffler422
MetalMuffler
410
S30
Air Inlet3/4" NPT
1" NPT Exhaust PortFor Optional Piping ExhaustAir In Submerged Applications
Suction Port80 DIN (10 Bar) Flange
Ø19mm 8 Holes Equally SpacedOn A Ø160mm Bolt Circle
Discharge Port80 DIN (10 Bar) FlangeØ19mm 8 Holes Equally Spaced On A Ø160mm Bolt Circle
908 mm
483 mm
499 mm
365 mm
184 mm
62 mm
298 mm
149 mm
105 mm
105 mm
107 mm
808 mm
200 mm
A
305 mm
152 mm
17 mm
129 mm
257 mm124 mm
T30

520-222-000 11/04 Rev C Model S30 Metallic Design Level 1 Page 6
Dimensions: S30 Metallic
Dimensions in InchesDimensional Tolerance:±1/8"
Discharge Port3" NPT
Both Sution AndDischarge Ports AreAvailable With3" BSP Tapered Connection
Center Of Gravity
Suction Port3" NPT
1 3/4" To CenterOf Gravity
Standard Encapsulated Muffler1" NPT Exhaust PortFor Optional Muffler
Styles Or Piping ExhaustAir In Submerged
Applications
Air Inlet3/4" NPT
Pulse Output KitAluminum
Sound Dampening Muffler
Encapsulated Muffler
Stainless Steel
Metal Muffler
DIMENSION B C D E
15 3/4
16 1/3229 31/32 2 11/32 17 9/64 32 1/16
30 3/16 2 9/16 17 23/64 32 9/32Mesh Muffler 17 3/16
17 3/16
16 3/4
A

520-222-000 11/04 Rev C Model S30 Metallic Design Level 1 Page 7
Metric Dimensions: S30 MetallicDimensions in MillimetersDimensional Tolerance:± 3mm
Discharge Port3" NPT
Suction Port3" NPT
Both Suction AndDischarge Ports AreAvailable With3" BSP Tapered Connection
Air Inlet3/4" NPT
Standard Encapsulated Muffler1" NPT Exhaust PortFor Optional Muffler
Styles Or Piping ExhaustAir In Submerged
Applications
Pulse Output KitAluminum
Sound Dampening Muffler
Encapsulated Muffler
Stainless Steel
Metal Muffler
DIMENSION B C D E
400
407761 60 435 815
767 66 441 821Mesh Muffler 437
437
425
A
520-222-000 11/04 Rev C Model S30 Metallic Design Level 1 Page 8
PRINCIPLE OF PUMP OPERATIONThis ball type check valve pump is
powered by compressed air and is a 1:1ratio design. The inner side of onediaphragm chamber is alternatelypressurized while simultaneouslyexhausting the other inner chamber. Thiscauses the diaphragms, which areconnected by a common rod securedby plates to the centers of thediaphragms, to move in a reciprocatingaction. (As one diaphragm performs thedischarge stroke the other diaphragmis pulled to perform the suction strokein the opposite chamber.) Air pressureis applied over the entire inner surfaceof the diaphragm while liquid isdischarged from the opposite side of thediaphragm. The diaphragm operates ina balanced condition during thedischarge stroke which allows the pumpto be operated at discharge heads over200 feet (61 meters) of water.
For maximum diaphragm life, keepthe pump as close to the liquid beingpumped as possible. Positive suctionhead in excess of 10 feet of liquid (3.048meters) may require a back pressureregulating device to maximizediaphragm life.
Alternate pressurizing andexhausting of the diaphragm chamberis performed by an externally mounted,pilot operated, four way spool type airdistribution valve. When the spool shiftsto one end of the valve body, inletpressure is applied to one diaphragmchamber and the other diaphragmchamber exhausts. When the spool
shifts to the opposite end of the valvebody, the pressure to the chambers isreversed. The air distribution valve spoolis moved by a internal pilot valve whichalternately pressurizes one end of theair distribution valve spool whileexhausting the other end. The pilot valveis shifted at each end of the diaphragmstroke when a actuator plunger iscontacted by the diaphragm plate. Thisactuator plunger then pushes the end ofthe pilot valve spool into position toactivate the air distribution valve.
The chambers are connected withmanifolds with a suction and dischargecheck valve for each chamber,maintaining flow in one direction throughthe pump.
INSTALLATION AND START-UPLocate the pump as close to the
product being pumped as possible. Keepthe suction line length and number offittings to a minimum. Do not reduce thesuction line diameter.
For installations of rigid piping, shortsections of flexible hose should beinstalled between the pump and thepiping. The flexible hose reducesvibration and strain to the pumpingsystem. A Warren Rupp Tranquilizer®
surge suppressor is recommended tofurther reduce pulsation in flow.
AIR SUPPLYAir supply pressure cannot exceed
125 psi (8.6 bar). Connect the pump airinlet to an air supply of sufficientcapacity and pressure required fordesired performance. When the air
supply line is solid piping, use a shortlength of flexible hose not less than1/2" (13mm) in diameter between thepump and the piping to reduce strain tothe piping. The weight of the air supplyline, regulators and filters must besupported by some means other thanthe air inlet cap. Failure to providesupport for the piping may result indamage to the pump. A pressureregulating valve should be installed toinsure air supply pressure does notexceed recommended limits.
AIR VALVE LUBRICATIONThe air distribution valve and the pilot
valve are designed to operate WITHOUTlubrication. This is the preferred modeof operation. There may be instances ofpersonal preference or poor quality airsupplies when lubrication of thecompressed air supply is required. Thepump air system will operate withproperly lubricated compressed airsupply. Proper lubrication requires theuse of an air line lubricator (available fromWarren Rupp) set to deliver one drop ofSAE 10 non-detergent oil for every 20SCFM (9.4 liters/sec.) of air the pumpconsumes at the point of operation.Consult the pump’s publishedPerformance Curve to determine this.
AIR LINE MOISTUREWater in the compressed air supply
can create problems such as icing orfreezing of the exhaust air, causing thepump to cycle erratically or stopoperating. Water in the air supply can bereduced by using a point-of-use air dryer
to supplement the user’s air dryingequipment. This device removes waterfrom the compressed air supply andalleviates the icing or freezing problems.
AIR INLET AND PRIMINGTo start the pump, open the air valve
approximately 1/2" to 3/4" turn. After thepump primes, the air valve can beopened to increase air flow as desired.If opening the valve increases cyclingrate, but does not increase the rate offlow, cavitation has occurred. The valveshould be closed slightly to obtain themost efficient air flow to pump flow ratio.
BETWEEN USESWhen the pump is used for materials
that tend to settle out or solidify whennot in motion, the pump should be flushedafter each use to prevent damage.(Product remaining in the pump betweenuses could dry out or settle out. This couldcause problems with the diaphragms andcheck valves at restart.) In freezingtemperatures the pump must becompletely drained between uses in allcases.

520-222-000 11/04 Rev C Model S30 Metallic Design Level 1 Page 9
1
2 3
1
2
3
TA3 or TA80 Surge Suppressor
020-051-000 Filter/Regulator
020-051-001 Lubricator
Available from Warren Rupp
CAUTIONThe air exhaust should be piped to an area for safe disposition of the product being pumped, in the event of a diaphragm failure.
INSTALLATION GUIDETop Discharge Ball Valve Unit

520-222-000 11/04 Rev C Model S30 Metallic Design Level 1 Page 10
TROUBLESHOOTINGPossible Symptoms:• Pump will not cycle.• Pump cycles, but produces no flow.• Pump cycles, but flow rate is
unsatisfactory.• Pump cycle seems unbalanced.• Pump cycle seems to produce
excessive vibration.
What to Check: Excessive suction liftin system.Corrective Action: For lifts exceeding20 feet (6 meters), filling the pumpingchambers with liquid will prime the pumpin most cases.
What to Check: Excessive floodedsuction in system.Corrective Action: For floodedconditions exceeding 10 feet (3 meters)of liquid, install a back pressure device.
What to Check: System head exceedsair supply pressure.Corrective Action: Increase the inlet airpressure to the pump. Most diaphragmpumps are designed for 1:1 pressureratio at zero flow.
What to Check: Air supply pressure orvolume exceeds system head.Corrective Action: Decrease inlet airpressure and volume to the pumpas calculated on the publishedPERFORMANCE CURVE. Pump iscavitating the fluid by fast cycling.
What to Check: Undersized suction line.Corrective Action: Meet or exceedpump connection recommendationsshown on the DIMENSIONALDRAWING.
What to Check: Restricted or undersizedair line.Corrective Action: Install a larger air lineand connection. Refer to air inletrecommendations shown in your pump’sSERVICE MANUAL.
What to Check: Check ESADS, theExternally Serviceable Air DistributionSystem of the pump.Corrective Action: Disassemble andinspect the main air distribution valve,pilot valve and pilot valve actuators.Refer to the parts drawing and air valvesection of the SERVICE MANUAL.Check for clogged discharge or closedvalve before reassembly.
What to Check: Rigid pipe connectionsto pump.Corrective Action: Install flexibleconnectors and a Warren RuppTranquilizer® surge suppressor.
What to Check: Blocked air exhaustmuffler.Corrective Action: Remove mufflerscreen, clean or de-ice and reinstall.Refer to the Air Exhaust section of yourpump SERVICE MANUAL.
What to Check: Pumped fluid in airexhaust muffler.Corrective Action: Disassemble pumpchambers. Inspect for diaphragm ruptureor loose diaphragm plate assembly. Referto the Diaphragm Replacement sectionof your pump SERVICE MANUAL.
What to Check: Suction side air leakageor air in product.Corrective Action: Visually inspect allsuction side gaskets and pipeconnections.
What to Check: Obstructed checkvalve.Corrective Action: Disassemble the wetend of the pump and manuallydislodge obstruction in the checkvalve pocket. Refer to the CheckValve section of the pump SERVICEMANUAL for disassembly instructions.
What to Check: Worn or misalignedcheck valve or check valve seat.Corrective Action: Inspect check valvesand seats for wear and proper seating.Replace if necessary. Refer to CheckValve section of the pump SERVICEMANUAL for disassembly instructions.
What to Check: Blocked suction line.Corrective Action: Remove or flushobstruction. Check and clear all suctionscreens and strainers.
What to Check: Blocked discharge line.Corrective Action: Check for obstructionor closed discharge line valves.
What to Check: Blocked pumpingchamber.Corrective Action: Disassemble andinspect the wetted chambers of thepump. Remove or flush any obstructions.Refer to the pump SERVICE MANUALfor disassembly instructions.
What to Check: Entrained air or vaporlock in one or both pumping chambers.Corrective Action: Purge chambersthrough tapped chamber vent plugs.PURGING THE CHAMBERS OF AIRCAN BE DANGEROUS! Contact theWarren Rupp Technical Services Groupbefore performing this procedure. Anymodel with top-ported discharge willreduce or eliminate problems withentrained air.
If your pump continues to performbelow your expectations, contact yourlocal Warren Rupp Distributor or factoryTechnical Services Group for a serviceevaluation.
WARRANTYRefer to the enclosed Warren Rupp
Warranty Certificate.

520-222-000 11/04 Rev C Model S30 Metallic Design Level 1 Page 11
RECYCLINGMany components of SANDPIPER®
Metallic AODD pumps are made ofrecyclable materials (see chart on page10 for material specifications). Weencourage pump users to recycle wornout parts and pumps whenever possible,after any hazardous pumped fluids arethoroughly flushed.
This pump is pressurizedinternally with air pressureduring operation. Alwaysmake certain that all boltingis in good condition and that
all of the correct bolting is reinstalled duringassembly.
WARNING
Before pump operation,inspect all gasketedfasteners for loosenesscaused by gasket creep.Re-torque loose fasteners
to prevent leakage. Follow recommendedtorques stated in this manual.
CAUTION
When used for toxic oraggressive fluids, the pumpshould always be flushedclean prior to disassembly.
WARNING
Before maintenance orrepair, shut off the com-pressed air line, bleed thepressure, and disconnectthe air line from the pump.
The discharge line may be pressurized andmust be bled of its pressure.
WARNING
Take action to prevent staticsparking. Fire or explosioncan result, especially whenhandling flammable liquids.The pump, piping, valves,
containers or other miscellaneous equipment mustbe grounded. (See page 28)
WARNING
IMPORTANTRead these safety warningsand instructions in thismanual completely, beforeinstallation and start-upof the pump. It is the
responsibility of the purchaser to retain thismanual for reference. Failure to comply withthe recommendations stated in this manual willdamage the pump, and void factory warranty.
WARNINGAirborne particles and loudnoise hazards.
Wear ear and eye protection.
Before doing any main-tenance on the pump, becertain all pressure iscompletely vented from thepump, suction, discharge,
piping, and all other openings and connections.Be certain the air supply is locked out or madenon-operational, so that it cannot be started whilework is being done on the pump. Be certain thatapproved eye protection and protective clothingare worn all times in the vicinity of the pump.Failure to follow these recommendations mayresult in serious injury or death.
WARNING
WARNINGIn the event of diaphragmrupture, pumped materialmay enter the air end of thepump, and be dischargedinto the atmosphere. If
pumping a product which is hazardous or toxic,the air exhaust must be piped to an appropriatearea for safe disposition.
IMPORTANT SAFETYINFORMATION
CE
Pump complies with EN809 Pumping Directive andDirective 98/37/EC Safety of Machinery, and ATEX 100aDirective 94/9/EC Equipment for use in PotentiallyExplosive Environments. For reference to the directivecertificates visit: www.warrenrupp.com
I M2 c/b T5II 2GD b T5

520-222-000 11/04 Rev C Model S30 Metallic Design Level 1 Page 12
000 ..... Assembly, sub-assembly;and some purchased items
010 ..... Cast Iron012 ..... Powered Metal015 ..... Ductile Iron020 ..... Ferritic Malleable Iron025 ..... Music Wire080 ..... Carbon Steel, AISI B-1112100 ..... Alloy 20110 ..... Alloy Type 316 Stainless Steel111 ..... Alloy Type 316 Stainless Steel
(Electro Polished)112 ..... Alloy “C” (Hastelloy equivalent)113 ..... Alloy Type 316 Stainless Steel
(Hand Polished)114 ..... 303 Stainless Steel115 ..... 302/304 Stainless Steel117 ..... 440-C Stainless Steel (Martensitic)120 ..... 416 Stainless Steel
(Wrought Martensitic)123 ..... 410 Stainless Steel (Wrought
Martensitic)148 ..... Hardcoat Anodized Aluminum149 ..... 2024-T4 Aluminum150 ..... 6061-T6 Aluminum151 ..... 6063-T6 Aluminum152 ..... 2024-T4 Aluminum (2023-T351)154 ..... Almag 35 Aluminum155 ..... 356-T6 Aluminum156 ..... 356-T6 Aluminum157 ..... Die Cast Aluminum Alloy #380158 ..... Aluminum Alloy SR-319159 ..... Anodized Aluminum162 ..... Brass, Yellow, Screw Machine Stock165 ..... Cast Bronze, 85-5-5-5166 ..... Bronze, SAE 660170 ..... Bronze, Bearing Type,
Oil Impregnated
MATERIAL CODESThe Last 3 Digits of Part Number
175 ..... Die Cast Zinc180 ..... Copper Alloy305 ..... Carbon Steel, Black Epoxy Coated306 ..... Carbon Steel, Black PTFE Coated307 ..... Aluminum, Black Epoxy Coated308 ..... Stainless Steel, Black PTFE Coated309 ..... Aluminum, Black PTFE Coated310 ..... Kynar® Coated313 ..... White Epoxy Coated Aluminum330 ..... Zinc Plated Steel331 ..... Chrome Plated Steel332 ..... Aluminum, Electroless Nickel Plated333 ..... Carbon Steel, Electroless
Nickel Plated335 ..... Galvanized Steel336 ..... Zinc Plated Yellow Brass337 ..... Silver Plated Steel340 ..... Nickel Plated342 ..... Filled Nylon351 ..... FDA Santoprene353 ..... Geolast; Color: Black354 ..... Injection Molded #203-40 Santoprene-
Duro 40D +/-5; Color: RED355 ..... Thermal Plastic356 ..... Hytrel357 ..... Injection Molded Polyurethane358 ..... Urethane Rubber
(Some Applications) (Compression Mold)359 ..... Urethane Rubber360 ..... Buna-N Rubber. Color coded: RED361 ..... Buna-N363 ..... Viton (Flurorel). Color coded: YELLOW364 ..... E.P.D.M. Rubber. Color coded: BLUE365 ..... Neoprene Rubber.
Color coded: GREEN366 ..... Food Grade Nitrile368 ..... Food Grade EPDM370 ..... Butyl Rubber. Color coded: BROWN
371 ..... Philthane (Tuftane)374 ..... Carboxylated Nitrile375 ..... Fluorinated Nitrile378 ..... High Density Polypropylene379 ..... Conductive Nitrile405 ..... Cellulose Fibre408 ..... Cork and Neoprene425 ..... Compressed Fibre426 ..... Blue Gard440 ..... Vegetable Fibre465 ..... Fibre500 ..... Delrin 500501 ..... Delrin 570502 ..... Conductive Acetal, ESD-800503 ..... Conductive Acetal, Glass-Filled505 ..... Acrylic Resin Plastic506 ..... Delrin 150520 ..... Injection Molded PVDF Natural color540 ..... Nylon541 ..... Nylon542 ..... Nylon544 ..... Nylon Injection Molded550 ..... Polyethylene551 ..... Glass Filled Polypropylene552 ..... Unfilled Polypropylene553 ..... Unfilled Polypropylene555 ..... Polyvinyl Chloride556 ..... Black Vinyl558 ..... Conductive HDPE570 ..... Rulon II580 ..... Ryton590 ..... Valox591 ..... Nylatron G-S592 ..... Nylatron NSB600 ..... PTFE (virgin material)
Tetrafluorocarbon (TFE)601 ..... PTFE (Bronze and moly filled)602 ..... Filled PTFE
603 ..... Blue Gylon604 ..... PTFE606 ..... PTFE607 ..... Envelon608 ..... Conductive PTFE610 ..... PTFE Encapsulated Silicon611 ..... PTFE Encapsulated Viton632 ..... Neoprene/Hytrel633 ..... Viton/PTFE634 ..... EPDM/PTFE635 ..... Neoprene/PTFE637 ..... PTFE , Viton/PTFE638 ..... PTFE , Hytrel/PTFE639 ..... Buna-N/TFE643 ..... Santoprene®/EPDM644 ..... Santoprene®/PTFE656 ..... Santoprene Diaphragm and
Check Balls/EPDM Seats666 ..... FDA Nitrile Diaphragm PTFE Overlay,
Balls, and Seals
Delrin, Viton and Hytrel areregistered tradenames of E.I. DuPont.
Gylon is a registered tradename of Garlock, Inc.
Nylatron is a registered tradename ofPolymer Corp.
Santoprene is a registered tradename ofMonsanto Corp.
Rulon II is a registered tradename ofDixion Industries Corp.
Hastelloy-C is a registered tradename ofCabot Corp.
Ryton is a registered tradename ofPhillips Chemical Co.
Valox is a registered tradename ofGeneral Electric Co.
Kynar® is a registered tradename of ATOFINAChemicals, Inc.
Warren Rupp, SANDPIPER, Portapump,Tranquilizer and SludgeMaster are registeredtradenames of Warren Rupp, Inc.

520-222-000 11/04 Rev C Model S30 Metallic Design Level 1 Page 13

520-222-000 11/04 Rev C Model S30 Metallic Design Level 1 Page 14
Composite Repair Parts Drawing
476-227-000 AIR END KIT (Aluminum Center)Air Valve Assembly, Pilot Valve Assembly, Seals,O-rings, Gaskets, Plungers
**476-170-000 AIR END KIT (Air Valve with Stroke Indicator Pin, Aluminum Center)Seals, O-ring, Gaskets, Retaining Rings, Air Valve Sleeve and SpoolSet, and Pilot Valve Assembly
476-171-360 WET END KIT (S30)Buna Diaphragms, Balls, and Seats.
476-171-656 WET END KIT (S30)Santoprene Diaphragms, Balls and EPDM Seats.
476-171-364 WET END KIT (S30)EPDM Diaphragms, Balls and Seats.
476-171-365 WET END KIT (S30)Neoprene Diaphragms, Balls, and Seats.
476-171-633 WET END KIT (S30)Viton Diaphragms, PTFE Balls and PTFE Seats.
476-171-635 WET END KIT (S30)Neoprene Diaphragms, PTFE Overlay,PTFE Balls and PTFE Seats.
476-171-636 WET END KIT (T30)FDA Nitrile Diaphragms, PTFE Balls, PTFE Encapsulated Seals
476-171-654 WET END KIT (S30)Santoprene Diaphragms, PTFE Overlays, PTFEBalls, PTFE Seats
476-171-666 WET END KIT (T30)FDA Nitrile Diaphragms, PTFE Overlay, Balls and PTFEEncapsulated Seals
475-217-000 MIDSECTION CONVERSION KIT(Replaces Aluminum Midsection with Cast IronComponents) Air Inlet Cap, Intermediate Bracket,Inner Chambers, and Inner Diaphragm Plates
HARDWARE KITS475-197-330 Zinc Plated Capscrews, Washers, and Hex Nuts475-197-115 Stainless Steel Capscrews, Washers, and Hex Nuts
**PULSE OUTPUT KITS(For use with 530-010-000 mufflers,or piped exhaust)475-198-001 DC Kit475-198-002 DC Intrinsically Safe Kit475-198-003 110/120VAC or 220/240VAC Kit475-198-004 110/120VAC Intrinsically Safe Kit475-198-005 220/240VAC Intrinsically Safe Kit
**ELECTRONIC LEAK DETECTOR KITS032-040-000 110VAC032-037-000 220VAC
**Note: Pumps equipped with these components arenot ATEX compliant
AVAILABLE SERVICE AND CONVERSION KITS
(For use with encapsulated 530-028-550 muffler)475-198-006 DC Kit475-198-007 DC Intrinsically Safe Kit475-198-008 110/120VAC or 220/240VAC Kit475-198-009 110/120VAC Intrinsically Safe Kit475-198-010 220/240VAC Intrinsically Safe Kit

520-222-000 11/04 Rev C Model S30 Metallic Design Level 1 Page 15
ITEM PART NUMBER DESCRIPTION QTY1 **031-146-000 Air Valve Assembly 1
**031-147-000 Air Valve Assembly 1**031-173-000 Air Valve Assembly 1**031-173-001 Air Valve Assembly (with Stainless Steel Hardware) 1031-183-000 Air Valve Assembly (with Stainless Steel Hardware) 1031-179-000 Air Valve Assembly (Cast Iron Centers Only) 1
2 050-014-354 Ball, Check 4050-014-360 Ball, Check 4050-014-364 Ball, Check 4050-014-365 Ball, Check 4050-015-600 Ball, Check 4
3 070-006-170 Bushing 24 095-110-000 Pilot Valve Assembly 1
095-110-110 Pilot Valve Assembly (Cast Iron Centers Only) 15 114-024-157 Intermediate Bracket 1
114-024-010 Intermediate Bracket 16 132-035-360 Bumper, Diaphragm 27 135-034-506 Bushing, Plunger 28 165-113-157 Cap, Air Inlet Assembly 1
165-113-010 Cap, Air Inlet Assembly 19 170-055-115 Capscrew, Hex Hd 1/2-13 X 2.50 16
170-055-330 Capscrew, Hex Hd 1/2-13 X 2.50 1610 170-060-115 Capscrew, Hex Hd 7/16-14 X 2.00 16
170-060-330 Capscrew, Hex Hd 7/16-14 X 2.00 1611 170-069-115 Capscrew, Hex Hd 5/16-18 X 1.75 4
170-069-330 Capscrew, Hex Hd 5/16-18 X 1.75 412 171-053-115 Capscrew, Soc Hd 3/8-16 X 2.50 (Stroke Indicator Only) 4
171-053-330 Capscrew, Soc Hd 3/8-16 X 2.50 (Stroke Indicator Only) 4170-006-115 Capscrew, Hex HD 3/8-16 X 1.00 4170-006-330 Capscrew, Hex HD 3/8-16 X 1.00 4
13 171-059-115 Capscrew, Soc Hd 7/16-14 X 1.25 8171-059-330 Capscrew, Soc Hd 7/16-14 X 1.25 8171-011-115 Capscrew, Soc Hd 1/2-13 x 1.00 (Stainless Center) 8
14 196-164-156 Chamber, Outer 2196-164-015 Chamber, Outer 2196-164-110 Chamber, Outer 2196-164-112 Chamber, Outer 2
15 196-165-156 Chamber, Inner 2196-165-010 Chamber, Inner 2
16 286-098-604 Diaphragm, Overlay 217 286-098-360 Diaphragm 2
286-098-363 Diaphragm 2286-098-354 Diaphragm 2286-098-365 Diaphragm 2
18 360-093-360 Gasket, Air Valve 119 360-103-360 Gasket, Pilot Valve 120 360-104-379 Gasket, Air Inlet 121 360-105-360 Gasket, Inner Chamber 222 518-143-156 Manifold, Suction 1
518-143-156E Manifold, Suction 3" BSPT 1518-143-010 Manifold, Suction 1518-143-010E Manifold, Suction 3" BSPT 1518-143-110 Manifold, Suction 1518-143-110E Manifold, Suction 3" BSPT 1518-143-112 Manifold, Suction 1518-143-112E Manifold, Suction 3' BSPT 1
23 518-144-156 Manifold, Discharge 1518-144-156E Manifold, Discharge 3" BSPT 1518-144-010 Manifold, Discharge 1518-144-010E Manifold, Discharge 3" BSPT 1518-144-110 Manifold, Discharge 1518-144-110E Manifold, Discharge 3" BSPT 1518-144-112 Manifold, Discharge 1518-144-112E Manifold, Discharge 3" BSPT 1
24 545-007-115 Nut, Hex 7/16-14 16545-007-330 Nut, Hex 7/16-14 16
25 545-008-115 Nut, Hex 1/2-13 16545-008-330 Nut, Hex 1/2-13 16
26 560-001-360 O-Ring 227 560-105-360 Seal (O-Ring) (See item 34) 8
560-105-363 Seal (O-Ring) (See item 34) 8560-105-364 Seal (O-Ring) (See item 34) 8560-105-365 Seal (O-Ring) (See item 34) 8720-055-608 Seal (O-Ring) (See item 34) 8
28 612-192-157 Plate, Inner Diaphragm Assembly 2612-192-010 Plate, Inner Diaphragm Assembly 2
29 612-194-157 Plate, Outer Diaphragm Assembly 2612-194-010 Plate, Outer Diaphragm Assembly 2612-194-110 Plate, Outer Diaphragm Assembly 2612-194-112 Plate, Outer Diaphragm Assembly 2
30 620-020-115 Plunger, Actuator 231 675-042-115 Ring, Retaining 232 685-040-120 Rod, Diaphragm 133 720-004-360 Seal, Diaphragm Rod 234 722-090-360 Seat, Check Ball 4
722-090-363 Seat, Check Ball 4722-090-364 Seat, Check Ball 4722-090-365 Seat, Check Ball 4722-090-600 Seat, Check Ball 4722-090-080 Seat, Check Ball (seals required see item 27) 4722-090-110 Seat, Check Ball (seals required see item 27) 4722-090-150 Seat, Check Ball (seals required see item 27) 4
35 901-038-115 5/16 Flat Washer 4901-038-330 5/16 Flat Washer 4
36 901-048-115 3/8 Flat Washer (Stroke Indicator Only) 4901-048-330 3/8 Flat Washer (Stroke Indicator Only) 4
42 530-033-000 Metal Muffler 1(for other muffler options see pg. 26)
ITEM PART NUMBER DESCRIPTION QTY
**Note: Pumps equipped with these components are not ATEX compliant
Composite Parts List For S30
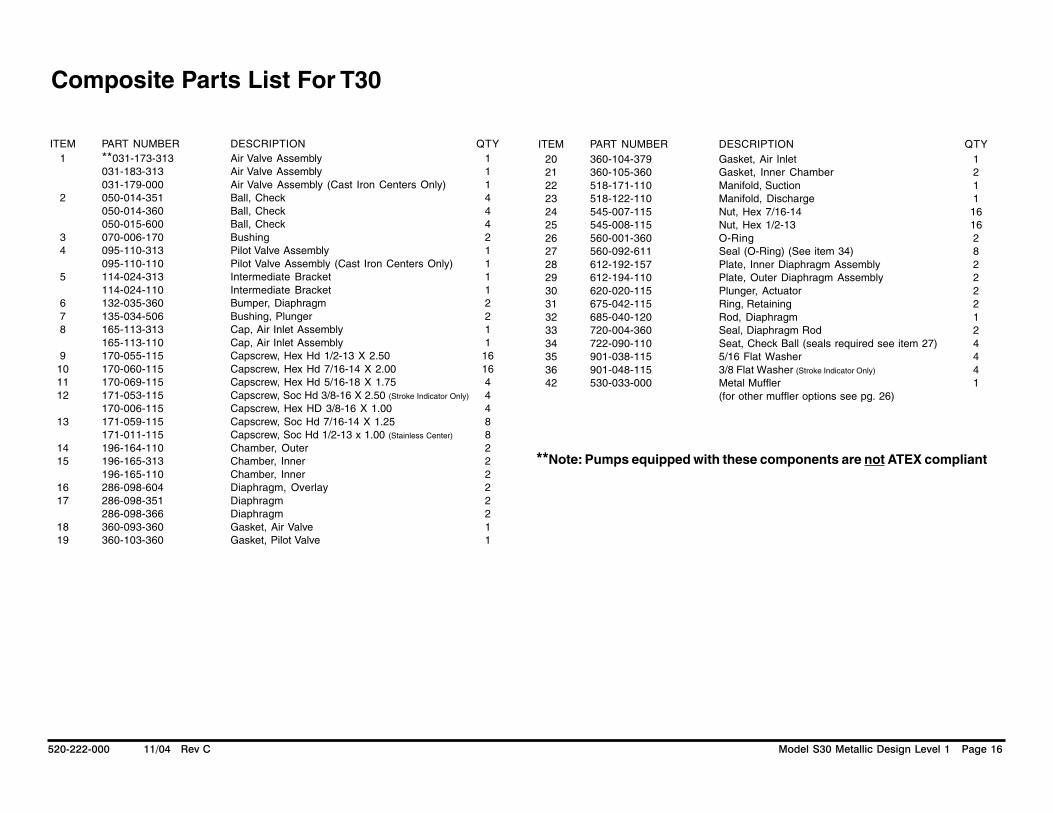
520-222-000 11/04 Rev C Model S30 Metallic Design Level 1 Page 16
ITEM PART NUMBER DESCRIPTION QTY1 **031-173-313 Air Valve Assembly 1
031-183-313 Air Valve Assembly 1031-179-000 Air Valve Assembly (Cast Iron Centers Only) 1
2 050-014-351 Ball, Check 4050-014-360 Ball, Check 4050-015-600 Ball, Check 4
3 070-006-170 Bushing 24 095-110-313 Pilot Valve Assembly 1
095-110-110 Pilot Valve Assembly (Cast Iron Centers Only) 15 114-024-313 Intermediate Bracket 1
114-024-110 Intermediate Bracket 16 132-035-360 Bumper, Diaphragm 27 135-034-506 Bushing, Plunger 28 165-113-313 Cap, Air Inlet Assembly 1
165-113-110 Cap, Air Inlet Assembly 19 170-055-115 Capscrew, Hex Hd 1/2-13 X 2.50 16
10 170-060-115 Capscrew, Hex Hd 7/16-14 X 2.00 1611 170-069-115 Capscrew, Hex Hd 5/16-18 X 1.75 412 171-053-115 Capscrew, Soc Hd 3/8-16 X 2.50 (Stroke Indicator Only) 4
170-006-115 Capscrew, Hex HD 3/8-16 X 1.00 413 171-059-115 Capscrew, Soc Hd 7/16-14 X 1.25 8
171-011-115 Capscrew, Soc Hd 1/2-13 x 1.00 (Stainless Center) 814 196-164-110 Chamber, Outer 215 196-165-313 Chamber, Inner 2
196-165-110 Chamber, Inner 216 286-098-604 Diaphragm, Overlay 217 286-098-351 Diaphragm 2
286-098-366 Diaphragm 218 360-093-360 Gasket, Air Valve 119 360-103-360 Gasket, Pilot Valve 1
20 360-104-379 Gasket, Air Inlet 121 360-105-360 Gasket, Inner Chamber 222 518-171-110 Manifold, Suction 123 518-122-110 Manifold, Discharge 124 545-007-115 Nut, Hex 7/16-14 1625 545-008-115 Nut, Hex 1/2-13 1626 560-001-360 O-Ring 227 560-092-611 Seal (O-Ring) (See item 34) 828 612-192-157 Plate, Inner Diaphragm Assembly 229 612-194-110 Plate, Outer Diaphragm Assembly 230 620-020-115 Plunger, Actuator 231 675-042-115 Ring, Retaining 232 685-040-120 Rod, Diaphragm 133 720-004-360 Seal, Diaphragm Rod 234 722-090-110 Seat, Check Ball (seals required see item 27) 435 901-038-115 5/16 Flat Washer 436 901-048-115 3/8 Flat Washer (Stroke Indicator Only) 442 530-033-000 Metal Muffler 1
(for other muffler options see pg. 26)
ITEM PART NUMBER DESCRIPTION QTY
Composite Parts List For T30
**Note: Pumps equipped with these components are not ATEX compliant
520-222-000 11/04 Rev C Model S30 Metallic Design Level 1 Page 17
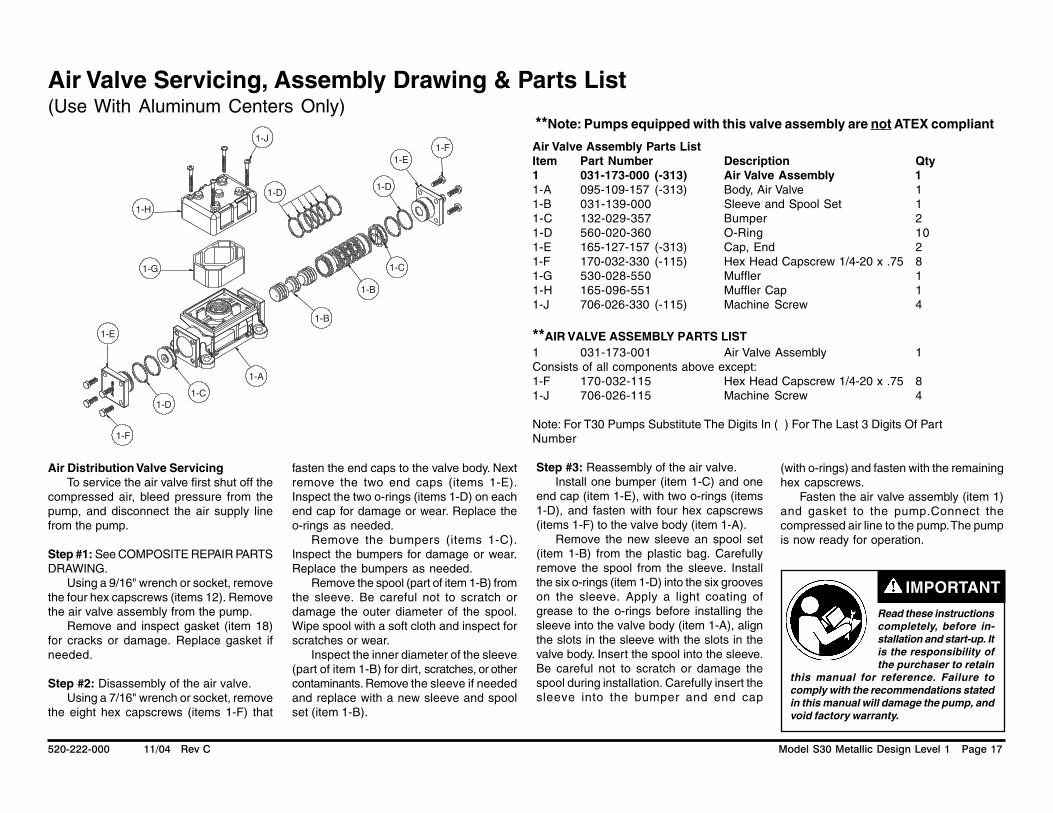
Air Valve Servicing, Assembly Drawing & Parts List(Use With Aluminum Centers Only)
1-H
1-G
1-E
1-F
1-D1-C
1-A
1-B
1-B
1-C
1-F1-E
1-D1-D
1-J**Note: Pumps equipped with this valve assembly are not ATEX compliant
Read these instructionscompletely, before in-stallation and start-up. Itis the responsibility ofthe purchaser to retain
this manual for reference. Failure tocomply with the recommendations statedin this manual will damage the pump, andvoid factory warranty.
IMPORTANT
Air Valve Assembly Parts ListItem Part Number Description Qty1 031-173-000 (-313) Air Valve Assembly 11-A 095-109-157 (-313) Body, Air Valve 11-B 031-139-000 Sleeve and Spool Set 11-C 132-029-357 Bumper 21-D 560-020-360 O-Ring 101-E 165-127-157 (-313) Cap, End 21-F 170-032-330 (-115) Hex Head Capscrew 1/4-20 x .75 81-G 530-028-550 Muffler 11-H 165-096-551 Muffler Cap 11-J 706-026-330 (-115) Machine Screw 4
**AIR VALVE ASSEMBLY PARTS LIST1 031-173-001 Air Valve Assembly 1Consists of all components above except:1-F 170-032-115 Hex Head Capscrew 1/4-20 x .75 81-J 706-026-115 Machine Screw 4
Note: For T30 Pumps Substitute The Digits In ( ) For The Last 3 Digits Of PartNumber
Air Distribution Valve ServicingTo service the air valve first shut off the
compressed air, bleed pressure from thepump, and disconnect the air supply linefrom the pump.
Step #1: See COMPOSITE REPAIR PARTSDRAWING.
Using a 9/16" wrench or socket, removethe four hex capscrews (items 12). Removethe air valve assembly from the pump.
Remove and inspect gasket (item 18)for cracks or damage. Replace gasket ifneeded.
Step #2: Disassembly of the air valve.Using a 7/16" wrench or socket, remove
the eight hex capscrews (items 1-F) that
fasten the end caps to the valve body. Nextremove the two end caps (items 1-E).Inspect the two o-rings (items 1-D) on eachend cap for damage or wear. Replace theo-rings as needed.
Remove the bumpers (items 1-C).Inspect the bumpers for damage or wear.Replace the bumpers as needed.
Remove the spool (part of item 1-B) fromthe sleeve. Be careful not to scratch ordamage the outer diameter of the spool.Wipe spool with a soft cloth and inspect forscratches or wear.
Inspect the inner diameter of the sleeve(part of item 1-B) for dirt, scratches, or othercontaminants. Remove the sleeve if neededand replace with a new sleeve and spoolset (item 1-B).
Step #3: Reassembly of the air valve.Install one bumper (item 1-C) and one
end cap (item 1-E), with two o-rings (items1-D), and fasten with four hex capscrews(items 1-F) to the valve body (item 1-A).
Remove the new sleeve an spool set(item 1-B) from the plastic bag. Carefullyremove the spool from the sleeve. Installthe six o-rings (item 1-D) into the six grooveson the sleeve. Apply a light coating ofgrease to the o-rings before installing thesleeve into the valve body (item 1-A), alignthe slots in the sleeve with the slots in thevalve body. Insert the spool into the sleeve.Be careful not to scratch or damage thespool during installation. Carefully insert thesleeve into the bumper and end cap
(with o-rings) and fasten with the remaininghex capscrews.
Fasten the air valve assembly (item 1)and gasket to the pump.Connect thecompressed air line to the pump. The pumpis now ready for operation.

520-222-000 11/04 Rev C Model S30 Metallic Design Level 1 Page 18
Read these instructionscompletely, before in-stallation and start-up. Itis the responsibility ofthe purchaser to retain
this manual for reference. Failure tocomply with the recommendations statedin this manual will damage the pump, andvoid factory warranty.
IMPORTANT
Air Valve Servicing, Assembly Drawing & Parts ListAir Valve Assembly Parts List (Use w/Aluminum centers only)Item Part Number Description Qty1 031-183-000 (-313) Air Valve Assembly 11-A 095-109-157 (-313) Body, Air Valve 11-B 031-139-000 Sleeve and Spool Set 11-C 132-029-357 Bumper 21-D 560-020-360 O-Ring 101-E 165-127-157(-313) Cap, End 21-F 170-032-330 (-115) Hex Head Capscrew 1/4-20 x .75 8
**AIR VALVE ASSEMBLY PARTS LIST1 031-183-001 Air Valve Assembly 1Consists of all components above except:1-F 170-032-115 Hex Head Capscrew 1/4-20 x .75 8
Air Valve Assembly Parts List (Use w/Cast Iron centers only)Item Part Number Description Qty1 031-179-000 Air Valve Assembly 11-A 095-109-110 Body, Air Valve 11-B 031-139-000 Sleeve and Spool Set 11-C 132-029-357 Bumper 21-D 560-020-379 O-Ring 101-E 165-127-110 Cap, End 21-F 170-032-115 Hex Head Capscrew 1/4-20 x .75 8
Note: For T30 Pumps Substitute The Digits in ( ) For The Last 3 Digits Of PartNumber
1-E
1-F
1-D
1-C
1-A
1-B
1-B
1-C
1-D
1-E
1-F
1-D
I M2 c/b T5II 2GD b T5
Air Distribution Valve ServicingTo service the air valve first shut off the
compressed air, bleed pressure from thepump, and disconnect the air supply linefrom the pump.
Step #1: See COMPOSITE REPAIR PARTSDRAWING.
Using a 9/16" wrench or socket, removethe four hex capscrews (items 12). Removethe air valve assembly from the pump.
Remove and inspect gasket (item 18)for cracks or damage. Replace gasket ifneeded.
Step #2: Disassembly of the air valve.Using a 7/16" wrench or socket, remove
the eight hex capscrews (items 1-F) that
fasten the end caps to the valve body. Nextremove the two end caps (items 1-E).Inspect the two o-rings (items 1-D) on eachend cap for damage or wear. Replace thebumpers as needed.
Remove the bumpers (items 1-C).Inspect the bumpers for damage or wear.Replace the bumpers as needed.
Remove the spool (part of item 1-B) fromthe sleeve. Be careful not to scratch ordamage the outer diameter of the spool.Wipe spool with a soft cloth and inspect forscratches or wear.
Inspect the inner diameter of the sleeve(part of item 1-B) for dirt, scratches, or othercontaminants. Remove the sleeve if neededand replace with a new sleeve and spoolset (item 1-B).
Step #3: Reassembly of the air valve.Install one bumper (item 1-C) and one
end cap (item 1-E), with two o-rings (items1-D), and fasten with four hex capscrews(items 1-F) to the valve body (item 1-A).
Remove the new sleeve an spool set(item 1-B) from the plastic bag. Carefullyremove the spool from the sleeve. Installthe six o-rings (item 1-D) into the six grooveson the sleeve. Apply a light coating ofgrease to the o-rings before installing thesleeve into the valve body (item 1-A), alignthe slots in the sleeve with the slots in thevalve body. Insert the spool into the sleeve.Be careful not to scratch or damage thespool during installation. Carefully insert thesleeve into the bumper and end cap
(with o-rings) and fasten with the remaininghex capscrews.
Fasten the air valve assembly (item 1)and gasket to the pump.Connect thecompressed air line to the pump. The pumpis now ready for operation.

520-222-000 11/04 Rev C Model S30 Metallic Design Level 1 Page 19
Air Valve with Stroke Indicator Assembly Drawing, Parts List
AIR VALVE ASSEMBLY PARTS LIST
ITEM PART NUMBER DESCRIPTION QTY1 031-146-000 Air Valve Assembly 11-A 031-143-000 Sleeve and Spool Set 11-B 095-094-551 Body, Air Valve 11-C 132-029-552 Bumper 21-D 165-096-551 Cap, Muffler 11-E 165-098-147 Cap, End 21-F 530-028-550 Muffler 11-G 560-020-360 O-Ring 81-H 675-044-115 Ring, Retaining 21-J 710-015-115 Screw, Self Tapping 41-K 210-008-330 Clip, Safety 11-M 560-001-360 O-Ring 2
For Pumps with Alternate Mesh, Sound Dampening Mufflersor Piped Exhaust:1 031-147-000 Air Valve Assembly 1
(includes all items on 031-146-000 minus 1-D, 1-F, & 1-J).
**Note: Pumps equipped with this valve assembly are not ATEX compliant
520-222-000 11/04 Rev C Model S30 Metallic Design Level 1 Page 20
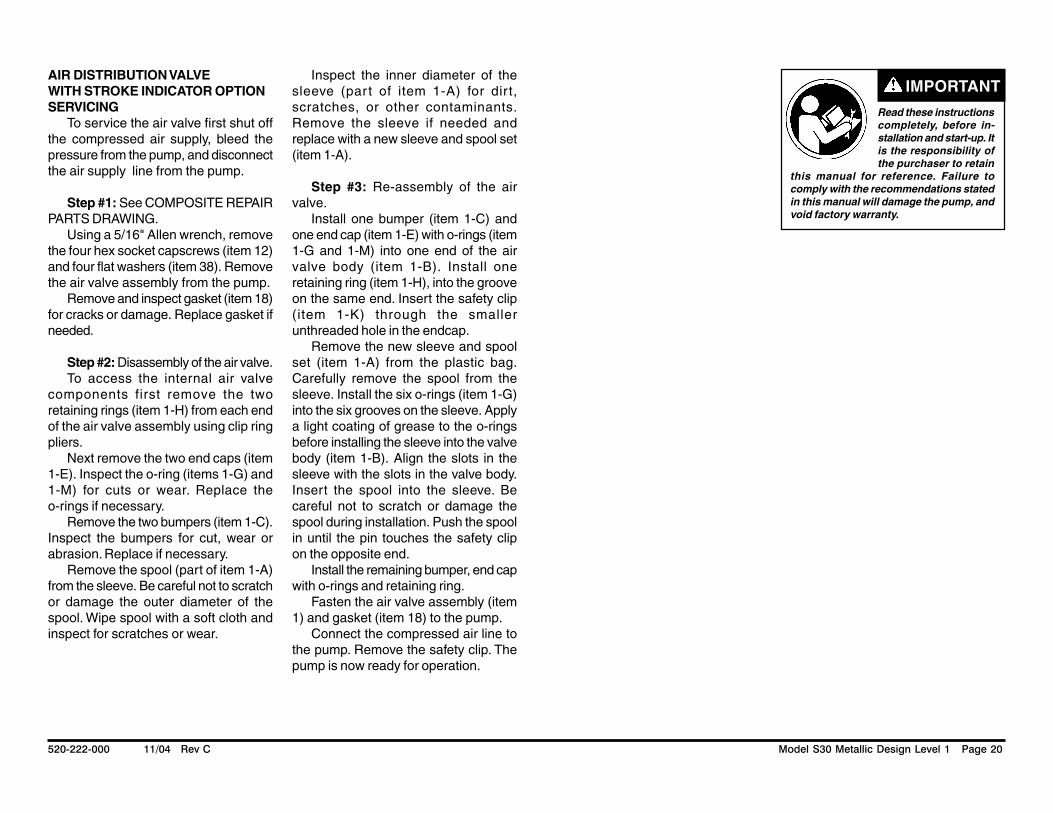
AIR DISTRIBUTION VALVEWITH STROKE INDICATOR OPTIONSERVICING
To service the air valve first shut offthe compressed air supply, bleed thepressure from the pump, and disconnectthe air supply line from the pump.
Step #1: See COMPOSITE REPAIRPARTS DRAWING.
Using a 5/16" Allen wrench, removethe four hex socket capscrews (item 12)and four flat washers (item 38). Removethe air valve assembly from the pump.
Remove and inspect gasket (item 18)for cracks or damage. Replace gasket ifneeded.
Step #2: Disassembly of the air valve.To access the internal air valve
components first remove the tworetaining rings (item 1-H) from each endof the air valve assembly using clip ringpliers.
Next remove the two end caps (item1-E). Inspect the o-ring (items 1-G) and1-M) for cuts or wear. Replace theo-rings if necessary.
Remove the two bumpers (item 1-C).Inspect the bumpers for cut, wear orabrasion. Replace if necessary.
Remove the spool (part of item 1-A)from the sleeve. Be careful not to scratchor damage the outer diameter of thespool. Wipe spool with a soft cloth andinspect for scratches or wear.
Inspect the inner diameter of thesleeve (par t of item 1-A) for dir t,scratches, or other contaminants.Remove the sleeve if needed andreplace with a new sleeve and spool set(item 1-A).
Step #3: Re-assembly of the airvalve.
Install one bumper (item 1-C) andone end cap (item 1-E) with o-rings (item1-G and 1-M) into one end of the airvalve body (item 1-B). Install oneretaining ring (item 1-H), into the grooveon the same end. Insert the safety clip(item 1-K) through the smallerunthreaded hole in the endcap.
Remove the new sleeve and spoolset (item 1-A) from the plastic bag.Carefully remove the spool from thesleeve. Install the six o-rings (item 1-G)into the six grooves on the sleeve. Applya light coating of grease to the o-ringsbefore installing the sleeve into the valvebody (item 1-B). Align the slots in thesleeve with the slots in the valve body.Insert the spool into the sleeve. Becareful not to scratch or damage thespool during installation. Push the spoolin until the pin touches the safety clipon the opposite end.
Install the remaining bumper, end capwith o-rings and retaining ring.
Fasten the air valve assembly (item1) and gasket (item 18) to the pump.
Connect the compressed air line tothe pump. Remove the safety clip. Thepump is now ready for operation.
Read these instructionscompletely, before in-stallation and start-up. Itis the responsibility ofthe purchaser to retain
this manual for reference. Failure tocomply with the recommendations statedin this manual will damage the pump, andvoid factory warranty.
IMPORTANT

520-222-000 11/04 Rev C Model S30 Metallic Design Level 1 Page 21
SOLENOID SHIFTED AIR VALVE PARTS LIST(Includes all items used on Composite Repair Parts List except as shown)
ITEM PART NUMBER DESCRIPTION QTY37 893-097-000 Solenoid Valve, NEMA4 138 219-001-000 Solenoid Coil, 24VDC 1
219-004-000 Solenoid Coil, 24VAC/12VDC 1219-002-000 Solenoid Coil, 120VAC 1219-003-000 Solenoid Coil, 240VAC 1
39 241-001-000 Connector, conduit 1241-003-000 Conduit Connector with 1
Suppression Diode (DC Only)40 170-029-330 Capscrew, Hex HD 5/16-18 x 1.50 441 618-051-150 Plug 2
For Explosion Proof Solenoid Valve(Connector not required for explosion proof coil; coil is integral with valve)37 893-098-001 Solenoid Valve, NEMA 7/9, 24VDC 1
893-098-002 Solenoid Valve, NEMA 7/9, 24VAC/12VDC 1893-098-003 Solenoid Valve, NEMA 7/9, 120VAC 1893-098-004 Solenoid Valve, NEMA 7/9, 220VAC 1
**Solenoid Shifted Air Valve Drawing
39
37
38
37
41
40
**Note: Pumps equipped with Integral Solenoid Valves are not ATEX compliant
520-222-000 11/04 Rev C Model S30 Metallic Design Level 1 Page 22
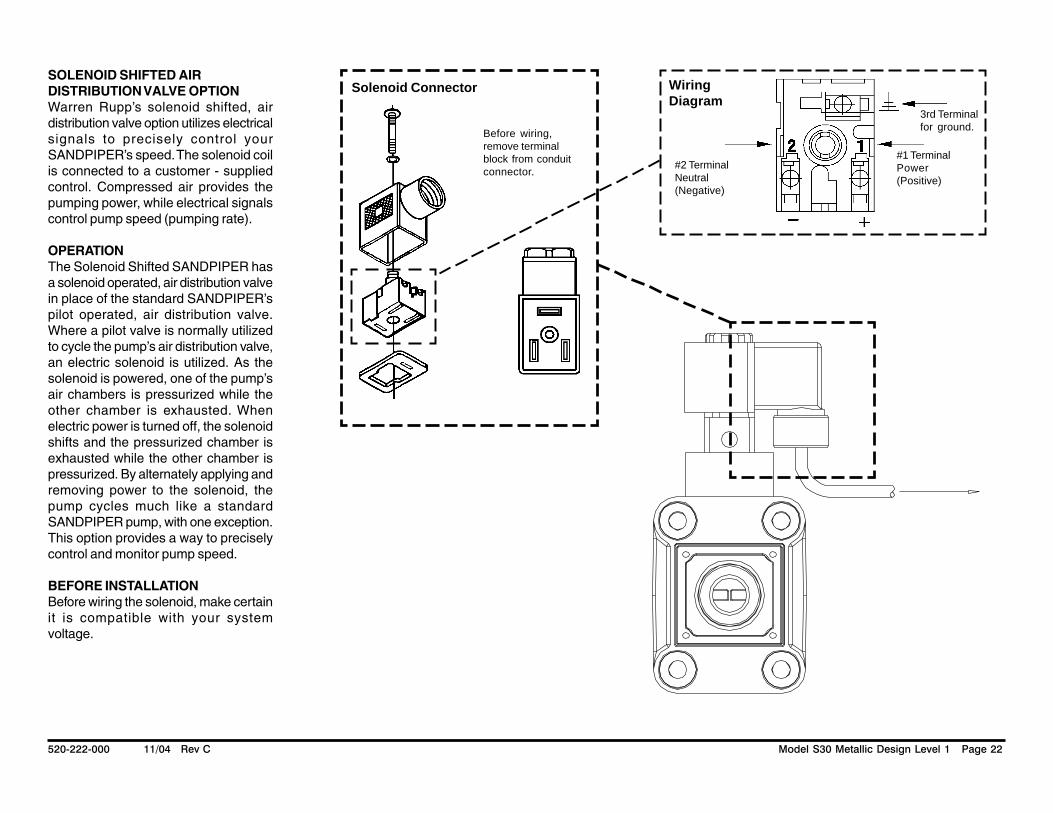
SOLENOID SHIFTED AIRDISTRIBUTION VALVE OPTIONWarren Rupp’s solenoid shifted, airdistribution valve option utilizes electricalsignals to precisely control yourSANDPIPER’s speed. The solenoid coilis connected to a customer - suppliedcontrol. Compressed air provides thepumping power, while electrical signalscontrol pump speed (pumping rate).
OPERATIONThe Solenoid Shifted SANDPIPER hasa solenoid operated, air distribution valvein place of the standard SANDPIPER’spilot operated, air distribution valve.Where a pilot valve is normally utilizedto cycle the pump’s air distribution valve,an electric solenoid is utilized. As thesolenoid is powered, one of the pump’sair chambers is pressurized while theother chamber is exhausted. Whenelectric power is turned off, the solenoidshifts and the pressurized chamber isexhausted while the other chamber ispressurized. By alternately applying andremoving power to the solenoid, thepump cycles much like a standardSANDPIPER pump, with one exception.This option provides a way to preciselycontrol and monitor pump speed.
BEFORE INSTALLATIONBefore wiring the solenoid, make certainit is compatible with your systemvoltage.
Solenoid Connector
#2 TerminalNeutral(Negative)
#1 TerminalPower(Positive)
3rd Terminalfor ground.
WiringDiagram
Before wiring,remove terminalblock from conduitconnector.

520-222-000 11/04 Rev C Model S30 Metallic Design Level 1 Page 23
Diaphragm Service Drawing,Non-Overlay
Diaphragm Service Drawing,with Overlay
32
25
15
13
6
28
17
16
29
9
1424
24
32
25
15
13
6
28
17
29
9
1424
24

520-222-000 11/04 Rev C Model S30 Metallic Design Level 1 Page 24
DIAPHRAGM SERVICINGTo service the diaphragms first shut
off the suction, then shut off thedischarge lines to the pump. Shut off thecompressed air supply, bleed thepressure from the pump, and disconnectthe air supply line from the pump. Drainany remaining liquid from the pump.
Step #1: See the pump assemblydrawing, and the diaphragm servicingillustration.
Using a 9/16" wrench or socket,remove the 16 capscrews (item 10), andhex nuts that fasten the manifolds (items22 & 23) to the outer chambers (item 14).
Step #2: Removing the outerchambers.
Using a 11/16" and a 5/8" wrench orsocket, remove the 16 capscrews (items9), and hex nuts that fasten the outerchambers, diaphragms, and innerchambers (items 15) together.
Step #3: Removing the diaphragmassemblies.
Use a 11/16" (27mm) wrench or sixpointed socket to remove the diaphragmassemblies (outer plate, diaphragm, andinner plate) from the diaphragm rod(item 32) by turning counterclockwise.
NOTE: To uninstall the diaphragmplates from the diaphragm, hold the innerdiaphragm plate using one of twomethods:
Preferred Method: Place theassembled plates and diaphragm in alarge vise, gripping on the exterior castdiameter of the inner diaphragm plate(see the drawing at far right).
Alternate Method: When a larger viseis not available, insert a 1/4 - 20UNC hexcapscrew or setscrew (standardhardware) into the tapped hole in the innerdiaphragm plate. Insert the assembledplates and diaphragm into a vise with thestud from the outer plate and the1/4 - 20 fastener loosely between thejaws of the vise (see illustration at right).
Use a 11/16" wrench or socket toremove the outer diaphragm plate (item29) by turning counterclockwise. Inspectthe diaphragm (item 17) for cuts,punctures, abrasive wear or chemicalattack. Replace the diaphragms ifnecessary.
Step #4: Installing the diaphragms.Push the threaded stud of the outer
diaphragm plate through the center holeof the diaphragm. Thread the inner plateclockwise onto the stud. Use one of thetwo methods for holding the innerdiaphragm plate that was described inprior note in step #3. Use a torque wrenchto tighten the diaphragm assemblytogether to 50 ft. lbs. (67.79 Newtonmeters). Allow a minimum of 15 minutesto elapse after torquing, then re-torquethe assembly to compensate for stressrelaxation in the clamped assembly.
Step #5: Installing the diaphragmassemblies to the pump.
Make sure the bumper (item 6) isinstalled over the diaphragm rod.
Thread the stud of the one diaphragmassembly clockwise into the tapped holeat the end of the diaphragm rod (item32) until the inner diaphragm plate is flushto the end of the rod. Insert rod intopump.
Align the bolt holes in the diaphragmwith the bolt pattern in the inner chamber(item 15).
Fasten the outer chamber (item 14)to the pump, using the capscrews (items9), and hex nuts.
On the opposite side of the pump,pull the diaphragm rod out as far aspossible. Make sure the bumper (item6) is installed over the diaphragm rod.
Thread the stud of the remainingdiaphragm assembly clockwise into thetapped hole at the end of the diaphragmrod (item 32) as far as possible and stillallow for alignment of the bolt holes inthe diaphragm with the bolt pattern inthe inner chamber (item 15).
Fasten the remaining outer chamber(item 14) to the pump, using thecapscrews (items 9), and hex nuts.
Step #6: Re-install the manifolds tothe pump, using the capscrews (items10), hex nuts and flat washers.
Read these instructionscompletely, before in-stallation and start-up. Itis the responsibility ofthe purchaser to retain
this manual for reference. Failure tocomply with the recommendations statedin this manual will damage the pump, andvoid factory warranty.
IMPORTANT
The pump is now ready to bere-installed, connected and returned tooperation.
OVERLAY DIAPHRAGM SERVICINGThe overlay diaphragm (item 16)
is designed to fit over the exterior of thestandard TPE diaphragm (item 17).
The molded directional arrows on theoverlay diaphragm must point vertically.
Follow the same proceduresdescribed for the standard diaphragm forremoval and installation.
Alternate Method:Install 1/4 - 20UNC fastener
into tapped hole.
Preferred Method:Grip this exteriorcast diameter.
520-222-000 11/04 Rev C Model S30 Metallic Design Level 1 Page 25
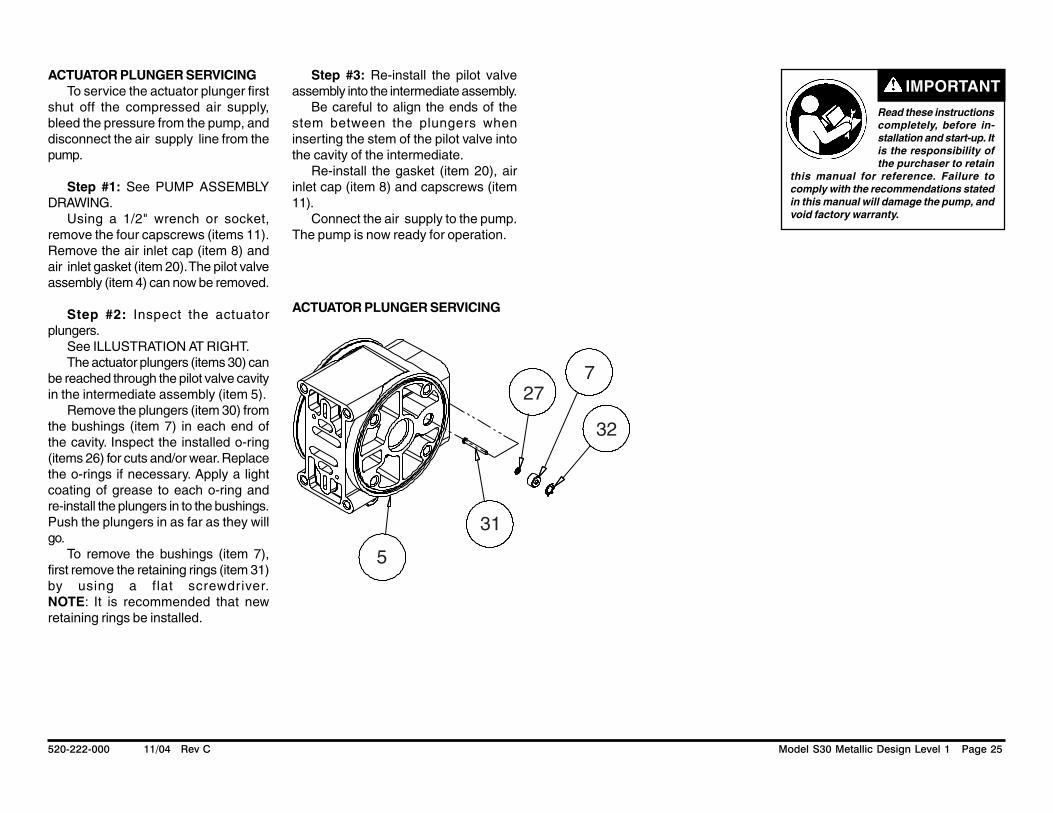
ACTUATOR PLUNGER SERVICINGTo service the actuator plunger first
shut off the compressed air supply,bleed the pressure from the pump, anddisconnect the air supply line from thepump.
Step #1: See PUMP ASSEMBLYDRAWING.
Using a 1/2" wrench or socket,remove the four capscrews (items 11).Remove the air inlet cap (item 8) andair inlet gasket (item 20). The pilot valveassembly (item 4) can now be removed.
Step #2: Inspect the actuatorplungers.
See ILLUSTRATION AT RIGHT.The actuator plungers (items 30) can
be reached through the pilot valve cavityin the intermediate assembly (item 5).
Remove the plungers (item 30) fromthe bushings (item 7) in each end ofthe cavity. Inspect the installed o-ring(items 26) for cuts and/or wear. Replacethe o-rings if necessary. Apply a lightcoating of grease to each o-ring andre-install the plungers in to the bushings.Push the plungers in as far as they willgo.
To remove the bushings (item 7),first remove the retaining rings (item 31)by using a flat screwdriver.NOTE: It is recommended that newretaining rings be installed.
Step #3: Re-install the pilot valveassembly into the intermediate assembly.
Be careful to align the ends of thestem between the plungers wheninserting the stem of the pilot valve intothe cavity of the intermediate.
Re-install the gasket (item 20), airinlet cap (item 8) and capscrews (item11).
Connect the air supply to the pump.The pump is now ready for operation.
ACTUATOR PLUNGER SERVICING
277
32
31
5
Read these instructionscompletely, before in-stallation and start-up. Itis the responsibility ofthe purchaser to retain
this manual for reference. Failure tocomply with the recommendations statedin this manual will damage the pump, andvoid factory warranty.
IMPORTANT

520-222-000 11/04 Rev C Model S30 Metallic Design Level 1 Page 26
Check Valve DrawingCHECK VALVE SERVICINGBefore servicing the check valve
components, first shut off the suctionline and then the discharge line to thepump. Next, shut off the compressed airsupply, bleed air pressure from thepump, and disconnect the air supply linefrom the pump. Drain any remaining fluidfrom the pump. The pump can now beremoved for service.
To access the check valvecomponents, remove the manifold(item 23 or item 22 not shown). Use a9/16" wrench or socket to remove thefasteners. Once the manifold is removed,the check valve components can beseen.
Inspect the check balls (items 2) forwear, abrasion, or cuts on the sphericalsurface. The check valve seats (item 34)should be inspected for cuts, abrasivewear, or embedded material on thesurfaces of both the external and internalchambers. The spherical surface of thecheck balls must seat flush to thesurface of the check valve seats for thepump to operate to peak efficiency.Replace any worn or damaged parts asnecessary.
Re-assemble the check valvecomponents. The seat should fit into thecounter bore of the outer chamber.
The pump can now be reassembled,reconnected and returned to operation.
METALLIC SEATSTwo o-rings (or conductive PTFE
seals) (item 27) are required for metallicseats.
with Non-MetallicSeats
with Metallic Seats
520-222-000 11/04 Rev C Model S30 Metallic Design Level 1 Page 27
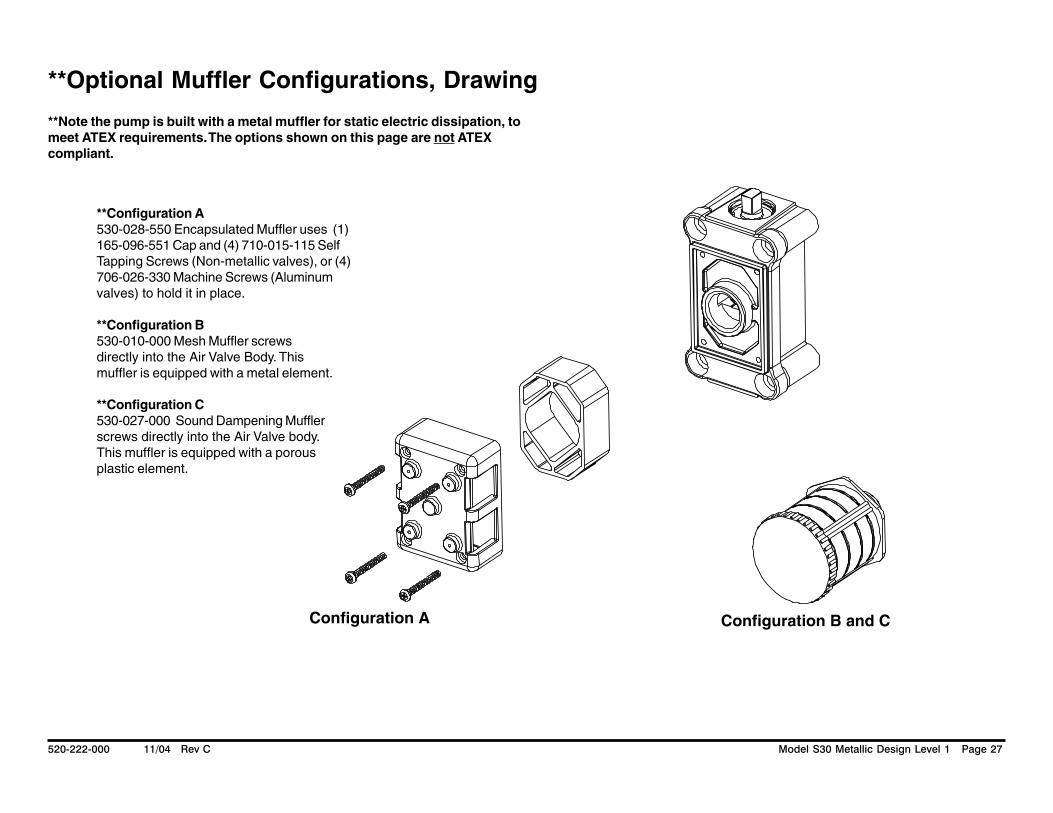
**Optional Muffler Configurations, Drawing
**Configuration A530-028-550 Encapsulated Muffler uses (1)165-096-551 Cap and (4) 710-015-115 SelfTapping Screws (Non-metallic valves), or (4)706-026-330 Machine Screws (Aluminumvalves) to hold it in place.
**Configuration B530-010-000 Mesh Muffler screwsdirectly into the Air Valve Body. Thismuffler is equipped with a metal element.
**Configuration C530-027-000 Sound Dampening Mufflerscrews directly into the Air Valve body.This muffler is equipped with a porousplastic element.
Configuration A Configuration B and C
**Note the pump is built with a metal muffler for static electric dissipation, tomeet ATEX requirements. The options shown on this page are not ATEXcompliant.

520-222-000 11/04 Rev C Model S30 Metallic Design Level 1 Page 28
SAFE AIREXHAUSTDISPOSALAREA
PUMP INSTALLATION AREA
1" DIAMETER AIREXHAUST PIPING
1" DIAMETER AIREXHAUST PIPING
1" DIAMETER AIREXHAUST PIPING
MUFFLER
LIQUIDLEVEL
SUCTIONLINE
LIQUIDLEVEL
SUCTIONLINE
MUFFLER
MUFFLER
CONVERTED EXHAUST ILLUSTRATION
Illustration #1
Illustration #2
Illustration #3
PUMPING HAZARDOUS LIQUIDSWhen a diaphragm fails, the pumped
liquid or fumes enter the air end of thepump. Fumes are exhausted into thesurrounding environment. When pumpinghazardous or toxic materials, theexhaust air must be piped to anappropriate area for safe disposal. Seeillustration #1 at right.
This pump can be submerged if thepump materials of construction arecompatible with the liquid being pumped.The air exhaust must be piped abovethe liquid level. See illustration #2 atright. Piping used for the air exhaust mustnot be smaller than 1" (2.54 cm)diameter. Reducing the pipe size willrestrict air flow and reduce pumpperformance. When the pumped productsource is at a higher level than the pump(flooded suction condition), pipe theexhaust higher than the product sourceto prevent siphoning spills. Seeillustration #3 at right.
CONVERTING THE PUMP FORPIPING THE EXHAUST AIR
The following steps are necessary toconvert the pump to pipe the exhaustair away from the pump.
Remove the muffler (item 42). Theair distribution valve (item 1) has 1" NPTthreads for piped exhaust.
IMPORTANT INSTALLATIONNOTE: The manufacturer recommendsinstalling a flexible conductive hose orconnection between the pump and anyrigid plumbing. This reduces stresses onthe molded threads of the air exhaustport. Failure to do so may result indamage to the air distribution valve body.
Any piping or hose connected to the pump’s air exhaust port must beconductive and physically supported.Failure to support these connectionscould also result in damage to the airdistribution valve body.
1
On ATEX compliant unitsthe pump comes equippedwith a standard metalmuffler
Air Valve Assembly
42

520-222-000 11/04 Rev C Model S30 Metallic Design Level 1 Page 29
Configuration "B"
Configuration "A"TO CONTROL BOX
LEAK DETECTORS
**RuppTech® Leak Detection Options, Drawing
RuppTech® Electronic Leak DetectorKit 032-037-000 100VAC 50Hz
or 110-120VAC 50/60Hzor 220-240VAC 50/60Hz
Kit 032-045-000 12-32VDC
Configuration ATo be used with the Encapsulated muffler option. Youwill need to mount the terminal box directly to themuffler cap on the air valve using the (2) 710-014-330self tapping screws. Then insert the leak detectorsinto the bottom port in the inner chambers.
Configuration BTo be used with either of the muffler options or if yourexhaust is piped away. You will need to mount theterminal box to the 612-185-552 mounting plate usingthe (2) 710-014-330 self tapping screws. Then mountthe mounting plate directly to the air valve body usingthe (4) 710-009-115 self tapping screws. Then insertthe leak detectors into the bottom port in the innerchambers.
Mechanical Leak DetectorKit 031-023-110Insert the leak detectors into the bottom part in theinner chambers.
**Note: Pumps equipped with these options are not ATEX compliant.

520-222-000 11/04 Rev C Model S30 Metallic Design Level 1 Page 30
RuppTech® PULSE OUTPUT KIT OPTIONThis pump can be fitted with a Pulse Output Kit. This converts the mechanical
strokes of the pump to an electrical signal which interfaces with the RuppTech®Stroke Counter/ Batch Controller or user control devices such as a PLC.
The Pulse Output Kits mount directly onto the Muffler Cap on the Air DistributionValve Assembly or onto the Air Distribution Valve Assembly when the threadedexhaust port or an auxiliary muffler is being used.
See the individual kits listed on the Pump Repair Parts List for further information.
**RuppTech® Pulse Output Kit Drawing & Options
Exhaust Port or AuxiliaryMuffler Setup Integral Muffler Setup
Muffler Cap
Pulse Output Kit
Pulse Output Kit
**Note: Pumps equipped with Pulse Output Kits are not ATEX compliant.

520-222-000 11/04 Rev C Model S30 Metallic Design Level 1 Page 31
This 8 foot long (244 centimeters) Ground Strap, partnumber 920-025-000, can be ordered as a servicepart.
To reduce the risk of static electrical sparking, thispump must be grounded. Check the local electricalcode for detailed grounding instruction and the type ofequipment required.
Grounding The Pump
Take action to prevent staticsparking. Fire or explosion canresult, especially when handlingflammable liquids. The pump,piping, valves, containers or othermiscellaneous equipment must begrounded.
WARNING
One eyelet is installed to a true earth ground.(Requires a 5/16 or 8mm maximum diameter bolt)
One eyelet is fastened to the pump hardware.