SeqCap EZ Library SR User's Guidenetdocs.roche.com/DDM/Effective/RSS_SeqCap_EZ_UGuide_v5.4.pdf ·...
55
For Research Use Only. Not for use in diagnostic procedures. SeqCap EZ Library SR User’s Guide Version 5.4
Transcript of SeqCap EZ Library SR User's Guidenetdocs.roche.com/DDM/Effective/RSS_SeqCap_EZ_UGuide_v5.4.pdf ·...
For Research Use Only. Not for use in diagnostic procedures.
SeqCap EZ Library SR User’s Guide
Version 5.4
SeqCap EZ Library SR User’s Guide, v5.4 2
Copyright
© 2015-2017 Roche Sequencing Solutions, Inc. All Rights Reserved.
Roche Sequencing Solutions, Inc. 4300 Hacienda Drive Pleasanton, CA 94588 USA
Editions
Version 1.0, December 2010 (SeqCap EZ Choice SR 06264808001); Version 2.2, December 2010 (SeqCap EZ Exome SR 05836611001); Version 3.0, November 2011; Version 4.0, January 2013; Version 4.1, May 2013; Version 4.2, December 2013; Version 4.3, October 2014; Version 5.0, December 2014; Version 5.1, September 2015; Version 5.2, March 2017, Version 5.3, June 2017. Version 5.4, December 2017
Restrictions and Liabilities
This document is provided “as is” and Roche Sequencing Solutions, Inc. (Roche) assumes no responsibility for any typographical, technical, or other inaccuracies in this document. Roche reserves the right to periodically change information that is contained in this document; however, Roche makes no commitment to provide any such changes, updates, enhancements, or other additions to this document to you in a timely manner or at all.
OTHER THAN THE LIMITED WARRANTY CONTAINED IN THIS USER GUIDE, ROCHE MAKES NO REPRESENTATIONS, WARRANTIES, CONDITIONS OR COVENANTS, EITHER EXPRESS OR IMPLIED (INCLUDING WITHOUT LIMITATION, ANY EXPRESS OR IMPLIED WARRANTIES OR CONDITIONS OF FITNESS FOR A PARTICULAR PURPOSE, NON-INFRINGEMENT, MERCHANTABILITY, DURABILITY, TITLE, OR RELATED TO THE PERFORMANCE OR NON-PERFORMANCE OF ANY PRODUCT REFERENCED HEREIN OR PERFORMANCE OF ANY SERVICES REFERENCED HEREIN).
This document might contain references to third party sources of information, hardware or software, products, or services and/or third party web sites (collectively the “Third-Party Information”). Roche does not control, and is not responsible for, any Third-Party Information, including, without limitation the content, accuracy, copyright compliance, compatibility, performance, trustworthiness, legality, decency, links, or any other aspect of Third-Party Information. The inclusion of Third-Party Information in this document does not imply endorsement by Roche of the Third-Party Information or the third party in any way.
Roche does not in any way guarantee or represent that you will obtain satisfactory results from using Roche products as described herein. The only warranties provided to you are included in the Limited Warranty enclosed with this guide. You assume all risk in connection with your use of Roche products.
Roche is not responsible nor will be liable in any way for your use of any software or equipment that is not supplied by Roche in connection with your use of Roche products.
Conditions of Use
You are responsible for understanding and performing the protocols described within. Roche does not guarantee any results you may achieve. These protocols are provided as Roche’s recommendations based on its use and experience with Roche products.
Use Restrictions
For patent license limitations for individual products, refer to: www.technical-support.roche.com.

SeqCap EZ Library SR User’s Guide, v5.4 3
Table of Contents
Table of Contents ................................................................................................................................................. 3
Preface .................................................................................................................................................................... 5 Regulatory Disclaimer ................................................................................................................................................................................................ 5
SeqCap EZ Probe Pool ......................................................................................................................................................................................... 5 Contact Information .................................................................................................................................................................................................... 5
Technical Support .................................................................................................................................................................................................. 5 Manufacturer and Distribution ......................................................................................................................................................................... 5
Conventions Used in This Manual ........................................................................................................................................................................ 5 Symbols ..................................................................................................................................................................................................................... 5 Text .............................................................................................................................................................................................................................. 6
Chapter 1. Before You Begin ............................................................................................................................. 7 Workflow ......................................................................................................................................................................................................................... 7 Prepare the Following Reagents and Equipment ............................................................................................................................................ 8 What’s New in v5.4? ................................................................................................................................................................................................... 9 Terminology ................................................................................................................................................................................................................... 9 Components Supplied ............................................................................................................................................................................................... 9 Protocol Information & Safety ............................................................................................................................................................................... 10 Required Equipment, Labware & Consumables ............................................................................................................................................ 10
Laboratory Equipment........................................................................................................................................................................................ 10 Consumables Available from Roche Diagnostics ................................................................................................................................... 11 Consumables Purchased from Other Vendors ......................................................................................................................................... 11 Custom Oligonucleotides Purchased from IDT or Another Vendor ................................................................................................. 12
Chapter 2. Store the SeqCap EZ Reagents ................................................................................................... 13 Step 1. Aliquot the SeqCap EZ Probe Pool ...................................................................................................................................................... 13 Step 2. Store the Frozen Reagents ...................................................................................................................................................................... 14 Step 3. Store the Refrigerated Reagents .......................................................................................................................................................... 14
Chapter 3. Prepare the Sample Library ......................................................................................................... 15 References ................................................................................................................................................................................................................... 15 Sample Requirements .............................................................................................................................................................................................. 15 Step 1. Resuspend the Index Adapters ............................................................................................................................................................. 15 Step 2. Prepare the Sample Library .................................................................................................................................................................... 16
Chapter 4. Amplify the Sample Library Using LM-PCR .............................................................................. 21 References ................................................................................................................................................................................................................... 21 Sample Requirements .............................................................................................................................................................................................. 21 Step 1. Resuspend the SeqCap Pre-LM-PCR Oligos ................................................................................................................................... 21 Step 2. Prepare the Pre-Capture LM-PCR Master Mix ............................................................................................................................... 21 Step 3. Perform the Pre-Capture PCR Amplification ................................................................................................................................... 22 Step 4. Purify the Amplified Sample Library using Agencourt AMPure XP Beads .......................................................................... 22 Step 5. Check the Quality of the Amplified Sample Library ...................................................................................................................... 23
Chapter 5. Hybridize the Sample and SeqCap EZ Probe Pool .................................................................. 25 Step 1. Prepare for Hybridization ......................................................................................................................................................................... 25 Step 2. Resuspend the SeqCap HE Universal and SeqCap HE Index Oligos ..................................................................................... 25 Step 3. Prepare the Multiplex DNA Sample Library Pool ........................................................................................................................... 26 Step 4. Prepare the Multiplex Hybridization Enhancing Oligo Pool ....................................................................................................... 26 Step 5. Prepare the Hybridization Sample ....................................................................................................................................................... 27
Chapter 6. Wash and Recover Captured Multiplex DNA Sample ............................................................ 29 Step 1. Prepare Sequence Capture and Bead Wash Buffers ................................................................................................................... 29 Step 2. Prepare the Capture Beads .................................................................................................................................................................... 30 Step 3. Bind DNA to the Capture Beads .......................................................................................................................................................... 30
Table of Contents
SeqCap EZ Library SR User’s Guide, v5.4 4
Step 4. Wash the Capture Beads Plus Bound DNA ..................................................................................................................................... 30
Chapter 7. Amplify Captured Multiplex DNA Sample Using LM-PCR ............................................................ 32 References ................................................................................................................................................................................................................... 32 Step 1. Resuspend the Post-LM-PCR Oligos .................................................................................................................................................. 32 Step 2. Prepare the Post-Capture LM-PCR Master Mix ............................................................................................................................. 32 Step 3. Perform the Post-Capture PCR Amplification ................................................................................................................................. 33 Step 4. Purify the Amplified Captured Multiplex DNA Sample using Agencourt AMPure XP Beads ...................................... 34 Step 5. Determine the Concentration, Size Distribution, and Quality of the Amplified Captured Multiplex DNA Sample35
Chapter 8. Measure Enrichment Using qPCR ................................................................................................... 36 References ................................................................................................................................................................................................................... 36 Step 1. Perform the qPCR Assay .......................................................................................................................................................................... 36 Step 2. Analyze Data ................................................................................................................................................................................................ 39
Example: NSC-0268 assay ................................................................................................................................................................................ 40 Interpreting qPCR Results – SeqCap EZ Probe Pool Captures .......................................................................................................... 40
Appendix A. Hybridize Using 96-Well Plates and a Liquid Handler System .......................................... 41 Step 1. Prepare for Hybridization ......................................................................................................................................................................... 41 Step 2. Resuspend the SeqCap HE Universal and SeqCap HE Index Oligos ..................................................................................... 41 Step 3. Prepare the Multiplex DNA Sample Library Pool ........................................................................................................................... 41 Step 4. Prepare the Multiplex Hybridization Enhancing Oligo Pool ....................................................................................................... 42 Step 5. Prepare the Hybridization Sample ....................................................................................................................................................... 42
Appendix B. Wash and Recover Using 96-Well Plates and a Liquid Handler System ......................... 45 Additional Equipment, Labware & Consumables ......................................................................................................................................... 45 Step 1. Prepare Buffers............................................................................................................................................................................................ 46 Step 2. Prepare the Capture Beads .................................................................................................................................................................... 46 Step 3. Bind DNA to the Capture Beads .......................................................................................................................................................... 47 Step 4. Wash the Capture Beads Plus Bound DNA ..................................................................................................................................... 47
Appendix C. Post-Capture Multiplexing for Sequencing ........................................................................... 49
Appendix D. Purify the Amplified Captured DNA using Qiagen QIAquick PCR Purification Kit ........ 50 References ................................................................................................................................................................................................................... 50
Appendix E. Troubleshooting ........................................................................................................................... 51
Appendix F. Limited Warranty .......................................................................................................................... 54
Preface
SeqCap EZ Library SR User’s Guide, v5.4 5
Preface
Regulatory Disclaimer For Research Use Only. Not for use in diagnostic procedures.
SeqCap EZ Probe Pool
SeqCap EZ probe pool is a solution-based capture method that enables enrichment of the whole exome or customer regions of interest in a single tube. Throughout this document, ‘SeqCap EZ probe pool’ refers to the SeqCap EZ Library, SeqCap EZ Prime Probes, and SeqCap EZ Enrichment Kits.
Contact Information
Technical Support
If you have questions, contact your local Roche Technical Support. Go to sequencing.roche.com/support.html for contact information.
Manufacturer and Distribution
Manufacturer Roche Sequencing Solutions, Inc. Pleasanton, CA USA
Distribution Roche Diagnostics GmbH Mannheim, Germany
Distribution in USA Roche Diagnostics Corporation Indianapolis, IN USA
Conventions Used in This Manual Symbols
Symbol Description
Important Note: Information critical to the success of the procedure or use of the product. Failure to follow these instructions could result in compromised data.
Information Note: Designates a note that provides additional information concerning the current topic or procedure.

Preface
SeqCap EZ Library SR User’s Guide, v5.4 6
Text
Conventions Description
Numbered listing Indicates steps in a procedure that must be performed in the order listed.
Italic type, blue Identifies a resource in a different area of this manual or on a web site.
Italic type Identifies the names of dialog boxes, windows, tabs, panels, views, or message boxes in the software.
Bold type Identifies names of menus and controls (buttons, checkboxes, etc.) in the software.
Chapter 1. Before You Begin
SeqCap EZ Library SR User’s Guide, v5.4 7
Chapter 1. Before You Begin
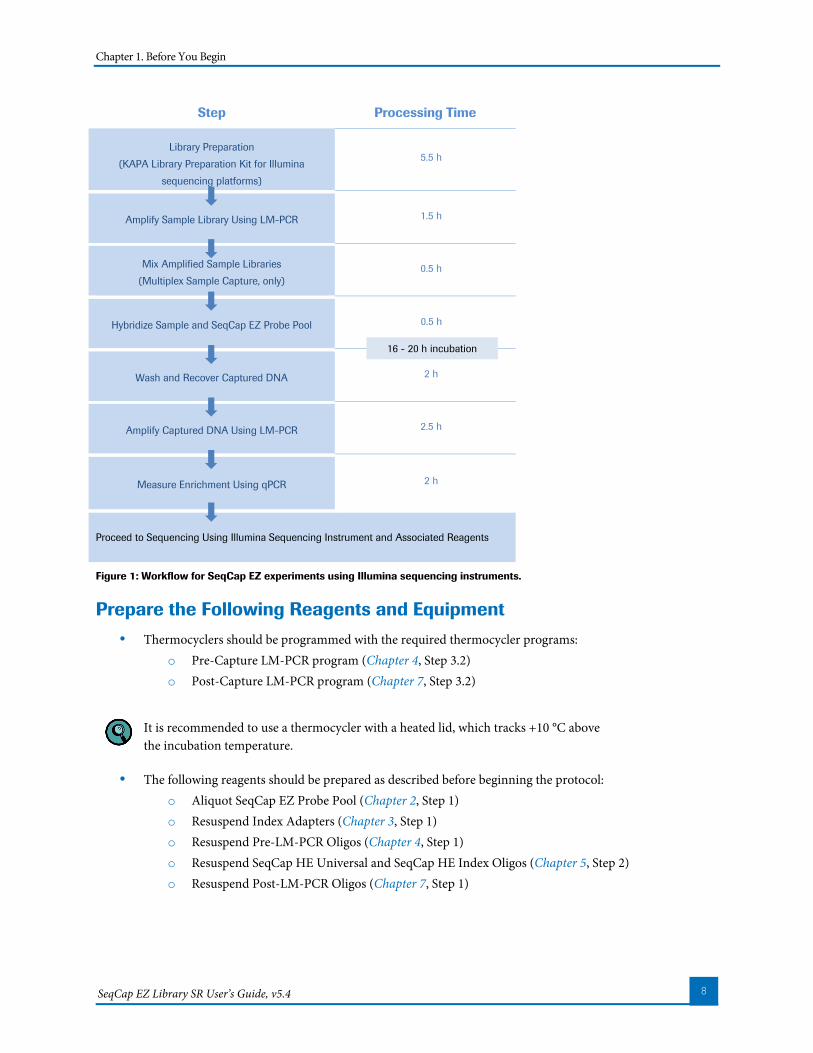
This User’s Guide describes the process for enrichment of individual or multiplexed genomic DNA (gDNA) sample libraries using SeqCap EZ Libraries, and the amplification of these sample libraries by ligation-mediated PCR (LM-PCR) (Figure 1). Specifically, this User’s Guide provides a protocol for the workflow outlined below. The output of this protocol consists of enriched gDNA fragments that can be sequenced directly using an Illumina sequencing instrument.
Workflow The SeqCap EZ protocol involves:
1. Preparation of the gDNA sample library using the KAPA Library Preparation Kits.
2. Amplification of the DNA sample library using the KAPA HiFi HotStart ReadyMix.
3. Capturing target regions by hybridizing the gDNA sample library with the SeqCap EZ probe pool.
4. Recovery of captured sample using the SeqCap Hybridization and Wash Kit.
5. Further amplification of the captured DNA sample using the KAPA HiFi HotStart ReadyMix.
6. Sequencing the captured and amplified DNA sample using an Illumina sequencing instrument.
Figure 1 lists the steps in the workflow for SeqCap EZ Libraries.
The corresponding estimated time for each step is based on processing one capture reaction. When applicable, incubation times are indicated between processing times in Figure 1.
Chapter 1. Before You Begin
SeqCap EZ Library SR User’s Guide, v5.4 8
Step Processing Time
Library Preparation (KAPA Library Preparation Kit for Illumina
sequencing platforms)
5.5 h
Amplify Sample Library Using LM-PCR 1.5 h
Mix Amplified Sample Libraries (Multiplex Sample Capture, only)
0.5 h
Hybridize Sample and SeqCap EZ Probe Pool
0.5 h
Wash and Recover Captured DNA 2 h
Amplify Captured DNA Using LM-PCR 2.5 h
Measure Enrichment Using qPCR 2 h
Proceed to Sequencing Using Illumina Sequencing Instrument and Associated Reagents
Figure 1: Workflow for SeqCap EZ experiments using Illumina sequencing instruments.
Prepare the Following Reagents and Equipment · Thermocyclers should be programmed with the required thermocycler programs:
o Pre-Capture LM-PCR program (Chapter 4, Step 3.2) o Post-Capture LM-PCR program (Chapter 7, Step 3.2)
It is recommended to use a thermocycler with a heated lid, which tracks +10 °C above the incubation temperature.
· The following reagents should be prepared as described before beginning the protocol: o Aliquot SeqCap EZ Probe Pool (Chapter 2, Step 1) o Resuspend Index Adapters (Chapter 3, Step 1) o Resuspend Pre-LM-PCR Oligos (Chapter 4, Step 1) o Resuspend SeqCap HE Universal and SeqCap HE Index Oligos (Chapter 5, Step 2) o Resuspend Post-LM-PCR Oligos (Chapter 7, Step 1)
16 - 20 h incubation
Chapter 1. Before You Begin
SeqCap EZ Library SR User’s Guide, v5.4 9
What’s New in v5.4? Version 5.4 adds support for the SeqCap EZ Share and SeqCap EZ Share Prime products.
To verify you are using the most up-to-date version of this User’s Guide to process your captures, go to sequencing.roche.com/support.html.
Terminology LM-PCR: Ligation Mediated PCR. In the context of this document, PCR using primers complementary to the sequencing adapters.
Sequence Capture (or Capture): The process of enriching targeted regions from genomic DNA. In the context of this document, the hybridization of the amplified sample library and SeqCap EZ probe pool, and subsequent washing steps.
SeqCap EZ probe pool: The complete set of biotinylated long oligonucleotide probes provided by Roche to perform sequence capture (SeqCap EZ Human Exome, SeqCap EZ MedExome, SeqCap EZ Choice, SeqCap EZ Choice XL, SeqCap EZ Developer, SeqCap EZ Prime Choice, SeqCap EZ Prime Choice XL, or SeqCap EZ Prime Developer).
Sample Library: The initial shotgun library generated from genomic DNA by fragmentation and ligation of sequencing-platform-specific linkers. In the context of this document, the sample library before amplification by LM-PCR and before capture.
Amplified Sample Library: The sample library after amplification by LM-PCR but before capture.
Captured Multiplex DNA Sample: The enriched DNA population from the amplified sample library after the multiplex capture process but before another round of LM-PCR.
Amplified, Captured Multiplex DNA Sample: The captured DNA after LM-PCR amplification.
Components Supplied Component Description
SeqCap EZ MedExome Enrichment Kit Available in 4, 48, or 384 reaction packs
SeqCap EZ MedExome Plus Enrichment Kit Available in 48 reaction packs SeqCap EZ Choice Library SeqCap EZ Choice XL Library SeqCap EZ Developer Library SeqCap EZ Prime Choice Probes SeqCap EZ Prime Choice XL Probes SeqCap EZ Prime Developer Probes
Available in 4, 12, 24, 48, 96, 384 or 960 reaction packs
SeqCap EZ Share Choice Library SeqCap EZ Share Choice XL Library SeqCap EZ Share Developer Library SeqCap EZ Share Prime Choice Library SeqCap EZ Share Prime Choice XL Library SeqCap EZ Share Prime Developer Library
Available in 24, 96, 384 reaction packs
SeqCap EZ Human Exome Library v3.0 Available in 4 or 48 reaction packs
SeqCap EZ Exome Plus Library Available in 12, 48 or 96 reaction packs
SeqCap EZ Designs Available in various reaction packs 1 View .bed files using Roche SignalMap software (available at sequencing.roche.com/products/software/signalmap-software.html or the
Internet-based UCSC Genome browser).
Chapter 1. Before You Begin
SeqCap EZ Library SR User’s Guide, v5.4 10
Protocol Information & Safety n Wear gloves and take precautions to avoid sample contamination.
n Perform all centrifugations at room temperature (+15 to +25 °C) unless indicated otherwise.
Required Equipment, Labware & Consumables You assume full responsibility when using the equipment, labware, and consumables described below. These protocols are designed for use with the specified equipment, labware, and consumables.
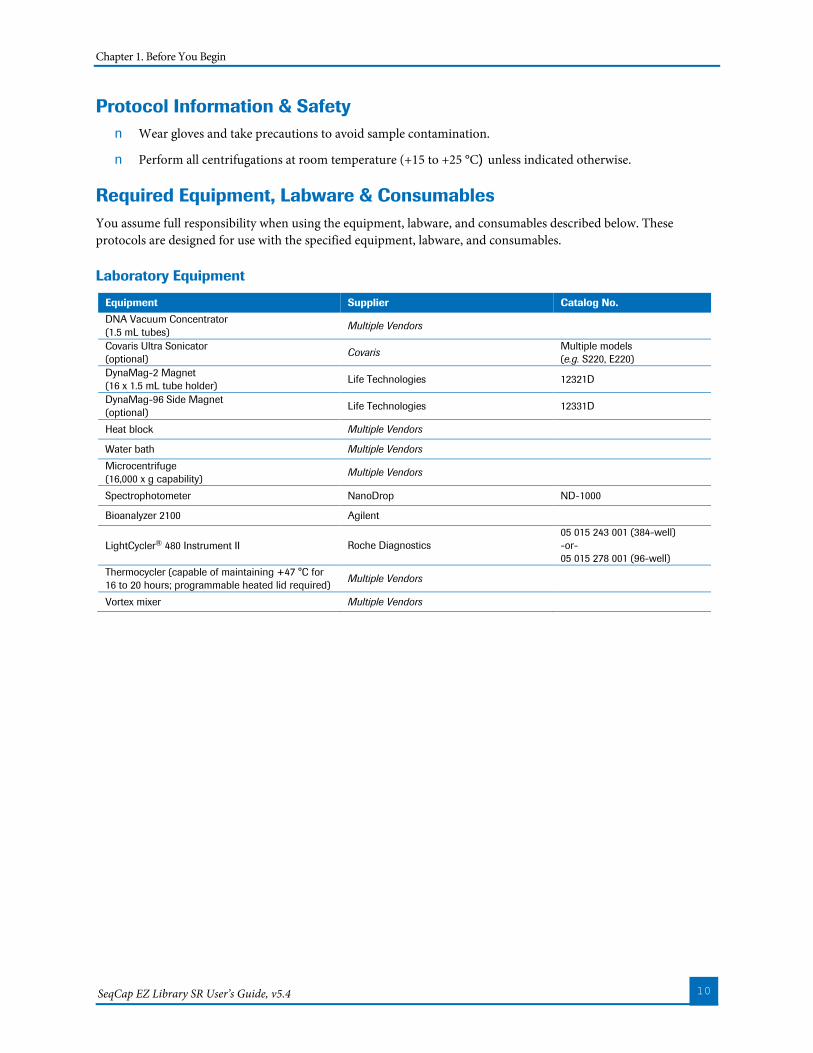
Laboratory Equipment
Equipment Supplier Catalog No. DNA Vacuum Concentrator (1.5 mL tubes) Multiple Vendors
Covaris Ultra Sonicator (optional) Covaris Multiple models
(e.g. S220, E220) DynaMag-2 Magnet (16 x 1.5 mL tube holder) Life Technologies 12321D
DynaMag-96 Side Magnet (optional) Life Technologies 12331D
Heat block Multiple Vendors
Water bath Multiple Vendors Microcentrifuge (16,000 x g capability) Multiple Vendors
Spectrophotometer NanoDrop ND-1000
Bioanalyzer 2100 Agilent
LightCycler® 480 Instrument II Roche Diagnostics 05 015 243 001 (384-well) -or- 05 015 278 001 (96-well)
Thermocycler (capable of maintaining +47 °C for 16 to 20 hours; programmable heated lid required) Multiple Vendors
Vortex mixer Multiple Vendors

Chapter 1. Before You Begin
SeqCap EZ Library SR User’s Guide, v5.4 11
Consumables Available from Roche Diagnostics
The package sizes listed provide sufficient material to perform a minimum of 24 Sequence Capture experiments.
Component Package Size/Contents Catalog No.
LightCycler® 480 Multiwell Plate 384 (with sealing foils) 5 x 10 plates 04 729 749 001
LightCycler® 480 SYBR Green I Master (2X Mix) 5 x 1 mL 04 707 516 001
Water. PCR Grade 4 x 25 mL 03 315 843 001
KAPA Library Preparation Kit for Illumina sequencing platforms 10 reactions 07 137 923 001
KAPA Library Preparation Kit for Illumina sequencing platforms 50 reactions 07 137 974 001
KAPA HTP Lib Preparation Kit for Illumina sequencing platforms 96 reactions 07 138 008 001
SeqCap Adapter Kit A 96 96 reactions 07 141 530 001
SeqCap Adapter Kit B 96 96 reactions 07 141 548 001
SeqCap Hybridization and Wash Kit1 24 reactions 05 634 261 001
SeqCap EZ Accessory Kit v21 24 reactions 07 145 594 001
SeqCap EZ Accessory Kit v2 96 reactions 06 776 345 001
SeqCap HE-Oligo Kit A1 96 reactions 06 777 287 001
SeqCap HE-Oligo Kit B 96 reactions 06 777 317 001
SeqCap Pure Capture Bead Kit2 24 reactions 06 977 952 001
1 These items can be ordered together in the SeqCap EZ Reagent Kit v2, 24 reactions2 (Cat. No. 06 953 212 001)
2 These items can be ordered together in the SeqCap EZ Reagent Kit Plus v2, 24 reactions (Cat. No. 06 953 247 001)
Use nuclease-free, PCR-grade water for all described protocol steps. Working with a liquid handler system may require a considerably greater excess volume (Appendix B).
Consumables Purchased from Other Vendors
Component Supplier Package Size Catalog No.
Agilent DNA 1000 Kit Agilent 1 kit 5067-1504
Agencourt AMPure XP Beads Beckman Coulter 5 mL 60 mL 450 mL
A63880 A63881 A63882
Ethanol, 200 proof (absolute), for molecular biology Sigma-Aldrich 500 mL E7023-500ML
TE Buffer, 1 X Solution pH 8.0, Low EDTA USB Corporation 100 mL 75793
microTUBE AFA Fiber Pre-Slit Snap-Cap 6x16mm (25) Covaris, Inc. 1 package of 25 tubes 520045
Elution buffer (10 mM Tris-HCl, pH 8.0) Multiple Vendors Tubes: n 0.2 mL PCR tubes n 1.5 mL microcentrifuge tubes
Multiple Vendors
Chapter 1. Before You Begin
SeqCap EZ Library SR User’s Guide, v5.4 12
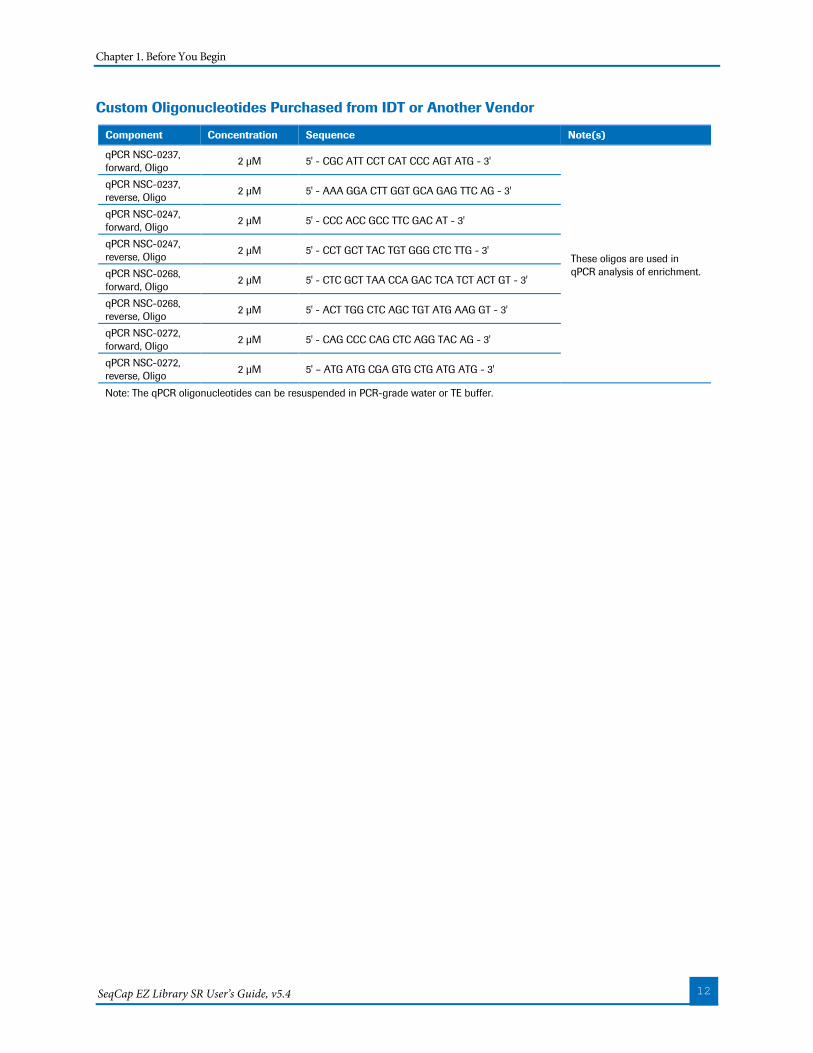
Custom Oligonucleotides Purchased from IDT or Another Vendor
Component Concentration Sequence Note(s)
qPCR NSC-0237, forward, Oligo 2 µM 5' - CGC ATT CCT CAT CCC AGT ATG - 3'
These oligos are used in qPCR analysis of enrichment.
qPCR NSC-0237, reverse, Oligo 2 µM 5' - AAA GGA CTT GGT GCA GAG TTC AG - 3'
qPCR NSC-0247, forward, Oligo 2 µM 5' - CCC ACC GCC TTC GAC AT - 3'
qPCR NSC-0247, reverse, Oligo 2 µM 5' - CCT GCT TAC TGT GGG CTC TTG - 3'
qPCR NSC-0268, forward, Oligo 2 µM 5' - CTC GCT TAA CCA GAC TCA TCT ACT GT - 3'
qPCR NSC-0268, reverse, Oligo 2 µM 5' - ACT TGG CTC AGC TGT ATG AAG GT - 3'
qPCR NSC-0272, forward, Oligo 2 µM 5' - CAG CCC CAG CTC AGG TAC AG - 3'
qPCR NSC-0272, reverse, Oligo 2 µM 5' – ATG ATG CGA GTG CTG ATG ATG - 3'
Note: The qPCR oligonucleotides can be resuspended in PCR-grade water or TE buffer.
Chapter 2. Store the SeqCap EZ Reagents
SeqCap EZ Library SR User’s Guide, v5.4 13
Chapter 2. Store the SeqCap EZ Reagents
Chapter 2 describes the storage conditions for the following kits:
n SeqCap EZ Library, SeqCap EZ Prime Probes, or SeqCap EZ MedExome Enrichment Kit
n SeqCap EZ Accessory Kit v2
n SeqCap Hybridization and Wash Kit
n SeqCap Adapter Kit (A and/or B)
n SeqCap HE-Oligo Kits (A and/or B)
n SeqCap Pure Capture Bead Kit
Step 1. Aliquot the SeqCap EZ Probe Pool Upon receipt of the SeqCap EZ Library, SeqCap EZ Prime Probes, or SeqCap EZ MedExome Enrichment Kit, undertake the following steps to ensure the highest performance of the SeqCap EZ probe pool to avoid multiple freeze/thaw cycles or potential accidental contamination:
1. If frozen, thaw the tube of SeqCap EZ probe pool on ice.
2. Vortex the SeqCap EZ probe pool for 3 seconds.
3. Centrifuge the tube of SeqCap EZ probe pool at 10,000 x g for 30 seconds to ensure that the liquid is at the bottom of the tube before opening the tube.
4. Aliquot the SeqCap EZ probe pool into single-use aliquots (4.5 μL/aliquot) in 0.2 mL PCR tubes (or 96-well plates if following the higher throughput protocol described in Appendix A) and store at -15 to -25 °C until use. The presence of some residual volume after dispensing all single-use aliquots is normal.
5. When ready to perform the experiment, thaw the required number of single-use SeqCap EZ probe pool aliquots on ice.
The SeqCap EZ probe pool should not undergo multiple freeze/thaw cycles. To help ensure the highest performance of the SeqCap EZ probe pool, Roche recommends aliquoting the SeqCap EZ probe pool into single-use volumes to prevent damage from successive freeze/thaw cycles.
Chapter 2. Store the SeqCap EZ Reagents
SeqCap EZ Library SR User’s Guide, v5.4 14
Step 2. Store the Frozen Reagents Upon receipt, undertake the following steps to ensure the highest performance of the SeqCap EZ Accessory Kit v2, SeqCap Hybridization and Wash Kit, SeqCap Adapter Kits A and B, and SeqCap HE-Oligo Kits:
1. Store the kits at -15 to -25 °C until use.
Step 3. Store the Refrigerated Reagents Upon receipt, undertake the following steps to ensure the highest performance of the SeqCap Pure Capture Bead Kit:
1. Store the SeqCap Pure Capture Bead kit at +2 to +8 °C until use.
The SeqCap Pure Capture Bead Kit must not be frozen.
Chapter 3. Prepare the Sample Library
SeqCap EZ Library SR User’s Guide, v5.4 15
Chapter 3. Prepare the Sample Library
Chapter 3 describes the sample library preparation method and how to assess the quality of the sample library before amplification using LM-PCR.
n KAPA Library Preparation Kit
n SeqCap Adapter Kit (A and/or B)
n SeqCap EZ Accessory Kit v2
n Agencourt Ampure XP Beads (warmed to room temperature prior to use)
Ensure that the following are available:
n Additional PCR-grade water for sample library preparation
n Freshly-prepared 80% ethanol: 1.6 mL per DNA sample
n Elution buffer (10 mM Tris-HCl, pH 8.0): 125 μL per DNA sample
If the sample library preparation protocol is split across two days, freshly prepare the required amount of 80% ethanol daily.
References n KAPA Library Preparation Kit Technical Data Sheet, KR0935 – v2.14 (or later) (hard-copy included in the
KAPA Library Preparation Kit.) n Covaris Focused-ultrasonicator User’s Guide
Sample Requirements Roche recommends starting with 100 ng of input gDNA for sample library preparation; however, up to 1 µg of input gDNA has been validated and is supported for use in sample library preparation if desired (see Appendix E).
Step 1. Resuspend the Index Adapters
Resuspension of the Index Adapters must be performed on ice. Care should be taken when opening tubes to avoid loss of the lyophilized pellet.
1. Spin the lyophilized index adapters, contained in the SeqCap Adapter Kit A and/or B, briefly to allow the contents to pellet at the bottom of the tube.
2. Add 50 μL cold, PCR-grade water to each of the 12 tubes labeled ‘SeqCap Index Adapter’ in the SeqCap Adapter Kit A and/or B. Keep adapters on ice.
3. Briefly vortex the index adapters plus PCR-grade water and spin down the resuspended index adapter tubes.
4. The resuspended index adapter tubes should be stored at -15 to -25 °C.
Chapter 3. Prepare the Sample Library
SeqCap EZ Library SR User’s Guide, v5.4 16
Step 2. Prepare the Sample Library
Instructions for preparing an individual sample library are included here in Step 2, based on v2.14 of the KAPA Library Preparation Kit Technical Data Sheet. When assembling a master mix for processing multiple samples, prepare an excess volume of ~5% to allow for complete pipetting (liquid handling systems may require an excess of ~20%). The KAPA Technical Data Sheet includes several specific scaling examples.
Prior to executing the sample library preparation, carefully read the entire Technical Data Sheet (v2.14 or later). Ensure you are using the most recent version of the protocol.
For guidelines on preparing sample libraries using amounts of input DNA other than 100 ng, or for using low quality DNA extracted from formalin-fixed paraffin-embedded (FFPE) tissues, see Appendix E, or contact your local Roche Technical Support (go to sequencing.roche.com/support.html for contact information).
1. Pipette 100 ng of the gDNA sample of interest into a 1.5 mL tube.
2. Adjust the volume to a total of 52.5 μL using 1x TE (low EDTA) and transfer to a Covaris microTUBE for fragmentation.
3. Fragment the gDNA so that the average DNA fragment size is 180 to 220 bp.
4. Following fragmentation, proceed with the End Repair Reaction Setup:
a. Transfer 50 μL of the fragmented DNA to a 0.2 mL PCR tube.
b. To each 50 μL fragmented sample add 20 μL of End Repair Master Mix, resulting in a total volume of 70 μL.
End Repair Master Mix Per Individual Sample Library
PCR-grade water 8 μL
10X KAPA End Repair Buffer 7 μL
KAPA End Repair Enzyme Mix 5 μL
Total 20 μL
c. Mix the End Repair reaction by pipetting up and down.
d. Incubate the reaction at +20 °C for 30 minutes.
e. Following the 30 minute incubation, proceed immediately to the next step.
5. Perform the End Repair Cleanup:
a. To each 70 μL End Repair Reaction, add 120 μL of room temperature Agencourt AMPure XP beads, resulting in a total volume of 190 μL.
End Repair Cleanup Per Individual Sample Library
End Repair Reaction 70 μL
Agencourt AMPure XP beads 120 μL
Total 190 μL
b. Mix thoroughly by pipetting up and down multiple times.
c. Incubate the tube at room temperature for 15 minutes to allow the DNA to bind to the beads.
Chapter 3. Prepare the Sample Library
SeqCap EZ Library SR User’s Guide, v5.4 17
d. Place the tube on a magnet to capture the beads. Incubate until the liquid is clear.
e. Carefully remove and discard the supernatant.
f. Keeping the tube on the magnet, add 200 μL of freshly-prepared 80% ethanol.
g. Incubate the tube at room temperature for ≥30 seconds.
h. Carefully remove and discard the ethanol.
i. Keeping the tube on the magnet, add 200 μL of freshly-prepared 80% ethanol.
j. Incubate the tube at room temperature for ≥30 seconds.
k. Carefully remove and discard the ethanol. Try to remove all residual ethanol without disturbing the beads.
l. Allow the beads to dry at room temperature, sufficiently for all the ethanol to evaporate.
Caution: Over-drying the beads may result in dramatic yield loss.
m. Remove the tube from the magnet.
6. Perform the A-Tailing Reaction Setup:
a. To each tube of DNA plus beads add 50 μL of the A-Tailing Master Mix, resulting in a total volume of 50 μL.
A-Tailing Master Mix Per Individual Sample Library
PCR-grade water 42 μL
10X KAPA A-Tailing Buffer 5 μL
KAPA A-Tailing Enzyme 3 μL
Total 50 μL
b. Thoroughly resuspend the beads by pipetting up and down multiple times.
c. Incubate the A-Tailing reaction at +30 °C for 30 minutes.
d. After incubation, proceed immediately to the next step.
7. Perform the A-Tailing Cleanup:
a. To each 50 μL A-Tailing Reaction add 90 μL of thawed, room temperature PEG/NaCl SPRI Solution, resulting in a total volume of 140 μL.
A-Tailing Cleanup Per Individual Sample Library
A-Tailing Reaction 50 μL
PEG/NaCl SPRI Solution 90 μL
Total 140 μL
b. Mix thoroughly by pipetting up and down multiple times.
c. Incubate the tube at room temperature for 15 minutes to allow the DNA to bind to the beads.
d. Place the tube on a magnet to capture the beads. Incubate until the liquid is clear.
e. Carefully remove and discard the supernatant.
f. Keeping the tube on the magnet, add 200 μL of freshly-prepared 80% ethanol.

Chapter 3. Prepare the Sample Library
SeqCap EZ Library SR User’s Guide, v5.4 18
g. Incubate the tube at room temperature for ≥30 seconds.
h. Carefully remove and discard the ethanol.
i. Keeping the tube on the magnet, add 200 μL of freshly-prepared 80% ethanol.
j. Incubate the tube at room temperature for ≥30 seconds.
k. Carefully remove and discard the ethanol. Try to remove all residual ethanol without disturbing the beads.
l. Allow the beads to dry at room temperature, sufficiently for all the ethanol to evaporate.
Caution: Over-drying the beads may result in dramatic yield loss.
m. Remove the tube from the magnet.
8. Proceed with the Adapter Ligation Reaction Setup:
a. To each tube of beads add 47 μL of the Ligation Master Mix, resulting in a total volume of 47 μL.
Ligation Master Mix Per Individual Sample Library
PCR-grade water 32 μL
5X KAPA Ligation Buffer 10 μL
KAPA T4 DNA Ligase 5 μL
Total 47 μL
b. Thoroughly resuspend the beads by pipetting up and down multiple times.
c. Add 3 μL of the SeqCap Library Adapter (with the desired Index) to the tube containing the Ligation Master Mix plus DNA and beads.
Ensure that you record the index used for each sample.
d. Pipette up and down 10 times to mix.
e. Incubate the Ligation reaction at +20 °C for 15 minutes.
f. Following the incubation, proceed immediately to the next step.
9. Perform the First Post Ligation Cleanup as follows:
a. To each 50 μL Ligation Reaction add 50 μL of thawed, room temperature PEG/NaCl SPRI Solution, resulting in a total volume of 100 μL.
First Post Ligation Cleanup Per Individual Sample Library
Ligation Reaction 50 μL
PEG/NaCl SPRI Solution 50 μL
Total 100 μL
b. Mix thoroughly by pipetting up and down multiple times.
c. Incubate the tube at room temperature for 15 minutes to allow the DNA to bind to the beads.
d. Place the tube on a magnet to capture the beads. Incubate until the liquid is clear.
e. Carefully remove and discard the supernatant.
Chapter 3. Prepare the Sample Library
SeqCap EZ Library SR User’s Guide, v5.4 19
f. Keeping the tube on the magnet, add 200 μL of freshly-prepared 80% ethanol.
g. Incubate the tube at room temperature for ≥30 seconds.
h. Carefully remove and discard the ethanol.
i. Keeping the tube on the magnet, add 200 μL of freshly-prepared 80% ethanol.
j. Incubate the tube at room temperature for ≥30 seconds.
k. Carefully remove and discard the ethanol. Try to remove all residual ethanol without disturbing the beads.
l. Allow the beads to dry at room temperature, sufficiently for all the ethanol to evaporate.
Caution: Over-drying the beads may result in dramatic yield loss.
m. Remove the tube from the magnet.
n. Thoroughly resuspend the beads in 100 μL of elution buffer (10 mM Tris-HCl, pH 8.0 or PCR-grade water).
In this and subsequent steps, use buffer rather than PCR-grade water if the eluted sample will be stored for an extended period of time (>24 hours).
o. Incubate the tube at room temperature for 2 minutes to allow the DNA to elute off the beads.
p. Proceed immediately to the next step.
10. Perform the Dual-SPRI Size Selection:
a. To each tube containing 100 μL resuspended DNA with beads add 60 μL of thawed, room temperature PEG/NaCl SPRI Solution, resulting in a total volume of 160 μL.
Dual-SPRI Size Selection Per Individual Sample Library
Resuspended DNA with beads 100 μL
PEG/NaCl SPRI Solution 60 μL
Total 160 μL
b. Mix thoroughly by pipetting up and down multiple times.
c. Incubate the tube at room temperature for 15 minutes to allow library fragments larger than ~450 bp to bind to the beads.
d. Place the tube on a magnet to capture the beads. Incubate until the liquid is clear.
e. Carefully transfer 155μL of the supernatant containing library fragments smaller than ~450 bp to a new tube.
Do NOT discard the supernatant at this step. It is also critical to not transfer any beads with the supernatant.
f. To the 155 μL supernatant add 20 μL of room temperature Agencourt AMPure XP beads.
g. Thoroughly resuspend the beads by pipetting up and down multiple times.
h. Incubate the tube at room temperature for 15 minutes to allow library fragments larger than ~250 bp to bind to the beads.

Chapter 3. Prepare the Sample Library
SeqCap EZ Library SR User’s Guide, v5.4 20
i. Place the tube on a magnet to capture the beads. Incubate until the liquid is clear.
j. Carefully remove and discard the supernatant.
k. Keeping the tube on the magnet, add 200 μL of freshly-prepared 80% ethanol.
l. Incubate the tube at room temperature for ≥30 seconds.
m. Carefully remove and discard the ethanol.
n. Keeping the tube on the magnet, add 200 μL of freshly-prepared 80% ethanol.
o. Incubate the tube at room temperature for ≥30 seconds.
p. Carefully remove and discard the ethanol. Try to remove all residual ethanol without disturbing the beads.
q. Allow the beads to dry at room temperature, sufficiently for all the ethanol to evaporate.
Caution: Over-drying the beads may result in dramatic yield loss.
r. Remove the tube from the magnet.
s. Thoroughly resuspend the beads in 25 μL of elution buffer (10 mM Tris-HCl, pH 8.0 or PCR-grade water).
t. Incubate the tube at room temperature for 2 minutes to allow the DNA to elute off the beads.
u. Place the tube on a magnet to capture the beads. Incubate until the liquid is clear.
v. Transfer the clear supernatant to a new tube and proceed with the amplification of the sample library as detailed in Chapter 4.
Chapter 4. Amplify the Sample Library Using LM-PCR
SeqCap EZ Library SR User’s Guide, v5.4 21
Chapter 4. Amplify the Sample Library Using LM-PCR
This chapter describes how to amplify the sample library (prepared inChapter 3) using LM-PCR in preparation for hybridization to the SeqCap EZ probe pool. This chapter requires the use of the components from the following kits:
n SeqCap EZ Accessory Kit v2
n SeqCap Adapter Kit A and/or B
n SeqCap Pure Capture Bead Kit
Ensure that the following is available:
n Freshly-prepared 80% ethanol: 0.4 mL per DNA sample
References n Thermocycler Manual
n Agilent DNA 1000 Kit Guide
Sample Requirements For each sample library to be captured, 20 μL of the sample library from Chapter 3 is amplified via Pre-Capture LM-PCR.
Step 1. Resuspend the SeqCap Pre-LM-PCR Oligos 1. Briefly spin the lyophilized ‘Pre-LM-PCR Oligos 1 & 2’, contained in the SeqCap Adapter Kit A and/or B, to
allow the contents to pellet at the bottom of the tube. Note that both oligos are contained within a single tube.
2. Add 550 μL PCR-grade water to the tube of centrifuged oligos.
3. Briefly vortex the resuspended oligos.
4. Spin down the tube to collect contents.
5. The resuspended oligo tube should be stored at -15 to -25 °C.
Step 2. Prepare the Pre-Capture LM-PCR Master Mix
The Pre-Capture LM-PCR Master Mix is temperature sensitive. Thawing of components and preparation of LM-PCR reactions must be performed on ice.
We recommend the inclusion of negative (water) and positive (previously amplified library) controls in the Pre-Capture LM-PCR step.
Instructions for preparing an individual PCR reaction are shown here. When assembling a master mix for processing multiple samples, prepare an excess volume of ~5% to allow for complete pipetting (liquid handling systems may require an excess of ~20%).
Chapter 4. Amplify the Sample Library Using LM-PCR
SeqCap EZ Library SR User’s Guide, v5.4 22
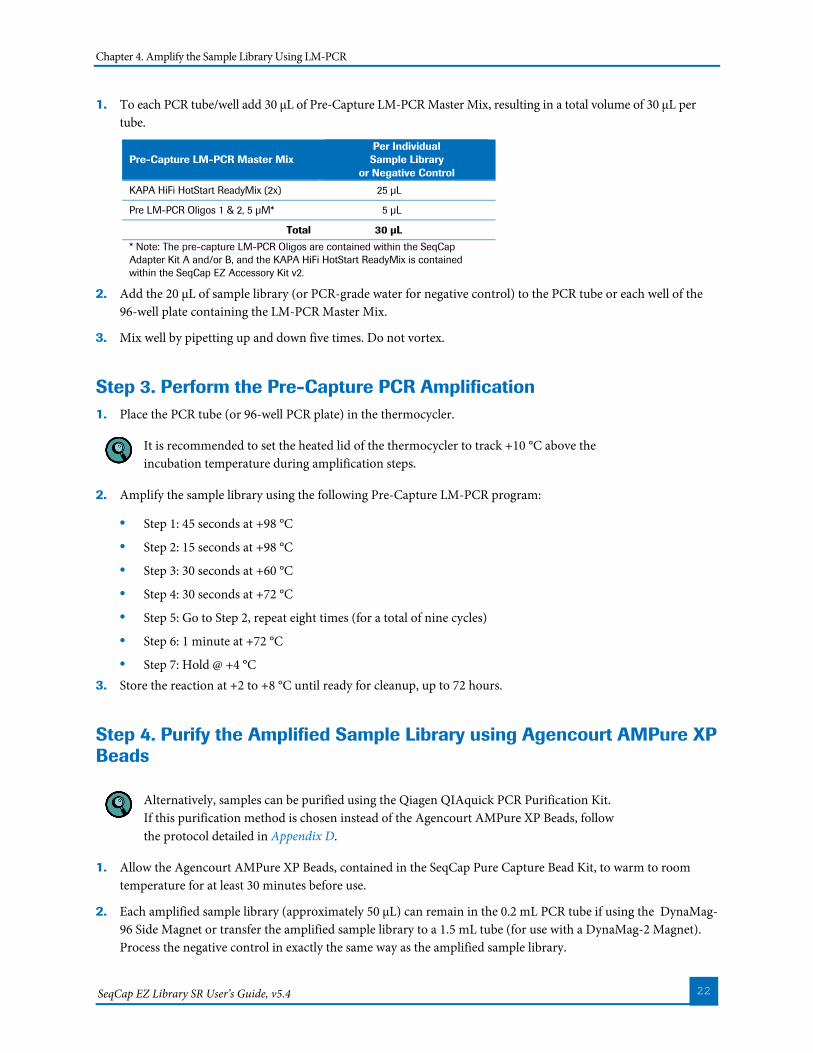
1. To each PCR tube/well add 30 μL of Pre-Capture LM-PCR Master Mix, resulting in a total volume of 30 μL per tube.
Pre-Capture LM-PCR Master Mix Per Individual
Sample Library or Negative Control
KAPA HiFi HotStart ReadyMix (2x) 25 μL
Pre LM-PCR Oligos 1 & 2, 5 µM* 5 μL
Total 30 μL * Note: The pre-capture LM-PCR Oligos are contained within the SeqCap Adapter Kit A and/or B, and the KAPA HiFi HotStart ReadyMix is contained within the SeqCap EZ Accessory Kit v2.
2. Add the 20 μL of sample library (or PCR-grade water for negative control) to the PCR tube or each well of the 96-well plate containing the LM-PCR Master Mix.
3. Mix well by pipetting up and down five times. Do not vortex.
Step 3. Perform the Pre-Capture PCR Amplification 1. Place the PCR tube (or 96-well PCR plate) in the thermocycler.
It is recommended to set the heated lid of the thermocycler to track +10 °C above the incubation temperature during amplification steps.
2. Amplify the sample library using the following Pre-Capture LM-PCR program:
· Step 1: 45 seconds at +98 °C
· Step 2: 15 seconds at +98 °C
· Step 3: 30 seconds at +60 °C
· Step 4: 30 seconds at +72 °C
· Step 5: Go to Step 2, repeat eight times (for a total of nine cycles)
· Step 6: 1 minute at +72 °C
· Step 7: Hold @ +4 °C 3. Store the reaction at +2 to +8 °C until ready for cleanup, up to 72 hours.
Step 4. Purify the Amplified Sample Library using Agencourt AMPure XP Beads
Alternatively, samples can be purified using the Qiagen QIAquick PCR Purification Kit. If this purification method is chosen instead of the Agencourt AMPure XP Beads, follow the protocol detailed in Appendix D.
1. Allow the Agencourt AMPure XP Beads, contained in the SeqCap Pure Capture Bead Kit, to warm to room temperature for at least 30 minutes before use.
2. Each amplified sample library (approximately 50 μL) can remain in the 0.2 mL PCR tube if using the DynaMag-96 Side Magnet or transfer the amplified sample library to a 1.5 mL tube (for use with a DynaMag-2 Magnet). Process the negative control in exactly the same way as the amplified sample library.
Chapter 4. Amplify the Sample Library Using LM-PCR
SeqCap EZ Library SR User’s Guide, v5.4 23
3. Vortex the Agencourt AMPure XP Beads for 10 seconds before use to ensure a homogenous mixture of beads.
4. Add 90 μL Agencourt AMPure XP Beads to the 50 μL amplified sample library.
5. Vortex briefly.
6. Incubate at room temperature for 15 minutes to allow the DNA to bind to the beads.
7. Place the tube containing the bead bound DNA in a magnetic particle collector.
8. Allow the solution to clear.
9. Once clear, remove and discard the supernatant being careful not to disturb the beads.
10. Add 200 μL freshly-prepared 80% ethanol to the tube containing the beads plus DNA. The tube should be left in the magnetic particle collector during this step.
11. Incubate at room temperature for 30 seconds.
12. Remove and discard the 80% ethanol and repeat Steps 4.9-4.11 for a total of two washes with 80% ethanol.
13. Following the second wash, remove and discard all of the 80% ethanol.
14. Allow the beads to dry at room temperature with the tube lid open for 15 minutes (or until dry).
Over drying of the beads can result in yield loss.
15. Remove the tube from the magnetic particle collector.
16. Resuspend the DNA using 52 μL of PCR-grade water.
It is critical that the amplified sample library is eluted with PCR-grade water and not buffer EB or 1X TE.
17. Pipet up and down ten times to mix to ensure that all of the beads are resuspended.
18. Incubate at room temperature for 2 minutes.
19. Place the tube back in the magnetic particle collector and allow the solution to clear.
20. Remove 50 μL of the supernatant that now contains the amplified sample library and transfer into a new 1.5 mL tube.
Step 5. Check the Quality of the Amplified Sample Library 1. Measure the A260/A280 ratio of the amplified sample library to quantify the DNA concentration using a
NanoDrop spectrophotometer and determine the DNA quality.
When working with samples that will be pooled for hybridization (i.e. multiplex Sequence Capture), accurate quantitation is essential. Alternative quantitation methods, such as those that are fluorometry-based, should be used in place of, or in addition to, the NanoDrop spectrophotometer. Slight differences in the mass of each sample combined to form the ‘Multiplex DNA Sample Library Pool’ will result in variations in the total number of sequencing reads obtained for each sample in the library pool.
Chapter 4. Amplify the Sample Library Using LM-PCR
SeqCap EZ Library SR User’s Guide, v5.4 24
· The A260/A280 ratio should be 1.7 - 2.0.
· The sample library yield should be >1.0 µg.
· The negative control yield should be negligible. If this is not the case, the measurement may be high due to the presence of unincorporated primers carried over from the LM-PCR reaction and not an indication of possible contamination between amplified sample libraries.
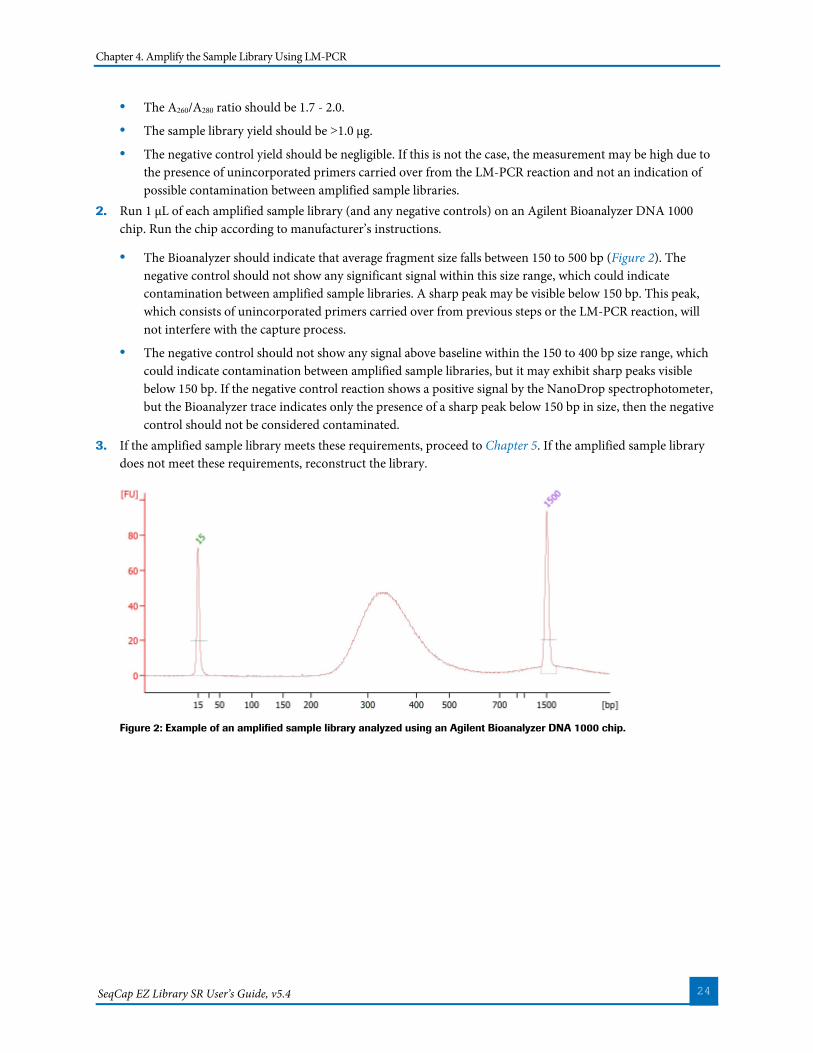
2. Run 1 μL of each amplified sample library (and any negative controls) on an Agilent Bioanalyzer DNA 1000 chip. Run the chip according to manufacturer’s instructions.
· The Bioanalyzer should indicate that average fragment size falls between 150 to 500 bp (Figure 2). The negative control should not show any significant signal within this size range, which could indicate contamination between amplified sample libraries. A sharp peak may be visible below 150 bp. This peak, which consists of unincorporated primers carried over from previous steps or the LM-PCR reaction, will not interfere with the capture process.
· The negative control should not show any signal above baseline within the 150 to 400 bp size range, which could indicate contamination between amplified sample libraries, but it may exhibit sharp peaks visible below 150 bp. If the negative control reaction shows a positive signal by the NanoDrop spectrophotometer, but the Bioanalyzer trace indicates only the presence of a sharp peak below 150 bp in size, then the negative control should not be considered contaminated.
3. If the amplified sample library meets these requirements, proceed to Chapter 5. If the amplified sample library does not meet these requirements, reconstruct the library.
Figure 2: Example of an amplified sample library analyzed using an Agilent Bioanalyzer DNA 1000 chip.
Chapter 5. Hybridize the Sample and SeqCap EZ Probe Pool
SeqCap EZ Library SR User’s Guide, v5.4 25
Chapter 5. Hybridize the Sample and SeqCap EZ Probe Pool
Chapter 5 describes the Roche protocol for hybridization of the amplified sample libraries and the SeqCap EZ probe pool. This chapter requires the use of components from the following kits:
n SeqCap EZ probe pool (refers to SeqCap EZ Library, SeqCap EZ Prime Probes, or SeqCap EZ Enrichment Kit)
n SeqCap Hybridization and Wash Kit
n SeqCap EZ Accessory Kit v2
n SeqCap HE Oligo Kit
The hybridization protocol requires a thermocycler capable of maintaining +47 °C for 16 to 20 hours. A programmable heated lid is required.
Note: Instructions for using SeqCap HE-Oligo Kits A & B with automated liquid handling instruments for setting up hybridizations is described inAppendix A.
Note: In this chapter we use the term ‘Multiplex DNA Sample Library Pool’, however a single DNA sample library may be captured using the same instructions. It is not required to capture more than one library at a time.
Step 1. Prepare for Hybridization 1. Turn on a heat block to +95 °C and let it equilibrate to the set temperature.
2. Remove the appropriate number of 4.5 μL SeqCap EZ probe pool aliquots (one per hybridization) from the -15 to -25 °C freezer and allow them to thaw on ice.
Step 2. Resuspend the SeqCap HE Universal and SeqCap HE Index Oligos 1. Briefly spin the lyophilized oligo tubes, contained in the SeqCap HE-Oligo Kits A and/or B, to allow the
contents to pellet to the bottom of the tube.
2. Add 120 μL PCR-grade water to the SeqCap HE Universal Oligo tube (1,000 µM final concentration).
3. Add 10 μL PCR-grade water to each SeqCap HE Index Oligo tube (1,000 µM final concentration).
4. Vortex the primers plus PCR-grade water for five seconds and spin down the resuspended oligo tube.
5. The resuspended oligo tube should be stored at -15 to -25 °C.
To prevent damage to the Hybridization Enhancing (HE) oligos due to multiple freeze/thaw cycles, once resuspended the oligos can be aliquoted into smaller volumes to minimize the number of freeze/thaw cycles.
Chapter 5. Hybridize the Sample and SeqCap EZ Probe Pool
SeqCap EZ Library SR User’s Guide, v5.4 26
Step 3. Prepare the Multiplex DNA Sample Library Pool 1. Thaw on ice each of the uniquely indexed amplified DNA sample libraries that will be included in the multiplex
capture experiment (generated in Chapter 4).
2. Mix together equal amounts (by mass) of each of these amplified DNA sample libraries to obtain a single pool with a combined mass of at least 1.25 µg. This mixture will subsequently be referred to as the ‘Multiplex DNA Sample Library Pool’. One µg of the multiplex DNA sample library pool will be used in the sequence capture hybridization step, and 60 ng will be used for measurement of enrichment using qPCR (Chapter 8).
To obtain equal numbers of sequencing reads from each component libraries in the Multiplex DNA Sample Library Pool upon completion of the experiment, it is very important to combine identical amounts of each independently amplified DNA sample library at this step. Accurate quantification and pipetting are critical.
Note: Store remaining 250 ng of Multiplex DNA Sample Library Pool at -15 to -25 °C until use in measurement of enrichment using qPCR (Chapter 8).
Step 4. Prepare the Multiplex Hybridization Enhancing Oligo Pool 1. Thaw on ice the resuspended SeqCap HE Universal Oligo (1,000 µM) and each resuspended SeqCap HE Index
oligo (1,000 µM) that matches a DNA Adapter Index included in the Multiplex DNA Sample Library Pool from Step 2 of this section.
2. Mix together the HE oligos so that the resulting Multiplex Hybridization Enhancing Oligo Pool contains, by mass, 50% SeqCap HE Universal Oligo and 50% of a mixture of the appropriate SeqCap HE Index oligos. The total combined mass of the Multiplex Hybridization Enhancing Oligo Pool should be 2,000 pmol, which is the amount required for a single Sequence Capture experiment.
Example: If a Multiplex DNA Sample Library Pool contains four DNA sample libraries prepared with SeqCap Adapter Indexes 2, 4, 6, and 8, respectively, then the Multiplex Hybridization Enhancing Oligo Pool would contain the following:
Component Amount
SeqCap HE Universal Oligo 1,000 pmol (1 μL of 1,000 µM)
SeqCap HE Index 2 Oligo 250 pmol (0.25 μL of 1,000 µM)
SeqCap HE Index 4 Oligo 250 pmol (0.25 μL of 1,000 µM)
SeqCap HE Index 6 Oligo 250 pmol (0.25 μL of 1,000 µM)
SeqCap HE Index 8 Oligo 250 pmol (0.25 μL of 1,000 µM)
Total 2,000 pmol (2 μL of 1,000 µM)
Due to the difficulty of accurately pipetting small volumes, it is recommended to either prepare a larger volume of the Multiplex Hybridization Enhancing Oligo Pool using the 1,000 µM stocks or dilute the 1,000 µM stocks and then pool. These pools can be dispensed into individual single-use aliquots that can be stored at -15 to -25 °C until needed.

Chapter 5. Hybridize the Sample and SeqCap EZ Probe Pool
SeqCap EZ Library SR User’s Guide, v5.4 27
For optimal results, it is important that the individual SeqCap HE oligos contained in a Multiplex Hybridization Enhancing Oligo Pool are precisely matched with the adapter indexes present in the Multiplex DNA Sample Library Pool in a multiplexed Sequence Capture experiment.
Step 5. Prepare the Hybridization Sample
Note: When working with non-human gDNA, consider using the SeqCap EZ Developer Reagent (catalog number 06684335001) in place of COT Human DNA. When using the SeqCap EZ Developer Reagent, add 10 μL of this reagent to each hybridization instead of COT Human DNA.
1. Add 5 μL of COT Human DNA (1 mg/mL), contained in the SeqCap EZ Accessory Kit v2, to a new 1.5 mL tube.
2. Add 1 µg of Multiplex DNA Sample Library to the 1.5 mL tube containing 5 μL of COT Human DNA.
3. Add 2,000 pmol (or 2 μL) of the Multiplex Hybridization Enhancing Oligo Pool (1 μL of 1,000 pmol SeqCap HE Universal Oligo and 1 μL of the 1,000 pmol SeqCap HE Index Oligo pool) to the Multiplex DNA Sample Library Pool plus COT Human DNA.
The tube should now contain the following components:
Component Amount Volume
COT Human DNA 5 µg 5 μL
Multiplex DNA Sample Library Pool 1 µg ~ 50 μL
SeqCap HE Universal Oligo 1,000 pmol 1 μL
SeqCap HE Index Oligo pool 1,000 pmol 1 μL
Total varies
4. Close the tube’s lid and make a hole in the top of the tube’s cap with an 18 to 20 gauge or smaller needle.
The closed lid with a hole in the top of the tube’s cap is a precaution to suppress contamination in the DNA vacuum concentrator.
5. Dry the Multiplex DNA Sample Library Pool/COT Human DNA/Multiplex Hybridization Enhancing Oligo Pool in a DNA vacuum concentrator on high heat (+60 °C).
Denaturation of the DNA with high heat is not problematic because the hybridization utilizes single-stranded DNA.
6. To each dried-down Multiplex DNA Sample Library Pool/COT Human DNA/Multiplex Hybridization Enhancing Oligo Pool, add:
· 7.5 μL of 2X Hybridization Buffer (vial 5)
· 3 μL of Hybridization Component A (vial 6)
Chapter 5. Hybridize the Sample and SeqCap EZ Probe Pool
SeqCap EZ Library SR User’s Guide, v5.4 28
The tube should now contain the following components:
Component Solution Capture
COT Human DNA 5 µg
Multiplex DNA Sample Library Pool 1 µg
Multiplex Hybridization Enhancing Oligo Pool 2,000 pmol*
2X Hybridization Buffer (vial 5) 7.5 μL
Hybridization Component A (vial 6) 3 μL
Total 10.5 μL *Composed of 50% (1,000 pmol) SeqCap HE Universal Oligo and 50% (1,000 pmol) of a mixture of the appropriate SeqCap HE Index oligos.
7. Cover the hole in the tube’s cap with a sticker or small piece of laboratory tape.
8. Vortex the Multiplex DNA Sample Library Pool/COT Human DNA/Multiplex Hybridization Enhancing Oligo Pool plus Hybridization Cocktail (2X Hybridization Buffer + Hybridization Component A) for 10 seconds.
9. Centrifuge at maximum speed for 10 seconds.
10. Place the Multiplex DNA Sample Library Pool/COT Human DNA/Multiplex Hybridization Enhancing Oligo Pool/Hybridization Cocktail in a +95 °C heat block for 10 minutes to denature the DNA.
11. Centrifuge the Multiplex DNA Sample Library Pool/COT Human DNA/Multiplex Hybridization Enhancing Oligo Pool/Hybridization Cocktail at maximum speed for 10 seconds at room temperature.
12. Transfer the Multiplex DNA Sample Library Pool/COT Human DNA/Multiplex Hybridization Enhancing Oligo Pool/Hybridization Cocktail to the 4.5 μL aliquot of SeqCap EZ probe pool in a 0.2 mL PCR tube prepared in Chapter 2 (the entire volume can also be transferred to one well of a 96-well PCR plate).
13. Vortex for 3 seconds.
14. Centrifuge at maximum speed for 10 seconds.
The hybridization sample should now contain the following components:
Component Solution Capture
COT Human DNA 5 µg
Multiplex DNA Sample Library Pool 1 µg
Multiplex Hybridization Enhancing Oligo Pool 2,000 pmol*
2X Hybridization Buffer (vial 5) 7.5 μL
Hybridization Component A (vial 6) 3 μL
SeqCap EZ probe pool 4.5 μL
Total 15 μL *Composed of 50% (1,000 pmol) SeqCap HE Universal Oligo and 50% (1,000 pmol) of a mixture of the appropriate SeqCap HE Index oligos.
15. Incubate in a thermocycler at +47 °C for 16 to 20 hours. The thermocycler’s heated lid should be turned on and set to maintain +57 °C (10 °C above the hybridization temperature).
Chapter 6. Wash and Recover Captured Multiplex DNA Sample
SeqCap EZ Library SR User’s Guide, v5.4 29
Chapter 6. Wash and Recover Captured Multiplex DNA Sample
Chapter 6 describes the process for the washing and recovery of the captured multiplex DNA sample from the hybridization of the Multiplex DNA Sample Library Pool and SeqCap EZ probe pool. (Refer to Appendix C for instructions for increased throughput applications.) This chapter requires the use of components from the following kits:
n SeqCap Hybridization and Wash Kit
n SeqCap Pure Capture Bead Kit
Ensure that the following is available:
n Additional PCR-grade water for buffer preparation and elution
It is extremely important that the water bath temperature be closely monitored and remains at +47 °C. Because the displayed temperatures on many water baths are often imprecise, Roche recommends that you place an external, calibrated thermometer in the water bath.
Equilibrate buffers at +47 °C for at least 2 hours before washing the captured Multiplex DNA sample.
Step 1. Prepare Sequence Capture and Bead Wash Buffers
Volumes for an individual capture are shown here. When preparing 1X buffers for processing multiple reactions, prepare an excess volume of ~5% to allow for complete pipetting (liquid handling systems may require an excess of ~20%).
1. Dilute 10X Wash Buffers (I, II, III and Stringent) and 2.5X Bead Wash Buffer, contained in the SeqCap Hybridization and Wash Kit, to create 1X working solutions. Volumes listed below are sufficient for one capture.
Concentrated Buffer Volume of Concentrated Buffer
Volume of PCR-grade Water
Total Volume of 1X Buffer*
10X Stringent Wash Buffer (vial 4) 40 μL 360 μL 400 μL
10X Wash Buffer I (vial 1) 30 μL 270 μL 300 μL
10X Wash Buffer II (vial 2) 20 μL 180 μL 200 μL
10X Wash Buffer III (vial 3) 20 μL 180 μL 200 μL
2.5X Bead Wash Buffer (vial 7) 200 μL 300 μL 500 μL *Store working solutions at room temperature (+15 to +25 °C) for up to 2 weeks. The volumes in this table are calculated for a single experiment; scale up accordingly if multiple samples will be processed.
2. Preheat the following wash buffers to +47 °C in a water bath:
· 400 μL of 1X Stringent Wash Buffer
· 100 μL of 1X Wash Buffer I.
Chapter 6. Wash and Recover Captured Multiplex DNA Sample
SeqCap EZ Library SR User’s Guide, v5.4 30
Step 2. Prepare the Capture Beads 1. Allow the Capture Beads, contained in the SeqCap Pure Capture Bead Kit, to warm to room temperature for 30
minutes prior to use.
2. Mix the beads thoroughly by vortexing for 15 seconds.
3. Aliquot 100 μL of beads for each capture into a single 1.5 mL tube (i.e. for one capture use 100 μL beads and for four captures use 400 μL beads, etc.). Enough beads for six captures can be prepared in a single tube.
4. Place the tube in a DynaMag-2 device. When the liquid becomes clear (should take less than 5 minutes), remove and discard the liquid being careful to leave all of the beads in the tube. Any remaining traces of liquid will be removed with subsequent wash steps.
5. While the tube is in the DynaMag-2 device, add twice the initial volume of beads of 1X Bead Wash Buffer (i.e. for one capture use 200 μL of buffer and for four captures use 800 μL buffer, etc.).
6. Remove the tube from the DynaMag-2 device and vortex for 10 seconds.
7. Place the tube back in the DynaMag-2 device to bind the beads.
8. Once clear, remove and discard the liquid.
9. Repeat Steps 2.5 - 2.8 for a total of two washes.
10. After removing the buffer following the second wash, resuspend by vortexing the beads in 1x the original volume using the 1X Bead Wash Buffer (i.e. for one capture use 100 μL buffer and for four captures use 400 μL buffer, etc.).
11. Aliquot 100 μL of resuspended beads into new 0.2 mL tubes (i.e. one tube for each capture).
12. Place the tube in the DynaMag-2 device to bind the beads. Once clear, remove and discard the liquid.
13. The Capture Beads are now ready to bind the captured DNA. Proceed immediately to the next step.
Do not allow the Capture Beads to dry out. Small amounts of residual Bead Wash Buffer will not interfere with binding of DNA to the Capture Beads.
Step 3. Bind DNA to the Capture Beads 1. Transfer the hybridization samples to the Capture Beads prepared in the previous step.
2. Mix thoroughly by pipetting up and down ten times.
3. Bind the captured sample to the beads by placing the tubes containing the beads and DNA in a thermocycler set to +47 °C for 45 minutes (heated lid set to +57 °C). Mix the samples by vortexing for 3 seconds at 15 minute intervals to ensure that the beads remain in suspension. It is helpful to have a vortex mixer located close to the thermocycler for this step.
Step 4. Wash the Capture Beads Plus Bound DNA 1. After the 45-minute incubation, add 100 μL of 1X Wash Buffer I heated to +47 °C to the 15 μL of Capture Beads
Plus Bound DNA.
2. Mix by vortexing for 10 seconds.
3. Transfer the entire content of each 0.2 mL tube to a 1.5 mL tube.
Chapter 6. Wash and Recover Captured Multiplex DNA Sample
SeqCap EZ Library SR User’s Guide, v5.4 31
4. Place the tubes in the DynaMag-2 device to bind the beads.
5. Remove and discard the liquid once clear.
6. Remove the tubes from the DynaMag-2 device and add 200 μL of 1X Stringent Wash Buffer heated to +47 °C.
7. Pipette up and down ten times to mix. Work quickly so that the temperature does not drop much below +47 °C.
8. Incubate at +47 °C for 5 minutes.
9. Repeat Steps 4.4 - 4.8 for a total of two washes using 1X Stringent Wash Buffer heated to +47 °C.
10. Place the tubes in the DynaMag-2 device to bind the beads.
11. Remove and discard the liquid once clear.
12. Add 200 μL of room temperature 1X Wash Buffer I and mix by vortexing for 2 minutes. If liquid has collected in the tube’s cap, tap the tube gently to collect the liquid into the tube’s bottom before continuing to the next step.
13. Place the tubes in the DynaMag-2 device to bind the beads.
14. Remove and discard the liquid once clear.
15. Add 200 μL of room temperature 1X Wash Buffer II.
16. Mix by vortexing for 1 minute.
17. Place the tubes in the DynaMag-2 device to bind the beads.
18. Remove and discard the liquid once clear.
19. Add 200 μL of room temperature 1X Wash Buffer III.
20. Mix by vortexing for 30 seconds.
21. Place the tubes in the DynaMag-2 device to bind the beads.
22. Remove and discard the liquid once clear.
23. Remove the tubes from the DynaMag-2 device.
24. Add 50 μL PCR-grade water to each tube of bead-bound captured sample.
25. Store the beads plus captured samples at -15 to -25 °C or proceed to Chapter 7.
There is no need to elute DNA off the beads. The beads plus captured DNA will be used as template in the LM-PCR as described in Chapter 7.
Chapter 7. Amplify Captured Multiplex DNA Sample Using LM-PCR
SeqCap EZ Library SR User’s Guide, v5.4 32
Chapter 7. Amplify Captured Multiplex DNA Sample Using LM-PCR
Chapter 7 describes the amplification of captured Multiplex DNA sample, bound to the Capture Beads, using LM-PCR. A total of two reactions are performed per sample, and subsequently combined, to minimize PCR bias. This chapter requires the use of components from the following kits:
n SeqCap EZ Accessory Kit v2
n SeqCap Pure Capture Bead Kit
In addition, ensure that the following are available:
n Additional PCR-grade water for 80% ethanol preparation and elution
n Freshly-prepared 80% ethanol: 0.4 mL per DNA sample
References n Thermocycler Manual
n Agilent DNA 1000 Kit Guide
Step 1. Resuspend the Post-LM-PCR Oligos 1. Briefly spin the lyophilized ‘Post-LM-PCR Oligos 1 & 2’ oligos, contained in the SeqCap EZ Accessory Kit v2, to
allow the contents to pellet at the bottom of the tube. Note that both oligos are contained within a single tube.
2. Add 480 μL PCR-grade water to the tube of centrifuged oligos.
3. Briefly vortex the resuspended oligos.
4. Spin down the tube to collect the contents.
5. The resuspended oligo tube should be stored at -15 to -25 °C.
Step 2. Prepare the Post-Capture LM-PCR Master Mix
The Post-Capture LM-PCR Master Mix and the individual PCR tubes must be prepared on ice.
Instructions for preparing individual PCR reactions are shown here. When assembling a master mix for processing multiple samples, prepare an excess volume of ~5% to allow for complete pipetting (liquid handling systems may require an excess of ~20%). Note that each captured DNA sample requires two PCR reactions.

Chapter 7. Amplify Captured Multiplex DNA Sample Using LM-PCR
SeqCap EZ Library SR User’s Guide, v5.4 33
1. To each PCR tube/well (one pair per captured DNA sample) add 30 μL of Post-Capture LM-PCR Master Mix, resulting in a total volume of 30 μL per tube, or 60 μL per DNA sample.
Post-Capture LM-PCR Master Mix Per Individual PCR Reaction
(Two Reactions Per DNA Sample)
KAPA HiFi HotStart ReadyMix 25 μL
Post-LM-PCR Oligos 1 & 2, 5 µM* 5 μL
Total 30 μL * Note: The post-capture LM-PCR Oligos and the KAPA HiFi HotStart ReadyMix are contained within the SeqCap EZ Accessory Kit v2.
Two LM-PCR reactions will be performed for each captured multiplex DNA sample. The total volume of the PCR Master Mix is 60 μL that will be distributed in two tubes (30 μL each).
2. Vortex the bead-bound captured DNA to ensure a homogenous mixture of beads.
3. Aliquot 20 μL of bead-bound captured DNA as template into each of the two PCR tubes/wells.
4. Mix well by pipetting up and down.
5. Add 20 μL of PCR-grade water to the negative control.
6. Mix well by pipetting up and down five times.
7. Store the remaining bead bound captured DNA at -15 to -25 °C.
Step 3. Perform the Post-Capture PCR Amplification 1. Place the PCR tube (or 96-well PCR plate) in the thermocycler.
It is recommended to set the heated lid of the thermocycler to track +10 °C above the incubation temperature during amplification steps.
2. Amplify the captured DNA using the following Post-Capture LM-PCR program:
· Step 1: 45 seconds @ +98 °C
· Step 2: 15 seconds @ +98 °C
· Step 3: 30 seconds @ +60 °C
· Step 4: 30 seconds @ +72 °C
· Step 5: Go to Step 2, repeat 13 times (for a total of 14 cycles)
· Step 6: 1 minutes @ +72 °C
· Step 7: Hold @ +4 °C 3. Store reactions at +2 to +8 °C until ready for purification, up to 72 hours.
Chapter 7. Amplify Captured Multiplex DNA Sample Using LM-PCR
SeqCap EZ Library SR User’s Guide, v5.4 34
Step 4. Purify the Amplified Captured Multiplex DNA Sample using Agencourt AMPure XP Beads
Alternatively, samples can be purified using the Qiagen QIAquick PCR Purification Kit. If this purification method is chosen instead of the Agencourt AMPure XP Beads, follow the protocol detailed in Appendix D.
1. Allow the Agencourt AMPure XP Beads, contained in the SeqCap Pure Capture Bead Kit, to warm to room temperature for at least 30 minutes before use.
2. Pool the like amplified captured Multiplex DNA Sample Libraries into a 1.5 mL microcentrifuge tube (approximately 100 μL). Process the negative control in exactly the same way as the amplified sample library.
3. Vortex the beads for 10 seconds before use to ensure a homogenous mixture of beads.
4. Add 180 μL Agencourt AMPure XP Beads to the 100 μL pooled amplified captured Multiplex DNA Sample library.
5. Vortex briefly.
6. Incubate at room temperature for 15 minutes to allow the DNA to bind to the beads.
7. Place the tube containing the bead bound DNA in a magnetic particle collector.
8. Allow the solution to clear.
9. Once clear, remove and discard the supernatant being careful not to disturb the beads.
10. Add 200 μL freshly-prepared 80% ethanol to the tube containing the beads plus DNA. The tube should be left in the magnetic particle collector during this step.
11. Incubate at room temperature for 30 seconds.
12. Remove and discard the 80% ethanol, and repeat Steps 4.9-4.11 for a total of two washes with 80% ethanol.
13. Following the second wash, remove and discard all of the 80% ethanol.
14. Allow the beads to dry at room temperature with the tube lid open for 30 minutes (or until dry).
Over drying of the beads can result in yield loss.
15. Remove the tube from the magnetic particle collector.
16. Resuspend the DNA using 52 μL of PCR-grade water.
17. Pipet up and down ten times to mix to ensure that all of the beads are resuspended.
18. Incubate at room temperature for 2 minutes.
19. Place the tube back in the magnetic particle collector and allow the solution to clear.
20. Remove 50 μL of the supernatant that now contains the amplified captured Multiplex DNA Sample Library Pool and transfer into a new 1.5 mL tube.
Chapter 7. Amplify Captured Multiplex DNA Sample Using LM-PCR
SeqCap EZ Library SR User’s Guide, v5.4 35
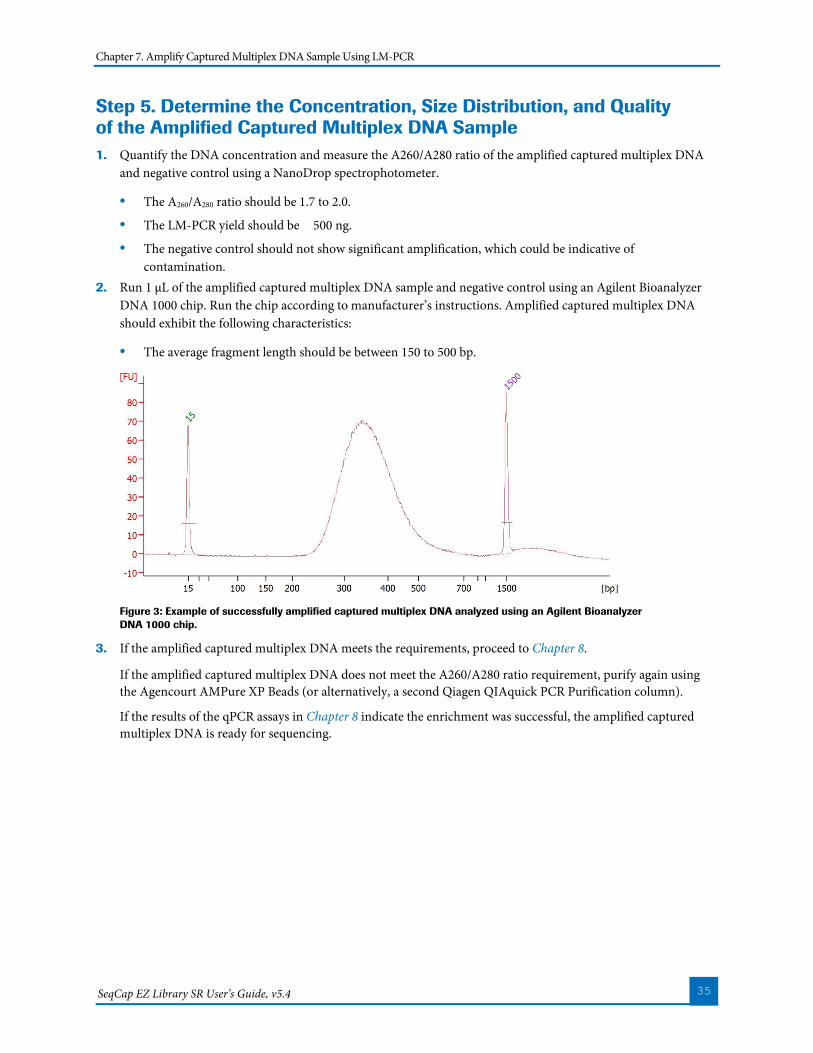
Step 5. Determine the Concentration, Size Distribution, and Quality of the Amplified Captured Multiplex DNA Sample 1. Quantify the DNA concentration and measure the A260/A280 ratio of the amplified captured multiplex DNA
and negative control using a NanoDrop spectrophotometer.
· The A260/A280 ratio should be 1.7 to 2.0.
· The LM-PCR yield should be ≥500 ng.
· The negative control should not show significant amplification, which could be indicative of contamination.
2. Run 1 μL of the amplified captured multiplex DNA sample and negative control using an Agilent Bioanalyzer DNA 1000 chip. Run the chip according to manufacturer’s instructions. Amplified captured multiplex DNA should exhibit the following characteristics:
· The average fragment length should be between 150 to 500 bp.
Figure 3: Example of successfully amplified captured multiplex DNA analyzed using an Agilent Bioanalyzer DNA 1000 chip.
3. If the amplified captured multiplex DNA meets the requirements, proceed to Chapter 8.
If the amplified captured multiplex DNA does not meet the A260/A280 ratio requirement, purify again using the Agencourt AMPure XP Beads (or alternatively, a second Qiagen QIAquick PCR Purification column).
If the results of the qPCR assays in Chapter 8 indicate the enrichment was successful, the amplified captured multiplex DNA is ready for sequencing.
Chapter 8. Measure Enrichment Using qPCR
SeqCap EZ Library SR User’s Guide, v5.4 36
Chapter 8. Measure Enrichment Using qPCR
Chapter 8 describes the qPCR assays employed as internal quality controls for Roche SeqCap experiments performed with human total gDNA. These assays estimate the relative fold enrichment by measuring the relative abundance of control targets in the pre- and post-capture LM-PCR reactions. The genomic loci recognized by these assays are included as capture targets in every SeqCap EZ probe pool and provide an inexpensive way to determine whether the capture was successful prior to sequencing.
This chapter requires the use of the following reagents:
n LightCycler® 480 SYBR Green I Master (2x Mix)
n Additional PCR-grade water
n Custom Oligonucleotides:
Component Concentration Sequence
qPCR NSC-0237, forward, Oligo 2 µM 5' - CGC ATT CCT CAT CCC AGT ATG - 3'
qPCR NSC-0237, reverse, Oligo 2 µM 5' - AAA GGA CTT GGT GCA GAG TTC AG - 3'
qPCR NSC-0247, forward, Oligo 2 µM 5' - CCC ACC GCC TTC GAC AT - 3'
qPCR NSC-0247, reverse, Oligo 2 µM 5' - CCT GCT TAC TGT GGG CTC TTG - 3'
qPCR NSC-0268, forward, Oligo 2 µM 5' - CTC GCT TAA CCA GAC TCA TCT ACT GT - 3'
qPCR NSC-0268, reverse, Oligo 2 µM 5' - ACT TGG CTC AGC TGT ATG AAG GT - 3'
qPCR NSC-0272, forward, Oligo 2 µM 5' - CAG CCC CAG CTC AGG TAC AG - 3'
qPCR NSC-0272, reverse, Oligo 2 µM 5' – ATG ATG CGA GTG CTG ATG ATG - 3'
Note: The qPCR oligonucleotides can be resuspended in PCR-grade water or TE buffer.
References n LightCycler® 480 User’s Guide
Step 1. Perform the qPCR Assay 1. Determine the number of DNA samples to be analyzed:
· A ‘DNA sample’ in this chapter is defined as one amplified sample library (Chapter 4) and the corresponding amplified captured multiplex DNA (Chapter 7).
If samples are multiplexed pre-capture, you only need one representative pre-capture amplified sample library for the corresponding amplified captured multiplex DNA sample.
Instructions for preparing an individual PCR reaction are shown here. When assembling a master mix for processing multiple samples, prepare an excess volume of ~5% to allow for complete pipetting (liquid handling systems may require an excess of ~20%).
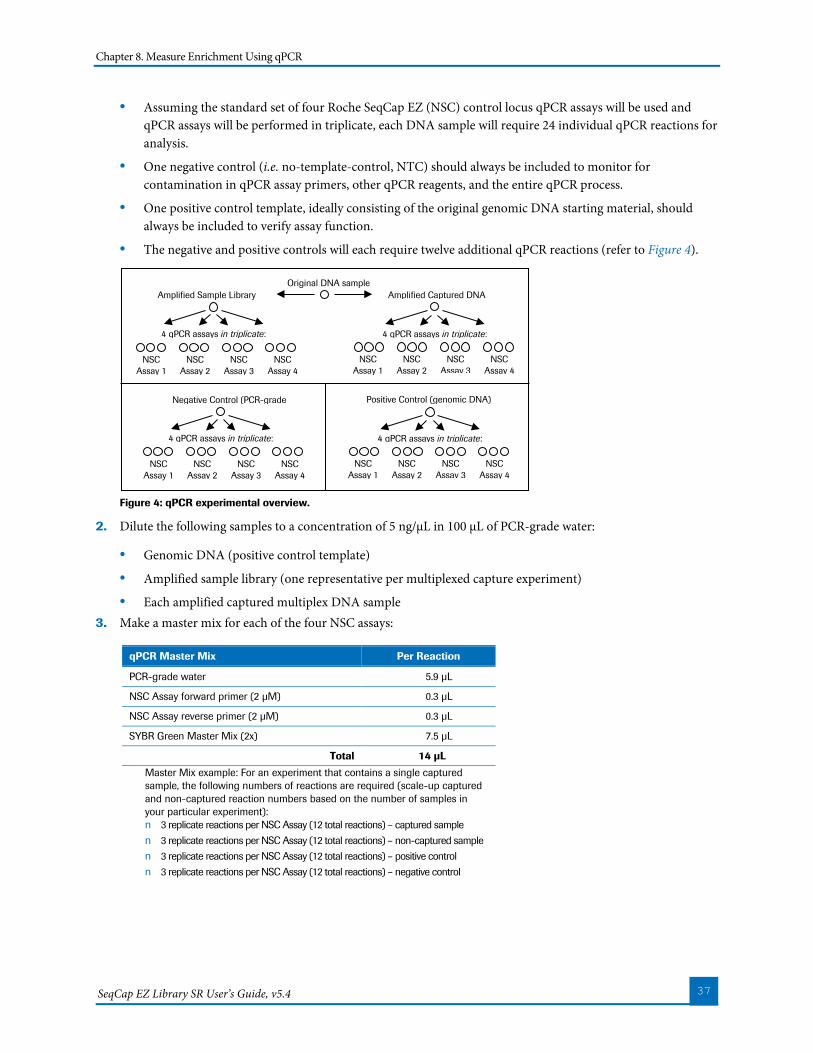
Chapter 8. Measure Enrichment Using qPCR
SeqCap EZ Library SR User’s Guide, v5.4 37
· Assuming the standard set of four Roche SeqCap EZ (NSC) control locus qPCR assays will be used and qPCR assays will be performed in triplicate, each DNA sample will require 24 individual qPCR reactions for analysis.
· One negative control (i.e. no-template-control, NTC) should always be included to monitor for contamination in qPCR assay primers, other qPCR reagents, and the entire qPCR process.
· One positive control template, ideally consisting of the original genomic DNA starting material, should always be included to verify assay function.
· The negative and positive controls will each require twelve additional qPCR reactions (refer to Figure 4).
Figure 4: qPCR experimental overview.
2. Dilute the following samples to a concentration of 5 ng/μL in 100 μL of PCR-grade water:
· Genomic DNA (positive control template)
· Amplified sample library (one representative per multiplexed capture experiment)
· Each amplified captured multiplex DNA sample 3. Make a master mix for each of the four NSC assays:
qPCR Master Mix Per Reaction
PCR-grade water 5.9 μL
NSC Assay forward primer (2 µM) 0.3 μL
NSC Assay reverse primer (2 µM) 0.3 μL
SYBR Green Master Mix (2x) 7.5 μL
Total 14 μL
Master Mix example: For an experiment that contains a single captured sample, the following numbers of reactions are required (scale-up captured and non-captured reaction numbers based on the number of samples in your particular experiment): n 3 replicate reactions per NSC Assay (12 total reactions) – captured sample n 3 replicate reactions per NSC Assay (12 total reactions) – non-captured sample n 3 replicate reactions per NSC Assay (12 total reactions) – positive control n 3 replicate reactions per NSC Assay (12 total reactions) – negative control
Original DNA sample Amplified Sample Library
Amplified Captured DNA
4 qPCR assays in triplicate: 4 qPCR assays in triplicate: NSC
Assay 1 NSC Assay 2 NSC
Assay 3 NSC Assay 4 NSC
Assay 1 NSC Assay 2 NSC
Assay 3 NSC Assay 4
Negative Control (PCR-grade
4 qPCR assays in triplicate: NSC
Assay 1 NSC Assay 2 NSC
Assay 3 NSC Assay 4
Positive Control (genomic DNA)
4 qPCR assays in triplicate: NSC
Assay 1 NSC Assay 2 NSC
Assay 3 NSC Assay 4
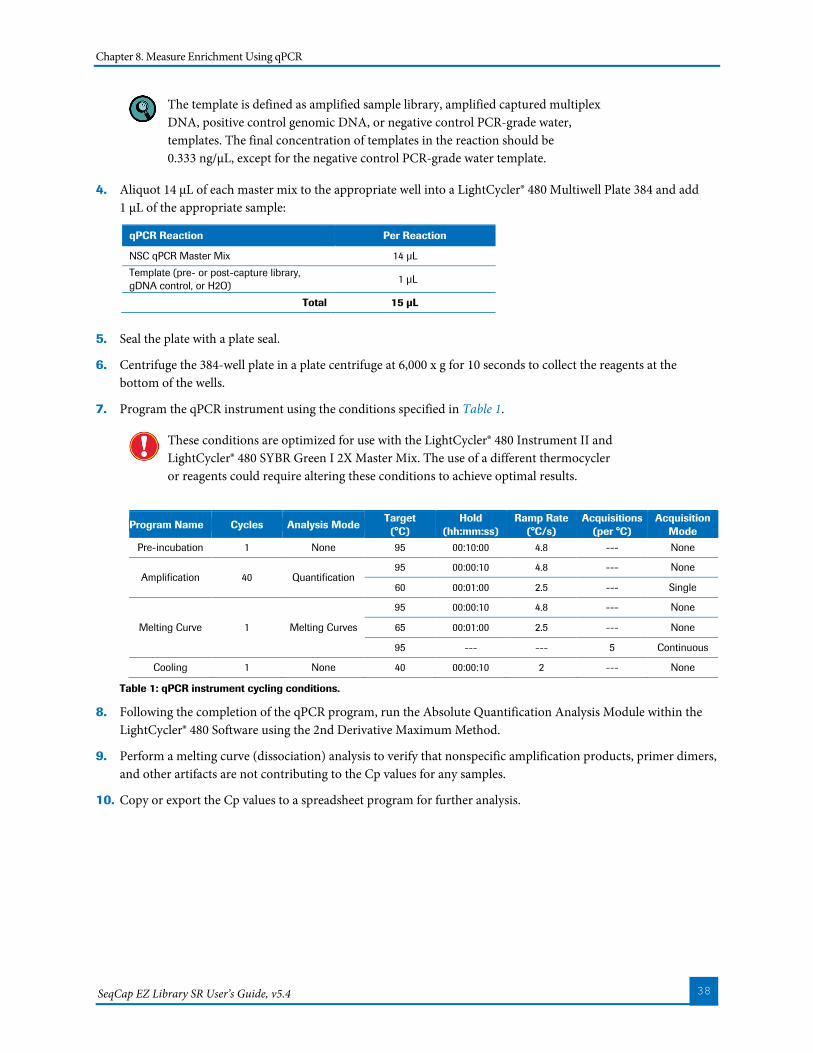
Chapter 8. Measure Enrichment Using qPCR
SeqCap EZ Library SR User’s Guide, v5.4 38
The template is defined as amplified sample library, amplified captured multiplex DNA, positive control genomic DNA, or negative control PCR-grade water, templates. The final concentration of templates in the reaction should be 0.333 ng/μL, except for the negative control PCR-grade water template.
4. Aliquot 14 μL of each master mix to the appropriate well into a LightCycler® 480 Multiwell Plate 384 and add 1 μL of the appropriate sample:
qPCR Reaction Per Reaction
NSC qPCR Master Mix 14 μL Template (pre- or post-capture library, gDNA control, or H2O) 1 μL
Total 15 μL
5. Seal the plate with a plate seal.
6. Centrifuge the 384-well plate in a plate centrifuge at 6,000 x g for 10 seconds to collect the reagents at the bottom of the wells.
7. Program the qPCR instrument using the conditions specified in Table 1.
These conditions are optimized for use with the LightCycler® 480 Instrument II and LightCycler® 480 SYBR Green I 2X Master Mix. The use of a different thermocycler or reagents could require altering these conditions to achieve optimal results.
Program Name Cycles Analysis Mode Target (°C)
Hold (hh:mm:ss)
Ramp Rate (°C/s)
Acquisitions (per °C)
Acquisition Mode
Pre-incubation 1 None 95 00:10:00 4.8 --- None
Amplification 40 Quantification 95 00:00:10 4.8 --- None
60 00:01:00 2.5 --- Single
Melting Curve 1 Melting Curves
95 00:00:10 4.8 --- None
65 00:01:00 2.5 --- None
95 --- --- 5 Continuous
Cooling 1 None 40 00:00:10 2 --- None
Table 1: qPCR instrument cycling conditions.
8. Following the completion of the qPCR program, run the Absolute Quantification Analysis Module within the LightCycler® 480 Software using the 2nd Derivative Maximum Method.
9. Perform a melting curve (dissociation) analysis to verify that nonspecific amplification products, primer dimers, and other artifacts are not contributing to the Cp values for any samples.
10. Copy or export the Cp values to a spreadsheet program for further analysis.
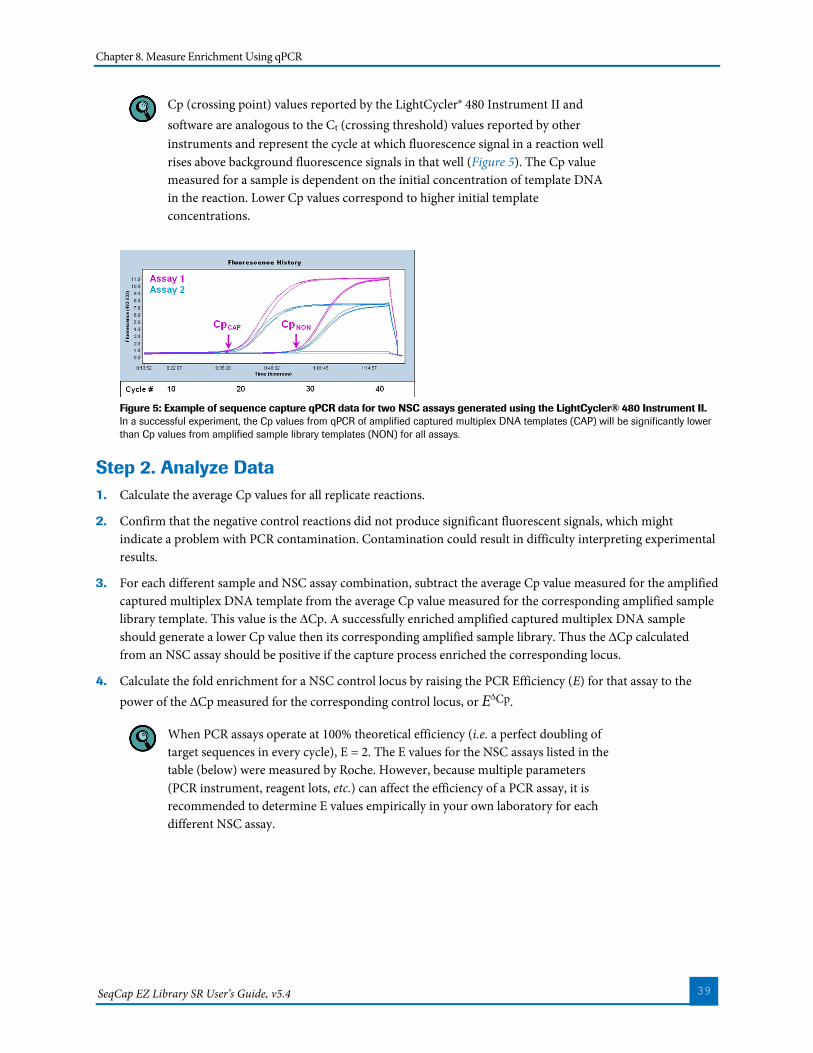
Chapter 8. Measure Enrichment Using qPCR
SeqCap EZ Library SR User’s Guide, v5.4 39
Cp (crossing point) values reported by the LightCycler® 480 Instrument II and software are analogous to the Ct (crossing threshold) values reported by other instruments and represent the cycle at which fluorescence signal in a reaction well rises above background fluorescence signals in that well (Figure 5). The Cp value measured for a sample is dependent on the initial concentration of template DNA in the reaction. Lower Cp values correspond to higher initial template concentrations.
Figure 5: Example of sequence capture qPCR data for two NSC assays generated using the LightCycler® 480 Instrument II. In a successful experiment, the Cp values from qPCR of amplified captured multiplex DNA templates (CAP) will be significantly lower than Cp values from amplified sample library templates (NON) for all assays.
Step 2. Analyze Data 1. Calculate the average Cp values for all replicate reactions.
2. Confirm that the negative control reactions did not produce significant fluorescent signals, which might indicate a problem with PCR contamination. Contamination could result in difficulty interpreting experimental results.
3. For each different sample and NSC assay combination, subtract the average Cp value measured for the amplified captured multiplex DNA template from the average Cp value measured for the corresponding amplified sample library template. This value is the ∆Cp. A successfully enriched amplified captured multiplex DNA sample should generate a lower Cp value then its corresponding amplified sample library. Thus the ∆Cp calculated from an NSC assay should be positive if the capture process enriched the corresponding locus.
4. Calculate the fold enrichment for a NSC control locus by raising the PCR Efficiency (E) for that assay to the power of the ∆Cp measured for the corresponding control locus, or E∆Cp.
When PCR assays operate at 100% theoretical efficiency (i.e. a perfect doubling of target sequences in every cycle), E = 2. The E values for the NSC assays listed in the table (below) were measured by Roche. However, because multiple parameters (PCR instrument, reagent lots, etc.) can affect the efficiency of a PCR assay, it is recommended to determine E values empirically in your own laboratory for each different NSC assay.
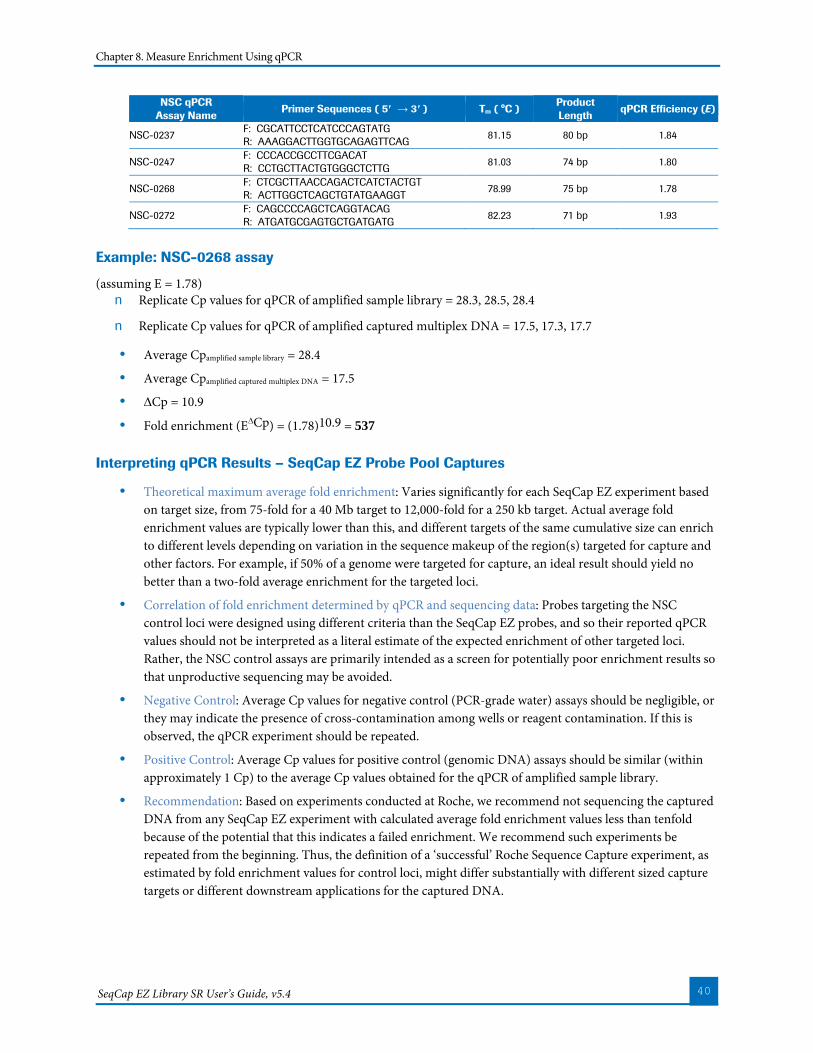
Chapter 8. Measure Enrichment Using qPCR
SeqCap EZ Library SR User’s Guide, v5.4 40
NSC qPCR Assay Name Primer Sequences ( 5′ → 3′ ) Tm ( °C ) Product
Length qPCR Efficiency (E)
NSC-0237 F: CGCATTCCTCATCCCAGTATG R: AAAGGACTTGGTGCAGAGTTCAG 81.15 80 bp 1.84
NSC-0247 F: CCCACCGCCTTCGACAT R: CCTGCTTACTGTGGGCTCTTG 81.03 74 bp 1.80
NSC-0268 F: CTCGCTTAACCAGACTCATCTACTGT R: ACTTGGCTCAGCTGTATGAAGGT 78.99 75 bp 1.78
NSC-0272 F: CAGCCCCAGCTCAGGTACAG R: ATGATGCGAGTGCTGATGATG 82.23 71 bp 1.93
Example: NSC-0268 assay
(assuming E = 1.78) n Replicate Cp values for qPCR of amplified sample library = 28.3, 28.5, 28.4
n Replicate Cp values for qPCR of amplified captured multiplex DNA = 17.5, 17.3, 17.7
· Average Cpamplified sample library = 28.4
· Average Cpamplified captured multiplex DNA = 17.5 · ∆Cp = 10.9
· Fold enrichment (E∆Cp) = (1.78)10.9 = 537
Interpreting qPCR Results – SeqCap EZ Probe Pool Captures
· Theoretical maximum average fold enrichment: Varies significantly for each SeqCap EZ experiment based on target size, from 75-fold for a 40 Mb target to 12,000-fold for a 250 kb target. Actual average fold enrichment values are typically lower than this, and different targets of the same cumulative size can enrich to different levels depending on variation in the sequence makeup of the region(s) targeted for capture and other factors. For example, if 50% of a genome were targeted for capture, an ideal result should yield no better than a two-fold average enrichment for the targeted loci.
· Correlation of fold enrichment determined by qPCR and sequencing data: Probes targeting the NSC control loci were designed using different criteria than the SeqCap EZ probes, and so their reported qPCR values should not be interpreted as a literal estimate of the expected enrichment of other targeted loci. Rather, the NSC control assays are primarily intended as a screen for potentially poor enrichment results so that unproductive sequencing may be avoided.
· Negative Control: Average Cp values for negative control (PCR-grade water) assays should be negligible, or they may indicate the presence of cross-contamination among wells or reagent contamination. If this is observed, the qPCR experiment should be repeated.
· Positive Control: Average Cp values for positive control (genomic DNA) assays should be similar (within approximately 1 Cp) to the average Cp values obtained for the qPCR of amplified sample library.
· Recommendation: Based on experiments conducted at Roche, we recommend not sequencing the captured DNA from any SeqCap EZ experiment with calculated average fold enrichment values less than tenfold because of the potential that this indicates a failed enrichment. We recommend such experiments be repeated from the beginning. Thus, the definition of a ‘successful’ Roche Sequence Capture experiment, as estimated by fold enrichment values for control loci, might differ substantially with different sized capture targets or different downstream applications for the captured DNA.
Appendix A. Hybridize Using 96-Well Plates and a Liquid Handler System
SeqCap EZ Library SR User’s Guide, v5.4 41
Appendix A. Hybridize Using 96-Well Plates and a Liquid Handler System
This appendix describes a procedure for using the SeqCap HE-Oligo Kits A and B with liquid handling instruments for setting up Hybridizations. This appendix can be used in place of Chapter 5, when working with a liquid handling instrument. Appendix A requires the use of components from the following kits:
n SeqCap EZ Library or SeqCap EZ MedExome Enrichment Kit
n SeqCap Hybridization and Wash Kit
n SeqCap EZ Accessory Kit v2
n SeqCap HE Oligo Kit
Proper automation equipment maintenance and protocol setup are essential to obtaining high-quality and reproducible results.
Ensure that the following is available:
n Additional PCR-grade water (~2.4 mL total per SeqCap HE Oligo Kit, which comes with 2 x 1 mL)
Step 1. Prepare for Hybridization 1. Turn on a heat block to +95 °C and let it equilibrate to the set temperature.
2. Remove the appropriate number of 4.5 μL SeqCap EZ probe pool aliquots (one per hybridization) from the -15 to -25 °C freezer and allow them to thaw on ice.
Step 2. Resuspend the SeqCap HE Universal and SeqCap HE Index Oligos 1. Spin the lyophilized oligo tubes, contained in the SeqCap HE-Oligo Kit A and/or B, briefly to allow the contents
to pellet to the bottom of the tube.
2. Add 1,200 μL PCR-grade water to SeqCap HE Universal Oligo tube (100 µM final concentration).
3. Add 100 μL PCR-grade water to each SeqCap HE Index Oligo tube (100 µM final concentration).
4. Vortex the primers plus PCR-grade water for 5 seconds and spin down the resuspended oligo tubes.
5. The resuspended oligo tube should be stored at -15 to -25 °C.
Step 3. Prepare the Multiplex DNA Sample Library Pool 1. Thaw on ice each of the uniquely-indexed amplified DNA sample libraries that will be included in the multiplex
capture experiment (generated in Chapter 4).
2. Mix together equal amounts (by mass) of each of these amplified DNA sample libraries to obtain a single pool with a combined mass of at least 1.1 µg. This mixture will subsequently be referred to as the ‘Multiplex DNA Sample Library Pool’. One µg of the multiplex DNA sample library pool will be used in the sequence capture hybridization step, and 60 ng will be used for measurement of enrichment using qPCR (Chapter 8).
Appendix A. Hybridize Using 96-Well Plates and a Liquid Handler System
SeqCap EZ Library SR User’s Guide, v5.4 42
To obtain equal numbers of sequencing reads from each component libraries in the Multiplex DNA Sample Library Pool upon completion of the experiment, it is very important to combine identical amounts of each independently amplified DNA sample library at this step. Accurate quantification and pipetting are critical.
Note: Store remaining Multiplex DNA Sample Library Pool at -15 to -25 °C until use in measurement of enrichment using qPCR (Chapter 8).
Step 4. Prepare the Multiplex Hybridization Enhancing Oligo Pool 1. Thaw on ice the resuspended SeqCap HE Universal Oligo (100 µM) and each resuspended SeqCap HE Index
oligo (100 µM) that matches a DNA Adapter Index included in the Multiplex DNA Sample Library Pool from Step 2 of this section.
2. Mix together the HE oligos so that the resulting Multiplex Hybridization Enhancing Oligo Pool contains, by mass, 50% HE Universal Oligo and 50% of a mixture of the appropriate SeqCap HE Index oligos. The total combined mass of the Multiplex Hybridization Enhancing Oligo Pool should be 2,000 pmol, which is the amount required for a single Sequence Capture experiment.
Example: If a Multiplex DNA Sample Library Pool contains four DNA sample libraries prepared with SeqCap Adapter Indexes 2, 4, 6, and 8, respectively, then the Multiplex Hybridization Enhancing Oligo Pool would contain the following:
Component Amount
SeqCap HE Universal Oligo 1,000 pmol (10 μL of 100 µM)
SeqCap HE Index 2 Oligo 250 pmol (2.5 μL of 100 µM)
SeqCap HE Index 4 Oligo 250 pmol (2.5 μL of 100 µM)
SeqCap HE Index 6 Oligo 250 pmol (2.5 μL of 100 µM)
SeqCap HE Index 8 Oligo 250 pmol (2.5 μL of 100 µM)
Total 2,000 pmol (20 μL of 100 µM)
For optimal results, it is important that the individual SeqCap HE oligos contained in a Multiplex Hybridization Enhancing Oligo Pool are precisely matched with the adapter indexes present in the Multiplex DNA Sample Library Pool in a multiplexed Sequence Capture experiment.
Step 5. Prepare the Hybridization Sample 1. Add 5 μL of COT Human DNA (1 mg/mL), contained in the SeqCap EZ Accessory Kit v2, to a new 1.5 mL tube.
2. Add 1 µg of Multiplex DNA Sample Library to the 1.5 mL tube containing 5 μL of COT Human DNA.
3. Add 2,000 pmol of Multiplex Hybridization Enhancing Oligo Pool (1,000 pmol HE Universal Oligo and 1,000 pmol HE Index Oligo pool) to the Multiplex DNA Sample Library Pool plus COT Human DNA.
4. Close the tube’s lid and make a hole in the top of the tube’s cap with an 18 to 20 gauge or smaller needle.
The closed lid with a hole in the top of the tube’s cap is a precaution to suppress contamination in the DNA vacuum concentrator.
Appendix A. Hybridize Using 96-Well Plates and a Liquid Handler System
SeqCap EZ Library SR User’s Guide, v5.4 43
5. Dry the Multiplex DNA Sample Library Pool/COT Human DNA/Multiplex Hybridization Enhancing Oligo Pool in a DNA vacuum concentrator on high heat (60 °C).
Denaturation of the DNA with high heat is not problematic because the hybridization utilizes single-stranded DNA.
6. To each dried-down Multiplex DNA Sample Library Pool/COT Human DNA/Multiplex Hybridization Enhancing Oligo Pool, add:
· 7.5 μL of 2X Hybridization Buffer (vial 5)
· 3 μL of Hybridization Component A (vial 6) The tube with the Multiplex DNA Sample Library Pool/COT Human DNA/Multiplex Hybridization Enhancing Oligo Pool should now contain the following components:
Component Solution Capture
COT Human DNA 5 µg
Multiplex DNA Sample Library Pool 1 µg
Multiplex Hybridization Enhancing Oligo Pool 2,000 pmol*
2X Hybridization Buffer (vial 5) 7.5 μL
Hybridization Component A (vial 6) 3 μL
Total 10.5 μL *Composed of 50% (1,000 pmol) SeqCap HE Universal Oligo and 50% (1,000 pmol) of a mixture of the appropriate SeqCap HE Index oligos.
7. Cover the hole in the tube’s cap with a sticker or small piece of laboratory tape.
8. Vortex the Multiplex DNA Sample Library Pool/COT Human DNA/Multiplex Hybridization Enhancing Oligo Pool plus Hybridization Cocktail (2X Hybridization Buffer + Hybridization Component A) for 10 seconds and centrifuge at maximum speed for 10 seconds.
9. Place the Multiplex DNA Sample Library Pool/COT Human DNA/Multiplex Hybridization Enhancing Oligo Pool/Hybridization Cocktail in a +95 °C heat block for 10 minutes to denature the DNA.
10. Centrifuge the Multiplex DNA Sample Library Pool/COT Human DNA/Multiplex Hybridization Enhancing Oligo Pool/Hybridization Cocktail at maximum speed for 10 seconds at room temperature.
11. Transfer the Multiplex DNA Sample Library Pool/COT Human DNA/Multiplex Hybridization Enhancing Oligo Pool/Hybridization Cocktail to the 4.5 μL aliquot of EZ Library in a 0.2 mL PCR tube prepared in Chapter 2 (entire volume can also be transferred to a 96-well PCR plate).
12. Vortex for 3 seconds and centrifuge at maximum speed for 10 seconds.
Appendix A. Hybridize Using 96-Well Plates and a Liquid Handler System
SeqCap EZ Library SR User’s Guide, v5.4 44
The hybridization sample should now contain the following components:
Component Solution Capture
COT Human DNA 5 µg
Multiplex DNA Sample Library Pool 1 µg
Multiplex Hybridization Enhancing Oligo Pool 2,000 pmol*
2X Hybridization Buffer (vial 5) 7.5 μL
Hybridization Component A (vial 6) 3 μL
SeqCap EZ Library 4.5 μL
Total 15 μL *Composed of 50% (1,000 pmol) SeqCap HE Universal Oligo and 50% (1,000 pmol) of a mixture of the appropriate SeqCap HE Index oligos.
Incubate in a thermocycler at +47 °C for 16 to 20 hours. The thermocycler’s heated lid should be turned on and set to maintain +57 °C (10 °C above the hybridization temperature).
Appendix B. Wash and Recover Using 96-Well Plates and a Liquid Handler System
SeqCap EZ Library SR User’s Guide, v5.4 45
Appendix B. Wash and Recover Using 96-Well Plates and a Liquid Handler System
This appendix describes a procedure for an increased throughput method for SeqCap EZ probe pool washing and recovery of captured DNA. This appendix can be substituted for Chapter 6 of the protocol to process captured DNA in a 96-well plate format and to adapt the protocol onto a liquid handling instrument. Appendix B requires the use of components from the following kits:
n SeqCap Hybridization and Wash Kit
n SeqCap Pure Capture Bead Kit
Proper automation equipment maintenance and protocol setup are essential to obtaining high-quality and reproducible results.
Ensure that the following is available:
n Additional PCR-grade water: ~215 mL per 96-well plate
Additional Equipment, Labware & Consumables Equipment Supplier Item Number
MagnaBot II Magnetic Separation Device Promega V8351 Multichannel Pipettors (20 μL and 200 μL) Multiple vendors
96-well PCR Plate (1/2 skirt) Multiple Vendors Note: Full skirt 96-well PCR plates will not work with the MagnaBot II Magnetic Separation Device.
15 mL and 50 mL Conical Tubes Multiple vendors
Equilibrate 1X Stringent Wash Buffer and 1X Wash Buffer I at +47 °C for at least 2 hours before washing the captured Multiplex DNA sample.
Appendix B. Wash and Recover Using 96-Well Plates and a Liquid Handler System
SeqCap EZ Library SR User’s Guide, v5.4 46
Step 1. Prepare Buffers 1. Prepare a 1X working solution for each of the Sequence Capture Wash Buffers (enough of each buffer for a full
96-well plate) each in a separate 50 mL conical tube.
Component Volume
10X Stringent Wash Buffer 4 mL
PCR-grade water 36 mL
Total 40 mL
Preheat 1X Stringent Wash Buffer to +47 °C in a water bath.
Component Volume
10X Wash Buffer I 3 mL
PCR-grade water 27 mL
Total 30 mL
Remove 10 mL of 1X Wash Buffer I to a separate 15 mL conical tube and preheat to +47 °C in a water bath. Store remaining 1X Wash Buffer at room temperature.
Component Volume
10X Wash Buffer II 2 mL
PCR-grade water 18 mL
Total 20 mL
Store 1X Wash Buffer II at room temperature after preparation.
Component Volume
10X Wash Buffer III 2 mL
PCR-grade water 18 mL
Total 20 mL
Store 1X Wash Buffer III at room temperature after preparation.
Component Volume
2.5X Bead Wash Buffer 20 mL
PCR-grade water 30 mL
Total 50 mL
Store 1X Bead Wash Buffer at room temperature after preparation.
Step 2. Prepare the Capture Beads 1. Warm the Capture Beads to room temperature for 30 minutes prior to use.
2. Vortex the Capture Beads for 15 seconds to resuspend.
3. For each capture reaction, aliquot 100 μL of beads into a well of a 96-well PCR plate.
4. Place the PCR plate onto the MagnaBot II magnetic separation device.
5. Wait for 1 minute to capture the Capture Beads to the side of the tubes. Remove supernatant and discard to waste.
6. Remove the PCR plate from the MagnaBot II device.
Appendix B. Wash and Recover Using 96-Well Plates and a Liquid Handler System
SeqCap EZ Library SR User’s Guide, v5.4 47
7. Add 200 μL of 1X Bead Wash Buffer to each well of the 96-well PCR plate and mix by pipetting up and down to thoroughly resuspend the Capture Beads into solution.
8. Place the PCR plate onto the MagnaBot II device. Wait for 1 minute to capture the Capture Beads to the side of the tubes. Remove the supernatant and discard to waste.
9. Remove the PCR plate from the MagnaBot II device.
10. Repeat Steps 2.7 - 2.9 for a total of two washes.
11. Add 100 μL of 1X Bead Wash Buffer to each well of the 96-well PCR plate and mix by pipetting up and down to thoroughly resuspend the Capture Beads into solution.
12. Place the PCR plate onto the MagnaBot II device. Wait for 1 minute to capture the Capture Beads to the side of the tubes. Remove the supernatant and discard to waste.
Step 3. Bind DNA to the Capture Beads 1. Transfer each hybridization sample (approximately 15 μL) to a well of the 96-well PCR plate containing the
prepared Capture Beads.
2. Mix thoroughly by pipetting up and down ten times.
3. Bind the captured sample to the beads by placing the 96-well plate containing the beads and DNA in a thermocycler set to +47 °C for 45 minutes. Mix the samples by vortexing at 15-minute intervals to ensure that the beads remain in suspension.
Step 4. Wash the Capture Beads Plus Bound DNA 1. After the 45-minute incubation at +47 °C, place the 96-well PCR plate onto the MagnaBot II device. Wait for
1 minute to capture the Capture Beads to the side of the tubes. Remove the supernatant to waste.
2. Add 100 μL of preheated (+47 °C) 1X Wash Buffer I to each well of the 96-well PCR plate. Mix by pipetting up and down to thoroughly resuspend the Capture Beads into solution.
Alternatively, it is acceptable to add 100 μL of preheated (+47 °C) 1X Wash Buffer I to each well of the 96-well PCR plate prior to Step 4.1 if there is sufficient room in the individual PCR wells to accommodate the additional volume of the buffer.
3. Place the PCR plate onto the MagnaBot II device. Wait for 1 minute to capture the Capture Beads to the side of the tubes. Remove the supernatant and discard to waste.
4. Add 200 μL of 1X Stringent Wash Buffer heated to +47 °C to each well of the 96-well plate. Mix by pipetting up and down to thoroughly resuspend the Capture Beads into solution.
5. Place the PCR plate into a thermocycler and incubate for five minutes at +47 °C.
6. Place the PCR plate onto the MagnaBot II device. Wait for 1 minute to capture the Capture Beads to the side of the tubes. Remove the supernatant and discard to waste.
7. Repeat Steps 4.4 - 4.6 for a total of two washes with the 1X Stringent Wash Buffer heated to +47 °C.
8. Add 200 μL of room temperature 1X Wash Buffer I to each well of the 96-well PCR plate. Mix by pipetting up and down to thoroughly resuspend the Capture Beads into solution.
Appendix B. Wash and Recover Using 96-Well Plates and a Liquid Handler System
SeqCap EZ Library SR User’s Guide, v5.4 48
9. Place the PCR plate onto the MagnaBot II device. Wait for 1 minute to capture the Capture Beads to the side of the tubes. Remove the supernatant and discard to waste.
10. Add 200 μL of room temperature 1X Wash Buffer II to each well of the 96-well PCR plate. Mix by pipetting up and down to thoroughly resuspend the Capture Beads into solution.
11. Place the PCR plate onto the MagnaBot II device. Wait for 1 minute to capture the Capture Beads to the side of the tubes. Remove the supernatant and discard to waste.
12. Add 200 μL of room temperature 1X Wash Buffer III to each well of the 96-well PCR plate. Mix by pipetting up and down to thoroughly resuspend the Capture Beads into solution.
13. Place the PCR plate onto the MagnaBot II device. Wait for 1 minute to capture the Capture Beads to the side of the tubes. Remove the supernatant and discard to waste.
14. Remove the plate from the MagnaBot II device and add 50 μL of PCR-grade water to each well of the 96-well PCR plate. Mix by pipetting up and down to thoroughly resuspend the Capture Beads into solution.
15. Store the beads plus captured samples at -15 to -25 °C or proceed to Chapter 7.
There is no need to elute DNA off the beads. The beads plus captured DNA will be used as template in the LM-PCR as described in Chapter 7.
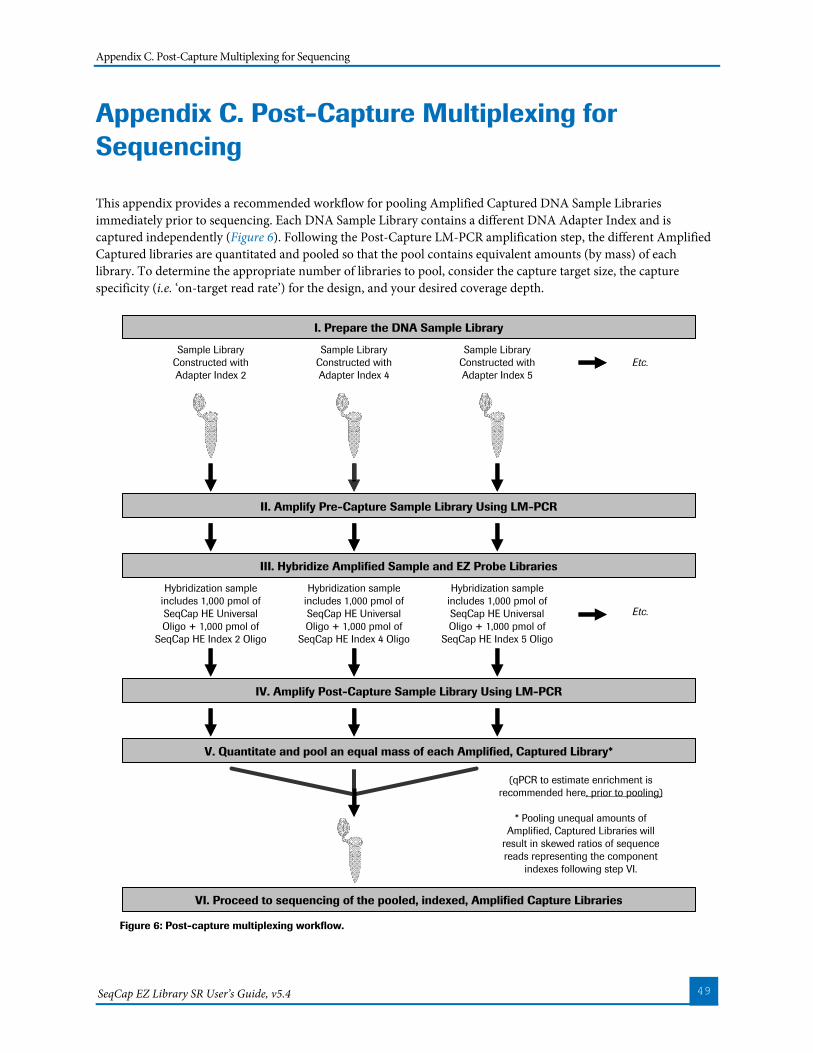
Appendix C. Post-Capture Multiplexing for Sequencing
SeqCap EZ Library SR User’s Guide, v5.4 49
Appendix C. Post-Capture Multiplexing for Sequencing
This appendix provides a recommended workflow for pooling Amplified Captured DNA Sample Libraries immediately prior to sequencing. Each DNA Sample Library contains a different DNA Adapter Index and is captured independently (Figure 6). Following the Post-Capture LM-PCR amplification step, the different Amplified Captured libraries are quantitated and pooled so that the pool contains equivalent amounts (by mass) of each library. To determine the appropriate number of libraries to pool, consider the capture target size, the capture specificity (i.e. ‘on-target read rate’) for the design, and your desired coverage depth.
Sample LibraryConstructed withAdapter Index 2
I. Prepare the DNA Sample Library
Sample LibraryConstructed withAdapter Index 4
Sample LibraryConstructed withAdapter Index 5
Etc.
II. Amplify Pre-Capture Sample Library Using LM-PCR
III. Hybridize Amplified Sample and EZ Probe Libraries
IV. Amplify Post-Capture Sample Library Using LM-PCR
V. Quantitate and pool an equal mass of each Amplified, Captured Library*
VI. Proceed to sequencing of the pooled, indexed, Amplified Capture Libraries
Hybridization sample includes 1,000 pmol of SeqCap HE Universal Oligo + 1,000 pmol of
SeqCap HE Index 2 Oligo
Hybridization sample includes 1,000 pmol of SeqCap HE Universal Oligo + 1,000 pmol of
SeqCap HE Index 4 Oligo
Hybridization sample includes 1,000 pmol of SeqCap HE Universal Oligo + 1,000 pmol of
SeqCap HE Index 5 Oligo
Etc.
(qPCR to estimate enrichment is recommended here, prior to pooling)
* Pooling unequal amounts of Amplified, Captured Libraries will
result in skewed ratios of sequence reads representing the component
indexes following step VI.
Figure 6: Post-capture multiplexing workflow.
Appendix D. Purify the Amplified Captured DNA using Qiagen QIAquick PCR Purification Kit
SeqCap EZ Library SR User’s Guide, v5.4 50
Appendix D. Purify the Amplified Captured DNA using Qiagen QIAquick PCR Purification Kit
This appendix provides a instructions for the use of Qiagen QIAquick PCR Purification Kit in place of Agencourt AMPure XP Beads (Chapter 4 and Chapter 7) for the purification of the PCR products resulting prior to and after hybridization. It follows the protocol detailed in the Qiagen QIAquick PCR Purification Kit guide with the following exception: elute the pre-capture amplified, bisulfite-converted sample library DNA using PCR-grade water instead of Qiagen buffer EB.
References n Microcentrifuge Manual
n Qiagen QIAquick PCR Purification Kit Protocol
Post-Capture LM-PCR: Pool the two reactions from each amplified, captured bisulfite-converted DNA sample into a single 1.5 mL microcentrifuge tube (approximately 200 μL). Process the negative control in exactly the same way as the amplified captured DNA.
1. Follow the instructions provided with Qiagen QIAquick PCR Purification Kit with the following modifications.
2. To each tube of amplified DNA add 5x volume (250 μL following pre-capture LM-PCR amplification or 500 μL following post-capture LM-PCR amplification) of Qiagen buffer PB. Mix well.
3. Pipette 750 μL of the amplified DNA in PB into a QIAquick PCR Purification column.
4. Centrifuge at 16,000 x g for 1 minute. Discard the flow-through.
5. Add 750 μL of buffer PE to the column. Centrifuge at 16,000 x g for 1 minute.
6. Discard the flow-through and place the column back in the same tube. Centrifuge the column for an additional minute.
7. Add 50 μL of PCR-grade water (following Pre-capture LM-PCR amplification) or 50 μL of buffer EB (following Post-capture LM-PCR amplification) directly to the column matrix. Transfer the column to a 1.5 mL microcentrifuge tube.
It is critical that the Pre-Capture amplified sample library is eluted with PCR-grade water and not buffer EB or 1X TE.
8. Let the column stand for 1 minute.
9. Centrifuge at 16,000 x g for 1 minute to elute the DNA.
Post-capture LM-PCR: Due to the presence of the Capture Beads, the Qiagen QIAquick column might appear brown in color. The Capture Beads will not interfere with the action of the Qiagen QIAquick PCR Purification Kit column or buffers.
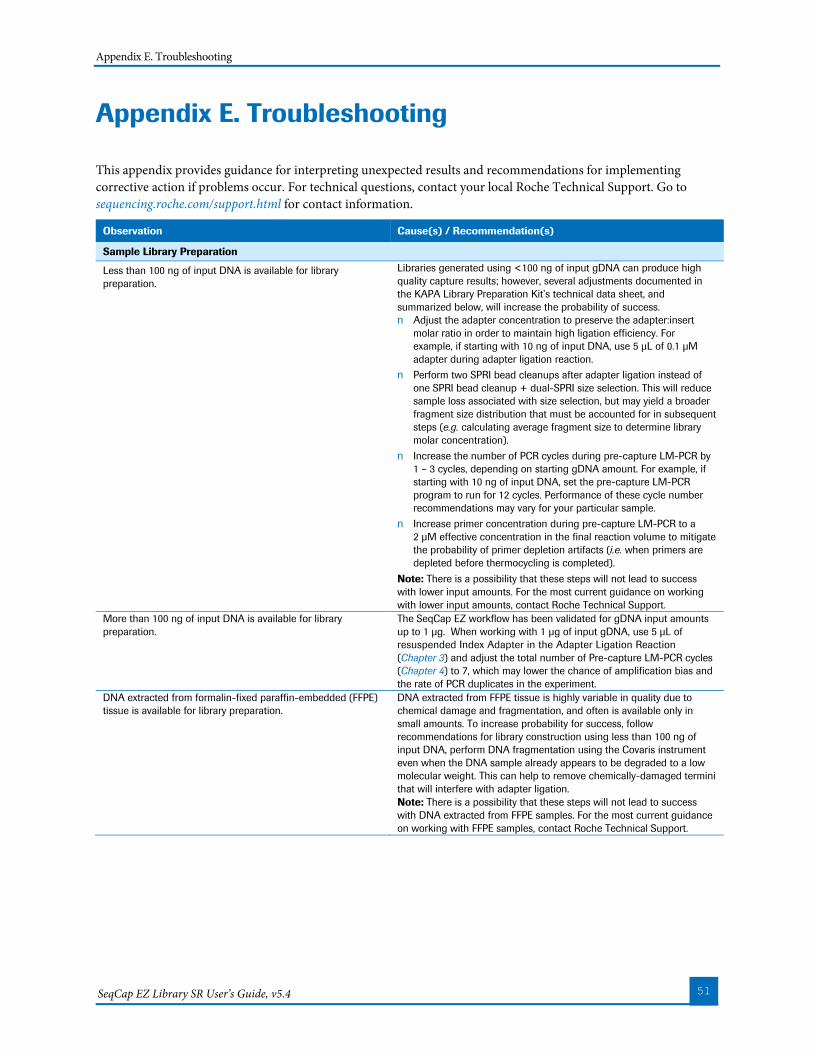
Appendix E. Troubleshooting
SeqCap EZ Library SR User’s Guide, v5.4 51
Appendix E. Troubleshooting
This appendix provides guidance for interpreting unexpected results and recommendations for implementing corrective action if problems occur. For technical questions, contact your local Roche Technical Support. Go to sequencing.roche.com/support.html for contact information.
Observation Cause(s) / Recommendation(s)
Sample Library Preparation
Less than 100 ng of input DNA is available for library preparation.
Libraries generated using <100 ng of input gDNA can produce high quality capture results; however, several adjustments documented in the KAPA Library Preparation Kit’s technical data sheet, and summarized below, will increase the probability of success. n Adjust the adapter concentration to preserve the adapter:insert
molar ratio in order to maintain high ligation efficiency. For example, if starting with 10 ng of input DNA, use 5 μL of 0.1 µM adapter during adapter ligation reaction.
n Perform two SPRI bead cleanups after adapter ligation instead of one SPRI bead cleanup + dual-SPRI size selection. This will reduce sample loss associated with size selection, but may yield a broader fragment size distribution that must be accounted for in subsequent steps (e.g. calculating average fragment size to determine library molar concentration).
n Increase the number of PCR cycles during pre-capture LM-PCR by 1 – 3 cycles, depending on starting gDNA amount. For example, if starting with 10 ng of input DNA, set the pre-capture LM-PCR program to run for 12 cycles. Performance of these cycle number recommendations may vary for your particular sample.
n Increase primer concentration during pre-capture LM-PCR to a 2 µM effective concentration in the final reaction volume to mitigate the probability of primer depletion artifacts (i.e. when primers are depleted before thermocycling is completed).
Note: There is a possibility that these steps will not lead to success with lower input amounts. For the most current guidance on working with lower input amounts, contact Roche Technical Support.
More than 100 ng of input DNA is available for library preparation.
The SeqCap EZ workflow has been validated for gDNA input amounts up to 1 µg. When working with 1 µg of input gDNA, use 5 μL of resuspended Index Adapter in the Adapter Ligation Reaction (Chapter 3) and adjust the total number of Pre-capture LM-PCR cycles (Chapter 4) to 7, which may lower the chance of amplification bias and the rate of PCR duplicates in the experiment.
DNA extracted from formalin-fixed paraffin-embedded (FFPE) tissue is available for library preparation.
DNA extracted from FFPE tissue is highly variable in quality due to chemical damage and fragmentation, and often is available only in small amounts. To increase probability for success, follow recommendations for library construction using less than 100 ng of input DNA, perform DNA fragmentation using the Covaris instrument even when the DNA sample already appears to be degraded to a low molecular weight. This can help to remove chemically-damaged termini that will interfere with adapter ligation. Note: There is a possibility that these steps will not lead to success with DNA extracted from FFPE samples. For the most current guidance on working with FFPE samples, contact Roche Technical Support.
Appendix E. Troubleshooting
SeqCap EZ Library SR User’s Guide, v5.4 52
Observation Cause(s) / Recommendation(s)
Amplified Sample Library (Pre-Capture LM-PCR Product) Yield is <1 µg (yield should be ≥1 µg). Possible error occurred during library preparation or damaged reagents
were used. Use an evaluated sample library as a positive control for LM-PCR reagents. Repeat library preparation if necessary.
Fragment distribution (analyzed using a Agilent DNA 1000 chip) shows that the average amplified fragment size is not within the size range of 150 to 500 bp.
Poor fragmentation occurred. Repeat library preparation. Consider implementing the gel-cut size selection option.
Fragment distribution (analyzed using a Agilent DNA 1000 chip) is bimodal, with a larger set of fragments observed in addition to, or instead of, the expected set of fragments.
See the section entitled “Amplified captured multiplex DNA (Post-Capture LM-PCR Product)” in this appendix.
A260/A280 is <1.7 (ratio should be 1.7 to 2.0). Inefficient sample cleanup was performed. Repeat cleanup. The negative control yield measured by the NanoDrop spectrophotometer is non-negligible.
The measurement may be high due to the presence of oligonucleotides carried over from previous steps/LM-PCR. This carryover will be apparent as one or more sharp peaks visible less than 150 bp in size when examining the data from the Agilent Bioanalyzer DNA 1000 chip. This carryover is not a sign of contamination and will not interfere with the capture process.
The Agilent Bioanalyzer DNA 1000 chip indicates one or more visible sharp peaks that are <150 bp in size.
These peaks, which represent oligonucleotides carried over from previous steps/LM-PCR, may be especially prominent when the library preparation procedure omits the optional gel-cut step. This carryover will not interfere with the capture process but could lead to overestimation of the amplified library yield when interpreting the data from NanoDrop spectrophotometer.
The Agilent Bioanalyzer DNA 1000 chip indicates that the average amplified material is 150 to 500 bp in size in the negative control for sample library amplification.
This material could represent cross-contamination between amplified sample libraries. Test reagents for contamination and replace if necessary. Repeat library construction using fresh genomic DNA.
Hybridizing the Sample Library and SeqCap EZ Probe Pool Non-standard hybridization times. Roche SeqCap EZ experiments can safely incubate during the
hybridization step for up to 3 days (72 hours).
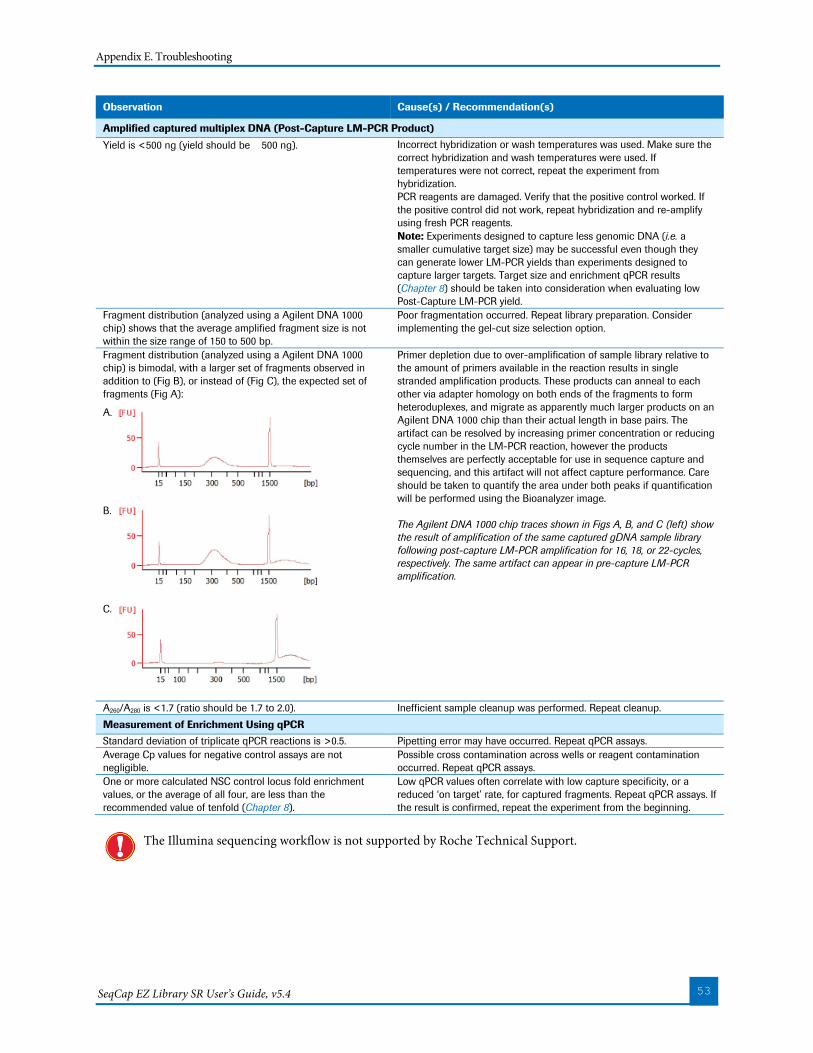
Appendix E. Troubleshooting
SeqCap EZ Library SR User’s Guide, v5.4 53
Observation Cause(s) / Recommendation(s)
Amplified captured multiplex DNA (Post-Capture LM-PCR Product) Yield is <500 ng (yield should be ≥500 ng). Incorrect hybridization or wash temperatures was used. Make sure the
correct hybridization and wash temperatures were used. If temperatures were not correct, repeat the experiment from hybridization. PCR reagents are damaged. Verify that the positive control worked. If the positive control did not work, repeat hybridization and re-amplify using fresh PCR reagents. Note: Experiments designed to capture less genomic DNA (i.e. a smaller cumulative target size) may be successful even though they can generate lower LM-PCR yields than experiments designed to capture larger targets. Target size and enrichment qPCR results (Chapter 8) should be taken into consideration when evaluating low Post-Capture LM-PCR yield.
Fragment distribution (analyzed using a Agilent DNA 1000 chip) shows that the average amplified fragment size is not within the size range of 150 to 500 bp.
Poor fragmentation occurred. Repeat library preparation. Consider implementing the gel-cut size selection option.
Fragment distribution (analyzed using a Agilent DNA 1000 chip) is bimodal, with a larger set of fragments observed in addition to (Fig B), or instead of (Fig C), the expected set of fragments (Fig A):
A.
B.
C.
Primer depletion due to over-amplification of sample library relative to the amount of primers available in the reaction results in single stranded amplification products. These products can anneal to each other via adapter homology on both ends of the fragments to form heteroduplexes, and migrate as apparently much larger products on an Agilent DNA 1000 chip than their actual length in base pairs. The artifact can be resolved by increasing primer concentration or reducing cycle number in the LM-PCR reaction, however the products themselves are perfectly acceptable for use in sequence capture and sequencing, and this artifact will not affect capture performance. Care should be taken to quantify the area under both peaks if quantification will be performed using the Bioanalyzer image. The Agilent DNA 1000 chip traces shown in Figs A, B, and C (left) show the result of amplification of the same captured gDNA sample library following post-capture LM-PCR amplification for 16, 18, or 22-cycles, respectively. The same artifact can appear in pre-capture LM-PCR amplification.
A260/A280 is <1.7 (ratio should be 1.7 to 2.0). Inefficient sample cleanup was performed. Repeat cleanup. Measurement of Enrichment Using qPCR Standard deviation of triplicate qPCR reactions is >0.5. Pipetting error may have occurred. Repeat qPCR assays. Average Cp values for negative control assays are not negligible.
Possible cross contamination across wells or reagent contamination occurred. Repeat qPCR assays.
One or more calculated NSC control locus fold enrichment values, or the average of all four, are less than the recommended value of tenfold (Chapter 8).
Low qPCR values often correlate with low capture specificity, or a reduced ‘on target’ rate, for captured fragments. Repeat qPCR assays. If the result is confirmed, repeat the experiment from the beginning.
The Illumina sequencing workflow is not supported by Roche Technical Support.
Appendix F. Limited Warranty
SeqCap EZ Library SR User’s Guide, v5.4 54
Appendix F. Limited Warranty
1. Limited Warranty
A. Products: Roche Sequencing Solutions, Inc. (“Roche”) warrants that its Products conform to its published specifications and are free from defects in material or workmanship. Customer’s sole and exclusive remedy (and Roche’s sole and exclusive liability) under this limited warranty shall be to either (a) replace the defective Products, or (b) provide Customer with a refund, as solely determined by Roche.
B. Under no circumstances shall Roche’s liability to Customer exceed the amount paid by Customer for the Services and Products to Roche. Roche will bear all reasonable shipping costs if service is re-performed at Roche or the Products are replaced. This warranty does not apply to any defect or nonconformance caused by (i) the failure by Customer to provide a suitable storage, use, or operating environment for the Materials or Customer’s submission of substandard quality Materials or contaminated or degraded Materials to Roche, (ii) Customer’s use of non-recommended reagents, (iii) Customer’s use of the Products, Materials or Data for a purpose or in a manner other than that for which they were designed, (iv) the failure by Customer to follow Roche published protocols; or (v) as a result of any other abuse, misuse or neglect of the Products, Materials or Data by Customer. This warranty applies only to Customer and not to third parties.
C. TO THE FULLEST EXTENT PERMITTED BY APPLICABLE LAW, ROCHE DISCLAIMS ALL OTHER REPRESENTATIONS, AND WARRANTIES, EXPRESS OR IMPLIED, WITH RESPECT TO THE PRODUCTS, SERVICES AND DATA, INCLUDING BUT NOT LIMITED TO, ANY IMPLIED WARRANTIES OF MERCHANTABILITY, FITNESS FOR A PARTICULAR PURPOSE OR NON-INFRINGEMENT. CUSTOMER’S SOLE REMEDY FOR BREACH OF WARRANTY IS STATED ABOVE.
D. Any action by Customer against Roche for Roche’s breach of this warranty must be commenced within 12 months following the date of such breach. Notwithstanding such 12-month period, within twenty (20) days of the delivery of Data and/or Products to Customer, Customer must notify Roche in writing of any nonconformity of the Services and Products, describing the nonconformity in detail; otherwise all Services and Products shall be conclusively deemed accepted without qualification.
2. FURTHER LIABILITY LIMITATION
TO THE FULLEST EXTENT PERMITTED UNDER APPLICABLE LAW, ROCHE SHALL NOT HAVE ANY LIABILITY FOR INCIDENTAL, COMPENSATORY, PUNITIVE, CONSEQUENTIAL, INDIRECT, SPECIAL OR OTHER SIMILAR DAMAGES, HOWEVER CAUSED AND REGARDLESS OF FORM OF ACTION WHETHER IN CONTRACT, TORT (INCLUDING NEGLIGENCE), STRICT PRODUCT LIABILITY OR OTHERWISE, EVEN IF ROCHE HAS BEEN ADVISED OF THE POSSIBILITY OF SUCH DAMAGES. CUSTOMER UNDERSTANDS THAT ANY RISKS OF LOSS HEREUNDER ARE REFLECTED IN THE PRICE OF THE SERVICES AND PRODUCTS AND THAT THESE TERMS WOULD HAVE BEEN DIFFERENT IF THERE HAD BEEN A DIFFERENT ALLOCATION OF RISK.
If you have any questions concerning service of this product, contact your local Roche Technical Support. Go to sequencing.roche.com/support.html for contact information.
Evidence of original purchase is required. It is important to save your sales receipt or packaging slip to verify purchase.
sequencing.roche.com © 2015-2017 Roche Sequencing Solutions, Inc. All rights reserved. Roche Sequencing Solutions, Inc. 4300 Hacienda Drive Pleasanton, CA 94588 USA 06588786001 (12) 12/17
KAPA, LIGHTCYCLER, and SEQCAP are trademarks of Roche. SYBR is a registered trademark of Life Technologies Corporation. AMPure, Beckman, and Beckman Coulter are trademarks or registered trademarks of Beckman Coulter, Inc. All other product names and trademarks are the property of their respective owners.
For Research Use Only. Not for use in diagnostic procedures.