SELFIE: The Self Portrait · SELFIE: The Self Portrait ... Have students start by drawing a large...
7
1 SELFIE: The Self Portrait Presenters: Dede Tisone and Lee Hanson, Ph.D. Grade Levels: Middle School through High School Overview of the Lesson (The Big Idea): The lesson introduces the “selfie” as the basis of a contemporary self portrait, and compares characteristics and purposes of today’s self portrait to those of the past. California Content Standards: 1.0 ARTISTIC PERCEPTION 1.1 (GR 8) Use artistic terms when describing the intent and content of works of art. 1.1 (GR 9-12) Identify and use the principles of design to discuss, analyze, and write about visual aspects in the environment and in works of art, including their own. 1.2 (GR 7) Identify and describe scale (proportion) as applied to 2-D and 3-D works of art. 2.0 CREATIVE EXPRESSION 2.1 (GR 9-12) Solve a visual arts problem that involves the effective use of the elements of art and the principles of design. 2.3 (GR 8) Create an original work of art using photography. 2.3 (GR 9-12) Develop and refine skill in the manipulation of digital imagery. 2.4 (GR 9-12 adv) Demonstrate in their own works of art a personal style and an advanced proficiency in communicating an idea, theme, or emotion. 2.5 (GR 9-12 adv) Use innovative visual metaphors in creating works of art. 3.0 HISTORICAL & CULTURAL CONTEXT 3.1 (GR 9-12) 3.2 Compare and contrast works of art from various periods, styles, and cultures and Identify similarities and differences in the purposes of art created in selected cultures/societies. 3.2 (GR 7) Compare and contrast works of art from various periods, styles, and cultures and explain how those works reflect the society in which they were made. 3.2 (GR 9-12) Identify and describe the role and influence of new technologies on contemporary works of art. 4.0 AESTHETIC VALUING 4.1 (GR 7) Explain the intent of a personal work of art and draw possible parallels between it and the work of a recognized artist. 4.2 (GR 8) Develop a theory about the artist’s intent in a series of works of art, using reasoned statements to support personal opinions. 4.3 (GR 7) Take an active part in a small-group discussion about the artistic value of specific works of art, with a wide range of the viewpoints of peers being considered. 4.5 (Gr 9-12) Employ the conventions of art criticism in writing and speaking about works of art. 5.0 CONNECTIONS, RELATIONSHIPS, APPLICATIONS 5.2 (Gr 9-12 adv) Compare and contrast works of art, probing beyond the obvious and identifying psychological content found in the symbols and images.
Transcript of SELFIE: The Self Portrait · SELFIE: The Self Portrait ... Have students start by drawing a large...

1
SELFIE: The Self Portrait Presenters: Dede Tisone and Lee Hanson, Ph.D. Grade Levels: Middle School through High School Overview of the Lesson (The Big Idea): The lesson introduces the “selfie” as the basis of a contemporary self portrait, and compares characteristics and purposes of today’s self portrait to those of the past.
California Content Standards: 1.0 ARTISTIC PERCEPTION 1.1 (GR 8) Use artistic terms when describing the intent and content of works of art. 1.1 (GR 9-12) Identify and use the principles of design to discuss, analyze, and write about visual aspects in the environment and in works of art, including their own. 1.2 (GR 7) Identify and describe scale (proportion) as applied to 2-D and 3-D works of art.
2.0 CREATIVE EXPRESSION 2.1 (GR 9-12) Solve a visual arts problem that involves the effective use of the elements of art and the principles of design. 2.3 (GR 8) Create an original work of art using photography. 2.3 (GR 9-12) Develop and refine skill in the manipulation of digital imagery. 2.4 (GR 9-12 adv) Demonstrate in their own works of art a personal style and an advanced proficiency in communicating an idea, theme, or emotion. 2.5 (GR 9-12 adv) Use innovative visual metaphors in creating works of art.
3.0 HISTORICAL & CULTURAL CONTEXT 3.1 (GR 9-12) 3.2 Compare and contrast works of art from various periods, styles, and cultures and Identify similarities and differences in the purposes of art created in selected cultures/societies.
3.2 (GR 7) Compare and contrast works of art from various periods, styles, and cultures and explain how those works reflect the society in which they were made. 3.2 (GR 9-12) Identify and describe the role and influence of new technologies on contemporary works of art.
4.0 AESTHETIC VALUING 4.1 (GR 7) Explain the intent of a personal work of art and draw possible parallels between it and the work of a recognized artist. 4.2 (GR 8) Develop a theory about the artist’s intent in a series of works of art, using reasoned statements to support personal opinions. 4.3 (GR 7) Take an active part in a small-group discussion about the artistic value of specific works of art, with a wide range of the viewpoints of peers being considered. 4.5 (Gr 9-12) Employ the conventions of art criticism in writing and speaking about works of art.
5.0 CONNECTIONS, RELATIONSHIPS, APPLICATIONS 5.2 (Gr 9-12 adv) Compare and contrast works of art, probing beyond the obvious and identifying psychological content found in the symbols and images.

2
California Common Core Content Standards (for ELA and Technical Subjects):
RST (Gr 11-12) 4. Determine the meaning of symbols and key terms used in text (and art) 7. Integrate and evaluate multiple sources of information presented in diverse formats and media in order to address a questions or solve a problem. WHST (Gr 11-12) 1. Write arguments focused on discipline-specific content. 2. Write informative/explanatory texts including narration of technical processes. Learning Objectives The learner will
1) Identify and demonstrate the correct placement and proportion of facial features in developing a likeness in portraits and self portraits.
2) Use a “selfie” to develop a self portrait that captures personal likeness through intentional placement of unique facial features.
3) Expand the self portrait to include objects and symbols as part of a composition that shows balance and unity.
4) Analyze and discuss the purposes of portraits and self portraits created in the past and compare them to those created in the present.
5) After creating a “selfie” portrait, reflect on the ways technology can shape and enhance personal expression.
Vocabulary: self portrait, “selfie,” likeness, diagram, facial features, symbol, proportion, placement, focal point, dominance/subordination, balance (symmetrical and asymmetrical), unity Materials: paper, pencils, erasers, rulers (optional – colored pencils, oil pastels, markers, charcoal, conte pencils or sticks).
Each student will need a “selfie” portrait taken by smart phone or iPad (students may use the image straight from the device or send it to a printer to be enlarged). Motivational Materials: reproductions of self portraits (particularly the etchings) by Rembrandt as well as works by artists known for their self portraits (such as Vincent Van Gogh, Frida Kahlo), Before starting, introduce a variety of portraits and self portraits as well as photographs of famous artists -- selected from the internet from sources such as Pinterest: http://www.pinterest.com/MicolContini/self-portraits-portraits-and-photos-of-famous-arti/ In a class discussion, compare the images to find similarities and differences. Note to teacher: Portraits and self portraits by various artists will be different because each artist has his/her own style. The lesson can be greatly enhanced by comparing different artists’ interpretations and styles. Some suggested artworks might include portraiture by women artists such as Alice Neel, Frida Kahlo, and Mary Cassatt, self portraits by African-American artists such as Horace Pippin and Jacob Lawrence as well as portraits of famous people by Pop Artist Andy Warhol. Rembrandt and Van Gogh made dozens of self portraits, created at different times of their lives. How do these artworks show similarities and differences?
3
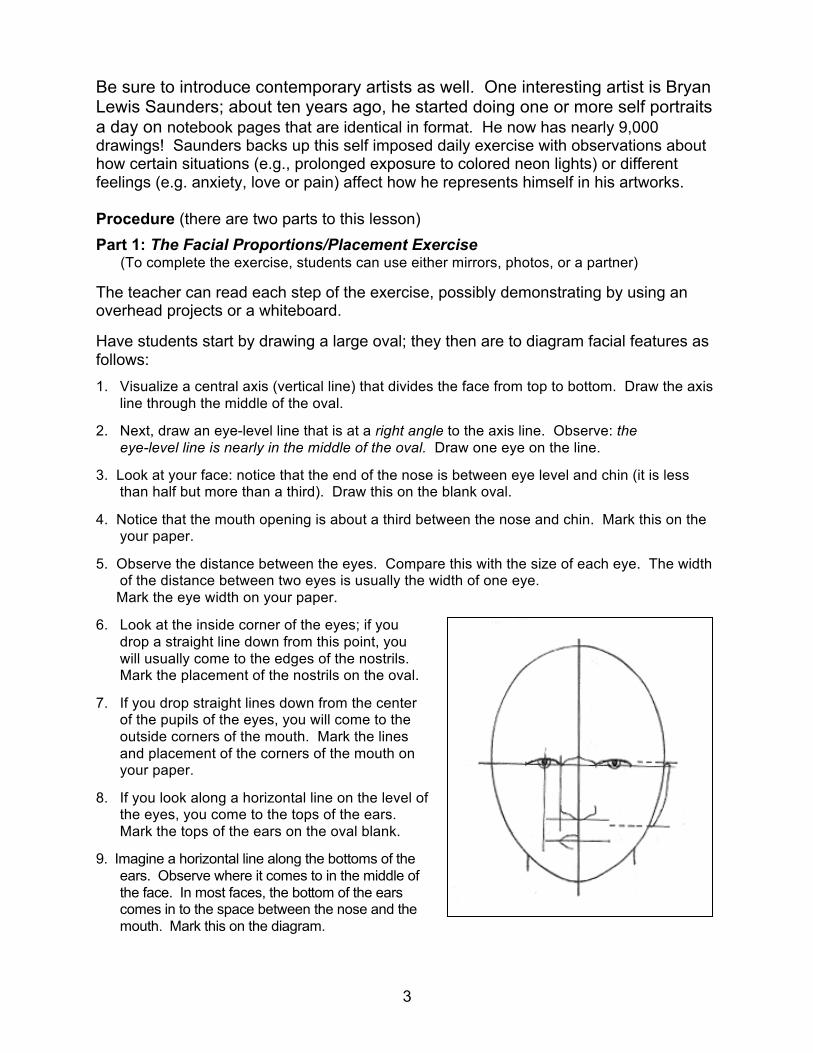
Be sure to introduce contemporary artists as well. One interesting artist is Bryan Lewis Saunders; about ten years ago, he started doing one or more self portraits a day on notebook pages that are identical in format. He now has nearly 9,000 drawings! Saunders backs up this self imposed daily exercise with observations about how certain situations (e.g., prolonged exposure to colored neon lights) or different feelings (e.g. anxiety, love or pain) affect how he represents himself in his artworks. Procedure (there are two parts to this lesson)
Part 1: The Facial Proportions/Placement Exercise (To complete the exercise, students can use either mirrors, photos, or a partner) The teacher can read each step of the exercise, possibly demonstrating by using an overhead projects or a whiteboard. Have students start by drawing a large oval; they then are to diagram facial features as follows:
1. Visualize a central axis (vertical line) that divides the face from top to bottom. Draw the axis line through the middle of the oval.
2. Next, draw an eye-level line that is at a right angle to the axis line. Observe: the eye-level line is nearly in the middle of the oval. Draw one eye on the line.
3. Look at your face: notice that the end of the nose is between eye level and chin (it is less than half but more than a third). Draw this on the blank oval.
4. Notice that the mouth opening is about a third between the nose and chin. Mark this on the your paper.
5. Observe the distance between the eyes. Compare this with the size of each eye. The width of the distance between two eyes is usually the width of one eye.
Mark the eye width on your paper. 6. Look at the inside corner of the eyes; if you
drop a straight line down from this point, you will usually come to the edges of the nostrils. Mark the placement of the nostrils on the oval.
7. If you drop straight lines down from the center of the pupils of the eyes, you will come to the outside corners of the mouth. Mark the lines and placement of the corners of the mouth on your paper.
8. If you look along a horizontal line on the level of the eyes, you come to the tops of the ears. Mark the tops of the ears on the oval blank.
9. Imagine a horizontal line along the bottoms of the
ears. Observe where it comes to in the middle of the face. In most faces, the bottom of the ears comes in to the space between the nose and the mouth. Mark this on the diagram.

4
9. Imagine a horizontal line along the bottoms of the ears. Observe where it comes to in the middle of the face. In most faces, the bottom of the ears comes in to the space between the nose and the mouth. Mark this on the diagram.
10. How wide should the neck be compared to the jaw? Mark this on the oval. Finish your facial diagram by drawing in the second eye.
(Introduction and Transition) Developing a diagram of a face is less creative than making a drawing of a specific person. Diagrams show “one right way” while artwork expresses many different ways of showing the same thing. Awareness of the placement and relative sizes of \facial features is important – even if we choose to ignore them.
Part II: The “Selfie” Portrait
Students need to know how their artwork is being assessed. Before starting the Selfie portion of the lesson, distribute and discuss the rubric.
Have students take a series of self portraits using their smart phones or iPads. Ask them to select one that they will enlarge and use in a self portrait composition.
Use the selected Selfie to create a self portrait. As students draw their faces, encourage them to remember and use the information they gathered during the facial proportion and placement exercise. Also encourage them to observe carefully and consider: What makes their own face different from all others? Although students are to infuse the information they’ve gathered about facial proportions and placement in their self portraits, they will also need to interpret their own
unique features and expressions. In addition to their own faces, ask students to consider things they like and enjoy – favorite clothes, subject in school, books, music, pets, sports and other activities. Working from sketches of these objects, they are to include them as well as symbols for their favorites as part of their self portrait.
High School Selfie Drawing. Music (piano) and horses are two of her favorite things

5
Assessment and/or Evaluation:
Rubric for Selfie Portraits
1. BEGINNING
2. DEVELOPING
3. PROFICIENT
4. ADVANCED
SCORE
A,
Proportion and Placement
Limited use of accurate proportion found in facial features; some are randomly placed.
Some features are drawn to show correct facial proportions; many features are accurately placed.
Facial features are correctly represented and placed; the self portrait shows accurate proportion.
Convincing use of proportion in facial features goes beyond accuracy to express personal traits; placement is purposeful, deliberately following or breaking conventions.
B.
Likeness
Drawing shows little or no resemblance to the person who made it.
Drawing shows some resemblance to the person who made it; a few details show individual features.
Drawing accurately and precisely depicts small details that capture unique individual facial features.
The Selfie Portrait strongly resembles the person who made it. Details capture the individual’s unique personality.
C.
Expressiveness
The portrait is stiff and hastily drawn; very little is revealed about the person who made it.
The portrait shows limited expression; few thoughts or feelings are revealed.
The drawing – face and objects -- reveals thoughts or feelings of the individual who created it.
The face is natural and expresses thoughts and/or feelings; the total effect is visually complex and revealing.
D.
Composition
Components are haphazardly arranged in an arrangement that lacks unity and/or balance.
Components are positioned in an attempt to develop balance, but the drawing lacks unity and/or a strong focal point.
The components are carefully positioned to create a balanced and unified layout. Dominance and subordination are clearly present.
The drawing clearly shows dominance and subordination in the placement of components; simple perspective techniques are used to develop a strong sense of balance and unity.
E.
Craftsmanship
Work is incomplete or shows evidence of being hastily done.
Work is complete. The self portrait demonstrates some effort; the drawing is fairly neat and clean.
The drawing is finished and neatly drawn; the work demonstrates effort and attention to detail.
The Selfie Portrait is carefully, neatly, and precisely finished; it shows skill and exceptional effort with great attention to detail.
Total

6
Teacher Notes on Criteria:
A. Proportion: The drawing shows correct size and relationships between facial features as well as their accurate placement.
B. Likeness: The drawing of the face is natural and expressive. Significant details have been
added that personalize the Selfie Portrait so that it resembles the person who made it. C. Expressiveness: The drawing communicates thoughts and feelings of the individual who
created it; objects and symbols convey personal preferences and choices.
D. Composition: The drawing displays a well thought-out arrangement of elements; the face is placed so that it is the dominant focal point in the artwork with symbols and personal objects taking a subordinate role. Simple perspective techniques (size, placement, overlapping) have been used to create visual balance and unity.
E. Craftsmanship: the quality of the work is evident with careful attention to neatness and detail. The face and objects/symbols have been carefully drawn and purposefully placed for greatest effect.
Reflection:
Have students express their individual thoughts in sketches and written reflections in a journal or sketchbook. Prompt their writing by asking them to respond to one or more of the question clusters below encourage them to use the appropriate art vocabulary):
o Explain the early stages of beginning your Selfie Portrait; what difficulties did you have and how did you overcome them? What decisions did you make? What did you do that was new to you while you were creating your self portrait? !
o Did new ideas emerge in the process of making your Selfie Portrait? If so, what were they? Identify two artistic choices you made and explain your reasons for making them.!
o Artists develop excellence through revising and refining their work; what changes/additions/revisions did you make when you were completing your Selfie Portrait? What would you change if you were to repeat the activity?!
Think and Discuss: Display the artworks on a bulletin board and ask students to observe and comment on them; a few questions to consider might include: • Which of the artworks most closely resemble the persons who drew them?
• Which self portraits use accurate facial proportions and placement?
• Which are the most expressive self portraits? What makes them that way?
• Are any of the Selfie Portraits both “accurate” and expressive?
• What objects and symbols have been used to represent personal interests?
• What objects and symbols can you identify that represent interests of two or more people?

7
• Looking at the group of artworks, which interests or favorites are used most often? • Which artworks show symmetry? Asymmetry? Are the components balanced within
the composition?
• Which artworks display unity? How was this achieved? Identify one or two techniques used to unify one of your favorite Selfie Portraits.
• Which of the artworks shows careful craftsmanship and attention to detail? How has that added to the overall effect?
• What purpose would an artist have for making a self portrait? Have the reasons for making self portraits changed over time? Why or why not?
• How has technology (cameras, smart phones, iPads) enhanced or diminished the
making of original works of art? Give reasons for your opinion(s). • What ways can you think of to share your artwork with other students outside of your
art class? What steps would you need to take to follow your suggestions? Extensions: Have students collect a set of ten symbols and develop a “dictionary” that explains their meaning. Ask students to evaluate the multiple sources of information they used to create their artwork; which were most useful in solving their artistic problem? Why/how? Students create a photocollage that includes their own selfie and includes objects and symbols (they can use a program such as Photoshop). Students research symbols in famous works of art and create a virtual art exhibition of the works, including explanations and descriptions in their own original “signage” for each piece.