Self-service Feature for PIV/CAC Registration and Login ID ...
18
ELECTRONIC OFFICIAL PERSONNEL FOLDER Self-service Feature for PIV/CAC Registration and Login ID/Password Retrieval for New Users in release 5.0.4 eOPF provides web-based access for federal personnel to view and print employment documents. Employees are able to view their own documents through the eOPF application at https://eopf.opm.gov/doi/. eOPF includes security measures that ensure the integrity of the system and protection of employee documents. eOPF benefits include: Immediate access to user documents Ability to view or print user documents Enhanced accuracy, portability, and security of user documents Increased accountability through an audit trail that tracks who accesses user documents and the reason why Faster and more efficient records transfer between federal agencies Timely and accurate data retrieval for retirement claims processing Registering/Logging in with PIV/CAC Card Users who wish to connect using their PIV/CAC Card for the first time need to register their PIV/CAC card to authenticate their card with the eOPF system. Upon successful login user’s identity is recognized and only the PIN needs to be typed. Part 1: Register PIV/CAC Card Part 2: PIV/CAC Login Scenarios for Previously Registered Users New Users/Logging in with eOPF ID and Password Accessing eOPF is simple and convenient. To access eOPF, user needs an eOPF ID and password, which may be retrieved using the eOPF self-service feature. This Help page consists of three sections for NEW users. Part 1: Obtain eOPF ID for New Users Part 2: Create an eOPF Password for New Users Part 3: First Time eOPF Logon for New Users
Transcript of Self-service Feature for PIV/CAC Registration and Login ID ...

ELECTRONIC OFFICIAL PERSONNEL FOLDER
Self-service Feature for PIV/CAC Registration and Login ID/Password Retrieval for New Users in release 5.0.4
eOPF provides web-based access for federal personnel to view and print employment documents. Employees are able to view their own documents through the eOPF application at https://eopf.opm.gov/doi/. eOPF includes security measures that ensure the integrity of the system and protection of employee documents.
eOPF benefits include:
Immediate access to user documents
Ability to view or print user documents
Enhanced accuracy, portability, and security of user documents
Increased accountability through an audit trail that tracks who accesses user documents and the reason why
Faster and more efficient records transfer between federal agencies
Timely and accurate data retrieval for retirement claims processing
Registering/Logging in with PIV/CAC Card Users who wish to connect using their PIV/CAC Card for the first time need to register their PIV/CAC card to authenticate their card with the eOPF system. Upon successful login user’s identity is recognized and only the PIN needs to be typed.
Part 1: Register PIV/CAC Card
Part 2: PIV/CAC Login Scenarios for Previously Registered Users
New Users/Logging in with eOPF ID and Password Accessing eOPF is simple and convenient. To access eOPF, user needs an eOPF ID
and password, which may be retrieved using the eOPF self-service feature. This Help
page consists of three sections for NEW users.
Part 1: Obtain eOPF ID for New Users
Part 2: Create an eOPF Password for New Users
Part 3: First Time eOPF Logon for New Users

Registering/Logging in with PIV/CAC Card Users who wish to connect using their PIV/CAC Card for the first time need to register their PIV/CAC card to authenticate their card with the eOPF system. Upon successful login user’s identity is recognized and only the PIN needs to be entered. Part 1: Register your PIV/CAC Card Part 2: PIV/CAC Login Scenarios for Previously Registered Users
Part 1: Register PIV/CAC Card
Step Action Screen Shot
1
Access user’s specific agency eOPF URL. This can be obtained from the HR servicing office.
Read the eOPF User Agreement page.
Click the Accept button.
2
From the eOPF Login page, click the Login with your PIV or CAC image.
Make sure PIV/CAC card is inserted into the reader.

Step Action Screen Shot
3
User is prompted for the certificate to be used based on what is available from the workstation/PIV.
Select the certificate to be used to validate PIV/CAC. Users must use the certificate that has “Client Authentication” and “Smart Card Logon” capabilities (do *not* use the certificate for Email Authentication).
4
Once selected, based on the workstation environment, a prompt will appear asking for the PIV/CAC PIN. This example uses ActivIdentity Software; user’s prompts may look slightly different.
5
If the PIN is not entered correctly a message similar to the one shown here is displayed.

Step Action Screen Shot
6
If the correct PIN was entered and the user has previously used PIV/CAC authentication to access eOPF, they are logged into eOPF and forwarded to the eOPF Welcome page.
7
If the correct PIN was entered however the user has *not* accessed eOPF with PIV/CAC previously the user is shown a subsequent authentication page.
Enter user’s eOPF ID and Password before pressing the Register button.

Step Action Screen Shot
8
If the information provided does not match the information in the eOPF system, then the following message is displayed.
9
If user’s credentials are validated but user’s last name in eOPF is not found in the Common Name of user’s PIV/CAC Certificate then the following message is displayed.

Step Action Screen Shot
10
If user’s credentials are validated but user’s account in eOPF is locked, then the following error message is displayed.
11
If user’s status is not active (i.e. retired, terminated or inactive) the following error message is displayed.
Step Action Screen Shot
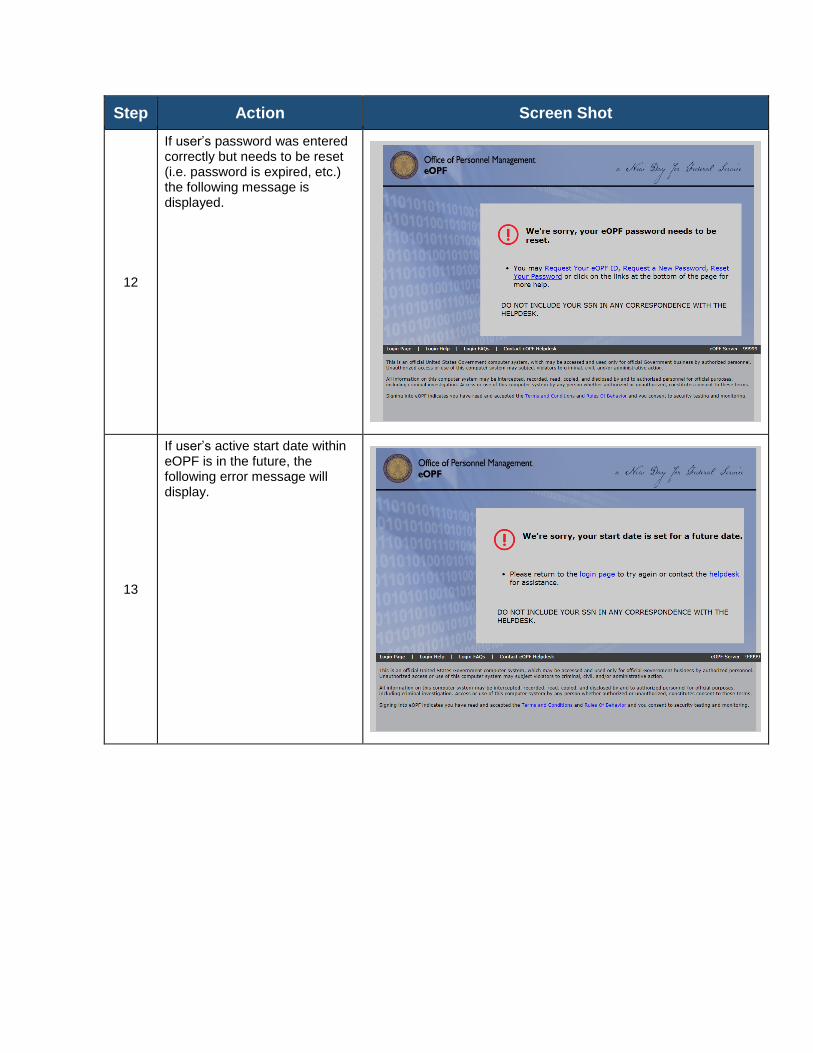
12
If user’s password was entered correctly but needs to be reset (i.e. password is expired, etc.) the following message is displayed.
13
If user’s active start date within eOPF is in the future, the following error message will display.
Step Action Screen Shot
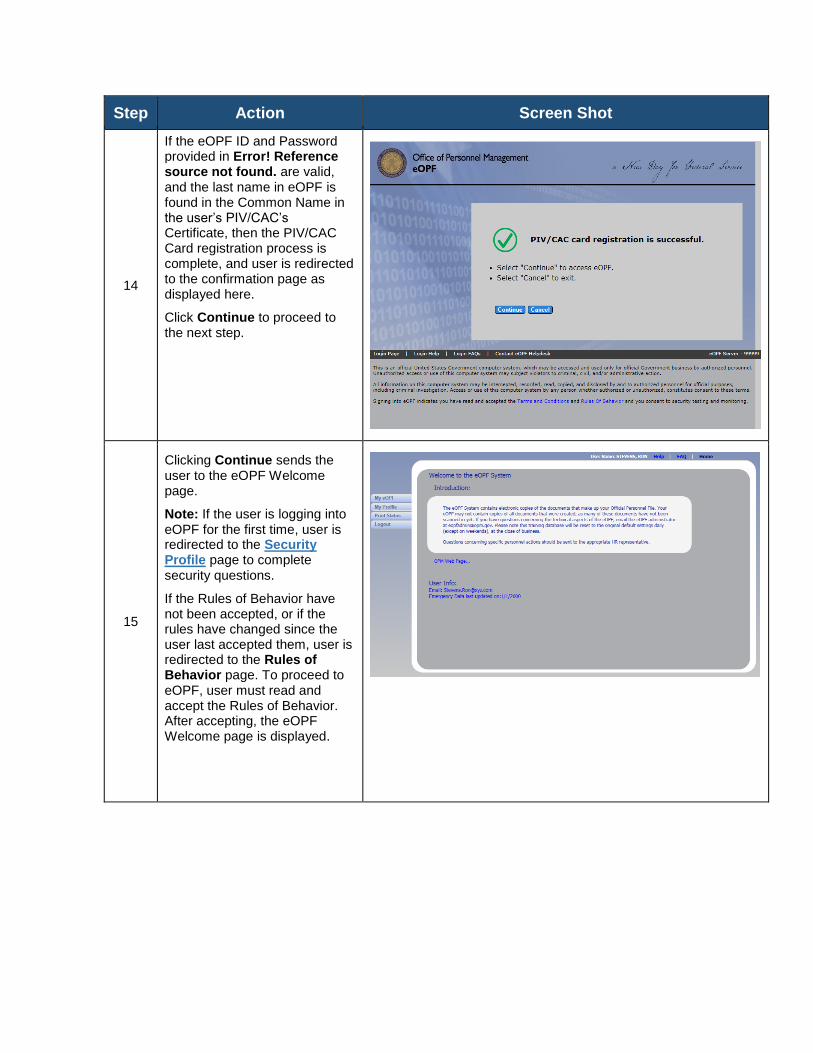
14
If the eOPF ID and Password provided in Error! Reference source not found. are valid, and the last name in eOPF is found in the Common Name in the user’s PIV/CAC’s Certificate, then the PIV/CAC Card registration process is complete, and user is redirected to the confirmation page as displayed here.
Click Continue to proceed to the next step.
15
Clicking Continue sends the user to the eOPF Welcome page.
Note: If the user is logging into eOPF for the first time, user is redirected to the Security Profile page to complete security questions.
If the Rules of Behavior have not been accepted, or if the rules have changed since the user last accepted them, user is redirected to the Rules of Behavior page. To proceed to eOPF, user must read and accept the Rules of Behavior. After accepting, the eOPF Welcome page is displayed.
Part 2: PIV/CAC Login Scenarios for Previously Registered Users
Step Action Screen Shot
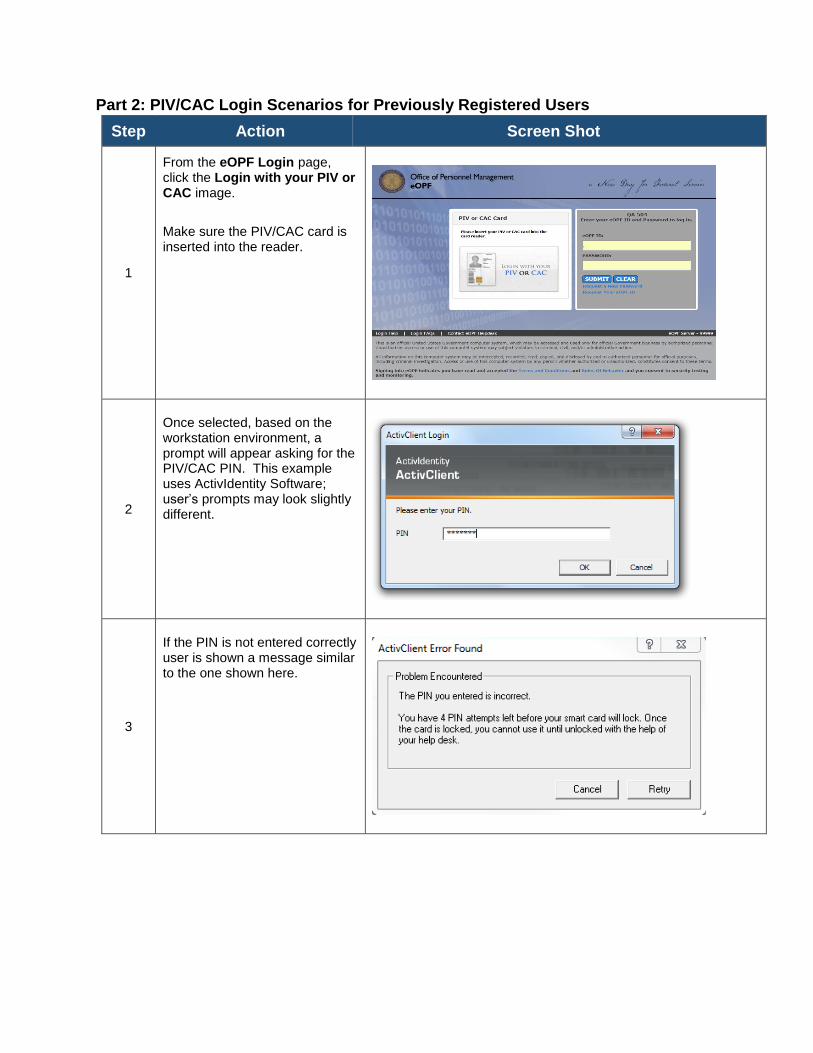
1
From the eOPF Login page, click the Login with your PIV or CAC image.
Make sure the PIV/CAC card is inserted into the reader.
2
Once selected, based on the workstation environment, a prompt will appear asking for the PIV/CAC PIN. This example uses ActivIdentity Software; user’s prompts may look slightly different.
3
If the PIN is not entered correctly user is shown a message similar to the one shown here.

Step Action Screen Shot
4
If the correct PIN is entered and the PIV/CAC was previously registered then the eOPF Welcome page is presented.
5
If user was previously registered, and the credentials are valid, but user’s last name in eOPF is not found in the Common Name of the user’s PIV/CAC certificate, the following error message is displayed. Follow the instructions in the error message to resolve.
6
If user’s credentials are valid but user’s account in eOPF is locked, the following error message is displayed. Follow the instructions in the error message to resolve.

Step Action Screen Shot
7
The following screenshot depicts an alternative PIN prompt other than the ActivIdentity prompt used in the above scenarios.
New Users/Logging in with eOPF ID and Password Accessing eOPF is simple and convenient. To access your eOPF, you need an eOPF ID and password, which may be retrieved using the eOPF self-service feature. This Help page consists of three sections for NEW users. Part 1: Obtain Your eOPF ID for New Users Part 2: Create an eOPF Password for New Users Part 3: First Time eOPF Logon for New Users
Part 1: ObtaineOPF ID for New Users
Step Action Screen Shot
1
Access user’s specific agency eOPF URL. This can be obtained from the HR servicing office.
Read the eOPF User Agreement page.
Click the Accept button.

Step Action Screen Shot
2
From the eOPF Login page, click the Request Your eOPF ID link.
3
From the Request Your eOPF ID screen, enter the
Last 5 digits of SSN
Last Name
Date of Birth (mm/dd/yyyy)
Click the Submit button.
4
The Request Your eOPF ID page displays stating that the request has been submitted for processing.
Click the Click here to return to logon page link.
5
The eOPF ID is emailed to the email address of record in eOPF.
Please contact the eOPF Help Desk if an email with the requested eOPF ID is not received.

Part 2: Create an eOPF Password for New Users
Step Action Screen Shot
1
From the eOPF Logon page, click the Request a New Password link.
User will need their eOPF ID to request a password.
2
On the Request a New Password page, enter:
eOPF ID
Last 5 digits of SSN
Last Name
Click the Submit button.
3
The Request a New Password page displays indicating user’s request has been submitted for processing.
Note: If user’s information is verified, but user’s eOPF account does not have a valid email address, then an email is sent to user’s PO ID administrator stating that the user requested their password but does not have a valid email address in the system.

Step Action Screen Shot
4
If user’s information fails to be verified, an Access Denied message is displayed. Verify user information is correct OR contact the helpdesk.
5
If New Password Request is successful as shown in step 3, an email with a password reset link and instructions is sent to the email address on file in user’s eOPF. The link is valid for 4 hours.
Click the LINK. If it is not clickable, copy and paste it into the browser window.
Please contact the eOPF Helpdesk if an email with the password reset link is not received.
6
The link opens the Reset Your Password screen. Type in:
eOPF ID
Last 5 digits of SSN
Last Name
Click the Submit button.

Step Action Screen Shot
7
The Please reset your password page displays.
Enter a password that meets user’s agency’s security guidelines in the New Password field, then again in the Verify Password field.
Click the Reset Password button, which brings user back to the eOPF Logon page.
You are ready to log in to eOPF! Continue with Part 3.
Part 3: First Time eOPF Logon for New Users
Step Action Screen Shot
1
Enter eOPF ID and password on the eOPF Logon page.
Click the Submit button.
Step Action Screen Shot
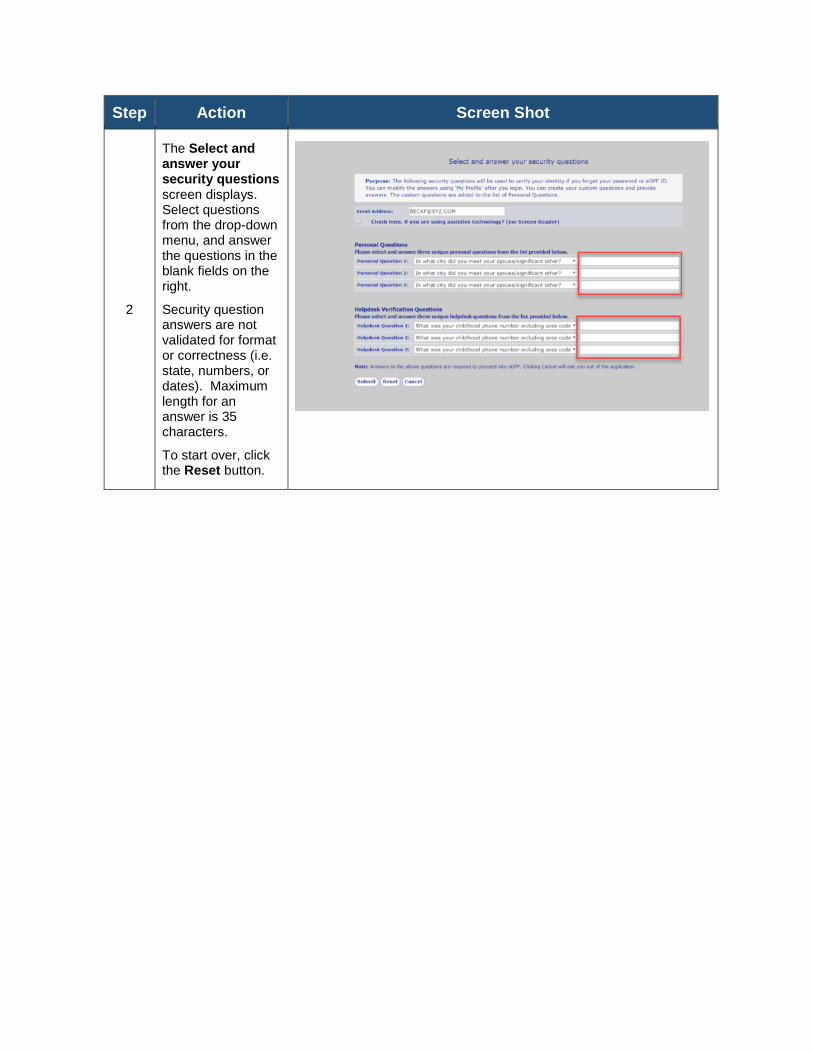
2
The Select and answer your security questions screen displays. Select questions from the drop-down menu, and answer the questions in the blank fields on the right.
Security question answers are not validated for format or correctness (i.e. state, numbers, or dates). Maximum length for an answer is 35 characters.
To start over, click the Reset button.
Step Action Screen Shot
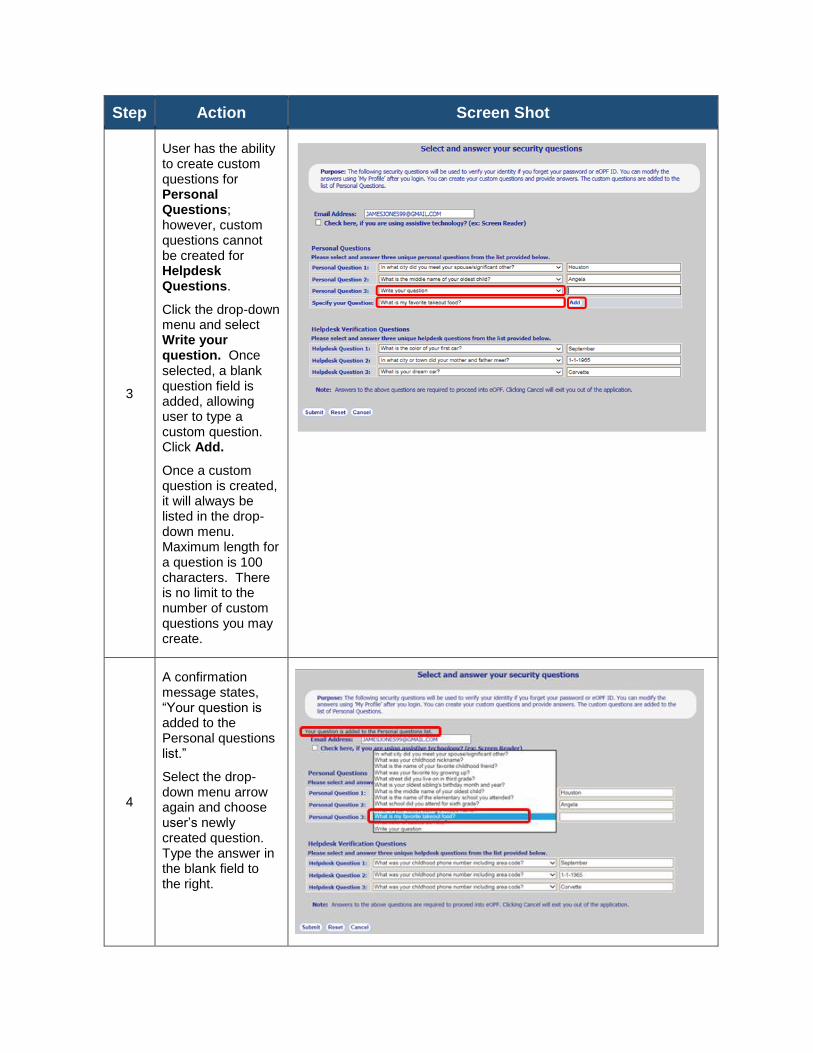
3
User has the ability to create custom questions for Personal Questions; however, custom questions cannot be created for Helpdesk Questions.
Click the drop-down menu and select Write your question. Once selected, a blank question field is added, allowing user to type a custom question. Click Add.
Once a custom question is created, it will always be listed in the drop-down menu. Maximum length for a question is 100 characters. There is no limit to the number of custom questions you may create.
4
A confirmation message states, “Your question is added to the Personal questions list.”
Select the drop-down menu arrow again and choose user’s newly created question. Type the answer in the blank field to the right.
Step Action Screen Shot
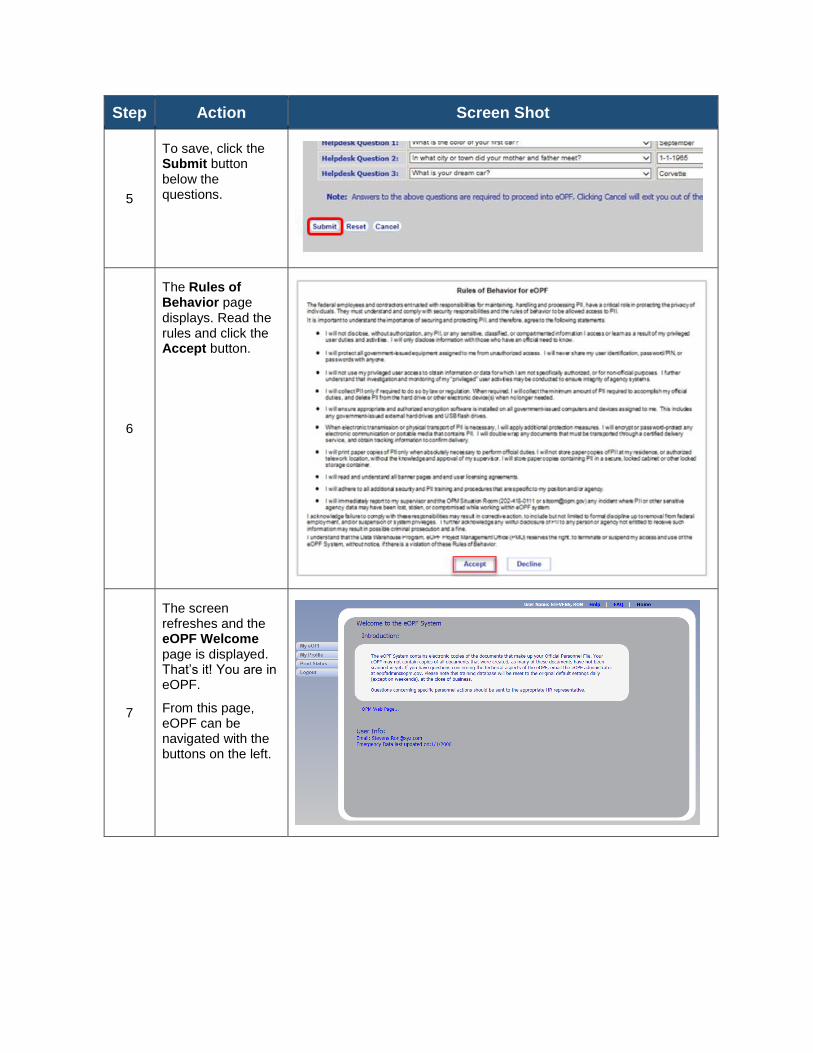
5
To save, click the Submit button below the questions.
6
The Rules of Behavior page displays. Read the rules and click the Accept button.
7
The screen refreshes and the eOPF Welcome page is displayed. That’s it! You are in eOPF.
From this page, eOPF can be navigated with the buttons on the left.