![Seeker [ehv3] Eindhoven](https://static.fdocuments.in/doc/165x107/5594536e1a28abc84f8b4770/seeker-ehv3-eindhoven.jpg)
Seeker Setup Configuration Software - ctnet.com.cn the years and broadened its offerings of RF and...
52
Seeker Setup Software OPERATION MANUAL
Transcript of Seeker Setup Configuration Software - ctnet.com.cn the years and broadened its offerings of RF and...

Seeker Setup Software
OPERATIONMANUAL

Seeker Setup - Operation Manual2
Trilithic Company ProfileTrilithic is a privately held manufacturer founded in 1986 as an engineering and assemblycompany that built and designed customer-directed products for telecommunications, military andindustrial customers. From its modest beginnings as a two-man engineering team, Trilithic grewover the years and broadened its offerings of RF and microwave components by addingbroadband solutions to its product line. This was accomplished with the acquisition ofcomponents manufacturer Cir-Q-Tel and instruments manufacturer Texscan.
Today, Trilithic is an industry leader providing telecommunications solutions for major broadband,RF and microwave markets around the world. As an ISO 9000:2001 certified company with over40 years of collective expertise in engineering and custom assembly, Trilithic is dedicated toproviding quality products, services and communications solutions that exceed customerexpectations.
Trilithic is comprised of three major divisions:
• Broadband Instruments & SystemsOffers test, analysis and quality management solutions for the major cable televisionsystems worldwide.
• RF Microwave ComponentsProvides components and custom subsystems for companies specializing in cellular,military and other wireless applications.
• Emergency Alert SystemsLeading supplier of government-mandated emergency alert systems used by HFC service

Seeker Setup - Operation Manual3
Table of Contents1. General Information ..............................................................................................................5
Helpful Website .....................................................................................................................5Where to Get Technical Support .............................................................................................5How this Manual is Organized ................................................................................................6Conventions Used in this Manual ...........................................................................................6
2. Introduction & Installation....................................................................................................7Overview ...............................................................................................................................7Features ................................................................................................................................7System Requirements............................................................................................................8Seeker Setup Installation Instructions .....................................................................................9Installing the Seeker & Seeker MCA USB Drivers ................................................................12Initial Connection of the Seeker or Seeker MCA ..................................................................14
3. Guided Tour ........................................................................................................................20Overview .............................................................................................................................20
Seeker Lite Setup Screen ..............................................................................................20Seeker Setup Screen .....................................................................................................22Seeker MCA Setup Screen ............................................................................................24
4. Seeker Lite Setup ...............................................................................................................26Overview .............................................................................................................................26Connecting to the Seeker Lite ..............................................................................................26Get Setup from the Seeker Lite ............................................................................................26Get Setup from the PC.........................................................................................................27User Setup of the Seeker Lite ..............................................................................................27
Display Units ..................................................................................................................27Squelch ..........................................................................................................................27Peak Hold ......................................................................................................................27GT Noise Discrimination ................................................................................................28Frequency Presets .........................................................................................................28
Save Setup to the PC ..........................................................................................................30Send Setup to the Seeker Lite .............................................................................................30Updating Seeker Lite Firmware ...........................................................................................30

Seeker Setup - Operation Manual4
5. Seeker Setup.......................................................................................................................31Overview .............................................................................................................................31Connecting to the Seeker ....................................................................................................31Get Setup from the Seeker ..................................................................................................32Get Setup from the PC.........................................................................................................32User Setup of the Seeker .....................................................................................................32
Display Units ..................................................................................................................32Squelch ..........................................................................................................................33Peak Hold ......................................................................................................................33GT Noise Discrimination ................................................................................................33WaveTracker Mode ........................................................................................................33Technician ID ..................................................................................................................35Frequency Presets .........................................................................................................35
Save Setup to the PC ..........................................................................................................37Send Setup to the Seeker ....................................................................................................37Updating Seeker Firmware ..................................................................................................37Read Snapshots from the Seeker ........................................................................................38
6. Seeker MCA Setup ..............................................................................................................39Overview .............................................................................................................................39Connecting to the Seeker MCA ...........................................................................................39Get Setup from the Seeker MCA .........................................................................................40Get Setup from the PC.........................................................................................................40MCA Setup ..........................................................................................................................40
Truck ID ..........................................................................................................................40Home GPS Location ......................................................................................................41Peak Hold ......................................................................................................................42Bluetooth GPS Setup .....................................................................................................42Wi-Fi Setup ....................................................................................................................46Sapias Setup .................................................................................................................50
Save Setup to the PC ..........................................................................................................51Send Setup to the Seeker MCA ...........................................................................................51Updating Seeker MCA Firmware .........................................................................................51

Seeker Setup - Operation Manual5
Helpful WebsiteThe following website contains general information which may be of interest to you:
http://www.trilithic.com
Trilithic’s website contains product specifications and information, tips, release information,marketing information, Frequently Asked Questions (FAQs), bulletins and other technicalinformation. You can also check this website for product updates.
Where to Get Technical SupportTrilithic technical support is available Monday through Friday from 8:00 AM to 5:00 PM EST.Callers in North America can dial 1-317-895-3600 or 1-800-344-2412 (toll free). Internationalcallers should dial 1-317-895-3600 or fax questions to 1-317-895-3613. You can also e-mailtechnical support at [email protected].
For quicker support response when calling or sending e-mail, please provide the followinginformation:
• Your name and your company name
• The technical point of contact (name, phone number, e-mail)
• The Seeker Setup software version number
• The operating system of the PC or Laptop computer where the Seeker Setup software isinstalled
• The Seeker Lite, Seeker, or Seeker Mobile Communications Adapter (MCA) serialnumber and firmware version number
• The GPS receiver manufacturer and model number
• A detailed description of the problem you are having, including any error or informationmessages
1. General Information 1

Seeker Setup - Operation Manual6
Note: A note is information that will be of assistance to you related tothe current step or procedure.
WARNING: A warning alerts you to any condition that could causepersonal injury.
CAUTION: A caution alerts you to any condition that could cause amechanical failure or potential loss of data.
How this Manual is OrganizedThis manual is divided into the following chapters:
• Chapter 1, “General Information” provides Trilithic contact information and describes howthis Operation Manual is structured.
• Chapter 2, “Introduction & Installation” describes how to install the Seeker Setup softwareand introduces what the Seeker Setup software is and what it does. This chapterdiscusses the practical application of the Seeker Setup software. Finally, this chapter willalso explain the controls of the Seeker Setup software.
Chapter 3, “Guided Tour” describes how the Seeker Setup software is structured and howto use the software.
• Chapter 4, “Seeker Lite Setup” describes the steps needed to configure the Seeker Lite.
• Chapter 5, “Seeker Setup” describes the steps needed to configure the Seeker.
• Chapter 6, “Seeker MCA Setup” describes the steps needed to configure the SeekerMobile Communications Adapter (MCA).
Conventions Used in this ManualThis manual has several standard conventions for presenting information.
• Connections, Menus, menu options, and user entered text and commands appear in bold.
• Section names, Web and email addresses appear in italics.

Seeker Setup - Operation Manual7
2. Introduction & Installation 2
OverviewThe Seeker Setup software is used to communication between a PC or Laptop computer and theSeeker Lite, Seeker, and Seeker Mobile Communications Adapter (MCA).
FeaturesThe Seeker Setup software can be used to perform the following tasks:
• Change display units for detected RF energy and adjust the squelch level of the SeekerLite and Seeker
• Enable and disable the GT noise discrimination function of the Seeker Lite and Seeker
• Enter frequency preset values, select the default frequency preset, and choose whichfrequency presets are enabled on the Seeker Lite and Seeker
• Enter channel tagging frequency values, and choose which frequency presets have channeltagging enabled on the Seeker Lite and Seeker
• Enable and disable the Wave Tracker mode of the Seeker and perform Wave Trackersetup
• Read snapshots from the Seeker
• Sync the PC clock with the internal Seeker clock
• Enable and disable the peak hold function of the Seeker Lite, Seeker, and Seeker MobileCommunications Adapter (MCA)
• Edit the truck ID, GPS coordinates of the home location, size of the home location, parkdelay, and test the GPS connection of the Seeker Mobile Communications Adapter (MCA)
• Configure Bluetooth GPS devices that connect to the Seeker Mobile CommunicationsAdapter (MCA)
• Configure Wi-Fi connections that connect to the Seeker Mobile Communications Adapter(MCA)
• Enable and disable Sapias compatibility of the Seeker Mobile Communications Adapter(MCA) and perform Sapias setup
• Update the firmware of the Seeker Lite, Seeker, and Seeker Mobile CommunicationsAdapter (MCA)
Seeker Setup - Operation Manual8
System RequirementsOnce you have made sure that your system meets the following minimum requirements, you’reready to install the Seeker Setup software.
• Pentium-III or upward compatible CPU
• 64 MB RAM
• 100 MB free disk space
• Windows 2000 or XP
• Color monitor running at 256 colors or higher, 1024 x 768 minimum screen resolution
• Windows-compatible mouse
• Device specific communication cable
Note: Be sure to check the CD for release notes that may affect theinstallation and configuration process!

Seeker Setup - Operation Manual9
Seeker Setup Installation InstructionsTo install the Seeker Setup software, perform the following steps:
1. Depending on the operating system you are installing the Seeker Setup software on, youmay need to log on as the local administrator.
Note: Check with your network or systems administrator if you’re notsure about your current login account permissions.
2. Insert the Seeker Setup software CD in the appropriate drive.
3. If you have Autorun enabled for the CD-ROM drive, the Seeker Setup software setupprogram will start automatically. Otherwise, select the Start button then select Run, andtype [drive]:\SeekerSetup.exe, then select the OK button. (Substitute the appropriate drivepath in the command.)
4. The “Welcome to the Trilithic Seeker Setup Wizard” screen appears, select theNext > button to proceed to the next step of the installation wizard.
Note: To cancel the installation of the Seeker Setup software at anytime during the installation, select the Cancel button.

Seeker Setup - Operation Manual10
5. The “Ready to Install the Program” screen appears. Select the Install button to start thesoftware installation.
6. The “Installing Trilithic Seeker Setup” screen will appear momentarily to indicate the statusof the software installation.

Seeker Setup - Operation Manual11
7. The “InstallShield Wizard Completed” screen will appear. Select the Finish button to exit.The Seeker Setup software is now installed.

Seeker Setup - Operation Manual12
Note: Check with your network or systems administrator if you’re notsure about your current login account permissions.
Note: To cancel the installation of the Seeker USB Drivers, select theCancel button.
Installing the Seeker & Seeker MCA USB Drivers
2. Insert the Seeker Setup software CD in the appropriate drive.
3. Select the Start button then select Run, and type [drive]:\Trilithic CustomUSBDriverInstall\PreInstaller.exe, then select the OK button. (Substitute the appropriatedrive path in the command.)
4. The “Install Driver” window appears, select the Install button to proceed.
To install the Seeker USB Drivers, perform the following steps:
1. Depending on the operating system you are installing the Seeker USB Drivers on, you mayneed to log on as the local administrator.
CAUTION: Do not connect the Seeker or Seeker MCA via the Mini-USB connection until prompted to in the following procedure. Failure tofollow the procedure in the order listed will cause the devices to notproperly connect to the Seeker Setup software.
Note: The following installation procedure is only for users of theSeeker and Seeker MCA. The Seeker and Seeker MCA USB driversare not required for the Seeker Setup software to communicate with theSeeker Lite.

Seeker Setup - Operation Manual13
5. The “Windows Logo Testing” screen appears, select the Continue Anyway button toproceed. A second “Windows Logo Testing” screen appears, select the ContinueAnyway button to proceed.
6. Once the Seeker USB Drivers have been installed, the “Installation Successful” screenappears, select the OK button to complete the installation.

Seeker Setup - Operation Manual14
Initial Connection of the Seeker or Seeker MCA1. Connect one end of the Mini-USB cable to the Seeker’s
Mini-USB connection or the Seeker MCA’s Mini-USBconnection, and the other end to the corresponding USBport on the PC or Laptop computer that the Seeker Setupsoftware and Seeker/Seeker MCA USB Driver is installedon.
Note: The Seeker MCA must be connected to a power supply throughthe Mobile Mount in order for the PC or Laptop computer to recognizethe Seeker MCA.
Note: If a Seeker or Seeker MCA has been connected to, it is notrequired to connect to the other device that has not been connected to inorder to install the driver.
CAUTION: Only connect one Seeker or Seeker MCA device to the PCor Laptop computer at a time.

Seeker Setup - Operation Manual15
3. The “This wizard helps you install software for: Trilithic Seeker Meter, Cal SN: nnnnnnnn” or“This wizard helps you install software for: Trilithic Seeker MCA, Cal SN: nnnnnnnn” screenappears, select the Install the software automatically (Recommended) radio buttonand select the Next > button.
2. The “Welcome to the Found New Hardware Wizard” screen will appear, select the No, notthis time radio button and then select the Next > button.
Note: The designation of “nnnnnnnn” indicates a unique identificationnumber for the Seeker or Seeker MCA device.
Note: The name of the screen that appears is determined by whetherthe Seeker or Seeker MCA is connected.

Seeker Setup - Operation Manual16
5. The “Completing the Found New Hardware Wizard” screen appears, select the Finishbutton.
4. The “Windows Logo Testing” screen appears, select the Continue Anyway button toproceed.

Seeker Setup - Operation Manual17
7. The “This wizard helps you install software for: Trilithic CP210x USB to UART BridgeController” screen appears, select the Install the software automatically(Recommended) radio button and select the Next > button.
6. The “Welcome to the Found New Hardware Wizard” screen will appear again, select theNo, not this time radio button and then select the Next > button.

Seeker Setup - Operation Manual18
9. The “Completing the Found New Hardware Wizard” screen appears, select the Finishbutton.
8. The “Windows Logo Testing” screen appears, select the Continue Anyway button toproceed.
10.Select the Start button, then select the Control Panel Icon, then select the System Icon.
Seeker Setup - Operation Manual19
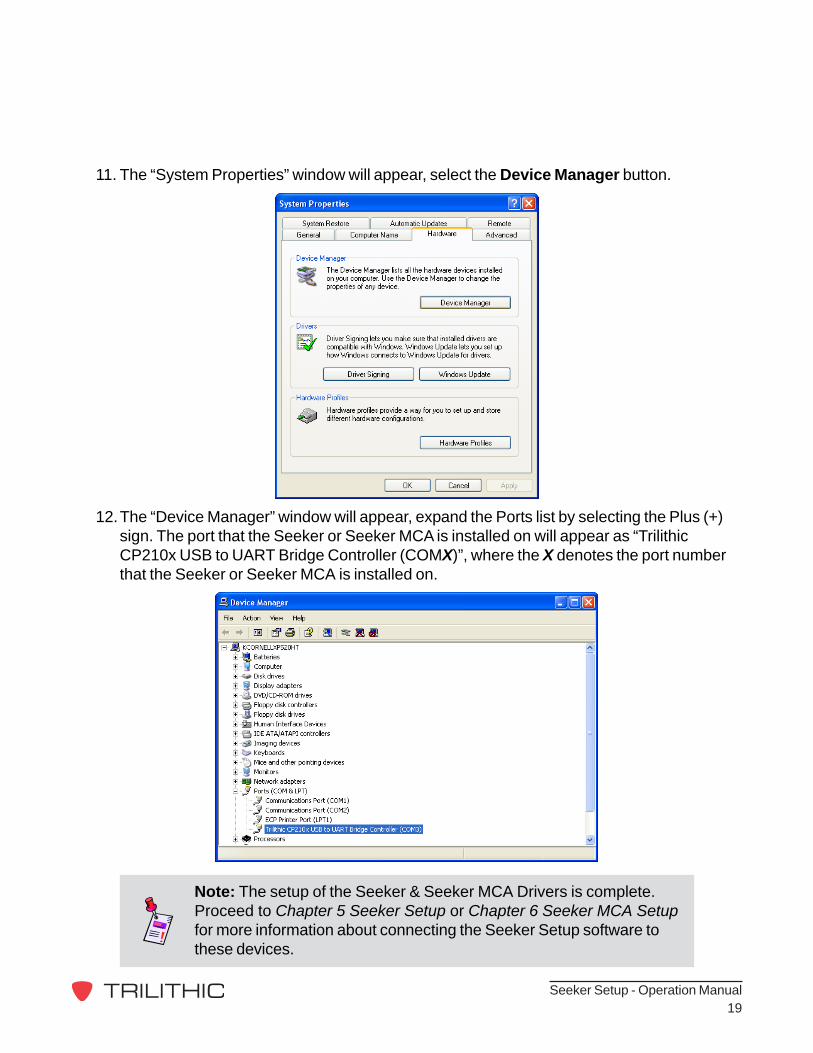
11. The “System Properties” window will appear, select the Device Manager button.
Note: The setup of the Seeker & Seeker MCA Drivers is complete.Proceed to Chapter 5 Seeker Setup or Chapter 6 Seeker MCA Setupfor more information about connecting the Seeker Setup software tothese devices.
12.The “Device Manager” window will appear, expand the Ports list by selecting the Plus (+)sign. The port that the Seeker or Seeker MCA is installed on will appear as “TrilithicCP210x USB to UART Bridge Controller (COMX)”, where the X denotes the port numberthat the Seeker or Seeker MCA is installed on.

Seeker Setup - Operation Manual20
3. Guided Tour 3
OverviewOnce you have installed the Seeker Setup software, you’re ready to learn your way around. Startthe Seeker Setup software by double-clicking the Seeker Setup icon on your desktop.
Seeker Lite Setup Screen
1. Model Information - When connected to a device the model number, software version,and bootloader version of the device will appear in this area.
2. Model Name - Choose “Seeker Lite” to view setup information for the Seeker Lite.
3. Display Units - This area is used to change display units for detected RF energy.
4. Squelch - This area is used to adjust the squelch level.
5. Enable Peak Hold - This checkbox is used to enable and disable the peak hold function.
6. Enable GT Noise Discrimination - This checkbox is used to enable and disable the GTnoise discrimination.
7. Frequency Presets - This area is used to enter frequency preset values, select the defaultfrequency preset, choose which frequency presets are enabled, enter channel taggingfrequency values, and choose which frequency presets have channel tagging enabled.
7
1
2
3
4
5
6
9
1011
1213
14
8

Seeker Setup - Operation Manual21
8. Status - This area displays status text associated with the actions taken when any of thebuttons to the right of the screen are pressed.
9. COM Port - This area is used to enter the number of the COM port that the Seeker Lite isconnected to.
10.Send Setup to Seeker - This button is used to send the setup configuration to the SeekerLite.
11. Get Setup from Seeker - This button is used to get the setup configuration from theSeeker Lite.
12.Save Setup to PC - This button is used to save the setup configuration of the Seeker Liteto the PC that the Seeker Setup software is running on.
13.Get Setup from PC - This button is used to get the setup configuration of the Seeker Litefrom the PC that the Seeker Setup software is running on.
14.Update Seeker Firmware - This button is used to update the firmware of the Seeker Lite.

Seeker Setup - Operation Manual22
Seeker Setup Screen
1. Model Information - When connected to a device the model number, software version,and bootloader version of the device will appear in this area.
2. Model Name - Choose “Seeker” to view setup information for the Seeker.
3. Display Units - This area is used to change display units for detected RF energy.
4. Frequency Presets - This area is used to enter frequency preset values, select the defaultfrequency preset, choose which frequency presets are enabled, enter channel taggingfrequency values, and choose which frequency presets have channel tagging enabled.
5. Squelch - This area is used to adjust the squelch level.
6. Enable Peak Hold - This checkbox is used to enable and disable the peak hold function.
7. Enable GT Noise Discrimination - This checkbox is used to enable and disable the GTnoise discrimination.
8. Enable WaveTracker Mode - This checkbox is used to enable and disable theWaveTracker mode.
9. WT Setup - This button is used to enter WaveTracker mode setup.
10.Get WT Rideout - This button is used to upload WaveTracker data from the Seeker.
7
4
1
2
3
5
6
13
1415
1617
18
12
891011
1920
Seeker Setup - Operation Manual23
11. Tech ID - This area is used to enter the technician ID for WaveTracker mode.
12.Status - This area displays status text associated with the actions taken when any of thebuttons are pressed.
13.COM Port - Select the COM port that the Seeker is connected to.
14.Send Setup to Seeker - This button is used to send the setup configuration to the Seeker.
15.Get Setup from Seeker - This button is used to get the setup configuration from theSeeker.
16.Save Setup to PC - This button is used to save the setup configuration of the Seeker tothe PC that the Seeker Setup software is running on.
17.Get Setup from PC - This button is used to get the setup configuration of the Seeker fromthe PC that the Seeker Setup software is running on.
18.Update Seeker Firmware - This button is used to update the firmware of the Seeker.
19.Read Snapshots - This button is used to upload snapshot data from the Seeker.
20.Sync Clock to PC - This button is used to synchronize the internal clock of the Seeker withthe internal clock of the PC that the Seeker Setup software is running on.

Seeker Setup - Operation Manual24
Seeker MCA Setup Screen
1. Model Information - When connected to a device the model number, software version,bootloader version, and installed hardware options of the device will appear in this area.
2. Model Name - Choose “Seeker MCA” to view setup information for the Seeker MCA.
3. Truck ID - This area is used to enter a unique identifier for the vehicle that the SeekerMCA is installed in.
4. Home GPS Latitude/Longitude - This area is used to enter the latitude and longitude ofthe Home Location.
5. Width/Height - This area is used to enter the dimensions of the Home Location.
6. Enable Peak Hold - This checkbox is used to enable and disable the peak hold function.
7. Park Delay - This area is used to enter the park time delay in minutes.
8. Address (Hex) - This area is used to enter the unique address of a Bluetooth device.
9. Authentication - This checkbox is used to enable and disable the use of deviceauthentication using the PIN.
10.PIN - This area is used to enter the Personal Identification Number (PIN).
11. Setup - This button is used to open the Wi-Fi Setup window.
9
6
1
2
3
78
14
1617
1819
21
13
10
1112
2223
45
20
15

Seeker Setup - Operation Manual25
12.Test connection to L.A.W. server - This button is used to test the connection to the LAWserver.
13.Status - This area displays status text associated with the actions taken when any of thebuttons are pressed.
14.COM Port - Select the COM port that the Seeker MCA is connected to.
15.Test GPS Connection/Get current location - This button is used to test the SeekerMCA’s connection to a GPS receiver and to retrieve the current GPS location for settingthe Home GPS Latitude/Longitude.
16.Send Setup to MCA - This button is used to send the setup configuration to the SeekerMCA.
17.Get Setup from MCA - This button is used to get the setup configuration from the SeekerMCA.
18.Save Setup to PC - This button is used to save the setup configuration of the SeekerMCA to the PC that the Seeker Setup software is running on.
19.Get Setup from PC - This button is used to get the setup configuration of the Seeker MCAfrom the PC that the Seeker Setup software is running on.
20.Search for Devices - This button is used to search for Bluetooth devices.
21.Update Seeker MCA Firmware - This button is used to update the firmware of the SeekerMCA.
22.Setup - This button is used to open the Sapias Setup window.
23.Enable - This checkbox is used to enable Sapias compatibility.

Seeker Setup - Operation Manual26
OverviewThis chapter provides information on how to connect a Seeker Lite to a PC or Laptop computerand how to configure the user setup of the device.
Connecting to the Seeker LiteThe following steps must be taken to get setup parameters from the Seeker Lite, send setupparameters to the Seeker Lite, and to update the firmware of the Seeker Lite.
1. Turn on your Seeker Lite by holding down its red button.
2. Connect one end of the serial data cable to the Seeker Lite’sbottom panel connector, and the other end to the correspondingserial port on the PC or Laptop computer that is running the SeekerSetup software.
3. The letters PC will appear on the Seeker Lite’s display to show thatit is connected.
4. Select the Seeker Lite radio button from the Model Name section of the Seeker Setupsoftware.
5. Enter the COM port number that the Seeker Lite is connected to in the COM Port box.
Get Setup from the Seeker LiteSelect the Get Setup from Seeker button to retrieve the existing configuration from the SeekerLite.
• The model number, software version, and bootloader version of the Seeker Lite will appearin the Model Information area.
• The text “Attempting to connect to a Seeker...” will appear momentarily in the Status area.
• The text “Connection Established” will appear momentarily in the Status area when theSeeker Lite is communicating with the Seeker Setup software.
• The text “Setup read completed” will appear in the Status area when the Seeker Lite isdone communicating with the Seeker Setup software. The Seeker Lite setup informationwill populate the Seeker Setup software.
4. Seeker Lite Setup 4
Seeker Setup - Operation Manual27
Get Setup from the PCPerform the following steps to get Seeker Lite setup information from the PC:
1. Select the Get Setup from PC button.
2. The “Open” window will appear. Select the directory and file name of the setup file.
3. Select the Open button to populate the Seeker Setup software with the setup parameters.
User Setup of the Seeker LiteThe following sections will explain how to setup the individual configuration parameters of theSeeker Lite.
Display UnitsChoose the units of RF energy that are to be displayed by selecting one of the following radiobuttons from the Display Units section;
• μμμμμV/m
• dBμμμμμV
• dBμμμμμV/m
Note: The Display Units must be selected before the Squelch level canbe selected.
SquelchThe Seeker Lite will not alert a user to a signal that is below the squelch level. Enter a value inthe Squelch area to set the squelch level.
Note: The display units of the squelch level will change based on whichdisplay units are selected.
Peak HoldThe Peak Hold function of the Seeker Lite is used to hold the value shown on the display for upto five (5) seconds unless the reading increases in magnitude. To enable the Peak Holdfunction of the Seeker Lite, select the Peak Hold checkbox.

Seeker Setup - Operation Manual28
GT Noise DiscriminationSome cable systems use digital set top terminals that cannot tolerate “tagged” leakagecarriers. The Seeker Lite analyzes the detected RF energy and rejects all noise and signalsnot caused by leaks from the cable system. Select the Enable GT Noise Discriminationcheckbox to enable the GT Noise Discrimination function.
Frequency PresetsThe following sections will explain how to configure the frequency presets of the Seeker Lite.
1. # - These numbers correspond to the FREQ numbers on the Seeker Lite’s display.
2. Enable - These checkboxes are used to choose which frequencies to display on theSeeker Lite.
3. Default - These radio buttons are used to choose which frequency is displayed as thedefault frequency on the Seeker Lite.
4. Frequency (MHz) - This area is used to enter the leakage monitoring frequency.
5. Tag Enable - These checkboxes are used to choose which frequencies have channeltagging enabled.
6. Tag Frequency - This area is used to enter the channel tagging frequency of thecorresponding frequency preset.
1 2 3 4 5 6

Seeker Setup - Operation Manual29
Enable & Disable FrequenciesTo enable a frequency preset on the Seeker Lite display, select the Enable checkbox nextto the corresponding FREQ number. To disable a frequency preset, deselect the Enablecheckbox next to the corresponding FREQ number.
Set Frequency DefaultTo choose which frequency preset is displayed as the default frequency on the Seeker Lite,select the radio button next to the corresponding FREQ number.
Set Frequency ValuesEnter the frequency values to perform leakage monitoring in the Frequency (MHz) areanext to the corresponding FREQ number.
Note: The range of acceptable frequencies is from 118.50 MHz to147.25 MHz entered in 6.25 kHz increments.
Enable & Disable Channel TaggingTo choose which frequency presets have channel tagging enabled, select the Tag Enablecheckbox next to the corresponding FREQ number.
Note: The Tag Enable function requires the use of Trilithic’s CT-2 orCT-3 channel tagging devices.
Note: The range of channel tagging frequencies is from 10 Hz to 23 Hzin 1 Hz increments with the exception of 16 Hz.
Note: The channel tagging frequency set in the Seeker Setup softwaremust match the frequency that is set on the CT-2 or CT-3 channeltagging devices.
Set Channel Tagging FrequencyTo choose the channel tagging frequency, select the down arrow next to the TagFrequency dropdown box and select the desired frequency from the dropdown list.

Seeker Setup - Operation Manual30
Save Setup to the PCPerform the following steps to save the setup parameters to the PC:
1. Select the Save Setup to PC button.
2. The “Save” window will appear. Select the directory and enter the file name of the SeekerLite setup file.
3. Select the Save button to save the setup to the PC.
Send Setup to the Seeker LiteSelect the Send Setup to Seeker button to send the configuration to the Seeker Lite.
• The text “Attempting to connect to a Seeker...” will appear momentarily in the Status area.
• The text “Sending User Parameters to the Seeker” will appear momentarily in the Statusarea when the Seeker Setup software is sending the setup information to the Seeker Lite.
• The text “Parameters set; reading back” will appear momentarily in the Status area whenthe Seeker Setup software is confirming that the setup parameters have been correctlywritten to the Seeker Lite.
• The text “Configuration completed” will appear in the Status area when the Seeker Setupsoftware is done writing the setup parameters to the Seeker Lite.
Updating Seeker Lite FirmwarePerform the following steps to update the Seeker Lite firmware:
1. Press and hold the Seeker Lite’s red button.
2. Select the Update Seeker Firmware button.
3. The “Open” window will appear. Select the directory and file name of the firmware file.
4. Select the Open button, the Seeker Lite’s display will go blank during the firmwareupgrade. Continue to press and hold the Seeker Lite’s red button.
5. When the firmware upgrade is complete, the Seeker Lite may beep and the text “DownloadSuccessful!” will appear in the Status area. Release the Seeker Lite’s red button.

Seeker Setup - Operation Manual31
5. Seeker Setup 5
OverviewThis chapter provides information on how to connect a Seeker to a PC or Laptop computer andhow to configure the user setup of the device.
Connecting to the Seeker
Note: The Seeker USB driver must be installed on the PC or Laptopcomputer that is running the Seeker Setup software before connectingto the Seeker.
The following steps must be taken to get setup parameters from the Seeker, send setupparameters to the Seeker, and to update the firmware of the Seeker.
1. Connect one end of the Mini-USB cable to the Seeker’sMini-USB connection and the other end to thecorresponding USB port on the PC or Laptop computerthat the Seeker Setup software is installed on.
2. Select the Seeker radio button from the Model Namesection of the Seeker Setup software.
3. Enter the COM port number (See Page 19) that the Seekeris connected to in the COM Port box.
CAUTION: Only connect one Seeker or Seeker MCA device to the PCor Laptop computer at a time.

Seeker Setup - Operation Manual32
Get Setup from the SeekerSelect the Get Setup from Seeker button to retrieve the existing configuration from the Seeker.
• The letters PC will appear on the Seeker’s display to show that it is connected.
• The model number, software version, and bootloader version of the Seeker will appear inthe Model Information area.
• The text “Attempting to connect to a Seeker...” will appear momentarily in the Status area.
• The text “Connection Established” will appear momentarily in the Status area when theSeeker is communicating with the Seeker Setup software.
• The text “Setup read completed” will appear in the Status area when the Seeker is donecommunicating with the Seeker Setup software. The Seeker setup information willpopulate the Seeker Setup software.
Get Setup from the PCPerform the following steps to get Seeker setup information from the PC:
1. Select the Get Setup from PC button.
2. The “Open” window will appear. Select the directory and file name of the setup file.
3. Select the Open button to populate the Seeker Setup software with the setup parameters.
User Setup of the SeekerThe following sections will explain how to setup the individual configuration parameters of theSeeker.
Display UnitsChoose the units of RF energy that are to be displayed by selecting one of the following radiobuttons from the Display Units section;
• μμμμμV/m
• dBμμμμμV
• dBμμμμμV/m
Note: The Display Units must be selected before the Squelch level canbe selected.

Seeker Setup - Operation Manual33
SquelchThe Seeker will not alert a user to a signal that is below the squelch level. Enter a value in theSquelch area to set the squelch level.
Peak HoldThe Peak Hold function of the Seeker is used to hold the value shown on the display for up tofive (5) seconds unless the reading increases in magnitude. To enable the Peak Hold functionof the Seeker, select the Peak Hold checkbox.
GT Noise DiscriminationSome cable systems use digital set top terminals that cannot tolerate “tagged” leakagecarriers. The Seeker analyzes the detected RF energy and rejects all noise and signals notcaused by leaks from the cable system. Select the Enable GT Noise Discriminationcheckbox to enable the GT Noise Discrimination function.
WaveTracker ModeThis feature is used to provide compatibility with the Cable Leakage Technologies (CLT)WaveTracker systems. Select the Enable WaveTracker Mode checkbox to enable theWaveTracker function. The Seeker will correct the displayed leakage values based on thedistance preset selected.
Note: The display units of the squelch level will change based on whichdisplay units are selected.

Seeker Setup - Operation Manual34
WaveTracker SetupTo setup the WaveTracker function, select the WT Setup button. The “WaveTracker Setup”window appears. When done changing the WaveTracker setup parameters, select the OKbutton.
1. WaveTracker Serial Number: - This area is used to enter the serial number of theWaveTracker device. Users of CLT’s APLAS software will need a valid registeredserial number to import the Seeker data.
2. # - These numbers correspond to the distance preset numbers shown on the Seekerdisplay.
3. Enable - These checkboxes are used to choose which distances to display on theSeeker.
4. Value - This area is used to enter the distance value for that preset. The distance valuerepresents the estimated distance from the antenna to the actual leak location.
5. Units - This area is used to select the units for the distance value.
Get WT Rideout DataPerform the following steps to save the CLT APLAS data file to the PC:
1. Select the Get WT Rideout button.
2. The CLT APLAS data will be saved in the appropriate APLAS outbox.
2 31
4
5

Seeker Setup - Operation Manual35
Technician IDEnter the unique technician ID into the Tech ID: area. This ID will appear in any reportsgenerated in the Leakage Analysis Workshop (LAW) software.
Frequency PresetsThe following sections will explain how to configure the frequency presets of the Seeker.
1. # - These numbers correspond to the FREQ numbers on the Seeker’s display.
2. Enable - These checkboxes are used to choose which frequencies to display on theSeeker.
3. Default - These radio buttons are used to choose which frequency is displayed as thedefault frequency on the Seeker.
4. Frequency (MHz) - This area is used to enter the leakage monitoring frequency.
5. Tag Enable - These checkboxes are used to choose which frequencies have channeltagging enabled.
6. Tag Frequency - This area is used to enter the channel tagging frequency of thecorresponding frequency preset.
1 2 3 4 5 6

Seeker Setup - Operation Manual36
Enable & Disable FrequenciesTo enable a frequency preset on the Seeker display, select the Enable checkbox next tothe corresponding FREQ number. To disable a frequency preset, deselect the Enablecheckbox next to the corresponding FREQ number.
Set Frequency DefaultTo choose which frequency preset is displayed as the default frequency on the Seeker,select the radio button next to the corresponding FREQ number.
Set Frequency ValuesEnter the frequency values to perform leakage monitoring in the Frequency (MHz) areanext to the corresponding FREQ number.
Enable & Disable Channel TaggingTo choose which frequency presets have channel tagging enabled, select the Tag Enablecheckbox next to the corresponding FREQ number.
Note: The range of acceptable frequencies is from 118.50 MHz to147.25 MHz entered in 6.25 kHz increments.
Note: The Tag Enable function requires the use of Trilithic’s CT-2 orCT-3 channel tagging devices.
Set Channel Tagging FrequencyTo choose the channel tagging frequency, select the down arrow next to the TagFrequency dropdown box and select the desired frequency from the dropdown list.
Note: The range of channel tagging frequencies is from 10 Hz to 23 Hzin 1 Hz increments with the exception of 16 Hz.
Note: The channel tagging frequency set in the Seeker Setup softwaremust match the frequency that is set on the CT-2 or CT-3 channeltagging devices.
Seeker Setup - Operation Manual37
Save Setup to the PCPerform the following steps to save the setup parameters to the PC:
1. Select the Save Setup to PC button.
2. The “Save” window will appear. Select the directory and enter the file name of the Seekersetup file.
3. Select the Save button to save the setup to the PC.
Send Setup to the SeekerSelect the Send Setup to Seeker button to send the configuration to the Seeker.
• The text “Attempting to connect to a Seeker...” will appear momentarily in the Status area.
• The text “Sending User Parameters to the Seeker” will appear momentarily in the Statusarea when the Seeker Setup software is sending the setup information to the Seeker.
• The text “Parameters set; reading back” will appear momentarily in the Status area whenthe Seeker Setup software is confirming that the setup parameters have been correctlywritten to the Seeker.
• The text “Configuration completed” will appear in the Status area when the Seeker Setupsoftware is done writing the setup parameters to the Seeker.
Updating Seeker FirmwarePerform the following steps to update the Seeker firmware:
1. Select the Update Seeker Firmware button.
2. The “Open” window will appear. Select the directory and file name of the firmware file.
3. Select the Open button, the Seeker’s display will go blank during the firmware upgrade.
4. When the firmware upgrade is complete, the Seeker may beep and the text “DownloadSuccessful!” will appear in the Status area.

Seeker Setup - Operation Manual38
Read Snapshots from the SeekerPerform the following steps to read snapshots from the Seeker:
1. Select the Read Snapshots button to read snapshot data from the Seeker.
• The text “Attempting to connect to a Seeker...” will appear momentarily in the Statusarea.
• The text “Connection Established” will appear momentarily in the Status area whenthe Seeker Setup software has connected to the Seeker.
2. The “Save” window will appear. Select the directory and enter the file name of the snapshotfile.
3. Select the Save button to save the snapshot data to the PC.
• The text “Reading Snap XX...” will appear momentarily in the Status area when theSeeker Setup software is reading the snapshots from the Seeker.
• The text “Snapshot reads were successful.” will appear in the Status area when theSeeker Setup software is done reading the snapshots from the Seeker.
Seeker Setup - Operation Manual39
6. Seeker MCA Setup 6
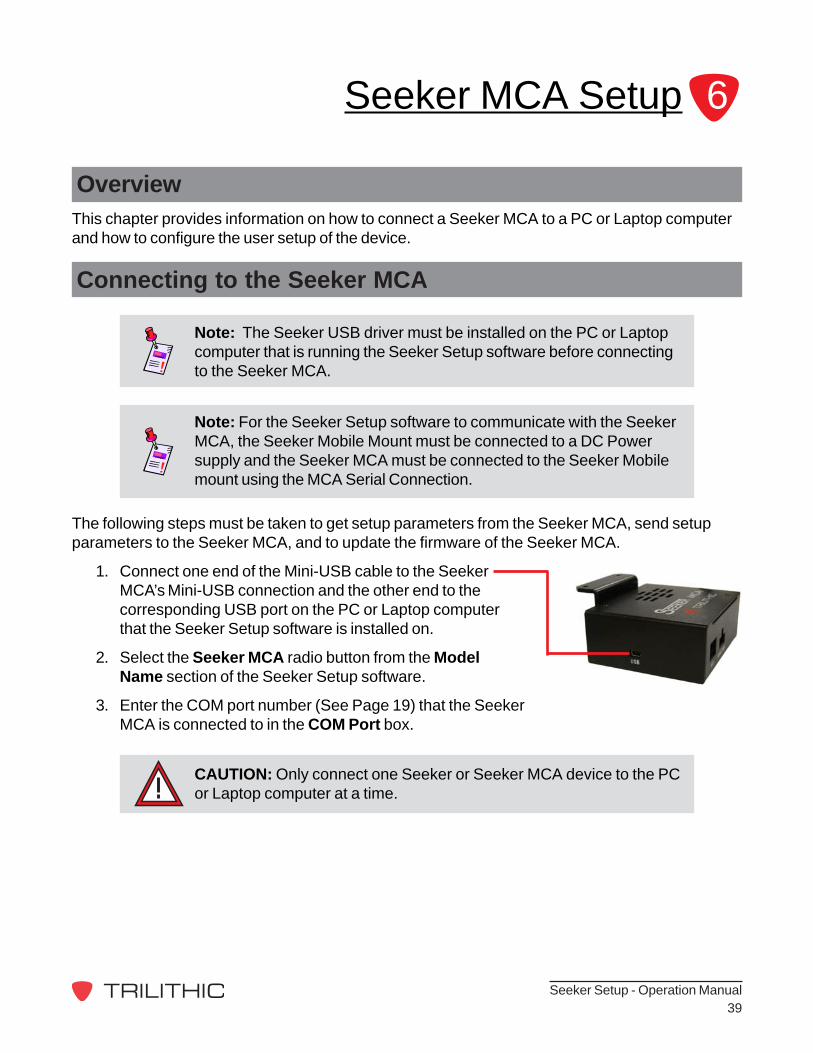
OverviewThis chapter provides information on how to connect a Seeker MCA to a PC or Laptop computerand how to configure the user setup of the device.
Connecting to the Seeker MCA
Note: The Seeker USB driver must be installed on the PC or Laptopcomputer that is running the Seeker Setup software before connectingto the Seeker MCA.
The following steps must be taken to get setup parameters from the Seeker MCA, send setupparameters to the Seeker MCA, and to update the firmware of the Seeker MCA.
1. Connect one end of the Mini-USB cable to the SeekerMCA’s Mini-USB connection and the other end to thecorresponding USB port on the PC or Laptop computerthat the Seeker Setup software is installed on.
2. Select the Seeker MCA radio button from the ModelName section of the Seeker Setup software.
3. Enter the COM port number (See Page 19) that the SeekerMCA is connected to in the COM Port box.
Note: For the Seeker Setup software to communicate with the SeekerMCA, the Seeker Mobile Mount must be connected to a DC Powersupply and the Seeker MCA must be connected to the Seeker Mobilemount using the MCA Serial Connection.
CAUTION: Only connect one Seeker or Seeker MCA device to the PCor Laptop computer at a time.

Seeker Setup - Operation Manual40
Get Setup from the PCPerform the following steps to get Seeker MCA setup information from the PC:
1. Select the Get Setup from PC button.
2. The “Open” window will appear. Select the directory and file name of the setup file.
3. Select the Open button to populate the Seeker Setup software with the setup parameters.
MCA SetupThe following sections will explain how to setup the individual configuration parameters of theSeeker MCA.
Truck IDEnter the unique truck ID in the Truck ID: area. This ID will identify the vehicle that the SeekerMCA is installed in.
Get Setup from the Seeker MCASelect the Get Setup from MCA button to retrieve the existing configuration from the SeekerMCA.
• The model number, software version, bootloader version, and installed hardware optionsof the Seeker MCA will appear in the Model Information area.
• The text “Attempting to connect to a Seeker...” will appear momentarily in the Status area.
• The text “Connection Established” will appear momentarily in the Status area when theSeeker MCA is communicating with the Seeker Setup software.
• The text “Setup read completed” will appear in the Status area when the Seeker MCA isdone communicating with the Seeker Setup software. The Seeker MCA setup informationwill populate the Seeker Setup software.
CAUTION: For security purposes, the Wi-Fi WEP and WPA-PSKsecurity keys can not be read back from the Seeker MCA. Therefore,the key should be saved to a PC setup file. Then upon starting theSeeker Setup software, the setup file may be read, and then the key(s)will be available to send to the Seeker MCA.

Seeker Setup - Operation Manual41
Home GPS LocationThe home GPS location creates an “exclusion zone” where data logging will not take place.This can be the location of a reference leakage signal, cable plant, or service center wheredata logging is not desired. It further creates an area where the Seeker MCA will search for aWi-Fi access point, if the Wi-Fi option is installed.
Location Latitude & LongitudeTo setup the latitude and longitude of the home location, perform one of the followingprocedures:
• Manually enter the home GPS latitude and longitude in the Home GPS Latitude/Longitude area.
OR
• Automatically enter the home GPS latitude and longitude by selecting the Test GPSConnection/Get current location button.
• The text “Attempting to connect to a Seeker...” will appear momentarily in theStatus area.
• The text “Checking GPS connection...” will appear momentarily in the Statusarea when the Seeker MCA & GPS receiver are communicating with theSeeker Setup software.
• The text “No Valid GPS fix detected!” will appear in the Status area when theGPS receiver cannot receive a GPS satellite fix or is not connected to aGPS receiver.
• The text “Valid GPS fix detected!” will appear in the Status area when theGPS receiver has received a GPS satellite fix. The current GPS locationinformation will populate the Seeker Setup software.
Note: If this message appears, relocate the GPS receiver to a locationwhere the sky can be seen clearly and wait at least five minutes beforetrying to get the current location using the Seeker Setup software.
Note: If this message appears and the GPS receiver is located wherethe sky can be seen clearly, see the Bluetooth GPS Setup on Page 42to verify the connection settings of the GPS receiver.

Seeker Setup - Operation Manual42
Location SizeThe home location size is used to define the area around the home location latitude andlongitude in which the Seeker MCA does not record leakage signals. To setup the size ofthe home location, enter the dimensions of the home location in feet into the Width/Heightarea.
Park DelayOnce the GPS receiver of the Seeker MCA has recognized that it has entered the homelocation area, the park delay is used to delay the uploading of Seeker leakage data to theLeakage Analysis Workshop (LAW) via an optional Wi-Fi connection. To setup the parkdelay, enter the park delay in minutes into the Park delay area.
Peak HoldThe Peak Hold function of the Seeker MCA is used to enable the recording of the peak holdleakage data from the Seeker. To enable the Peak Hold function select the Enable Peak Holdcheckbox.
Bluetooth GPS SetupThe Bluetooth GPS Setup function of the Seeker MCA is used to pair the Seeker MCA to aBluetooth GPS receiver. The setup of the connection between the Bluetooth GPS receiver andthe Seeker MCA is used each time a new Bluetooth GPS receiver is paired with a SeekerMCA.
Manual SetupPerform the following steps to manually setup a Bluetooth GPS receiver:
1. Enter the unique address of the Bluetooth GPS receiver in the Address(Hex) area.
2. If device authentication is required, select the Authentication checkbox and enterthe PIN number of the Bluetooth GPS receiver.
Note: See the documentation provided by the original equipmentmanufacturer of the Bluetooth GPS receiver that is being used for thespecific Bluetooth Address and PIN number (if authentication isrequired).
Seeker Setup - Operation Manual43
3. Send the Seeker MCA configuration to the Seeker MCA by performing theprocedure shown in the Send Setup to the Seeker MCA section on Page 51.
4. Select the Test GPS Connection/Get current location button to verify that theSeeker MCA can communicate with the Bluetooth GPS receiver.
• The text “Attempting to connect to a Seeker...” will appear momentarily in theStatus area.
• The text “Checking GPS connection...” will appear momentarily in the Statusarea when the Seeker MCA & Bluetooth GPS receiver are communicatingwith the Seeker Setup software.
• The text “No Valid GPS fix detected!” will appear in the Status area when theGPS receiver cannot receive a GPS satellite fix or is not connected to aGPS receiver.
CAUTION: DO NOT select the Test GPS Connection/Get currentlocation button if outside of the Home GPS Location or the homelocation information that is already entered will be lost.
• The text “Valid GPS fix detected!” will appear in the Status area when theGPS receiver has received a GPS satellite fix. The current GPS locationinformation will populate the Seeker Setup software.
Note: If this message appears, relocate the GPS receiver to a locationwhere the sky can be seen clearly and wait at least five minutes beforetrying to get the current location using the Seeker Setup software.

Seeker Setup - Operation Manual44
Automatic SetupPerform the following steps to automatically setup a Bluetooth GPS receiver:
1. To search for any Bluetooth devices within range of the Seeker MCA, select theSearch for Devices button. The “Bluetooth Pairing” window will appear.
A. Bluetooth Address - This number is the unique address of each Bluetoothdevice.
B. Bluetooth Name - This name is the generic name of each Bluetooth device.
C. Known device - This area shows whether the Bluetooth device name is knownby the Seeker Setup software, which can then automatically check theAuthentication checkbox and populate the PIN number.
2. Select the radio button next to the Bluetooth Address of the Bluetooth GPSReceiver to connect to and then select the OK button.
• For a Bluetooth GPS receiver that is NOT known by the Seeker Setupsoftware, if authentication of the Bluetooth GPS receiver is needed, theAuthentication checkbox will need to be selected and the user will have toenter the unique PIN number of the GPS receiver.
A B C
Note: See the documentation provided by the original equipmentmanufacturer of the Bluetooth GPS receiver that is being used for thedevice specific PIN number (if authentication is required).
Seeker Setup - Operation Manual45
• The text “Attempting to connect to a Seeker...” will appear momentarily in theStatus area.
• The text “Checking GPS connection...” will appear momentarily in the Statusarea when the Seeker MCA is communicating with the Seeker Setupsoftware.
• The text “No Valid GPS fix detected!” will appear in the Status area when theGPS receiver is working but cannot receive a GPS satellite fix.
• The text “Error reading GPS location from the MCA!” will appear in theStatus area when there is a communication problem with the Seeker MCA.
• The text “No valid GPS connection established!” will appear in the Statusarea when the Seeker MCA is not able to establish communications with theGPS device. The serial GPS device may be disconnected or the BluetoothGPS device may be off, not paired, or not within range.
• The text “Valid GPS fix detected!” will appear in the Status area when theGPS receiver has received a GPS satellite fix. The current GPS locationinformation will populate the Seeker Setup software.
3. Select the Send Setup to MCA button to send the configuration to the Seeker MCA.For more information, see the Send Setup to the Seeker MCA section on Page 51.
4. To test communication between the Seeker MCA and the Bluetooth GPS receiver,select the Test GPS Connection/Get current location button.
Note: If this message appears, relocate the GPS receiver to a locationwhere the sky can be seen clearly and wait at least five minutes beforetrying to get the current location using the Seeker Setup software.
CAUTION: DO NOT select the Test GPS Connection/Get currentlocation button if outside of the Home GPS Location or the homelocation information that is already entered will be lost.

Seeker Setup - Operation Manual46
Wi-Fi SetupThe Wi-Fi Setup function of the Seeker MCA is used to setup the Wi-Fi connection betweenthe Seeker Setup software and the Leakage Analysis Workshop (LAW) server. Select theSetup button, the “WiFi Setup” window will appear.
1. SSID - This area is used to enter the Service Set Identifier (SSID) of the Wireless AccessPoint.
2. MAC - This area is used to display the unique Media Access Control (MAC) address of theWi-Fi module in a particular Seeker MCA.
3. Use DHCP - This checkbox is used to enable the Seeker MCA to request an IP via DHCP.The DHCP protocol is used for assigning dynamic IP addresses to devices on the Wi-Finetwork.
4. IP - This area is used to enter the static Internet Protocol (IP) address that is the logicaladdress of the Seeker MCA on the Wi-Fi network.
5. Subnet - This area is used to enter the static Subnetwork (Subnet) address of the Wi-Finetwork. The Subnet address represents all of the devices at one geographic location, inone building, or on the same Local Area Network (LAN).
6. Gateway - This area is used to enter the static Gateway address of the Wi-Fi network. TheGateway address acts as an entrance to another network.
12
34
7 12
1156
8910
Seeker Setup - Operation Manual47
7. DNS1 / DNS2 - This area is used to enter the static Domain Name System (DNS)addresses of the Wi-Fi network. The DNS is an Internet service that translates domainnames into IP addresses.
8. IP - This area is used to enter a static Internet Protocol (IP) address of the LeakageAnalysis Workshop (LAW) Server.
9. DNS Name - This area is used to enter a Domain Name System (DNS) name of theLeakage Analysis Workshop (LAW) Server.
10.Port # - This is used to enter the TCP communications port number of the WiFi server.
11. WEP - This area is used to choose the Wired Equivalency Privacy (WEP) security protocoland to enter the 128 bit hexadecimal security key.
12.WPA-PSK - This area is used to choose the Wi-Fi Protected Access - Pre SharedKey(WPA-PSK) security protocol and to enter the ASCII security key provided.
Wi-Fi Network SettingsAutomatic Configuration
1. Select the Use DHCP checkbox. The IP, Subnet, Gateway, DNS1, and DNS2addresses will be assigned automatically.
2. Proceed to the Leakage Analysis Workshop (LAW) Settings section.
Note: See the Network Administrator of the local Wi-Fi network toobtain the proper IP, Subnet, Gateway, DNS1, and DNS2 addresses.
Manual Configuration
1. Deselect the Use DHCP checkbox.
2. Manually enter the IP, Subnet, Gateway, DNS1, and DNS2 addresses of theWi-Fi network.
3. Proceed to the Leakage Analysis Workshop (LAW) Server Settings section onPage 48.

Seeker Setup - Operation Manual48
Leakage Analysis Workshop (LAW) Server Settings1. Manually configure the Wi-Fi network settings by entering the IP address or DNS
name of the Leakage Analysis Workshop (LAW).
2. Proceed to the Security Settings section.
Note: See the Network Administrator of the local Wi-Fi network toobtain the proper security protocol and security key.
Security SettingsIf the Wi-Fi network that the MCA is connecting to is an unsecured network, select theNone radio button.
If the network that the MCA is connecting to is a secured network, select either theWEP (128 bit) or WPA-PSK radio button.
Note: See the Network Administrator of the Leakage AnalysisWorkshop (LAW) server to obtain the proper IP address and DNSname.
Test Server ConnectionOnce the network settings are complete, select the OK button and then select the Testconnection to L.A.W. server button.
• The text “No WiFi module installed!” will appear in the Status area when there is noWi-Fi hardware detected in the Seeker MCA.
• The text “Cannot enter WiFi Configuration mode!” or “WiFi Testing command error!”will appear in the Status area when there are communication errors between thePC and the Seeker MCA.
• The text “Connection to LAW server was successful!” will appear in the Status areawhen the Wi-Fi connection is completely working.
• The text “WiFi POST Error!” will appear in the Status area when there is ahardware problem with the Wi-Fi module.
• The text “No WiFi Access Point association!” will appear in the Status area whenthe Seeker MCA cannot associate with an wireless access point. The access pointSSID does not match the Seeker MCA or the access point is out of range.

Seeker Setup - Operation Manual49
• The text “No WiFi IP Address (static or DHCP)!” will appear in the Status areawhen the Seeker MCA does not have an IP address. This will occur if the SeekerMCA is set for DHCP but the access point does not provide a DHCP address. Thismay also indicate a mismatch of security protocols (none/WEP/WPA) and/orsecurity keys.
• The text “WiFi DNS resolve failure!” will appear in the Status area if the DNS of theLAW server name is selected, this indicates a failure of the Seeker MCA todetermine the IP address of the LAW server. Either the DNS server cannot bereached or the DNS server does not know the IP of the LAW server.
• The text “LAW Server connection failed!” will appear in the Status area if thewireless connection appears to be intact but a socket cannot be opened to the LAWserver. Possible problems are the lack of an IP route to the LAW server, firewallblocks between the access point and the LAW server, or the LAW server is notrunning.
• The text “Unknown WiFi Test failure!” will appear in the Status area if the softwarecatches any errors reported by the Seeker MCA that Seeker Setup does notunderstand, and really represents a Seeker Setup bug.

Seeker Setup - Operation Manual50
1 21. # - These numbers correspond to the threshold level messages that are setup in the
Sapias software.
2. Value (μμμμμV/m) - This area is used to enter the threshold level of the leakage signal that willbe reported to the Sapias software. When the leakage signal transitions up from one levelto a higher level or down to a lower level, the leakage data will be reported to the Sapiassoftware.
Sapias SetupThe Sapias Setup function of the Seeker MCA is used to enter the threshold values that arerelayed to the Sapias interface. Select the Setup button, and the Sapias Setup window willappear.

Seeker Setup - Operation Manual51
Save Setup to the PCPerform the following steps to save the setup parameters to the PC:
1. Select the Save Setup to PC button.
2. The “Save” window will appear. Select the directory and enter the file name of the SeekerMCA setup file.
3. Select the Save button to save the setup to the PC.
Send Setup to the Seeker MCASelect the Send Setup to MCA button to send the configuration to the Seeker MCA.
• The text “Attempting to connect to a Seeker...” will appear momentarily in the Status area.
• The text “Sending User Parameters to the Seeker” will appear momentarily in the Statusarea when the Seeker Setup software is sending the setup information to the Seeker MCA.
• The text “Parameters set; reading back” will appear momentarily in the Status area whenthe Seeker Setup software is confirming that the setup parameters have been correctlywritten to the Seeker MCA.
• The text “Configuration completed” will appear in the Status area when the Seeker Setupsoftware is done writing the setup parameters to the Seeker MCA.
Updating Seeker MCA FirmwarePerform the following steps to update the Seeker MCA firmware:
1. Select the Update Seeker MCA Firmware button.
2. The “Open” window will appear. Select the directory and file name of the firmware file.
3. Select the Open button, when the firmware upgrade is complete, the text “DownloadSuccessful!” will appear in the Status area.

9710 Park Davis DriveIndianapolis, IN 46235
(317) 895-3600www.trilithic.com
P/N 0010241099 9/07 Made in U.S.A.