Security Console - MRI Software
40
Security Console
Transcript of Security Console - MRI Software

Security Console

AgendaThis course will provide basic instruction for security administration
This course will cover:Basic Security Console functionsSecurity Roles and Entity Class configurationDifferences in Windows and Web SecurityAdding a UserAssigning security to a userEntity class and Site ID interactionBest practices for security
2

The BasicsIn this section we will cover:
Logging into the Security ConsoleSecurity Console overviewReportsSynchronize SecurityLocksClear Workstation

Logging into the Security ConsoleOption 1: On the login screen (available if you do not have network login enabled).
Option 2: On the home screen of the MRI application in the windows product.
Both will bring you to the same interface:

Security Console1. You must select a
database to get started. If no database is selected, you will see the left window grayed out.
2. Until you select a database, your access buttons will be grayed out.
3. The large middle section will list all of your users.

Reports
There are three report categories: Excel, Audit, and User.Excel reports are various security reports available in Excel format.Auditing must be turned on for Audit report to be active.User reports are various reports regarding user access and can be saved in multiple formats.
Excel reports:There are 3 Excel report options:
• Effective User Security Report
• Role/Class Security Report• User Access

Reports
User Reports:Three user report options:
User AccessUser Access by Role/ClassMRI Login Report
Reports are saved in one of three formats:
PDFHTMLRTF

Synchronize Security
Synchronize Security will functionally refresh security for all usersWhat might this be used for?Synchronize Security utilizes significant resources, so use this with caution

LocksLock functions:
Prevent data corruptionPrevent schema changes by multiple usersAllow proper updating to tables
Locks occur because:Program functionTask shut down incorrectlyUser session lost
How to clear:Select databaseClick LocksRight panel populates with tasksChoose the correct lock and click Clear Lock(s)Be careful of the locks you clear

Clear WorkstationThe workstation tracks active and inactive MRI sessions.Status:
(A) Active(AW) Active Web(I) Inactive
Active records (A or AW) utilize a concurrent user on your license.Caution should be used when clearing active sessions.

Security and System Administration
In this section we will cover:Web vs. WindowsManaging Security RolesManaging Entity ClassesAdding UsersAssigning rights to user ID’sSetting up Web security

Web vs. Windows SecurityWhat is shared:
Tables accessReports accessEntity accessAdditional Access options
What is not shared:Menu accessReports access

Managing Security RolesLet’s create a new security
role:Select Database Security
Select the Role tabClick the Add button
• Type in the Name of the new security role.• Type in a meaningful description for the role.• You can also copy an existing role or delete a role
in this window.

Managing Security RolesNow to set up security for the new role
Select Access Options.
In the dropdown box, select the role.You will notice that by default, when a new role is created, all security sections are checked, which means Global Access has been granted.You will want to uncheck the sections that you want to manage manually, and leave checked those you want to have global access.

Managing Security RolesMenu Security
Select Menus
By default all menu items are “X”ed out.
•Tree View

Managing Security RolesTable access
Select Tables
Tables can be granted Full, View, Add, Update, or Delete access. This defines the rights a user has to the data in a specific table.

Managing Security RolesReport Access
Select Reports.
Reports have two statuses: Enabled and Disabled. If the report is checked, access has been granted in Windows.

Managing Security RolesAdditional Access
Select Additional Access
Additional Access options have two statuses: Enabled and Disabled. If the option is checked, access has been granted in Windows.Additional access options control many MRI features that are not specifically controlled by menu buttons, table access, or report access.

Managing Entity ClassesLets create a new entity class:
Select Database Security
Select the Entity Classes tab, and then click the Add button.
• Add New Entity Class opens.• Give the new entity class a
meaningful name and description.
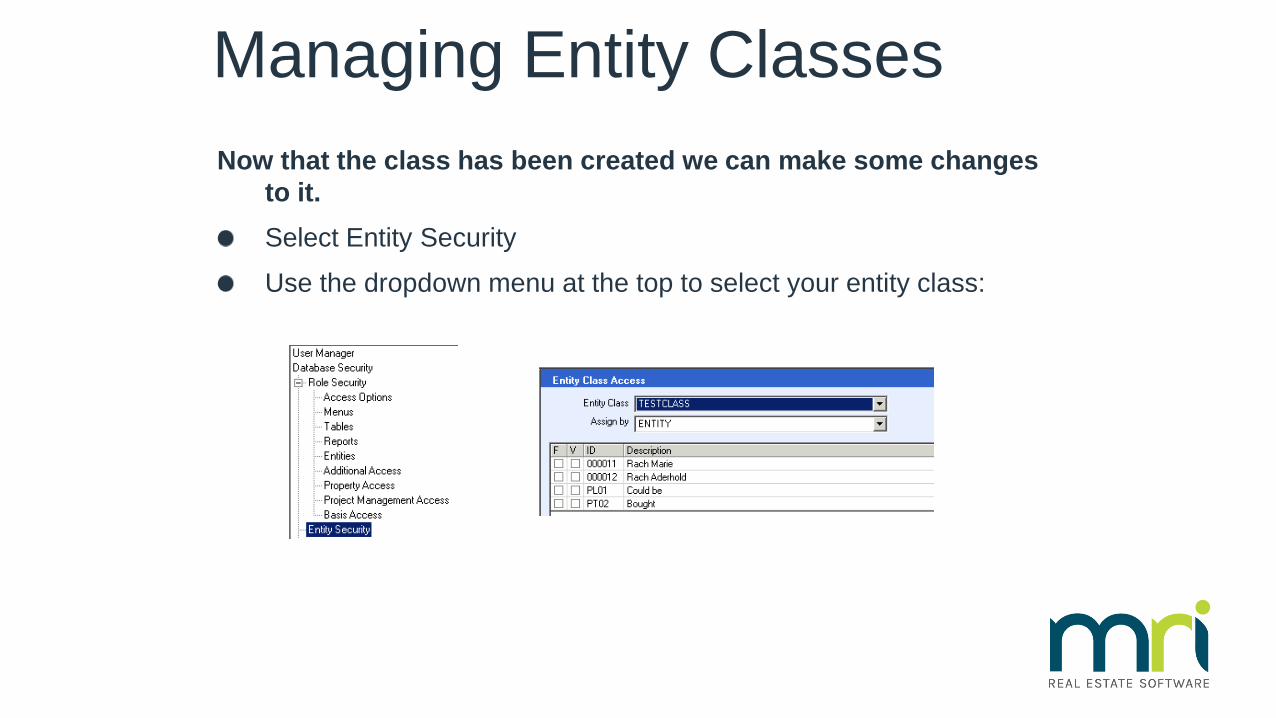
Managing Entity ClassesNow that the class has been created we can make some changes
to it.Select Entity SecurityUse the dropdown menu at the top to select your entity class:

Managing Entity ClassesYou will see 4 columns. F for full access, V for view access, ID for the entity ID, and Description which contains the entity description.
Depending on your license you might also have Property Security or Project Management Security. These function in a similar way to Entity Class.

Entity Class and Site ID
Similarities , Differences, and how do they work together?Both function as a simple filter only allowing users to see data from specific entities.Entity classes act as a simple filter only.Site ID’s have added functionality including:
home office status vs. site statusApproval rights for various modulesSite specific vendors, banks etc.
Employing both will double-filter the user. The user will only see the Entities shared by both Entity Class and Site ID.

Adding a User
Let’s add a user.Select User ManagerThen click the Add buttonThis will open the New User Detail screen.

Adding a User1. User ID2. Full Name3. Password4. Default View5. Default Database6. Network Login7. Force Password Change8. Disable Login9. Locked/Failed Login10. Allow Application Unlocks11. Web Service User12. Administrator13. Named User License14. Inquiry User15. IRES Support
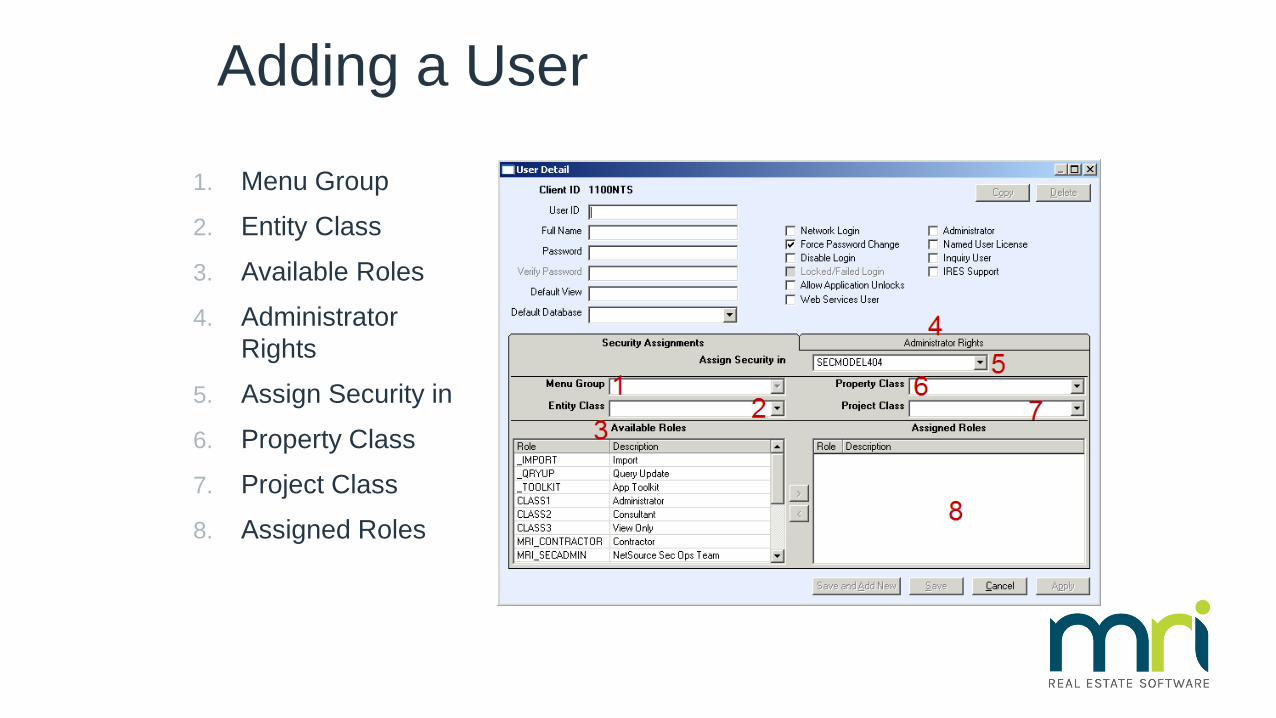
Adding a User
1. Menu Group2. Entity Class3. Available Roles4. Administrator
Rights5. Assign Security in6. Property Class7. Project Class8. Assigned Roles

Adding a UserAdministrator rights
1. Full Access to User Manager
2. Full Access to Database Security
3. Reset Passwords
4. Assign Protected Role
5. Assign Roles and Classes
6. Export Roles and Classes
7. Allow Application Upgrades
8. Assign User and Database Security Rights
9. Assign Database Administration Rights
10. Assign System Administration Rights
11. Clear/Remove Workstation
12. View/Edit Database Information
13. Upgrade Database
14. Create New Database
15. Delete Database
16. System Security
17. License Administration
18. System Password Options

Web Menu Security
To open Web Design, select Application Toolkit, then select Web Design.
This will open the Web Design
interface

Web Menu SecuritySelect File on the top menu bar, then select Customize Menus.Close the pop-up for “Select Existing Menu”This brings us to the Web Menu Design interface.
Under File, you can select: • Open Setup Menu• Open Global Navigation Menu• Open Application Menu

Web Menu Security
This will populate the left hand window with the navigation menu.
You can select then right-click on a menu item to open the options menu.
We will select Customize to change who has rights to this menu item.

Web Menu Security
How do I change the menu security?

Web Enable ReportsHow do I web enable a report?
From the Web Design main page, select File then Web Reports
This will open the Web Reports window. You will need to select a folder in the left window to look for the report you desire to
web enable. Select that folder to open the list in the right window.
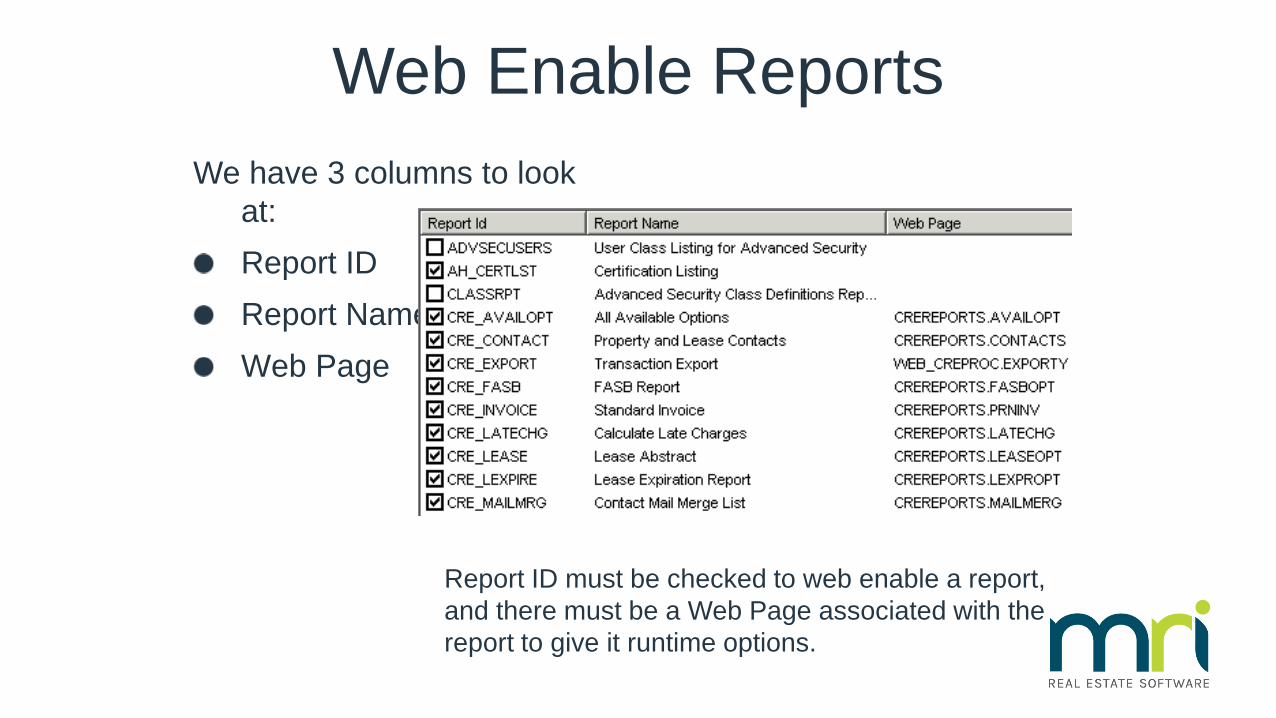
We have 3 columns to look at:Report IDReport NameWeb Page
Report ID must be checked to web enable a report, and there must be a Web Page associated with the report to give it runtime options.
Web Enable Reports

Under the section: Web page containing runtime options, you can link the web page with the desired
runtime options.
Right-click on the report for which you want to add a Web Page, select Edit, and this will open a new window where you can add the page.
Adding a Web Page
Web Enable Reports

Best PracticesIn this section we will cover best practices for the
following topics:User Access SetupMenu SetupReportsTablesAdditional Tips and Tricks

User Access Setup
Keep it simple. The simpler the security roles, the simpler the troubleshooting.Multiple security roles can be assigned to a user but limit to 5.Make security roles descriptive. For example: Property Manager, AP Clerk, Leasing Agent, etc.Only one Entity, Property, Project class, or Site ID can be assigned to a single user. Site ID and Entity Class can be assigned together to work as a double filter.Adding a Site ID, Property class, Project class, or Entity class to a user will not allow them to add new entities to the database.
Menu Setup
Create separate security roles for Web access vs. Windows access. Menu access is the best place to start for building security. By turning off access to certain modules you can control much of security. When changing to a custom menu for a security role that already has menu settings, all settings will be lost.After setting up Web menu security and saving it, you can archive these settings. This might be useful if your web security gets corrupted.

Reports
Not all reports are just reports; some update data or trigger executables.Granting global access to a role for reports will automatically add any newly created reports to their access.If a report designer does not have global access to reports, once the report has been saved, they will not be able to see it.

Tables
Some tables cross modules and functions.It is recommended that you start by granting view access to tables, then if there is a need for access beyond View try Update and Add before granting Full access.Field level security can be assigned for each table to further control security, though you only have Full, View, and Hide as options.

Additional Tips and TricksEvery tab in a security role must have at least 1 property defined, or a corrupt security class may result.The more roles or classes in your database, the more it will impact your performance.Sometimes modular security is the best solution for complex security needs.Recommend Entity, Property Access, Project Management Access, and Basis Access be set to global access. Access can be managed with separate entity classes which are more effective and have less impact on performance. For MRI 4.0 versions and older (3.0, 2.X, etc) the highest access that is granted wins. So if two security classes are assigned to a user, and one grants view access to the BANK table, and another grants full access to the BANK table, the user will have full access.Customized menus, views, and tables can break security. If one is involved look there first.Understand your security needs before you begin building out security.

Course Summary
40
In this course you learned the following:– Basic Security Console functions– Security Roles and Entity Class configuration– Differences in Windows and Web Security– Adding a User– Assigning security to a user– Entity class and Site ID interaction– Best practices for security