Security Center Administrator’s Guide - 2AB and SecureWay are ... 6-1 Table 6.1 Security Center...
104
Security Center Administrator’s Guide Power Edition Release 5.0
Transcript of Security Center Administrator’s Guide - 2AB and SecureWay are ... 6-1 Table 6.1 Security Center...

Security Center Administrator’s Guide
Power Edition
Release 5.0


iLock Security Services Security Center
Administrator’s Guide
Subject
Administration and operation of the iLock Security Center.
Software Supported
iLock Security Services• iLock Enterprise 5.0
• jLock 5.0
• orb for Java Security Services 5.0
• webLock 5.0
• c/Lock 5.0
Revision History
Product Release September 2002
Release 4.1 March 2003
Release 4.2 February 2004
Release 4.3 October 2004
Release 4.4 September 2006
Release 5.0 December 2007

2AB, Inc. disclaims the implied warranties of merchantability and fitness for a particular purpose and makes no express warranties except as may be stated in its written agreement with and for its customer. In no event is 2AB, Inc. liable to anyone for any indirect, special or consequential damages.
The information and specifications in this document are subject to change without notice. Consult your 2AB, Inc. marketing representative for product or service availability.
U.S. Government Restricted Rights. The Software Program(s) and Documentation furnished under this Agreement were developed at private expense and are provided with Restricted Rights. Any use, duplication, or disclosure by and for any agency of the U.S. Government shall be subject to the Restricted Rights applicable to commercial computer software under FAR Clause 52.227-19 or DFAR Clause 252.277-7013 or any successor thereof.
Copyright © 1999-2006 by 2AB, Inc. All Rights Reserved.
Trademarks
The 2AB logo, iLock, the iLock logo and orbLock are registered trademarks of 2AB, Inc. 2AB, eXplorer, jLock, orb2, webLock and Xcon are trademarks of 2AB, Inc.
Active Directory, Microsoft, Windows, Windows NT, Windows 2000 and Windows XP are registered trademarks of the Microsoft Corporation.
OMG, Object Management Group, OMG Interface Definition Language (IDL), Unified Modeling Language and UML are trademarks of the Object Management Group. CORBA and IIOP are registered trademarks of the Object Management Group.
UNIX is a registered trademark in the United States and other countries, licensed exclusively through X/Open Company Limited.
HP-UX is a registered trademarks of the Hewlett-Packard Company.
Apache and Tomcat are trademarks of The Apache Software Foundation.
Domino is a trademark of the International Business Machines Corporation in the United States or other countries or both. AIX and SecureWay are registered trademarks of the International Business Machines Corporation in the United States or other countries or both.
iPlanet, J2EE, J2SE, Java, JavaScript, JavaServer Pages, JKD, Solaris, Sun and Sun Microsystems are trademarks or registered trademarks of Sun Microsystems, Inc. in the United States and other countries.
Netscape is a registered trademark of Netscape Communication Corporation in the United States and other countries.
Berkley DB is a trademark of Sleepycat Software, Inc.
All other brand or product names are trademarks or registered trademarks of their respective companies or organizations.


Security Center Administrator’s Guide iLock Security Services 5.0 i
Contents
Contents
Figures
Tables
About This Document
Chapter 1 Configuration1.1 Java Virtual Machine. . . . . . . . . . . . . . . . . . . . . . . . . . . . . . . . . . . . . . . . . . . . . . . . . . . . . . . . 2-11.2 Environment Variables . . . . . . . . . . . . . . . . . . . . . . . . . . . . . . . . . . . . . . . . . . . . . . . . . . . . . . 2-11.3 Network Ports . . . . . . . . . . . . . . . . . . . . . . . . . . . . . . . . . . . . . . . . . . . . . . . . . . . . . . . . . . . . . 2-11.4 Installing the License . . . . . . . . . . . . . . . . . . . . . . . . . . . . . . . . . . . . . . . . . . . . . . . . . . . . . . . 2-11.5 Security Center Connections. . . . . . . . . . . . . . . . . . . . . . . . . . . . . . . . . . . . . . . . . . . . . . . . . . 2-2
1.5.1 Running iconfig . . . . . . . . . . . . . . . . . . . . . . . . . . . . . . . . . . . . . . . . . . . . . . . . . . . . . . . . 2-21.5.2 Command-Line Options for iconfig. . . . . . . . . . . . . . . . . . . . . . . . . . . . . . . . . . . . . . . . . 2-31.5.3 Distributing Duplicate Configurations. . . . . . . . . . . . . . . . . . . . . . . . . . . . . . . . . . . . . . . 2-3
Chapter 2 Security CenterOverview
2.1 iLock Security Services. . . . . . . . . . . . . . . . . . . . . . . . . . . . . . . . . . . . . . . . . . . . . . . . . . . . . . 5-12.2 Security Center Instances . . . . . . . . . . . . . . . . . . . . . . . . . . . . . . . . . . . . . . . . . . . . . . . . . . . . 5-12.3 Objects Managed by Security Center . . . . . . . . . . . . . . . . . . . . . . . . . . . . . . . . . . . . . . . . . . . 5-2
2.3.1 Users. . . . . . . . . . . . . . . . . . . . . . . . . . . . . . . . . . . . . . . . . . . . . . . . . . . . . . . . . . . . . . . . . 5-22.3.2 Security Attributes . . . . . . . . . . . . . . . . . . . . . . . . . . . . . . . . . . . . . . . . . . . . . . . . . . . . . . 5-22.3.3 Secured Resources . . . . . . . . . . . . . . . . . . . . . . . . . . . . . . . . . . . . . . . . . . . . . . . . . . . . . . 5-32.3.4 Security Policies. . . . . . . . . . . . . . . . . . . . . . . . . . . . . . . . . . . . . . . . . . . . . . . . . . . . . . . . 5-32.3.5 Resource Policies and Policy Groups . . . . . . . . . . . . . . . . . . . . . . . . . . . . . . . . . . . . . . . 5-5
2.4 Object Type Relationships . . . . . . . . . . . . . . . . . . . . . . . . . . . . . . . . . . . . . . . . . . . . . . . . . . . 5-52.5 LDAP and Custom Interfaces . . . . . . . . . . . . . . . . . . . . . . . . . . . . . . . . . . . . . . . . . . . . . . . . . 5-6
2.5.1 LDAP Interface . . . . . . . . . . . . . . . . . . . . . . . . . . . . . . . . . . . . . . . . . . . . . . . . . . . . . . . . 5-62.5.2 CustomUserManager Interface . . . . . . . . . . . . . . . . . . . . . . . . . . . . . . . . . . . . . . . . . . . . 5-6
2.6 Security Center Administration. . . . . . . . . . . . . . . . . . . . . . . . . . . . . . . . . . . . . . . . . . . . . . . . 5-7
Chapter 3 Security CenterOperation
3.1 Security Center Instances . . . . . . . . . . . . . . . . . . . . . . . . . . . . . . . . . . . . . . . . . . . . . . . . . . . . 4-13.2 Security Center Database . . . . . . . . . . . . . . . . . . . . . . . . . . . . . . . . . . . . . . . . . . . . . . . . . . . . 4-13.3 Starting the Security Center . . . . . . . . . . . . . . . . . . . . . . . . . . . . . . . . . . . . . . . . . . . . . . . . . . 4-13.4 Terminating the Security Center . . . . . . . . . . . . . . . . . . . . . . . . . . . . . . . . . . . . . . . . . . . . . . . 4-2
Chapter 4 Security Center

ii iLock Security Services 5.0 Security Center Administrator’s Guide
Contents
Administration Tool4.1 Running the Security Center Administration Tool . . . . . . . . . . . . . . . . . . . . . . . . . . . . . . . . . 5-14.2 Main Window . . . . . . . . . . . . . . . . . . . . . . . . . . . . . . . . . . . . . . . . . . . . . . . . . . . . . . . . . . . . . 5-1
4.2.1 Menu Bar . . . . . . . . . . . . . . . . . . . . . . . . . . . . . . . . . . . . . . . . . . . . . . . . . . . . . . . . . . . . . 5-24.2.2 Policy Groups Tab . . . . . . . . . . . . . . . . . . . . . . . . . . . . . . . . . . . . . . . . . . . . . . . . . . . . . . 5-24.2.3 Users/Attributes Tab. . . . . . . . . . . . . . . . . . . . . . . . . . . . . . . . . . . . . . . . . . . . . . . . . . . . . 5-34.2.4 Basic Resources Tab . . . . . . . . . . . . . . . . . . . . . . . . . . . . . . . . . . . . . . . . . . . . . . . . . . . . 5-34.2.5 JAAS Resources Tab . . . . . . . . . . . . . . . . . . . . . . . . . . . . . . . . . . . . . . . . . . . . . . . . . . . . 5-34.2.6 Web Resources Tab . . . . . . . . . . . . . . . . . . . . . . . . . . . . . . . . . . . . . . . . . . . . . . . . . . . . . 5-34.2.7 RAD Resources Tab. . . . . . . . . . . . . . . . . . . . . . . . . . . . . . . . . . . . . . . . . . . . . . . . . . . . . 5-34.2.8 CORBA Operations Tab . . . . . . . . . . . . . . . . . . . . . . . . . . . . . . . . . . . . . . . . . . . . . . . . . 5-34.2.9 Status Bar . . . . . . . . . . . . . . . . . . . . . . . . . . . . . . . . . . . . . . . . . . . . . . . . . . . . . . . . . . . . . 5-34.2.10 Resizing the Main Window . . . . . . . . . . . . . . . . . . . . . . . . . . . . . . . . . . . . . . . . . . . . . . . 5-34.2.11 Using Menus . . . . . . . . . . . . . . . . . . . . . . . . . . . . . . . . . . . . . . . . . . . . . . . . . . . . . . . . . . 5-4
4.3 Connecting to a Security Center . . . . . . . . . . . . . . . . . . . . . . . . . . . . . . . . . . . . . . . . . . . . . . . 5-64.4 Authenticating the Administrator . . . . . . . . . . . . . . . . . . . . . . . . . . . . . . . . . . . . . . . . . . . . . . 5-64.5 Security Center Preferences . . . . . . . . . . . . . . . . . . . . . . . . . . . . . . . . . . . . . . . . . . . . . . . . . . 5-7
4.5.1 Setting Security Center Diagnostics . . . . . . . . . . . . . . . . . . . . . . . . . . . . . . . . . . . . . . . . 5-74.5.2 Setting Access Control Combinator. . . . . . . . . . . . . . . . . . . . . . . . . . . . . . . . . . . . . . . . . 5-84.5.3 Setting User Management Options . . . . . . . . . . . . . . . . . . . . . . . . . . . . . . . . . . . . . . . . . 5-84.5.4 Setting Security Center User Management . . . . . . . . . . . . . . . . . . . . . . . . . . . . . . . . . . . 5-84.5.5 LDAP Properties . . . . . . . . . . . . . . . . . . . . . . . . . . . . . . . . . . . . . . . . . . . . . . . . . . . . . . . 5-9
4.5.5.1 Connection Tab . . . . . . . . . . . . . . . . . . . . . . . . . . . . . . . . . . . . . . . . . . . . . . . . . . . . 5-104.5.5.2 Users Schema Tab. . . . . . . . . . . . . . . . . . . . . . . . . . . . . . . . . . . . . . . . . . . . . . . . . . 5-114.5.5.3 Lists Schema Tab . . . . . . . . . . . . . . . . . . . . . . . . . . . . . . . . . . . . . . . . . . . . . . . . . . 5-134.5.5.4 Client Authentication Tab . . . . . . . . . . . . . . . . . . . . . . . . . . . . . . . . . . . . . . . . . . . . 5-144.5.5.5 Advanced Schema Tab . . . . . . . . . . . . . . . . . . . . . . . . . . . . . . . . . . . . . . . . . . . . . . 5-154.5.5.6 LDAP Search Filter Format . . . . . . . . . . . . . . . . . . . . . . . . . . . . . . . . . . . . . . . . . . 5-16
4.6 Managing Security Attributes . . . . . . . . . . . . . . . . . . . . . . . . . . . . . . . . . . . . . . . . . . . . . . . . 5-164.6.1 Displaying Security Attribute Information . . . . . . . . . . . . . . . . . . . . . . . . . . . . . . . . . . 5-174.6.2 Creating a Defining Authority . . . . . . . . . . . . . . . . . . . . . . . . . . . . . . . . . . . . . . . . . . . . 5-184.6.3 Deleting a Defining Authority . . . . . . . . . . . . . . . . . . . . . . . . . . . . . . . . . . . . . . . . . . . . 5-194.6.4 Creating Access IDs, Groups and Roles . . . . . . . . . . . . . . . . . . . . . . . . . . . . . . . . . . . . 5-204.6.5 Deleting Access IDs, Groups and Roles . . . . . . . . . . . . . . . . . . . . . . . . . . . . . . . . . . . . 5-204.6.6 Attaching a Role to a Group . . . . . . . . . . . . . . . . . . . . . . . . . . . . . . . . . . . . . . . . . . . . . 5-204.6.7 Attaching a Role to a Group Using Drag and Drop. . . . . . . . . . . . . . . . . . . . . . . . . . . . 5-214.6.8 Detaching a Role from a Group . . . . . . . . . . . . . . . . . . . . . . . . . . . . . . . . . . . . . . . . . . . 5-21
4.7 Managing User Definitions . . . . . . . . . . . . . . . . . . . . . . . . . . . . . . . . . . . . . . . . . . . . . . . . . . 5-214.7.1 Displaying User Information . . . . . . . . . . . . . . . . . . . . . . . . . . . . . . . . . . . . . . . . . . . . . 5-224.7.2 Creating a User. . . . . . . . . . . . . . . . . . . . . . . . . . . . . . . . . . . . . . . . . . . . . . . . . . . . . . . . 5-244.7.3 Deleting a User. . . . . . . . . . . . . . . . . . . . . . . . . . . . . . . . . . . . . . . . . . . . . . . . . . . . . . . . 5-244.7.4 Editing User Information . . . . . . . . . . . . . . . . . . . . . . . . . . . . . . . . . . . . . . . . . . . . . . . . 5-254.7.5 Resetting a User Password. . . . . . . . . . . . . . . . . . . . . . . . . . . . . . . . . . . . . . . . . . . . . . . 5-254.7.6 Attaching Security Attributes to Users . . . . . . . . . . . . . . . . . . . . . . . . . . . . . . . . . . . . . 5-254.7.7 Attaching Attributes to Users Using Drag-and-Drop . . . . . . . . . . . . . . . . . . . . . . . . . . 5-264.7.8 Detaching Security Attributes from Users . . . . . . . . . . . . . . . . . . . . . . . . . . . . . . . . . . . 5-27
4.8 Managing Security Policies. . . . . . . . . . . . . . . . . . . . . . . . . . . . . . . . . . . . . . . . . . . . . . . . . . 5-274.8.1 Creating a New Policy Group . . . . . . . . . . . . . . . . . . . . . . . . . . . . . . . . . . . . . . . . . . . . 5-284.8.2 Financial Policy Group Example . . . . . . . . . . . . . . . . . . . . . . . . . . . . . . . . . . . . . . . . . . 5-30

Security Center Administrator’s Guide iLock Security Services 5.0 iii
Contents
4.8.3 Viewing an Existing Policy Group. . . . . . . . . . . . . . . . . . . . . . . . . . . . . . . . . . . . . . . . . 5-334.8.4 Editing an Existing Policy Group . . . . . . . . . . . . . . . . . . . . . . . . . . . . . . . . . . . . . . . . . 5-344.8.5 Cloning an Existing Policy Group . . . . . . . . . . . . . . . . . . . . . . . . . . . . . . . . . . . . . . . . . 5-354.8.6 Deleting an Existing Policy Group . . . . . . . . . . . . . . . . . . . . . . . . . . . . . . . . . . . . . . . . 5-354.8.7 Testing an Existing Policy Group . . . . . . . . . . . . . . . . . . . . . . . . . . . . . . . . . . . . . . . . . 5-354.8.8 Printing an Existing Policy Group . . . . . . . . . . . . . . . . . . . . . . . . . . . . . . . . . . . . . . . . . 5-364.8.9 Showing Secured Resources Associated with a Policy Group . . . . . . . . . . . . . . . . . . . 5-36
4.9 Managing Basic Resources . . . . . . . . . . . . . . . . . . . . . . . . . . . . . . . . . . . . . . . . . . . . . . . . . . 5-384.9.1 Creating a New Basic Resource. . . . . . . . . . . . . . . . . . . . . . . . . . . . . . . . . . . . . . . . . . . 5-384.9.2 Viewing an Existing Basic Resource . . . . . . . . . . . . . . . . . . . . . . . . . . . . . . . . . . . . . . . 5-394.9.3 Setting a Resource Policy . . . . . . . . . . . . . . . . . . . . . . . . . . . . . . . . . . . . . . . . . . . . . . . 5-404.9.4 Editing a Resource Policy . . . . . . . . . . . . . . . . . . . . . . . . . . . . . . . . . . . . . . . . . . . . . . . 5-424.9.5 Deleting an Existing Resource Policy . . . . . . . . . . . . . . . . . . . . . . . . . . . . . . . . . . . . . . 5-424.9.6 Deleting an Existing Basic Resource . . . . . . . . . . . . . . . . . . . . . . . . . . . . . . . . . . . . . . . 5-424.9.7 Setting Policy Groups for a Basic Resource . . . . . . . . . . . . . . . . . . . . . . . . . . . . . . . . . 5-424.9.8 Printing a Basic Resource . . . . . . . . . . . . . . . . . . . . . . . . . . . . . . . . . . . . . . . . . . . . . . . 5-43
4.10 Managing JAAS Resources. . . . . . . . . . . . . . . . . . . . . . . . . . . . . . . . . . . . . . . . . . . . . . . . . . 5-444.10.1 Creating a JAAS Resource. . . . . . . . . . . . . . . . . . . . . . . . . . . . . . . . . . . . . . . . . . . . . . . 5-444.10.2 Viewing an Existing JAAS Resource. . . . . . . . . . . . . . . . . . . . . . . . . . . . . . . . . . . . . . . 5-454.10.3 Setting the Resource Policy and Policy Groups. . . . . . . . . . . . . . . . . . . . . . . . . . . . . . . 5-454.10.4 Deleting an Existing JAAS Resource . . . . . . . . . . . . . . . . . . . . . . . . . . . . . . . . . . . . . . 5-454.10.5 Printing a JAAS Resource . . . . . . . . . . . . . . . . . . . . . . . . . . . . . . . . . . . . . . . . . . . . . . . 5-45
4.11 Managing Web Resources . . . . . . . . . . . . . . . . . . . . . . . . . . . . . . . . . . . . . . . . . . . . . . . . . . . 5-464.11.1 Web Resource Components . . . . . . . . . . . . . . . . . . . . . . . . . . . . . . . . . . . . . . . . . . . . . . 5-474.11.2 Defining A New Web Resource. . . . . . . . . . . . . . . . . . . . . . . . . . . . . . . . . . . . . . . . . . . 5-494.11.3 Setting the Resource Policy and Policy Groups. . . . . . . . . . . . . . . . . . . . . . . . . . . . . . . 5-494.11.4 Deleting A Web Resource . . . . . . . . . . . . . . . . . . . . . . . . . . . . . . . . . . . . . . . . . . . . . . . 5-494.11.5 Printing A Web Resource. . . . . . . . . . . . . . . . . . . . . . . . . . . . . . . . . . . . . . . . . . . . . . . . 5-49
4.12 Managing RAD Resources . . . . . . . . . . . . . . . . . . . . . . . . . . . . . . . . . . . . . . . . . . . . . . . . . . 5-504.12.1 Creating a New RAD Resource . . . . . . . . . . . . . . . . . . . . . . . . . . . . . . . . . . . . . . . . . . . 5-504.12.2 Viewing an Existing RAD Resource . . . . . . . . . . . . . . . . . . . . . . . . . . . . . . . . . . . . . . . 5-514.12.3 Setting the Resource Policy and Policy Groups. . . . . . . . . . . . . . . . . . . . . . . . . . . . . . . 5-514.12.4 Deleting an Existing RAD Resource . . . . . . . . . . . . . . . . . . . . . . . . . . . . . . . . . . . . . . . 5-514.12.5 Printing a RAD Resource. . . . . . . . . . . . . . . . . . . . . . . . . . . . . . . . . . . . . . . . . . . . . . . . 5-52
4.13 Managing CORBA Operation Definitions . . . . . . . . . . . . . . . . . . . . . . . . . . . . . . . . . . . . . . 5-524.13.1 Defining a New Operation . . . . . . . . . . . . . . . . . . . . . . . . . . . . . . . . . . . . . . . . . . . . . . . 5-534.13.2 Setting the Resource Policy and Policy Groups. . . . . . . . . . . . . . . . . . . . . . . . . . . . . . . 5-534.13.3 Deleting An Operation . . . . . . . . . . . . . . . . . . . . . . . . . . . . . . . . . . . . . . . . . . . . . . . . . . 5-534.13.4 Importing Operations From IDL . . . . . . . . . . . . . . . . . . . . . . . . . . . . . . . . . . . . . . . . . . 5-544.13.5 Printing An Operation . . . . . . . . . . . . . . . . . . . . . . . . . . . . . . . . . . . . . . . . . . . . . . . . . . 5-55
4.14 Securing Administrators . . . . . . . . . . . . . . . . . . . . . . . . . . . . . . . . . . . . . . . . . . . . . . . . . . . . 5-55
Chapter 5 Batch Administration
5.1 Running the Batch Administration Tool . . . . . . . . . . . . . . . . . . . . . . . . . . . . . . . . . . . . . . . . . 6-15.2 Batch Command File Commands . . . . . . . . . . . . . . . . . . . . . . . . . . . . . . . . . . . . . . . . . . . . . . 6-1
5.2.1 Comments . . . . . . . . . . . . . . . . . . . . . . . . . . . . . . . . . . . . . . . . . . . . . . . . . . . . . . . . . . . . 6-25.2.2 SKIP . . . . . . . . . . . . . . . . . . . . . . . . . . . . . . . . . . . . . . . . . . . . . . . . . . . . . . . . . . . . . . . . . 6-25.2.3 SECURITY_CENTER. . . . . . . . . . . . . . . . . . . . . . . . . . . . . . . . . . . . . . . . . . . . . . . . . . . 6-2

iv iLock Security Services 5.0 Security Center Administrator’s Guide
Contents
5.2.4 ASSOCIATE_ATTRIBUTE . . . . . . . . . . . . . . . . . . . . . . . . . . . . . . . . . . . . . . . . . . . . . . 6-25.2.5 ASSOCIATE_POLICY_GROUP . . . . . . . . . . . . . . . . . . . . . . . . . . . . . . . . . . . . . . . . . . 6-35.2.6 DISASSOCIATE_ATTRIBUTE . . . . . . . . . . . . . . . . . . . . . . . . . . . . . . . . . . . . . . . . . . . 6-35.2.7 DISASSOCIATE_POLICY_GROUP . . . . . . . . . . . . . . . . . . . . . . . . . . . . . . . . . . . . . . . 6-35.2.8 LIST_POLICY_GROUPS . . . . . . . . . . . . . . . . . . . . . . . . . . . . . . . . . . . . . . . . . . . . . . . . 6-35.2.9 LIST_RESOURCES . . . . . . . . . . . . . . . . . . . . . . . . . . . . . . . . . . . . . . . . . . . . . . . . . . . . 6-45.2.10 LIST_RESOURCE_POLICY_GROUPS . . . . . . . . . . . . . . . . . . . . . . . . . . . . . . . . . . . . 6-45.2.11 NEW_ATTRIBUTE. . . . . . . . . . . . . . . . . . . . . . . . . . . . . . . . . . . . . . . . . . . . . . . . . . . . . 6-45.2.12 NEW_POLICY_GROUP. . . . . . . . . . . . . . . . . . . . . . . . . . . . . . . . . . . . . . . . . . . . . . . . . 6-45.2.13 NEW_RESOURCE . . . . . . . . . . . . . . . . . . . . . . . . . . . . . . . . . . . . . . . . . . . . . . . . . . . . . 6-55.2.14 NEW_RESOURCE_WITH_POLICY. . . . . . . . . . . . . . . . . . . . . . . . . . . . . . . . . . . . . . . 6-55.2.15 NEW_USER . . . . . . . . . . . . . . . . . . . . . . . . . . . . . . . . . . . . . . . . . . . . . . . . . . . . . . . . . . 6-65.2.16 REMOVE_ATTRIBUTE. . . . . . . . . . . . . . . . . . . . . . . . . . . . . . . . . . . . . . . . . . . . . . . . . 6-65.2.17 REMOVE_POLICY_GROUP. . . . . . . . . . . . . . . . . . . . . . . . . . . . . . . . . . . . . . . . . . . . . 6-65.2.18 REMOVE_RESOURCE . . . . . . . . . . . . . . . . . . . . . . . . . . . . . . . . . . . . . . . . . . . . . . . . . 6-65.2.19 REMOVE_RESOURCE_POLICY . . . . . . . . . . . . . . . . . . . . . . . . . . . . . . . . . . . . . . . . . 6-65.2.20 REMOVE_USER. . . . . . . . . . . . . . . . . . . . . . . . . . . . . . . . . . . . . . . . . . . . . . . . . . . . . . . 6-75.2.21 SET_RESOURCE_POLICY . . . . . . . . . . . . . . . . . . . . . . . . . . . . . . . . . . . . . . . . . . . . . . 6-75.2.22 SHOW_POLICY_GROUP . . . . . . . . . . . . . . . . . . . . . . . . . . . . . . . . . . . . . . . . . . . . . . . 6-75.2.23 SHOW_RESOURCE. . . . . . . . . . . . . . . . . . . . . . . . . . . . . . . . . . . . . . . . . . . . . . . . . . . . 6-8
5.3 Argument Line Commands . . . . . . . . . . . . . . . . . . . . . . . . . . . . . . . . . . . . . . . . . . . . . . . . . . . 6-85.3.1 ENTITLEMENT . . . . . . . . . . . . . . . . . . . . . . . . . . . . . . . . . . . . . . . . . . . . . . . . . . . . . . . 6-85.3.2 OPERATION . . . . . . . . . . . . . . . . . . . . . . . . . . . . . . . . . . . . . . . . . . . . . . . . . . . . . . . . . . 6-85.3.3 POLICY_NAME . . . . . . . . . . . . . . . . . . . . . . . . . . . . . . . . . . . . . . . . . . . . . . . . . . . . . . . 6-85.3.4 RESOURCE. . . . . . . . . . . . . . . . . . . . . . . . . . . . . . . . . . . . . . . . . . . . . . . . . . . . . . . . . . . 6-95.3.5 SEC_ATTRIBUTE. . . . . . . . . . . . . . . . . . . . . . . . . . . . . . . . . . . . . . . . . . . . . . . . . . . . . . 6-95.3.6 START_DATE . . . . . . . . . . . . . . . . . . . . . . . . . . . . . . . . . . . . . . . . . . . . . . . . . . . . . . . . . 6-95.3.7 START_DAY . . . . . . . . . . . . . . . . . . . . . . . . . . . . . . . . . . . . . . . . . . . . . . . . . . . . . . . . . . 6-95.3.8 START_TIME . . . . . . . . . . . . . . . . . . . . . . . . . . . . . . . . . . . . . . . . . . . . . . . . . . . . . . . . . 6-95.3.9 STOP_DATE . . . . . . . . . . . . . . . . . . . . . . . . . . . . . . . . . . . . . . . . . . . . . . . . . . . . . . . . . . 6-95.3.10 STOP_DAY . . . . . . . . . . . . . . . . . . . . . . . . . . . . . . . . . . . . . . . . . . . . . . . . . . . . . . . . . . 6-105.3.11 STOP_TIME . . . . . . . . . . . . . . . . . . . . . . . . . . . . . . . . . . . . . . . . . . . . . . . . . . . . . . . . . 6-10
5.4 Special Resource Definitions . . . . . . . . . . . . . . . . . . . . . . . . . . . . . . . . . . . . . . . . . . . . . . . . 6-105.4.1 Basic Resources . . . . . . . . . . . . . . . . . . . . . . . . . . . . . . . . . . . . . . . . . . . . . . . . . . . . . . . 6-105.4.2 JAAS Resources. . . . . . . . . . . . . . . . . . . . . . . . . . . . . . . . . . . . . . . . . . . . . . . . . . . . . . . 6-105.4.3 Web Resources . . . . . . . . . . . . . . . . . . . . . . . . . . . . . . . . . . . . . . . . . . . . . . . . . . . . . . . . 6-105.4.4 CORBA Operations . . . . . . . . . . . . . . . . . . . . . . . . . . . . . . . . . . . . . . . . . . . . . . . . . . . . 6-10
Chapter 6 Reset Password6.1 Starting pw_reset . . . . . . . . . . . . . . . . . . . . . . . . . . . . . . . . . . . . . . . . . . . . . . . . . . . . . . . . . . . 7-16.2 Operation. . . . . . . . . . . . . . . . . . . . . . . . . . . . . . . . . . . . . . . . . . . . . . . . . . . . . . . . . . . . . . . . . 7-1
Security Center Administrator’s Guide iLock Security Services 5.0 v
Figures
Figure 2.1 Object Type Relationships . . . . . . . . . . . . . . . . . . . . . . . . . . . . . . . . . . . . . . . . . . . . . . . . 5-5

vi iLock Security Services 5.0 Security Center Administrator’s Guide
Figures

Security Center Administrator’s Guide iLock Security Services 5.0 vii
Tables
Table 1.1 iconfig Command-Line Options . . . . . . . . . . . . . . . . . . . . . . . . . . . . . . . . . . . . . . . . . . . 2-3Table 3.1 Security Center Service Command-Line Options . . . . . . . . . . . . . . . . . . . . . . . . . . . . . . 4-2Table 4.1 Security Center Admin Tool Command-Line Options . . . . . . . . . . . . . . . . . . . . . . . . . . 5-1Table 4.2 LDAP Search Filter Symbols. . . . . . . . . . . . . . . . . . . . . . . . . . . . . . . . . . . . . . . . . . . . . 5-16Table 5.1 Security Center Admin Tool Command-Line Options . . . . . . . . . . . . . . . . . . . . . . . . . . 6-1Table 6.1 Security Center Admin Tool Command-Line Options . . . . . . . . . . . . . . . . . . . . . . . . . . 7-1

viii iLock Security Services 5.0 Security Center Administrator’s Guide
Tables
Security Center Administrator’s Guide iLock Security Services 5.0 ix
About This Document
Who should read this guide?Administrators and programmers who will be using iLock Security Services to manage secured resources. Readers of this guide should be familiar with the concepts presented in the iLock Security Services: System Concepts Guide.
If you are already familiar with the basic concepts of the iLock Security Services, you may choose to skip directly to Chapter 3, Security Center Operation.
Technical SupportYour feedback is important to us. Please provide input to the 2AB Technical Support Staff.
You can communicate comments to and request help from the Technical Support Staff via the following methods:
Telephone
U.S. or Canada877.334.9572 (Toll Free)
All Other Countries+1.205.621.7455

About This Document Technical Support
x iLock Security Services 5.0 Security Center Administrator’s Guide

Security Center Administrator’s Guide iLock Security Services 5.0 1-1
Chapter 1 Configuration
The following sections detail the configuration environment that must be established to run the Security Center and its administrative tools.
1.1 Java Virtual MachineThe Security Center software was developed and tested using Java Version 1.4. The Security Center and associated administration programs should be run with a Java Runtime Environment (JRE) that is version 1.4. The installation program automatically installs a JRE in the jre subdirectory of the installation.
1.2 Environment VariablesThe scripts provided with the Security Center depend on the setting of various environment variables. If you do not plan to use any of the scripts provided with the product, only the PATH environment variable must be set.
On all operating system platforms, there are three environment variables used by all Security Center services and associated utilities: PATH, JRE_HOME and ILOCK_HOME. Each of these variables should have been set when running the installation program. If not, use the Windows Control Panel to set the following variables.
1. PATH - this environment variable must include the full path name for the bin subdirectory of the iLock Security Services installation. An additional requirement for compiling demonstration programs is the PATH variable also includes the bin subdirectory of a Java JDK installation.
2. JRE_HOME – this environment variable is set to the path of the home directory of a Java (version 1.3 or 1.4) Runtime Environment.
3. ILOCK_HOME - this environment variable must be set to the path of the iLock Security Service installation directory. If you will not be using the scripts provided, the variable is not required.
1.3 Network PortsEach instance of the Security Center that runs on a single machine utilizes two consecutive network ports that are unique to that instance. When starting the Security Center, the -port command-line option is used to specify the first of the two consecutive ports. If the port is not specified, the port 8998 will be used as the default port. It should be noted that this results in the use of both ports 8998 and 8999.
1.4 Installing the LicenseLicensed users of the iLock Security Services software will be provided with a special license file, which will provide permissions for running the various components that make up iLock Security Services. This file must be installed with each Security Center installation in order to utilize the functionality of the Security Center and the products that comprise the iLock family of security components.
Enterprise licenses may restrict features available, operating system platforms supported and/or allowable host machines. Each feature may also have a fixed expiration date.
Configuration 1.5 Security Center Connections
1-2 iLock Security Services 5.0 Security Center Administrator’s Guide
The license file will be named xxxxx.lic, where xxxxx indicates the enterprise that owns the license. To install the license file, move a copy of the license file to the lib subdirectory of the iLock installation directory. There should be only be one license file in this directory.
Note The license file only needs to be installed on the machine(s) where the Security Center will run. Components that require licensing permissions will get them from the Security Center.
1.5 Security Center ConnectionsThe Security Center administration tools and all iLock components require information that allows them to connect with an instance of the Security Center. That information is the instance name and its associated host name and port. The iconfig tool is used to configure this information and must be run on all machines where administrative tools and iLock components will run.
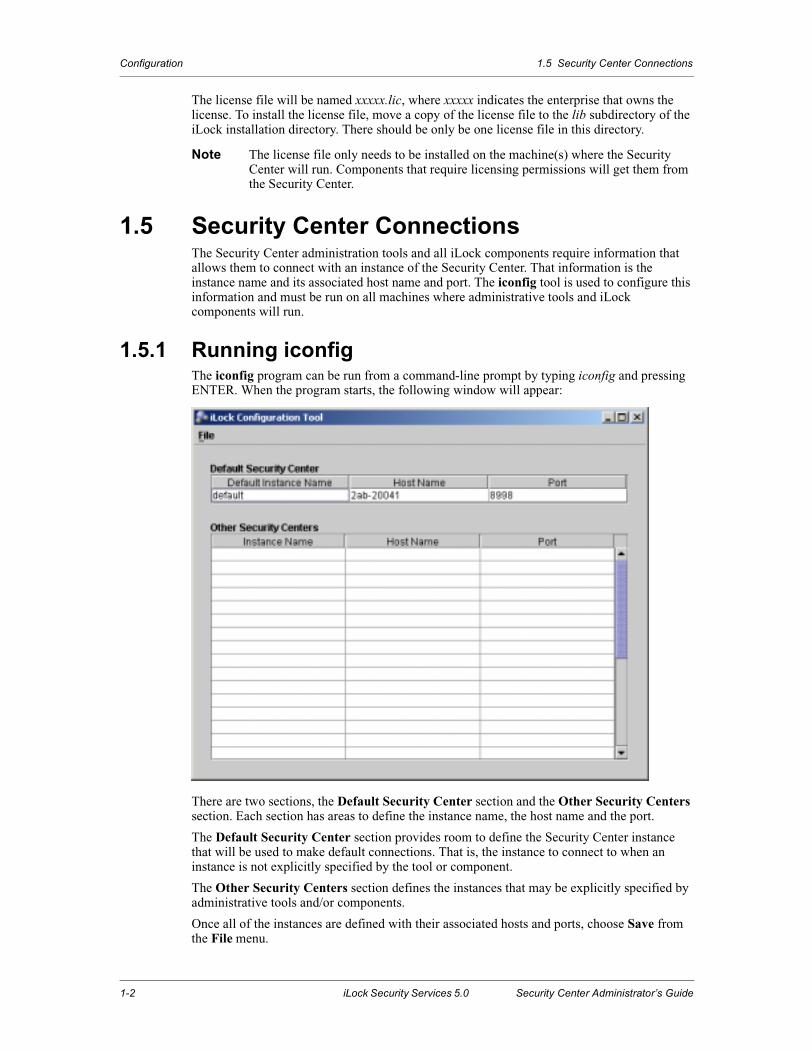
1.5.1 Running iconfigThe iconfig program can be run from a command-line prompt by typing iconfig and pressing ENTER. When the program starts, the following window will appear:
There are two sections, the Default Security Center section and the Other Security Centers section. Each section has areas to define the instance name, the host name and the port.
The Default Security Center section provides room to define the Security Center instance that will be used to make default connections. That is, the instance to connect to when an instance is not explicitly specified by the tool or component.
The Other Security Centers section defines the instances that may be explicitly specified by administrative tools and/or components.
Once all of the instances are defined with their associated hosts and ports, choose Save from the File menu.

Security Center Administrator’s Guide iLock Security Services 5.0 1-3
1.5.2 Command-Line Options for iconfig Configuration
To exit the program, choose Exit from the File menu. If you have not saved your information, a dialog will remind you to do so.
1.5.2 Command-Line Options for iconfigTable 1.1 lists the command-line options for the iconfig program.
1.5.3 Distributing Duplicate ConfigurationsThere may be many machines that are required to run the iconfig program. This can be bypassed by distributing the file that is created by the iconfig program. This file is named sc.properties and is located in the lib subdirectory of the iLock installation.
Simply run the iconfig program on one machine and then distribute the sc.properties files to all machines that require configuration.
Table 1.1 iconfig Command-Line Options
Command Value
-corba Must be specified if an orbLock component will need access to Security Center instances. If not using the orbLock product, do not use this.
-max_instances xxx The maximum number of lines that will appear in the table defining "Other Security Centers." The default is 30.
-noedit Normally, the iconfig tool will validate that host names specified can lookup a valid network address. This editing feature is turned off by using this option.

Configuration 1.5.3 Distributing Duplicate Configurations
1-4 iLock Security Services 5.0 Security Center Administrator’s Guide

Security Center Administrator’s Guide iLock Security Services 5.0 2-1
Chapter 2 Security CenterOverview
With the explosion of online services, controlling access to enterprise computing resources is increasingly critical. iLock Security Services is a collection of software components that an enterprise can use to secure access to a wide variety of computing resources that belong to that enterprise. The types of enterprise resources that can be protected include distributed applications, database elements, Web pages, and so forth. In fact, any enterprise resource that can be assigned a unique name can be secured, and these resources can exist in various infrastructure environments such as Web Servers, J2EE Application Servers and CORBA-based systems.
The Security Center serves as a repository of information related to securing enterprise computing resources and processes queries from the iLock components that need the security-related data it manages. This includes information about users, secured resources and security policies. The Security Center is the central component of the iLock Security Services software.
2.1 iLock Security ServicesThe components that make up the iLock Security Services include distributed services that help manage access to secured resources, administrative tools that manage these distributed services and programming interfaces (APIs) that can be used by applications to control access to secure enterprise resources.
The iLock Security Services is a collection of software components designed to protect resources unique to a particular computing environment. Each of these components use the Security Center as the repository for security-related configurations and policies. These components are packaged in a set of products that are each geared to a specific environment. Current products in the iLock Security Services family are:
1. jLock - provides authentication and access control facilities for applications running on J2EE Application Servers, servlets or standalone Java applications. For more information, please see the iLock Security Services: jLock User Guide.
2. webLock - secures access to Web resources such as Web pages, servlets and JavaServer Pages. For more information, please see the iLock Security Services: webLock User Guide.
3. orbLock - secures access to resources in an OMG CORBA-based environment. For more information, please see the iLock Security Services: orbLock User Guide.
2.2 Security Center InstancesA single running instance of the Security Center is referred to as a Security Center Instance. An enterprise may run one or more copies of the Security Center; however, each instance must be assigned an instance name that is unique with the enterprise. Each instance of the Security Center represents a domain of security information that is available to the iLock Security Services components that use that instance of the Security Center.
Many enterprises will only run a single instance of the Security Center. Larger, more complex enterprises may choose to run multiples instances of the Security Center, with each managing a different domain of security-related information. On the other hand, an enterprise might

Security Center Overview 2.3 Objects Managed by Security Center
2-2 iLock Security Services 5.0 Security Center Administrator’s Guide
manage the security of the entire enterprise with a single instance. One or more applications will interact with a Security Center instance to provide security services for a particular environment.
Example An enterprise might have separate security center instances to manage separate organizational departments. An application using jLock might specify that it will use the Security Center named accounting, and a different application using jLock might specify that it will use the Security Center named engineering.
2.3 Objects Managed by Security CenterThe Security Center manages objects required to secure enterprise resources. This section describes different types of objects that are managed by the Security Center.
2.3.1 UsersUsers are defined to represent either a human user of systems or a system itself. For example, an accounting system might be defined as user Acct101, and a human user of that system might be defined as Susan. The following information can be specified when defining a user.
• First Name
• Middle Name or Initial
• Last Name
• User ID
• User Domain
The first, middle and last names are used to identify the human or system.
The User ID is used when authenticating a user (i.e. logging on). The User ID must be unique within the Security Center. Users are associated with zero or more security attributes. Applications that enforce access control rules use those attributes to make the access decisions.
The user’s domain is simply a group of users. Controlling management of different user domains is a planned enhancement for a future release.
2.3.2 Security AttributesSecurity attributes, used to define an identity or a privilege, are associated with User IDs to provide a set of privileges for that user and will be used in security policies (rules) to control access to secured resources. The Security Center supports three types of security attributes:
1. Access ID - an attribute that denotes an ID that can be used to access certain secured resources. Each individual user might be associated with a unique Access ID, or multiple users might be associated with the same Access ID. The Security Center always defines a special Access ID that has the value of Public. This special Access ID can be used in security policies to indicate that anyone, even users that are not assigned an Access ID, will be allowed to access a given resource.
2. Group - an attribute that denotes an ID that can be assigned to one or more users, typically to indicate that all members of a given Group possess certain privileges. The Group attribute is typically associated with a group of users that are related by geography, enterprise, department, etc.
3. Role - an attribute that denotes the role (typically the job function) that users possess. The same Role attribute can be assigned to many users. The Role attribute is somewhat different in that it can also be associated with a Group attribute as well as a user definition. If a Group has one or more associated Roles, then any users that are associated with that Group are automatically associated with the Roles possessed by that Group

Security Center Administrator’s Guide iLock Security Services 5.0 2-3
2.3.3 Secured Resources Security Center Overview
Note It is important to note that security attributes, not user definitions, are used to define security policies. User definition may be associated with one or more security attributes.
The security attribute is a data structure that is composed of three data members.
1. Attribute Type - Access ID, Group or Role.
2. Defining Authority - defines the entity (organization) that has defined and certified the attribute. Some enterprises may only define a single Defining Authority, while others may define multiple defining authorities.
3. Value - the value for an Access ID will typically be a User name, Group name or Role name. For example, a Group attribute might have a value of Engineering.
There are two special security attributes that are automatically created and managed by the Security Center. The first special attribute is an Access ID whose value is PUBLIC and whose Defining Authority is 2AB. Some components will always assign every user to that attribute, even unauthenticated users. Policies can then be built that will allow access to all users. The second special attribute is an Access ID whose value is AUTHENTICATED and whose Defining Authority is 2AB. Users that have successfully been authenticated (i.e. logged in) will automatically be assigned this attribute.
2.3.3 Secured ResourcesA secured resource is anything within an enterprise computing environment that should be protected from unauthorized access. That might be a processor, an application, a particular function of an application, a file, a database or a particular record in a database.
The five types of secured resources currently supported by the Security Center are Basic Resources, JAAS Resources, RAD Resources, Web Resources, and CORBA Operations. The meaning of the resource will depend on the iLock component protecting the resource. For example, when using orbLock, a RAD Resource can represent anything that an application wants to protect (such as a database record), whereas a CORBA Operation is intended to represent a single, CORBA IDL-defined operation.
Although each of these secured resources are represented in the same format internally, each is presented visually to the administrator using somewhat different formats. The Security Center presents different views of resources depending on the context in which they will be used. This effectively means that an administrator will view different types of resources with views that present different formats. Secured resources are identified by a unique name within the Security Center. Although the different iLock components will control access to secured resources that may be identified in different ways, all secured resources are eventually mapped to a common format within the Security Center.
A secured resource may be associated with zero or more security policies (see Section 2.3.4, Security Policies). When an access decision for a resource is made, the user accessing that resource must satisfy each of the security policies that are associated with that resource.
2.3.4 Security PoliciesA Security Policy is comprised of a set of operation policies that govern whether or not a specific operation should be allowed on a particular resource. For example, if a specified file is the resource to be protected, there will be different rules that govern the read and write operations.
Since a security policy must be capable of different rules for different operations, the security policy is comprised of one or more operation policies. For example, a security policy might consist of two operation policies, one for the read operation and another for the write operation. Any operation can be defined. For example, we could define an operation named obliterate.
Each operation policy will consist of one or more rules that define how the access decision will be made. Since these rules can be time dependent, we call these Timed Rules.

Security Center Overview 2.3.4 Security Policies
2-4 iLock Security Services 5.0 Security Center Administrator’s Guide
A Timed Rule is a rule used to make access decisions and consists of a rule type, a collection of security attributes, entitlement rules and time attributes that indicate the time constraints to place on the rule.
Timed Rule Types
There are five types of Timed Rules:
1. Required Attributes
Indicates that a user must possess all of the attributes defined in the rule in order to meet the access requirements of the rule. For example, if a Timed Rule defines two attributes, AccessID-Smith and Role-Doctor, then a user is required to have both of these attributes to meet the access requirements.
2. Any Attributes
Indicates that if a user possesses any one of the attributes defined in the rule, the user then meets the access requirements of the rule. For example, if a Timed Rule defines two attributes, AccessID–Smith and Role-Doctor, then a user having either of these two attributes will meet the access requirements.
3. Deny Attributes
Indicates that if a user possesses any of the attributes defined in the rule, the user will be denied access. For example, if a Timed Rule defines two attributes, AccessID–Smith and Role-Doctor, then a user having either of these attributes will be denied access.
4. Anybody Allowed
Indicates that all users, regardless of their attributes, will meet the access requirements.
5. Nobody Allowed
Indicates that no users, regardless of their attributes, will meet the access requirements.
Precedence of Timed Rule Types
When evaluating a sequence of Timed Rules, the Timed Rule types are evaluated and enforced in the following precedence order:
• Nobody Allowed
• Deny Attributes
• Required Attributes
• Any Attributes
• Anybody Allowed
For example, consider a sequence of rules that has a rule type of Nobody Allowed and another one that has a type of Any Attributes. The rule of Nobody Allowed will take precedence, and even people having attributes that would match the Any Attributes rule will be denied. This precedence is time-dependent. If a higher precedence rule type does not meet a specified time constraint, its precedence is of no importance. For example, if the Nobody Allowed type is only to be enforced on Tuesdays, it precedence is meaningless on Wednesday.
Timed Rule Security Attributes
A Timed Rule can have a sequence of Security Attributes that are used to make access decisions. The security attributes are required for the Required Attributes, Any Attributes and Deny Attributes types. They have no meaning for the Anybody Allowed and Nobody Allowed rule types.
Timed Rule Entitlement Rules
A Timed Rule can have a collection of entitlement rules that are enforced when making access decisions. An entitlement rule consists of a variable name, a variable value, a variable type and a variable relationship (e.g. greater than). When an application requests an access decision, it must provide the variable name and a value. The access decision engine will validate the variable’s type and insure that the relationship specified in the entitlement rule is correct. For example, an entitlement rule might have a variable named Salary, a value of 40000, a type of

Security Center Administrator’s Guide iLock Security Services 5.0 2-5
2.3.5 Resource Policies and Policy Groups Security Center Overview
decimal and a relationship of greater than. If an application provides entitlement data with a variable named Salary and a value of 39000, the entitlement rule will deny access. On the other hand, if the value is 410000, the entitlement rule will allow access.
Timed Rule Time Constraints
Each Timed Rule can specify the time frame during which the rule is to be effective. The time constraint may be in the form of an exact time (e.g. 10:01 AM January 23, 1999) or in the form of a recurring-day-of-the-week. A recurring-day-of-the-week time constraint may be used to make a rule effective Tuesday through Friday of every week.
Combining Timed Rules
Once you have an understanding of the different rule types and their precedence, it becomes quite easy to build security policies, consisting of multiple rules, that would otherwise seem difficult to express.
As an example, suppose you want to allow everyone in the Engineering Department to have access to a set of documents (secured resources); however, the exception to this rule is that Lawyers in the Engineering Department should not be allowed to access the documents. To accomplish this, simply create two rules. The first rule, an Any Attributes type, allows access to anybody with a Group attribute of engineering. The second rule, a Deny Attributes type, prevents anyone with a Role attribute of lawyer from accessing the documents.
2.3.5 Resource Policies and Policy GroupsSecurity policies may manifest themselves in two different forms.
The first is referred to as a Resource Policy. This is an unnamed security policy that is associated with one and only one protected resource. A protected resource may or may not have an associated resource policy.
The second is referred to as a Policy Group. This is a named security policy that may be associated with zero or more protected resources. A protected resource may or may not have an associated policy group. A protected resource may have multiple associated policy groups.
2.4 Object Type RelationshipsFigure 2.1, Object Type Relationships, illustrates the relationship between the various object types managed by the Security Center.
Figure 2.1 Object Type Relationships
In the above illustration, note that the solid lines indicate a relationship between two data elements. Some important points to note about these relationships are:
User
User
User
SecurityAttribute
SecurityAttribute
SecurityAttribute
SecurityPolicy
SecurityPolicy
SecureResource
SecureResource
SecureResource

Security Center Overview 2.5 LDAP and Custom Interfaces
2-6 iLock Security Services 5.0 Security Center Administrator’s Guide
• A user can be associated with zero or more security attributes.
• Different users can be associated with the same security attribute.
• A security policy can be associated with zero or more security attributes.
• Different security policies can be associated with the same security attribute.
• Secured resources can be protected by one or more security policies.
• Different secured resources can share the same security policy.
2.5 LDAP and Custom InterfacesMany enterprises have existing repositories that maintain information about users, User IDs and security attributes (Groups and Roles) that are associated with these users. A common infrastructure for managing these repositories is an LDAP-based (Lightweight Directory Access Protocol) directory service. Other enterprises manage this task with other infrastructures, including those developed within the enterprise.
The Security Center provides the ability to interface with these infrastructures to retrieve information about users and their associated security attributes. A special LDAP option allows the Security Center to interface with an existing LDAP-based service. An implementation of the CustomUserManager interface will allow those enterprises to have the Security Center interface with non-LDAP-based infrastructures.
2.5.1 LDAP InterfaceThe Security Center maintains information about users and the security attributes associated with those users in its database; however, there are many enterprises that already maintain that information in an existing repository. That repository is often based on the Lightweight Directory Access Protocol (LDAP). Other repositories may be proprietary to the enterprise.
The Security Center allows you to configure and use these repositories in place of the normal Security Center database for users and their security attributes. The interface that it provides is read-only, and the management of users and/or their attributes must be performed with tools native to the repository.
For LDAP-based repositories, the Security Center supports a variety of schema definitions. Most schema definitions follow one of two paradigms. The first is one where the security attributes associated with a user are defined as attributes in user entries. This is the paradigm used by IBM Directory Server, Sun ONE Directory Server and Microsoft Active Directory. The second is one where there are entries for Groups and/or Roles that have lists of users that belong to the Group/list. This is the paradigm used by IBM SecureWay, Netscape and Domino directory servers. The schema to be supported is configured using the Security Center Administration Tool.
In addition to defining various schemas, you may choose from a variety of security mechanisms to be used in accessing the LDAP-based repository. This includes Simple LDAP Authentication, Simple Authentication and Security Layer (SASL) and SSL transport layer security.
2.5.2 CustomUserManager InterfaceFor those enterprises that have an existing proprietary user repository, it may be interfaced with the Security Center by developing a simple Java class that implements the com.twoab.ilock.util.CustomUserManager interface. Simply develop and compile the class and ensure that it is in the classpath when running the Security Center.

Security Center Administrator’s Guide iLock Security Services 5.0 2-7
2.6 Security Center Administration Security Center Overview
The interface that must be implemented is as follows:
2.6 Security Center AdministrationThere are two tools provided to allow administrators to manage the Security Center. There is a program with a graphical user interface that allows administrators to manage resources, policies, users and their associated attributes. Similarly, there is a command-line tool that can perform the same tasks in a batch mode by reading management tasks to be performed from a text file.
The Security Center Administration Tool is a graphical user interface that is provided to manage Security Center instances. This tool can connect to any instance of a Security Center on the network and manage its resources. It can manage security policies, secured resource definitions and user/privilege information and can support multiple types of secured resources appropriate for different computing environments and different iLock components.
The Security Center Batch Administration Tool, just like the GUI-based Administration Tool, provides security administrators with the ability to define and manage the security information within the Security Center. This tool uses a text-based file that provides instructions that describe the administrative tasks to be performed. This tool can connect to different instances of the Security Center.
public interface CustomUserManager {
public void initialize(Properties properties);
public String [] getUsers();
public boolean authenticate(String user_id, String password);
public String getDefiningAuthority();
public String [] getGroups(String user_id);
public String [] getRoles(String user_id);
public String [] getAccessIds(String user_id);
public String [] getGroups();
public String [] getRoles();
public String [] getAccessIds();
public String describe(String user_id);
}

Security Center Overview 2.6 Security Center Administration
2-8 iLock Security Services 5.0 Security Center Administrator’s Guide

Security Center Administrator’s Guide iLock Security Services 5.0 3-1
Chapter 3 Security CenterOperation
The Security Center Service provides a storage repository for security information. This chapter provides step-by-step instructions for running an instance of the Security Center and the options that can be used when running the service. These instructions assume that a Windows NT platform will be used; however, other platforms could be easily substituted.
3.1 Security Center InstancesEvery time the Security Center service is run, it is referred to as an instance of the Security Center. Each instance has its own database, which represents a domain of security information. Some enterprises may choose to support a single security domain and, hence, run only one instance of the Security Center. Others may choose to run multiple security domains and, hence, run multiple instances of the Security Center.
Every instance of the Security Center is identified by its instance name. A Security Center’s instance name must be unique throughout an enterprise. The instance name is used to uniquely identify a security domain (a Security Center instance). It is used when locating the instance of the Security Center and in naming the database for this instance of the Security Center. The default value for the instance name is default.
3.2 Security Center DatabaseThe Security Center maintains state information in text files (properties) or in embedded database files. The name of a Security Center’s database will be xxxx_rules.db where xxx is the instance name. Installations should back up this database file on a regular basis.
The embedded database software utilized by the Security Center is the "Berkeley DB Embedded Database," a product of Sleepycat Software, Inc.
3.3 Starting the Security CenterThe Security Center Service can be started by using by the sec_ctr program provided with the iLock Security Services installation.
To start the Security Center service:
1. Open a command-line window.
2. Type sec_ctr and press ENTER.
The Security Center should output a message indicating that it has started. Allow the Security Center to continue to run. A Security Center started with no command-line arguments will run with an instance name of default.

Security Center Operation 3.4 Terminating the Security Center
3-2 iLock Security Services 5.0 Security Center Administrator’s Guide
Table 3.1 lists the command-line options for the sec_ctr program.
3.4 Terminating the Security CenterAn instance of the Security Center can be safely terminated by pressing CTRL+C in the DOS window that is running the Security Center.
On Unix machines only, you can use the kill command; however, you should not use the kill –9 command as this may not allow the service to perform an orderly shutdown of its database. The kill command must be issued against the corresponding java session, not the sec_ctr session. The correct java session should have a PID number of one greater than the sec_ctr session.
Table 3.1 Security Center Service Command-Line Options
Command Value
-instanceThis optional argument indicates the service’s instance name. If this command-line parameter is not specified, a value of default will be used. The instance name must be globally unique within an enterprise.
-port PORT
This optional argument indicates that the service will listen for requests on the port specified by PORT. If this command-line parameter is not specified, a value of 8098 will be used. If you run multiple instances of the Security Center on a single host, you must specify different port numbers.
-data DIR
This is an optional argument where DIR indicates the directory where the Security Center configuration and database files should be located. If this argument is not specified, the directory will default to the data subdirectory of the iLock installation directory.

Security Center Administrator’s Guide iLock Security Services 5.0 4-1
Chapter 4 Security CenterAdministration Tool
The Security Center Administration Tool provides security administrators with the ability to define and manage the security information within the Security Center. This tool provides a graphical user interface to make the management of this information visually intuitive and easy to learn. This tool can connect to different instances of the Security Center, allowing a single administrator to manage multiple security domains from one console.
This tool allows an administrator to define new users and manage their passwords. It allows the definition of security attributes (Access IDs, Groups and Roles) and the association of these attributes with a user. It allows the easy definition and management of security policies, including a feature that allows policy testing. It allows the definition of secured resources (Basic Resources, JAAS Resources, WEB Resources, RAD Resources and CORBA Operations) and allows the association of security policies with the defined resource.
There is also a command-line utility program that supports the management of a Security Center. This utility program provides much of the functionality provided by the Security Center Administration Tool but has the advantage of being capable of being packaged into an executable script that performs a set of administrative tasks. For more information on this utility program, please see Chapter 5, Batch Administration.
This chapter describes the process of starting and stopping the Security Center Administration Tool and describes the use of the graphical windows presented by the program.
4.1 Running the Security Center Administration ToolTo start the Security Center Administration Tool:
1. Open a command-line window.
2. Type sc_admin and press ENTER.
Table 4.1 lists the command-line options for the sc_admin program.
4.2 Main WindowWhen the Security Center Administration Tool is started, the main window is displayed. By navigating through this window you can access all the functionality of this tool. The main window appears as follows:
Table 4.1 Security Center Admin Tool Command-Line Options
Command Value
-nologin Bypass user login process.

Security Center Administration Tool 4.2.1 Menu Bar
4-2 iLock Security Services 5.0 Security Center Administrator’s Guide
4.2.1 Menu BarThe menu bar contains ten menus. The File menu contains commands to connect to the Security Center and to exit the program. The Policy Groups menu contains commands to add a new security policy group and to print an existing policy group. This menu is activated when the Policy Groups tab is selected. The Users/Attributes menu contains commands to define new users, define security attributes and to associate security attributes with users. This menu is activated when the Users/Attributes tab is selected. The Basic Resources menu contains commands to manage the definition of Basic Resources, represented with a single string, and to associate security policies with these resources. This menu is activated when the Basic Resources tab is selected. The JAAS Resources menu contains commands to manage the definition of JAAS Resources and to associate security policies with these resources. This menu is activated when the JAAS Resources tab is selected. The Web Resources menu contains commands to manage the definition of Web Resources and to associate security policies with these resources. This menu is activated when the Web Resources tab is selected. The RAD Resources menu contains commands to manage the definition of RAD Resources and to associate security policies with these resources. This menu is activated when the RAD Resources tab is selected. The CORBA Operations menu contains commands to manage the definition of IDL operations, import IDL and associate security policies with operations. This menu is activated when the CORBA Operations tab is selected. The Preferences menu contains commands to set configuration options used by the Security Center. The Help menu contains a command to display version information about this product.
4.2.2 Policy Groups TabThe Policy Groups tab allows you to view the existing named security policies, and by selecting a policy group, a description of the policy group will appear in the rightmost panel. From this panel, you can create, edit, copy, test and print security policy groups. You can also view the secured resources (Basic Resources, JAAS Resources, Web Resources, RAD Resources or CORBA Operations) associated with each policy group.

Security Center Administrator’s Guide iLock Security Services 5.0 4-3
4.2.3 Users/Attributes Tab Security Center Administration Tool
4.2.3 Users/Attributes TabThe Users/Attributes tab allows you to manage the definition of users (both human and machine) and security attributes (Access IDs, Groups and Roles). It also provides the capability to manage the association of security attributes with users
4.2.4 Basic Resources TabA Basic Resource is one that is represented by a single string value. The Basic Resources tab allows you to view the defined Basic Resources, and by selecting a Basic Resource, a description of the Basic Resource and any associated security policies will appear in the rightmost panel. From this panel, you can create, edit and print Basic Resources and their associated policies.
4.2.5 JAAS Resources TabA JAAS Resource is one that is represented by a single string value and maps to a JAAS ResourcePermission object. The JAAS Resources tab allows you to view the defined JAAS Resources, and by selecting a JAAS Resource, a description of the JAAS Resource and any associated security policies will appear in the rightmost panel. From this panel, you can create, edit and print JAAS Resources and their associated policies.
4.2.6 Web Resources TabThe Web Resources tab allows you to view the defined, secured Web Resources that can be protected by webLock, and by selecting a Web Resource view, a description of the Web Resource and any associated security policies will appear in the rightmost panel. From this panel, you can create, edit and print Web Resources and their associated policies.
4.2.7 RAD Resources TabThe RAD Resources tab allows you to view the defined, secured resources that can be protected by the orbLock component, and by selecting a RAD Resource view, a description of the RAD Resource and any associated security policies will appear in the rightmost panel. From this panel, you can create, edit and print RAD Resources and their associated policies.
4.2.8 CORBA Operations TabThe CORBA Operations tab allows you to view the defined IDL operations, and by selecting a CORBA Operation view, a description of the operation and any associated security policies will appear in the rightmost panel. From this panel, you can create, edit and print CORBA Operations and their associated policies. In addition, you can import new operation definitions from IDL files.
4.2.9 Status BarThe Status bar is located in the lower right corner of the window. It indicates the connection status of the administrative tool. If the tool is connected to a Security Center, the instance name of the Security Center is displayed. The Status bar also displays the login status. If the administrator has not successfully logged in, the tool will only allow display capabilities.
4.2.10 Resizing the Main WindowThe main window can be resized using standard resizing techniques for the platform that you are using. For example, on a Windows NT platform, you can drag one of the edges of the window to resize it. The size of the window is maintained persistently; therefore, when you restart the program, its size will be the same as the last time it ran.

Security Center Administration Tool 4.2.11 Using Menus
4-4 iLock Security Services 5.0 Security Center Administrator’s Guide
In addition to resizing the entire window, the amount of space occupied by the left and right panels can be adjusted by placing the cursor on top of the bar separating the panels and dragging it to the desired spot. The following is an example of the main window with the leftmost panel occupying most of the space.
4.2.11 Using MenusTypically, there are two ways to access menu operations when using this tool. The first is by using the main menu bar at the top of the tool’s main window, and the second is by using popup menus displayed by right-clicking selected items.
The menu commands available in the main window will depend on the currently selected tab and the selected item within that tab. For example, in the screenshot below, a user is selected in the leftmost panel, and the Users/Attributes menu is displaying the functionality that can be performed on a user.
Notice that the Policy Groups, Basic Resources, JAAS Resources, Web Resources, RAD Resources and CORBA Operations menus are disabled because the Users/Attributes tab is selected. This is the technique used to choose menu commands for all of the tabs within this tool.

Security Center Administrator’s Guide iLock Security Services 5.0 4-5
4.2.11 Using Menus Security Center Administration Tool
Another method of obtaining the same menu commands is right-clicking the selected user, which will result in a popup menu being displayed with the same menu commands.

Security Center Administration Tool 4.3 Connecting to a Security Center
4-6 iLock Security Services 5.0 Security Center Administrator’s Guide
4.3 Connecting to a Security CenterTo establish a connection to a Security Center, choose Connect …from the File menu. The Connect to Security Center dialog will be displayed.
Select the instance name of the Security Center you wish to administer in the Instance drop-down combo box.
Click Connect to initiate the connection or click Cancel to close the dialog. If the Save check box is selected, the program will automatically connect to this Security Center when started again. To clear this configuration, choose Clear saved auto-connection… from the File menu in the main window.
4.4 Authenticating the AdministratorWhen a connection to a Security Center is established, the administrator is asked to provide a User ID and Password that authenticates that they are a valid administrator.
Type the User ID and Password in the User Id and Password text boxes, and then click OK.
Note See Section 4.14, Securing Administrators, for details on securing the administrative tool.

Security Center Administrator’s Guide iLock Security Services 5.0 4-7
4.5 Security Center Preferences Security Center Administration Tool
4.5 Security Center PreferencesThe Preferences dialog is used to configure some operational aspects of the Security Center. The description of these features are in the following sections. To set preferences for the Security Center, choose Security Center... from the Preferences menu and the Preferences dialog will be displayed.
4.5.1 Setting Security Center DiagnosticsThe Security Center Diagnostics area contains three options for specifying the level of diagnostic messages the Security Center should output. If the None option button is selected, diagnostic messages will not be output. If the Low option button is selected, only recoverable error messages will be output. If the High option button is selected, all diagnostic messages will be output. It should be noted that there could be performance implications if all diagnostic messages are always output. This option should be reserved for debugging activities. The diagnostics setting is effective immediately. There is no requirement to restart the Security Center.

Security Center Administration Tool 4.5.2 Setting Access Control Combinator
4-8 iLock Security Services 5.0 Security Center Administrator’s Guide
4.5.2 Setting Access Control CombinatorWhen access decisions are made, each policy associated with a resource is evaluated, and the combination of these results provides the decision requested. If the And Combinator option button is selected, all of the policies must evaluate to allow access. This is the default combinator policy. If the Or Combinator option button is selected, only one of the policies must evaluate to allow access.
4.5.3 Setting User Management OptionsThis section controls the creation and association of some standard security attributes when creating a new user.
If the Generate Access ID with Defining Authority text field is set, then when a new user is created, an Access ID security attribute is created that has a defining authority defined by the text field and a value equal to the user ID. This security attribute is associated with the user.
If the Create Public Access ID checkbox is selected, then when a new user is created, the special Access ID security attribute whose defining authority is 2AB and value is PUBLIC is associated with the user.
4.5.4 Setting Security Center User ManagementThe Security Center User Management area contains options that control how user and security attribute information is managed. If the Standard option button is selected, the Security Center database will be used to maintain information about users and their security attributes. The Security Center Administration Tool can be used to managed the creation/deletion of users and/or security attributes. If the LDAP option button is selected, the Security Center will interface with an LDAP-based repository that manages information about users and/or security attributes. Use the LDAP Properties button to configure properties necessary to interface with an LDAP-based service (See section below). If the Custom option button is selected, the Security Center will interface with a customer provided Java class that provides information about users and/or security attributes. The Custom Class text box is used to identify the customer provided Java class, and the Property File text box identifies a file that has properties that are passed to the initialize operation of the customer provided class.
When the User Management option is changed (e.g. change to LDAP), the change is not effective until the Security Center is restarted.

Security Center Administrator’s Guide iLock Security Services 5.0 4-9
4.5.5 LDAP Properties Security Center Administration Tool
4.5.5 LDAP PropertiesThe LDAP Properties button will display a dialog that is used to configure information necessary to interface with an LDAP-based service. The dialog has five tabs which are described in the subsections that follow. The administrator of the LDAP-based service will have to provide the information required by this dialog.

Security Center Administration Tool 4.5.5 LDAP Properties
4-10 iLock Security Services 5.0 Security Center Administrator’s Guide
4.5.5.1 Connection TabThe Connection tab provides information required to connect to an LDAP service.
The Host text box defines the host name of the machine where the LDAP service is running.
The Port text box defines the port number that the LDAP service listens on.
The Security Protocol text box defines the security transport protocol to use. The only valid value is ssl. If no value is specified, the transport protocol used is simple TCP/IP.
The Certificate Authority Path text box defines the path of a keystore that contains the certificates that are used to certify servers. This text box is used if the Security Protocol text box is set to ssl.
The Certificate Path text box defines the path of a digital certificate that is to be used to authenticate the Security Center as a client. This text box is only defined if the LDAP service requires client authentication.
The Authentication Method text box defines an LDAP client authentication method. It may be simple, none or an SASL authentication method supported by the LDAP service. If this text box is not defined, anonymous authentication is used.
The Authentication Principal text box defines the principal name to be used for authentication. The type of principal name will be dependent on the authentication method used.

Security Center Administrator’s Guide iLock Security Services 5.0 4-11
4.5.5 LDAP Properties Security Center Administration Tool
The Authentication Credentials text box defines the credentials to be used for authentication. The type of credential will be dependent on the authentication method used. For example, for "simple" authentication, a password is used.
4.5.5.2 Users Schema TabThe Users Schema tab provides information required to interface with an LDAP service that defines users and their associated security attributes in a common user object. The security attributes are defined as attributes of the user object.
The Base DN text box defines the distinguished name from which all searches will begin. This text box is required.
The Defining Authority text box defines the name of the Defining Authority that will be used to create all security attributes. This text box is required.
The User Filter text box defines the filter used to find users. See Section 4.5.5.6 for a description of the LDAP filter format. This text box is required.
The Attribute (User Common Name) text box defines the name of the attribute that specifies the name of the user. The value of this attribute will be used to display users in lists.
The Attribute (User ID) text box defines the name of the attribute that specifies the User ID for a user. The value of this attribute will be used for authentication with orbLock’s CSIv2 and CSS and jLock’s LoginManager and JAAS LoginModule. This text box is required.

Security Center Administration Tool 4.5.5 LDAP Properties
4-12 iLock Security Services 5.0 Security Center Administrator’s Guide
The Attribute (Password) text box defines the name of the attribute that specifies the password for a user. The value of this attribute will be used for authentication with orbLock’s CSIv2 and CSS and jLock’s LoginManager and JAAS LoginModule. This text box is required when using these features.
The Attribute (Access ID) text box defines the name of the LDAP attribute that specifies an Access ID security attribute that is associated with the user.
The Attribute (Group) text box defines the name of the LDAP attribute that specifies a Group security attribute that is associated with the user.
The Attribute (Role) text box defines the name of the LDAP attribute that specifies a Role security attribute that is associated with the user.
The Password Decryption Class text box defines the name of a customer provided Java class that implements the com.twoab.ilock.util.Decryption interface. This class can return clear text passwords given an encrypted password that was stored in an LDAP repository. The following is the Decryption interface:
public interface Decryption { public String decrypt(byte [] val); public String decrypt(String val);}

Security Center Administrator’s Guide iLock Security Services 5.0 4-13
4.5.5 LDAP Properties Security Center Administration Tool
4.5.5.3 Lists Schema TabThe Lists Schema tab provides information required to interface with an LDAP service that defines individual objects that define Groups and/or Roles, and each object includes a list of users that are included in the Group/Role.
The Group Filter text box defines the filter used to find Group attributes. See Section 4.5.5.6 for a description of the LDAP filter format. This text box is required.
The Group Attribute (Member) text box defines the name of the LDAP attribute that defines a member of this Group. The value should be a distinguished name that identifies a user.
The Role Filter text box defines the filter used to find Role attributes. See Section 4.5.5.6 for a description of the LDAP filter format. This text box is required.
The Role Attribute (Member) text box defines the name of the LDAP attribute that defines a member of this Role. The value should be a distinguished name that identifies a user.

Security Center Administration Tool 4.5.5 LDAP Properties
4-14 iLock Security Services 5.0 Security Center Administrator’s Guide
4.5.5.4 Client Authentication TabThe Client Authentication tab provides the ability to select the types of security attributes that are supported.
The Return Access ID’s specified by Access ID Attribute checkbox indicates that users may have security attributes of the type Access ID, and that attribute value is retrieved from the configured LDAP Access ID attribute.
The Return Access ID specified by User ID Attribute checkbox indicates that users may have security attributes of the type Access ID, and that attribute value is retrieved from the configured LDAP User ID attribute.
The Return Access ID specified by User Distinguished Name checkbox indicates that users may have security attributes of the type Access ID, and that attribute value is retrieved from the configured LDAP User ID attribute. The attributes value will be the user’s distinguished name.
The Return Public Access ID checkbox indicates that all users will have the public Access ID. The public Access ID has a defining authority value of OMG and a value of PUBLIC.
The Return Groups checkbox indicates that users may have security attributes of the type Group. Depending on the LDAP schema used, groups may come from user attributes or from group entries that specify members of that group.

Security Center Administrator’s Guide iLock Security Services 5.0 4-15
4.5.5 LDAP Properties Security Center Administration Tool
The Return Roles checkbox indicates that users may have security attributes of the type Role. Depending on the LDAP schema used, roles may come from user attributes or from role entries that specify members with that role.
4.5.5.5 Advanced Schema TabThe Advanced Schema tab provides miscellaneous information used to interface with an LDAP service.
The Debug checkbox can be selected if diagnostic messages related to LDAP communications should be displayed.
The Context Factory Class text box defines the name of the Java class that will be used to create contexts for communicating with LDAP services. If this is not specified, the default Java implementation will be used.
The Provider URL text box defines a URL that identifies the LDAP service to use. If this is not defined, a URL created from the configured host and port will be created.

Security Center Administration Tool 4.6 Managing Security Attributes
4-16 iLock Security Services 5.0 Security Center Administrator’s Guide
4.5.5.6 LDAP Search Filter FormatA search filter is a logical expression that specifies the attributes that the directory objects being requested should have. Table 4.2 lists the symbols that may be used in search filters.
As an example, a search filter for a User might look as follows:
(&(uid=%v)(objectclass=inetOrgPerson)
This filter would search for users in directory entries whose objectclass is inetORgPerson and whose ID is defined by the "uid" attribute.
4.6 Managing Security AttributesSecurity attributes represent the identity or privileges of some entity. That is, they typically represent a user or some privilege that may be shared by one or more users. These attributes are then used in security policies to control access to protected resources.
This section describes the manner in which security attributes are managed when using the Security Center’s standard user management. If users and security attributes are managed by an LDAP directory service or some custom user management service, then that service must provide the tools to manage its content.
The Security Center supports three types of security attributes: Access IDs, Groups and Roles. An Access ID typically identifies an individual. A Group typically represents a collection of one or more individuals. A Role typically represents a work function that one or more individuals may perform. The Security Center allows a Group to have associated Roles. That is, all individuals in the Group are also assumed to have the associated work functions.
All three types of security attributes are represented by two values. They are the Defining Authority and the Attribute Value. The Defining Authority typically represents the organization that creates the attribute. Typically, an enterprise might have only one Defining Authority; however, it might have different defining authorities for different departments. The Attribute Value is the value assigned to the attribute. For example, a Group might have a value of Engineering.
Table 4.2 LDAP Search Filter Symbols
Symbol Meaning
%v Replacement Value - indicates that a value to be searched for.
& Conjunction - all in the list must be true.
| Disjunction - one or more in the list must be true.
! Negation - the item being negated must not be true.
= Equality - done based on the matching rule for the attribute.
~= Approximate Equality - done based on the matching rule for the attribute.
>= Greater Than - done based on the matching rule for the attribute.
<= Less Than - done based on the matching rule for the attribute.
=* Presence - the directory entry must possess the attribute, but it value is irrelevant.
* Wildcard - indicates that zero or more characters can occur in the position.
\ Escape - for escaping "*", "(", or ")" inside an attribute value

Security Center Administrator’s Guide iLock Security Services 5.0 4-17
4.6.1 Displaying Security Attribute Information Security Center Administration Tool
Note If the LDAP or Custom User Management option has been configured, then security attributes must be managed by the native tool for managing the customer user management system. The Users/LDAP or Users/Custom tab will replace the Users/Attributes tab.
The Users/Attributes tab is used to define and manage security attributes. Select the Users/Attributes tab from the lower left of the main window. The defined security attributes are represented by the tree structure under the Security Attributes node in the rightmost panel.
Security Attribute management functionality is accessed via the Users/Attributes menu or via the Security Attributes popup menu obtained by selecting an element in the Security Attributes tree structure and right-clicking. The Users/Attributes tab appears as follows:
4.6.1 Displaying Security Attribute InformationInformation about security attributes is displayed in a tree structure as shown below. A node in the tree can be expanded to show or hide its child nodes by double-clicking a node. The following depicts a fully-expanded tree

Security Center Administration Tool 4.6.2 Creating a Defining Authority
4-18 iLock Security Services 5.0 Security Center Administrator’s Guide
The top-level node is labeled Security Attributes. The level below this displays the defining authorities. In the illustration above, there are three defining authorities shown, 2AB, acme and imb. Each Defining Authority has three child nodes that are labeled Access IDs, Groups and Roles. The child nodes of these security attributes will show the attribute values. For example, in the window shown above, management is an attribute value for Groups in the acme Defining Authority.
The nodes representing the attribute values can be expanded and contracted by selecting the attribute and double-clicking. Child nodes will display elements that are associated with the attributes. Typically, these will be users that are associated with the attribute; however, Groups can also have associated Roles.
4.6.2 Creating a Defining AuthorityBecause every security attribute belongs to a Defining Authority, a Defining Authority must be created prior to defining security attributes. To create a new Defining Authority, right-click the top-level node labeled Security Attributes in the leftmost panel and choose New Defining Authority …from the Security Attributes popup menu. A New Defining Authority dialog will be displayed, which requests the name of the Defining Authority to be created.

Security Center Administrator’s Guide iLock Security Services 5.0 4-19
4.6.3 Deleting a Defining Authority Security Center Administration Tool
In the Defining Authority Name text box, type the name of the Defining Authority, and then click OK. When the new Defining Authority is created, it will appear as a node under the Security Attributes node. It will also have three child nodes, which are Access IDs, Groups and Roles.
4.6.3 Deleting a Defining AuthorityTo delete a Defining Authority, right-click a selected Defining Authority, and then choose Delete Defining Authority …from the popup menu. A Remove Defining Authority Confirmation dialog will confirm the request.
If attributes are currently defined for this Defining Authority, an error message will be displayed, and the Defining Authority will not be deleted.

Security Center Administration Tool 4.6.4 Creating Access IDs, Groups and Roles
4-20 iLock Security Services 5.0 Security Center Administrator’s Guide
4.6.4 Creating Access IDs, Groups and RolesThe technique used to create Access IDs, Groups and Roles are identical. To define a new security attribute, select the node representing the attribute type (Access IDs, Groups or Roles) and right-click, and then choose New Access Id …, New Group … or New Role … from the popup menu. When the menu command is chosen, a New Access IDs, New Role or New Group dialog will be displayed requesting the value for the attribute.
After typing in the attribute value, click OK to create the new attribute. The attribute is placed in the tree structure under the node identifying the attribute type.
4.6.5 Deleting Access IDs, Groups and RolesThe technique used to delete Access IDs, Groups and Roles are identical. To delete an existing security attribute, select the node representing the attribute type (Access IDs, Groups or Roles) and right-click, and then choose Delete Access Id …, Delete Group … or Delete Role … from the popup menu. When the menu command is chosen, a Remove Attribute Confirmation dialog will confirm the request.
Click Yes to confirm the deletion.
4.6.6 Attaching a Role to a GroupGroup security attributes can have Role security attributes attached to them. The effect is that anyone who belongs to a Group that has a Role attached, effectively possesses that Role. To attach a Role to a Group, right-click a selected Group, and then choose Attach Role … from the popup menu. The Attach/Detach Roles dialog will be displayed, which allows you to select the Role to be attached.

Security Center Administrator’s Guide iLock Security Services 5.0 4-21
4.6.7 Attaching a Role to a Group Using Drag and Drop Security Center Administration Tool
Select the appropriate Defining Authority and Role from the Defining Authority and Role list boxes. Click OK to attach the Role.
4.6.7 Attaching a Role to a Group Using Drag and DropAn alternative method of attaching a Role to a Group is to use drag-and-drop functionality. Select the Role to be attached and while holding down the left mouse button, drag the cursor on top of the Group that is to have the attached Role. Release the left mouse button, and the Role is attached. You can double-click the Group to verify that it has the attached Role.
4.6.8 Detaching a Role from a GroupTo detach a Role from a Group, right-click the selected Group, and then choose Detach Role … from the popup menu. The Select role detach dialog will be displayed, which allows you to select the Role to be detached.
Select the appropriate Defining Authority and Role from the Defining Authority and Role list boxes. Click OK to detach the Role.
4.7 Managing User DefinitionsUsers are either human or computer systems that will try to access the functionality of some distributed computing service. Typically, a user is a human being that is using a client application, and that client application accesses functionality on one or more server applications. To do this, the user must be able to prove their identity via some type of authentication technology.
This section describes the manner in which user definitions are managed when using the Security Center’s standard user management. If users and security attributes are managed by an LDAP directory service or some custom user management service, then that service must provide the tools to manage its content.
The Security Center manages four pieces of information about each user. This information is the name of the user, their login ID, password and domain. Each of these are described in the following paragraphs.
The user’s name consists of three fields. They are the first name, middle name and last name. Only the last name is required. For example, a user might have a last name of Public, a first name of John and a middle name of Q. On the other hand, a computer server might have a last name of CustomerRecords and a first name of SouthEast.
The User ID is the value of the user’s ID as defined by the underlying security system that is used. For example, in an environment using Kerberos-based authentication, a User ID might look like john_q_public@realm22. In a PKI-based environment, a User ID might look like [email protected]. Here the User ID matches the e-mail address field in a digital certificate.
The user’s Password is the value of the password that is used with the User ID to authenticate a user.

Security Center Administration Tool 4.7.1 Displaying User Information
4-22 iLock Security Services 5.0 Security Center Administrator’s Guide
The user’s domain is simply a group of users. With this concept, it is possible to control who is authorized to administer information. For example, some people may belong to a domain called AccountingDept. Therefore, only people authorized to manage information about people in the accounting department can add, delete or modify information about users in that department. The domain is optional. If not specified, only enterprise-wide administrators can manage this information.
Note If the LDAP or Custom User Management option has been configured, then user information must be managed by the native tool for managing the customer user management system. The Users/LDAP or Users/Custom tab will replace the Users/Attributes tab.
The Users/Attributes tab is used to define and manage users. Select the Users/Attributes tab from the lower left of the main window. The defined users are represented by the tree structure under the “Users” node in the leftmost panel. User management functionality is accessed via the Users/Attributes menu or via the Users popup menu obtained by right-clicking a selected element in the Users tree structure. The Users/Attributes tab appears as follows:
4.7.1 Displaying User InformationInformation about users is displayed in a tree structure in the leftmost panel as shown below. A node in the tree can be expanded to show or hide its child nodes by double-clicking a node. The following depicts a fully expanded tree.

Security Center Administrator’s Guide iLock Security Services 5.0 4-23
4.7.1 Displaying User Information Security Center Administration Tool
The top-level node is labeled Users. The level below this displays the actual users. In the illustration above, there are six users shown. Each user is displayed as Last Name, First Name, Middle Name and User ID.
The nodes representing the attribute values associated with a user can be expanded and contracted by selecting the user and double-clicking. Child nodes will display elements that are associated with the user.

Security Center Administration Tool 4.7.2 Creating a User
4-24 iLock Security Services 5.0 Security Center Administrator’s Guide
For those that are interfacing with an LDAP-based directory service, this tab will be replaced by the Users/LDAP tab. The following depicts this tab.
4.7.2 Creating a UserTo define a new user, choose New … from the Users/Attribute menu. Alternatively, you may select a Users node in the tree structure and right-click, and then choose New … from the popup menu, and a User Editor dialog will be displayed.
Type in the requested information, and then click OK to create the new user. The Last Name and User ID Value text boxes are required.
4.7.3 Deleting a UserTo delete a user, select the user, and then choose Delete … from the Users/Attributes menu or select the node representing the user in the tree structure and right-click, and then choose Delete … from the popup menu. A Delete Confirmation dialog will confirm the deletion request.

Security Center Administrator’s Guide iLock Security Services 5.0 4-25
4.7.4 Editing User Information Security Center Administration Tool
4.7.4 Editing User InformationTo edit information about an existing user, select the user, and then choose Edit … from the Users/Attributes menu or select the node representing the user in the tree structure and right-click, and then choose Edit … from the popup menu. A User Editor dialog will be displayed that can be used to edit user information.
Modify the information about the user, and then click OK to save the modifications.
4.7.5 Resetting a User PasswordTo reset a user’s password, select the user, and then choose Reset Password … from the Users/Attributes menu or select the node representing the user in the tree structure and right-click, and then choose Reset Password … from the popup menu. A Reset Password dialog will be displayed that can be used to reset the password.
Type the new password in both the Password and Password Confirm text boxes, and then click OK to change the value of the password.
4.7.6 Attaching Security Attributes to UsersSecurity attributes (Access IDs, Groups and Roles) are attached to users to provide them with privileges that those attributes allow in different security policies. To attach a security attribute, select the user and then choose Attach Access ID …, Attach Group … or Attach Role … from the Users/Attributes menu or select the node representing the user in the tree

Security Center Administration Tool 4.7.7 Attaching Attributes to Users Using Drag-and-Drop
4-26 iLock Security Services 5.0 Security Center Administrator’s Guide
structure and right-click, and then choose Attach Access Id …, Attach Group … or Attach Role … from the popup menu. A Select access id to add, Select group to add or Select role to add dialog will be displayed that can be used to select the attribute to attach.
Select the attribute by selecting the Defining Authority from the Defining Authority list box and select the attribute from the Access ID, Group or Role list box. Click OK to attach the attribute to the user.
4.7.7 Attaching Attributes to Users Using Drag-and-DropAn alternative method of attaching security attributes to users is to use drag-and-drop functionality. Select the attribute to be attached and while holding down the left mouse button, drag the cursor on top of the user that is to have the attribute. Release the left mouse button, and the attribute is attached. You can double-click the user to verify that it has the attached attribute.
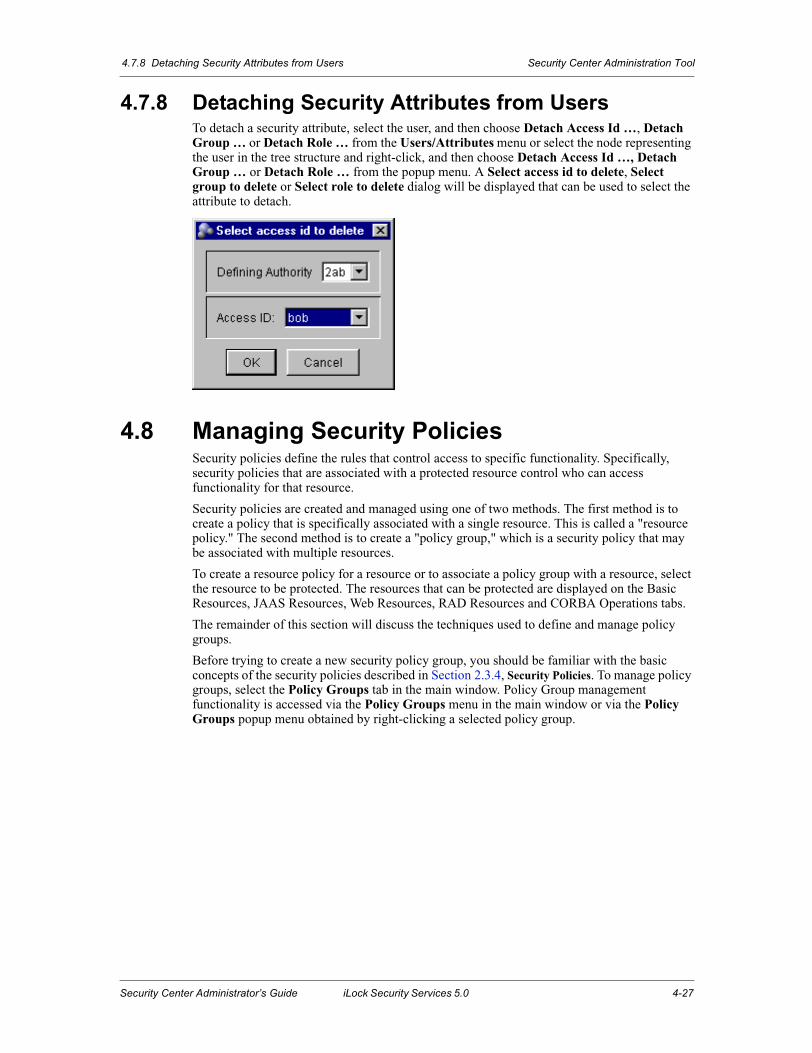
Security Center Administrator’s Guide iLock Security Services 5.0 4-27
4.7.8 Detaching Security Attributes from Users Security Center Administration Tool
4.7.8 Detaching Security Attributes from UsersTo detach a security attribute, select the user, and then choose Detach Access Id …, Detach Group … or Detach Role … from the Users/Attributes menu or select the node representing the user in the tree structure and right-click, and then choose Detach Access Id …, Detach Group … or Detach Role … from the popup menu. A Select access id to delete, Select group to delete or Select role to delete dialog will be displayed that can be used to select the attribute to detach.
4.8 Managing Security PoliciesSecurity policies define the rules that control access to specific functionality. Specifically, security policies that are associated with a protected resource control who can access functionality for that resource.
Security policies are created and managed using one of two methods. The first method is to create a policy that is specifically associated with a single resource. This is called a "resource policy." The second method is to create a "policy group," which is a security policy that may be associated with multiple resources.
To create a resource policy for a resource or to associate a policy group with a resource, select the resource to be protected. The resources that can be protected are displayed on the Basic Resources, JAAS Resources, Web Resources, RAD Resources and CORBA Operations tabs.
The remainder of this section will discuss the techniques used to define and manage policy groups.
Before trying to create a new security policy group, you should be familiar with the basic concepts of the security policies described in Section 2.3.4, Security Policies. To manage policy groups, select the Policy Groups tab in the main window. Policy Group management functionality is accessed via the Policy Groups menu in the main window or via the Policy Groups popup menu obtained by right-clicking a selected policy group.

Security Center Administration Tool 4.8.1 Creating a New Policy Group
4-28 iLock Security Services 5.0 Security Center Administrator’s Guide
4.8.1 Creating a New Policy GroupYou can create a new Policy Group in one of the following ways: 1) From the main window, choose New … from the Policy Groups menu or 2) right-click the Policy Groups tree node and choose New … from the popup menu or 3) right-click any existing policy tree node and choose New … from the popup menu.
Choosing New … will bring up the Policy Editor dialog.

Security Center Administrator’s Guide iLock Security Services 5.0 4-29
4.8.1 Creating a New Policy Group Security Center Administration Tool
Type the name of the policy group in the text box, and press ENTER. For illustration purposes, we have typed in a policy group named Financial.
Every policy group must support at least one operation. To add an operation, right-click the policy group name, and then choose New Operation. Type in an operation name. For illustration purposes, we have typed in an operation named deposit. Each operation can have one or more rules. To add a rule, right-click the operation, and then choose New Rule, which will enable the Rule panel in the Policy Editor dialog.
Notice that the default Rule Type is Nobody unless you modify the rule. You can create as many rules as you wish for an operation. As operation rules are created, they will be displayed in the leftmost panel underneath the operation.
To create an operation rule from the panels, do the following:
• Select the rule type from the Type area of the Rule panel.
• Set the attributes in the Security Attributes area of the Rule panel, if necessary.
• Set the time constraints in the Time Constraints panel, if desired.

Security Center Administration Tool 4.8.2 Financial Policy Group Example
4-30 iLock Security Services 5.0 Security Center Administrator’s Guide
• Set entitlement rules in the Entitlement Rules panel, if desired.
Once all of the operation rules have been built, click OK to create the new policy group. Changes will not be applied unless you click OK. To close the Policy Editor dialog click Cancel.
4.8.2 Financial Policy Group ExampleThe following exercise will walk you through the completion of the Financial policy group started in the previous section and should familiarize you with all the features of the user interface.
Create Rule 1
Rule 1 will require that the requestor be in a Group called preferredcustomer *and* in a Role of employee to view resources protected by this policy.
First, select Required Attributes in the Rule Type area.
In the Security Attributes area, select Groups and right-click, and then choose Add Attribute to display the Add Security Attribute for Groups dialog, as shown below. If you want to create a new attribute, click the New... button. Otherwise, select the Group in the Value list box that you are requiring as a part of this rule, and then click OK.
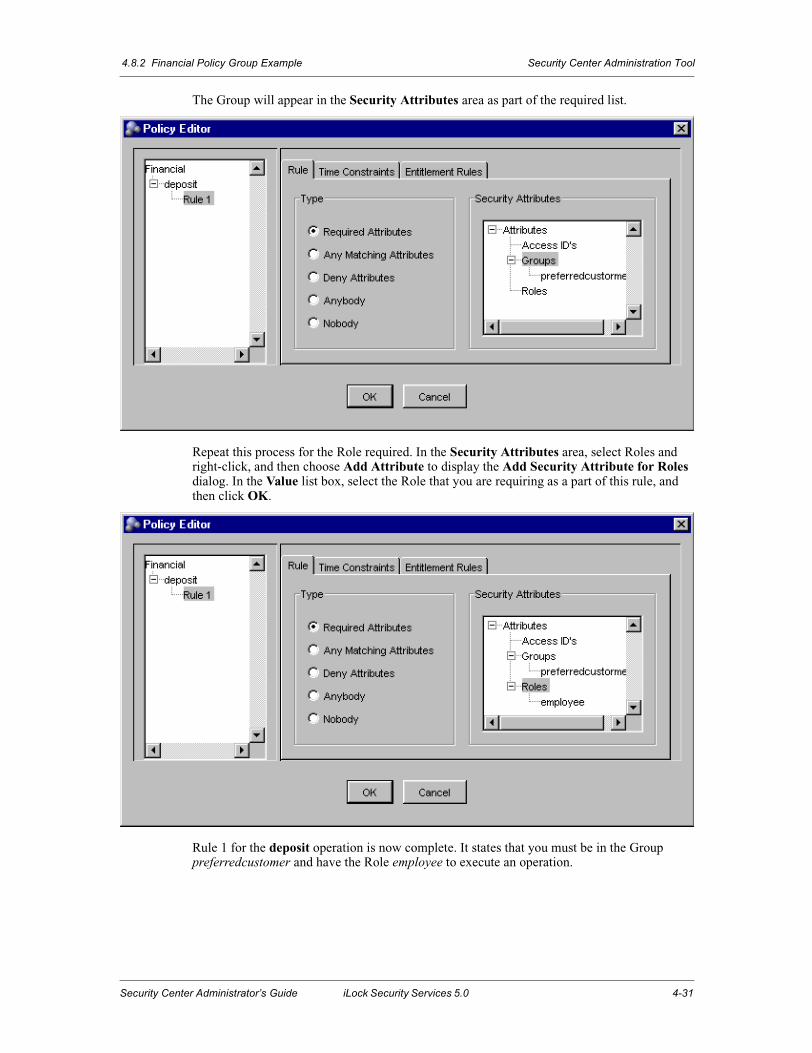
Security Center Administrator’s Guide iLock Security Services 5.0 4-31
4.8.2 Financial Policy Group Example Security Center Administration Tool
The Group will appear in the Security Attributes area as part of the required list.
Repeat this process for the Role required. In the Security Attributes area, select Roles and right-click, and then choose Add Attribute to display the Add Security Attribute for Roles dialog. In the Value list box, select the Role that you are requiring as a part of this rule, and then click OK.
Rule 1 for the deposit operation is now complete. It states that you must be in the Group preferredcustomer and have the Role employee to execute an operation.

Security Center Administration Tool 4.8.2 Financial Policy Group Example
4-32 iLock Security Services 5.0 Security Center Administrator’s Guide
Set Time Restraints
Every rule may optionally have time constraints associated with it. To set time constraints, select the Time Constraints panel.
You may specify a Start/Stop Date and/or a Start/Stop Time and/or a Start/Stop Day of Week.
Every rule may optionally specify entitlement rules that are enforced when applications request access decisions with entitlement data. The application will provide the entitlement name and value. The entitlement will be evaluated based of the value, value type and relationship to be enforced. These values are specified in the entitlement rule. The Entitlement Rules tab appears as follows:
Create Rule 2

Security Center Administrator’s Guide iLock Security Services 5.0 4-33
4.8.3 Viewing an Existing Policy Group Security Center Administration Tool
Assume that there is someone who has the credentials specified in Rule 1, but you have reason to deny them access. Create a new rule by right-clicking on the deposit operation and choosing New Timed Rule. This will create Rule 2, which you can now define. Rule 2 will be used to deny a user with an Access ID of bburt. Select Deny Attributes in the Rule Type area:
In the Security Attributes area, select Access IDs and right-click, and then choose Add Attribute to display the Add Security Attribute for Access IDs dialog. In the Value list box, select the Access ID that you are denying (bburt) as a part of this rule, and then click OK.
4.8.3 Viewing an Existing Policy GroupIn the main window, you can view a policy group by selecting the policy group in the leftmost panel, which will display a text description of the policy group in the rightmost panel. You may want to double-click to expand the policy. To view a particular rule, select the rule.

Security Center Administration Tool 4.8.4 Editing an Existing Policy Group
4-34 iLock Security Services 5.0 Security Center Administrator’s Guide
4.8.4 Editing an Existing Policy GroupTo edit an existing policy group, you must bring up the Policy Editor dialog. Right-click the selected policy group in the main window, and then choose Edit... from the popup menu.
The operation of this editor is identical to the Policy Editor of the New Policy dialog. Once editing of the policy group is complete, click OK to store the policy group.

Security Center Administrator’s Guide iLock Security Services 5.0 4-35
4.8.5 Cloning an Existing Policy Group Security Center Administration Tool
4.8.5 Cloning an Existing Policy GroupCloning an existing policy group is an effective technique when you wish to create a new policy group that is a minor variant from an existing policy group. From the main window, right-click a policy group, and then choose Clone... from the popup menu. Type the name of the new policy group. The new policy group can be edited to make any desired changes.
4.8.6 Deleting an Existing Policy GroupFrom the main window, right-click a policy group, and then choose Delete... from the popup menu. Confirm the deletion when requested.
4.8.7 Testing an Existing Policy GroupExisting policy groups can be tested to determine whether or not an entity with certain security attributes will be allowed access or not allowed access to any resources that this policy group is associated with. From the main window, right-click a policy, then choose Test... from the popup menu to display the Test Policy dialog.
Each policy group can have one or more operations. From the Operation to perform list box, select an operation to test. Now define the attributes to use to test the policy group. These will be the attributes that would be possessed by some user that would access a resource that had

Security Center Administration Tool 4.8.8 Printing an Existing Policy Group
4-36 iLock Security Services 5.0 Security Center Administrator’s Guide
this policy group. Right-click one of the attributes in the Attributes To Use area to add an attribute. The Add Security Attribute dialog will be displayed for the attribute you selected (for illustration purposes, we have selected Access IDs).
Select the appropriate attribute from the Value list box, and then click OK. When you have created all of the attributes for the simulated user, click Test. The policy group will be tested and return TRUE if the simulated user is allowed access while performing a specified operation. An Access dialog will be displayed to show the result.
4.8.8 Printing an Existing Policy GroupFrom the main window, right-click a policy group, and then choose Print... from the popup menu.
4.8.9 Showing Secured Resources Associated with a Policy GroupDetermining all of the resources associated with a given policy group can be a time consuming action, especially if there are many resources defined. For this reason, the action is run as a background process, and a dialog is displayed showing the result upon completion.
To display the secured resources currently associated with a policy group, select a policy group from the main window and right-click, and then choose Show Resources... from the popup menu. When the report is complete, a dialog will be displayed showing the result.

Security Center Administrator’s Guide iLock Security Services 5.0 4-37
4.8.9 Showing Secured Resources Associated with a Policy Group Security Center Administration Tool
If no resources are associated with the policy group, an Information dialog will be displayed stating that fact.
If the policy group has secured resources associated with it, an Associated Resources dialog will be displayed that shows the associated resources.
Click OK to close the Associated Resources dialog.

Security Center Administration Tool 4.9 Managing Basic Resources
4-38 iLock Security Services 5.0 Security Center Administrator’s Guide
4.9 Managing Basic Resources
4.9.1 Creating a New Basic ResourceSelect the Basic Resources tab from the lower left of the main window. Any nodes directly under the Basic Resources item are string values representing the resource.
You can create a new Basic Resource in one of the following ways: 1) From the main window, choose New … from the Basic Resources menu or 2) right-click the Basic Resources tree root on the Basic Resources tab.

Security Center Administrator’s Guide iLock Security Services 5.0 4-39
4.9.2 Viewing an Existing Basic Resource Security Center Administration Tool
Choosing New... will display a request for the name of the new basic resource.
Enter the value for the Basic Resource and click OK to create the Basic Resource.
4.9.2 Viewing an Existing Basic ResourceBasic Resources will appear on the Basic Resources panel tree in the Basic Resources tab in the main window. When you select a resource name, a description of the resource and its associated security policy(s) is displayed in the rightmost panel.

Security Center Administration Tool 4.9.3 Setting a Resource Policy
4-40 iLock Security Services 5.0 Security Center Administrator’s Guide
4.9.3 Setting a Resource PolicyTo set the resource policy for an existing Basic Resource, right-click a selected resource, and then choose Set Policy … from the popup menu. The Policy Editor will be displayed.

Security Center Administrator’s Guide iLock Security Services 5.0 4-41
4.9.3 Setting a Resource Policy Security Center Administration Tool
Right-click on the Operations node, and then choose New Operations... from the popup menu. A blank text box will appear where the operation name may be define. Type in the operation name and then press ENTER. If the operation read was entered, the dialog will now appear as follows:
Right-click on the read node, and then choose New Timed Rule... from the popup menu. You may now define the timed rule in a manner identical to the one used to define timed rules for policy groups, see Section 4.8, Managing Security Policies.

Security Center Administration Tool 4.9.4 Editing a Resource Policy
4-42 iLock Security Services 5.0 Security Center Administrator’s Guide
4.9.4 Editing a Resource PolicyTo edit a resource policy for an existing Basic Resource, right-click a selected resource, and then choose Set Policy … from the popup menu. The Policy Editor will be displayed.
You may use the Policy Editor dialog to set the policy as desired.
4.9.5 Deleting an Existing Resource PolicyTo delete a resource policy for an existing Basic Resource, right-click a selected resource, and then choose Set Policy … from the popup menu. The Policy Editor will be displayed. Click the Remove Policy button at the bottom of the dialog.
4.9.6 Deleting an Existing Basic ResourceTo delete an existing Basic Resource, right-click a selected Basic Resource, and then choose Delete … from the popup menu. Confirm the deletion when requested.
4.9.7 Setting Policy Groups for a Basic ResourceOne or more policy groups may be associated with a basic resource. To add or remove policy group associations with a basic resource, right-click a selected resource, and then choose Set Policy Groups… from the popup menu. The following dialog will appear:

Security Center Administrator’s Guide iLock Security Services 5.0 4-43
4.9.8 Printing a Basic Resource Security Center Administration Tool
To add policy group associations, select the policy groups to be associated from the Available Policy Groups list area and use the right arrow button to move these policy groups to the Configured Policy Groups list area.
To remove policy group associations, select the policy groups to be removed from the Configured Policy Groups list area and use the left arrow button to remove these policy groups.
When the resource has the desired policy groups, click the OK button to set the policy group associations.
4.9.8 Printing a Basic ResourceTo print an existing Basic Resource, right-click a selected Basic Resource, and then choose Print … from the popup menu.

Security Center Administration Tool 4.10 Managing JAAS Resources
4-44 iLock Security Services 5.0 Security Center Administrator’s Guide
4.10 Managing JAAS Resources
4.10.1 Creating a JAAS ResourceSelect the JAAS Resources tab from the lower left of the main window. The nodes directly under the “JAAS Resources” item are the JAAS Resources
You can create a new JAAS Resource in one of the following ways: 1) From the main window, choose New … from the JAAS Resources menu or 2) right-click the JAAS Resources tree root on the JAAS Resources tab.

Security Center Administrator’s Guide iLock Security Services 5.0 4-45
4.10.2 Viewing an Existing JAAS Resource Security Center Administration Tool
Choosing New... will display a request for the name of the new JAAS resource.
Enter the value for the JAAS Resource and click OK to create the JAAS Resource.
4.10.2 Viewing an Existing JAAS ResourceJAAS Resources will appear on the JAAS Resource panel tree in the JAAS Resources tab in the main window. When you select a resource, a description of the resource and its associated policy(s) is displayed in the rightmost panel.
4.10.3 Setting the Resource Policy and Policy GroupsSetting the resource policy and policy groups for a JAAS resource is done in an identical manner as that for a Basic resource. See the section describing this operation in Section 4.9, Managing Basic Resources.
4.10.4 Deleting an Existing JAAS ResourceTo delete an existing JAAS Resource, right-click a selected JAAS Resource, and then choose Delete … from the popup menu. Confirm the deletion when requested.
4.10.5 Printing a JAAS ResourceTo print an existing JAAS Resource, right-click a selected JAAS Resource, and then choose Print … from the popup menu.

Security Center Administration Tool 4.11 Managing Web Resources
4-46 iLock Security Services 5.0 Security Center Administrator’s Guide
4.11 Managing Web ResourcesThe Security Center permits you to define Web Resources that are protected by the webLock component. Security policies can be assigned to Web Resources that control access to the resource, whether it be a Web page, servlet, etc.
The Web Resources tab is used to define and manage Web Resources. Select the Web Resources tab from the lower left of the main window. Any nodes directly under the “Web Resource” item are URL names of individual Web Resources. Web Resource management functionality is accessed via the Web Resource menu in the main window or via the Web Resource popup menu obtained by selecting an element in the Web Resources tree structure and right-clicking. The Web Resources tab appears as follows:

Security Center Administrator’s Guide iLock Security Services 5.0 4-47
4.11.1 Web Resource Components Security Center Administration Tool
4.11.1 Web Resource ComponentsA Web Resource can be any entity returned from a Web server for a client request. A Web Resource is identified by the URLs that may be used to access it over a local network or the Internet. When securing access to a Web Resource, it is important to secure all possible URLs that may be used to access it.
The URL syntax, as it applies to webLock, is broken down into seven components as indicated below. The component names shown below are surrounded with < and > for visual separation. The < and > are not part of the URL or the component names.
<Scheme>://<Host>:<Port><Context Path><Servlet Path><Path Info>?<Query String>
Where:
Scheme The communication protocol type. When creating a Web Resource in the Security Center this can be:
• http - Access authorizations will use a Web Resource declared with this value only when HTTP is being used.
• https - Access authorizations will use a Web Resource declared with this value only when HTTPS is being used.
• * - Access authorizations will use a Web Resource declared with this value no matter what communication protocol is being used.
Host The Web server DNS name or IP address. When creating a Web Resource in the Security Center this can be:
• A non-blank value - Access authorizations will use a Web Resource declared with this value only if the Host in the URL being accessed matches the value exactly.
• * - Access authorizations will use a Web Resource declared with this value no matter what Host is used.
Port The IP port number the Web server listens to for processing calls to the URL. Some communication protocols have default ports assigned that are used if a URL used to connect does not specify a specific port. The webLock component uses the actual port for access authorization processing, even if one was not specified in the URL supplied by the user. When creating a Web Resource in the Security Center this can be:
• A non-blank numeric value - Access authorizations will use a Web Resource declared with this value only if the Port in the URL being accessed matches the value exactly.
• * - Access authorizations will use a Web Resource declared with this value no matter what Port is used.
Context Path The path to a particular Web application running in a servlet container. The path starts with a “/” character but does not end with a “/” character. For servlets in the default (root) context, the Context Path is “”. When creating a Web Resource in the Security Center this can be:
• A blank value - Access authorizations will use a Web Resource declared with this value only if the Context Path in the URL being accessed is blank (i.e. the root context).
• A non-blank value starting with / - Access authorizations will use a Web Resource declared with this value only if the Context Path in the URL being accessed matches the value exactly.
• /* - Access authorizations will use a Web Resource declared with this value as long as the Context Path is non-blank.
• * - Access authorizations will use a Web Resource declared with this value no matter what the Context Path is.

Security Center Administration Tool 4.11.1 Web Resource Components
4-48 iLock Security Services 5.0 Security Center Administrator’s Guide
Servlet Path The path to a Web page or servlet within a Web application. This always starts with a “/” unless it is null. The webLock component converts a null value to "" for access authorization processing. When creating a Web Resource in the Security Center this can be:
• A blank value - Access authorizations will use a Web Resource declared with this value only if the Servlet Path in the URL being accessed is blank (i.e. the default resource for a Web application).
• A non-blank value starting with / - Access authorizations will use a Web Resource declared with this value only if the Servlet Path in the URL being accessed matches the value exactly.
• /* - Access authorizations will use a Web Resource declared with this value as long as the Servlet Path is non-blank.
• * - Access authorizations will use a Web Resource declared with this value no matter what the Servlet Path is.
Path Info Additional information that may be passed to a servlet. This always starts with a “/” if it is not null. The webLock component converts a null value to "" for access authorization processing. When creating a Web Resource in the Security Center this can be:
• A blank value - Access authorizations will use a Web Resource declared with this value only if the Path Info in the URL being accessed is blank.
• A non-blank value starting with / - Access authorizations will use a Web Resource declared with this value only if the Path Info in the URL being accessed matches the value exactly.
• /* - Access authorizations will use a Web Resource declared with this value as long as the Path Info is non-blank.
• * - Access authorizations will use a Web Resource declared with this value no matter what the Path Info is.
Query String Additional information that follows the first “?” in the URL or null if there is no Query String. The webLock component converts a null value to "" for access authorization processing. When creating a Web Resource in the Security Center this can be:
• A blank value - Access authorizations will use a Web Resource declared with this value only if the Query String in the URL being accessed is blank.
• A non-blank value - Access authorizations will use a Web Resource declared with this value only if the Query String in the URL being accessed matches the value exactly.
• * - Access authorizations will use a Web Resource declared with this value no matter what the Query String is.

Security Center Administrator’s Guide iLock Security Services 5.0 4-49
4.11.2 Defining A New Web Resource Security Center Administration Tool
4.11.2 Defining A New Web ResourceTo define a new Object Domain, choose New … from the Web Resource menu or right-click and choose New … from the popup menu. The Web Resource Editor dialog will be displayed, which allows you to define the resource and associate security policies with the resource.
Use the text boxes to define the Web Resource. The text boxes correspond to each of the Web Resource components. Click OK to create the resource.
4.11.3 Setting the Resource Policy and Policy GroupsSetting the resource policy and policy groups for a Web resource is done in an identical manner as that for a Basic resource. See the section describing this operation in Section 4.9, Managing Basic Resources.
4.11.4 Deleting A Web ResourceTo delete an existing Web Resource, select the Web Resource to be deleted, and then choose Delete … from the Web Resource menu or right-click the selected Web Resource, and then choose Delete … from the popup menu. A Delete Confirmation dialog will confirm the deletion.
4.11.5 Printing A Web ResourceTo print an existing Web Resource, select the resource to be printed, and then choose Print … from the Web Resource menu or right-click the selected resource, and then choose Print … from the popup menu.

Security Center Administration Tool 4.12 Managing RAD Resources
4-50 iLock Security Services 5.0 Security Center Administrator’s Guide
4.12 Managing RAD Resources
4.12.1 Creating a New RAD ResourceSelect the RAD Resources tab from the lower left of the main window. Any nodes directly under the “Resources” item are Naming Authorities used to group the resource names. A Resource Name (per the OMG specification) contains a Naming Authority plus a sequence of named values.
You can create a new Resource Name in one of the following ways: 1) From the main window, choose New … from the RAD Resource menu or 2) right-click an existing Naming Authority shown on the Resources tab or 3) right-click the “Resources” tree root on the RAD Resources tab.

Security Center Administrator’s Guide iLock Security Services 5.0 4-51
4.12.2 Viewing an Existing RAD Resource Security Center Administration Tool
Choosing New... will display the Resource Name Editor dialog.
If not already provided, type in the Naming Authority in the Naming Authority text box and the named values that make up the resource name. Click OK to create the Resource Name.
4.12.2 Viewing an Existing RAD ResourceResource names will appear on the resources panel tree in the RAD Resources tab in the main window. When you select a resource name, a description of the resource and its associated policy(s) is displayed in the rightmost panel.
4.12.3 Setting the Resource Policy and Policy GroupsSetting the resource policy and policy groups for a RAD resource is done in an identical manner as that for a Basic resource. See the section describing this operation in Section 4.9, Managing Basic Resources.
4.12.4 Deleting an Existing RAD ResourceTo delete an existing Resource Name, right-click a selected Resource Name, and then choose Delete … from the popup menu. Confirm the deletion when requested.

Security Center Administration Tool 4.12.5 Printing a RAD Resource
4-52 iLock Security Services 5.0 Security Center Administrator’s Guide
4.12.5 Printing a RAD ResourceTo print an existing Resource Name, right-click a selected Resource Name, and then choose Print … from the popup menu.
4.13 Managing CORBA Operation DefinitionsCORBA technology provides a distributed object paradigm where interfaces (defined by CORBA IDL) are implemented as CORBA objects. Every interface can define operations and/or attributes that can be invoked by client applications. The CORBA Operations tab is used to define and manage operations and/or attributes for which orbLock will control the access permissions.
Select the CORBA Operations tab from the lower left of the main window. Any nodes directly under the “Operations” item are repository IDs for interfaces that contain the defined operations. Each node that specifies a repository ID can have one or more child nodes, where each node represents an operation contained in that interface. Operation management functionality is accessed via the CORBA Operations menu or via the CORBA Operations popup menu obtained by right-clicking a selected interface.
Operations can be defined manually one at a time or entire IDL files containing multiple interfaces can be imported. The CORBA Operations tab appears as follows:

Security Center Administrator’s Guide iLock Security Services 5.0 4-53
4.13.1 Defining a New Operation Security Center Administration Tool
4.13.1 Defining a New OperationTo define a new operation, choose New … from the CORBA Operations menu or right-click a selected interface, and then choose New … from the popup menu. The Operation Editor dialog (as shown below) will be displayed to allow you to define a new operation.
In the Interface text box, you must type the full repository ID for the interface. In the Operation text box, you must type the name of the operation. An example dialog would appear as follows:
Click OK to save the definition of the new operation.
From the main window, you may also select an existing operation, and then choose New … from the CORBA Operations menu. This will display an identical dialog that was described above; however, the Interface text box will contain the name of the selected interface’s repository ID.
4.13.2 Setting the Resource Policy and Policy GroupsSetting the resource policy and policy groups for a CORBA Operation is done in an identical manner as that for a Basic resource. See the section describing this operation in Section 4.9, Managing Basic Resources.
4.13.3 Deleting An OperationTo delete an existing operation, select the operation to be deleted, and then choose Delete … from the CORBA Operations menu or right-click a selected operation, and then choose Delete … from the popup menu. A Delete Confirmation dialog will confirm the deletion.
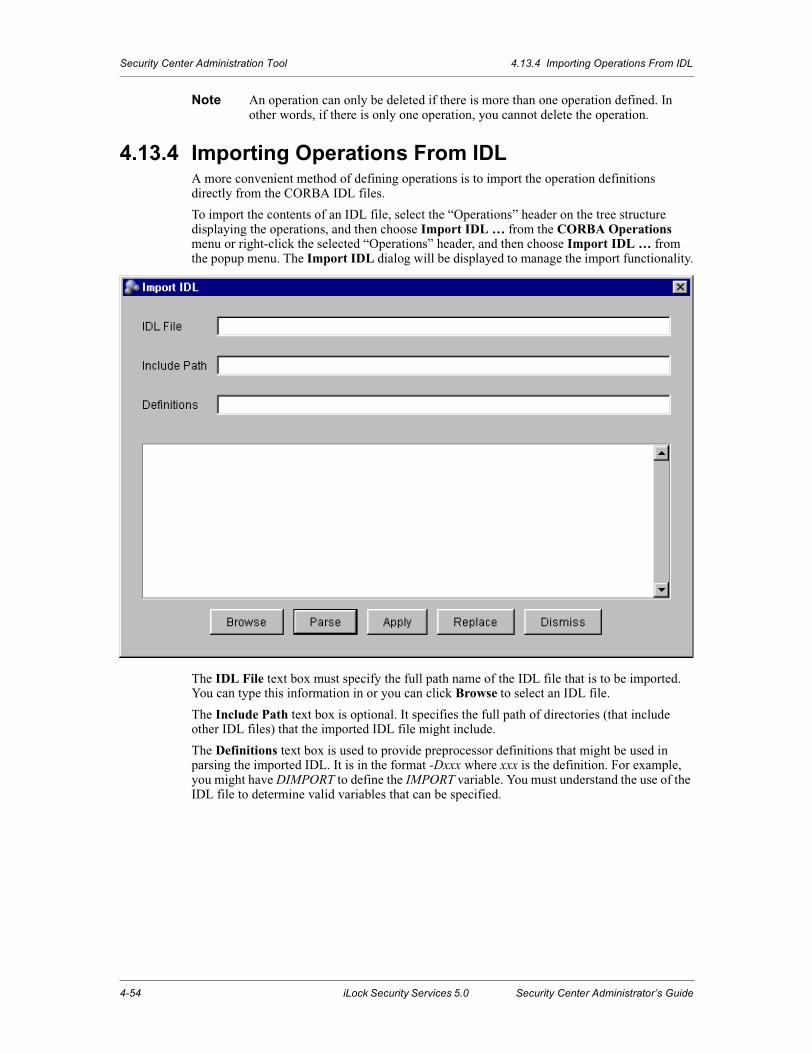
Security Center Administration Tool 4.13.4 Importing Operations From IDL
4-54 iLock Security Services 5.0 Security Center Administrator’s Guide
Note An operation can only be deleted if there is more than one operation defined. In other words, if there is only one operation, you cannot delete the operation.
4.13.4 Importing Operations From IDLA more convenient method of defining operations is to import the operation definitions directly from the CORBA IDL files.
To import the contents of an IDL file, select the “Operations” header on the tree structure displaying the operations, and then choose Import IDL … from the CORBA Operations menu or right-click the selected “Operations” header, and then choose Import IDL … from the popup menu. The Import IDL dialog will be displayed to manage the import functionality.
The IDL File text box must specify the full path name of the IDL file that is to be imported. You can type this information in or you can click Browse to select an IDL file.
The Include Path text box is optional. It specifies the full path of directories (that include other IDL files) that the imported IDL file might include.
The Definitions text box is used to provide preprocessor definitions that might be used in parsing the imported IDL. It is in the format -Dxxx where xxx is the definition. For example, you might have DIMPORT to define the IMPORT variable. You must understand the use of the IDL file to determine valid variables that can be specified.

Security Center Administrator’s Guide iLock Security Services 5.0 4-55
4.13.5 Printing An Operation Security Center Administration Tool
Once you have correctly specified the path of the IDL file to import, click Parse to parse the operations and/or attributes defined in the IDL file and display them in the dialog as shown below:
The operations and/or attributes listed are color-coded. Operations that are displayed in a black font are operations that have not been previously defined. Operations that are displayed in a blue font are operations that have been previously defined. Operations that are displayed in a red font are operations that have been previously defined but are not defined in this version of the interface.
Once you have parsed the IDL file, you can save the changes by clicking Apply or Replace. Clicking Apply will add any newly defined operations (displayed in black fonts). It will maintain operations that are already defined (displayed in blue and red fonts). Clicking Replace will replace operations for all interfaces with those displayed in black or blue fonts. In other words, it will delete any previously defined operations that are no longer part of this version of the IDL. Clicking Dismiss will cancel the operation, and no changes will be applied to the Security Center databases.
Once the operations have been defined by importing an IDL file, the operations can be edited to associate the appropriate security policies.
4.13.5 Printing An OperationTo print an existing operation, select the operation to be printed, and then choose Print … from the CORBA Operations menu or right-click a selected operation, and then choose Print … from the popup menu.
4.14 Securing AdministratorsThis tool is capable of requiring that users authenticate themselves by providing a User ID and Password. To set up this requirement, you must:
• Define User IDs and associate appropriate security attributes.
Security Center Administration Tool 4.14 Securing Administrators
4-56 iLock Security Services 5.0 Security Center Administrator’s Guide
• Define a security policy that allows access to users with appropriate attributes. The operation name must be execute.
• Define the special Basic Resource named SecurityCenterAdmin.
• Associate the security policy with this Basic Resource.
Once this is done, only users that have the appropriate security attributes will be allowed to use this tool.

Security Center Administrator’s Guide iLock Security Services 5.0 5-1
Chapter 5 Batch Administration
The Security Center Batch Administration Tool, just like the GUI-based Administration Tool, provides security administrators with the ability to define and manage the security information within the Security Center. This tool uses a text-based file that provides instructions that describe the administrative tasks to be performed. This tool can connect to different instances of the Security Center.
This tool allows for the easy definition and management of security policies. It allows the definition of secured resources and allows the association of security policies with the defined resource. It allows the creation and deletion of user definitions and that of security attributes such as Groups, Roles and Access IDs.
5.1 Running the Batch Administration ToolTo start the Batch Administration Tool:
1. Open a command-line window.
2. Type sc_cmd with appropriate command-line arguments and press ENTER.
Table 5.1 lists the command-line options for the sc_cmd program.
5.2 Batch Command File CommandsThe batch command file is a text-based file that indicates the target Security Center and includes the commands that are to be executed.
The Security Center section of the command file describes the instance name of the target Security Center. It can also contain User ID and Password information for invoking operations on a secured instance of the Security Center.
Batch commands consist of one or more lines. The first line is the command to execute (e.g. REMOVE_RESOURCE). Additional lines may follow the command to provide the required arguments necessary to execute the command (e.g. REMOVE_RESOURCE must have a
Table 5.1 Security Center Admin Tool Command-Line Options
Command Value
-file NAMEIndicates that the file whose name is NAME is used as the batch command file. It contains the commands that will be applied to the Security Center. Section 5.2 describes the format of the batch command file.
-debug Diagnostic messages will be sent to the standard output console.
-warningsWarning messages will be output to the standard output console when a line in the batch command file is not recognized as a valid command. The line will be ignored.
-home PATHThis argument specifies the PATH of the iLock installation directory. This argument should not be specified unless the ILOCK_HOME environmental variable is not specified.

Batch Administration 5.2.1 Comments
5-2 iLock Security Services 5.0 Security Center Administrator’s Guide
RESOURCE line that names the resource to be removed). Batch commands are not case sensitive. For example, you may use REMOVE_RESOURCE, remove_resource or Remove_Resource.
The following sections describe the available commands that may be placed in the batch command file. Detailed descriptions of command-line argument are provided in Section 5.3, Argument Line Commands.
5.2.1 CommentsAny line that begins with the ’#’ character will be ignored.
5.2.2 SKIPIf the SKIP command is encountered, all lines will be ignored until a SKIP_END command line is encountered.
Example In the following example, the REMOVE_RESOURCE command will not be executed.
SKIP
REMOVE_RESOURCE
RESOURCE = { 2ab TheName TheValue }
SKIP_END
5.2.3 SECURITY_CENTERThis command is used to indicate which Security Center instance will be the target of the commands in the batch command file. The SECURITY_CENTER command may consists of multiple argument lines and must be terminated by a SECURITY_CENTER_END line. The SECURITY_CENTER command may be placed anywhere within the batch command file.
There are four valid argument commands.
• INSTANCE is used to define the instance name of the target Security Center.
• HOST is used to override the Security Center host that might have been configured using the iconfig program.
• PORT is used to override the Security Center port that might have been configured using the iconfig program.
• USER_ID is used to define the User ID that is used for authentication with secured Security Centers.
• PASSWORD is used to define the password used for authentication with secured Security Centers.
Example The following is an example of a SECURITY_CENTER command:
SECURITY_CENTER
INSTANCE = bhm
SECURITY_CENTER_END
5.2.4 ASSOCIATE_ATTRIBUTEThis command is used to associate a security attribute with a user. The ASSOCIATE_ATTRIBUTE command must have two argument lines. The first is the USER_ID, which defines the User ID that the attribute is to be associated with, and the second is SEC_ATTRIBUTE, which defines the attribute to be associated with the User ID.

Security Center Administrator’s Guide iLock Security Services 5.0 5-3
5.2.5 ASSOCIATE_POLICY_GROUP Batch Administration
Example The following is an example of an ASSOCIATE_ATTRIBUTE command:
ASSOCIATE_ATTRIBUTE
USER_ID = jdoe
SEC_ATTRIBUTE = { GROUP Acme Executives }
5.2.5 ASSOCIATE_POLICY_GROUPThis command is used to associate a policy group with a resource. The ASSOCIATE_POLICY_GROUP command must have two argument lines. The first is the POLICY_NAME argument, which defines the name of the policy group to be associated, and the second is the RESOURCE argument, which defines the resource that the policy group will be associated with.
Example The following is an example of an ASSOCIATE_POLICY_GROUP command:
ASSOCIATE_POLICY_GROUP
POLICY_NAME = policy_001
RESOURCE = { 2ab "The Name" "The Value" }
5.2.6 DISASSOCIATE_ATTRIBUTEThis command is used to disassociate a security attribute currently associated with a user. The DISASSOCIATE_ATTRIBUTE command must have two argument lines. The first is the USER_ID that defines the User ID that has the attribute is to be disassociated, and the second is SEC_ATTRIBUTE that defines the attribute to be disassociated from the User ID.
Example The following is an example of an DISASSOCIATE_ATTRIBUTE command:
DISASSOCIATE_ATTRIBUTE
USER_ID = jdoe
SEC_ATTRIBUTE = { GROUP Acme Executives }
5.2.7 DISASSOCIATE_POLICY_GROUPThis command is used to disassociate a policy group that is currently associated with a resource. The DISASSOCIATE_POLICY_GROUP command must have two argument lines. The first is the POLICY_NAME argument, which defines the name of the policy group currently associated with the resource, and the second is the RESOURCE argument, which defines the resource to be disassociated from the policy group.
Example The following is an example of an DISASSOCIATE_POLICY_GROUP command:
DISASSOCIATE_POLICY_GROUP
POLICY_NAME = policy_001
RESOURCE = { 2ab "The Name" "The Value" }
5.2.8 LIST_POLICY_GROUPSThis command is used to display a list the names of all policy groups defined in the Security Center. This command has no argument lines.
Example The following is an example of the LIST_POLICY_GROUPS command:
LIST_POLICY_GROUPS

Batch Administration 5.2.9 LIST_RESOURCES
5-4 iLock Security Services 5.0 Security Center Administrator’s Guide
5.2.9 LIST_RESOURCESThis command is used to display a list of all resource defined in the Security Center. This command has no argument lines.
Example The following is an example of the LIST_RESOURCES command:
LIST_RESOURCES
5.2.10 LIST_RESOURCE_POLICY_GROUPSThis command is used to display a list of all names of policy groups associated with a resource. This command has one argument line. The RESOURCE argument line defines the resource whose associated policies will be listed.
Example The following is an example of the LIST_RESOURCE_POLICY_GROUPS command:
LIST_RESOURCE_POLICY_GROUPS
RESOURCE = { 2ab TheName TheValue }
5.2.11 NEW_ATTRIBUTEThis command is used to create a new security attribute or create a new Defining Authority. Security attributes may be either an Access ID, Group or Role. This command has one argument line. The SEC_ATTRIBUTE argument line defines the security attribute or Defining Authority to be created.
Example The following is an example of the NEW_ATTRIBUTE command:
NEW_ATTRIBUTE
SEC_ATTRIBUTE = { ROLE 2ab Programmer }
5.2.12 NEW_POLICY_GROUPThis command is used to create a new security policy group. This command has multiple argument lines. The command must be terminated with a NEW_POLICY_GROUP_END command.
The POLICY_NAME argument line is required and specifies the name of the policy group.
The OPERATION argument line defines an operation defined by the policy group. A policy group may define one or more operations. Each operation will have one or more rules associated with the operation. The rules are defined by using the RULE_TYPE argument line.
The RULE_TYPE argument line defines the type of rule (ANYBODY, NOBODY, ANY_MATCHING_ATTRIBUTES, REQUIRED_ATTRIBUTES or DENY_ATTRIBUTES). Each RULE_TYPE argument line can be followed by one or more SEC_ATTRIBUTE lines (to define the security attributes in the rule) and argument lines that can define entitlement rules (ENTITLEMENT) or the time constraints on the rule (START_DATE, STOP_DATE, START_TIME, STOP_TIME, START_DAY and STOP_DAY).
Example The following is an example of the NEW_POLICY_GROUP command:
NEW_POLICY_GROUP
POLICY_NAME = TopSecret
OPERATION = read
RULE_TYPE = ANYBODY
ENTITLEMENT={ Salary 40000 Decimal >= }
START_DAY = Monday

Security Center Administrator’s Guide iLock Security Services 5.0 5-5
5.2.13 NEW_RESOURCE Batch Administration
STOP_DAY = Friday
OPERATION = write
RULE_TYPE = REQUIRED_ATTRIBUTES
SEC_ATTRIBUTE = { ROLE 2ab TopSecretFunction }
NEW_POLICY_GROUP_END
5.2.13 NEW_RESOURCEThis command is used to create a new resource. This command has one argument line. The RESOURCE argument line defines the resource to be created.
Example The following is an example of the NEW_RESOURCE command:
NEW_RESOURCE
RESOURCE = { 2ab TheName TheValue }
5.2.14 NEW_RESOURCE_WITH_POLICYThis command is used to create a new resource and an associated resource policy. The command must be terminated with a NEW_RESOURCE_WITH_POLICY_END command.
The RESOURCE argument line defines the resource to be created.
The OPERATION argument line defines an operation defined by the resource policy. A resource policy may define one or more operations. Each operation will have one or more rules associated with the operation. The rules are defined by using the RULE_TYPE argument line.
The RULE_TYPE argument line defines the type of rule (ANYBODY, NOBODY, ANY_MATCHING_ATTRIBUTES, REQUIRED_ATTRIBUTES or DENY_ATTRIBUTES). Each RULE_TYPE argument line can be followed by one or more SEC_ATTRIBUTE lines (to define the security attributes in the rule) and argument lines that can define entitlement rules (ENTITLEMENT) or the time constraints on the rule (START_DATE, STOP_DATE, START_TIME, STOP_TIME, START_DAY and STOP_DAY).
Example The following is an example of the NEW_RESOURCE_WITH_POLICY command:
NEW_RESOURCE_WITH_POLICY
RESOURCE = { 2ab TheName TheValue }
OPERATION = read
RULE_TYPE = ANYBODY
ENTITLEMENT={ Salary 40000 Decimal >= }
START_DAY = Monday
STOP_DAY = Friday
OPERATION = write
RULE_TYPE = REQUIRED_ATTRIBUTES
SEC_ATTRIBUTE = { ROLE 2ab TopSecretFunction }
NEW_RESOURCE_WITH_POLICY_END

Batch Administration 5.2.15 NEW_USER
5-6 iLock Security Services 5.0 Security Center Administrator’s Guide
5.2.15 NEW_USERThis command is used to create a new user. This command has multiple argument lines, and the command must be terminated with the NEW_USER_END command. The FIRST_NAME argument line is an optional line that defines the first name of the user. The MIDDLE_NAME argument line is an optional line that defines the middle name of the user. The LAST_NAME argument line is a required line that defines the last name of the user. The USER_ID argument line is a required line that defines the User ID of the user. The DOMAIN argument line is an optional line that defines the domain of the user. The PASSWORD argument line is an optional line that defines the initial password associated with the User ID of the user.
Example The following is an example of the NEW_USER command:
NEW_USER
FIRST_NAME = John
LAST_NAME = Doe
USER_ID = jdoe
PASSWORD = x&r4jte
NEW_USER_END
5.2.16 REMOVE_ATTRIBUTEThis command is used to remove the definition of a security attribute. This command has one argument line. The SEC_ATTRIBUTE argument line defines the security attribute or Defining Authority to be removed.
Example The following is an example of the REMOVE_ATTRIBUTE command:
REMOVE_ATTRIBUTE
SEC_ATTRIBUTE = { ROLE 2ab Programmer }
5.2.17 REMOVE_POLICY_GROUPThis command is used to remove a security policy group. This command has one argument line. The POLICY_NAME argument line defines the policy group to be removed.
Example The following is an example of the REMOVE_POLICY_GROUP command:
REMOVE_POLICY_GROUP
POLICY_NAME = TopSecret
5.2.18 REMOVE_RESOURCEThis command is used to remove a resource. This command has one argument line. The RESOURCE argument line defines the resource to be removed.
Example The following is an example of the REMOVE_RESOURCE command:
REMOVE_RESOURCE
RESOURCE = { 2ab TheName TheValue }
5.2.19 REMOVE_RESOURCE_POLICYThis command is used to remove the resource policy associated with resource. This command has one argument line. The RESOURCE argument line defines the resource whose resource policy is to be removed.

Security Center Administrator’s Guide iLock Security Services 5.0 5-7
5.2.20 REMOVE_USER Batch Administration
Example The following is an example of the REMOVE_RESOURCE_POLICY command:
REMOVE_RESOURCE_POLICY
RESOURCE = { 2ab TheName TheValue }
5.2.20 REMOVE_USERThis command is used to remove a user. This command has one argument line. The USER_ID argument line defines the user to be removed.
Example The following is an example of the REMOVE_USER command:
REMOVE_USER
USER_ID = jdoe
5.2.21 SET_RESOURCE_POLICYThis command is used to update the resource policy associated with a resource. The command must be terminated with a SET_RESOURCE_POLICY_END command.
The RESOURCE argument line defines the resource whose policy is to be updated.
The OPERATION argument line defines an operation defined by the resource policy. A resource policy may define one or more operations. Each operation will have one or more rules associated with the operation. The rules are defined by using the RULE_TYPE argument line.
The RULE_TYPE argument line defines the type of rule (ANYBODY, NOBODY, ANY_MATCHING_ATTRIBUTES, REQUIRED_ATTRIBUTES or DENY_ATTRIBUTES). Each RULE_TYPE argument line can be followed by one or more SEC_ATTRIBUTE lines (to define the security attributes in the rule) and argument lines that can define entitlement rules (ENTITLEMENT) or the time constraints on the rule (START_DATE, STOP_DATE, START_TIME, STOP_TIME, START_DAY and STOP_DAY).
Example The following is an example of the SET_RESOURCE_POLICY command:
SET_RESOURCE_POLICY
RESOURCE = { 2ab TheName TheValue }
OPERATION = read
RULE_TYPE = ANYBODY
ENTITLEMENT={ Salary 40000 Decimal >= }
START_DAY = Monday
STOP_DAY = Friday
OPERATION = write
RULE_TYPE = REQUIRED_ATTRIBUTES
SEC_ATTRIBUTE = { ROLE 2ab TopSecretFunction }
SET_RESOURCE_POLICY_END
5.2.22 SHOW_POLICY_GROUPThis command is used to display the details about a policy group. This command has one argument line. The POLICY_NAME argument line defines the policy group to be displayed.
Example The following is an example of the SHOW_POLICY_GROUP command:
SHOW_POLICY_GROUP
POLICY_NAME = TopSecret

Batch Administration 5.2.23 SHOW_RESOURCE
5-8 iLock Security Services 5.0 Security Center Administrator’s Guide
5.2.23 SHOW_RESOURCEThis command is used to display the details about a resource. This command has one argument line. The RESOURCE argument line defines the resource to be displayed.
Example The following is an example of the SHOW_RESOURCE command:
SHOW_RESOURCE
RESOURCE = { 2ab TheName TheValue }
5.3 Argument Line CommandsThe previous section described the commands that can be used in a batch command file. Each command briefly described the argument lines that were either required or could optionally be used with the command.
Some argument line commands described in the previous section have no special formatting features and are not documented in this section (e.g. USER_ID). All of these have a value of a simple string with no embedded spaces. For example:
USER_ID = jdoe
This section describes in detail the format of the argument line commands. Since many of these commands are used with multiple batch commands, they will be described in alphabetical order and not in an order associated with a specific batch command.
5.3.1 ENTITLEMENTThis command defines an entitlement rule within a security policy rule. The value must begin with an open bracket ’{’ and end with a close bracket ’}’. The first value following the open bracket defines the name of the entitlement variable. The second value is the comparison value for the entitlement variable. The third value is the variable data type that may be a "string," "integer" or "decimal." The fourth value is the relationship to enforce, it may be "=," ">," ">=," "<" or "<=."
Example ENTITLEMENT = { Salary 40000 Decimal >= }
5.3.2 OPERATIONThis command defines the operation name that is defined in a security policy. Its value can be a simple string or a string with embedded spaces. Values with embedded spaces must be enclosed in quotation marks.
Example OPERATION = read
OPERATION = "read backward"
5.3.3 POLICY_NAMEThis command defines the policy name that is defined in a security policy group. Its value can be a simple string or a string with embedded spaces. Values with embedded spaces must be enclosed in quotation marks.
Example POLICY_NAME = TopSecret
POLICY_NAME = "Top Secret"
Security Center Administrator’s Guide iLock Security Services 5.0 5-9
5.3.4 RESOURCE Batch Administration
5.3.4 RESOURCEThis command defines a resource name. The value must begin with an open bracket ’{’ and end with a close bracket ’}’. The first value following the open bracket must be the resource’s naming authority. The following values are resource component name and values. There can be multiple components, but each component should define both the name and value. Any of the strings may have embedded spaces by enclosing the string in quotation marks.
The command is typically used to define a RAD Resource; however, other resource types (e.g. Object Domain) can also be defined. Please see Section 5.4, Special Resource Definitions, for details.
Example RESOURCE = { 2ab name1 value1 }
RESOURCE = { 2ab "name 1" "value 1" }
RESOURCE = { 2ab name1 value1 name2 value2 name3 value3 }
5.3.5 SEC_ATTRIBUTEThis command defines a security attribute or a Defining Authority for security attributes. The value must begin with an open bracket ’{’ and end with a close bracket ’}’. The first value following the open bracket defines the type of attributes being defined (DEF_AUTH means Defining Authority, ACCESS_ID means an Access ID, GROUP means a Group and ROLE means a Role). The second value is the name of the Defining Authority. The third value is the value of the attribute. (The third value is not used for defining a Defining Authority.)
Example SEC_ATTRIBUTE = { GROUP 2ab Programmers }
SEC_ATTRIBUTE = { DEF_AUTH 2ab }
5.3.6 START_DATEThis command defines a start date time constraint within a security policy rule. The format of the date must be in the format YY/MM/DD, where YY is a 2-digit year, MM is a 2-digit month and DD is a 2-digit day.
Example START_DATE = 03/04/24
5.3.7 START_DAYThis command defines a start day of the week time constraint within a security policy rule. Valid values are SUNDAY, MONDAY, TUESDAY, WEDNESDAY, THURSDAY, FRIDAY or SATURDAY. Values are not case sensitive.
Example START_DAY = Monday
5.3.8 START_TIMEThis command defines a start-time time constraint within a security policy rule. The format of the time must be in the format HH:MM, where HH is 2-digit hour (24 hour clock) and MM is 2-digit minute.
Example START_TIME = 10:33
5.3.9 STOP_DATEThis command defines a stop date time constraint within a security policy rule. The format of the date must be in the format YY/MM/DD, where YY is 2-digit year, MM is a 2-digit month and DD is a 2-digit day.

Batch Administration 5.3.10 STOP_DAY
5-10 iLock Security Services 5.0 Security Center Administrator’s Guide
Example STOP_DATE = 03/04/24
5.3.10 STOP_DAYThis command defines a stop day of the week time constraint within a security policy rule. Valid values are SUNDAY, MONDAY, TUESDAY, WEDNESDAY, THURSDAY, FRIDAY or SATURDAY. Values are not case sensitive.
Example STOP_DAY = Friday
5.3.11 STOP_TIMEThis command defines a stop-time time constraint within a security policy rule. The format of the time must be in the format HH:MM, where HH is 2-digit hour (24 hour clock) and MM is 2-digit minute.
Example STOP_TIME = 10:33
5.4 Special Resource DefinitionsAs described in previous sections, the RESOURCE argument command can be used to define a resource, typically a RAD resource. In addition to the normal RAD resources, iLock defines other special resources that are described below. By knowing these naming conventions, the RESOURCE command can be used to define these resource types.
5.4.1 Basic ResourcesEach Basic Resource has a resource naming authority with a value of 2ab_cod. It has only one resource component whose name is the string representing the resource and whose value is an empty string.
5.4.2 JAAS ResourcesEach JAAS Resource has a resource naming authority with a value of 2ab_jaas. It has only one resource component whose name is the string representing the resource and whose value is an empty string.
5.4.3 Web ResourcesEach Web Resource has a resource naming authority with a value of 2ab_wl. Each has exactly seven resource components. The first component has a name of "1," and its value is the schema. The second component has a name of "2," and its value is the host. The third component has a name of "3," and its value is the port. The fourth component has a name of "4," and its value is the context path. The fifth component has a name of "5," and its value is the servlet path. The sixth component has a name of "6," and its value is the path information. The seventh component has a name of "7," and its value is the query string.
5.4.4 CORBA OperationsEach CORBA Operation has a resource naming authority with a value of 2ab_idl: followed by the repository ID of the operation’s interface. It has only one resource component whose name is Op and whose value is the CORBA operation’s name.

Security Center Administrator’s Guide iLock Security Services 5.0 6-1
Chapter 6 Reset Password
Although the administrative tools described in previous chapters allow administrators to define and change a user’s password value, it is often necessary to provide the actual user with the ability to change his/her own password. The pw_reset program is provided to allow existing users to change their existing password.
6.1 Starting pw_resetTo run the pw_reset program:
1. Open a command line window.
2. Type pw_reset and press ENTER.
Table 6.1 lists the command-line options for the pw_reset program.
Note Most organizations will probably want to make the information about the Security Center transparent to their users. They will do this by either modifying the pw_reset script (and including the correct command-line arguments) or by providing a custom script modeled after the pw_reset script.
6.2 OperationThe pw_reset command will prompt for the user ID and the current password. If valid values are provided for these prompts, the program will prompt for the new password value. When the user replies to the prompt with a new value, then that value will immediately become the password for that user.
Table 6.1 Security Center Admin Tool Command-Line Options
Command Value
-instance YYY The instance name, YYY, for the Security Center that manages the definition of users.
Reset Password 6.2 Operation
6-2 iLock Security Services 5.0 Security Center Administrator’s Guide

Security Center Administrator’s Guide iLock Security Services 5.0 Index-1
Numerics2AB Technical Support 2-ix
Aaccess control combinator, security center
setting preferences 5-8access ID, security attribute 5-2access IDs, groups, roles
creating 5-20deleting 5-20
administratorauthenticating the 5-6securing 5-55
Argument Line CommandsENTITLEMENT 6-8OPERATION 6-8POLICY_NAME 6-8RESOURCE 6-9SEC_ATTRIBUTE 6-9START_DATE 6-9START_DAY 6-9START_TIME 6-9STOP_DATE 6-9STOP_DAY 6-10STOP_TIME 6-10
ASSOCIATE_ATTRIBUTE 6-2ASSOCIATE_POLICY_GROUP 6-3attaching
a role to a group 5-20security attributes to users 5-25
attribute type 5-3authenticating the administrator 5-6
Bbasic resource 5-3
creating 5-38deleting 5-42managing 5-38printing 5-43viewing 5-39
batch administration tool-debug 6-1-file NAME 6-1-home PATH 6-1running 6-1-warnings 6-1
batch command fileASSOCIATE_ATTRIBUTE 6-2ASSOCIATE_POLICY_GROUP 6-3DISASSOCIATE_ATTRIBUTE 6-3DISASSOCIATE_POLICY_GROUP 6-3LIST_POLICY_GROUP 6-3LIST_RESOURCE_POLICY_GROUPS 6-4LIST_RESOURCES 6-4NEW_ATTRIBUTE 6-4NEW_POLICY_GROUP 6-4NEW_RESOURCE 6-5
NEW_RESOURCE_WITH POLICY 6-5NEW_USER 6-6REMOVE_ATTRIBUTE 6-6REMOVE_POLICY_GROUP 6-6REMOVE_RESOURCE 6-6REMOVE_RESOURCE_POLICY 6-6REMOVE_USER 6-7SECURITY_CENTER 6-2SET_RESOURCE_POLICY 6-7SHOW_POLICY_GROUP 6-7SHOW_RESOURCE 6-8SKIP 6-2
batch command file commands 6-1
Ccloning policy groups 5-35combining timed rules 5-5command-line options 2-3, 5-1, 6-1, 7-1
security center 2-3, 4-2security center administration tool 5-1, 6-1, 7-1security center batch administration tool 6-1
components, security services 5-1connecting to a security center 5-6-corba
iconfig program 2-3CORBA operations 5-3
defining 5-53deleting 5-53managing 5-52printing 5-55
CORBA resourcesetting resource policy and policy group 5-53
creatinga new basic resource 5-38access IDs, groups, roles 5-20defining authority 5-18JAAS resources 5-44policy groups 5-28RAD resources 5-50users 5-24
D-data DIR
sec_ctr program 2-3, 4-2data type relationships 5-5database 5-6, 4-1-debug 6-1defining
CORBA operations 5-53web resources 5-49
defining authority 5-3creating 5-18deleting 5-19
deletinga basic resource 5-42a defining authority 5-19a JAAS resource 5-45a RAD resource 5-51

Index-2 iLock Security Services 5.0 Security Center Administrator’s Guide
a resource policy 5-42a web resource 5-49access IDs, groups, roles 5-20CORBA operations 5-53object domains 5-49policy groups 5-35users 5-24
detachinga role from a group 5-21security attributes from users 5-27
diagnostics, security centersetting preferences 5-7
DISASSOCIATE_ATTRIBUTE 6-3DISASSOCIATE_POLICY_GROUP 6-3displaying
resources and their associated policy group 5-36security attribute info 5-17user information 5-22
Distributing Duplicate Configurations 2-3
Eediting
a RAD resource 5-53a resource policy 5-42policy group 5-34user info 5-25
environment variablesILOCK_HOME 2-1JRE_HOME 2-1PATH 2-1
F-file NAME 6-1Financial Policy Group Example 5-30
Ggroup, security attribute 5-2
H-home PATH 6-1
Iiconfig 2-2ILOCK_HOME 2-1importing operations from IDL 5-54installation, license 2-1-instance
sec_ctr program 4-2
JJAAS resource 5-3
creating 5-44deleting 5-45managing 5-44printing 5-45
setting resource policy and policy group 5-45viewing 5-45
java virtual machine 2-1JRE_HOME 2-1
LLDAP and Custom Interfaces 5-6LDAP Interface 5-6LDAP properties 5-9
advanced schema tab 5-15client authentication tab 5-14connection tab 5-10lists schema tab 5-13search filter formats 5-16users schema tab 5-11
license installation 2-1LIST_POLICY_GROUP 6-3LIST_RESOURCE_POLICY_GROUPS 6-4LIST_RESOURCES 6-4
Mmanaging
basic resources 5-38CORBA operation definitions 5-52JAAS resources 5-44RAD resources 5-50security attributes 5-16security policies 5-27user definitions 5-21web resources 5-46
NNetwork Ports 2-1NEW_ATTRIBUTE 6-4NEW_POLICY_GROUP 6-4NEW_RESOURCE 6-5NEW_RESOURCE_WITH_POLICY 6-5NEW_USER 6-6-nologin
sc_admin program 5-1
Oobject domains
deleting 5-49
Ppassword, resetting user 5-25, 7-1PATH 2-1policy groups 5-5
cloning 5-35creating 5-28deleting 5-35displaying associated resources 5-36editing 5-34printing 5-36

Security Center Administrator’s Guide iLock Security Services 5.0 Index-3
setting for a basic resource 5-42testing 5-35viewing 5-33
port for security center 4-1-port PORT
sec_ctr program 2-3, 4-2precedence of timed rule types 5-4preferences
security center 5-7security center diagnostics 5-7setting access control combinator 5-8setting security center user management 5-8setting user management options 5-8
printinga basic resource 5-43a JAAS resource 5-45a RAD resource 5-52CORBA operations 5-55policy groups 5-36web resource 5-49
pw_reset 7-1
RRAD resource 5-3
creating 5-50deleting 5-51editing 5-53managing 5-50printing 5-52setting resource policy and policy group 5-51viewing 5-51
REMOVE_ATTRIBUTE 6-6REMOVE_POLICY_GROUP 6-6REMOVE_RESOURCE 6-6REMOVE_RESOURCE_POLICY 6-6REMOVE_USER 6-7resetting user password 5-25, 7-1RESOURCE Argument Command 6-9Resource Policies and Policy Groups 5-5resource policy 5-5
deleting 5-42editing 5-42setting 5-40
role, security attribute 5-2running
batch administration tool 6-1iconfig 2-2the security center 4-1
Ssc_admin 5-1sc_cmd program 6-1
-debug 6-1-file NAME 6-1-home PATH 6-1-warnings 6-1
SEC_ATTRIBUTE Argument Command 6-9secured resources 5-3
Basic resources 5-3CORBA operations 5-3definition 5-5JAAS resources 5-3RAD resources 5-3Web resources 5-3
securing administrators 5-55security attributes 5-2
data membersattribute type 5-3defining authority 5-3value 5-3
displaying info 5-17managing 5-16type
access ID 5-2group 5-2role 5-2
security centeradministration tool 5-7, 5-1
basic resources tab 5-3command-line options 5-1, 6-1, 7-1CORBA operations tab 5-3JAAS resources tab 5-3main window 5-1menu bar 5-2policy group tab 5-2RAD resources tab 5-3resizing main window 5-3running 5-1status bar 5-3users/attributes tab 5-3using menus 5-4web resources tab 5-3
batch administration tool 5-7, 6-1running 6-1
command-line options 2-3, 4-2connections 2-2instances 5-1, 4-1navigation from the main window 5-1running 4-1secured resources 5-3
Basic resource 5-3CORBA operations 5-3JAAS resources 5-3RAD resources 5-3Web resources 5-3
terminating 4-2users 5-2
security center administration tool 5-7, 5-1, 6-1, 7-1attaching
a role to a group 5-20security attributes to users 5-25
authenticating the administrator 5-6basic resources tab 5-3cloning, policy groups 5-35command-line options 5-1, 6-1, 7-1connecting to a security center 5-6CORBA operations tab 5-3

Index-4 iLock Security Services 5.0 Security Center Administrator’s Guide
creatinga new basic resource 5-38a new JAAS resource 5-44a new RAD resource 5-50access IDs, groups, roles 5-20defining authority 5-18policy groups 5-28users 5-24
definingCORBA operations 5-53
deletinga basic resource 5-42a defining authority 5-19a JAAS resource 5-45a RAD resource 5-51a resource policy 5-42access IDs, groups, roles 5-20CORBA operations 5-53object domains 5-49policy groups 5-35users 5-24web resource 5-49
detachinga role from a group 5-21security attributes from users 5-27
displayingresources and their associated policy
groups 5-36security attribute info 5-17user information 5-22
editinga RAD resource 5-53a resource policy 5-42policy group 5-34user info 5-25
importing operations from IDL 5-54JAAS resources tab 5-3LDAP properties 5-9
advanced schema tab 5-15client authentication tab 5-14connection tab 5-10lists schema tab 5-13search filter formats 5-16users schema tab 5-11
main window 5-1managing
basic resources 5-38CORBA operation definitions 5-52JAAS resources 5-44RAD resources 5-50security attributes 5-16security policies 5-27user definitions 5-21web resources 5-46
menu bar 5-2policy group tab 5-2preferences 5-7
setting access control combinator 5-8setting security center diagnostics 5-7
setting security center user management 5-8
setting user management options 5-8printing
a basic resource 5-43a JAAS resource 5-45a RAD resource 5-52CORBA operations 5-55policy groups 5-36web resource 5-49
RAD resources tab 5-3resetting user password 5-25resizing main window 5-3running 5-1securing administrators 5-55setting
policy groups for a basic resource 5-42resource policy and policy group for
CORBA resource 5-53resource policy and policy group for JAAS
resource 5-45resource policy and policy group for RAD
resource 5-51resource policy and policy group for Web
resource 5-49setting a resource policy 5-40status bar 5-3testing policy groups 5-35users/attributes tab 5-3using menus 5-4viewing
a basic resource 5-39a JAAS resource 5-45a RAD resource 5-51policy group 5-33
web resource 5-49web resource components 5-47web resources tab 5-3
security center batch administration tool 5-7, 6-1security center port 4-1security center preferences 5-7security policies 5-3
managing 5-27timed rules
combining timed rules 5-5precedence of 5-4security attributes 5-4time constraints 5-5types
any attribute 5-4anybody attribute 5-4deny attribute 5-4nobody attribute 5-4required attribute 5-4
security services components 5-1SECURITY_CENTER 6-2SET_RESOURCE_POLICY 6-7setting
a resource policy 5-40
Security Center Administrator’s Guide iLock Security Services 5.0 Index-5
access control combinator 5-8policy groups for a basic resource 5-42resource policy and policy group for CORBA
resource 5-53resource policy and policy group for JAAS
resource 5-45resource policy and policy group for RAD
resource 5-51resource policy and policy group for Web
resource 5-49security center diagnostics 5-7security center user management 5-8user management options 5-8
SHOW_POLICY_GROUP 6-7SHOW_RESOURCE 6-8SKIP 6-2START_DATE Argument Command 6-9START_DAY Argument Command 6-9START_TIME Argument Command 6-9STOP_DATE Argument Command 6-9STOP_DAYS Argument Command 6-10STOP_TIME Argument Command 6-10
Ttechnical support 2-ixterminating the security center 4-2testing policy groups 5-35timed rules
combining timed rules 5-5precedence of 5-4security attributes 5-4time constraints 5-5types
any attribute 5-4anybody attribute 5-4deny attribute 5-4nobody attribute 5-4required attribute 5-4
Uuser ID 5-2user management options, security center
setting preferences 5-8user password, resetting 5-25users 5-2
attaching security attributes 5-25creating 5-24deleting 5-24detaching security attributes 5-27displaying information 5-22editing info 5-25managing definitions 5-21
using menus 5-4
Vvalue 5-3viewing
a basic resource 5-39a JAAS resource 5-45a RAD resource 5-51policy group 5-33
W-warnings 6-1web resource 5-3
components 5-47defining 5-49deleting 5-49managing 5-46printing 5-49setting resource policy and policy group 5-49

Index-6 iLock Security Services 5.0 Security Center Administrator’s Guide