Secure Chat Setuptraining.digitalinsight.com/diu/sssc/sssc-admin/story... · Web viewPre-populate...
12
Secure Chat Setup Use this document while in your financial institution’s LivePerson Admin Console to set up the required components. Be sure to Save or Apply Changes after changing each setting. Topic: Default Email Address Go to: Admin Console > Account Set Up > Settings > Chat (tab) Topic: Automated Chat Distribution Go to: Admin Console > Account Set Up > Settings > ACD (tab) 5/17/18 Page 1 Enter a general email for your FI. This is used anywhere in the system where an email field is left Presentation Timeout - the amount of time (ex. 15 seconds) before the system presents the chat to the next available operator. Set Operator Status to ‘Away’… - If set to yes, the system will change the status of an operator to Away if that operator does not accept a presented chat (even if they are working in the Operator Console). That operator will not be presented with future chats until they change their status back to Online. Auto Accept Setting – New chats are automatically placed into an operator’s workspace/queue without the operator pressing the Take button. This feature only functions if the ‘Set Operator Status…’ is set to No. TIP: It is recommended to keep this Auto Accept Setting set to Off.
-
Upload
trinhkhuong -
Category
Documents
-
view
216 -
download
2
Transcript of Secure Chat Setuptraining.digitalinsight.com/diu/sssc/sssc-admin/story... · Web viewPre-populate...

Secure Chat SetupUse this document while in your financial institution’s LivePerson Admin Console to set up the required components. Be sure to Save or Apply Changes after changing each setting.
Topic: Default Email Address Go to: Admin Console > Account Set Up > Settings > Chat (tab)
Topic: Automated Chat DistributionGo to: Admin Console > Account Set Up > Settings > ACD (tab)
Topic: Customize the Chat Window Appearance Go to: Admin Console > Visitor Experience > Chat > Window Editor (tab)
5/17/18 Page 1
Enter a general email for your FI. This is used anywhere in the system where an email field is left blank.
Presentation Timeout - the amount of time (ex. 15 seconds) before the system presents the chat to the next available operator.
Set Operator Status to ‘Away’… - If set to yes, the system will change the status of an operator to Away if that operator does not accept a presented chat (even if they are working in the Operator Console). That operator will not be presented with future chats until they change their status back to Online.
Auto Accept Setting – New chats are automatically placed into an operator’s workspace/queue without the operator pressing the Take button. This feature only functions if the ‘Set Operator Status…’ is set to No. TIP: It is recommended to keep this Auto Accept Setting set to Off.
ACD Attribute Sets – Ability to create a separate set of ACD settings that can be tied to a specific Operator Group via User Set Up > Operator Groups.

For FIs with Premier Secure Chat:
5/17/18 Page 2
Click Default and customize the settings on the next screen.
If your FI has Mobile Chat, you will see a “Mobile App” template in this list.
If your FI has Premier Chat, you can click the New Window button and create additional window versions to be tied to specific profiles via Visitor Experience > Profiles.
Window Skin - Choose “Chat Classic Design”. If your FI has Premier Chat or Mobile Chat, select “Engagement Modern Design” and skip to next page.
Tabs
Dimensions – Specify the size of the window.
Buttons – If you select “Custom Image”, provide the URL of the location of the image on your website.
Colors & Styles – HEX value colors
Branding - If you select “Custom Image”, provide the URL of the location of the image on your website.
Extras – It is recommended to uncheck “Allow visitor to email transcripts” as the email is non-secure.
Check this box on each tab to apply the settings for each tab to each of the 4 Window Types.
Window Types
Chat Window – The screen the user uses to chat with the operator.
PreChat Survey – The screen that the user fills out before beginning a chat session.
Offline Survey – The screen that the user sees when chat is offline.
Exit Survey – The screen that the user fills out after the chat has ended.

Choose the New Window button (on previous screen) if you want to create different window appearances to be tied to specific profiles via Visitor Experience > Profiles.
Topic: Customize Chat Surveys Go to: Visitor Experience > Chat > Surveys (tab)
5/17/18 Page 3
Window Skin - Choose “Engagement Modern Design”
Collaboration Widgets and PCI Form application - enable both options to allow Secure Forms to be sent via Chat.
Email Transcript – If checked, allows users to send a non-secure email with the contents of the chat to the user. TIP: Do not check box!
Print Chat - If checked, allows user to print a copy of the chat.
Mute Button – n/a
Branding Header Image – If checked, displays an image at the top of the chat window. Provide the location (URL) of where the image is located on your site (e.g. www.fi.com/images/logo.jpg) in the Branding Header Image URL field.

IMPORTANT: Anytime new skills are added (via User Set Up > Skills), you will need to edit the Skill question here and be sure to add all newly created skills (not automatically done for you as new skills are added).
5/17/18 Page 4
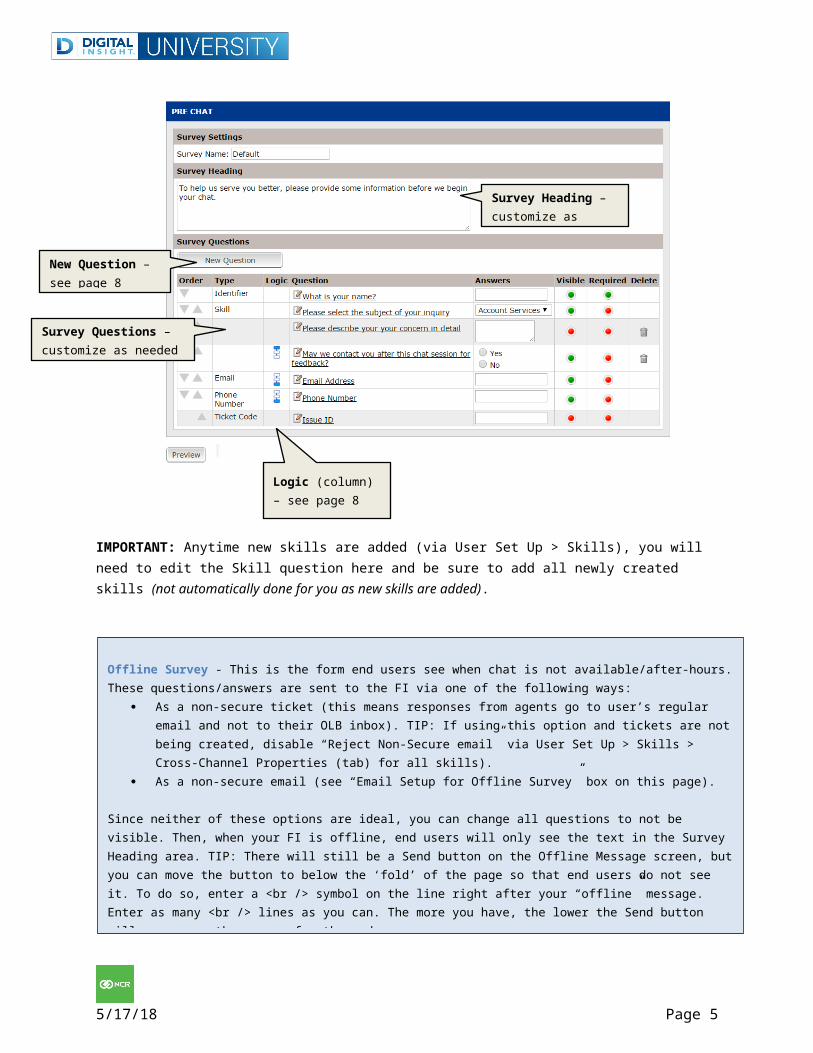
Pre Chat Survey - This is the form end users see before starting a chat.
Survey Heading – customize as needed
Choose a survey to customize. Options are: Pre Chat, Offline, Exit, and Chat Operator.
Survey Questions – customize as needed
Offline Survey - This is the form end users see when chat is not available/after-hours. These questions/answers are sent to the FI via one of the following ways:
As a non-secure ticket (this means responses from agents go to user’s regular email and not to their OLB inbox). TIP: If using this option and tickets are not being created, disable “Reject Non-Secure email” via User Set Up > Skills > Cross-Channel Properties (tab) for all skills).
As a non-secure email (see “Email Setup for Offline Survey” box on this page).
Enable/disable a survey after choosing the survey from the dropdown on the left.
Click Default and customize the settings on the next screen.
If your FI has Premier Chat, you can click the “New xxx Survey” button and create additional survey versions to be tied to specific profiles via Visitor Experience > Profiles.
New Question – see page 8
Logic (column) – see page 8
5/17/18 Page 5
Offline Survey - This is the form end users see when chat is not available/after-hours. These questions/answers are sent to the FI via one of the following ways:
As a non-secure ticket (this means responses from agents go to user’s regular email and not to their OLB inbox). TIP: If using this option and tickets are not being created, disable “Reject Non-Secure email” via User Set Up > Skills > Cross-Channel Properties (tab) for all skills).
As a non-secure email (see “Email Setup for Offline Survey” box on this page).
Survey Heading – Customize as needed. Include your business hours.
Email Setup for Offline Survey – Leave this section blank unless your FI would like to have the contents of this Offline Survey sent non-securely to a specific email address. If you would, specify the email address in the Recipient Email field on this screen. You will also need to disable the Chat Integration setting (via Account Set Up > Cross-Channel Set Up > Ticketing Set Up (tab) Chat Integration - Route Offline Survey Responses to Ticketing setting).
No ticket is opened in this situation.
Exit Survey - This is the form end users will be presented with after the chat has ended.
To get the exit survey results, Go to Reporting & Analytics > Reports > Chat (folder) > Standard (folder) >Custom Variable > in Custom Variable dropdown select “Exit Survey”.
New Question – see page 8
(It is not recommended to have questions on the Offline Survey.)
Logic (column) – see page 8

5/17/18 Page 6
Survey Heading – customize as needed
Survey Questions – customize as needed
Logic (column) – see page 8
Chat Operator Survey - This is the form that operators will need to complete (if required) after a chat session has ended.
New Question – see page 8
Email Setup for Chat Transcripts – If your FI uses the "Do you want us to send you a copy of this chat transcript?" question in the survey below and if the end user chooses to have the transcript sent to them, use this area to specify where email should appear as coming from and what the header of the email should be.

When the “New Question” button is clicked on the previous screens, this screen displays.
5/17/18 Page 7
Survey Heading – customize as needed
Survey Questions – customize as needed
New Question – see page 8
Question - type the question you want to ask the end user on the survey.
Logic (column) – see page 8
Automatically submit… –If this box is checked, when an end user starts a chat, but never types to the agent, the Operator survey will automatically submit as "Non Interactive," saving the time of the agent from having to submit a survey with information about a chat where there was no conversation with the end user.

Topic: Customize System MessagesGo to: Content Management > Chat > System Messages (tab)
5/17/18 Page 8
Pre-populate answer… - allows for this question to use the answer from the previous time the visitor filled out the survey.
Encrypt responses to this question - allows the FI to encrypt the answers in Live Person’s database so if anyone ever accessed the database without an encryption key, the data would be hidden. This is useful for Personally Identifiable Information such as Social Security Numbers. NOTE: This box does not display for Premier Chat.
Answer Type - select how you would like for the answer to display to the end user (i.e. radio buttons, check boxes, etc)
Answer List - Enter the answer choices that should display to the end user and click ‘Add’ after each entry. Note: This does not apply for the following answer types:
Text Field Numeric Field Text Area
Survey Logic - Question logic may be used to created branched questions (if one question is answered a certain way, additional questions will display). For Premier Chat only.

Topic: Create Visitor Profiles (if your FI has Premier Secure Chat)
5/17/18 Page 9
Message Types:
System Messages – Various system messages. TIP: If you refer to employees as ‘Call Center Representatives’ vs. ‘Operators’ make this change for each message in the list.
On-Hold Messages - Displayed to the user when waiting for an operator to respond. One of the three messages will be selected at random, followed by the remaining other messages. The process will repeat until the operator responds.
Nonresponsive Messages - Displayed to the user sequentially when the user has not responded for the set period of time. Note that the chat session will automatically end after the third period of time has passed.
Email Chat Transcript – If you allow users the option to be emailed a copy of the chat session, these fields allow you customize the fields in that email.
Type Indication - Appears to the user advising that the operator is actively typing a response.
Click English and customize the settings on the next screen.
If your FI has Premier Chat, you can click the “New System Message Set” button and create additional survey versions to be tied to specific profiles via Visitor Experience > Profiles.

Go to: Admin Console > Visitor Experience > Profiles
Visitor Profiles may be used to display certain content (surveys, windows, message sets, and canned answer sets) based on the skill that is selected by the end user. You must create these surveys, windows, message sets, and/or canned answer sets prior to completing this screen.
5/17/18 Page 10
Visitor Profile Details - Enter a name and description and move skills that should be included with the profile to the right column. A * indicate that the skill is already used in another profile.
Chat Settings - Select which survey, chat window design, system messages set and/or canned answers set should be used for the current profile. The Default option is selected and may be changed if you have created a custom option for that item.
Ticketing Settings – These are covered in the “Secure Support Setup” Quick Help Guide.

Topic: Final Step - Turn on ChatGo to: Account Set Up > Online Status > Online Status (tab)
5/17/18 Page 11
Account Status - Enables Chat for your end users.
When set to Online, at least one operator must have their status set to ‘online’ for chat to be available to end users.
When set to Offline, the Offline Survey will be presented to end users.
When switching to Offline, all current chats can be finished.
Ticketing is not affected (i.e. always on).
Online Operators – Displays which operators are online. Click the Disconnect button to log off an operator. This will release the concurrent login.