SECTION II: BASIC FLIGHT HARDWARE · 2013-01-07 · K-size helium bottles for a single flight. ......
21
13 SECTION II: BASIC FLIGHT HARDWARE General Overview The basic BOREALIS flight hardware is shown schematically in Figure 8. Figure 1: Schematic of BOREALIS flight hardware. The hardware stack is shown as it is suspended vertically from the latex weather balloon and deployed parachute. In the following sections, we consider each of the items shown in this figure in greater detail.
-
Upload
truonglien -
Category
Documents
-
view
213 -
download
0
Transcript of SECTION II: BASIC FLIGHT HARDWARE · 2013-01-07 · K-size helium bottles for a single flight. ......
13
SECTION II: BASIC FLIGHT HARDWARE General Overview The basic BOREALIS flight hardware is shown schematically in Figure 8.
Figure 1: Schematic of BOREALIS flight hardware.
The hardware stack is shown as it is suspended vertically from the latex weather balloon and deployed parachute. In the following sections, we consider each of the items shown in this figure in greater detail.
14
Balloons and Helium At the top of the stack is the BOREALIS “engine”, a latex weather balloon. To date we have used sounding balloons sold by Kaymont and Kaysam. Other vendors are listed in Table 2.
Balloon Distributor Web Page AEROSTAR
Promotional Balloons and Inflatables
www.aerostar.com
KAYMONT
Meteorological Balloons
www.kaymont.com
KAYSAM
Meteorological Balloons
www.kaysam.com
RAVEN IND.
Engineered Films Division
www.ravenind.com
Table 1: Distributors and manufacturers of latex weather balloons (compiled by Ralph Wallio).
The mass of the balloon used – generally given in grams – is the primary factor which determines the altitude at which burst will occur. On their web pages, Kaymont and Kaysam provide information on what performance can be expected for a given mass balloon. Our experience has shown the Kaysam estimates to be closer to the performance we achieve than those provided by Kaymont. Altitudes achieved by BOREALIS with various Kaymont balloons with 12-pound payloads are tabulated in Table 3.
Flight Balloon mass Max Altitude BOR0106A 300 grams 13,820 meters 45,341 feetBOR0106B 1200 grams 26,284 meters 86,233 feetBOR0109A 1500 grams 29,015 meters 95,193 feetBOR0110A 3000 grams 30,480 meters 110,028 feetBOR0205A 1500 grams 28,875 meters 94,734 feet
Table 2: BOREALIS flights to date, including balloon mass and maximum altitude data.
The latex balloons are filled with standard bottled helium at 99.99% purity. We typically use 1 ½ K-size helium bottles for a single flight. We obtain our helium through the MSU Physics Department research supply, at approximately $63 per bottle.

15
In addition to using a standard regulator and Tygon tubing attached to the He bottle, we have manufactured a nozzle coupling device out of PVC pipe (Figure 9) to connect the gas bottles to the balloons. The balloon nozzle fits snugly over the PVC pipe. Note that balloons of different masses may have different sized nozzles.
Figure 2: PVC nozzle coupling device. The barbed brass fitting connects to the Tygon tubing from the gas regulator. The balloon nozzle fits over the PVC end. The nylon line which is duct-taped to the coupling device is for securing the balloon during inflation and measuring balloon lift. Also see this device in use in Figure 20. Lanyard and support lines The balloon is connected to the parachute with 100-pound test nylon line purchased from Into the Wind (www.intothewind.com), a manufacturer of kite supplies. (Note: We have performed laboratory tests confirming that the “breaking force” of this 100-pound line, when knotted, is actually about 50 pounds. This is critical for meeting the FAR-101 exclusionary criteria given in Appendix A) The connection between the shroud ring and modules, and between the modules themselves are made of this same nylon line. During launch, the lanyard lines are also made from 100-pound test nylon. To aid in quick connection at launch time, the nylon line is typically looped through miniature aluminum carabiners (available at most sporting goods stores). We have manufactured a line separator from delrin plastic to couple the balloon line and parachute, and also to serve as a connection point for the lanyard lines during launch (See Figure 10).

16
Figure 3: Delrin line separator (left) and illustration of its usage during launch (right). Mini-carabiners connect the separator to the balloon line and parachute, lanyard lines are passed through the additional holes to control the rising stack during launch. Parachute We use a commercially manufactured balloon from Rocketman Industries (www.the-rocketman.com) to safely return our payloads to earth after the balloon has burst. Other sources include Spherachutes at www.spherachutes.com. Our Rocketman chute (Figure 2) is made from low-porosity 1.1 rip-stop nylon, is 9 feet in diameter and is rated to return a 6 to 12 pound payload to earth at a descent rate of 15 to 20 feet per second. It has performed well, but is probably heavier than a homemade parachute would need to be for this use. Other groups prefer to manufacture their own parachutes; see for example the Treasure Valley Near Space Project at www.voiceofidaho.org/tvnsp.
17
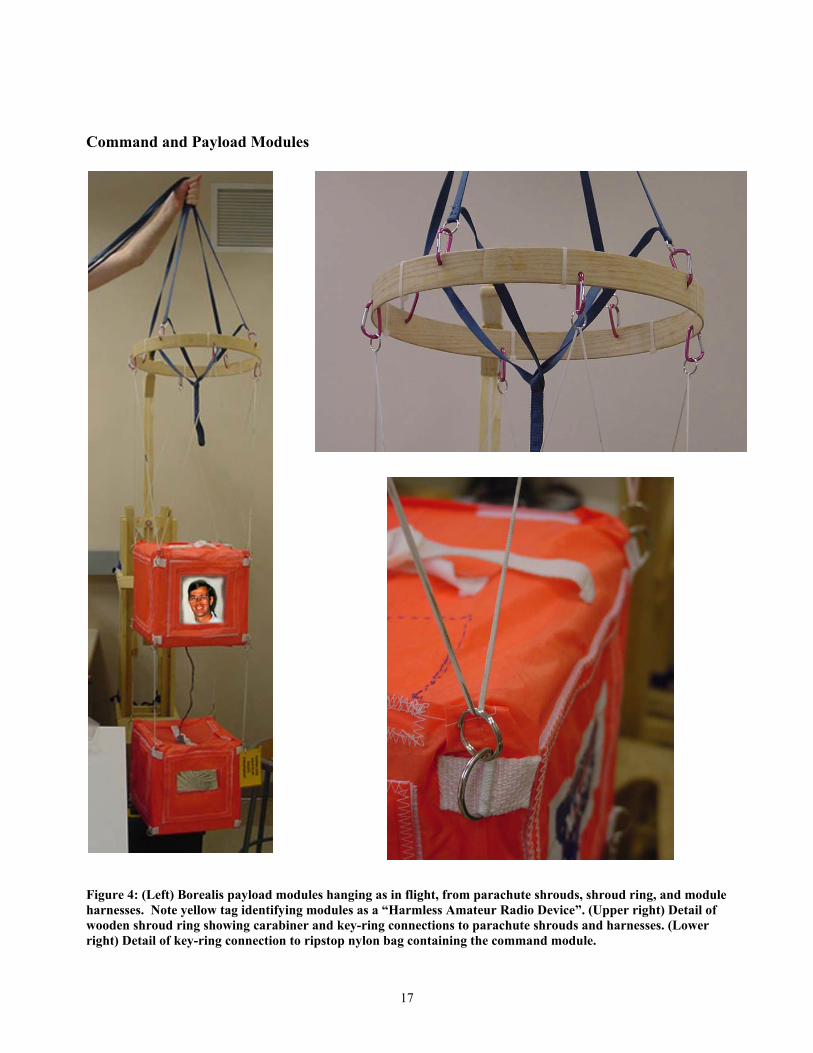
Command and Payload Modules
Figure 4: (Left) Borealis payload modules hanging as in flight, from parachute shrouds, shroud ring, and module harnesses. Note yellow tag identifying modules as a “Harmless Amateur Radio Device”. (Upper right) Detail of wooden shroud ring showing carabiner and key-ring connections to parachute shrouds and harnesses. (Lower right) Detail of key-ring connection to ripstop nylon bag containing the command module.

18
The BOREALIS near-space modules are shown in Figure 11 suspended from the parachute shroud lines, shroud ring, and harness lines as they hang in flight. The wooden shroud ring, which we made by wet-warping a strip of layered board, keeps the parachute shroud lines separated during flight to insure proper parachute deployment once the balloon has burst. Again, lightweight (5 gram) mini-carabineers are used for simple connections. The modules themselves are constructed from one-inch thick extruded polystyrene insulation foam (easily purchased at home improvement centers), typically glued together with silicon rubber (which retains its adhesive properties over a wide range of temperatures). The cube dimensions are approximately 12” x 12” x 12”.
Figure 5: Extruded polystyrene cube wrapped in aluminized mylar “space wrap” layer. The modules are wrapped first in a layer of “space wrap” (thin aluminized mylar). Anecdotally this helps the module retain some temperature stability, although this has never been confirmed. Finally, fluorescent orange ripstop nylon covers form a protective and highly visible outer layer. The covers are made in house, with material purchased from the kite material supplier Into The Wind at www.intothewind.com. Rings are sewn directly into the covers, to allow easy connection via key ring to the module-module and module-shroud ring harness lines.

19
Figure 6: New, smaller Command Module with thinner (1/2 inch) foam walls. New mount for 3 MegaPixel IBIS
II camera is also shown. We have recently rebuilt the Command Module in an effort to reduce mass (shown in Figure 13 below). The new module (first flown June 4, 2003) is made of ½ inch foam, and is 12 inches by 12 inches by 6 inches in height. The thinner foam walls of the module, together with a new sewn nylon ripstop bag, have provided us with a large increase in available mass for science/engineering payloads
Tracking System Basics The simplest tracking system for a balloon is based on using a GPS (Global Positioning System) receiver and ham (amateur) radio in the balloon payload transmitting digital packets to the ground giving the balloons latitude, longitude, and altitude. There is an established ham radio method of transmitting such information known as APRS (Automatic Position Reporting System). The key essentials are a GPS receiver that sends its output to a ham radio, which then transmits the information to a ground station tracking the balloon. The ham radio must have a TNC (Terminal Node Controller – the radio equivalent of a modem) either built in or attached externally, to encode the digital packets into the radio signal. Note: You must have an FCC license to transmit on the ham radio bands (including your balloon!). See Appendix B: “What's this business about getting an Amateur Radio license?”

20
Radio and antennas Regarding flight equipment, four things are of utmost importance: small size, low mass, ability to withstand cold temperatures, and ability to withstand impacts from landing. The equipment we chose has stood up to all of these criteria well, but there are many other options that would work just as well. The flight radio we are using is the Kenwood model TH-D7A (G). This radio is a dual band (2m and 70 cm) handheld HAM radio (HT) with a built-in terminal node controller (TNC) (equivalent to a modem). For ballooning, when one must be very careful about the mass of the flight equipment, a radio such as this is ideal. Also, since this radio comes with a built-in TNC, we do not need a separate external TNC cluttering up our payload box. The transmitter has three power level settings. When supplied with 9.6V, the maximum output in both the UHF (70 cm) and VHF (2 m) bands is around 5W, which is more than enough power for the signal , even at altitudes of over 100,000 feet. We often use the medium transmitter power setting, around 0.5W. With this setting, we still receive roughly 24 out of 25 packets at around 90,000 feet, which is very satisfactory. Two websites where you can buy ham radio equipment are listed below, as well as the sites for the major three ham radio manufacturers: Kenwood, Yaesu, and Icom.
Supplier Web Page Ham Radio Outlet www.hamradio.com AES www.aesham.com Kenwood www.kenwood.net Yaesu www.yaesu.com Icom www.icomamerica.com
Table 4: Some Suppliers of Ham Radio equipment.
Figure 14: Kenwood TH-D7A radio.
21
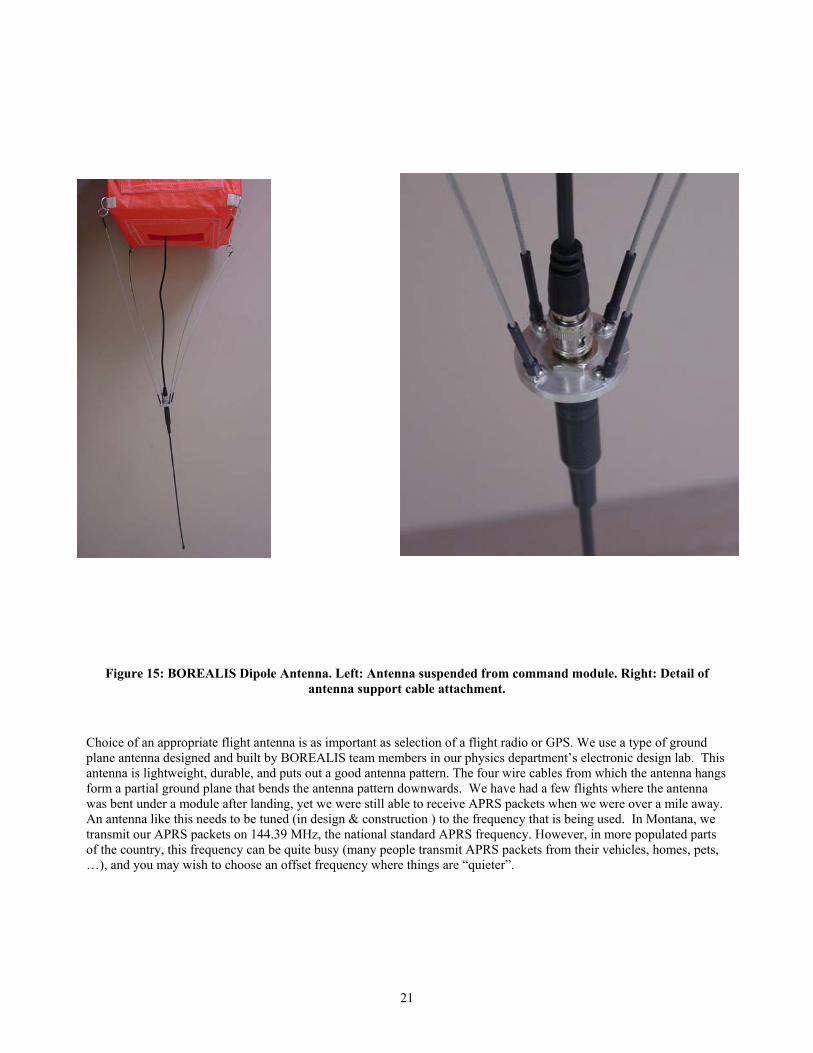
Figure 15: BOREALIS Dipole Antenna. Left: Antenna suspended from command module. Right: Detail of antenna support cable attachment.
Choice of an appropriate flight antenna is as important as selection of a flight radio or GPS. We use a type of ground plane antenna designed and built by BOREALIS team members in our physics department’s electronic design lab. This antenna is lightweight, durable, and puts out a good antenna pattern. The four wire cables from which the antenna hangs form a partial ground plane that bends the antenna pattern downwards. We have had a few flights where the antenna was bent under a module after landing, yet we were still able to receive APRS packets when we were over a mile away. An antenna like this needs to be tuned (in design & construction ) to the frequency that is being used. In Montana, we transmit our APRS packets on 144.39 MHz, the national standard APRS frequency. However, in more populated parts of the country, this frequency can be quite busy (many people transmit APRS packets from their vehicles, homes, pets, …), and you may wish to choose an offset frequency where things are “quieter”.
22
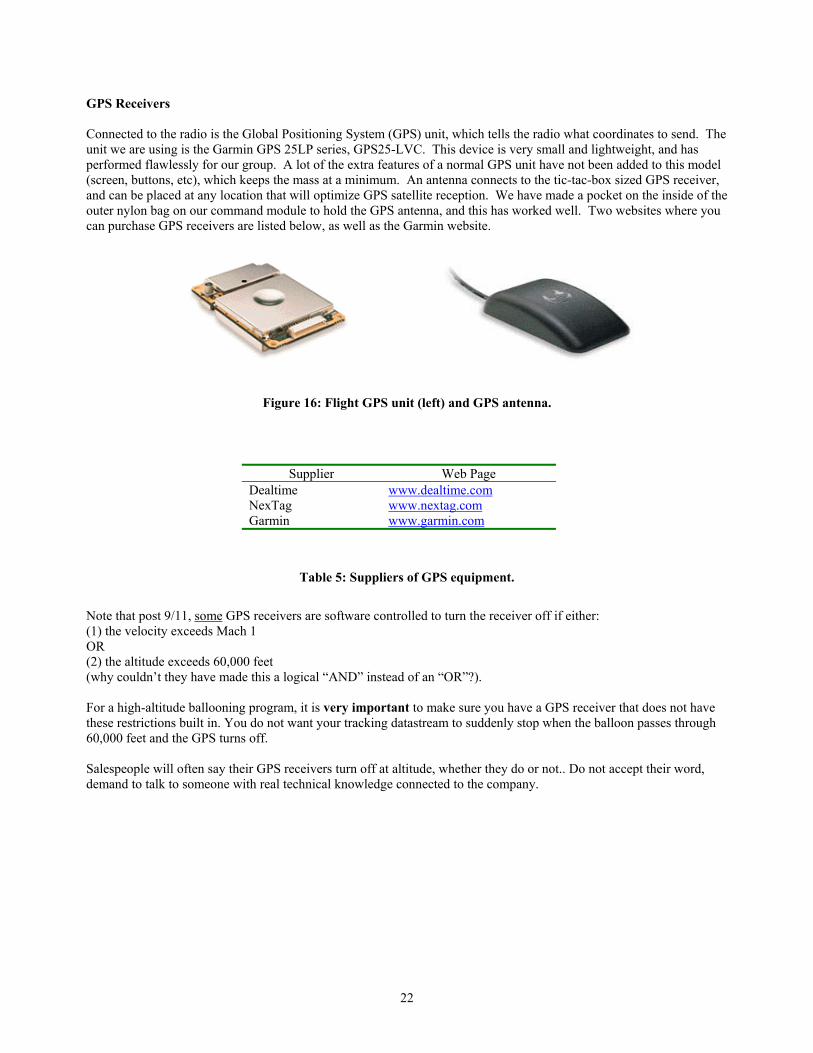
GPS Receivers Connected to the radio is the Global Positioning System (GPS) unit, which tells the radio what coordinates to send. The unit we are using is the Garmin GPS 25LP series, GPS25-LVC. This device is very small and lightweight, and has performed flawlessly for our group. A lot of the extra features of a normal GPS unit have not been added to this model (screen, buttons, etc), which keeps the mass at a minimum. An antenna connects to the tic-tac-box sized GPS receiver, and can be placed at any location that will optimize GPS satellite reception. We have made a pocket on the inside of the outer nylon bag on our command module to hold the GPS antenna, and this has worked well. Two websites where you can purchase GPS receivers are listed below, as well as the Garmin website.
Figure 16: Flight GPS unit (left) and GPS antenna.
Supplier Web Page Dealtime www.dealtime.com NexTag www.nextag.com Garmin www.garmin.com
Table 5: Suppliers of GPS equipment.
Note that post 9/11, some GPS receivers are software controlled to turn the receiver off if either: (1) the velocity exceeds Mach 1 OR (2) the altitude exceeds 60,000 feet (why couldn’t they have made this a logical “AND” instead of an “OR”?). For a high-altitude ballooning program, it is very important to make sure you have a GPS receiver that does not have these restrictions built in. You do not want your tracking datastream to suddenly stop when the balloon passes through 60,000 feet and the GPS turns off. Salespeople will often say their GPS receivers turn off at altitude, whether they do or not.. Do not accept their word, demand to talk to someone with real technical knowledge connected to the company.
23
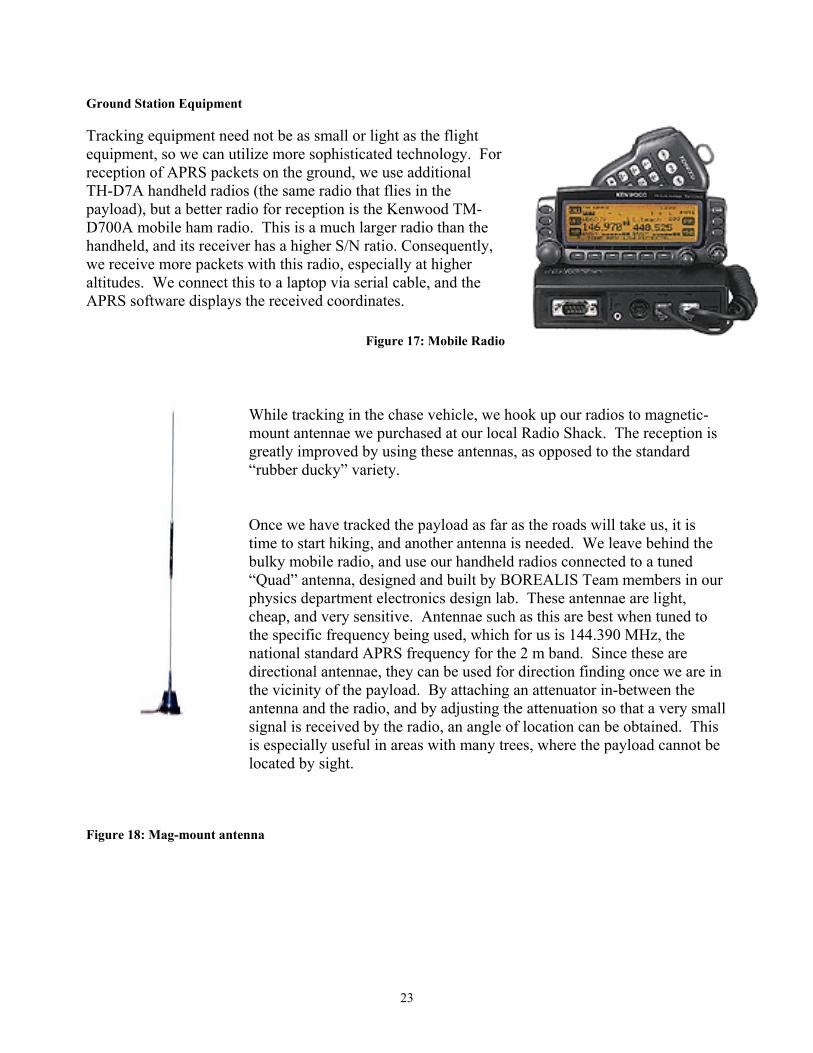
Ground Station Equipment Tracking equipment need not be as small or light as the flight equipment, so we can utilize more sophisticated technology. For reception of APRS packets on the ground, we use additional TH-D7A handheld radios (the same radio that flies in the payload), but a better radio for reception is the Kenwood TM-D700A mobile ham radio. This is a much larger radio than the handheld, and its receiver has a higher S/N ratio. Consequently, we receive more packets with this radio, especially at higher altitudes. We connect this to a laptop via serial cable, and the APRS software displays the received coordinates.
Figure 17: Mobile Radio
While tracking in the chase vehicle, we hook up our radios to magnetic-mount antennae we purchased at our local Radio Shack. The reception is greatly improved by using these antennas, as opposed to the standard “rubber ducky” variety. Once we have tracked the payload as far as the roads will take us, it is time to start hiking, and another antenna is needed. We leave behind the bulky mobile radio, and use our handheld radios connected to a tuned “Quad” antenna, designed and built by BOREALIS Team members in our physics department electronics design lab. These antennae are light, cheap, and very sensitive. Antennae such as this are best when tuned to the specific frequency being used, which for us is 144.390 MHz, the national standard APRS frequency for the 2 m band. Since these are directional antennae, they can be used for direction finding once we are in the vicinity of the payload. By attaching an attenuator in-between the antenna and the radio, and by adjusting the attenuation so that a very small signal is received by the radio, an angle of location can be obtained. This is especially useful in areas with many trees, where the payload cannot be located by sight.
Figure 18: Mag-mount antenna

24
Figure 19: Homemade quad directional antenna (left) and handheld GPS tracking unit (right). Another very useful piece of tracking equipment is a handheld GPS receiving unit. We are using the Garmin GPS II Plus. Once the last set of coordinates are received from the payload, they can be entered into the GPS unit, and the payloads distance and bearing can be ascertained. This is especially useful when the payload lands in an area inaccessible with a vehicle, and hiking is involved. Also, once the payload has been recovered, the exact coordinates for the landing site can be found and entered in. This may be useful in later profile analysis, as the last coordinates received via APRS may be different than the actual landing coordinates. APRS computer software APRS software is readily available on the web, and easy to install and use. Many different programs exist, and each has their own advantages and disadvantages. As with any software, the more the program can do, the longer it will take to learn and use. The software our group is currently using is APRS+SA. We chose this program for its easy-to-use history function, which lets us save all of the received APRS packets from a single source to a .txt file. Also, the software automatically displays the GPS coordinates from the packet in a readable degrees/minutes format, so we do not need to decipher the GPS code. We have also, in the past, utilized such programs as UI-View and WinAPRS. These two programs have fewer options, but can be up and running in no time. The websites where these three programs can be downloaded are listed below in Table 5.
Program Web Page APRS+SA www.tapr.org/~kh2z/aprsplus WinAPRS aprs.Rutgers.edu UI-View www.ui-view.com
Table 6: Sources for APRS software.
25
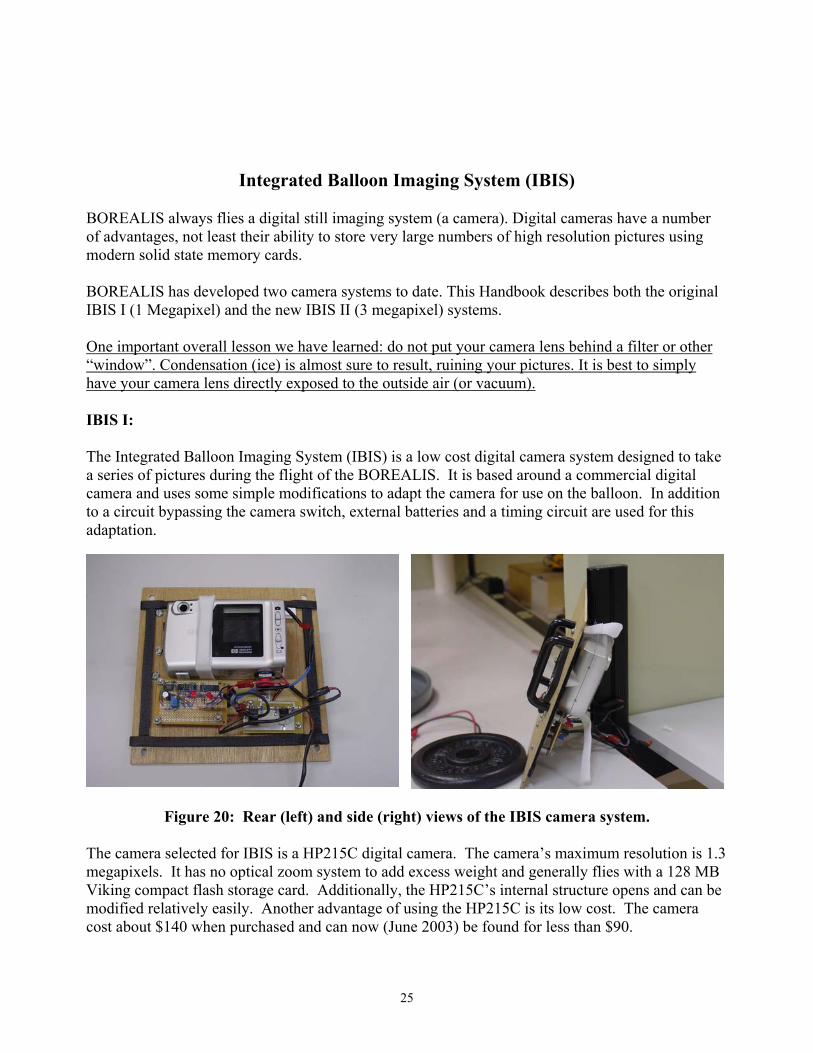
Integrated Balloon Imaging System (IBIS) BOREALIS always flies a digital still imaging system (a camera). Digital cameras have a number of advantages, not least their ability to store very large numbers of high resolution pictures using modern solid state memory cards. BOREALIS has developed two camera systems to date. This Handbook describes both the original IBIS I (1 Megapixel) and the new IBIS II (3 megapixel) systems. One important overall lesson we have learned: do not put your camera lens behind a filter or other “window”. Condensation (ice) is almost sure to result, ruining your pictures. It is best to simply have your camera lens directly exposed to the outside air (or vacuum). IBIS I: The Integrated Balloon Imaging System (IBIS) is a low cost digital camera system designed to take a series of pictures during the flight of the BOREALIS. It is based around a commercial digital camera and uses some simple modifications to adapt the camera for use on the balloon. In addition to a circuit bypassing the camera switch, external batteries and a timing circuit are used for this adaptation.
Figure 20: Rear (left) and side (right) views of the IBIS camera system. The camera selected for IBIS is a HP215C digital camera. The camera’s maximum resolution is 1.3 megapixels. It has no optical zoom system to add excess weight and generally flies with a 128 MB Viking compact flash storage card. Additionally, the HP215C’s internal structure opens and can be modified relatively easily. Another advantage of using the HP215C is its low cost. The camera cost about $140 when purchased and can now (June 2003) be found for less than $90.

26
Figure 21: Close up view of the HP215C digital camera (left) and the manual switch bypass leads (right).
The 128 MB compact flash card allows storage of approximately 350 pictures over the duration of the flight. A Viking 128 MB compact flash card cost about $125 when purchased and similar cards from other companies are available for less than $70 now. A SanDisk compact flash card has also been flown. The compact flash cards are well adapted to use in high altitude environments as there are no moving parts and the cards appear immune to the near zero pressure and low temperatures encountered in flight. The compact flash cards can be read by computers through the use of an inexpensive card reader available almost anywhere the cards are sold. This simplifies downloading and reviewing the pictures. Alternatively, most camera come with a cable and software that will allow a computer to download the pictures from the camera directly. This is less intuitive in most cases and the download speed tends to be much slower.
Figure 22: Compact Flash (CF) cards used in IBIS.
To make the camera take pictures, a simple timing circuit was developed to bypass the camera’s manual switch. The timing circuit can be set for a specific interval between pictures, varying from six seconds to over three minutes. The timing circuit can actually signal faster than six seconds but the camera requires about six seconds to recycle and be ready for the next picture. A schematic of

27
the timing circuit is included in Appendix C. This circuit requires a few resistors, capacitors, and some logic chips. The least common component is the solid-state power switch. This is the component that bypasses the manual switch on the camera. For this the IBIS uses a Texas Instruments TPS2015 Act Lo switch. This circuit design was selected for its simplicity and the availability of the components.
Figure 23: The timer circuit with the variable resistor (blue box) and the solid state switch on the upright board.
Additional camera components include the panel on which it is mounted, a manual interrupt switch, a Kodak UV camera filter and two drawer handles used as “roll-bars” to protect the camera lens. The panel is a laminate of oak panels. Although heavier than a balsa wood or plastic, this panel is much easier to work with and is stiffer while still being within weight limits. Changing the panel to a corrugated plastic only results in a weight savings of 40g and causes increased motion of the camera during flight. The manual interrupt switch prevents the timing circuit signal from reaching the camera stopping the camera from taking pictures. This allows the system to be started and stopped, thus preventing the automatic shut-off feature of the camera from activating, while limiting the amount of wasted pictures (and power) while on the ground. The UV filter protects the lens from impacts and also enhances the quality of the pictures at high altitude. However, our experience from several flights shows that the filter is prone to condensation (usually in the form of ice), which can quickly ruin a wonderful set of pictures. After trying to solve this problem without heating the lens itself, we determined the lens is not worth the improvement in the pictures.
The roll-bars protect the UV filter from damage if the payload lands on the camera. They also act as handles when moving and installing the camera in the module. Figure 24: Front view of IBIS showing the switch, roll bars, and UV filter in its mount.
28
This description of the camera is the original easiest to assemble version of IBIS. A second IBIS with higher resolution, lower mass, and smaller size has been built and flown. A discussion of the IBIS II is included in Appendix D.
Batteries and power Power is a major limiting factor governing the duration of the balloon mission and payload design. Although more batteries can always be added, the extra weight requires weight reduction from other systems. Therefore, the batteries chosen for use should have as large of a specific energy (amount energy/unit weight) and energy density (amount energy/unit volume) as possible. Naturally, one should not chose batteries that utilize air as a working component, such as zinc-air. The next most powerful batteries are some type of lithium battery. The efficiencies of the voltage converters in the power system also greatly affect the total power requirements and also the thermal properties of the balloon system.
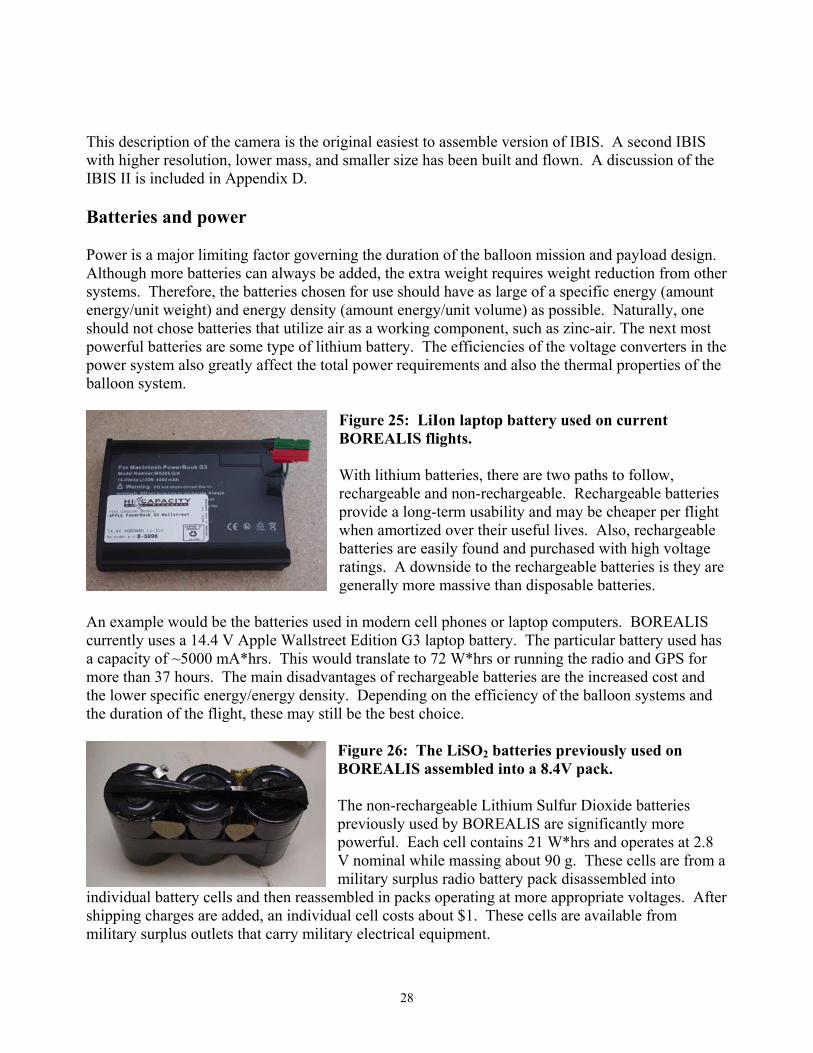
Figure 25: LiIon laptop battery used on current BOREALIS flights. With lithium batteries, there are two paths to follow, rechargeable and non-rechargeable. Rechargeable batteries provide a long-term usability and may be cheaper per flight when amortized over their useful lives. Also, rechargeable batteries are easily found and purchased with high voltage ratings. A downside to the rechargeable batteries is they are generally more massive than disposable batteries.
An example would be the batteries used in modern cell phones or laptop computers. BOREALIS currently uses a 14.4 V Apple Wallstreet Edition G3 laptop battery. The particular battery used has a capacity of ~5000 mA*hrs. This would translate to 72 W*hrs or running the radio and GPS for more than 37 hours. The main disadvantages of rechargeable batteries are the increased cost and the lower specific energy/energy density. Depending on the efficiency of the balloon systems and the duration of the flight, these may still be the best choice.
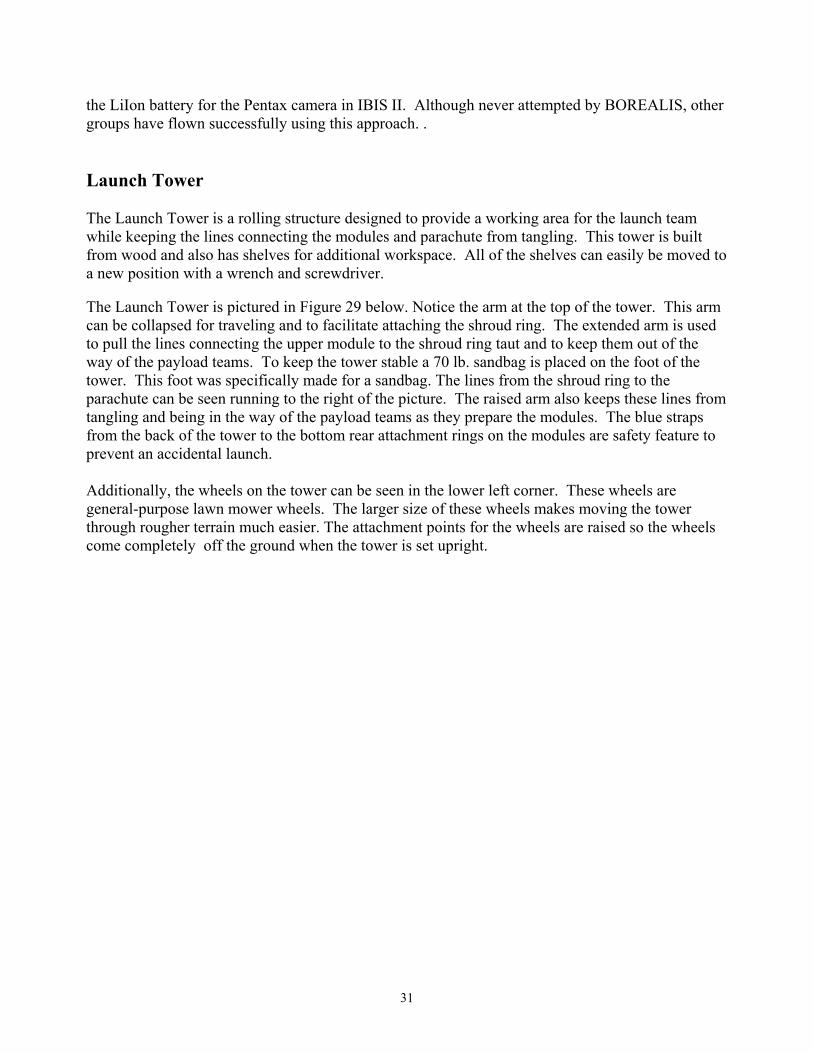
Figure 26: The LiSO2 batteries previously used on BOREALIS assembled into a 8.4V pack. The non-rechargeable Lithium Sulfur Dioxide batteries previously used by BOREALIS are significantly more powerful. Each cell contains 21 W*hrs and operates at 2.8 V nominal while massing about 90 g. These cells are from a military surplus radio battery pack disassembled into
individual battery cells and then reassembled in packs operating at more appropriate voltages. After shipping charges are added, an individual cell costs about $1. These cells are available from military surplus outlets that carry military electrical equipment.

29
The main reason the BOREALIS discontinued the use of these batteries is because they are chemically hazardous—in 2002 a set of these batteries vented noxious gases into our lab, causing a safety evacuation of the entire building. . Although the specific gases that were vented in that event remain unknown, materials safety sheets for these batteries indicate carbon dioxide, carbon monoxide, cyanide gas, and sulfur dioxide can be vented by the batteries when outgassing. Since these batteries had not even flown but were in storage awaiting the next flight and because the type of gasses the batteries may emit, we discontinued our use of the batteries and (properly) disposed of all remaining stock. An additional source of batteries may be Tadiran Batteries (http://www.tadiranbat.com). BOREALIS has no experience with their batteries, although they do have specifications similar to the military batteries used. Their website describes their batteries’ capabilities well and also shows some of the applications in which they have been used. Voltage conversions on BOREALIS were previously done with linear regulators. Although not as efficient as switching regulators, these are simple to use and also provide additional heat to the module. They are also well proven in hostile environments and do not generate high frequency noise like most switching regulators. Linear regulators are available from Maxim Integrated Products, Texas Instruments, National Semiconductor, and On Semiconductor to name a few. Most circuits will only require a pair of capacitors in addition to the chip.
Figure 27: The linear regulators formerly used on BOREALIS.
BOREALIS previously used four different voltage levels to operate its systems. The IBIS requires a 6V regulated line for the camera and a 5V regulated line for the timing circuit. The radio uses an 8.4V nominal unregulated line from the batteries and the microprocessor uses a 5.6V nominal unregulated line. The unregulated lines
are possible due to the individual systems incorporating a regulator into their design, meaning another regulation system would be excessively wasteful. Included below is a power consumption table for the major components on BOREALIS prior to conversion efficiencies.
Component Voltage
(V) Current
(mA) Power Draw
(W) Energy for 3hr flight
(Whrs) Radio (nominal flight) 8.4 ave. 170 1.428 4.284
Camera (30s cadence) 6.0 ave. 300 1.800 10.500 GPS 5.0 ~100 0.500 1.500
Timing Circuit 5.0 ~100 0.500 1.500 Microprocessor 5.6 ~140 0.784 2.352
Table 7: BOREALIS electronics components and their power requirements (old).

30
Note that the table indicates the total energy used is less than that stored in a single cell of the LiSO2 batteries and BOREALIS operated with six cells normally. This is due to efficiency considerations and also to voltage requirements when not using a step-up switching DC-DC converter. Also, by using more batteries divided into two packs, the radio and GPS are isolated from the IBIS. The additional energy for the radio provides operation time after the package has landed thus facilitating the recovery of the module. The new version of BOREALIS that uses the rechargeable battery implements switching regulators to improve the efficiency of the system. The high voltage of the rechargeable battery allows the use of higher efficiency Buck (step-down) converters. This reduces the amount of heat sent into the module but does not seem to affect the operation of our equipment. We built a centralized power board (schematic and board artwork available on request) that allows four different voltages through. The power board provides a pass through to the radio and three regulated lines at 4V, 5V, and 9.25V.
Figure 28: BOREALIS central power board. The power board allows the battery to run the radio, GPS, IBIS II, and microprocessor for more than 12 hours. With the higher voltage of the battery, the radio can also operate at a much higher output power. This enables the balloon position reports to be received more frequently when we are chasing the packages.
Component Voltage
(V) Current
(mA) Power
Draw (W) Energy for 3hr flight (Whrs)
Radio (nominal flight) 14.4 ave. 170 2.448 7.344 Camera (45s cadence) 4.0 ave. 200 0.800 2.400
GPS 5.0 ~100 0.500 1.500 Timing Circuit 5.0 ~100 0.500 1.500
Microprocessor 9.25 ~140 1.295 3.885
Table 8: BOREALIS command module power consumption (new). Another way to provide power to all of the components is to power the individual components by the OEM batteries that they were designed to use. Although this is the simplest and easiest solution, these batteries tend to be heavy and also not large enough to power the system for a full flight (Note in particular that it is desirable to keep the tracking system – radio and GPS – operating for some hours after the anticipated landing, to facilitate recovery efforts). Two extremes are shown to the left with the rechargeable NiCd battery pack for the TH-D7 radio and
31
the LiIon battery for the Pentax camera in IBIS II. Although never attempted by BOREALIS, other groups have flown successfully using this approach. . Launch Tower
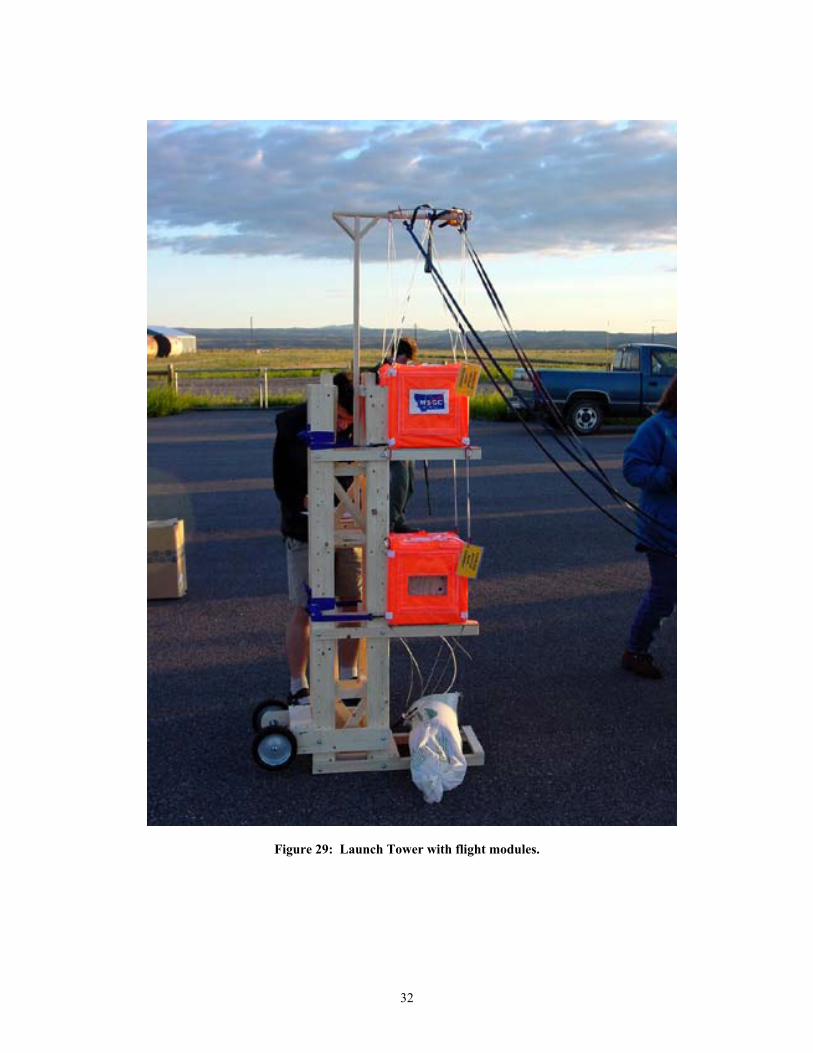
The Launch Tower is a rolling structure designed to provide a working area for the launch team while keeping the lines connecting the modules and parachute from tangling. This tower is built from wood and also has shelves for additional workspace. All of the shelves can easily be moved to a new position with a wrench and screwdriver. The Launch Tower is pictured in Figure 29 below. Notice the arm at the top of the tower. This arm can be collapsed for traveling and to facilitate attaching the shroud ring. The extended arm is used to pull the lines connecting the upper module to the shroud ring taut and to keep them out of the way of the payload teams. To keep the tower stable a 70 lb. sandbag is placed on the foot of the tower. This foot was specifically made for a sandbag. The lines from the shroud ring to the parachute can be seen running to the right of the picture. The raised arm also keeps these lines from tangling and being in the way of the payload teams as they prepare the modules. The blue straps from the back of the tower to the bottom rear attachment rings on the modules are safety feature to prevent an accidental launch. Additionally, the wheels on the tower can be seen in the lower left corner. These wheels are general-purpose lawn mower wheels. The larger size of these wheels makes moving the tower through rougher terrain much easier. The attachment points for the wheels are raised so the wheels come completely off the ground when the tower is set upright.
32
Figure 29: Launch Tower with flight modules.

33
Figure 30: Work shelf on the tower.
Figure 30 shows the equipment work shelf mounted to the side of the launch tower. This shelf provides an additional convenient workspace for teams preparing equipment to be placed inside the modules. Here the camera team is using the shelf to prepare an early version of IBIS. Note the shelf is close enough so that cables can be connected to equipment already inside the modules. This shelf is removable with a few bolts to allow easier transportation. Additionally, the tower has multiple holes so the height of the shelf can be adjusted.
Figure 31: Module shelf on the tower.
The shelves designed to hold the modules while preparing the system for launch are mounted “forward” on the tower (Figure 31). These shelves are pre-positioned so the lines connecting the modules are taut when the modules are in place. These shelves generally are not moved in the field although the tower is drilled with a series of mounting holes along its height. (These can be seen in Figure 30 just above the lower orange box.) The shelves are also cut with a “V” in the front to allow the antenna to hang beneath the module. In the case of the upper module shelf, this also allows electrical and data cables to more easily connect the two modules.