
SECTION 1 GOOD MANUFACTURING PRACTICES FOR THE ON …
28
SECTION 1 GOOD MANUFACTURING PRACTICES FOR THE ON-BOARD HANDLING AND PROCESSING OF TUNA -1 -
Transcript of SECTION 1 GOOD MANUFACTURING PRACTICES FOR THE ON …

SECTION 1
G O O D M A N U F A C T U R IN G PRACTICES FOR
TH E O N -B O A R D H A N D L IN G A N D PROCESSING OF
T U N A
- 1 -

Tuna is worth a lot of money, To obtain the highest price possible the method of catching tuna is very important. The demand for fresh tuna is increasing and with it is also the demand for a consistent quality product.
Good Manufacturing Practices (GMP) guidelines must be followed. GMP procedures are aimed at prevention of the problems by controlling the quality of the tuna as it is being caught.
Biology of Tuna
Tuna comes from the family of fishes called SCOMBROIDEA. This family of fishes possess large amounts of the unbound amino acid, HISTIDINE through the flesh. If the tuna is not handled properly at time of catching, this chemical can be converted, by bacterial action, to one of several toxic compounds, notably HISTAMINE. If sufficient amounts of histamine are produces in the muscles, scombroid poisoning may result, which in humans resembles a severe allergic action. Additional symptoms experienced include headaches, nausea, vomiting and swelling of the lips. To prevent the build up of this toxic-by-product, it is very important that the cooling process begin as soon as possible once the tuna is taking on board the fishing vessel. Histamine production is minimized at internal temperatures of lower than 7°C.
Tuna are unique among bony fish for their high metabolic rate (resulting in an extraordinary growth pattern) and in their vascular heat exchange system permitting them to maintain body temperatures several degrees higher than the ambient temperature, up to 38°C at time of catching. Most fish cool their muscles by transferring their metabolic heat to the blood where it cools at the gill surface where blood comes in close proximity to the water. In tuna however, a countercurrent heat exchange formed by arteries and veins supplying the red muscles (called retia mirable) acts in a way that the heated blood leaving the muscles warms the cooled blood entering the muscle. The retia, therefore, form a thermal barrier retaining metabolic heat in the tissue and preventing its loss in the gills.
The ability to thermoregulate varies. Large bluefin tuna appears to have a greater capacity to thermoregulate than smaller fish. Skipjack and yellowfin tuna can maintain an elevated muscle temperature, but it is only a fixed value above ambient over a wide rage of temperatures. Large bluefin tuna can maintain a red muscle temperature of between 26°C and 32°C, while the ambient temperatures varies between 6°C and 30°C respectively, This implies regulation of muscle temperature, which could be achieved by altering the functional size of the retia and/or by altering the blood flow through the retia.
It has been noted that when a tuna struggles, it will reduce the cooling of its muscles by the blood, as it uses all its energy to fight to escape capture. Therefore, it is very important to let the tuna return to its pre-exercise levels or stop struggling before it is removed from the hook.
Struggling will also have a dramatic effect on the amount of glycogen (stored carbohydrate) in the flesh which would be used up by the struggle.
This causes an effect on the amount of Adenosine Triphosphate (ATP) generated in the
1.1 INTRODUCTION
- 2 -

flesh after death (from the glycogen). When the concentration of ATP falls to a certain level, the fish will enter into rigor mortis. Upon resolution of rigor (softening and relaxation of the muscle tissue), autolytic digestion spoilage will start, resulting in changes in the freshness of the flesh. The longer it takes the fish to go into and through rigor, the longer the fish will remain chemically fresh.
The utilisation of glycogen from struggling also effects the ultimate post-mortem condition of the flesh by the generation of lactic and pyruvic acids as it end-products. High concentrations of these acids can be built up in the flesh after two minutes of intense struggling. This acidic condition can lead to a visual deterioration of tuna causing a rainbow colour if the flesh which may further develop into a serious defect called "burnt fish". The flesh will turn pale and watery, giving a cooked appearance (called 'yake' in Japan) greatly reducing its value. Fish in this condition are not suitable for sashimi.
Struggling will take place upon taking the hook, and if allowed to struggle to death without immediate cooling, will result in "burnt flesh". The lactic acid will be metabolised by a live tuna on a hook, so that after two hours the flesh could return to pre-exercise levels. Care must be taken to stop a re-building of lactic acid as the tuna is being landed. Bleeding of fish also significantly reduces post-mortem production of lactic acid.
Other biological and non-biologicaI factors will also contribute to tuna meat quality. These include feeding/food composition and flesh (fat) composition, parasites, age, sexual maturation, disease, killing methods, dressing procedures, chilling and storage procedures, and holding temperatures,
Tuna also contains polyunsaturated fats and oils which are warmed due to the blood in the system. If oxygen comes in contact with these oils, the fish will become rancid, producing odours and a poor taste. One cause of rancidity is the failure to properly bleed oxygen-rich blood from the meat. The GMP procedures will discuss the proper method for bleeding which must be followed.
Real fresh fish, when cut across will have the bone sticking up. This indicates that fish is still fresh and rigour mortis has not yet taken place.
For these reasons, fresh tuna especially for sashimi demands special handling and processing methods including:
gentle catching and landingproper killing and bleedingcareful dressingrapid cooling or freezing as appropriate
Rapid cooling and chilling at 0°C throughout the handling process is highly recommended for raw material intended for sashimi. If the product is to be frozen, it should be frozen to a core temperature of -60°C within 8 hours or less, followed by frozen storage at -50°C or lower.
The storage life of chilled tuna (yellowfin) is 10-12 days at 0°C. Frozen tuna will have the same initial quality as chilled tuna after thawing; however, its market life will only be three days, after which colour changes and textual changes become noticeable. Thawed
- 3-

tuna also tends to exudate drip accompanied by rapid textural changes. Fresh tuna should be shipped within seven days of capture, if the product is to enter the fresh sashimi market.
Quality of tuna will start to decrease as soon as the tuna is caught. The loss of quality in tuna cannot be stopped, it can only slowed down. With Good Manufacturing Practices, the more care taken, the better the maintenance of the quality of the tuna for the end user. Final product grading is determined by the way the tuna is handled aboard the vessel.
1.2 PROCESSING STEPS
Processing Steps
Method of Catching
Landing of Tuna on Vessel
Method of Killing
Bleeding
Dressing
Washing
Lowering of Temperature
Storage of Fresh Tuna
Freezing of Whole Tuna On Board of Vessel
Hazards
Time of Stress
Area Clean and Safe
System used
Proper Removal of Blood
Removal of Intestines & Gills
Clean and Safe Salt Water
Proper Iced Chilled Sea Water
Protect Skin and Cover with Good Clean Ice
A Core Temperature of -60°C Must be Reached in 8 Hours or Less
1.3 METHODS OF CATCHING
To maintain a food quality product, tuna should be landed as soon as possible after catching. There are several methods which are used for the catching of tuna.
The longline system is the most commonly used method for the fishing of sashimi quality tuna. The proper method when using this system is to tend the lines at all times to ensure no dead tuna are being landed. Presently, tuna longlines use between 1600 to 3000 hooks. This is considered to many as it can take up to 15 hours to retrieve the lines. It is recommended that less then 800 hooks be used at any one time, or a number whereby no dead tuna are found when tending.
Decreasing the amount of hooked time that tuna is in the water will decrease the amount of dead tuna and increase the amount of higher quality tuna for the end user.
Other hooking methods such as handline, trolling, and the pole and line are also satisfactory as long as the tuna are landed quickly and killed immediately,
Purse seining may also be used to land sashimi grade tuna. However, with this method
- 4 -

much care must be taken to ensure that not too many tuna are caught at one given time. If there are large numbers of tuna caught, it will lead to physical damage and maximum stress (and acid levels). Tuna which are caught by sein must be allowed to return to pre-exercise levels before removal. Tuna should be removed from the sein by gaffing the fish in the head with a hook or by the use of a tuna missile.
Tuna is a very delicate fish and has to be treated as such. The quality of the tuna starts to decrease as soon as it is on the hook, so what ever can be done from there on will only slow down the decrease in quality.
Points of Concern
Tuna must be handled properly even when it is in the water.
Eliminate the amount of stress, by tending the hooks more often.
Decrease the amount of dead tuna by decreasing the amount of time that the tuna is on the hooks after catching.
1.4 TEMPERATURE OF TUNA
Tuna is a very large fish, and as such it takes time for its heat to be removed. The best way is to completely surround the fish in a heat removing substance - water/ice slurry. Ice alone can be used, but ice melting at the surface of the fish may cause "bridges" in the ice pack, and the ice in the gut may also melt causing little contact and heat transfer slowing the cooling rate and requiring laborious re-packing.
Also, depending on the species of the tuna, the temperature of the tuna meat could be 10 to 15°C higher than the water temperature. Additional heat may also be caused by struggling and, if the fish is not killed properly, the tuna will try to keep the body's temperature as high as possible after death.
Points of Concern
Tuna must be cooled as soon as possible after taking on board the vessel.
Tuna must be placed in a cooling tank so as to decrease the core temperature as quickly as possible.
1.5 HANDLING
One method of taking the tuna on board is by the use of a gaff which is placed very carefully through the lower jaw. Another method is the use of a Tuna Missile. This is a multi-jawed griping device which is slid down the line to grip the tuna by the head. It is said to both clam the tuna and ensure it cannot escape (Annex 2).
When the crew are handling the tuna, they should wear gloves to protect the skin and the scales of the tuna.
The outer appearance of the tuna will tell the buyers how the tuna has been handled at time of catching,
-5-

During handling, if the skin is damaged then the meat will also be damaged. This will cause the tuna to have a lower grade which in turn can reduce the price. All care must be taken to ensure proper handling of tuna.
The deck surface must be kept clean and have a proper covering on the surface so as to protect the tuna from being damaged.
There should also be a proper overhead canopy in place to protect the tuna from the sun.
NOTE: One very important point to remember especially for the longline fishing vessel is that there should be enough crew available at all times to handle each tuna as it is taken on board the vessel. Tuna cannot be left on the deck without being properly handled; for example, a boat cannot take in all the tuna that are on the long line and then start the killing and handling operation.
Section 5.9 gives a flowchart for tuna grading at sea.
Points of Concern
Prevent tuna from being damaged,
Care must be taken to ensure that the skin, scales and outer meat is protected.
1.6 CLUBBING AND KILLING
Tuna is killed by either a sharp blow to the head or a spike inserted into the brain. The soft spot is found between the two eyes. The brain should be destroyed by placing a sharp object into the brain and pushing down so as to destroy the nervous system. The spinal core should also be destroyed by the use of a short metal rod and a tube. Force the rod through the tube into the brain and down the spinal canal to destroy the spinal core.
The primary reason for immediate killing is to prevent the tuna from suffering additional stress and struggling during the bleeding process. The reason for the destruction of brain and spinal core is to ensure the tuna's central nervous system which regulates body temperature will not function after death so that the tuna's body temperature will fall more rapidly in cold storage.
Points of Concern
Ensure that the tuna is killed properly.
Decrease the chances of struggling.
Decrease the chances of damage.
1.7 BLEEDING
Tuna must be bled as soon as possible after being taken on board. Removal of the hot blood will allow the tuna to cool much faster, and also reduce acidity. Listed are three steps that should be taken to properly bleed the tuna.
- 6 -

STEP #1: Locate the lateral median line behind the pectoral fin and with a clean knife roughly 2 inches long by ½ inch wide, make a cut no more than 2 inches long behind the pectoral fin, To cut the blood vessel make a cut 1 to 2 inches deep into the blood vessel. This cut must be completed on both sides of the fish.
STEP #2: The next step is to cut the blood vessels in the gills, Pull open one side of the gill cover, and with a clean sharp knife cut through the membrane behind the gill. Cut upward toward the spine to sever the blood vessel, being careful not to damage the heart, The heart, even though the tuna is dead, will continue to pump the blood as long as it is not damaged. This cut must be completed on both sides of the head.
STEP #3: The final step is to cut vertically on both sides of the tail between the third and fourth dorsal finlet from the tail. Do not remove the tail. During these three steps clean salt water must be kept running over the tuna to prevent the blood from clotting.
Points o f Concern
Ensure that the proper bleeding is completed with each fish.
Ensure that when cutting the blood vessel in the gill area that the heart is not damaged.
1.8 GUTTING & GILLING (REMOVAL OF EXTERNAL ORGANS & GILLS)
It is very important that all the internal organs are removed from the tuna as quickly as possible after bleeding. Fish possess chemically active proteins known as enzymes which are responsible for the digestion of their food. At death, these enzymes, which include the digestive enzymes of the stomach and intestines, remains active. If they are not removed, they will actually breakdown the tissues of the digestive tract and begin destroying the belly meat, which is very important. The thickest part of the tuna is around the belly area and this is where the highest yield recovery takes place. It must be protected.
To remove the internal organs, first make a straight cut 4 inches long in the belly, cutting towards the anus. You must not cut through the anus. Reach into the cut and pull out the intestine which is attached to the body wall of the fish. Cut the intestine as close to the anus as possible.
Next, you must remove the gills from the head, making sure not to damage the head. Pull open the gill cover and then grab the lower end of gills. Cut gills away from the head, then pull and remove the gills and gut material.
When this process has been completed, the belly area must be properly cleaned with proper clean safe sea water. Making sure that all gut remnants and blood is removed. The area around where the gills have been removed must also be properly washed and all blood removed. This area is usually scrubbed with a soft nylon brush to ensure that the blood in the bone area is properly removed. After this process is completed the outer area of the skin must be washed properly so as to ensure that there are no slime or foreign material present. The above-mentioned process should be done as quickly and carefully as possible to ensure that the quality of the tuna is maintained at all times.
Where seawater temperatures are warm, it is recommended that the water be cooled before it comes in contact with the tuna. One method to do this is to pass the wash
- 7-
water through a 2.5 cm coil of copper pipe approximately 4 m long which has been placed in an incubated box filled with ice and water. This will help in the initial cooling of the tuna.
Points o f Concern
Gutting must be done properly.
No fish to be placed in fish hole which is not gutted.
Protect the belly wall by proper washing after gut removal.
1.9 LOWERING THE TEMPERATURE
Tuna should be placed in a container of salt water and ice for a period of up to 12 hours or until the core temperature of the tuna is at 0°C. If it is kept for longer than 12 hours, there may be a bleaching effect. The mixture of ice and water should be at least two parts ice to one part water. This procedure should be used on vessels wherever possible. Remember that the quicker the body temperature is lowered the better results you will have in maintaining the quality of the tuna. For vessels that are unable to use this process due to size, then the tuna must be placed in ice as quickly as possible. If the tuna is chilled in ice, it may have to be re-packed several times as it chills.
1.10 ICING OF TUNA (STORAGE ON BOARD)
When the proper core temperature has being acquired, the tuna must be removed from the slush tanks and very quickly and carefully placed in the fish hole. We must ensure that the skin or the meat are not being damaged when being placed down through the fish hatch.
The first part of icing a tuna is to properly pack the belly completely with ice. This will help maintain the proper temperature in the belly wall.
The outer area of the tuna must be covered with a green tuna paper so as to protect the skin of the tuna from coming in direct contact with the ice. This procedure will help maintain a good skin surface. Before the paper is placed around the tuna it must be soaked in clean salt water, not fresh water. Fresh water causes bleaching of the skin. Salt water help maintain the natural colour of the skin.
Green tuna paper is a special parchment type paper that can be ordered from Japan. An alternative is to use cheese on muslin cloth.
The main type of ice used in Indonesia is block ice. Due to the very hot climate this is the only type of ice that is suitable. It will last for a longer period of time. However, block ice must be properly crushed before it is placed around the tuna. It is very important that there are no large pieces of ice or sharp edges of ice used in the icing of tuna. The tuna must be properly covered at all time with a good layer of ice.
There should be a layer of ice 30 centimetres deep under the tuna. The tuna are placed head to tail ensuring that there is enough room between each fish to properly ice. Each tuna must be laid flat so as to ensure that the tuna does not bend. If tuna is allowed to be bent, then this will cause tearing off the meat which in turn will cause
-8-
downgrading of the quality. There can be two layers of tuna placed in a fish hole compartment one on top of the other; if more layers, shelving must be used. Between each layer of tuna, the fish must be covered with at least 30 centimetres of ice. The ice must be spread evenly over the fish, ensuring that there are no air pockets present. As the ice melts the water must be able to run clear of the fish. Proper pumping of the fish hole must be maintained.
Large and small tuna should not be iced together, large tuna should not be placed on top of small tuna. The more pressure that is placed on the fish the more chances there is of damage occurring while the fish is in the ice.
The fish hole must be properly insulated to maintain a proper cold temperature. The fish hatch opening must be well insulated to protect the hole from the outside air temperature.
Another method of holding tuna is the use of Refrigerated Sea Water. This system can only be used with vessels that have water tight fish holes and the proper refrigeration system on board. They must have the proper controls and holding facilities so as to maintain this system,
When fish are being placed in this system, the tuna must be placed into plastic bags so as to protect each tuna. The temperature must be maintained at 0°C at all times. The water must be kept clean and systems must be place to change the water as it becomes stale.
Once the tuna is properly iced and stored, it must be continuously checked to see that it is covered by ice at all times. Temperature of the meat should not drop below -2.5°C in the fresh state as rapid browning of the meat in the outer layers can occur.
Points of Concern
All tuna must be properly iced.
Regular inspection to ensure that the tuna is completely covered with ice,
Prevent tuna from touching when being iced in the fish hole.
1.11 DISCHARGING OF TUNA
When the time comes to discharge the tuna from the fish hole, all care must be taken to ensure that the tuna is handled very carefully and quickly,
Before the tuna is removed from the fish hole there should be a proper protected covering around the fish hole so as to ensure that the skin and flesh cannot be damaged.
There must be an overhead covering in place aboard the vessel if the tuna are going to be exposed to the sun for any period of time.
1.12 ON BOARD FREEZING OF TUNA (FOR SASHIMI AND OTHER MARKETS)
To obtain high quality frozen product, the previously mentioned landing and handling
- 9 -

on-board procedures apply. Temperature of tuna must be reduced as quickly as possible.
Air-blast freezing is recommended because low temperature can be obtained relatively quickly. Tuna in air-blast freezers should be suspended from the head, or aligned head- first into the air-blast. Tuna laid flat must be protected so that it does not bend. If tuna is bent during freezing, when it is thawed the meat will become torn causing a decrease in the quality.
The required core temperature that tuna is to be frozen on board is -60°C. The refrigeration capacity should be such as to do this within 8 hours or less.
The freezer storage area on board must maintain a constant temperature. The temperature should be held at -50°C or below. If the temperature is allowed to fluctuate or rise excessively, the freezer store's atmosphere will hold enough water vapour to cause a drying effect on the skin of the tuna and create a condition called freezer burn.
On-board blast freezers and cold storage rooms are required to be equipped with a monitoring gauge to record the temperature on an hourly basis. This will give information to show if there is a problem with the temperature in the rooms.
1.13 SUMMARY OF FISH HANDLING PROCEDURES:
1. Remove fish from hook as soon as possible after hooking.2. Gaff tuna carefully through the lower jaw, or the use of a Tuna Missile is also
recommended.3. Eliminate struggling by clubbing the fish properly.4. Handle the fish quickly and carefully at all times.5. Kill the fish with a spike inserted in the brain as soon as it is on board.6. Bleed the fish immediately after killing.7. Wash the fish after bleeding,8. Gut and gill the fish following bleeding.9. Wash the fish properly after gutting and gilling.10. Start chilling as soon as possible.11. Properly ice the fish in fish hole.12. Core temperature of fresh tuna must be kept at 0°C.13. For tuna that is frozen on-board, the core temperature should be at least -60°C.14. The cold storage area for the tuna frozen on-board should be maintained at -50°C
or below.
- 1 0 -

Annex 1
FLOWCHARTS FOR
THE ON-BOARD HANDLING OF
FRESH A N D FROZEN T U N A
- 11 -

Annex 1.1 Flowchart for On Board Handling of Fresh Tuna
-1 2 -

Annex 1.2 Flowchart for On-Board Handling of Frozen Tuna
- 13 -

Annex 2
Tuna Missile
- 14-

Annex 3
Diagrams of
Proper Handling Procedures and Descriptions
Taken from: Nakamuna, Robert M., et. al.
The Management of Yellowfin Tuna
in the Handline Fishing Industry of Hawaii:
A Fish-Handling Handbook.
University of Hawaii Sea Grant College Program (1987)
UNIHI-SEAGRANT-AR-88-01
Note: To handle tuna head-on, follow steps 1 through 14
as shown in figures 1 to 18.
Note: To head tuna, follow steps 1 through 5
as shown in figures 22 to 24.
- 1 5 -

Annex 3
LANDING THE FISH
Run-Fight Time
More runs after hookup mean longer fight time and an increased chance of BTS occurrence. To reduce this possibility, the number of runs should be minimized and tuna should be landed as rapidly as possible -- ideally within 6 minutes of hookup.
Gaffing
The best place to gaff a fish is through the lower jaw (Figure 1) because it is strong enough to support the fish when lifted. Also, a gaff through the jaw makes it easy to position the fish for stunning. Gaffs should not be made through the body or heart. A gaff through the body reduces the value of the fish, and an accidental gaff through the heart ruins the chances for proper bleeding.
Figure 7. Gaff the fish through the lower jaw.
Stunning and Killing
Longer struggling time results in increased body temperature, bruising, scale loss, and muscular contractions. Fish should be stunned and killed as quickly as possible. The best place to club a fish is on the soft spot. The soft spot, which is whitish in colour, is located on the mid-dorsal line just above the eyes (Taniguchi, 1977). The brain is located slighted behind the soft spot.
-1 6 -

• Stunning
Fish should be stunned by clubbing immediately after gaffing or as soon as they are brought on board. Clubbing can be accomplished with a bat, mallet, or lead-filled steel pipe (Figure 2).
Figure 2. Stun the fish by dubbing the soft spot between the eyes.
• Killing
Sometimes stunning only temporary renders the fish unconscious. Fish that appear to be dead can recover and start to thrash in the fish box. To prevent this, the fish should be killed immediately after stunning by destroying the brain. Three techniques are described below. When properly executed, the fish will shudder once, become limp, and die.
The first technique involves the use of a sharp probe such as an ice pick or a screwdriver. These are simple tools which can be used to quickly and easily kill the fish (Figure 3).
Step 1 Place a sharp probe on either side of the soft spot.Step 2 Pierce the skin, and then push the probe down until the skull is reached.Step 3 Apply downward pressure on the probe, and then slide it backward in
the direction of the tail until you reach a thin cartilaginous plate at the base of the ridge. The plate will collapse, and the probe will sink about 1 inch deeper into the brain.
Step 4 Move the probe back and forth to destroy the brain.
Figure 3. Destroy the brain on either side o f the soft spot using an ice pick o f screwdriver.
- 17-

Another killing techniques involves the use of the Taniguchi tool (Figure 4). Developed in Japan by Dr. H. Taniguchi (1997) and used mainly on longline fishing vessels, this tool consists of a short metal tube and a rod. A welding rod or flexible plastic rod may also be used.
Step 1 Bore a hole into the fish's brain at the soft spot.Step 2 Force the rod through the tube, into the brain, and down the hollow
core of the spinal canal to destroy the spinal cord.
Figure 4. Insert the metal tube through the brain, followed by the rod into the spinal canal to destroy the spinal cord.
A third technique used to kill fish involves the use of a hacksaw and rod (Figure 5). A sharp knife may be used in place of a hacksaw.
Step 1 Using a hacksaw, cut a wedge from the area over the soft spot to the base of the eyes.
Step 2 Remove the wedge to expose the brain.Step 3 Insert the rod through the brain and into the spinal canal to destroy the
spinal cord.
Figure 5. Cut a wedge over the soft spot to expose the brain, and then pass a rod through the brain into the spinal canal.
-1 8 -

CLEANING THE FISH
Bleeding
Fish should be bled for 5 minutes immediately after killing. Removal of the "hot" blood allows the fish to cool more rapidly. When heart, which continues to function even after the brain is destroyed, must be kept intact in order for it to pump the blood out of the fish. Three methods for proper bleeding are given below,
• Pectoral Cut
To make the pectoral cut, a short, narrow knife roughly 2 inches long by 1/2 inch wide should be used since the blood vessels (subcutaneous artery) lies no more than 1 inch below the skin surface of the fish. A sharpened oyster shucker or any other similar-sized knife is ideal. The knife should be kept extra clean to prevent bacteria - which may contribute to accelerated spoilage - from being introduced into the fish.
Step 1 Locate a spot the width of three fingers behind the base of the pectoral fin and about 1/4 inch below the lateral median line which extends along the side of the fish (Figure 6).
Step 2 To sever the blood vessel, make a 1 to 2 inch cut, 1 inch deep, from the spot towards the base of the pectoral fin.
Step 3 Make this cut on both sides of the fish.Step 4 To drain the blood from the fish, position it's head down, on an incline.
Shoot water on the fish to prevent blood c lot.
Figure 6. Bleed fish by cutting behind the pectoral fin.
• Gill Cut
Step 1 Position the fish so that it is lying on its side.Step 2 Pull open one side of the gill cover, and then insert a knife behind the
gills through the membrane (Figure 7).Step 3 Cut upwards towards the spine to sever the blood vessels, being careful
not to stab the heart.Step 4 Make a cut on both sides of the fish.Step 5 To drain the blood from the fish, position its head down, on an incline.
Shoot water on the fish to prevent blood clotting.
- 1 9 -
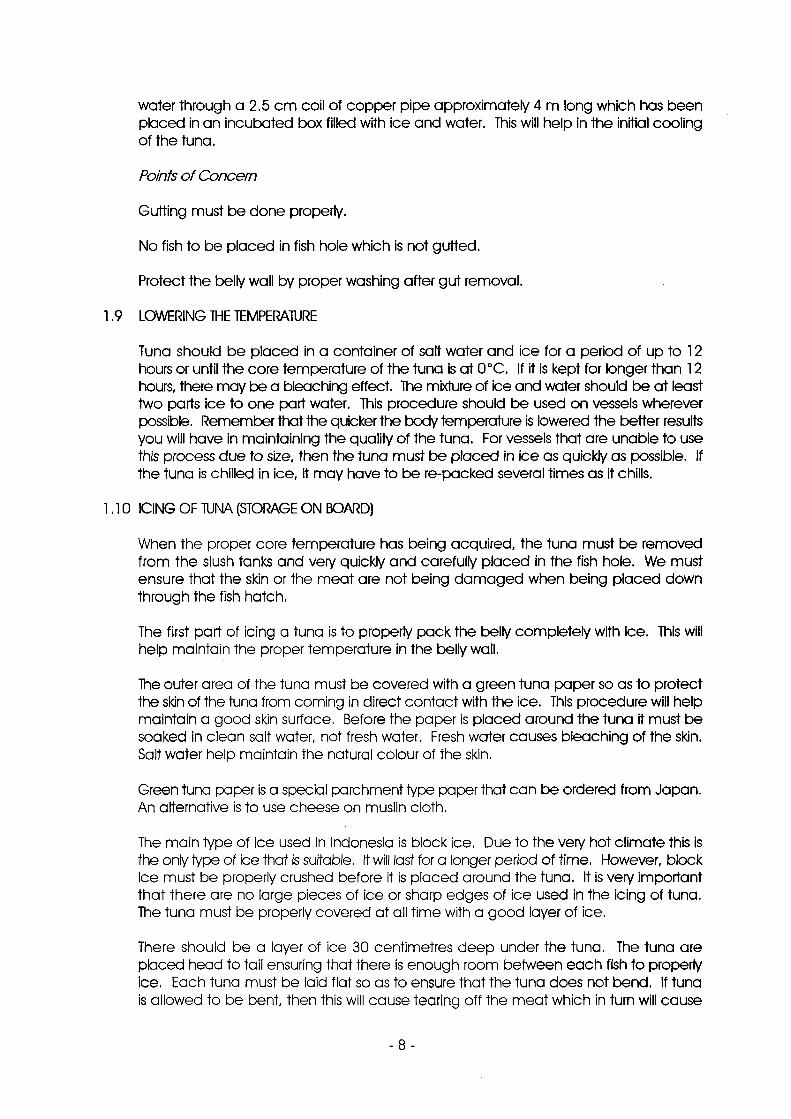
Figure 7. Bleed fish by cutting blood vessel a t top o f gills.
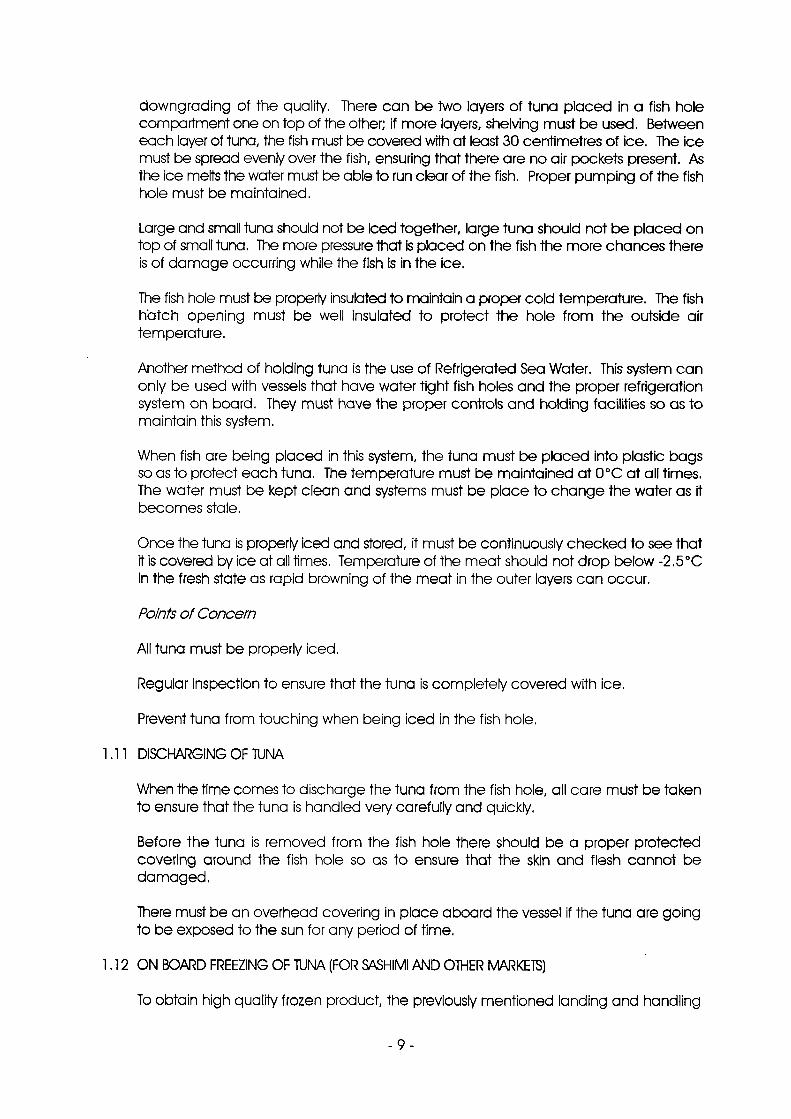
• Tail Cut
Step 1 Cut the blood vessel vertically between the third and fourth dorsal finlet (see appendix) from the tail (Figure 8).
Step 2 Make cuts on both sides of the fish, or remove the tail completely.Step 3 Drain the blood from the fish. Shoot water on the fish to prevent blood
clotting.
Figure 8. Bleed fish by cutting tail
Gutting and Gilling
Removing the internal organs and gills is another way to cool the fish faster to prevent spoilage and bacterial growth which can cause BTS. Also, a gutted, gilled fish can be processed faster and handled less at the market. Female and very large fish should be handled more quickly - but carefully - since they are prone to a greater incidence of BTS. Although tuna smaller than 80 pounds rarely develop BTS, those weighing as little as 5 pounds have been observed with this condition.
The sex of the fish can be determined by the presence of testicles of ovaries. During the spawning season - from May to October - the male testicles are smooth, elongated, and noticeably white in appearance; the female ovaries are elongated, rough in texture, and yellow to orange in colour, and their surface is lined by prominent veins.
-2 0 -

Fish can be gutted and gilled with the head on or off. Both approaches are given below.
• Head-on Approach
Step 1 Make a straight, 4 inch slit in the belly, cutting towards the anus (Figure 9).
Figure 9. Insert knife 4 inches in front o f the anus, and then cut towards it.
Step 2 Reach into the cavity and pull out the intestines attached to the body wall. Cut the intestine near the anus (Figure 10).
Figure 10. Cut the intestine near the anus
Step 3 Pull one gill away from the body. Then insert a knife at the top of the gill and slide towards the eye. Make this cut on both sides of the fish (Figure 11).
Figure 11. Insert knife a t the top o f the gill cover and slide it toward the eye.
-2 1 -

Step 4 Pull the gill cover back, reach inside the cavity with a knife, and then cut the main muscle attaching the gill cover to the head. Make this cut on both sides of the fish to allow easier access to the gills, which needs to be removed (Figure 12).
Figure 12. Cut the main muscle attaching the gill cover to the head.
Step 5 Cut the lower end of the gill-to-head attachment and not the entire connection of the lower body to the underside of the mouth (Figure 13). If you cut the entire connection, unequal pressure exerted by muscle stiffening will lower the quality of the fish in two ways. First, it will cause the head to lift up and bend backwards, distorting the shape and appearance of the fish. Second, this unequal pressure will cause tearing and gaping of fillets.
Figure 13. Cut lower end o f gill-to-head attachment.
Step 6 Pull one gill cover from the body, and then cut through the membrane behind the gills. Extend the cut through the kidneys as far back and as close to the backbone as possible. Bring the cut down each side of the gill openings. Make this cut on both sides of the fish (Figure 14).
-2 2 -

Figure 14. Cut through the membrane behind the gills.
Step 7 Pull one gill cover away from the body. Insert a knife under the gills, close to the spinal column, and cut the upper end of the gill-to-head attachment. Cut on both sides of the fish, and then free gills from the head.
Figure 15. Cut upper end o f gill-to-head attachment.
Step 8 Pull open gill cover, and then grab the lower end of the gills. Pull and remove the gills and guts. Remove any remaining attachments (Figure 16).
Figure 16. Remove gills and guts and any remaining attachments.
Step 9 Remove the gonads from the cavity by sliding your hand under them and tearing the membranes anchoring them to the stomach.
-2 3 -

Step 10 Pop the air bladder.Step 11 Remove as much of the kidney and coagulated blood as possible
from the backbone. Scrub the area with a stiff wire or nylon brush until spine becomes white (Figure 17).
Figure 17. Scrub spine through gill openings to remove the kidney and coagulated blood.
Step 12 Remove as much loose skin and hanging attachments as possible from the bone within the gill openings.
Step 13 Remove the membranes from inside gill cover (Figure 18).
Figure 18. Trim the membranes lining the gill collar.
Step 14 Rinse fish with chilled water and wash away slime from the outside of the skin.
Step 15 Remove all fins, and even the tail, if desired (Figures 19 and 20).
-2 4 -

Figure 19. Remove all fins.
Figure 20. Gilled, gutted fish with head on and fins removed.
Step 16 Optional. For easier processing, cut off a portion of the gill cover for better access to the gills and guts. Either use a saw or bend the gill plate back until it snaps in half, and then cut along the crease with a knife (Figure 21).
Figure 21. Saw off the gill cover or fold it back and cut along crease.
• Head-off Approach
With the head-off approach, a part or all of the head is sawed off and the gills and guts are removed with the head. The procedure is as follows.
Step 1 Remove the head by sawing straight down behind the eyes (Figure 22).Step 2 Alternatively, insert the saw behind the gill cover and saw at an angle towards
the snout. Make this tapered cut on both sides of the fish (Figure 23).
-2 5 -

Figure 22. Saw straight down behind the eyes to remove the head.
Figure 23. Sa w towards snout from behind the gill cover on both sides o f fish to achieve a tapered cut.
Step 3 For gutting and gilling instructions, follow steps 1, 2 and 6 through 13 in the head-on approach section.
Step 4 Rinse fish with chilled water and wash away slime from the outside of the skin.
Step 5 Remove all fins, and even the tail, if desired (Figure 24).
Figure 24. Gilled, gutted fish with head and fins removed.
-2 6 -

External Anatomy o f Yellowfin Tuna
Internal Organs o f Yellowfin Tuna
-2 7 -

- 28 -