Second release of the COMPASS Tool User Manual · Second release of the COMPASS Tool User Manual...
32
Grant Agreement: 287829 Comprehensive Modelling for Advanced Systems of Systems Second release of the COMPASS Tool User Manual Technical Note Number: D31.2a Version: 1.2 Date: January 2013 Public Document http://www.compass-research.eu
Transcript of Second release of the COMPASS Tool User Manual · Second release of the COMPASS Tool User Manual...
Grant Agreement: 287829
Comprehensive Modelling for Advanced Systems of Systems
Second release of the COMPASS ToolUser Manual
Technical Note Number: D31.2a
Version: 1.2
Date: January 2013
Public Document
http://www.compass-research.eu

D31.2a - COMPASS Tool User Manual (Public)
Contributors:
Joey W, Coleman, AUAnders Kaels Malmos, AURasmus Lauritsen, AULuis D. Couto, AU
Editors:
Joey Coleman, AU
Reviewers:
Ralph Hains, AtegoSimon Foster, York
2
D31.2a - COMPASS Tool User Manual (Public)
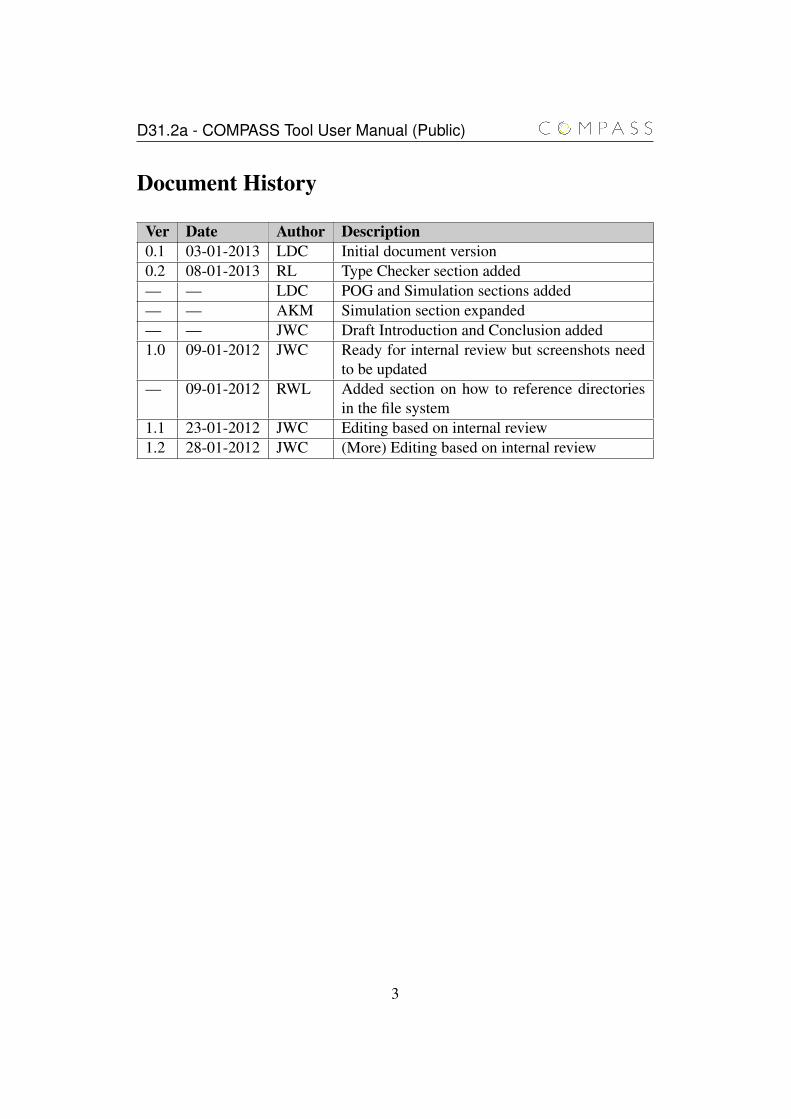
Document History
Ver Date Author Description0.1 03-01-2013 LDC Initial document version0.2 08-01-2013 RL Type Checker section added— — LDC POG and Simulation sections added— — AKM Simulation section expanded— — JWC Draft Introduction and Conclusion added1.0 09-01-2012 JWC Ready for internal review but screenshots need
to be updated— 09-01-2012 RWL Added section on how to reference directories
in the file system1.1 23-01-2012 JWC Editing based on internal review1.2 28-01-2012 JWC (More) Editing based on internal review
3

D31.2a - COMPASS Tool User Manual (Public)
Contents1 Introduction 5
2 Obtaining the Software 6
3 The Command-line Interface 73.1 Available Functionality . . . . . . . . . . . . . . . . . . . . . . . 73.2 Basic Invocation . . . . . . . . . . . . . . . . . . . . . . . . . . . 83.3 CML Simulation . . . . . . . . . . . . . . . . . . . . . . . . . . 9
4 Using the COMPASS Perspective 124.1 Eclipse Terminology . . . . . . . . . . . . . . . . . . . . . . . . 12
5 Managing COMPASS Projects 155.1 Creating new COMPASS projects . . . . . . . . . . . . . . . . . 155.2 Importing COMPASS projects . . . . . . . . . . . . . . . . . . . 155.3 Referencing folders in the filesystem . . . . . . . . . . . . . . . . 175.4 Exporting COMPASS projects . . . . . . . . . . . . . . . . . . . 18
6 The CML Type Checker 216.1 Output . . . . . . . . . . . . . . . . . . . . . . . . . . . . . . . . 216.2 Representation . . . . . . . . . . . . . . . . . . . . . . . . . . . 21
7 Using the Proof Obligation Generator 23
8 The COMPASS Simulator 248.1 Using COMPASS Simulator . . . . . . . . . . . . . . . . . . . . 248.2 Creating a Launch Configuration . . . . . . . . . . . . . . . . . . 258.3 Launch Via Shortcut . . . . . . . . . . . . . . . . . . . . . . . . 278.4 Simulation . . . . . . . . . . . . . . . . . . . . . . . . . . . . . . 28
9 Conclusion 31
4

D31.2a - COMPASS Tool User Manual (Public)
1 Introduction
This document is a user manual for the COMPASS tool, an open source toolsupporting systematic engineering of System of Systems using the COMPASSModelling Language (CML). The ultimate target is a tool that is built on top ofthe Eclipse platform, that integrates with the RT-Tester tool and also integrateswith Artisan Studio. For developers and advanced users, the core CML languagefunctionality is also available from a command-line interface. This document istargeted at users with limited experience working with Eclipse-based tools. Di-rections are given as to where to obtain the software.
This user manual does not provide details regarding the underlying CML formal-ism. Thus if you are not familiar with this, we suggest the tutorial for CML beforeproceeding with this user manual [WCF+12, BGW12]. However, users broadlyfamiliar with CML may find the Tool Grammar reference (COMPASS DeliverableD31.2c [Col13]) useful to ensure that the they are using the exact syntax acceptedby the tool.
This version of the document supports version 0.1.0 of the COMPASS tool suite.The intent is to introduce readers to how this version of the tool interacts withCML models. The connection to the Artisan Studio tool is not yet available and,hence, is not described further in this deliverable.
The main tool is the COMPASS IDE, which integrates all of the available CMLanalysis functionality and provides editing abilities. It also integrates the CMLsimulator and initial version of the link to the RT-Tester tool.
We also provide a command-line interface to the core functionality of the tool.This interface is aimed primarily at developers but there are situations where itmay be useful to users of the tool.
Section 2 describes how to obtain the software and install it on your own com-puter. Section 3 describes the command-line interface to the COMPASS tool.Section 4 explains the different views in the COMPASS Eclipse perspective. Thisis followed by Section 5 which explains how to manage different projects in theCOMPASS tool. Section 6 describes what output the CML typechecker will pro-duce, and where it may be found in the COMPASS IDE. Section 7 describes howto access the output from the proof obligation generator. Section 8 describes theinterface to the COMPASS simulator as included in the COMPASS IDE.
5

D31.2a - COMPASS Tool User Manual (Public)
2 Obtaining the Software
This section explains how to obtain the COMPASS IDE and COMPASS command-line tool, described in this user manual.
The COMPASS suite is an open source tool, developed by universities and indus-trial partners involved in the COMPASS EU-FP7 project [FLW12]. The tool isdeveloped on top of the Eclipse platform.1
The source code and pre-built releases for the COMPASS CML tool are hostedon SourceForge.net, as this has been selected as our primary mechanism for sup-porting the community of users of CML and the developers building tools for theCOMPASS platform. It has facilities for file distribution, source code hosting, andbug reporting.
The simplest way to run the COMPASS Tool is to download it from the Source-Forge.net project files download page at
https://sourceforge.net/projects/compassresearch/files/
This download is a specially-built version of the Eclipse platform that only in-cludes the components that are neccessary to run the COMPASS Tool — it doesnot include the Java development tools usually associated with the Eclipse plat-form.
Once the tool has been downloaded, in order to run it, simply unzip the archiveinto the directory of your choice and run the COMPASS executable. The tool isself-contained so no further instalation is necessary.
Also available from that page is the command-line tool, which exposes the corelanguage analysis functionality via a command-line interface. This tool is in-tended for developers and advanced users.
The COMPASS CML tool requires the Java SE Runtime Environment version 6or later. On Windows environments, either the 32-bit or 64-bit versions may beused, on Mac OS X and Linux, the 64-bit version is required.
Artisan Studio and the RT-Tester environment are available from Atego and Veri-fied Systems International, respectively, and are not distributed through the Source-Forge.net website. Obtaining those software environments is outside of the scopeof this document.
1http://www.eclipse.org
6

D31.2a - COMPASS Tool User Manual (Public)
3 The Command-line Interface
The command-line interface to the COMPASS tool was conceived as a tool fordevelopers to quickly allow them to access and test the core libraries. This allowsdevelopers of the tool to quickly test new functionality for correctness withouthaving to create the GUI elements that will control the functionality in the inte-grated IDE. A beneficial side-effect of having this tool is that general users are notrequired to load the IDE to test CML programs, but instead may invoke them viathe command-line.
3.1 Available Functionality
The command-line tool presently has access to the following features in the corelibraries:
• CML parser
• CML typechecker
• CML AST to DOT graph generation
• CML proof obligation generator
• CML interpreter
• Example core plugins
The CML parser is the primary element of the command-line tool, as nothing canhappen without using it. Generally, the tool will read in a (sequence of) CMLfile(s) and then perform a typecheck on the abstract syntax tree (AST). At thispoint, the data is ready to be used by the rest of the core libraries and plugins.It is possible to run the core libraries on an AST that has not been typechecked,but doing so is not recommended except to test error reporting or if the user onlywishes to generate a DOT graph of the AST.
The DOT graph generator will output a representation of the AST generated fromthe input CML files in the DOT language. The output is suitable for use in theGraphviz suite of graph visualization utilities.2 The output is useful for producinga visual representation of the data used internally by the COMPASS tool to repre-sent the static structure of a model of a system of systems. This allows a developerto quickly verify whether the input CML files result in the expected internal datastructures.
2Found at http://www.graphviz.org.
7

D31.2a - COMPASS Tool User Manual (Public)
The Proof Obligation Generator (POG) can be invoked by the command-line tooland doing so will cause it to produce the internal representation of the consis-tency and validation checks that the input CML files require. The theorem prov-ing and model checking plugins planned for future releases will be able to usethese proof obligations to verify the consistency and correctness of the input CMLmodel.
The CML interpreter is only accessible from the command-line tool in the M12release of the COMPASS tools. Invoking the CML interpreter on a set of inputCML files will result in the model being executed in a simulation run. The re-sults of the simulation will be printed to the console during the run. Interfaces tographical components are not yet available.
3.2 Basic Invocation
After obtaining the commandline tool package, decompress it into a folder. In thatfolder will be –among others– the files cmlc and cmlc.bat. Invocation of thecmlc (Linux, Mac OS X) or cmlc.bat (Windows) script with no parameterswill produce the following output:� �COMPASS command line CML Checker - CML M16
Usage: cmlc [switches] <file1>, ...,<fileN>Switches:
-coe - Continue on Exception-dotg - DOT graph generation,
-dotg=<out> write output to <out>-dwa - Run the Div Warn Analysis example-e - Simulation,
-e=<processId> simulate the process identifiedby <processId>
-empty - Empty analysis, run the empty analysis-i - Interactive mode-notc - Omit type checking phase-po - Parse Only, stop analysis after the parsing-soe - Silence on Exception-tco - Type Check Only� �
Assuming some CML model in a file, example.cml, loading it into the command-line interface is accomplished by typing cmlc example.cml. If run in thismanner, the output will be:� �
8
D31.2a - COMPASS Tool User Manual (Public)
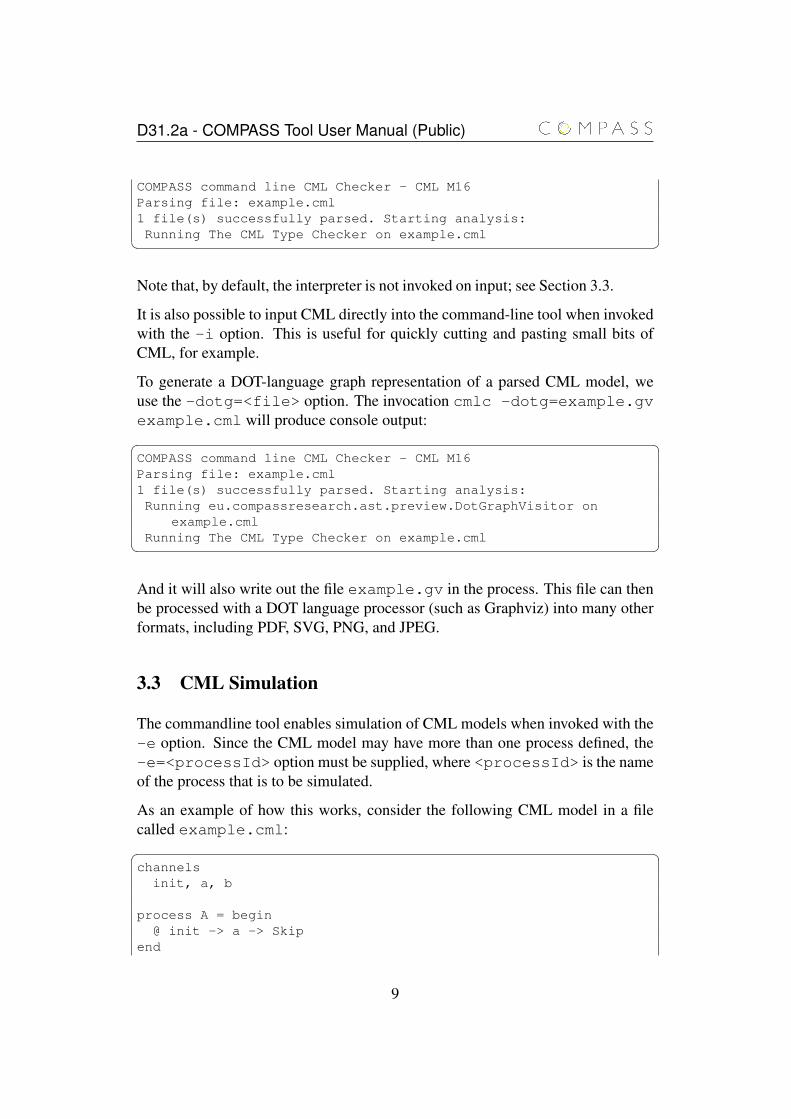
COMPASS command line CML Checker - CML M16Parsing file: example.cml1 file(s) successfully parsed. Starting analysis:Running The CML Type Checker on example.cml� �
Note that, by default, the interpreter is not invoked on input; see Section 3.3.
It is also possible to input CML directly into the command-line tool when invokedwith the -i option. This is useful for quickly cutting and pasting small bits ofCML, for example.
To generate a DOT-language graph representation of a parsed CML model, weuse the -dotg=<file> option. The invocation cmlc -dotg=example.gvexample.cml will produce console output:� �COMPASS command line CML Checker - CML M16Parsing file: example.cml1 file(s) successfully parsed. Starting analysis:Running eu.compassresearch.ast.preview.DotGraphVisitor on
example.cmlRunning The CML Type Checker on example.cml� �
And it will also write out the file example.gv in the process. This file can thenbe processed with a DOT language processor (such as Graphviz) into many otherformats, including PDF, SVG, PNG, and JPEG.
3.3 CML Simulation
The commandline tool enables simulation of CML models when invoked with the-e option. Since the CML model may have more than one process defined, the-e=<processId> option must be supplied, where <processId> is the nameof the process that is to be simulated.
As an example of how this works, consider the following CML model in a filecalled example.cml:� �channels
init, a, b
process A = begin@ init -> a -> Skip
end
9

D31.2a - COMPASS Tool User Manual (Public)
process B = begin@ init -> b -> Skip
end
process C = A;B� �The following command will simulate the process identified by C:� �cmlc -e=C example.cml� �This results in the following output being printed to the console:� �COMPASS command line CML Checker - CML M16Parsing file: example.cml1 file(s) successfully parsed. Starting analysis:Running The CML Type Checker on example.cmlRunning The CML Interpreter on example.cml
--------begin step---------Offered Events:<init>Current interpretation state:C = (A = (init->a->Skip);B)Trace after step:<init>
--------begin step---------Offered Events:<a>Current interpretation state:C = (A = (a->Skip);B)Trace after step:<init><a>
--------begin step---------Offered Events:<init>Current interpretation state:C = (B = (init->b->Skip))Trace after step:<init><a><init>
--------begin step---------Offered Events:<b>
10

D31.2a - COMPASS Tool User Manual (Public)
Current interpretation state:C = (B = (b->Skip))Trace after step:<init><a><init><b>
--------begin step---------Offered Events:Current interpretation state:Trace after step:<init><a><init><b>� �The output has three pieces of information for each step:
Offered Events: These are the events that were available for synchronisation be-fore the current step is taken. This means that the collection of processes inthe model are able to synchronise with the environment on these events.
Current interpretation state: This is a representation of the current process stateof the interpreter just before the step was taken.
Trace after step: This is the history of past events, including the event that hap-pened in this step. Presently this is the entire history and will produce longoutputs.
At present the interpreter will synchronise on any offered event using a stub “en-vironment”. This means that there is, in effect, a process running in parallel withevery model that can synchronise on every possible event. This is not meant tomirror the intended semantics, but is just an intermediate state that will lead to aninteractive mode that allows the user to act as the environment for the purposes ofsimulating the whole CML model of a system of systems.
11

D31.2a - COMPASS Tool User Manual (Public)
4 Using the COMPASS Perspective
When the COMPASS tool is started, the splash screen from Figure 1 should ap-pear. The first time it is started you will have to decide where you want the defaultplace for your projects to be. Click ok to start using the default workspace andclose the welcome screen to get started for the first time.
Figure 1: The COMPASS spash screen used at startup
4.1 Eclipse Terminology
Eclipse is an open source platform based around a workbench that provides acommon look and feel to a large collection of extension products. Thus, for auser familiar with one Eclipse product it will generally be easy to start using adifferent product on the same workbench. The Eclipse workbench consists ofseveral panels known as views, such as the COMPASS Explorer view at the top leftof Figure 2. A collection of panels is called a perspective, for example Figure 2shows the standard COMPASS perspective. This consists of a set of views formanaging COMPASS projects and viewing and editing files in a project. Differentperspectives are available in COMPASS as will be described later, but for themoment think of a perspective as a useful composition of views for conducting aparticular task.
The COMPASS Explorer view lets you create, select, and delete COMPASS projectsand navigate between the files in these projects, as well as adding new files to ex-isting projects.
12

D31.2a - COMPASS Tool User Manual (Public)
Figure 2: Outline of the COMPASS Workbench.
Figure 3: The COMPASS Explorer view.
The Outline view, on the right hand side of Figure 2, presents an outline of the fileselected in the editor. This view displays any declared CML definitions such astheir state components, values, types, functions, operations and processes3. Thetype of the definitions are also shown in the outline view. The Outline view is at themoment only available for the CML models of the system. In the case another typeof file is selected, the message An outline is not available will be displayed.
The outline will have an appropriate structure based on the type of CML constructfound in the source file that is displayed in the visible CML editor. In Figure 4 aCML class is outlined on the left reflecting the structure of a class. On the rightFigure 4 depicts a CML process and lists its actions. In the current version of theCOMPASS tool outline decorations are omitted but are planned to be as follows:The icon in front of a name indicates the type of respective CML element: a browncircle with a “V” indicates a value, a purple circle with a “T” indicates a Type, ared circle with a “P” indicates a process, a blue circle with an “O” indicates an
3In a later version of the tool the outline view will also support other types of files.
13

D31.2a - COMPASS Tool User Manual (Public)
Figure 4: The outline view showing CML class named Component1 on the left.On the right the outline view is showing a CML process and its actions.
operation, a yellow circle with a “F” indicates a function, a green circle with a“C” indicates a class, a dark brown circle with “Cs” indicates a chanset and a lightbrown circle with “Ch” indicates a channel.
The higher level elements of the outline begin collapsed and can be expanded toshow their child nodes. For example, a process can be expanded in order to see itsactions, operations etc.
Clicking on the name of a definition will move the cursor in the editor to the defi-nition. The outline will also automatically highlight whichever node correspondsto the cursor position as it changes.
The outline is only created/refreshed when the source file is saved.
14

D31.2a - COMPASS Tool User Manual (Public)
5 Managing COMPASS Projects
This section explains how to use the tool to manage COMPASS projects. Step bystep instructions for importing, exporting and creating projects will be given.
5.1 Creating new COMPASS projects
Follow these steps in order to create a new COMPASS project:
1. Create a new project by choosing File → New → Project → COMPASSproject (see Figure 5)
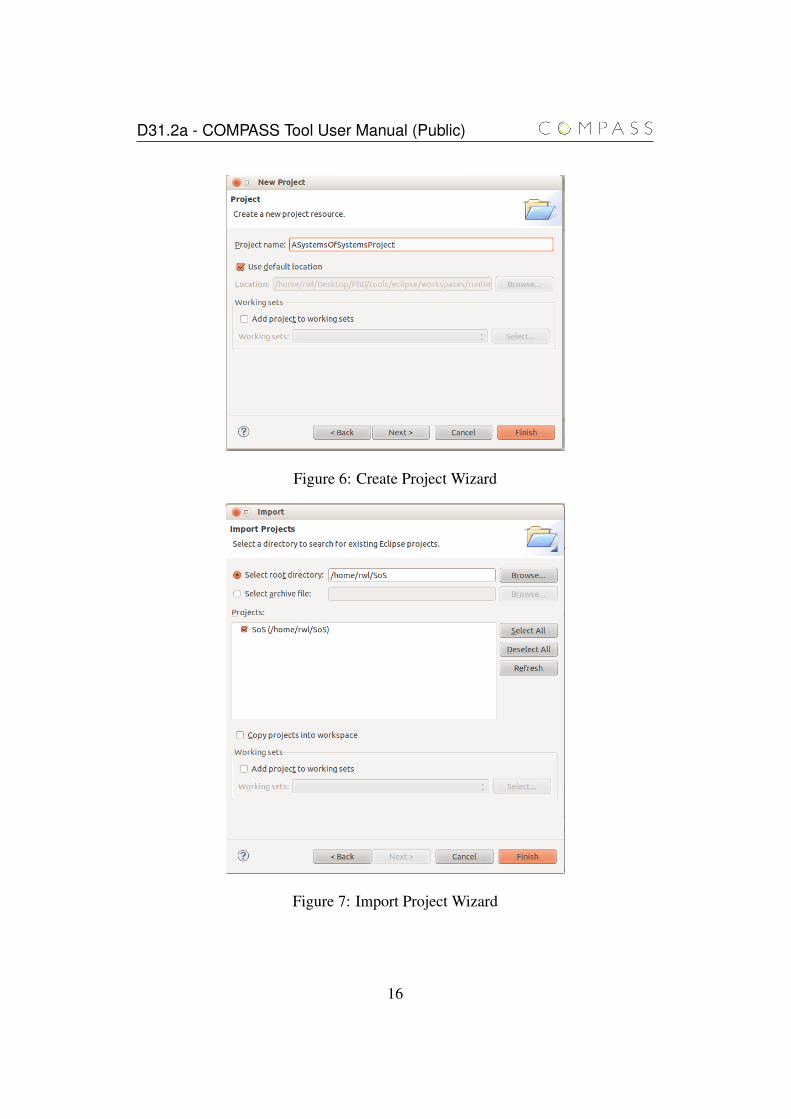
2. Type in a project name (see Figure 6)
3. Click the button Finish.
Figure 5: Create Project Wizard
5.2 Importing COMPASS projects
Follow these steps in order to import an already existing COMPASS project:
1. Right-click the explorer view and select Import, followed by General →Existing Projects into Workspace. See Figure 7 for more details. Click Nextto proceed.
15
D31.2a - COMPASS Tool User Manual (Public)
Figure 6: Create Project Wizard
Figure 7: Import Project Wizard
16
D31.2a - COMPASS Tool User Manual (Public)
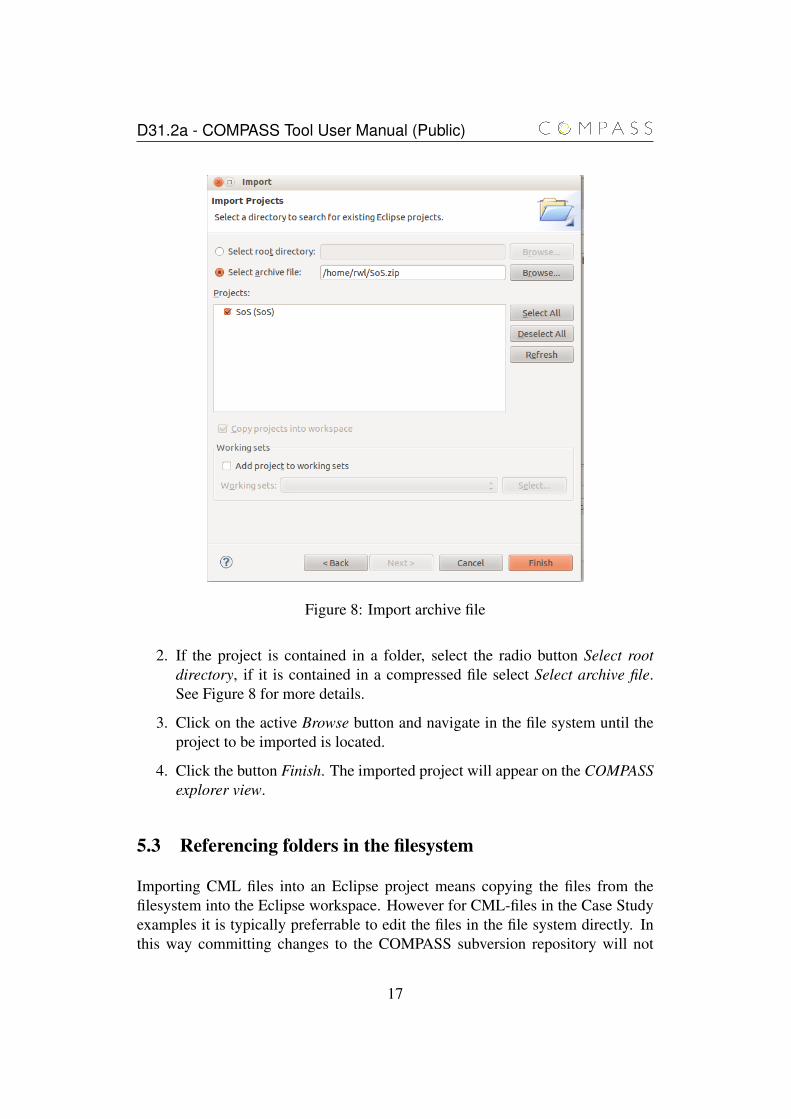
Figure 8: Import archive file
2. If the project is contained in a folder, select the radio button Select rootdirectory, if it is contained in a compressed file select Select archive file.See Figure 8 for more details.
3. Click on the active Browse button and navigate in the file system until theproject to be imported is located.
4. Click the button Finish. The imported project will appear on the COMPASSexplorer view.
5.3 Referencing folders in the filesystem
Importing CML files into an Eclipse project means copying the files from thefilesystem into the Eclipse workspace. However for CML-files in the Case Studyexamples it is typically preferrable to edit the files in the file system directly. Inthis way committing changes to the COMPASS subversion repository will not
17
D31.2a - COMPASS Tool User Manual (Public)
include copying changed files from the Eclipse workspace back to the COMPASSsubversion check out directory.
To do this it is recommended to create a project in which a link to an externalfolder can be created. The steps to set this up in the COMPASS Tool are asfollows:
1 Create a CML project and give it a name
2 Right click on the project and select New→ Other ...
3 In the appearing window, expand General and select Folder, press Next
4 Give the “link” a name of your linking in “Folder name”-field.
5 Press the Advanded button
6 Select the bullet point saying “Link to Alternate location (Linked Folder).
7 Click the “Browse...”-button
8 Navigate to the CML source folder. E.g. compass svn\Common\CaseStudies\EmergencyResponse\ workspace\ Expert-Led\ model
9 Press “Open”
10 Press “Finish”
Now a new folder with a small link ornament on it will show up in the newly createproject. Expand that folder in the “COMPASS Explorer” to see your files.
The Parser and TypeChecker are currently not run at all times even though Auto-matic Build is enabled. To force the source files to be built go to “project→ clean...“.
5.4 Exporting COMPASS projects
Follow these steps in order to export a COMPASS project:
1. Right click on the target project and select Export, followed by General→Archive File. See Figure 9 for more details.
2. A new window like the one shown in Figure 10 will follow. In this case theselected project will appear as root node on the left side of it. It is possibleto browse through the contents of the project and select the convenient filesto be exported. All the files contained in the project will be selected bydefault.
18

D31.2a - COMPASS Tool User Manual (Public)
Figure 9: Select an output format for the exporting process.
3. Enter a name for the archive file in the text box following To archive file.A specific path to place the final file can be selected through the buttonBrowse.
4. Click on the Finish button to complete the export process.
19

D31.2a - COMPASS Tool User Manual (Public)
Figure 10: Project ready to be exported.
20

D31.2a - COMPASS Tool User Manual (Public)
6 The CML Type Checker
The COMPASS-Tool ships with the CML Type Checker. The Type Checkerchecks type consistentcy and referential integrity of your model. Type consis-tentcy includes checking that operator and variable types are respected. Referen-tial integrity includes checking that named references exists and have an appro-priate type for their context.
6.1 Output
The type checker produces two kinds of artifacts: Type Errors and Type Warnings.Both carry a reference to the offending bit of the model, a description of what isill formed and an exact location of where the issue occurred.
6.2 Representation
In the COMPASS-Tool user interface type errors show up in three places. To pointthe user at the exact piece of CML-source causing an error, an error marker will beshowing in the left margin of its Editor. Additionally, the offending piece of syntaxwill be underlined with red as seen in Figure 11. To give the complete picture for
Figure 11: User Interface showing a typical type error marker.
all errors in a given model the problem view shows the list of all generated errors(see Figure 12). The third and last way type errors are made visible in the userinterface is through the CML Project Explorer. The CML Project Explorer offersa tree view of CML model file structure. If an error occurs in a CML-source filethen all of folders containing that file up through the hierarchy to the project levelwill have a red error marker (see Figure 13). Type error markers will be updatedwhenever a CML-Source file is saved with changes. To force a re-check of all
21

D31.2a - COMPASS Tool User Manual (Public)
Figure 12: User Interface problems view with type errors.
Figure 13: CML Project Explorer with error markers.
source files again click the “Clean ...” option in the Project menu bar, see Figure14. One last thing to notice is that the Outline view, when displayed, is only
Figure 14: Project menu-bar with “Clean...” option for rechecking the model.
updated for source-files that parse correctly. Thus, files that have parse errors willnot have their Outline view updated and may also contain type errors. Seeing anoutline is only an indication the model is syntactically correct.
22

D31.2a - COMPASS Tool User Manual (Public)
7 Using the Proof Obligation Generator
Usage of the COMPASS Proof Obligation Generator (POG) is quite simple. Atthe moment, the POG has only one function: generating the POs. In order to dothis, the user must click the POG button as shown in Figure 15.
Figure 15: Using the COMPASS POG.
Once the POG has run successfully, the generated POs are written to a file asshown in Figure 16. At the moment the only things that may be done with this fileis to inspect and copy (parts of) it. If you wish to discharge any PO, you must doso manually. Keep in mind that the file is temporary and will be deleted when youexit the COMPASS tool. If you wish to preserve the POs, copy the contents of thefile elsewhere.
Figure 16: The POG output file.
23

D31.2a - COMPASS Tool User Manual (Public)
8 The COMPASS Simulator
This section explains how to configure, start, run and stop a simulation of a CMLmodel with the COMPASS tool. This involves describing how a simulation launchconfiguration can be configured and how the simulation engine is launched andused.
There are two ways of simulating a CML model:
1. Without user interaction: This option will simulate the model withoutuser interaction. When faced with an observable event choice this will beresolved by picking random one. The events are picked in a random but de-terministic manner. Thus, the simulation will always make the same choicesfor every run of the same model.
2. With user interaction: This option will simulate the model without any in-teraction from the user so long as no observable events occur. If an observ-able event occurs at some point, then the user must to choose an event beforethe simulation can continue. Presently the simulator requires a “choice”from the user even when the set of choices is a single event; while thisis useful for understanding the behaviour of the model, later versions willallow single-choice events to be automatically chosen.
The first option is associated with the Eclipse “Run” command and the secondwith the “Debug” command.
As the simulation without user interaction chooses synchronisation events in apseudo-random manner, we have implemented this in a deterministic manner toallow for easy replay of the exact same sequence of event synchronisations. Futureversions of the simulator will enhance the ability to control the sequence of eventsynchronisation further.
8.1 Using COMPASS Simulator
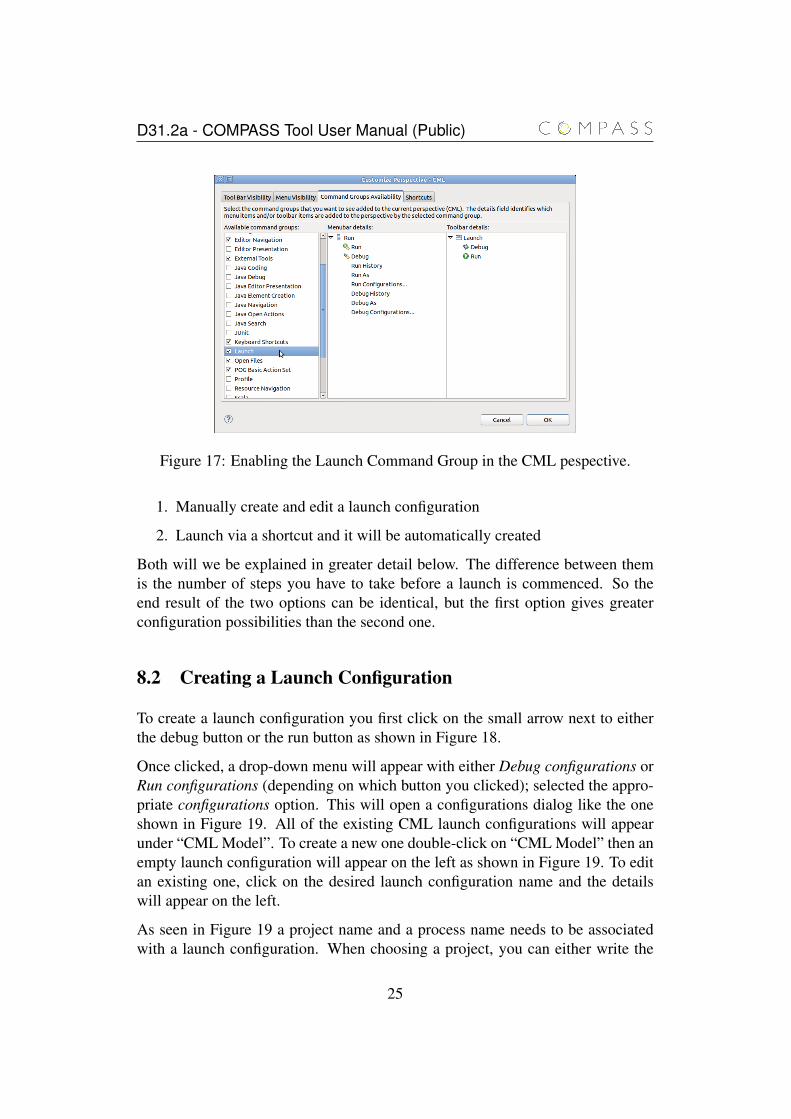
In order to use the simulator, the CML perpective must be edited in order to makethe relevant commands visible. Go to Window→ Customize Perpective→ Command Groups Availability and enable the Launch group (seeFigure 17).
Before starting a simulation, a launch configuration must be created. The purposeof this is to define which CML process should be the initial point of simulation.There are two ways of doing this:
24
D31.2a - COMPASS Tool User Manual (Public)
Figure 17: Enabling the Launch Command Group in the CML pespective.
1. Manually create and edit a launch configuration
2. Launch via a shortcut and it will be automatically created
Both will we be explained in greater detail below. The difference between themis the number of steps you have to take before a launch is commenced. So theend result of the two options can be identical, but the first option gives greaterconfiguration possibilities than the second one.
8.2 Creating a Launch Configuration
To create a launch configuration you first click on the small arrow next to eitherthe debug button or the run button as shown in Figure 18.
Once clicked, a drop-down menu will appear with either Debug configurations orRun configurations (depending on which button you clicked); selected the appro-priate configurations option. This will open a configurations dialog like the oneshown in Figure 19. All of the existing CML launch configurations will appearunder “CML Model”. To create a new one double-click on “CML Model” then anempty launch configuration will appear on the left as shown in Figure 19. To editan existing one, click on the desired launch configuration name and the detailswill appear on the left.
As seen in Figure 19 a project name and a process name needs to be associatedwith a launch configuration. When choosing a project, you can either write the
25

D31.2a - COMPASS Tool User Manual (Public)
Figure 18: The debug button (the left one) and the run button (the right one),present in the toolbar at the COMPASS tool.
Figure 19: The launch configuration dialog showing a newly created launch con-figuration
name or click on the browse button which shows a list of all the available projectsand choose one from there. The process name selection is identical.
The project name and process name must exist. It will not be possible to launchif they do not. In the left corner of Figure 19 a small red icon with an “X” and amessage will indicate what is wrong. In the figure it indicates that no project hasbeen set so this should be the first thing to do.
After setting the project name and process name, the Apply button must be clickedto save the changes to the launch configuration. If the project exists and is open
26

D31.2a - COMPASS Tool User Manual (Public)
and a process with the specified name exists in the project, then the Run or De-bug button will be active and it is possible to launch the simulation as shown inFigure 20.
Figure 20: The configuration dialog after a project and process has been selected
This launch configuration will now appear in the a drop-down menu describedin the beginning of this section. The actual simulation will be described in Sec-tion 8.4.
8.3 Launch Via Shortcut
Another way to launch a simulation is through a shortcut in the COMPASS ex-plorer view in the CML perspective. To access this, right click on a cml file tomake the context menu appear. From here either choose “Debug As → DebugCML Model” or “Run As → Run CML Model”. After that two things can hap-pen: if the cml file only contains one process then this process will be launched, ifhowever more than one process is defined then a process selection dialog appearswith a list of possible processes. This is shown in Figure 21.
To launch a simulation, a process must be chosen. This is done by double-clickingone of the process names in the list. This will launch a simulation with that processas the top-level process.
If you launch via a shortcut then a temporary launch configuration will be createdand launched. It will not be shown in the list as it would be if it was created asdefined in section 8.2.
27

D31.2a - COMPASS Tool User Manual (Public)
Figure 21: Right after “Run As → Run CML Model” has been clicked on, thecontext menu of the test.cml file appears. Since the file has defined more than oneprocesses, the process selection dialog is shown.
8.4 Simulation
As mentioned in Section 8 there are two possible ways to simulate a model, eachof them will be described.
8.4.1 Simulating without user interaction
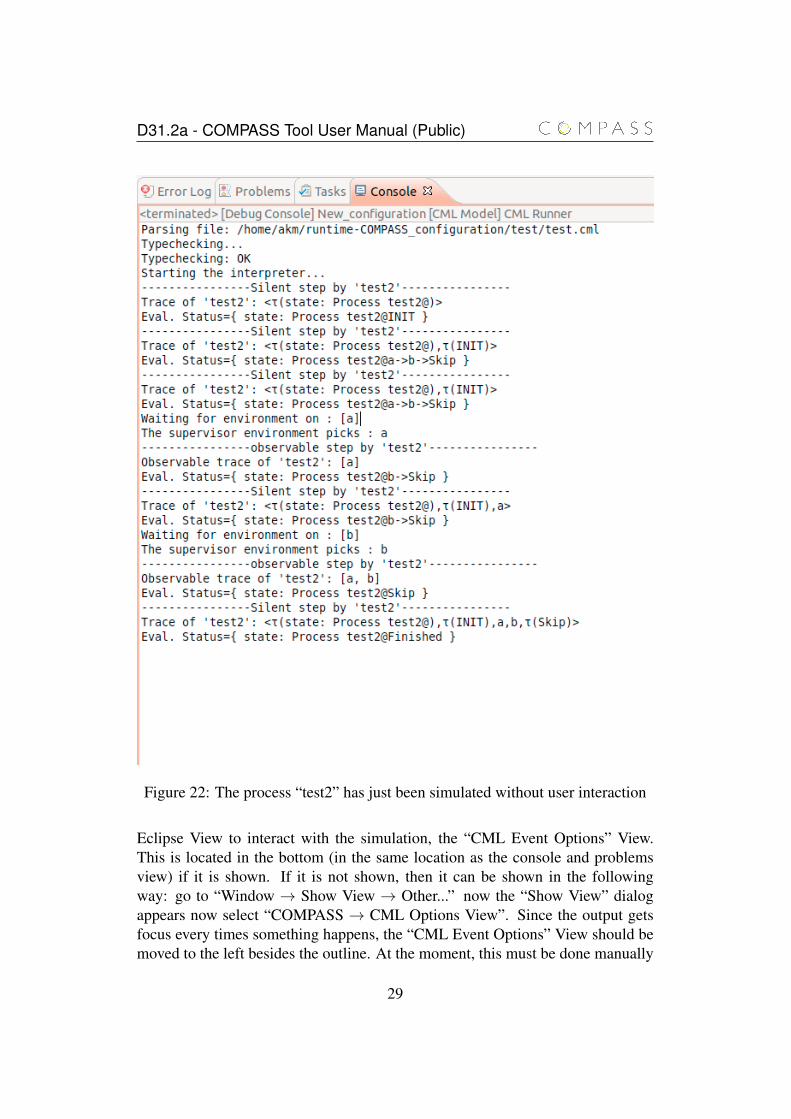
Simulating without user interaction is achieved by choosing the “Run” option.Once a “Run” simulation is launched, as described in the previous sections, theoutput of the interpreter is entirely shown in the Eclipse Console view. This isshown in Figure 22.
8.4.2 Simulating with user interaction
Simulating with user interaction is achieved by choosing the “Debug” option. Theoutput of the interpreter is still shown in the console view but there is an additional
28
D31.2a - COMPASS Tool User Manual (Public)
Figure 22: The process “test2” has just been simulated without user interaction
Eclipse View to interact with the simulation, the “CML Event Options” View.This is located in the bottom (in the same location as the console and problemsview) if it is shown. If it is not shown, then it can be shown in the followingway: go to “Window → Show View → Other...” now the “Show View” dialogappears now select “COMPASS → CML Options View”. Since the output getsfocus every times something happens, the “CML Event Options” View should bemoved to the left besides the outline. At the moment, this must be done manually
29
D31.2a - COMPASS Tool User Manual (Public)
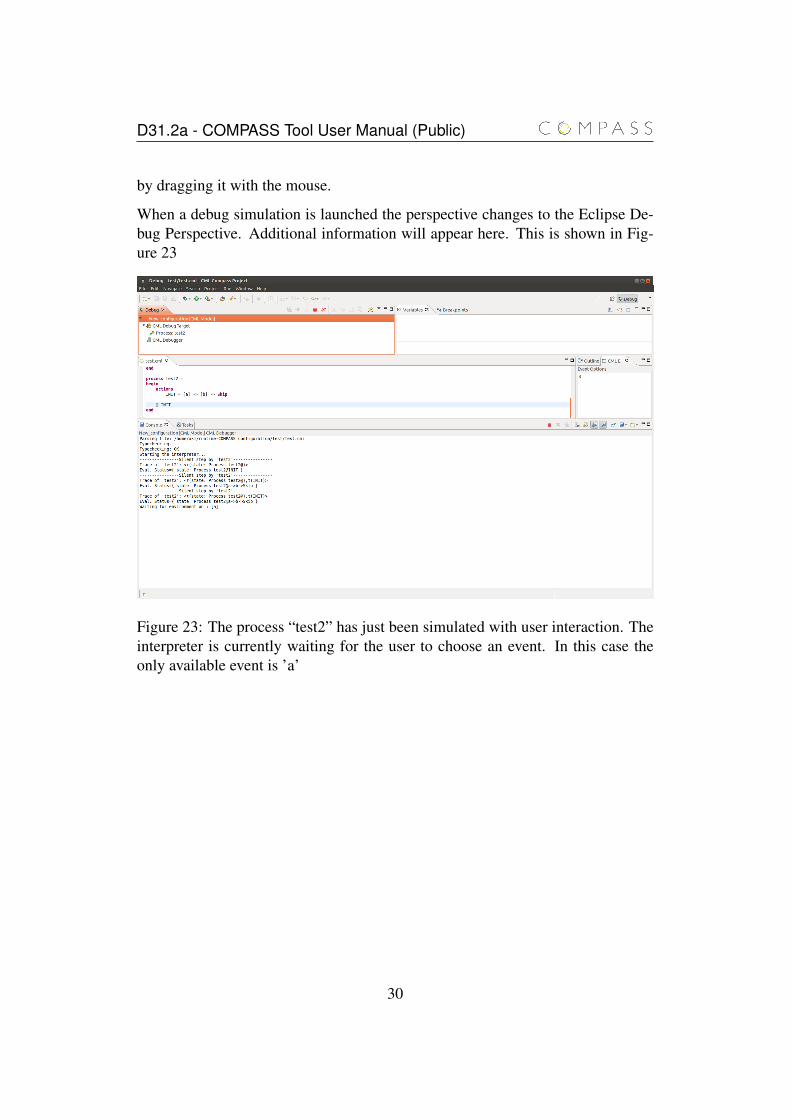
by dragging it with the mouse.
When a debug simulation is launched the perspective changes to the Eclipse De-bug Perspective. Additional information will appear here. This is shown in Fig-ure 23
Figure 23: The process “test2” has just been simulated with user interaction. Theinterpreter is currently waiting for the user to choose an event. In this case theonly available event is ’a’
30

D31.2a - COMPASS Tool User Manual (Public)
9 Conclusion
As of Month 16 in the COMPASS project we now have the core functionality ofthe COMPASS IDE in place, and the tool is ready for initial use by the projectpartners focussing on case studies. This document provides an initial guide to theuse of the COMPASS IDE and where to find and activate the tool’s features.
This document will be migrated into a wiki form, and future versions will be gen-erated from that. This will allow us to have a continuously-updated user manualwith the ability to produce snapshots of it at need.
31
D31.2a - COMPASS Tool User Manual (Public)
References
[BGW12] Jeremy Bryans, Andy Galloway, and Jim Woodcock. CML definition1. Technical report, COMPASS Deliverable, D23.2, September 2012.
[Col13] Joey W. Coleman. Second release of the COMPASS tool —tool grammar reference. Technical report, COMPASS Deliverable,D31.2c, January 2013.
[FLW12] John Fitzgerald, Peter Gorm Larsen, and Jim Woodcock. Modellingand Analysis Technology for Systems of Systems Engineering: Re-search Challenges. In INCOSE, Rome, Italy, July 2012.
[WCF+12] J. Woodcock, A. Cavalcanti, J. Fitzgerald, P. Larsen, A. Miyazawa,and S. Perry. Features of CML: a Formal Modelling Language forSystems of Systems. In Proceedings of the 7th International Con-ference on System of System Engineering, volume 6 of IEEE SystemsJournal. IEEE, July 2012.
32