~Season’s~ - This & That Pattern Company · *Stitch 1 ½" X 10 ½" strip to top and bottom of...
15
~Season’s~
-
Upload
duongnguyet -
Category
Documents
-
view
213 -
download
0
Transcript of ~Season’s~ - This & That Pattern Company · *Stitch 1 ½" X 10 ½" strip to top and bottom of...

~Season’s~

Finished Size 40" X 54" What you need~
Stitchery Block Borders~(6) 1/8 yd cuts of assorted fabrics for
stitchery block borders.Windmill blocks~
(3) 5" medium/dark charm squares.(2) 5" light charm squares.
Churn Dash block~(4) 5" medium/dark charm squares.
(5) 5" light charm squares. Flying geese strips~
(9) 5" medium/dark charm squares.(9) 5" light charm squares.Pin Wheel Star Block~
7" X 14" scrap for background.4" X 14" scrap for star #1 fabric.4" X 14" scrap for star #2 fabricFarmer’s Daughter Block~
1/8 yd for background.(2) 5" charm squares for main fabric.(1) 5" charm square for accent fabric.
Anvil Block~1/6 yd for background.
5" or larger scrap for main fabric.3" X 6" or larger scrap for accent
fabric.Twitter Star Block~1/6 yd for background.
3" or larger scrap for accent fabric.3" X 22" or larger scrap for main
fabric.9-Patch Fancy Block~1/6 yd for background.
(2) 5" charm squares for main fabric.(1) 5" charm square for accent fabric.
Quilt top assembly~(13) 5" charm squares.
1/4 yd for inner border.(3) fat 1/4's for outer border. (More
if you want it scrappier)½ yd for binding.
2 2/3 yds for backing.
© Copyright 2011 Sherri K. Falls All rights reserved. No part of this pattern may be reproduced in any form, including
photocopying, without prior written consent from the designer. Every effort has been made to be sure these instructions are complete
and accurate. This & That cannot be responsible for variations in workmanship and materials used.
This & That by Sherri K Falls2075 River Bend Trail,
Mayer, Mn 55360www.thisandthatpatterns.com
www.thisandthatpatterns.typepad.com
Stitchery Block Borders~
What you need~(6) 1/8 yd cuts of assorted fabrics for stitchery block borders.
Cutting~From (1) 1/8 yd cut~(Winter’s Day Stitchery)*Cut (2) 1 ½" X 8 ½" strips.*Cut (2) 1 ½" X 10 ½" strips.From (1) 1/8 yd cut~(Love Bird’s Stitchery)*Cut (2) 1 ½" X 6 ½" strips.*Cut (2) 1 ½" X 10 ½" strips.From (1) 1/8 yd cut~(Fresh Flowers Stitchery)*Cut (2) 1 ½" X 8 ½" strips.*Cut (2) 1 ½" X 12 ½" strips.From (1) 1/8 yd cut~(Early Bird Stitchery)*Cut (2) 1 ½" X 8 ½" strips.*Cut (2) 1 ½" X 10 ½" strips.From (1) 1/8 yd cut~(Pumpkin Patch Stitchery)*Cut (2) 1 ½" X 8 ½" strips.*Cut (2) 1 ½" X 12 ½" strips.From (1) 1/8 yd cut~(Snowman Caroler’s Stitchery)*Cut (2) 1 ½" X 8 ½" strips.*Cut (2) 1 ½" X 12 ½" strips.
Let’s begin~*Press all stitchery.*Trim Winter’s Day stitchery to 8 ½" X 8 ½" square.*Trim Love Bird’s stitchery to 6 ½" X 8 ½" rectangle.*Trim Fresh Flowers stitchery to 8 ½" X 10 ½" rectangle.*Trim Early Bird stitchery to 8 ½" X 8 ½" square.*Trim Pumpkin Patch stitchery to 8 ½" X 10 ½" rectangle.*Trim Snowman Caroler’s stitchery to 8 ½" X 10 ½" rectangle.*Stitch 1 ½" X 8 ½" strip to sides of Winter’s Day stitchery. Press.*Stitch 1 ½" X 10 ½" strip to top and bottom of Winter’s Day
stitchery. Press.*Stitch 1 ½" X 6 ½" strip to sides of Love Birds stitchery. Press.*Stitch 1 ½" X 10 ½" strip to top and bottom of Love Birds
stitchery. Press.*Stitch 1 ½" X 8 ½" strip to sides of Fresh Flowers stitchery. Press.*Stitch 1 ½" X 12 ½" strip to top and bottom of Fresh Flowers
stitchery. Press.*Stitch 1 ½" X 8 ½" strip to sides of Early Bird stitchery. Press.*Stitch 1 ½" X 10 ½" strip to top and bottom of Early Bird
stitchery. Press.*Stitch 1 ½" X 8 ½" strip to sides of Pumpkin Patch stitchery. Press.*Stitch 1 ½" X 12 ½" strip to top and bottom of Pumpkin Patch
stitchery. Press.*Stitch 1 ½" X 8 ½" strip to sides of Snowman Caroler’s stitchery. Press.*Stitch 1 ½" X 12 ½" strip to top and bottom of Snowman Caroler’s
stitchery. Press.
Page 1 Season’s finishing pattern 2011 © This & That

Windmill blocks~What you need~(3) 5" medium/dark charm squares.(2) 5" light charm squares.Cutting~From medium/dark squares~*Cut (4) 2 ½" X 4 ½" rectangles.*Cut (1) 2 ½" center square.From light squares~*Cut (8) 2 ½" squares.Let’s begin~*Stitch 2 ½" background square diagonally to 2 ½" X 4 ½" medium/dark rectangle.*Trim excess fabric, fold triangle back and press. Make 4.*Stitch 2 ½" background square diagonally to other side of medium/dark
rectangles.*Trim excess fabric, fold triangle back and press.
Make 4 Flying geese units.
*Stitching partial seam, stitch flying geese unit to top of 2 ½" center squares. Press. Make 1.
*Stitch flying geese unit to left side of center square. Press. Make 1.
*Stitch flying geese unit to bottom of center square. Press. Make 1.
*Stitch flying geese unit to right side of center square. Press. Make 1.
*Finish stitching, partial seam. Press. Make 1. (6 ½" unfinished square.)
Page 2 Season’s finishing pattern 2011 © This & That

Churn Dash block~What you need~(4) 5" medium/dark charm squares.(5) 5" light charm squares. Cutting~From medium/dark squares~*Cut (4) 1 ½" X 4 ½" rectangles.*Cut (2) 2 7/8" corner squares.From light squares for background~*Cut (4) 1 ½" X 4 ½" rectangles.*Cut (2) 2 7/8" squares.*Cut (1) 4 ½" square.Let’s begin~*Draw a diagonal line on the wrong side of (2) 2 7/8" background squares. *Layer background squares with (2) 2 7/8" med/dark squares. (Right sides together)*Stitch on both sides of drawn line,
1/4" out from line.*Cut squares on drawn line, open ½ triangle squares and press. Make 4.*Stitch 1 ½" X 4 ½" background strip to 1 ½" X 4 ½"
medium/dark strip. Press. Make 4.*Stitch (2) ½ triangle squares together with (1) strip units. Press. Make 2.
*Stitch together (2) strip units together with (1) 4 ½" light center square. Press. Make 2.
*Stitch units together to form churn dash block.Press. Make 1. (8 ½" unfinished square.)
Page 3 Season’s finishing pattern 2011 © This & That

Flying geese strips~What you need~(9) 5" medium/dark charm squares.(9) 5" light charm squares.Cutting~From medium/dark squares~*Cut (18) 2 ½" X 4 ½" rectangles.From light squares~*Cut (36) 2 ½" squares.Let’s begin~*Stitch 2 ½" background square diagonally to 2 ½" X 4 ½" medium/dark
rectangle.*Trim excess fabric, fold triangle back and press. Make 18.
*Stitch 2 ½" background square diagonally to other side of medium/darkrectangles.
*Trim excess fabric, fold triangle back and press. Make 18 Flying geese units.
*Stitch (5) flying geese units together. Press. Make 2.
*Stitch (4) flying geese units together. Press. Make 2.
Page 4 Season’s finishing pattern 2011 © This & That

Pin Wheel Star Block~What you need~7" X 14" scrap for background.4" X 14" scrap for star #1 fabric.4" X 14" scrap for star #2 fabric.Cutting~From background fabric~*Cut (4) 2 ½" squares.*Cut (4) 2 7/8" squares.From star #1 fabric~*Cut (4) 2 7/8" squares.From star #2 fabric~*Cut (4) 2 7/8" squares.Let’s begin~*Draw a diagonal line on the wrong side of (2) 2 7/8" background squares. *Layer background squares with (2) 2 7/8" star fabric #1 squares. (Right sides
together)*Stitch on both sides of drawn line, 1/4" out
from line.*Cut squares on drawn line, open ½ triangle squares and press. Make 4.*Repeat above instructions with (2) 2 7/8" light background squares and (2) 2 7/8"
star #2 squares. Press. Make 4.*Draw a diagonal line on the wrong side of (4) 2 7/8" star #2 squares. *Layer star #2 squares with (4) 2 7/8" star fabric #1 squares. (Right sides together)*Stitch on both sides of drawn line, 1/4" out from line.*Cut squares on drawn line, open ½ triangle squares and press. Make 4.
*Stitch ½ triangle squares together to form top section of star. Press. Make 1.
*Stitch (1) star #1, (1) star #2 and (2) 2 ½" background squares to form star point strip. Make 1.(You will piece this star strip together with rest of star when youassemble the quilt top.)
Page 5 Season’s finishing pattern 2011 © This & That

Farmer’s Daughter Block~What you need~1/8 yd for background.2, 5" charm squares for main fabric.1, 5" charm square for accent fabric.Cutting~From background fabric~*Cut (4) 2 ½" X 6 ½" rectangles.*Cut (9) 2 ½" squares.From main fabric~*Cut (8) 2 ½" squares.From accent fabric~*Cut (4) 2 ½" squares.Let’s begin~*Stitch 2 ½" main square diagonally to 2 ½" X 6 ½" background
rectangle.*Trim excess fabric, fold triangle back and press. Make 4.*Stitch 2 ½" main square diagonally to other side of background rectangles.*Trim excess fabric, fold triangle back and press. Make 4 point units.*Stitch (4) 2 ½" accent squares together with (5)
2 ½" background squares. Press. Make 1 center 9-patch.
*Stitch point units to both sides of 9-patch. Press.*Stitch 2 ½" background square to both sides of point units. Press. Make 2.*Stitch pieced units to top and bottom of 9-patch. Press. Make 1.
Page 6 Season’s finishing pattern 2011 © This & That

Anvil Block~What you need~1/6 yd for background.5" or larger scrap for main fabric.3" X 6" or larger scrap for accent fabric.Cutting~From background fabric~*Cut (1) 4 7/8" square.*Cut (2) 2 7/8" squares.*Cut (4) 2 ½" squares.From main fabric~*Cut (1) 4 7/8" square.From accent fabric~*Cut (2) 2 7/8" squares.Let’s begin~*Draw a diagonal line on the wrong side of (2) 2 7/8" background squares. *Layer background squares with (2) 2 7/8" accent squares. (Right sides together)*Stitch on both sides of drawn line,
1/4" out from line.*Cut squares on drawn line, open ½ triangle squares. Press. Make 4.*Repeat above instructions using (1) 4 7/8" background square and (1) 4 7/8" main
square. Press. Make 2.*Stitch main and accent ½ triangle squares together with 2 ½"
background squares to form Anvil block. Press. Make 1.
Page 7 Season’s finishing pattern 2011 © This & That

Twitter Star Block~What you need~1/6 yd for background.3" or larger scrap for accent fabric.3" X 22" or larger scrap for main fabric.Cutting~From background fabric~*Cut (1) 2 7/8" square.*Cut (4) 2 ½" X 4 ½" rectangles.*Cut (6) 2 ½" squares.From accent fabric~*Cut (1) 2 7/8" square.From main fabric~*Cut (8) 2 ½" squares.Let’s begin~*Stitch 2 ½" main square diagonally to 2 ½" X 4 ½" background rectangle.*Trim excess fabric, fold triangle back and press. Make 4.*Stitch 2 ½" main square diagonally to other side of background
rectangles.*Trim excess fabric, fold triangle back and press. Make 4 star point units.
*Draw a diagonal line on the wrong side of (1) 2 7/8" background squares. *Layer background squares with (1) 2 7/8" accent squares. (Right sides together)*Stitch on both sides of drawn line,
1/4" out from line.*Cut squares on drawn line, open ½ triangle squares. Press. Make 2.*Stitch all units together to form star. Press. Make 1.
Page 8 Season’s finishing pattern 2011 © This & That
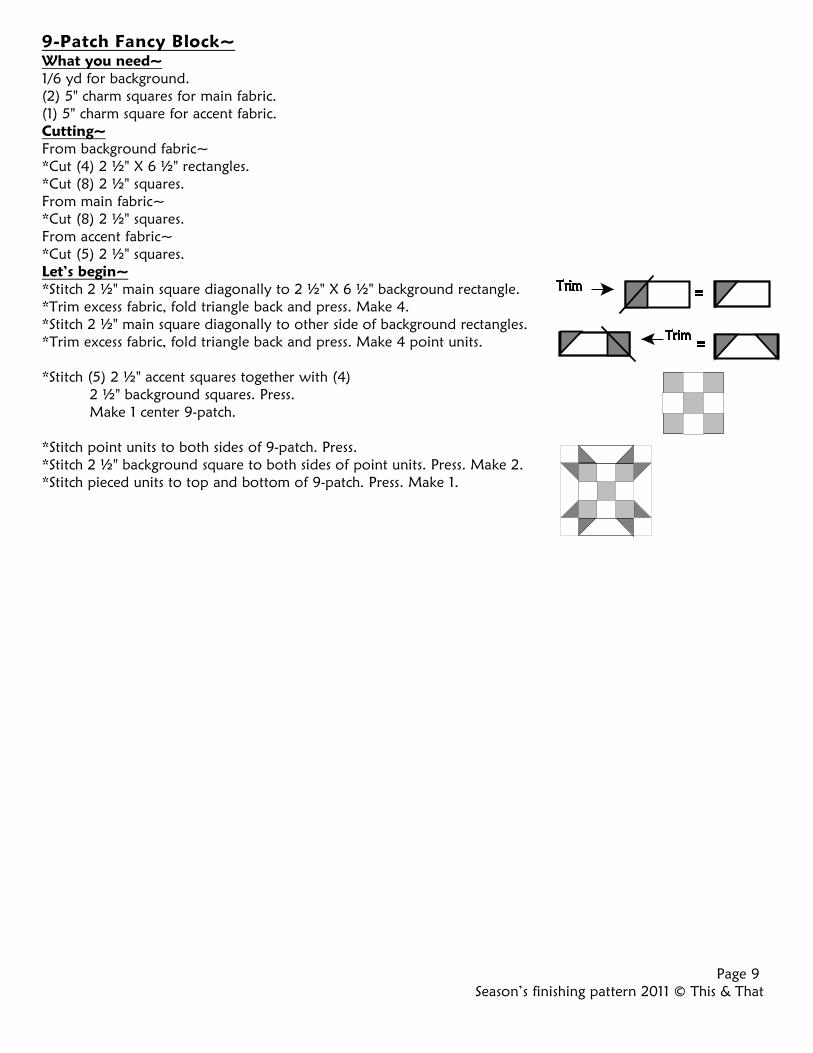
9-Patch Fancy Block~What you need~1/6 yd for background.(2) 5" charm squares for main fabric.(1) 5" charm square for accent fabric.Cutting~From background fabric~*Cut (4) 2 ½" X 6 ½" rectangles.*Cut (8) 2 ½" squares.From main fabric~*Cut (8) 2 ½" squares.From accent fabric~*Cut (5) 2 ½" squares.Let’s begin~*Stitch 2 ½" main square diagonally to 2 ½" X 6 ½" background rectangle.*Trim excess fabric, fold triangle back and press. Make 4.*Stitch 2 ½" main square diagonally to other side of background rectangles.*Trim excess fabric, fold triangle back and press. Make 4 point units.
*Stitch (5) 2 ½" accent squares together with (4) 2 ½" background squares. Press. Make 1 center 9-patch.
*Stitch point units to both sides of 9-patch. Press.*Stitch 2 ½" background square to both sides of point units. Press. Make 2.*Stitch pieced units to top and bottom of 9-patch. Press. Make 1.
Page 9 Season’s finishing pattern 2011 © This & That

Quilt top assembly~What you need~
(13) 5" charm squares.1/4 yd for inner border.(3) fat 1/4's for outer border. (More if you want it scrappier)½ yd for binding.2 2/3" yds for backing.Cutting~From charm squares~*Cut (49) 2 ½" squares.From inner border fabric~*Cut (5) 1 ½" X 42" strips.From outer border fabrics~*Cut (22) 3 ½" X 8 ½" rectangles.From binding fabric~*Cut (5) 2 ½" X 42" strips.
Let’s begin~*Note~ You will be piecing this quilt in sections and then stitching
sections together.*Stitch (5) 2 ½" charm squares together and stitch to left side of Winter’s
Day block. Press. *Stitch (6) 2 ½" charm squares together and stitch to top of Winter’s Day
block. Press.
*Stitch Churn Dash block together with (4) 2 ½" charm squares and the Love Birds Blocks. Press.
*Stitch (2) 2 ½" charm squares together with Twitter Star block, a fourflying geese strip and a five flying geese strip. Press.
*Stitch Fresh Flowers block together with a four flying geese strip and (10) 2 ½" charm squares. Press.
*Stitch Anvil block together with (4) 2 ½" charm squares and large section of Pinwheel Star block.Press.
Page 10 Season’s finishing pattern 2011 © This & That
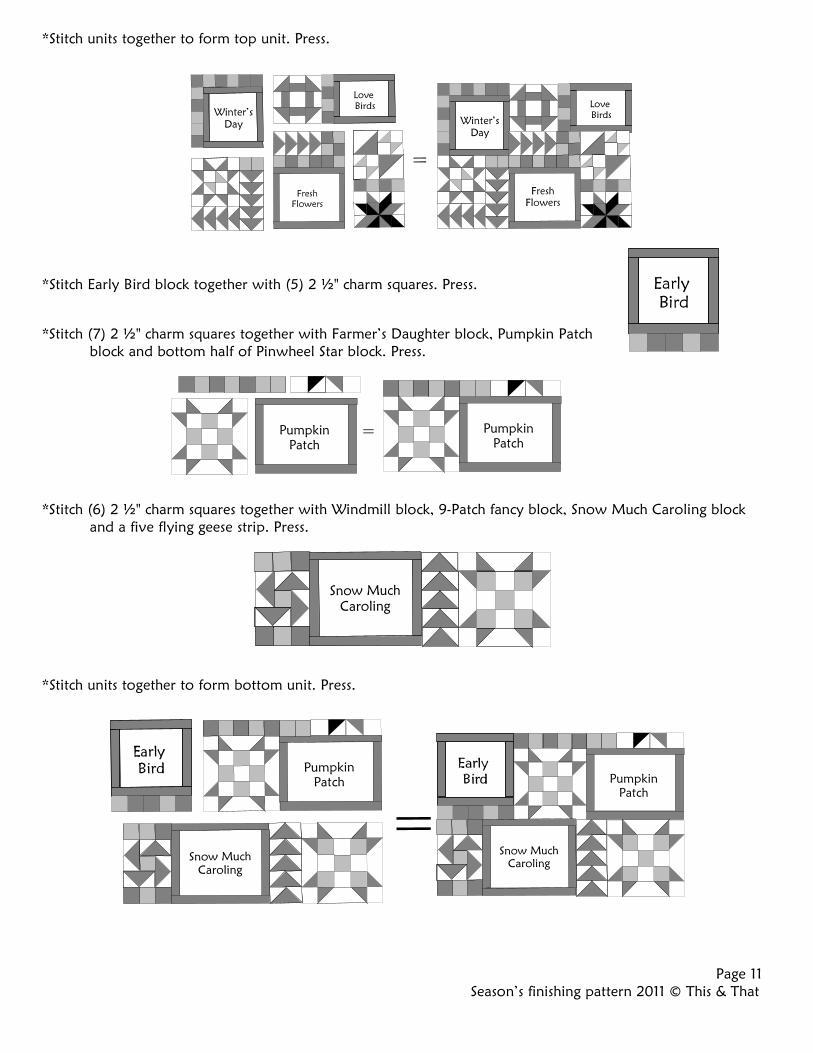
*Stitch units together to form top unit. Press.
*Stitch Early Bird block together with (5) 2 ½" charm squares. Press.
*Stitch (7) 2 ½" charm squares together with Farmer’s Daughter block, Pumpkin Patchblock and bottom half of Pinwheel Star block. Press.
*Stitch (6) 2 ½" charm squares together with Windmill block, 9-Patch fancy block, Snow Much Caroling blockand a five flying geese strip. Press.
*Stitch units together to form bottom unit. Press.
Page 11 Season’s finishing pattern 2011 © This & That

*Stitch top and bottom units together to form quilt top. Press.
Inner border~*Stitch (3) 1 ½" X 42" inner border strips together, end to end.*Subcut pieced inner border strip into (2) 1 ½" X 46 ½" strips.*Stitch inner border strips to sides of quilt top. Press.*Subcut remaining (2) 1 ½" X 42" strips into (2) 1 ½" X 34 ½" strips.*Stitch inner borders strips to top and bottom of quilt top. Press.
Outer border~*Stitch (6) 3 ½" X 8 ½" outer border rectangles together. Press. Make 2 side borders.*Stitch side borders to sides of quilt top. Press.*Stitch (5) 3 ½" X 8 ½" outer border rectangles together. Press. Make 2 top and bottom borders.*Stitch outer border strips to top and bottom of quilt top. Press.*You are all done with the quilt top!*Layer with batting and backing. *Quilt as desired.
Page 12 Season’s finishing pattern 2011 © This & That

Binding~ *Join the binding strips together with bias seams. *Trim seam to 1/4" and press open.*Cut end of binding strip at a 45 degree angle and press under 1/4".
*Fold binding strip in half lengthwise and press. (Wrong sidestogether.) *On right side of quilt top, stitch binding to the edge. (Raw edges together.) *Stop 1/4" from corner and backstitch. *Turn the quilt, fold the binding up and then back down to fold a
pleat in the corner.
*Stitch the binding to the next side of quilt. *Repeat these steps until you reach the beginning of the binding. *Cut off the binding end at an angle. (Make sure that the ends over lap.) *Tuck binding end into binding beginning. *Finish stitching. *Fold binding around the to the back and hand stitch in place.*Don’t forget to label your projects!*It is always nice to know when you made them, and the pattern name.
Page 13 Season’s finishing pattern 2011 © This & That