Seagate® Nytro™ vCenter Plug-In Solution Rev 1.0 · Seagate® Nytro™ vCenter Plug-In Solution...
31
Seagate® Nytro™ vCenter Plug-In Solution Rev 1.0.0 User Guide 100769979, Rev.C May 2015
Transcript of Seagate® Nytro™ vCenter Plug-In Solution Rev 1.0 · Seagate® Nytro™ vCenter Plug-In Solution...

Seagate® Nytro™ vCenter Plug-In Solution Rev 1.0.0User Guide
100769979, Rev.CMay 2015

Revision History
Revision Date Description of Changes
Rev. C May 2015 Updated the document with the appropriate product name. Replaced the cover page boilerplate and corrected the version details. Updated the Seagate support page.
Rev. B March 2015 Updated the Nytro vCenter information. Added Nytro Event Monitoring Service plug-in information.
Rev. A December 2014 Initial release of the document.
© 2015, Seagate Technology LLC All rights reserved.
Publication number: 100769979, Rev.C, May 2015
Seagate reserves the right to change, without notice, product offerings or specifications.
Seagate, Seagate Technology and the Wave logo are registered trademarks of Seagate Technology LLC in the United States and/or other countries. Nytro, Nytro WarpDrive and SeaTools are either trademarks or registeredtrademarks of Seagate Technology LLC or one of its affiliated companies in the United States and/or other countries. All other trademarks or registered trademarks are the property of their respective owners.
No part of this publication may be reproduced in any form without written permission of Seagate Technology LLC. Call 877-PUB-TEK1(877-782-8351) to request permission.
When referring to drive capacity, one gigabyte, or GB, equals one billion bytes and one terabyte, or TB, equals one trillion bytes. Your computer’s operating system may use a different standard of measurement and reporta lower capacity. In addition, some of the listed capacity is used for formatting and other functions, and thus will not be available for data storage. Actual quantities will vary based on various factors, including file size, fileformat, features and application software. Actual data rates may vary depending on operating environment and other factors. The export or re-export of hardware or software containing encryption may be regulated bythe U.S. Department of Commerce, Bureau of Industry and Security (for more information, visit www.bis.doc.gov), and controlled for import and use outside of the U.S.
Contents
Nytro vCenter Plug-In Solution User Guide 3
Seagate Technology Support Services . . . . . . . . . . . . . . . . . . . . . . . . . . . . . . . . . . . . . . . . . . . . . . . . . . . . . . . . . . . . . . . . . . . . . . . . . . . . . . . . . . . . . . . . . . . 4
Chapter 1: Nytro vCenter Plug-In Overview . . . . . . . . . . . . . . . . . . . . . . . . . . . . . . . . . . . . . . . . . . . . . . . . . . . . . . . . . . . . . . . . . . . . . . . . . . . . . . . . . . . . . . 5
1.1 Supported Controllers . . . . . . . . . . . . . . . . . . . . . . . . . . . . . . . . . . . . . . . . . . . . . . . . . . . . . . . . . . . . . . . . . . . . . . . . . . . . . . . . . . . . . . . . . . . . . . . . . . . . . . . . . . . . . . 51.2 Supported Operations . . . . . . . . . . . . . . . . . . . . . . . . . . . . . . . . . . . . . . . . . . . . . . . . . . . . . . . . . . . . . . . . . . . . . . . . . . . . . . . . . . . . . . . . . . . . . . . . . . . . . . . . . . . . . . 6
Chapter 2: Installing and Registering the Nytro vCenter Plug-In . . . . . . . . . . . . . . . . . . . . . . . . . . . . . . . . . . . . . . . . . . . . . . . . . . . . . . . . . . . . . . . . . . . 7
2.1 Hardware and Software Requirements . . . . . . . . . . . . . . . . . . . . . . . . . . . . . . . . . . . . . . . . . . . . . . . . . . . . . . . . . . . . . . . . . . . . . . . . . . . . . . . . . . . . . . . . . . . . . . 72.1.1 Supported Platforms . . . . . . . . . . . . . . . . . . . . . . . . . . . . . . . . . . . . . . . . . . . . . . . . . . . . . . . . . . . . . . . . . . . . . . . . . . . . . . . . . . . . . . . . . . . . . . . . . . . . . . . . . 7
2.2 Prerequisites to Use the Nytro vCenter Plug-In . . . . . . . . . . . . . . . . . . . . . . . . . . . . . . . . . . . . . . . . . . . . . . . . . . . . . . . . . . . . . . . . . . . . . . . . . . . . . . . . . . . . . . . 72.3 Deploying the Nytro vCenter Plug-In . . . . . . . . . . . . . . . . . . . . . . . . . . . . . . . . . . . . . . . . . . . . . . . . . . . . . . . . . . . . . . . . . . . . . . . . . . . . . . . . . . . . . . . . . . . . . . . . 82.4 Installing the Nytro vCenter Plug-In . . . . . . . . . . . . . . . . . . . . . . . . . . . . . . . . . . . . . . . . . . . . . . . . . . . . . . . . . . . . . . . . . . . . . . . . . . . . . . . . . . . . . . . . . . . . . . . . . 82.5 Registering the Nytro vCenter Plug-In . . . . . . . . . . . . . . . . . . . . . . . . . . . . . . . . . . . . . . . . . . . . . . . . . . . . . . . . . . . . . . . . . . . . . . . . . . . . . . . . . . . . . . . . . . . . . . . 82.6 Enabling the Nytro vCenter Plug-In . . . . . . . . . . . . . . . . . . . . . . . . . . . . . . . . . . . . . . . . . . . . . . . . . . . . . . . . . . . . . . . . . . . . . . . . . . . . . . . . . . . . . . . . . . . . . . . . . . 92.7 Disabling the Nytro vCenter Plug-In . . . . . . . . . . . . . . . . . . . . . . . . . . . . . . . . . . . . . . . . . . . . . . . . . . . . . . . . . . . . . . . . . . . . . . . . . . . . . . . . . . . . . . . . . . . . . . . . . 92.8 Unregistering the Nytro vCenter Plug-In . . . . . . . . . . . . . . . . . . . . . . . . . . . . . . . . . . . . . . . . . . . . . . . . . . . . . . . . . . . . . . . . . . . . . . . . . . . . . . . . . . . . . . . . . . . . . 92.9 Installing the Nytro vCenter EMS Plug-In . . . . . . . . . . . . . . . . . . . . . . . . . . . . . . . . . . . . . . . . . . . . . . . . . . . . . . . . . . . . . . . . . . . . . . . . . . . . . . . . . . . . . . . . . . . 102.10 Registering the Nytro vCenter EMS Plug-In . . . . . . . . . . . . . . . . . . . . . . . . . . . . . . . . . . . . . . . . . . . . . . . . . . . . . . . . . . . . . . . . . . . . . . . . . . . . . . . . . . . . . . . . 112.11 Enabling the Nytro vCenter EMS Plug-In . . . . . . . . . . . . . . . . . . . . . . . . . . . . . . . . . . . . . . . . . . . . . . . . . . . . . . . . . . . . . . . . . . . . . . . . . . . . . . . . . . . . . . . . . . . 122.12 Disabling the Nytro vCenter EMS Plug-In . . . . . . . . . . . . . . . . . . . . . . . . . . . . . . . . . . . . . . . . . . . . . . . . . . . . . . . . . . . . . . . . . . . . . . . . . . . . . . . . . . . . . . . . . . 122.13 Unregistering the Nytro vCenter EMS Plug-In . . . . . . . . . . . . . . . . . . . . . . . . . . . . . . . . . . . . . . . . . . . . . . . . . . . . . . . . . . . . . . . . . . . . . . . . . . . . . . . . . . . . . . 12
Chapter 3: Using the Nytro vCenter Plug-In . . . . . . . . . . . . . . . . . . . . . . . . . . . . . . . . . . . . . . . . . . . . . . . . . . . . . . . . . . . . . . . . . . . . . . . . . . . . . . . . . . . . . 14
3.1 Logging On to the VMware vSphere Web Client . . . . . . . . . . . . . . . . . . . . . . . . . . . . . . . . . . . . . . . . . . . . . . . . . . . . . . . . . . . . . . . . . . . . . . . . . . . . . . . . . . . . 143.2 Navigating to the Nytro vCenter Plug-In environment . . . . . . . . . . . . . . . . . . . . . . . . . . . . . . . . . . . . . . . . . . . . . . . . . . . . . . . . . . . . . . . . . . . . . . . . . . . . . . 14
3.2.1 Controller Grid . . . . . . . . . . . . . . . . . . . . . . . . . . . . . . . . . . . . . . . . . . . . . . . . . . . . . . . . . . . . . . . . . . . . . . . . . . . . . . . . . . . . . . . . . . . . . . . . . . . . . . . . . . . . . . 153.2.2 Controller Summary View . . . . . . . . . . . . . . . . . . . . . . . . . . . . . . . . . . . . . . . . . . . . . . . . . . . . . . . . . . . . . . . . . . . . . . . . . . . . . . . . . . . . . . . . . . . . . . . . . . . 163.2.3 Controller Physical View . . . . . . . . . . . . . . . . . . . . . . . . . . . . . . . . . . . . . . . . . . . . . . . . . . . . . . . . . . . . . . . . . . . . . . . . . . . . . . . . . . . . . . . . . . . . . . . . . . . . . 173.2.4 Controller Logical View . . . . . . . . . . . . . . . . . . . . . . . . . . . . . . . . . . . . . . . . . . . . . . . . . . . . . . . . . . . . . . . . . . . . . . . . . . . . . . . . . . . . . . . . . . . . . . . . . . . . . . 183.2.5 Controller Events Log View . . . . . . . . . . . . . . . . . . . . . . . . . . . . . . . . . . . . . . . . . . . . . . . . . . . . . . . . . . . . . . . . . . . . . . . . . . . . . . . . . . . . . . . . . . . . . . . . . . 20
3.3 Managing the Storage Device . . . . . . . . . . . . . . . . . . . . . . . . . . . . . . . . . . . . . . . . . . . . . . . . . . . . . . . . . . . . . . . . . . . . . . . . . . . . . . . . . . . . . . . . . . . . . . . . . . . . . . 203.3.1 Creating a Virtual Drive . . . . . . . . . . . . . . . . . . . . . . . . . . . . . . . . . . . . . . . . . . . . . . . . . . . . . . . . . . . . . . . . . . . . . . . . . . . . . . . . . . . . . . . . . . . . . . . . . . . . . . 203.3.2 Renaming a Virtual Drive . . . . . . . . . . . . . . . . . . . . . . . . . . . . . . . . . . . . . . . . . . . . . . . . . . . . . . . . . . . . . . . . . . . . . . . . . . . . . . . . . . . . . . . . . . . . . . . . . . . . 213.3.3 Deleting a Virtual Drive . . . . . . . . . . . . . . . . . . . . . . . . . . . . . . . . . . . . . . . . . . . . . . . . . . . . . . . . . . . . . . . . . . . . . . . . . . . . . . . . . . . . . . . . . . . . . . . . . . . . . . 223.3.4 Physical Drive Secure Erase . . . . . . . . . . . . . . . . . . . . . . . . . . . . . . . . . . . . . . . . . . . . . . . . . . . . . . . . . . . . . . . . . . . . . . . . . . . . . . . . . . . . . . . . . . . . . . . . . . 233.3.5 Clearing the Configuration On the Nytro Controller . . . . . . . . . . . . . . . . . . . . . . . . . . . . . . . . . . . . . . . . . . . . . . . . . . . . . . . . . . . . . . . . . . . . . . . . . . 233.3.6 Formatting the Nytro WarpDrive . . . . . . . . . . . . . . . . . . . . . . . . . . . . . . . . . . . . . . . . . . . . . . . . . . . . . . . . . . . . . . . . . . . . . . . . . . . . . . . . . . . . . . . . . . . . . 24
Chapter 4: Using the Nytro vCenter Event Monitoring Service Plug-In . . . . . . . . . . . . . . . . . . . . . . . . . . . . . . . . . . . . . . . . . . . . . . . . . . . . . . . . . . . . . 25
4.1 Nytro vCenter Event Monitoring Service Plug-In Operations . . . . . . . . . . . . . . . . . . . . . . . . . . . . . . . . . . . . . . . . . . . . . . . . . . . . . . . . . . . . . . . . . . . . . . . . . 254.2 Navigating to the Event Console . . . . . . . . . . . . . . . . . . . . . . . . . . . . . . . . . . . . . . . . . . . . . . . . . . . . . . . . . . . . . . . . . . . . . . . . . . . . . . . . . . . . . . . . . . . . . . . . . . . 25
4.2.1 Exporting the Events . . . . . . . . . . . . . . . . . . . . . . . . . . . . . . . . . . . . . . . . . . . . . . . . . . . . . . . . . . . . . . . . . . . . . . . . . . . . . . . . . . . . . . . . . . . . . . . . . . . . . . . . 28
Appendix A: Troubleshooting the Nytro vCenter Plug-In Issues . . . . . . . . . . . . . . . . . . . . . . . . . . . . . . . . . . . . . . . . . . . . . . . . . . . . . . . . . . . . . . . . . . . 29
Glossary . . . . . . . . . . . . . . . . . . . . . . . . . . . . . . . . . . . . . . . . . . . . . . . . . . . . . . . . . . . . . . . . . . . . . . . . . . . . . . . . . . . . . . . . . . . . . . . . . . . . . . . . . . . . . . . . . . . . . . 30

Nytro vCenter Plug-In Solution User Guide 4
Seagate Technology Support Services
For information regarding online support and services, visit: http://www.seagate.com/about/contact-us/technical-support/
Available services include:
Presales & Technical support Global Support Services telephone numbers & business hours Authorized Service Centers
For information regarding Warranty Support, visit: http://www.seagate.com/support/warranty-and-replacements/
For information regarding data recovery services, visit: http://www.seagate.com/services-software/data-recovery-services/
For Seagate OEM and Distribution partner portal, visit: http://www.seagate.com/partners
For Seagate reseller portal, visit: http://www.seagate.com/partners/my-spp-dashboard/

www.seagate.comSupported Controllers
Chapter 1: Nytro vCenter Plug-In Overview
The Nytro™ vCenter plug-in enables you to manage the Seagate® controllers in the vSphere® environment to provide all of the major system integrators or OEMs with a single window to manage the Seagate controllers in the VMware® ESXi operating system. The plug-in coexists with the VMware ecosystem to provide seamless control over the Seagate controllers.
The Nytro vCenter plug-in includes the Nytro vCenter plug-in and Nytro vCenter Event Monitoring Service (EMS) plug-in, hereon called Nytro vCenter EMS plug-in.
The Nytro vCenter plug-in enables you to create basic configurations, rename the virtual drive (VD), and monitor the health status of the controllers. The plug-in leverages the core vCenter server capabilities, such as authentication. The plug-in includes storage monitoring, hardware status, management and monitoring of physical and virtual resources, and alert notifications. The Nytro vCenter plug-in empowers you to effectively manage your storage resources, that is, your physical and virtual storage infrastructure through a vSphere web client. See Chapter 3, Using the Nytro vCenter Plug-In.
The Nytro vCenter EMS plug-in enables you to view all of the controller events occurring at the vCenter level in a single common event console. You can monitor the connected controllers by using the events generated on the controllers. See Chapter 4, Using the Nytro vCenter Event Monitoring Service Plug-In.
You can use the Nytro vCenter plug-in without any additional hardware resources.
1.1 Supported Controllers
Nytro XP 6209 Nytro XP 6210 Nytro XP 730X WDELP4X100 WDELP4X200 NWD-BLP4-1365 NWD-RLP4-1860 NWD-6209-4A1024 NWD-6210-4A2048 MLSI800M MLSI400S NWD-BLP3-300 NWD-WLP3-300 NWD-BLP3-600 NWD-BLP4-800 NWD-WLP4-200 NWD-WLP4-400 NWD-BLP4-400 NWD-BLP4-800 NWD-BLP4-1600 NXD-BLP4-400 NXD-BLP4-800 NXD-BLP4-1600 NWD-BFH6-1200
Nytro vCenter Plug-In Solution User Guide 5

www.seagate.comSupported Operations
NWD-BFH8-1600 NWD-BFH8-3200
1.2 Supported Operations
The Nytro vCenter plug-in supports the operations provided in the following table.
Operation Supported MLSI/NWD/NXD/WDELP/Nytro XP62xx Nytro XP 73xx/Nytro XP 64xx
Create or Delete virtual drive (VD) Not supported Supported
Format controller Supported Not supported
Format Nytro Flash Modules Supported (if there are no VDs) Not supported
Erase physical drive (PD) Not supported Supported
Clear configuration Not supported Supported
VD rename Not supported Supported
Event Monitoring Supported Supported
Nytro vCenter Plug-In Solution User Guide 6

www.seagate.comHardware and Software Requirements
Chapter 2: Installing and Registering the Nytro vCenter Plug-In
This chapter provides you the steps to install and register the Nytro vCenter plug-in. The Nytro vCenter plug-in installation includes the installation of Nytro vCenter plug-in and Nytro vCenter EMS plug-in into the vSphere environment.
2.1 Hardware and Software Requirements
The Nytro vCenter plug-in is supported on the following hardware and software components.
2.1.1 Supported Platforms
vCenter Server 5.5 vSphere web client 5.5 ESXi 5.5
NOTE Refer to your vCenter server documentation and to the operating system documentation for more information.
2.2 Prerequisites to Use the Nytro vCenter Plug-In
Seagate provided CIM provider (included in the release package; the Nytro vCenter plug-in works with version 80.101.V0.08) installed on the ESXi host
vCenter Server 5.5Visit: http://kb.vmware.com/selfservice/microsites/search.do?language=en_US&cmd=displayKC&externalId=2053142
NOTE vCenter installation must have the Single sign-on, inventory service modules, and vSphere Web Client installed (visit: https://www.vmware.com/support/pubs/vsphere-esxi-vcenter-server-pubs.html).
vSphere web client 5.5 Nytro vCenter plug-in Nytro vCenter EMS plug-in (included in the release package) ESXi host version 5.5 with the Seagate controllers attached
NOTE Known issue with ESXi 5.5:sfcb service might fail to open the ESXi firewall for CIM indication delivery if more than one destination listens to the indication on different ports.The Nytro vCenter plug-ins work with ESXi 5.5 hosts and the fix for the this issue is available with only ESXi 5.5 U2. To work around this issue, disable the firewall on the ESXi hosts to be able to view the events passing from into the Nytro vCenter plug-ins. For more information, visit: https://www.vmware.com/support/vsphere5/doc/vsphere-esxi-55u2-release-notes.html
ESXi host must be configured as a part of a domain.
Nytro vCenter Plug-In Solution User Guide 7

www.seagate.comDeploying the Nytro vCenter Plug-In
2.3 Deploying the Nytro vCenter Plug-In
You can deploy the Nytro vCenter plug-in by performing one of the two methods: installing or registering the Nytro vCenter plug-in and Nytro vCenter EMS plug-in as mentioned in this chapter.
2.4 Installing the Nytro vCenter Plug-In
To install the Nytro vCenter plug-in, perform the following steps:
1. Extract the contents of the nytro-xm.zip into the nytro-xm folder.
NOTE Make sure that the vCenter plug-in contents are in the same path as mentioned under the nytro-xm.zip folder structure, that is, the plug-in contents must not be in any intermediate folder.
2. Stop the vSphere web client service.
3. Copy the nytro-xm folder into the following locations based on the operating systems used.
On the Windows server
— ..\Program Files\VMware\Infrastructure\vSphereWebClient\plugin-packages
On the Linux server
— /usr/lib/vmware-vsphere-client/plugin-packages
4. Start the vSphere web client service.
5. Log on to vSphere Web Client.
6. To use the Nytro vCenter plug-in, navigate to the vCenter->Host->Manage tab, and click the Nytro XM tab.
2.5 Registering the Nytro vCenter Plug-In
To register the Nytro vCenter plug-in, perform the following steps:
1. Pick up the respective zip file, nytro-xm.zip bundled within the release package.
2. Host the nytro-xm.zip on an HTTP location.
3. To ensure that the HTTP location is working correctly, type the URL, for example, http://<Webserver IP>:Port/nytro-xm.zip in a browser, and press Enter. Downloading starts.
4. In the PluginExtension.xml XML file, change the package location URL (zip file downloadable HTTP location) with the HTTP path provided in Step 2, and then save the XML file on the machine where you have the vSphere Client 5.5 installed.
NOTE vSphere Client 5.5 is a prerequisite to register the Nytro vCenter plug-in.
5. Modify the web client properties file, webclient under C:\ProgramData\VMware\vSphere Web Client on the vCenter machine to add a new line as shown in the following example:
allowHttp=true
6. Run vSphere client and connect it to the vCenter server.
7. Go to Plug-ins->Manage Plugins.
The Plug-in Manager dialog appears.
8. Right-click the blank space in the dialog, and select New Plug-in.
Nytro vCenter Plug-In Solution User Guide 8
www.seagate.comEnabling the Nytro vCenter Plug-In
The Register Plug-in dialog appears.
9. Click the Browse button, and select the path to the PluginExtension.xml file as provided in Step 3 in Section 2.4, Installing the Nytro vCenter Plug-In.
10. Click Register Plug-in.
11. Open a new web client session to the vCenter, and click the Nytro XM tab under Manage.
This action triggers the deployment of the plug-in on the web client host.
2.6 Enabling the Nytro vCenter Plug-In
You can access the Nytro vCenter plug-in interface in a separate tab when an ESXi host is selected.
To enable the Nytro vCenter plug-in, perform the following steps:
1. From the Applications menu, select System Administration > Plug-in Management.
2. Right-click the Nytro XM Plug-in, and select Other > Enable, from the Context menu.
3. Click Yes.
NOTE By default, the plug-ins are enabled.
2.7 Disabling the Nytro vCenter Plug-In
You can disable the Nytro vCenter plug-in. The plug-in remains installed, but will be inoperative. You can re-enable the plug-in anytime later.
1. From the Applications menu, select System Administration > Plug-in Management.
2. Right-click Nytro XM Plug-in, and select Other > Disable from the context menu.
3. Click Yes.
4. Click Yes on the Reload vSphere Web Client dialog that appears.
2.8 Unregistering the Nytro vCenter Plug-In
You can unregister the Nytro vCenter plug-in that you had previously registered with the vCenter server. You can manually delete the extension (for more information, look up for com.Seagate.vCenterPlugin.NytroXM) by using the vCenter Managed Object Browser (MOB) interface in your Web browser (refer to the vCenter documentation for the MOB interface usage).
Unregistering a Nytro vCenter plug-in package on the vCenter server does not delete the Nytro vCenter plug-in package files that are installed locally on the vSphere Web Client Virgo server. The files are not used after you unregister the package. To remove the files for clean-up purposes, you must delete the Nytro vCenter plug-in package files manually.
Perform the following steps to unregister the plug-in:
1. Open the VMware vSphere API Browser (MOB interface), https://<vCenter_IP_Address>/mob/?moid=ExtensionManager.
2. Log on to the vCenter server.
3. Under the Methods list that appears, click the UnregisterExtension method.
Nytro vCenter Plug-In Solution User Guide 9

www.seagate.comInstalling the Nytro vCenter EMS Plug-In
A pop-up dialog appears.
4. Enter the extension key for the plug-in, and then click Invoke Method at the bottom of the dialog.
NOTE The extension key is, com.Seagate.vCenterPlugin.NytroXM.
The preceding steps will unregister the plug-in extension. However, unregistering the plug-in on the vCenter server does not delete the plug-in files that are installed locally on the vSphere Web Client Virgo server. The files are not usable after you unregister the package. To remove the files for clean-up purposes, you must delete the plug-in files manually; typically from the following location on a Windows host
C:\ProgramData\VMware\vSphere Web Client\vc-packages\vsphere-client-serenity path.
2.9 Installing the Nytro vCenter EMS Plug-In
To install the Nytro vCenter EMS plug-in, perform the following steps:
1. Extract the contents of the nytro-xm-ems.zip into the nytro-xm-ems folder.
NOTE Make sure that the plug-in contents are in the same path as mentioned under the nytro-xm-ems.zip folder structure, that is, the plug-in contents must not be in any intermediate folder.
2. Stop the vSphere web client service.
3. Copy the nytro-xm-ems folder into the following locations based on the operating systems used.
On the Windows server
— ..\Program Files\VMware\Infrastructure\vSphereWebClient\plugin-packages
On the Linux server
— /usr/lib/vmware-vsphere-client/plugin-packages
4. Start the vSphere web client service.
5. Log on to vSphere Web Client.
6. To use the Nytro vCenter EMS plug-in, click the home ( ) icon on the top of the window.
Nytro vCenter Plug-In Solution User Guide 10

www.seagate.comRegistering the Nytro vCenter EMS Plug-In
The Home page appears.
Figure 1 Nytro vCenter EMS Plug-in Home Page
2.10 Registering the Nytro vCenter EMS Plug-In
To register the Nytro vCenter EMS plug-in, perform the following steps:
1. Pick up the respective zip file, nytro-xm-ems.zip bundled within the release package.
2. Host the nytro-xm-ems.zip on an HTTP location.
3. To ensure that the HTTP location is working correctly, type the URL, for example, http://<Webserver IP>:Port/nytro-xm-ems.zip in a browser, and press Enter.
Downloading starts.
4. In the PluginExtension.xml XML file, change the package location URL (zip file downloadable HTTP location) with the HTTP path provided in Step 2, and then save the XML file on the machine where you have the vSphere Client 5.5 installed.
NOTE vSphere Client 5.5 is a pre-requisite to register the Nytro vCenter EMS plug-in.
5. Modify the web client properties file, webclient under C:\ProgramData\VMware\vSphere Web Client on the vCenter machine to add a new line as shown in the following example:
allowHttp=true
6. Run vSphere client and connect it to the vCenter server.
7. Go to Plug-ins->Manage Plugins.
Nytro vCenter Plug-In Solution User Guide 11

www.seagate.comEnabling the Nytro vCenter EMS Plug-In
The Plug-in Manager dialog appears.
8. Right-click the blank space in the dialog, and select New Plug-in.
The Register Plug-in dialog appears.
9. Click the Browse button, and select the path to the PluginExtension.xml file as provided in Step 3 in Section 2.9, Installing the Nytro vCenter EMS Plug-In.
10. Click Register Plug-in.
11. Open a new web client session to the vCenter, and go to the vCentre home page.
This action triggers the deployment of the plug-in on the web client host.
2.11 Enabling the Nytro vCenter EMS Plug-In
You can access the Nytro vCenter EMS plug-in interfaces in a separate tab when an ESXi host is selected.
To enable the Nytro vCenter EMS plug-in, perform the following steps:
1. From the Applications menu, select System Administration > Plug-in Management.
2. Right-click the Nytro XM EMS plug-in, and select Other > Enable, from the Context menu.
3. Click Yes.
NOTE By default, the plug-in is enabled.
2.12 Disabling the Nytro vCenter EMS Plug-In
You can disable the Nytro vCenter EMS plug-in. The plug-in remains installed, but will be inoperative. You can re-enable the plug-in anytime later.
1. From the Applications menu, select System Administration > Plug-in Management.
2. Right-click Nytro XM EMS Plug-in, and select Other > Disable from the context menu.
3. Click Yes.
4. Click Yes on the Reload vSphere Web Client dialog that appears.
2.13 Unregistering the Nytro vCenter EMS Plug-In
You can unregister the Nytro vCenter EMS plug-in that you had previously registered with the vCenter server. You can manually delete the extension (for more information, look up for com.Seagate.vCenterPlugin.nytro-xm-ems) by using the vCenter Managed Object Browser (MOB) interface in your Web browser (refer to the vCenter documentation for the MOB interface usage).
Unregistering a Nytro vCenter EMS plug-in package on the vCenter server does not delete the Nytro vCenter EMS plug-in package files that are installed locally on the vSphere Web Client Virgo server. The files are not used after you unregister the package. To remove the files for clean-up purposes, you must delete the Nytro vCenter EMS plug-in package files manually.
Perform the following steps to unregister the plug-in:
1. Open the VMware vSphere API Browser (MOB interface), https://<vCenter_IP_Address>/mob/?moid=ExtensionManager.
Nytro vCenter Plug-In Solution User Guide 12
www.seagate.comUnregistering the Nytro vCenter EMS Plug-In
2. Log on to the vCenter server.
3. Under the Methods list that appears, click the UnregisterExtension method.
A pop-up dialog appears.
4. Enter the extension key for the plug-in, and then click Invoke Method at the bottom of the dialog.
NOTE The extension key is, com.Seagate.vCenterPlugin.nytro-xm-ems.
The preceding steps will unregister the plug-in extension. However, unregistering the plug-in on the vCenter server does not delete the plug-in files that are installed locally on the vSphere Web Client Virgo server. The files are not usable after you unregister the package. To remove the files for clean-up purposes, you must delete the plug-in files manually; typically from the following location on a Windows host
C:\ProgramData\VMware\vSphere Web Client\vc-packages\vsphere-client-serenity path.
Nytro vCenter Plug-In Solution User Guide 13
www.seagate.comLogging On to the VMware vSphere Web Client
Chapter 3: Using the Nytro vCenter Plug-In
This chapter helps you configure/setup the Nytro vCenter plug-in, and perform all of the controller-related operations.
The plug in enables you to perform the following operations:
Viewing the health and status of the controllers. Viewing the information of the events generated. Issuing management and administration commands to the VDs. Creating, configuring, or deleting VDs. Discovering the controllers, physical disk, virtual drive and viewing the controller properties.
3.1 Logging On to the VMware vSphere Web Client
Log on to the vmware vSphere Web Client interface with your user credentials.
After you log on to the VMware vSphere® Web Client, go to the Nytro vCenter plug-in environment to perform the Nytro controller-related operations.
3.2 Navigating to the Nytro vCenter Plug-In environment
To navigate to a Nytro vCenter Core plug-in, perform the following steps:
1. Click the icon on the vmware vSphere Web Client window or click on the left pane of the VMware vSphere Web Client window.
2. In the vCenter Home tree, expand Inventory Lists, and click Hosts.
The Hosts window appears on the right pane.
3. Select the host where the Seagate controllers are attached and can be viewed or managed.
4. Under the host view, select the Manage tab to view the plug-in-specific Nytro XM tab.
Nytro vCenter Plug-In Solution User Guide 14

www.seagate.comNavigating to the Nytro vCenter Plug-In environment
The Nytro vCenter Plug-In main window appears.
Figure 2 Nytro vCenter Plug-In Main Window
3.2.1 Controller Grid
The Grid view shows an overview of the system and shows the controller name, controller firmware version, the SAS address of the controller, and device ID. After you log onto the vCenter server, in the Managed Hosts page, select any controllers as shown in the following figure.
The selected controller is highlighted.
Figure 3 Controller Grid
The following table shows the GUI icons that appear in the Nytro vCenter plug-in application.
Icons Description
Alarm to indicate the critical events.
Alarm to indicate the warning events.
LED status of the controller.
Indicates that the controller status is critical or needs attention ( ).
Indicates that the controller status is in an optimal state.
Nytro vCenter Plug-In Solution User Guide 15

www.seagate.comNavigating to the Nytro vCenter Plug-In environment
3.2.2 Controller Summary View
The summary view is the default window. This view shows the information about the selected controller. The information on this dialog is read-only and cannot be modified directly. The available operations on the Nytro vCenter plug-in are, viewing the controller properties, drive properties, VD properties, health information, and other information. The properties shown might vary based on the controller that is being monitored.
Figure 4 Nytro vCenter Plug-in Summary View
Property Description
General Properties
Health Shows the controller health.
Product Name Shows the name of the controller.
Vendor ID Shows the vendor ID.
Device ID Shows the device ID.
SAS Address Shows the SAS address for the drive.
Cache Flush Interval The interval (in seconds) at which the contents of the on-board data cache are flushed. The default is 4 seconds.
Controller Temperature Shows the controller temperature; based upon this value, the controller functionality can be monitored and managed.
Alarm Enabled Indicates if the controller alarm is enabled.
Alarm Present Indicates if the alarm is present in the controller.
Battery Backup Present Indicates if the battery backup unit is present.
Firmware Properties
Firmware Version Shows the controller firmware version supported.
BIOS Version Shows the server BIOS version supported.
Online Firmware Upgrade Shows if the online firmware upgrade operation is enabled.
Nytro vCenter Plug-In Solution User Guide 16
www.seagate.comNavigating to the Nytro vCenter Plug-In environment
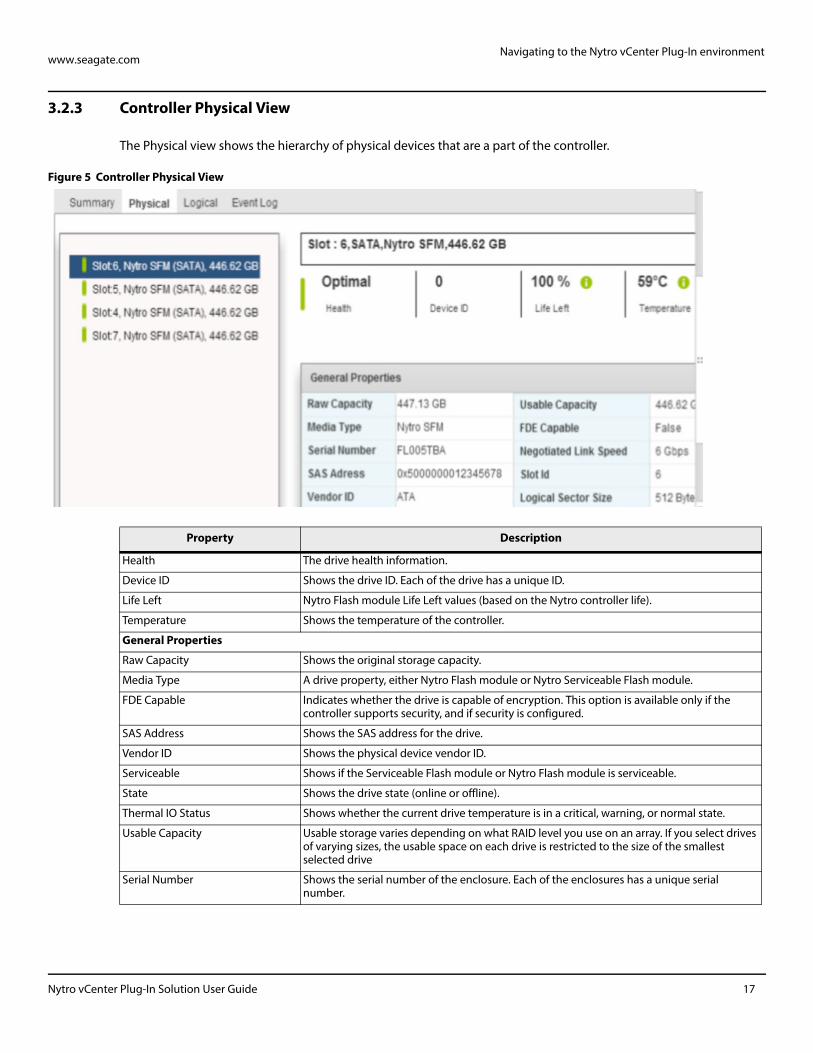
3.2.3 Controller Physical View
The Physical view shows the hierarchy of physical devices that are a part of the controller.
Figure 5 Controller Physical View
Property Description
Health The drive health information.
Device ID Shows the drive ID. Each of the drive has a unique ID.
Life Left Nytro Flash module Life Left values (based on the Nytro controller life).
Temperature Shows the temperature of the controller.
General Properties
Raw Capacity Shows the original storage capacity.
Media Type A drive property, either Nytro Flash module or Nytro Serviceable Flash module.
FDE Capable Indicates whether the drive is capable of encryption. This option is available only if the controller supports security, and if security is configured.
SAS Address Shows the SAS address for the drive.
Vendor ID Shows the physical device vendor ID.
Serviceable Shows if the Serviceable Flash module or Nytro Flash module is serviceable.
State Shows the drive state (online or offline).
Thermal IO Status Shows whether the current drive temperature is in a critical, warning, or normal state.
Usable Capacity Usable storage varies depending on what RAID level you use on an array. If you select drives of varying sizes, the usable space on each drive is restricted to the size of the smallest selected drive
Serial Number Shows the serial number of the enclosure. Each of the enclosures has a unique serial number.
Nytro vCenter Plug-In Solution User Guide 17

www.seagate.comNavigating to the Nytro vCenter Plug-In environment
3.2.4 Controller Logical View
The Logical view shows the hierarchy of controllers, virtual drives, and the drives and drive groups that make up the virtual drives.
Figure 6 Controller Logical View
Negotiated Link Speed The negotiated link speed for data transfer to and from the drive.
Slot ID Shows the slot ID of the drive.
Logical Sector Size Shows the logical sector size of this virtual drive.
Property Description
Health The drive group health information.
Configured Capacity The entire drive group capacity.
Remaining Capacity The remaining capacity in the drive group.
RAID Level The RAID level of the drive group.
Drive Group Name The name given to a group of drives that is attached to a RAID controller on which one or more virtual drives can be created.
Contributing Drives The drives that are part of the drive group.
Property Description
Nytro vCenter Plug-In Solution User Guide 18
www.seagate.comNavigating to the Nytro vCenter Plug-In environment
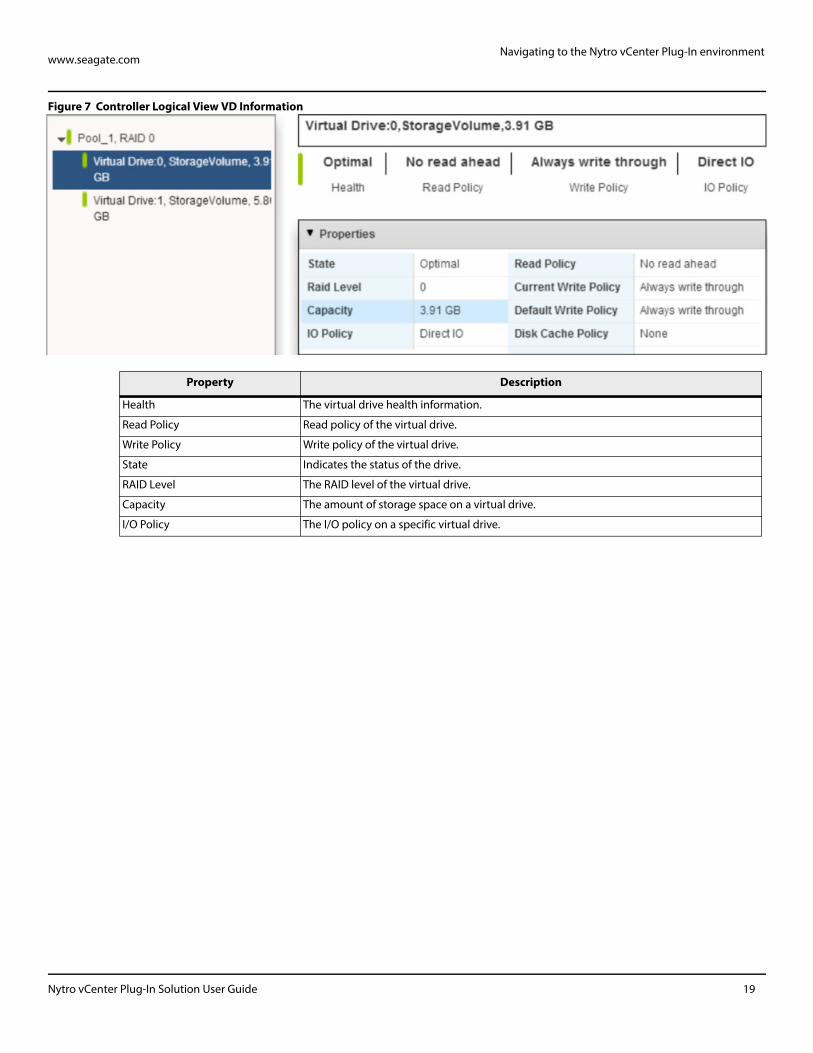
Figure 7 Controller Logical View VD Information
Property Description
Health The virtual drive health information.
Read Policy Read policy of the virtual drive.
Write Policy Write policy of the virtual drive.
State Indicates the status of the drive.
RAID Level The RAID level of the virtual drive.
Capacity The amount of storage space on a virtual drive.
I/O Policy The I/O policy on a specific virtual drive.
Nytro vCenter Plug-In Solution User Guide 19

www.seagate.comManaging the Storage Device
3.2.5 Controller Events Log View
This window shows the firmware event log entries. The new event log entries appear during the session. Each entry has an ID, an error level indicating the severity of the event, the timestamp and date, and a brief description of the event. You can filter the view based on your requirement.
To access the event log entries, perform the following steps:
1. Click the Event Log tab.
Figure 8 Controller Event Log
3.3 Managing the Storage Device
3.3.1 Creating a Virtual Drive
The following steps help you can create a virtual drive (VD).
Figure 9 Create Virtual Drive
1. Select the required controller, and right-click the icon.
2. Select Create VD.
Nytro vCenter Plug-In Solution User Guide 20
www.seagate.comManaging the Storage Device
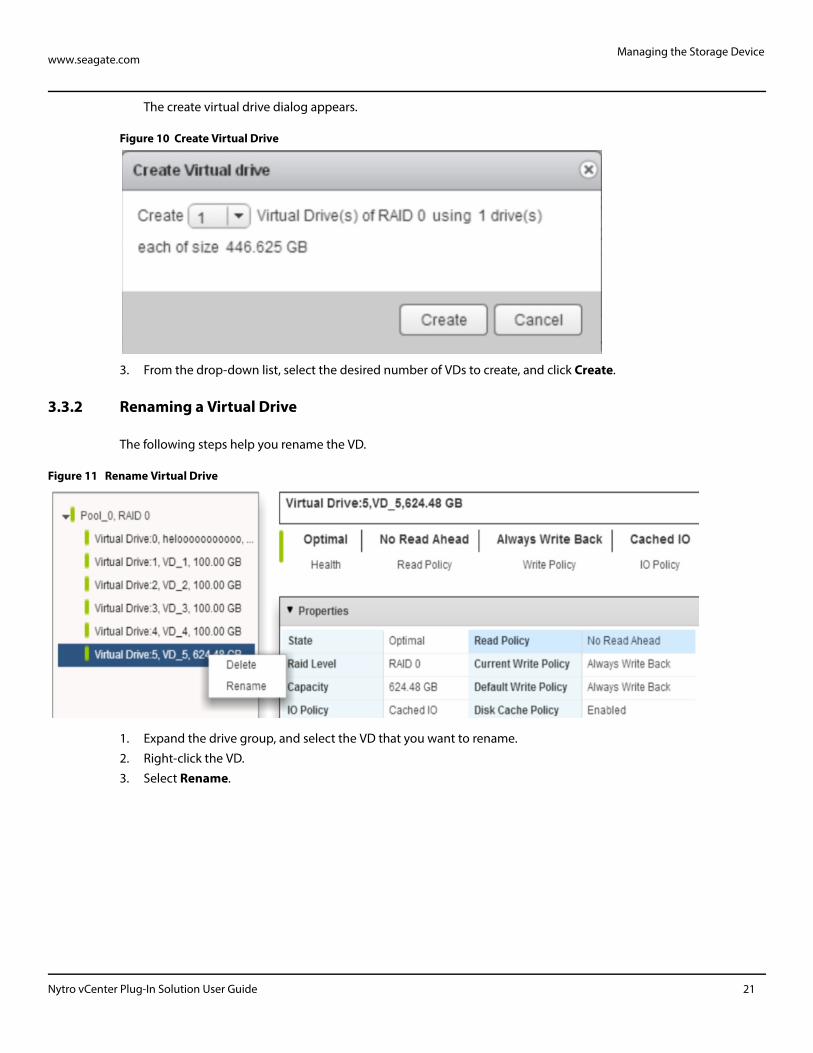
The create virtual drive dialog appears.
Figure 10 Create Virtual Drive
3. From the drop-down list, select the desired number of VDs to create, and click Create.
3.3.2 Renaming a Virtual Drive
The following steps help you rename the VD.
Figure 11 Rename Virtual Drive
1. Expand the drive group, and select the VD that you want to rename.
2. Right-click the VD.
3. Select Rename.
Nytro vCenter Plug-In Solution User Guide 21

www.seagate.comManaging the Storage Device
The Rename dialog appears.
Figure 12 Rename
4. Enter the new VD name, and click Rename.
3.3.3 Deleting a Virtual Drive
The following steps help you delete a VD.
CAUTION This operation is not recommended. Back up any data that is on the virtual drive that you want to keep before you delete the virtual drive. Make sure that the operating system is not installed on this VD.
You can delete any virtual drive on the controller if you want to reuse that space for a new virtual drive. If multiple virtual drives are defined on a single drive group, you can delete a VD without deleting the whole drive group.
1. Click the Logical tab.
2. Expand the drive group, and select the VD that you want to delete.
3. Right-click the VD that you want to delete.
4. Select Delete as shown in the following figure.
Figure 13 Delete Virtual Drive
5. When the warning messages appear, click Yes to confirm that you want to delete the virtual drive.
Nytro vCenter Plug-In Solution User Guide 22
www.seagate.comManaging the Storage Device
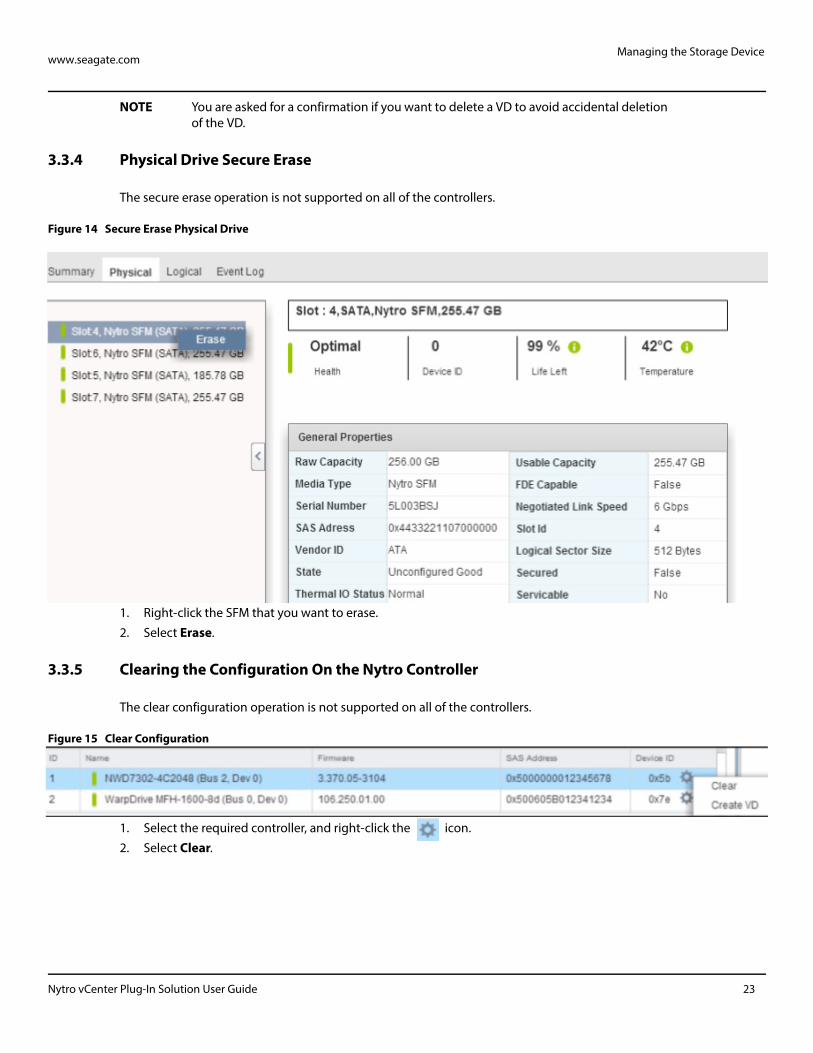
NOTE You are asked for a confirmation if you want to delete a VD to avoid accidental deletion of the VD.
3.3.4 Physical Drive Secure Erase
The secure erase operation is not supported on all of the controllers.
Figure 14 Secure Erase Physical Drive
1. Right-click the SFM that you want to erase.
2. Select Erase.
3.3.5 Clearing the Configuration On the Nytro Controller
The clear configuration operation is not supported on all of the controllers.
Figure 15 Clear Configuration
1. Select the required controller, and right-click the icon.
2. Select Clear.
Nytro vCenter Plug-In Solution User Guide 23
www.seagate.comManaging the Storage Device
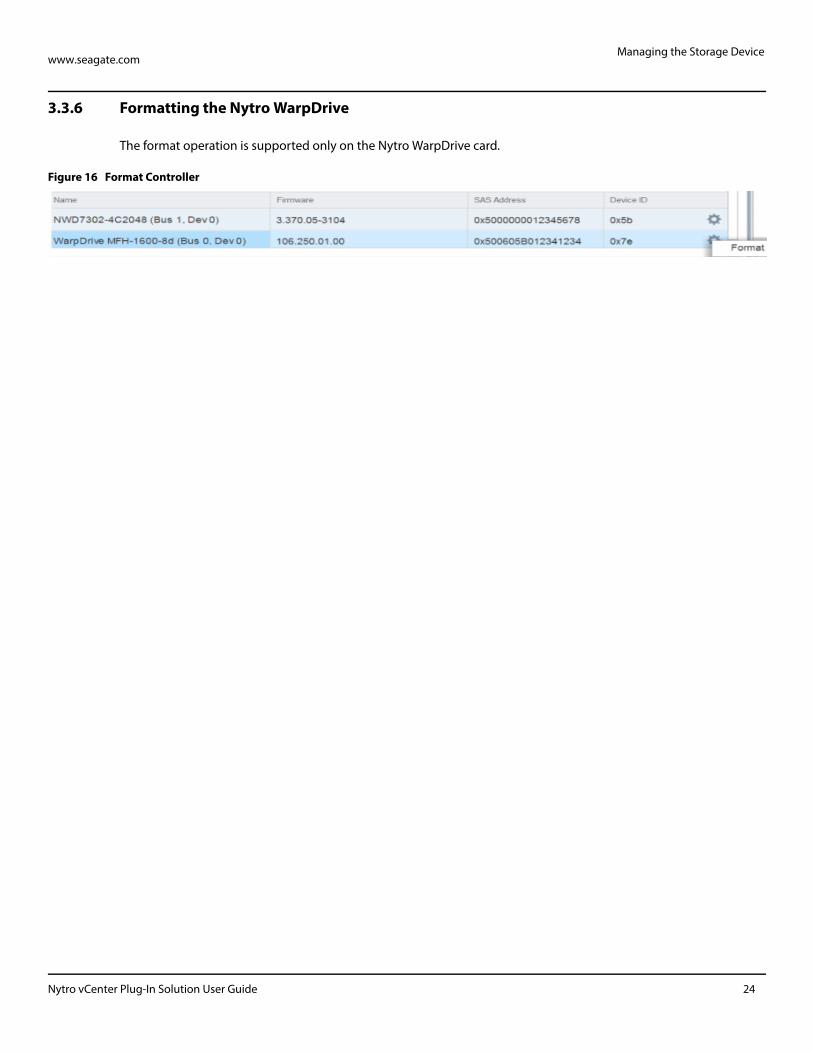
3.3.6 Formatting the Nytro WarpDrive
The format operation is supported only on the Nytro WarpDrive card.
Figure 16 Format Controller
Nytro vCenter Plug-In Solution User Guide 24

www.seagate.comNytro vCenter Event Monitoring Service Plug-In Operations
Chapter 4: Using the Nytro vCenter Event Monitoring Service Plug-In
This chapter helps you monitor the connected controllers by using the events generated on the controllers. You can view the generated events in a single interface.
4.1 Nytro vCenter Event Monitoring Service Plug-In Operations
The plug in enables you to perform the following operations:
View the run-time events in the Event console. Fetch and view the event logs (up to a maximum of 32 events per ESXi host).
4.2 Navigating to the Event Console
1. Click the Nytro XM Event Monitoring Service icon (marked in blue arrow in Figure 1).
If you are the first user for the day, the following window appears.
Figure 17 Nytro vCenter Event Monitoring Service
2. Enter the vCenter server IP, your user name and password that are provided to you, and click Submit.
3. Click Enable Event Monitoring.
Nytro vCenter Plug-In Solution User Guide 25
www.seagate.comNavigating to the Event Console
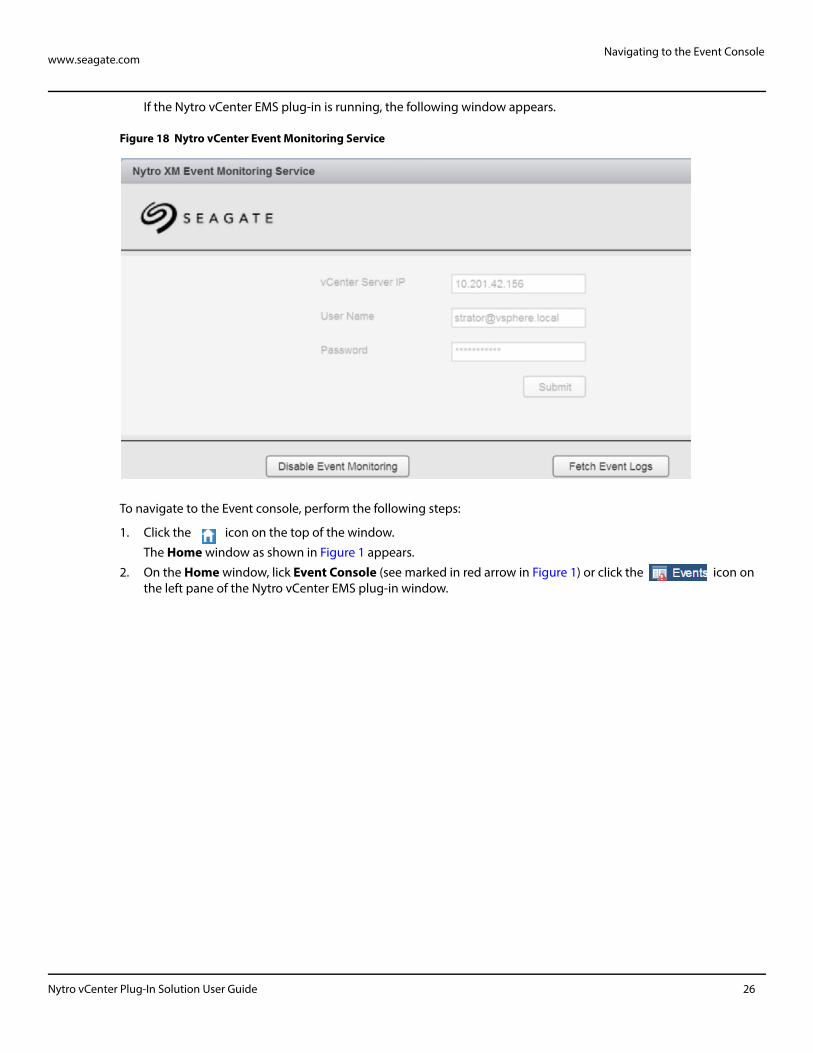
If the Nytro vCenter EMS plug-in is running, the following window appears.
Figure 18 Nytro vCenter Event Monitoring Service
To navigate to the Event console, perform the following steps:
1. Click the icon on the top of the window.
The Home window as shown in Figure 1 appears.
2. On the Home window, lick Event Console (see marked in red arrow in Figure 1) or click the icon on the left pane of the Nytro vCenter EMS plug-in window.
Nytro vCenter Plug-In Solution User Guide 26

www.seagate.comNavigating to the Event Console
The Event Console window appears.
Figure 19 Event Console
3. Highlight and click the event to be viewed as shown in the preceding figure. The detailed information appears in the lower section of the window.
Click the Target hyperlink to navigate directly to the host machine that is responsible for this event. This information helps you take corrective action.
NOTE To view the new events, refresh the Event Console by using the refresh ( ) button.
Nytro vCenter Plug-In Solution User Guide 27
www.seagate.comNavigating to the Event Console
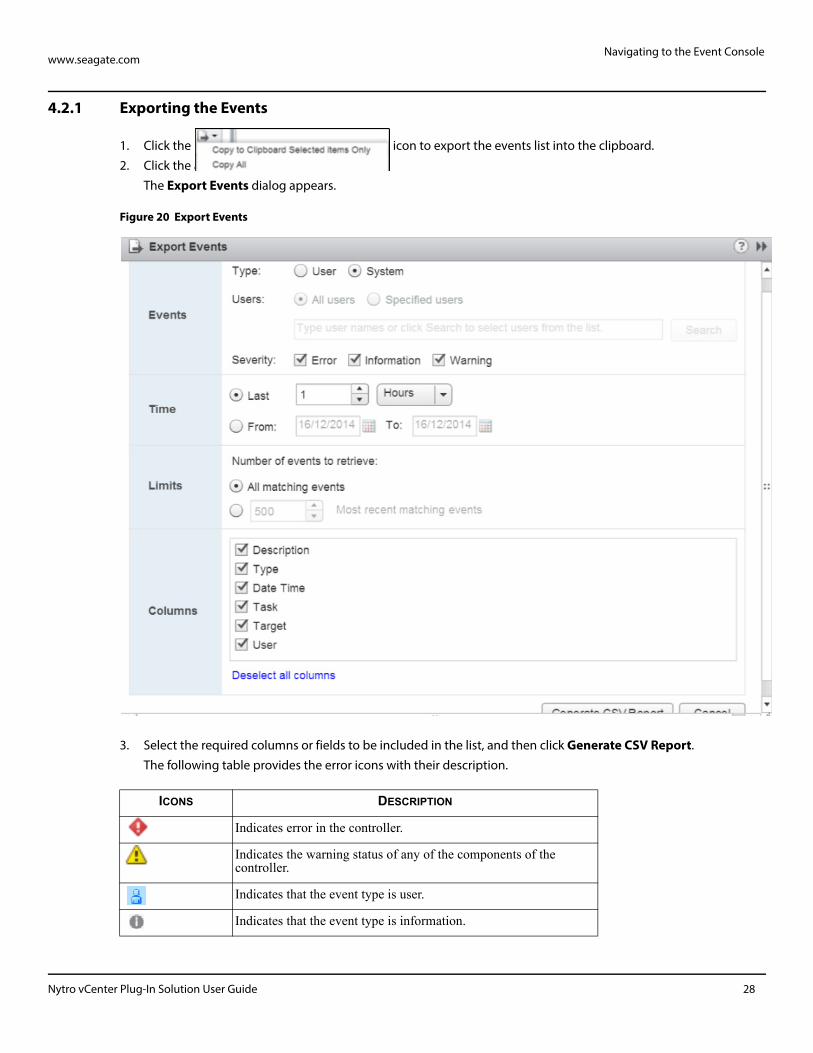
4.2.1 Exporting the Events
1. Click the icon to export the events list into the clipboard.
2. Click the arrow mark.
The Export Events dialog appears.
Figure 20 Export Events
3. Select the required columns or fields to be included in the list, and then click Generate CSV Report.
The following table provides the error icons with their description.
ICONS DESCRIPTION
Indicates error in the controller.
Indicates the warning status of any of the components of the controller.
Indicates that the event type is user.
Indicates that the event type is information.
Nytro vCenter Plug-In Solution User Guide 28

Nytro vCenter Plug-In Solution User Guide 29
www.seagate.comNytro vCenter Plug-In Issues
Appendix A: Troubleshooting the Nytro vCenter Plug-In Issues
A.1 Nytro vCenter Plug-In Issues
The Nytro vCenter plug-in uses the logging framework (which is used by vSphere Web Client plug-ins). If there are any issues while retrieving the data, the Nytro vCenter plug-ins log the debug statements to a log file. These logs can provide useful information to debug the issues, if any.This log file can be identified by the timestamp, vSphere_client_virgo. If you face any issues while working with the Nytro vCenter plug-in, retrieve the log file from its location, and contact Seagate Technical Support for further assistance at http://www.seagate.com/about/contact-us/technical-support/
You can find the Log file in the following locations based on the platform used: — On Windows: <OS_DISK>:\ProgramData\VMware\vSphere Web Client\serviceability\logs— On Linux: /var/log/vmware/vsphere-client/
A.2 Nytro vCenter Event Monitoring Service Plug-In Issues
I am unable to view the events in my event console.
This could be because of one of the following reasons:
— You might not have copied the Nytro vCenter EMS plug-in package.— You might not have correctly installed the Nytro vCenter EMS plug-in.— You might not have enabled Event Monitoring.
Perform the following steps to enable Event Monitoring.
1. Go to Home icon >Administration > Client Plug-Ins.
2. Check if the Nytro vCenter EMS plug-in is enabled. If it is not enabled, go back to the home screen, click the Nytro vCenter Event Monitoring Service icon.
3. Log on with your vCenter credentials, and remember to click Enable Event Monitoring.

Nytro vCenter Plug-In Solution User Guide 30
www.seagate.comGlossary
GlossaryThis appendix provides a glossary for terms used in this document.
C
Controller A controller that transfers data between the microprocessor and memory, or between the microprocessor and a peripheral device, such as a drive. The controllers perform functions, such as striping and mirroring to provide data protection.
D
Device ID A controller or drive property indicating the manufacturer-assigned device ID.
Drive group A group of drives attached to a RAID controller on which one or more virtual drives can be created. All virtual drives in the drive group use all of the drives in the drive group.
Drive state A drive property indicating the status of the drive.
G
GUI Graphical User Interface
P
Product name A controller property indicating the manufacturing name of the controller.
V
VC vCenter
Virtual drive A storage unit created by the controller card from one or more drives. Although a virtual drive (logical drive) can be created from several drives, it is seen by the operating system as a single drive. Depending on the RAID level used, the virtual drive can retain redundant data in case of a drive failure.
Seagate Technology LLCAMERICAS Seagate Technology LLC 10200 South De Anza Boulevard, Cupertino, California 95014, United States, 408-658-1000ASIA/PACIFIC Seagate Singapore International Headquarters Pte. Ltd. 7000 Ang Mo Kio Avenue 5, Singapore 569877, 65-6485-3888EUROPE, MIDDLE EAST AND AFRICA Seagate Technology SAS 16-18 rue du Dôme, 92100 Boulogne-Billancourt, France, 33 1-4186 10 00
Publication Number: 100769979, Rev.C May 2015